Preprint
Article

Novel Quick Value Assessment Procedure Of The Bond Work Index

Altmetrics

Downloads

103

Views

37

Comments

0

Submitted:

29 January 2023

Posted:

31 January 2023

You are already at the latest version

Alerts
Abstract
The bond index is an indicator of the grindability of the material and is widely used in the preparation of mineral raw materials and the cement industry. Paper offers new, abbreviated and simplified procedure to determine Bond work index that relies on first-order kinetics law and can be performed with any number of grinding cycles, depending on the desired accuracy of the required data. The parameters G and P80 of each grinding cycle are multiplied by the newly founded coefficients giDT and piDT to obtain values approximately equal to these parameters of the last grinding cycle when the equilibrium state is reached in the standard test. The paper presents comparative results obtained by standard Bond and new shortened procedure on individual samples of andesite, limestone, copper-ore and smelter slag and on composite samples of andesite from limestone and copper-ore with smelter slag in different mass ratios. As the number of grinding cycles increases, the precision of the shortened procedure increases, and the mean square error decrease 3.59%, 2.61% and 1.74% for two, three and four grinding cycles.
Keywords: 
Subject: Chemistry and Materials Science  -   Materials Science and Technology

1. Introduction

The resistance of the material to the crushing and grinding in a ball mill is represented by the comminution parameter called Bond work index. The determination of the energy required for comminution by means of a closed-cycle grinding test in a ball mill until a stable circular batch is established was devised by Bond et al. in Alice-Chalmers [1].
The Bond grinding test determines the work index and is performed by simulating dry grinding in a closed cycle in a Bond standardized laboratory mill with balls until a circulating batch of 250% is achieved [2]. Numerically, the work index is the energy (kWh) per one short ton of raw material required to reduced from theoretically infinite feed size to 80% of the raw material passing through a 100 µm square sieve [3,4,5]. To perform the test, a sample weight of approximately 10 kg is required, which is crushed to a size of 100% -3,327 mm. The Bond test involves a series of successive grinding cycles. The grinding is repeated until the circular batch in the last three grinding cycles is 250%. This is usually achieved with 7-10 grinding cycles [6]. The Bond working index is calculated using the parameters of the initial sample and the parameters from the last three grinding cycles and the formula:
W i = 1,1 · 44,5 P c 0,23 · G 0,82 · 10 P 80 10 F 80 ,
  • Wi– Bond work index (kWh/t);
  • Pc – the size of the opening of the control sieve (µm);
  • G– the mass of the newly created screen of the control sieve per revolution of the mill (g/rev);
  • F80– the size of the opening of the sieve through which 80% of the feed passes before grinding (µm);
  • P80– the size of the sieve opening through which 80% of the comparative sieve from the last grinding cycle passes (µm).
The description of the procedure shows that its execution is complicated, that it takes a lot of time and that it is prone to errors due to its complexity. Because of all this, a large number of scientists have tried with more or less success to shorten and simplify this procedure [7]. Crushing and grinding is a very important aspect of mineral processing, cement production and other branches of industry where material grinding is applied, therefore comminution process has been subjected to many investigations through decades and still continues to be challenging.
In order to facilitate the process of determing the comminution parameter some of the scientists provided a procedure that enable the usage of any mill, not only Bond mill [8,9,10]. Some other scientist proposed method that is using specially designed mills smaller than the Bond mill and, therefore, the required amount of the sample is much smaller [11,12,13]. The other scientists focus their investigations on mathematical algorithms [14,15,16] and mathematical correlations [17] that helped them to calculate Bond work index upon the data collected after the first or second grinding cycle as an input parameter. Grinding kinetic model was basis for many investigations and some resulted in promising models [18,19,20,21,22].
This paper provides novel fast procedure for determining the Bond work index and is based on many years of experience and observations of the authors. Procedure relies on the first-order kinetics present in the Bond mill with balls when crushing raw materials [23,24]. The presented results obtained by the standard Bond procedure and the fast procedure aim to compare the data obtained by these two procedures and show their differences.
The advantage of this novel procedure in relation to the others is that it is made on a heterogeneous mixture of raw materials with large differences in the grindability of the components, and the results obtained are of high satisfactory precision.

2. Objectives of the Investigation

Due to the complexity and length of performing this procedure for determining the Bond work index, process errors and incorrect results are possible. Because of all the above, attempts were made to facilitate procedure and make it shorter.
Also, there is a problem of determining the grindability of inhomogeneous composite materials. In the mineral industry, it is important to understand how milling will affect mixtures with different grindability of the ores that originate from different parts of the deposit or from two deposits.
The aim of the research presented in this paper is to give a theoretical and practical contribution to the knowledge of the comminution process in Bond's laboratory ball mill.
The subject of this research is to determine the grindability of inhomogeneous composite materials, test the abbreviated procedure for determining Bond's work index using comparative sieves of 105μm and 150μm, and finally determine and demonstrate its reliability.
Research includes:
- Monitoring of changes in the ratio of Ge/Gie parameters during different grinding cycles while performing standard Bond procedure on inhomogeneous composite materials at different mass fractions.
- Monitoring of changes in the ratio of P80/Pi80 parameters during different grinding cycles while performing standard Bond procedure on inhomogeneous composite materials with different mass fractions.
- Testing the abbreviated procedure for determining Bond's work index on inhomogeneous composite materials at different mass fractions and determining its reliability.

3. Theoretical Basis of Novel Procedure

The kinetics of grinding the raw material in the Bond mill with balls takes place according to the law of first order kinetics [25]:
R = R 0 · e k t ,
  • Where are:
  • R– reflection of the comparative sieve at the moment (t),
  • R0– screening of the comparative sieve at the beginning of grinding (t=0),
  • k– grinding rate constant,
  • t– grinding time.
For each grinding cycle of the Bond process, the grinding rate constant (k) can be determined according to the formula:
k = l n R 0 l n R t = n · ( l n R 0 l n R ) N ,
  • Where are:
  • N– the total number of revolutions of the mill,
  • n– number of mill revolutions per minute.
As the ordinal number of grinding cycles of the standard Bond procedure for determining the grindability of the raw material increases, so does the grinding rate constant (k). The reason for this is that the size of the circular batch decreases with each subsequent grinding cycle and it is easier to get the grinding product of the desired size, so k2 ˂ k3 ˂ k4 ˂ k5 ˂ ... (speed constants for the second, third, fourth, fifth... grinding cycle).
The grinding time required to obtain a circular batch of 250% (ie the number of revolutions of the mill) can be calculated using the known value of k.
When the equilibrium state is reached, ie a circular batch of 250%:
R 0 = 2,5 3,5 · M + M 3,5 · X and R = 2,5 3,5 · M
  • Where are:
  • M– the mass of the starting sample (700cm3),
  • X– class content +Pc in the initial sample (in parts of the unit).
t = 1 k l n 2,5 3,5 · 100 + X 3,5 · 100 l n 2,5 3,5 · 100 ,
N = n k l n 2,5 3,5 · 100 + X 3,5 · 100 l n 2,5 3,5 · 100
In this way, values can be obtained tie and Nie for each grinding cycle (t2e and N2e for the second cycle, t3e and N3e for the third cycle, t4e and N4e for the fourth cycle...).
When the equilibrium is reached, the circular batch of 250%, the newly created screen of the comparative sieve is Z = M 3,5 M 3,5 · 1 X = M 3,5 · X .
The value of G (g / rev) can be calculated using the value of N:
G = Z N = M 3,5 · X N
This is how values can be calculated Gie for each grinding cycle (G2e, G3e, G4e,... for the second, third, fourth ... grinding cycle).
By performing a vast number of tests on different raw materials by the standard Bond procedure, it was observed that the ratios of the obtained calculated values Gie and the values for the last grinding cycle G (250% circular batch) are approximately the same Figure 1 presents the relative mean values of the parameter Gie in relation to the parameter Ge of more than 30 performed Bond tests.
For two, three and four grinding cycles, the mean values of these ratios are
g 2 D T = G G 2 e c o n s t . = 1,158 g 3 D T = G G 3 e c o n s t . = 1,096 g 4 D T = G G 4 e c o n s t . = 1,037
It follows from the above that it is possible to calculate the approximate value of parameter G of the last grinding cycle of the standard Bond procedure as a product of the parameter Gie and the corresponding constants for a certain grinding cycle giDT [26].
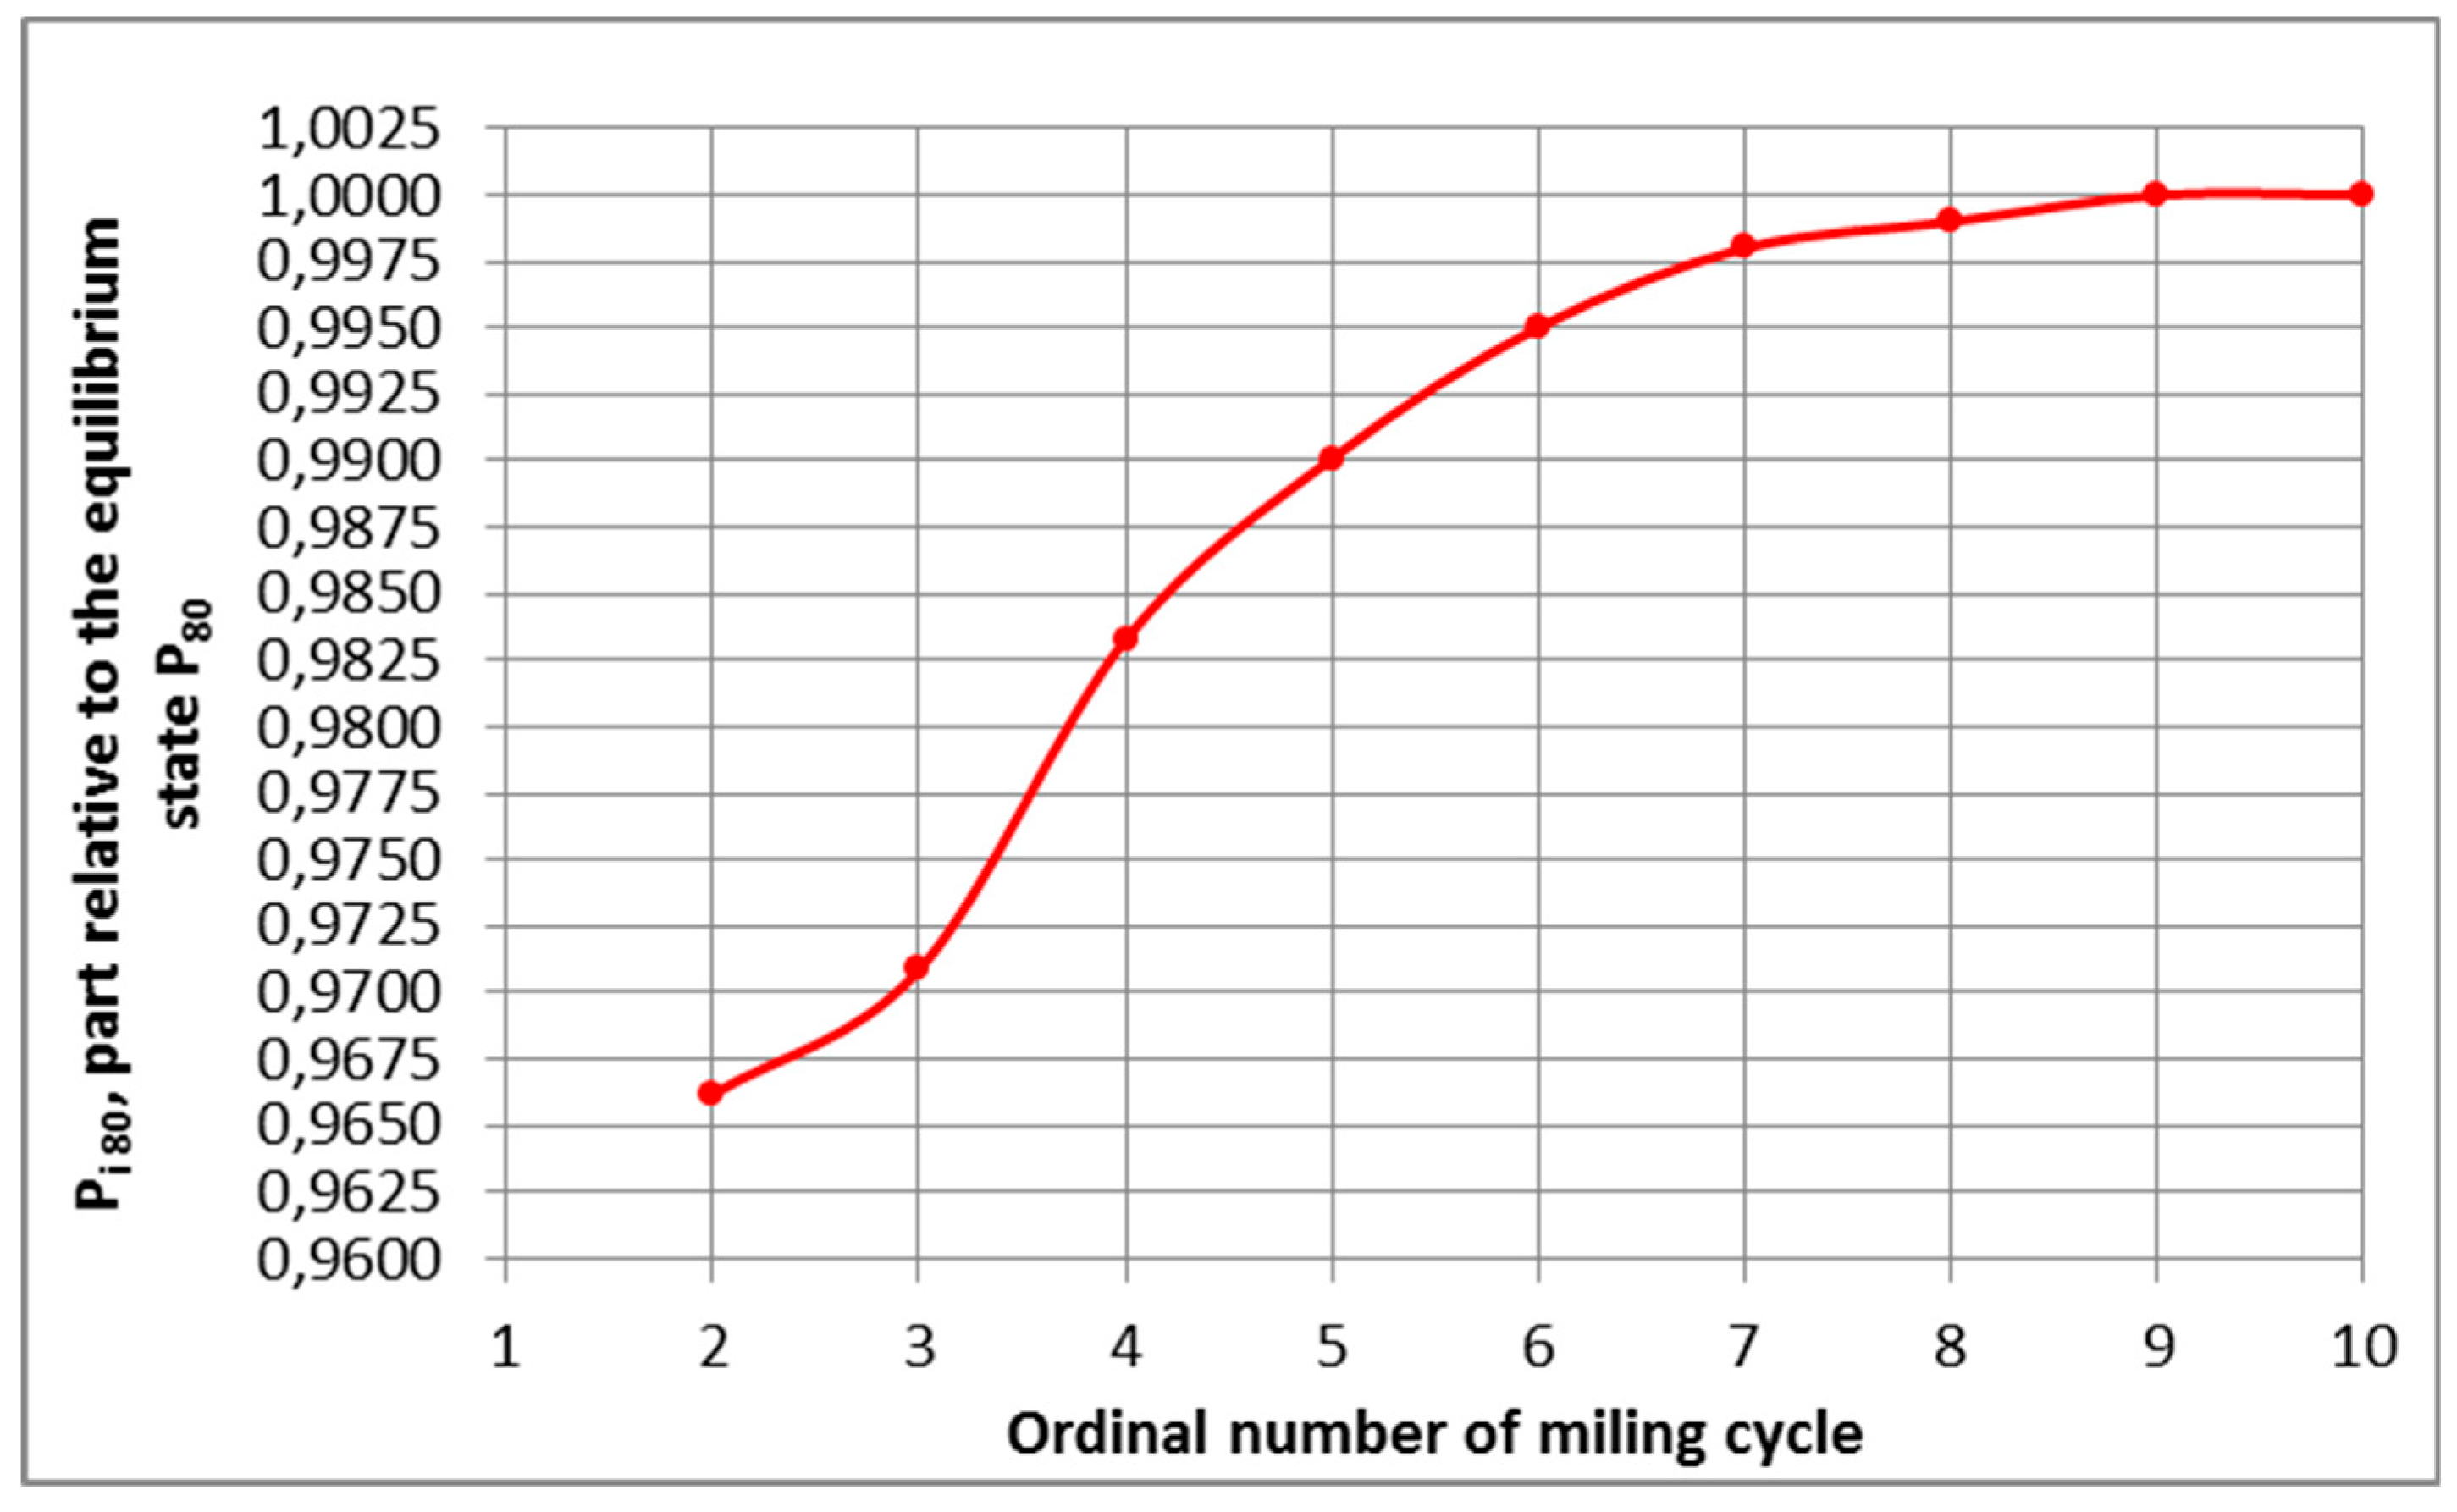
Simultaneously, by performing a large number of tests on different raw materials by the standard Bond procedure, it was noticed that the ratios of the parameters Pi80 of a certain grinding cycle and the parameters P80 for the last grinding cycle (250% circular batch) are approximately the same. Figure 2 presents the relative mean values of the parameter Pi80 in relation to the parameter P80 of more than 30 performed Bond tests.
For two, three and four grinding cycles, the mean values of these ratios are:
p 2 D T = P 80 P 2   80 c o n s t . = 1,035 p 3 D T = P 80 P 3   80 c o n s t . = 1,030 p 4 D T = P 80 P 4   80 c o n s t . = 1,017
It follows from the above that it is possible to calculate the approximate value of parameter P80 of the last grinding cycle of the standard Bond procedure as a product of parameter Pi80 and the corresponding constants for a certain grinding cycle piDT ([26].

4. Experimental

4.1. Materials

The experiments were performed on four raw different materials: andesite, limestone ore, copper ore and smelter slag.
Andesite – Density ρ = 2,77 g/cm3. The chemical composition of the andesite sample is given in Table 1.
Limestone ore – Density ρ = 2.72 g/cm3. The insoluble part of the limestone sample in HCl was 0.43%, CaCO3 content was 99.57%.
Copper ore – Density ρ = 2.95 g/cm3. The chemical composition of the copper ore sample is shown in Table 2.
Smelter slag - Density ρ = 3.52 g/cm3. The chemical composition of the smelter slag sample is given in Table 3.
Experiments were performed with andesite and limestone ore on pure samples and on their mixtures in different ratios. Andesite and limestone ore have large differences in grinding, ie differences in the size of the Bond work index. Experiments were performed on a mixture of such raw materials in order to better confirm the validity and accuracy of the fast procedure for estimating the size of the Bond work index. When performing the Bond process on mixtures of raw materials with different grindings, the content of harder raw materials in a circular batch increase with each subsequent grinding cycle until equilibrium is reached. So, such systems can best show the precision of a shortened procedure, because they do not perform grinding cycles until an equilibrium state is reached when the composition of the circular batch no longer changes.
Experiments were also performed with copper ore and smelted slag on pure samples and their mixtures in different ratios. In these samples, we also have large differences in the grindability of the components of the mixture, where the accuracy of the fast procedure on a very heterogeneous raw material can be confirmed. These raw materials were chosen also because it is a real example that we find in plant when grinding copper ore and smelting slag for copper flotation.
Andesite and limestone samples were grinded to a size of 100% -3.327 mm. Composite samples of andesite and limestone in mass ratios were made from such crushed samples: limestone:andesite=25:75, limestone:andesite=50:50, limestone:andesite=75:25. Experiments were performed on composite samples and on samples of pure limestone and pure andesite.
Copper ore and slag samples were grinded to a size of 100% -3.327 mm. Composite samples of copper ore and slag in mass ratios were made from such crushed samples: slag:copper ore=25:75, slag:copper ore=50:50, slag:copper ore=75:25. Experiments were performed on composite samples and on samples of pure slag and pure copper ore.
The characteristics of the Bond mill and the experimental conditions for performing the Bond test are given in Table 4.
On all the above samples, the determination of the Bond working index is according to the standard Bond test with comparative sieves of 105 µm and 150 µm. Granulometric analysis of comparative sieve screening was performed after each grinding cycle and the parameter Pi80 was determined.

4.1. Method - Procedure for Performing a Quick Procedure for Assessing the Value of a Bond Work Index

The fast procedure for estimating the value of the Bond work index [26] with two grinding cycles is done in the same way as the first two grindings of the standard Bond test and consists of the following operations:
  • Grinding of the sample to a size of 100 % -3.327 mm;
  • Determination of the granulometric composition of the initial sample and the parameter F80 (µm) and the participation of a class larger than the opening of the comparative sieve X (in parts of the unit);
  • A volume sample is taken 700 cm3, its mass M (g) is determined, it is loaded into a Bond mill with balls and ground for an arbitrary number of revolutions of the mill (N1 = 50, 100 or 150 revolutions);
  • After grinding, the sample is sieved on a comparative sieve and the mass of sieves D, (g) and sieves R, (g) is determined. Sieve D consists of the mass of sieve Du introduced with the inlet and the mass of newly created sieve in mill Dn:
D = D u + D n , g
  • The mass of the newly created sieve is calculated Dn:
D n = D D u , g
  • In the first experiment is:
D u = M · 1 X D n = D D u , g
  • In the following experiments is:
D u = D ( n 1 ) · 1 X , g
  • Where is:
  • D(n-1)– the sieve mass from the previous experiment, g.
  • The mass of the newly created sieve is calculated per one revolution of the mill:
G = D n N , g / r e v .
  • Where is:
  • N– the number of revolutions in the experiment in question.
  • The mill speed is calculated for the following grinding experiment:
N n = M 3,5 D n 1 · ( 1 X ) G , r e v .
  • A fresh sample is added to the screening of the comparative sieve, the mass of which is equal to the mass of the sieve from the previous experiment D(n-1). The entrance thus formed is inserted into the mill and grinds Nn rev.;
  • After grinding, the sample is sown on a comparative sieve and the reflection is measured R (g);
  • The constant k is calculated using formula (3):
k = n · ( l n R 0 l n R ) N = n · l n R ( n 1 ) M · 100 + D ( n 1 ) M · X · 100 l n R M · 100 N
  • Using the constant k and formula (6), the required number of revolutions N is calculated in case the quantity of raw material is ground at the same speed as in the second grinding as when the circular batch is 250 %;
  • The parameter G2e (g / rev.) is calculated using formula (7) and the value of N. The value of G2e is multiplied by the constant g2DT = 1.158 and the value of Ge is obtained, which is close to the value of G in the last grinding cycle of the standard Bond test;
  • On the sieving of the second grinding cycle, granulometric analysis is performed and parameter P2 80 is read from the graph. The read value is multiplied by the constant p2DT = 1.035. The obtained Pe80 result is close to the value of the P80 sieving parameter of the last grinding cycle of the standard Bond test;
  • Using the formula (1) and the calculated values of the parameters Ge and Pe80, an approximate value of Wi (kWh / t) is obtained.
In the fast process with three or four grinding cycles, the appropriate number of grinding cycles of the standard Bond process is performed. The parameters Ge and Pe80 are calculated as when two fast mills are made and multiplied by the corresponding constants giDT and piDT for a given number of grinding cycles. The Bond index is also calculated using formula (1).

5. Results and Discussion

Table 5, Table 6 and Table 7 show the comparative results, obtained by the standard Bond procedure and the fast procedure with two, three and four grinding cycles, parameters G and P80 and the Bond work index.
When performing the fast procedure with two, three and four grinds and the standard Bond procedure for parameter G, it is noticed that the largest error decreases from 8.11 % to 3.79 %, and the average error value decreases from 4.09 % to 1.65 %. From this it can be seen that as the number of grinding cycles increases, the accuracy of the estimated parameter G also increases (Table 5).
When performing the fast procedure with two, three and four grindings and the standard Bond procedure for the P80 parameter, the largest errors ranged from 5.68 % to 2.77 %, and the mean error value ranged from 1.86 % to 1.30 % (Table 6).
When performing the fast procedure with two, three and four grinds and the standard Bond procedure at the value of the Bond work index, the largest errors ranged from 6.73 % to 3.10 %, and the mean error value ranged from 3.10 % to 1.37 % (Table 7).
The reliability of the fast procedure for estimating the value of the Bond working index can best be assessed by comparing the values of G and Ge shown in Table 5.
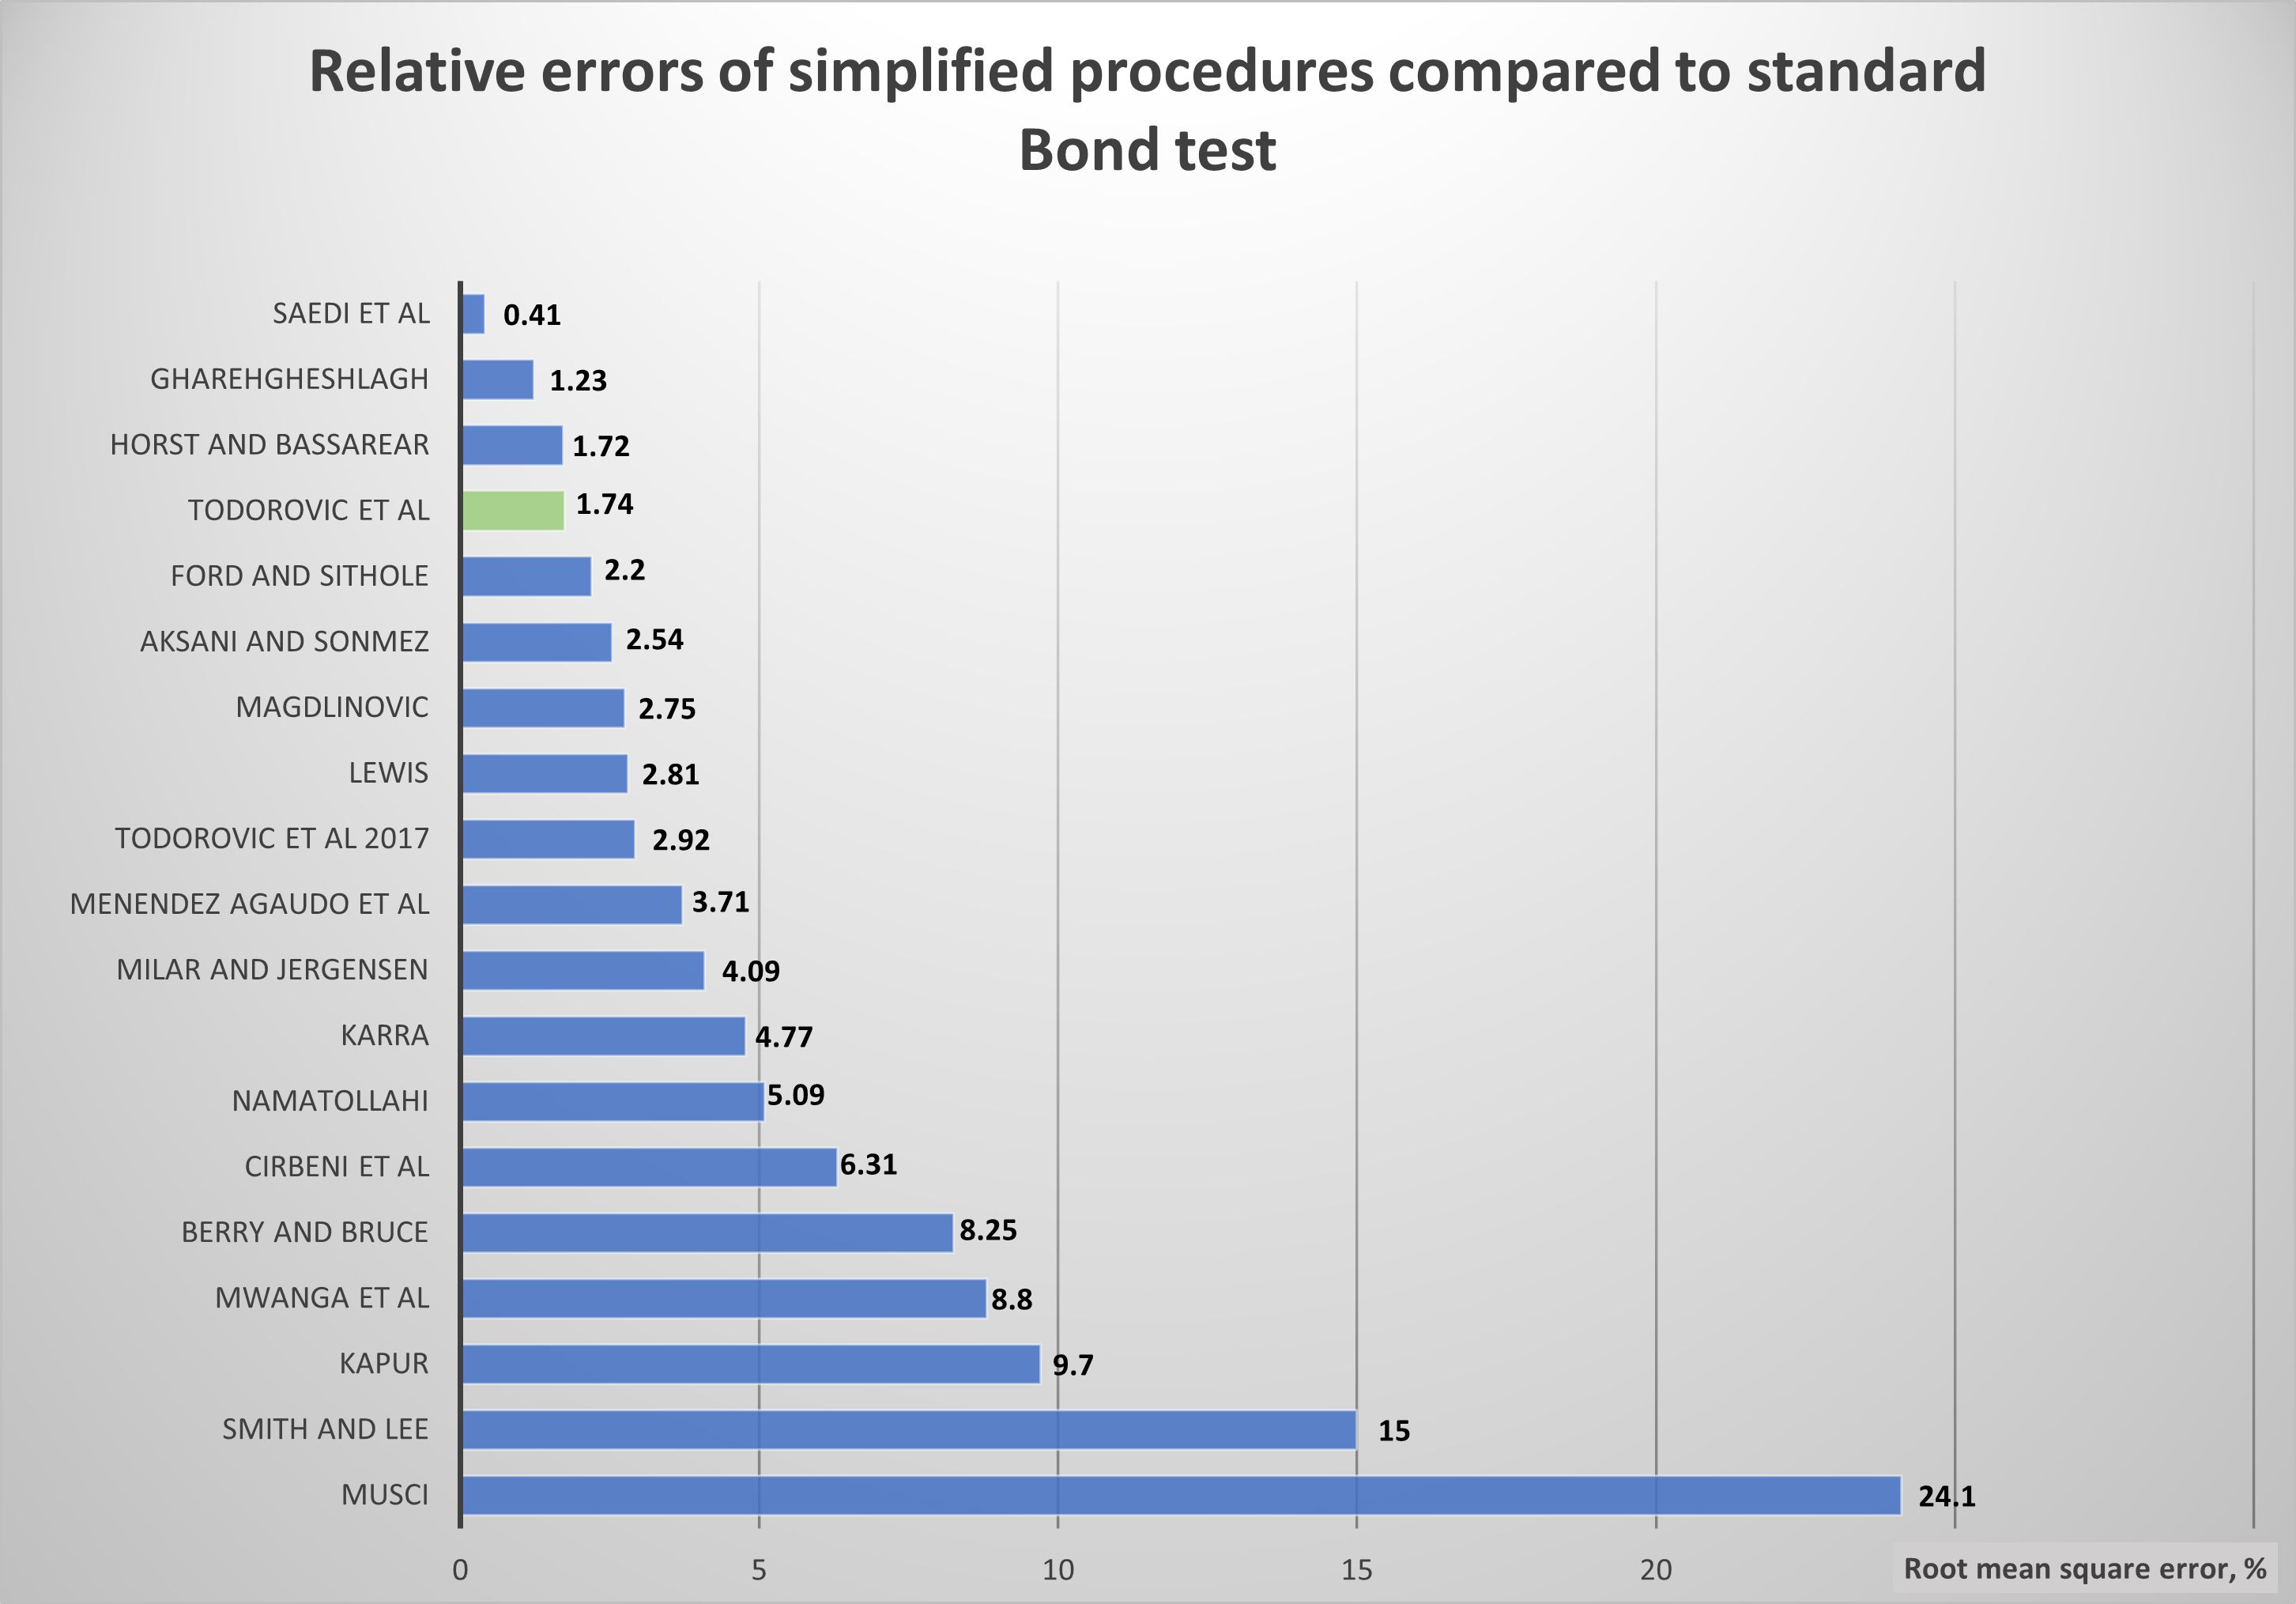
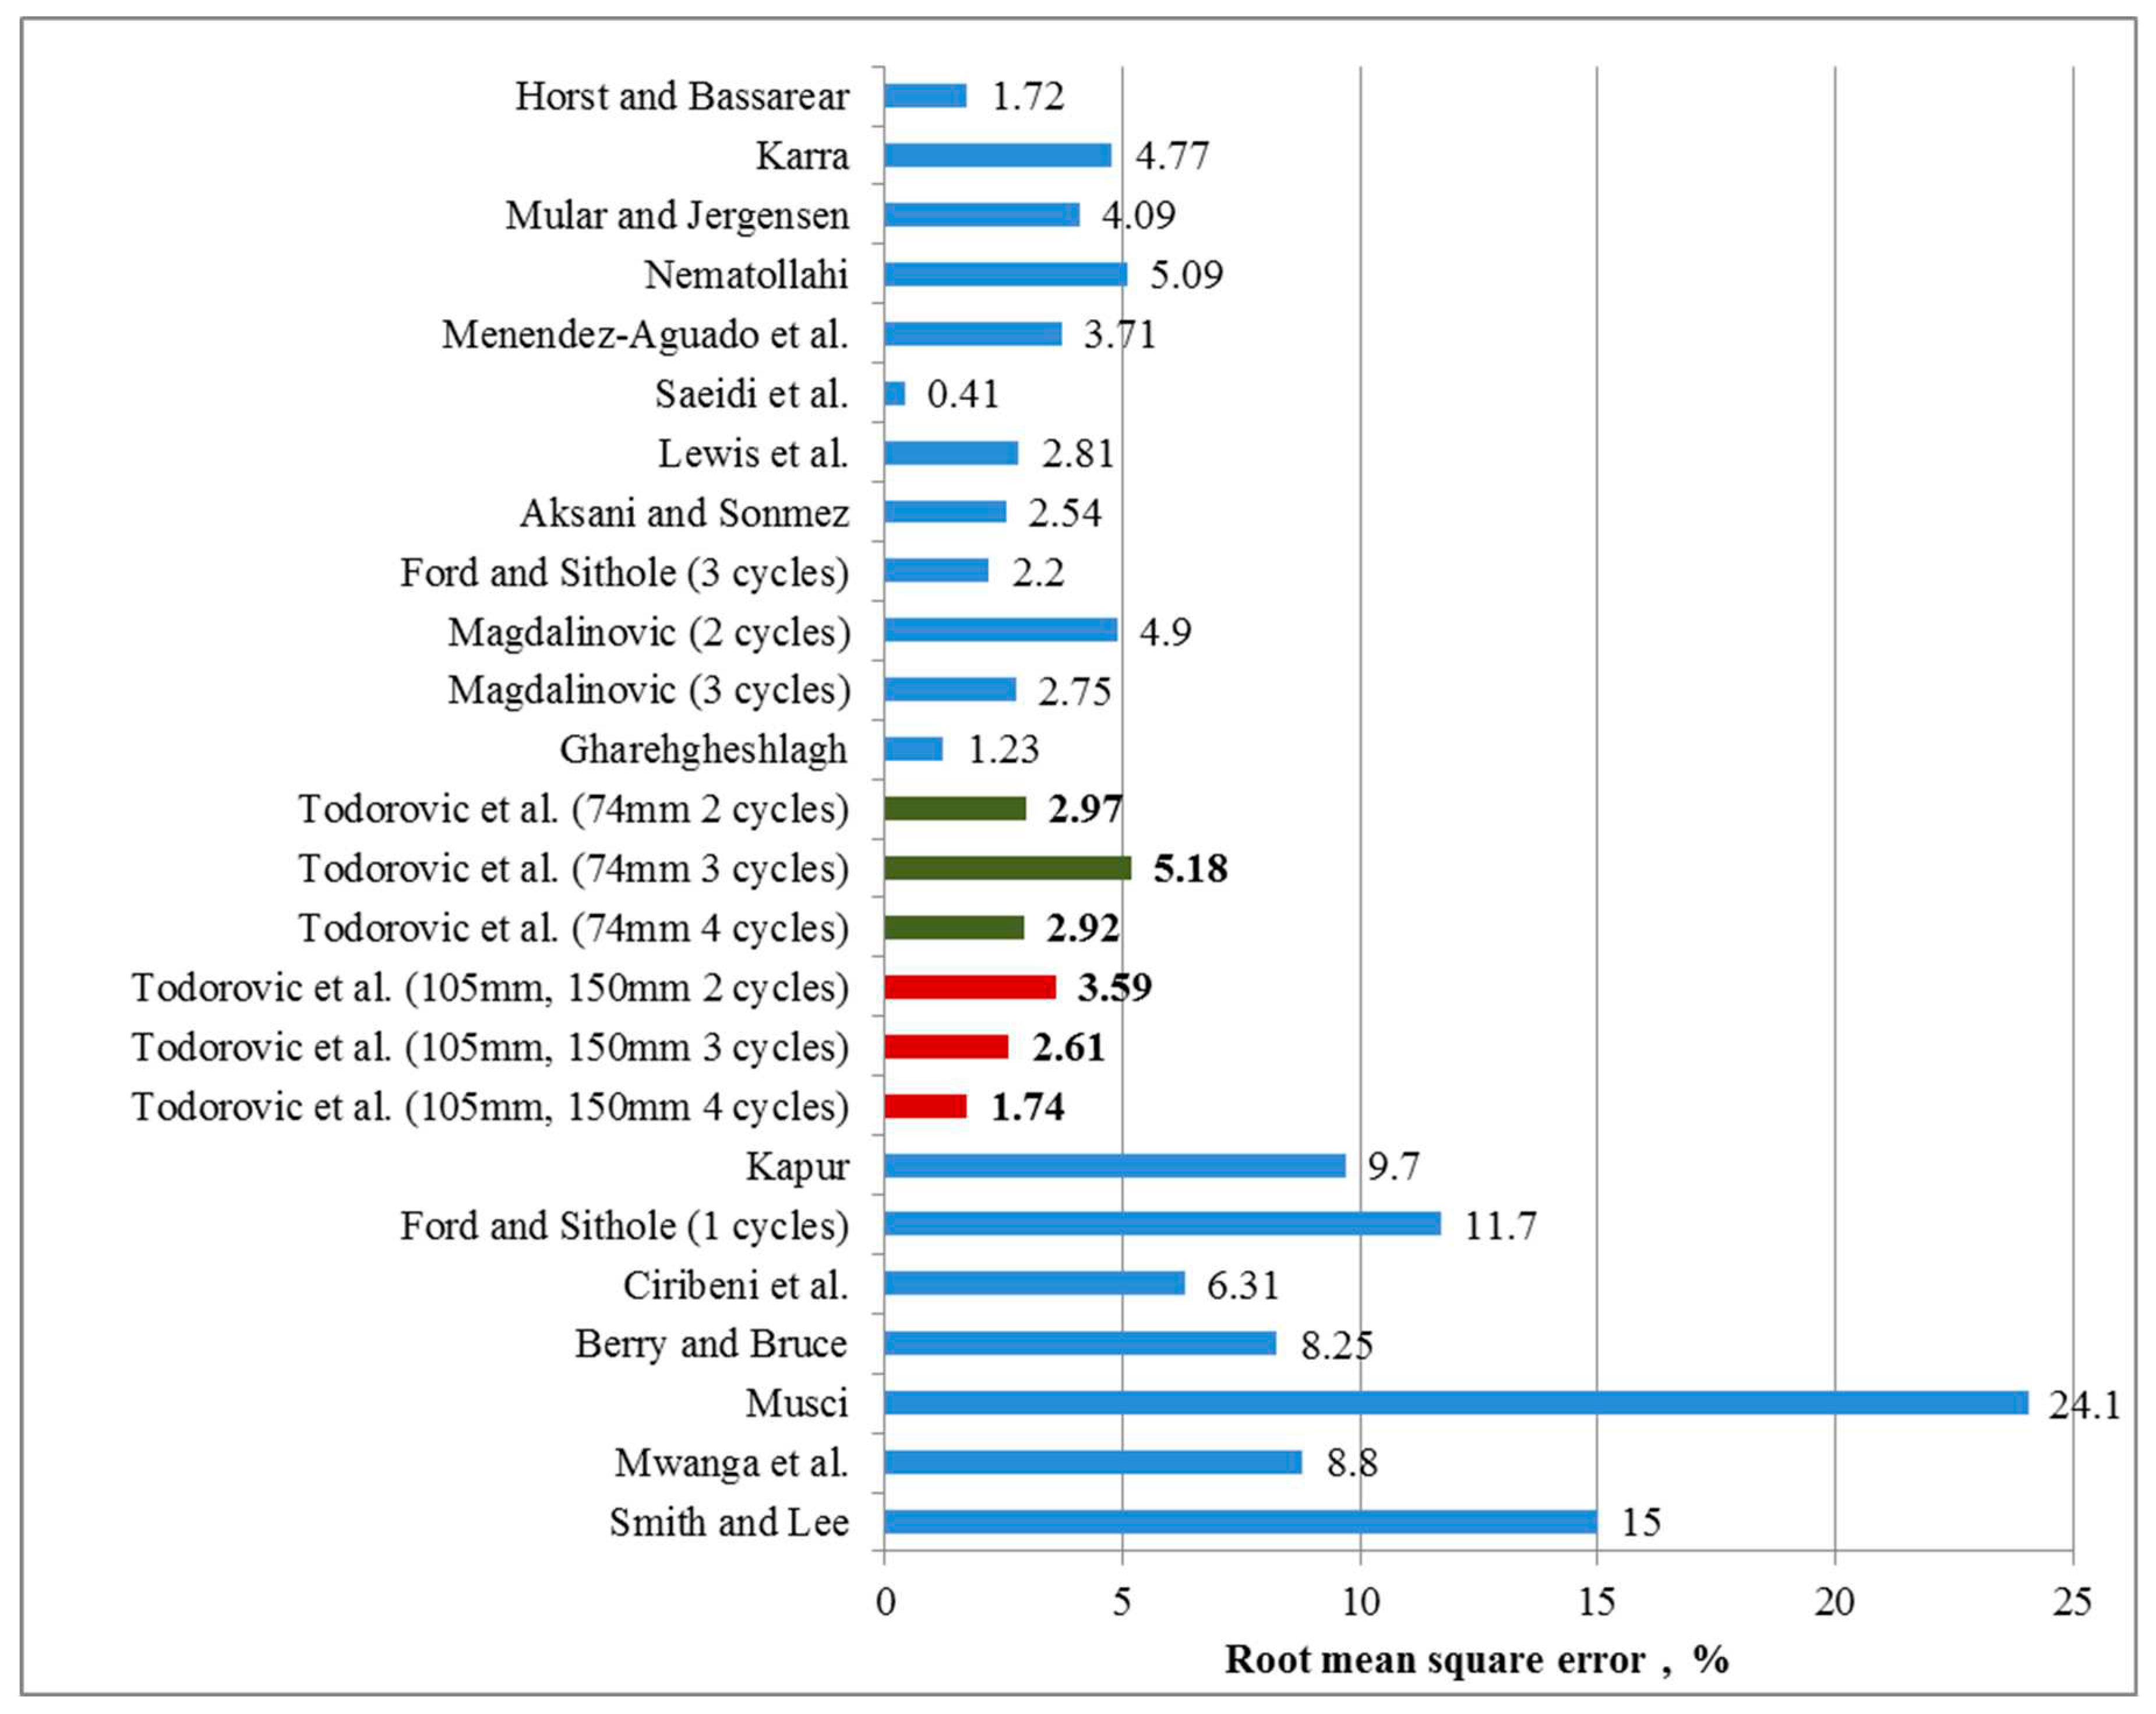
In previous years, since Bond's procedure for determining the ore grindability has been in use, there have been many attempts and suggestions on how to simplify and shorten this long and demanding procedure. Figure 1 compares some of the shortened/simplified procedures for obtaining the Bond index and the mean errors obtained by their application in relation to the actual value of Wi. The mean square errors in these procedures range from 0.41 % to 24.1 %. When performing the standard Bond procedure, due to the complexity of the procedure, an error of up to 5 % is considered frequent and tolerable (when performing two standard Bond’s test on the same sample). For this reason, shortened and simplified procedures that give the mean square error of less than 5 % compared to the original Bond procedure can be considered absolutely acceptable. Procedures with an error above 5 % will be excluded from further discussion. All the presented procedures can be divided into two groups: the first group includes procedures that simulate the standard Bond test with a simplified procedure, and the second group includes procedures that determine the grindability of raw materials using a reference sample of known grindability and a certain mathematical simulation. The procedure proposed by Horst and Baassarear (1977) [9] relies on the grindability of the referent material. The advantage of this procedure is that can be performed on any laboratory mill with balls and demand a small amount of sample (1kg). However, the time required to perform this procedure is quite long and is similar to the time required to perform the standard Bond procedure. Karra (1981) [15] proposed a mathematical algorithm that can estimate the Wi based on data from two grinding cycles using the standard Bond method. This procedure taking into account that the grindability of a circular batch is smaller than that of the initial sample. Mular and Jergensen (1982) [10] proposed the so-called Anaconda method, which can be performed on any laboratory mill. This method requires a reference raw material whose value of Wi is known, by means of which the calibration factor for a given mill is determined by a series of grinding. This method is performed quickly and gives good results, but extensive work is required to determine the calibration factor of the mill. Nematollahi (1994) [11] and Menéndez-Aguado et al. (2005) [12] proposed procedures that are performed in mills smaller than Bond's. A much smaller amount of ore is required to perform both of these processes, and the processes are performed identically to the Bond process. Saeidi et al. (2013) [13] proposed a procedure using a mill constructed by Nematollahi (1994). Due to the large deviations of the parameters P80 and G, he defined correction formulas for them. The relative error of the Bond working index was 0.41 %. Although Saeidi et al. obtained results almost identical results with the original Bond procedure, the lack of this procedure as well as the Nematollahi (1994) and Menéndez-Aguado et al. (2005) is the special construction of the mill that is used. Lewis et al. (2000) [16] proposed a complex mathematical algorithm that simulates the standard Bond test. The data obtained from the first grinding cycle of the standard Bond procedure are used for the input parameters of the algorithm. Aksani and Sönmez (2000) [18] developed a computer simulation of the standard Bond test based on the cumulative kinetic model. The model is based only on the correlation of grinding speed and grain size, for easier interpolation. The sample is ground in a Bond mill for 0.5, 1, 2 and 4 minutes, after each cycle G and P80 is determined. Based on these data, a simulation model is formed. Since they developed their own program for the simulation it’s not available for general use. Ford and Sithole (2015) [19] have developed two methods for estimating the Bond working index that are performed in the Bond mill. The first method is performed with only one grinding cycle for 0.5, 1, 2 and 4 minutes. Parameter G and P80 is determined for each time interval. Further, with the results obtained in this way, a mathematical simulation is performed, which is used to obtain Wi. However, one-grinding cycle method provide poor results with mean square error of 11 %. The second method is performed with three grinding cycles identical to the standard Bond procedure. After the third cycle, the parameters G and P80 are determined and Wi is calculated using the mathematical formula they proposed. The three-grind procedure gives more precise results. Magdalinović (1989) [22] proposed a procedure that is performed in a Bond mill with balls on a standard sample and which is based on the law of first order kinetics with only two grinding cycles. In the first grinding cycle, the sample is ground for any number of revolutions (50, 100 or 150) and after grinding, the amount of sieving of the comparative sieve is determined. Based on the initial data and data after grinding, the grinding speed constant (k) is determined. The second grinding cycle is performed for the number of mill revolutions (N) which is calculated using the constant k to obtain a circular batch of 250%. After the second grinding cycle, the parameters G and P80 are determined, which are used to determine the value of the Bond working index using a standard formula. Magdalinović (2003) [25] proposed a method with three grinding cycles. The method is identical to the two-cycle grinding method with the addition of one cycle. The procedure with three grinding cycles gives more precise results. Gharehgheshlagh (2015) [20] developed a method based on the kinetics of grinding in a Bond mill. This method grinds a standard sample of raw material for 0.33, 1, 2, 4 and 8 minutes. After each time interval, the parameters G and P80 are determined, and on the basis of these data, the grinding kinetics and the value of the Bond working index are determined. Since this procedure demands five grinding cycles, the time frame for this procedure is not much shortened compared to the original one.
The results presented in this paper obtained by the proposed fast and simplified procedure in comparison with the results of other procedures have a satisfactory accuracy. The fast process with four grinding cycles is one of the four most accurate results shown in the graph. However, it’s shorter compared to the procedures proposed by Horst and Bassarear (1977) and Gharehgheshlagh (2015), and does not require specially designed mill like Saeidi et al. This implies that results presented in this paper shows highest accuracy and has been significantly simplified compared to the original Bond’s procedure.
Figure 3. Summary of relative errors of alternative procedures [27].
Preprints 68017 g003

5. Conclusion

Crushing and grinding is a very important aspect of mineral processing, cement production and other branches of industry where material grinding is applied, therefore comminution process has been subjected to many investigations through decades and still continues to be challenging. The raw material is ground in a laboratory mill with balls according to the law of first order kinetics. Knowing this, it is possible to calculate the approximate values of the parameter G of the last grinding cycle on the basis of the data obtained by any grinding cycle of the standard Bond test and the corresponding giDT constants. Using the P80 screening parameter of the comparative sieve of any standard test grinding cycle and the corresponding piDT constants, the approximate P80 screening values of the last standard test grinding cycle can be calculated. Using the obtained approximate values of parameters G and P80, the approximate value of the Bond working index Wi can be calculated.
The largest errors of the obtained values of the Bond working index Wi by the fast procedure for two, three and four grinding cycles were 6.73 %, 5.00 % and 3.46 %, respectively. The mean square errors of the obtained values of the Bond working index Wi by the fast procedure for two, three and four grinding cycles were 3.59 %, 2.61 % and 1.74%, respectively. The accuracy of the obtained data increases with the number of performed grinding cycles.
The values of the Bond working index obtained by the fast and simplified procedure described in this paper on composite samples of limestone and andesite at their different mass fractions and on composite samples of smelting slag and copper ore, with comparative sieves of 100 and 150 µm, gave very good results. The verification of this procedure should be performed on more different raw materials and if the accuracy of the results obtained so far is confirmed, this procedure could be practically applied in cases when there is a small amount of test sample or when there is limited time to determine the grindability of raw materials.
The reliability of the parameter G, which is obtained by this method and which significantly affects the value of Wi, can be checked using data from already performed experiments by the standard Bond procedure on different raw materials and appropriate mathematical formulas.

Acknowledgments

The research presented in this paper was done with the financial support of the Ministry of Education, Science and Technological Development of the Republic of Serbia, within the funding of the scientific research work, according to the contracts with registration numbers 451-03-68/2021-14/200023.

References

  1. Maxson, W.L.; Cadena, F.; Bond, F.C. Grindability of Various Ores. Trans AIME Min. Eng. 1933, 112, 130. [Google Scholar]
  2. Mwanga, A.; Rosenkranz, J.; Lamberg, P. Development and experimental validation of the Geometallurgical Comminution Test(GCT). Miner. Eng. 2017, 108, 109–114. [Google Scholar] [CrossRef]
  3. Bond, F.C. Standard grindability test tabulated, Trans AIME Min. Eng. 1949, 183, 313. [Google Scholar]
  4. Bond, F.C. The third theory of communition, Trans AIME Min. Eng. 1952, 193, 484–494. [Google Scholar]
  5. Bond, F.C. Crushing and grinding calculation part I and II. Brit. Chem. Eng. 6 (6 and 8), 1961, 378-385 & 543-548.
  6. Mucsi, G. Fast test method for the determination of the grindability of fine materials. Chem. Eng. Res. Des. 2008, 86, 395–400. [Google Scholar] [CrossRef]
  7. WEISS, N.L. Mineral Processing Handbook, Society of Mining Engineers; AIMM: New York, NY, USA, 1985. [Google Scholar]
  8. Berry, T.F. Bruce R. W., A simle method of determining the grindability of ores., Can. Min. J. 1966, 87, 63–65. [Google Scholar]
  9. Horst, W.E. Bassarear J. H., Use of simplified ore grindability technique to evaluate plant preformance, Trans. Soc. Min. Eng. (AIME) 1977, 260, 348–351. [Google Scholar]
  10. Mular, A.L.; Jergensen, G.V. , Design and Installation of Comminution Circuits, Society of Mining Engineers of the American Institute of Mining; Metallurgical, and Pegroleum Engineers, Inc.: New York, NY, USA, 1982; p. 1022. [Google Scholar]
  11. Nematollahi, H. New size laboratory ball mill for Bond work index determination. Min. Eng. 1994, 46, 352–353. [Google Scholar]
  12. Menéndez-Aguado, J.M.; Dzioba, B.R.; Coello-Velazquez, A.L. Determination of work index in a common laboratory mill. Miner.Metall. Process. 2005, 22, 173–176. [Google Scholar] [CrossRef]
  13. Saeidi, N.; Noaparast, M.; Azizi, D.; Aslani, S.; Ramadi, A. A developed approach based on grinding time to determine ore comminution properties, J. Min. Environ 2013, 4, 105–112. [Google Scholar]
  14. Kapur, P.C. Analysis of the Bond grindability test, Trans. Inst. Min. Metal L 1970, 79, 103–107. [Google Scholar]
  15. Karra, V.K. Simulation of the Bond Grindability test. CIM Bulletin 1981, 74, 195–199. [Google Scholar]
  16. Lewis, K.A.; Pearl, M.; Tucker, P. Computer Simulation of the Bond ni test. Mineral Engineering 1990, 3, 199–206. [Google Scholar] [CrossRef]
  17. Smith, R.W. Lee K. H., A Comparison of data from Bond type simulated closed-circuit and batch type grindability in batch ball mill, Trans. Metall. Soc. AIME 1968, 241, 91–99. [Google Scholar]
  18. Aksani, B.; Sönmez, B. Simulation of bond grindability test by using cumulative based kinetic model. Miner. Eng. 2000, 13, 673–677. [Google Scholar] [CrossRef]
  19. Ford, E.; Sithole, V. A Comparison of Test Procedures for Estimating the Bond Ball Work Index on Zambian/DRC Copper-Cobalt Ores and Evaluation of Suitability for Use in Geometallurgical Studies, Copper Cobalt Africa. In Proceedings of the 8th Southern African Base Metals Conference, Livingstone, Zambia, 6–8 July 2015; pp. 65–68. [Google Scholar]
  20. Gharehgheshlagh, H.H. Kinetic grinding test approach to estimate the ball mill work index. Physicochem. Probl. Miner. Process. 2015, 52, 342–352. [Google Scholar]
  21. Ciribeni, V.; Bertero, R.; Tello, A.; Puerta, M.; Avellá, E.; Paez, M. Menéndez-Aguado, J. M. Application of the Cumulative KineticModel in the Comminution of Critical Metal Ores. Metals 2020, 10, 925. [Google Scholar]
  22. Magdalinovic, N. A Procedure for Rapid Determination of the Bond Work Index, Int. J. Miner. Process. 1989, 27, 125. [Google Scholar] [CrossRef]
  23. Austin, L.G. Bagga P. nad Celik M., Breakege Properties of some Materials in Laboratory Ball Mill, Powder Technol. 1981, 28, 235–241. [Google Scholar]
  24. Ahmadi, R. Shahsavari Sh. , Procedure for determination of ball Bond work index in the commercial operations, Miner. Eng. 2009, 22, 104–106. [Google Scholar]
  25. Magdalinovic, N. Abbreviated test for quick determination of Bond’s Work index, J. Min. And Metall. 2003, 39, 1–10. [Google Scholar]
  26. Todorovic, D.; Trumic, M.; Andric, L.; Milosevic, V.; Trumic, M. A quick method for Bond work index approximate value determination. Physicochem. Probl. Miner. Process 2017, 53, 321–332. [Google Scholar]
  27. Nikolic, V.; García, G.; Trumic, M.; Coello-Velázquez, A.; Menéndez-Aguado, J.; Trumic, M. A Review of Alternative Procedures to the Bond Ball Mill Standard Grindability Test. Metals 2021, 11, 1114. [Google Scholar] [CrossRef]
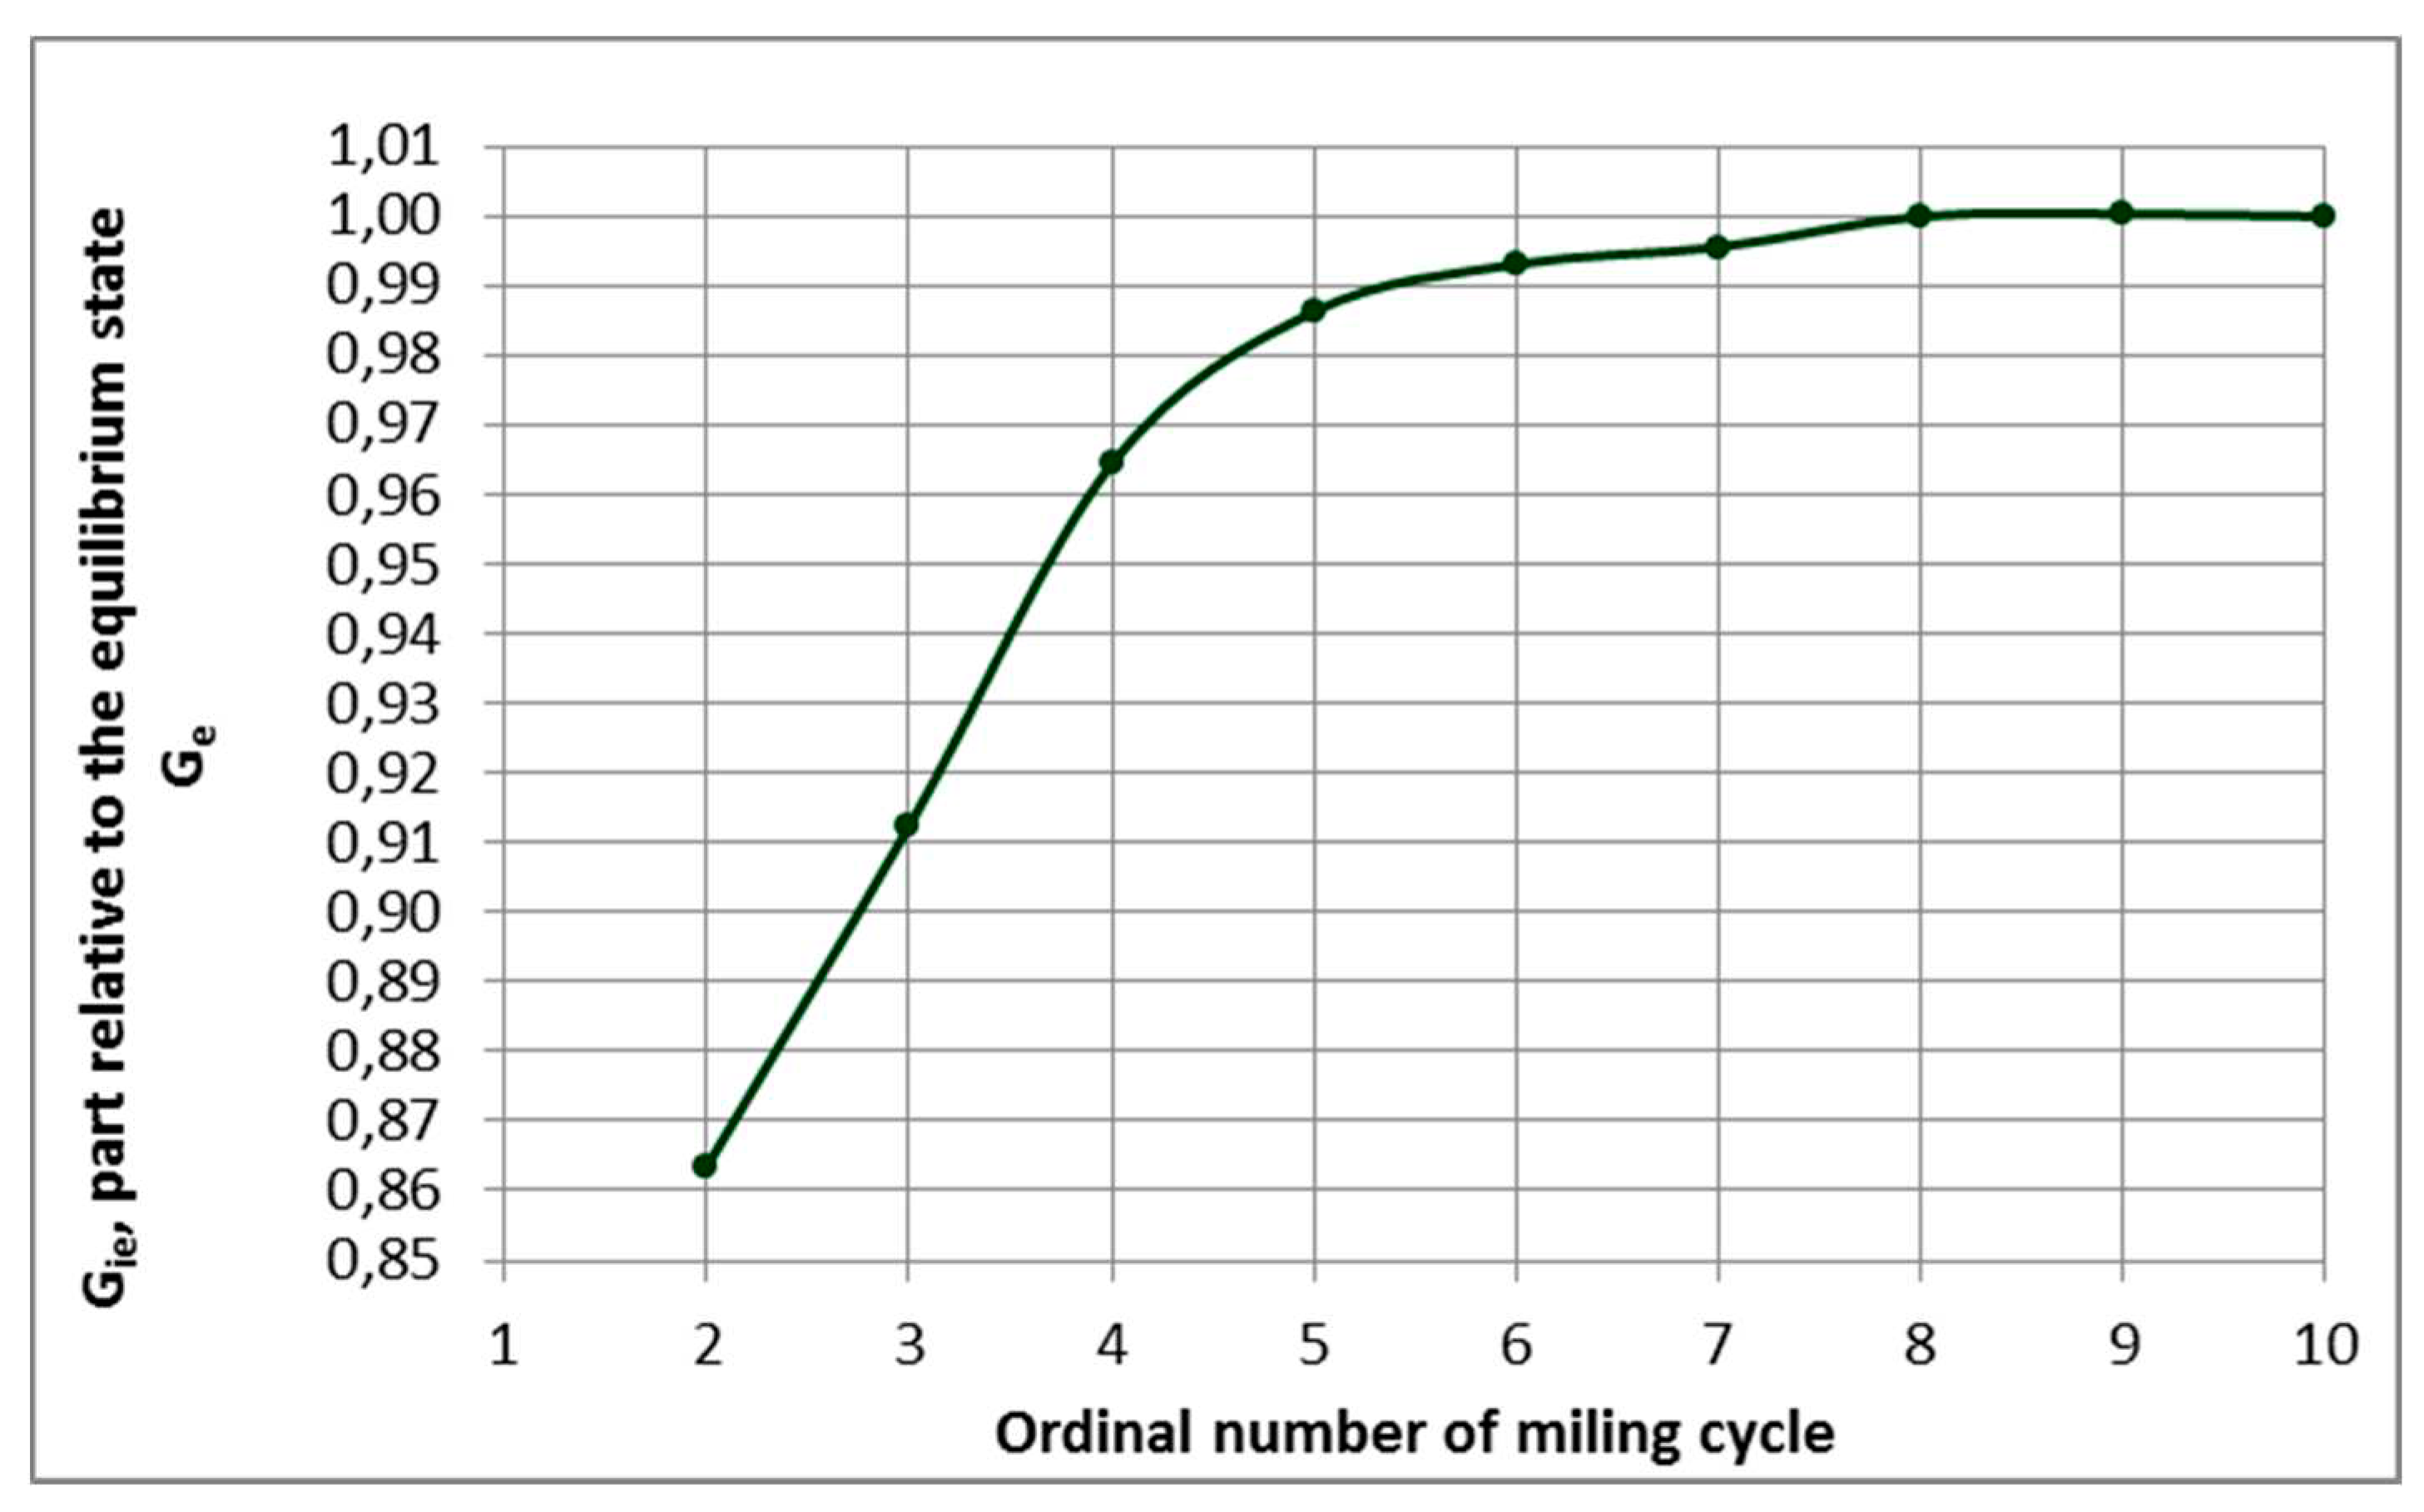
Figure 1. Ratios of the obtained calculated values Gie and the values for the last grinding cycle Ge (250% circular batch)
Preprints 68017 g001
Figure 2. Ratios of the Pi80 obtained calculated values and the P80 values for the last grinding cycle (250% circular batch)
Preprints 68017 g002
Table 1. Chemical composition of andesite
  Chemical element Cu S Cuox SiO2 Al2O3 CaO
  Content, % 0.184 3.51 0.040 64.130 17.430 0.420
  Chemical element MgO Fe2O3 K2O Na2O TiO2
  Content, % 1.250 6.000 3.990 0.849 0.50 5.15
  Chemical element Zn Cr Pb Cd Mn Ni
  Content, ppm 30.49 42.49 20.00 0.10 93.50 44.90
  Chemical element Mo / / / / /
  Content, ppm 47.99 / / / / /
Table 2. Chemical composition of andesite
  Chemical element Cuuk. Cuox. Cusulf. S Al2O3 SiO2
  Content, % 0.440 0.017 0.423 4.88 17.10 57.52
  Chemical element Fe Fe2O3 CaO / / /
  Content, % 3.21 <0.03 7.22 / / /
  Chemical element Au Ag Mo / / /
  Content, g/t 30.49 42.49 20.00 / / /
Table 3. Chemical composition of smelter slag
Chemical element Cu Cusulf Cuox S
Content, % 0.881 0.761 0.120 0.720
Table 4. Bond mill characteristics and experimental grinding conditions
Mill diameter, Dm 30.48 cm
The length of the mill, Lm 30.48 cm
Mill lining geometry Smooth
The number of revolutions of the mill per minute, n 70 min-1
Mass of balls, Mb 21.125 kg
Vsample 700 cm3
Type of grinding Dry
Table 5. Comparison of parameter G obtained by standard Bond procedure and fast procedure with two, three and four grinding cycles
Sample Sieve, µm G,
g/rev
2 Grinding 3 Grinding 4 Grinding
Ge2,
g/rev
Differ.,
%
Ge3,
g/rev
Differ.,
%
Ge4,
g/rev
Differ.,
%
Limestone : andesite 105 1.190 1.223 +2.77 1.261 +3.28 1.234 +1.15
0 : 100 150 1.540 1.645 +7.14 1.580 +2.60 1.556 +1.01
Limestone : andesite 105 1.270 1.259 -0.79 1.289 +1.57 1.276 +0.43
25 : 75 150 1.660 1.697 +2.14 1.678 +1.20 1.649 -0.67
Limestone : andesite 105 1.480 1.436 -2.70 1.442 -2.70 1.441 -2.61
50 : 50 150 1.810 1.893 +4.42 1.864 +2.76 1.804 -0.31
Limestone : andesite 105 1.600 1.538 -3.75 1.529 -4.38 1.556 -2.78
75 : 25 150 1.960 1.908 -2.55 1.958 0.00 1.898 -3.18
Limestone : andesite 105 1.810 1.785 -1.66 1.733 -4.42 1.742 -3.75
100 : 0 150 2.160 2.029 -6.02 2.112 -2.31 2.126 -1.58
Slag : Cu ore 150 1.85 2.00 +8.11 1.92 +3.78 1.89 +2.16
100 : 0
Slag : Cu ore 150 1.97 2.11 +7.11 2.03 +3.05 1.97 0.00
75 : 25
Slag : Cu ore 150 2.00 2.17 +8.50 2.13 +6.50 2.00 0.00
50 : 50
Slag : Cu ore 150 2.11 2.13 +0.95 2.16 +2.37 2.19 +3.79
25 : 75
Slag : Cu ore 150 2.13 2.19 +2.82 2.08 -2.35 2.10 -1.41
100 : 0
Maximum error / 8.11 6.50 3.79
Mean error / 4.09 2.88 1.65
Table 6. Comparison of parameter P80 obtained by standard Bond method and fast process with two, three and four grinding cycles
Sample Sieve, µm P80,
µm
2 Grinding 3 Grinding 4 Grinding
P80 e2,
µm
Differ.,
%
P80 e3,
µm
Differ.,
%
P80 e4,
µm
Differ.,
%
Limestone : andesite 105 86.00 87.98 +2.30 87.55 +1.80 87.46 +1.70
0 : 100 150 121.00 121.10 +0.08 121.54 +0.45 121.02 +0.02
Limestone : andesite 105 86.00 84.87 -1.31 87.55 +1.80 86.45 +0.52
25 : 75 150 121.00 121.10 +0.08 120.51 -0.40 122.04 +0.86
Limestone : andesite 105 87.00 87.98 +1.13 90.64 +4.18 88.48 +1.70
50 : 50 150 122.00 123.17 +0.96 125.66 +3.00 124.07 +1.70
Limestone : andesite 105 89.00 87.98 -1.15 90.64 +1.84 90.51 +1.70
75 : 25 150 124.00 122.13 -1.51 123.60 -0.32 124.07 +0.06
Limestone : andesite 105 91.00 94.19 +3.51 90.64 -0.40 88.48 -2.77
100 : 0 150 124.00 116.96 -5.68 120.51 -2.81 123.06 -0.76
Slag : Cu ore 150 127.00 126.27 -0.57 126.69 0.00 129.16 +1.70
100 : 0
Slag : Cu ore 150 122.00 125.00 +2.65 126.00 +3.00 124.00 +1.70
75 : 25
Slag : Cu ore 150 122.00 123.00 +0.95 124.00 +1.31 123.00 +0.87
50 : 50
Slag : Cu ore 150 120.00 116.00 -3.40 118.00 -1.29 121.00 +0.85
25 : 75
Slag : Cu ore 150 118.00 115.00 -2.60 115.00 -2.60 115.00 -2.60
100 : 0
Maximum error / 5.68 4.18 2.77
Mean error / 1.86 1.68 1.30
Table 7. Comparison of Bond work index Wi obtained by standard Bond procedure and fast procedure with two, three and four grinding cycles
Sample Sieve, µm Wi,
kWh/t
2 Grinding 3 Grinding 4 Grinding
Wie2,
kWh/t
Differ.,
%
Wie3,
kWh/t
Differ.,
%
Wie4,
kWh/t
Differ.,
%
Limestone : andesite 105 16.93 17.15 +1.26 16.68 -1.53 16.96 +0.14
0 : 100 150 16.01 15.17 -5.24 15.72 -1.76 15.88 -0.81
Limestone : andesite 105 16.41 16.38 -0.15 16.39 -0.09 16.40 -0.02
25 : 75 150 15.13 14.87 -1.74 14.96 -1.14 15.30 +1.14
Limestone : andesite 105 14.60 15.07 +3.23 15.31 +4.88 15.08 +3.30
50 : 50 150 14.26 13.83 -3.00 14.20 -0.39 14.46 +1.41
Limestone : andesite 105 13.91 14.27 +2.55 14.61 +5.00 14.40 +3.46
75 : 25 150 13.59 13.75 +1.18 13.57 -0.15 13.96 +2.73
Limestone : andesite 105 12.77 13.21 +3.45 13.20 +3.37 12.94 +1.32
100 : 0 150 12.63 12.77 +1.12 12.62 -0.13 12.73 +0.78
Slag : Cu ore 150 15.02 14.01 -6.73 14.55 -3.14 14.95 -0.50
100 : 0
Slag : Cu ore 150 13.71 13.17 -3.93 13.63 -0.58 13.89 +1.34
75 : 25
Slag : Cu ore 150 13.40 12.62 -5.81 12.83 -4.27 13.47 +0.50
50 : 50
Slag : Cu ore 150 12.58 12.19 -3.15 12.25 -2.63 12.27 -2.51
25 : 75
Slag : Cu ore 150 12.22 11.73 -3.99 12.26 +0.34 12.15 -0.56
100 : 0
Maximum error / 6.73 5.00 3.46
Mean error / 3.10 1.96 1.37
Root mean square error / 3.59 2.61 1.74
Disclaimer/Publisher’s Note: The statements, opinions and data contained in all publications are solely those of the individual author(s) and contributor(s) and not of MDPI and/or the editor(s). MDPI and/or the editor(s) disclaim responsibility for any injury to people or property resulting from any ideas, methods, instructions or products referred to in the content.
Copyright: This open access article is published under a Creative Commons CC BY 4.0 license, which permit the free download, distribution, and reuse, provided that the author and preprint are cited in any reuse.
Prerpints.org logo

Preprints.org is a free preprint server supported by MDPI in Basel, Switzerland.

Subscribe

© 2024 MDPI (Basel, Switzerland) unless otherwise stated