1. Introduction
Material processing using wire arc additive manufacturing (WAAM) technologies makes it possible to obtain various products from a wide range of metallic materials. The technology makes it possible to manufacture component parts with high precision, unique geometry, and material variety layer by layer. The undeniable advantage of this technology is the reduction of cost and production time in piece production [
1]. The WAAM technology could be a unique tool for creating new materials with given internal architecture that improves their mechanical and physical properties. It is well-known that severe plastic deformation (SPD) methods allow the formation of unique microstructure and properties in bulk metallic materials [
2]. Various SPD methods have been developed and examined in recent years, the results of this investigations have been analyzed and summarized in recent reviews [
2,
3,
4,
5,
6]. In recent years, many studies have been performed on SPD-processed pure aluminum and aluminum-based alloys [
8,
9,
10,
11,
12,
13,
14]. It was shown that SPD processing results in formation ultrafine-grained structure providing high mechanical strength. Furthermore, in some cases, materials with enhanced mechanical strength demonstrate high ductility [
13,
14], although this is mutually exclusive properties for traditional metallic materials [
15]. In [
14] a new approach to improve plasticity while maintaining high strength of HPT processed commercially pure Al was proposed. This approach is based on the modification of the annealed structure of the high-angle grain boundaries by a slight additional deformation by HPT after short-term low-temperature annealing.
The Al-Mg alloys are the main material for the manufacture of space technology products, lightweight aluminum ships and various critical structures [
16,
17]. The hardening of the Al-Mg alloys is due to the formation of a solid solution, as well as through deformation treatment. As it was shown for equal-channel angular pressing (ECAP) processed Al–Mg alloys, increase in Mg content from 0.5 to 2 wt.% leads to grain grinding and increase in dislocation density [
18]. The UFG Al–Mg alloys produced by high-pressure torsion (HPT) retained ductility at the acceptable level while Mg content is less than 2.5 wt.% [
19]. Further increase in Mg content up to 4.1 wt.% results in decrease of ductility of HPT-processed alloy [
20]. The increase of Mg content up to 4.5 wt.% completely suppresses plastic deformation in the HPT-processed material [
19,
20]. Thermal stability of nanostructured Al–Mg alloys remains unclear. One study found that Al–5Mg(wt.%) alloy treated by surface mechanical grinding has enhanced thermal stability of mechanical properties up to 200
oС [
21]. Another study found degradation of mechanical properties of Al–5.5Mg(wt.%) alloy produced by ECAP with an increase in the annealing duration at 350
oС [
22].
The problems mentioned above can be solved by introduction of alloying additives into the UFG Al-Mg alloy that increases strength and the recrystallization temperature. Among the alloying elements used in aluminum alloys, special attention is paid to Sc. It is one of the most effective modifiers, and even small Sc additives provide significant hardening and thermal stability [
23,
24,
25].
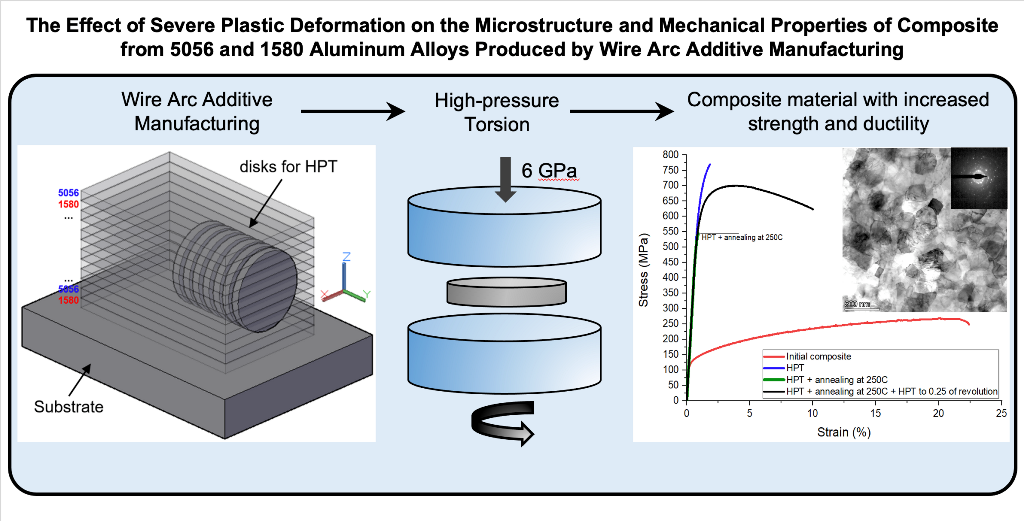
In this work, an attempt to combine the WAAM and the SPD processes for creating of multi-layer aluminum materials has been made. In this framework, the 5056 Al-Mg and 1580 Al-Mg(Sc) alloys were chosen as a material for the investigation. The possibility of simultaneous increase in strength and ductility of the HPT-processed composite by additional deformation and heat treatment previously proposed in [
14] was investigated.
2. Materials and Methods
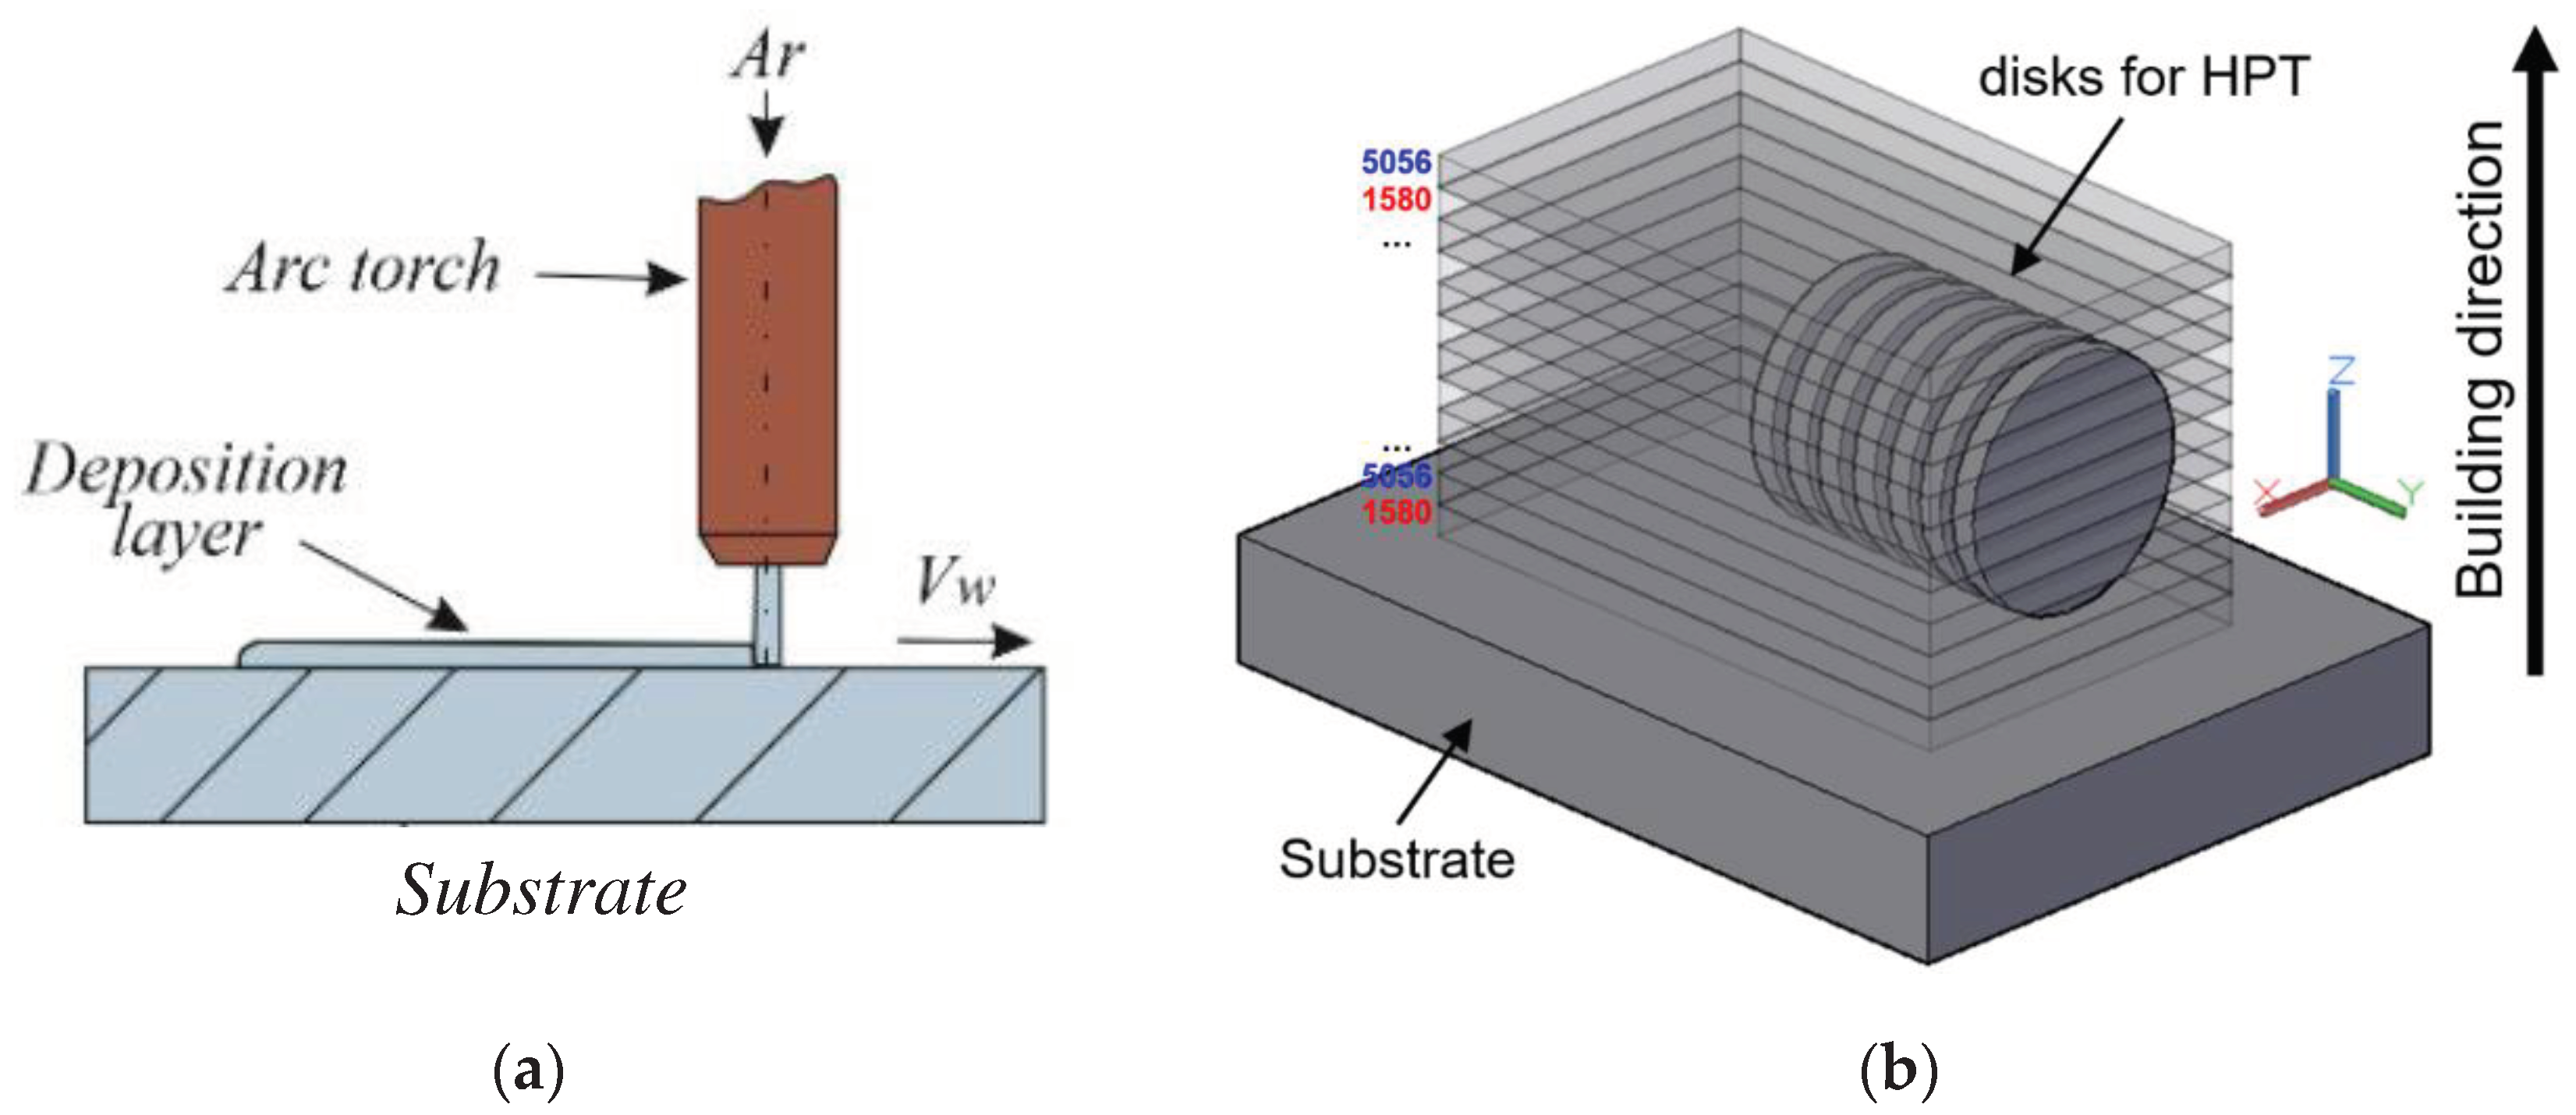
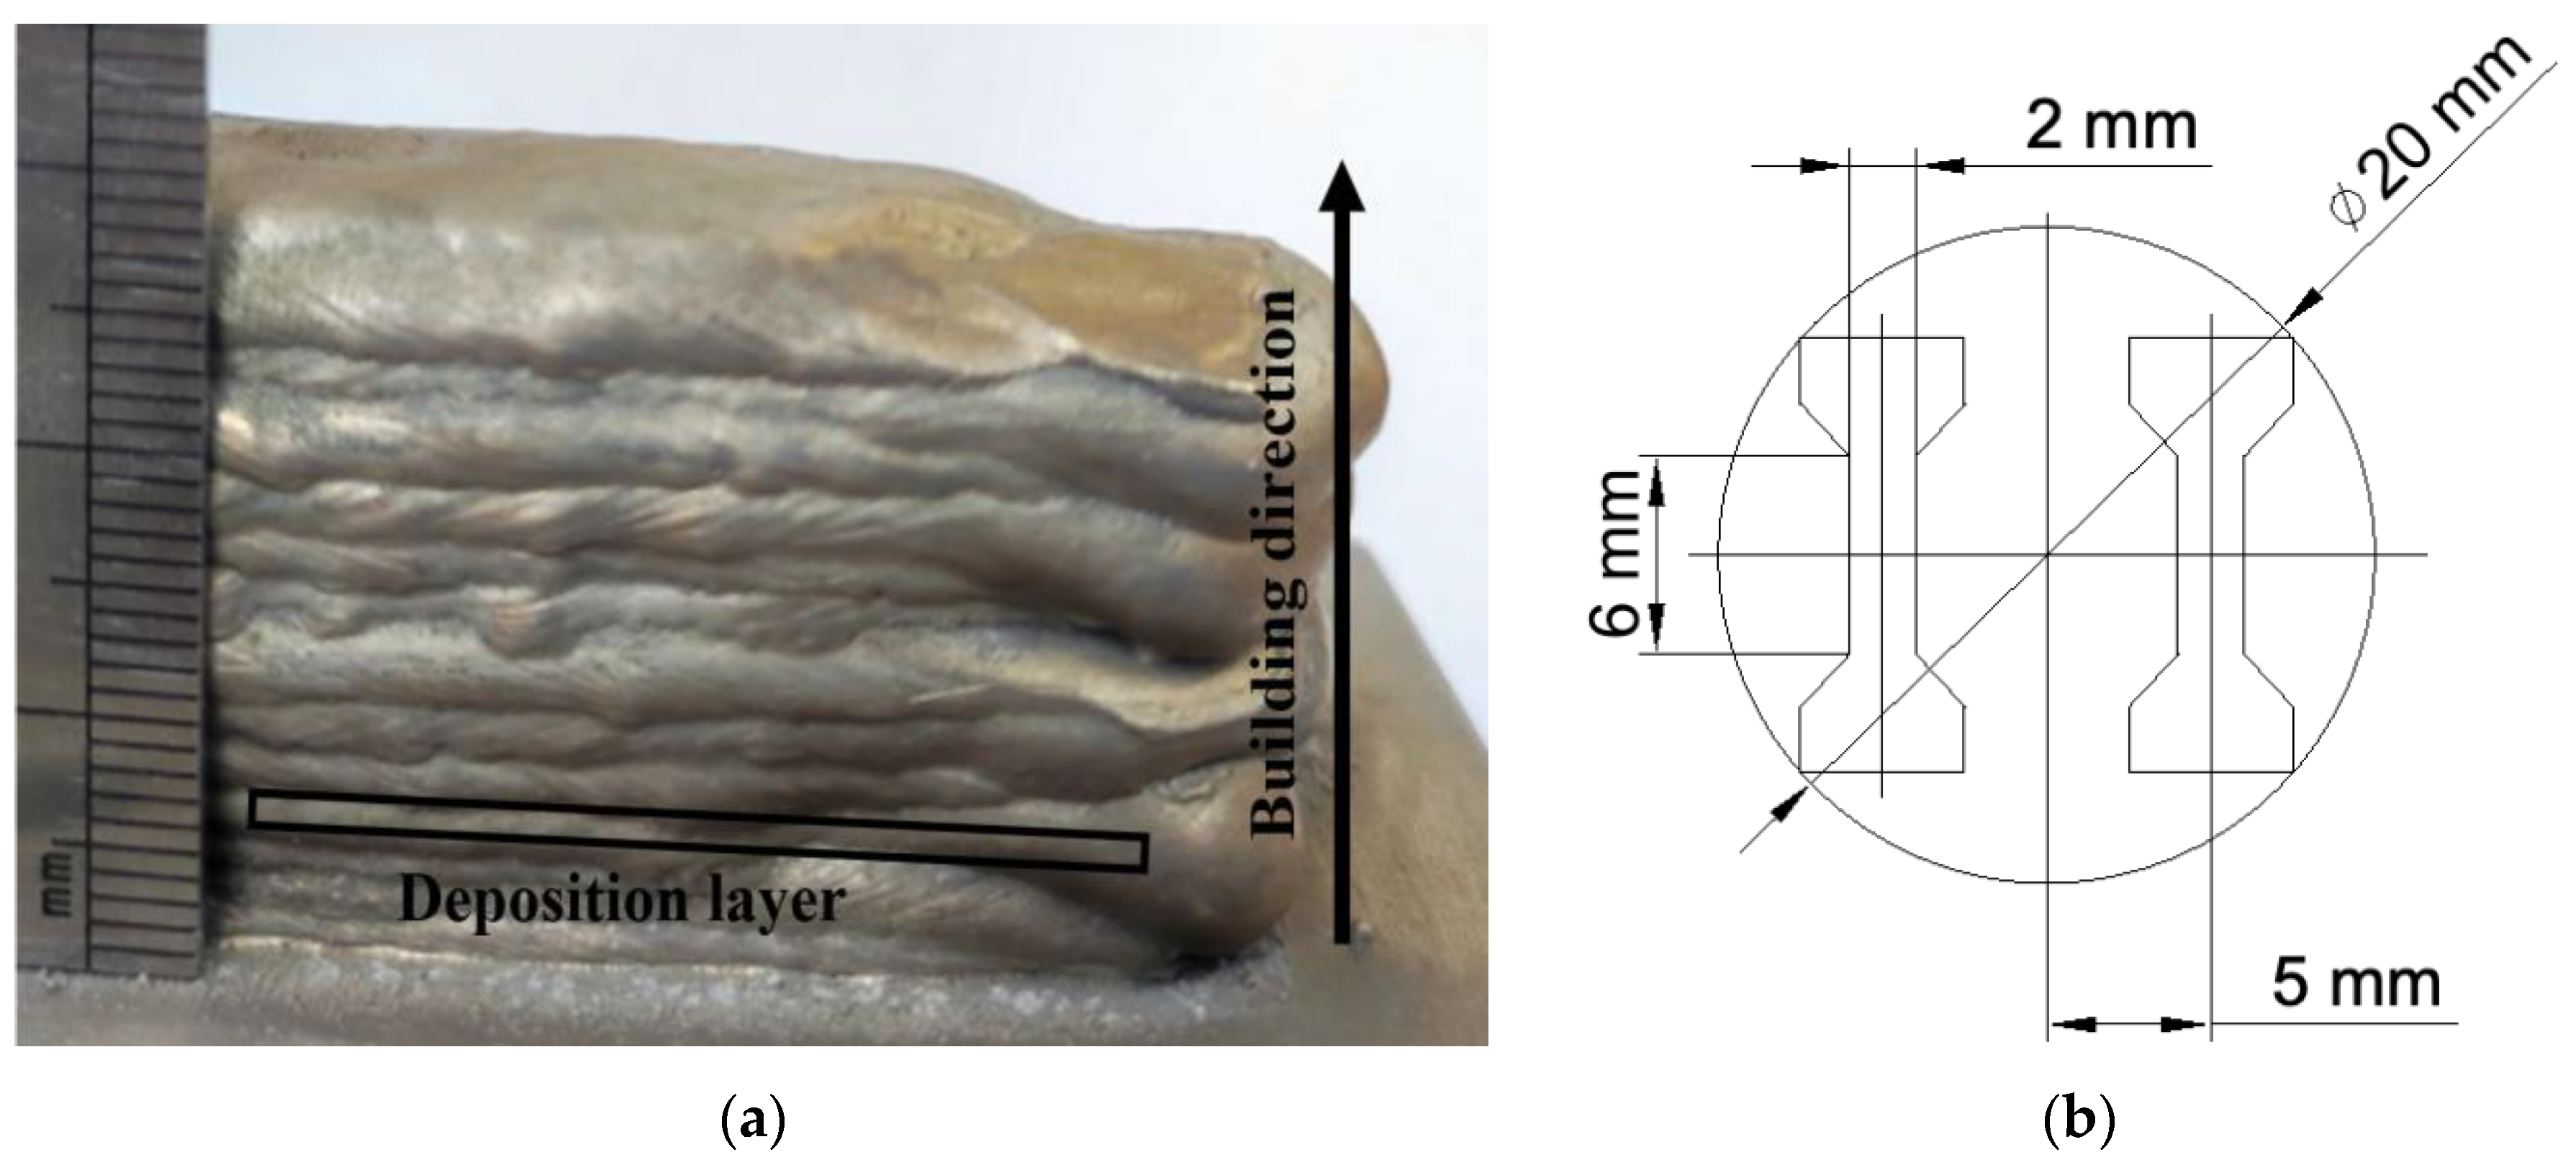
The material for investigation were grown using a WAAM setup. The WAAM machine is based on the Fronius equipment package with cold material transfer technology. TPS 500i was used as a welding arc source. Fanuc M-710ic industrial robot was used as a moving system. Samples were deposited using high purity Ar shielding gas. Figure 1a shows a schematic representation of the deposition process. Deposition was carried out at 120 A, 14.8 V with travel speed 10–15 mm/s, the offset between adjacent beads was 3.2 mm. The composite sample were obtained by depositing alternating layers of 5056 and 1580 aluminum alloys stacked on top of each other, with thickness of each layer 2.5 mm until the following final dimensions of the sample: 30 mm in height, 30 mm in width and 100 mm in length. Schematic setup of the sample is shown on Figure 1b. The composite sample manufactured in this way is shown on Figure 2a. For HPT processing, disks with a diameter of 20 mm and a thickness of 1.5 mm were cut out from the sample according to the scheme (Figure 1b).
The HPT processing of the disks was performed on the Walter-Klement HPT press to 10 revolutions at room temperature (RT) under a pressure of 6 GPa. After HPT processing disks with a diameter of 20 mm and thickness of ~1.0 mm were formed. The logarithmic strain of material at the middle of the disk radius was
e ≈ 5.5 [
26]. Additional deformation heat treatment included annealing at 200–275
oС for 1 h and further HPT processing to 0.25 revolutions at RT under the same pressure, which corresponded to the extra logarithmic strain of
e ≈ 1.5 [
26].
Chemical analysis of the 5056 Al–Mg and 1580 Al-Mg(Sc) alloys and the HPT-processed sample was performed using the scanning electron microscope (SEM) equipped with an Energy Dispersive X-Ray (EDX) detector and the Oxford AZtec console (Oxford Instruments NanoAnalysis, United Kingdom).
Figure 2.
Schematic representation of the deposition process (a); schematic setup of the sample obtained by depositing alternating layers of 1580 and 5056 aluminum alloys (b)
Figure 2.
Schematic representation of the deposition process (a); schematic setup of the sample obtained by depositing alternating layers of 1580 and 5056 aluminum alloys (b)
XRD analysis was performed on a Bruker D8 DISCOVER diffractometer in a symmetric θ–2θ scan modes using a parallel beam of CuKα radiation (40 kV, 40 mA). The scanning step was 0.02° and the time of exposure was 0.5 s. The average size of the coherent scattering regions (
C) and the level of microdistortions of the crystal lattice (
were determined via the full-profile Pauli simulation using the TOPAS 5.0 software. The dislocation density was calculated according to the following ratio [
27]:
where
b=0.286 nm is the Burgers vector for edge dislocation in Al.
Transmission electron microscopy (TEM) was performed on an FEI Talos system equipped with a 200 kV field emission gun. Rapid TEM micrograph collection was undertaken at 25 frames per second, while collecting 512х512 pixel images. Samples for TEM studies were prepared using Mill TEM Model 1051 ion polishing machine.
Dog-bone samples with the gauge length of 6 mm and width of 2 mm were cut out from the disks according to the scheme (
Figure 2b). The average values of the yield stress (
) corresponding to 0.2% of deformation, the ultimate tensile strength (
), the relative elongation to failure (
δ), and the relative uniform elongation (
δ1) were determined by the tensile tests at a constant strain rate of 5 × 10
–4 s
–1. Fracture surfaces of the destroyed samples were studied using the SEM Zeiss AURIGA at the accelerating voltage of 10 kV.
3. Results and Discussion
Chemical composition (in wt. %) of the 5056 Al–Mg and 1580 Al-Mg(Sc) layers in the obtained by WAAM sample and the composite obtained by HPT is shown in
Table 1. As can be seen, the concentration of Mg in the HPT-processed composite practically remains at the concentration level in 1580 alloy, but the concentration of Sc is significantly lower. The concentration of other elements is in the middle of concentration in two initial alloys.
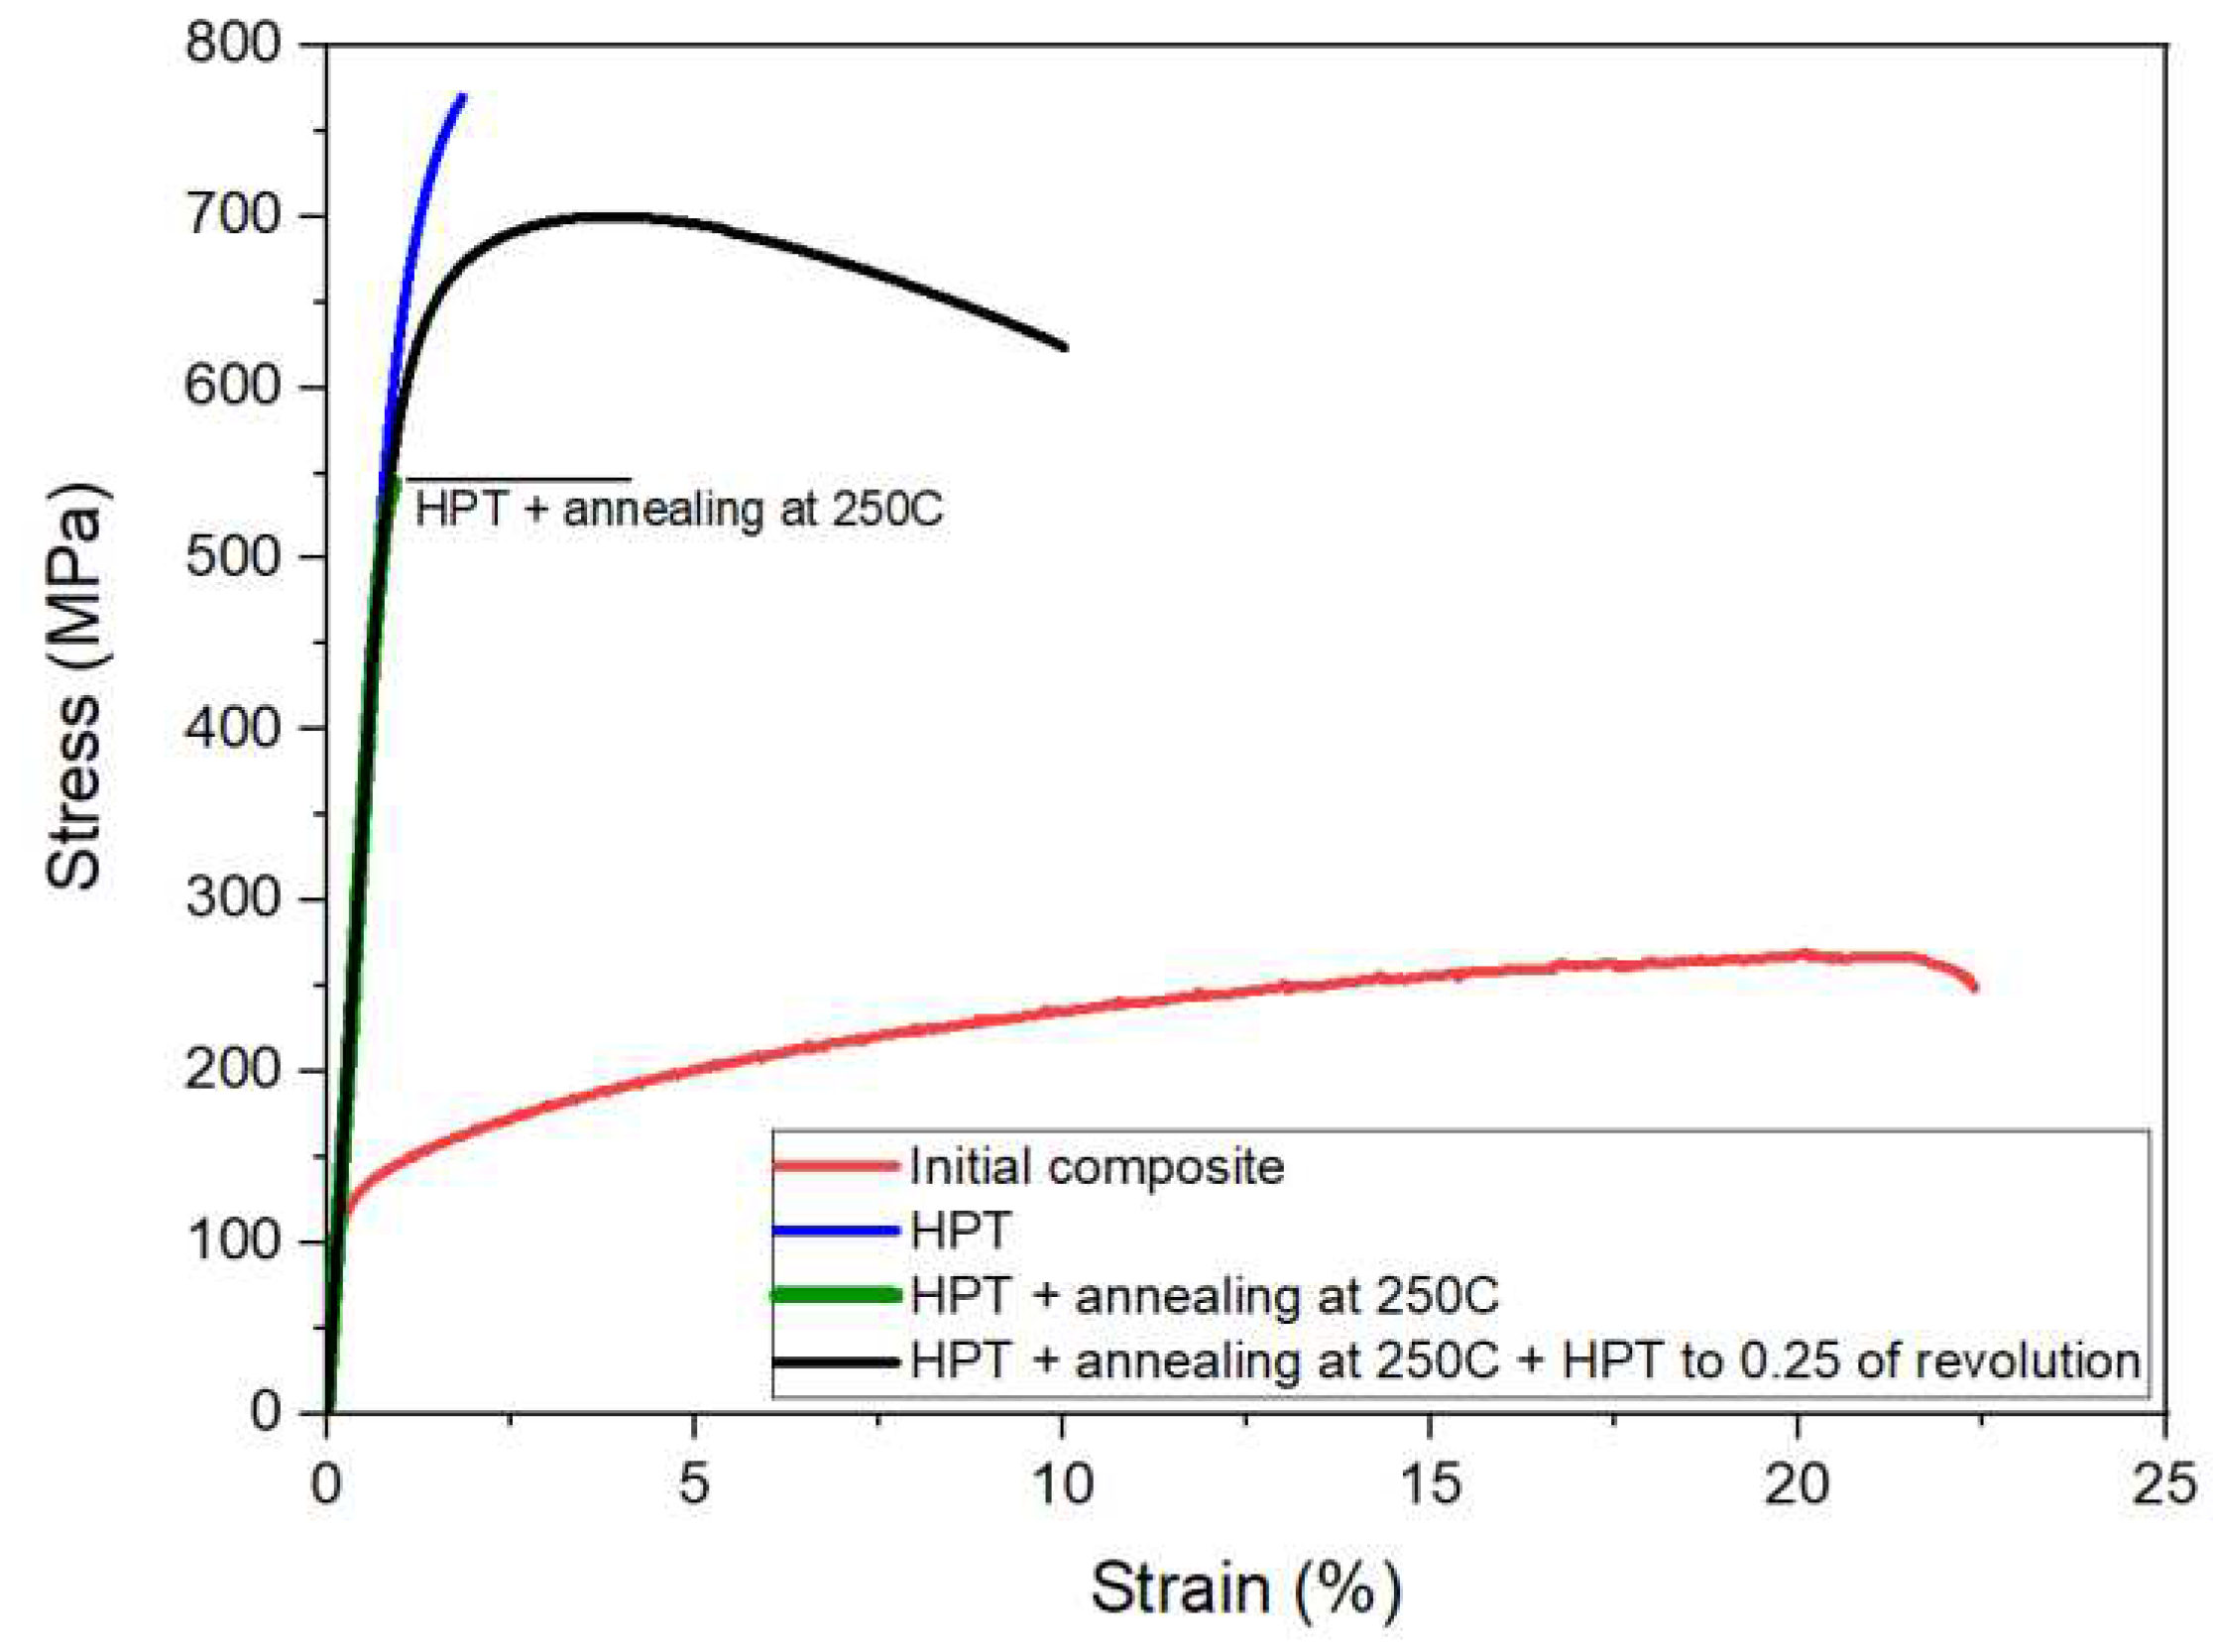
The stress-strain curves for the samples in different states of composite are shown on
Figure 3. The initial state characterized by low tensile strength (
≈ 265 MPa) and high elongation to failure δ ≈ 21%. After HPT processing the ultimate strength of the material has tripled from ~ 265 to ~ 770 MPa, at the same time, samples demonstrated brittle behavior. Subsequent annealing of the HPT-processed material at 200–275
oС leads to even more embrittlement and the sample was destroyed at the external stress ~ 504 MPa (
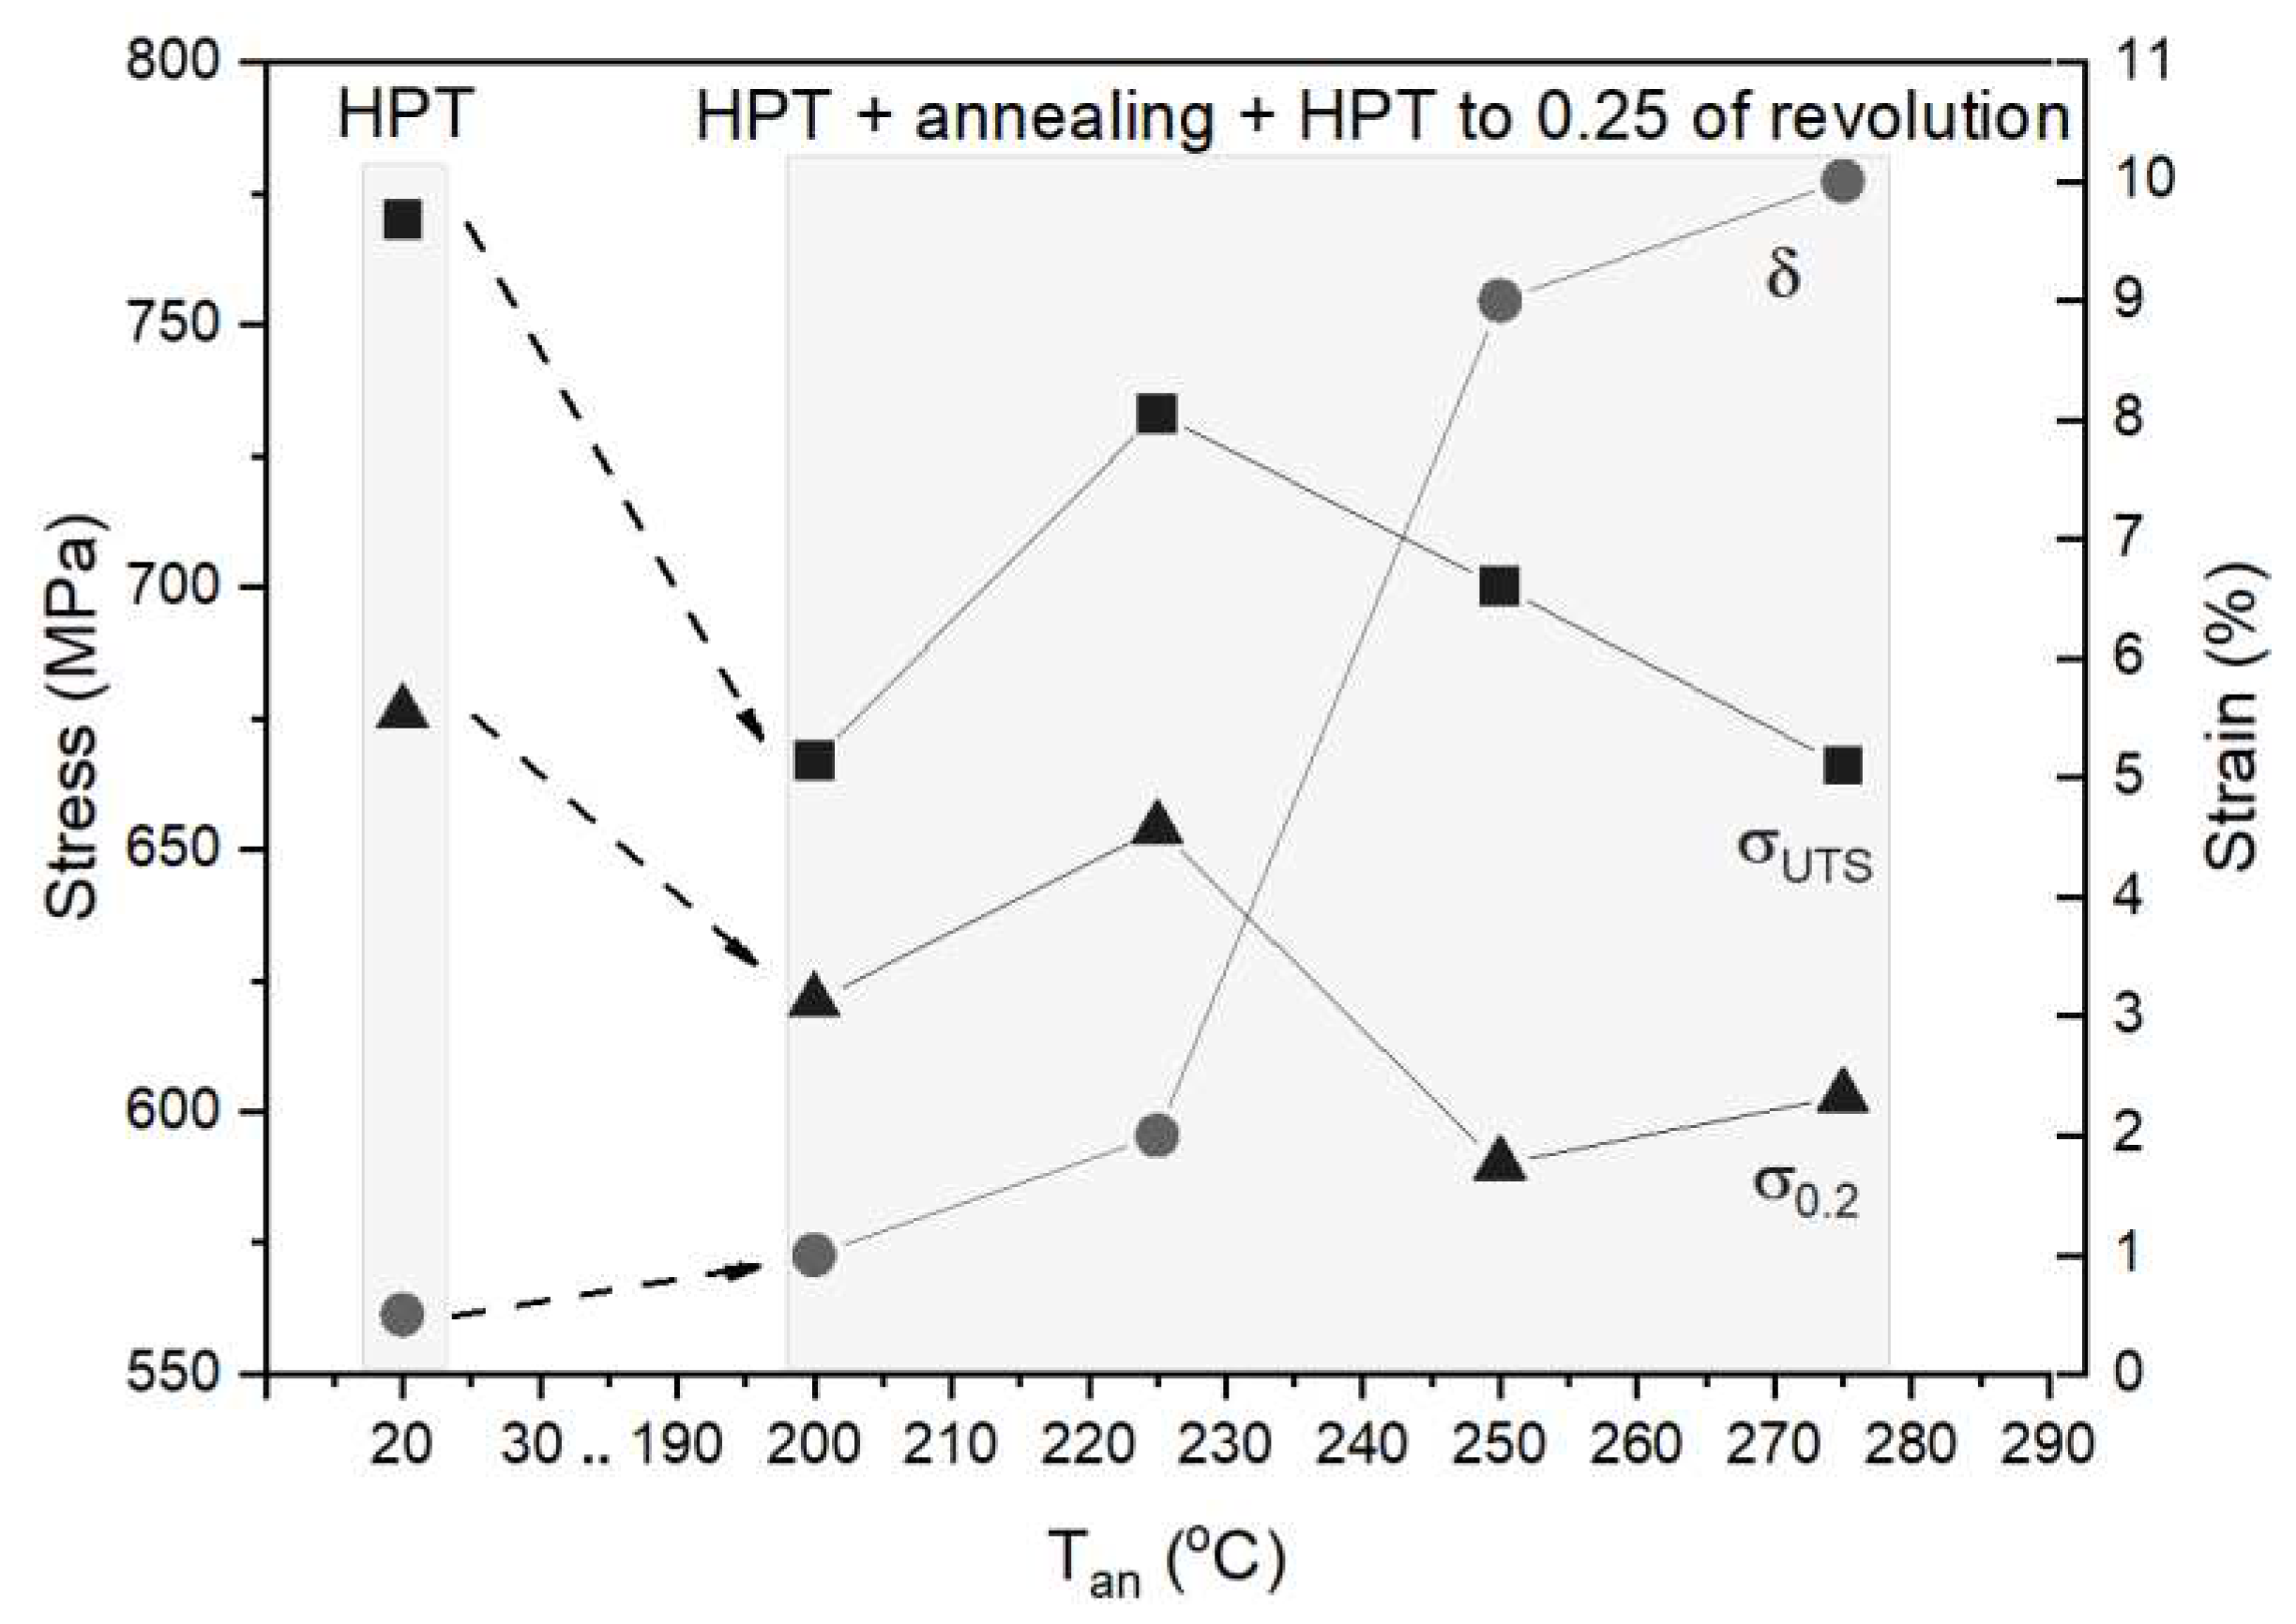
Table 2). After additional deformation by HPT to 0.25 revolutions the material demonstrates plasticity up to 10% (
Figure 4). The best combination of tensile strength and plasticity was obtained after annealing at 250
oС and additional HPT to 0.25 revolutions. As a result, the yield stress ~ 590 MPa, ultimate tensile strength ~ 700 MPa, the uniform elongation
~3% and elongation to failure ~9% were obtained (
Figure 4). The corresponding stress-strain curve is shown on (
Figure 3). The results of the mechanical tests of the material in different structural states are summarized in
Table 2.
The fracture surface of samples after HPT, annealing at 250
oС and additional HPT processing is shown in
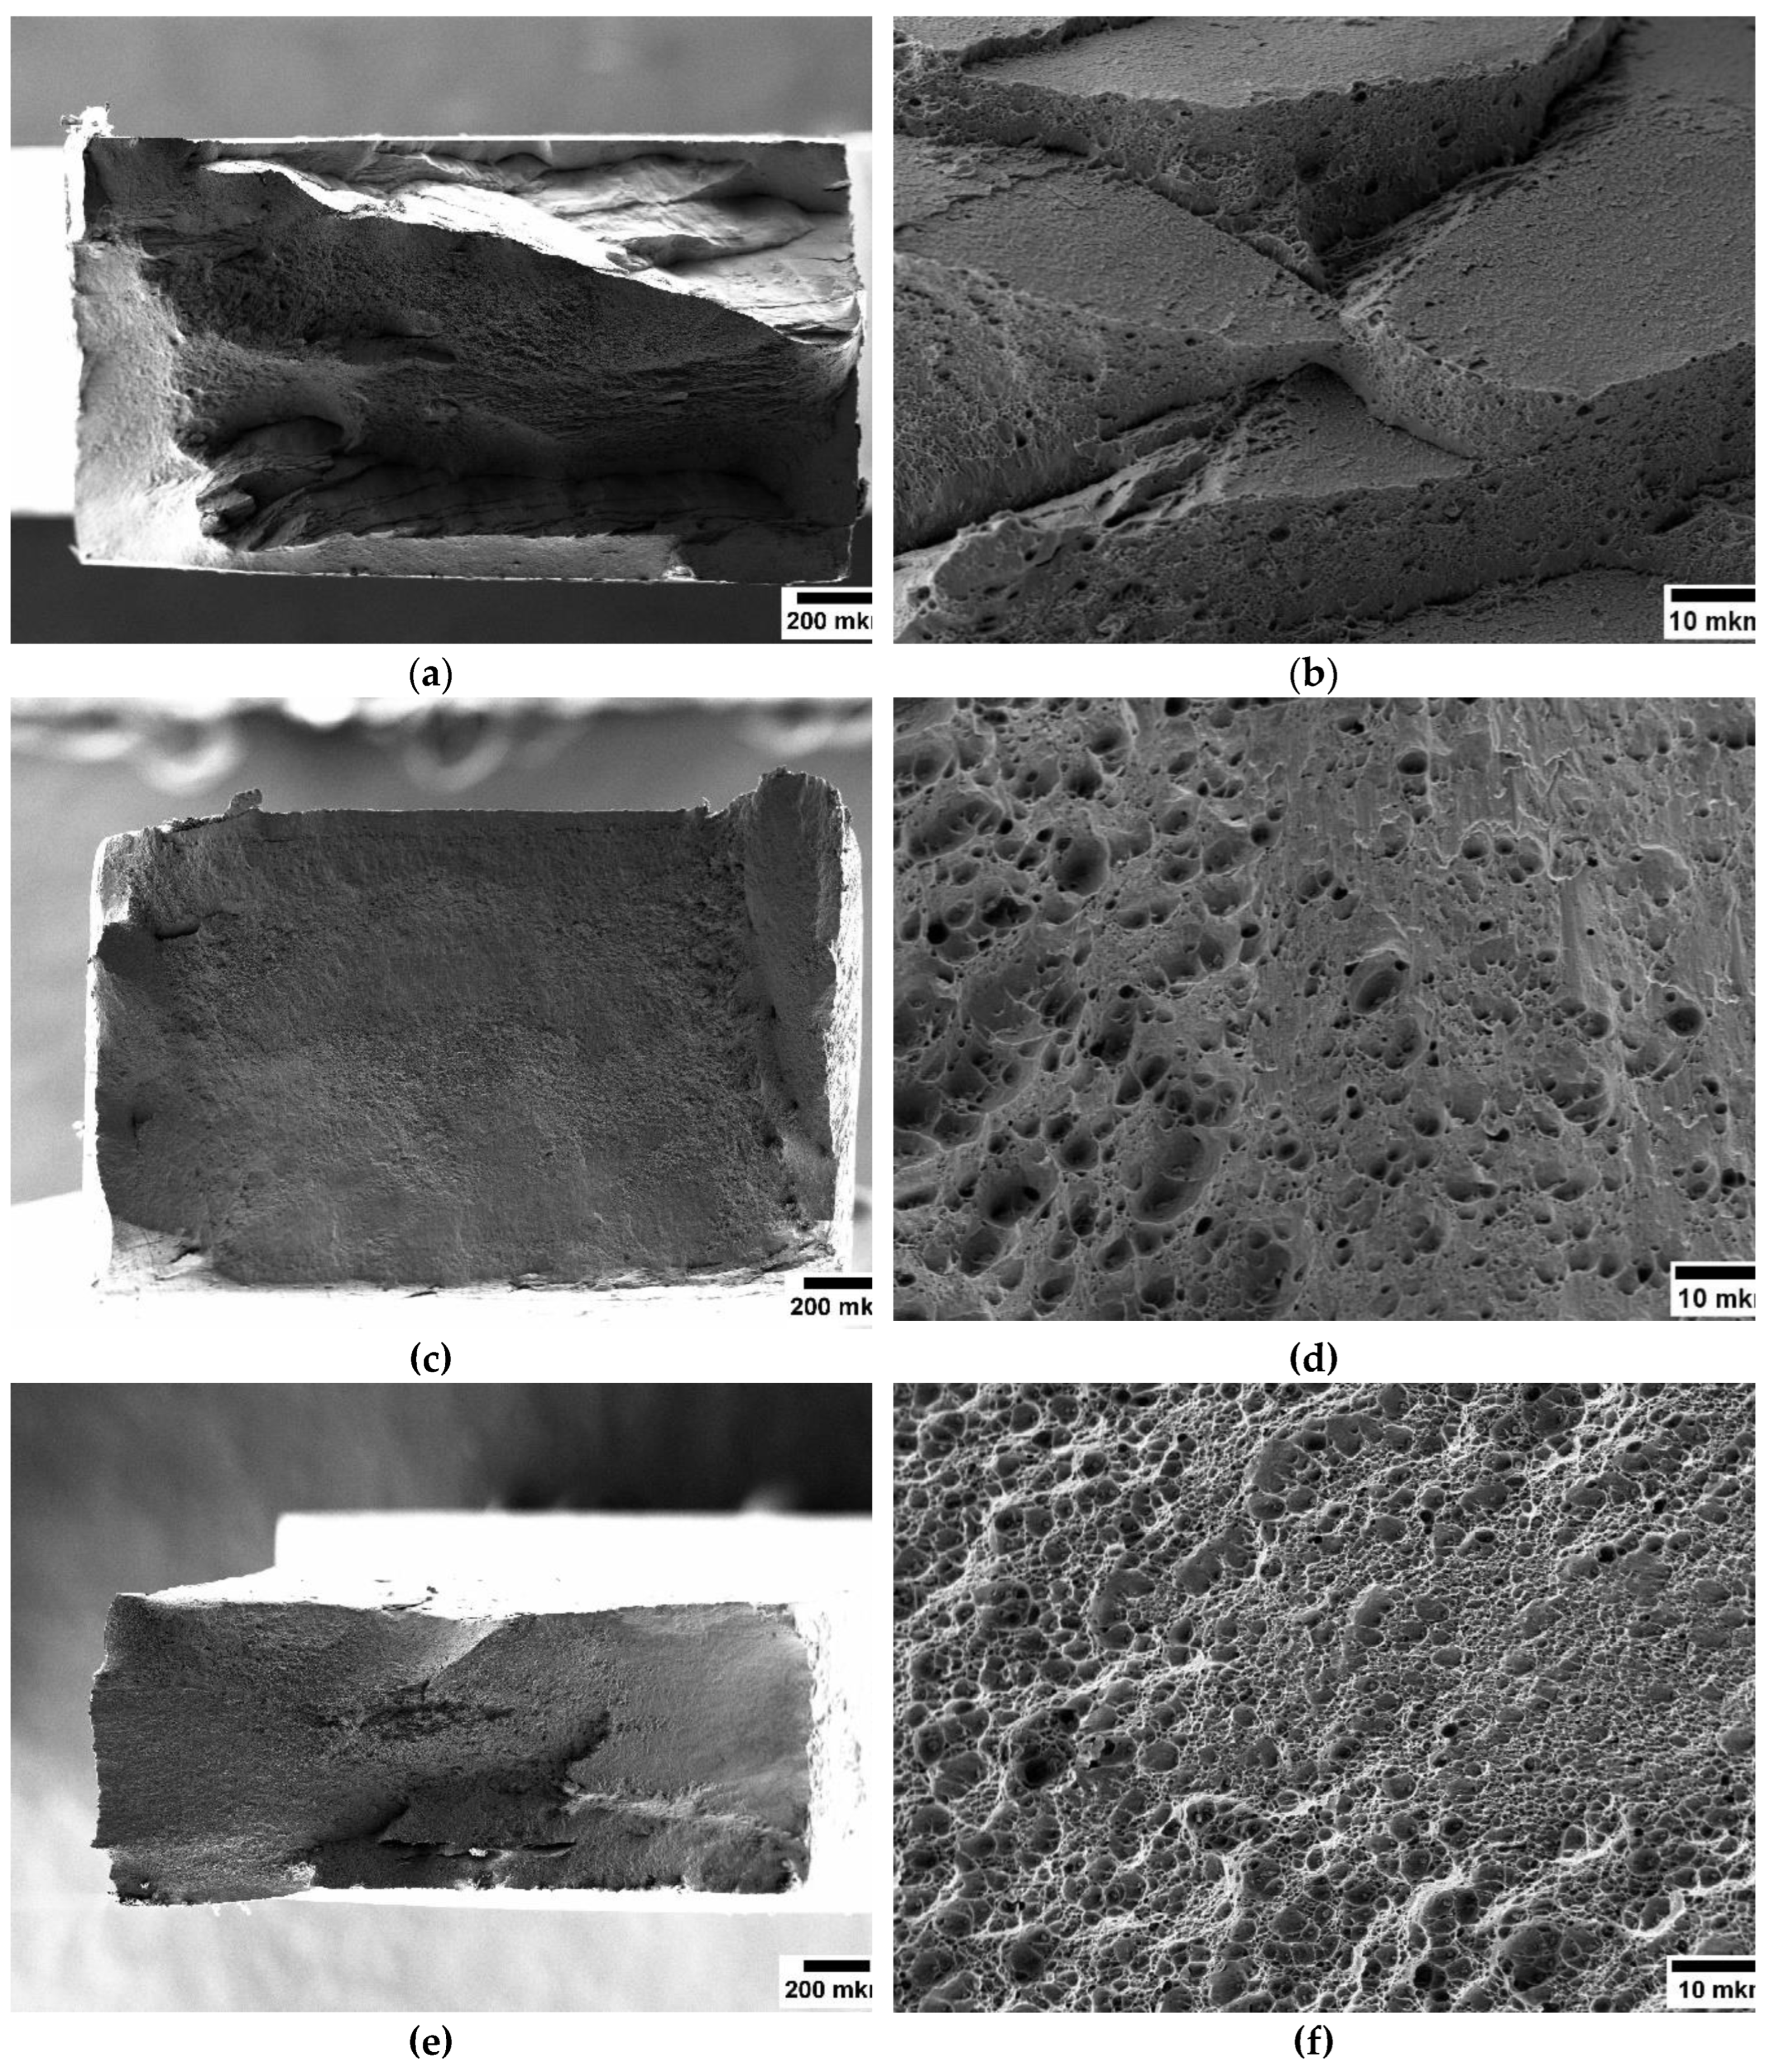
Figure 5. The fracture surface of the HPT-processed material (
Figure 5a,b) contains numerous micro- and macrocracks. Despite the severe destruction of the sample by a developed network of cracks, areas of plastic deformation still can be detected on the fracture surface (
Figure 5,b) which indicates that the material has some plastic capacity, nonetheless uniform deformation do not exceed 1%. The fracture surface of sample after HPT processing and annealing at 250
oС is characterized by a brittle fracture with an extensive net of cracks along the surface of the working part of the sample (
Figure 5c,d). There are no obvious traces of plastic deformation on the cracked surface. These results are fully correlate with X-ray analysis data showing the dislocation density reduction after annealing by an order of magnitude (
Table 3). Additional HPT processing of the annealed structure leads to the increase in dislocation density and the decrease in coherent scattering regions (
Table 3). On the fracture surface (
Figure 5e,f) it expressed by plastic deformation. The fracture surface is smoother and more homogeneous compared to the other structural states of the material.
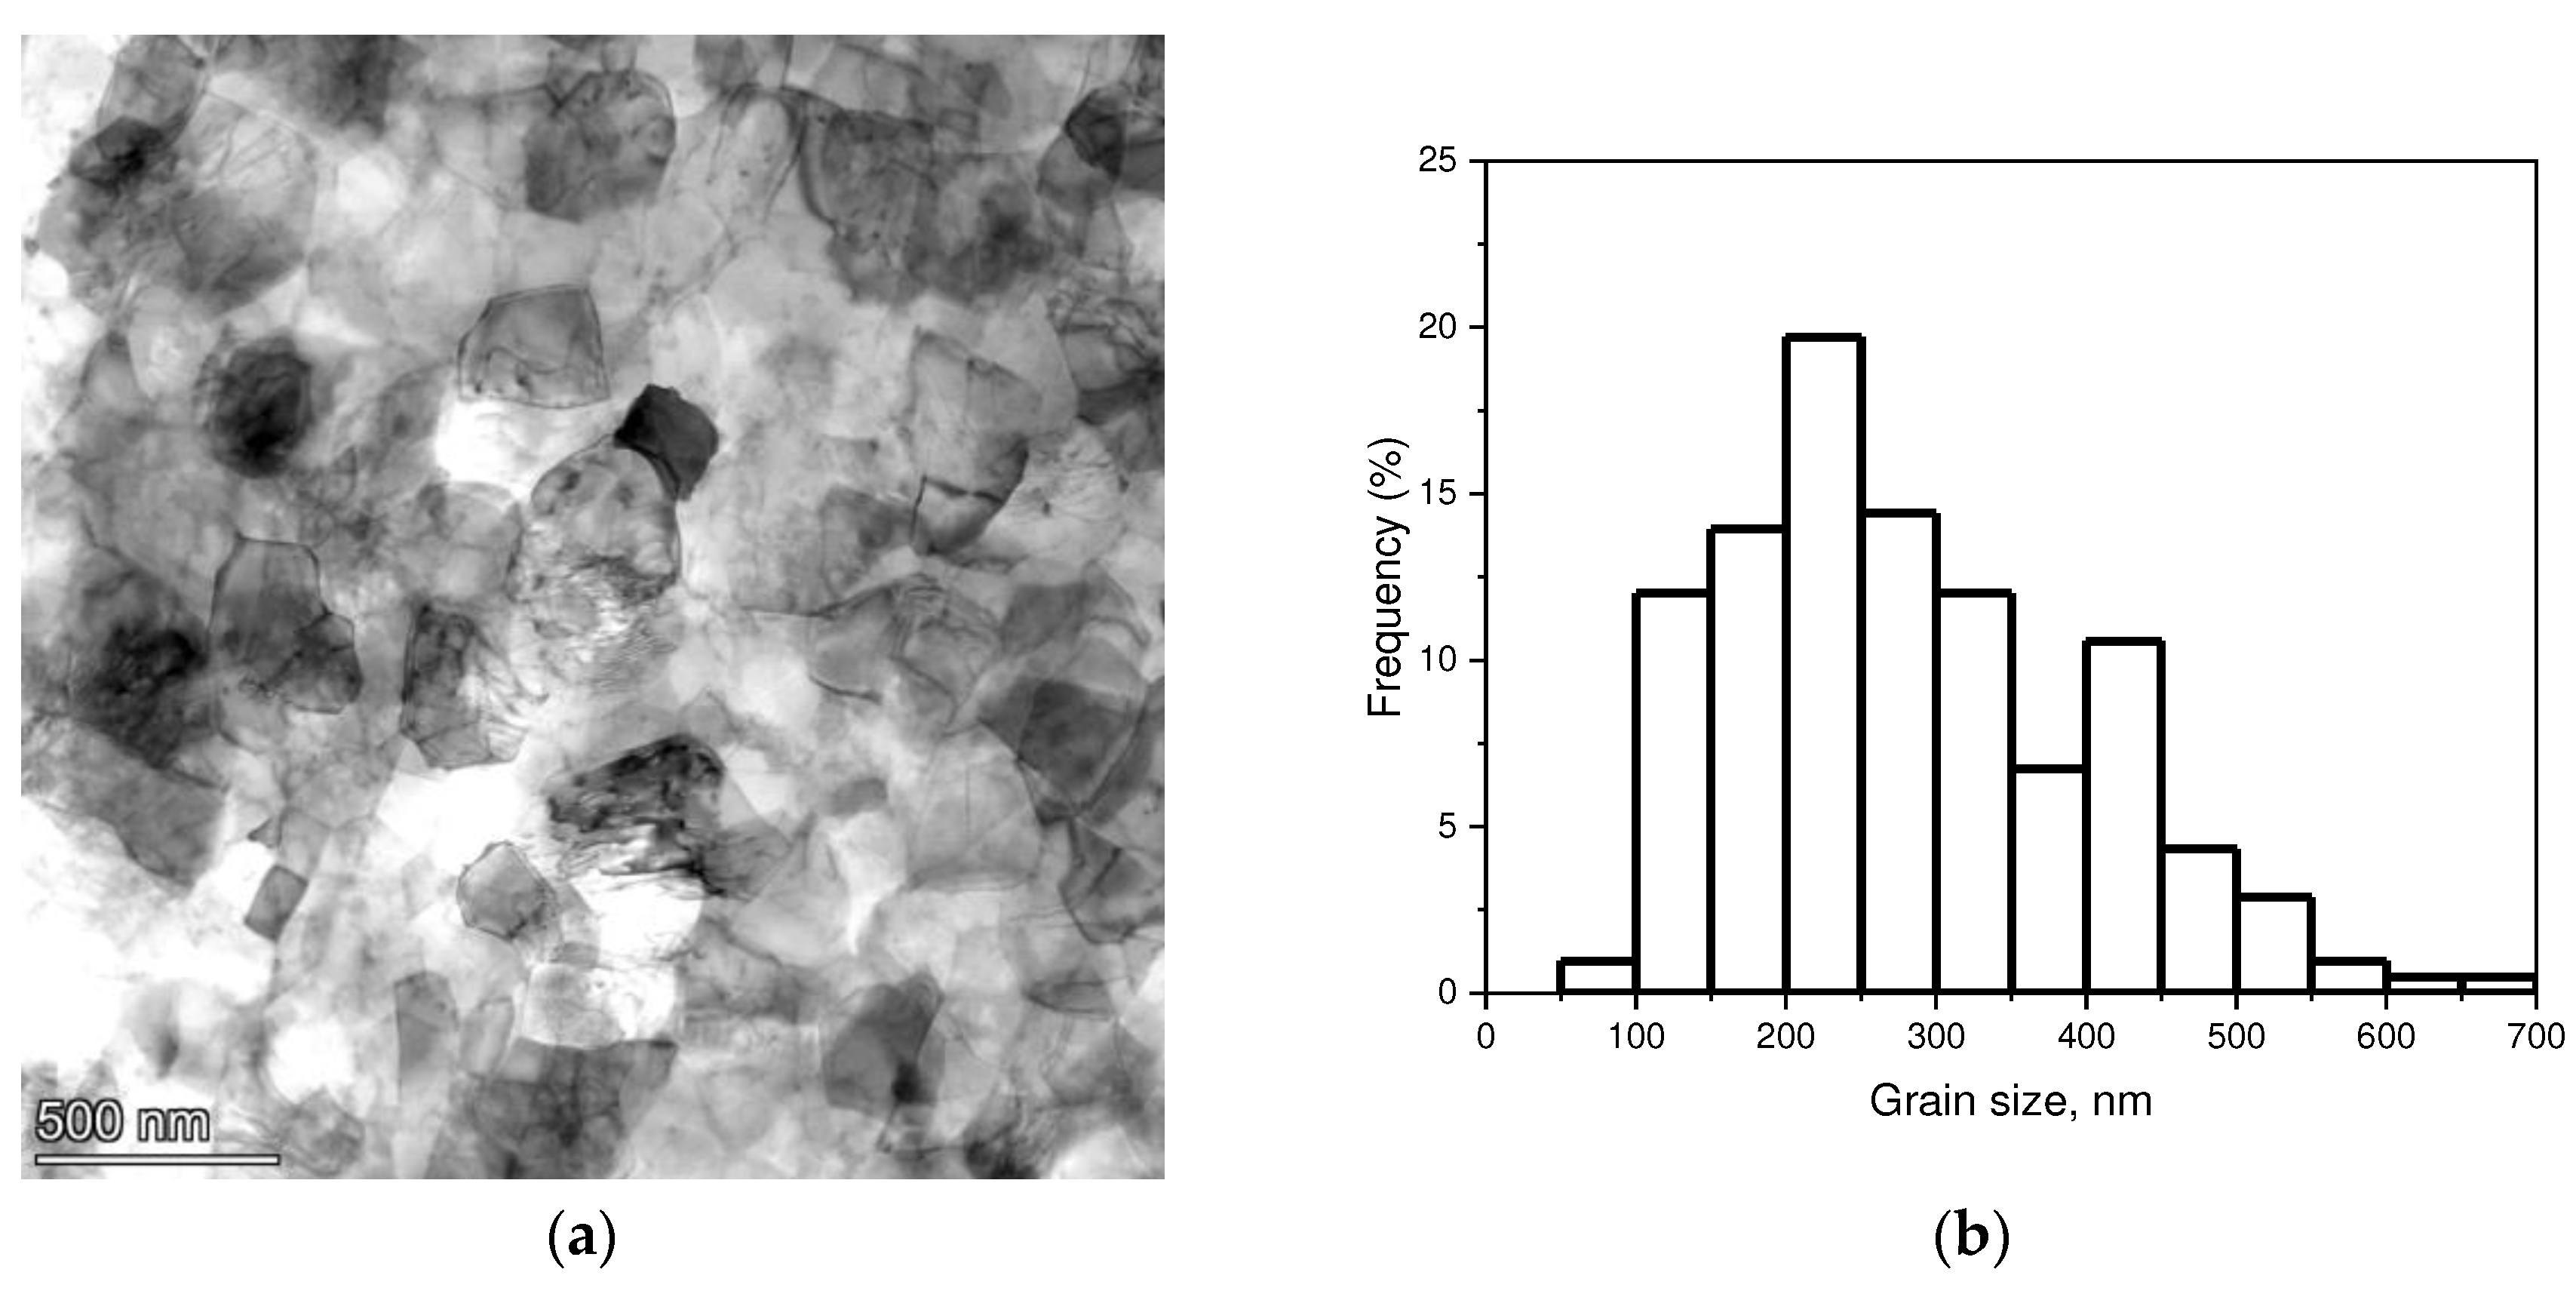
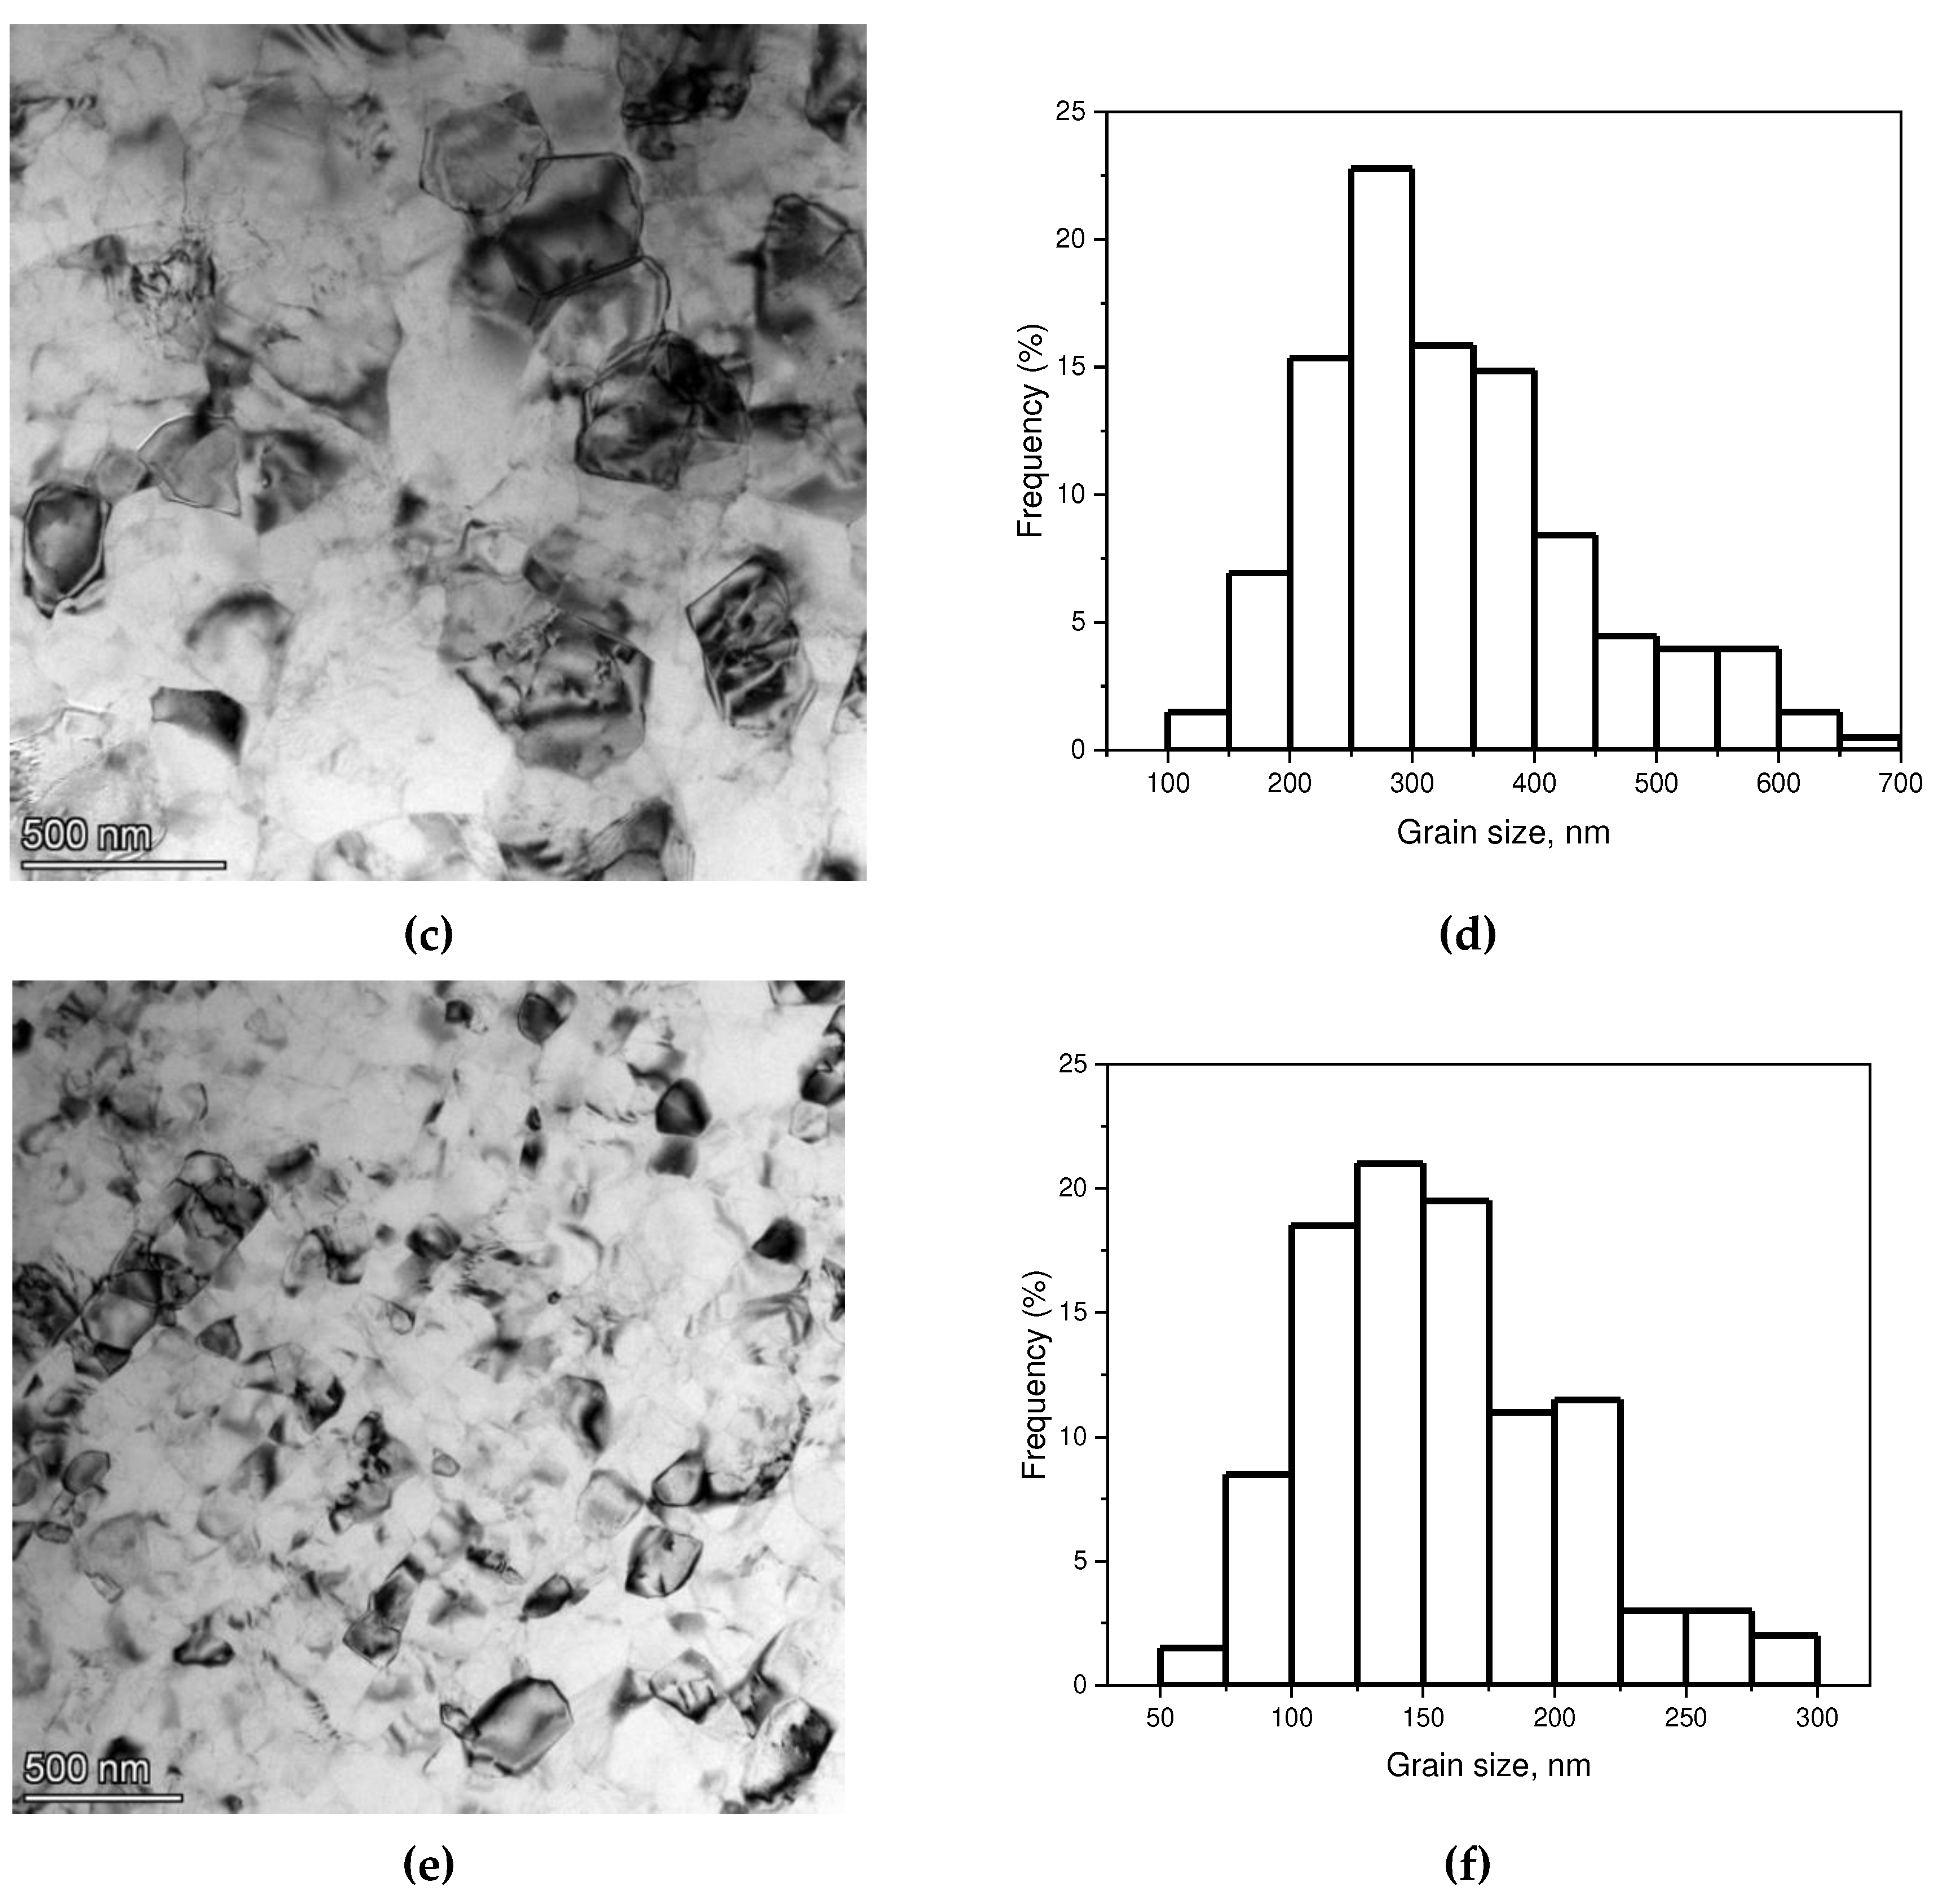
The TEM microstructure images of the composite in different structural states are shown in
Figure 6. As it can be seen ultrafine-grained structure with uniaxial grains is formed upon HPT processing (
Figure 6a). The average grain size determined on the basis of more than 100 measurements is d
av ≈ 285 nm which correlates with the size of coherent-scattering domains obtained by XRD analysis (
Table 3). Selected area electron diffraction pattern (the insert in
Figure 6a) reveals the high-angle misorientation of grains. The grain size has a normal distribution which is shown on
Figure 6b. After annealing at 250
oC, the average grain size and the distribution of grain size practically do not change (
Figure 6c,d). However, the results of the mechanical tests indicate reduced yield stress and ultimate tensile strength (
Table 2) after annealing. Such a drop in strength after annealing is typical for conventional coarse-grained metallic materials but usually accompanied by increased plasticity. The persistence of brittle behavior in our case may be associated with a decrease in the number of mobile dislocations during annealing as it was revealed by XRD analysis (
Table 3). Additional deformation by HPT to 0.25 of revolution results in grain refinement up to ~160 nm (
Figure 6e,
Table 3). The grain size distribution remains normal (
Figure 6d). According to the Hall-Petch ratio [
28,
29] such a grain refinement gives contribution to grain boundary strengthening Δσ
GB≈75 MPa. Dislocation density increasing gives additional contribution to yield stress Δσ
dis≈40 MPa caused by the action of dislocations strengthening mechanism [
30]. These two mechanisms provide practically the same strengthening as the experimentally observed increase in yield stress Δσ
0.2 ≈ 93 MPa. One of the main explanations of manifestation of plastic properties after additional HPT processing can be given on the bases of the model proposed earlier in [
31]. After additional deformation by HPT the deformation-induced dislocations are formed in a dislocation pile-ups in triple junctions of high-angle grain boundaries, increased plasticity occurs through the emission of lattice dislocations from triple junctions of grain boundaries, the glide of the lattice dislocations across neighboring grains, their accumulation at and climb along the opposite grain boundaries.
5. Conclusions
The results show the potential of combination wire arc additive manufacturing and high-pressure torsion technique for producing composite materials with high mechanical characteristics. The ultimate strength of the HPT-processed composite material can reach ~770 MPa. It's by ~ 3 times more than initial strength properties. However, the material exhibits low ductility, which is a limitation for many practical applications. It was found that deformation-heat treatment comprising short-term annealing at 250 oС and additional deformation by HPT to 0.25 of revolution at room temperature is an effective way to improve the ductility of the material while maintaining a high level of strength. The resulting material had a tensile strength of ~700 MPa, which was still 90% of the strength value after HPT processing, with a significant increase in ductility to approximately 9%.
The combination of sufficient ductility and high tensile strength was obtained by introducing of an additional dislocation density into the grain boundary or near grain boundary structure. The proposed approach suggests high potential for practical applications of the alloy studied and can be a universally effective way to achieve a combination of high strength and ductility for various UFG materials.
Author Contributions
A.M.: conceptualization, methodology, validation, analysis, supervision, writing—original draft, writing—review and editing. A.E.: investigation, data curation, visualization, XRD analysis and writing—original draft. D.V.: SEM and EDX analysis. M.G.: TEM analysis and editing. A.V.: participation in experimental work and visualization. O.Z.: participation in analysis and visualization. O.K.: conceptualization, analysis and writing—review and editing. All authors have read and agreed to the published version of the manuscript.
Funding
This research was funded by Russian Science Foundation, grant number 22-79-10043. WAAM printing technology was implemented as part of the World-class Research Center program: Advanced Digital Technologies (Contract no. 075-15-2022-312 dated 20 April 2022).
Data Availability Statement
The data presented in this study are available on request from the corresponding author.
Acknowledgments
The mechanical and structural studies were performed using the equipment of the Laboratory for Mechanics of Advanced Bulk Nanomaterials for Innovative Engineering Applications of St. Petersburg State University and the “Interdisciplinary Resource Center for Nanotechnology” and the “Centre for X-ray Diffraction Studies” of the Research Park of St. Petersburg State University.
Conflicts of Interest
The authors declare no conflict of interest.
References
- Ding, J.; Baumers, M.; Clark, E.A.; Wildman, R.D. The economics of additive manufacturing: Towards a general cost model including process failure. Int. J. Production Economics 2021, 237, 108087. [CrossRef]
- Zhu, Y.; Valiev, R.Z.; Langdon, T.G.; Tsuji, N.; Lu, K. Processing of nanostructured metals and alloys via plastic deformation. MRS Bulletin 2010, 35, 977–981. [CrossRef]
- Estrin, Y.; Vinogradov, A. Extreme grain refinement by severe plastic deformation: A wealth of challenging science. Acta Mater. 2013, 61, 782–817. [CrossRef]
- Langdon, T.G. Twenty-five years of ultrafine-grained materials: Achieving exceptional properties through grain refinement. Acta Mater. 2013, 61, 7035–7059. [CrossRef]
- Sabirov, I.; Murashkin, M.Yu.; Valiev, R.Z. MSEA 2013, 560, 1–24. [CrossRef]
- Kawasaki, M.; Langdon, T.G. Review: achieving superplasticity in metals processed by high-pressure torsion. J. Mater. Sci. 2014, 49, 6487–6496. [CrossRef]
- Duchaussoy, A.; Sauvage, X.; Edalati, K.; Horita, Z.; Renou, G.; Deschamps, A.; De Geuser, F. Structure and mechanical behavior of ultrafine-grained aluminum-iron alloy stabilized by nanoscaled intermetallic particles. Acta Mater. 2019, 167, 89–102. [CrossRef]
- Talebanpour, B.; Ebrahimi, R.; Janghorban, K. Microstructural and mechanical properties of commercially pure aluminum subjected to dual equal channel lateral extrusion. MSEA 2009, 527, 141–145. [CrossRef]
- Sabirov, I.; Murashkin, M.Yu.; Valiev, R.Z. Nanostructured aluminium alloys produced by severe plastic deformation: New horizons in development. MSEA 2013, 560: 1–24. [CrossRef]
- Mavlyutov, A.M.; Bondarenko, A.S.; Murashkin, M.Y.; Boltynjuk, E.V.; Valiev, R.Z.; Orlova, T.S. Effect of annealing on microhardness and electrical resistivity of nanostructured SPD aluminium. Jour. Alloys Comp. 2017, 698, 539–546. [CrossRef]
- Mavlyutov, A.M.; Kasatkin, I.A.; Murashkin, M.Yu.; Valiev, R.Z.; Orlova, T.S. Influence of the microstructure on the physicomechanical properties of the aluminum alloy Al–Mg–Si nanostructured under severe plastic deformation. Phys. Solid State 2015, 57, 2051–2058. [CrossRef]
- Huang, X.; Hansen, N.; Tsuji, N. Hardening by annealing and softening by deformation in nanostructured metals. Science 2006, 312, 249–251. [CrossRef]
- Kamikawa, N.; Huang, X.; Tsuji, N.; Hansen, N. Strengthening mechanisms in nanostructured high-purity aluminium deformed to high strain and annealed. Acta Mater. 2009, 57, 4198–4208. [CrossRef]
- Mavlyutov, A.M.; Latynina, T.A.; Murashkin, M.Yu.; Valiev, R.Z.; Orlova, T.S. Effect of annealing on the microstructure and mechanical properties of ultrafine-grained commercially pure Al. Phys. Solid State. 2017, 59, 1970–1977. [CrossRef]
- Valiev, R.Z.; Alexandrov, I.V.; Zhu, Y.T.; Lowe, T.C. Paradox of Strength and Ductility in Metals Processed by Severe Plastic Deformation. Jour. Mater. Res. 2002, 17, 5–8. [CrossRef]
- Mondolfo, L.F. Aluminum alloys: structure and properties. Elsevier, 2013.
- Aluminum Association. Aluminum: properties and physical metallurgy. ASM International, 1984.
- Kalsar, R.; Yadav, D.; Sharma, A.; Brokmeier, H.G.; May, J.; Höppel, H.W.; Skrotzki, W.; Suwas, S. Effect of Mg content on microstructure, texture and strength of severely equal channel angular pressed aluminium-magnesium alloys. MSEA 2020, 797, 140088. [CrossRef]
- Liu, M.P.; Roven, H.J.; Murashkin, M.Yu.; Valiev, R.Z.; Kilmametov, A.; Zhang, Z.; Yu, Y. Structure and mechanical properties of nanostructured Al-Mg alloys processed by severe plastic deformation. J. Mater. Sci. 2013, 48, 4681–4688. [CrossRef]
- Liu, Y.; Liu, M.; Chen, X.; Cao, Y.; Roven, H.J.; Murashkin, M.; Zhou, H. Effect of Mg on microstructure and mechanical properties of Al-Mg alloys produced by high pressure torsion. Scr. Mater. 2019, 159, 137–141. [CrossRef]
- Xu, W.; Zhang, B.; Du, K.; Li, X.Y.; Lu, K. Thermally stable nanostructured Al-Mg alloy with relaxed grain boundaries. Acta Mater. 2022, 226, 117640. [CrossRef]
- Snopiński, P.; Tański, T. Thermal stability and microstructure evolution of ultra-fine grained Al-Mg alloy. IOP Conference Series: Mater. Sci. Eng. 2018, 461, 012085. [CrossRef]
- Konstantinov, I.L., Baranov, V.N., Sidelnikov, S.B.; Kulikov, B.P.; Bezrukikh, A.I.; Frolov, V.F.; Orelkina, T.A.; Voroshilov, D.S.; Yuryev, P.O.; Belokonova, I.N. Investigation of the structure and properties of cold-rolled strips from experimental alloy 1580 with a reduced scandium content. Int. J. Adv. Manuf. Technol. 2020, 109, 443–450. [CrossRef]
- Konstantinov, I.L.; Baranov, V.N.; Sidelnikov, S.B.; Zenkin, E.Y.; Yuryev, P.O.; Belokonova, I.N. Influence of Rolling and Annealing Modes on Properties of Sheet Semifinished Products Made of Wrought Aluminum Alloy 1580. Russ. J. Non-ferrous Metals 2020, 61, 641–645. [CrossRef]
- Johansen, A. Microstructures and properties of aluminium-magnesium alloys with additions of manganese, zirconium and scandium. Trondheim: Norwegian University of Science and Technology 2000. 230 p.
- Zhilyaev, A.P.; Langdon, T.G. Using high-pressure torsion for metal processing: Fundamentals and applications. Prog. Mater. Sci. 2008, 53, 893–979. [CrossRef]
- Williamson, G.K.; Smallman, R.E. III. Dislocation densities in some annealed and cold-worked metals from measurements on the X-ray debye-scherrer spectrum. Philos. Mag. 1956, 1, 34–46. [CrossRef]
- Hall, E.O. The Deformation and Ageing of Mild Steel: III Discussion of Results. Proc. Phys. Soc. B 1951, 64, 747. [CrossRef]
- Petch, N.J. The orientation relationships between cementite and α-iron. Acta Cryst. 1953, 6, 96–96. [CrossRef]
- Hansen, N.; Huang, X. Microstructure and flow stress of polycrystals and single crystals. Acta Mater. 1998, 46, 1827–1836. [CrossRef]
- Orlova, T.S.; Skiba, N.V.; Mavlyutov, A.M.; Murashkin, M.Y.; Valiev, R.Z.; Gutkin, M.Y. Hardening by annealing and implementation of high ductility of ultra-fine grained aluminum: experiment and theory. Rev. Adv. Mater. Sci. 2018, 57, 224–240. [CrossRef]
Figure 2.
Photo of the WAAM sample (a) and schematic representation of the dog-bone samples for mechanical tests (b)
Figure 2.
Photo of the WAAM sample (a) and schematic representation of the dog-bone samples for mechanical tests (b)
Figure 3.
Stress-strain diagrams of composite in initial state, after HPT processing, after HPT processing and annealing at 250 oС for 1 h, after HPT processing, annealing at 250 oС for 1 h and additional HPT deformation to 0.25 revolutions.
Figure 3.
Stress-strain diagrams of composite in initial state, after HPT processing, after HPT processing and annealing at 250 oС for 1 h, after HPT processing, annealing at 250 oС for 1 h and additional HPT deformation to 0.25 revolutions.
Figure 4.
The dependences of ultimate tensile strength (), yield stress (), and elongation to failure (δ) on the annealing temperature for the composite samples, subjected to HPT, subsequent annealing and additional deformation by HPT to 0.25 of revolution.
Figure 4.
The dependences of ultimate tensile strength (), yield stress (), and elongation to failure (δ) on the annealing temperature for the composite samples, subjected to HPT, subsequent annealing and additional deformation by HPT to 0.25 of revolution.
Figure 5.
Fracture surface of the composite after HPT processing (a, b), after HPT processing and annealing at 250 oС for 1 h (c, d), after HPT processing, annealing at 250 oС for 1 h and additional HPT deformation to 0.25 revolutions (e, f).
Figure 5.
Fracture surface of the composite after HPT processing (a, b), after HPT processing and annealing at 250 oС for 1 h (c, d), after HPT processing, annealing at 250 oС for 1 h and additional HPT deformation to 0.25 revolutions (e, f).
Figure 6.
TEM micrographs of the composite after HPT processing (a), subsequent annealing at 250 oC (c) and addition deformation by HPT to 0.25 of revolution (e) and corresponding grain size distribution (b), (d) and (f).
Figure 6.
TEM micrographs of the composite after HPT processing (a), subsequent annealing at 250 oC (c) and addition deformation by HPT to 0.25 of revolution (e) and corresponding grain size distribution (b), (d) and (f).
Table 1.
Chemical composition of 5056 Al-Mg, 1580 Al-Mg(Sc) alloys manufactured by WAAM method and the HPT-processed composite according to EDX analysis. The concentration is given in wt.%.
Table 1.
Chemical composition of 5056 Al-Mg, 1580 Al-Mg(Sc) alloys manufactured by WAAM method and the HPT-processed composite according to EDX analysis. The concentration is given in wt.%.
| Material |
Mg |
Mn |
Sc |
Fe |
Ti |
Cr+V+Zn |
Al |
| 5056 alloy |
4.94 |
0.14 |
- |
0.09 |
0.14 |
<0.05 |
bal. |
| 1580 alloy |
4.61 |
0.55 |
0.08 |
0.17 |
0.1 |
<0.05 |
bal. |
| HPT-processed composite |
4.66 |
0.27 |
0.03 |
0.11 |
0.12 |
<0.05 |
bal. |
Table 2.
Mechanical properties of the composite in different structural states. σ0.2 is the yield stress, corresponding to 0.2% of deformation, σUTS is the ultimate tensile strength, δ is the relative elongation to failure, δ1 is the relative uniform elongation.
Table 2.
Mechanical properties of the composite in different structural states. σ0.2 is the yield stress, corresponding to 0.2% of deformation, σUTS is the ultimate tensile strength, δ is the relative elongation to failure, δ1 is the relative uniform elongation.
| Composite material state |
σ0.2,
MPa |
σUTS,
MPa |
δ,
% |
δ1,
% |
| Initial composite |
132±2 |
265±5 |
21±2 |
21±2 |
| HPT |
676±1 |
770±2 |
~0.5 |
~0.5 |
| HPT + annealing at 200 oС |
– |
611±5 |
– |
– |
| HPT + annealing at 250 oС |
497±2 |
504±5 |
~0.2 |
~0.2 |
| HPT + annealing at 200 oС + HPT to 0.25 of revolution |
621±2 |
667±2 |
~1 |
~1 |
| HPT + annealing at 225 oС + HPT to 0.25 of revolution |
654±2 |
733±3 |
~2 |
~2 |
| HPT + annealing at 250 oС + HPT to 0.25 of revolution |
590±1 |
700±3 |
9±1 |
~3 |
| HPT + annealing at 275 oС + HPT to 0.25 of revolution |
603±2 |
666±3 |
10±1 |
~2 |
Table 3.
Microstructure parameters of the composite in different structural states. C is the size of coherent-scattering domains, 1/2 is the elastic microdistortions level, Ldis is the dislocation density, dav is the average grain size.
Table 3.
Microstructure parameters of the composite in different structural states. C is the size of coherent-scattering domains, 1/2 is the elastic microdistortions level, Ldis is the dislocation density, dav is the average grain size.
| Composite material state |
C,
nm |
1/2
|
·1013,
m-2
|
dav,
nm |
| HPT |
300 |
0.0013 |
5.2 |
285 |
| HPT + annealing at 250 oC |
470 |
0.0002 |
0.4 |
330 |
| HPT + annealing at 250 oC + HPT to 0.25 of revolution |
200 |
0.0010 |
6.0 |
160 |
|
Disclaimer/Publisher’s Note: The statements, opinions and data contained in all publications are solely those of the individual author(s) and contributor(s) and not of MDPI and/or the editor(s). MDPI and/or the editor(s) disclaim responsibility for any injury to people or property resulting from any ideas, methods, instructions or products referred to in the content. |
© 2023 by the authors. Licensee MDPI, Basel, Switzerland. This article is an open access article distributed under the terms and conditions of the Creative Commons Attribution (CC BY) license (http://creativecommons.org/licenses/by/4.0/).
