1. Introduction
Semiconductor survey meters are more sensitive, fast-responding, compact, and lightweight than ionization chamber survey meters. They are also less affected by atmospheric pressure and humidity; so, they are widely used in the nuclear, medical, and industrial fields [
1,
2,
3]. Thanks to their high sensitivity, fast response, small size, and light weight, they are considered useful for measuring weak leakage radiation; however, they are highly energy- and temperature-dependent [
4,
5,
6,
7]. Therefore, it is difficult to make a correct assessment of leakage radiation unless the survey meter is traceable and has been calibrated and valued in the radiation reference field described below.
JIS Z 4511
-2018 is a Japanese Industrial Standard based on ISO 4037-1
-1996, ISO 4037-2
-1997, ISO 4037-3
-1999, and ISO 4037-4
-2004, with the technical content modified according to the conditions of use in Japan. It stipulates the setting of the air kerma standard field, the method of calibrating the dose equivalent (rate) measuring device used for the radiation protection field and personal monitoring, and the test method of the response to photon energy and the radiation incident angle [
8,
9,
10,
11,
12]. The standard also applies to air-absorbed dose (rate), air kerma (rate), and irradiation dose (rate) measuring instruments.
The calibration of survey meters used in radiation therapy and nuclear medicine facilities in the medical field is usually performed with 662 keV γ-rays emitted from 137Cs sources. However, leaked X-rays in the general radiographic X-ray region have a narrow spectrum of about 60 keV to 120 keV, which is 1/5 to 1/10 of the energy of 137Cs sources. To rephrase, semiconductor survey meters need to be calibrated with radiation qualities equivalent to N-60 to N-120 of the N-series in JIS Z 4511-2018 because the lower the energy, the stronger the energy dependence.
Comparing the number of calibration facilities and the number of survey meters, the latter is overwhelmingly large; so, the time and expense required for calibration cannot be overlooked. The X-ray equipment recommended by JIS Z 4511-2018 is an industrial X-ray equipment; however, if the N-series can be reproduced on the medical X-ray equipment installed in medical facilities, it will be possible to check and calibrate survey meters that have already been calibrated. However, it has not been clarified whether or not it is possible to calculate the time constants of semiconductor survey meters and calibrate them using medical X-ray equipment.
In this study, we sought to determine whether it is possible to reproduce the radiation quality of N-60 to N-120 using a medical X-ray system and whether it is possible to calculate the time constant and calibrate a semiconductor survey meter.
2. Materials and Methods
2.1. Equipment Used
The medical X-ray system will be UD150B-40 (Shimadzu), and the semiconductor survey meter will be RaySafe452 (Fluke Biomedical). EMF520R (EMF Japan)(checked in June 2020 ) will be used as the electrometer, a one-liter chamber for the reference dosimeter: TN32002 (PTW)(calibrated in June 2020 ), and copper(Cu), aluminum(Al), and tin(Sn) plates (with a purity of at least 99.9% for each material) will be used for additional filters. The RaySafe452 was calibrated in October 2021 using a 137Cs source and radiation quality of N-100 .
2.2. Evaluation of Continuous X-ray Standard Fields
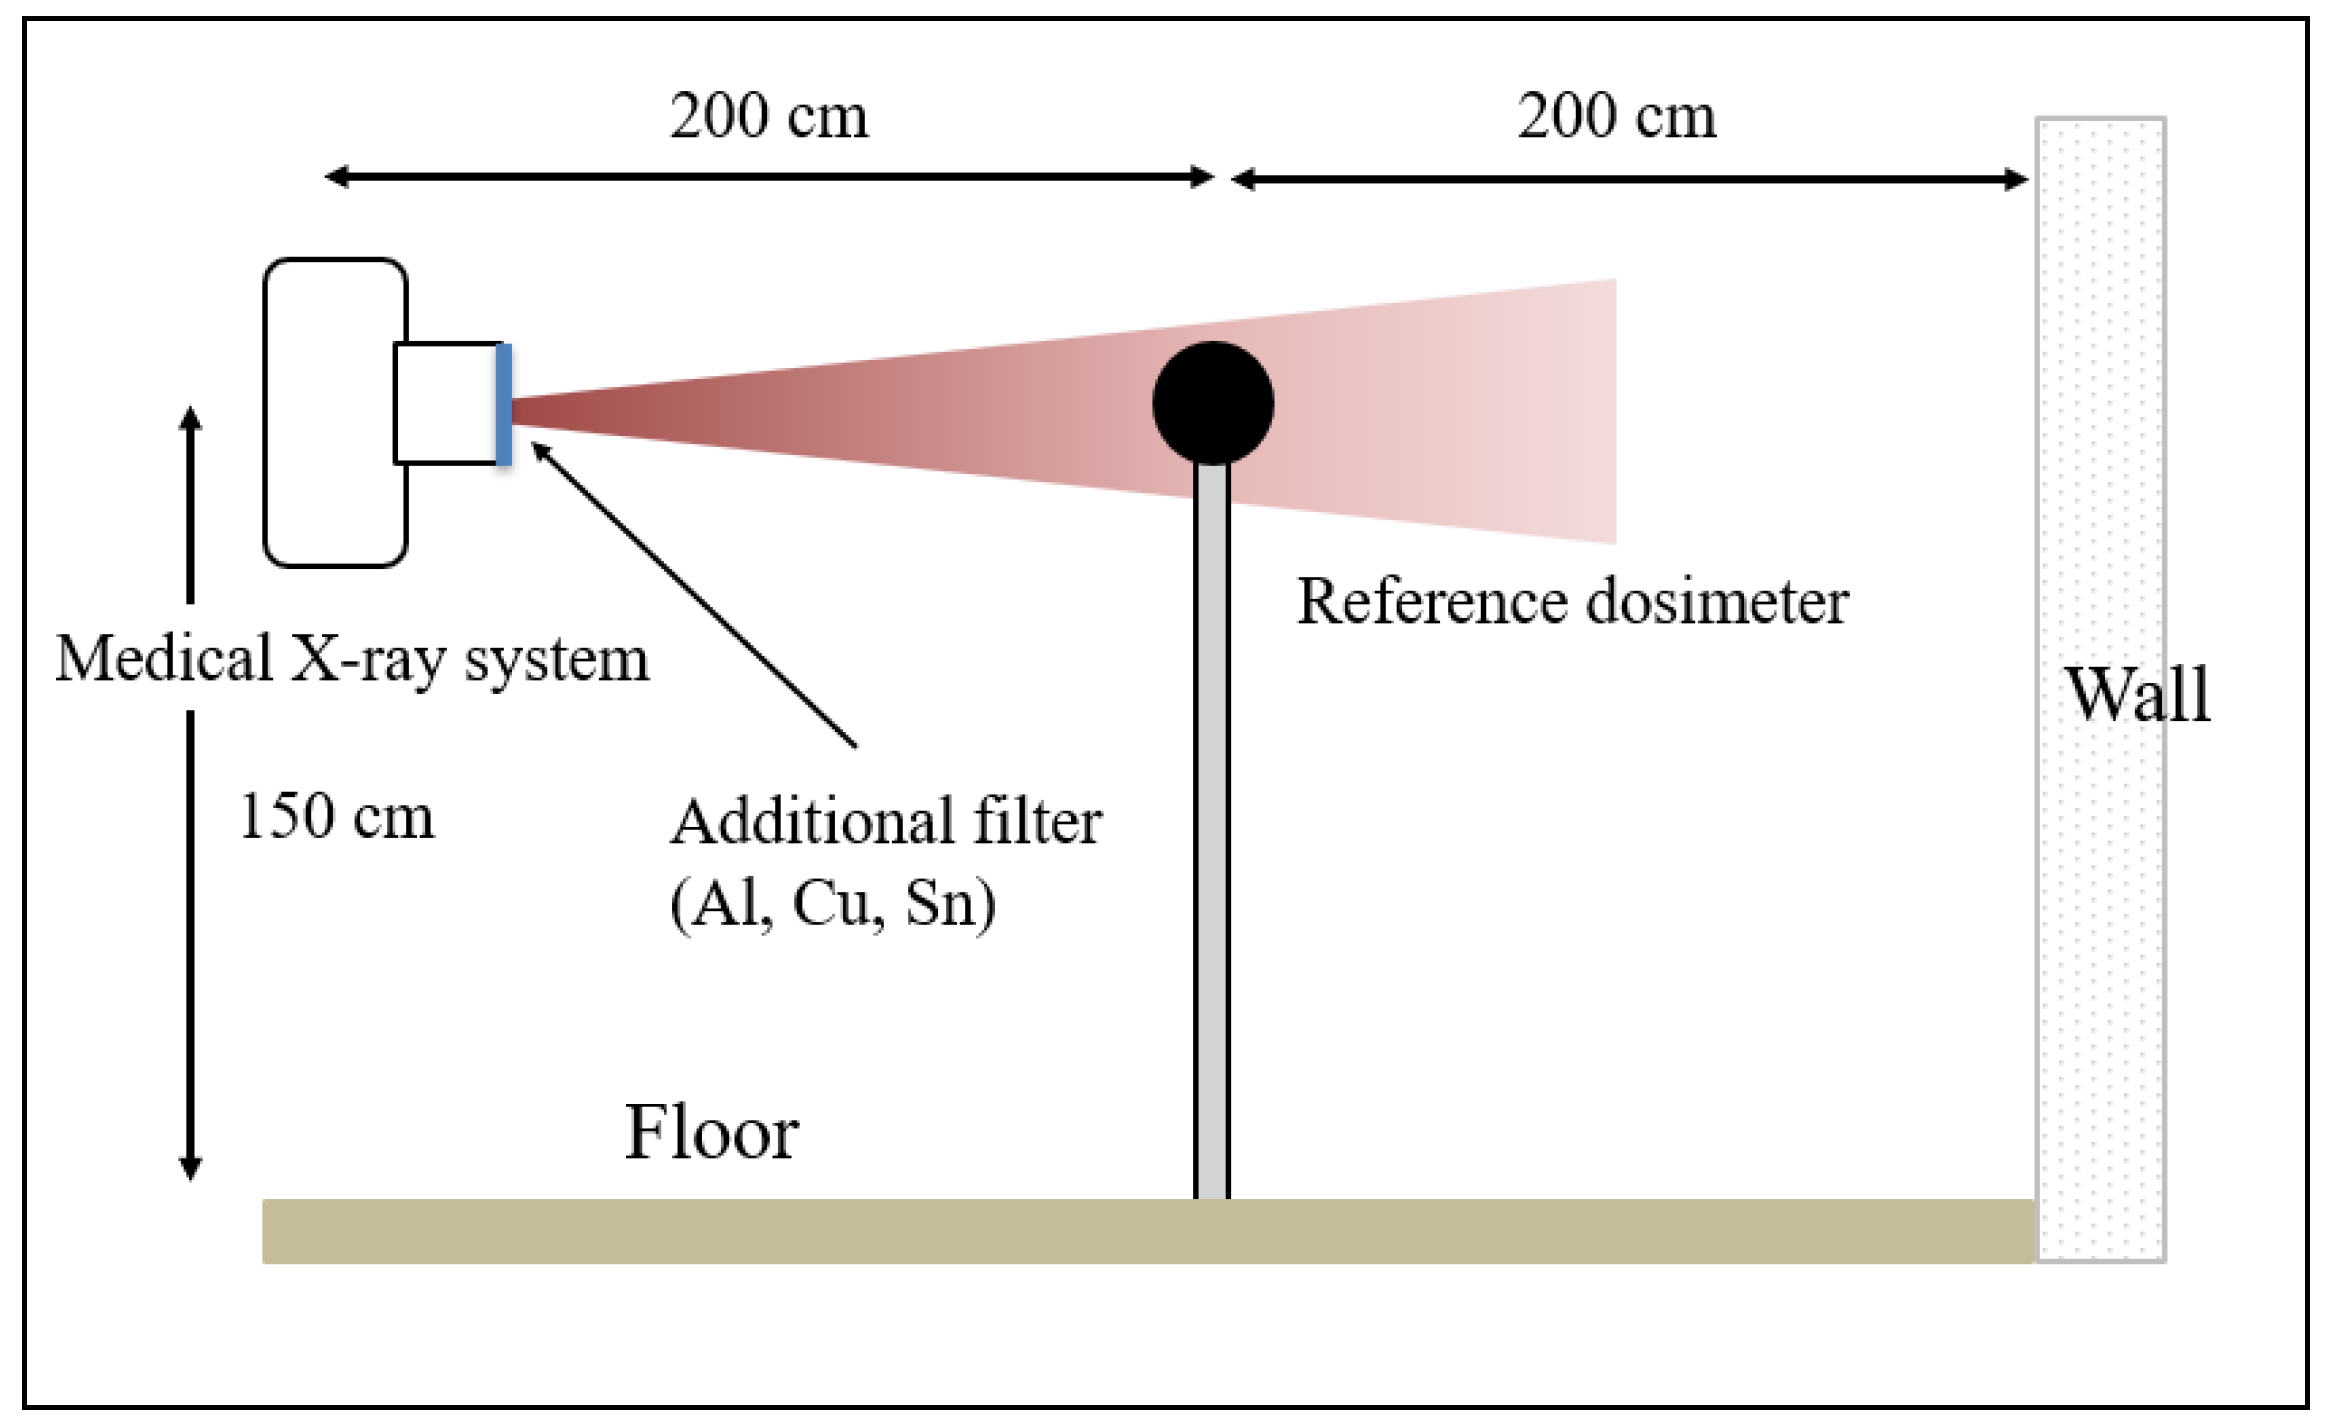
To verify whether it is possible to create the N-60 to N-120 radiation quality with a medical X-ray system, we set up an experimental system as shown in
Figure 1, referring to JIS Z 4511
-2018 [
8]. Since the total filtration of the medical X-ray device used is 3.7 mm Al, Al, Cu, and Sn plates are placed as additional filters according to the N-60 to N-120 standard. Based on this state, Cu plates are sequentially added, and attenuation curves are created from the measured values to obtain the first half-value layer (
HVL1) and the second half-value layer (
HVL2) (mm Cu). We used the following X-ray irradiation conditions: tube current: 100 mA, irradiation time: 2.0 s, large focus, and the measurement values were averaged over five measurements to minimize the measurement error. Equation (1) is used to calculate
HVL1, and Eq. (2) is used for
HVL2 [
13]. These values are compared to the reference values of N-60 to N-120.
I0: Measured value when irradiated without a Cu plate
I1 (I3): Measured value when slightly larger than I0/2 (I0/4).
I2 (I4): Measured value when slightly less than I0/2(I0/4).
t1 (t3): Thickness of Cu plate when I1(I3) is measured.
t2 (t4): Thickness of Cu plate when I2(I4) is measured.
2.3. Calculation of Time Constants for Semiconductor Survey Meters
It is said that a measurement time of 3 to 4 times the time constant is desirable for accurate measurement with a survey meter. However, X-ray imaging in the diagnostic field is a short exposure. Therefore, it is necessary to measure leaked X-rays in a very short time, and it is not possible to secure a measurement time that is 3 to 4 times the time constant.
Therefore, we devised a method of calculating the time constant by calculation. The indicated value of the survey meter is 1-exp(-
t/
T) [
14] with respect to the final indicated value, where
t is the measurement time and
T is the time constant. Therefore, if
x is the measured value at time
t and
X is the final indicated value, it can be expressed as the following equation.
By transforming Equation (3), the time constant T can be expressed as the following equation.
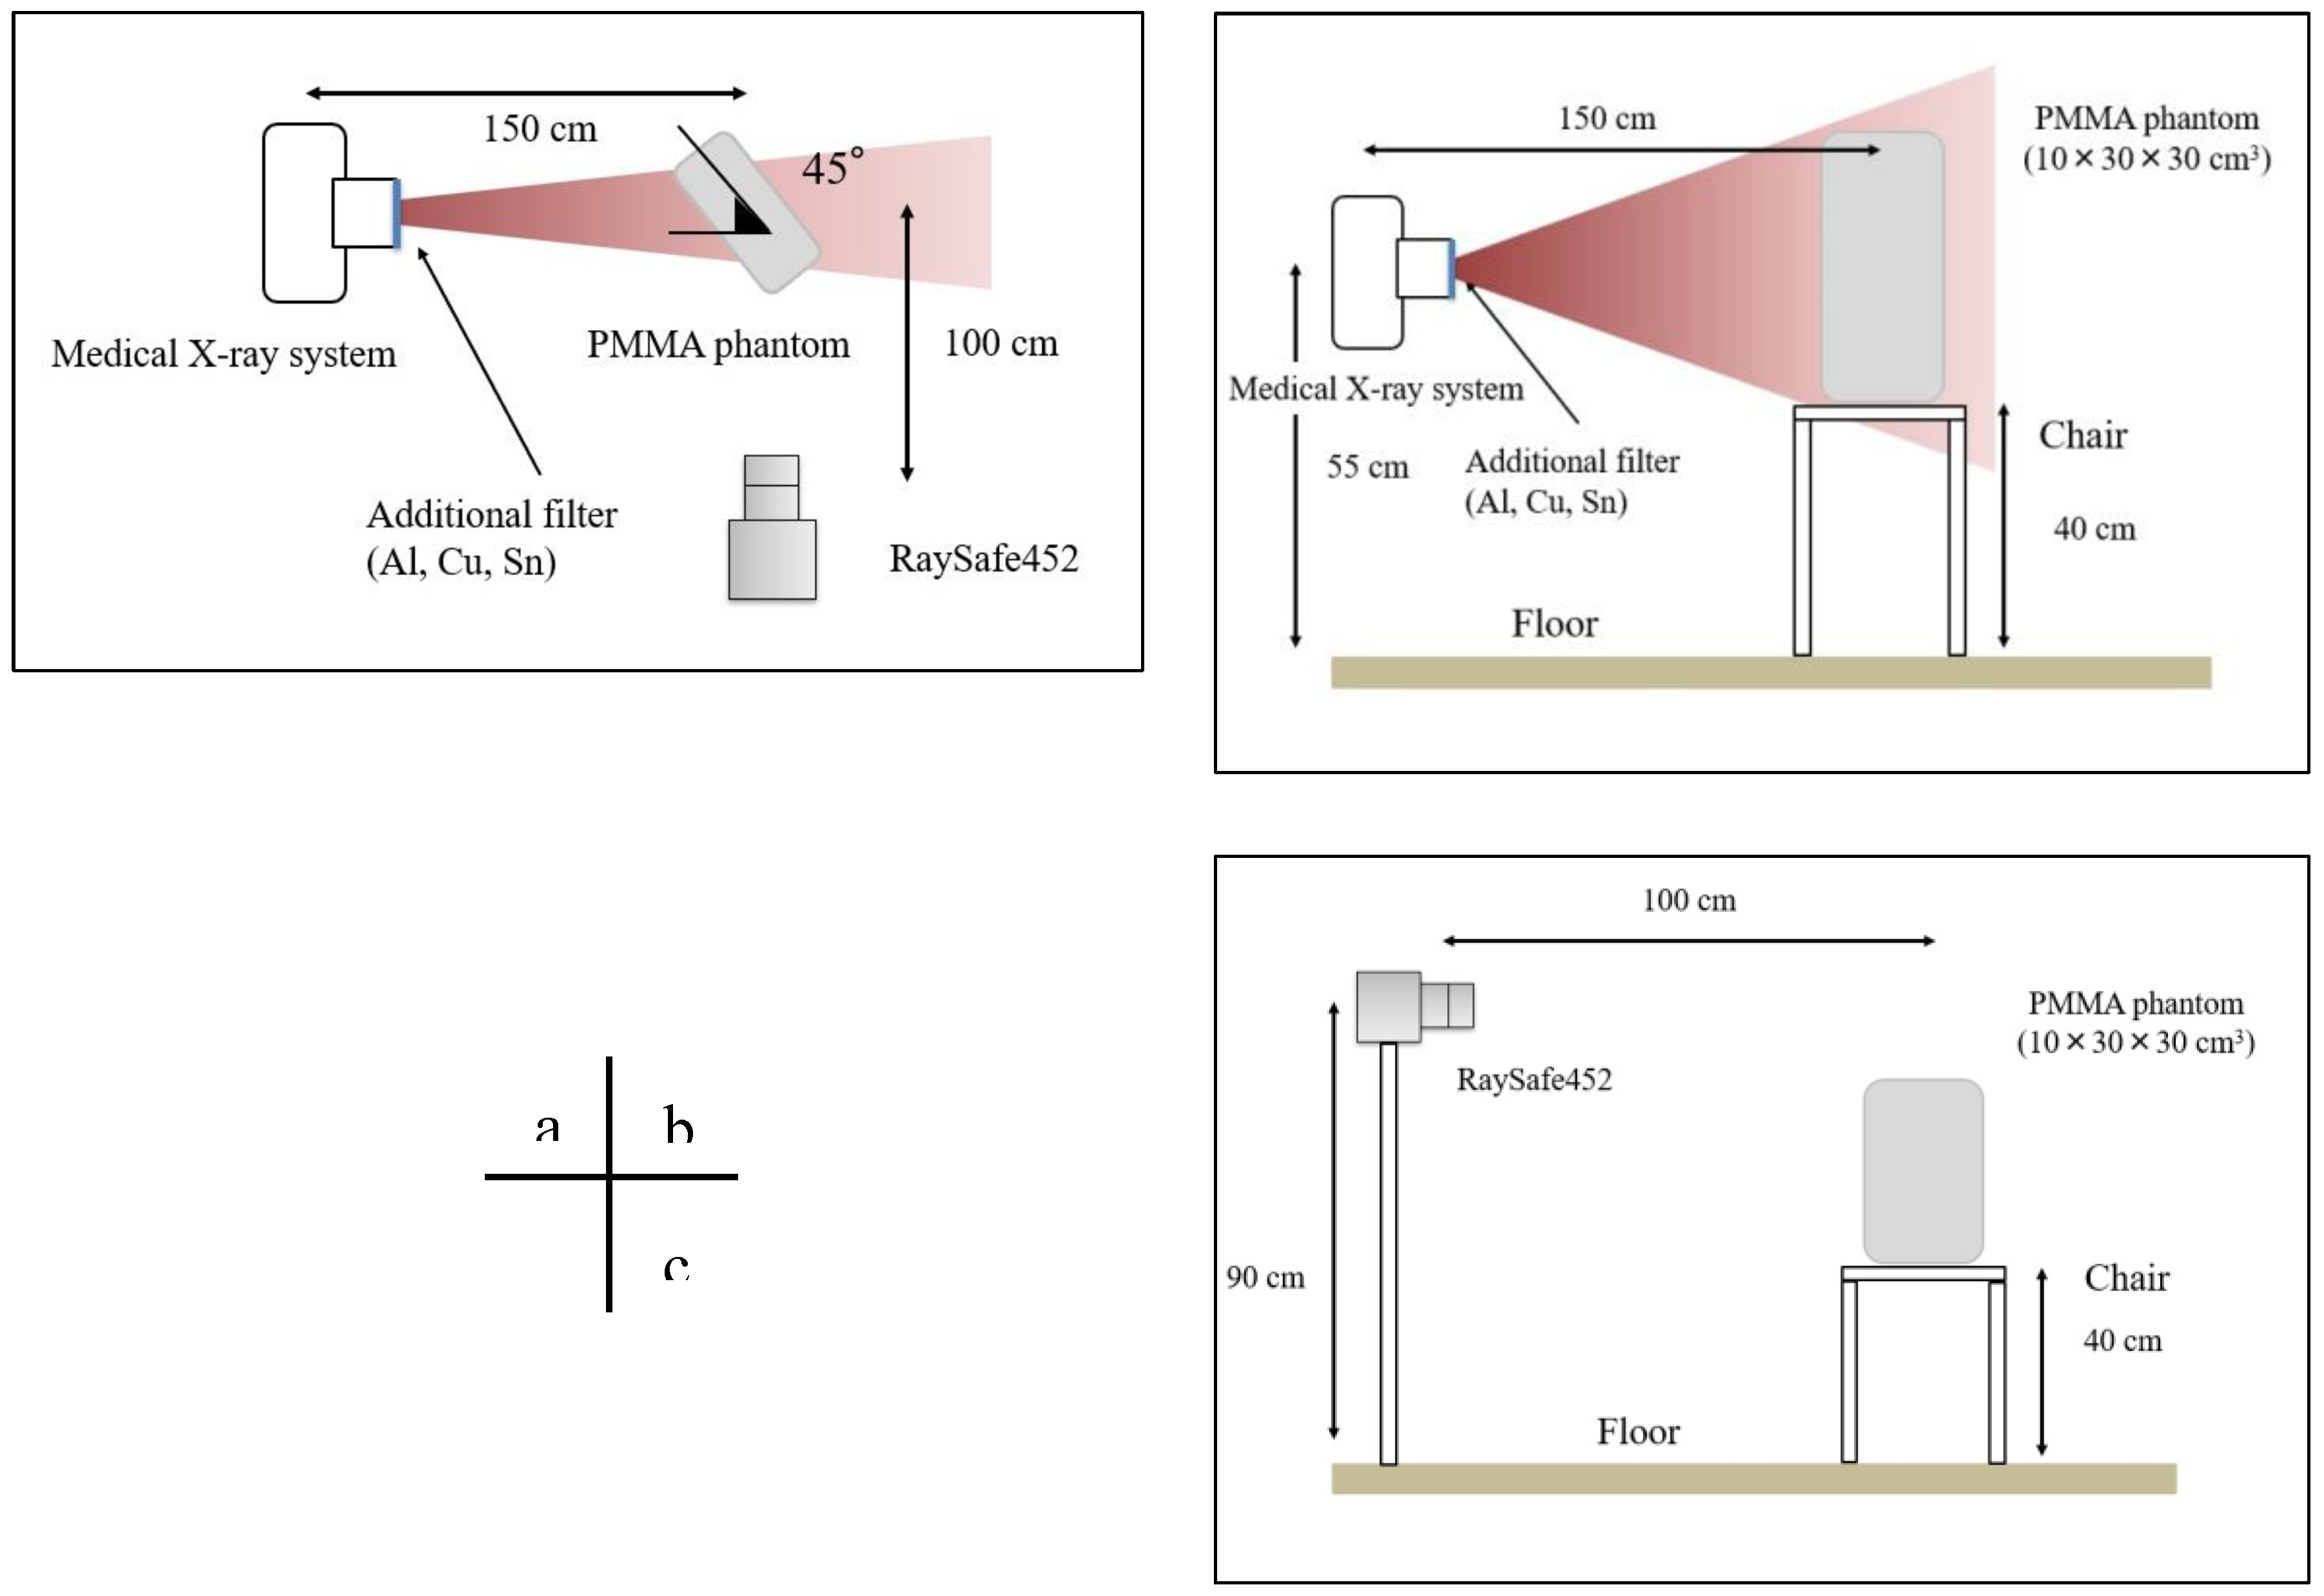
The time constant calculated from the calculation can be expressed as in order to verify the agreement between the calculated time constants and the measured values, a system similar to that shown in
Figure 2 was established assuming actual leakage X-ray measurements. In this system, the irradiation time was varied from N-60 to N-120 from 0.20, 0.28, 0.36, 0.50, 0.63, 0.80, 1.0, 1.2, 1.6, 2.0, and 2.5 s, and the measured values were compared with the measured values. The largest measured value is used as
X. Although the time constant can be obtained by extracting only one measurement point from each irradiation time, the calculation result is expected to differ greatly depending on the extracted measurement point because the indicated value of the survey meter is 1-exp(-
t/
T)[
14] with respect to the final indicated value. Therefore, the average value of the calculation result of Equation (4) at each irradiation time is used as the time constant. Measurements are taken 10 times, and the average value is calculated after excluding outliers using the interquartile range. For irradiation durations of 1.6 seconds or longer, the measured value was stable, so the average value of five measurements is used, taking into account the load on the X-ray tube.
2.4. Calibration of Semiconductor Survey Meters
To verify whether it is possible to calibrate a semiconductor survey meter with a medical X-ray system, a survey meter is installed in the same position as in the experimental system shown in
Figure 1. There are several methods for calibrating survey meters, but in this study, the substitution method is used to reduce the calibration uncertainty [
15]. The same irradiation conditions as in 2.2 are used, and the measured value is the average of five measurements to reduce the measurement error. The calibration factor (CF) is calculated from the results of this study and 2.2 using Equation (5) and compared with the energy characteristics of RaySafe452. In addition, since the measured value of the 1L chamber is mGy/2s, it is converted to mSv/h, which is the unit of the measured value of RaySafe452. The relative expanded uncertainty of the calibration for each of N-60 to N-120 is also calculated [
16,
17].
NA: Measured value for 1 L chamber
NB: Measured value for RaySafe452
h*K: Air kerma-dose equivalent conversion coefficient
CA: Tube current for 1 L chamber measurement
CB: Tube current for RaySafe452 measurement
DA: Source-to-detector distance when measuring in 1 L chamber
DB: Source-to-detector distance when measuring in RaySafe452
dies involving animals or humans, and other studies that require ethical approval, must list the authority that provided approval and the corresponding ethical approval code.
3. Results
3.1. Evaluation of Continuous X-ray Standard Fields
Table 1 shows the comparison between the measured values in this study and the reference values for N-60 to N-120. The results show that
HVL1 and
HVL2 in the measured values of this study slightly differ from the reference value of N-60 to N-120 but the difference is at most 1.92% and within ±5%; so, they can be regarded as the same radiation quality [
8]. Therefore, it is clear that the radiation quality of N-60 to N-120 can be reproduced using a medical X-ray system.
3.2. Evaluation of the Calculation of time Constants for Semiconductor Survey Meters
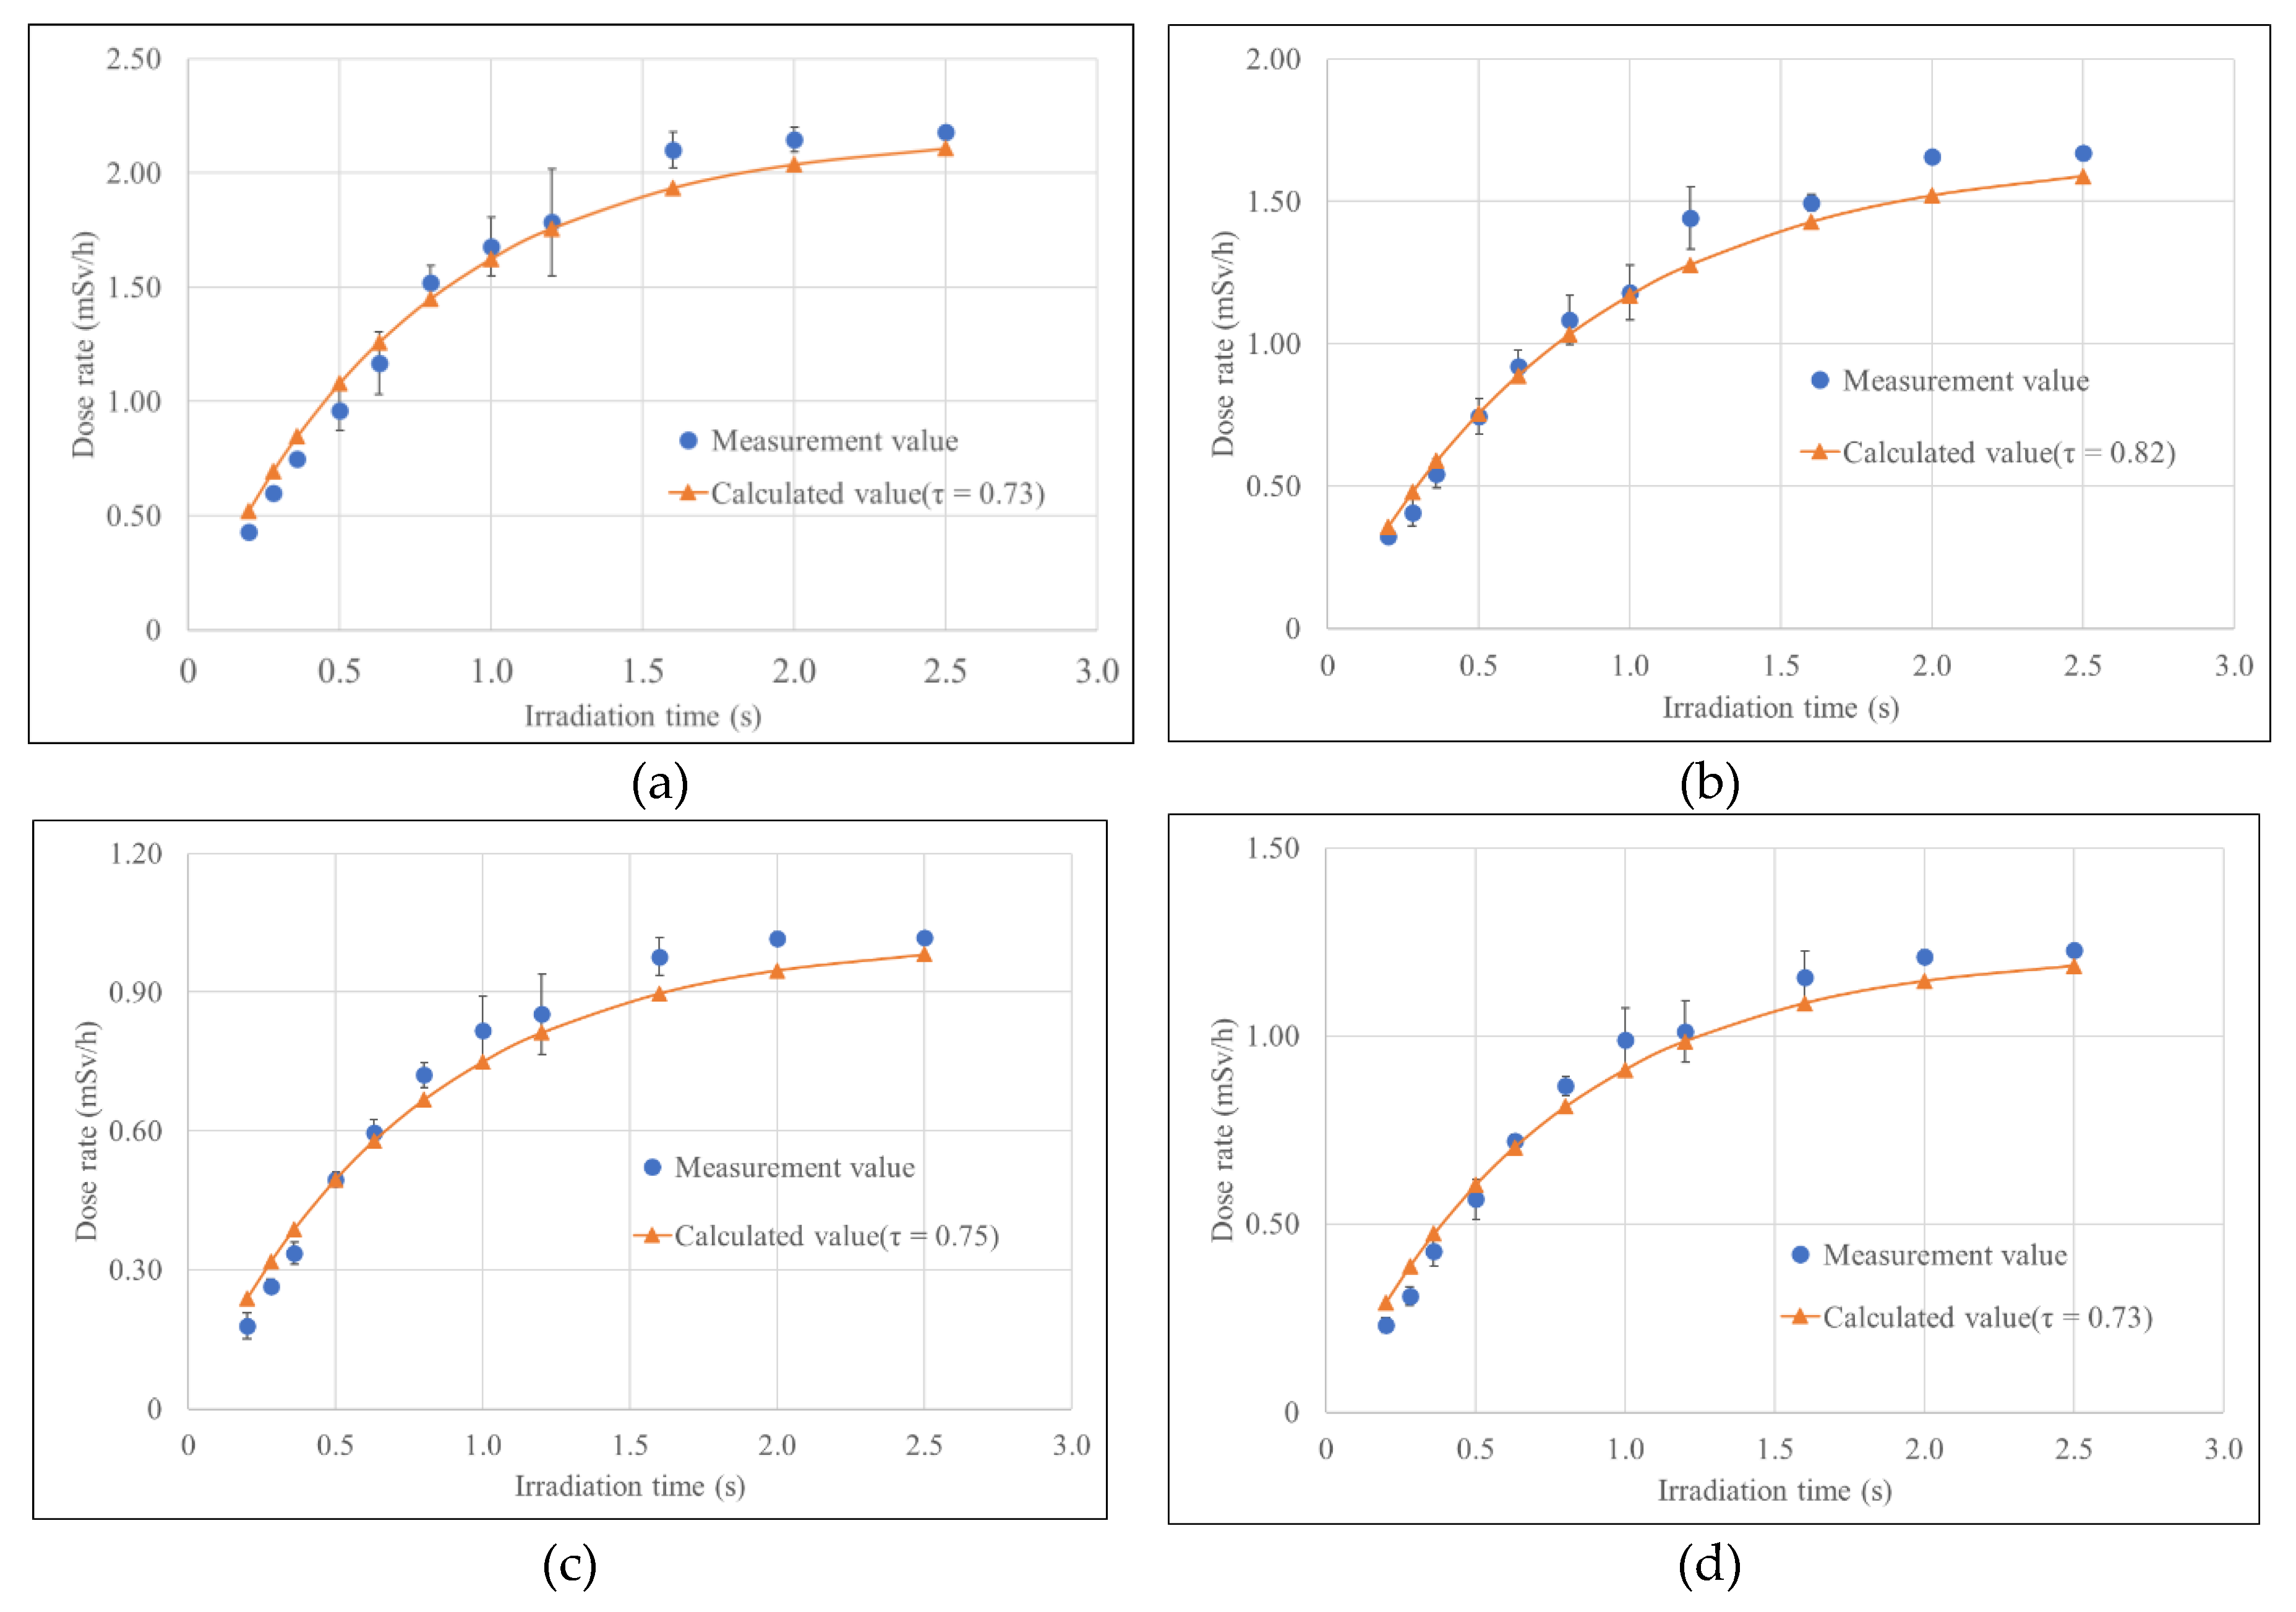
Figure 3 shows a graph comparing the measured values for each N-60 to N-120 and the calculated values using the time constant calculated from Equation (4), with the horizontal axis representing the X-ray irradiation time (s) and the vertical axis representing the dose rate (mSv/h). The time constants were 0.73(s) for N-60, 0.82(s) for N-80, 0.75(s) for N-100, and 0.73(s) for N-120, or about 0.7–0.8 seconds, which were consistent with the RaySafe452 specification[
18], and the calculated values obtained from the calculated time constants were also almost consistent with the actual measured values. Therefore, it is clear that the time constants of the RaySafe452 can be calculated using a medical X-ray system. This section may be divided by subheadings. It should provide a concise and precise description of the experimental results, their interpretation, as well as the experimental conclusions that can be drawn.
3.3. Evaluating the Calibration of Semiconductor Survey Meters
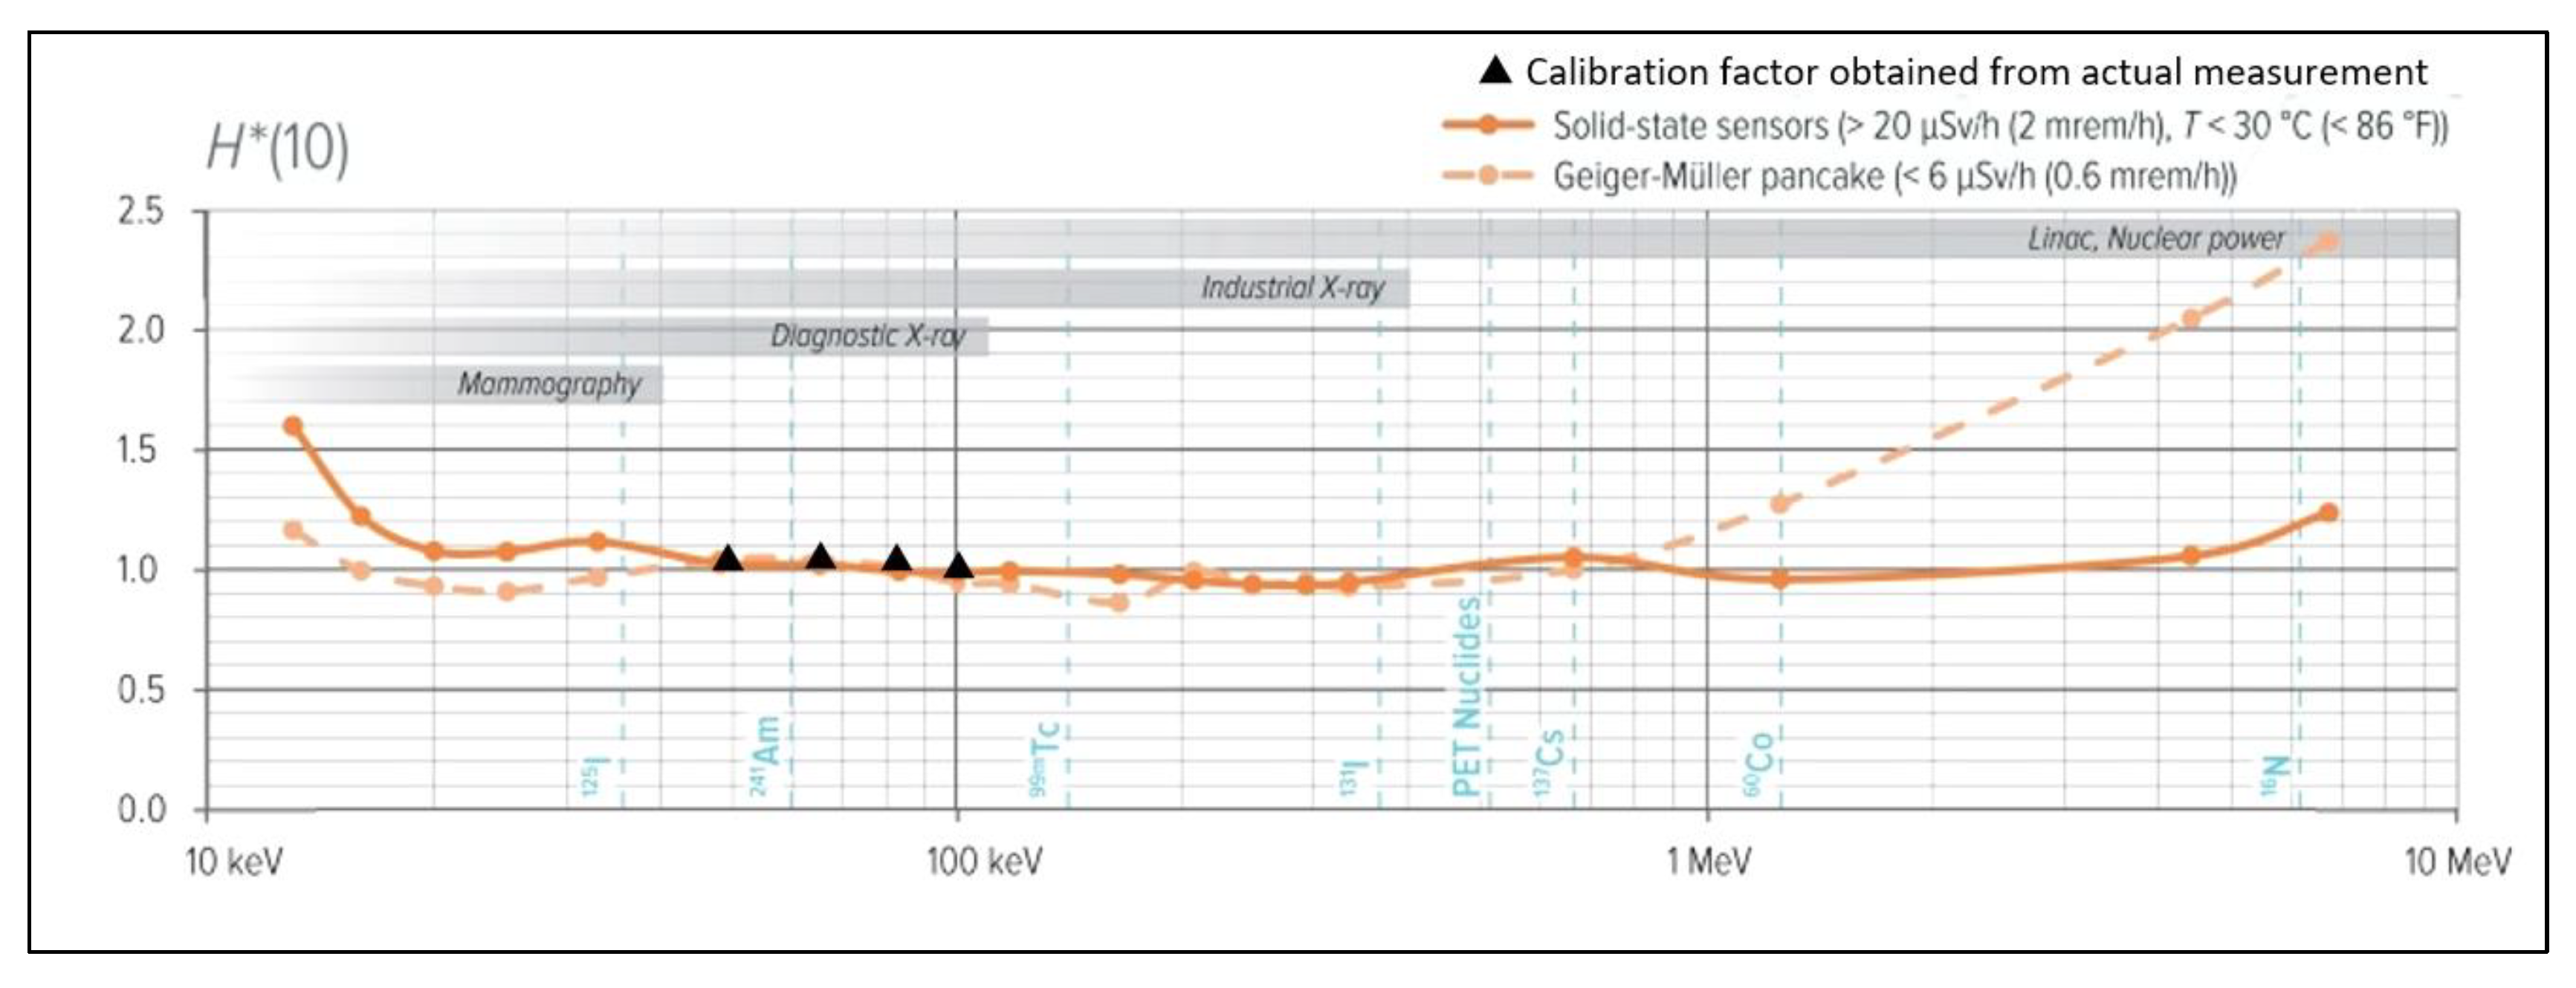
Table 2 shows the calibration results and calibration uncertainties of the survey meter in the medical X-ray system. The calibration factors were 1.03 for N-60, 1.04 for N-80, 1.03 for N-100, and 1.01 for N-120, which were found to be in close agreement with the energy characteristics of RaySafe452 [
18]. Also, the horizontal axis is the average energy
(keV) and the vertical axis is the calibration constant. The relationship between the industrial and medical X-ray systems is shown in
Figure 4. The calibration factors for the industrial X-ray system were 1.08 for N-60, 1.08 for N-80, 1.06 for N-100, and 1.02 for N-120, indicating that calibration using the medical X-ray system is almost as accurate as that for the industrial X-ray system.
4. Discussion
When the radiation quality of N-60 to N-120 was reproduced using a medical X-ray system, the values of the first and second semi-valent layers were almost consistent with the reference values in JIS Z 4511
-2018 [
8]. This could be because the current inverter-type X-ray systems have a rise and fall time of less than 1 ms, which greatly improves the short-time characteristics [
19], so that the output is stable even with short irradiation durations and meets the conditions specified as a continuous X-ray standard field. In this study, experiments were conducted by attaching aluminum, copper, and tin plates, which are additional filters, directly to the movable X-ray aperture. Once the experimental system is set up, the radiation quality can be reproduced by adjusting the tube voltage and switching to the corresponding additive filter.
In the method of determining the time constants of the survey meter by calculation, some variation in the measured values was observed, especially in short-time imaging. This is thought to be because RaySafe452 has a time constant for the stabilization of the measured values according to the dose rate, and the dose rate in the experimental system of this study did not allow sufficient time for stabilization [
18]. It is considered necessary to pay attention to this point when calculating the time constant with RaySafe452. Especially when the irradiation time is short, it is necessary to increase the number of measurements as in this study, and to obtain the measured value using the interquartile range to remove the influence of outliers. As mentioned at the beginning of this discussion, it is possible to reproduce the radiation quality of N-60 to N-120 with a medical X-ray system. Since the method of calculating the time constant is a reproducible system, if there is a scatterer such as PMMA in addition to the filter, it can be implemented in every medical facility. The method proposed in this study is considered useful for improving the accuracy of leakage dose measurement during short-time radiography.
The calibration constants of RaySafe452 with the medical X-ray system were almost the same as those with the industrial X-ray system. This is thought to be because the radiation quality of N-60 to N-120 is reproduced even with a short irradiation duration and because the RaySafe452 measurements reach a plateau and measure stable values. This indicates that the time constant of RaySafe452 is up to 2 s [
16]; however, it is less than 1 s for the dose rates irradiated by the experimental system in this study, which is consistent with the calculated results. Since the irradiation conditions in this study can be reproduced by the medical X-ray systems installed in each medical facility, calibration using medical X-ray systems is considered possible. However, according to JIS Z 4511
-2018, X-rays must be generated by an X-ray device with a ripple tube voltage of ≤10%. Thus, it is necessary to confirm that the medical X-ray equipment to be used meets this requirement [
8]. In addition, it is necessary to pay attention to the loading of the X-ray tube, especially at 100 kV and 120 kV, by spacing the irradiation intervals.
There are several limitations to this study. (1) The RaySafe452 used in this study has only a dose rate mode for measurement; so, we were not able to study the totalization mode. (2) The method of determining the time constant by calculation requires an X-ray irradiation duration of about 2 seconds; so, the method developed in this study cannot be used for X-ray systems with a maximum irradiation duration of less than 2 seconds. The dose rate of the N-60 to N-120 radiation quality reproduced using an X-ray system for medical treatment is about 45 to 190 mSv/h. Therefore, we have not been able to study dose ranges other than those mentioned above. These will require further investigation in the future.
5. Conclusions
We found that it is possible to reproduce the N-60 to N-120 radiation quality using a medical X-ray system, calculate the time constant using the radiation quality, and calibrate a semiconductor survey meter with the same accuracy as an industrial X-ray system. Since the experimental system used in this study can be reproduced in the radiography room of each medical facility, it is suggested that the survey meters can be calibrated in each facility via the use of reference dosimeters and additional filters.
Author Contributions
Conceptualization, T.N. and Y.K.; methodology, M.S. and Y.K.; software, T.N.; validation, T.N., Y.K. and M.S.; formal analysis, T.N.; investigation, T.N.; resources, T.N. and Y.K.; data curation, T.N.; writing—original draft preparation, T.N. and Y.K.; writing—review and editing, T.N., Y.K. and M.S.; visualization, T.N., Y.K. and M.S.; supervision, T.N.; project administration, T.N.. All authors have read and agreed to the published version of the manuscript.
Funding
This research received no external funding.
Institutional Review Board Statement
Not applicable.
Informed Consent Statement
Not applicable.
Data Availability Statement
Data is available upon request.
Acknowledgments
I would like to express my deepest gratitude to everyone at the Negishi Laboratory of Tokyo Metropolitan University for their kind words and guidance in carrying out this study.
Conflicts of Interest
The authors declare no conflict of interest.
References
- H. Ishii, K. Saturai, N. Uesugi, M. Kato, M. Sannohe, K. Miyata, Y. Inaba, and K. Chida: Japanese Society of Radiation Safety Management, 2018 17(1):2-8. (in Japanese). https://doi:10.11269/jjrsm.17.2.
- K. Saturai, H. Ishii, Y. Haga, Y. Kaga, H. Sato, T. Honda, Y. Inaba, and K. Chida: Japanese Society of Radiation Safety Management, 2018 17(2):114-120. (in Japanese). [CrossRef]
- R. Kobayashi, K. Chida, Y. Inaba, Y. Haga, Y. Kaga, and M. Zuguchi: Fundamental Study of a Radiation Dose Measuring Tool for Diagnostic X-Ray Apparatus: Bulletin of School of Health Sciences Tohoku University. 2015 24(1):39-44(in Japanese).
- C. J. Hourdakis, A. Boziari, and A. Manetou: Health Physics, 2010 May; 98(5): 704-16. [CrossRef]
- K. Terasaki, T. Fujibuchi, H.Murazaki, T. Kuramoto, Y. Umezu, Y. Ishigaki, and Y. Matsumoto: Radiological Physics and Technology, 2017 Jun;10(2):189-194. [CrossRef]
- T. Fujibuchi, T. Iimori, Y. Masuda, Y. Uchida, T. Isobe, and T. Sakae: Radiological Physics and Technology, 2010 Jan;3(1):53-7. [CrossRef]
- J. A. Posar, J. Davis, O. Brace, P. Sellin, M. J. Griffith, O. Dhez, D. Wilkinson, M. L.F. Lerch, A. Rosenfeld, and M. Petasecca: Physics and Imaging in Radiation Oncology, 14(2020)48-52: . [CrossRef]
- Japanese Industrial Standards: Calibration methods for irradiation dosimeters and dose equivalent meters: JIS Z 4511, 2018(in Japanese).
- International Organization for Standardization. Radiological protection — X and gamma reference radiation for calibrating dosemeters and dose rate meters and for determining their response as a function of photon energy — Part 1: Radiation characteristics and production methods. ISO 4037-1, 2019.
- International Organization for Standardization. Radiological protection — X and gamma reference radiation for calibrating dosemeters and doserate meters and for determining their response as a function of photon energy — Part 2: Dosimetry for radiation protection over the energy ranges from 8 keV to 13 MeV and 4 MeV to 9 MeV. ISO 4037-2, 2019.
- International Organization for Standardization. Radiological protection — X and gamma reference radiation for calibrating dosemeters and doserate meters and for determining their response as a function of photon energy — Part 3: Calibration of area and personal dosemeters and the measurement of their response as a function of energy and angle of incidence. ISO 4037-3, 2019.
- International Organization for Standardization. Radiological protection ― X and gamma reference radiation for calibrating dosemeters and doserate meters and for determining their response as a function of photon energy ― Part 4: Calibration of area and personal dosemeters in low energy X reference radiation fields. ISO 4037-4, 2019.
- T. Negishi, Y. Asada, K. Ochiai, Y. Kato, S. Koyama, H. Sakamoto, H. Sato, T. Shoji, M. Sekimoto, K. Noto, and T. Minamoto: Standard methods for measuring absorbed dose in the diagnostic X-ray field: (Ohmsha, Ltd., Tokyo, 2013)(in Japanese).
- G. Nishitani, K. Yamada, H. Maekoshi, Y. Kato, H. Sato, F. Araki, S. Koyama, K. Koshida, H. Horii, and H. Onishi: Radiation Measurement: (Ohmsha, Ltd., Tokyo, 2013)(in Japanese).
- M. Nakamura, Y. Watanabe, N. Yasuda, H. Shimazaki, I. Kanamori, Y. Nakagiri, and M. Onogi: Medical radiation measurement. (Iryokagakusha Co., Ltd., Tokyo, 2007)(in Japanese).
- ISO/IEC Guide 98-3:2008, Uncertainty of measurement —Part 3: Guide to the expression of uncertainty in measurement (GUM:1995).
- Guide for Uncertainty Estimation, Accreditation Center of National Institute of Technology and Evaluation (JCSS), Accreditation-Division-JCG217S11-01, 2012.
- Edited by Fluke Biomedical: RaySafe452 Users Manual(Fluke Biomedical, 2019).
- T. Aoyagi, I. Ogura, S. Abe, and E. Shimizu: Radiological Equipment Engineering (I):(CORONA PUBLISHING CO., LTD., 2008)(in Japanese).
|
Disclaimer/Publisher’s Note: The statements, opinions and data contained in all publications are solely those of the individual author(s) and contributor(s) and not of MDPI and/or the editor(s). MDPI and/or the editor(s) disclaim responsibility for any injury to people or property resulting from any ideas, methods, instructions or products referred to in the content. |
© 2023 by the authors. Licensee MDPI, Basel, Switzerland. This article is an open access article distributed under the terms and conditions of the Creative Commons Attribution (CC BY) license (http://creativecommons.org/licenses/by/4.0/).


