1. Introduction
In majority of industrial
countries, nuclear power plants (NPPs) are used worldwide to generate
electricity. There are two reasons for the current use of nuclear power:
increased world prices for fossil fuels and the fear of climate change due to
CO2 emissions during combustion. Today 353 reactors in the world are older than
25 years among which, 154 are above 40 years. The long-term operation (LTO) of
existing NPPs has already been accepted in many countries as a strategic
objective to ensure adequate supply of electricity over the coming decades [1,
2]. The public and energy experts may disagree as to whether or not nuclear
reactors are indispensable as an energy source for today's human society, but
both supporters and opponents of nuclear energy agree that the safety of
reactors must be maintained at the highest possible level.
The design lifetimes are affected
by operating conditions, such as neutron exposure (fluence), and also by
magnitude and number of temperature and/or pressure cycles [3,4]. The two basic regulatory
approaches are the license renewal and the periodic safety reviews, which are
required for an authorization of the long-term operation of NPPs [1]. Evaluation of these parameters
makes possible an estimation of the operational NPP lifetime
[3].
One of the most important and
irreplaceable parts that limits the lifetime of NPPs is the steel reactor
pressure vessels (RPV), which encloses the extremely radioactive part of the
whole system. RPV must be tough, solid, strong and absolutely reliable. It
should never be cracked or leak or in any way allow the radioactive contents to
escape from inside. However, it is well known, that the mechanical properties
of the RPV wall are modified during the operation
[5]
. The ageing of the structure of
the RPV steel near to reactor core is generated by long term and high-energy
neutron irradiation and also, by thermal effects. These effects change the
microstructure of the steel and changes the RPV material to become more and
more brittle, more susceptible to unwanted cracks.
Evaluation of these parameters
allows for an estimation of the operational lifetime of NPPs. Currently,
destructive tests are performed on surveillance samples in the frame of
periodic safety reviews (PSRs) in order to assess the material degradation induced
by the neutron irradiation in RPV. Charpy impact test, which is performed on
surveillance specimens is the presently applied traditional and highly reliable
way of the RPV toughness inspections. Surveillance specimens are standard
tensile and ISO-V Charpy specimens of exactly the same RPV steels and their
welds [6]. These
specimens experience exactly the same history as does the RPV steel of the
vessel. It is supposed that their physical conditions are varying during the
whole lifetime of the reactor in the same way as that of the vessel. Their
physical condition testifies even about the “near future” condition of the
vessel material.
The neutron irradiation induced
embrittlement is usually described by the ductile-to brittle-transition
temperature (DBTT). To obtain a single DBTT value, several specimens must be
tested. For assessing structural material information over a long period, a lot
of Charpy samples are needed. In parallel, tensile specimens tested under a
quasistatic loading rate are used to determine yield strength, tensile
strength, uniform elongation, total elongation, and reduction in diameter.
Due to possible material
heterogeneities such as macro-segregated regions, hydrogen flakes, inclusion
areas in such large components the surveillance specimens might not necessarily
represent the whole vessel material. Furthermore, the destructive methods do
not allow for the characterization of the progress of material properties of
the same specimen when successively damaged. They are not applicable to the
actual component and finally, the amount of surveillance Charpy samples are
limited for monitoring over an elongated period.
It is evident, that a nondestructive
technique of RPV steel material testing can avoid many of the aforementioned
problems. It could be either a nondestructive inspection of an alternative
series of surveillance specimens, which would be measured outside of the
pressure vessel, then returned back into the vessel after each investigation,
and measured again, at the next periodic inspection phase. Alternatively,
special inspection methods and devices employing non-destructive techniques
could be utilized, enabling an inside inspection of the vessel with the aid of
specially equipped electrical leads. Even, a non-invasive evaluation of the
vessel material could be per-formed, focusing on carefully chosen external
areas of the vessel whenever feasible.
However, unlike mechanical tests,
nondestructive tests do not directly measure the material property. Currently,
no single nondestructive test has re-placed existing testing methods such as
the destructive Charpy test.
A project (“NOMAD”), oriented
towards the development of novel electromagnetic nondestructive methods for the
inspection of operation-induced material degradation in nuclear power plants
received funding from the Euratom research and training programme. The purpose
of this review paper is to give a comprehensive survey about the results,
achieved within the project. In the project a combination of several
nondestructive methods was used to examine how accurately and reliably the
degradation of cladded RPV material could be determined, especially when
compared to sample-based destructive testing. Charpy samples, cladded and
non-cladded blocks of various RPV steels along with different levels of
irradiation states, were provided. Different non-destructive evaluation
techniques were adapted and applied to measure the irradiated and
non-irradiated samples. The applied NDE methods were magnetic, electrical and
ultrasonic methods. Destructive reference tests for the determination of the
DBTT and other material characteristics were carried out as well. The
irradiated samples were handled and measured in hot cells. The measured data
were evaluated and correlated with the destructively determined DBTT values
using machine learning methods. In this way a predictive model was generated
which is able to non-destructively determine the DBTT for various RPV steel
types by intelligently combining the information of several non-destructive
testing methods. The outcome of the data-driven approach was finally validated.
The validation was established by
a detailed evaluation of the functionality of the NOMAD tool. This was done in
the context of the regression approach as well as it was complemented by a
classification approach. Furthermore, the evaluation provided insight into the
relevance of the different measurement features. Based on these achievements,
recommendations were made under the assumption of a continuation of the
development toward a higher TRL.
A short description of the
physical background of the radiation embrittlement of RPV steel is devoted in
Section 2. The state-of-the
art regarding nondestructive investigation before the NOMAD project is
summarized in
Section 3. Electromagnetic nondestructive tests of various irradiated RPV
steels are summarized in
Section 4. The purpose of the NOMAD project is described in
Section 5. The sample
preparation and description of destructive tests are described in
Section 6 and
Section 7. The results
of the measurement, performed in the project, both on Charpy and block
specimens are summarized and, in addition different methods are compared with
each other in
Section 8.
Section 9
is devoted to studying the evaluation of multi-output-parameter
(i.e. combined) NDE technique with the help of advanced classification methods,
particularly Machine Learning (ML) technique and its applicability.
Section 10
is the discussion
and interpretation of the project, while in summary and conclusions (
Section 11) the summary of the
whole project and recommendations are given for future research and application
of the investigated techniques.
The different methods, applied in
the project are described detailed in
Appendix A, while in
Appendix B, the interpretation of the scatter of measured points
is analysed.
2. The Radiation Embrittlement
The main ageing process of the
reactor pressure vessels is the irradiation embrittlement of the metallic
structural materials. A large number of experimental and theoretical studies
were published on the influence of radiation embrittlement. Several reviews
were published about this phenomenon [7-18].
Radiation embrittlement is caused
by the high energy fast neutron radiation (over 0.1 MeV), and high energy gamma
radiation. Embrittlement refers to a decrease in the fracture toughness of
reactor vessel materials and affects the vessel materials in the vicinity of
the reactor fuel, referred to as the vessel's "beltline”. It is one of the
most significant life limiting degradation phenomena of the pressurized and
boiling water reactors. Consequently, the monitoring of this ageing process is
primary interest of the Nuclear Power Plant Operators and the Regulatory
Bodies.
Testing and evaluation of
radiation embrittlement is a difficult task. The radiation embrittlement is not
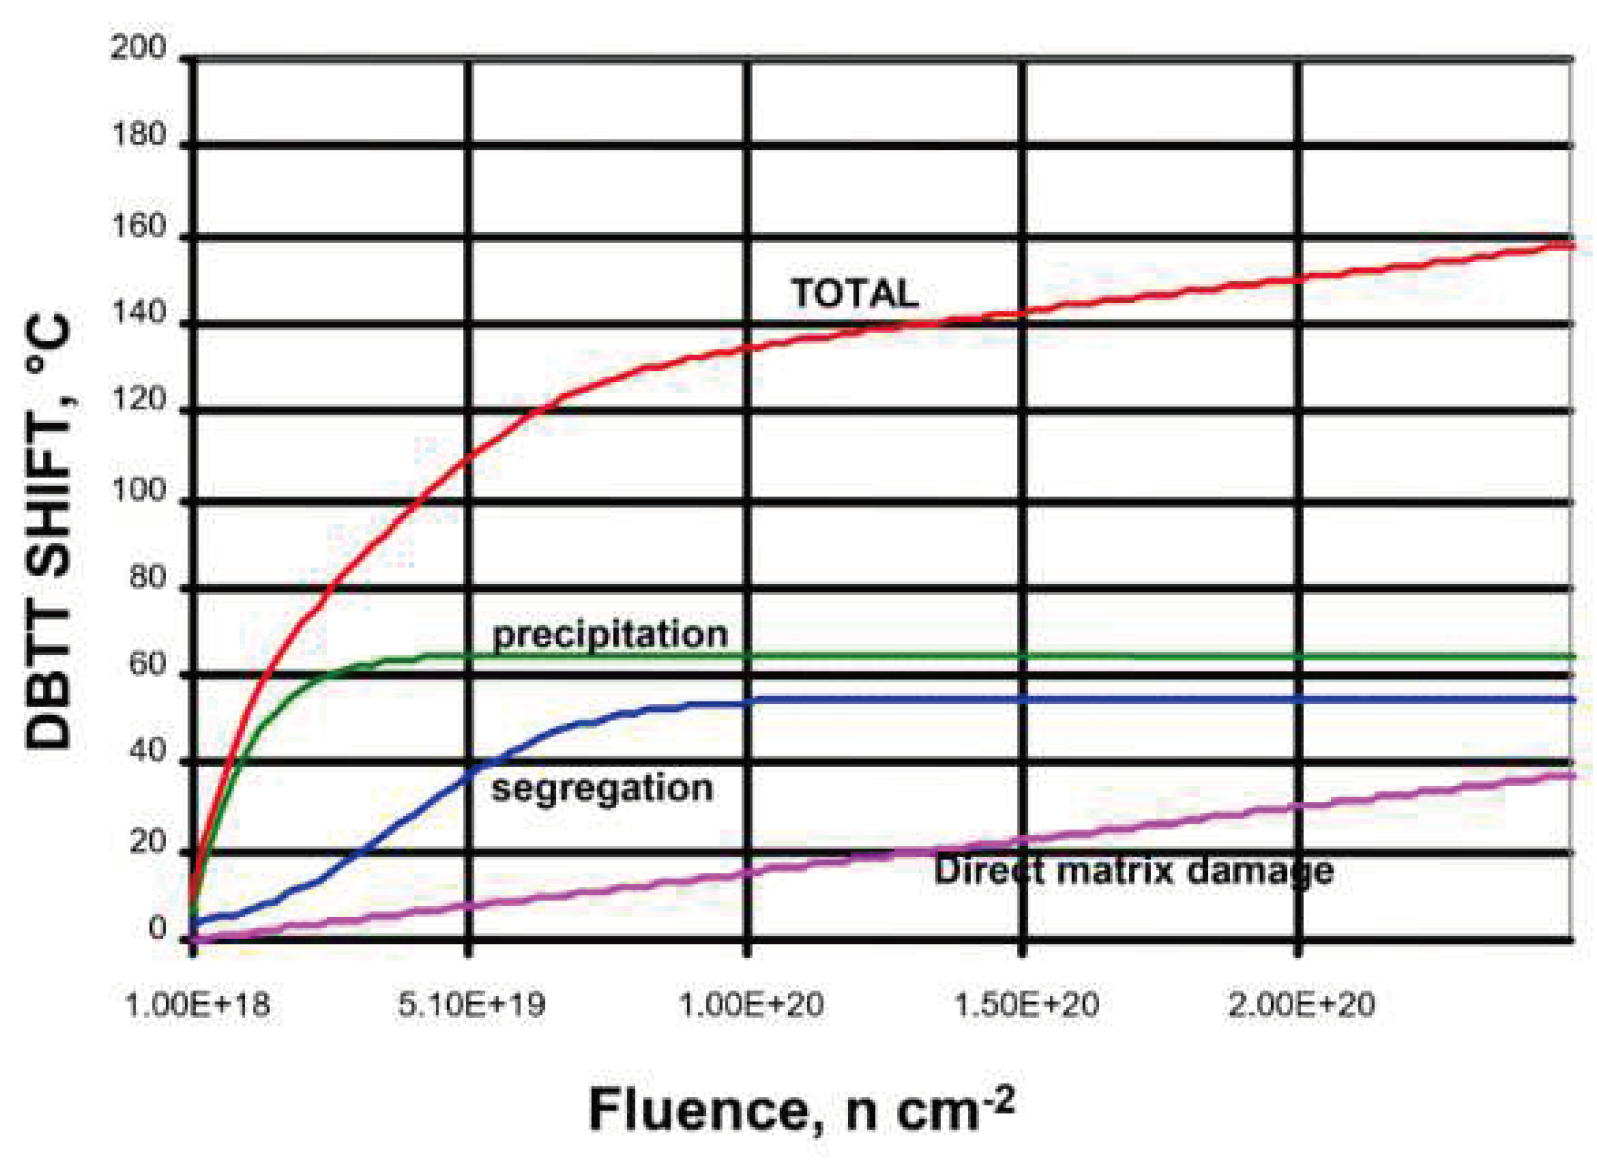
one simple degradation mechanism but the sum of several processes as it is
shown in
Figure 1.
direct matrix damage due to neutron bombardment (increase of the dislocation density)
precipitation hardening of the matrix (Cu is the leading element but Ni, Mn, Si etc. also has influence)
segregation (P is a recognized segregating element) and if P covers the grain boundary even only in one atom thickness it can cause non-hardening embrittlement.
Direct matrix damage due to
neutron irradiation can be assumed to be simply root square dependent on
fluence for a given material and a given temperature. At higher irradiation
temperatures the rate of damage is considered to be decreasing due to increased
atoms mobility. During direct matrix damage formation, Cu, together with other
elements, is known to lead to precipitation mechanisms of nano-precipitates
also inducing matrix hardening and embrittlement. Such mechanism continues
until saturation depending on available amount of precipitants, Cu
concentration in particular. In addition, other elements, like P, can
segregate, in the grains (and or through diffusion processes at grain boundary)
also in combination to matrix damage or attracted into the Cu-type
precipitates. Diffusion of segregates also plays a role making this mechanism
rather difficult to understand in detail. P segregation to the grain boundaries
generally doesn’t cause hardening.
The so-called Master Curve
approach for assessing fracture toughness of an irradiated reactor pressure
vessel (RPV) steel has been gaining acceptance throughout the world. This
direct measurement approach is preferred over the correlative and indirect methods
used in the past to assess irradiated RPV integrity. Experience in using
results obtained from Master Curve testing has been illustrated by Wallin
[19], and the approach has been
applied utilizing ASTM Standard Test Method E 1921
[20]
in the USA
[21]. There have been comparisons
made using Master Curve data in other countries, but the primary attempts at
licensing implementation for nuclear reactor safety of RPVs have been in the
USA.
Furthermore, several other effects
have to be considered. Thermal ageing and thermal annealing are accelerated by
irradiation (irradiation speeds up the diffusion processes even at relatively
low temperature). These processes are time dependent; consequently, the
irradiation flux rate may also affect the rate of the embrittlement. Through
the cross section of an RPV wall (especially in the case of forgings) the
fracture toughness properties are changing and the rate of thermal ageing is
different [22-24]. Significant differences can be found in thermal expansion
coefficients with respect to pressure vessel base metals, which can cause a
stress peak
[25]. This
is the so-called pressurized thermal shock and it is a potential risk of
interfacial crack initiation and propagation. Safety analysis of this
phenomenon has lately become a subject of interest for operators of nuclear
power plants
[26].
There is a literature review
available that presents the current understanding of the mechanisms behind
radiation-induced embrittlement in low alloy reactor pressure vessel steels and
irradiation-assisted stress corrosion cracking in the core internals of
stainless steels
[27].
3. NDT Methods - State of Art
As outlined in the previous
sections, the mechanical properties of the reactor pressure vessel wall are
modified during its operation. As a result, the regular inspection of nuclear
power plants is an extremely important task. The DBTT, measured by destructive
Charpy tests is the standardized parameter in the nuclear industry, which
characterizes the embrittlement. A significant drawback of this method is that
many samples are necessarily used for this inspection. Additionally, the
measurement error is high. Because of these arguments, different nondestructive
methods have also been recommended and applied for monitoring the degradation
of nuclear pressure vessel steel material. The life prediction and NDE of
materials properties in the power plant industry was given in
[28].
However, as already mentioned in
the introduction, nondestructive tests cannot directly measure the material
property that needs to be determined - un-like destructive methods. They can
measure quantitative values of other physical properties (like different
electromagnetic parameters), which are influenced by similar reasons, such as,
for instance by presence and quality of structural material defects and
therefore correlate with the mechanical properties. The reliable way to obtain
quantitative information on a destructive-test-based required property, such as
DBTT, when using nondestructive measurements, is through establishing a
credible one-to-one correlation between the destructively and nondestructively
measured properties. This requires series of comparative experimental
investigations. All nondestructive tests must be rigorously correlated to
relevant destructive tests through multiple series of checked and re-checked
measurements before reliable application. This lack of correlation is the
primary reason that no non-destructive test has been able to replace
destructive tests, or even be applied as an auxiliary test, which could build a
strong foundation for correlation verification. Nevertheless, a number of
potential nondestructive tests were recommended and tested, and the mosaic of
the requested correlations is presently being built up.
These tests could be done with the
aid of armoured electrical leads through special bushing/containment within the
vessel. Furthermore − at least in principle − it could be a nondestructive
quality inspection of the vessel material itself, at different well selected
positions, from outside of the vessel. Several indirect physical methods (e.g.
magnetic, ultrasound, acoustic, X-rays, and others) of nondestructive testing
exist, and they can be principally applied for such inspections.
Number of nondestructive methods
have recently been suggested for studying the neutron irradiation-generated
embrittlement of RPV steel material. Paper
[29]
gives a summary of electromagnetic techniques used for
nondestructive testing (NDT) of degradation of nuclear reactor components.
However, since neutron irradiation makes the investigated material radioactive
and this causes significant difficulty in their measurement, simulation
techniques, such as ion irradiation, thermal ageing and cold working, can also
be used to simulate irradiation damages [30-32].
3.1 Piezoelectric Ultrasound
(Piezo-US)
The well known ultrasonic method
is widely applied in the inspection of NPPs [33-35]. Piezoelectric transducers
use the so-called piezoelectric effect to excite ultrasonic waves. This effect
is based on the occurrence of an electrical voltage when piezoelectric crystals
are mechanically expanded and compressed (direct piezoelectric effect).
Applying an electrical voltage to these crystals will, in turn, lead to their
deformation proportional to the electric field (indirect piezoelectric effect).
Thus, by using the piezoelectric effect, electrical energy is transformed into
mechanical energy and vice versa. The indirect piezoelectric effect is used to
transmit ultrasonic waves; the direct one is used to receive ultrasonic waves.
As in this case the ultrasonic waves are generated in the transducers
themselves, a coupling agent is needed to transfer these waves into the test
object as well as to receive them.
The ultrasonic time-of-flight
(TOF) method can be used as well, as the main measured quantity of the
ultrasonic testing method. The TOF is defined as the time the ultrasonic wave
requires for propagating from transmitter to receiver. For a given wave mode,
microstructure changes and mechanical properties influence the effective ultrasound
velocity and, therefore, they affect the TOF. The TOF is determined by fitting
a peak of the received waveform with a parabolic function and determining the
peak position analytically. The achievable accuracy lies in the single-digit
nanosecond range [36, 37].
3.2. Electrical Methods
3.2.1. Thermoelectric Power Measuring Method (TEPMM)
Thermoelectricity is based on the
fact that a thermal flux driven by a temperature gradient in an electrically
conductive material is accompanied by an electric current. The voltage or
thermoelectric power (TEP) created hereby is proportional to the temperature
gradient. The material-dependent proportionality factor is called Seebeck
coefficient (SC). Today, thermoelectric devices as temperature sensors
(thermocouples), heat sources or sinks and remote power generators are based on
thermoelectric effects and widely used. The change of the SC due to neutron
irradiation, thermal and mechanical ageing was observed experimentally. These
effects are well known as a cause of drift in thermocouples, which are widely
used as temperature sensors [38-40].
3.2.2. Direct Current-Reversal Potential Drop (DCRPD)
Four-point probe direct
current-reversal potential drop (DCRPD) method is based on the measurement of
electrical resistivity of metal. Material property changes in irradiated RPV
can be used as indicators for the state of the degradation. One physical effect
that can be used for the detection of irradiated material degradation is the
electrical resistivity. If the change of electrical resistivity is a
well-defined function of the neutron fluence, and if the effect is large enough
compared with that of other influencing parameters, it can be used the monitor
the material embrittlement. The development and testing is done to investigate
the suitability of electrical resistivity measurement for the characterization
of the irradiation embrittlement in irradiated pressure vessel steel.
Characterizing irradiated RPV base metal, electrical resistivity requires
measurement of very low resistance changes with high accuracy
[41,42].
3.3. Magnetic Methods
The majority of the nuclear
reactors, which are used presently are pressurized water reactors. The steel
used in the reactor pressure vessel is ferromagnetic, allowing for effective
inspection using magnetic methods. Magnetic nondestructive methods are an
important part of all the possible techniques, especially because of their
simplicity. Furthermore, it is known and understood that magnetic and
mechanical properties of ferromagnetic materials are very closely correlated:
regularity of microstructure of ferromagnetic construction materials (e.g. of
RPVs) and density and quality of its defects, has a significant influence on
both the mechanical and magnetic properties of the material. Domain wall motion
and dislocation movement are both influenced by the microstructure of the
material. The correlation between mechanical and magnetic hardness in
ferromagnetic materials is well-known and understood
[43,44]. The practical
applicability of magnetic methods for quantitative indication of steels
micro-structural modifications resulting embrittlement were proved by numerous
successful measurements.
In [45-49] overviews can be found
about nondestructive magnetic methods. These papers provide guideline to the
literature of magnetic techniques for nondestructive material testing. Compared
to other NDE techniques such as ultrasonics or eddy currents, the literature on
magnetic methods is limited, yet one of the challenges is its wide-spread
dispersion. The above mentioned reviews present a fairly comprehensive summary
of works on the known methods, such as Barkhausen noise effect, magnetoacoustic
emission, magnetic hysteresis method, residual field and magnetically induced
velocity change methods that can be used in practice.
The well-known magnetic Barkhausen
noise technique (MBN) was originally developed for inspection of surface
defects, of residual stresses and of microstructure changes
[50]. There is a wide choice in the
literature how MBN can be applied for material characterization [51-60].
Magnetoacoustic emission, another
magnetic method, can also be successfully used for the monitoring of residual
stresses
[61,62].
A nondestructive magnetic method
was previously developed, which is called as 3MA approach (3MA = micromagnetic,
multiparameter, microstructure and stress analysis) and this technique uses
different methods [63-65].
The measurement of the magnetic
hysteresis loops is also among the perspective candidates of magnetic NDE.
Theory of ferromagnetic hysteresis is given in several papers, see
[66] as an example.
The magnetic hysteretic
characterization of ferromagnetic materials with objectives towards NDE of
material degradation was discussed in
[67].
In
[31] cold rolling was applied to
generate crystalline defects in RPV steel. Magnetic hysteresis measurement
together with Vickers hardness and tensile properties measurements were
performed. The variations of remanence, hysteresis loss and coercivity were discussed
in detail. It was found that the strength, the hardness and the coercivity
increased with increasing deformation. A good linear correlation between the
increment of coercivity, hardness and yield strength was found.
In traditional measurements of
magnetic hysteresis, the major loop is measured, and several characteristic
parameters, like remanence magnetization, coercive force, maximal permeability
are determined from the major loop. However, in recently developed novel
methods, the series of minor loops are measured instead the major loop, and a
lot of different parameters of minor hysteresis loops are used for material
characterization. One of these novel methods is the magnetic minor loops power
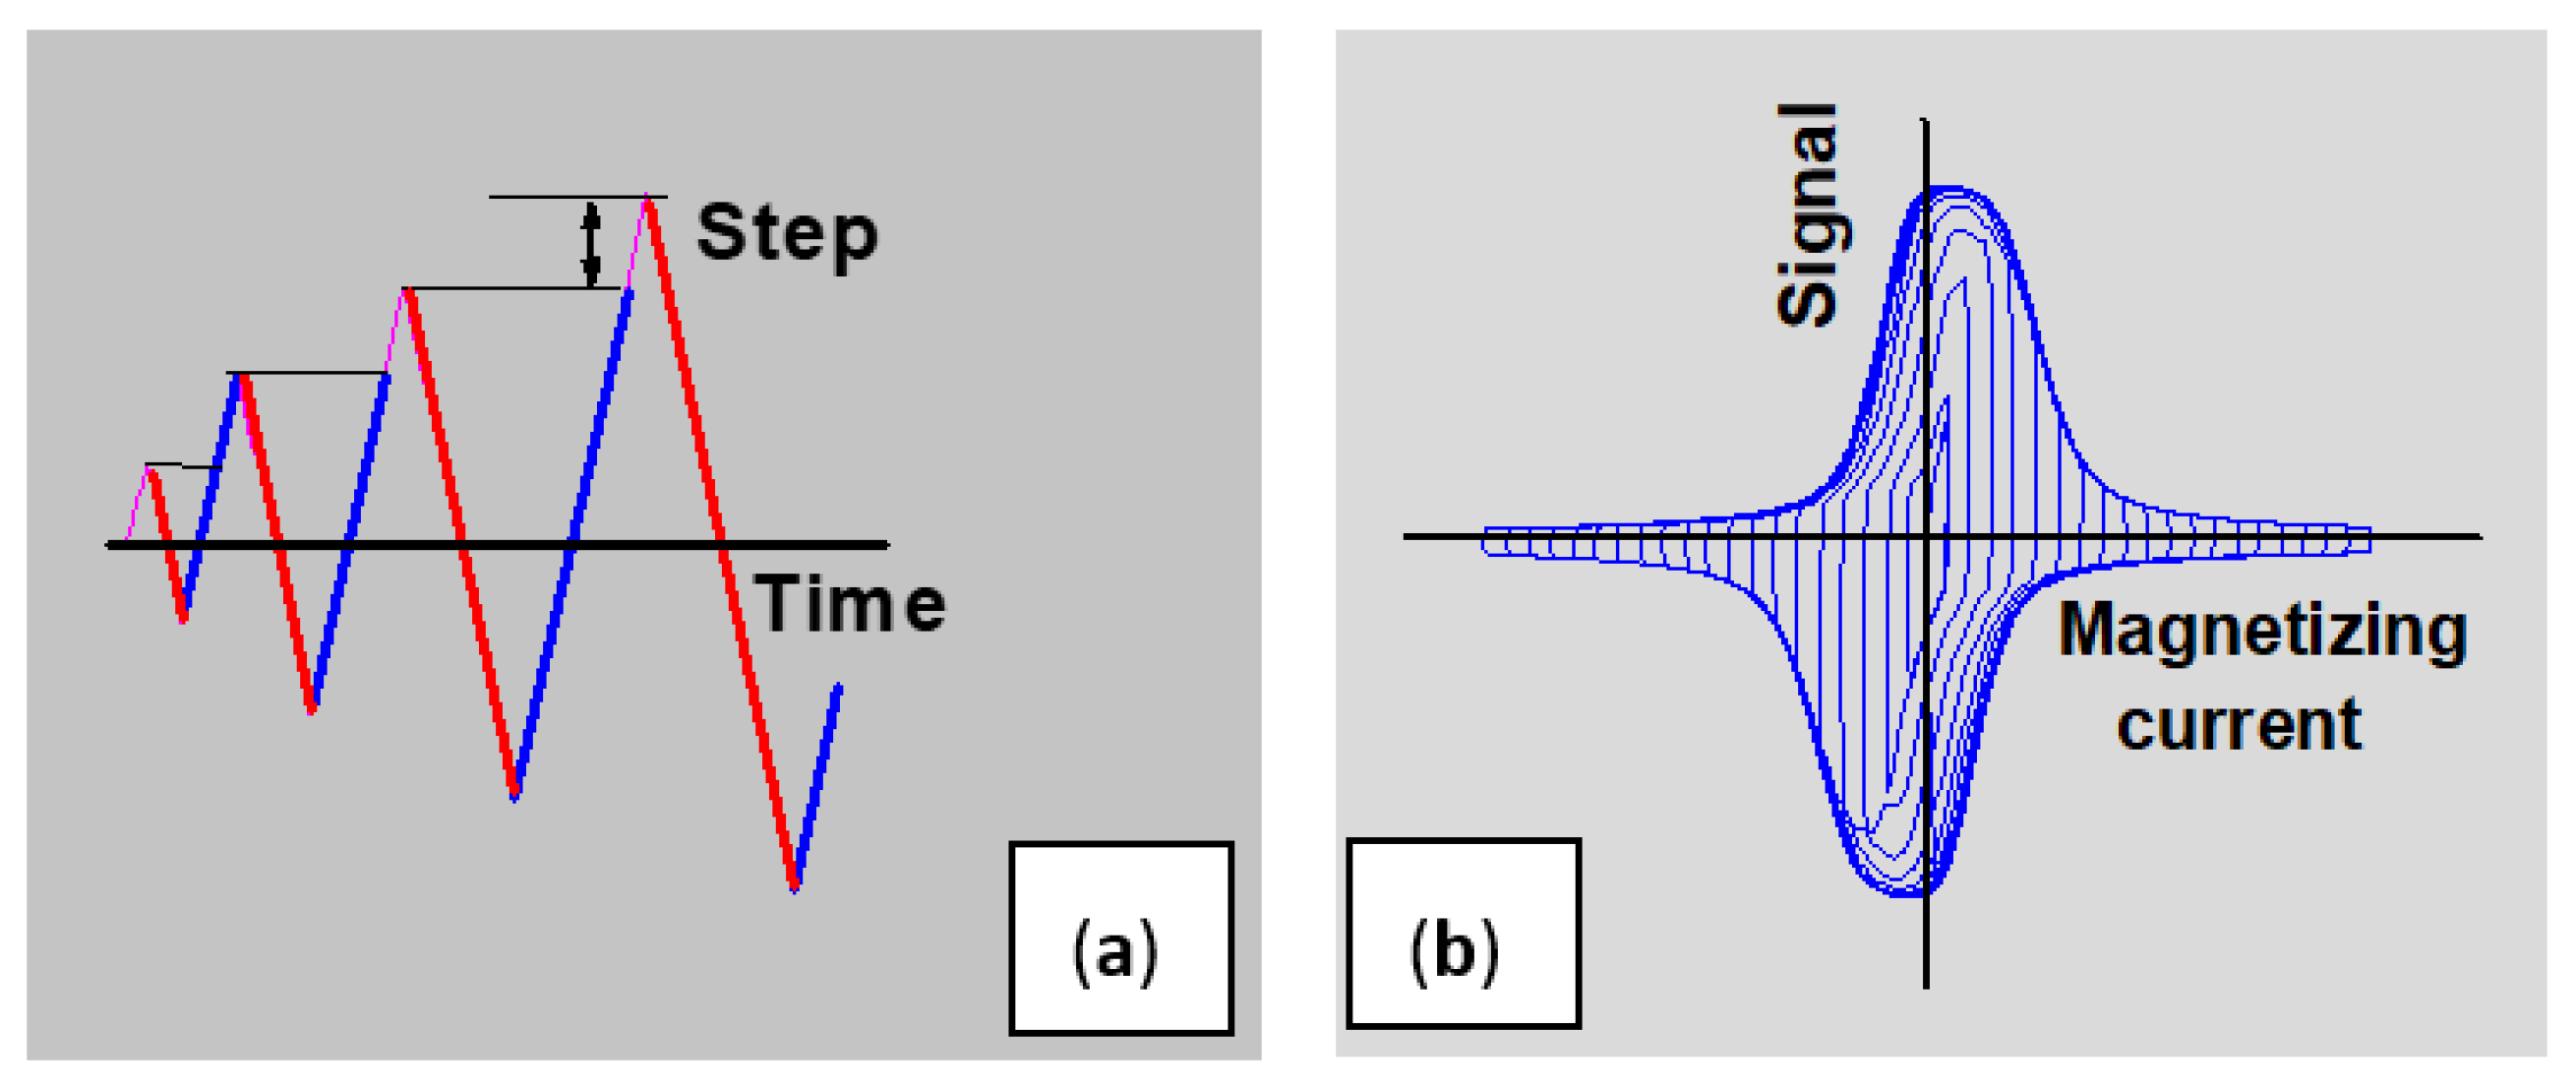
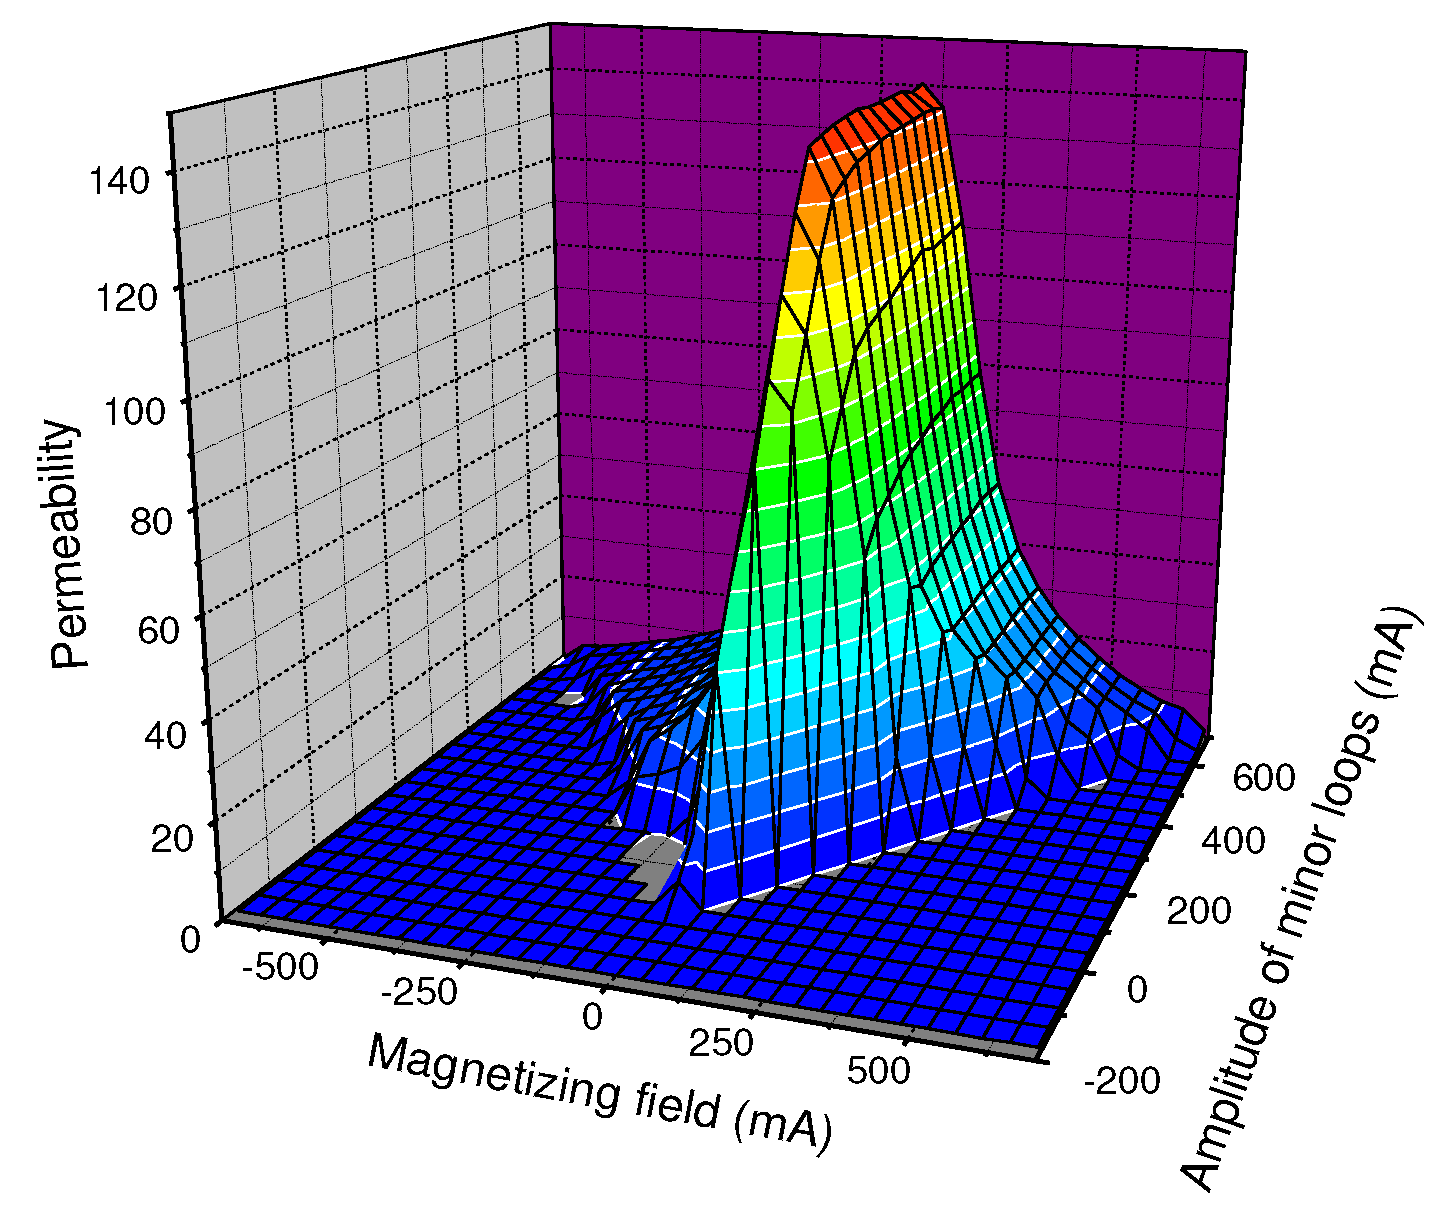
scaling laws (PSL) [31, 68]. A similar method, called magnetic adaptive testing
(MAT) also measures systematically the minor magnetic hysteresis loops [69-71].
As it was demonstrated, all 3MA, PSL and MAT methods are multi-parametric,
powerful and sensitive method of magnetic inspection. In case of MAT method
systematic comparisons were made between different magnetic nondestructive
techniques: different methods
−
full hysteresis loop measurement, MAT and MBN
−
were applied in
series of plastically deformed transformation induced plasticity (TRIP) steel
specimens, and the results of these methods were compared with each other
[72]. As a conclusion:
Good correlation was found between
magnetic parameters, measured by different techniques, which is a direct proof
that all magnetic methods accurately characterize the material degradation.
MAT seems to be the most sensitive
method among the other investigated ones.
Good correlation was also found
between magnetic parameters and with the destructively measured Vickers
hardness values. This fact makes possible the future potential use of magnetic
methods in the inspection of RPVs’ structural integrity.
All of these parameters were
determined without magnetic saturation of the investigated samples. This fact
is very important in practical applications.
In the next section it will be
reviewed, how these methods have been applied for investigation of the material
degradation, caused by neutron irradiation.
The methods 3MA, MAT and MBN were
applied in the NOMAD project.
4. Magnetic Nondestructive Tests of Various Neutron Irradiated RPV Steels - State of Art
The practical applicability of
magnetic methods have been proved recently by several successful measurements.
These methods are suitable for quantitative indication of micro-structural
modifications of RPV steel, causing steel embrittlement. Based on these results
the future potential application of magnetic methods seems to be promising in
the inspection of RPVs’ structural integrity. Possibilities and difficulties of
the NDE evaluation of irradiation degradation is analysed in Ref.
[73]. There is a comprehensive
summary about the investigation of the hardening in neutron irradiated and
thermally aged iron-copper alloys, on the basis of mechanical and magnetic
relaxation phenomena in Ref.
[74]. In this subsection the results, which were achieved in the area of
magnetic nondestructive tests of various irradiated RPVs are shown, with
separated results for each of the applied methods.
4.1. Major Hysteresis Loop Measurements
The modification of the magnetic
hysteretic behaviour generated by neutron irradiation was studied for different
materials in
[75]. Two
parameters of the hysteresis loop (maximum relative differential permeability
and peak intensity of interaction field) were determined as a function of
neutron fluence. A decreasing trend (change up to 40%) was found in magnetic
parameters during embrittlement, regardless the origin of the embrittlement.
The influence of the neutron
irradiation on the M-H magnetization curve of the RPV material was studied in
[76]. The saturation and the
residual magnetic induction and the initial magnetic susceptibility were
determined. It was found that the clockwise variation of the magnetization of
the hysteresis curves before irradiation was lower than than after irradiation.
Furthermore, the magnetization of the specimens before and after irradiation
were not sensitive to temperature changes. The residual magnetization intensity
was found as linearly related to the irradiation fluences less than 0.154 dpa.
An exponential relationship of initial magnetic susceptibility with the
radiation fluence was found as well.
The modification of saturation
magnetization of RPV steel, caused by neutron irradiation was studied in
[77]. Magnetic and metallurgical
properties were investigated by hysteresis loop and ferromagnetic resonance
(FMR) techniques. Saturation magnetization of neutron-irradiated steel
increased. To explain the cause of this increase, FMR experiments were also conducted
and a large difference was experienced in the resonance fields of
non-irradiated and irradiated samples.
Irradiation-generated changes in
the magnetic behaviour and in the mechanical properties were measured and
compared in RPV forging and weld surveillance Charpy specimens to reveal the
possible correlations between them
[78]. The samples were irradiated by E>1.0 MeV energy neutrons up to
the fluence of 2.3×10¹⁹ n cm-2. Tensile and Charpy impact
tests and Vickers microhardness measurements were carried out as mechanical
parameters. Magnetic parameters, such as saturation magnetization, remanence,
coercivity and Barkhausen noise amplitude were determined for none irradiated
and for irradiated specimens. Hysteresis loops were found to turn clockwise,
which resulted an increase in coercivity. Barkhausen noise amplitude decreased
after irradiation. These magnetic parameters revealed correlation with the
changes of mechanical parameters.
Recently, research on magnetic
methods to investigate the neutron irradiation embrittlement processes of RPV
steel have been focused mainly on Barkhausen emission measurements, and on
minor hysteresis loop measurements as will be discussed in next subsections.
4.2. Barkhausen Emission Measurements
Promising results were achieved in
the field of magnetic nondestructive tests of irradiated RPV steel also by
applying Barkhausen emission measurements. One of them was already mentioned in
previous sub-section
[59].
As shown in
[79], the measurement of Barkhausen
emission can reveal neutron irradiation caused degradation in pressure vessel
this parameter were in the range of −20% to −45% in case of fluences up to
25×1018 n/ cm-2.
MBN and magnetomechanical acoustic
emission were applied in Mn–Mo–Ni pressure-vessel steels, having different
microstructures for studying the influence of microstructural changes on these
parameters
[80]. The
measured signals were significantly affected the microstructural features. MBN
energy varied inversely with hardness and it depended also by the
microstructure. The results indicated that these quantities were closely
related to the dislocation density and residual stress which.
Barkhausen noise measurements were
used for the investigation of the radiation damage and thermal recovery of
irradiated RPV steel samples
[81]. There were identified two recovery stages from the hardness
measurements results. This effect resulted from isochronal annealing, and it
was presumed to be accountable for it. The mechanism can be explained by using
the results of MBN measurement on the basis of the interaction between
radiation induced defects and the magnetic domain wall. Irradiation caused an
increase in the maximum magnetic induction, but the coercivity was not modified
by neutron irradiation. MBN parameters associated with the magnetic domain wall
motion decreased due to neutron irradiation, and they recovered with subsequent
heat treatments.
Papers
[82,83] deal with the use of MBN
measurements to study the irradiation effects on nuclear reactor structural
materials. Different RPV materials were investigated, and the specimens were
irradiated with different neutron fluences. A stabilised flux mode was used,
the magnetic flux within the sample was controlled to compensate for leakage
and variations on the flux. Anisotropy effect caused by the sample cutting
direction was found, which masked the magnetic signal induced by the
irradiation effects. Specimens cut in the same direction correlate with
irradiation-generated material hardening and its dependency on fluence. It was
found that different materials resulted in different hardening levels. MBN
parameters were correlated to neutron fluence by taking into account the
cutting direction.
Microstructure effects on MBN
emission and on first-order reversal curve (FORC) analysis was studied in
ferritic/martensitic alloy (HT-9), which can be interesting for the experts in
nuclear materials
[84].
It was found that MBN emission and reversible component of magnetization,
determined from the FORC data, decreased with increasing mechanical hardness.
The results were discussed in terms of the use of magnetic signatures for use
in NDE of radiation damage and other microstructural changes in
ferritic/martensitic alloys. It is shown in this work, that FORC analysis is
particularly useful for characterization of defect density and pinning, which
can be correlated to bulk NDE field measurements such as MBN emission.
4.3. Measurement of Minor Hysteresis Loops
By applying the magnetic minor
loops power scaling laws (PSL), neutron irradiation generated modification of
minor loops was found in pure Fe and in different model alloys
[85]. Minor hysteresis loop
coefficients which were determined from scaling relations between minor-loop
parameters and in proportion to internal stress decreased in all materials,
irradiated by a neutron fluence of 3.32×10¹⁹ n cm−2. The
decrease of the coefficients was found to be larger for alloys containing Cu,
and it is enhanced by 1% Mn addition. This decrease can be caused by the
reduction of internal stress during irradiation. It is in contrast with the
changes of yield strength after neutron irradiation, which is increasing with
Cu and Mn contents. In this paper, a qualitative explanation can be found on
the basis of the preferential formation of Cu precipitates along pre-existing
dislocations, which decreases internal stress of the dislocations.
The same PSL method was used for
the measurement of low carbon steel and Fe metal, which were irradiated at 563K
in a 50MW nuclear reactor
[86]. Special attention was devoted to minor-loop coefficients
investigating the nucleation mechanism of copper precipitates and dislocation
loops during neutron radiation. The minor-loop parameters was found to be very
sensitive to lattice defects, such as dislocations, copper precipitates, and
grain boundaries. The minor-loop coefficients increased monotonously with the
increase of neutron fluence in Fe metal. Here the dislocation loops has an
important role for the brittleness.
Minor magnetic hysteresis loops
were also measured on A533B-type RPV steels having various combinations of Cu
and Ni content. Samples were irradiated by neutrons to a fluence up to 3.32x 10¹⁹
n cm-2
[87].
There was found a strong compositional dependence in the minor-loop
coefficient, which is obtained from a scaling power law between minor-loop
parameters. This is due to the internal stress. A large increase was found in
the low fluence regime (below 0.4x10¹⁹ n cm-2) in the
properties of high Ni and high-Cu steel, which was followed by a slow decrease.
However, in low Ni and low-Cu content steel, a sudden decrease was experienced.
These variations are mostly in a linear relationship with changes in yield strength.
The results were interpreted from the viewpoint of the formation and growth of
Cu-rich precipitates and/or fine scale defects in the matrix and along
pre-existing dislocations. A model analysis, assuming Avrami-type growth of
Cu-rich precipitates and an empirical logarithmic law for relaxation of
residual stress demonstrated that an increment of the coefficient due to
Cu-rich precipitates increased with Cu and Ni contents and was in proportion to
a yield stress change, related to irradiation hardening
[88,89].
In
[90]
the applicability of MAT, an
alternative way of minor hysteresis loop measurement is demonstrated for the
inspection of neutron irradiation embrittlement in RPV steels. Three series of
samples (JRQ, 15CH2MFA and 10ChMFT type steels), irradiated by E > 1 MeV
energy neutrons with total neutron fluence of 1.58 – 11.9 x 10¹⁹ n
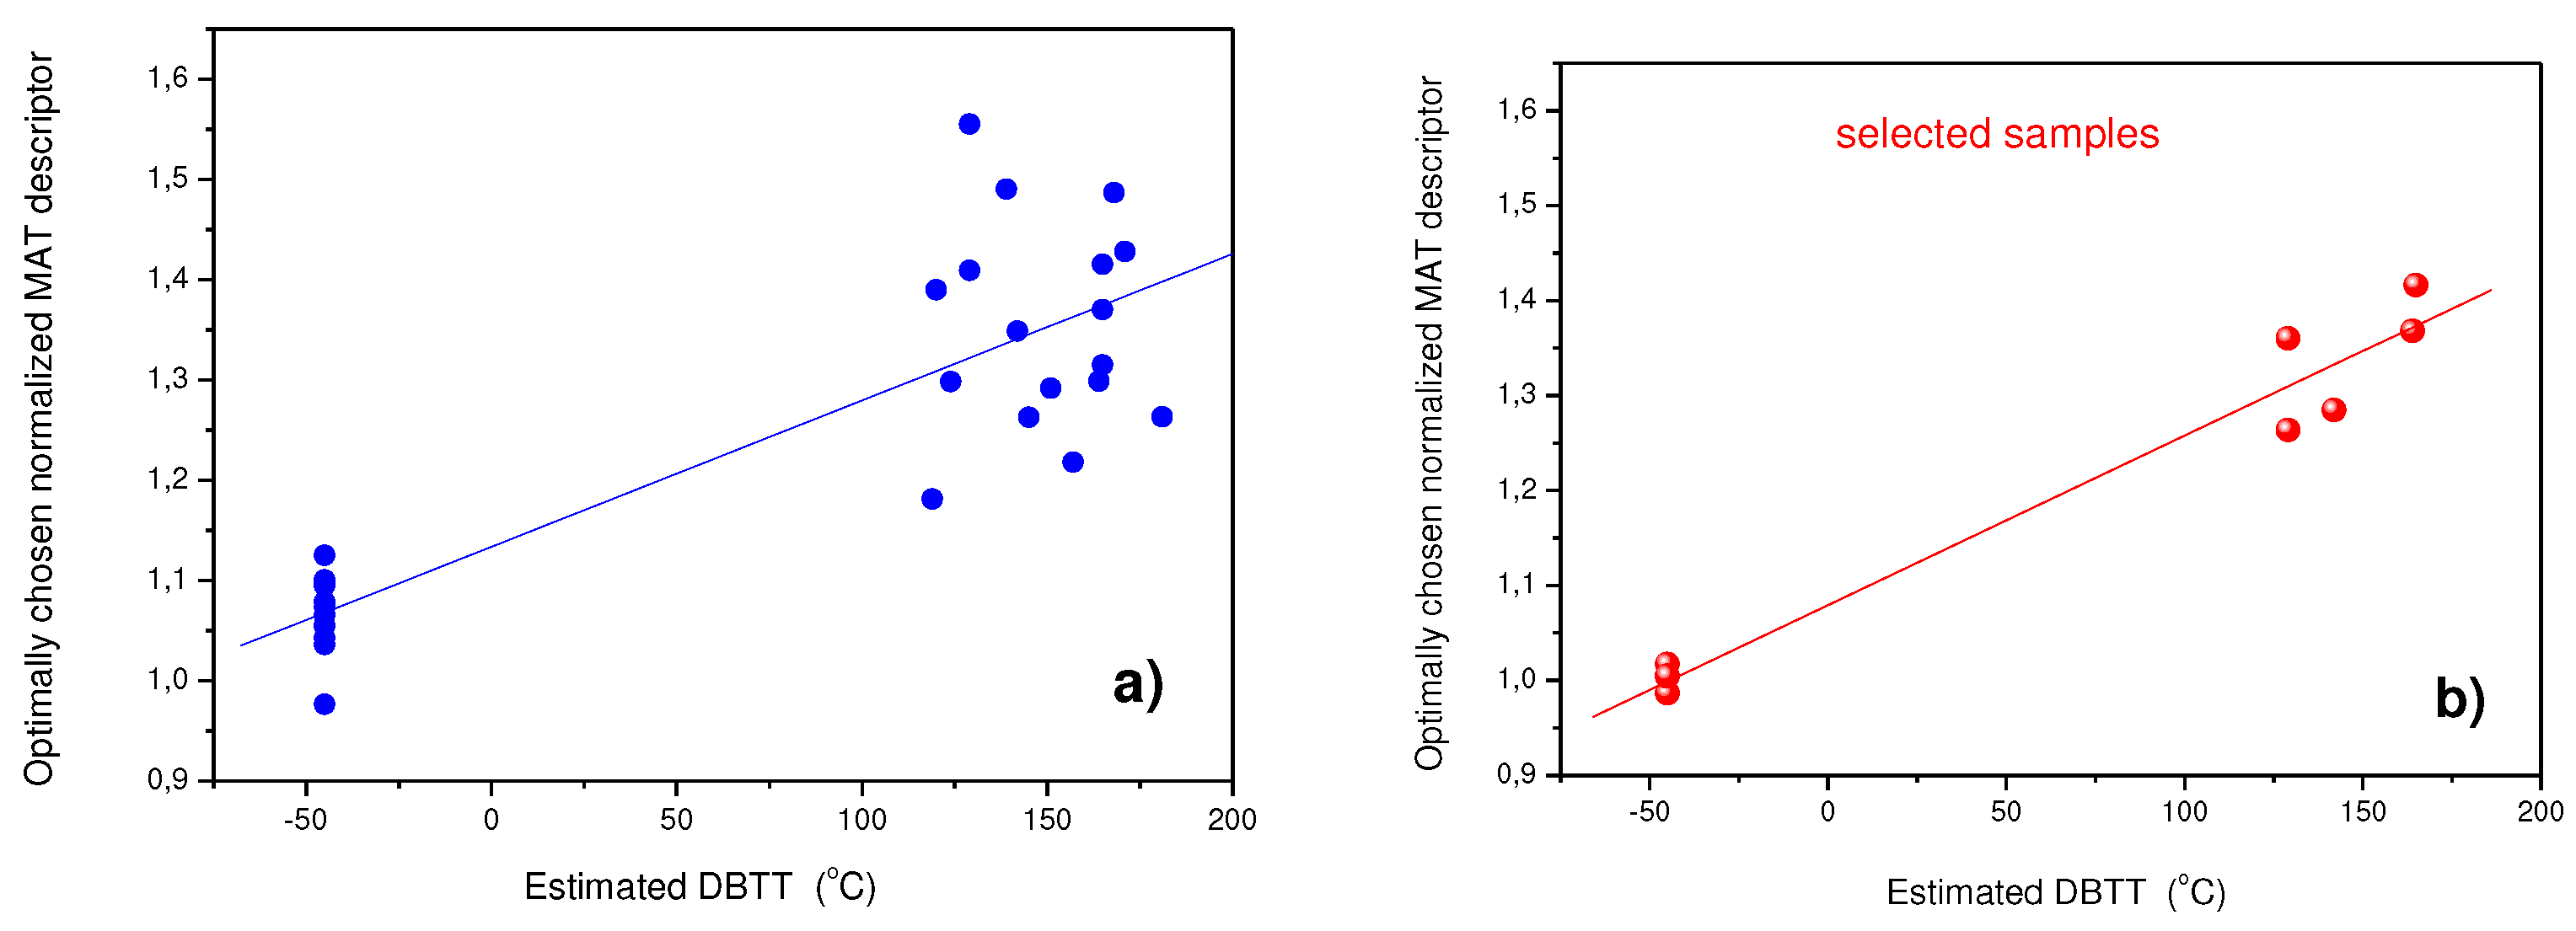
cm-2 were investigated by this method. Correlation was demonstrated
between the MAT parameters and the neutron fluence in all types of the
investigated materials. Shift of DBTT as a function of the neutron fluence for
the 15CH2MFA type material was also evaluated. In this case, a sensitive,
linear correlation was found between DBTT and MAT parameters. Based on these
results, MAT was shown as a promising, complimentary tool of the destructive
tests within the surveillance programs, currently used for the inspection of
neutron-irradiation-generated embrittlement of RPV steels. It was also found
that the sensitivity depended also on the structural anisotropy due to the
original direction of the material rolling/forging. The samples magnetized
along the original direction of steel rolling provided the most sensitive
results. Another conclusion of these measurements was that the magnetic
properties of the samples were affected by the quality of the magnetic contact
between the sample surface and the attached soft magnetic yoke. It was
concluded that if the yoke was not in good contact with the sample surface, the
results would be strongly influenced.
In other work
[91]
three methods (MBN emission
measurements, PSL and MAT) were compared with each other on the same series of
neutron irradiated RPV steel material. JRQ and 15Kh2MFA material and 10KhMFT
type welding steels (for WWER 440-type Russian reactors) were used for the
measurements, which were irradiated by high-energy (>1MeV) neutrons with up
to 11.9x10¹⁹n cm-2 fluences. MAT was found as the most
sensitive method among the investigated techniques. It revealed the most
straightforward linear correlation with the independently measured DBTT values.
The other magnetic methods (MBE and PSL) were found to be less sensitive than
MAT, and also, they did not correlate with DBTT, nor with each other.
Considering that both MBN and PSL are highly structure-sensitive magnetic methods,
the lower sensitivity and their poor correlation with DBTT can be primarily
attributed to the different sensitivity to lattice defects from that of DBTT.
It was also concluded, similarly to experiences in
[90], that an uncontrolled
fluctuation of surface quality of the slightly corroded specimens made the
measurement difficult. Contact-less ways of investigating of more conveniently
shaped irradiated nuclear pressure vessel steel samples was suggested for future
inspections.
The influence of the rough surface
on MAT measurements was carefully analysed in
[92], and it was found that this harmful effect could be significantly
reduced by applying a non-magnetic spacer between the sample surface and the
magnetizing yoke.
4.4. Electromagnetic NDT Techniques
3MA method (micromagnetic,
multiparameter, microstructure and stress analysis) has been found as a
suitable tool for the characterization of the degradation of ferromagnetic
materials (like RPV steels).
The microstructure of the steels
is modified by the neutron induced embrittlement. This phenomenon depends on
the neutron fluence but also on the special design of the RPV of nuclear power
plants. Embrittlement contributes to the increase of hardness and strength on
the basis of vacancies and Cu-rich precipitates, and also to the shift of the
DBTT to higher temperatures. Micromagnetic investigations were done at full
Charpy specimen and material of the last generation of German NPP in order to
characterize the material degradation
[93]. This contribution reports on the results obtained by the
application of the 3MA method and the magnetostrictive excitation of ultrasound
using an EMAT. Both technologies document potential to be further developed to
an in-service inspection technique.
By using the electromagnetic
non-destructive techniques the ability of characterization of material ageing
was demonstrated
[94].
Thermal degradation causes hardness enhancement and appearance of Cu
precipitation. An early warning can be done before fatigue life is elapsed due
to Low Cycle Fatigue.
By using the micromagnetic
non-destructive techniques the ability of characterization of material ageing
was demonstrated
[94].
Thermal degradation causes hardness enhancement and appearance of Cu
precipitation. An early warning can be done before fatigue life is elapsed due
to Low Cycle Fatigue.
The DBTT shift was indicating when
material degradation was at well-defined laboratory-type specimens. A high
sensitivity and confidence in the results was obtained. As the special
application of EMAT sensors demonstrated its reliable use at a service temperature
of 300 oC, the integration of this sensor type into plant lifetime
management systems is an engineering problem. The purpose is to solve the
proper selection of cooling devices for the driving microelectronic systems and
to apply heat resistant wires for coils and cables especially isolated for high
temperature access.
5. NOMAD Project
As it is outlined in the
introduction, the long-term operation (LTO) of existing nuclear power plants
(NPPs) has already been accepted in many countries as a strategic objective to
ensure adequate supply of electricity over the coming decades. In order to
estimate the
remaining
useful
lifetime of NPP components, LTO requires reliable and accurate tools.
To achieve a step forward in this important area, a joint research
work was initiated by ten different laboratories from seven different European
countries.
The project (Non-destructive Evaluation
System for the Inspection of Operation-Induced Material Degradation in Nuclear
Power Plants, or, NOMAD for short) has received funding from the Euratom
research and training programme 2014-2018 under grant agreement No 755330. The
common work started in 2017
[95].
The
objective
of NOMAD was the development, demonstration and validation of a NDE
tool for the local and volumetric characterisation of the embrittlement in
operational reactor pressure vessels (RPVs). In order to address these
objectives, the following steps were taken:
Development and demonstration of an NDE tool for the characterisation of RPV embrittlement, especially accounting for material heterogeneities and exceeding the existing information from surveillance programmes.
Extension of the existing database of RPV material degradation by adding correlations of mechanical, microstructural and NDE parameters as well as including quantification of reliability and uncertainty.
Application of the developed tool to cladded material resembling the actual RPV inspection scenario.
The project NOMAD took into
account the priorities of reactor operation, responding to stringent safety
requirements from regulators, and sought to foster the convergence of nuclear
safety approaches. The approach developed within NOMAD delivers information
complementary to and exceeding the information obtained by destructive tests of
surveillance samples, which are currently assumed to represent the whole
component and do not take into account possible local material variations.
NOMAD’s aim was to fulfil requirements for nuclear safety in the framework of
assessment for lifetime operation.
In the previous section different
application possibilities of several novel – mainly magnetic – nondestructive
methods are reviewed. As it is seen, good results were achieved, how these
methods could be applied for the inspection of neutron irradiation generated
embrittlement of RPV steel. However, only few of them were done on mechanically
intact RPV steel, which would form a continuous series from not-irradiated
samples up to samples of the same RPV material having the same shape, which
would be subjected to high fluence of neutrons in a nuclear reactor. Hence, it
can be stated that presently there is no really effective nondestructive method
for radiation embrittlement evaluation in practical use. One of the reasons of
the contradictory results is that the investigated irradiated specimens were
mostly collected from different surveillance programs. Furthermore the
investigated specimens were often mechanically deformed, sometimes corroded,
and in several cases the zero level specimens were missing, or they were cut
from different parts of the material.
Within NOMAD project several
different nondestructive techiques were applied to detect the neutron
irradiation generated material degradation in many different RPV steel
materials, having either Charpy geometry or larger, cladded or non-cladded
blocks. The same series of samples were measured before and after neutron
irradiation, and the results, obtained by different methods were compared with
each other. The purpose was to reveal the benefits and drawbacks of different
methods, and finally to find, which techniques are suitable for future,
practical applications. The parameters extracted from different methods were
compared with the destructively measured DBTT values. A combination of several
NDE methods has been used to examine how accurately and reliably the
degradation of RPV material can be determined, especially when compared to
sample-based destructive testing.
Charpy samples, cladded and
non-cladded blocks of various RPV steels and irradiation states were provided.
NDE techniques were adapted and applied to measure the irradiated and
non-irradiated samples. The applied NDE methods were the magnetic methods MAT,
3MA-X8, MBN, the electrical methods DCRPD, TEP and the ultrasonic method
Piezo-US. They were used to characterise the microstructure changes and the
variation of the material properties as a function of progressing exposure
(fluence level).
Table 1
gives an overview on the NDE methods applied to different specimen
geometries (Charpy and blocks) within the project.
Destructive reference tests for
the determination of the DBTT and other material characteristics were carried
out. The irradiated samples were measured and the data were correlated with the
DBTT values by using machine learning methods.
The ultimate goal was to produce a
machine learning-based computational tool that can estimate the neutron
irradiation-induced embrittlement of reactor pressure vessel steel alloys based
on the NDE parameters. This would revolutionize the current surveillance
procedures, which rely heavily on destructive methods.
The non-destructive
characterization was carried out by means of micromagnetic, electrical and
ultrasonic methods at various stages of material degradation caused by neutron
irradiation. They were used to characterise the microstructure changes and the
variation of the material properties as a function of progressing exposure
(fluence level).
Table 1
gives an overview on the NDE methods applied to different specimen
geometries (Charpy and blocks) within the project.
In the following chapters the results of NOMAD project will be presented and analyzed.
6. Materials
Several sets of samples with
various irradiation and embrittlement conditions were provided. The first
specimen set consists of ISO-V Charpy samples of the four materials 18MND5
(weld), 22NiMoCr37, HSST-03 (A533-B) and A508-B. These were existing samples
from previous CHIVAS - surveillance programs, which were available in
non-irradiated states and in two or three irradiation states. The second
specimens set consists also of ISO-V Charpy samples of the two materials
A508Cl.2 and 15kH2NMFA. The A508Cl.2 was cut out from ¾ depth of a large part
of the Lemoniz reactor vessel, a Spanish reactor of Western type that was never
operated,
[96,97]. The
15kH2NMFA material was cut out from original eastern 1000 MW RPV from the ¼
depth. The 15Kh2NMFA (CrNiMoV) forging steel was manufactured by the Russian
IZHORA company for a 1000 MW WWER reactor. The original heat number is 181358
and the forging steel was produced according to the Russian specification TU
108.765-78. These Charpy samples were irradiated at three well-defined levels
at the Belgium Reactor BR2. The neutron irradiation was performed in a
specially designed rig where 24 Charpy specimens were directly irradiated
[98]. The second set of specimens
could be non-destructively measured before and after irradiation, so an
evaluation of the progressive change of the embrittlement could be performed.
Table 2
shows the
corresponding material compositions.
Finally, in order to characterize the neutron-irradiation induced embrittlement through the cladding, a third specimen set was chosen consisting of six cladded and six non-cladded blocks of Western RPV material A508 Cl.2 (See also in
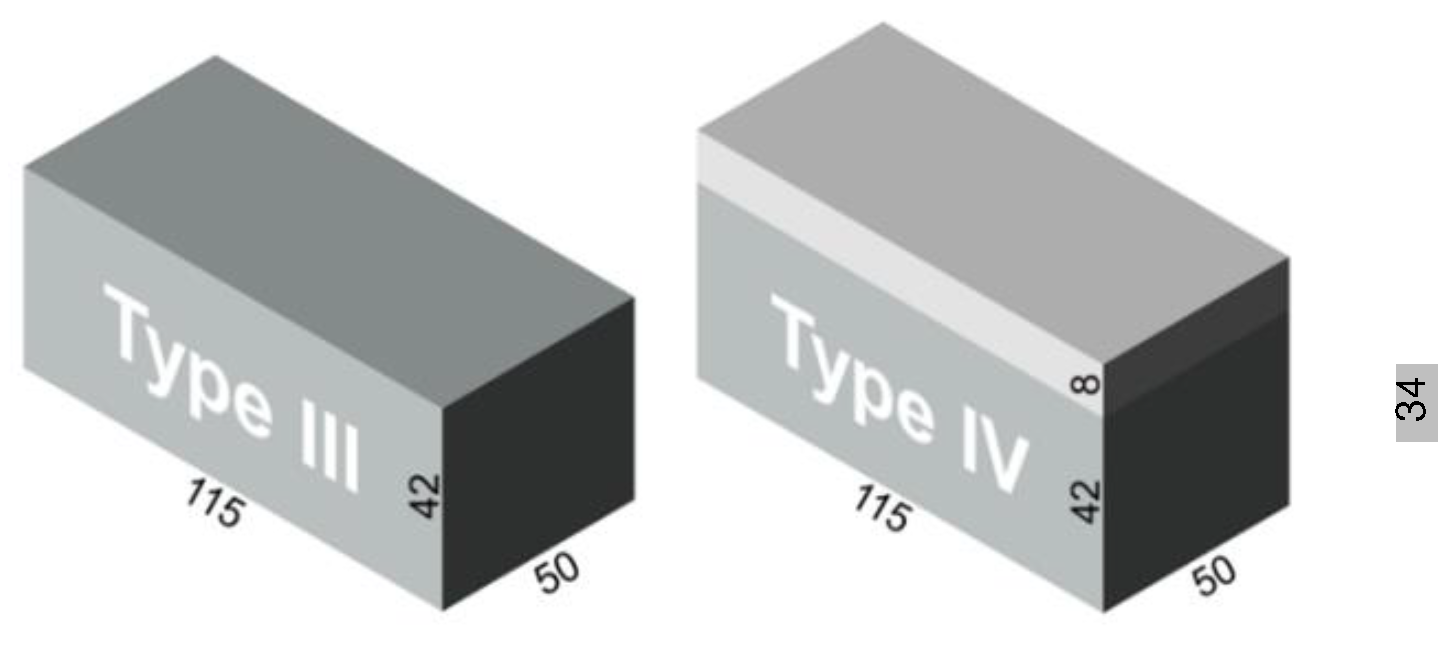
Table 2). They are more representative for in-situ vessel inspection than the standard test Charpy samples, and has been fabricated and irradiated over a large range of neutron fluences at BR2. One part of the block samples without cladding was made of compact material cut out of the mid area of a real RPV, whereby another part of the block samples with cladding was cut out from the cladded surface of the RPV. So, the latest can be used to examine the capability of the non-destructive measuring methods for testing the irradiation induced material degradation through the cladding. The dimensions of both types of block samples are shown in
Figure 2.
These blocks were irradiated at
three defined levels within BR2 similarly to the second specimens set. Two
different strategies have been applied for the irradiation. The first one aimed
to achieve an as uniform as possible neutron fluence profile and was applied on
three cladded blocks and three, non-cladded blocks. The second one aimed to
achieve damage that is much more realistic since the blocks have experienced a
fluence attenuation profile.
7. Mechanical Testing
Charpy impact tests were performed
on all of the samples previously investigated non-destructively in order to
determinate the DBTT. For the determination of DBTT of the blocks, Charpy
samples have been cut out from the top layer as well as from the bottom layer.
By this procedure individual DBTT values for both sides of the block specimens
could be provided. The results of the mechanical testing for all three
specimens sets are shown in the
Table 3,
Table 4 and
Table 5.
For the CHIVAS-samples (first
sample set) it is visible that the DBTT is not strongly correlated with the
real fluence level. Probably the overlapping varying fluence temperature may
cause an annealing effect, which reduces the influence of the irradiation.
For the Charpy and block samples
(second and third sample set) where the irradiation temperature was constant it
can be seen that there is a strong correlation between the fluence level and
the DBTT for the samples with 0, low and medium fluence. However, for the
samples with medium and high fluence there is no more increasing of the DBTT.
There is a clear saturation effect.
8. Experimental Results
8.1. Measuring Procedure
In order to guarantee reproducible measurements and a stable sample-probe coupling, sample/probe holders were constructed for each NDE technique. These were relevant especially for measuring the irradiated samples in the hot cell by the mechanical manipulation for handling and positioning the samples onto the NDE probe.
In order to define a unique way to perform all NDE measurements, an inspection and quality assurance procedure was defined. According to this procedure, each sample was measured five times, each time picking up the probe and replacing it on the sample. Although sample/probe holders were used the remaining scattering caused by the handling could be averaged by the repetitions.
As the measuring activities were spread over three years it was necessary to monitor the stability and functionality of the measuring NDE devices and probes. Therefore calibration samples were defined and were periodically measured by NDE. The analysis of the resulting outcome of these NDE measurements yields to the conclusion that all NDE results are stable over the time.
8.2. Description of the NDE of Embrittlement
8.2.1. Charpy Specimens
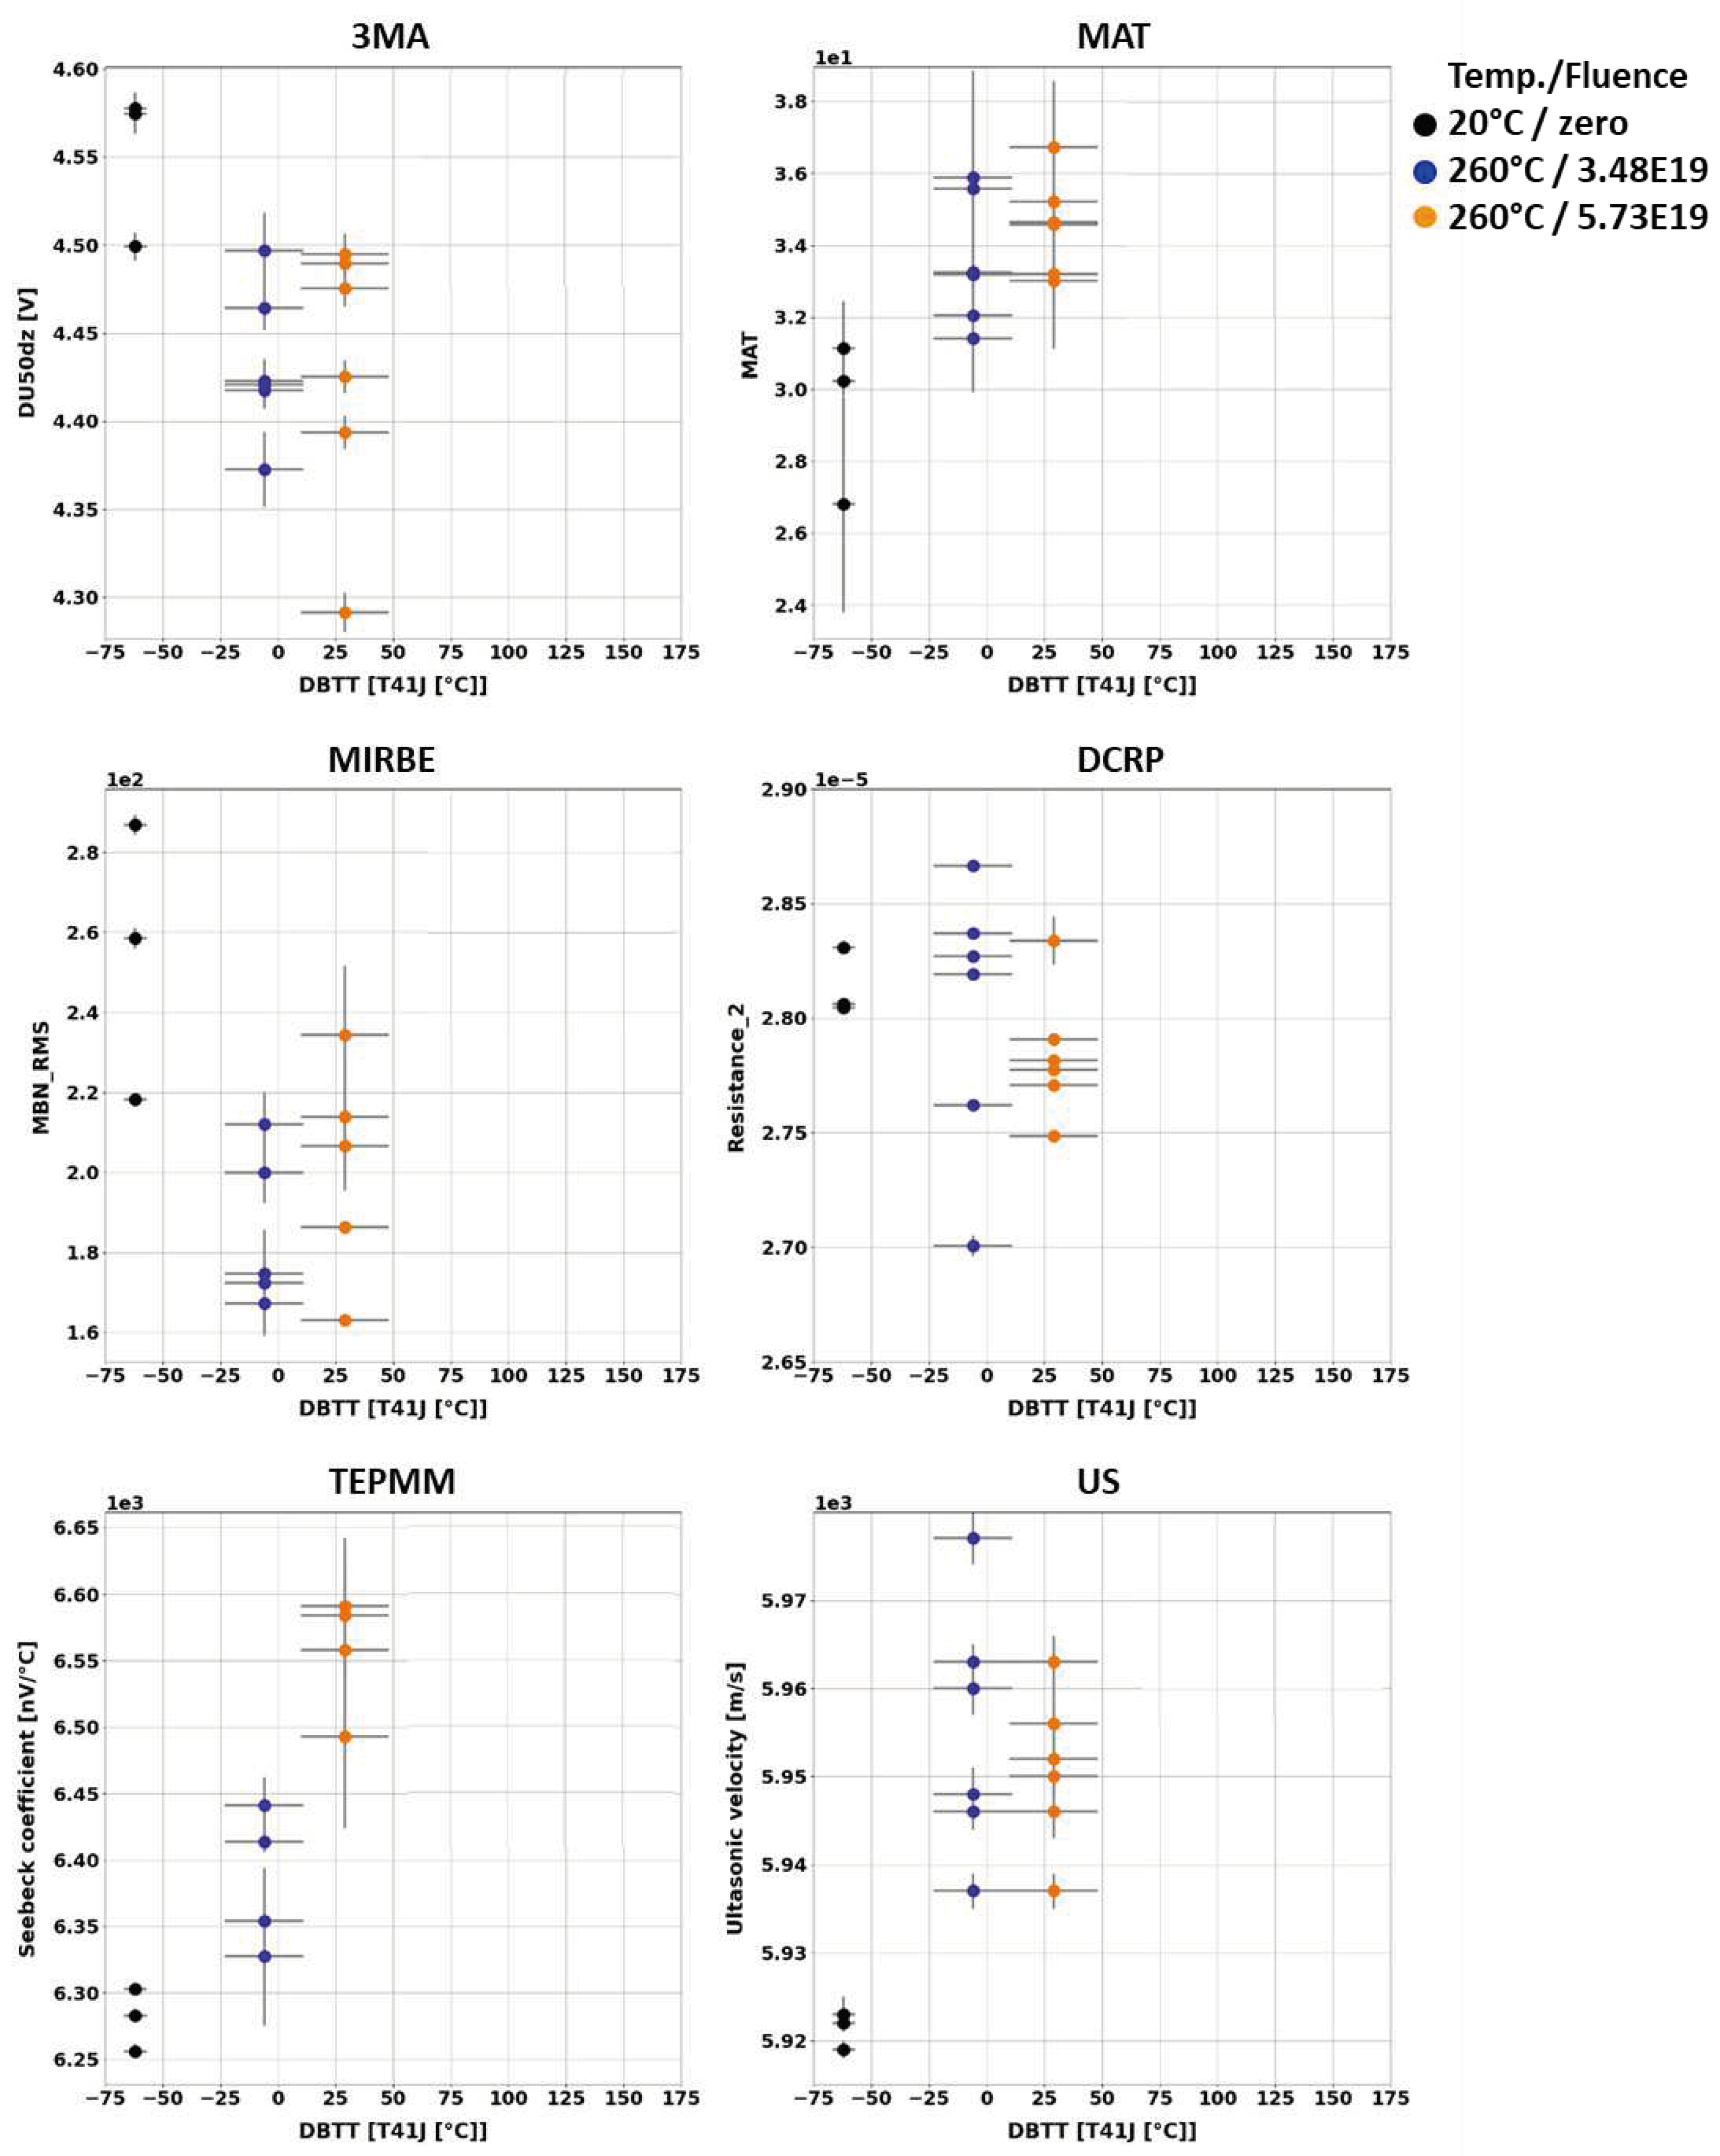
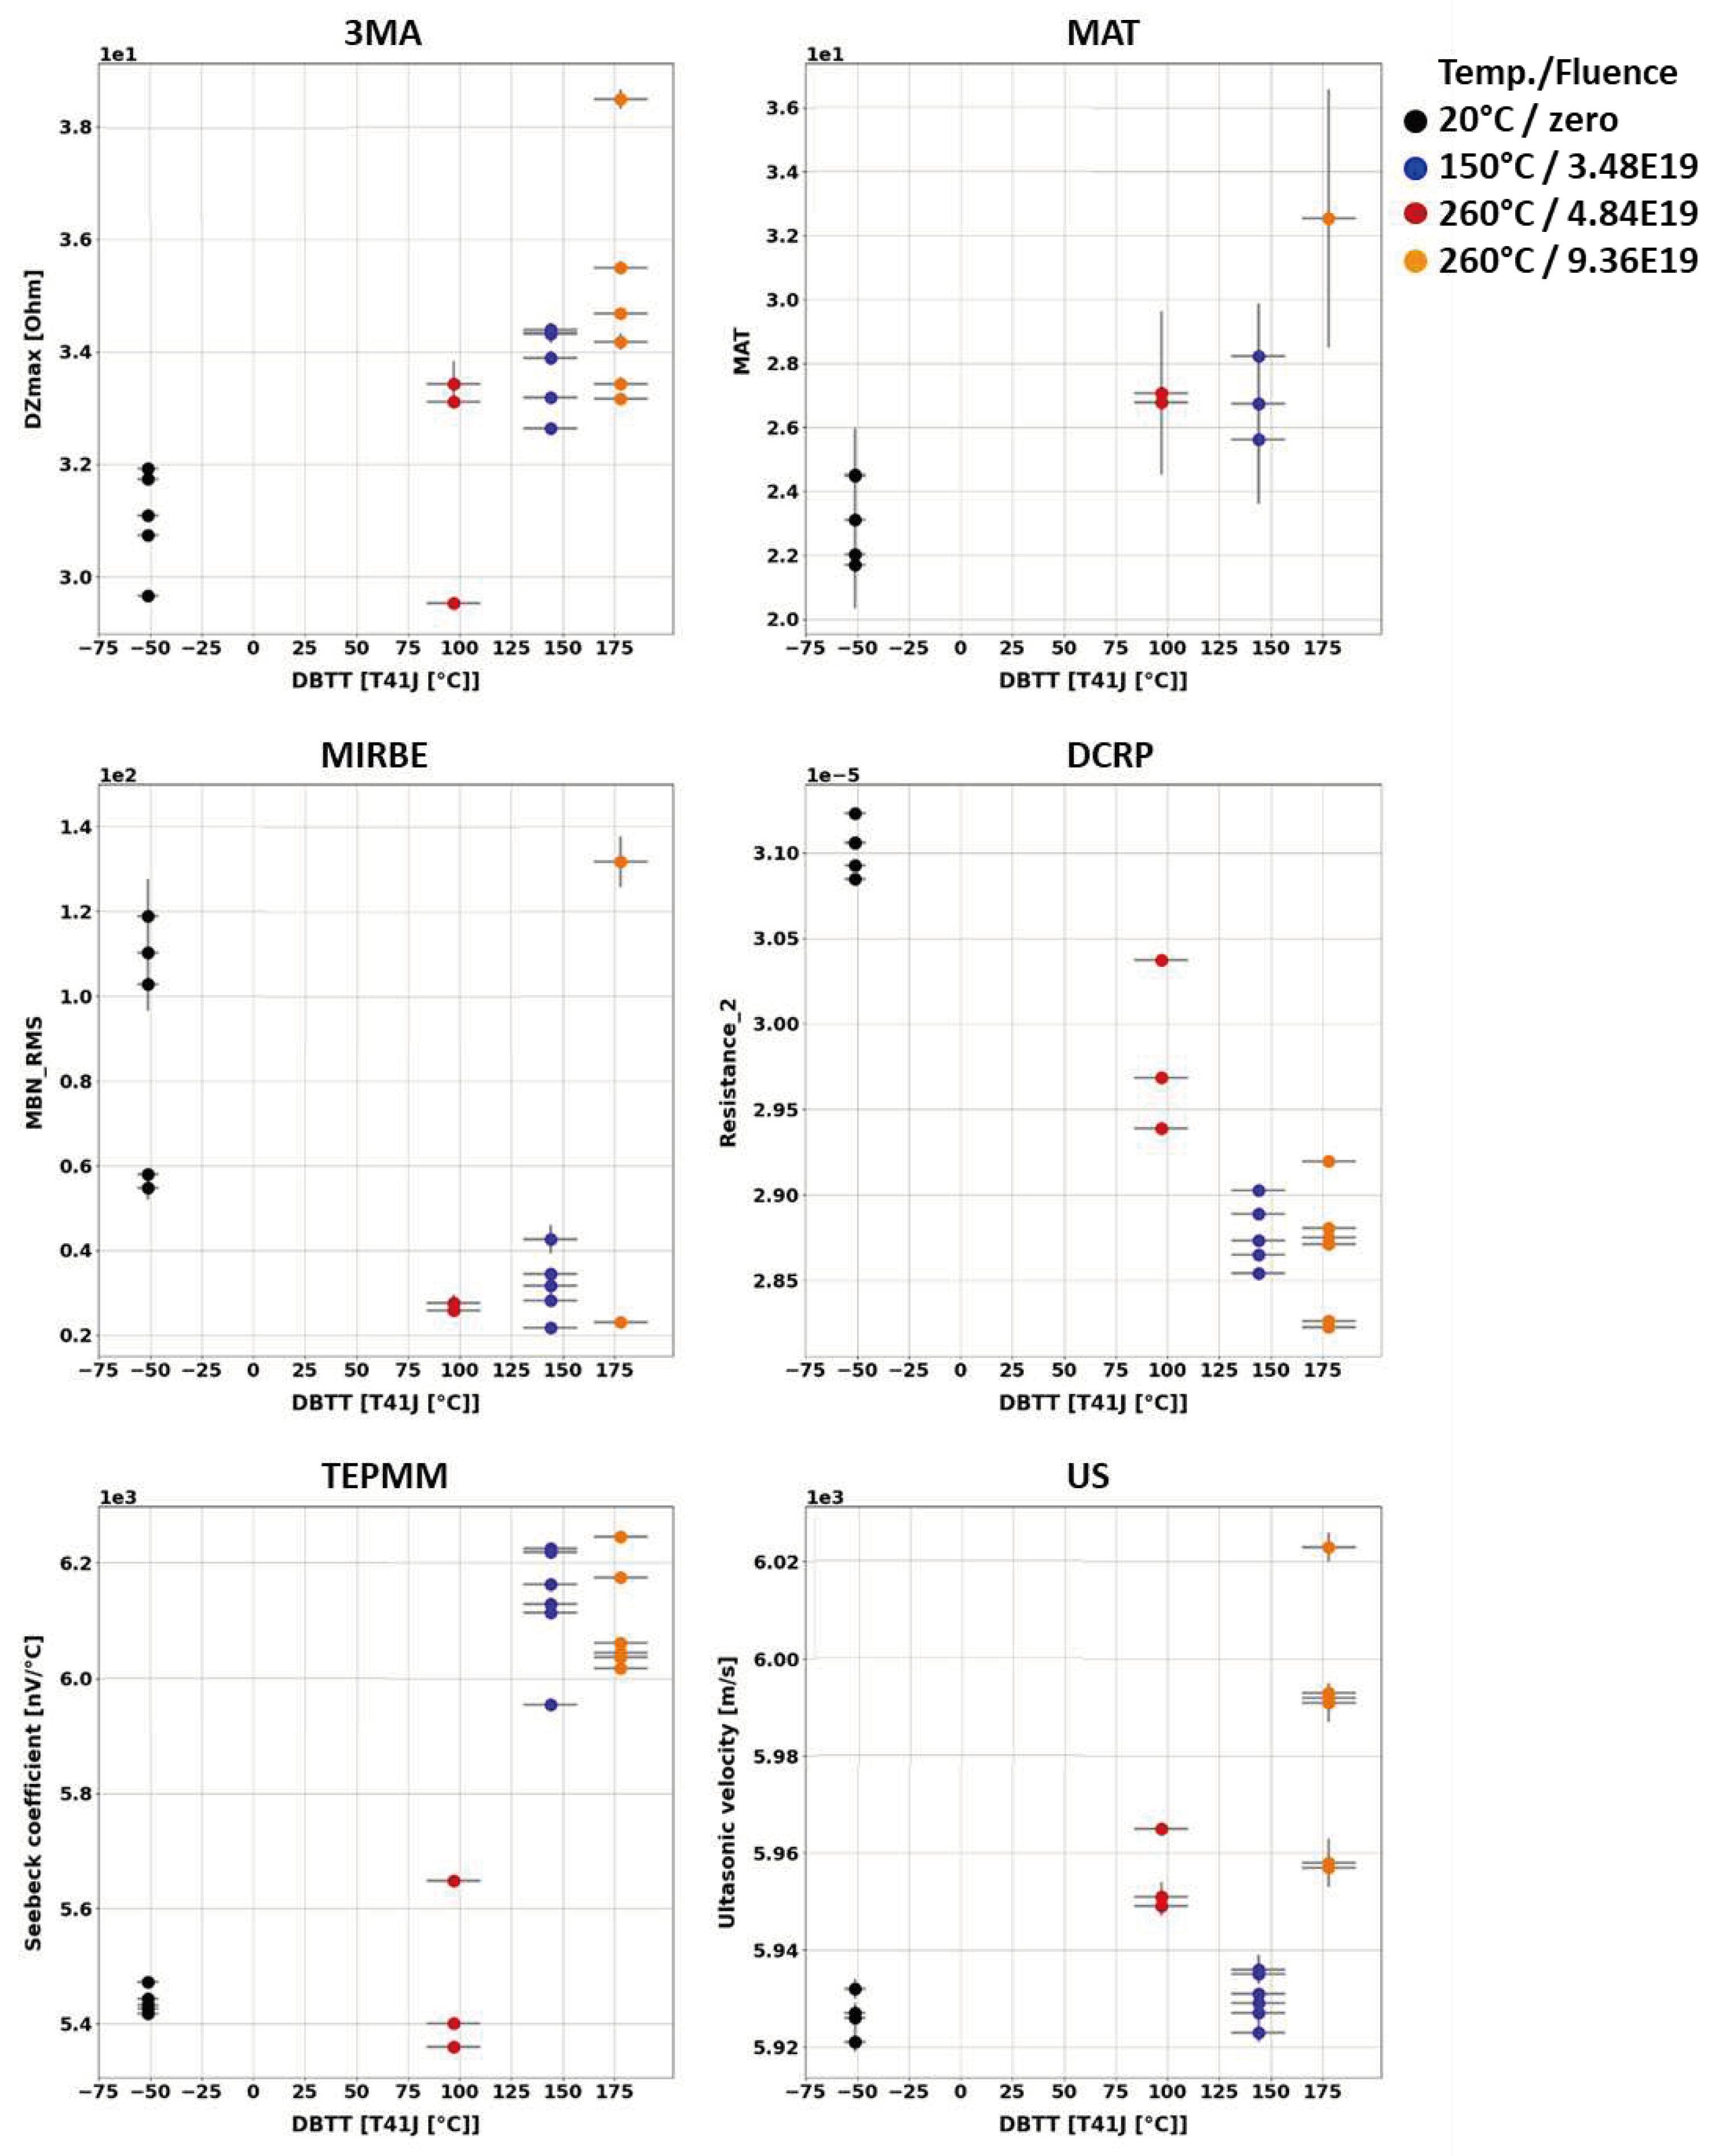
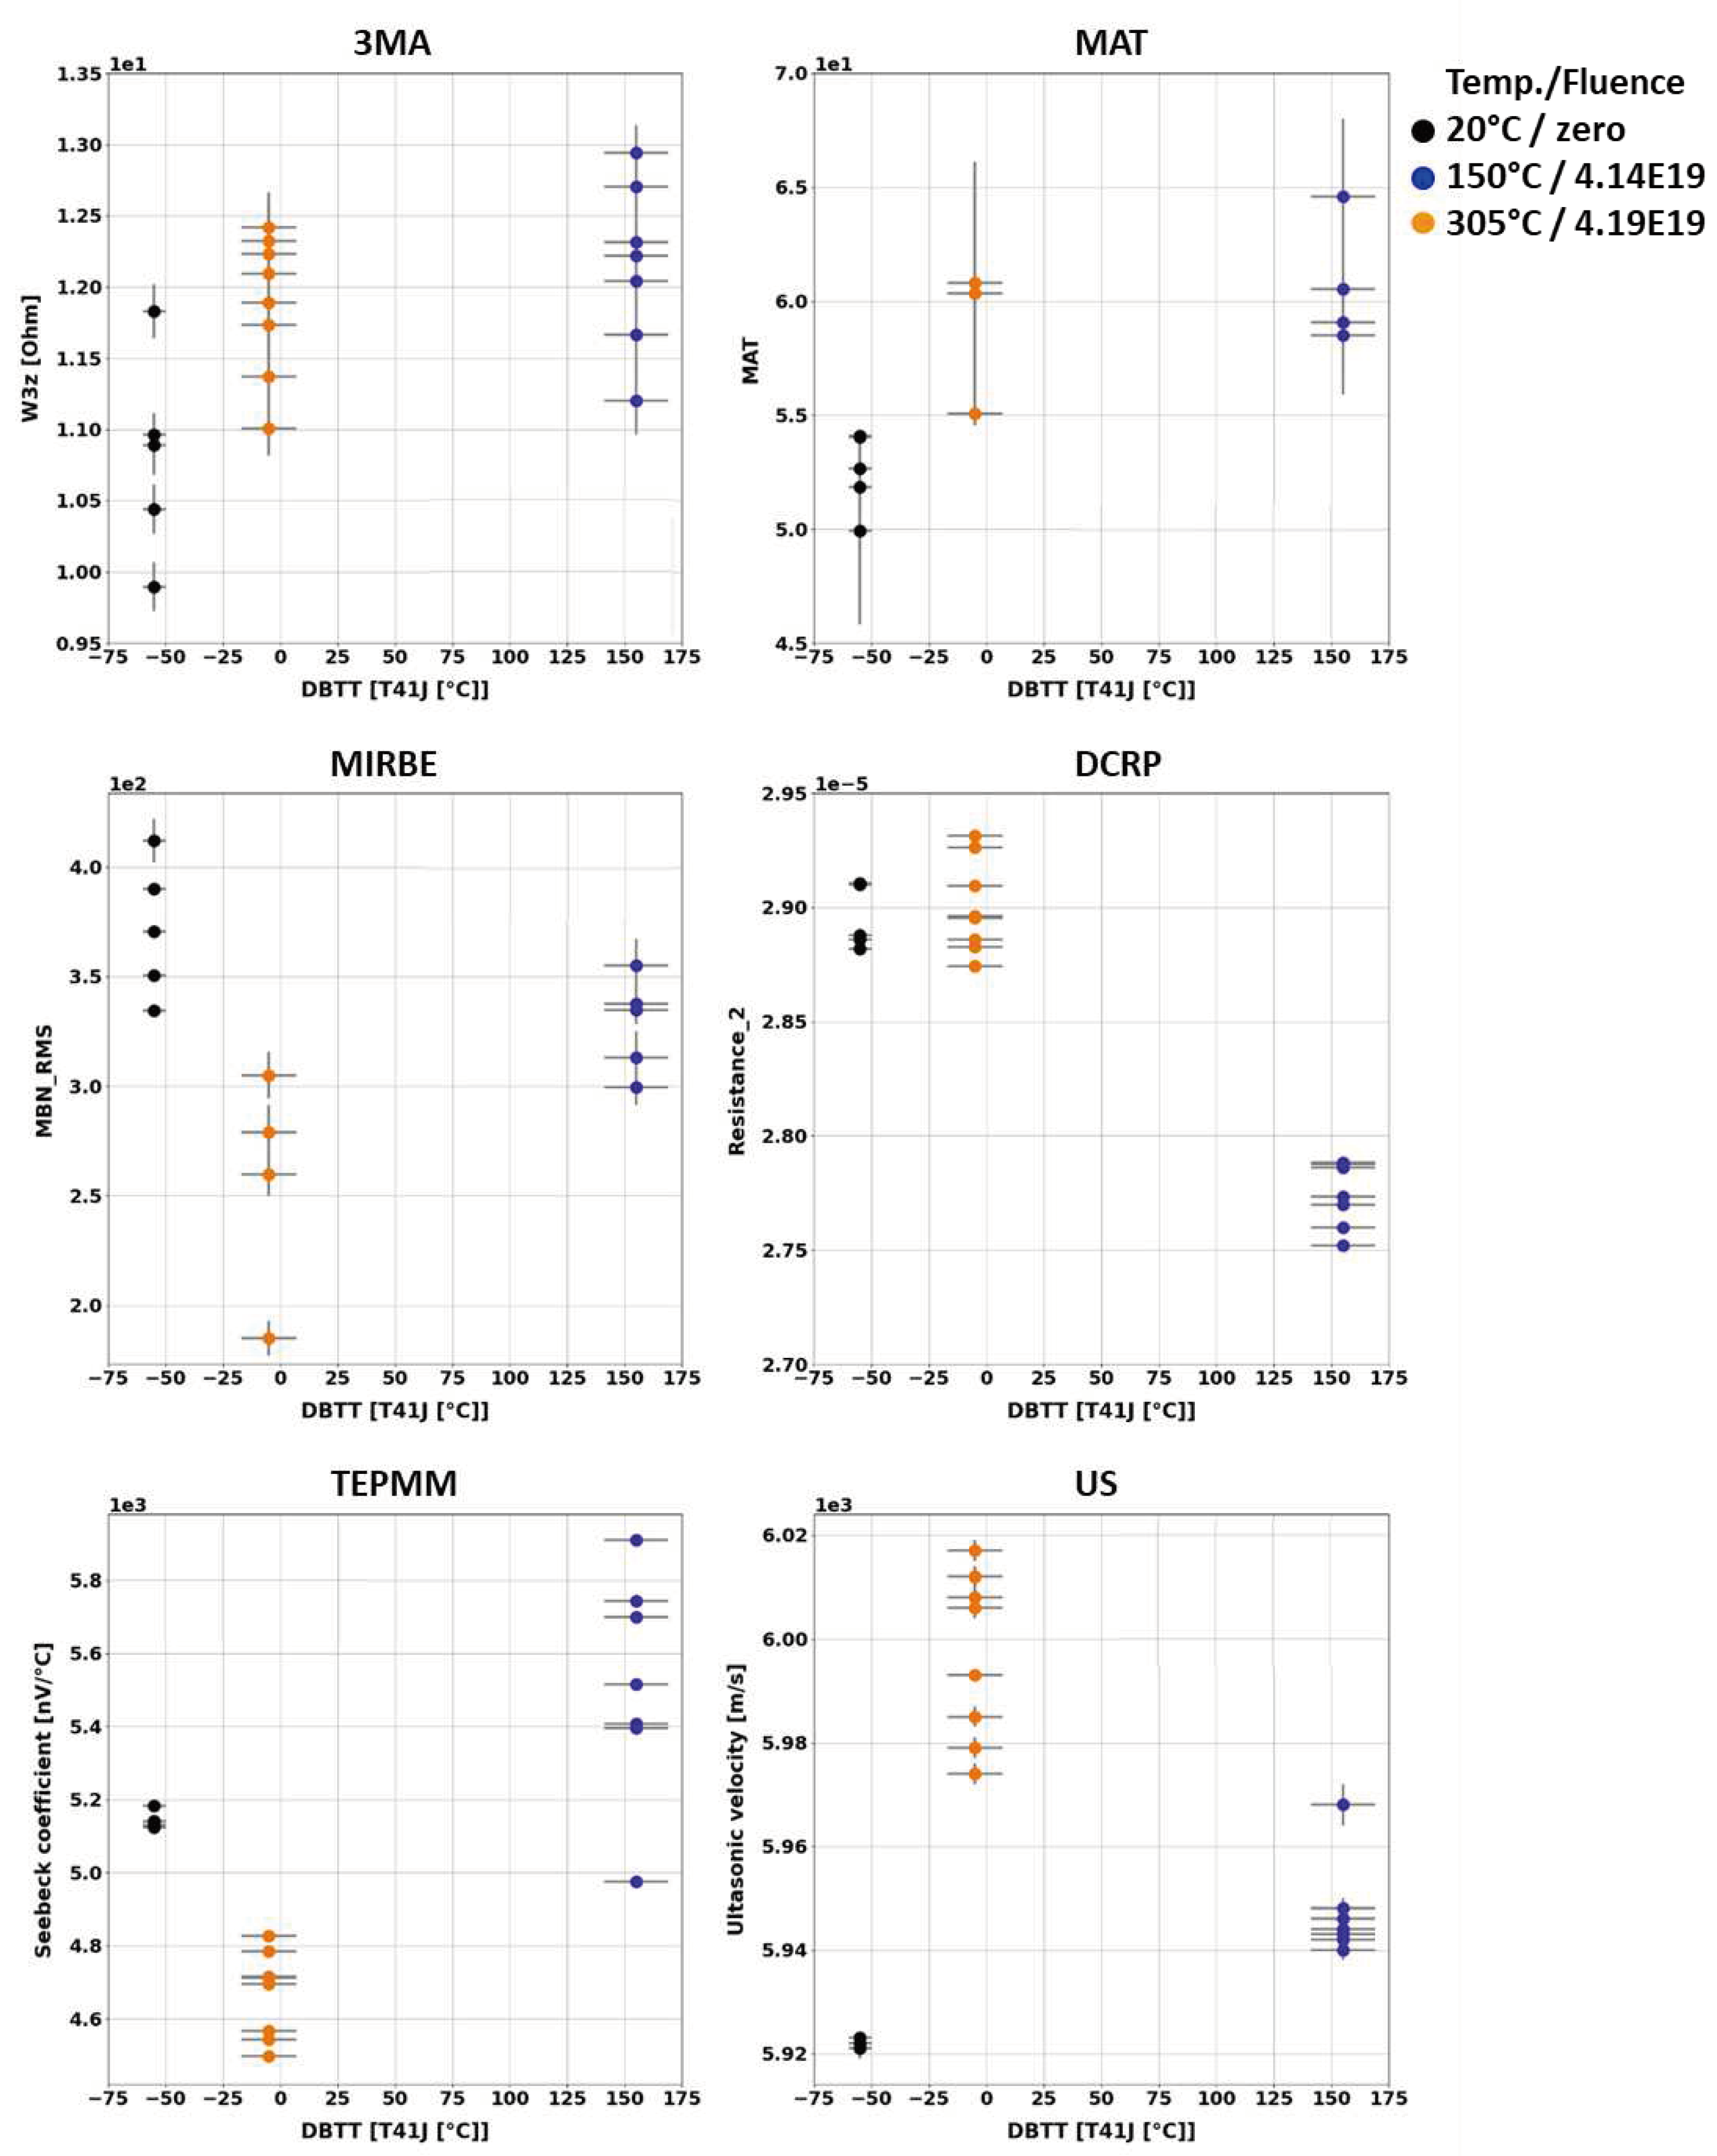
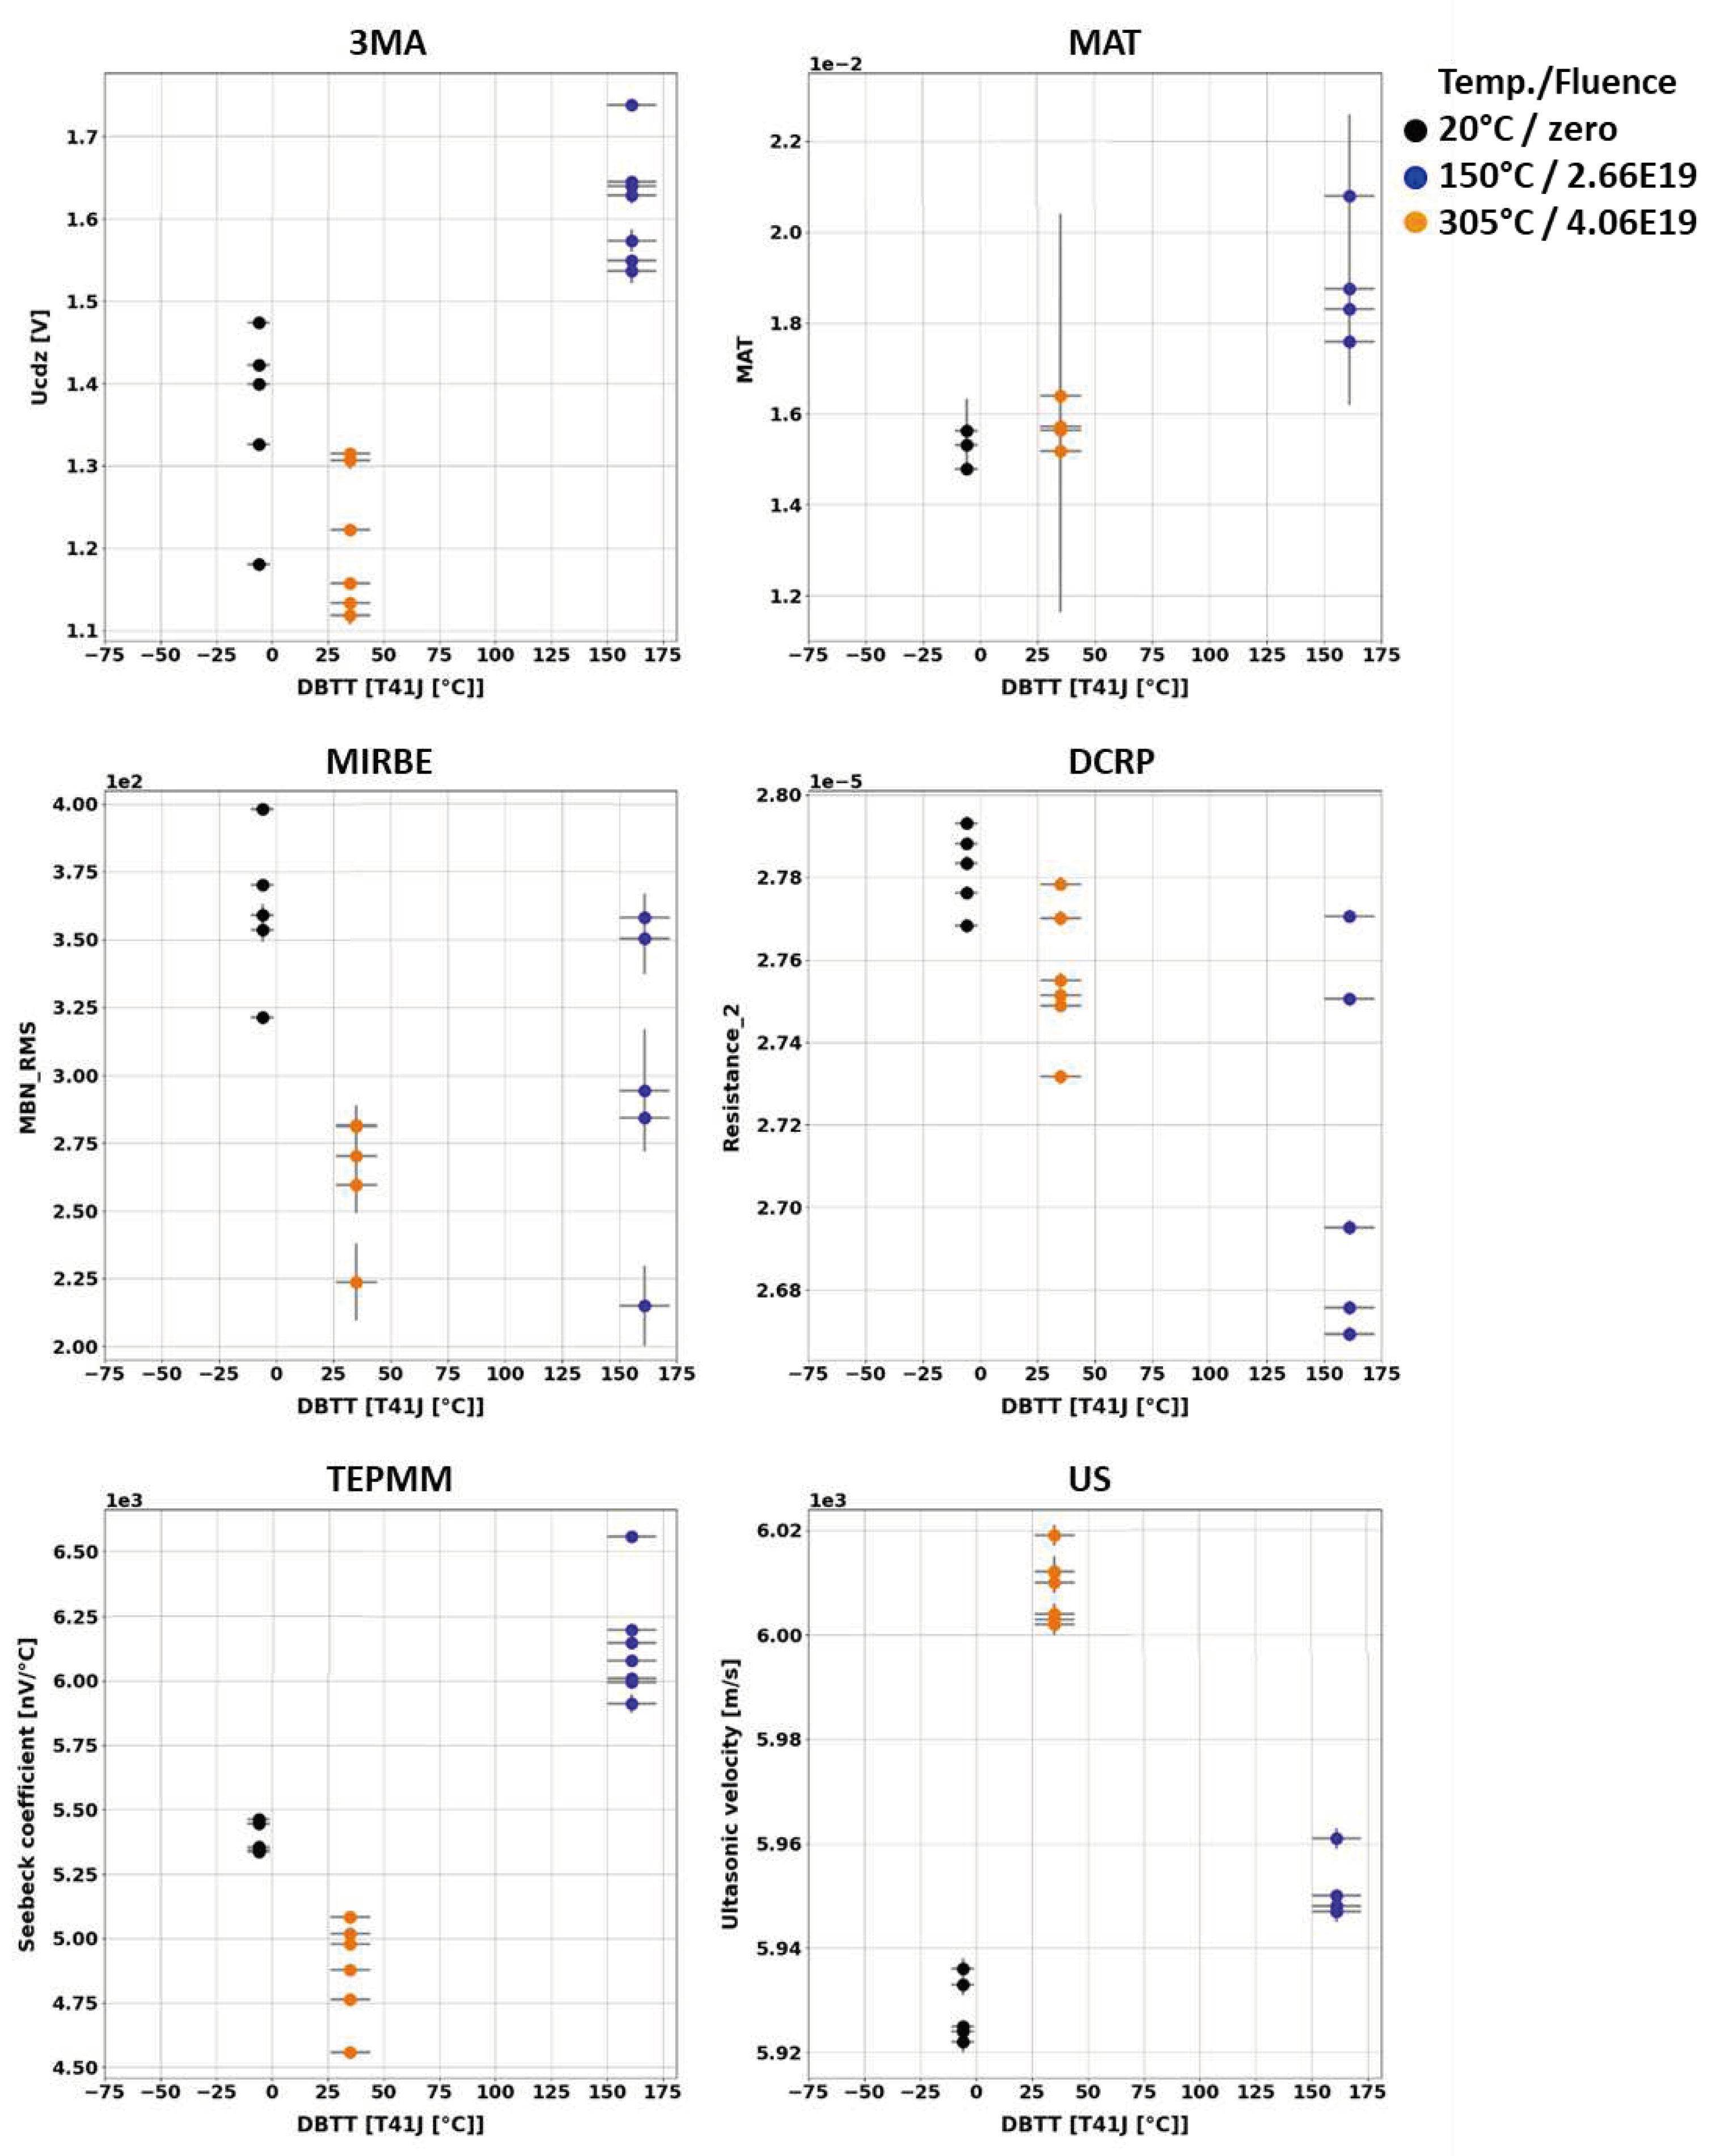
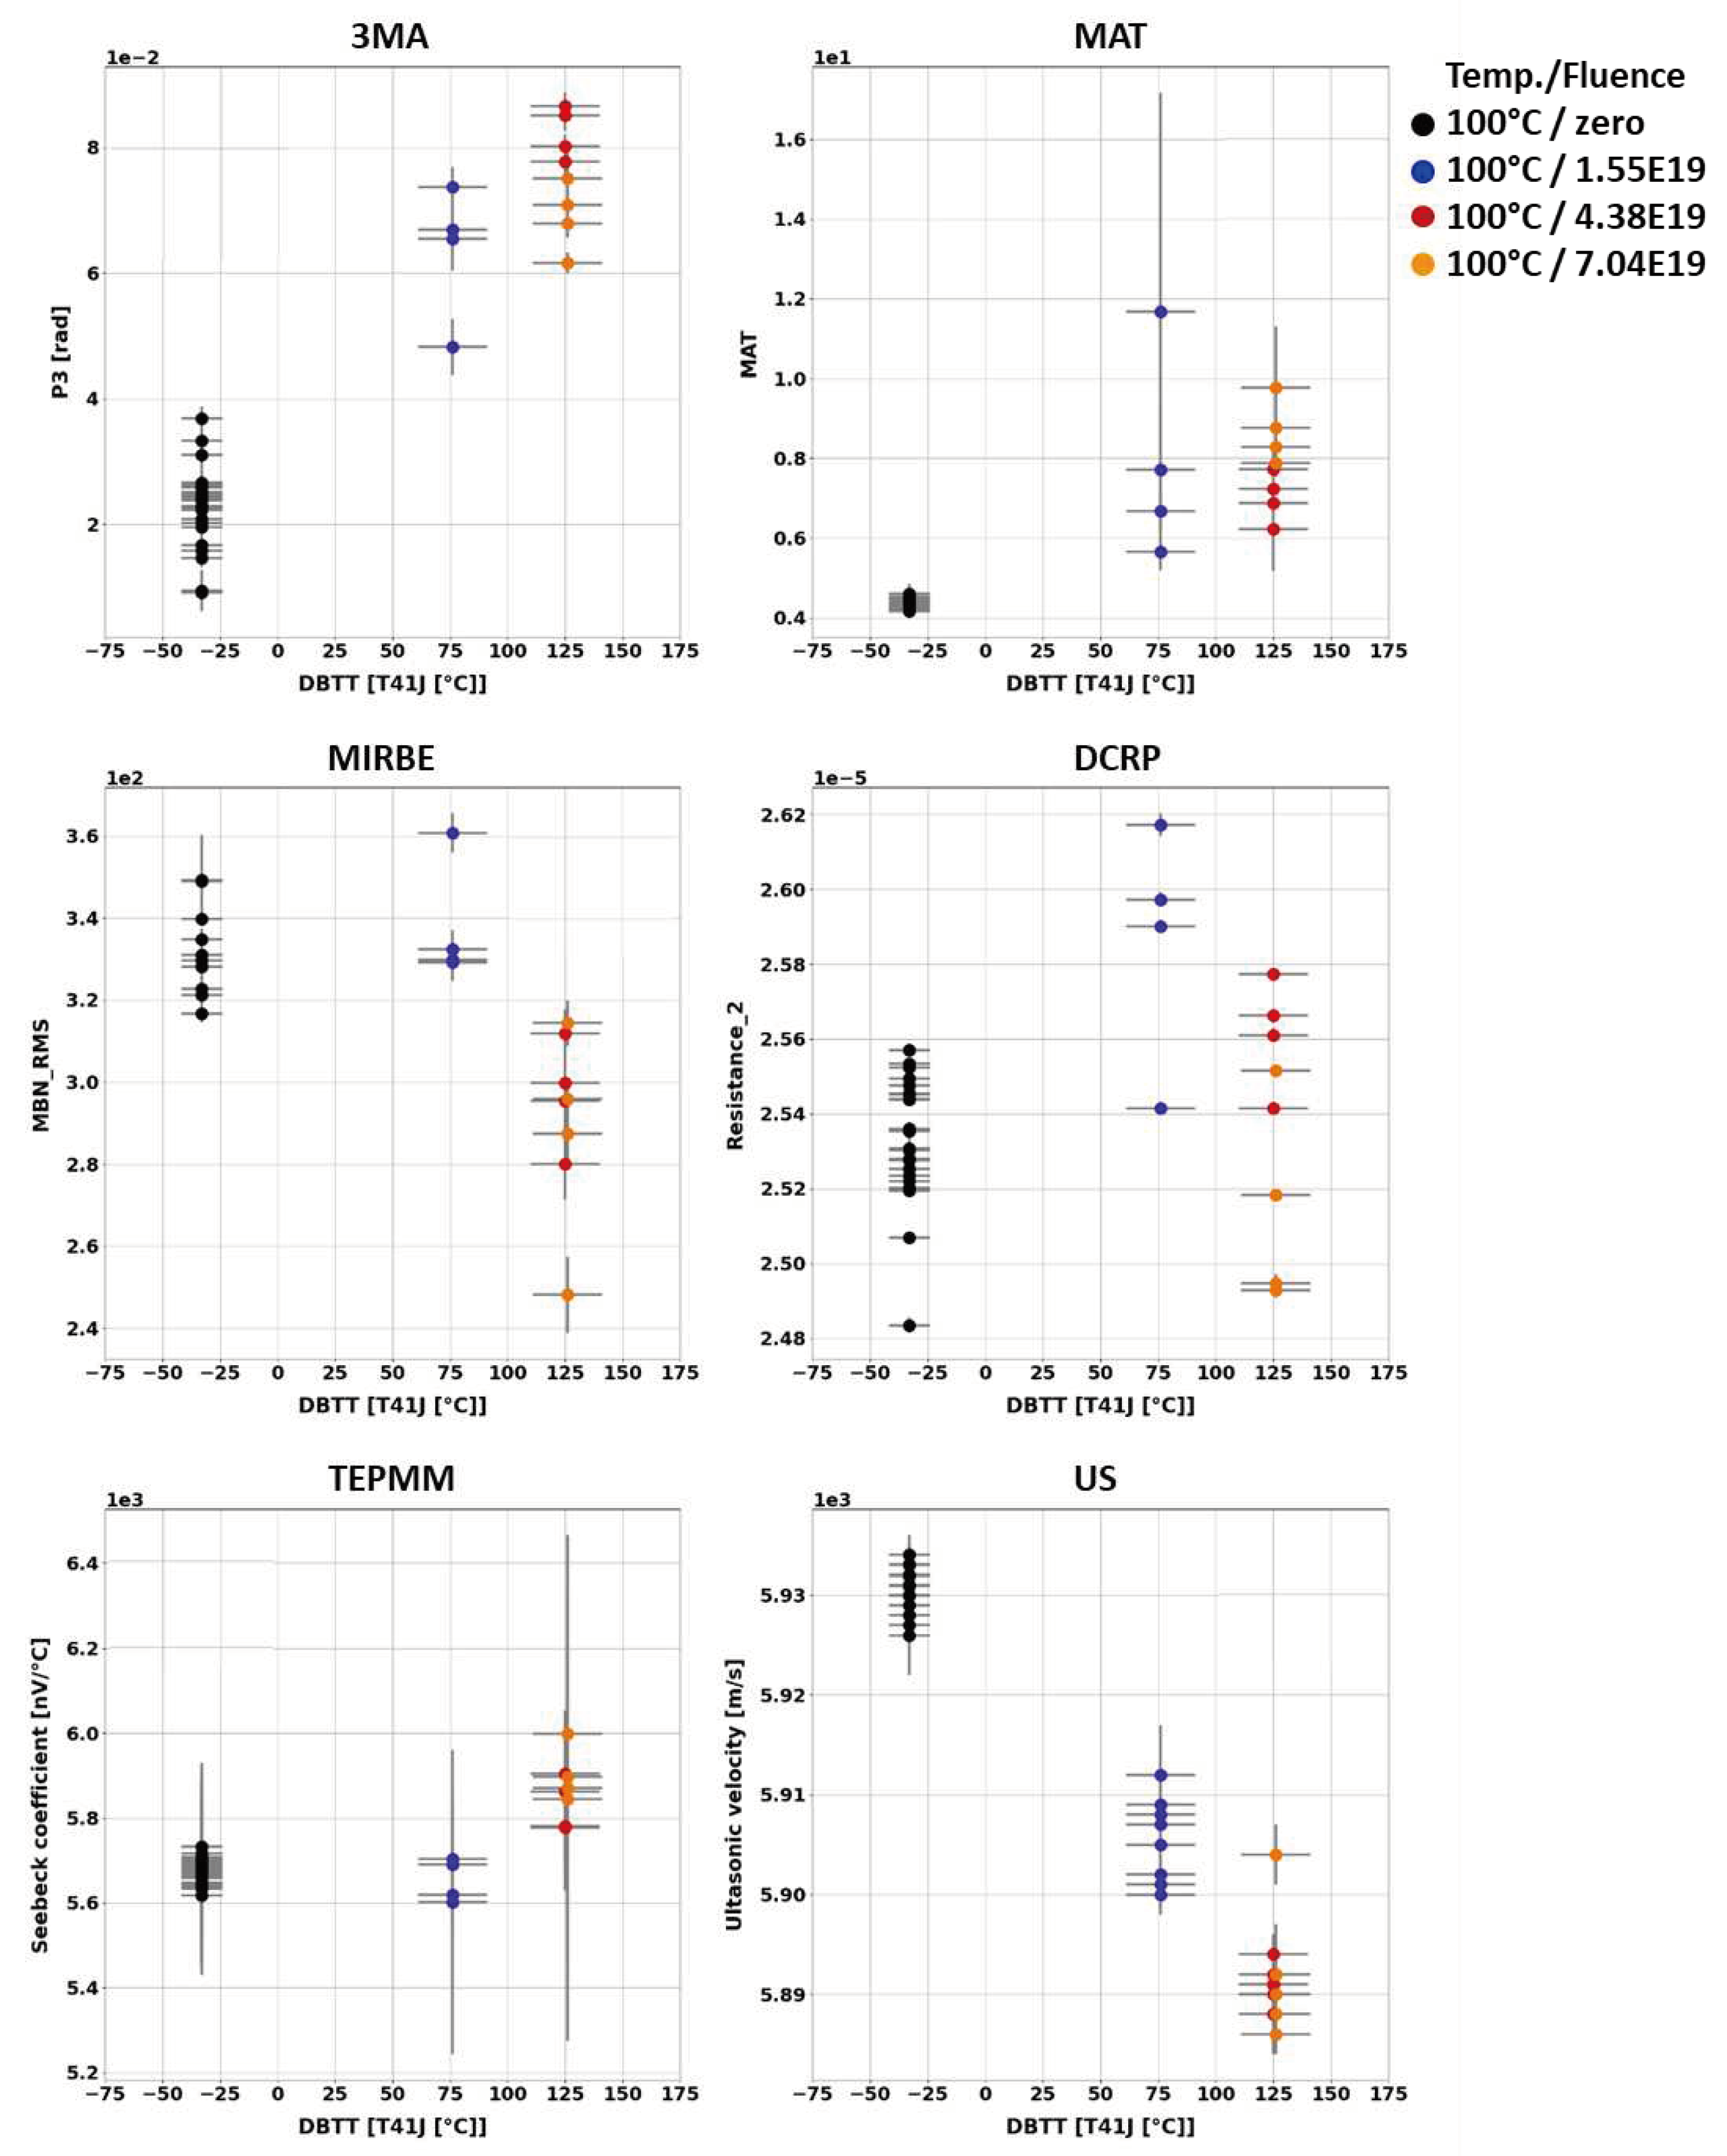
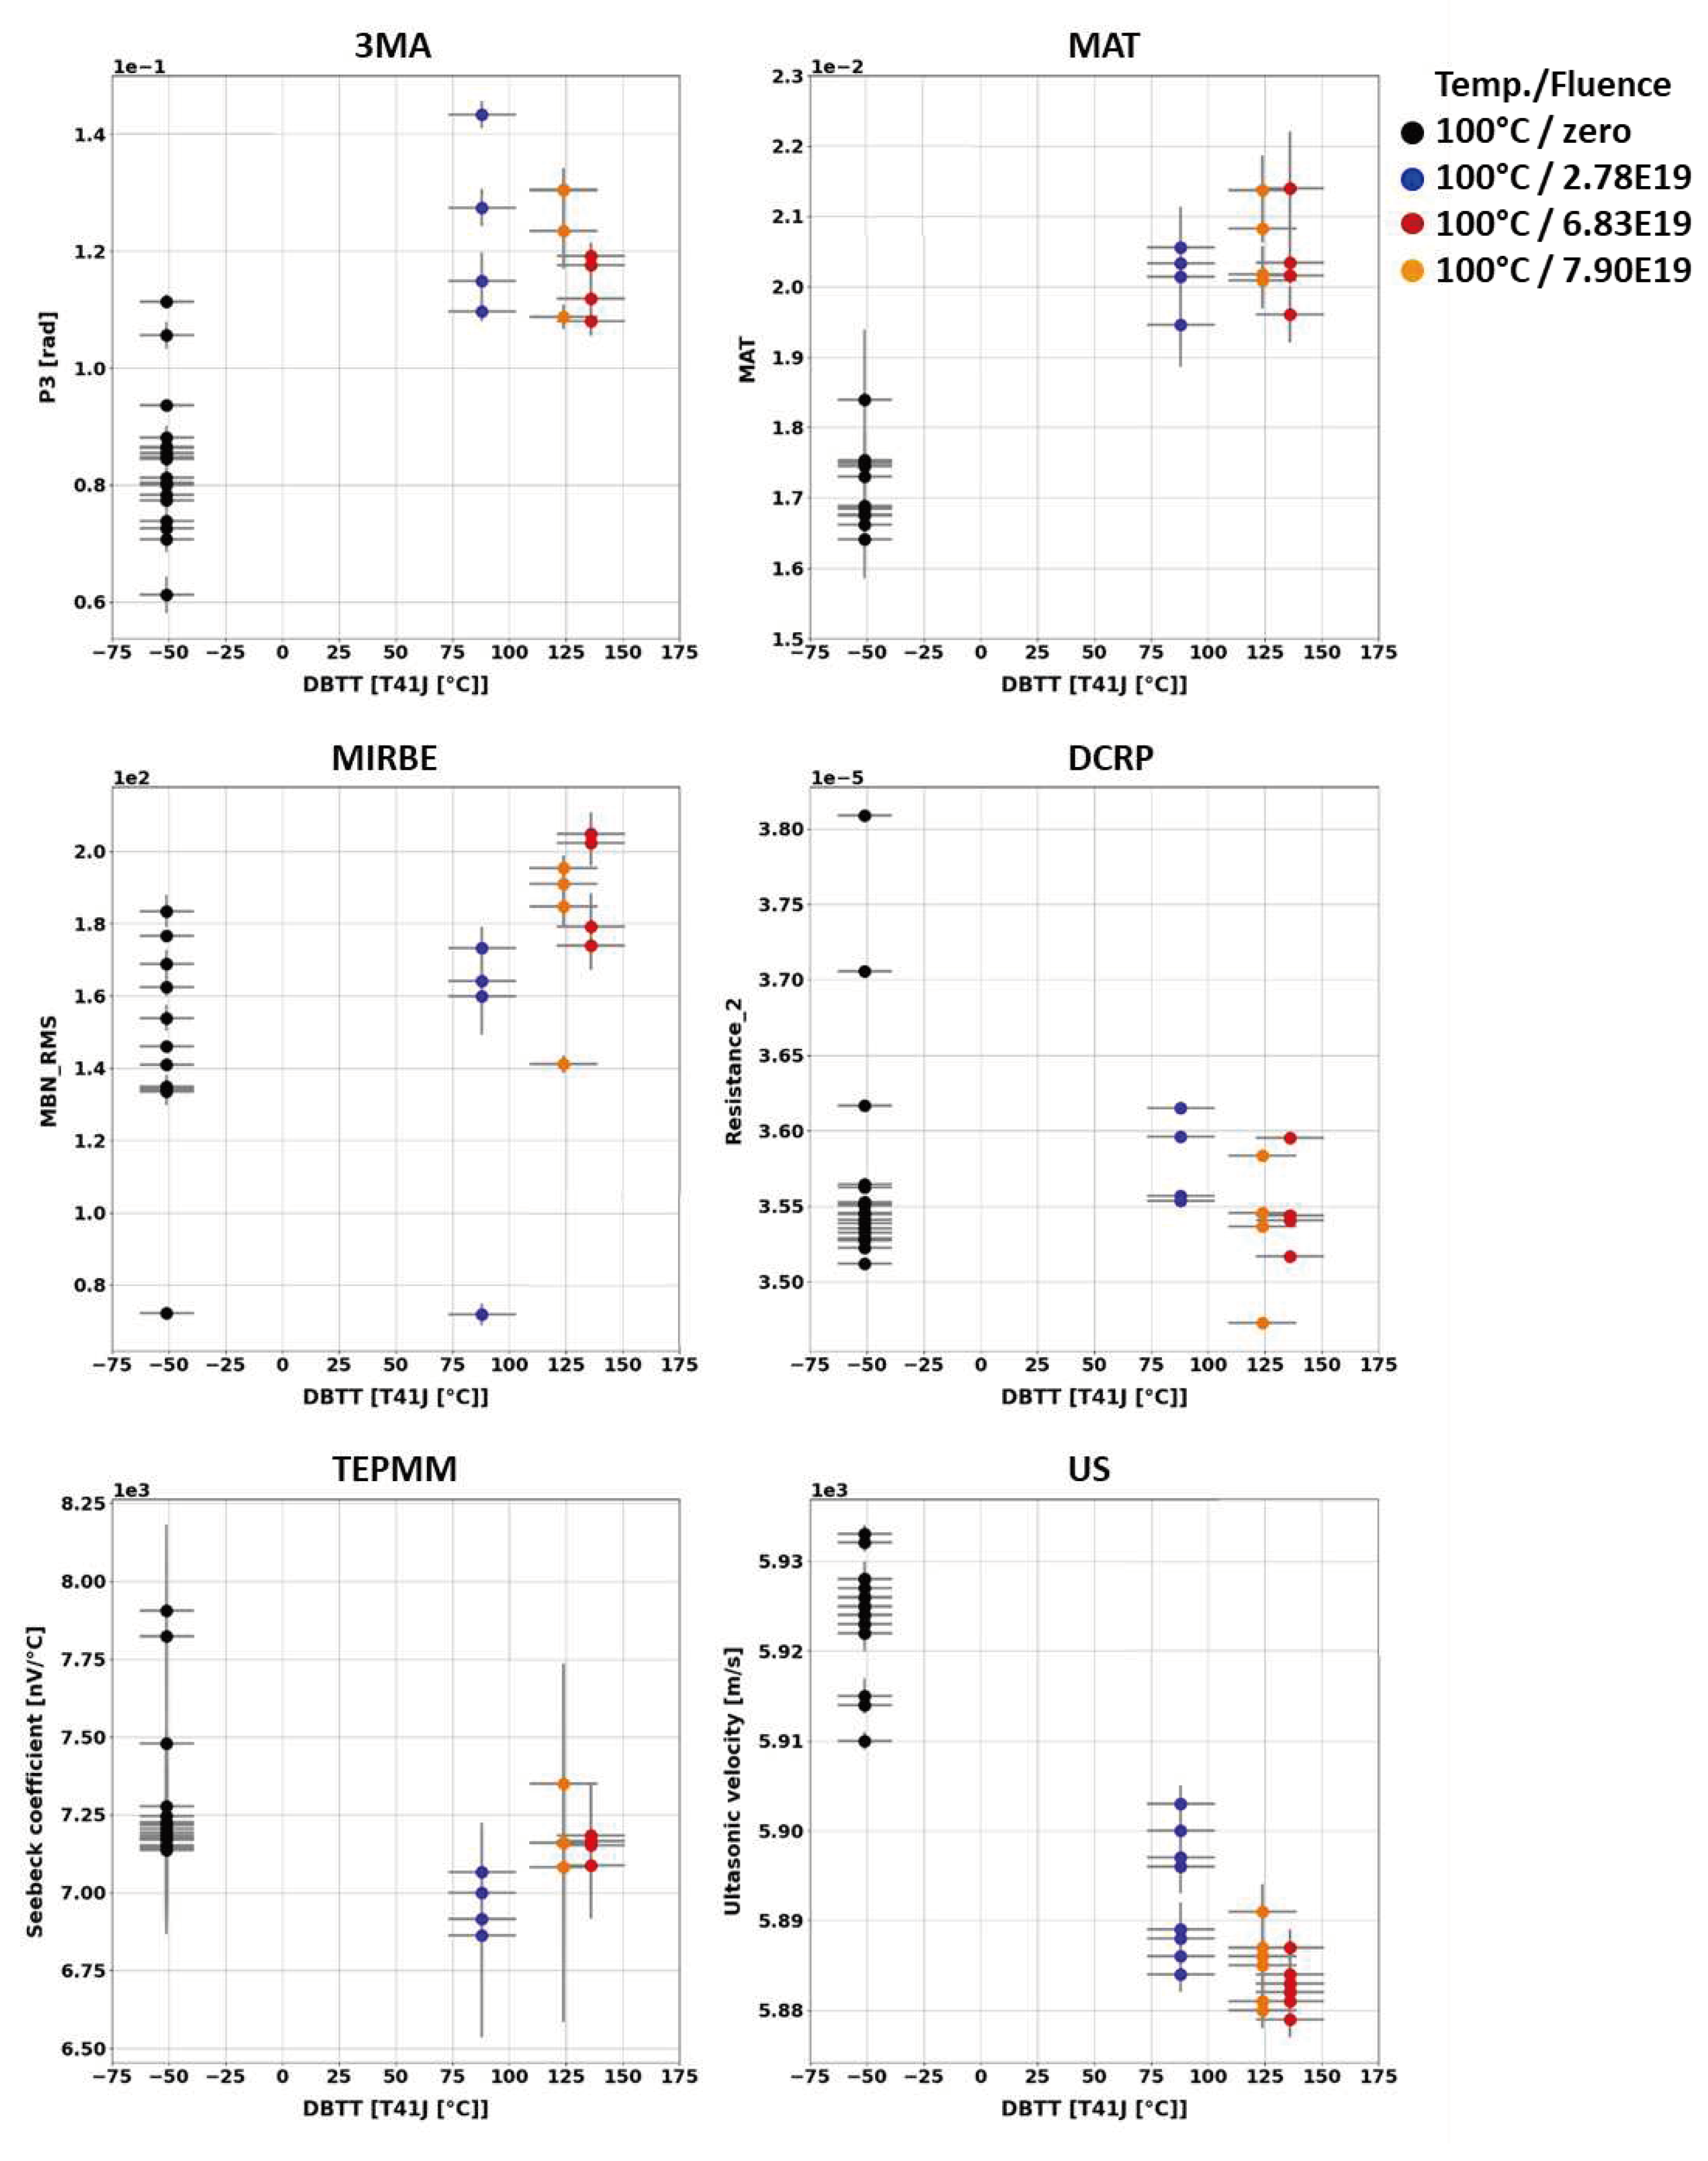
Generally, it has been observed that the outcome of the individual NDE measurements performed on different Charpy samples of the same material and the same irradiation condition scatter.
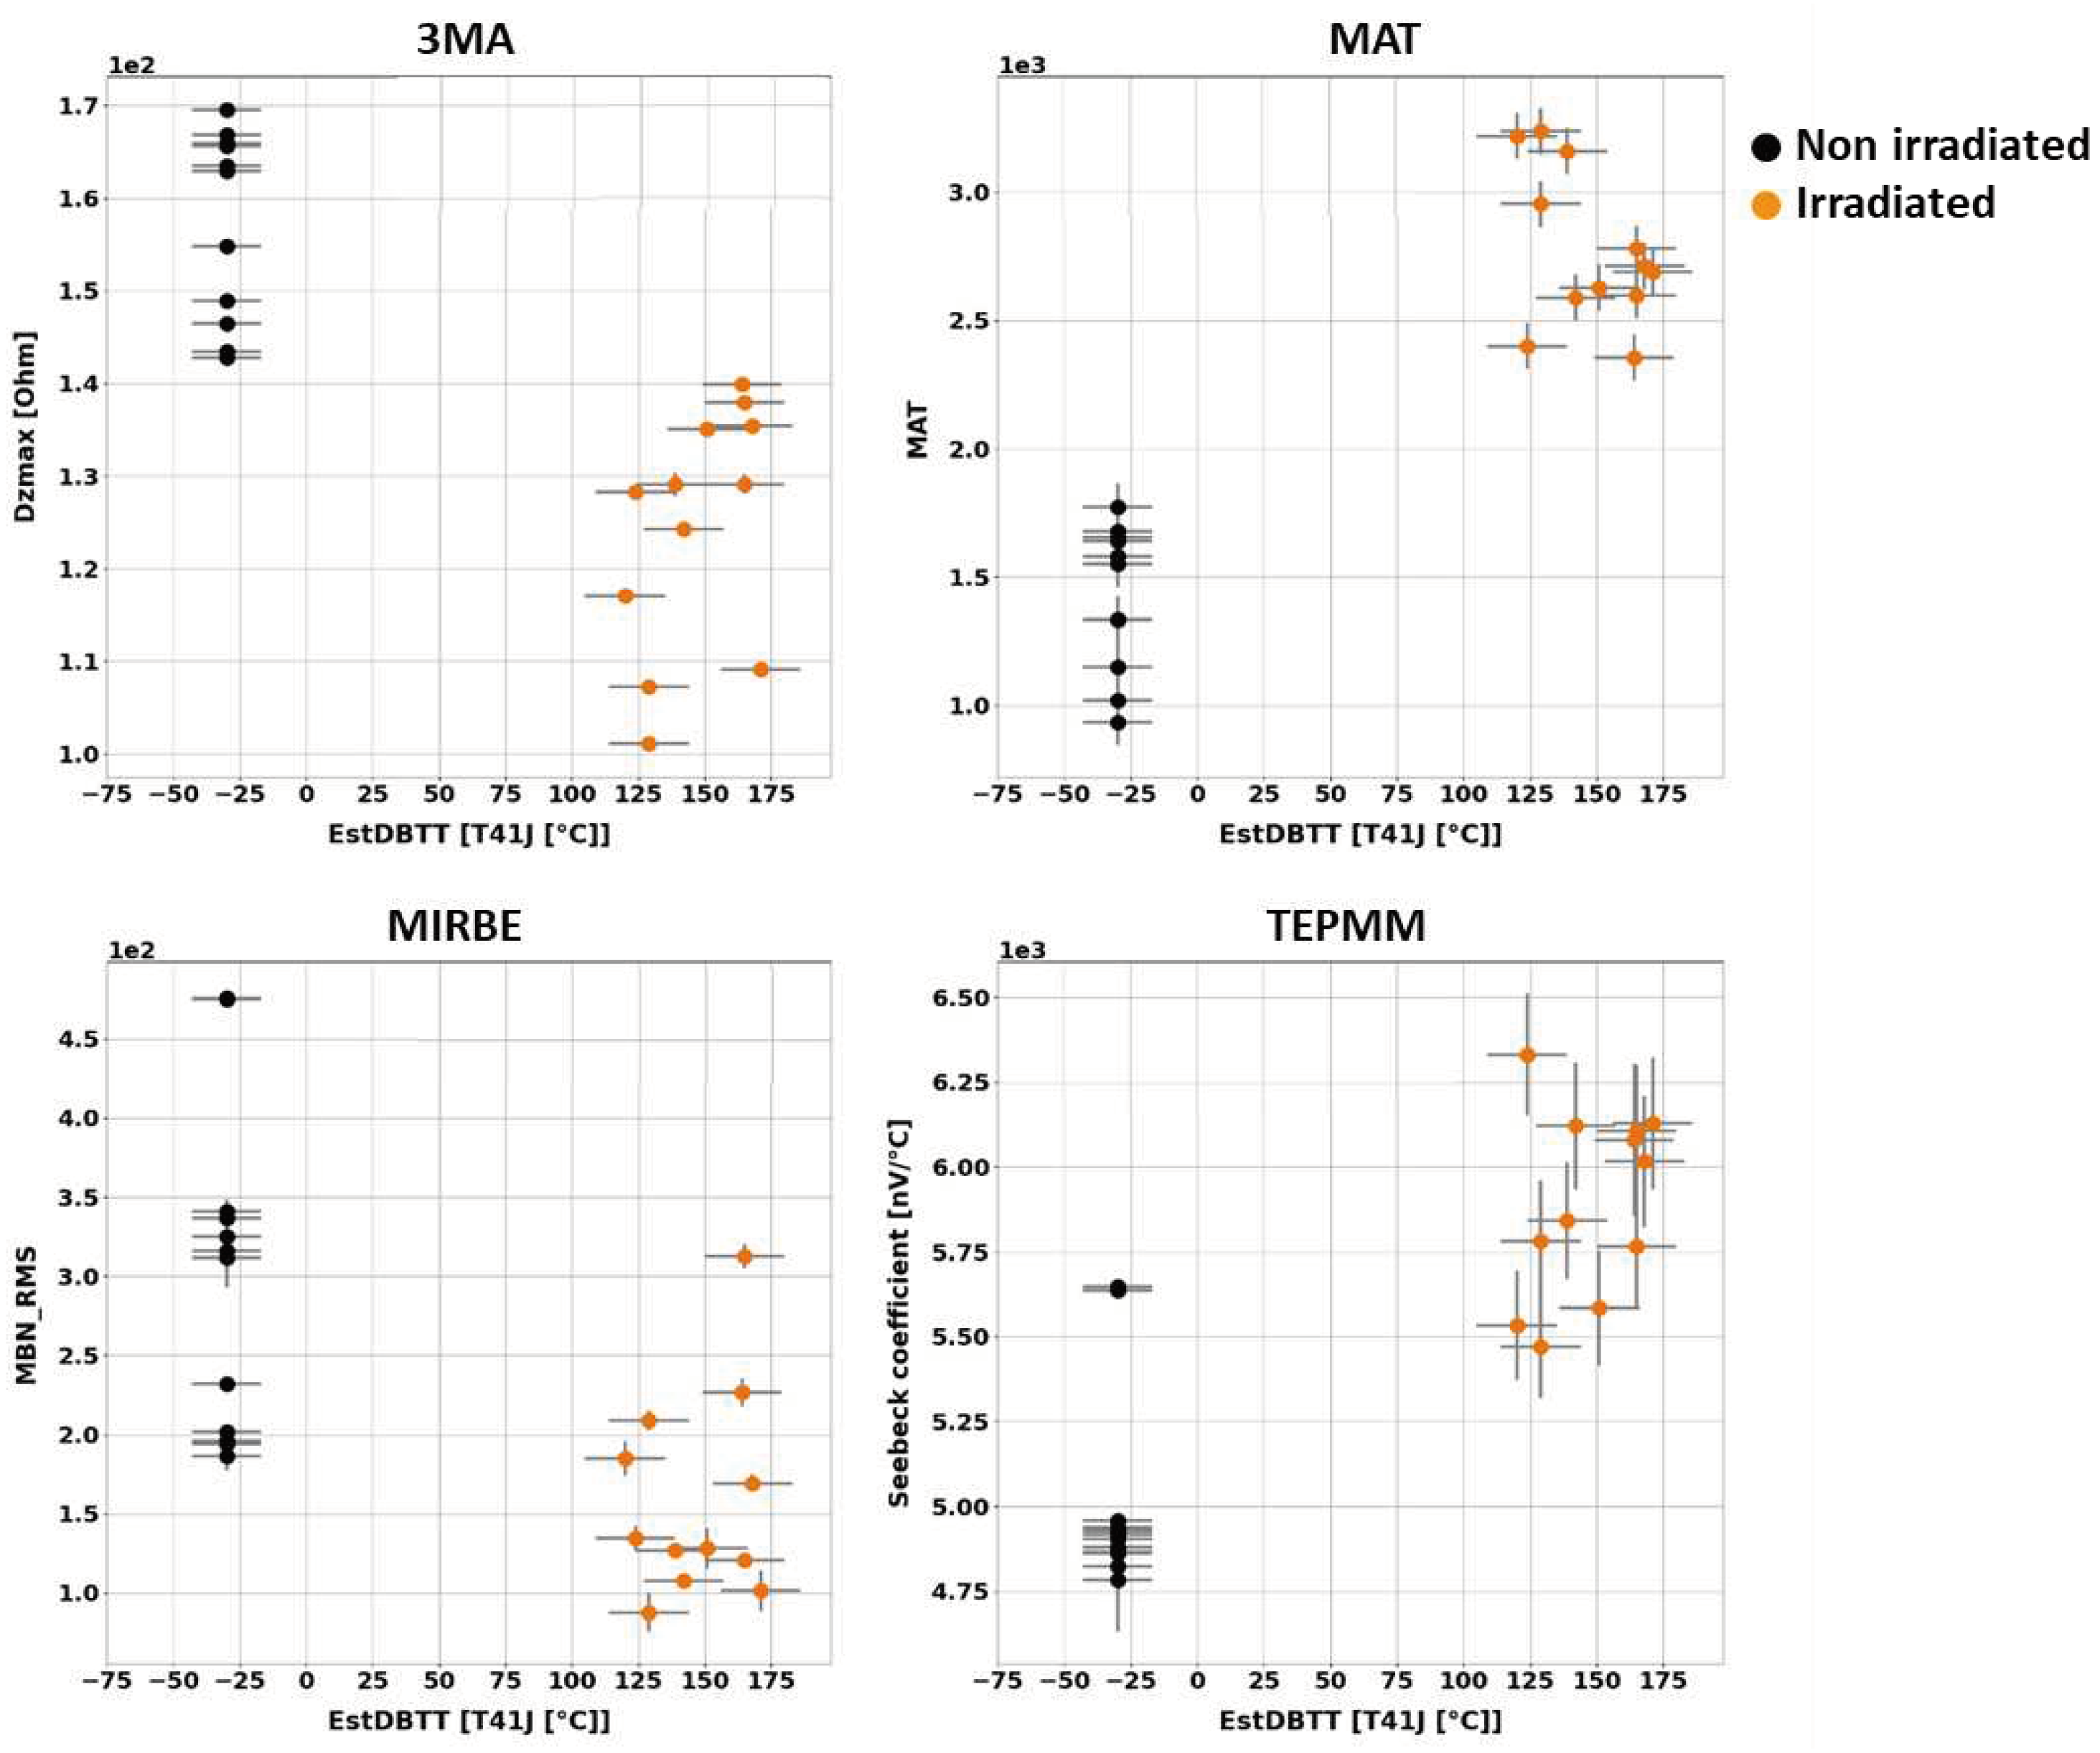
Figure 3,
Figure 4,
Figure 5,
Figure 6,
Figure 7 and
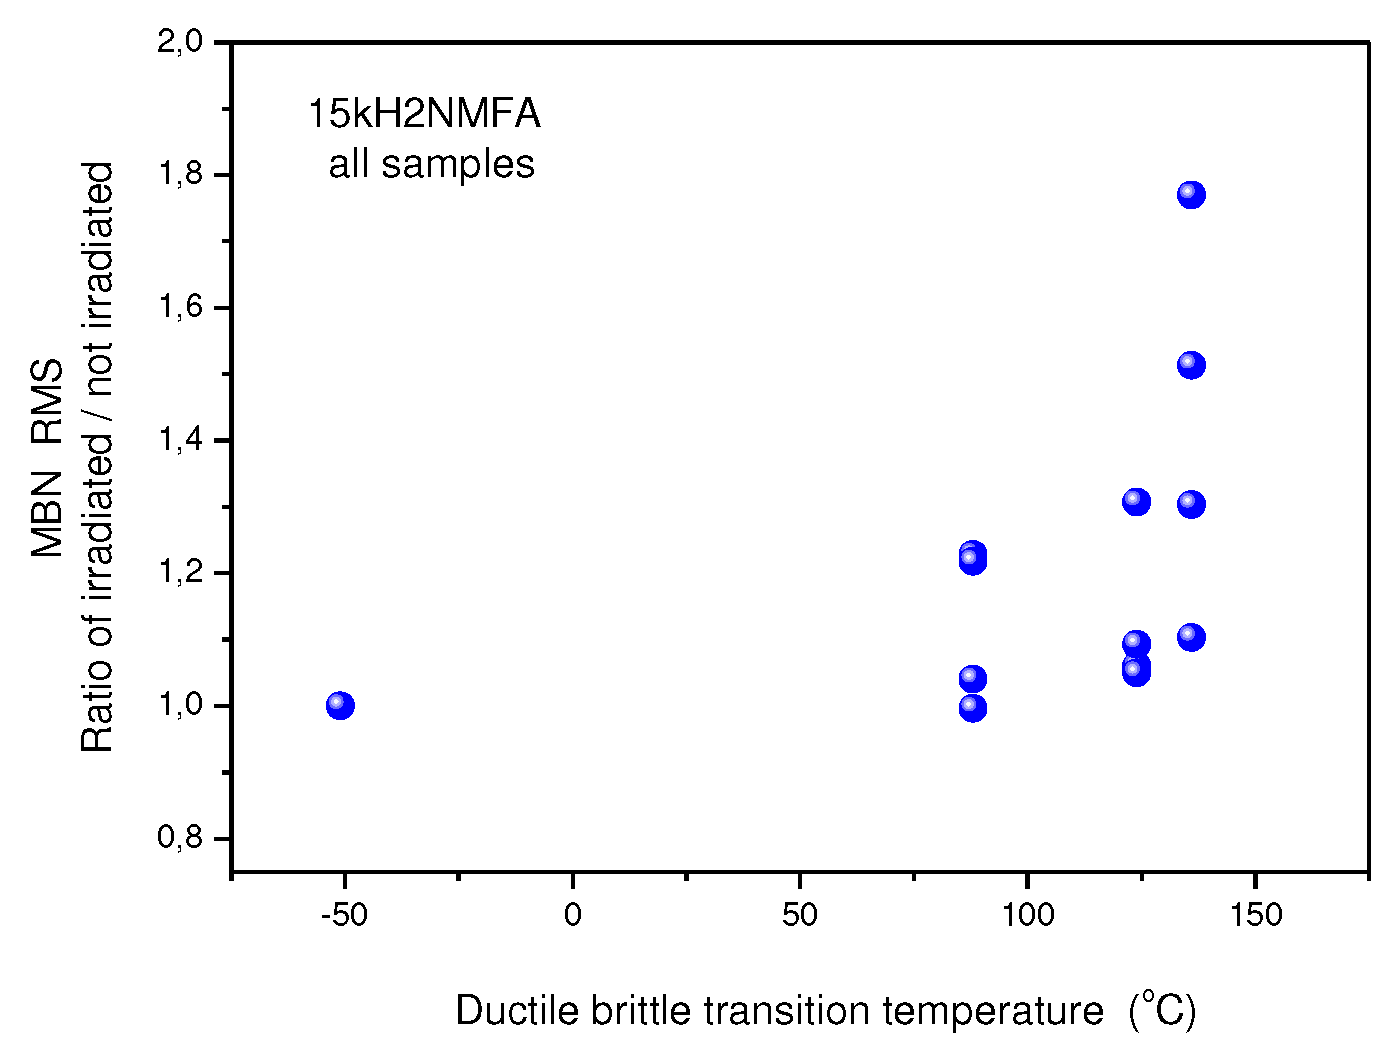
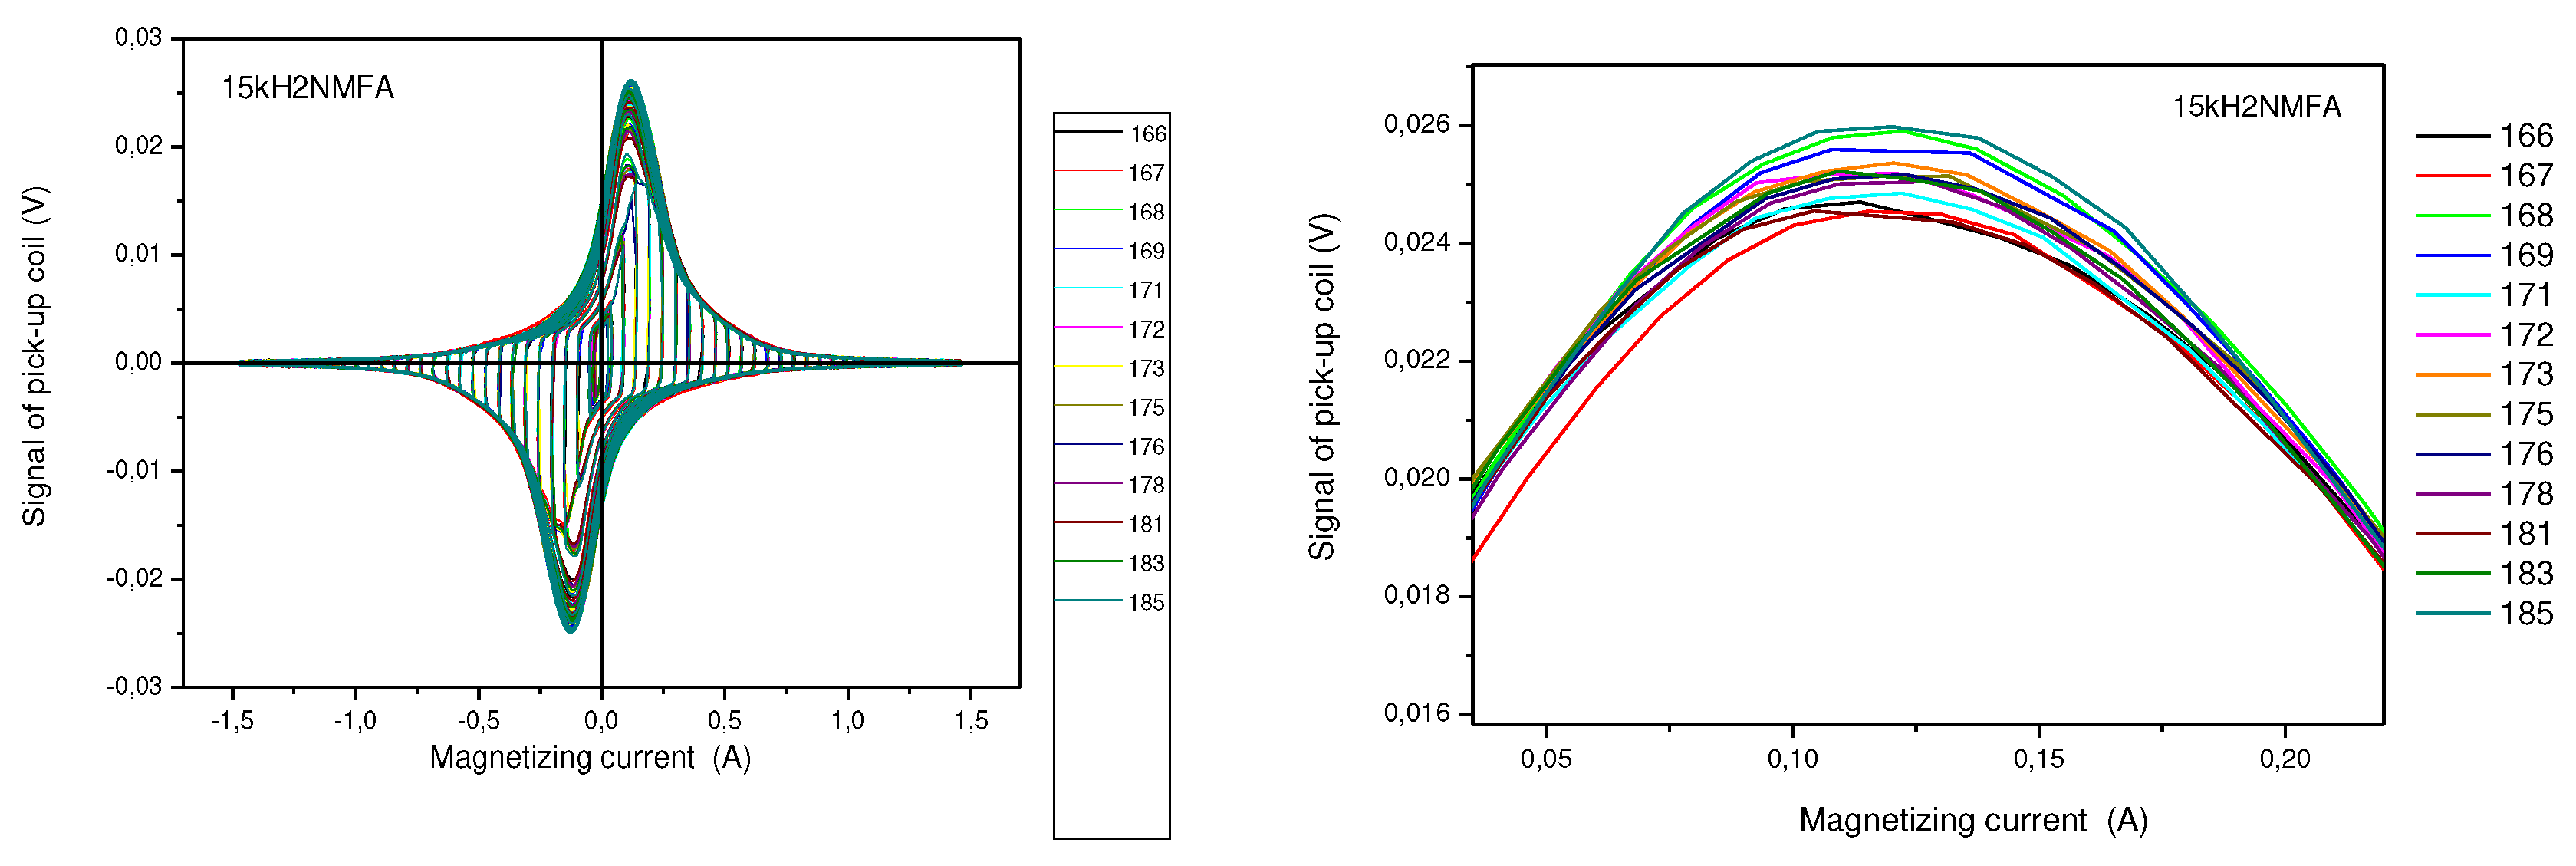
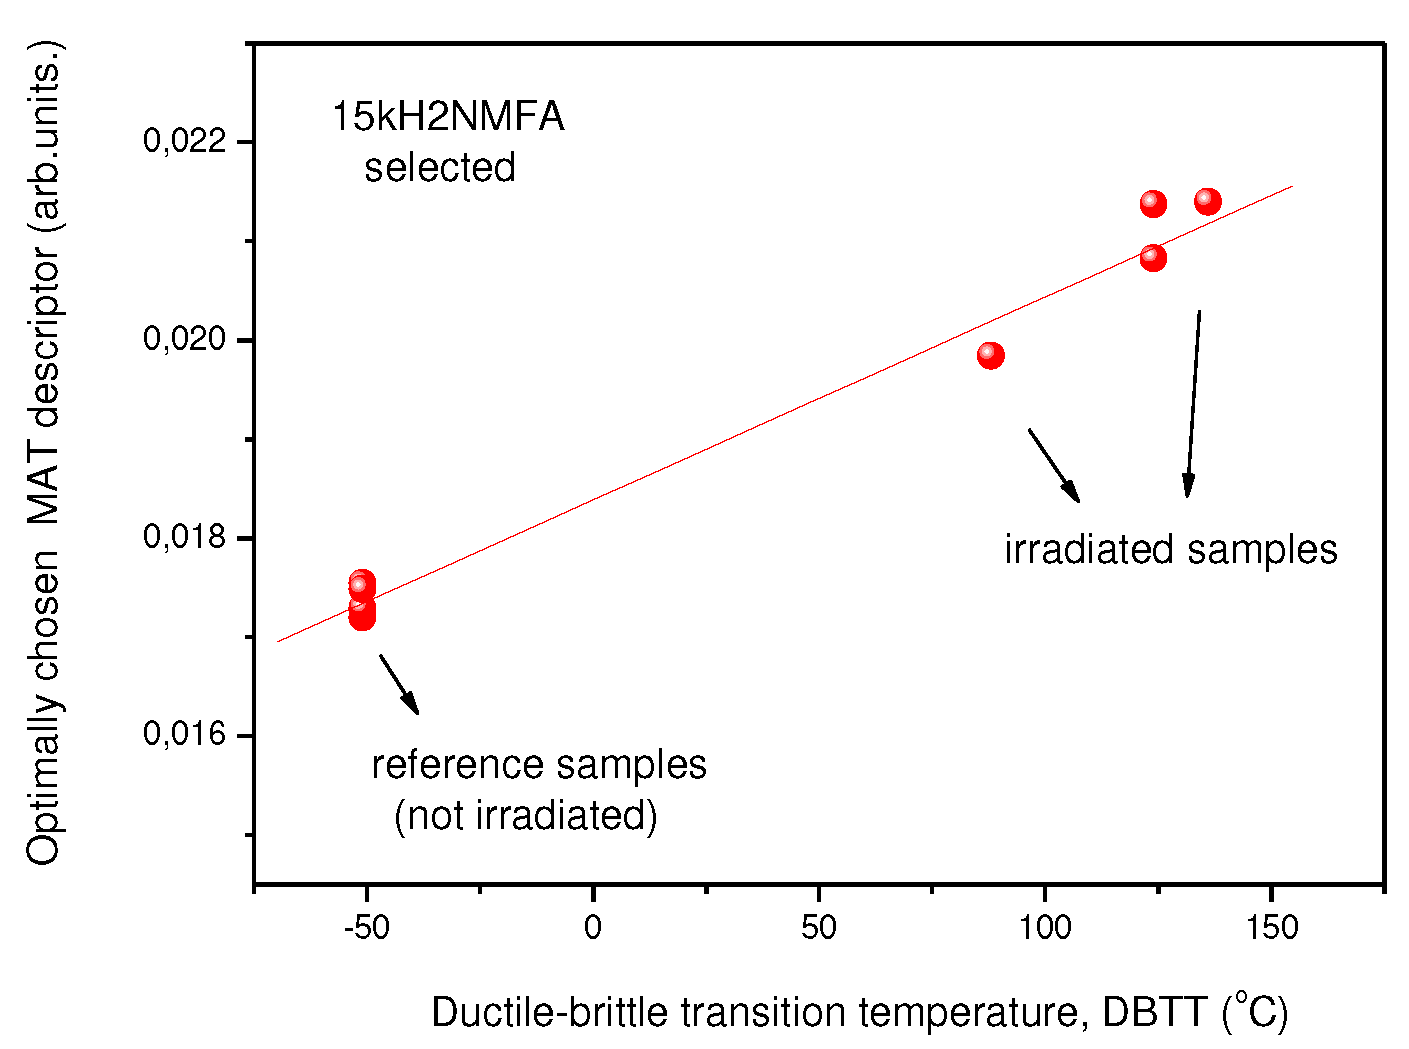
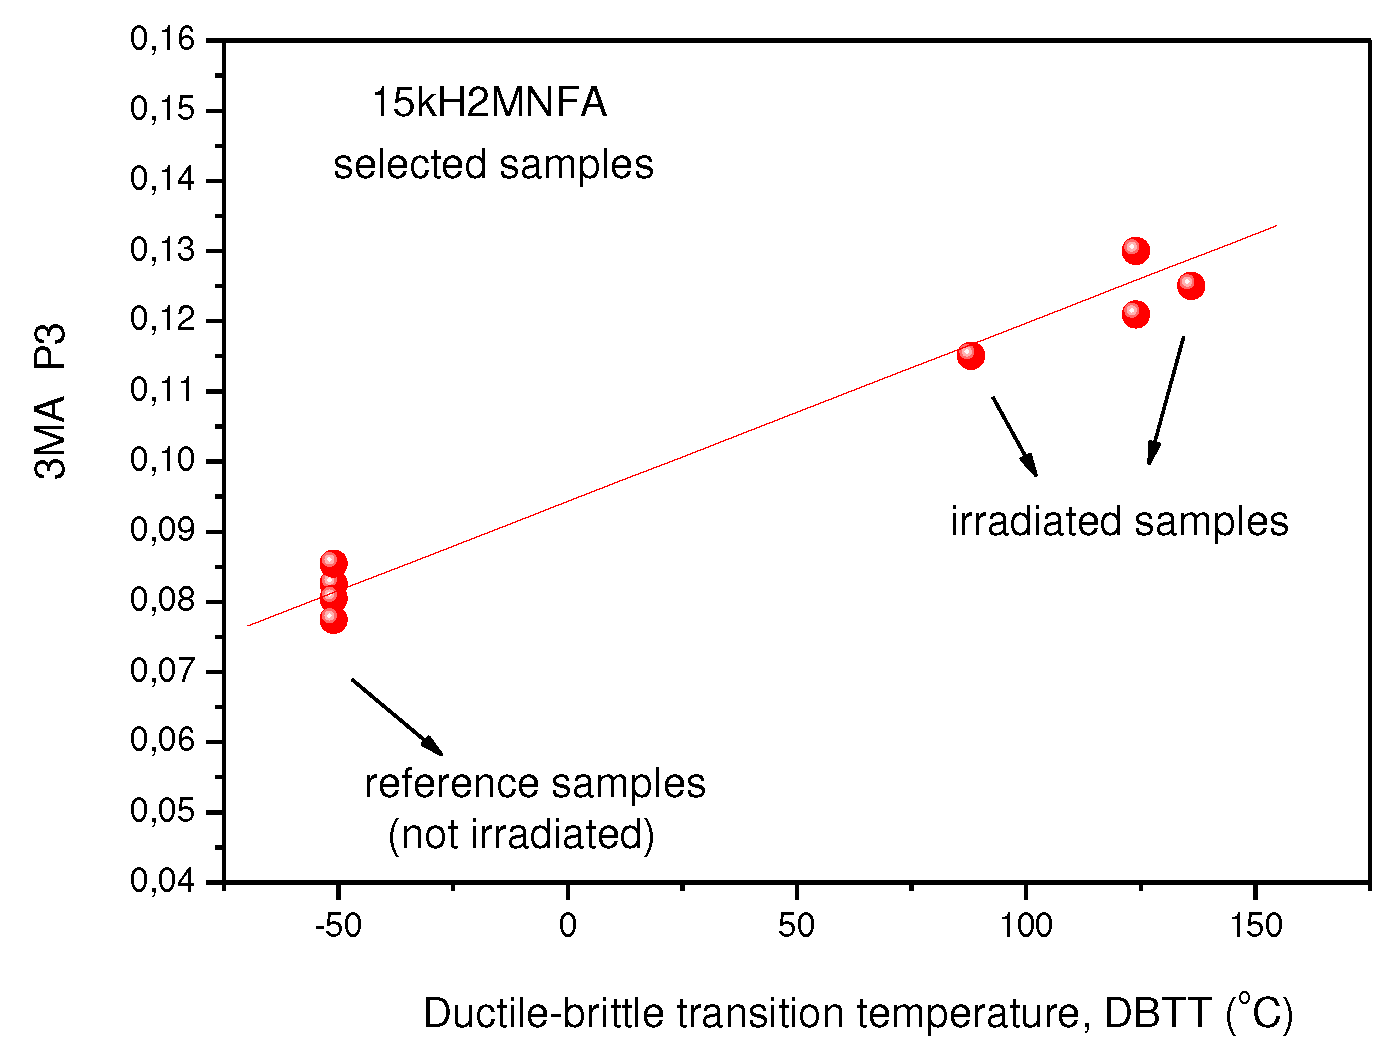
Figure 8 give an overview about the measuring results for each set of Charpy specimens and for each NDE method in dependency on the corresponding DBTT. A possible explanation of this scattering lies in different origin of the samples having the same irradiation condition and, consequently, slightly different material properties before irradiation. (This effect is discussed in detail in Appendix B). This causes different progress of the material properties during neutron irradiation. Long-term repetition measurements carried out during the measurement campaigns on a reference sample showed stable results. Uncertainty studies were performed in order to find out the origin of this scatter. These studies concluded that the uncertainty of the samples can be estimated to be higher than the uncertainty of the “inspection system” [99]. Nevertheless, correlation of the nondestructively extracted features with embrittlement have been identified. Several trends correlate with each other and deliver complementary information regarding the material properties. It was expected that the NDE features show either a continuously increasing or a continuously decreasing trend for a certain material. This behaviour cannot be confirmed in case of all materials (see Figure 6 - material HSST03).
Moreover, it was observed that the same NDE feature shows different trends for different materials: Seebeck coefficient is expected to increase with embrittlement. However it decreases in case of the materials A508b and HSST03 irradiated at 305°C compared with the non-irradiated condition.
The behaviour of the NDE features is affected by both the irradiation fluence and the irradiation temperature. The increase of the fluence causes an increase of the embrittlement. The increase of the temperature has different effects on some of the NDE features: whereas temperatures below 260°C have the same influence like the irradiation fluence, it seems that higher temperatures have a contrary effect especially on the ultrasonic (US) method and Seebeck coefficient measurement (TEPMM).
In the case of the 3MA method only the most significant feature of the 21 measured features are shown. (In these figures the terminology “Micromagnetic Inductive Response & Barkhausen Emission (MIRBE)” is used for the Barkhausen noise measurements”.)
In case of the material 22NiMoCr37 (irradiated between fluences of 3x10
19n cm
-2 and 6x10
19 n cm
-2) only the Seebeck coefficient continuously changed with increasing DBTT. No difference in terms of the other NDE parameters has been observed for both irradiated conditions (
Figure 3). The variation of the DBTT due to increasing fluence taking into account the scatter of points of the 95% confidence bounds of the Charpy test results can’t be detected accurately probably due to variations in the microstructure of the material before irradiation.
In case of the weld material 18MND5-W (
Figure 4) several NDE features show continuous trends. However, in case of this material the ultrasonic time-of-flight (TOF) of the samples irradiated at 150°C is comparable with the TOF of the non-irradiated samples.
In case of the materials A508-B (
Figure 5) and HSST03 (
Figure 6) the high irradiation temperature of 305°C affects the outcome of the NDE measurements. Especially the results of the methods MIRBE, Piezo-US and TEPM show an anomalous behavior compared with the other irradiation conditions.
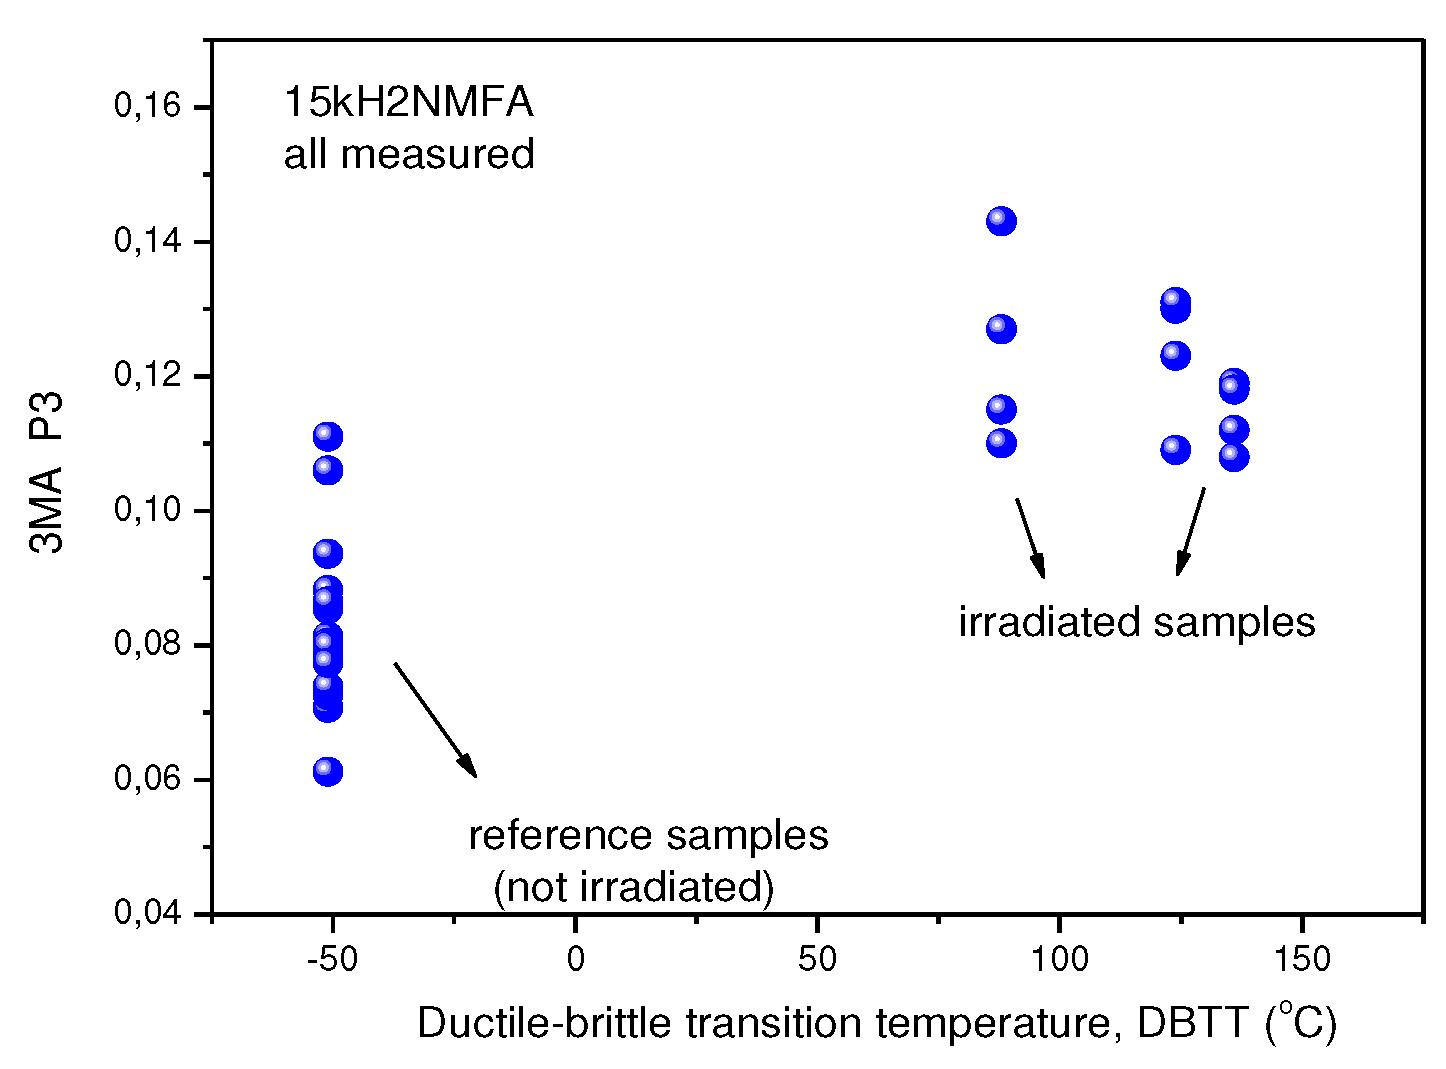
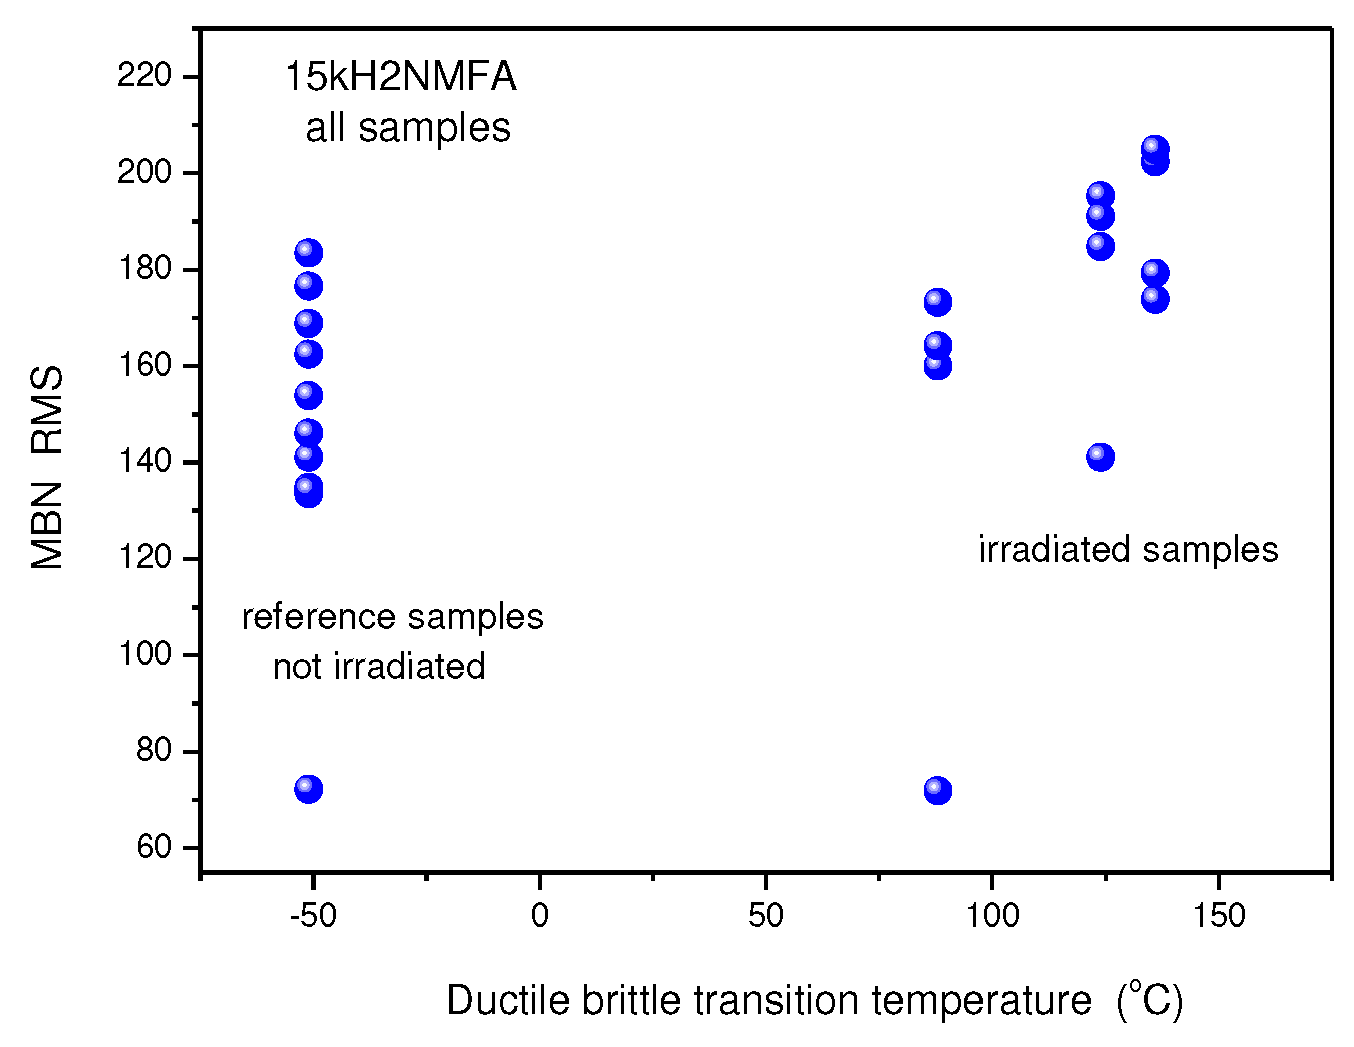
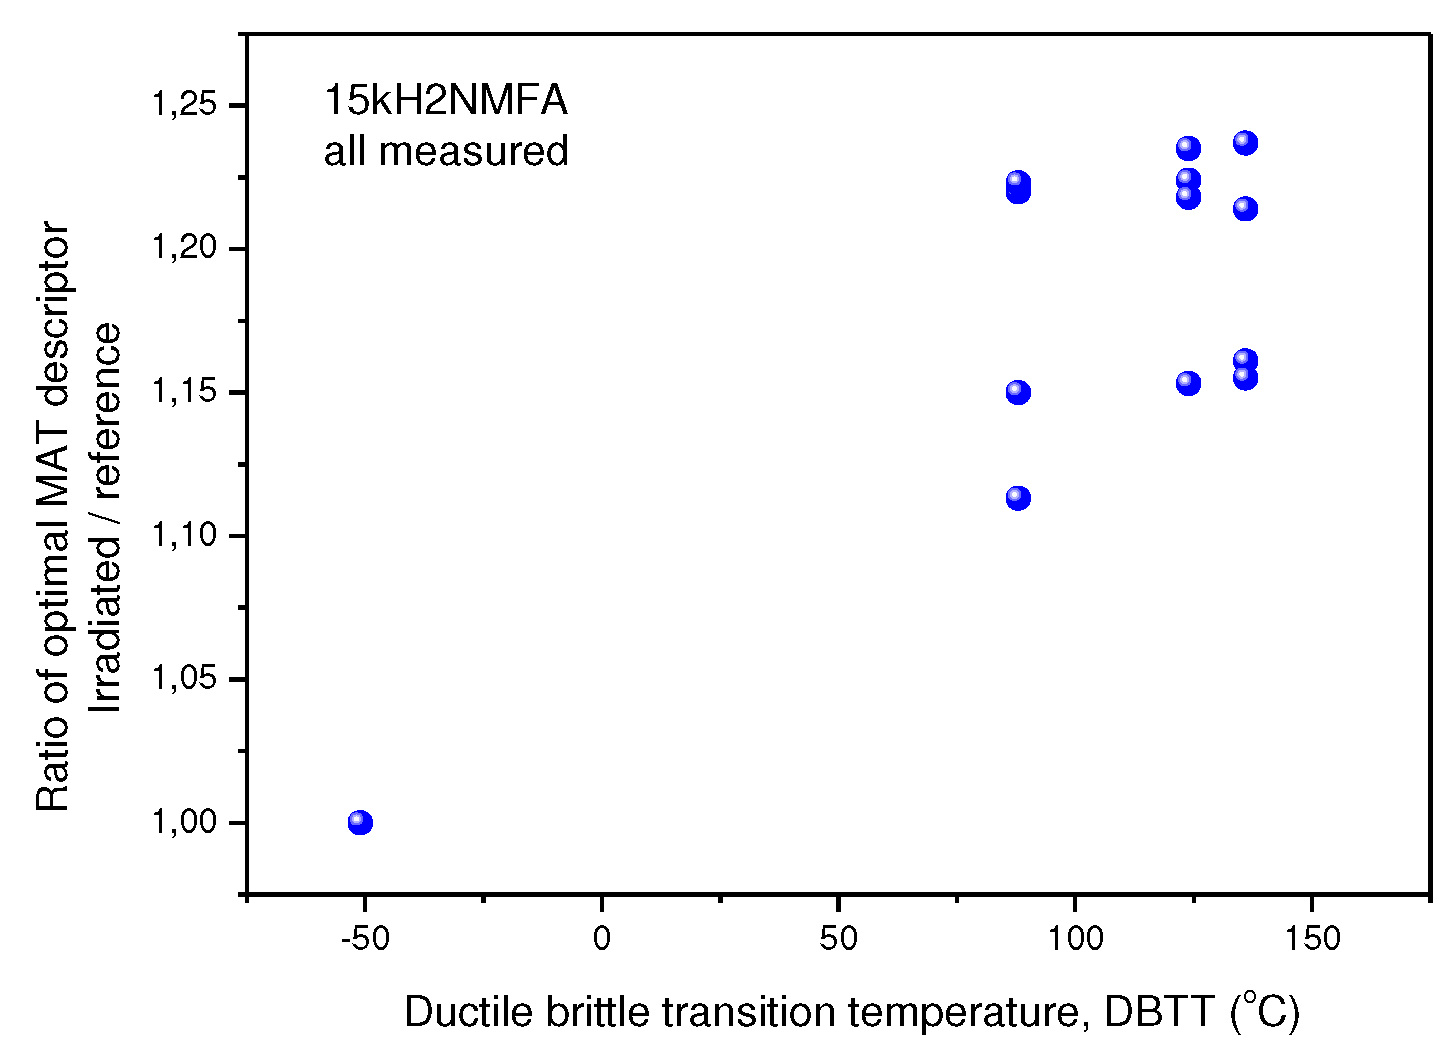
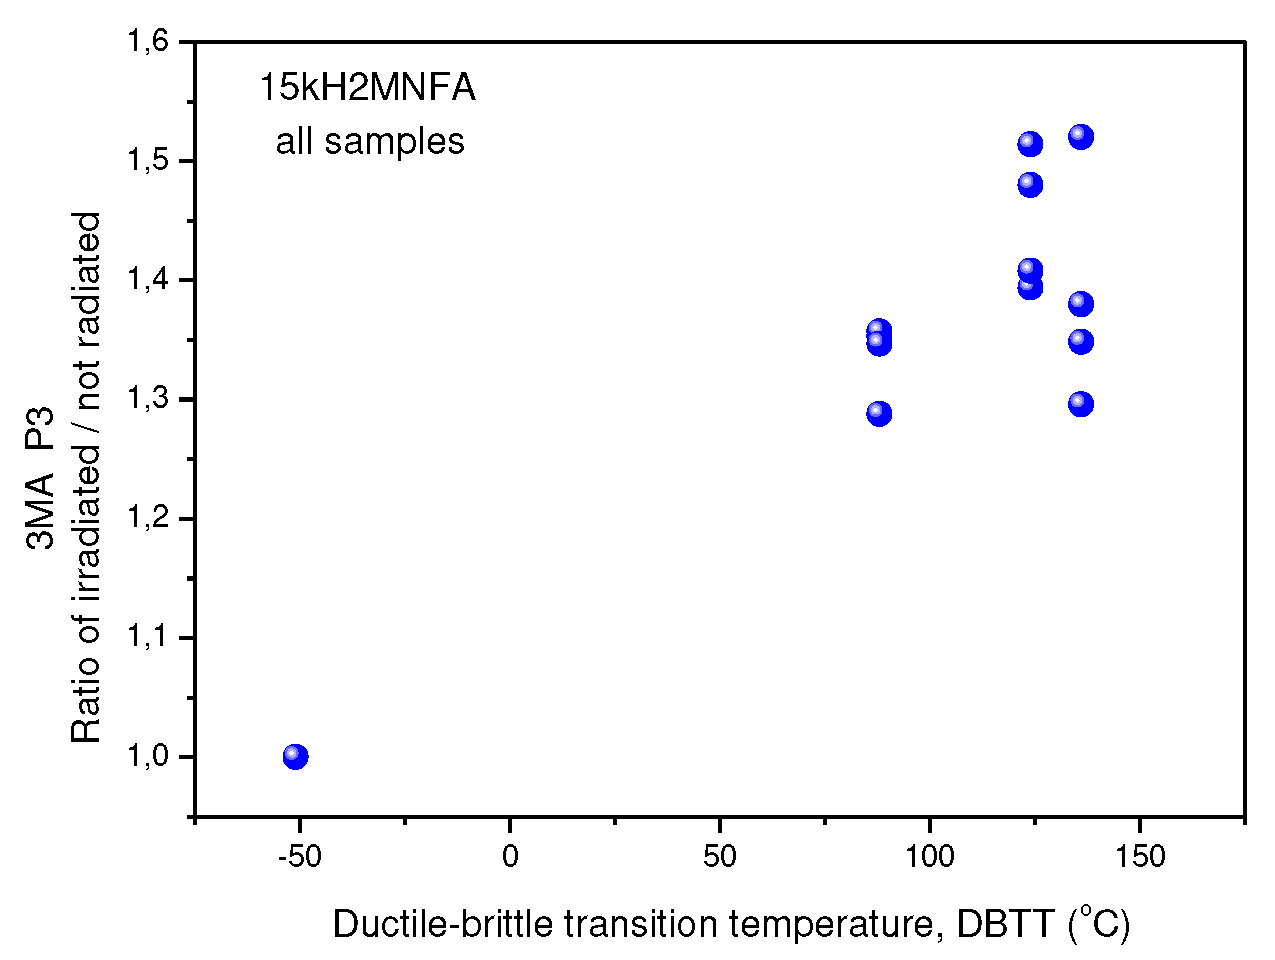
The NDE measurements on the Charpy sample sets of RPV materials of A508Cl.2 (
Figure 7) and 15kH2NMFA (
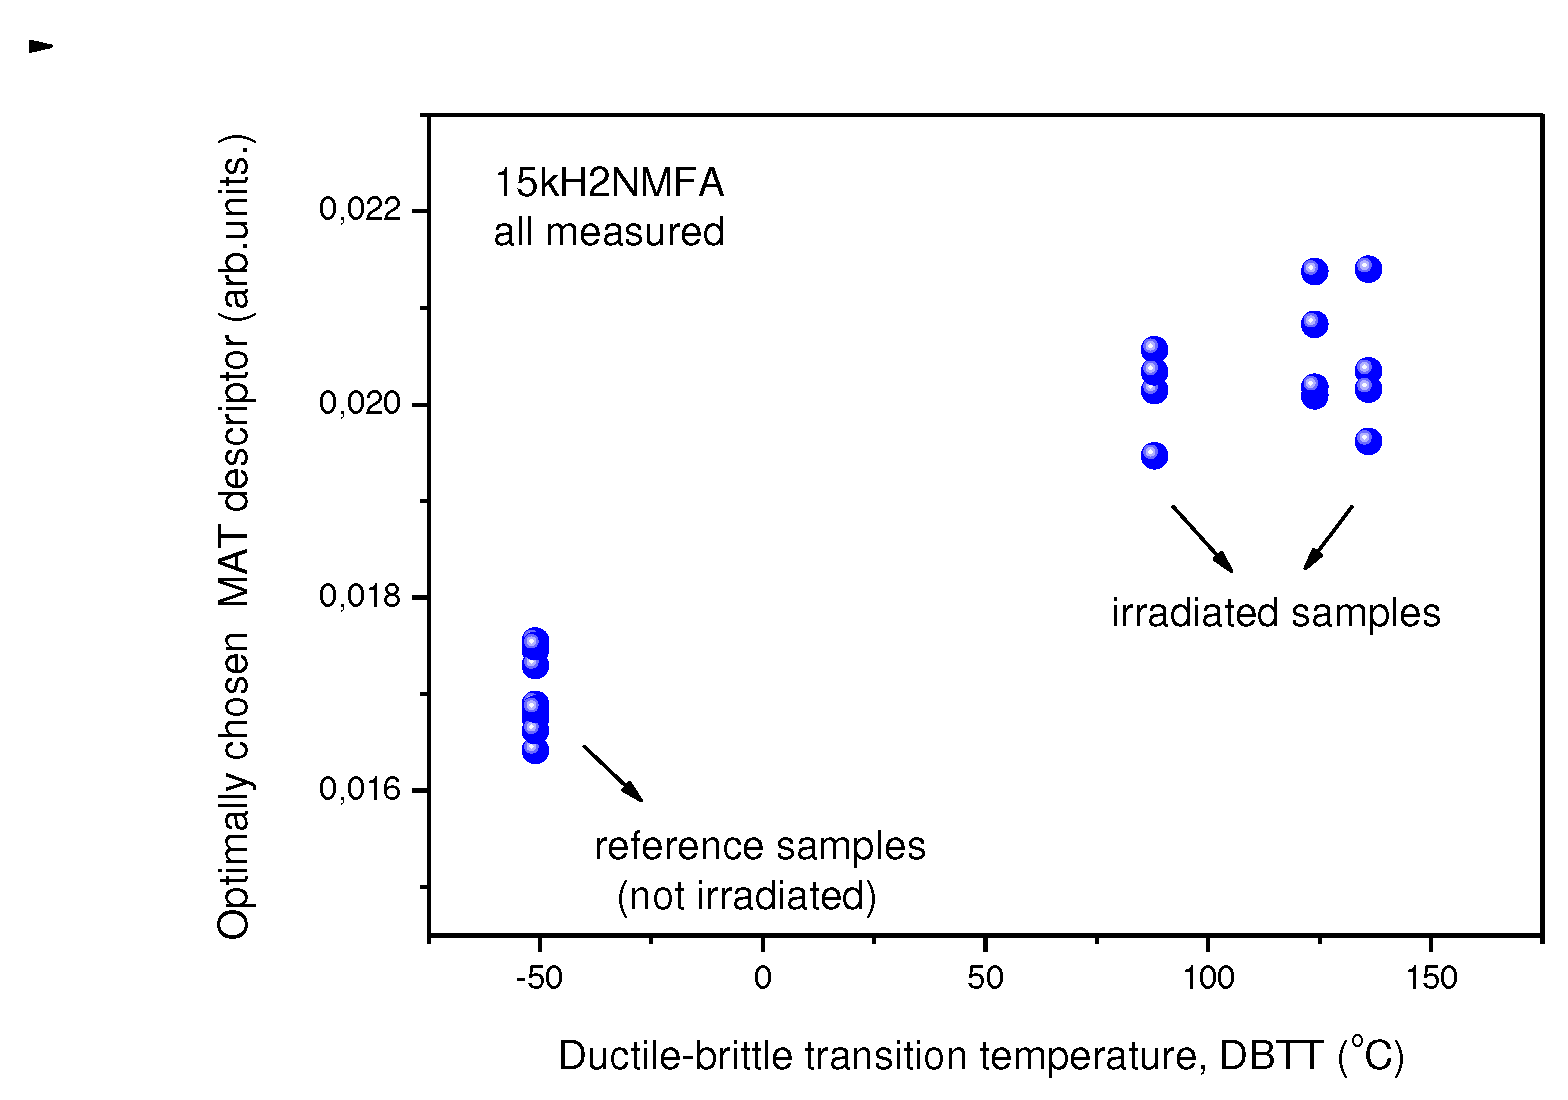
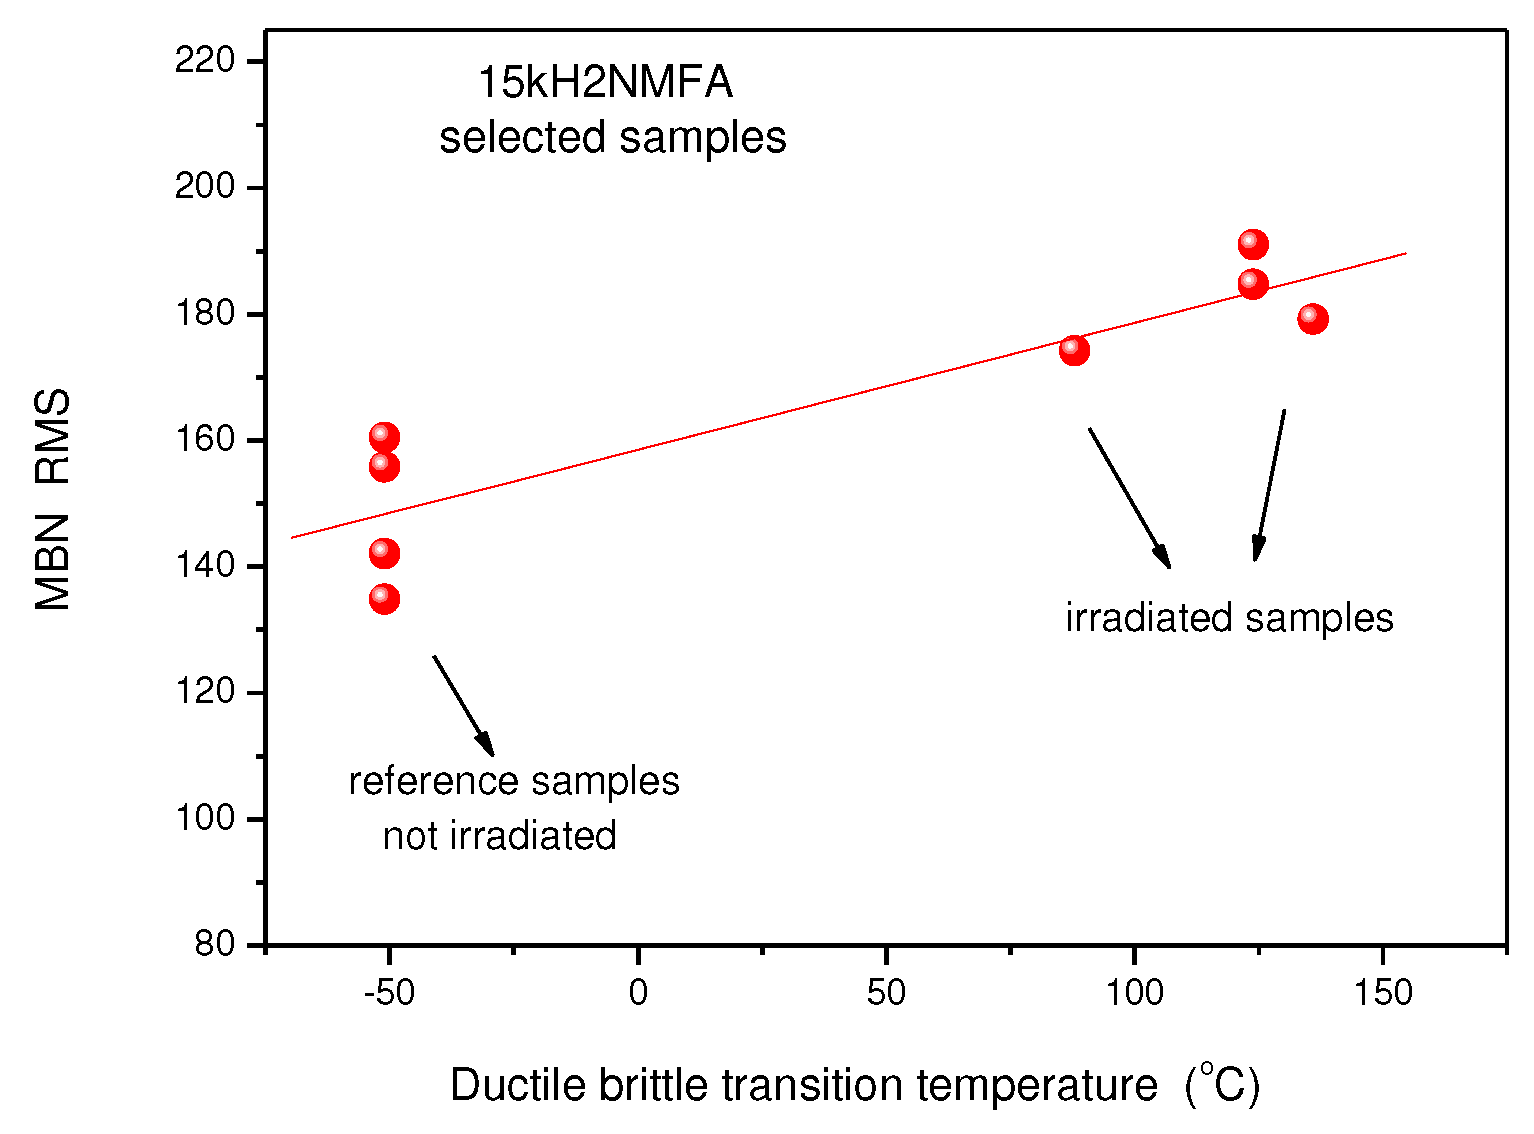
Figure 8) investigated before and after irradiation allowed for the first time the characterization of progressive change of embrittlement taking into account the initial condition of the materials (before irradiation). In case of these set of samples it has been observed that the scattering of outcome of the individual NDE measurements performed on different Charpy samples of the same material and the same irradiation condition is lower.
The influences of the neutron irradiation on several NDE parameters of Charpy specimens have been previously published and discussed in detail [100,101].
8.2.2. Cladded and Non-Cladded Blocks
One of the challenging task of the NOMAD project was to develop a method that can follow the degradation of the base material through the cladding, i.e. the probe can be applied from the inside of the reactor vessel wall. This task raises two problems simultaneously: on one hand to find a way to excite the base material through the cladding, and also to detect the response through the same. On the other hand, the degradation of the base material has to be differentiated from the changes of the cladding properties due to the irradiation.
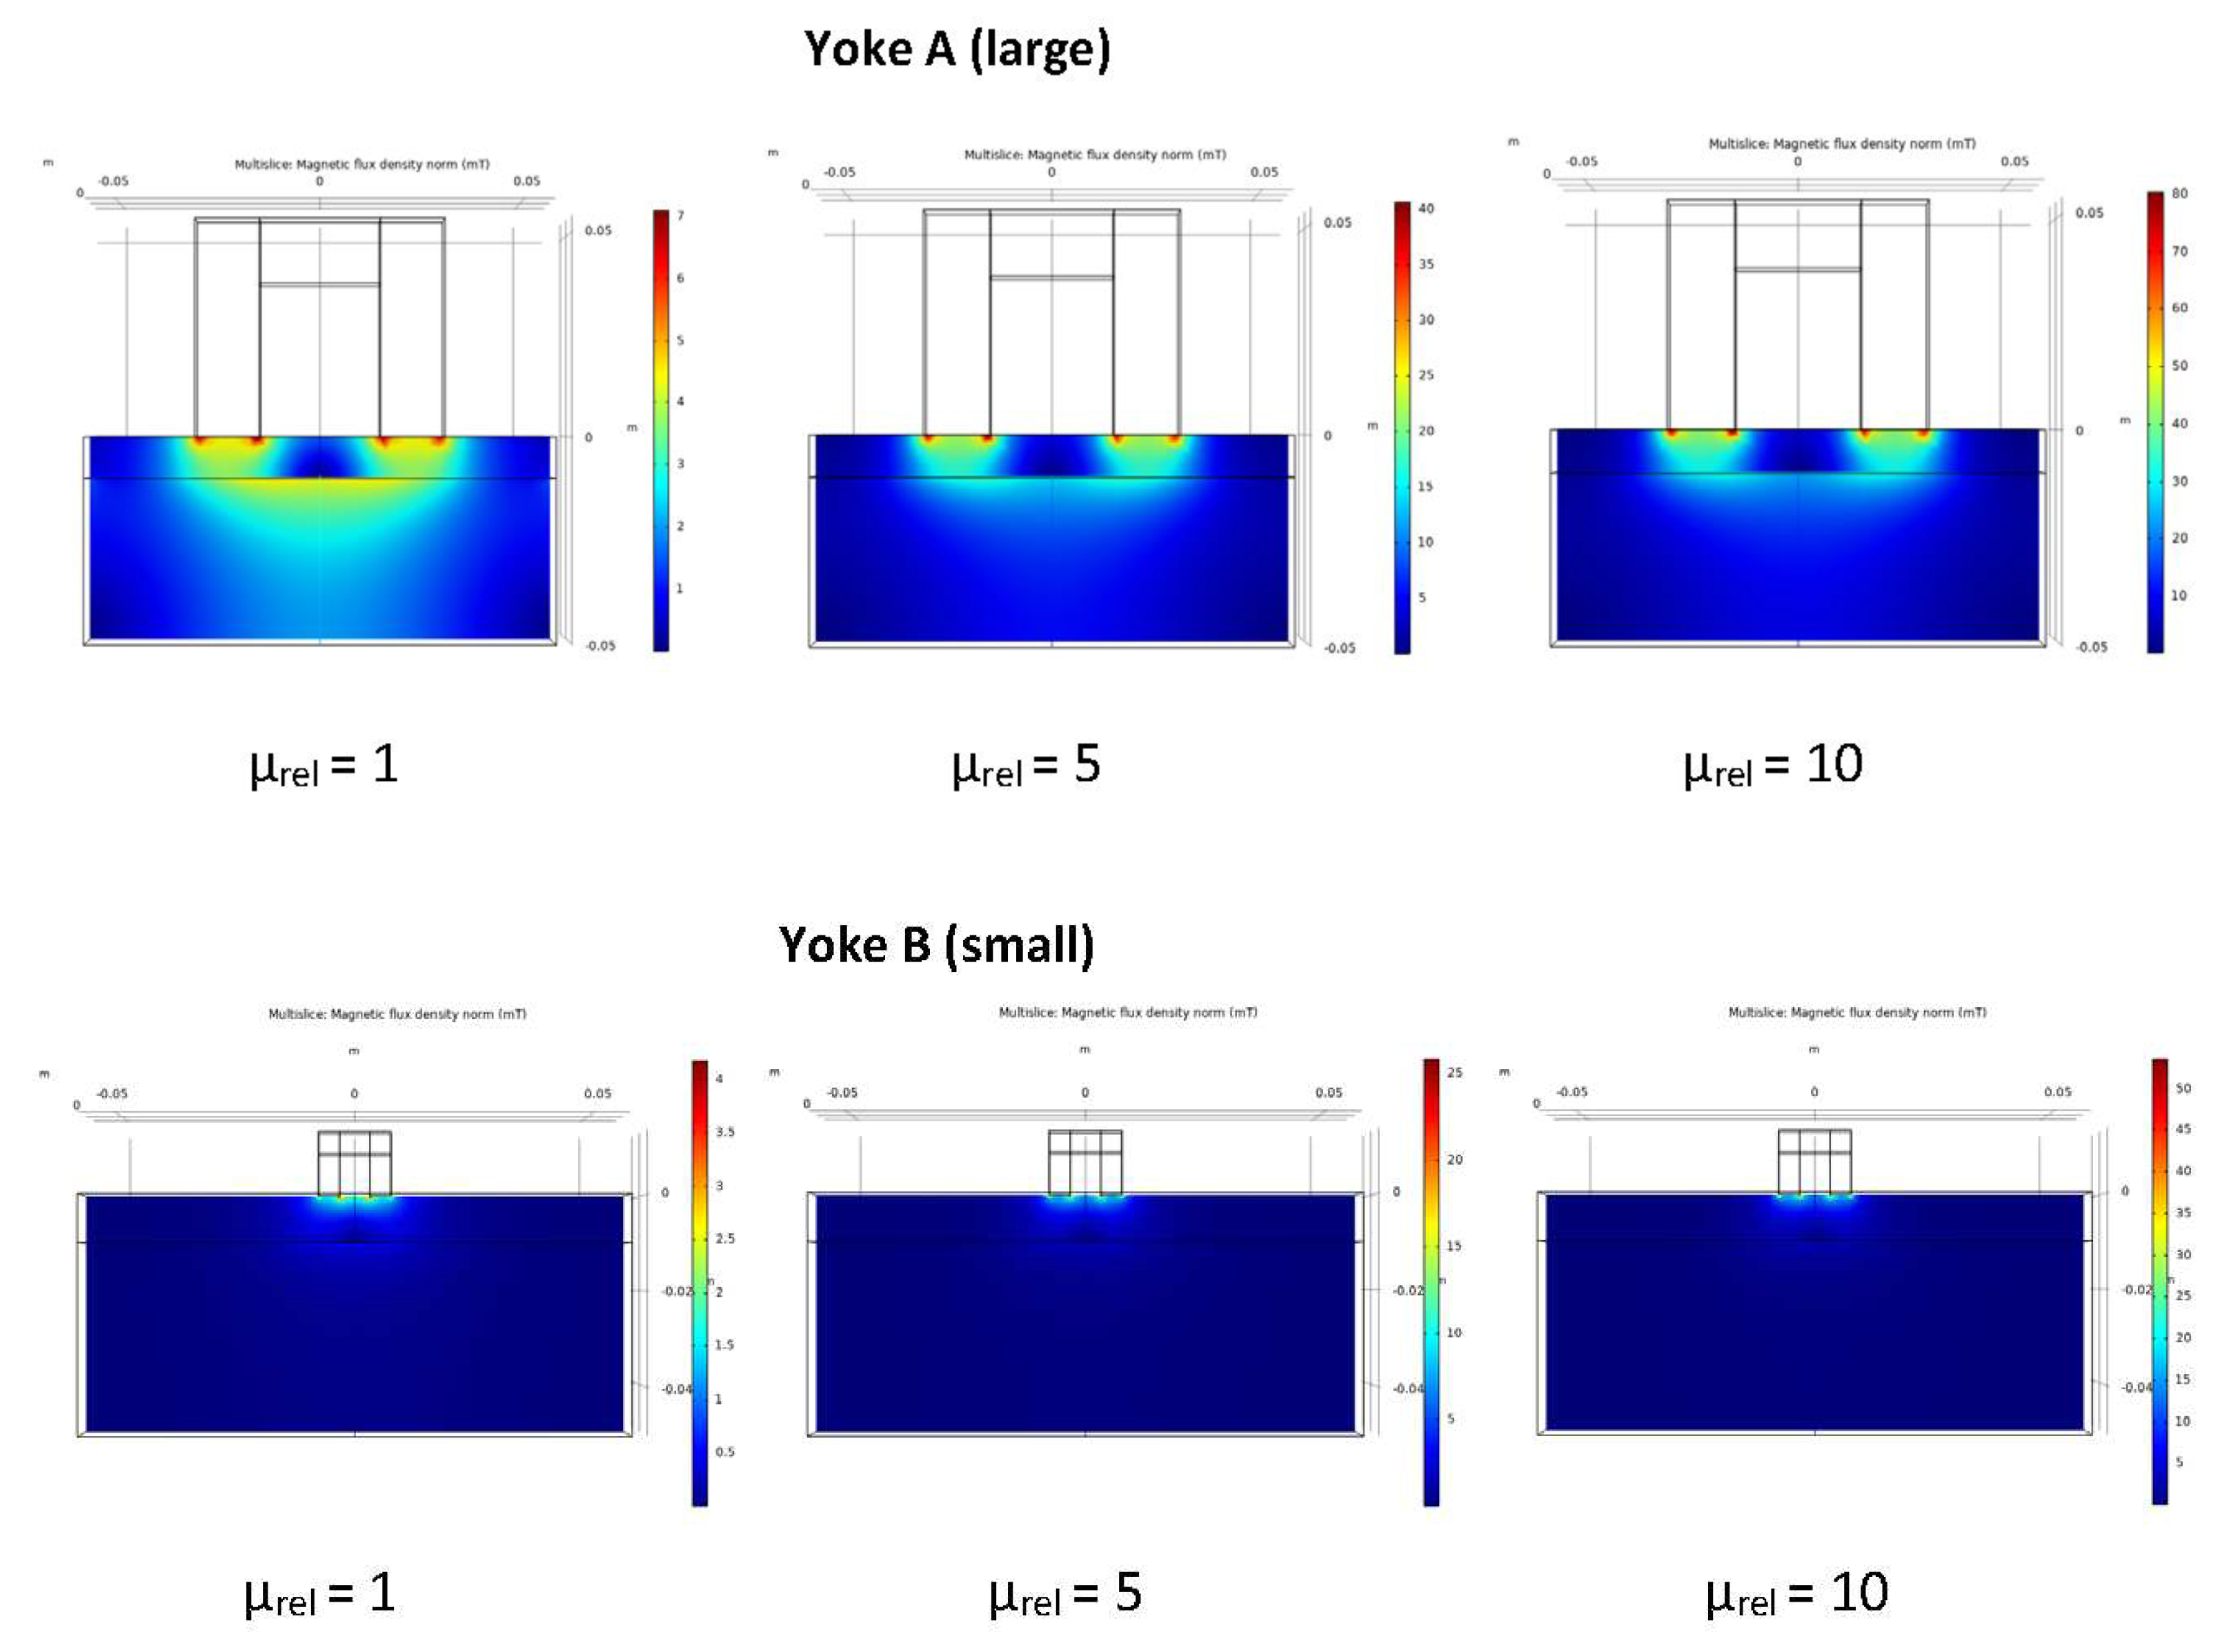
To decide whether the ferromagnetic base material can be investigated through the austenitic cladding by magnetic methods using an attached magnetizing yoke, numerical simulation of magnetic field was performed to show, how the magnetic field, generated by the magnetizing yoke penetrates into the base material through cladding [102]. The result of this simulation is presented in
Figure 9. The result of numerical simulation revealed that by using the large magnetizing yoke for generating exciting magnetic field, the base material could be magnetized sufficiently even through the cladding. On the other hand, when a yoke of a small-sized compared to the thickness of the cladding is applied, it can excite the region of cladding mostly, and the density of the penetrating exciting field in the base material is very limited, almost negligible. This way the cladded system and the cladding only can be studied separately.
To characterize the neutron irradiation induced embrittlement independent of the initial microstructure that can be heterogeneous all blocks have been non-destructively investigated by means of all previously optimized NDE methods before and after neutron irradiation. Some NDE methods (DCRP and EMAT) are not suitable for the materials characterization through the austenitic cladding.
NDE measurements carried out before neutron irradiation have shown that, similar to the Charpy samples made of the same material, the blocks (non-cladded or cladded) have different material properties. The explanation therefore lies in the different microstructure at different positions in the component where these investigated blocks originate from.
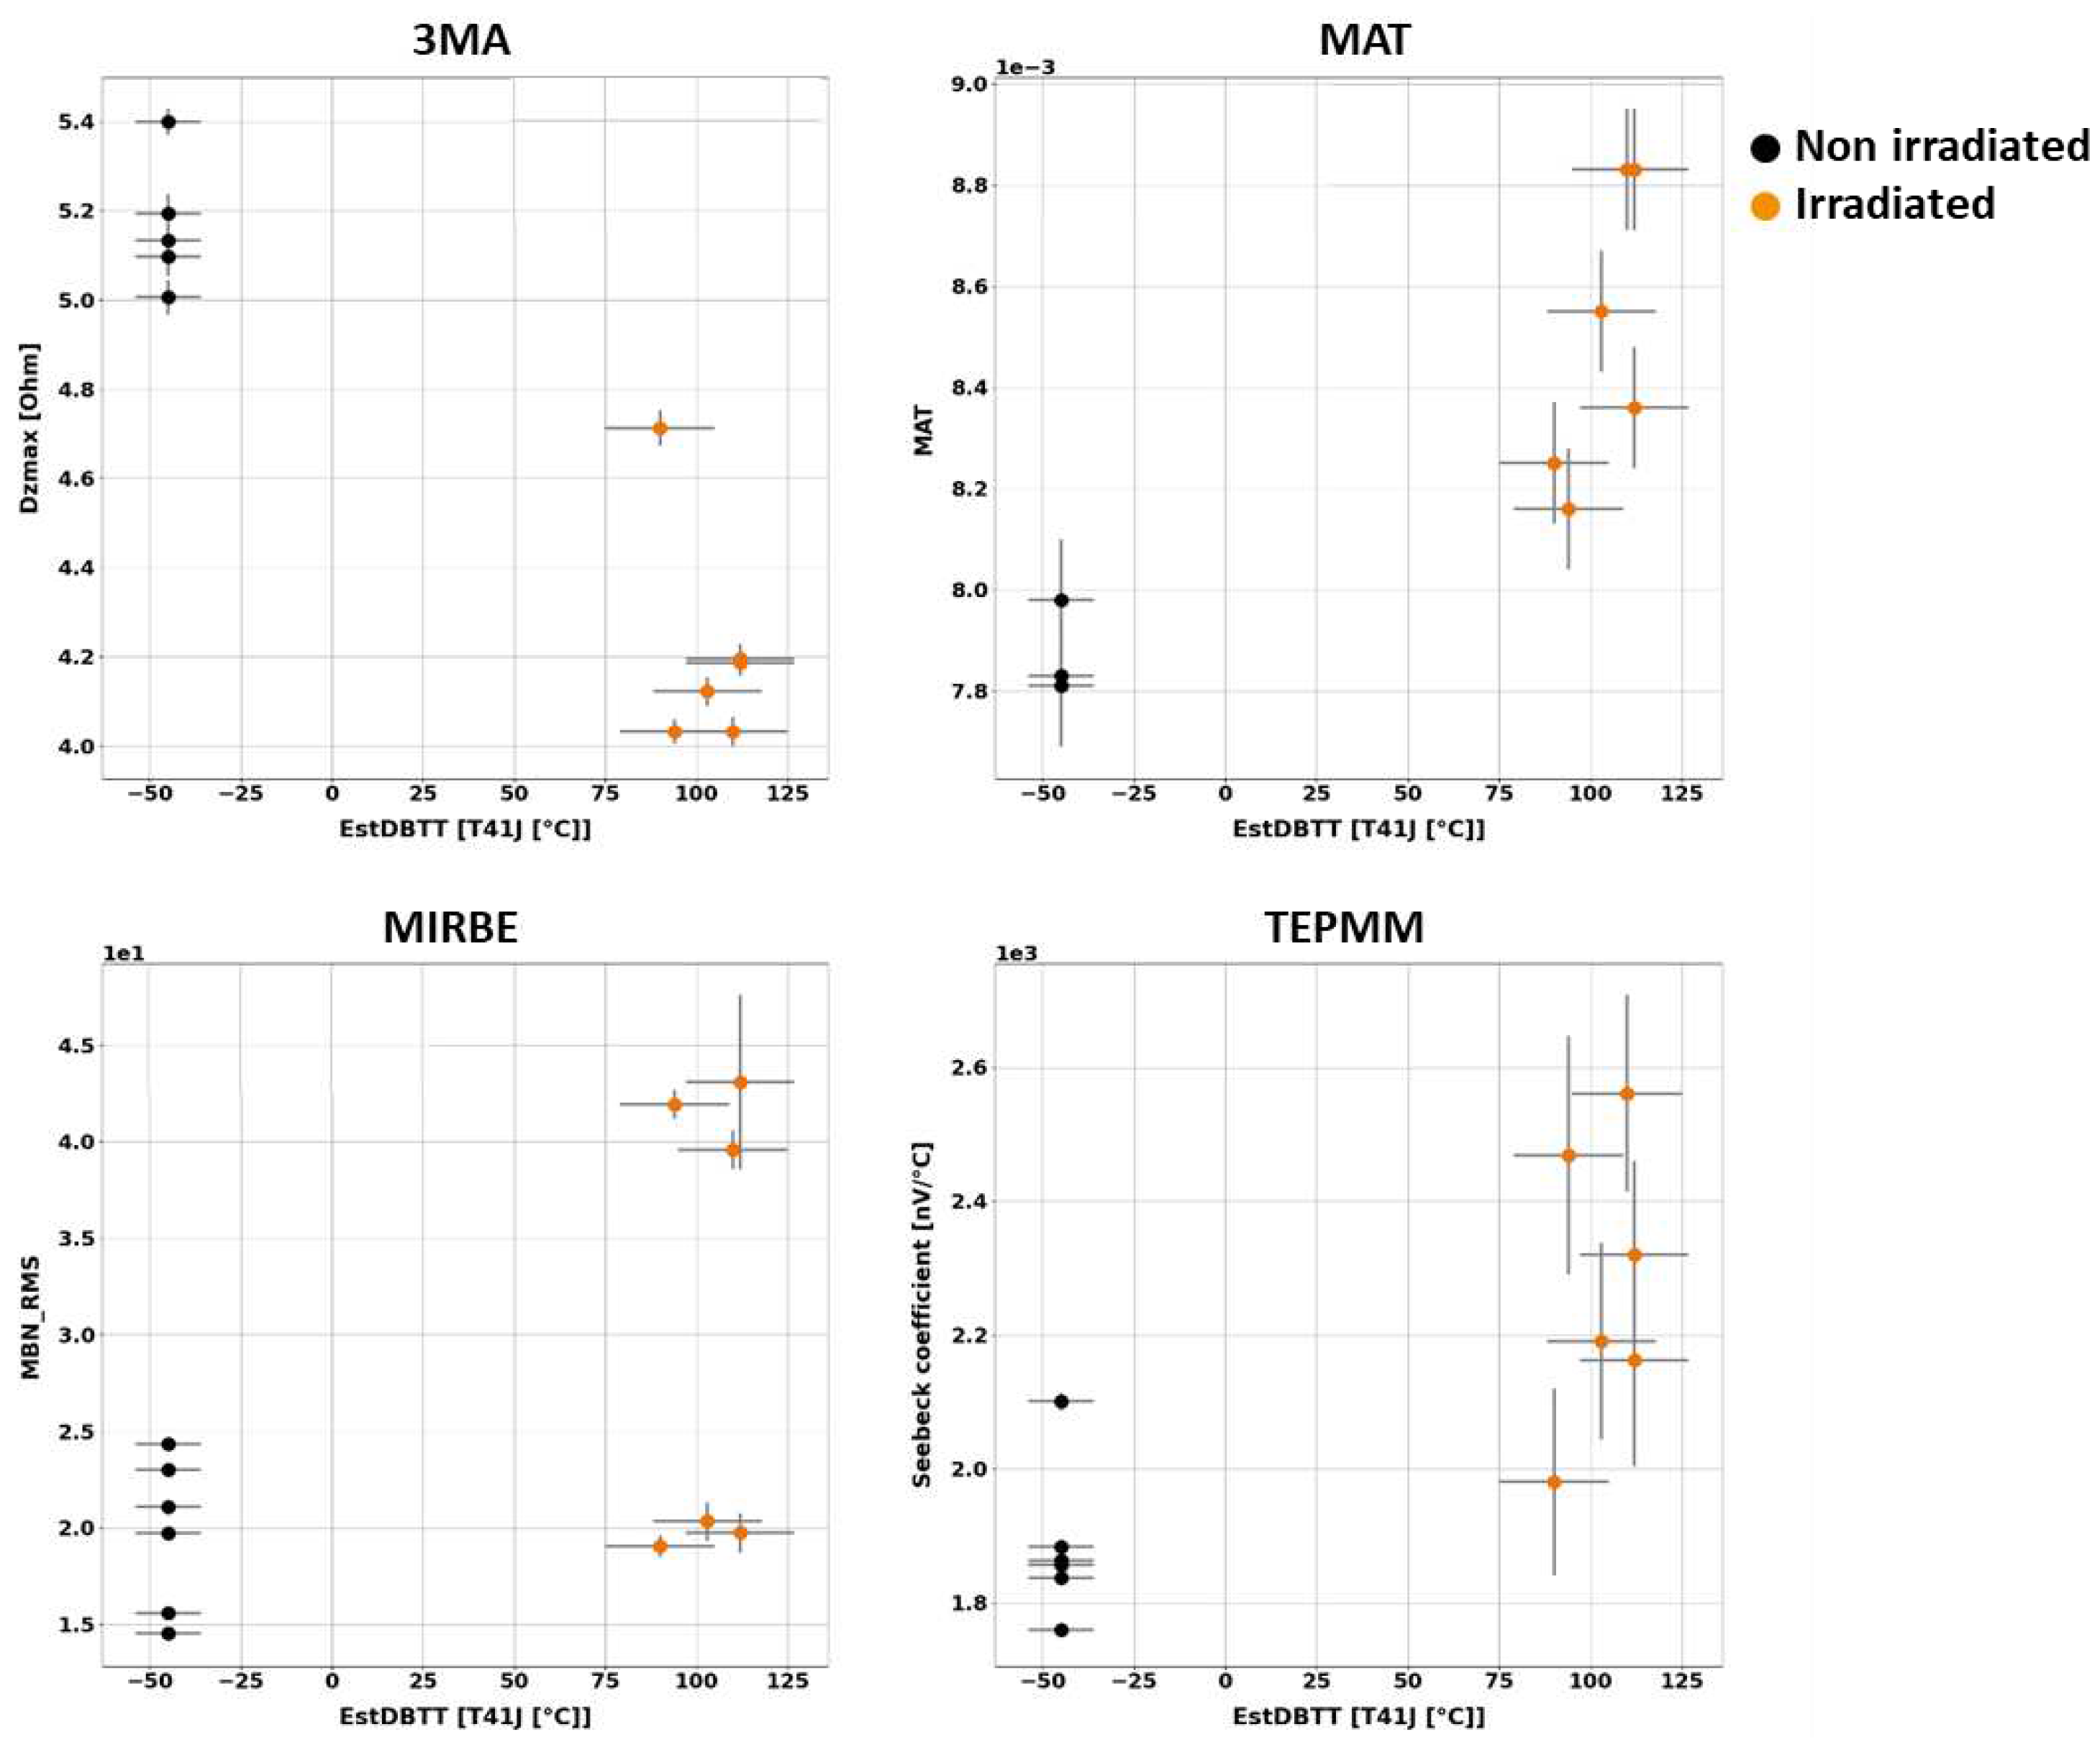
After irradiation, NDE measurements have been carried out again on all non-cladded and cladded blocks. Measuring quantities derived from the NDE methods have been individually collected and analyzed in terms of DBTT. Trends of the non-destructively determined measuring quantities have been identified. An overview of the results obtained on the block samples is given below (
Figure 10 and
Figure 11).
The influences of the neutron irradiation on MAT parameters of blocks specimens have been previously published and discussed in detail [103,104].
The results of the individual NDE methods have shown the difficulty to characterize the embrittlement by using single-parameter methods.
9. Results for Prediction of Embrittlement by Means of a Multi-Parameter Machine Learning (ML)-Driven Approach
9.1. Multiparameter Method
Since the individual test quantities have differently weighted sensitivities to target and disturbance quantities, the influence of the disturbance quantities can be eliminated or at least reduced by combining several features that have the potential to suppress overlapped disturbance influences. The advantages of combining test quantities in a multiparameter method are manifold. Such a combination of methods is particularly indispensable when the target quantities, so called independent parameters are to be measured (e.g. DBTT) and the disturbance quantities (temperature, residual stresses, surface condition) can vary simultaneously. The ultimate goal was to produce a machine learning-based computational tool that can estimate the neutron irradiation-induced embrittlement of reactor pressure vessel steel alloys based on the NDE parameters.
In case of multi-parameter, i.e. multi-dimensional nonlinear problems the required analytical expression cannot be formulated typically, so another statistical approach is required. ML algorithms are powerful tools that can be used to automatically create a regression model based on given data. The data must consist of one or several features, which are the input to the model, and one or several target variables, which are the desired prediction of the independent parameters, or in other words, the output of the model.
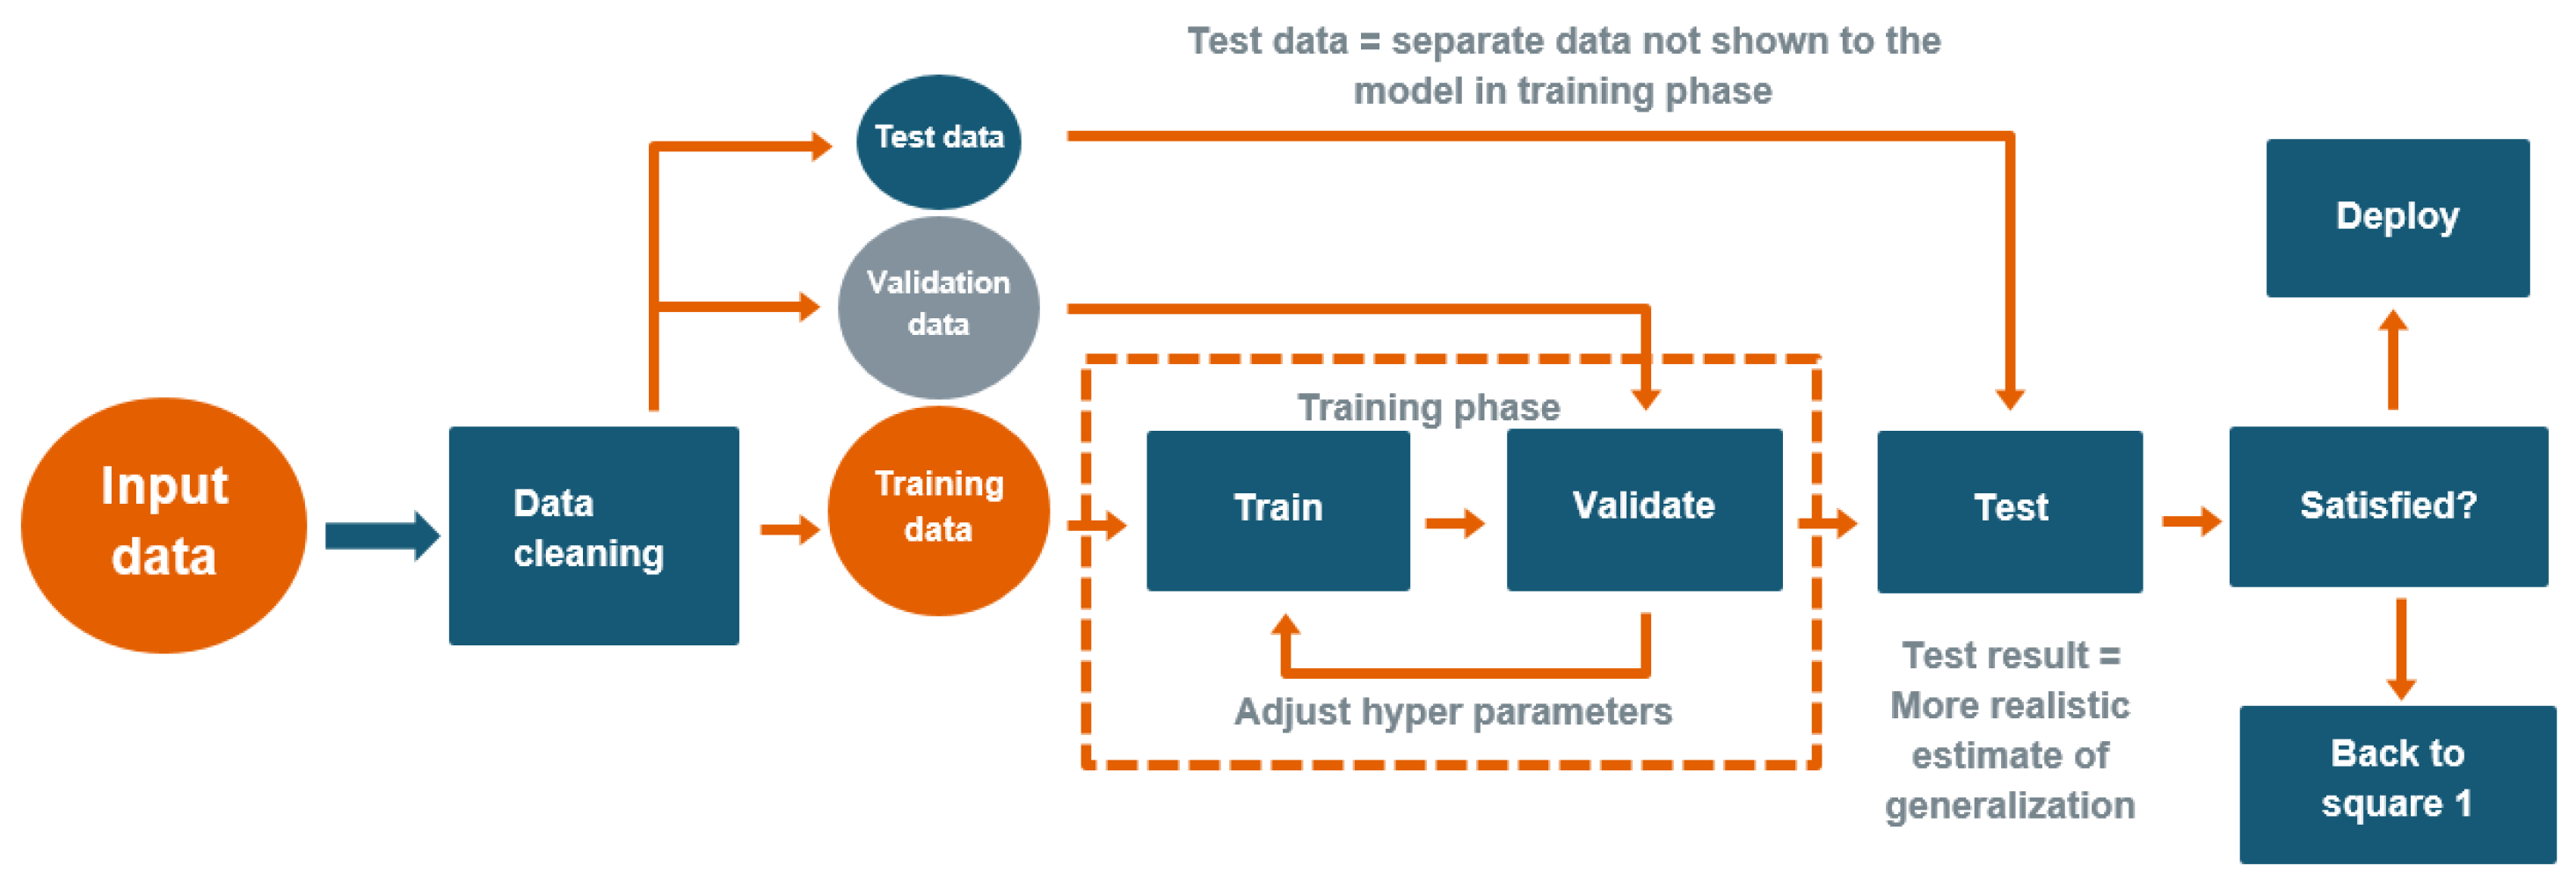
Since the analytical expression that links the input and the output parameters are not known in case of ML, the transparency is essential for the application of ML, especially in safety areas. Extra attention has to paid to careful studies of these methods and to their verification. In typical supervised machine learning, the model learns from a given training data, and traditionally, a separate validation data set is used to evaluate the performance of the trained model. But here, an additional data set is required for testing the reliability of the method. This set comprises not only some randomly selected elements, but data selected also from the interval boundaries (See in
Figure 12). When test result is unsatisfactory, the whole procedure has to be restarted (i.e. “Back to square 1”), by experimenting with new model structure and hyperparameters.
9.2. Database Preparation
Statistical methods work well on a large data set. This raises a quite frequent problem of ML applications: the insufficient number of the achievable measured samples or experimental data, i.e. the limited size of the true result database. The ML methods do not generate any novel information. Instead, they can be used to circumscribe and recognize the information that can be found in the database. Pre-processing the obtained database of the physical test results aims to ease this task of the ML approach and increases its performance, i.e. increases the precision of the regression or classification. Any operation on the experimental data set should be carried out with special attention not to degrade the targeted information content or falsify it.
There are basically two options for processing the database: eliminating some of its elements considered as useless ones, and modifying its entries, or even generating novel ones in an artificial way.
9.2.1 Reduction of Input Space Dimension
If the analysis includes too many features that have a weak correlation with the target variable, they can reduce computational efficiency, increase model complexity, and make it harder to interpret. Moreover, increased model com-plexity results in a higher probability of overfitting. A large number of features prompts a problem known as the curse of dimensionality: when the number of dimensions increases, the volume of the feature space increases, and the data becomes sparser. As the number of features increases, the number of samples required to maintain accuracy grows exponentially [105].
One of the most evident methods for reducing the dimension of the input space is to remove the least relevant features (i.e. input parameters). This reduces the complexity of the ML algorithm's problem. There are various simple statistical evaluations or more complex regression methods to study the importance of the different features.
9.2.2. Determining Feature Importance
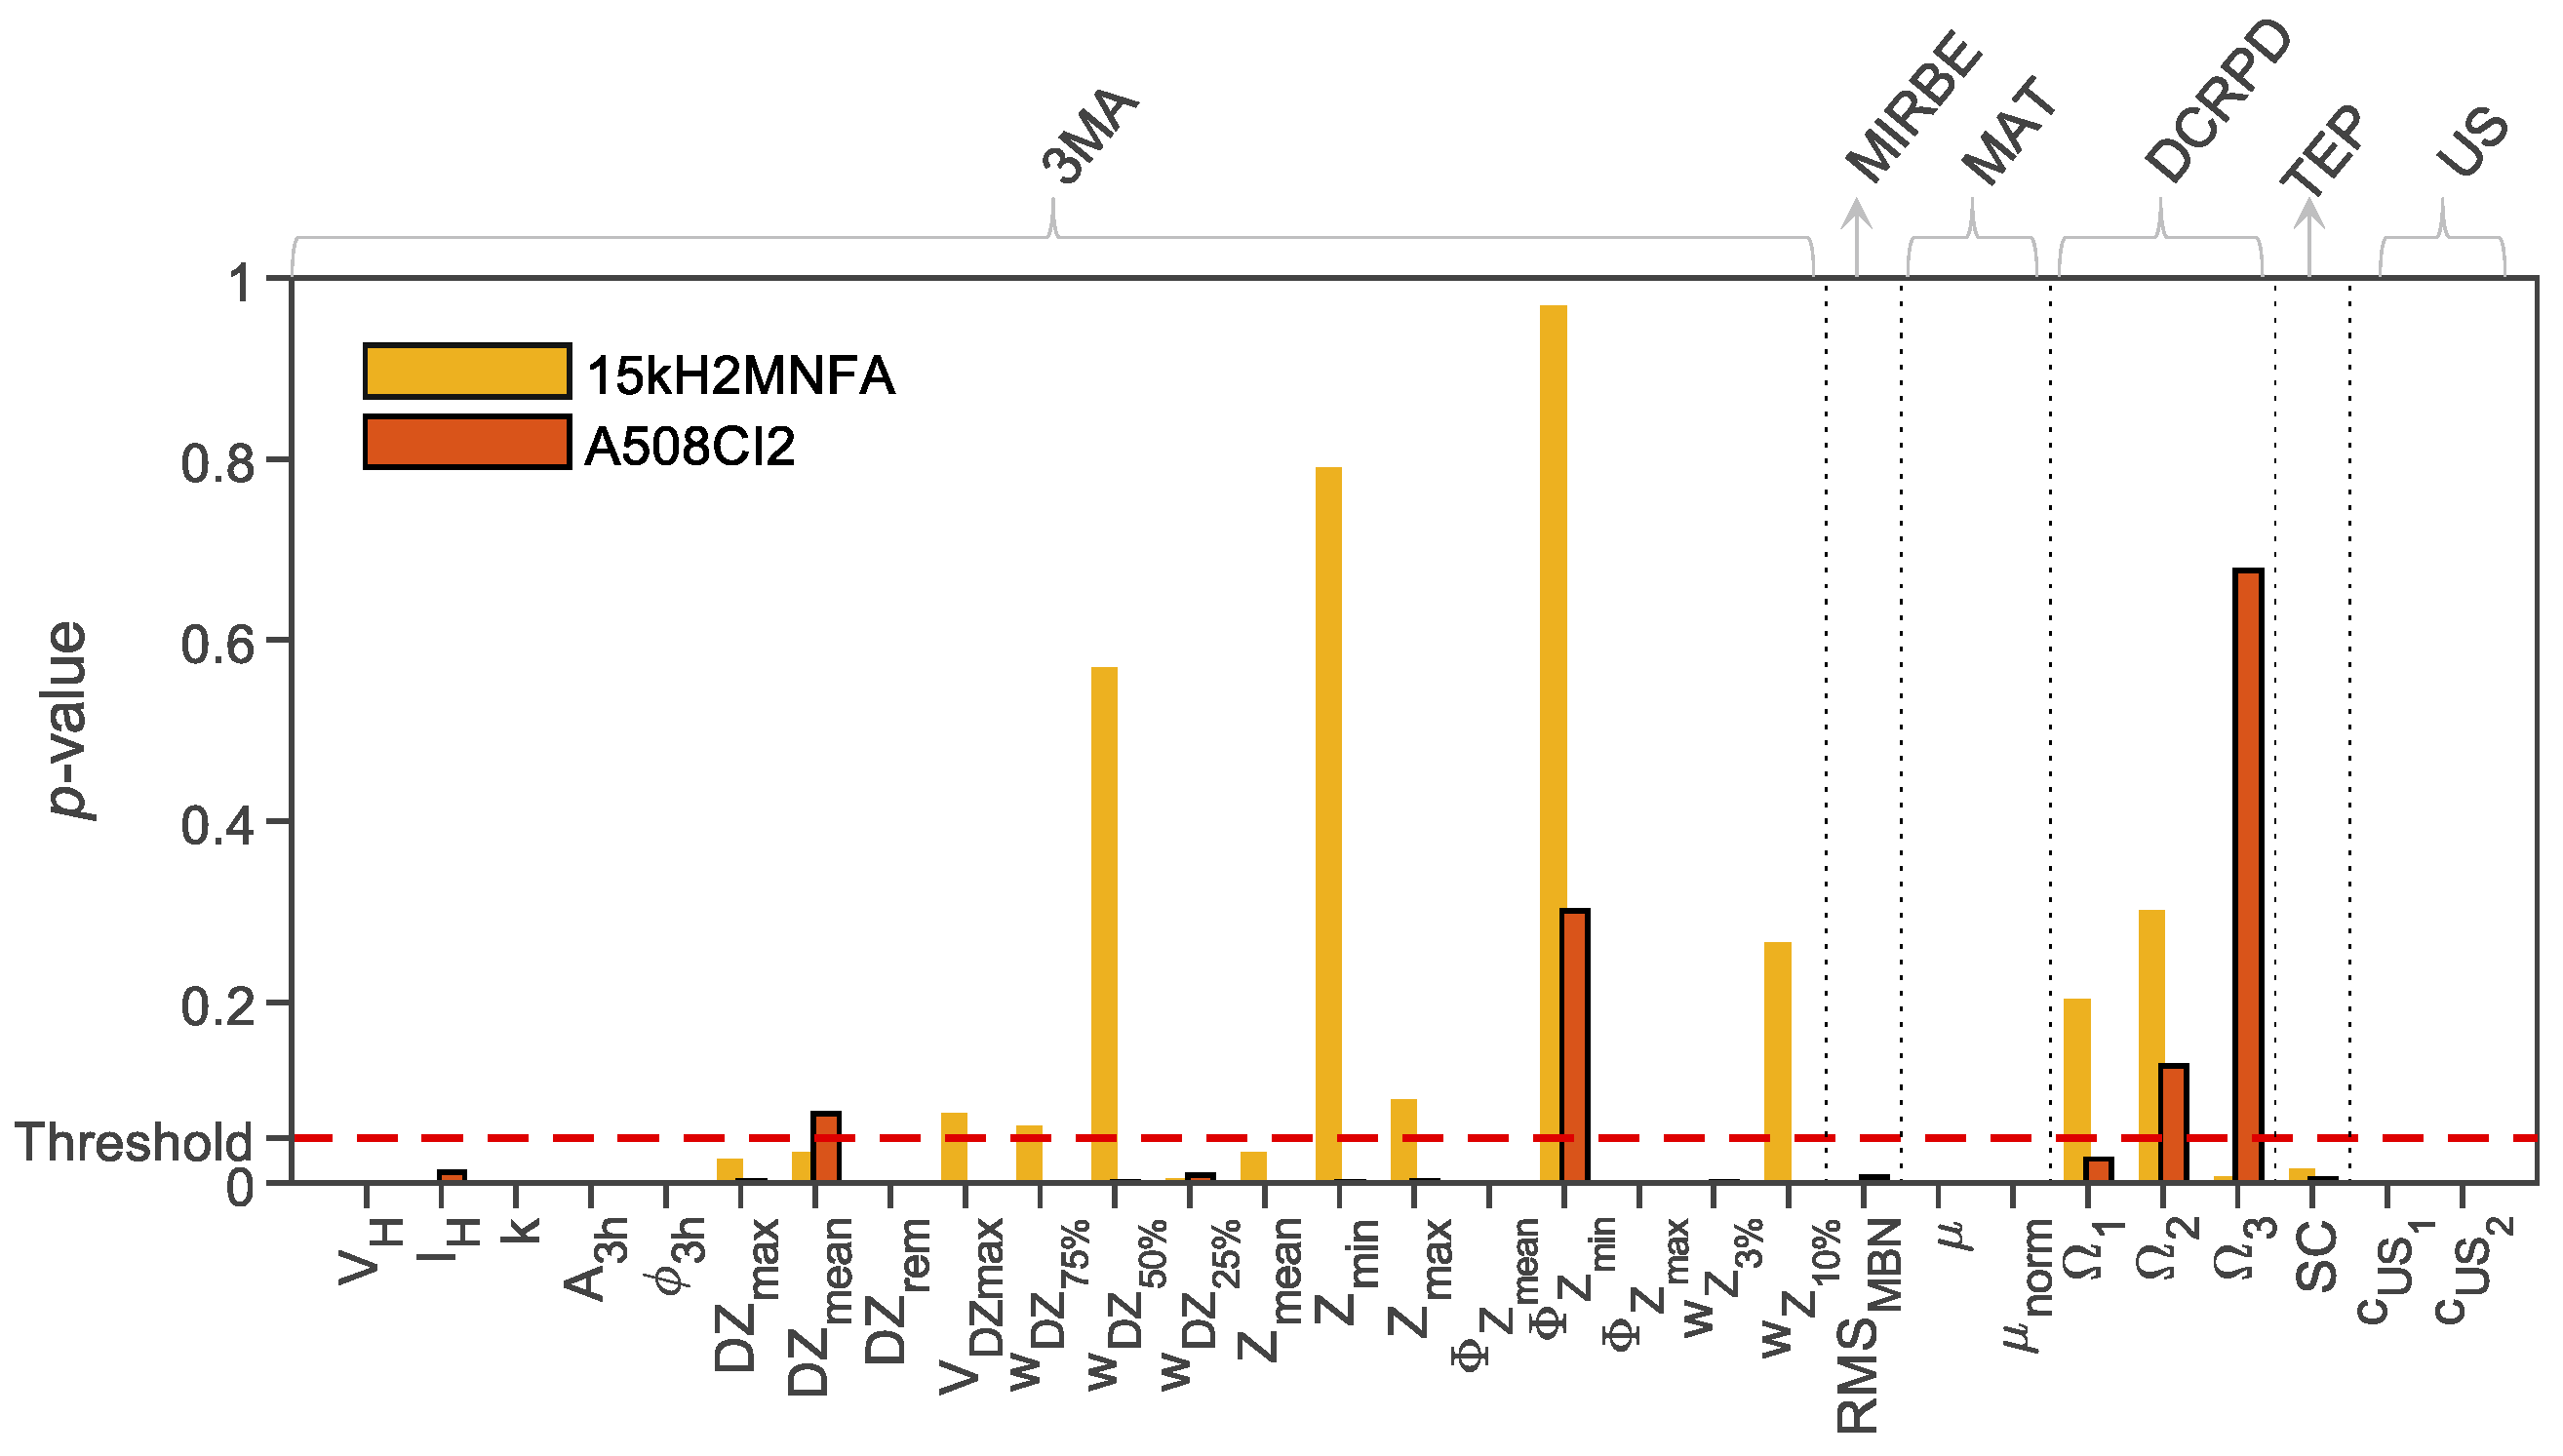
As an example, the Wilcoxon signed-rank test [106] can be used to study the statistical significance of materials properties caused by the irradiation in this paired data set. This test calculates the synthetic parameter differences for each pair of measurements and separately for each NDE feature. The outcome of the test is the p-value for the null hypothesis that the difference has a zero expectation value and a symmetric distribution. This corresponds to the conclusion that the irradiation did not affect the feature. The p-value is compared to a predefined significance level: If the p-value is greater than the significance level (threshold), the null hypothesis is accepted and we conclude that the irradiation has not caused a change in the feature, which can then be excluded from the analysis.
In the NOMAD project, the analysis focused on identifying which NDE parameters out of the 28 available contribute to precision and can aid in recognizing and suppressing side effects. In addition, the project isolated the parameters that are irrelevant and have no impact. Different types of ML algorithms tested in competition and their performances have been evaluated (see the example in Figure13).
Figure 13.
Example: Wilcoxon test results obtained on 29 NDE features (i.e. measurement output parameters) of the NOMAD project [105].
Figure 13.
Example: Wilcoxon test results obtained on 29 NDE features (i.e. measurement output parameters) of the NOMAD project [105].
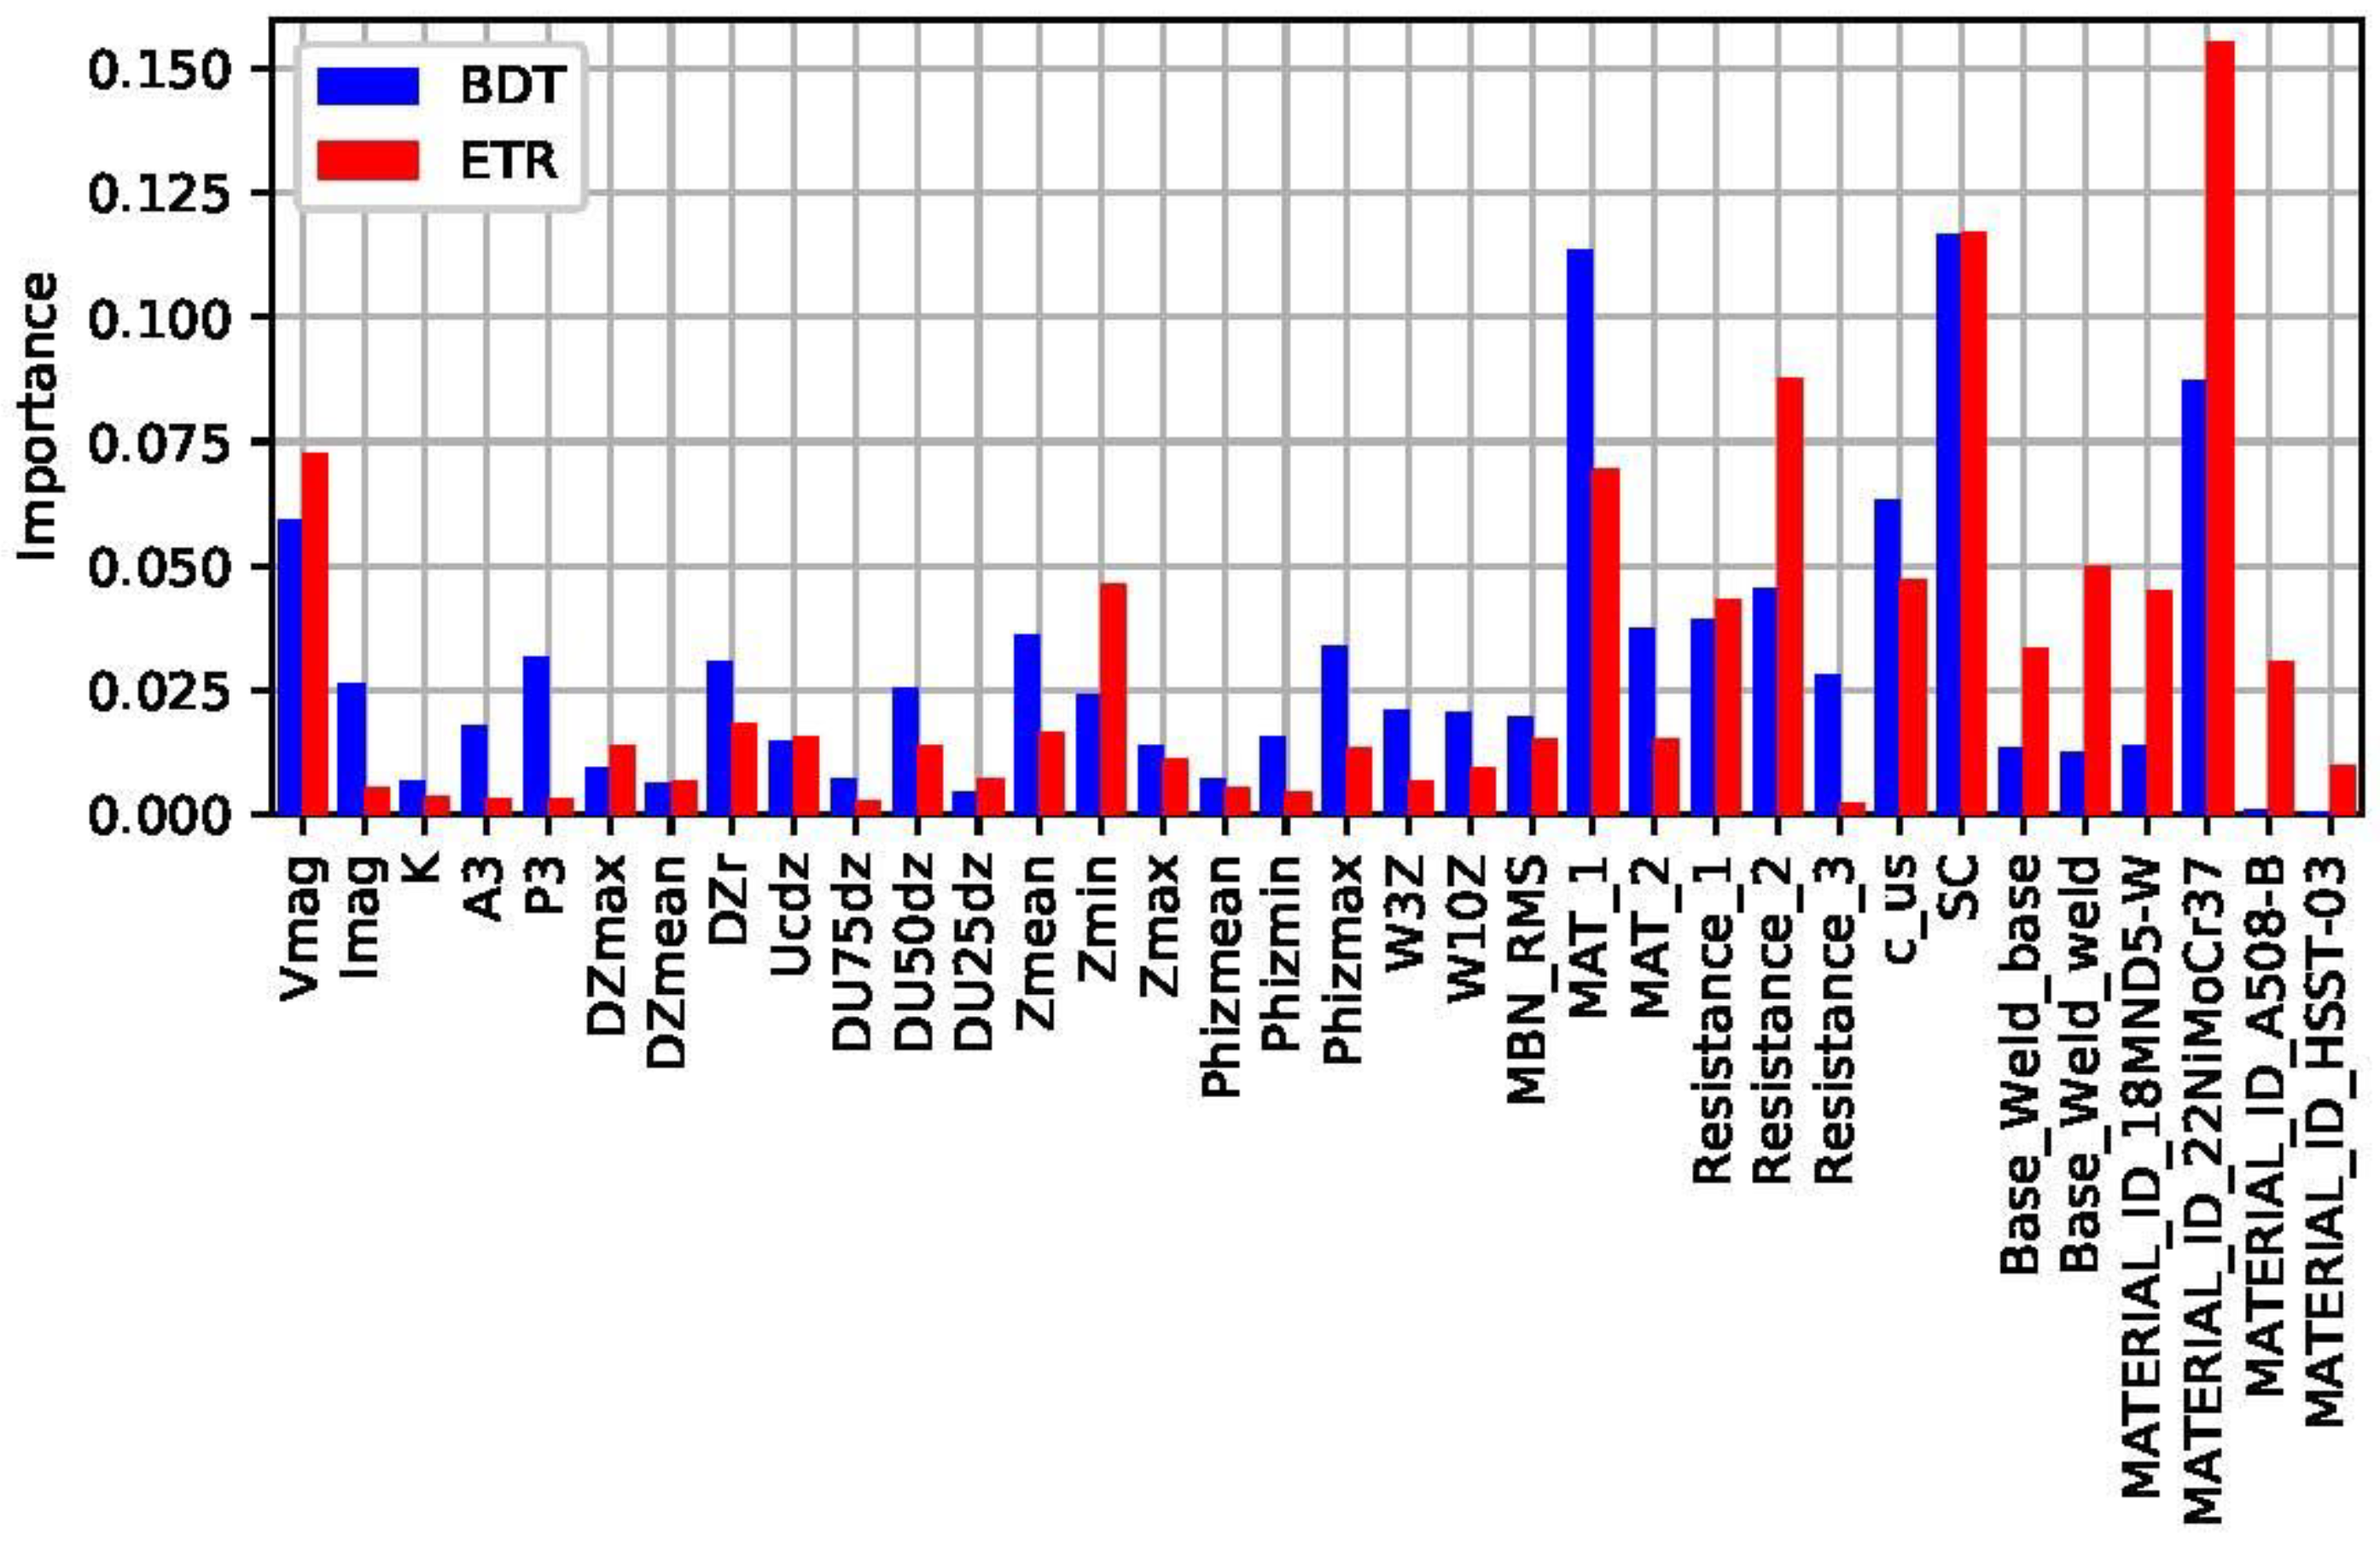
Wilcoxon signed-rank test is a simple approach that can be applied even on very limited dataset but also with limited accuracy. However, when the dimension of the database allows it, even more sophisticated methods can be implemented to study the importance of the input features. Ensembles of decision trees can be used for this purpose. The boosted decision tree (BDT) algorithm and the extra-trees regressor (ETR) algorithm can be used for better evaluation of the different feature significance (see in
Figure 14). These methods are typically not for the primary assessment, but rather for optimizing the ML tool to be developed [104].
9.2.3. K-Fold Cross-Validation Score
A traditional method to train a machine learning model is to set aside a third data set from the training data, known as testing data set that is used to test the different hyperparameter combinations (i.e. the combinations of those external configuration variables used to manage machine learning model training), for example. However, the model can be also trained using k-fold cross-validation [107], where the training set is divided into k parts, known as folds, and then one by one, each fold is used as a so-called test, or validation, set while the other k−1 folds are used to train the model. This is repeated k times and an averaged cross-validation score is calculated based on the predictions. Obviously, the separate test set must still exist and should be held out of this training process. There are several benefits to cross-validation: the real test set is not shown to the model at any point of the training process, and the k-fold cross-validation score provides an estimate of the test accuracy of the model.
The k-fold score is used to fine-tune the data pre-processing steps and the hyperparameters of the model. But it can also be used for determining the less relevant parameters. Dropping one of the features reduces the dimensionality of the feature space and can improve the performance of some algorithms. This way, dropping one by one the one-hot encoded features and calculating the k-fold cross-validation score for each feature, the least significant features can be identified and eliminated from the database [108].
9.3. Manipulating the Database
In order to increase the achievable classification accuracy of the ML methods, the quality of the otherwise limited database can be improved by manipulating its content. Artificial manipulation of any data obtained from real, i.e. physical experiments sounds surprising at first, since this involves significant risks of falsification and of losing the transparency of the ML method application.
It is quite typical when multiple different measurement principles are utilized for obtaining multidimensional response on the tested target, that some of measurement parameters become invalid in certain measurement cases. Here, invalid means that the related method cannot be applied in the given circumstances or some of the NDE probes fail because of a side effect occurring. As a consequence, the aggregated database will be not only limited due to the limited availability of test cases, but it will also be incomplete: there will be missing elements or existing elements having invalid values in it. Either the missing elements or the invalid elements degrade the classification accuracy.
9.3.1 Cleaning the Database
Database cleaning covers the efforts on identification and marking or eliminating database elements that can be recognized as undoubtedly false or missing before the database is used for training the ML methods. This step is not only an option but rather a necessary step in the practice.
The missing elements, as well as the invalid elements can be marked in the same way and both types can be considered as holding no information. One of the possibilities in practice is to substitute these values with a special number value, that is defined exactly for this purpose: NaN (i.e. Not a Number) [104]. This way the database becomes uniform and suitable for further processing in terms of meaning that all of its elements will contain uniformly encoded elements. Inserting or replacing elements to NaNs in the database does not alter the information it holds, but this makes possible to work on it with standard algorithms and software codes.
9.3.2 Dealing with NaNs
By having NaNs in the database further steps are available for improving the database for ML. If the elements of a certain test case contain too many NaNs or several of its significant elements are NaNs, such test cases (i.e. database rows) can be eliminated completely from the database since they cannot contribute to training the ML methods. Obviously, if all the measurement cases are deleted, where at least one parameter is missing (so called listwise deletion) it does not cause any bias in the prediction of the ML methods, but dramatically degrades the power of the classification. Therefore, the listwise deletion cannot be applied practically where the database is rather limited.
Instead of deletion, there are also different methods of predicting the missing values by either considering the statistics of its available neighbors, when possible, or filling them automatically by algorithms even by the help of ML techniques that consider global features not local ones.
9.3.3. Data Augmentation and Imputation
The aim of both the data augmentation and the imputation is to increase the classification accuracy [109]. Obviously, extending the database of the measured data with “artificially generated” values involves the possibility of either falsification or it can establish a “positive” feedback that can lead to miss prediction or misclassification at the end. The database extension has relevance primarily for the training of ML algorithms. This way the unwanted side effect of the database manipulation can be caught by testing the algorithm that was trained on the extended database and on the database without any extension.
9.4 Using ML methods
In the NOMAD project, following the database pre-processing, the training data was used to train three models: Huber loss regression (HLR) [110], support vector regression (SVR) [111] and an artificial neural network (ANN) [112]. In order to compare the performance of these three methods, the 10-fold cross-validation score is measured as the mean absolute error (MAE). Both test and training scores are reported as MAE, root mean square error (RMSE) and R
2 i.e. coefficient of determination score.
Table 6 summarizes the result of this study:
In certain applications of the NOMAD project, +/-25°C DBTT shift had to be detected. All of these three methods could provide significantly better prediction of the DBTT shift than this error threshold. It can be also deducted, that practically all three methods reached similar performance, i.e. the test scores vary 16…18 °C. The most complex approach, the ANN could also perform very well, despite the extraordinarily limited dataset.
Since the ANN requires the largest computational power, this test resulted in the SVR prevailing, as this method provides the optimal balance between the classification accuracy and the required computational power. Certainly, this claim is valid only for the given NOMAD database.
9.5. Results of NOMAD ML Approach
Within the framework of the NOMAD project, an SVR method was used to create models that accurately predict the neutron irradiation-induced embrittlement, measured as the DBTT, even though the data set is small. The SVR is a supervised machine learning algorithm that relies on kernel functions to solve problems that cannot be handled directly by linear classification. The SVR is flexible enough that it provides robust results even though the number of data points is low, and it is considerably simpler to optimize than other, e.g., neural network algorithms [104]. To evaluate the performance of the trained models in predicting the neutron irradiation-induced embrittlement of steel alloys based on non-destructive measurements two different model evaluation metrics were used.
9.5.1 Test Score in NOMAD
The traditional method to analyze the generalization skill of a machine learning model is to split the data set into training and test sets. The model is trained entirely based on the training set, and when the model has been fully trained, the generalization skill of the model is tested using the test set by feeding it to the model without its target values. After the test set has been shown to the model, the model should not be modified to produce an improved test result. The training process refers to the optimization of the model hyperparameters, and most of the time it also includes pre-processing steps, such as the selection of the feature scaling scheme. The trained model makes predictions based on the test set features and the predictions of the independent parameters are compared to the true target values of the test set. The test and training sets must be equally representative of the whole data set; otherwise, the test score does not represent the generalization skill of the model with the best accuracy. Commonly, the test set is a random subset of the whole data set, with a size of 20% of the size of the whole data set. The rest, 80% of the data then constitutes to the training set (this procedure is referred to as the 80/20 split). The larger and more diverse the training data set is, the more flexible and accurate the model will yield.
Three models were generated for the prediction of the embrittlement: one based on data obtained on Charpy specimens only, one based on data obtained on Blocks only and one based on mixed data obtained on Charpy and block specimens. The models to predict DBTT are based on supervised ML using the SVR model implemented in scikit learn and were trained and tested using the database. The database contains different materials which are marked by one-hot Boolean values in both the database and the tool. The input data is prepared using the Min/Max Scaler function within scikit learn.
The results obtained for the three different models are summarized in
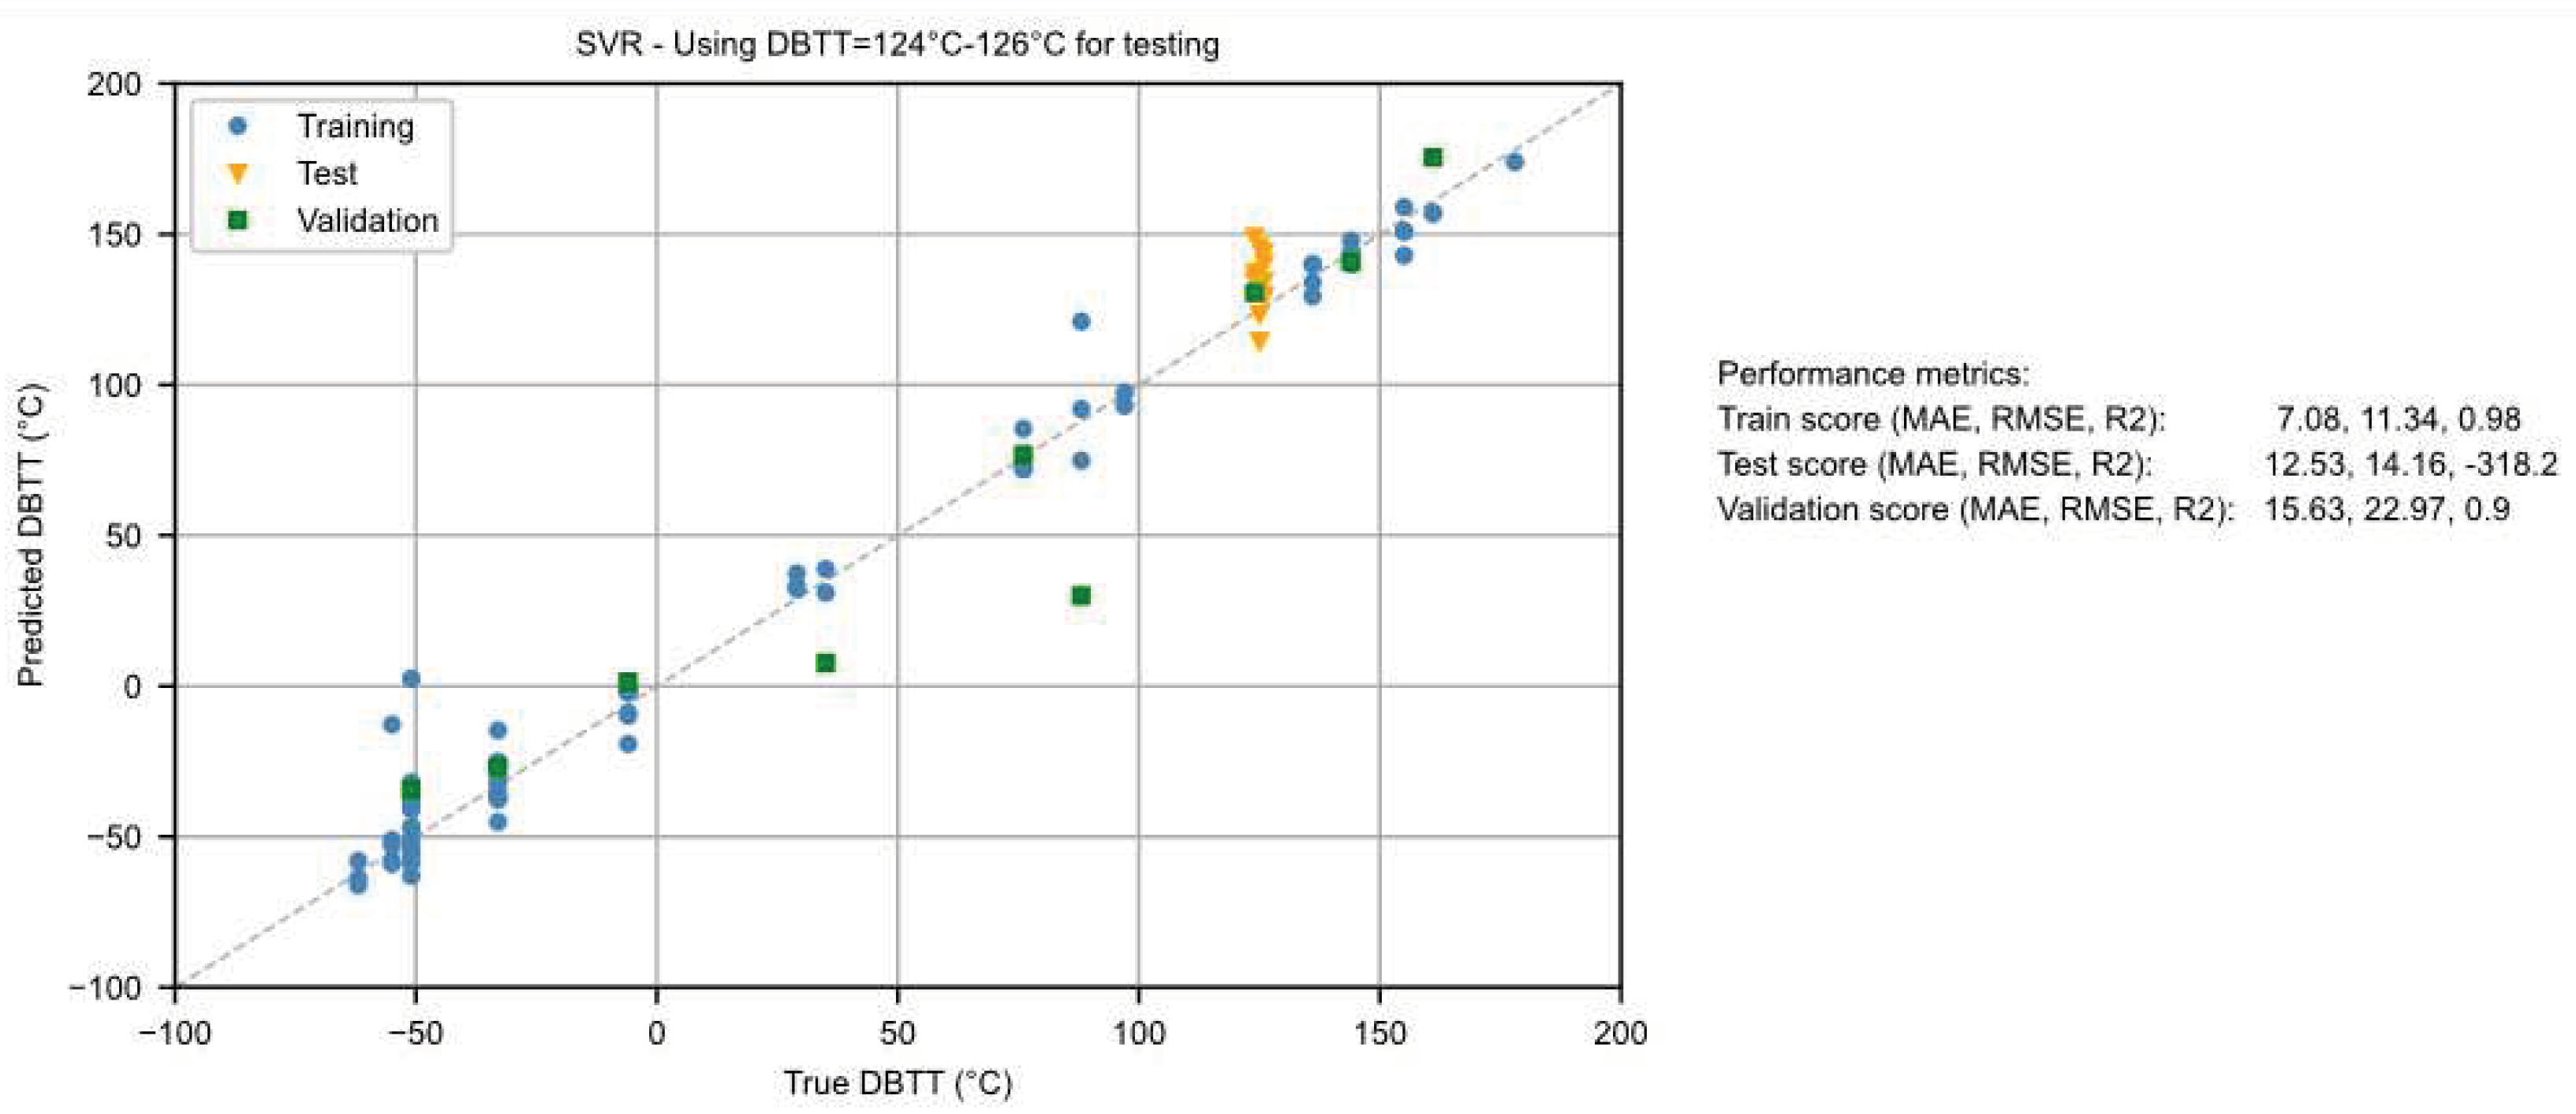
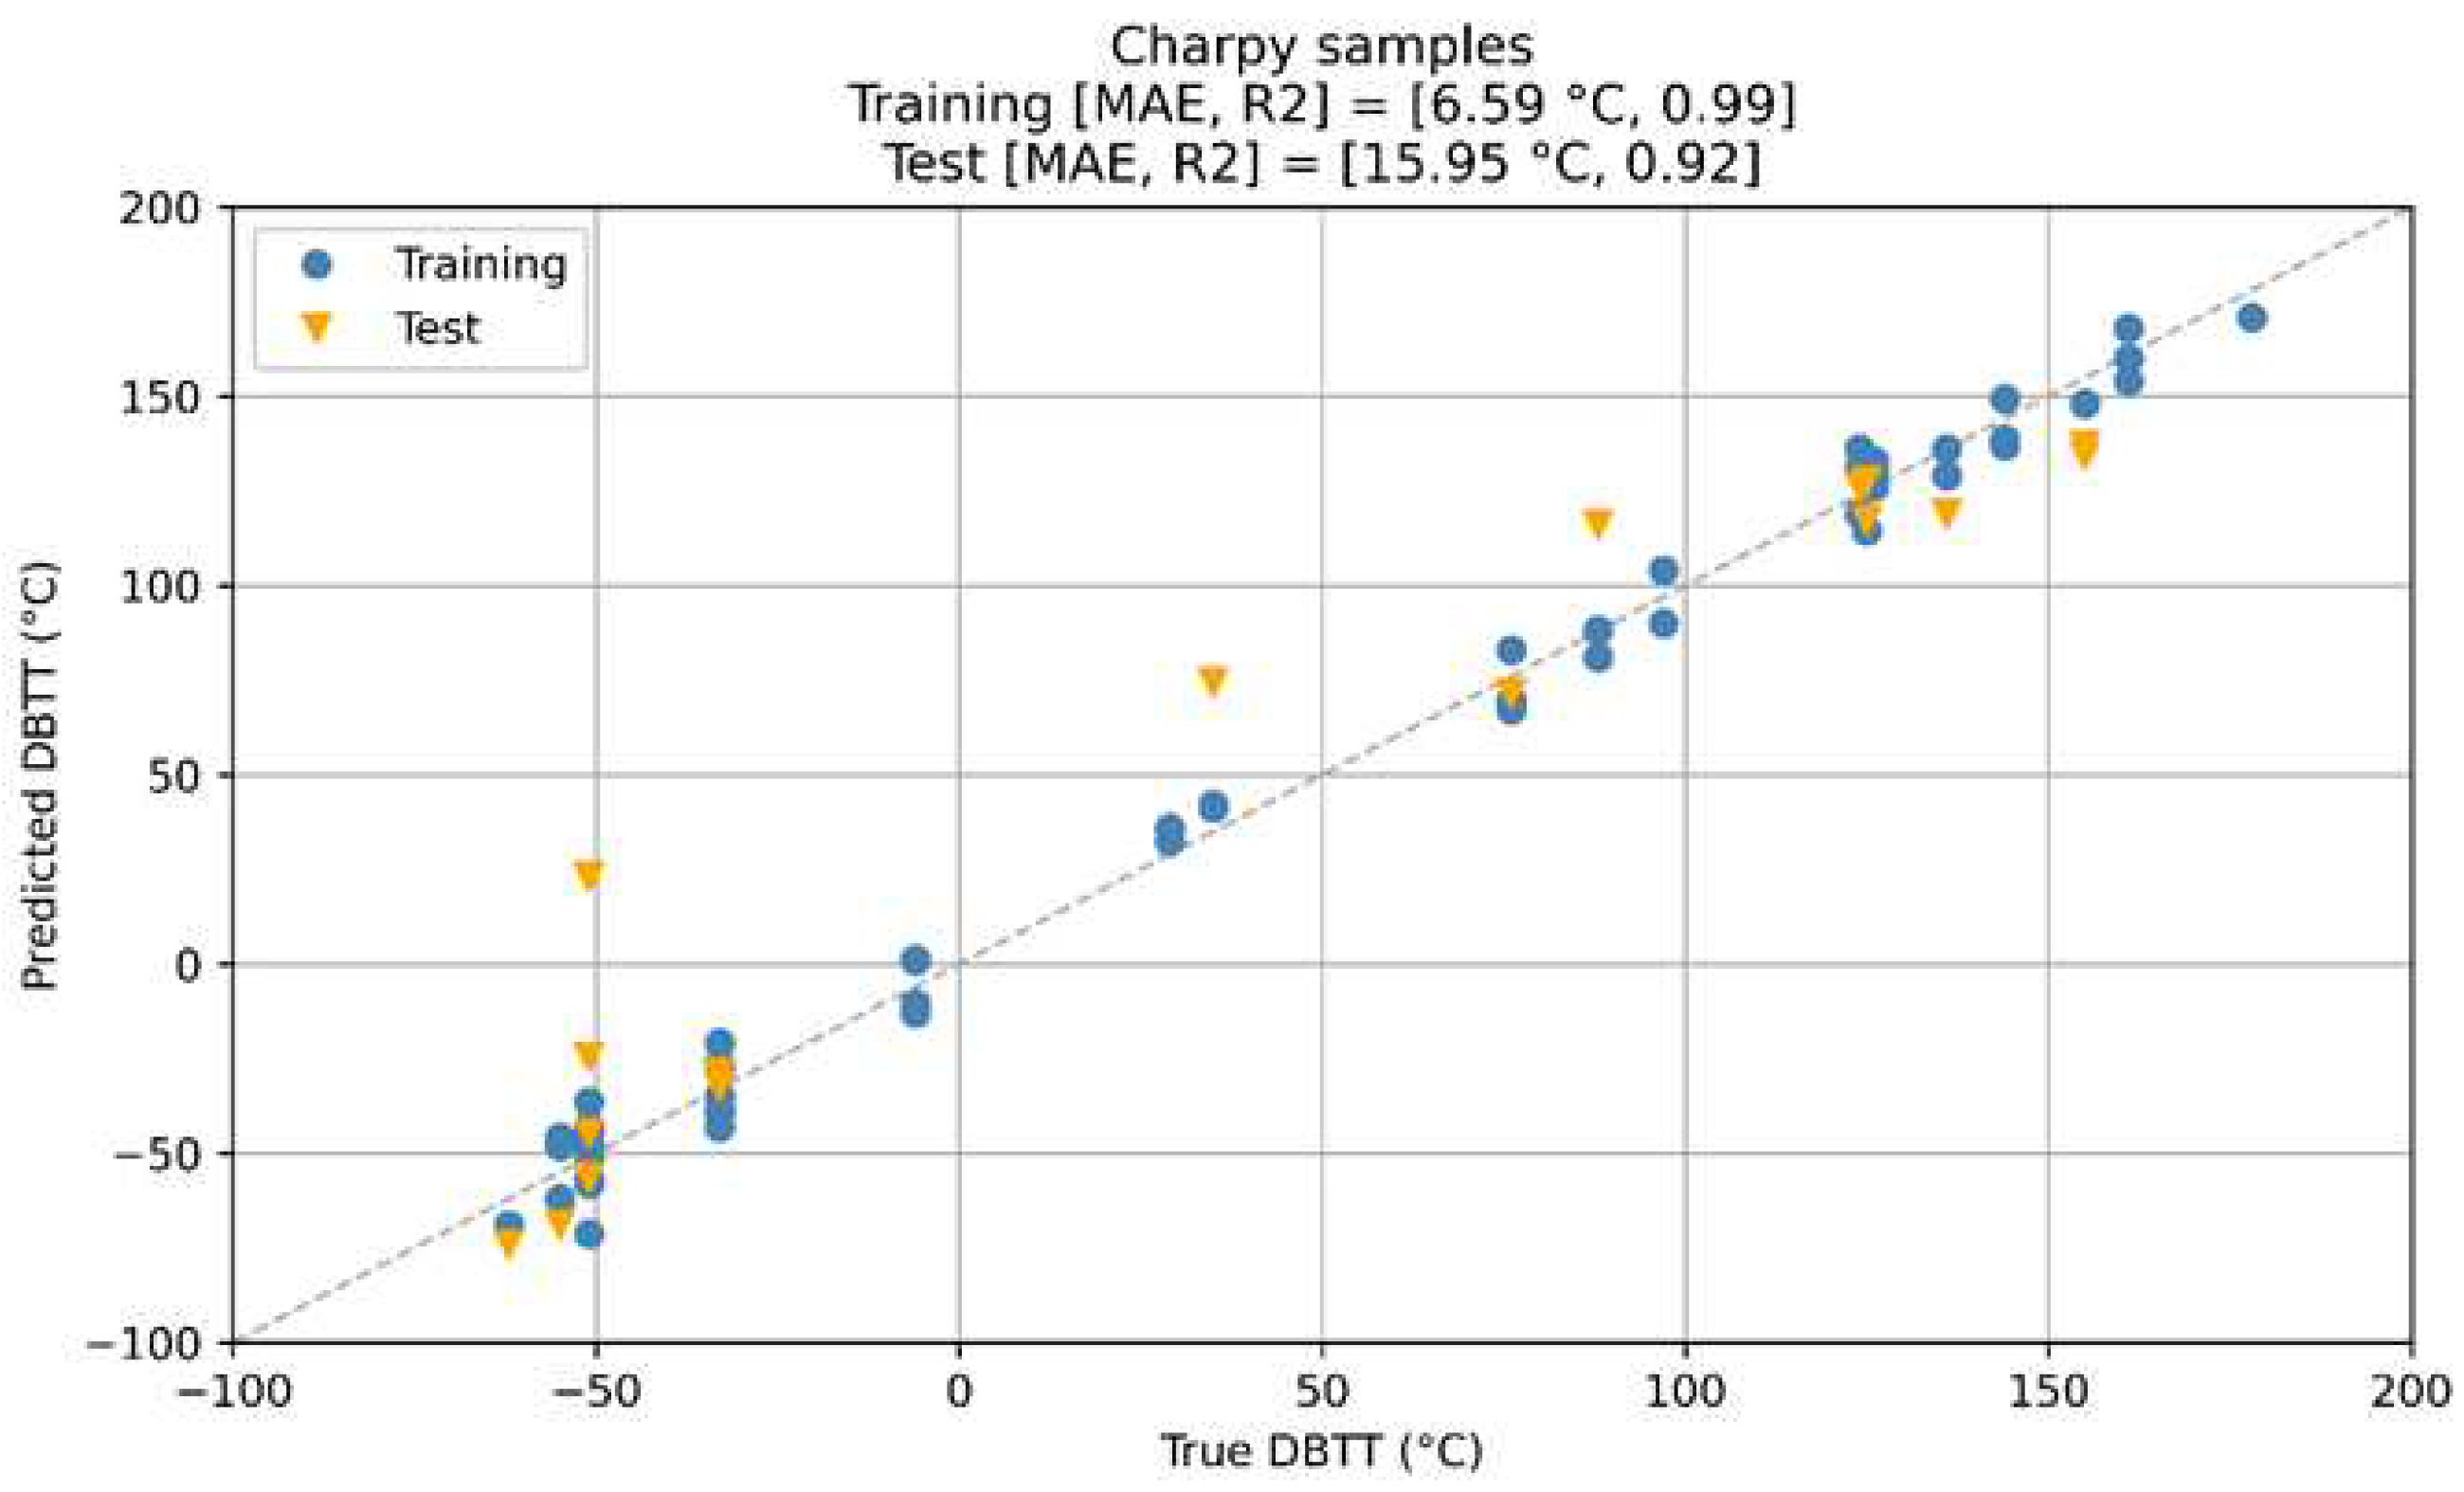
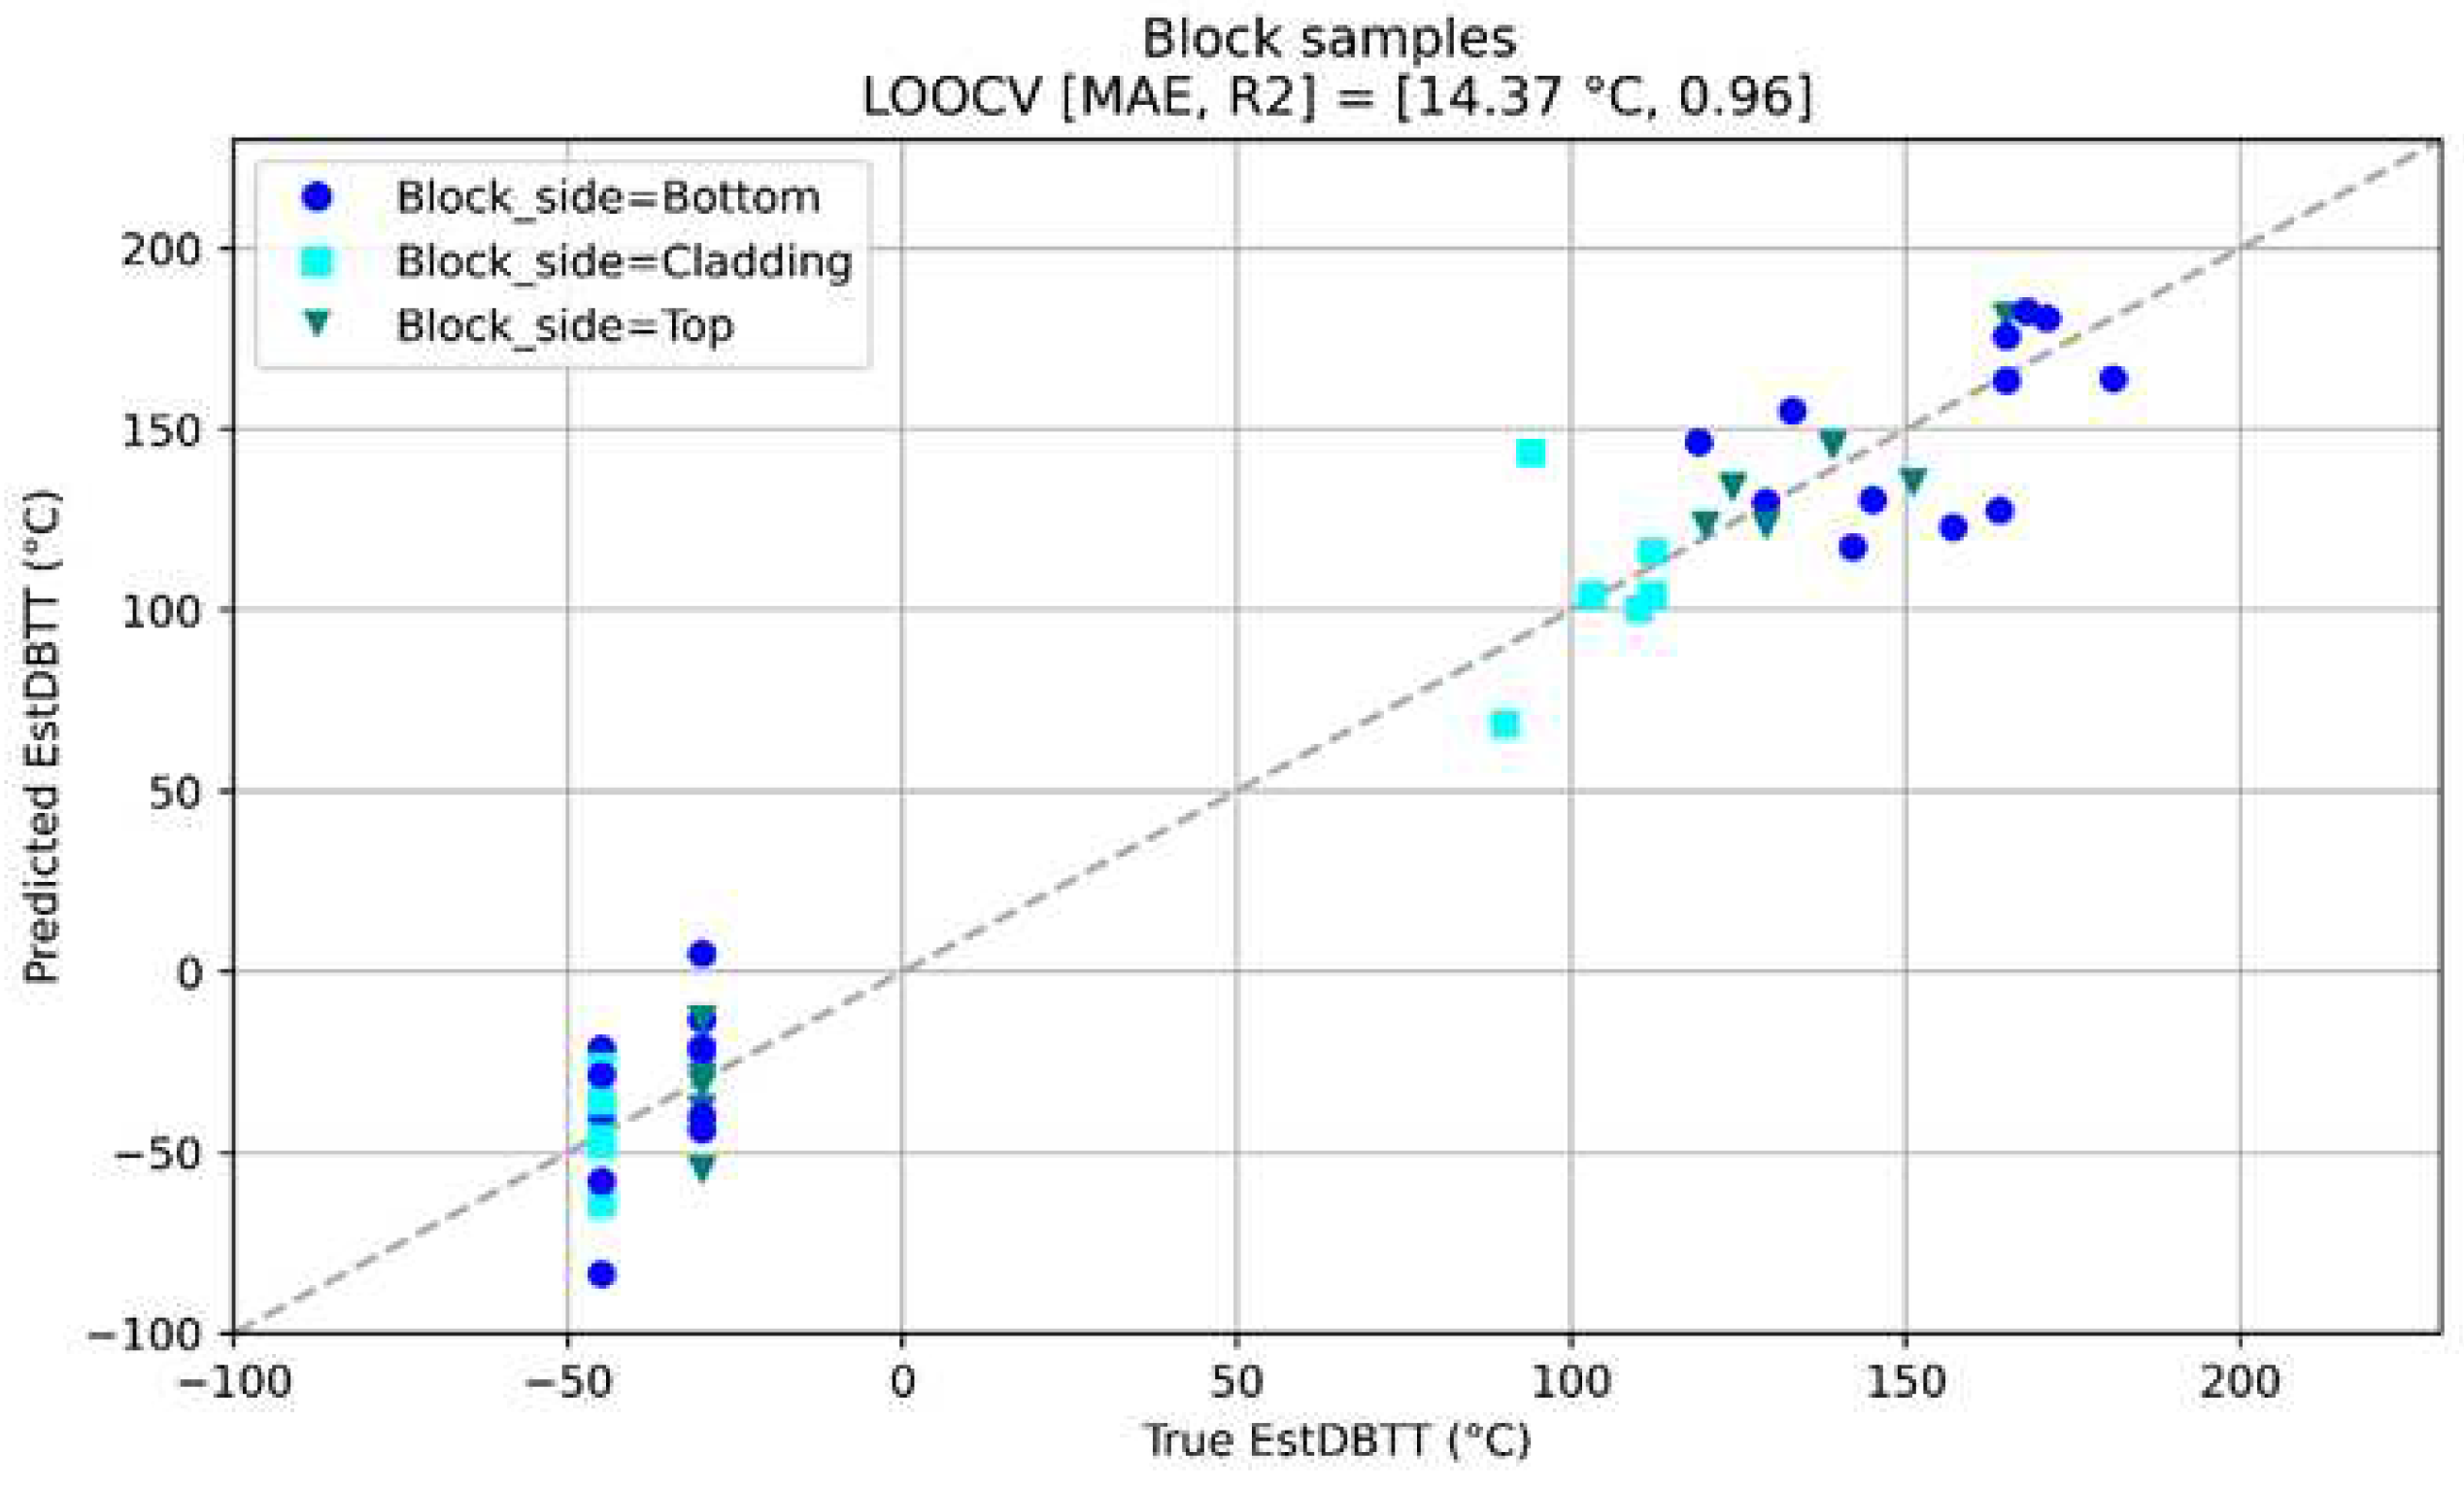
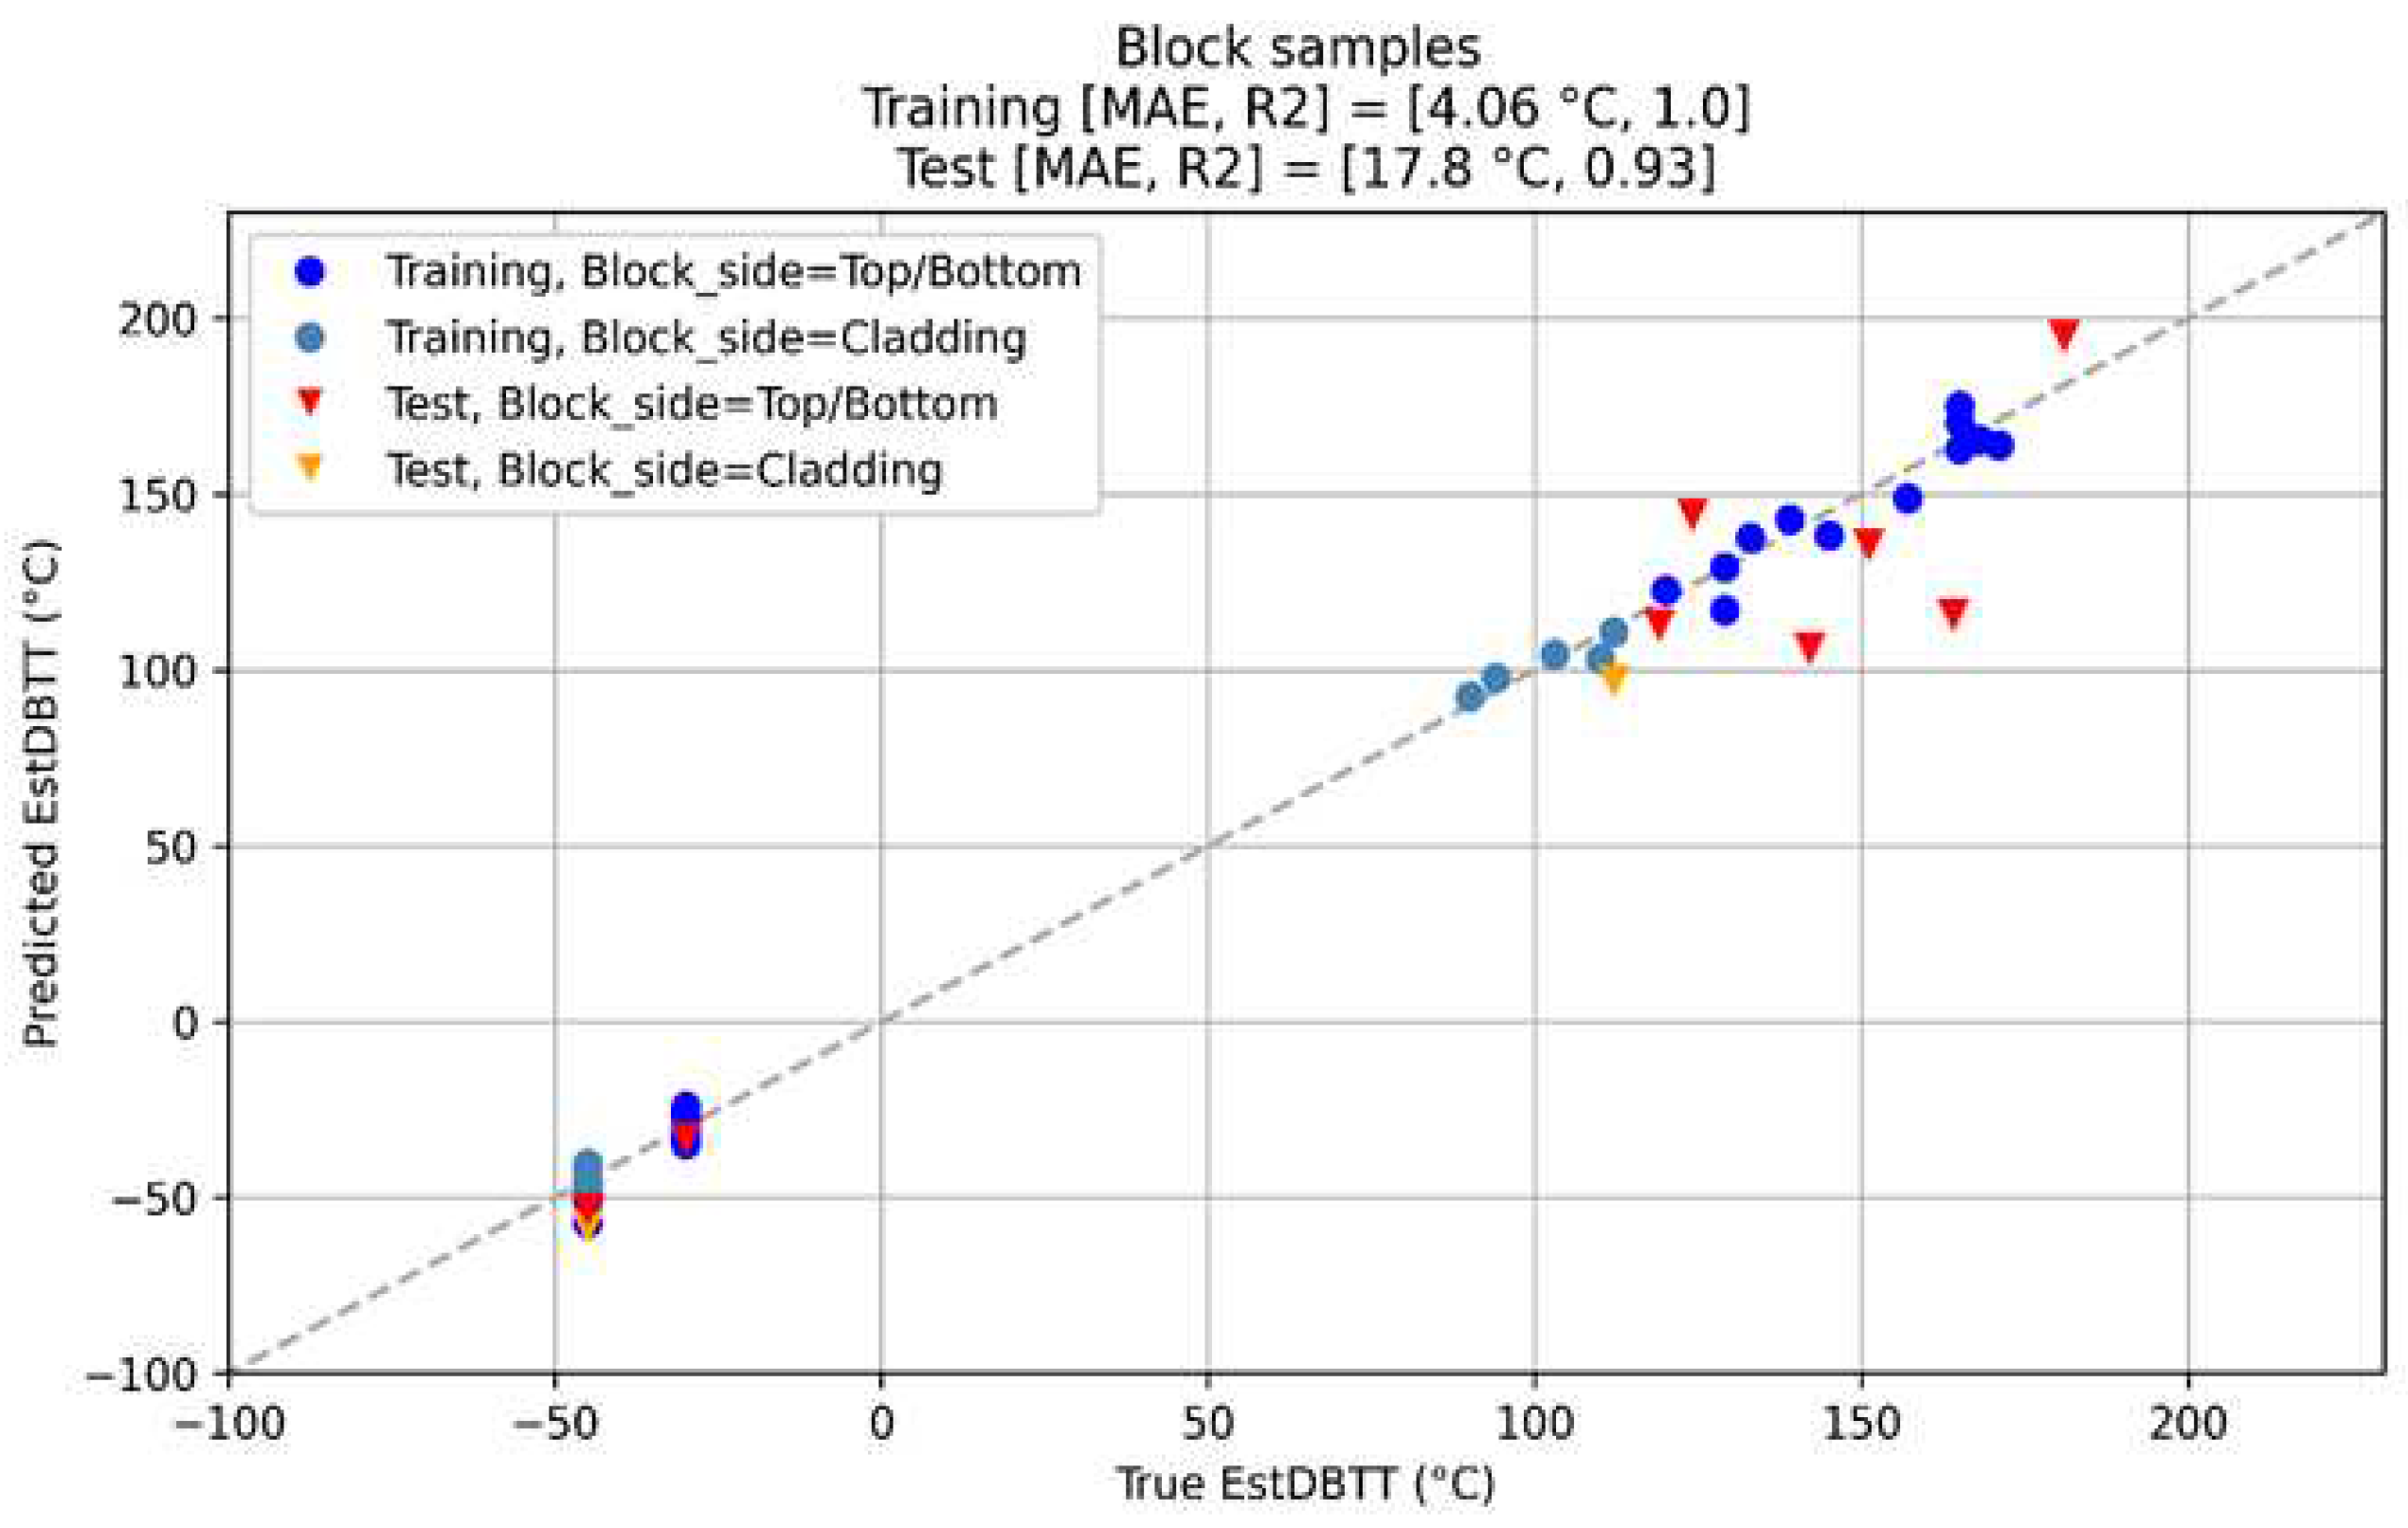
Table 7. The table presents the cross-validation scores of the fine-tuned models, the training scores, and the test scores. As can be seen from the results, all test MAEs are under 19 °C and the test R2 scores are equal or greater than 0.9. The accuracies of the models are also visualized in form of correlation plots in
Figure 15,
Figure 16 and
Figure 17, where the predictions made by a model are plotted as a function of the DBTT values
determined with Charpy tests.
While the NOMAD study has been conducted on different sample types, including large cladded blocks, the validation focuses on data collected on Charpy samples only due to the limited number of samples available for uncladded and cladded blocks. A transfer of the findings to block types is per se not possible and would require a new validation respectively. Hence, the validation process is a proof-of-concept regarding the Charpy samples. The validation has been established by a detailed evaluation of the functionality of the NOMAD tool. This has been done in the context of the regression as well as it has been complemented by a classification approach too.
In addition to the train and test data set, a validation data set is introduced for the tool validation. The validation set remains constant throughout the entire validation process and is not considered for training nor testing. This ensures that the different validation procedures can always be compared through the same validation set. The validation data set consists of 9 samples and contains only measured NDE values (no data augmentation is used in the validation set).
The robustness of the NOMAD tool was challenged by splitting the test and train set in a way that one temperature level was used for the test set and thus was entirely left out for training. Temperature levels used for testing were 124°C-126°C. This analysis gives insight to the question whether the algorithm is overfitted as well as to its ability to interpolate between different temperature levels. The results are shown in
Figure 17. The results show that the NOMAD tool still performs very well, and very good performance metrics are achieved even if one temperature level is not included for training.
Figure 17.
NOMAD tool performance evaluation leaving out the temperature level around 125°C for training (orange markers).
Figure 17.
NOMAD tool performance evaluation leaving out the temperature level around 125°C for training (orange markers).
10. Discussion
A total of nearly 200 non-irradiated and irradiated samples were provided, mechanically tested, non-destructively measured and the results evaluated and analyzed.
The sample set was consisting of Charpy samples of six different materials and of block shaped samples of one material, whereby a part of the block samples was covered with the cladding in order to simulate the real pressure vessel situation. In total 28 NDE parameters out of six NDE methods (three magnetic, electric, thermal and ultrasonic methods) were measured from all provided samples. In parallel, the various specimens were tested destructively to determine the irradiation induced changing in their properties, including tensile, Vickers hardness and Charpy impact transition curves allowing the determination of the DBTT.
Previously to the NOMAD project none of the NDE methods or their output parameters could reach the required precision and reliability for application in determining the DBTT.
It can be noticed, that samples within one material and degradation group show a large variation in the measured feature. This may be caused by influences overlapped to the DBTT caused for example by material inhomogeneity's, machining variation or variation in the surface condition. Single features are not suitable for the determination of DBTT. However, a combination of several features may have the potential to suppress these overlapped disturbance influences. A possible interpretation of the large scatter of measured points is given in Appendix B.
The advantages of combining test quantities in a multiparameter method are manifold. Such a combination of methods is particularly indispensable when the target quantities to be measured (e.g. DBTT) and the disturbance quantities (temperature, residual stresses, surface condition) can vary simultaneously. Since the individual test quantities have differently weighted sensitivities to target and disturbance quantities, the influence of the disturbance quantities can be eliminated or at least reduced in this way.
The NDE methods are a kind of inverse problem solutions that measure not the targeted physical quantity in direct manner but other physical quantities can be linked with, based on physical background. However, the irradiation effects are complex processes inside the material that affect the recorded quantities in different manners.
This is why a stand-alone NDE method based on a single physical principle has to face with the problem of several side effects resulting in unacceptable scattering of the output parameter. Therefore, the basic idea of the NOMAD project is to use multi-method/multi-parameter approach and to focus on their synergies that allows recognizing these side effects and therefore suppressing them, as well.
The nuclear industry already applies several statistical methods where the statistical parameters can be calculated by analytical expression. The Charpy Impact Test itself is an example, where the transition temperature curve is derived from the pool of the measured data by mathematical fitting. In case of multi-parameter, i.e. multi-dimensional nonlinear problems the required analytical expression cannot be formulated, so other statistical approach is required: the machine learning (ML).
Since the analytical expression that links the input and the output parameters is not known in case of ML, the transparency is essential for the application of ML, especially in safety areas. We paid large attention to careful studies of these methods and to their validation. We have analyzed separately, which NDE parameters (out of the 28) can contribute to the precision or can help the algorithm to recognize and suppress the side effects and which ones are irrelevant and can be left out without any effect. Different types of ML algorithms tested in competition and their performances have been evaluated. Unfortunately, the details of this extensive study are far beyond this paper.
The important outcome of the ML technique is that not only one, but several different ML techniques could reach required precision and reliability, i.e. to keep the DBTT prediction error lower than +/-25°C, which was previously not possible at all for each individual NDE method independently.
Although many specimens were investigated within the framework of the NOMAD project, the gathered database is extraordinary limited from ML point of view. Statistical methods work well on large data set. This raises a quite frequent problem of ML applications: the insufficient number of the achievable measurement samples or experimental data, i.e. the limited size of the result database. The task of ML methods is to circumscribe and recognize the information that can be found already in the database.
In order to ease this task, different ways of pre-processing the database are studied in order to increase the precision of the classification. The dimension of the database was reduced by eliminating features having no significant importance, i.e. dropping those measurement outputs cannot contribute to the classification performance. Different methods can be applied for this feature selection, starting with simple statistical approach (like the Wilcoxon signed-rank test) but also more complex ones like the different ensembles of decision trees. The K-fold cross-validation technique can also be used for scoring the different inputs and for optimizing the database. The database cleaning means not only the elimination of the unusable input parameters, but it covers also the possibilities of the data augmentation and imputation. The aim is clear: to provide better dataset for training of ML algorithms without falsifying or biasing the dataset. However, every step of data manipulation should be transparent, otherwise the technique cannot be accepted in safety critical areas.
The present results of the individual NDE measurements together with the ML evaluation proved their suitability to characterize the degradation of reactor pressure vessel steels caused by a simulated operation condition. A calibration/training procedure was carried out on the merged outcome of testing methods with excellent results to predict transition temperature, yield strength and mechanical hardness for all investigated materials.
The estimation of radiation damage of a reactor vessel through the cladding is a very challenging problem. Experimental and numerical studies have been carried out to analyze how the base material can be excited through the cladding and how the properties of the cladding and base material, thus their changes, due to the irradiation can be separated. These results have been published already in the case of MAT method [102-104].
The results can be useful for the future potential introduction of this (and in general, any) nondestructive evolution method.
11. Summary and Conclusions
The large test program was successfully completed. A total of more than 700 samples were mechanically tested and analysed. The various steps of preparation, support and execution of the multiple hot-cell campaigns allowed the NDE partners to investigate several hundreds of irradiated samples. As a result, 28 NDE parameters were measured on a variety of materials, specimens and irradiation conditions. In parallel, the various irradiated specimens were tested destructively to determine the post-irradiation properties, including tensile, Vickers hardness and Charpy impact transition curves allowing the determination of the DBTT.
Previously to the NOMAD project none of the NDE methods or their output parameters could reach the precision and reliability are required for application in determining the DBTT. The irradiation results in complex processes inside the material that affect the recorded quantities in different ways. This is why a standalone NDE method based on a single physical principle has to face with the problem of several side effects resulting in unacceptable scattering of the output parameter. However, as it is proven in Appendix B, this large scatter is probably due to the originally existing inhomogeneity of the investigated material. This is a very important conclusion of the project: not the possible error of applied magnetic methods is responsible for the scattering of measured parameters.
The basic idea of the NOMAD project is to use multi-method/multi-parameter approach and to focus on their synergies that allows us to recognize these side effects therefore supressing them, at the same time.
The nuclear industry already applies several statistical methods where the statistical parameters can be calculated by analytical expression. The Charpy Impact Test itself is an example, where the transition temperature curve is derived from the pool of the measured data by mathematical fitting. In case of multi-parameter, i.e. multi-dimensional nonlinear problems, the required analytical expression cannot be formulated, so other statistical approach is required: the machine learning (ML).
Since the analytical expression that links the input and the output parameters are not known in case of ML, the transparency is essential for the application of ML, especially in safety areas. We paid large attention to careful studies of these methods and to their validation. We have analysed separately, which NDE parameters (out of the 28) can contribute to the precision or can help the algorithm to recognize and suppress the side effects and which ones are irrelevant and can be left out without any detrimental effect. Different types of ML algorithms have been tested in terms of competition of their performances have been evaluated. Unfortunately, the details of this extensive study is far beyond of this paper.
The important outcome of the ML technique is that not only one, but several different ML techniques could reach required precision and reliability, i.e. to keep the DBTT prediction error lower than +/-20°C, which was not possible at all previously for the single NDE method.
Although hundreds of specimens were investigated within the framework of the NOMAD project, the gathered database is extraordinary limited from ML point of view. So, we can consider our carried out work as a kind of feasibility study. The next step should be to extend the data set. Nevertheless, the present results of the individual micromagnetic measurements together with the ML evaluation proved their suitability to characterize the degradation of reactor pressure vessel steels caused by simulated operation condition. A calibration/training procedure was carried out on the merged outcome of testing methods with excellent results to predict transition temperature, yield strength and mechanical hardness for all investigated materials.
The estimation of radiation damage of a reactor vessel through the cladding is very challenging problem. Experimental and numerical studies have been carried out to analyse how the base material can be excited trough the cladding and how their properties of the cladding and base material, therefore their changes due to the irradiation can be separated. These results have been published already in case of MAT method.
Our results, achieved within NOMAD project can be useful for the future potential introduction of this (and in general, any) nondestructive evolution method.
Acknowledgments
This research was carried out in frame of the “NOMAD” project. This project (Non-destructive Evaluation System for the Inspection of Operation-Induced Material Degradation in Nuclear Power Plants) received funding from the Euratom research and training programme 2014–2018 under grant agreement No 755330.
Appendix A: Description of Magnetic NDE Methods
1. MAT
A non-destructive testing method, called Magnetic Adaptive Testing (MAT) was developed for detecting different types of degradation of ferromagnetic materials in Centre for Energy Research. This method is an expansion of traditional magnetic hysteresis measurements. In contrast to it, where investigated samples are characterized by their single major hysteresis loop, this method studies the complex set of minor magnetic hysteresis loops of each sample within the investigated series. As presented in the theoretical Preisach hysteresis model [113], the complex sets of minor magnetic hysteresis loops contained a lot of information about the material properties. Physical principles of MAT, experimental applications and method of evaluation of recorded data are described detailed in Ref. [70].
The samples to be measured are magnetized by a magnetizing yoke, which is placed on the surface of the sample. The size of the yoke should be chosen to fit the size of investigated samples. A magnetizing coil and a pick-up are wounded on the bows of the yoke. The yoke is a C shape laminated FeSi transformer core. The current of the magnetizing coil is changed in a triangular shaped time function, by fixed slope and the maximum of amplitudes are gradually increasing by a pre-defined step in each reverse magnetization cycle. The signal induced in the pick-up coil is proportional to the differential permeability of the measured material.
where ha(t) is the effective field, produced in the magnetizing circuit and hb is the amplitude of the minor loops. Time variation of magnetizing current and the detected permeability loops are shown in
Figure 1. Before measurement the sample is demagnetized by decreasing amplitude magnetizing current, so in each case the measurements start on samples having zero magnetic moment.
Figure A1.
Time variation of magnetizing current (a) and the detected permeability loops (b).
Figure A1.
Time variation of magnetizing current (a) and the detected permeability loops (b).
The detected series of minor permeability loops serve as a base of the further evaluation. All sets of hysteresis loops are re-computed into a matrix of elements. These elements are positioned by field coordinates (
ha,
hb). Each matrix element can be used as a magnetic descriptor, which characterizes the structure variation of the investigated sample. As an illustration, the calculated μ(
ha,
hb) permeability matrix is presented in
Figure A2. If a series of samples is measured, such a matrix is determined for each sample. This matrix contains a lot of information. Other matrices can also be calculated, e.g. the hysteresis matrix by integration of directly measured permeability values, or first derivative of permeability values. Sometimes these matrices characterize the material degradation better than the permeability matrix.
Figure A2.
Permeability matrix.
Figure A2.
Permeability matrix.
MAT is a comparative method, it does not yield absolute values of magnetic quantities, but it is suitable to follow material changes, due to any external effect. For this purpose, another program of evaluation was developed as well: the actual matrix elements are divided by the corresponding matrix elements of the reference sample in original state. The result is a standardized μ(x) matrix, the elements of which contain all of the information about material degradation, and ‘x’ is the so called independent parameter, which characterizes, what happened with the investigated material: plastic or elastic deformation, fatigue, neutron irradiation, thermal treatment, etc.
Degradation functions having different coordinates differently react to the studied degradation. A procedure is used, which is able to pick up those descriptors, which react optimally to the considered way of degradation of the investigated material. The optimal, the most sensitive and the most reliable descriptors are used for detecting the structural modifications of the material in question.
The selection of the optimal descriptor increases the reliability and the robustness of this method. It is also possible, to analyze the know ‘side effects’ of the certain application and to identify those descriptors are mainly affected by these disturbances. This way an opportunity can be established for suppressing measurement uncertainties that can improve the method robustness further.
A careful analysis of potential experimental errors was performed in Ref. [114] and it was found that by taking into account of all possible sources of uncertainty, the error of the whole MAT evaluation is less than 1%.
Figure A3.
Probes, designed for hot cell MAT measurements. Left: probe for measuring blocks, Right: probe for measuring Charpy samples. (Here a sample is also shown, placed on the top (V-notch is opposite to the magnetizing yoke.).
Figure A3.
Probes, designed for hot cell MAT measurements. Left: probe for measuring blocks, Right: probe for measuring Charpy samples. (Here a sample is also shown, placed on the top (V-notch is opposite to the magnetizing yoke.).
2. 3MA-X8
Micromagnetic techniques are widely used for the nondestructive characterization of material properties of ferromagnetic steels. They are based on the correlation between the magnetic properties of ferromagnetic materials and their mechanical-technological characteristics, which are dependent on the microstructure. This correlation is related to the microstructure interaction with both the magnetic structure (domain (Bloch) walls) as well as the dislocations [63-65]. Fraunhofer IZFP has developed the 3MA technique (Micromagnetic Multiparameter Microstructure and Stress Analysis), which indirectly and non-destructively determines mechanical material properties using a one-sided access probe. 3MA is based on a combination of several magnetic methods and has been described in previous studies in detail [63-65]. The latest implementation of 3MA is the 3MA-X8 principle, which has been applied in this work. 3MA-X8 records parameters derived from three micromagnetic methods that rely on a single sensor coil wound on a U-shaped core. The 3MA-X8 probe contains an electromagnet that excites a magnetic field of two superimposed frequencies in the sample. The time domain signals of drive voltage and drive current depend on the sample property contacted by the probe. These signals are analyzed in order to extract up to 21 characteristic features that describe the magnetization behavior and then can be correlated to the mechanical material properties.
The following three micromagnetic methods are used in 3MA-X8: eddy current impedance analyis, incremental permeability analysis and harmonics analysis. They differ in terms of the interaction depth and mechanisms and deliver features that qualitatively correlate with material properties.
Figure 5m shows the 3MA-X8 device including the used probes and a PC. The 3MA-X8 device is controlled by the Modular Measuring System (MMS) software. For Charpy samples a standard probe was used and for measuring the block shaped samples a large adapted probe was designed and built up. Sample/probe holders were used to improve reproducibility by minimizing positioning variations.
Figure A4.
The micromagnetic multiparameter microstructure and stress analysis (3MA)-X8 system, including 3MA-X8 device, standard probe, and PC (top); probe and sample holder for Charpy’s (bottom left) and probe and sample holder for block samples (bottom right).
Figure A4.
The micromagnetic multiparameter microstructure and stress analysis (3MA)-X8 system, including 3MA-X8 device, standard probe, and PC (top); probe and sample holder for Charpy’s (bottom left) and probe and sample holder for block samples (bottom right).
3. MIRBE
The Micromagnetic Inductive Response & Barkhausen Emission (MIRBE) technique is a non-destructive examination technique for microstructural changes, detection of surface defects and case hardening levels [50 60]. In more depth, the method works where magnetic changes over time along with the Bakhausen Noise analysis provides an insight in to the material charcteristcis/properties. MIRBE has its origins from the B-H Hysteresis loop which is not a smooth curve as the magnetic flux density versus the intensity of the magnetic field resultants in a curve that is instead described as a non-linear step function. These steps correlate with the irregular fluctuations in the magnetization when energized from cyclic excitation provided by ferrous yokes to excite the material area under test. These steps or jumps of domains form Barkhausen Noise (BN) and are provided from magnetic domain motion which is the basis of the Barkhausen signal. Moreover, until the applied field is increased sufficiently, pining sites tend to restrict the moving domain wall. When the applied field is reached, sudden changes in magnetisation result which are produced by the sudden and discontinuous movement of domain walls. In the case of microstructural characteristics “defects” such as dislocations, precipitations and segregations which cause pinning of the moving domain walls and promote Barkhausen signal changes. Barkhausen Noise is measured from a recieiving ‘pick-up coil (independent to the energizing yoke)’ in the form of a voltage signal significant of surface eddy currents experienced near the surface of the material.
BN measurements were undertaken using a magnetic Barkhausen noise analys-er (Rollscan 350) with a general-purpose sensor developed by Stresstech [115]. The magneto elastic parameter (mp) signifying the RMS (Root Mean Square) value is expressed as a function of the magnetizing voltage, current and frequency. Each measurement consisted of periodic bursts of BN signals for a set duration of ten seconds, and the BN RMS is calculated from such signal bursts. The RMS of the MBN signals is given as:
where n is the total number of BN signals captured in the particular frequency range, and yi is the amplitude of the individual burst.
The main instrumentation input parameters are voltage and frequency and these are determined from voltage and frequency sweeps giving an optimum ‘trade-off’ value for a specific material under test. Both sinusoidal and triangular waveforms can be used to energise the surface, due to saturation issues with the triangular waveform, the sinusoidal waveform was used. It should also be noted, the frequency of the applied field affects the depth at which the Barkhausen Noise reading is obtained. The frequency is inversely proportial to depth of penetration. A penetration depth between 0.01 mm and 1 mm was achieved where a band pass filter of between 70 kHz and 200 kHz was selected for channeling the pick-up signals of interest.
Scatter of magnetic output responses vs. DBTT was also found with Barkhausen noise. It was considered such scatter is due to the material microstructure differences as well surface quality in terms of surface roughness. Measurement uncertainty however was minimized as much as possible, this is in terms of sensor pick-off, surface quality and applied force. The measurement testing regime used a three times sensor pick-off (physical movement of the sensor to and from the same position maintained) followed by 5 measurements each time the sensor touched the sur-face of the material. The MIRBE setup, used for the measurements can be seen in
Figure A5.
Figure A5.
MIRBE setup used in the work (a) noise analyser and (b) sensor (c) Schematic of domain growth during magnetic hysteresis cycle using MIRBE (BN) method.
Figure A5.
MIRBE setup used in the work (a) noise analyser and (b) sensor (c) Schematic of domain growth during magnetic hysteresis cycle using MIRBE (BN) method.
Appendix B: Interpretation of the Scatter of Points
The results of different nondestructive measurements are presented in
Section 8. As a general conclusion, a reasonable correlation was found between the nondestructively measured magnetic parameters and the destructively measured transition temperature, regardless on the type of measurement (MAT, 3MA, MIRBE). However, the measurement points significantly scatter in all of these experiments. It has been supposed that the reason of this scatter can be the local material inhomogeneity [114]. It is also known that the embrittlement also depends on the initial material conditions, in spite of the fact that the investigated samples were cut from the same block. Considering the importance of these nondestructive measurements on RPV steel for the potential future inspection of nuclear reactors, the results should be analyzed and verified carefully. This was the purpose of the work, described in Ref. [116], and in this Section the most important results and conclusions are summarized. The results of the measurements presented in
Section 8 are also considered here, but these results are evaluated from a different point of view. In Ref. [116] the measurement results of two series of Charpy specimens (made of two different types RPV steel) were analyzed. Measurements were performed before and after neutron irradiation, and the above mentioned three magnetic methods were applied on the same specimens. In this Section only the measurements, made on 15kH2NMFA material are presented, but very similar results were obtained also on A508 Cl.2 material.
The same procedure was taken for a series of blocks, this result is also presented below.
1. Results of MAT, 3MA and MIRBE Measurements Made on All Charpy Samples
1.1. Evaluation of Data without Normalization
It is shown in Figure B1, how the optimally chosen MAT descriptor depends on DBTT. Similar result of 3MA measurement is shown in Figure B2, while the result of MIRBE measurements can be seen in Figure B3. These results are identical with the results presented in
Section 8.
Figure B1.
MAT parameter as a function of DBTT for all measured 15kH2NMFA samples.
Figure B1.
MAT parameter as a function of DBTT for all measured 15kH2NMFA samples.
Figure B2.
3MA parameter as a function of DBTT for all measured 15kH2NMFA samples.
Figure B2.
3MA parameter as a function of DBTT for all measured 15kH2NMFA samples.
Figure B3.
MIRBE parameter as a function of DBTT for all measured 15kH2NMFA samples.
Figure B3.
MIRBE parameter as a function of DBTT for all measured 15kH2NMFA samples.
It is evident that neutron irradiation caused well measurable modification of magnetic parameters. A more or less linear correlation seems to exist between magnetic quantities and DBTT. However, the most visible effect is the big scatter of points, regardless on the actual way of measurement.
On the other side, it is also evident in the above figures that even the magnetic parameters of reference (not irradiated) samples scatter a lot. This experience gives a possible explanation of the scatter of points: the samples themselves behave differently, in spite of the fact that they were cut from the same block. Magnetic measurements only reflect this material inhomogeneity. Consequently, it is not surprising that the points scatter also after irradiation. To get an impression about behaviour of individual samples, it will be investigated in next subsection, how the magnetic behaviour of individual samples are modified due to neutron irradiation.
1.2. Evaluation of Normalized Data
In
Figure B1,
Figure B2 and
Figure B3 the measurement results are given without marking the individual samples. Perhaps a more useful way of presentation is to consider the modification of magnetic parameters for each individual sample. Because of this other graphs are shown in
Figure B4,
Figure B5 and
Figure B6). In these figures the change of magnetic parameters are given with respect to the same magnetic parameter measured on the same sample before irradiation. It is the reason that the first point (Ratio = 1) is the same for all samples, and the other points are connected with individual samples. These points show how the magnetic parameters of a given sample are modified due to irradiation.
Figure B4.
Normalized MAT parameters as function of DBTT for all 15kH2NMFA samples.
Figure B4.
Normalized MAT parameters as function of DBTT for all 15kH2NMFA samples.
Figure B5.
Normalized 3MA parameters as function of DBTT for all 15kH2NMFA samples.
Figure B5.
Normalized 3MA parameters as function of DBTT for all 15kH2NMFA samples.
Figure B6.
Normalized MIRBE parameters as function of DBTT for all 15kH2NMFA samples.
Figure B6.
Normalized MIRBE parameters as function of DBTT for all 15kH2NMFA samples.
It is seen very well in the above figures, that the scatter of points is also rather large in the normalized cases. This can be considered as a direct proof that the scatter of points is the result of the originally different behaviour. The neutron irradiation generates different material embrittlement, depending on the individual properties of the samples.
2. Selection of Samples
The influence of neutron irradiation is investigated in the above subsections for the case if all measured samples are taken into account. But it is seen very well that even the reference samples are very different from the point of view of magnetic properties. It is not surprising that they also behave differently after irradiation. In this subsection it is shown, how a magnetic selection of samples can be done. This selection is based on permeability measurements of samples. In the next subsection it will be shown, how the correlation between magnetic parameters and DBTT looks like if only the selected samples are taken into account. It is important to emphasize that this selection was made before any further magnetic measurement and evaluation of irradiated samples.
The permeability loops were measured on reference samples, before irradiation. This means, that the selection does not take into account the material embrittlement, generated by the neutron irradiation. It reflects simply the behaviour of samples in initial conditions.
No backward reasoning has been used to decide which measured points fit best to our hypothesis. To clarify this statement the details of this selection process are briefly given:
A large scatter of all magnetic parameters measured on both the reference and irradiated samples we observed.
Regardless of the result of magnetic measurements, we compared the magnetic behaviour of reference samples were compared to each other. It was found that four samples behaved similarly from the magnetic point of view.
The MAT, 3MA and MBN evaluations (not measurements!) were repeated, taking into account only those selected samples. It is evident that this selection cannot give any information about the behaviour of the irradiated samples; considering that it is done prior to the irradiation.
The series of permeability loops with increasing magnetization detected on 15kH2NMFA samples can be seen in the left side of
Figure B7. In the right side of the figure the magnified parts of the loops are shown. For the sake of better visibility here the envelope of the large amplitude minor loops are shown. The difference between loops are seen well, and an easy selection can be made. Four samples behave similarly: Nos. 172, 173, 178, 183.
Figure B7.
Total permeability loops of 15kH2NMFA samples before irradiation (left). The magnified part of the left graph (right).
Figure B7.
Total permeability loops of 15kH2NMFA samples before irradiation (left). The magnified part of the left graph (right).
3. Results of 3MA, MAT and MBN Measurements Considering Selected Samples only
In this subsection it is shown, how the scatter of points looks like if the evaluation of magnetic parameters has been performed by taking into account only the magnetically pre-selected samples. Results can be seen in
Figure B8,
Figure B9 and
Figure B10, respectively.
Figure B8.
Optimally chosen MAT descriptor as a function of DBTT for selected 15kH2NMFA samples.
Figure B8.
Optimally chosen MAT descriptor as a function of DBTT for selected 15kH2NMFA samples.
Figure B9.
3MA parameter as a function of transition temperature for selected 15kH2NMFA samples.
Figure B9.
3MA parameter as a function of transition temperature for selected 15kH2NMFA samples.
Figure B10.
MIRBE parameter as a function of transition temperature for selected 15kH2NMFA samples.
Figure B10.
MIRBE parameter as a function of transition temperature for selected 15kH2NMFA samples.
4. Results of MAT Measurements Made on Blocks
In this subsection the results of the same procedure as described above is given, but now those measurements are considered, which were performed on A508 Cl.2 base metal blocks, before and after neutron irradiation [104]. Again, the measurement points are the same as presented in
Section 8 but after performing the magnetic selection, and only MAT results are considered. The correlation between MAT parameters and DBTT are shown in
Figure B11, before and after selection.
Figure B11.
Optimally chosen MAT descriptor as a function of estimated DBTT on all base material samples (a), and the same correlation after magnetic selection (b).
Figure B11.
Optimally chosen MAT descriptor as a function of estimated DBTT on all base material samples (a), and the same correlation after magnetic selection (b).
5. Discussion
The above described analysis revealed that the experienced big scatter is most probable connected with the different behaviour of samples. The measurement errors of the applied magnetic methods are not responsible for this scatter. In case of MAT a careful analysis of potential experimental errors was performed [114] and it was found that by taking into account of all possible sources of uncertainty, the error of the whole MAT evaluation is less than 1%.
By comparing
Figure B8,
Figure B9 and
Figure B10 with either
Figure B1,
Figure B2 and
Figure B3 or with
Figure B4,
Figure B5 and
Figure B6 it is clearly seen that the scatter of points significantly decreased if the evaluation of measurement results was performed only on the selected Charpy samples. Obviously, a linear correlation with low scatter of points was found between magnetic parameters and DBTT. This statement is supported by the fact that all the three applied methods resulted the same: Neither the correlation between magnetic quantities and transition temperature, nor the scatter do not depend on the actual way of measurement. This fact is very promising for the future practical application of magnetic methods. Results of different methods verify each other.
Furthermore, the influence of proper magnetic selection is identical for both Charpy and block samples. This fact makes evident that this phenomenon also does not depend on the size and shape of investigated specimens.
6. Conclusions
It was clearly demonstrated by our experiments, that the neutron irradiation-generated embrittlement is very well characterized with low scatter of measured magnetic parameters if the parameters of the not irradiated samples are close to each other. The selection can be easily performed by magnetic measurements.
It can be stated – based on the above experimental results - that magnetic parameters seem to characterize better the neutron irradiaton induced material embrittlement than the traditionally used destructive methods, e.g. transition temperature. This is the most important conclusion of this work. The scatter of the magnetic parameters is significantly lower than the scatter of destructive Charpy impacts tests. Furthermore, the magnetic measurements characterize the individual samples, in contrary to the DBTT values determined by the Charpy method, which provides only statistical values on the sample sets.
Another important conclusion was also found that the local material inhomogeneity influence a lot the neutron irradiation-generated material embrittlement. Different parts of RPV, even if they are cut from the same block, are hardened differently. Local material conditions are responsible for the different embrittlement of the material caused by the same dosage of neutron irradiation.
These results mean a serious argument for the application of magnetic measurements in the reactor industry in the future.
References
- The Economics of Long-term Operation of Nuclear Power Plants, Nuclear Development 2012, NUCLEAR ENERGY AGENCY and ORGANISATION FOR ECONOMIC CO-OPERATION AND DEVELOPMENT, ISBN 978-92-64-99205-4.
- Keim E., Lidbury D.: Review of assessment methods used in nuclear plant lifetime management, report based on contributions by members of NULIFE Expert Groups 2 and 3, Report No. Nullife 12 (5), May 2012.
- Ballesteros, A.; Ahlstrand, R.; Bruynooghe, C.; von Estorff, U.; Debarberis, L.. Nucl. Eng. Des,. 2012, 243, 63–68. [CrossRef]
- Al Mazouzi, A.; Alamo, A.; Lidbury, D.; Moinereau, D.; Van Dyck, S., Nucl. Eng. Des., 2011, 241, 3403–3415. [CrossRef]
- Koutsky, J.; Kocık, J. Radiation Damage of Structural Materials; Elsevier: Amsterdam, The Netherlands, 1994.
- Ferreño, D.; Gorrochategui, I.; Gutiérrez-Solana, F. Degradation due to neutron embrittlement of nuclear vessel steels: A critical review about the current experimental and analytical techniques to characterise the material, with particular emphasis on alternative methodologies. In Nuclear Power—Control, Reliability and Human Factors;
- https://inis.iaea.org/collection/NCLCollectionStore/_Public/07/222/7222068.pdf.
- https://www.astm.org/stp909-eb.html.
- Steele L.E., Potapovs U., Nuclear Engineering and Design, 1968, 8, 58. [CrossRef]
- Odette G.R., Lucas G.E., Recent progress in understanding reactor pressure vessel steel embrittlemen,t Rad. Effects and Defects in Solids, 1998, 144, 189. [CrossRef]
- Odette G.R., Lucas G.E., JOM, 2001, 53, 18. [CrossRef]
- Odette GR, Nanstad RK. Predictive reactor pressure vessel steel irradiation embrittlement model: issues and opportunities. J Metals. 2009;61:17–23. [CrossRef]
- Debarberis L., Kryukov A., Gillemot F., Valo M., Morozov A., Brumovsky M., Acosta B., Sevini F., Strength of Materials, 2004, 36, 269. [CrossRef]
- Phythian WJ, English CA. Microstructural evolution in reactor pressure vessel steels. J Nucl Mater. 1993;205:162–177. [CrossRef]
- Scott P. A review of irradiation assisted stress corrosion cracking. J Nucl Mater. 1994;211:101–122. [CrossRef]
- Bruemmer SM, Simonen EP, Scott PM, Andresen PL, Was GS, Nelson JL. Radiation-induced material changes and susceptibility to intergranular failure of light-water-reactor core internals. J Nucl Mater.;274:299–314. [CrossRef]
- Was GS, Andresen PL. Stress corrosion cracking behavior of alloys in aggressive nuclear reactor core environments. Corrosion. 2007;63:19–45. [CrossRef]
- Chopra OK, Rao AS. A review of irradiation effects on LWRcore internalmaterials – IASCC susceptibility and crack growth rates of austenitic stainless steels. J Nucl Mater. 2011;409:235–256. [CrossRef]
- Wallin, K., “The Scatter in KIc results,” Engineering Fracture Mechanics, Vol. 19, (1984) 1085-1093. [CrossRef]
- AMERICAN SOCIETY FOR TESTING AND MATERIALS, Test Method for Determination of Reference Temperature, T0, for Ferritic Steels in the Transition Range, ASTM, West Conshohocken, PA, Vol. 03.01, ASTM E 1921 (2002).
- Server, W.L., et al., “Application of master curve fracture toughness for reactor pressure vessel integrity assessment in the USA”, presented at IAEA Specialists Meeting, Gloucester, UK, 2001.
- Debarberis L., Kryukov A., Gillemot F., Acosta B., Sevini F., International Journal of Pressure Vessels and Piping, 2005, 82, 195. [CrossRef]
- Gillemot F., Horváth Á., Horváth M., et. al., Microstructural changes in highly irradiated 15H2MFA steel, 26th Symposium on the Effects of Radiation on Nuclear Materials. ASTM STP, 2014, Paper ID STP-2013-0098. [CrossRef]
- Kryukov A., Debarberis L., von Estorff U., Gillemot F., Oszvald F., Journal of Nuclear Materials, 2013. 422, 173. [CrossRef]
- Trampus, P. Pressurized Thermal Shock Analysis of the Reactor Pressure Vessel. Procedia Struct. Integr. 2018, 13, 2083–2088. [CrossRef]
- Chen, M.; Yu, W.; Qian, G.; Shi, J.; Cao, Y.; Yu, Y. Crack Initiation, Arrest and Tearing Assessments of a RPV Subjected to PTS Events. Ann. Nucl. Energy 2018, 116, 143–151. [CrossRef]
- Fukuya K., Current understanding of radiation-induced degradation in light water reactor structural materials, Journal of Nuclear Science and Technology, 2013, 50, 213–254. [CrossRef]
- P.K.Liaw, W.G.Clark Jr., R.Rishel, D.Drinon, M.K.Devine and D.C.Jiles , Life prediction and nondestructive evaluation of materials properties in the power plant industry, Proceeding of the First International Conference on microstructures and mechanical properties of aging materials, Chicago, November 1992, p.345. Edited by P.K.Liaw, R.Viswanathan, K.L.Murty, D.Frear and E.P.Simonen.
- Frankfurt, Vladimir; Kupperman, David, Review of electromagnetic NDT methods for monitoring the degradation of nuclear reactor components, 2001 Argonne National Laboratory, Scientific publications.
- Wang X., Qiang W., Shu G., Magnetic non-destructive evaluation of hardening of cold rolled reactor pressure vessel steel, Journal of Nuclear Materials, 2017, 492, 178-182. [CrossRef]
- S. Takahashi, S. Kobayashi, H. Kikuchi, Y. Kamada, “Relationship between mechanical and magnetic properties in cold rolled low carbon steel”, J. Appl. Phys. (2006) vol.100, p.113908. [CrossRef]
- Tomáš, J. Kadlecová, R. Konop, M. Dvořáková, “Magnetic nondestructive indication of varied brittleness of 15Ch2MFA steel”, Proceedings of 9th International Conference on Barkhausen Noise and Micromagnetic Testing (ICBM9), Hejnice, Czech Republic, June 2011, ISBN 978-952-67247-4-4 (paperback), ISBN 978-952-67247-5-1 (CD-ROM), pp.55-63.
- Seiler, G. Early detection of fatigue at elevated temperature in austenitic steel using electromagnetic ultrasound transducers. In Proceedings of the Seventh International Conference on Low Cycle Fatigue: LCF7, Deutscher Verband für Materialforschung und-prüfung e.V. (DVM), Aachen, Germany, 9–11 September 2013; pp. S359–S364.
- Smith, R.L.; Rusbridge, K.L.; Reynolds, W.N.; Hudson, B. Ultrasonic attenuation, microstructure and ductile to brittle transition temperature in Fe-C alloys. Mater. Eval. 1993, 41, 219–222.
- Dobmann, G.; Kröning, M.; Theiner, W.; Willems, H.; Fiedler, U. Nondestructive characterization of materials (ultrasonic and magnetic techniques) for strength and toughness prediction and the detection early creep damage. Nucl. Eng. Des. 1995, 157, 137–158. [CrossRef]
- E. Schneider: Ultrasonic Technique; In: Hauk, V.: Structural and Residual Stress Analysis by Nondestructive Methods: Evaluation - Application – Assessment, In: Amsterdam: Elsevier, S. 522-563, 1997. [CrossRef]
- H. Willems and K. Goebbels, “Characterization of microstructure by backscatter ultrasonic waves”, Material Science, Vol.15, 191, pp. 549-553. [CrossRef]
- Niffenegger, M, Mora, DF, & Kottmann, H. "Non-Destructive Evaluation of RPV Embrittlement by Means of the Thermoelectric Power Method." Proceedings of the Volume 7: Non-Destructive Examination. Virtual, Online. August 3, 2020. V007T07A002. ASME. [CrossRef]
- Niffenegger, M.; Leber, H.J. Monitoring the embrittlement of reactor pressure vessel steels by using the Seebeck coefficient. J. Nucl. Mater. 2009, 389, 62. [CrossRef]
- Niffenegger, M.; Reichlin, K.; Kalkhof, D. Application of the Seebeck effect for monitoring of neutron embrittlement and low-cycle fatigue in nuclear reactor steel. Nucl. Eng. Des. 2005, 235, 1777–1788. [CrossRef]
- M. Valo, P. Lappalainen, T. Lyytikäinen, J.Lydman, M.Paasila, (2013) Advanced surveillance technique and embrittlement modelling (SURVIVE), In: SAFIR2014. The Finnish Research Programme on Nuclear Power Plant Safety 2011-2014. Interim Report. Simola, Kaisa (ed.). VTT Technology 80, VTT, Espoo. https://www.vtt.fi/inf/pdf/technology/2013/T80.pdf , pp. 313-323.
- T. Planman, M. Valo, P. Lappalainen, K. Wallin, (2014), Variability of material properties in Greifswald NPP beltline welds (P07), IGRDM 18, Int. Gr. Radiat. Damage Mechanisms, 23 - 28 Nov. 2014, Miyazaki, Japan.
- Kronmüller, H.; Fähnle, M. Micromagnetism and the Microstructure of Ferromagnetic Solids; Cambridge University Press: Cambridge, UK, 2003.
- Devine, M.K. Magnetic detection of material properties. J. Min. Met. Mater. JOM 1992, 44, 24–30. [CrossRef]
- D.C. Jiles, Review of magnetic methods for nondestructive evaluation",. NDT International, 21, 311, 1988. [CrossRef]
- Blitz, J. Electrical and Magnetic Methods of Nondestructive Testing; Adam Hilger IOP Publishing, Ltd.: Bristol, UK, 1991.
- Jiles, D.C. Magnetic methods in nondestructive testing. In Encyclopedia of Materials Science and Technology; Buschow, K.H.J., Ed.; Elsevier: Oxford, UK, 2001; p. 6021. [CrossRef]
- Johnson M.J, Lo C.C.H.,Zhu B., Cao H., Jiles D.C., Magnetic measurements for NDE: background, implementation and applications, Journal of Nondestructive Evaluation, 20, 11, 2000.
- Kempf R.A, Sacanell J., Milano J., Guerra Méndez N., Winkler E., ButeraA., Troiani H., Saleta M.E., Fortis A.M., Correlation between radiation damage and magnetic properties in reactor vessel steels, Journal of Nuclear Materials, 2014, 445, 57-62. [CrossRef]
- Rudyak V.M., The Barkhausen effect, Sov. Phys. Usp. 1971, 13 461. [CrossRef]
- Lo, C.C.H.; Jakubovics, J.P.; Scrub, C.B. Non-destructive evaluation of spheroidized steel using magnetoacoustic and Barkhausen emission. IEEE Trans. Magn. 1997, 33, 4035–4037. [CrossRef]
- Kikuchi, H.; Ara, K.; Kamada, Y.; Kobayashi, S. Effect of microstructure changes on Barkhausen noise properties and hysteresis loop in cold rolled low carbon steel. IEEE Trans. Magn. 2009, 45, 2744–2747. [CrossRef]
- Hartmann, K.; Moses, A.J.; Meydan, T. A system for measurement of AC Barkhausen noise in electrical steels. J. Magn. Magn. Mater. 2003, 254–255, 318–320. [CrossRef]
- Kadavath, G.; Mathew, J.; Gri_n, J.; Parfitt, D.; Fitzpatrick, M.E. Magnetic Barkhausen Noise Method for Characterisation of Low Alloy Steel. In Proceedings of the ASME Nondestructive Evaluation, Diagnosis and Prognosis Division (NDPD), San Antonio, TX, USA, 14–19 July 2019; ASME: New York, NY, USA, 2019. [CrossRef]
- Liu, T.; Kikuchi, H.; Kamada, Y.; Ara, K.; Kobayashi, S.; Takahashi, S. Comprehensive analysis of Barkhausen noise properties in the cold rolled mild steel. J. Magn. Magn. Mater. 2007, 310, e989–e991. [CrossRef]
- Ktena, A.; Hristoforou, E.; Gerhardt, G.J.L.; Missell, F.P.; Landgraf, F.J.G.; Rodrigues, D.L.; Alberteris-Campos, M., Barkhausen noise as a microstructure characterization tool, Physica B 2014, 435, 109–112.
- D.Clatterbuck, M.J.Johnson, D.C.Jiles and V.Garcia, Modeling the magnetic Barkhausen effect, Review of Progress in Quantitative NDE, 19, 1533, 2000. [CrossRef]
- Jeong, H.T., Park, D.G., Hong, J.H., Ahn, Y.S., Kim, G.M., The effect of microstructural changes on magnetic Barkhausen noise in Mn-Mo-Ni pressure vessel steel, Journal of the Korean Physical Society; 1999, 34(5), 429-433.
- Park D.G., Ok C.I., Jeong H.T., Kuk I.H., Hong J.H., Nondestructive evaluation of irradiation effects in RPV steel using Barkhausen noise and magnetoacoustic emission signals, Journal of Magnetism and Magnetic Materials, 1999, 196-197, 382-384. [CrossRef]
- JW Wilson, N Karimian, W Yin, J Liu, CL Davis, AJ Peyton, Magnetic sensing for microstructural assessment of power station steels: Magnetic Barkhausen noise and minor loop measurements, Journal of Physics: Conference Series 450 (2013) 012041. [CrossRef]
- R. Ranjan, D.C. Jiles and P.K. Rastogi, Magnetoacoustic emission, magnetisation and Barkhausen effect in decarburised steel, IEEE Transactions on Magnetics, MAG-22, 511, 1986. [CrossRef]
- Augustyniak, B.; Chmielewski, M.; Piotrowski, L.; Kowalewski, Z. Comparison of properties of magnetoacoustic emission and mechanical barkhausen effects for P91 steel after plastic flow and creep. IEEE Trans. Magn. 2008, 44, 3273–3276. [CrossRef]
- Dobmann, G.; Altpeter, I.; Kopp, M.; Rabung, M.; Hubschen, G. ND-materials characterization of neutron induced embrittlement in German nuclear reactor pressure vessel material by micromagnetic NDT techniques. In Electromagnetic Nondestructive Evaluation (XI); IOS Press: Amsterdam, The Netherlands, 2008; p. 54, ISBN 978-1-58603-896-0.
- Altpeter, I.; Becker, R.; G Dobmann, R.; Kern, W.A.; Theiner, A. Yashan: Robust Solutions of Inverse Problems in Eletromagnetic Non-Destructive Evaluation. Inverse Probl. 2002, 18, 1907–1921. [CrossRef]
- Szielasko, K.; Wolter, B.; Tschuncky, R.; Youssef, S. Micromagnetic materials characterization using m7schin learning—Progress in Nondestructive Prediction of Mechanical Properties of Steel and Iron. Tech. Mess. 2020, 87, 428–437. [CrossRef]
- D.C. Jiles and J.B. Thoelke, Theory of ferromagnetic hysteresis: determination of model parameters from experimental hysteresis loops, IEEE Trans. Mag. 25, 3928, 1989. [CrossRef]
- Vandenbossche, L., 2009. Magnetic Hysteretic Characterization of FerromagneticMaterials with Objectives Towards Non-Destructive Evaluation of MaterialDegradation. Gent University, Gent, Belgium (PhD Thesis).
- Satoru Kobayashi; Nobuhiro Kikuchi; Seiki Takahashi; Yasuhiro Kamada; Hiroaki Kikuchi, Magnetic properties of α′martensite in austenitic stainless steel studied by a minor-loop scaling law, Journal of Applied Physics 108, 043904 (2010). [CrossRef]
- Tomáš I., Non-destructive Magnetic Adaptive Testing of ferromagnetic materials. J. Magn. Magn. Mat. 2004, 268, 178–185. [CrossRef]
- Tomáš, I.; Vértesy, G. Magnetic adaptive testing. In Nondestructive Testing Methods and New Applications; Omar, M., Ed.; IntechOpen Limited: London, UK, 2012; ISBN 978-953-51-0108-6. Available online: http://www.intechopen.com/articles/show/title/magnetic-adaptive-testing.
- Vértesy, G., Tomás, I., Takahashi, S., Kobayashi, S., Kamada, Y., Kikuchi, H., Inspection of steel degradation by Magnetic Adaptive Testing, NDT&E Int., 2008. 41, 252–257. [CrossRef]
- G. Vértesy, I. Mészáros, I. Tomáš, Nondestructive magnetic characterization of TRIP steels, NDT & E INTERNATIONAL, 54 (2013) 107–114. [CrossRef]
- Gillemot F., Pirfo Barroso S. (2010) Possibilities and difficulties of the NDE evaluation of irradiation degradation, Proceedings of 8th International Conference on Barkhausen Noise and Micromagnetic Testing (ICBM8) (ISBN 978-952-67247-2-0).
- B. Minov, „Investigation of the hardening in neutron irradiated and thermally aged iron-copper alloys, on the basis of mechanical and magnetic relaxation phenomena“, Gent University, Gent, Belgium, PhD Thesis 2012.
- Vandenbossche, L., Konstantinović, M.J., Dupré, L., Magnetic hysteretic characterization of the irradiation-induced embrittlement of Fe, Fe–Cu model alloys, and reactor pressure vessel steel, J. Mag. Mag. Mater. 2008, 320, 562–566. [CrossRef]
- Li C., Shu G., Xu B., Liu Y., Chen J., Liu W., Effects of neutron irradiation on magnetic properties of reactor pressure vessel steel, Nuclear Engineering and Design, 2019, 342, 128-132. [CrossRef]
- Park D.G., Moon E.J., Kim D.J., Chi S.H., Hong J.H., The change of saturation magnetization in neutron-irradiated low-alloy steel, Physica B, 2003, 327 , 315-318. [CrossRef]
- Chi S.H., Chang K.O., Hong J.H., Kuk I.H., Changes in magnetic parameters of neutron irradiated SA 508 Cl. 3 reactor pressure vessel forging and weld surveillance specimens, J. Appl. Phys., 1999, 85, 5726-5728. [CrossRef]
- L.B. Sipahi, M.R. Govindarju, D.C. Jiles, Monitoring neutron embrittlement in nuclear pressure vessel steels using micromagnetic Barkhausen emissions, J. Appl. Phys., 1994, 85, 6981-6983. [CrossRef]
- Y.Y. Song, D.G. Park, J.H. Hong, The effect of microstructural changes on magnetic Barkhausen noise and magnetomechanical acoustic emission in Mn–Mo–Ni pressure vessel steel, J. Appl. Phys., 87 (2000), pp. 5242-5245. [CrossRef]
- Duck-Gun Park; Hee-Tae Jeong; Jun-Hwa Hong, A study on the radiation damage and recovery of neutron irradiated vessel steel using magnetic Barkhausen noise, Journal of Applied Physics 85, 5726–5728 (1999). [CrossRef]
- Barroso, S.P.; Horváth, M.; Horváth, Á. Magnetic measurements for evaluation of radiation damage on nuclear reactor materials. Nucl. Eng. Des. 2010, 240, 722–725. [CrossRef]
- F. Gillemot, S. Pirfo Barroso, “Possibilities and difficulties of the NDE evaluation of irradiation degradation”, Proceedings of 8th International Conference on Barkhausen Noise and Micromagnetic Testing (ICBM8), 2010, (ISBN 978-952-67247-2-0).
- J.S. McCloy; Pradeep Ramuhalli; Charles Henager, Jr. Use of first order reversal curve measurements to understand Barkhausen noise emission in nuclear steel, AIP Conference Proceedings 1511, 1709–1716 (2013). [CrossRef]
- Kobayashi S., Kikuchi H., Takahashi S., Kamada Y., Ara K., Yamamoto T., Klingensmith D., Odette, G.R., The effect of copper and manganese on magnetic minor hysteresis loops in neutron irradiated Fe model alloys, Journal of Nuclear Materials, 2009, 384, 109-114. [CrossRef]
- S. Takahashi, H. Kikuchi, K. Ara, N. Ebine, Y. Kamada, S. Kobayashi, M. Suzuki, “In situ magnetic measurements under neutron radiation in Fe metal and low carbon steel”, J. Appl. Phys. (2006) Vol. 100, p.023902. [CrossRef]
- S. Kobayashi, H. Kikuchi, S. Takahashi, Y. Kamada, K. Ara, T. Yamamoto, D. Klingensmith, G.R. Odette, Neutron irradiation effects on magnetic minor hysteresis loops in nuclear reactor pressure vessel steels, Philosophical Magazine, 2008, 88, 1791–1800. [CrossRef]
- S. Kobayashi, T. Yamamoto, D. Klingensmith, G.R. Odette, H. Kikuchi, Y. Kamada, Magnetic evaluation of irradiation hardening in A533B reactor pressure vessel steels: Magnetic hysteresis measurements and the model analysis, Journal of Nuclear Materials, 2012, 422, 158-162. [CrossRef]
- S. Kobayashi, F. Gillemot, Á. Horváth, R. Székely, „Magnetic properties of a highly neutron-irradiated nuclear reactor pressure vessel steel“, Journal of Nuclear Materials 421 (2012) 112-116. [CrossRef]
- Tomáš, I., Vértesy, G., Gillemot, F., Székely, R., Nondestructive Magnetic Adaptive Testing of nuclear reactor pressure vessel steel degradation. J. Nucl. Mater. 2013, 432, 371–377. [CrossRef]
- Tomáš I., Vértesy G., Pirfo Barroso S., Kobayashi S., Comparison of four NDT methods for indication of reactor steel degradation by high fluences of neutron irradiation, Nuclear Engineering and Design, 2013, 265 201-209. [CrossRef]
- Tomáš, J. Kadlecová, G. Vértesy, Measurement of flat samples with rough surfaces by Magnetic Adaptive Testing, IEEE Trans Magn, 48 (2012) 1441-1444. [CrossRef]
- G. Dobmann, I. Altpeter, M. Kopp, M. Rabung, G. Hubschen, “ND-materials characterization of neutron induced embrittlement in German nuclear reactor pressure vessel material by micromagnetic NDT techniques”, Electromagnetic Nondestructive Evaluation (XI), 2008, p.54, IOS Press, ISBN 978-1-58603-896-0.
- G. Dobmann, “Non-Destructive Testing for Ageing Management of Nuclear Power Components”, in Nuclear Power - Control, Reliability and Human Factors, P.Tsvetkov (Ed.), ISBN: 978-953-307-599-0, InTech (2011), Available from: http://www.intechopen.com/articles/show/title/non-destructive-testing-for-ageing-management-of-nuclear-power-component. [CrossRef]
- http://www.nomad-horizon2020.eu.
- Uytdenhouwen, R. Chaouadi and other NOMAD consortium members, “NOMAD: Non-destructive Evaluation (NDE) system for the inspection of operation-induced material degradation in nuclear power plants – overview of the neutron irradiation campaigns”, Proc. Of the ASME 2020, Vol. 7: Non-destructive examination, V007T07A003, PVP2020-21512. [CrossRef]
- Uytdenhouwen, R. Chaouadi, “Effect of neutron irradiation on the mechanical properties of an A508 Cl.2 forging irradiated in a BAMI capsule”, Proc. ASME 2020, Vol. 1: Codes and standards, V001T01A060, PVP2020-21513. [CrossRef]
- Uytdenhouwen, R. Chaouadi, To be published in the ASME 2021 proceedings PVP2021-61969 paper: Effect of neutron irradiation on the mechanical properties of an A508 Cl.2 and 15Kh2NMFA irradiated in the NOMAD_3 rig in the BR2 cooling water. [CrossRef]
- Nondestructive Evaluation (NDE) System for the Inspection of Operation-Induced Material Degradation in Nuclear Power Plants, (GA 755330), Parametric study, Documents download module (europa.eu). [CrossRef]
- Rabung, M.; Kopp, M.; Gasparics, A.; Vértesy, G.; Szenthe, I.; Uytdenhouwen, I.; Szielasko, K. Micromagnetic Characterization of Operation-Induced Damage in Charpy Specimens of RPV Steels. Appl. Sci. 2021, 11, 2917. [CrossRef]
- Vértesy G., Gasparics A., Szenthe I., Gillemot F., Uytdenhouwen I., Inspection of Reactor Steel Degradation by Magnetic Adaptive Testing, Materials 2019, 12, 963. [CrossRef]
- Vértesy G., Gasparics A., Szenthe I., Bilicz S., Magnetic Investigation of Cladded Nuclear Reactor Blocks, Materials, 2022, 15, 1425. [CrossRef]
- G. Vértesy, A. Gasparics, I. Szenthe, F. Gillemot, Magnetic nondestructive inspection of reactor steel cladded blocks, GLOBAL JOURNAL OF ADVANCED ENGINEERING TECHNOLOGIES AND SCIENCES, 6(6): June, 2019, pp. 1-9, ISSN 2349-0292, http://www.gjaets.com/Issues%20PDF/Archive-2019/June-2019/1.pdf. [CrossRef]
- Vértesy G., Gasparics A., Szenthe I., Uytdenhouwen I., Investigation of the Influence of Neutron Irradiation on Cladded Nuclear Reactor Pressure Vessel Steel Blocks by Magnetic Adaptive Testing, Appl. Sci. 2022, 12, 2074. [CrossRef]
- Sonja Grönroos “Machine learning in nondestructive estimation of neutron-induced reactor pressure vessel embrittlement” Master’s thesis Materials research, Computational materials physics, November 26, 2020 - https://helda.helsinki.fi/handle/10138/328799.
- S. M. Ross, Introductory Statistics, in: S. M. Ross (Ed.), Introductory Statistics (Fourth Edition), fourth edition Edition, Academic Press, Oxford, 2017, pp. 797. [CrossRef]
- R. Kohavi, A Study of Cross-Validation and Bootstrap for Accuracy Estimation and Model Selection, Proceedings of the 14th International Joint Conference on Artificial Intelligence - Volume 2 (1995) 1137-1143. Morgan Kaufmann Publishers Inc.
- Combination of Non-Destructive Methods in Estimating Irradiation-Induced Reactor Pressure Vessel Steel Alloy Embrittlement with Machine Learning by Sonja Grönroos, Jari Rinta-aho, Tuomas Koskinen, Gonçalo Sorger – SSRN - https://papers.ssrn.com/sol3/papers.cfm?abstract_id=3993039.
- James. M. Griffin, Jino. Mathew, Antal Gasparics, Gábor Vértesy, Inge Uytdenhouwen, Rachid. Chaouadi and Michael E. Fitzpatrick, “Machine-Learning Approach to Determine Surface Quality on a Reactor Pressure Vessel (RPV) Steel”, in: MDPI Applied Sciences 2022, 12, 3721. https://www.mdpi.com/journal/applsci. [CrossRef]
- P. J. Huber, Robust Estimation of a Location Parameter, The Annals of Mathematical Statistics 35 (1) (1964) 73. [CrossRef]
- A. J. Smola, B. Schölkopf, A tutorial on support vector regression, Statistics and computing 14 (3) (2004) 199-222.
- K. P. Murphy, Machine Learning: A Probabilistic Perspective, The MIT Press, 2012.
- Preisach F. Uber die magnetische Nachwirkung, Zeit. fur Physik 1935, Vol. 94 p. 277. [CrossRef]
- Gábor Vértesy, Antal Gasparics, Ildikó Szenthe, Inge Uytdenhouwen, Interpretation of Nondestructive Magnetic Measurements on Irradiated Reactor Steel Material, Appl. Sci. 2021, 11, 3650. [CrossRef]
- Stresstech Group. Microscan software, Operating Instructions, V.4.4.0. 2016. Available online: (accessed on 15 Fabruary 2019).
- Vértesy, G.; Gasparics, A.; Szenthe, I.; Rabung, M.; Kopp, M.; Griffin, J.M., Analysis of Magnetic Nondestructive Measurement Methods for Determination of the Degradation of Reactor Pressure Vessel Steel. Materials, 2021, 14, 5256. [CrossRef]
Figure 1.
The processes of the radiation embrittlement. Dependence of the change in the transition temperature (DBBT) as functions of the E>0.1 MeV neutron fluence. [13].
Figure 1.
The processes of the radiation embrittlement. Dependence of the change in the transition temperature (DBBT) as functions of the E>0.1 MeV neutron fluence. [13].
Figure 2.
Dimensions (in mm) of the noncladded and cladded block samples.
Figure 2.
Dimensions (in mm) of the noncladded and cladded block samples.
Figure 3.
NDE features measured on Charpy samples of 22NiMoCr37.
Figure 3.
NDE features measured on Charpy samples of 22NiMoCr37.
Figure 4.
NDE features measured on Charpy samples of 18MND5-W.
Figure 4.
NDE features measured on Charpy samples of 18MND5-W.
Figure 5.
NDE features measured on Charpy samples of A508-B.
Figure 5.
NDE features measured on Charpy samples of A508-B.
Figure 6.
NDE features measured on Charpy samples of HSST-03.
Figure 6.
NDE features measured on Charpy samples of HSST-03.
Figure 7.
NDE features measured on Charpy samples of A508 Cl.2.
Figure 7.
NDE features measured on Charpy samples of A508 Cl.2.
Figure 8.
NDE features measured on Charpy samples of 15kH2NMFA.
Figure 8.
NDE features measured on Charpy samples of 15kH2NMFA.
Figure 9.
Calculated distribution of the magnetic flux density in a cladded block excited through the cladding when large and small yokes is placed onto the top of the cladding has different relative permeability [102].
Figure 9.
Calculated distribution of the magnetic flux density in a cladded block excited through the cladding when large and small yokes is placed onto the top of the cladding has different relative permeability [102].
Figure 10.
NDE features measured on cladded blocks through the cladding.
Figure 10.
NDE features measured on cladded blocks through the cladding.
Figure 11.
NDE features measured on non-cladded blocks A508 Cl.2 on two opposite sides.
Figure 11.
NDE features measured on non-cladded blocks A508 Cl.2 on two opposite sides.
Figure 12.
Possible workflow of the ML method application [105].
Figure 12.
Possible workflow of the ML method application [105].
Figure 14.
Example: The relative importance of the features evaluated by the models built with the boosted decision tree (BDT) algorithm and the extra-trees regressor (ETR) algorithm plotted as bar plots in case of NOMAD database involving six different tested materials [104].
Figure 14.
Example: The relative importance of the features evaluated by the models built with the boosted decision tree (BDT) algorithm and the extra-trees regressor (ETR) algorithm plotted as bar plots in case of NOMAD database involving six different tested materials [104].
Figure 15.
The correlation plot for the Charpy samples. The true values of the ductile-to-brittle transition temperature (DBTT) are plotted on the x-axis, and the predictions made by the SVR model are plotted on the y-axis. Samples in the training set are plotted as steel blue dots, and samples in the test set are plotted as orange triangles. The grey diagonal line represents a perfect fit. The training and test scores, measured as the mean absolute error (MAE) and R2 score are reported in the heading.
Figure 16.
The leave-one-out cross-validation procedure results performed on the entire block data set, which contains 48 samples. The true values of the estimated ductile-to-brittle transition temperature (EstDBTT) are plotted on the x-axis, and the predictions made by the SVR model are plotted on the y-axis. The measurements taken from different block sides, top, bottom and through the cladding have been plotted with different colours and shapes. The LOOCV mean absolute error (MAE) and R2 score are reported in the figure heading.
Figure 17.
The correlation plot for the block samples. The true values of the estimated ductile-to-brittle transition temperature (EstDBTT) are plotted on the x-axis, and the predictions made by the SVR model are plotted on the y-axis. Samples in the training set are plotted as blue/steel blue dots, and samples in the test set are plotted as orange/red triangles. Whether the measurement was made through the cladding or not is indicated by the colours. The grey diagonal line represents a perfect fit. The training and test scores, measured as the mean absolute error (MAE) and R2 score, are reported in the heading.
Table 1.
NDE methods applied for the embrittlement characterization
Table 1.
NDE methods applied for the embrittlement characterization
| NDE method |
Charpy samples |
Blocks |
| Micromagnetic multiparameter microstructure and stress analysis (3MA-X8) |
√ |
√ |
| Piezoelectric Ultrasound (Piezo-US) |
√ |
not applicable |
| Direct Current-Reversal Potential Drop (DCRPD) |
√ |
not applicable |
| Micromagnetic Inductive Response & Barkhausen Emission (MIRBE) |
√ |
√ |
| Magnetic adaptive testing (MAT) |
√ |
√ |
| Thermoelectric power (TEP) |
√ |
√ |
Table 2.
Material compositions (wt %)
Table 2.
Material compositions (wt %)
| Material |
C |
Mn |
P |
Cr |
Mo |
Ni |
Cu |
S |
Si |
| 18MND5-W |
0.09 |
1.21 |
0.018 |
0.12 |
0.49 |
0.96 |
0.13 |
0.007-0.011 |
0.23-0.31 |
| 22NiMoCr37 |
0.2 |
0.87 |
0.009 |
0.39 |
0.49 |
0.85 |
0.06 |
0.007-0.011 |
0.23-0.31 |
| A508-B |
0.2 |
1.4 |
0.01 |
0.1 |
0.45 |
0.74 |
0.06 |
0.007-0.011 |
0.23-0.31 |
| HSST-03 |
0.25 |
1.42 |
0.013 |
0.48 |
0.62 |
0.12 |
0.12 |
0.007-0.011 |
0.23-0.31 |
| A508 Cl.2 |
0.21 |
0.75 |
0.01 |
0.39 |
0.6 |
0.8 |
0.12 |
0.007-0.011 |
0.23-0.31 |
| 15kH2NMFA |
0.16 |
0.42 |
0.012 |
1.97 |
0.52 |
1.29 |
0.12 |
0.007-0.011 |
0.23-0.31 |
Table 3.
Results of the Charpy impact tests.
Table 3.
Results of the Charpy impact tests.
| Material |
Fast neutron fluence
[n/cm²]*E-19
|
Irrad. temp.
[°C] |
DBTT [°C] |
Number of samples |
| 18MND5-W |
0 |
- |
-51 |
5 |
| 2.88 – 3.87 |
150 |
145 |
6 |
| 4.57 – 5.05 |
260 |
98 |
3 |
| 8.57 – 9.89 |
260 |
178 |
6 |
22NiMoCr37
|
0 |
- |
-62 |
3 |
| 2.99 – 4.02 |
260 |
-6 |
6 |
| 4.87 – 6.84 |
260 |
29 |
6 |
| HSST-03 |
0 |
- |
-6 |
5 |
| 2.43 – 2.80 |
150 |
161 |
7 |
| 3.55 – 4.40 |
305 |
34 |
7 |
| A508-B |
0 |
- |
-55 |
5 |
| 3.80 – 4.39 |
150 |
156 |
7 |
| 3.28 – 4.99 |
305 |
-5 |
8 |
| A508 Cl.2 |
0 |
- |
-33 |
12 |
| 1.55 |
100 |
76 |
4 |
| 4.38 |
100 |
125 |
4 |
| 7.04 |
100 |
126 |
4 |
| 15kH2NMFA |
0 |
- |
-51 |
12 |
| 2.78 |
100 |
88 |
4 |
| 6.83 |
100 |
136 |
4 |
| 7.9 |
100 |
124 |
4 |
Table 4.
Results of the Charpy impact tests on specimens cut out from the blocks: cladded blocks top side and bottom side.
Table 4.
Results of the Charpy impact tests on specimens cut out from the blocks: cladded blocks top side and bottom side.
| |
Real Fluence
[n/cm²]* E-19
|
Irrad. temp
[°C] |
DBTT
[°C] |
Number of samples |
A508 Cl.2
Cladded topside
uniform |
0 |
- |
-45 |
3 |
| 2.09 |
100 |
90 |
1 |
| 6.93 |
100 |
112 |
1 |
| 12.70 |
100 |
112 |
1 |
A508 Cl.2
Cladded topside
attenuated |
0 |
- |
-45 |
3 |
| 1.48 |
100 |
94 |
1 |
| 5.12 |
100 |
103 |
1 |
| 8.86 |
100 |
110 |
1 |
A508 Cl.2
Bottom side
uniform |
0 |
- |
-45 |
3 |
| 1.72 |
100 |
119 |
1 |
| 6.76 |
100 |
145 |
1 |
| 12.75 |
100 |
165 |
1 |
A508 Cl.2
Bottom side
attenuated |
0 |
- |
-45 |
3 |
| 4.55 |
100 |
133 |
1 |
| 11.23 |
100 |
157 |
1 |
| 17.40 |
100 |
181 |
1 |
Table 5.
Results of the Charpy impact tests on specimens cut out from the blocks: noncladded blocks.
Table 5.
Results of the Charpy impact tests on specimens cut out from the blocks: noncladded blocks.
| |
Real Fluence
[n/cm²]* E-19
|
Irrad. temp
[°C] |
DBTT
[°C] |
Number of samples |
A508 Cl.2
Cladded topside
uniform |
0 |
- |
-45 |
3 |
| 2.09 |
100 |
90 |
1 |
| 6.93 |
100 |
112 |
1 |
| 12.70 |
100 |
112 |
1 |
A508 Cl.2
Cladded topside
attenuated |
0 |
- |
-45 |
3 |
| 1.48 |
100 |
94 |
1 |
| 5.12 |
100 |
103 |
1 |
| 8.86 |
100 |
110 |
1 |
A508 Cl.2
Bottom side
uniform |
0 |
- |
-45 |
3 |
| 1.72 |
100 |
119 |
1 |
| 6.76 |
100 |
145 |
1 |
| 12.75 |
100 |
165 |
1 |
A508 Cl.2
Bottom side
attenuated |
0 |
- |
-45 |
3 |
| 4.55 |
100 |
133 |
1 |
| 11.23 |
100 |
157 |
1 |
| 17.40 |
100 |
181 |
1 |
Table 6.
The 10-fold cross-validation, training and test scores of the three models [107].
Table 6.
The 10-fold cross-validation, training and test scores of the three models [107].
| |
|
HLR |
SVR |
ANN |
| 10-fold cross-validation score |
MAE [°C] |
13.67 |
13.58 |
12.7 |
| Training score |
MAE [°C] |
9.32 |
8.68 |
9.21 |
| RMSE [°C] |
14.49 |
13.63 |
12.57 |
| R2
|
0.97 |
0.97 |
0.98 |
| Test score |
MAE [°C] |
17.1 |
17.77 |
16.04 |
| RMSE [°C] |
18.67 |
20.4 |
22.08 |
| R2
|
0.95 |
0.94 |
0.93 |
Table 7.
A summary of the accuracies of the models. The number of folds k, k-fold cross-validation scores, training scores and test scores are reported for each model. The scores are reported as mean absolute errors (MAEs), root-mean-square errors (RMSEs) and R² scores.
Table 7.
A summary of the accuracies of the models. The number of folds k, k-fold cross-validation scores, training scores and test scores are reported for each model. The scores are reported as mean absolute errors (MAEs), root-mean-square errors (RMSEs) and R² scores.
| Data set |
k |
k-fold MAE [°C] |
|
Train RMSE [°C] |
Train MAE [°C] |
|
Test RMSE [°C] |
Test MAE [°C] |
|
| Charpy of all RPV steels |
10 |
13.17 |
- |
7.26 |
6.59 |
0.99 |
23.69 |
15.95 |
0.92 |
| Blocks: test/train |
38 |
11.58 |
- |
4.99 |
4.06 |
1.0 |
22.17 |
17.8 |
0.93 |
| All samples of A508 Cl2 |
10 |
13.02 |
- |
8.18 |
5.79 |
0.99 |
17.56 |
13.47 |
0.96 |
| Charpy + blocks: 50/50 |
10 |
25.68 |
- |
13.1 |
8.02 |
0.98 |
26.21 |
18.65 |
0.9 |
|
Disclaimer/Publisher’s Note: The statements, opinions and data contained in all publications are solely those of the individual author(s) and contributor(s) and not of MDPI and/or the editor(s). MDPI and/or the editor(s) disclaim responsibility for any injury to people or property resulting from any ideas, methods, instructions or products referred to in the content. |
© 2023 by the authors. Licensee MDPI, Basel, Switzerland. This article is an open access article distributed under the terms and conditions of the Creative Commons Attribution (CC BY) license (http://creativecommons.org/licenses/by/4.0/).
