1. Introduction
The utilization of carbon-fiber-reinforced polymer (CFRP) in reinforcing concrete is increasingly favored for constructing resilient structures [
1,
2,
3,
4,
5]. The process of CFRP reinforcement involves the application of a layer of carbon matting bound with epoxy resin onto the cement base. The primary focus in this technique is the quality of adhesion between cement and CFRP [
6,
7]. Insufficient adhesive bonding or delamination weakens the reinforcement in specific areas, making constructed structures susceptible to damage [
8]. Hence, it is necessary to regulate the aforementioned structures in order to evaluate the bond between concrete and composite materials. Different non-destructive testing techniques can be used to assess the quality of the cement-composite connection. Possible methods include: radiography, ultrasonic imaging, and thermo-vision and electromagnetic techniques [
9,
10,
11,
12,
13,
14,
15]. Given the substantial size of the buildings under scrutiny, it is preferable to employ techniques that enable comprehensive assessment of extensive areas. Active thermography is a rapid and non-contact method for analyzing large structures, which makes it valuable for field study. In this study, the active thermography with microwave excitation technique for quality assessment of the CFRP concrete reinforcement was employed. Active thermography utilizes an external energy source to create a temperature contrast in the specimen [
16]. Numerous global research institutions investigate thermal imaging techniques for the investigation of large-scale objects, such as complex structures made of concrete. Passive thermography utilizes ambient solar radiation instead of an external heat source. This approach entails extended periods of monitoring and is influenced by daily changes and meteorological factors [
16,
17]. A variety of active thermography approaches employ halogen lamps, laser, flash lights, infrared radiators, and hot air as heat sources [
18,
19,
20,
21,
22,
23,
24]. In this case, the outcomes are no longer contingent on the external condition, but the primary concern is the extended duration required for heating because of the size of the structure. It is crucial to recall that conduction is the process by which heat is transferred from a heated surface to the inside of an object. These stimulation methods are highly specialized, resulting in longer examination durations. Vibrothermography [
25,
26,
27] employs mechanical energy and dissipation mechanisms to identify flaws. The acoustic wave stimulation propagates through the tested structure and attenuates in areas of damage and defects. While acoustic approaches have proven to be effective, they need direct physical contact between the exciter and the test object, which can pose challenges in some circumstances. These methods are most effective for identifying significant defects such as fractures. The utilization of microwave irradiation is proposed as the method of choice for heating in this study. The literature has utilized microwave heating to expedite the process of concrete curing, disinfect cement, and facilitate drilling or melting of concrete [
28,
29,
30,
31,
32,
33,
34,
35,
36,
37]. Microwaves have the potential to provide the necessary energy for infrared thermography, as indicated by several studies [
20,
38,
39,
40,
41,
42,
43,
44]. The primary advantage of microwave heating lies in its volumetric nature. This approach is efficient as it rapidly heats up a precise volume of the specimen at a given moment. Conversely, the heating ratio of this alternative energy source is influenced by both thermal and electrical properties, specifically the dielectric constant [
38,
45]. In case of conductive materials such as CFRP, microwave heating is limited by a shallower depth of penetration. Following the application of heat, a thermovision camera is utilized to visually assess the specimen. Delamination and adhesive loss can result in uneven heating of the sample, which is visible in the registered temperature distribution [
20,
46,
47,
48,
49,
50].
In this article the findings of our research on the study of a concrete samples reinforced with a carbon composite material are presented. The experiments involved submitting the material to microwave irradiation at a constant power level. The objective of the analysis was to validate the feasibility of utilizing the given methodology for identifying flaws in a carbon reinforcement in the form of lack of adhesive between the reinforcement and the concrete. First results of this analysis were presented in our previous articles [
37,
48]. An essential element of the current study involves utilizing a sample that underwent an extended aging period of 10 years. This prolonged duration facilitated the development of natural deterioration in the reinforcement, characterized by the fraying of the material at the edges and the chipping of the epoxy. During the initial phase of the study, we created numerical models with the aim of replicating material deterioration associated with aging. The models were utilized for comparison research and to ascertain the influence of this particular type of flaws on the efficacy of the approach. The numerical analysis presented in the study was validated through experimental verification, and the numerical and experimental findings were subsequently compared.
2. Materials and Methods
In this section, we present the numerical models and the utilized experimental setups. The numerical analysis was performed using Finite Element Method (FEM) in a COMSOL computing environment. In the subsequent section all the elements of the designed numerical models are presented.
2.1. Numerical Models
The numerical models were prepared in the commercial computing environment - COMSOL, in particular using Heat Transfer (HT) and Electromagnetic Waves (EMW) modules to fully analyze the phenomena of microwave heating. The propagation of an electromagnetic wave is defined as follows [
52]:
where denotes the magnetic permeability, is the electric permittivity, represents the electric conductivity, is the angular frequency, and is the electric field vector.
The heat flow is characterized here by the equation [
16]:
where is the material density, denotes the material heat capacity, is the heat flux associated with the convection phenomenon, T is the temperature, and denotes the external heat source.
And the external heat source is equal to the resistive heat generated by the electromagnetic field, which is described as follows [
52]:
where Re indicates the real part of the value.
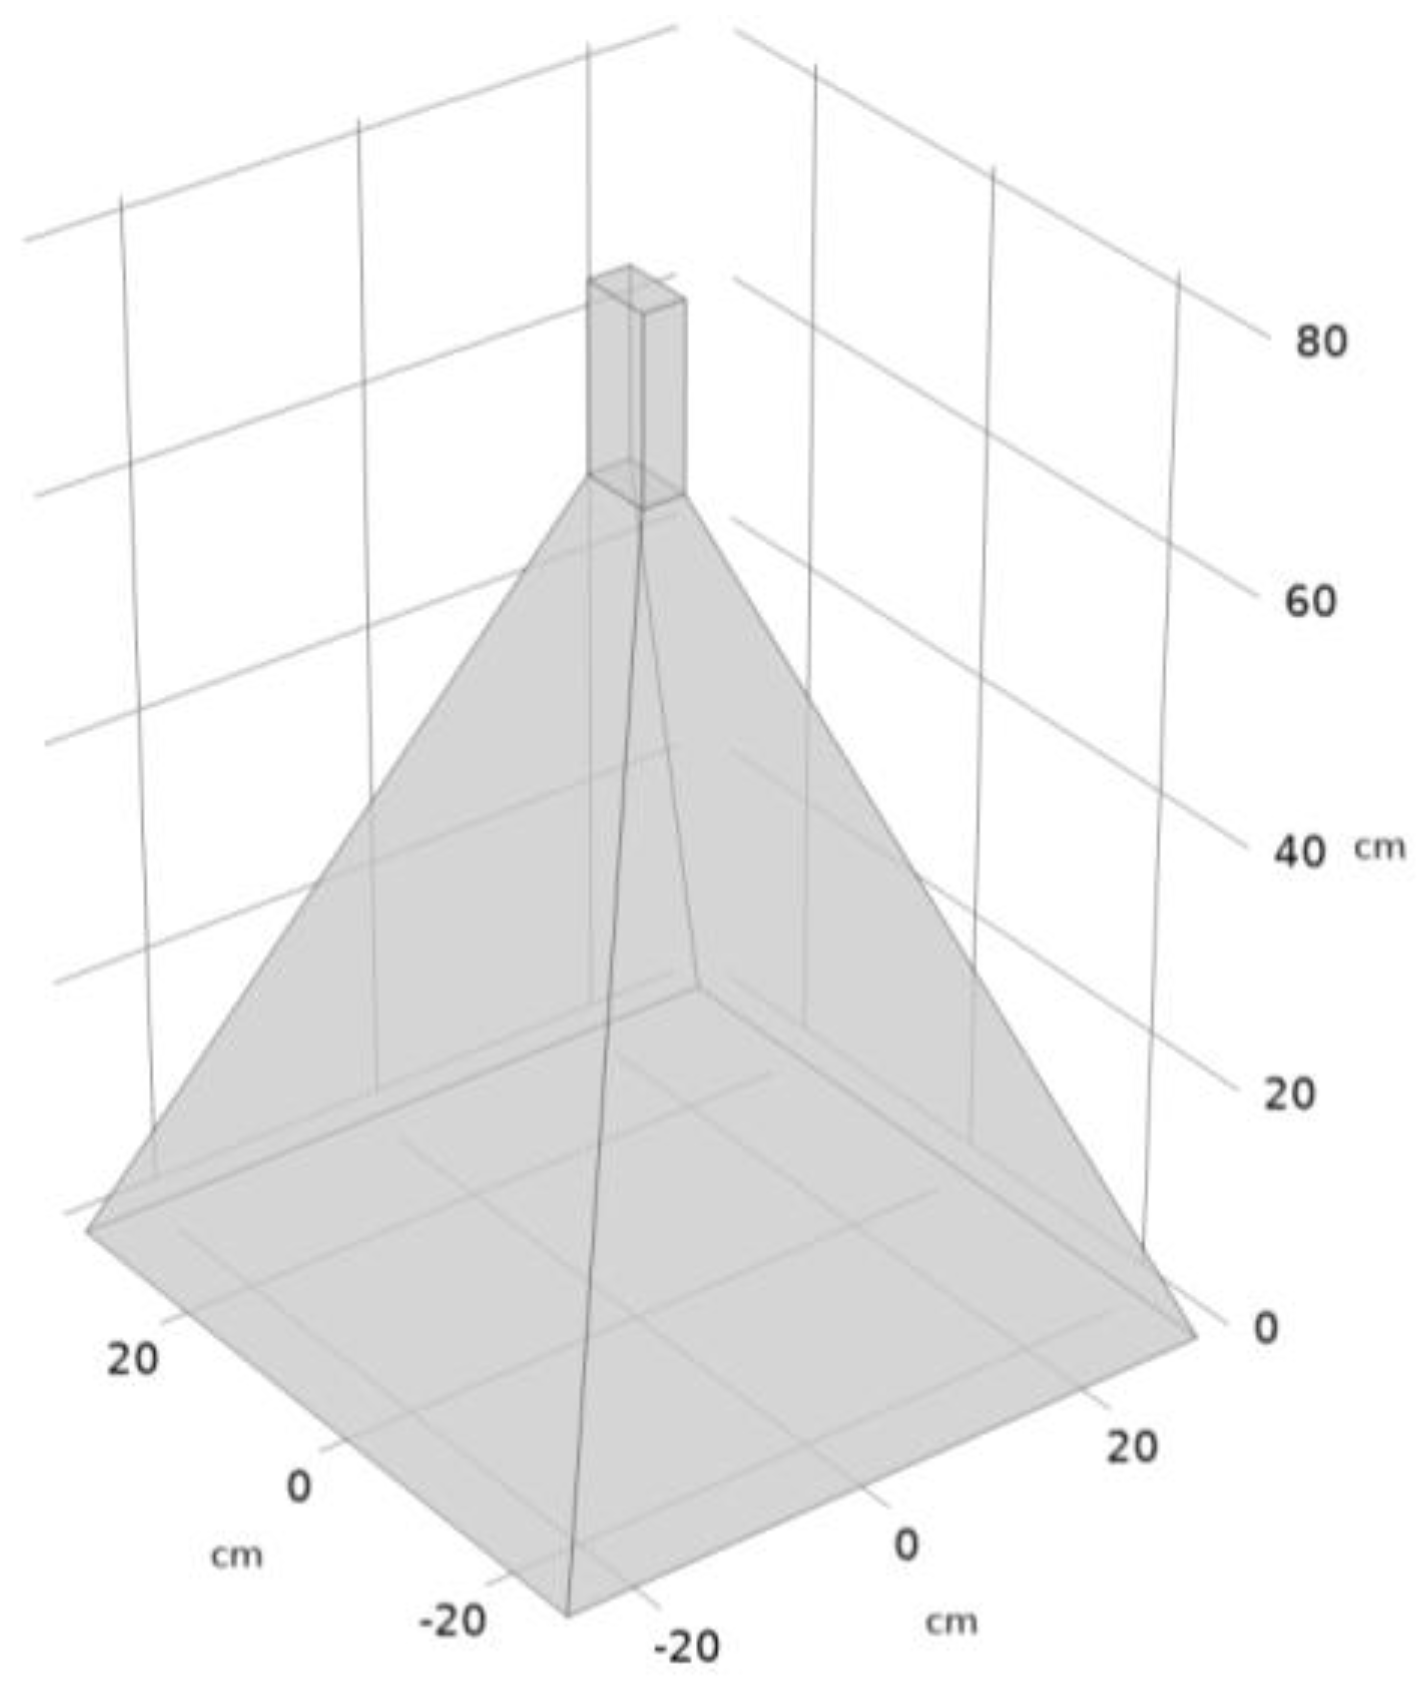
Figure 1 presents the geometry of the modelled horn antenna, with a rectangular waveguide. An electromagnetic wave was produced through the application of the port boundary condition on a specific wall within the waveguide. Here, the assumed mode was TE
10, the frequency was equal to 2.45 GHz and the total power was set to 1000 W. The energy was transmitted in the continuous manner.
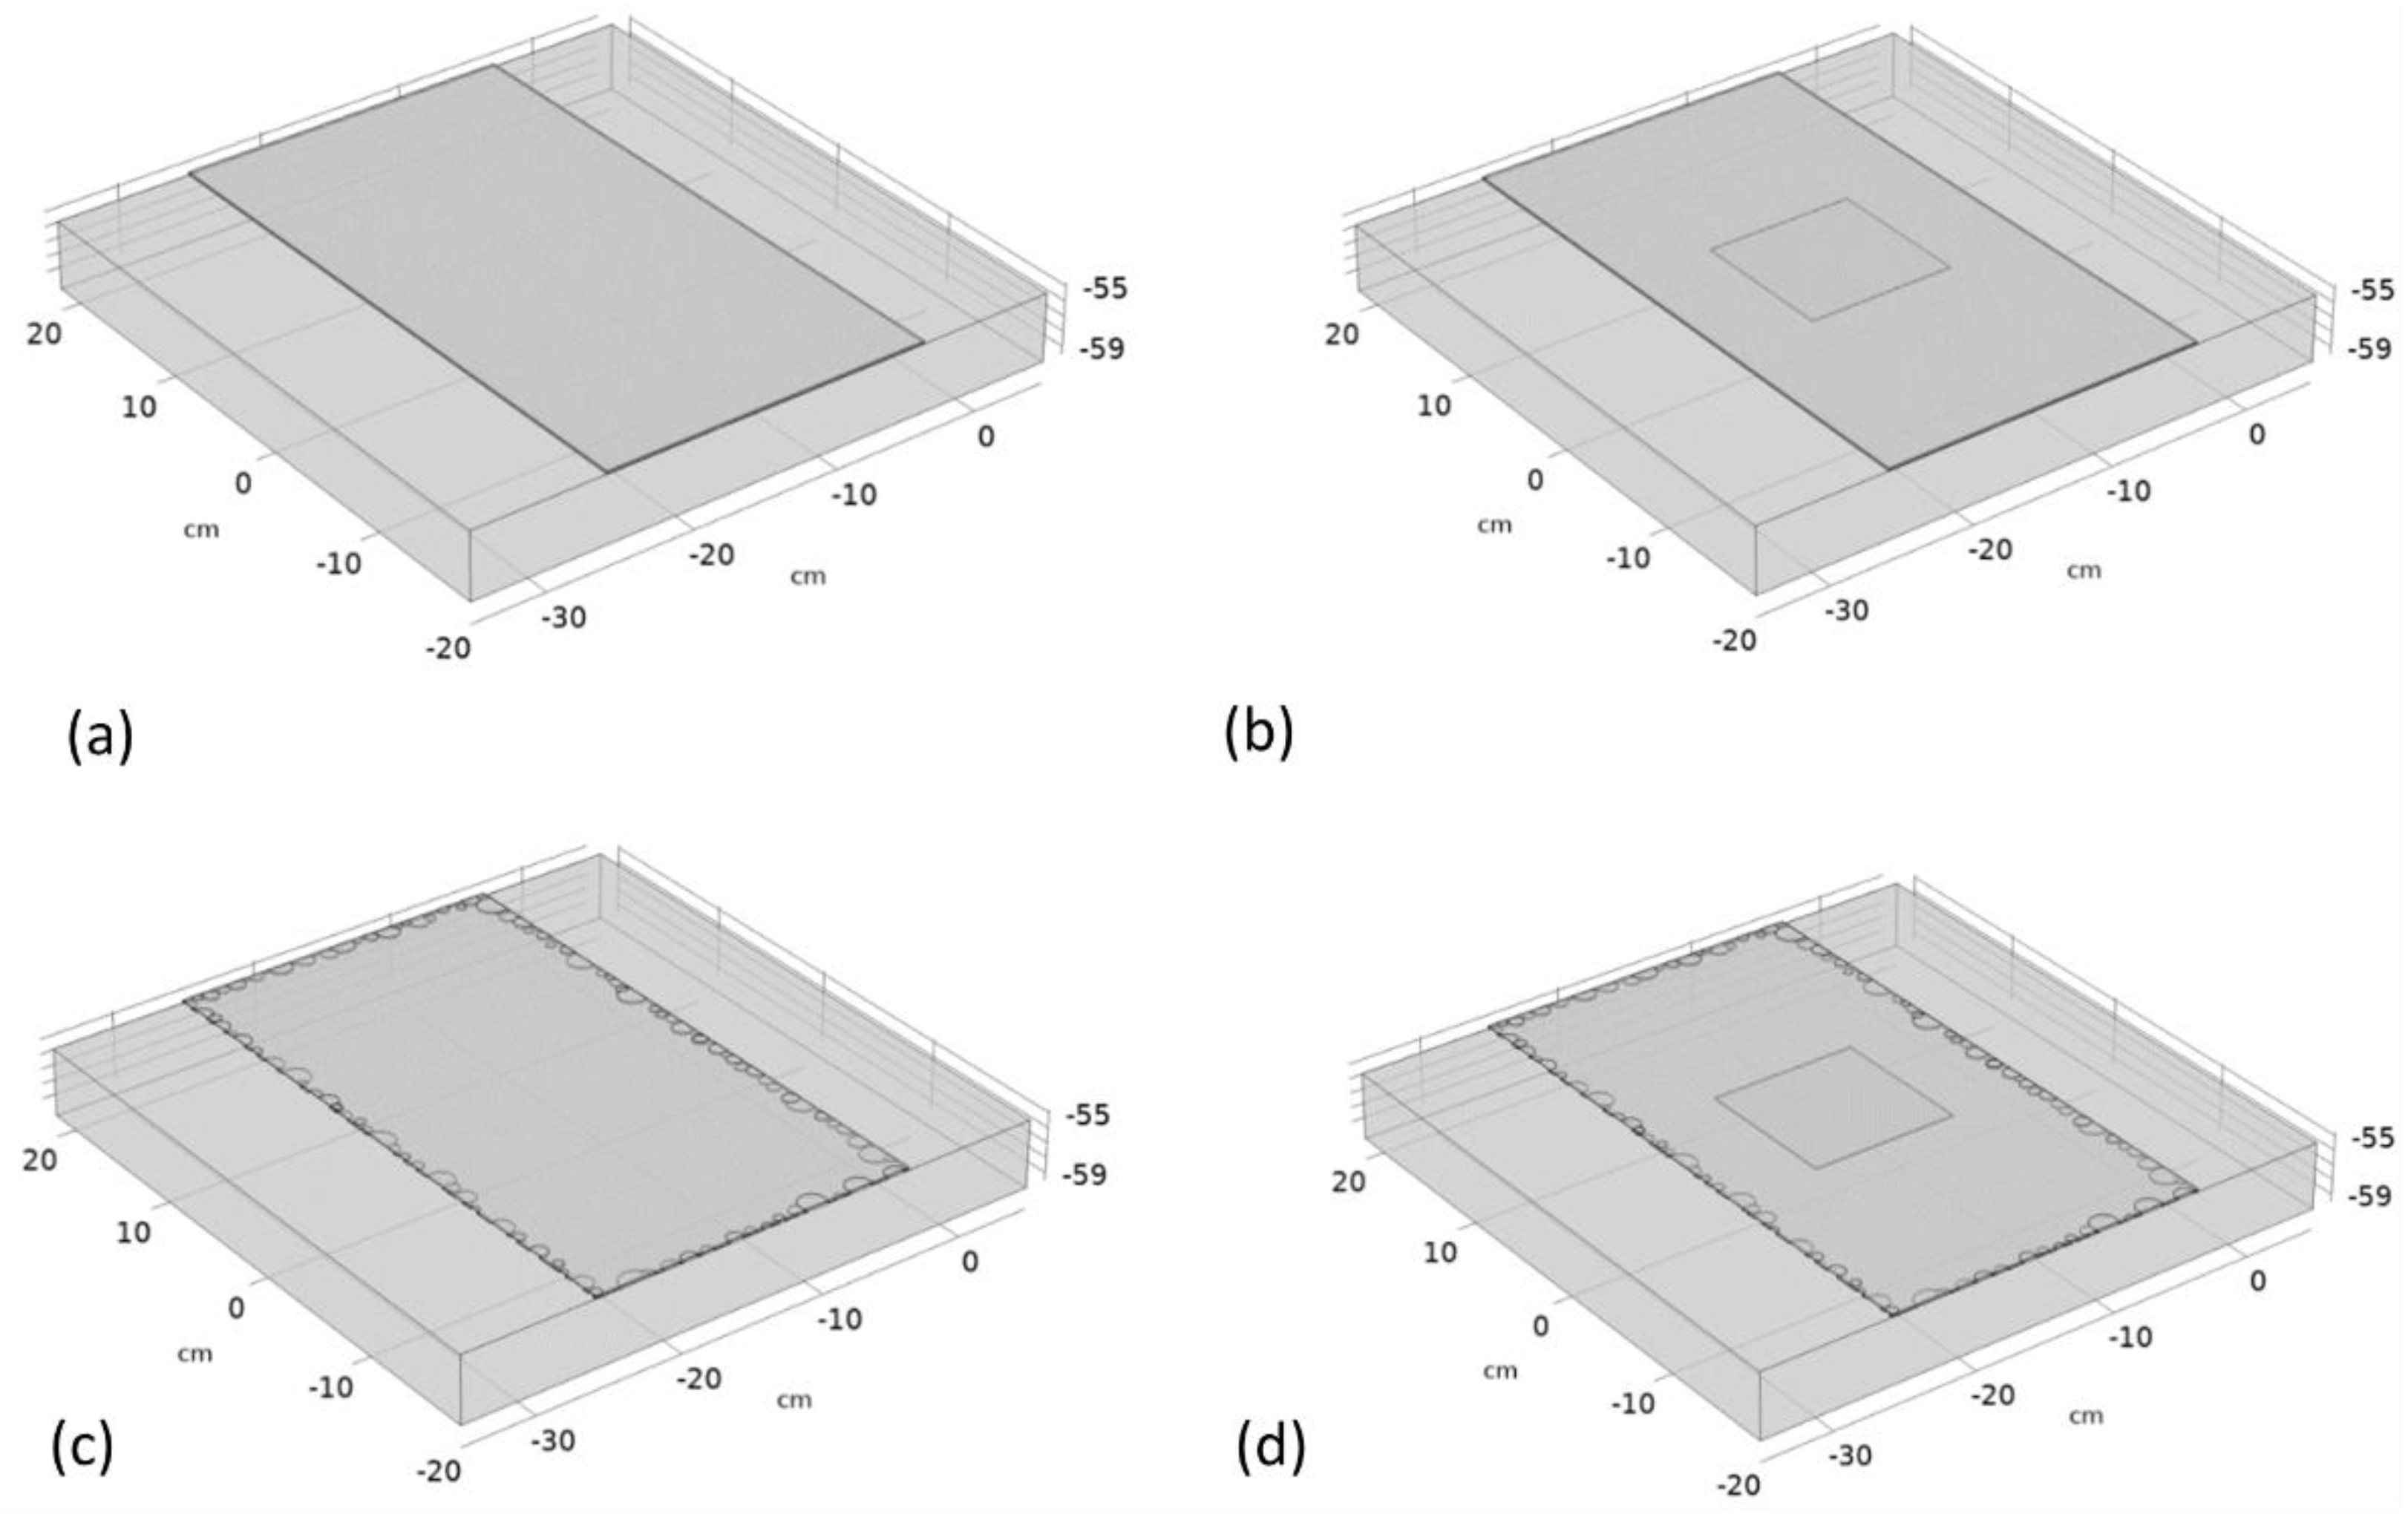
To thoroughly examine the functioning of the tested system, the suggested model includes four distinct variations of the sample. The sample being modeled is a concrete block of 400 x 400 x 45 mm, which has been reinforced with a layer of CFRP measuring 220 x 400 x 1 mm. A 1 mm epoxy adhesive bond was simulated between the composite layer and the concrete. All material parameters important for the modeled objects have been collected in a table. Four variants of the sample were prepared (
Figure 2):
a sample without any defects (
Figure 2 (a)) – (No Defect Sample - NDS);
a sample with a defect in the form of lack of adhesive (air void in the epoxy glue layer with dimensions of 100 x 100 mm located centrally) (
Figure 2 (b)) – (Central Defect Sample – CDS)
a sample with defects simulating the aging of the material, located on the edges of the composite reinforcement layer (
Figure 2 (c)) – (Ageing defects Sample – ADS)
a sample with defects simulating aging and with a centrally located defect in the form of lack of adhesive (
Figure 2 (d)) – (Central and Ageing Defects Sample – CADS)
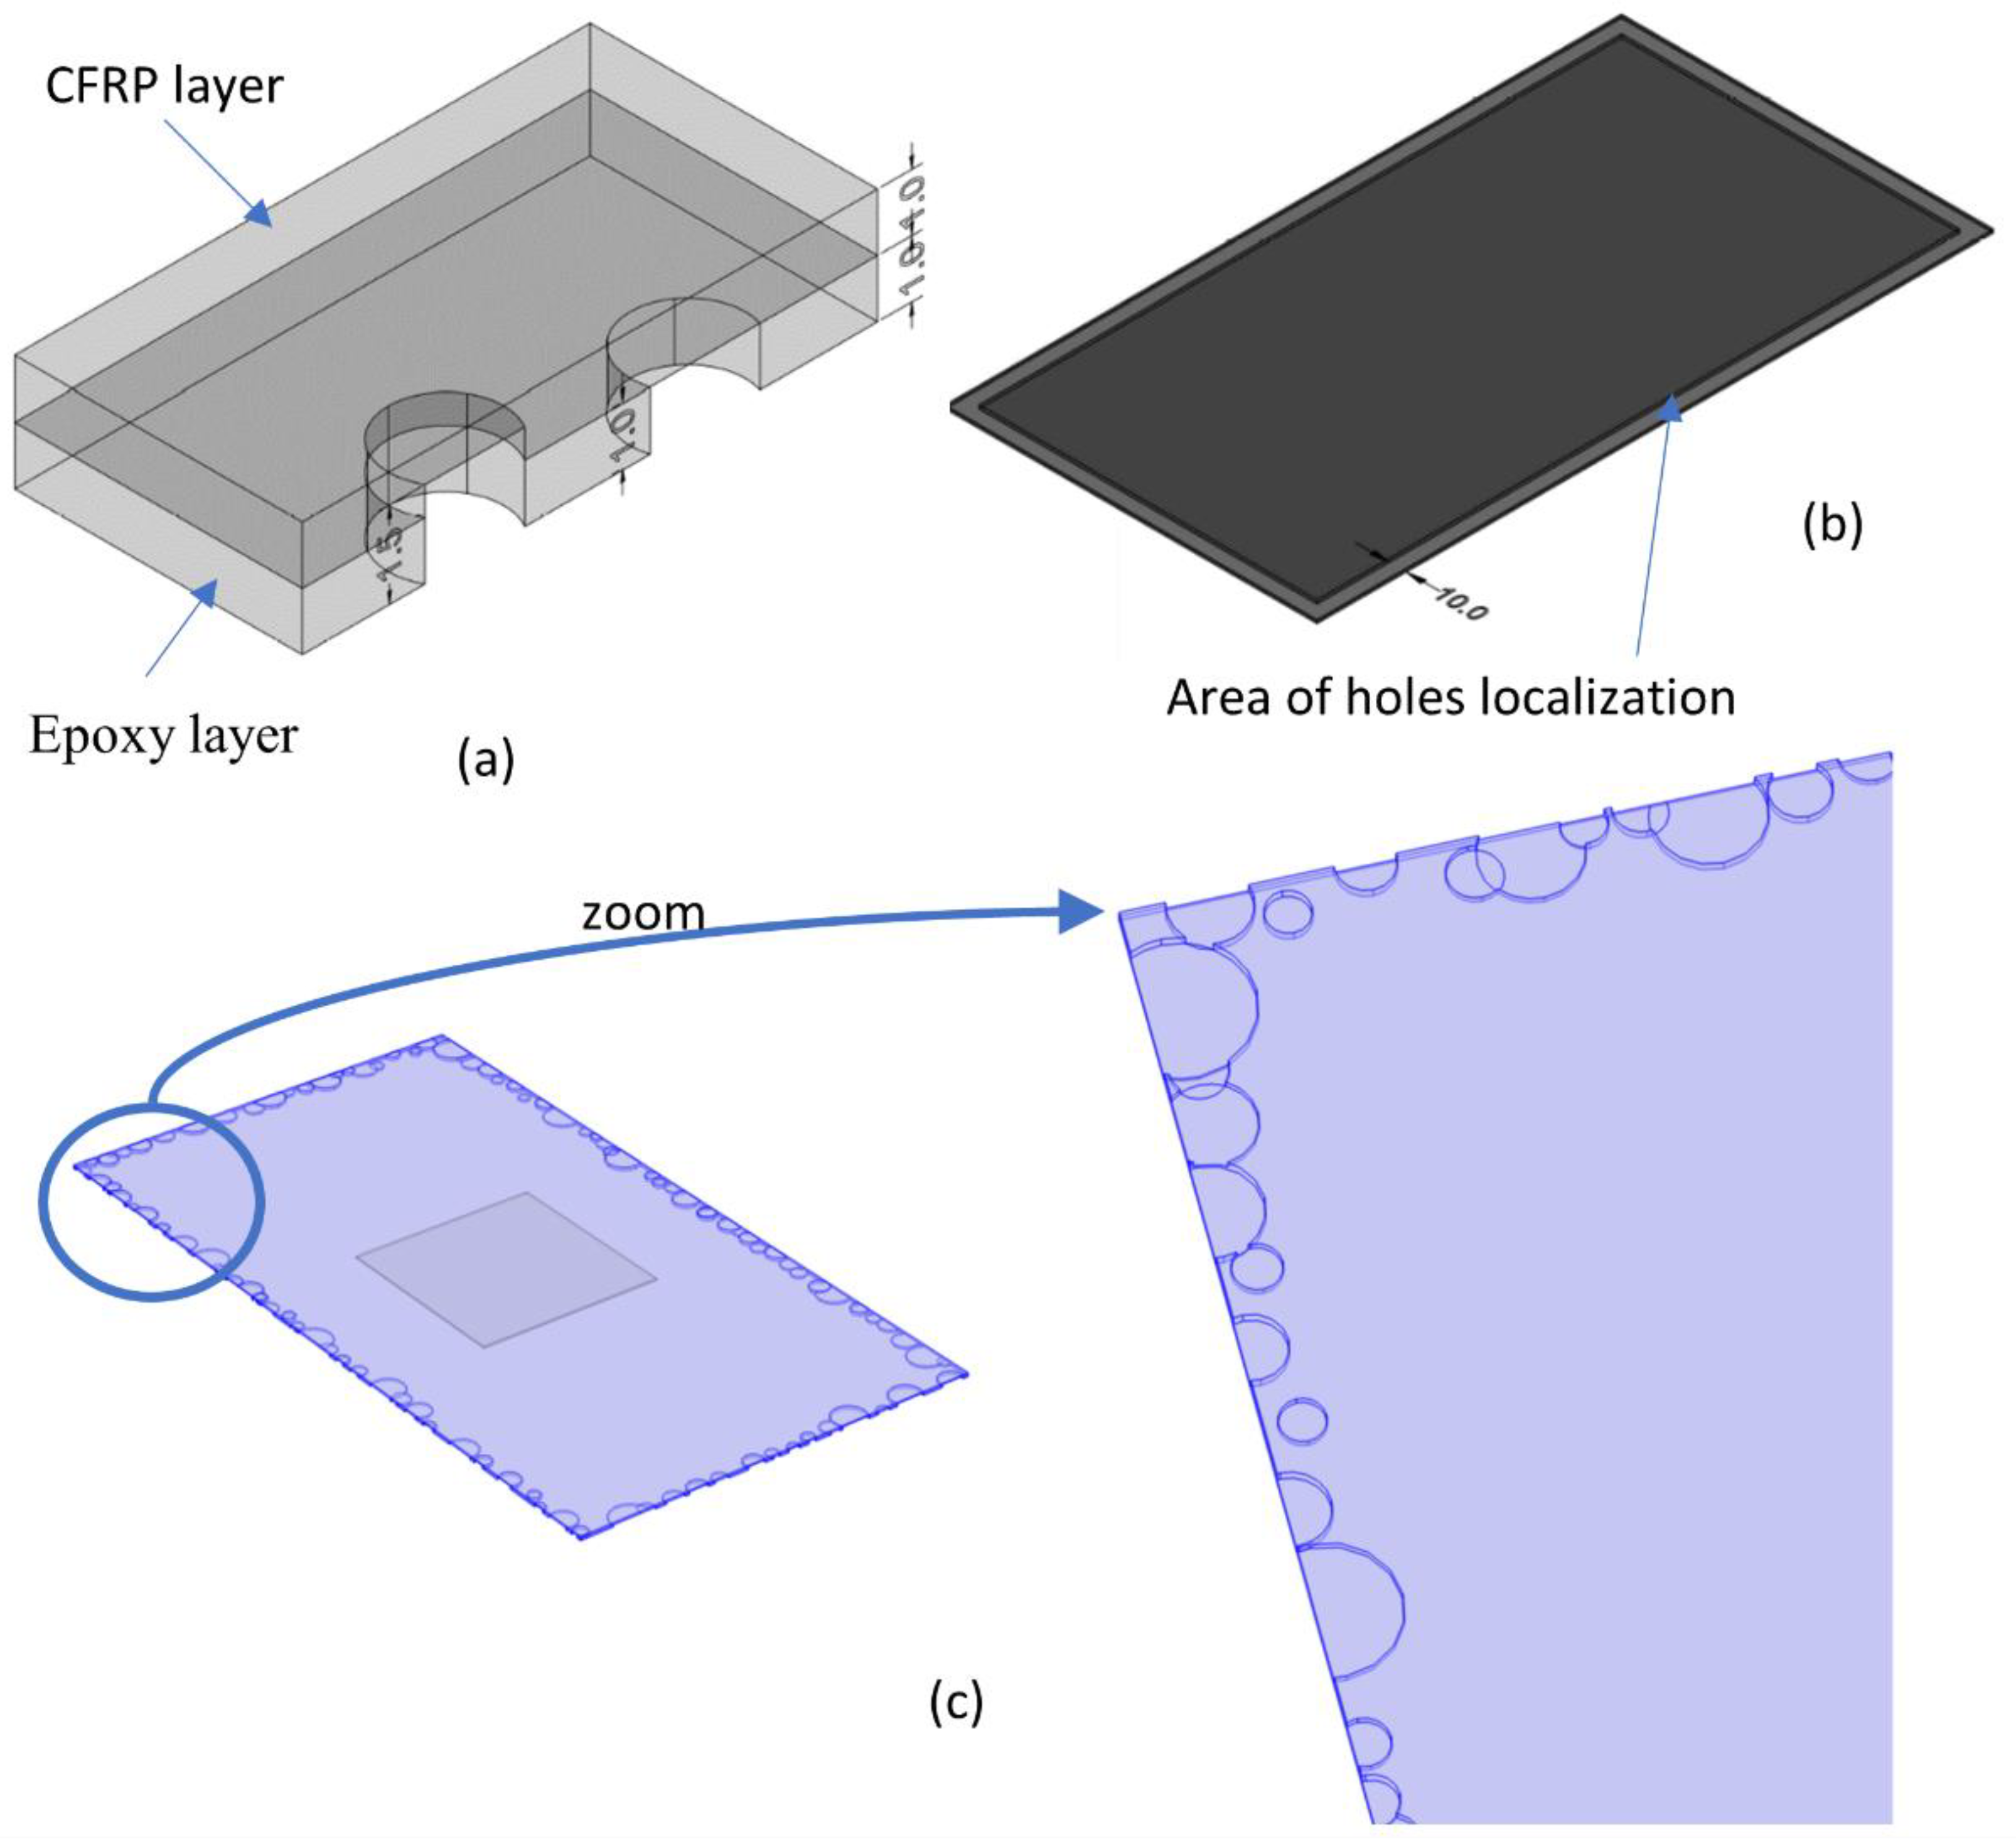
The main challenge in designing the numerical model was to model defects resulting from the aging of the composite material. Such defects first appear on the edges of the reinforcement layer and are caused by crumbling of the glue and fraying of the carbon fibers. A unique approach to the problem was suggested in order to replicate a similar result in a numerical model. The aging changes were represented by a stochastic structure consisting of many cylindrical air spaces that spanned both the epoxy adhesive layer and the adjacent carbon composite layer. This method replicates both the deterioration of the adhesive and the weakening of the carbon fibers at the same time. Building such a structure in the COMSOL environment is possible thanks to the automation of the geometry creation process in Application Builder. The random structure of defects (
Figure 3) was created with certain assumptions:
the radius of each defect varies randomly between 0.1 and 1 cm. The height of the defect is either 0.01 cm (for 30% of defects) or 0.015 cm (for the remaining 70% of defects). In the first case, the entire defect is within the adhesive layer, while in the latter, it partially extends into the composite layer (
Figure 3 (a));
the defects were located exclusively at the periphery of the composite reinforcement, with their centers randomly distributed along a 1 cm margin encompassing the entire composite (
Figure 3 (b));
the total count of cylindrical defects is 100;
overlapping defects are allowed, but their logical sum will be taken into account.
A whole structure is presented In
Figure 3 (c) with the magnification of the chosen region.
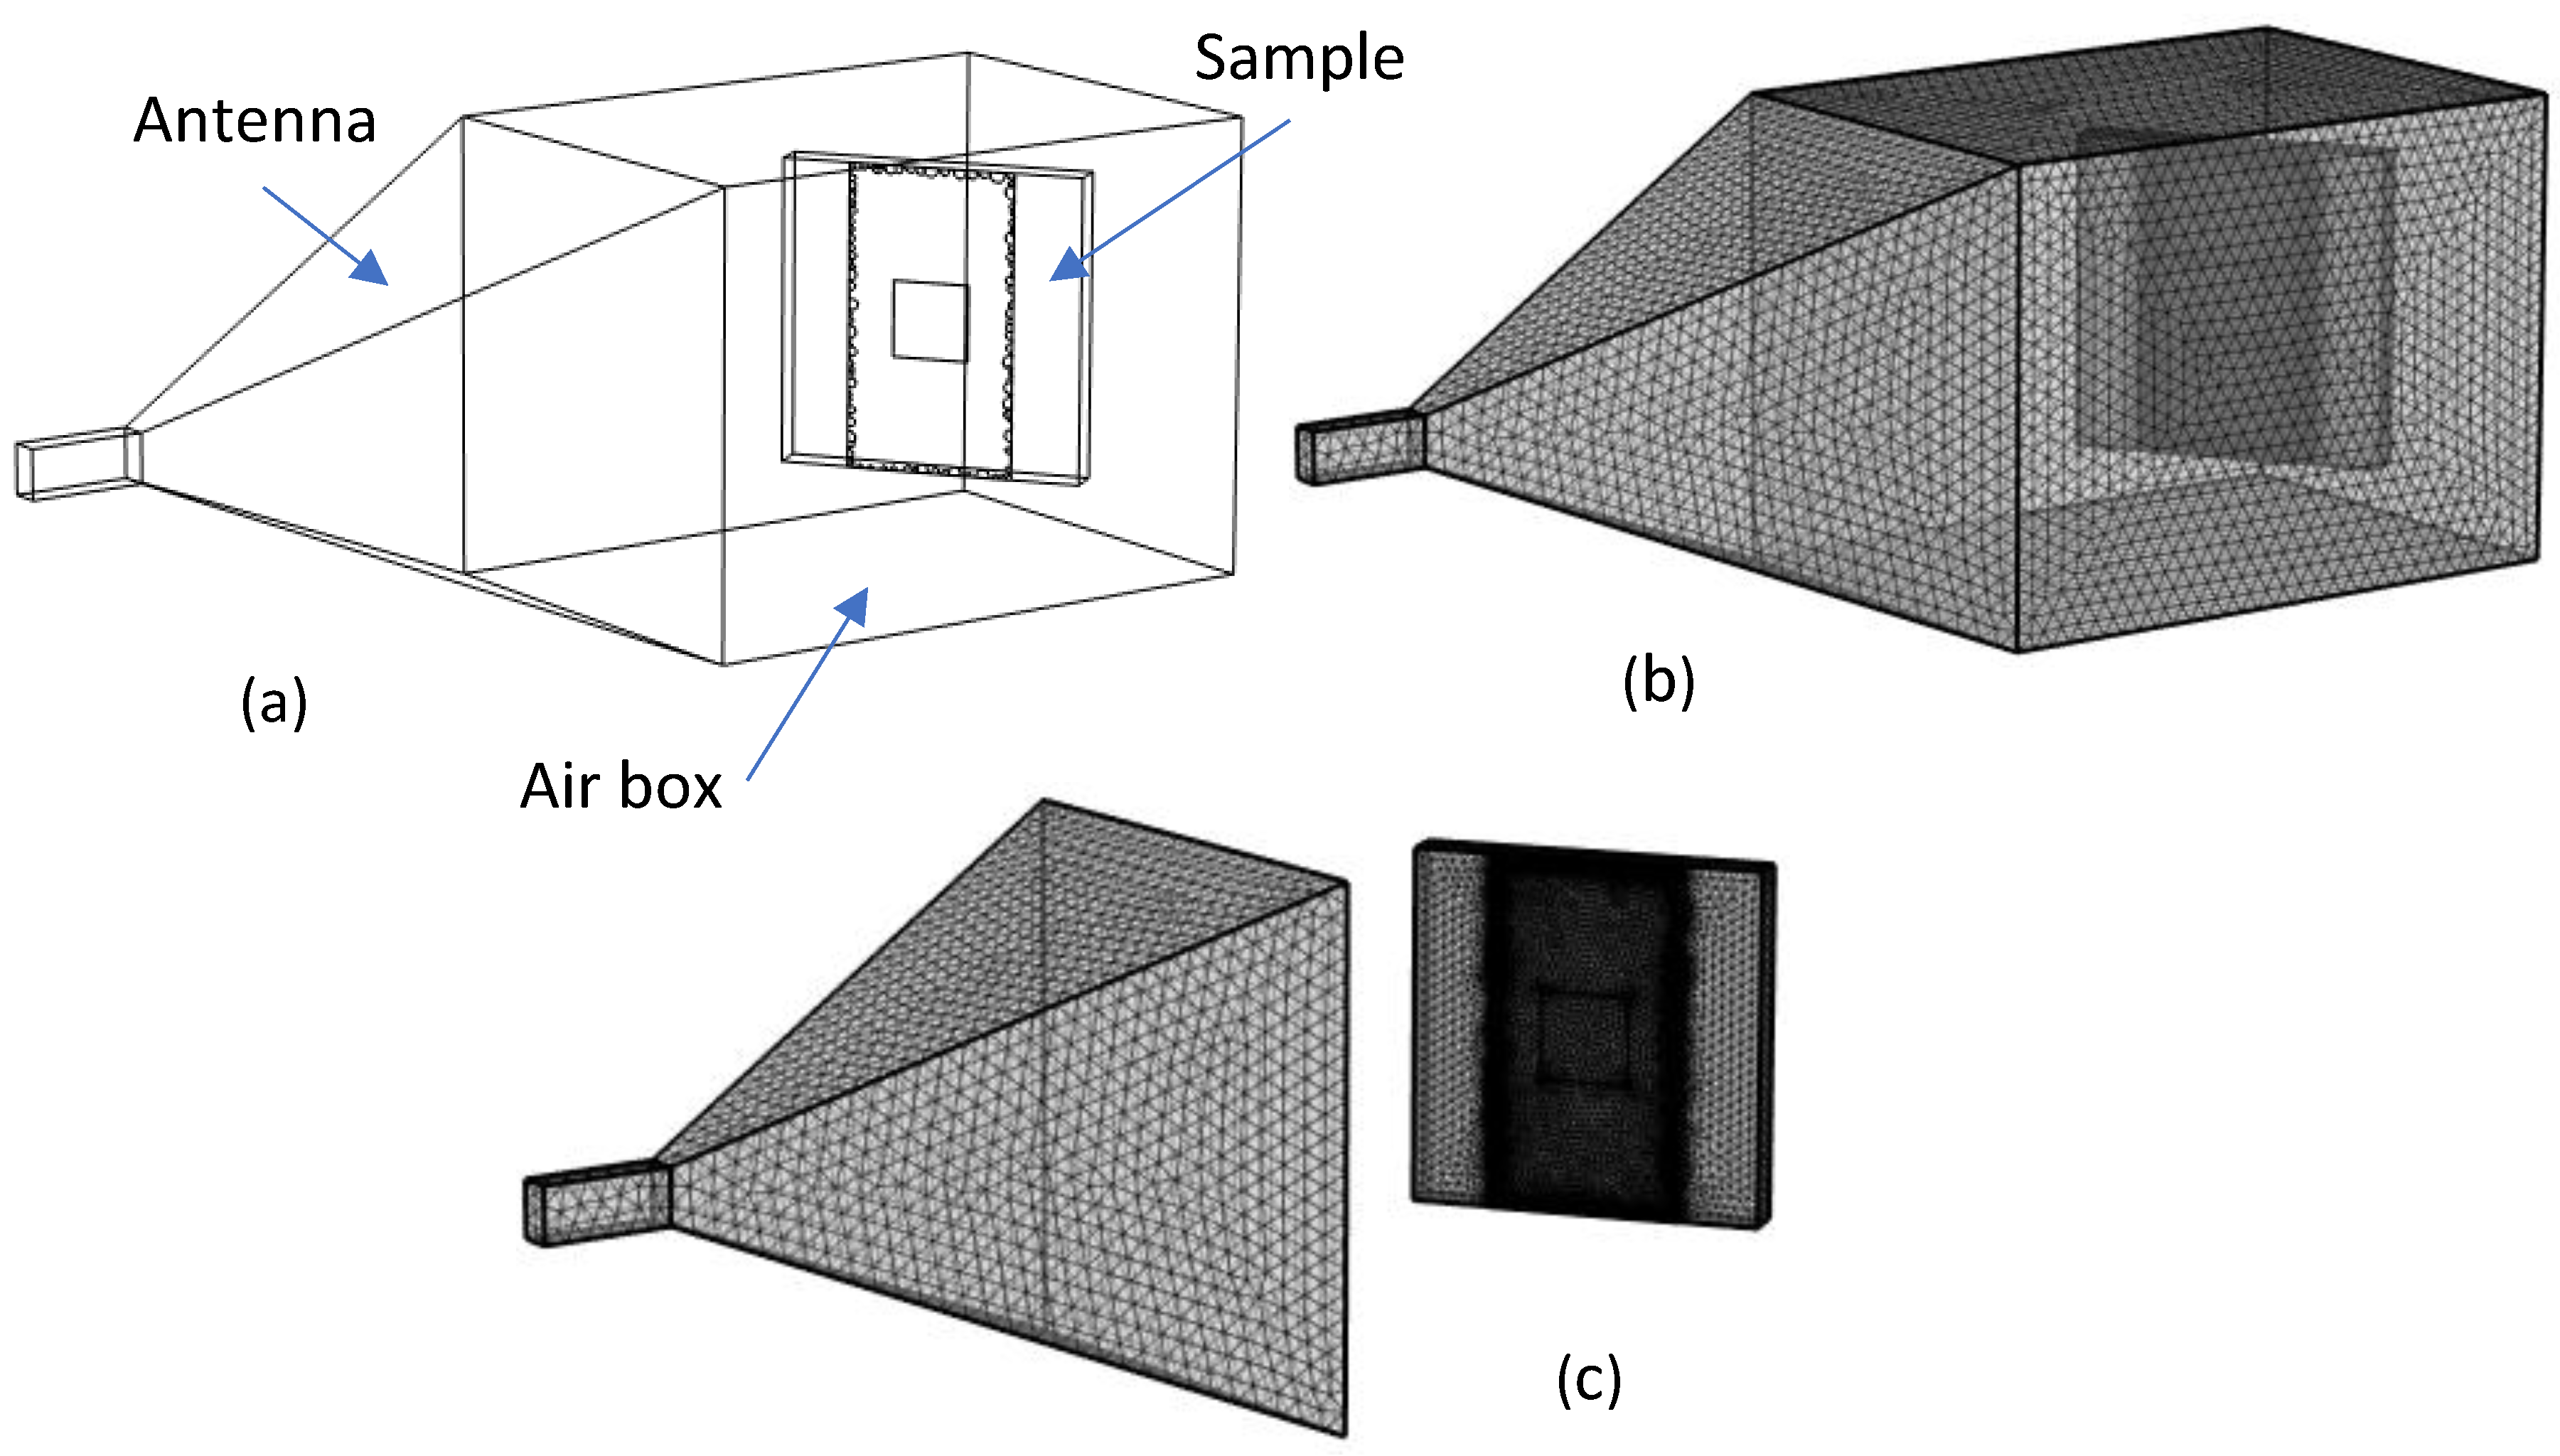
Figure 4 (a) presents the whole geometry designed for one of the scenarios, specifically a sample exhibiting a defect in the form of non-adherence, together with defects presented on the borders of the composite layer (CADS). The system accurately replicates the physical laboratory setup, considering the precise location of the sample in relation to the antenna. An adequate angle was chosen to rotate the sample in relation to the antenna, allowing for the surface to be observed using a thermal imaging camera. The angular placement of the sample in relation to the antenna significantly impacts the final result of microwave heating. In our particular situation, the choice of this angle was arbitrarily, but it is worth investigating the selection of an angle that allows for both the viewing of the sample while it is being heated and the establishment of a potentially even temperature distribution throughout its surface. The accuracy of the solution in the finite element method is significantly affected by the quality of the mesh. The Figure (b) presents the mesh configuration of the system under analysis. The Figure (b) illustrates an instance where the total number of finite tetrahedral elements was 776 410;. The meshing process was carried out in a customized manner, with the maximum size of each element set to 1/10 of the wavelength. This criterion was applied to the regions encompassing the antenna and the surrounding sample, where the heat transfer problem was not handled. In the sample domain regions, where the heat transfer was resolved, especially in the thin layers of epoxy and carbon composite, as well as in the surrounding of the small aging defects, the elements number was noticeably increased, as depicted in the Figure (c).
2.2. Specimens and the Experimental Setups
An experimental campaign was carried out with a CFRP sample with defects, which corresponded to the case of the numerical simulation with both ageing and central defect (CADS). The central defect was represented by the absence of an epoxy adhesive layer with a thickness of 1 mm, over an area of 100 mm × 100 mm, as already used in the previous work [
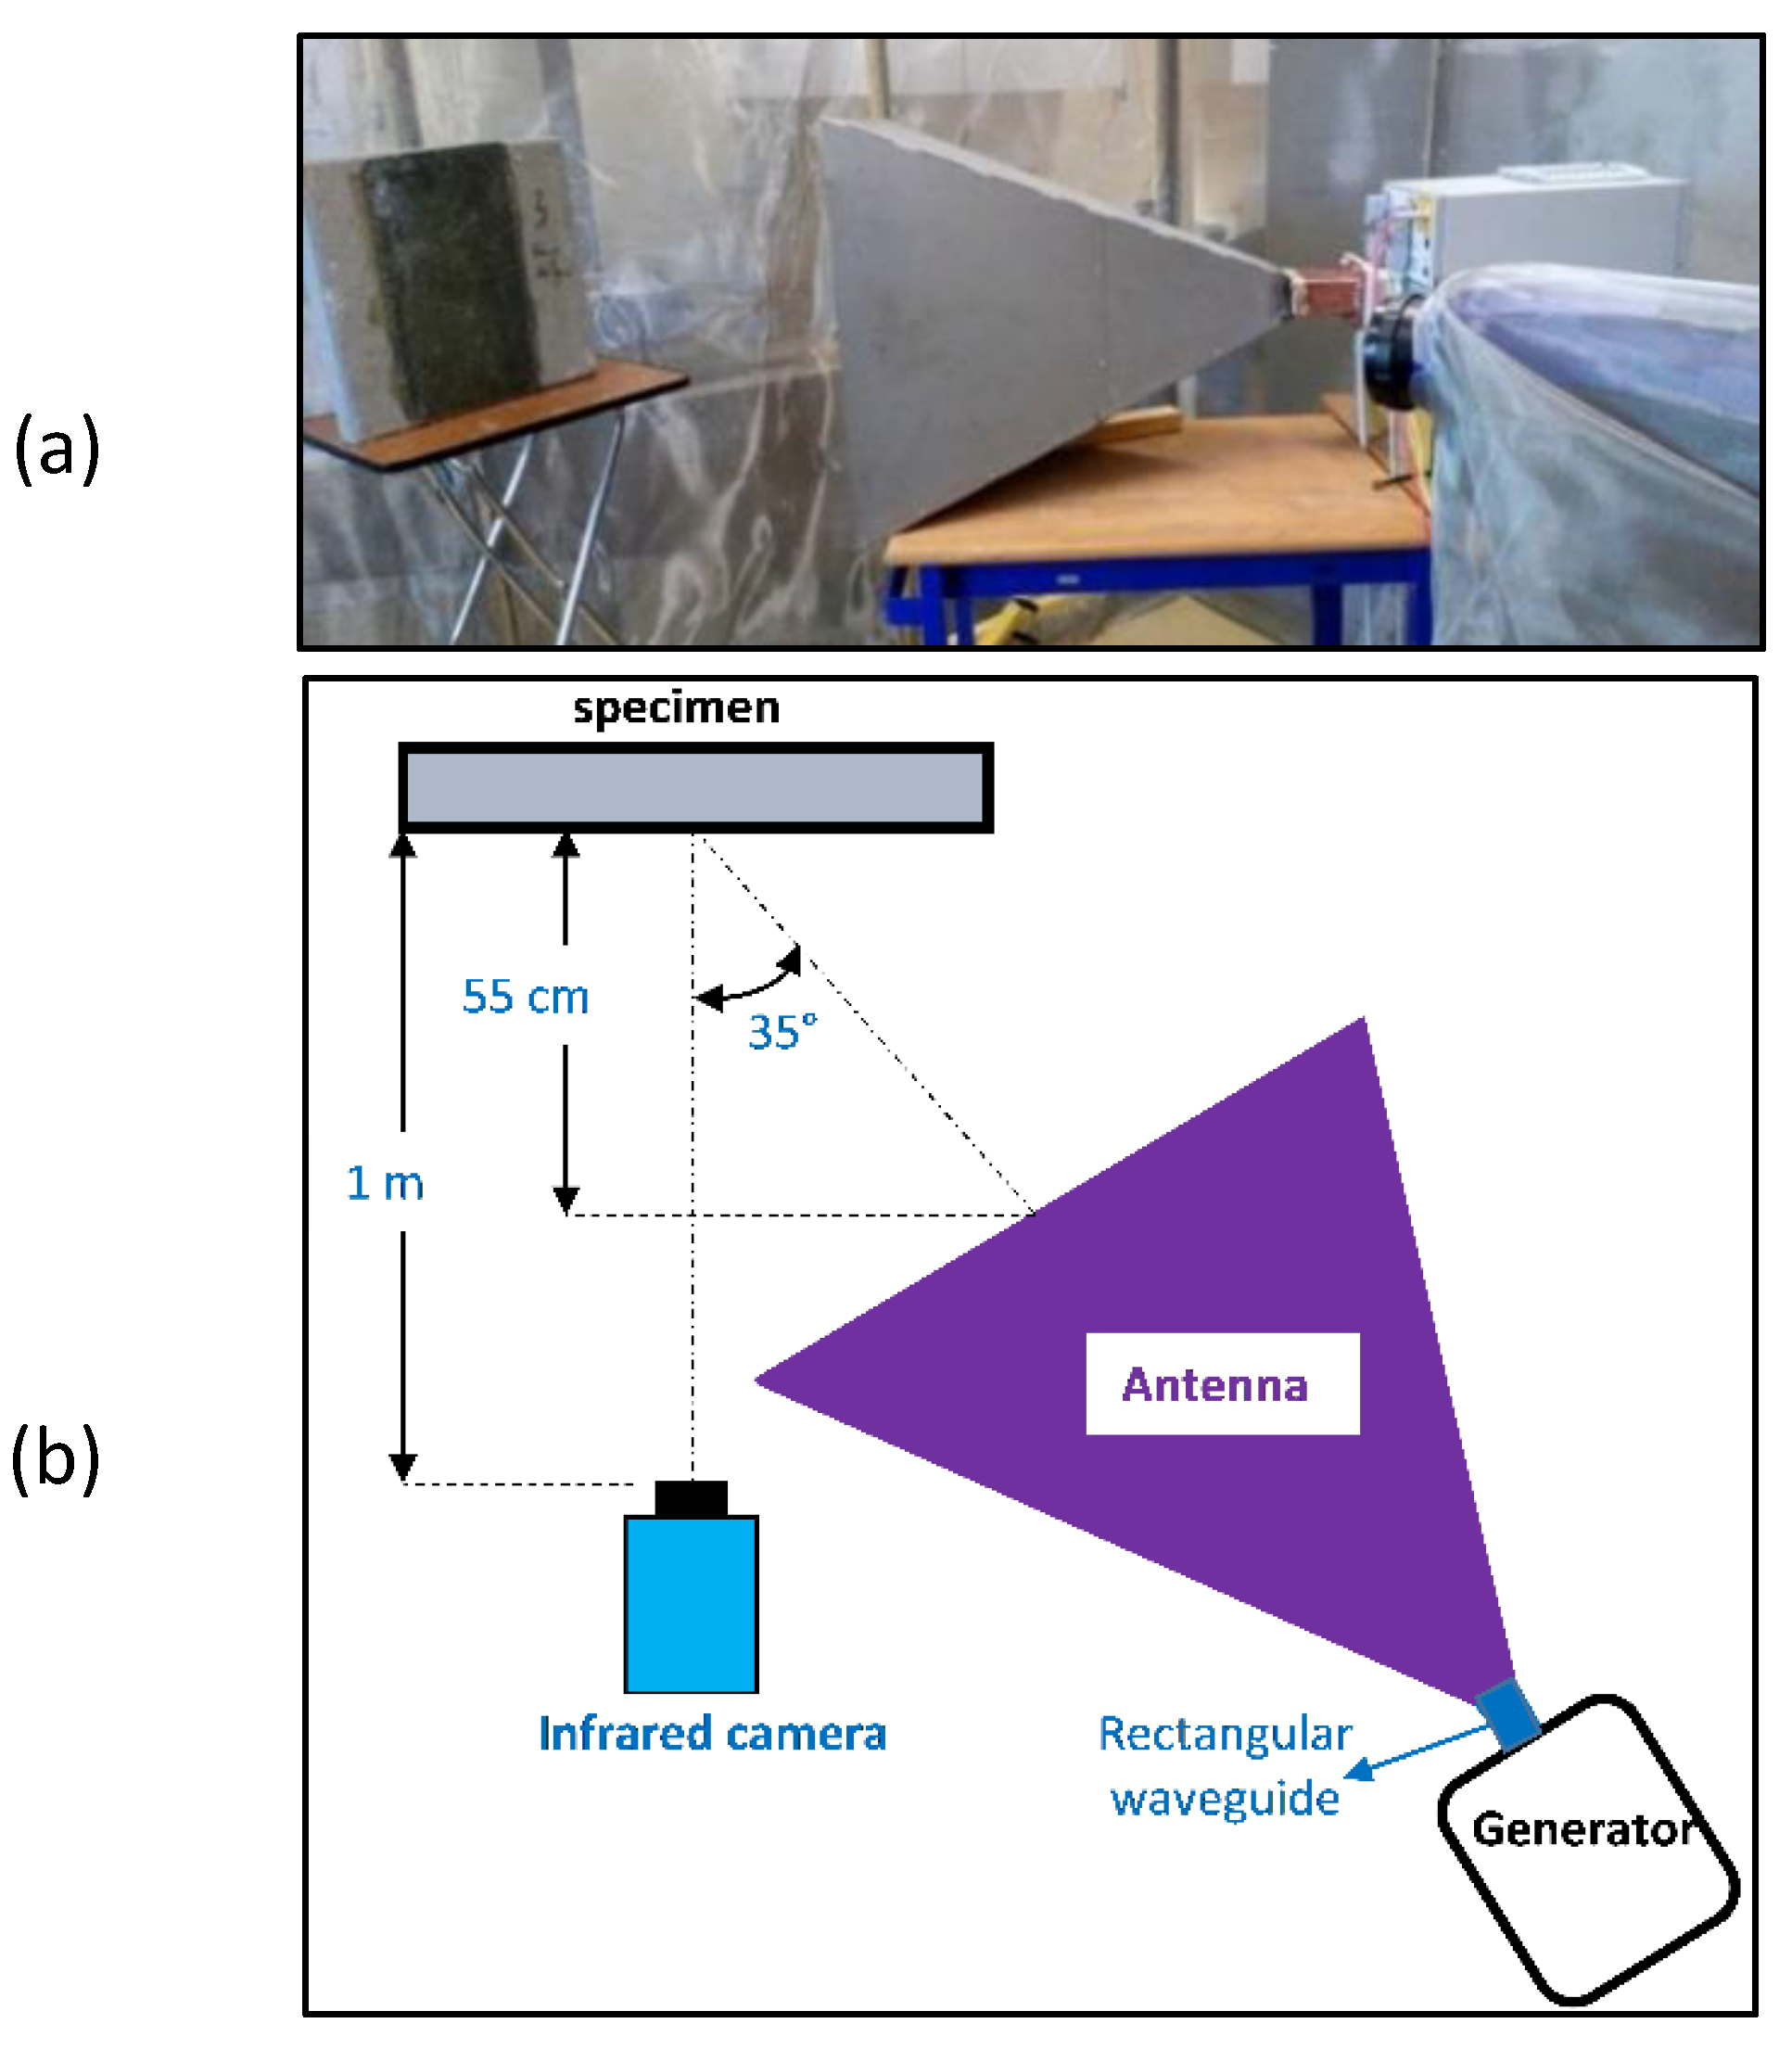
51]. The sample was exposed to laboratory ambiance conditions for 10 years. The experimental setup of the test is shown in
Figure 5.
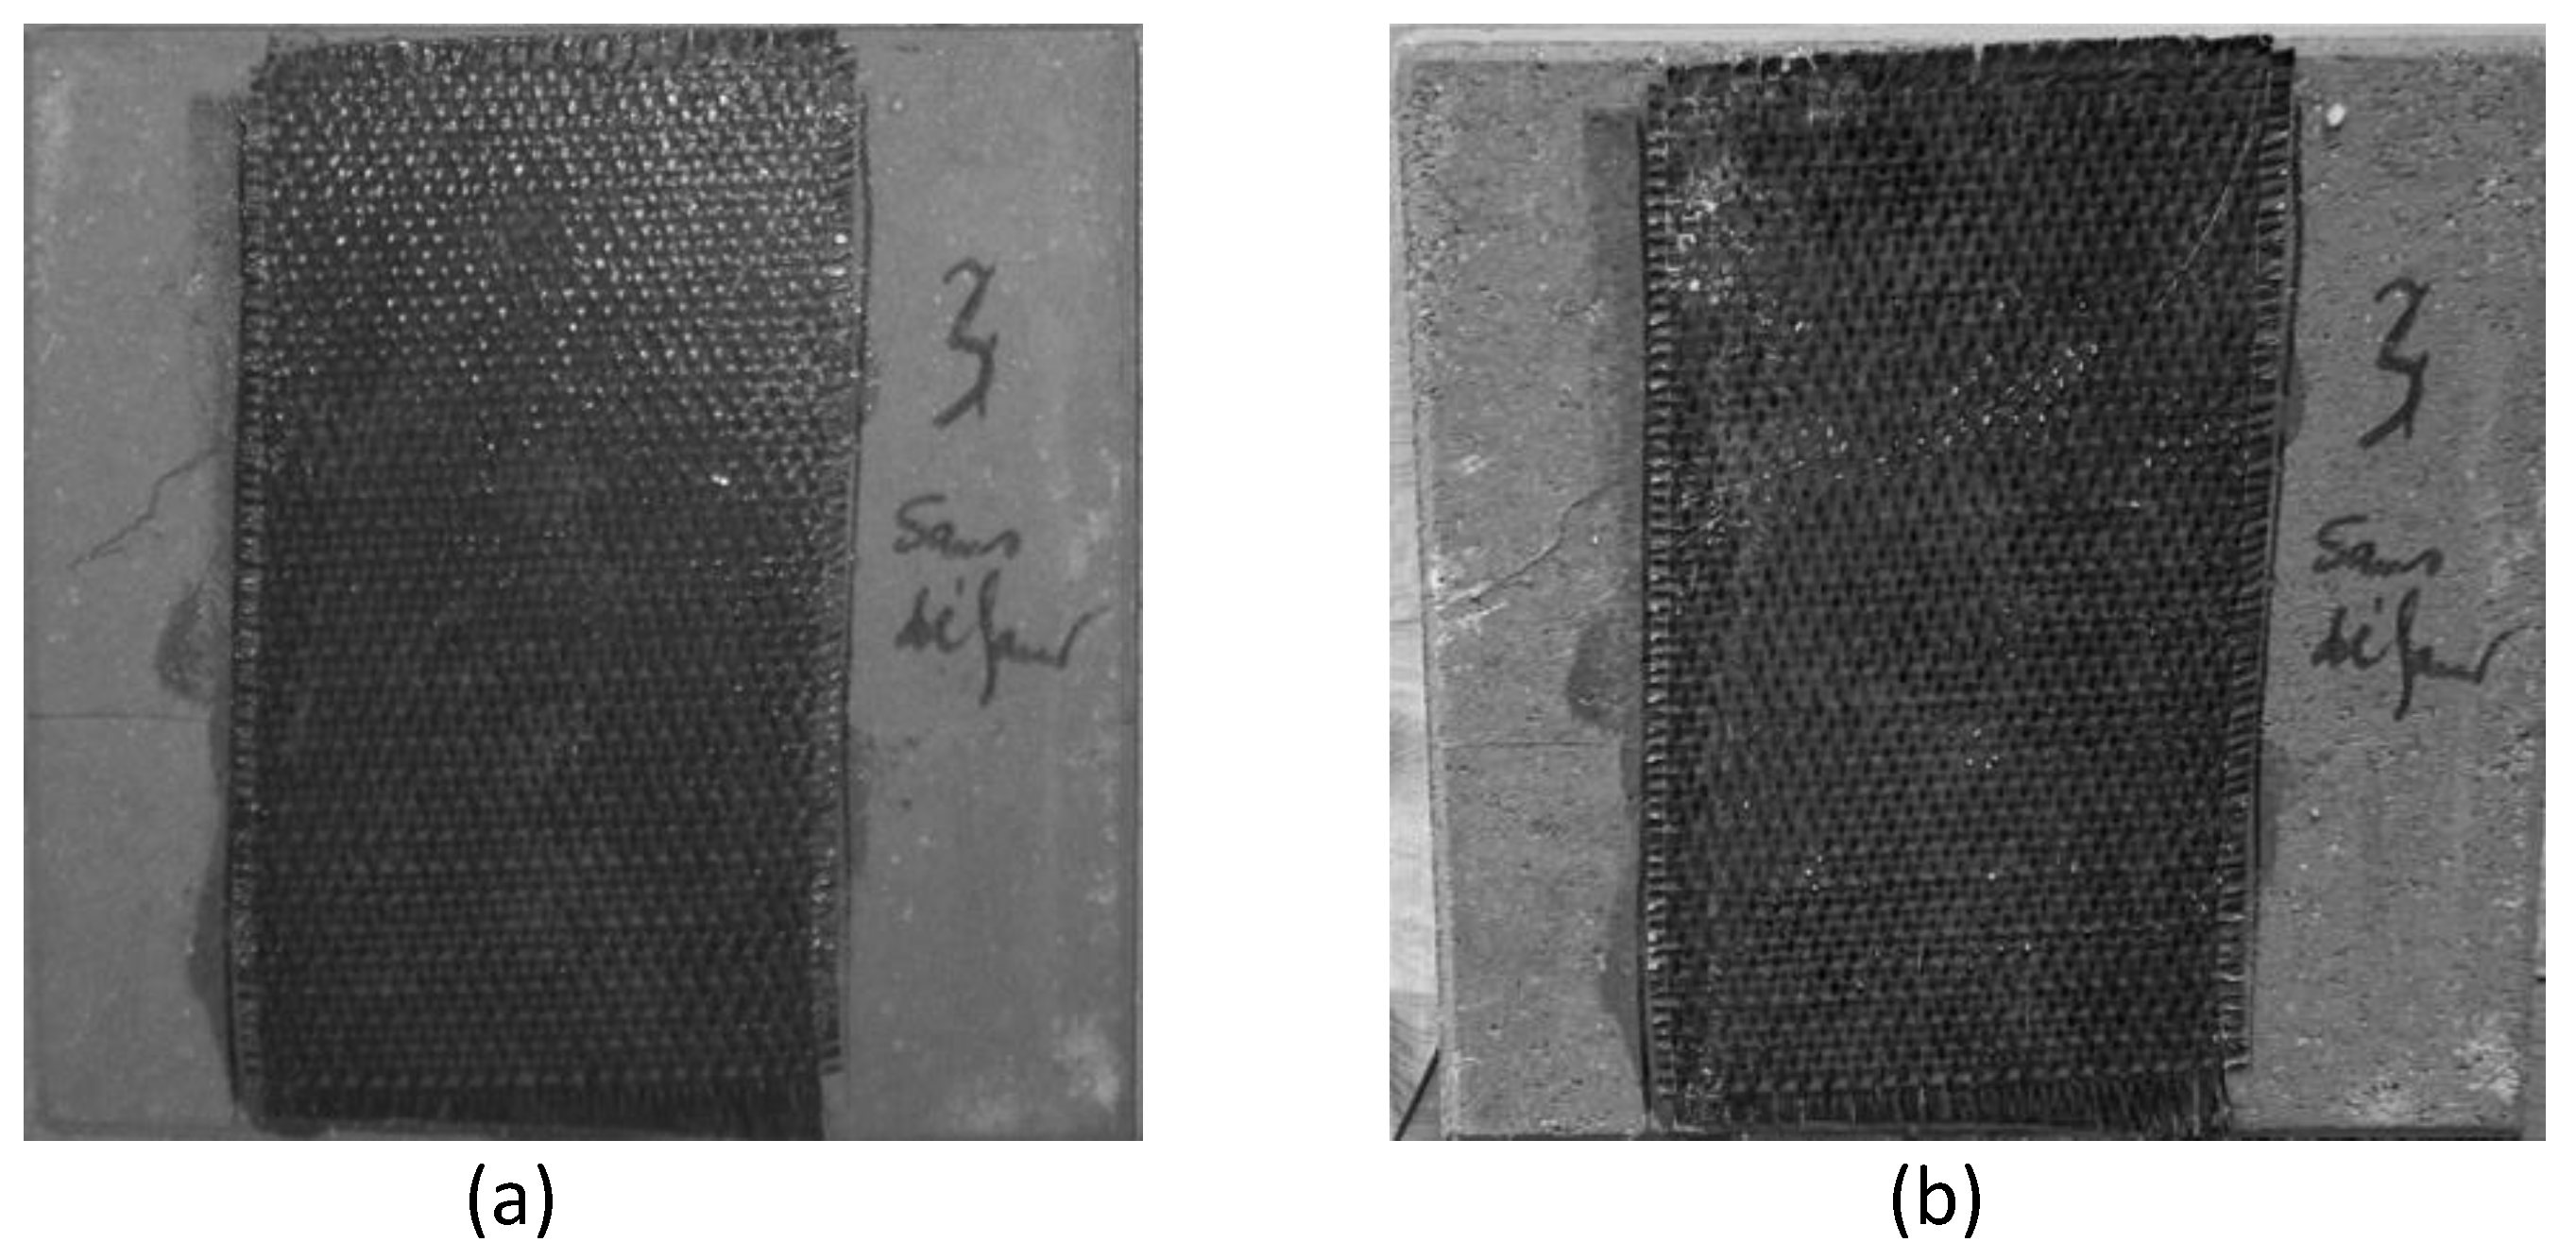
Figure 6 presents a comparison of the condition of the tested sample before the aging process with the condition of the same sample after 10 years of the natural ageing process. Some differences are noticeable, but the defects themselves are not visible.
The same microwave system 2.45 GHz as in the numerical model was used to heat the sample. The pyramidal horn antenna was placed at 550 mm from the sample, with a 35° direction. A heating power of 1000 W was used for heating (continuous heating mode) the sample for 2 minutes. An infrared camera was used to record thermograms with a frame rate of 1 image per second. In order to observe the whole surface of the specimen, the following position of the infrared camera was chosen for our experimental test: normal direction with a distance of 1 m from the sample. It is worthwhile to notice that the test was carried out inside a protection enclosure (as used in the previous works [
36,
38]). The operator must stay outside the enclosure during the test.
3. Numerical Modelling Results
In this section the results of numerical modeling for all the previously introduced scenarios will be presented. First, we will present the raw numerical results to assess their quality, and subsequently compare them with the data from the experiments.
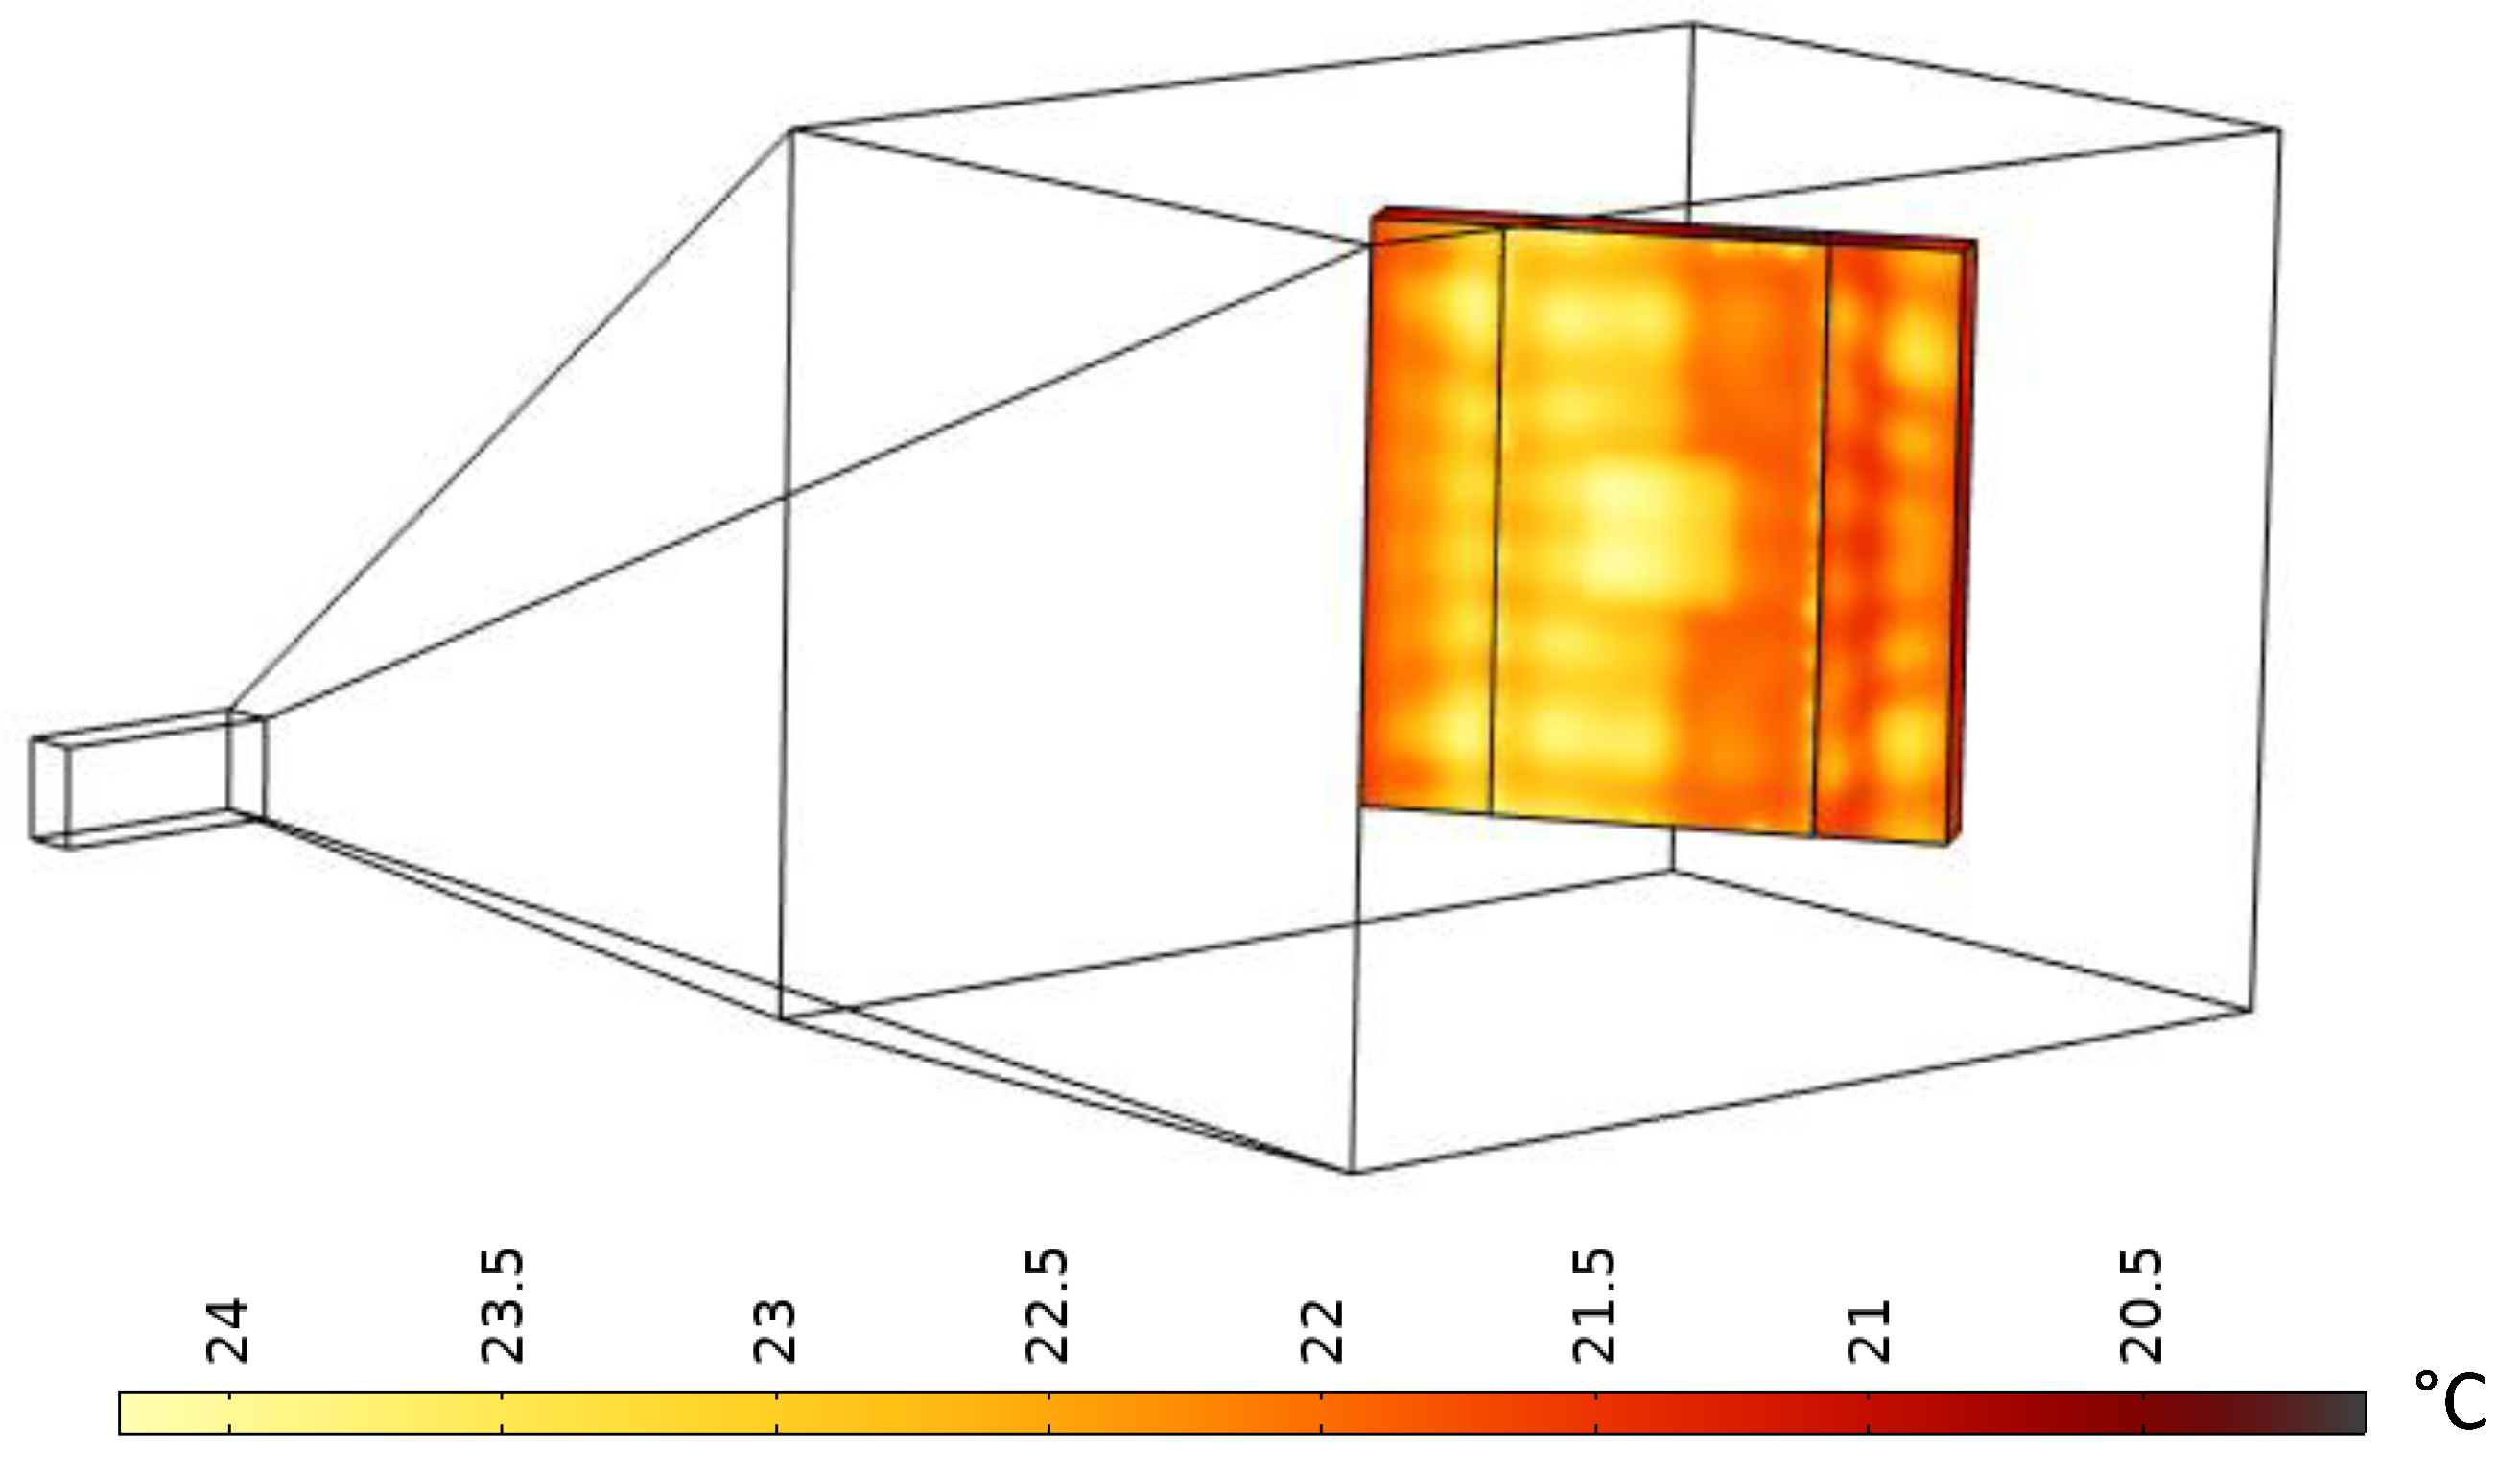
Figure 7 illustrates the numerical result of subjecting the sample to microwave heating, specifically focusing on the case with a central defect and defects that imitate the effects of ageing (CADS). The presented thermogram was acquired after a simulation period of 100 seconds, which is equal to the heating period used in the experiments as well. It is evident that when the sample is positioned at a certain angle to the antenna, a higher temperature is observed at the surface closer to the antenna. The overall temperature rise equals to around 4 °C, which enables the initial identification of all the defects.
Further results depicted in the
Figure 8 and
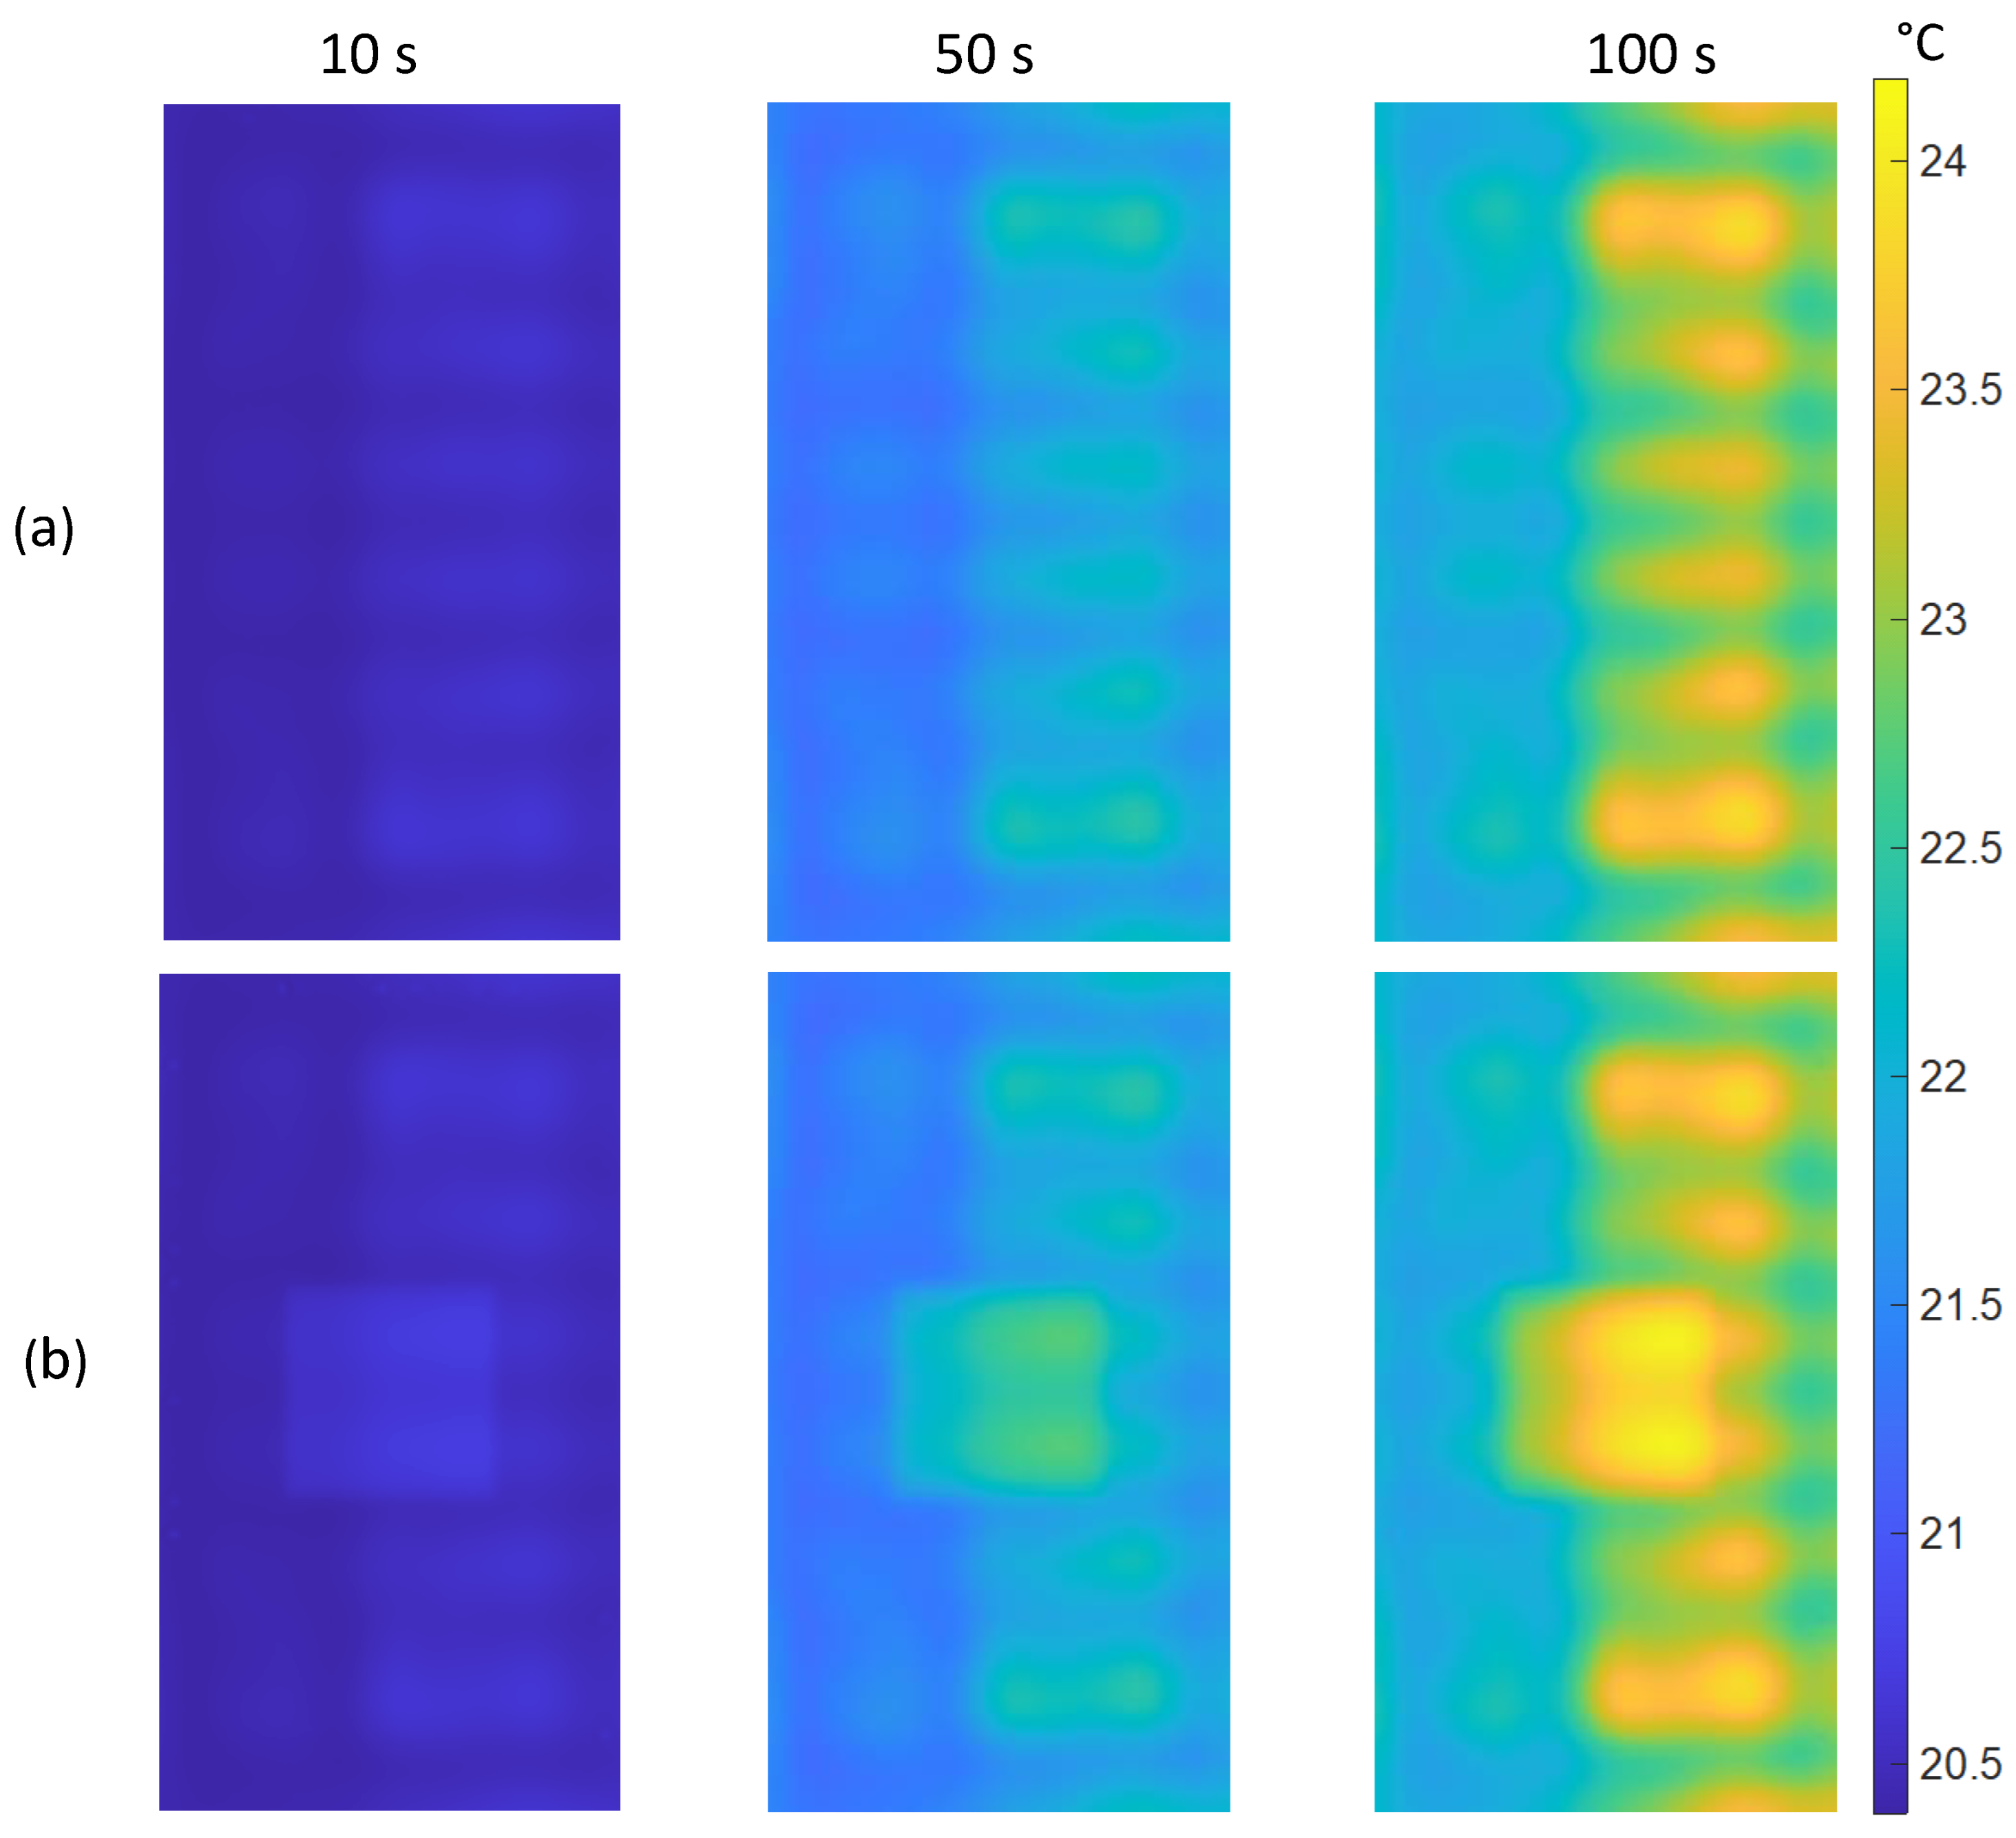
Figure 9 provide a more comprehensive examination of the numerical modeling outcomes. To enhance the presentation of the data, it was determined that only a part of the sample, specifically the composite reinforcement, would be displayed. First,
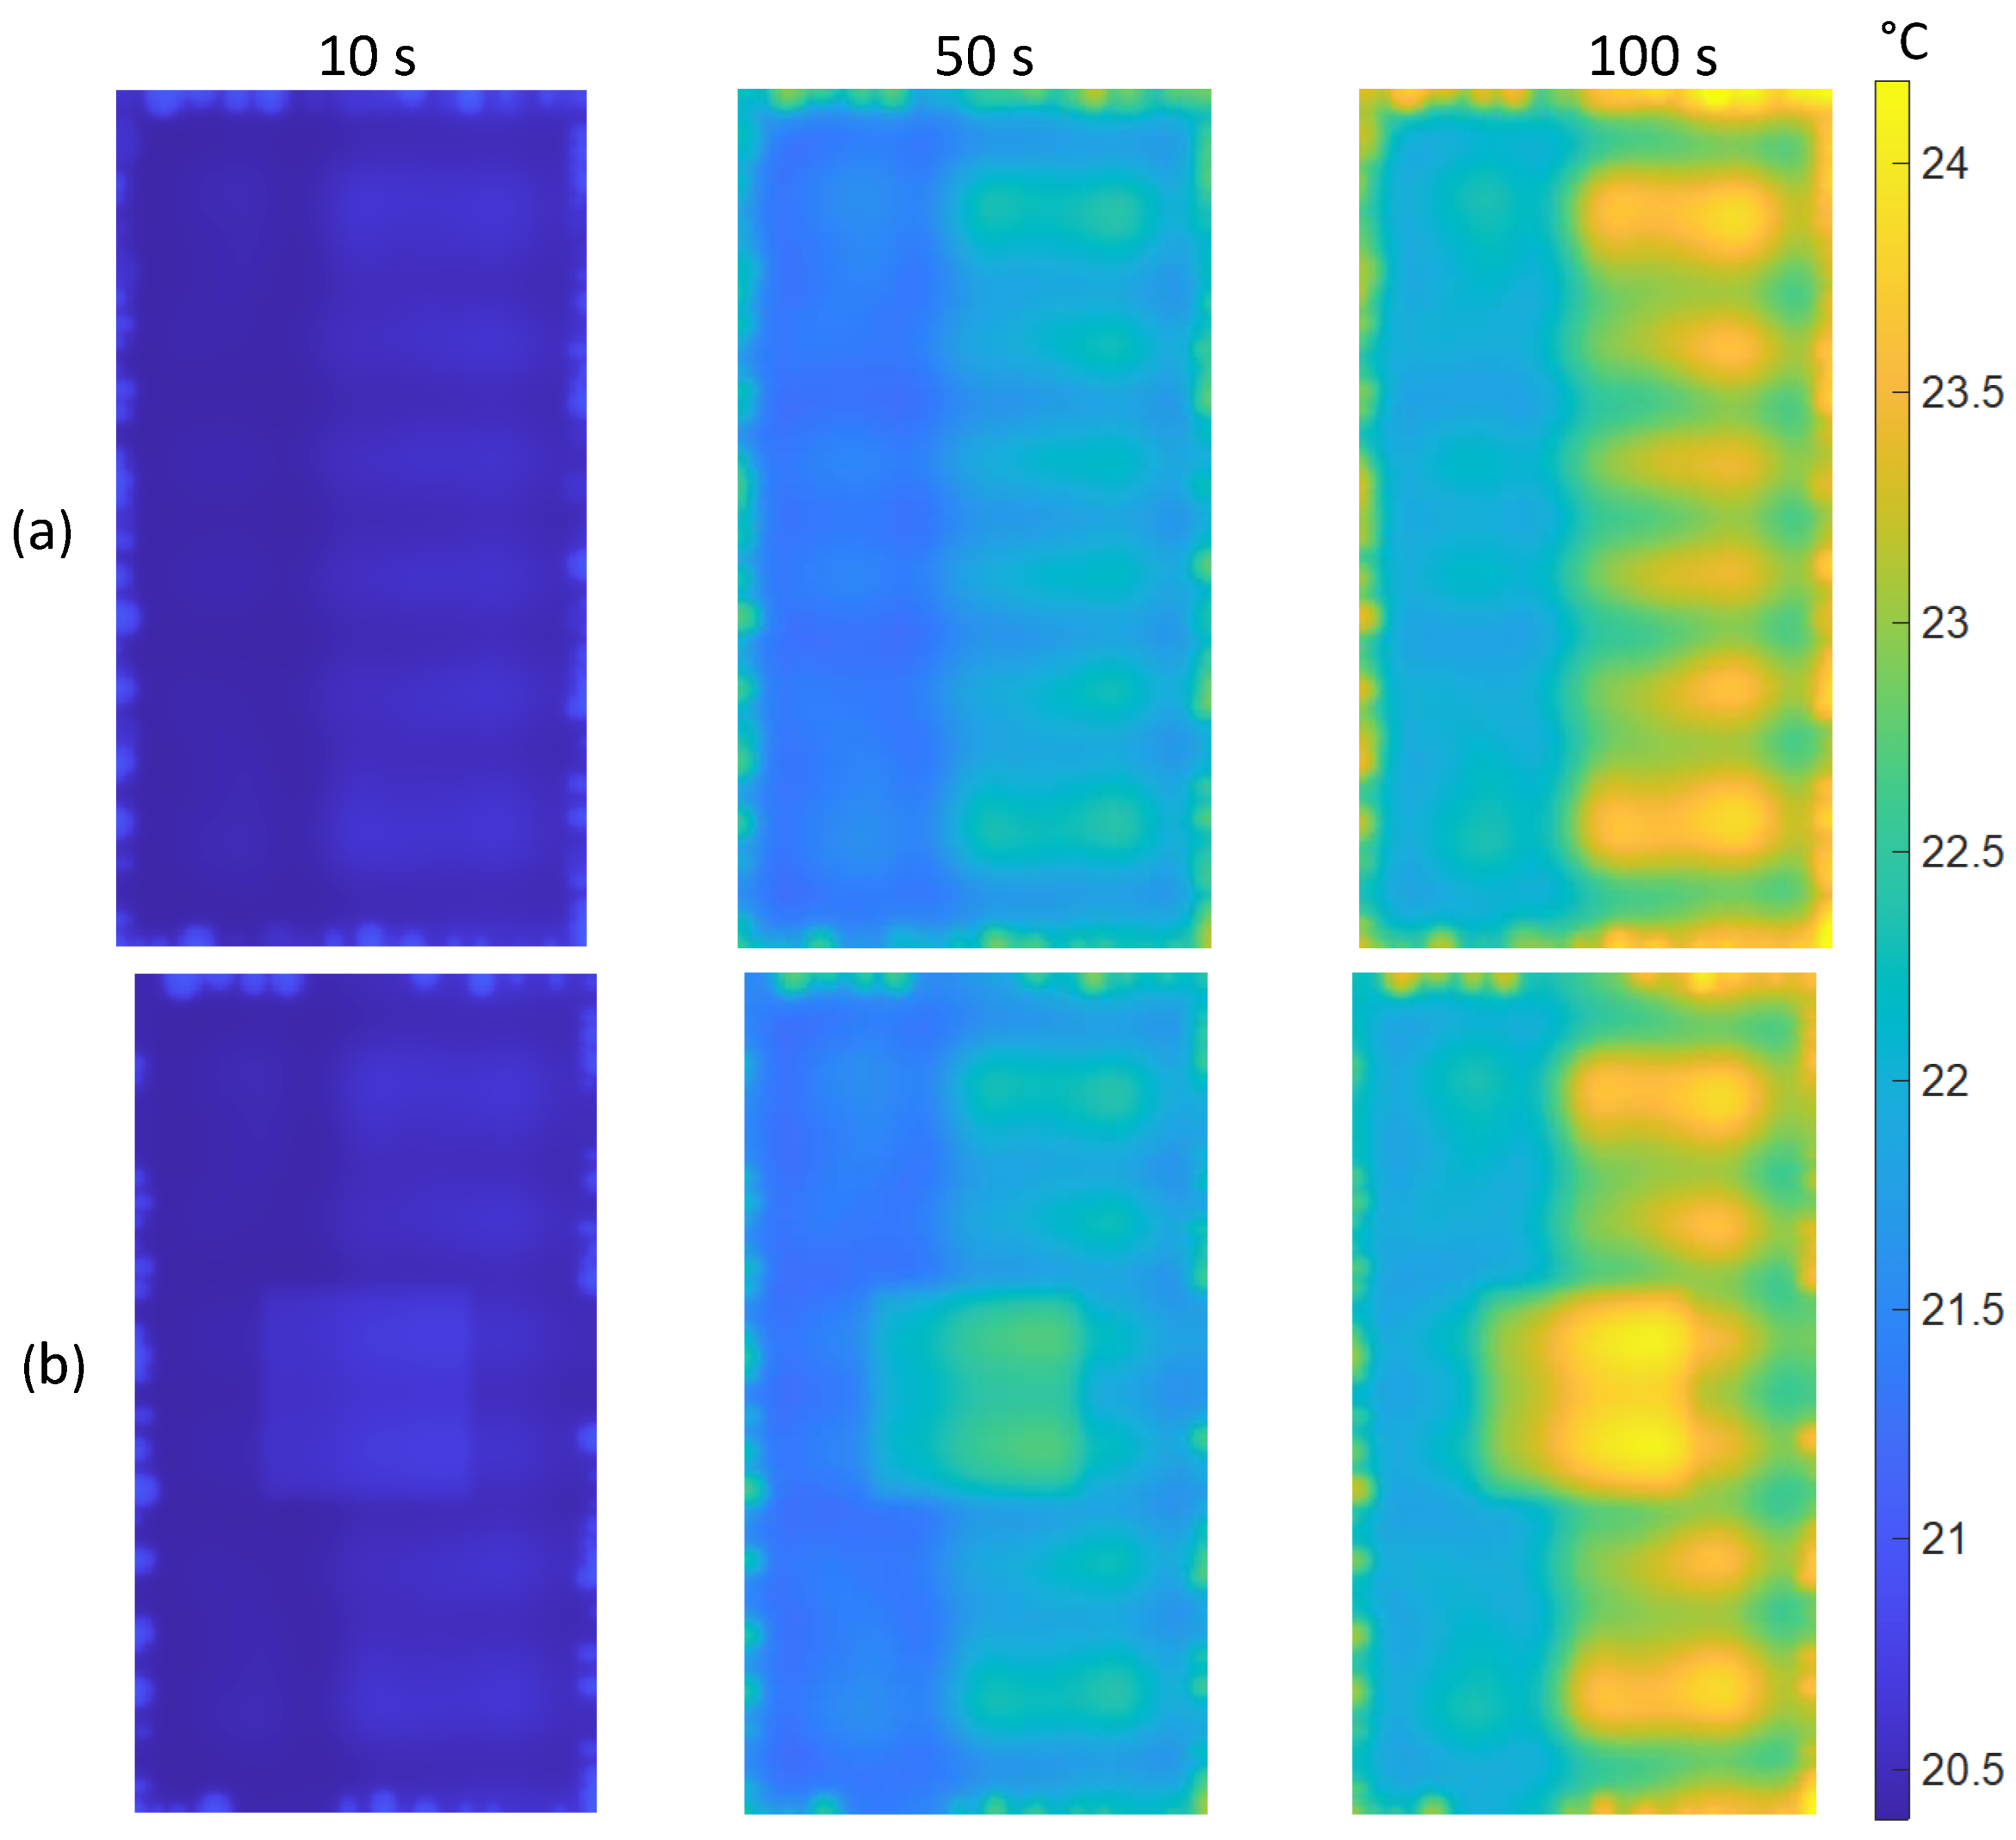
Figure 8 illustrates a comparison of the results obtained for two samples without the defects simulating ageing process – (NDS) and (CDS). As it can be noticed, in this case the proposed method has a high efficacy as the location of the defect may be identified even after 10 seconds of heating – nevertheless, it is important to acknowledge that during short heating, the difference in temperature between the background and the defects is small (approximately 0.3 °C for the given 10-second heating duration). While it is theoretically feasible to detect this with a highly sensitive thermal imaging camera, it could be exceedingly challenging to identify the defect under real measurement conditions. As the duration of heating increases, the difference between the background and the defect obviously grows. After 50 seconds, it reaches roughly 1.5 °C, and after 100 seconds, increases to around 2.1 °C. Figures 8(a) clearly demonstrate the significant imbalance in sample heating that is associated with the aforementioned angle at which the sample is positioned relative to the antenna. Furthermore, a distinct symmetrical temperature pattern can be observed on the surface being tested, which corresponds directly to the radiating characteristics of the antenna. Nevertheless, it is evident that these aspects do not completely eliminate the defect visibilty. Nevertheless, they have an impact on the overall image and can potentially hinder the identification of a flaw.
The most interesting feature of this research is the analysis of several elements related to the occurrence of flaws in the sample associated with the process of aging. Our objective was to determine the degree to which the method of the active microwave thermography can be used to identify these flaws, as well as the assessment of the influence these flaws have on the ability to detect other defects in the sample.
The most interesting feature of this research is the analysis of several elements related to the occurrence of flaws in the sample associated with the process of aging. Our objective was to determine the degree to which the method of the active microwave thermography can be used to identify these flaws, as well as the assessment of the influence these flaws have on the ability to detect other defects in the sample.
Figure 9 presents a comparison of temperature distributions for ADS and CADS samples. Evidently, defects associated with the aging process are observable in the periphery of the composite layer. Defects that encompass both the epoxy layer and a portion of the composite layer heat up more compared to defects solely present in the epoxy layer. The provided information indicates that the proposed method enables the detection and quantification of the extent of aging changes. It is evident that the presence of aging changes does not significantly affect the detection of a defect located in the center. The defect remains clearly visible just like in the previous case shown in the Figure. The temperature differences between the background and the defect are approximately the same for subsequent time steps in both cases. It is important to mention that the temperature of aging flaws' thermal signatures is similar to the temperature of a centrally positioned defect's thermal signature (maximum 24.1 °C). If the sample is significantly damaged, it can pose challenges in identifying additional defects.
4. Experimental Results
In this section a selected set of experimental results will be presented. As it was shown before, the experiment consisted of heating a concrete sample that was reinforced with a carbon composite. The reinforcement had an artificially produced defect in its center, in the form of lack of adhesive. Furthermore, the sample underwent an aging process for a duration of 10 years, leading to the emergence of a number of defects along the edges of the composite layer. The
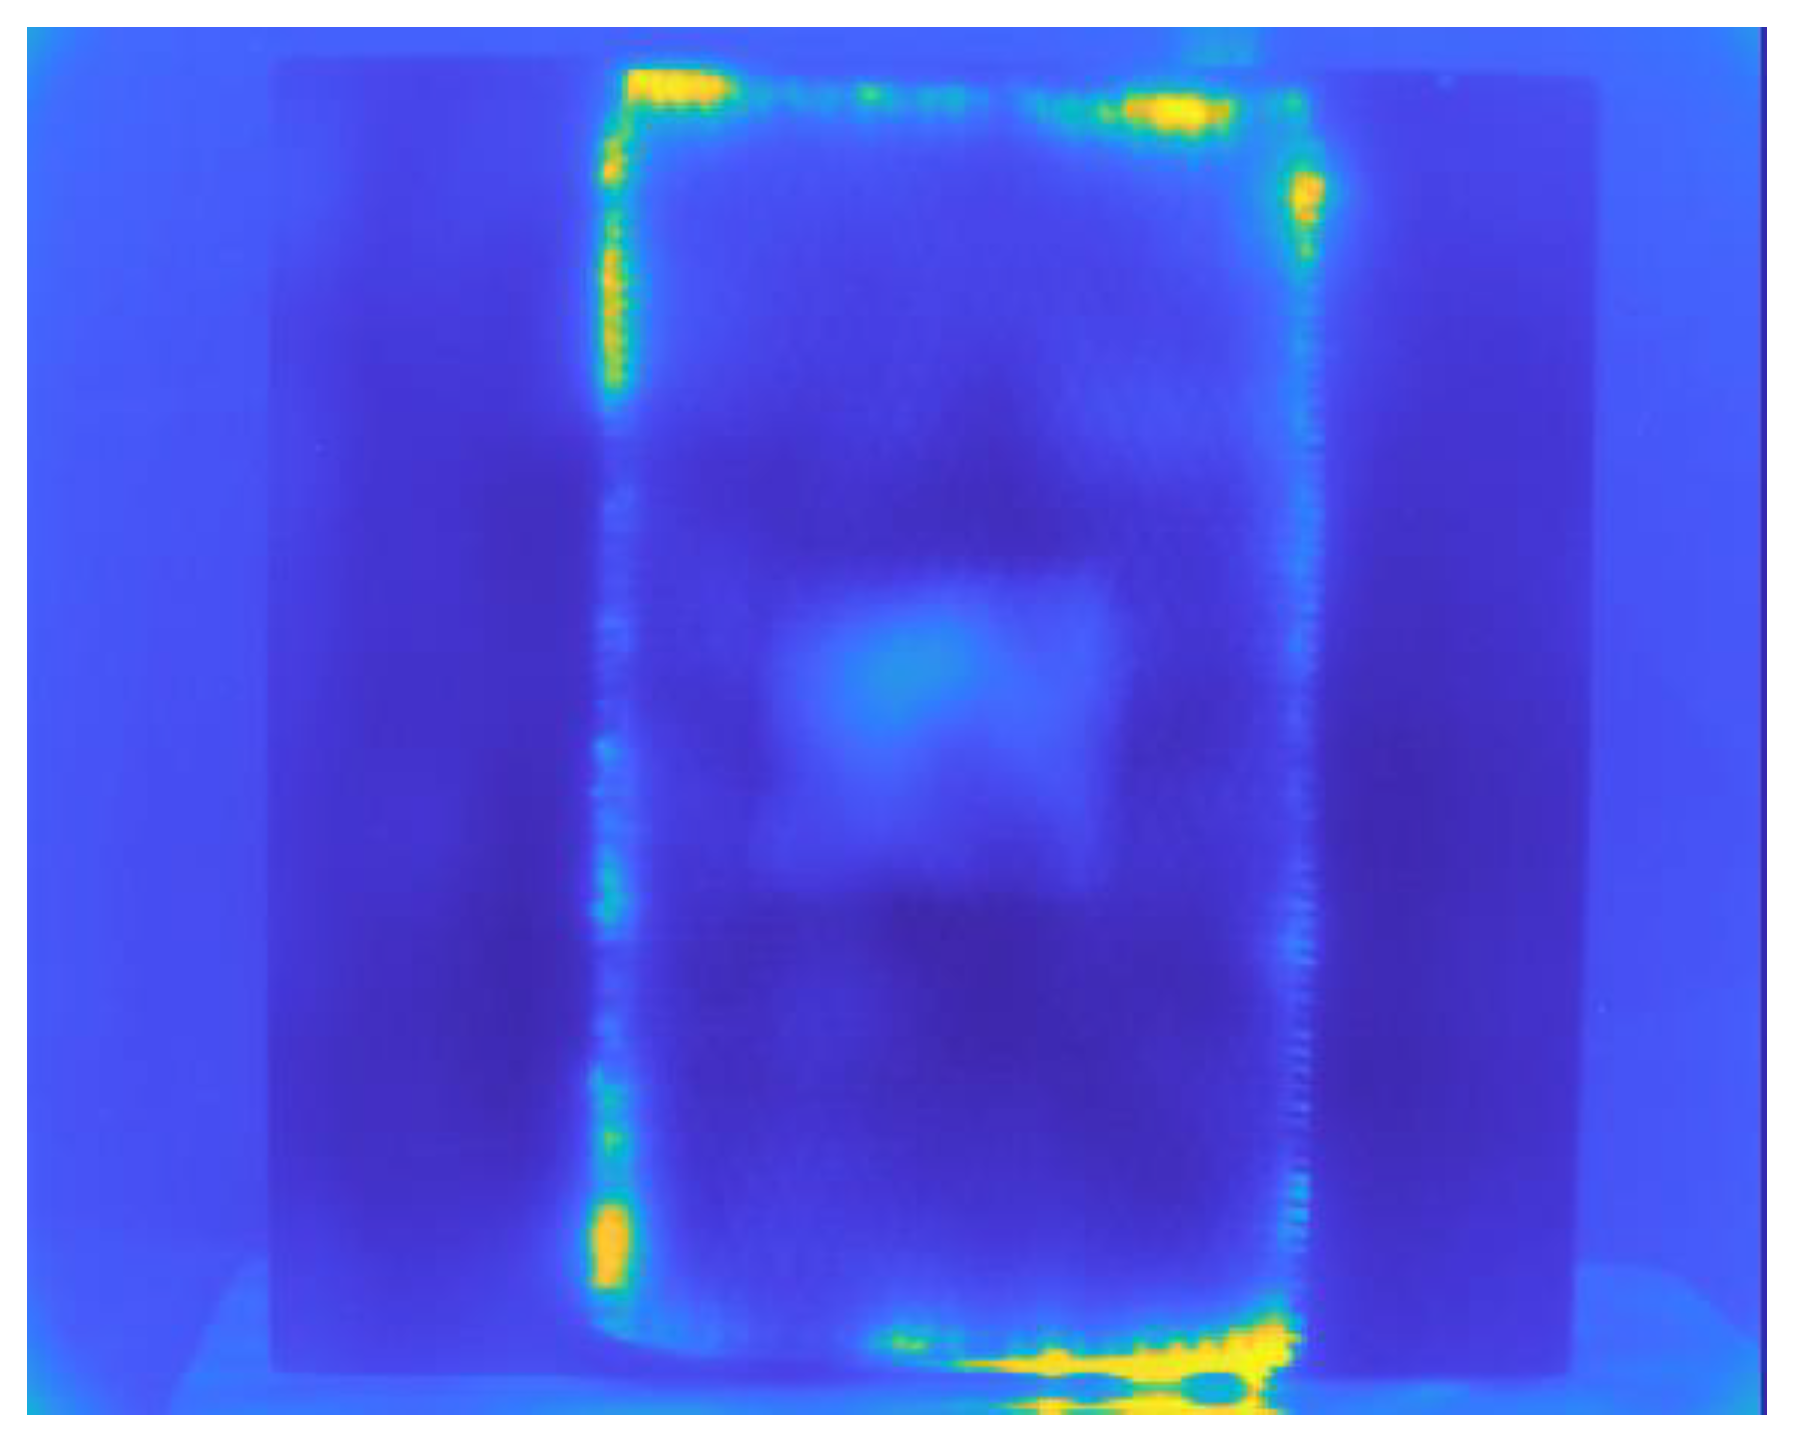
Figure 10 depicts a representative outcome obtained by subjecting the sample to heating for a duration of 100 seconds. The presence of numerous defects caused by the aging process is evident on the periphery of the composite layer, resulting in higher temperature readings. Furthermore, within the central part of the reinforcement, one can notice the thermal signature of a defect that is positioned at the center.
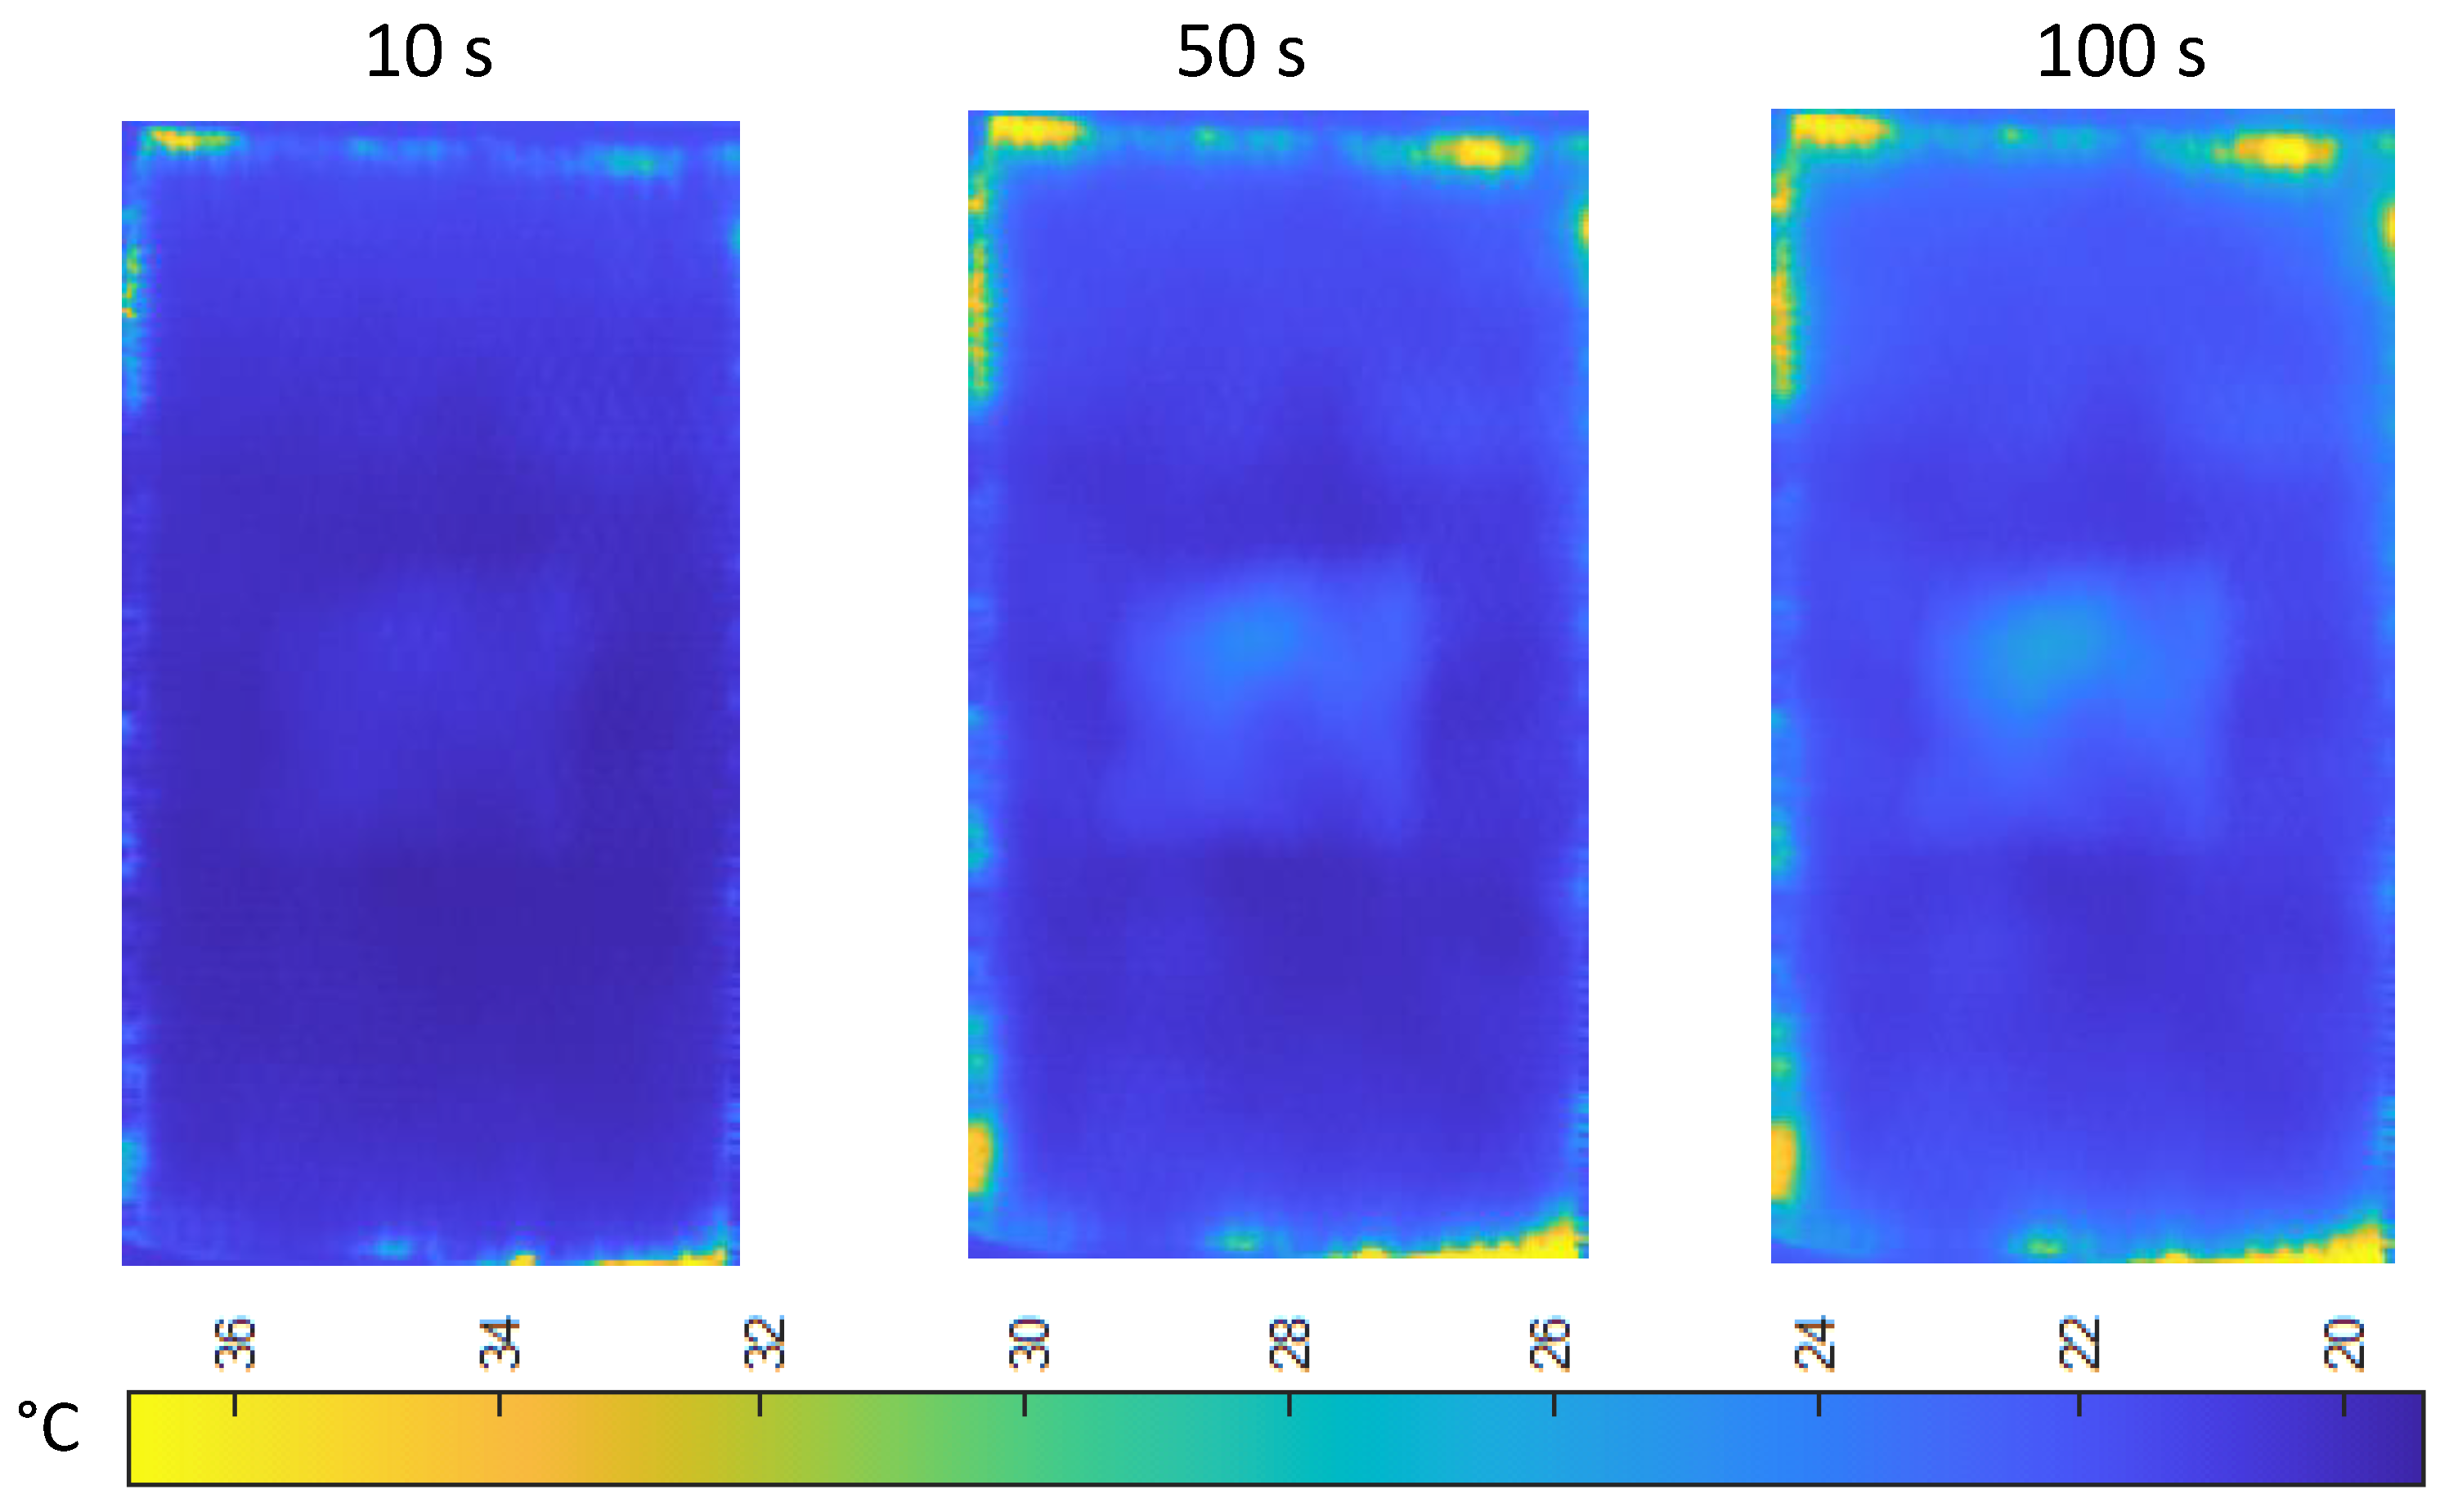
Figure 11 illustrates a comparison of the temperature distribution at specific time intervals (10, 50, and 100 seconds) for the region including the composite reinforcement. The results are comparable to those obtained numerically which will be quantitatively evaluated in the next section, however it is evident that the experimental results show higher temperature values for defects associated to the sample aging process compared to the numerical results. This is influenced by various variables. In the numerical model, we encountered a random distribution of defects that may not necessarily correlate to this particular scenario. The depth of defects in the real object may be larger. The rise in temperature in the mentioned region could potentially be affected by wave reflections, which were not taken into account in the computer model.
5. Conclusions Results Analysis and Discussion
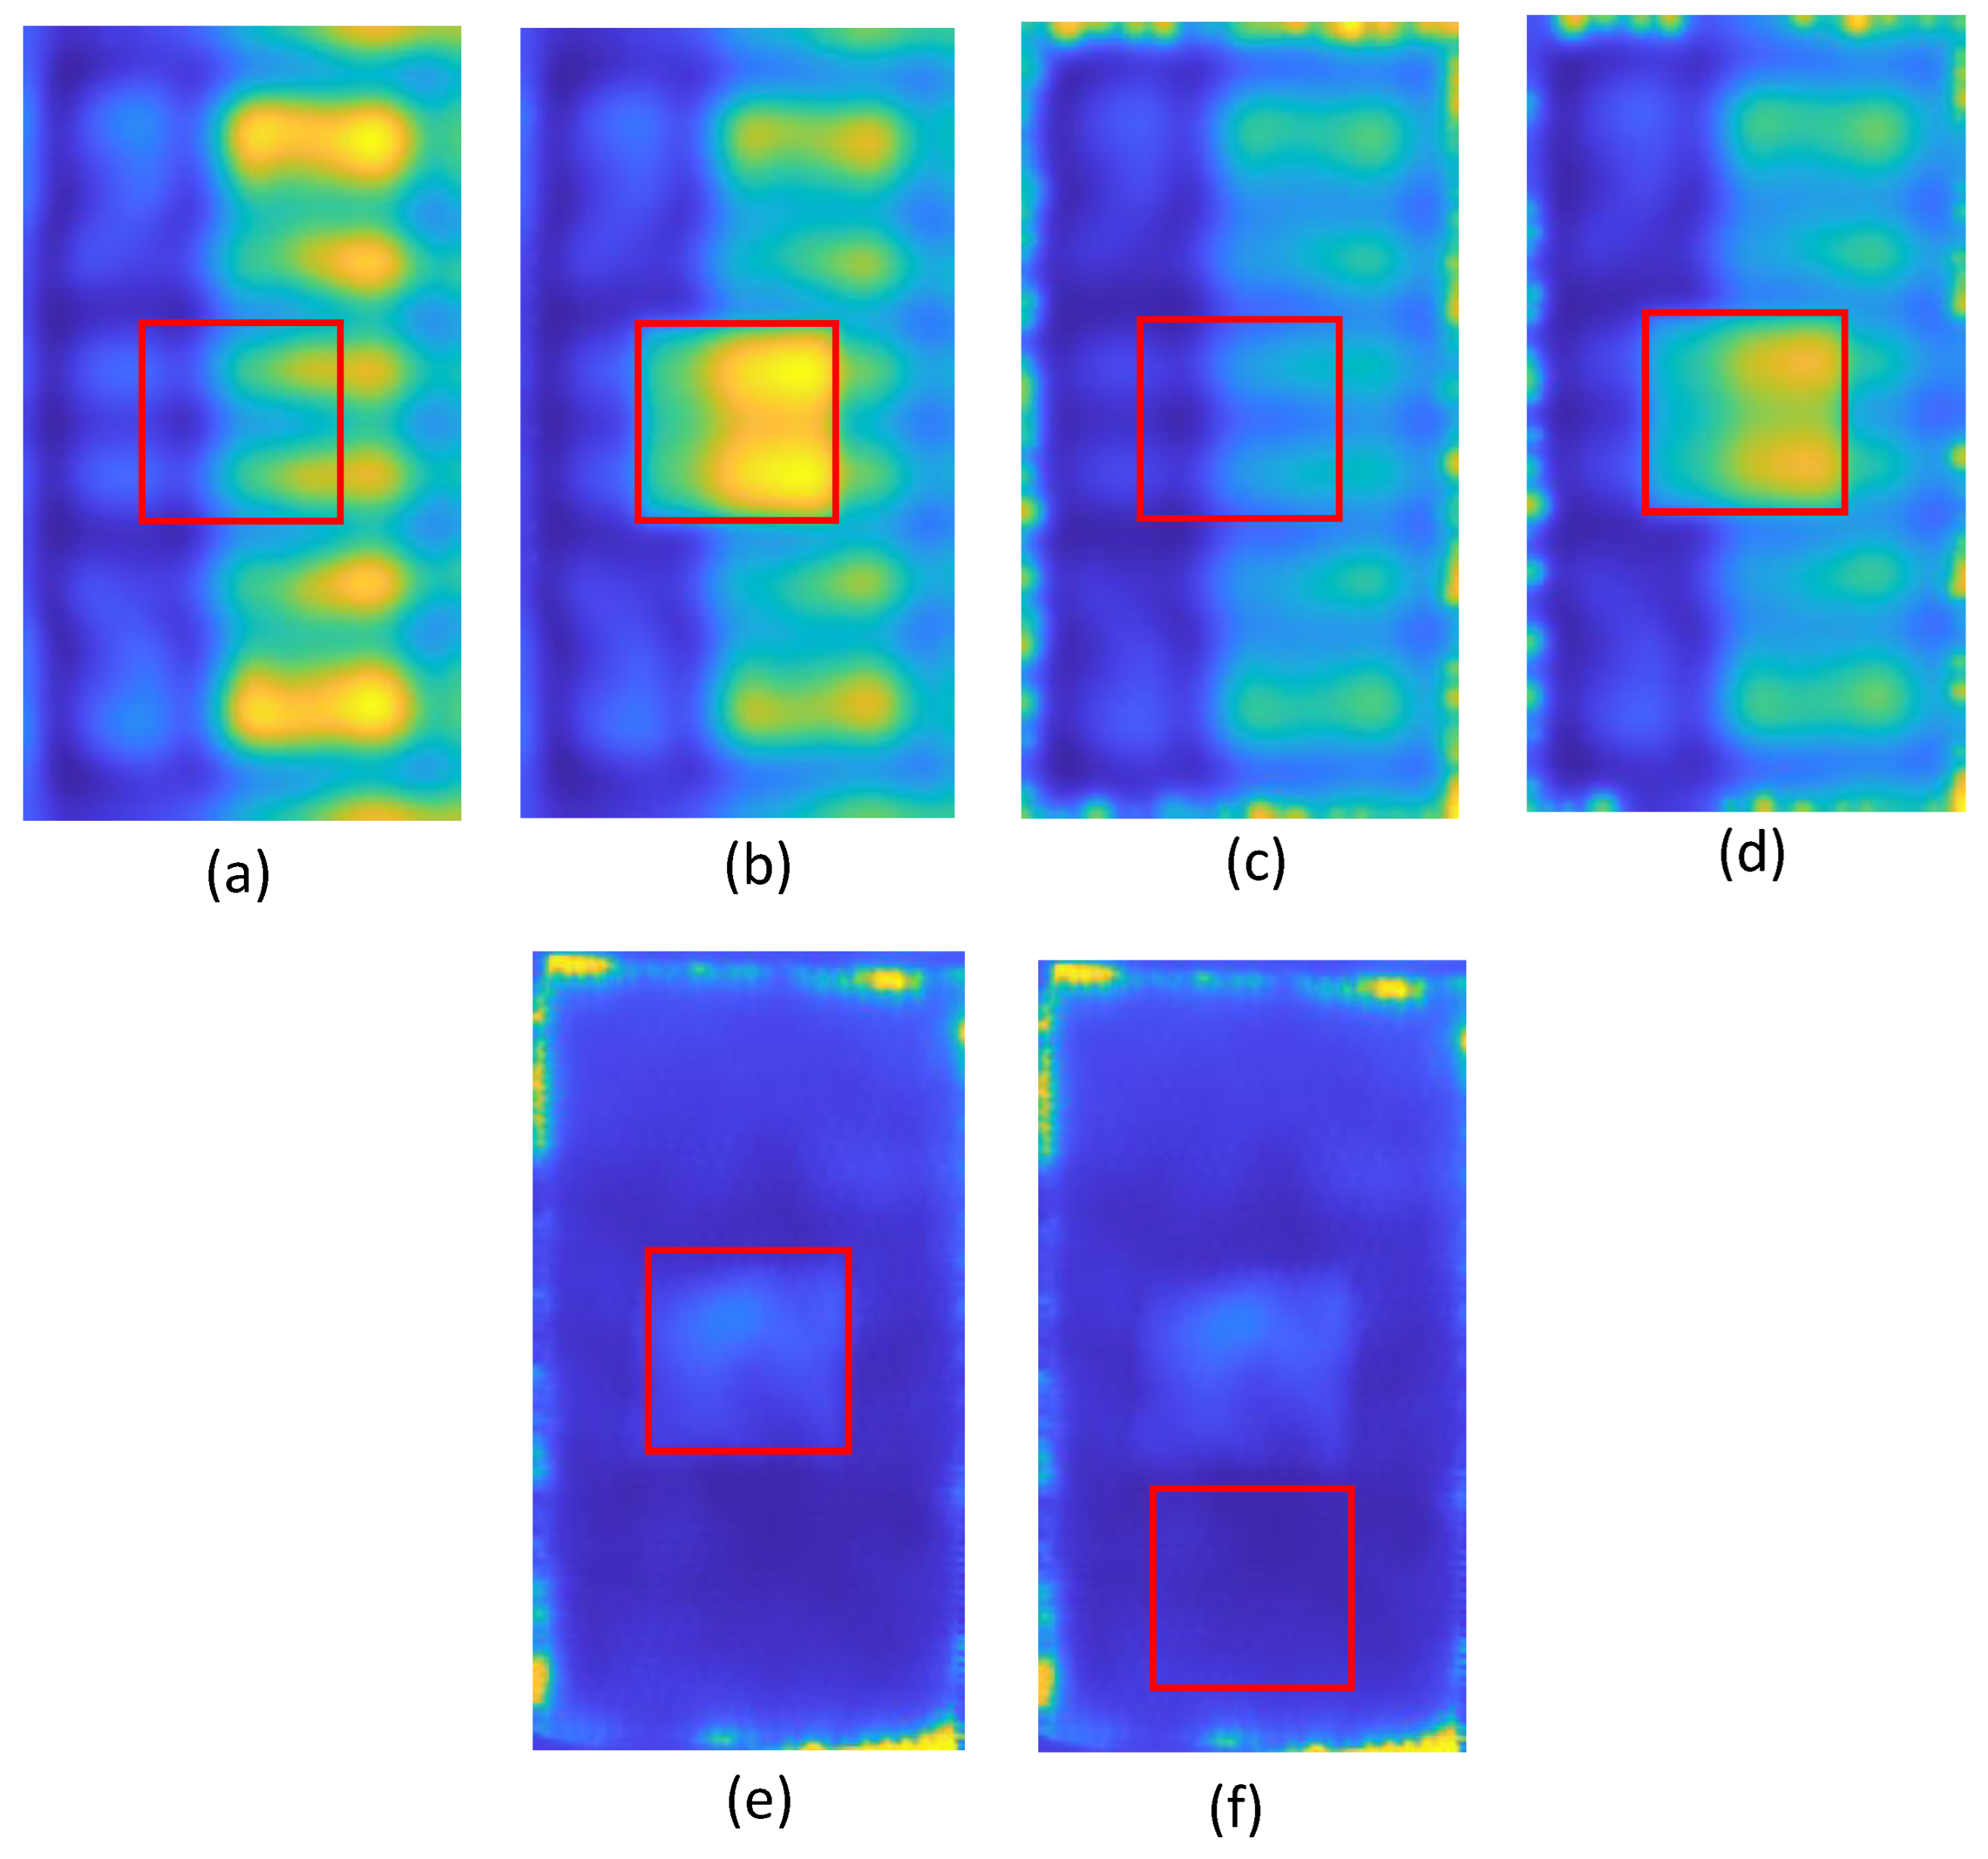
In this section, the examination of the acquired data and the attempt of the comparison the numerical and the experimental results will be presented. The quantitative influence of the presence of the defects caused by the object's ageing process on the capability to detect other sorts of defects will be evaluated. To conduct the analysis, the same region of interest (ROI) that covered the flaw located in the center for each numerical scenario was chosen. When analyzing the experimental results, not just the area that directly covered the defect, but also the surrounding area beneath the defect, which was presumed to be defect-free were considered. In the
Figure 12, all the chosen regions are presented.
In order to assess the acquired data in a quantitative manner, an average value was computed for all designated regions of interest (
Figure 12). Thus, the time - temperature characteristics were determined for the predicted mean temperature values in certain regions. First, the numerical results were compared for samples that did not have any aging defects (referred to as NDS and CDS samples), samples that had aging defects (referred to as ADS and CASD samples), and the sample that was physically tested in the experiment. In the comparison, both the regions containing the defect and the areas without the defect were taken into account.
Figure 12 illustrates all the aforementioned characteristics.
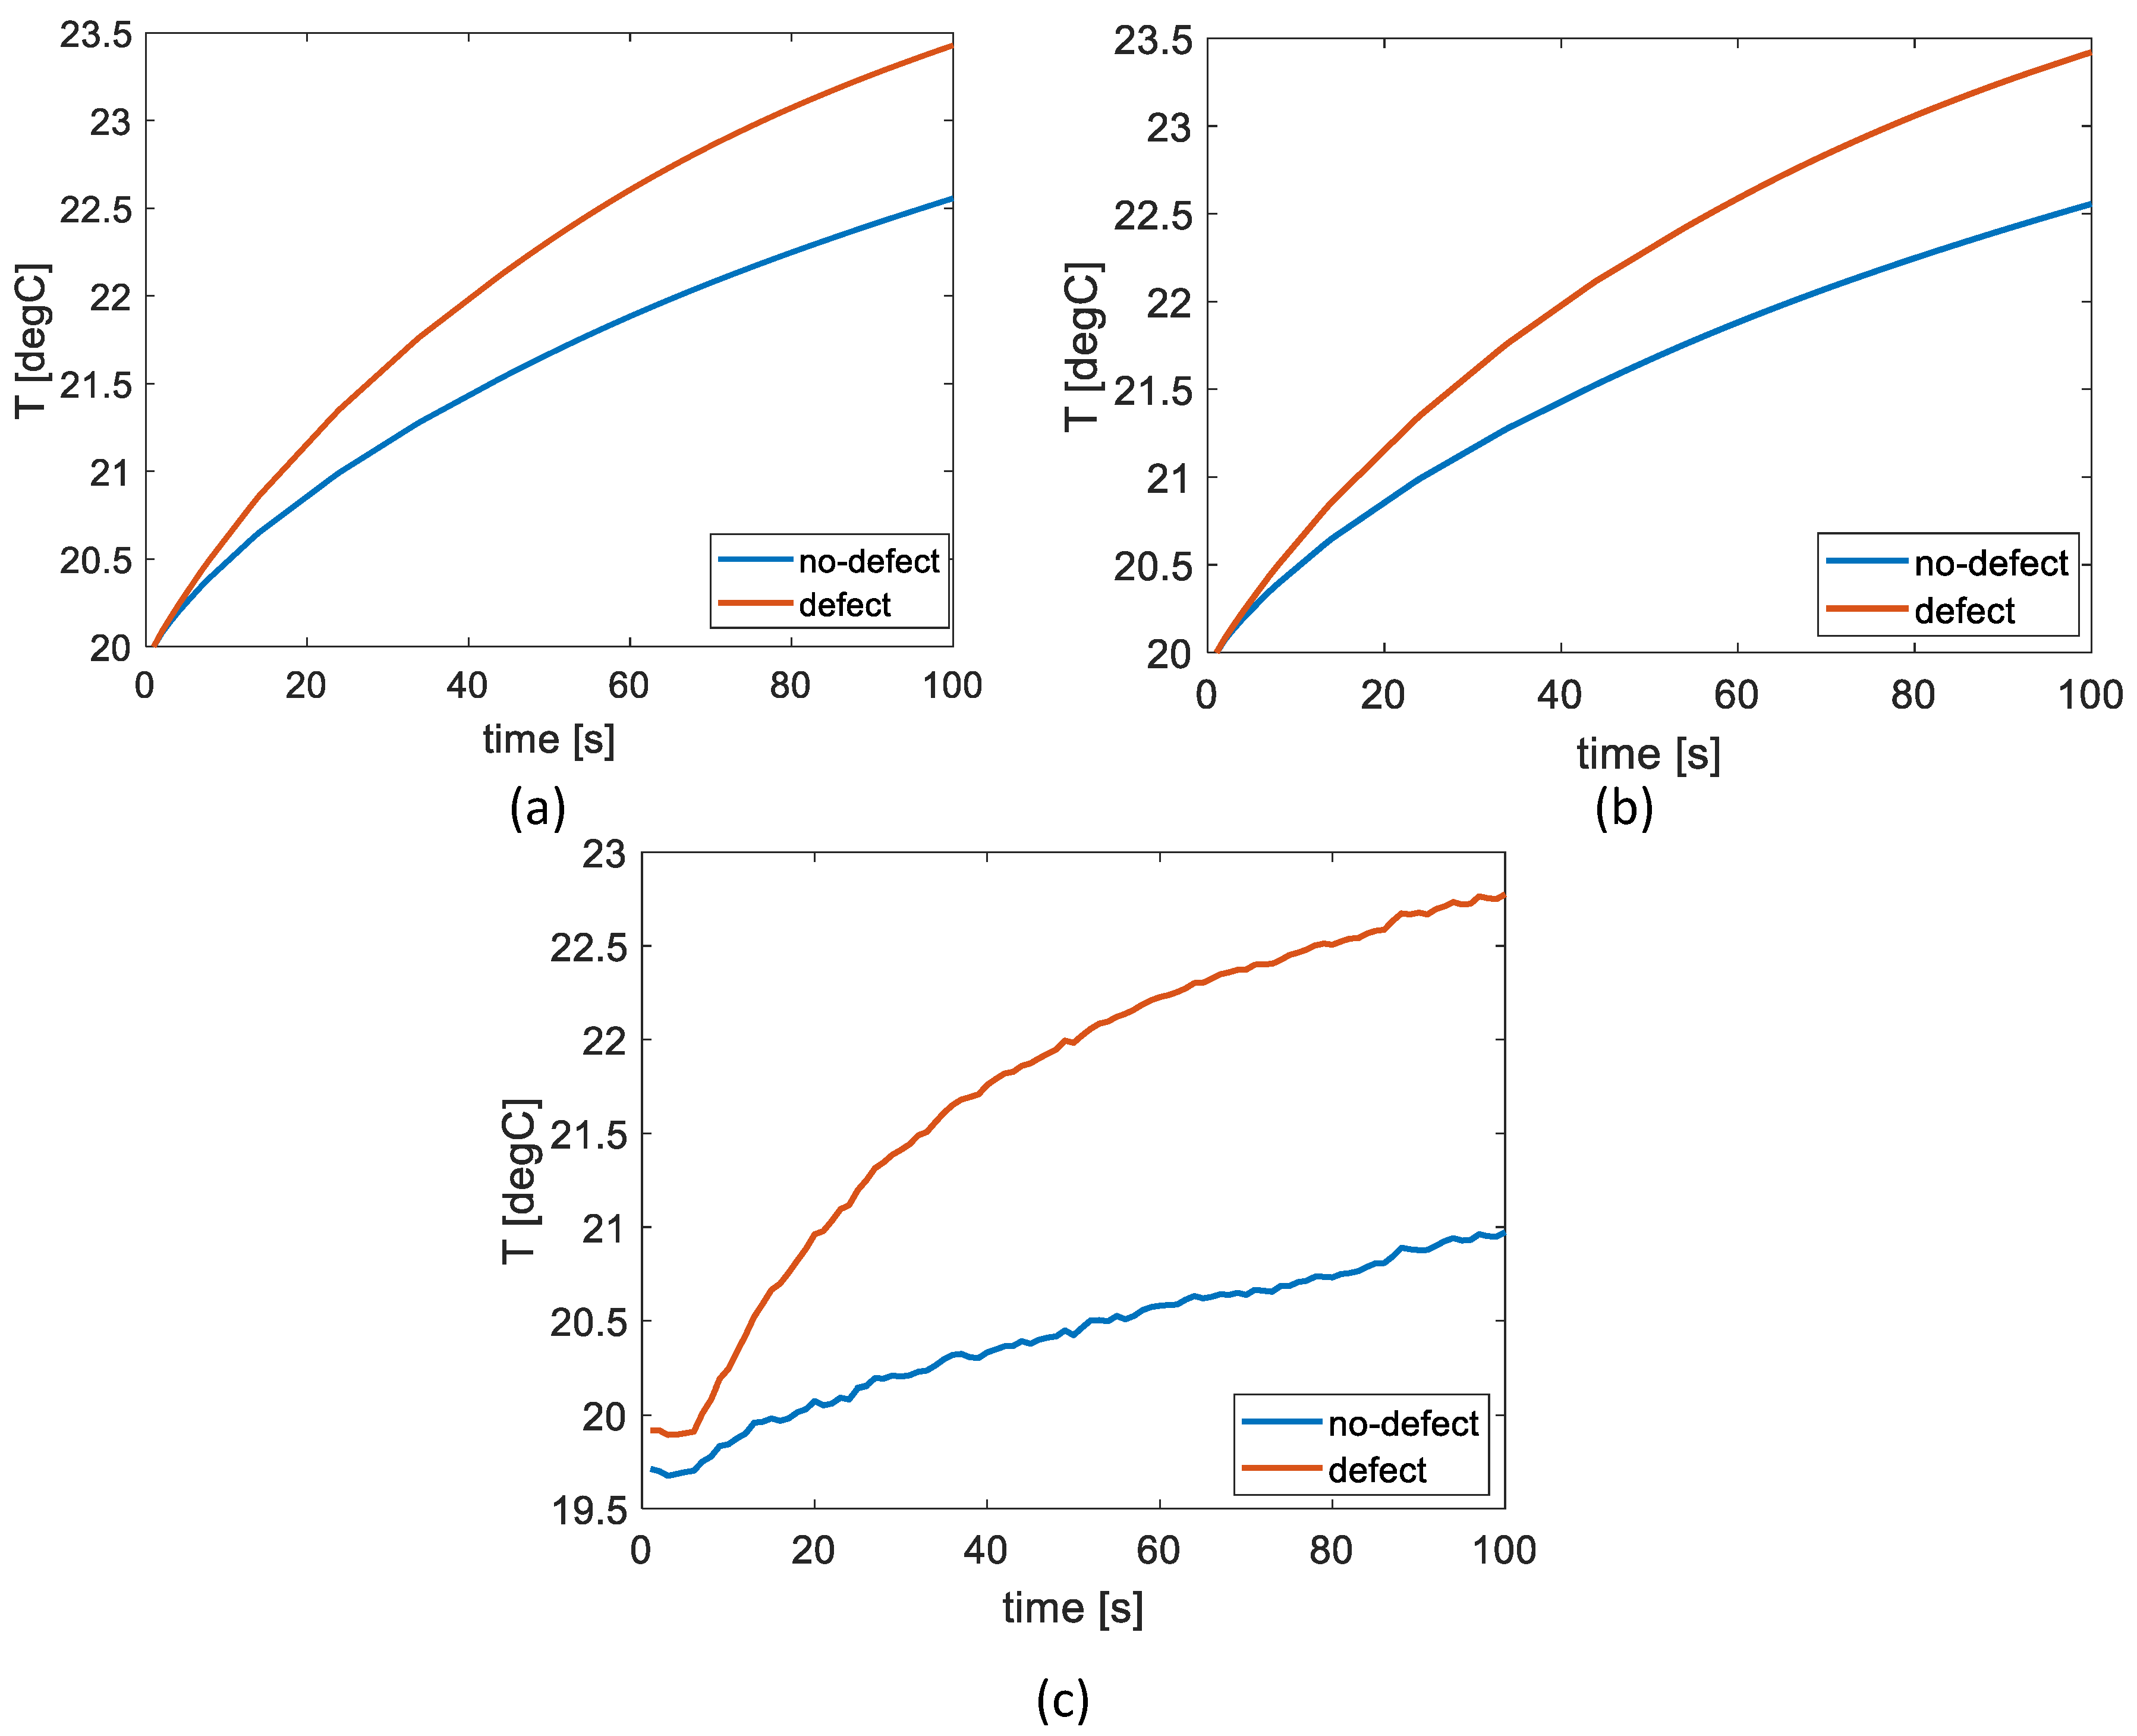
Figure 13 (a) presents a comparison of time - temperature characteristics for NDS and CDS samples. These characteristics were calculated by computing the average values from the areas marked in Figures 12 (a) and 12 (b). The largest disparity between the given features is roughly 1 °C. The comparison of characteristics between ADS and CADS samples is conducted by computing the averages for the regions shown in
Figure 13 (b). Therefore, the existence of defects associated with the ageing of the material has little impact on the temperature distribution in the area of the defect situated at the center of the sample.
Figure 13 (c) shows a comparison of analogous characteristics for a real sample that was evaluated via experimentation. In this case, the curves were derived by averaging the data from the specified areas shown in Figures 12 (e) and 12 (f). In this instance, the largest disparity between the characteristics is almost 2.3 °C which is a noteworthy difference in comparison to the numerical data. It is important to mention that the regions being compared in this context do not completely align with those being studied numerically.
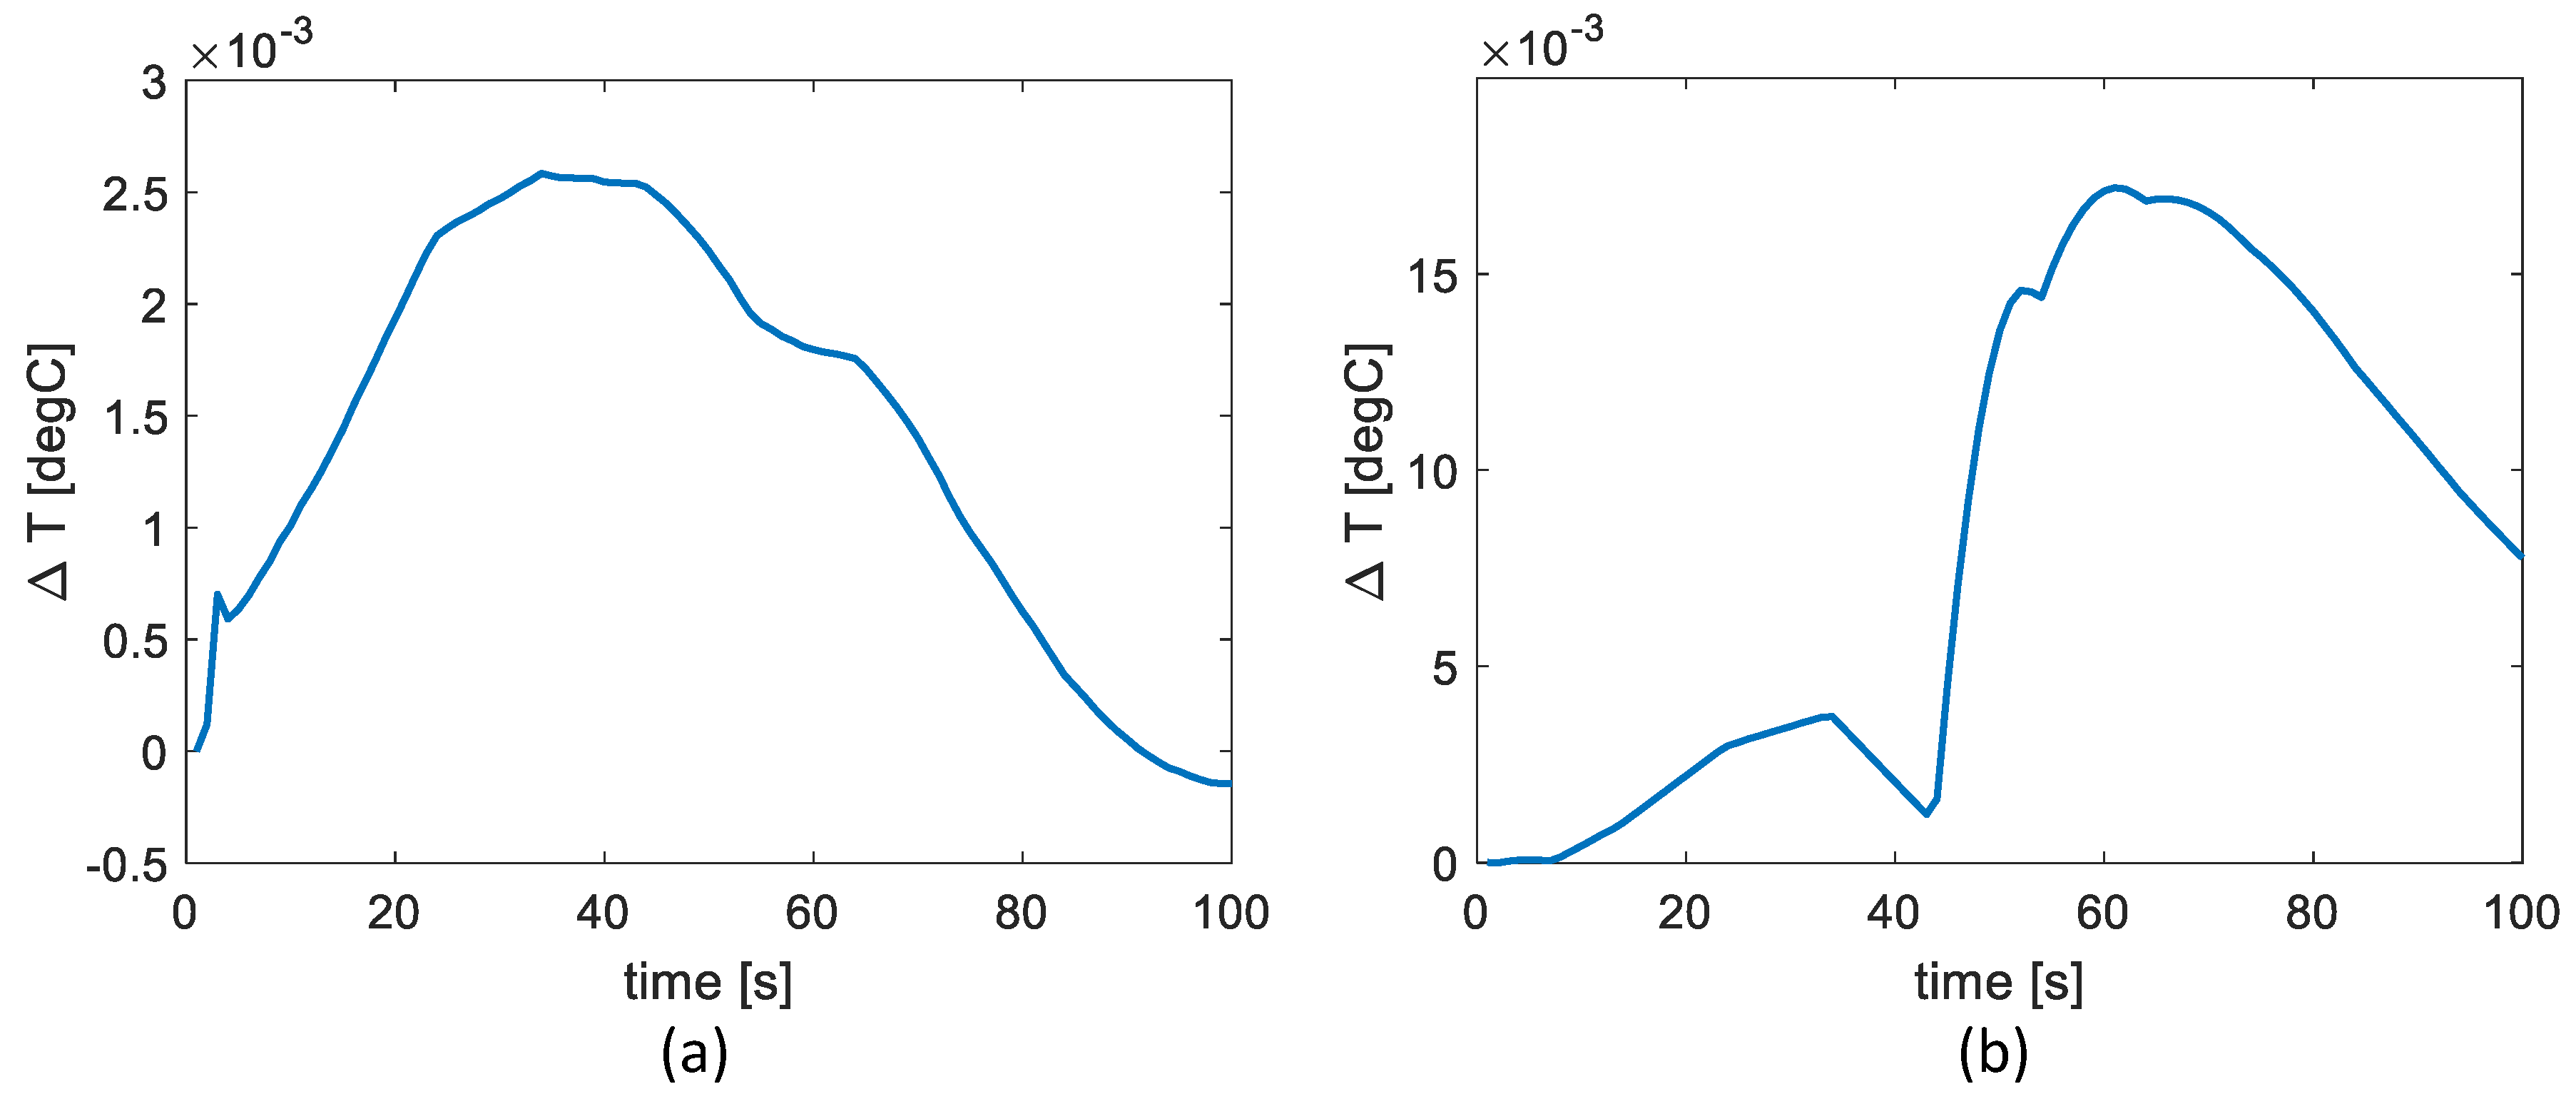
The differences between the results shown in Figures 13(a) and 13(b) are minimal, therefore in order to quantitatively determine how the presence of aging defects affects the temperature distribution within the region encompassing centrally located defect, additionally the difference between the characteristics for the NDS and ADS samples has been plotted (which will show how the presence of aging defects affects the temperature distribution in the central area of the sample when there is no defect there) and for CDS and CADS samples (which will show how the presence of aging defects affects the temperature distribution in the central area of the sample when there is a defect there). Plots of the differences defined above are presented in the
Figure 14. As it can be seen, the maximum values of
are
°C for the difference between NDS and ADS (
Figure 13(a)) and
°C for the difference in CDS and CADS (
Figure 13(b)), respectively. This difference between samples without a central defect and with such a defect is significant, but not observable in real conditions.
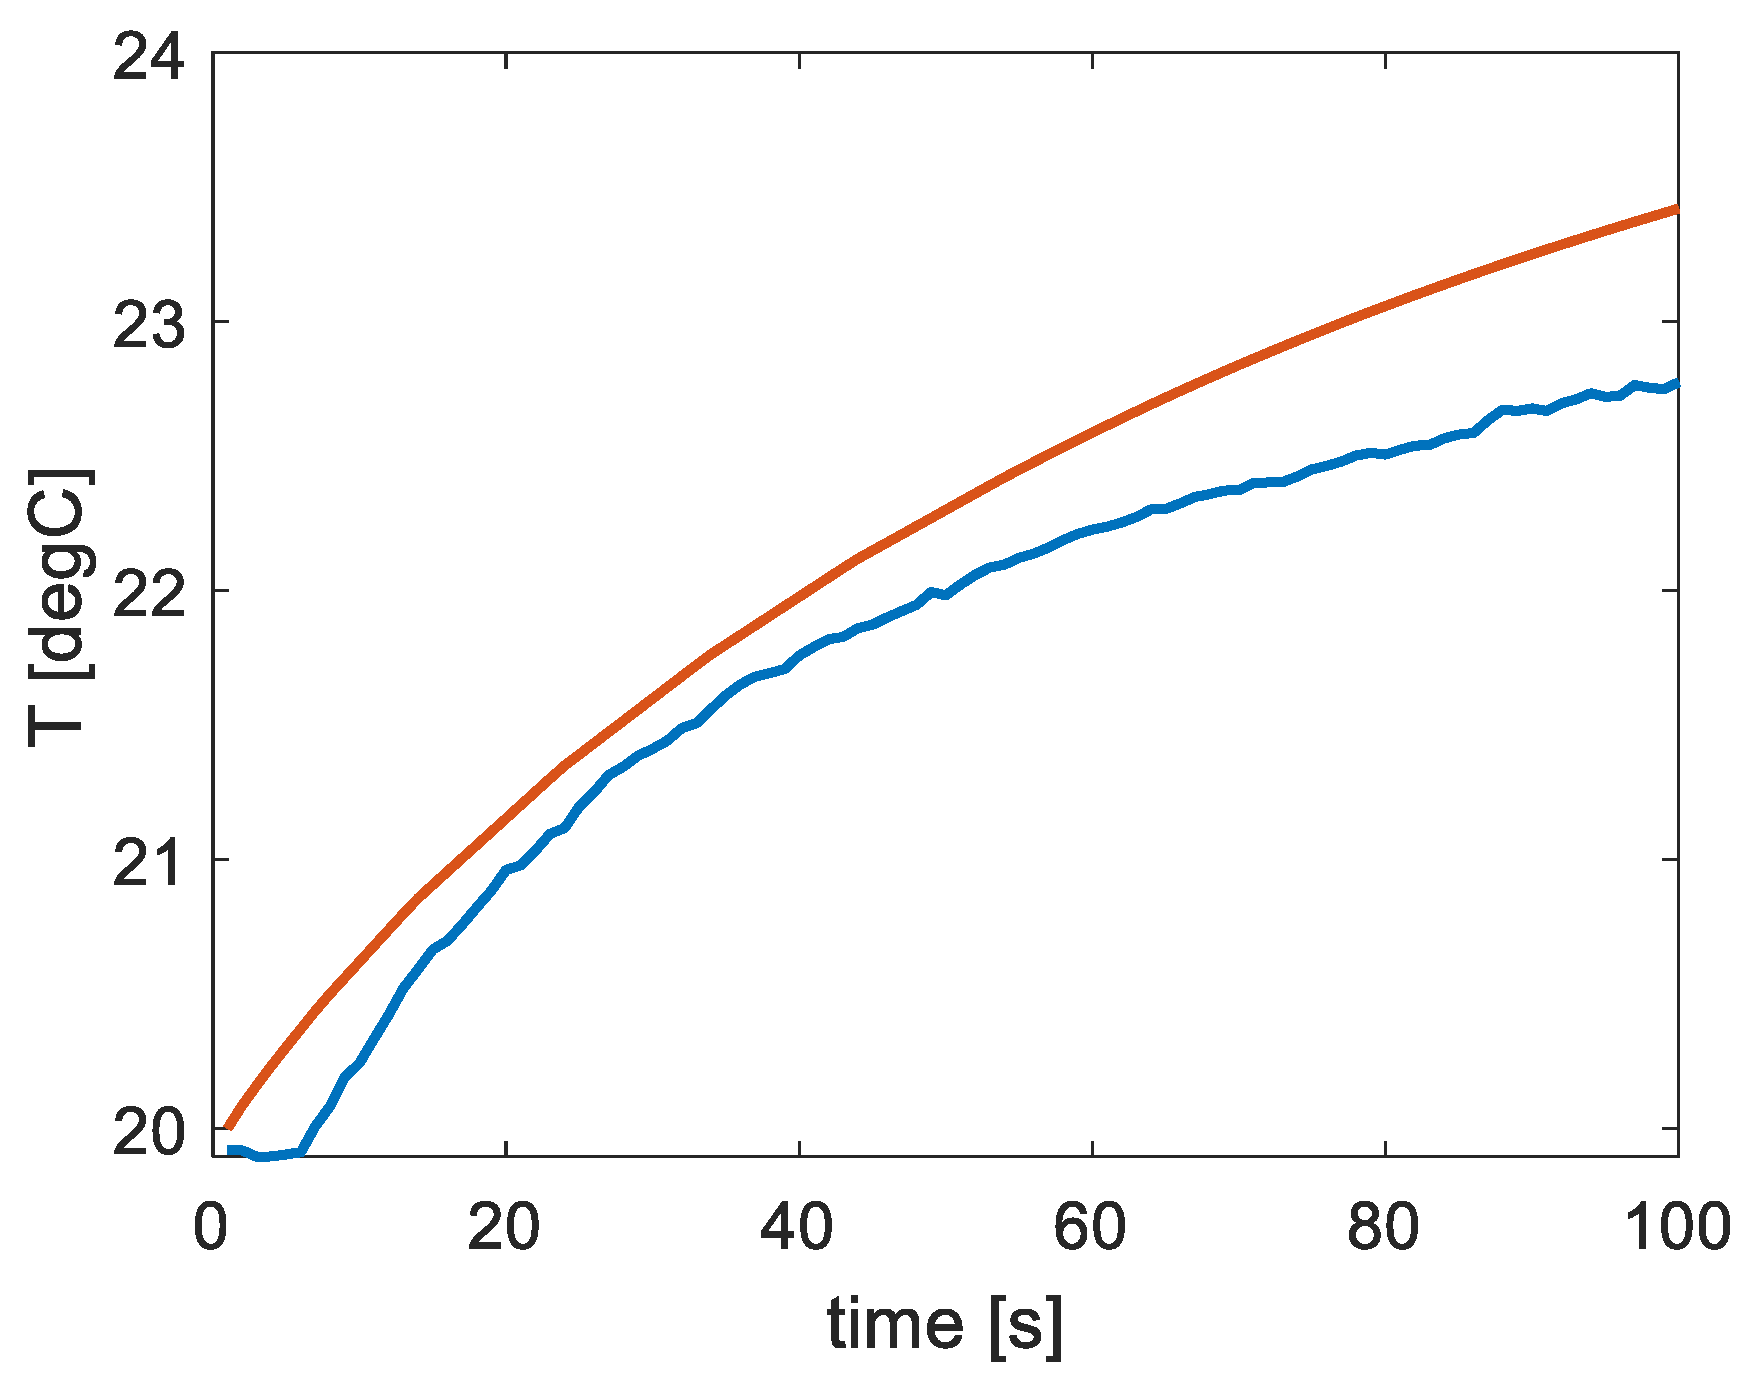
Figure 15 illustrates a comparison between the characteristics acquired from the regions of interest for the matching numerical and experimental results. One graph displays the characteristics obtained for the CADS sample (
Figure 12 (d)) and the real sample (
Figure 11 (e)). The indicated outcome demonstrates a high level of consistency. The highest disparity between the characteristics is around 0.7 °C. The agreement observed confirms the accuracy of the assumptions made in the developed numerical model.
6. Conclusions
In this study, the feasibility of applying the microwave infrared thermography method (MIRT) for identifying flaws in a CFRP reinforcement in the form of lack of adhesive between the reinforcement and the concrete was examined. The most challenging element considered in the study involves using a sample that underwent an extended aging period of 10 years, which facilitated the development of natural deterioration in the reinforcement characterized by the fraying of the material at the edges and the chipping of the epoxy. Numerical models were used for comparison research and to ascertain the influence of the flaws, related to material deterioration associated with aging, on the efficacy of the MIRT, and were validated through experimental verification. For this purpose, four numerical models with four variants of the sample were prepared: a sample without any defects, a sample with a defect in the form of lack of adhesive (Central Defect Sample), a sample with defects simulating the aging of the material, located on the edges of the composite reinforcement layer (Ageing defects Sample), a sample with defects simulating aging and with a centrally located defect in the form of lack of adhesive (Central and Ageing Defects Sample). A stochastic structure consisting of many cylindrical air spaces that spanned both the epoxy adhesive layer and the adjacent carbon composite layer was used to represent the flaws associated with ageing process.
The results show that the proposed MIRT enables the detection and quantification of the extent of aging deterioration. The presence of aging changes does not significantly affect the detection of a defect located in the center of the sample. The comparison between the matching numerical and experimental results demonstrates a high level of consistency confirming the accuracy of the assumptions made in the developed numerical models.
It is worthwhile to notice that the experimental results show slightly higher temperature values for defects associated to the sample aging process compared to the numerical results, which may be caused by the random distribution of defects that may not necessarily correlate to the scenario, and the depth of defects in the real object may be larger. Moreover, the temperature increase in the mentioned region could potentially be affected by wave reflections, which were not considered in the numerical model. These remarks may be the keys for improving the accuracy of the proposed models in the future studies.
The present study offers potential perspectives in terms of applying the MIRT method to investigate the durability of different types of composites and other new construction materials under various environmental conditions.
Author Contributions
Conceptualization, S.A.K. and B.S.; methodology, S.A.K. and B.S.; formal analysis, S.A.K. and B.S.; investigation, S.A.K. and B.S.; data curation, S.A.K. and B.S.; writing original draft preparation, S.A.K. and B.S.; writing—review and editing, S.A.K. and B.S.; visualization, S.A.K. and B.S.; supervision, D.D. and F.B.; funding acquisition, B.S, D.D. and F.B. All authors have read and agreed to the published version of the manuscript.
Funding
This research was partially funded by West Pomeranian University of Technology, Szczecin, Poland.
Institutional Review Board Statement
Not applicable.
Informed Consent Statement
Not applicable.
Data Availability Statement
Not applicable.
Acknowledgments
The work presented in the paper is the outcome of the collaboration between three research team centers: The Active Thermography Laboratory in Poland, LGCgE (Laboratoire de Génie Civil et géoEnvironnement), and ESTP – Grande école d’ingénieurs de la construction in France.
Conflicts of Interest
The authors declare no conflict of interest.
References
- Zhai, K.; Fang, H.; Guo, C.; Li, B.; Wang, N.; Yang, K.; Zhang, X.; Du, X.; Di, D. Using EPS and CFRP liner to strengthen prestressed concrete cylinder pipe. Constr. Build. Mater. 2024, 412. [Google Scholar] [CrossRef]
- Wu, C.; Li, V.C. CFRP-ECC hybrid for strengthening of the concrete structures. Compos. Struct. 2017, 178, 372–382. [Google Scholar] [CrossRef]
- Zhu, M.; Li, X.; Deng, J.; Peng, S. Electrochemical impedance based interfacial monitoring for concrete beams strengthened with CFRP subjected to wetting–drying cycling and sustained loading. Constr. Build. Mater. 2023, 366. [Google Scholar] [CrossRef]
- Ma, P.; Xin, R.; Yao, J. An investigation of bond behavior between composite materials (CFRP, GWMM, KPGC) and substrates (Brick and Concrete) for strengthening existing masonry structures. Constr. Build. Mater. 2023, 409. [Google Scholar] [CrossRef]
- Alshamrani, S.; Rasheed, H.A.; Salahat, F.H.; Borwankar, A.; Divilbiss, N. Seismic flexural behavior of CFRP strengthened reinforced concrete beams secured with fiber anchors. Eng. Struct. 2024, 305. [Google Scholar] [CrossRef]
- Yumnam, M.; Gupta, H.; Ghosh, D.; Jaganathan, J. Inspection of concrete structures externally reinforced with FRP composites using active infrared thermography: A review. Constr. Build. Mater. 2021, 310, 125265. [Google Scholar] [CrossRef]
- Alessi, S.; Pitarresi, G.; Spadaro, G. Effect of hydrothermal ageing on the thermal and delamination fracture behaviour of CFRP composites. Compos. Part B: Eng. 2014, 67, 145–153. [Google Scholar] [CrossRef]
- Shang, X.; Marques, E.; Machado, J.; Carbas, R.; Jiang, D.; da Silva, L. Review on techniques to improve the strength of adhesive joints with composite adherends. Compos. Part B: Eng. 2019, 177, 107363. [Google Scholar] [CrossRef]
- Wang, B.; He, P.; Kang, Y.; Jia, J.; Liu, X.; Li, N. Ultrasonic Testing of Carbon Fiber-Reinforced Polymer Composites. J. Sensors 2022, 2022, 1–20. [Google Scholar] [CrossRef]
- Wang, B.; Zhong, S.; Lee, T.-L.; Fancey, K.S.; Mi, J. Non-destructive testing and evaluation of composite materials/structures: A state-of-the-art review. Adv. Mech. Eng. 2020, 12. [Google Scholar] [CrossRef]
- Wen, B.; Zhou, Z.; Zeng, B.; Yang, C.; Fang, D.; Xu, Q.; Shao, Y.; Wan, C. Pulse-heating infrared thermography inspection of bonding defects on carbon fiber reinforced polymer composites. Sci. Prog. 2020, 103. [Google Scholar] [CrossRef]
- Jasiūnienė, E.; Yilmaz, B.; Smagulova, D.; Bhat, G.A.; Cicėnas, V.; Žukauskas, E.; Mažeika, L. Non-Destructive Evaluation of the Quality of Adhesive Joints Using Ultrasound, X-ray, and Feature-Based Data Fusion. Appl. Sci. 2022, 12, 12930. [Google Scholar] [CrossRef]
- Frankowski, P.K.; Chady, T. Impact of Magnetization on the Evaluation of Reinforced Concrete Structures Using DC Magnetic Methods. Materials 2022, 15, 857. [Google Scholar] [CrossRef]
- Frankowski, P.K.; Chady, T. Evaluation of Reinforced Concrete Structures with Magnetic Method and ACO (Amplitude-Correlation-Offset) Decomposition. Materials 2023, 16, 5589. [Google Scholar] [CrossRef]
- Frankowski, P.K.; Chady, T.; Zieliński, A. Magnetic force induced vibration evaluation (M5) method for frequency analysis of rebar-debonding in reinforced concrete. Measurement 2021, 182, 109655. [Google Scholar] [CrossRef]
- Maldague, X. P. V. Theory and Practice of Infrared Technology for Nondestructive Testing; New York, USA, 2001; Vol. Wiley series in microwave and optical engineering.
- Cannard, H.; Mahrez, M.; Perrin, T.; Muzet, V.; Prybyla, D.; Brachelet, F. The Use of Infrared Thermography for Defects Detection on Reinforced Concrete Bridges. In 12th Quantitative InfraRed Thermography (QIRT2014); Bordeaux, France, 2014.
- Keo, S.A.; Brachelet, F.; Breaban, F.; Defer, D. Defect detection in CFRP by infrared thermography with CO2 Laser excitation compared to conventional lock-in infrared thermography. Compos. Part B: Eng. 2015, 69, 1–5. [Google Scholar] [CrossRef]
- Keo, S.-A.; Brachelet, F.; Breaban, F.; Defer, D. Development of an Infrared Thermography Method with CO2 Laser Excitation, Applied to Defect Detection in CFRP. Int. J. Civ. Environ. Eng. 2013, 7, 5. [Google Scholar]
- Keo, S. A. Développement d’une méthode de Thermographie Infrarouge Active par Excitation Micro-Ondes Appliquée au Contrôle non Destructif. PhD thesis, Université d’Artois, Béthune, France, 2013.
- Dragan, R.G.; Rosca, I.-C.; Keo, S.-A.; Breaban, F. Active thermography method using an CO2 laser for thermal excitation, applied to defect detection in bioceramic materials. 2013 E-Health and Bioengineering Conference (EHB). LOCATION OF CONFERENCE, RomaniaDATE OF CONFERENCE; pp. 1–4.
- Geng, C.; Shi, W.; Liu, Z.; Xie, H.; He, W. Nondestructive Surface Crack Detection of Laser-Repaired Components by Laser Scanning Thermography. Appl. Sci. 2022, 12, 5665. [Google Scholar] [CrossRef]
- Deane, S.; Avdelidis, N.P.; Ibarra-Castanedo, C.; Williamson, A.A.; Withers, S.; Zolotas, A.; Maldague, X.P.V.; Ahmadi, M.; Pant, S.; Genest, M.; et al. Development of a thermal excitation source used in an active thermographic UAV platform. Quant. Infrared Thermogr. J. 2022, 20, 198–229. [Google Scholar] [CrossRef]
- Dahlberg, P.; Ziegeler, N.J.; Nolte, P.W.; Schweizer, S. Design and Construction of an LED-Based Excitation Source for Lock-In Thermography. Appl. Sci. 2022, 12, 2940. [Google Scholar] [CrossRef]
- Jia, Y.; Tang, L.; Xu, B.; Zhang, S. Crack Detection in Concrete Parts Using Vibrothermography. J. Nondestruct. Evaluation 2019, 38, 21. [Google Scholar] [CrossRef]
- Katunin, A.; Wronkowicz-Katunin, A.; Wachla, D. Impact damage assessment in polymer matrix composites using self-heating based vibrothermography. Compos. Struct. 2019, 214, 214–226. [Google Scholar] [CrossRef]
- Mendioroz, A.; Celorrio, R.; Cifuentes, A.; Zatón, L.; Salazar, A. Sizing vertical cracks using burst vibrothermography. NDT E Int. 2016, 84, 36–46. [Google Scholar] [CrossRef]
- Akbarnezhad, A.; Ong, K. Microwave decontamination of concrete. Mag. Concr. Res. 2010, 62, 879–885. [Google Scholar] [CrossRef]
- Shi, S.; Li, H.; Zhou, Q.; Zhang, H.; Basheer, P.; Bai, Y. Alkali-activated fly ash cured with pulsed microwave and thermal oven: A comparison of reaction products, microstructure and compressive strength. Cem. Concr. Res. 2023, 166. [Google Scholar] [CrossRef]
- Wei, W.; Shao, Z.; Zhang, Y.; Qiao, R.; Gao, J. Fundamentals and applications of microwave energy in rock and concrete processing – A review. Appl. Therm. Eng. 2019, 157, 113751. [Google Scholar] [CrossRef]
- Abu-Saleem, M.; Zhuge, Y.; Hassanli, R.; Ellis, M.; Rahman, M.; Levett, P. Microwave radiation treatment to improve the strength of recycled plastic aggregate concrete. Case Stud. Constr. Mater. 2021, 15, e00728. [Google Scholar] [CrossRef]
- Wei, W.; Shao, Z.; Qiao, R.; Chen, W.; Zhou, H.; Yuan, Y. Recent development of microwave applications for concrete treatment. Constr. Build. Mater. 2020, 269, 121224. [Google Scholar] [CrossRef]
- Liebezeit, S.; Mueller, A.; Leydolph, B.; Palzer, U. Microwave-induced interfacial failure to enable debonding of composite materials for recycling. Sustain. Mater. Technol. 2017, 14, 29–36. [Google Scholar] [CrossRef]
- Lehmann, G.; Mayr, M.; Käsling, H.; Thuro, K. Microwave pre-conditioning of granite and concrete and the implications on their geotechnical parameters. Int. J. Rock Mech. Min. Sci. Géoméch. Abstr. 2023, 164. [Google Scholar] [CrossRef]
- Makul, N.; Rattanadecho, P.; Agrawal, D.K. Applications of microwave energy in cement and concrete – A review. Renew. Sustain. Energy Rev. 2014, 37, 715–733. [Google Scholar] [CrossRef]
- Makul, N.; Rattanadecho, P.; Pichaicherd, A. Accelerated microwave curing of concrete: A design and performance-related experiments. Cem. Concr. Compos. 2017, 83, 415–426. [Google Scholar] [CrossRef]
- Buttress, A.; Jones, A.; Kingman, S. Microwave processing of cement and concrete materials – towards an industrial reality? Cem. Concr. Res. 2015, 68, 112–123. [Google Scholar] [CrossRef]
- Keo, S.-A.; Yune, C.-Y.; Dragan, R.G.; Defer, D.; Breaban, F. Analysis of effects of diffraction and interference on detection by microwave thermography. J. Civ. Struct. Heal. Monit. 2019, 9, 153–167. [Google Scholar] [CrossRef]
- Keo, S.A.; Brachelet, F.; Defer, D.; Breaban, F. Defects detection by infrared thermography with a new microwave excitation system. Mech. Ind. 2014, 15, 509–516. [Google Scholar] [CrossRef]
- Keo, S.-A.; Defer, D.; Breaban, F.; Brachelet, F. Comparison between Microwave Infrared Thermography and CO2 Laser Infrared Thermography in Defect Detection in Applications with CFRP. Mater. Sci. Appl. 2013, 04, 600–605. [Google Scholar] [CrossRef]
- Keo, S.A.; Brachelet, F.; Breaban, F.; Defer, D. Steel detection in reinforced concrete wall by microwave infrared thermography. NDT E Int. 2014, 62, 172–177. [Google Scholar] [CrossRef]
- Szymanik, B.; Frankowski, P.K.; Chady, T.; Chelliah, C.R.A.J. Detection and Inspection of Steel Bars in Reinforced Concrete Structures Using Active Infrared Thermography with Microwave Excitation and Eddy Current Sensors. Sensors 2016, 16, 234. [Google Scholar] [CrossRef]
- Szymanik, B.; Chady, T.; Frankowski, P. Inspection of reinforcement concrete structures with active infrared thermography. 43RD ANNUAL REVIEW OF PROGRESS IN QUANTITATIVE NONDESTRUCTIVE EVALUATION, VOLUME 36. LOCATION OF CONFERENCE, United StatesDATE OF CONFERENCE;
- Grubbs, G.; Mirala, A.; Bischof, D.; Ghasr, M.; Donnell, K. Measurement of the molecular dipole moment using active microwave thermography (AMT). J. Chem. Thermodyn. 2020, 151, 106245. [Google Scholar] [CrossRef]
- Keo, S.A.; Brachelet, F.; Defer, D.; Breaban, F. Detection of Concrete Cover of Reinforcements in Reinforced Concrete Wall by Microwave Thermography with Transmission Approach. Appl. Sci. 2022, 12, 9865. [Google Scholar] [CrossRef]
- Zou, X.; Mirala, A.; Sneed, L.H.; Al Qaseer, M.T.; Donnell, K. Detection of CFRP-concrete interfacial debonding using active microwave thermography. Compos. Struct. 2020, 260, 113261. [Google Scholar] [CrossRef]
- Zou, X.; Sneed, L.H.; Mirala, A.; Al Qaseer, M.T.; Donnell, K. Debonding detection of defected CFRP-concrete interface using active microwave thermography. Compos. Struct. 2023, 310. [Google Scholar] [CrossRef]
- Taraghi, I.; Łopato, P.; Paszkiewicz, S.; Fereidoon, A. State-of-the art non-destructive techniques for defects detection in nanocomposites foam-core sandwich panels containing carbon nanotubes: IR thermography and microwave imaging. Polym. Test. 2018, 73, 352–358. [Google Scholar] [CrossRef]
- Lai, W.L.; Kou, S.C.; Poon, C.S.; Tsang, W.F.; Ng, S.P.; Hung, Y.Y. Characterization of Flaws Embedded in Externally Bonded CFRP on Concrete Beams by Infrared Thermography and Shearography. J. Nondestruct. Evaluation 2009, 28, 27–35. [Google Scholar] [CrossRef]
- Sultan, A.A.; Washer, G. A pixel-by-pixel reliability analysis of infrared thermography (IRT) for the detection of subsurface delamination. NDT E Int. 2017, 92, 177–186. [Google Scholar] [CrossRef]
- Keo, S.A.; Szymanik, B.; Le Roy, C.; Brachelet, F.; Defer, D. Defect Detection in CFRP Concrete Reinforcement Using the Microwave Infrared Thermography (MIRT) Method—A Numerical Modeling and Experimental Approach. Appl. Sci. 2023, 13, 8393. [Google Scholar] [CrossRef]
- Kong, J. A. Electromagnetic Wave Theory; EMW Publishing: Cambridge: MA, USA, 2000. [Google Scholar]
Figure 1.
The geometry of the microwave antenna used in the numerical modelling.
Figure 1.
The geometry of the microwave antenna used in the numerical modelling.
Figure 2.
Modelled samples: (a) a sample without any defects (NDS), (b) a sample with one defect located in the center of the epoxy layer (CDS), (c) a sample with the defects simulating the ageing process located at the rim of the epoxy and composite layers (ADS), (d) a sample with both: ageing defects and central defect (CADS).
Figure 3.
Designing the defects simulating the ageing process (dimensions in mm): (a) the model of two possible depths of the defect – the defect located within the epoxy and composite layers and the defect located only in the epoxy layer, (b) marked frame at the reinforcement surface shows the localization of all the generated defects related to ageing, (c) the visualization of the effect of the defects generation in COMSOL.
Figure 4.
The model geometry and meshing: (a) a presentation of the model geometry for one od the cases (CADS), (b) the full meshing of the model, (c) the meshing of the sample.
Figure 4.
The model geometry and meshing: (a) a presentation of the model geometry for one od the cases (CADS), (b) the full meshing of the model, (c) the meshing of the sample.
Figure 5.
The MIRT test with CFRP specimen: (a) photo of the inside of the protection enclosure, (b) schema of the experimental set-up (top view).
Figure 5.
The MIRT test with CFRP specimen: (a) photo of the inside of the protection enclosure, (b) schema of the experimental set-up (top view).
Figure 6.
Utilized sample: (a) initial state, (b) the same sample after 10 years of natural ageing process.
Figure 6.
Utilized sample: (a) initial state, (b) the same sample after 10 years of natural ageing process.
Figure 7.
Exemplary raw result of the numerical simulation (CADS case). Themperature distribution after 100 s of heating.
Figure 7.
Exemplary raw result of the numerical simulation (CADS case). Themperature distribution after 100 s of heating.
Figure 8.
The comparison of the thermograms for 3 time steps (10, 50 and 100 s of heating) shown for two cases: (a) NDS, (b) CDS.
Figure 8.
The comparison of the thermograms for 3 time steps (10, 50 and 100 s of heating) shown for two cases: (a) NDS, (b) CDS.
Figure 9.
The comparison of the thermograms for 3 time steps (10, 50 and 100 s of heating) shown for two cases: (a) ADS, (b) CADS.
Figure 9.
The comparison of the thermograms for 3 time steps (10, 50 and 100 s of heating) shown for two cases: (a) ADS, (b) CADS.
Figure 10.
The exemplary result of the experiment showing the whole sample – concrete with the reinforcement layer.
Figure 10.
The exemplary result of the experiment showing the whole sample – concrete with the reinforcement layer.
Figure 11.
The comparison of the temperature distribution for 3 time steps (10, 50 and 100 s of heating) shown for the experimental result.
Figure 11.
The comparison of the temperature distribution for 3 time steps (10, 50 and 100 s of heating) shown for the experimental result.
Figure 12.
The ROI (Region Of Interest) defined for the numerical and experimental results: (a) NDS, (b) CDS, (c) ADS, (d) CADS, (e) experimental result, (f) the region defined for the “no-defect” case for the experimental result.
Figure 12.
The ROI (Region Of Interest) defined for the numerical and experimental results: (a) NDS, (b) CDS, (c) ADS, (d) CADS, (e) experimental result, (f) the region defined for the “no-defect” case for the experimental result.
Figure 13.
The comparison between the computed mean values for the chosen ROI: (a) NDS (blue line) vs CDS (orange line), (b) ADS (blue line) vs CADS (orange line), (c) experimental result: orange line – ROI covering the defect, blue line – ROI covering the non-defected area.
Figure 13.
The comparison between the computed mean values for the chosen ROI: (a) NDS (blue line) vs CDS (orange line), (b) ADS (blue line) vs CADS (orange line), (c) experimental result: orange line – ROI covering the defect, blue line – ROI covering the non-defected area.
Figure 14.
The temperature differences computed between the mean values of ROI for the cases: (a) the difference between ADS and NDS, (b) the difference between CADS and CDS.
Figure 14.
The temperature differences computed between the mean values of ROI for the cases: (a) the difference between ADS and NDS, (b) the difference between CADS and CDS.
Figure 15.
The comparison between the time- temperature characteristics for the mean values computed for ROI for the numerical result (CADS) and experimental result (ROI covering the defected area).
Figure 15.
The comparison between the time- temperature characteristics for the mean values computed for ROI for the numerical result (CADS) and experimental result (ROI covering the defected area).
|
Disclaimer/Publisher’s Note: The statements, opinions and data contained in all publications are solely those of the individual author(s) and contributor(s) and not of MDPI and/or the editor(s). MDPI and/or the editor(s) disclaim responsibility for any injury to people or property resulting from any ideas, methods, instructions or products referred to in the content. |
© 2024 by the authors. Licensee MDPI, Basel, Switzerland. This article is an open access article distributed under the terms and conditions of the Creative Commons Attribution (CC BY) license (http://creativecommons.org/licenses/by/4.0/).
