1. Introduction
Reinforced concrete represents the predominant technology in the modern built environment, providing essential infrastructure for residential, commercial, and industrial purposes. These constructions’ durability and structural integrity are crucial for guaranteeing long-term safety and functionality. The necessity of non-invasive procedures on the existing heritage has raised the birth of several Non-Destructive Testing (NDT) methods as indispensable tools in assessing and monitoring reinforced concrete structures. In recent years, there has been a surge in research and development aimed at advancing NDT techniques for reinforced concrete assessment. This surge is driven by the growing need for accurate and reliable evaluation methods to ensure the longevity and performance of existing structures and optimize the design and construction of new ones. Furthermore, the plans for many of the buildings from the last decades of the last century are no longer available, so there is a strong interest in recovering structural information regarding these buildings to certify their compliance with recent safety standards, including seismic.
The evolution of NDT techniques has been marked by a continual refinement of traditional methods and the emergence of cutting-edge technologies. Modern instrumentation and signal processing algorithms have enhanced traditional methods, such as ultrasonic testing (UT), rebound hammer(RH), and electromagnetic methods, enabling more precise and detailed assessments. Simultaneously, novel approaches, including ground-penetrating radar (GPR), digital image correlation (DIC), and acoustic emission testing (AET), have gained prominence for their ability to provide deeper insights into the internal health of reinforced concrete.
Bensaber
et al. (2023) investigated the influence of load on cubic concrete specimens against the accuracy of ultrasonic test [
1]. Yin
et al. (2023) proposed a nonlinear ultrasonic technique for in-situ monitoring of cracks and defects of ultra-high performance fiber reinforced concrete structures under tensile load [
2]. Kuchipudi and Ghosh (2024) suggested an enhancement in detecting defects in reinforced concrete using an automated two-stage convolutional neural network [
3]. Therefore, Alavi
et al. (2024) investigated reinforced concrete specimen’s strength by using the SonReb method combined with a machine learning algorithm [
4]. However, several other non-destructive tests can investigate the health monitoring of reinforced concrete structures. For instance, Jena
et al. (2024) investigated a coal mine overburden effect on strength as a substitute candidate to replace sand in reinforced concrete and analyzed the mechanical response performing Schmidt tests [
5]. Parhi and Patro (2024) assessed the fracture toughness of reinforced concrete structures by operating the Schmidt test and retrieving the rebound number [
6]. Thermal imaging (TI) is efficient for large-scale assessments as a versatile tool in non-destructive tests. In this realm, Keo
et al. (2023) and Woldeamanuel
et al. (2023) used the thermal imaging tool to investigate the health and strength of existing reinforced concrete structures. Notably, the first made applications of microwave infrared thermography for detecting and characterizing defects [
7], the latter proposed a combination of thermal imaging and deep-learning techniques for estimating the real strength of reinforced concrete structures [
8]. Another insightful tool investigating strains of reinforced concrete structures is the Digital Image Correlation (DIC). It is an optical method capable of analyzing complex crack patterns as shown in the works of Cheng
et al. (2023) [
9], Herbers
et al. (2023) [
10], Jin
et al. (2023) [
11], and through other numerical methods in Palladino
et al. (2022) [
12], and Esposito
et al. (2024) [
13].
Several other authors have investigated damage evolution and fracture propagation, such as Sagar and Basu (2023) [
14], and Ma
et al. (2023) [
15] by employing the Acoustic Emission Test (AET) which can detect defects in reinforced concrete by releasing transient stress waves. Beneficial is the combination of different approaches and tests, both numerical and experimental. The present work delves into another set of tests, namely the Radar-based ones. In this context, several contact and contactless radar-type tests emerged and were employed during the last decades due to their capability to work at high frequencies and penetrate and reflect electromagnetic signals at deeper heights into the concrete. For instance, Barrile and Pucinotti (2005) proposed applying contact-type Georadar technology on civil buildings [
16]. Pasculli
et al. (2018) used a dual-polarized Ground Penetrating Radar (GPR) to investigate the health status of reinforced concrete bridges [
17]. Rhee
et al. (2019) proposed an air-coupled GPR to assess the deterioration in concrete bridge decks [
18]. Tosti and Ferrante (2020) provided an overview of the literature on GPR techniques and proposed a new methodological approach for assessing reinforced concrete structures [
19]. In Chang
et al. (2009), several samples of concrete with bars with different diameters and different cover depths are realized and investigated by using a pulsed MALA GPR system (frequency 1 GHz) combined with a Digital Imaging Correlation technique. In [
20] an automated rebar picking algorithm for GPR data of concrete bridge decks is presented. The method is intuitive and useful because makes the image interpretation independent from the user expertise. Finally, Marchisotti and Zappa (2022) studied the possibility of monitoring defects in concrete media by employing a combination of optical Time-of-Flight sensors (ToF) and drone apparatus [
21].
However, it has to be noted that contactless radar-type tests gained popularity in practical applications only a few years ago because of the modern technological enhancements in making lightweight and practical ready-to-use Georadars. Moreover, several difficulties may arise during contactless radar applications due to the distance from structural targets, the choice of proper operative frequencies to penetrate concrete materials, and limitations to returning accurate measures of reinforcement steel bars.
From these perspectives, the present work aims to furnish a first experimental attempt to properly evaluate the real position of steel bars in concrete using the Quasi-Quadratic Inverse Scattering algorithm (QQIS) proposed by Brancaccio (2022) [
22], hence providing answers for future real-operative applications on air-drone radar.
2. Mathematical Formulation
Non destructive evaluation of reinforced concrete by means of measurements of the electromagnetic field collected "outside" the structure falls among the class of inverse scattering problems: the structure is illuminated by an external electromagnetic source and the field scattered under such illumination depends on the internal status of the structure itself. Once a suitable mathematical relationship is established between the parameters of interest and the scattered field, which is known by means of measurements, inverting such relationship allows to recover the parameters’ value. This is, as it is well known, a non linear and ill-posed problem. A complete theoretical insight is beyond the scope of this work, however, it is worth to recall some important features of the interaction between electromagnetic waves and dielectric materials (such the concrete is). First, the illuminating field must penetrate and propagate in the concrete structure, otherwise information about the inside could not be collected from the outside. So, the evaluation of the the power transmitted at the interface and of the attenuation due to internal losses is required. Such problem is addressed in the following with reference to plane wave propagation.
2.1. Attenuation
It is well known that losses cause the exponential decay of the wave amplitude in the propagation direction. Such decay can be calculated for a plane wave by looking at the imaginary part of the wavenumber, whose expression is
where
is the angular frequency,
is the dielectric permittivity of vacuum,
is the relative permittivity, the vacuum permeability
is assumed, and
is the material’s conductivity denoting the presence of induced currents. The expression of a wave propagating, for instance, in the direction of the
z-axis of a reference system
makes it evident the above mentioned exponential decay, where the imaginary part of
k, namely
, provides the attenuation rate per unit length. The reciprocal of
is known as "propagation depth", because it provides the order of magnitude of the depth above which the wave amplitude becomes negligible.
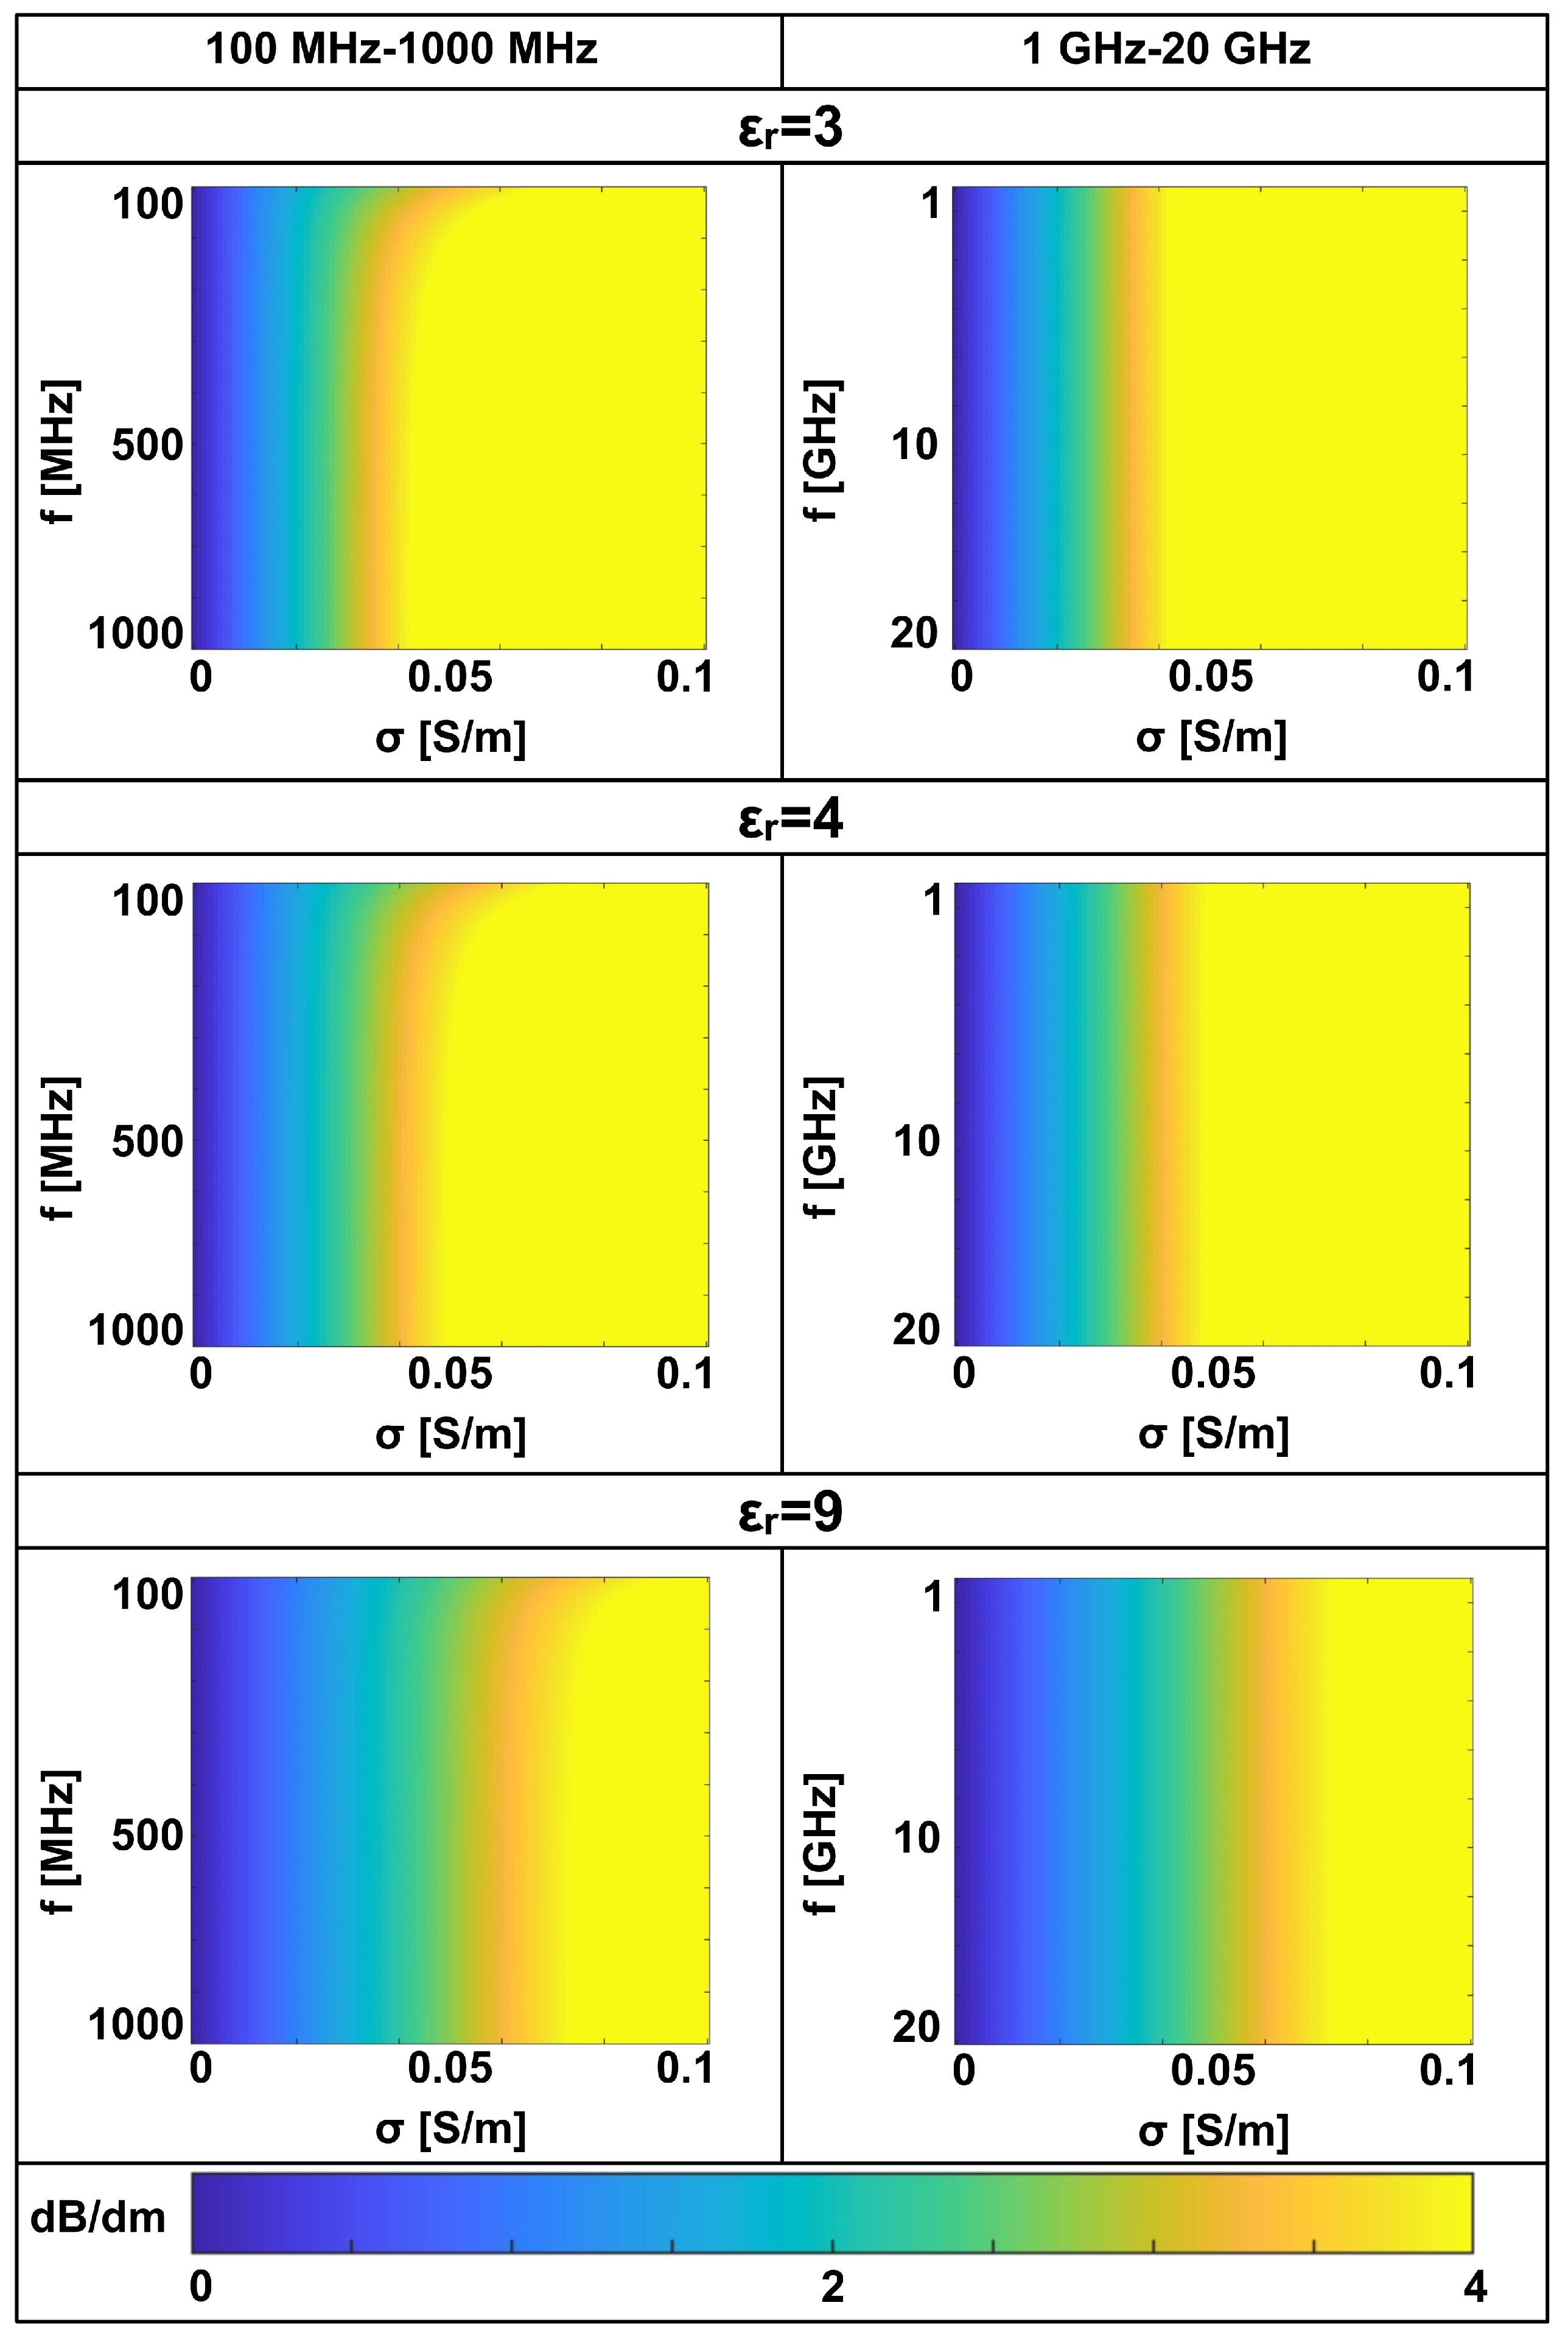
In
Figure 1,
expressed in
, is reported as a function of the frequency and of the conductivity for few different relative permittivity values. It is very interesting to note that, above few hundreds of
, the frequency value does not significantly affect the attenuation. What seriously makes it difficult to penetrate inside the structure for more than few centimeters is the conductivity. However, when the relative permittivity increases the situation becomes more favorable and, noteworthy, higher conductivity values correspond to higher relative permittivity values. We can conclude that inside a concrete structure whose size is a few decimeters the frequency can be kept even much higher than
without affecting the propagation depth. This result is interesting, because in GPR applications it is usually assumed that frequencies higher than
cannot significantly penetrate inside the investigated material [
23].
2.2. Reflection and Transmission
In order to provide a synthetic index, we consider a canonical geometry where a plane wave impinges on the planar interface between air and the concrete, this last denoted by its relative dielectric permittivity
and assuming
for brevity. The Fresnel reflection coefficients, for both transverse electric (TE) and transverse magnetic (TM) polarization, provide the way to evaluate how much of the impinging power is reflected and how much is transmitted inside the medium. As it is well-known, the Fresnel coefficients depend on the incidence angle
, whereas a dependence on the frequency arises only if the dielectric presents losses, i.e. if
is complex valued accounting also for the electric conductivity. Assuming again that the relative magnetic permeability is unitary everywhere, the Fresnel coefficients can be written as
In the following, reference is made to the power density carried by each plane wave (incident, transmitted, reflected), i.e. to the power per unit of surface area
perpedicular to the wave direction of propagation, provided by the amplitude of the real part of the Poynting vector. The transmitted active power density
can be calculated as
with
, where
stands for the incident power density. In
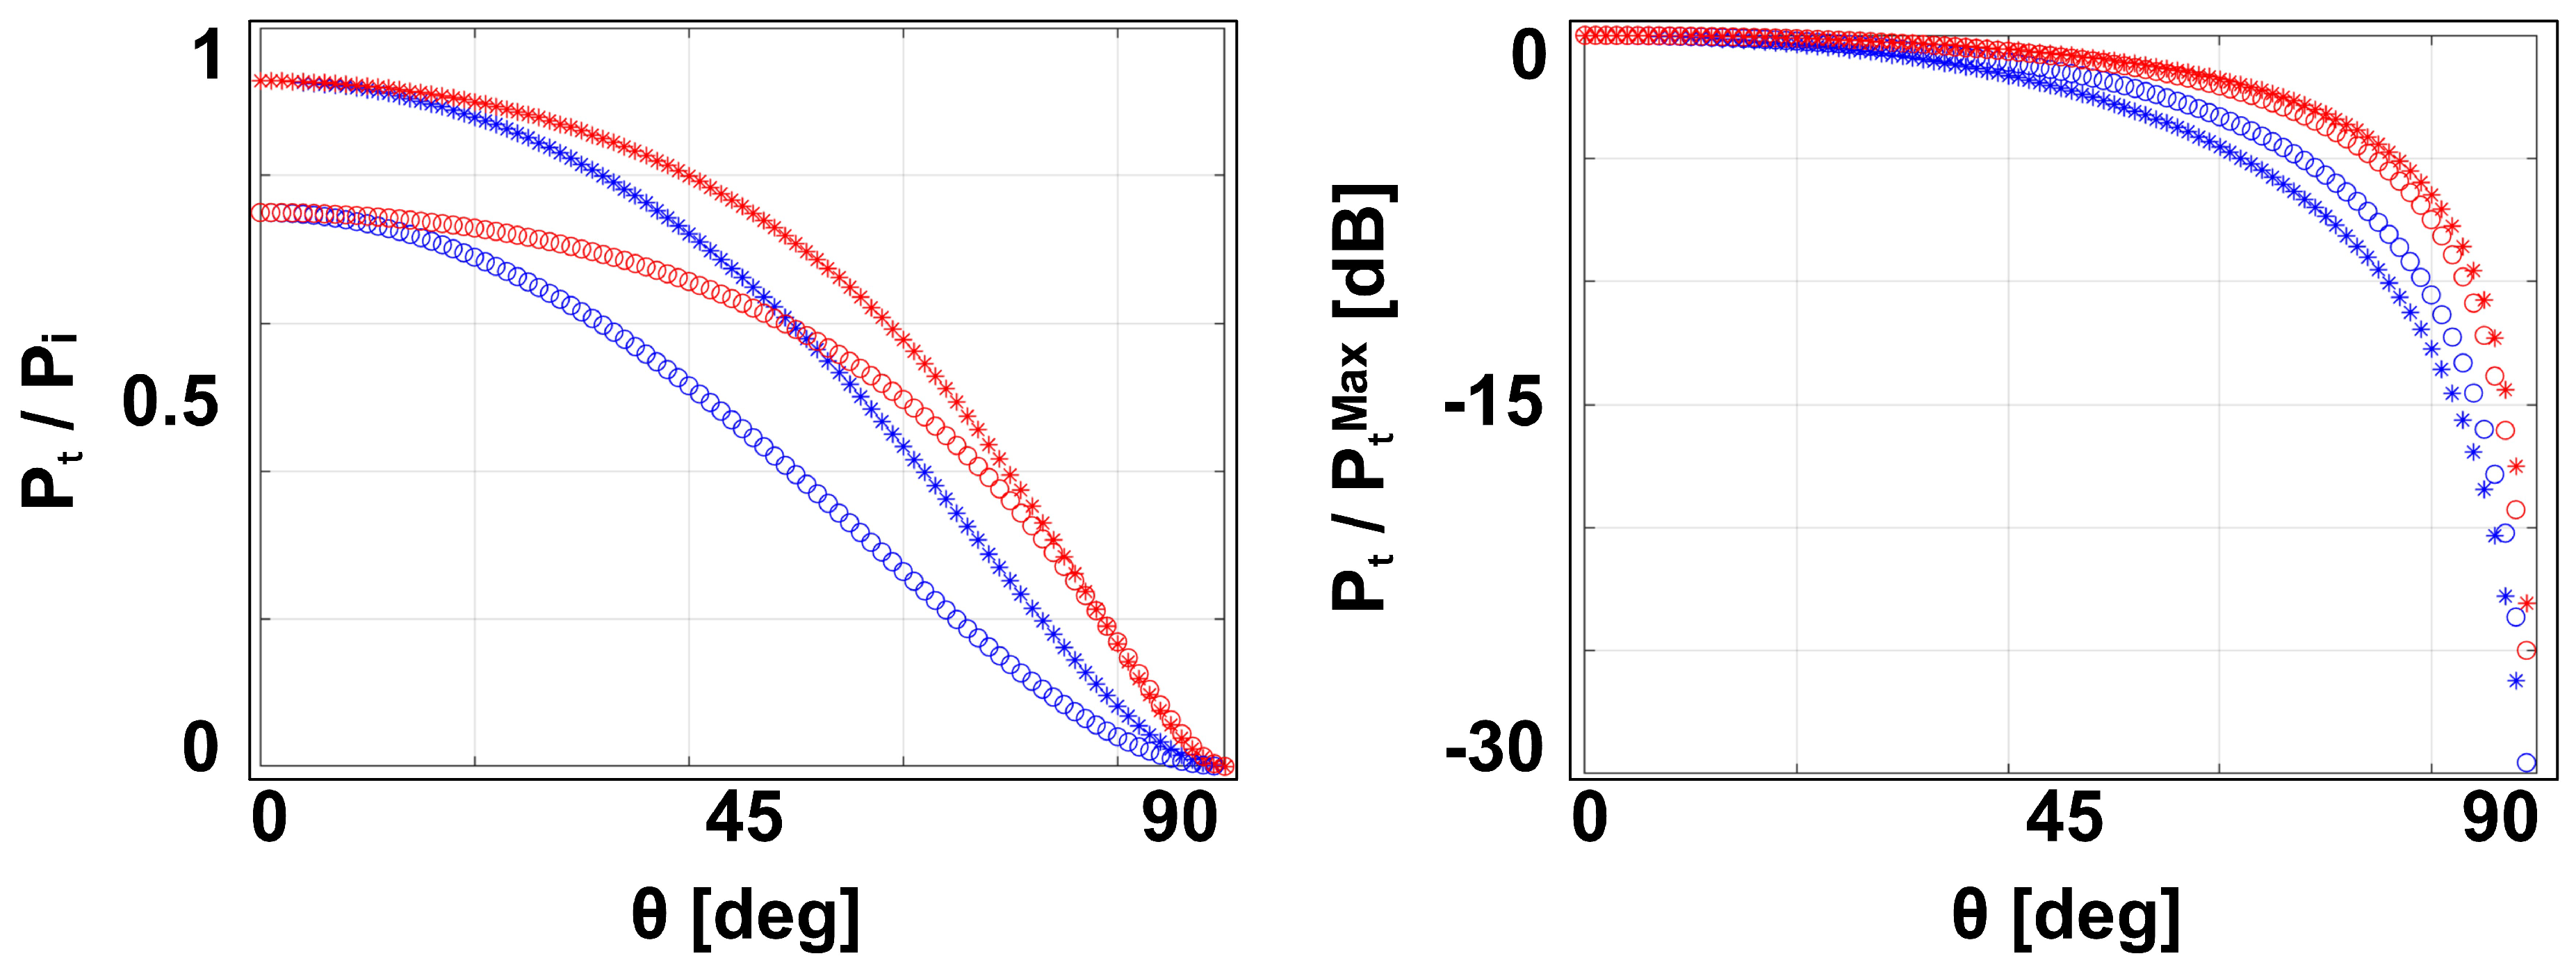
Figure 2 the normalized transmitted power, calculated by Equation (
4), is shown as a function of the incidence angle for two permittivity values. As it can be appreciated, TM polarization performs better than TE in both cases providing a higher transmitted power. This is due to the well known Brewster angle phenomenon. For both polarizations the transmitted power decreases as the incidence angle
increases. This reduces the angle of view useful to "illuminate" the structure under test, and must be taken into account in the design of the measurement configuration. In order to better understand the role of the incidence angle, the transmitted power normalized to its maximum value, arising at angle
, is shown on the right.
The curves in
Figure 2 suggest that, in case of contactless testing at some distance from the target, the angle of view should be kept approximately below
.
2.3. Bars Detection and Localization
In order to show the feasibility of NDT of reinforced concrete by contactless measurements at frequencies up to
, experimental and simulated data in the X-band
are processed by using the algorithm proposed in [
22]. Let us briefly recall the main features of the algorithm. A 2D geometry is assumed. The reinforced concrete is schematized as a rectangle of width
W and depth
P, where
positions, namely
are "candidate" for the bars. The concrete permittivity and the bars’ radius are known. The source is a filamentary current placed at
. In these hypotheses, the scattered field can be approximated as follows:
where
is the measurement point,
f is the frequency,
is the wave velocity in free space,
is the Hankel function of order zero and second kind, the coefficients
(whose expression is reported in [
22]) depend on the concrete permittivity and shape (rectangular in the considered case) but not on the measurement/ point and source positions, and
The model in Eq. (
5) establishes a linear relationship between the scattered field measured outside the structure under test and the function
, which represents the problem’s unknown. In [
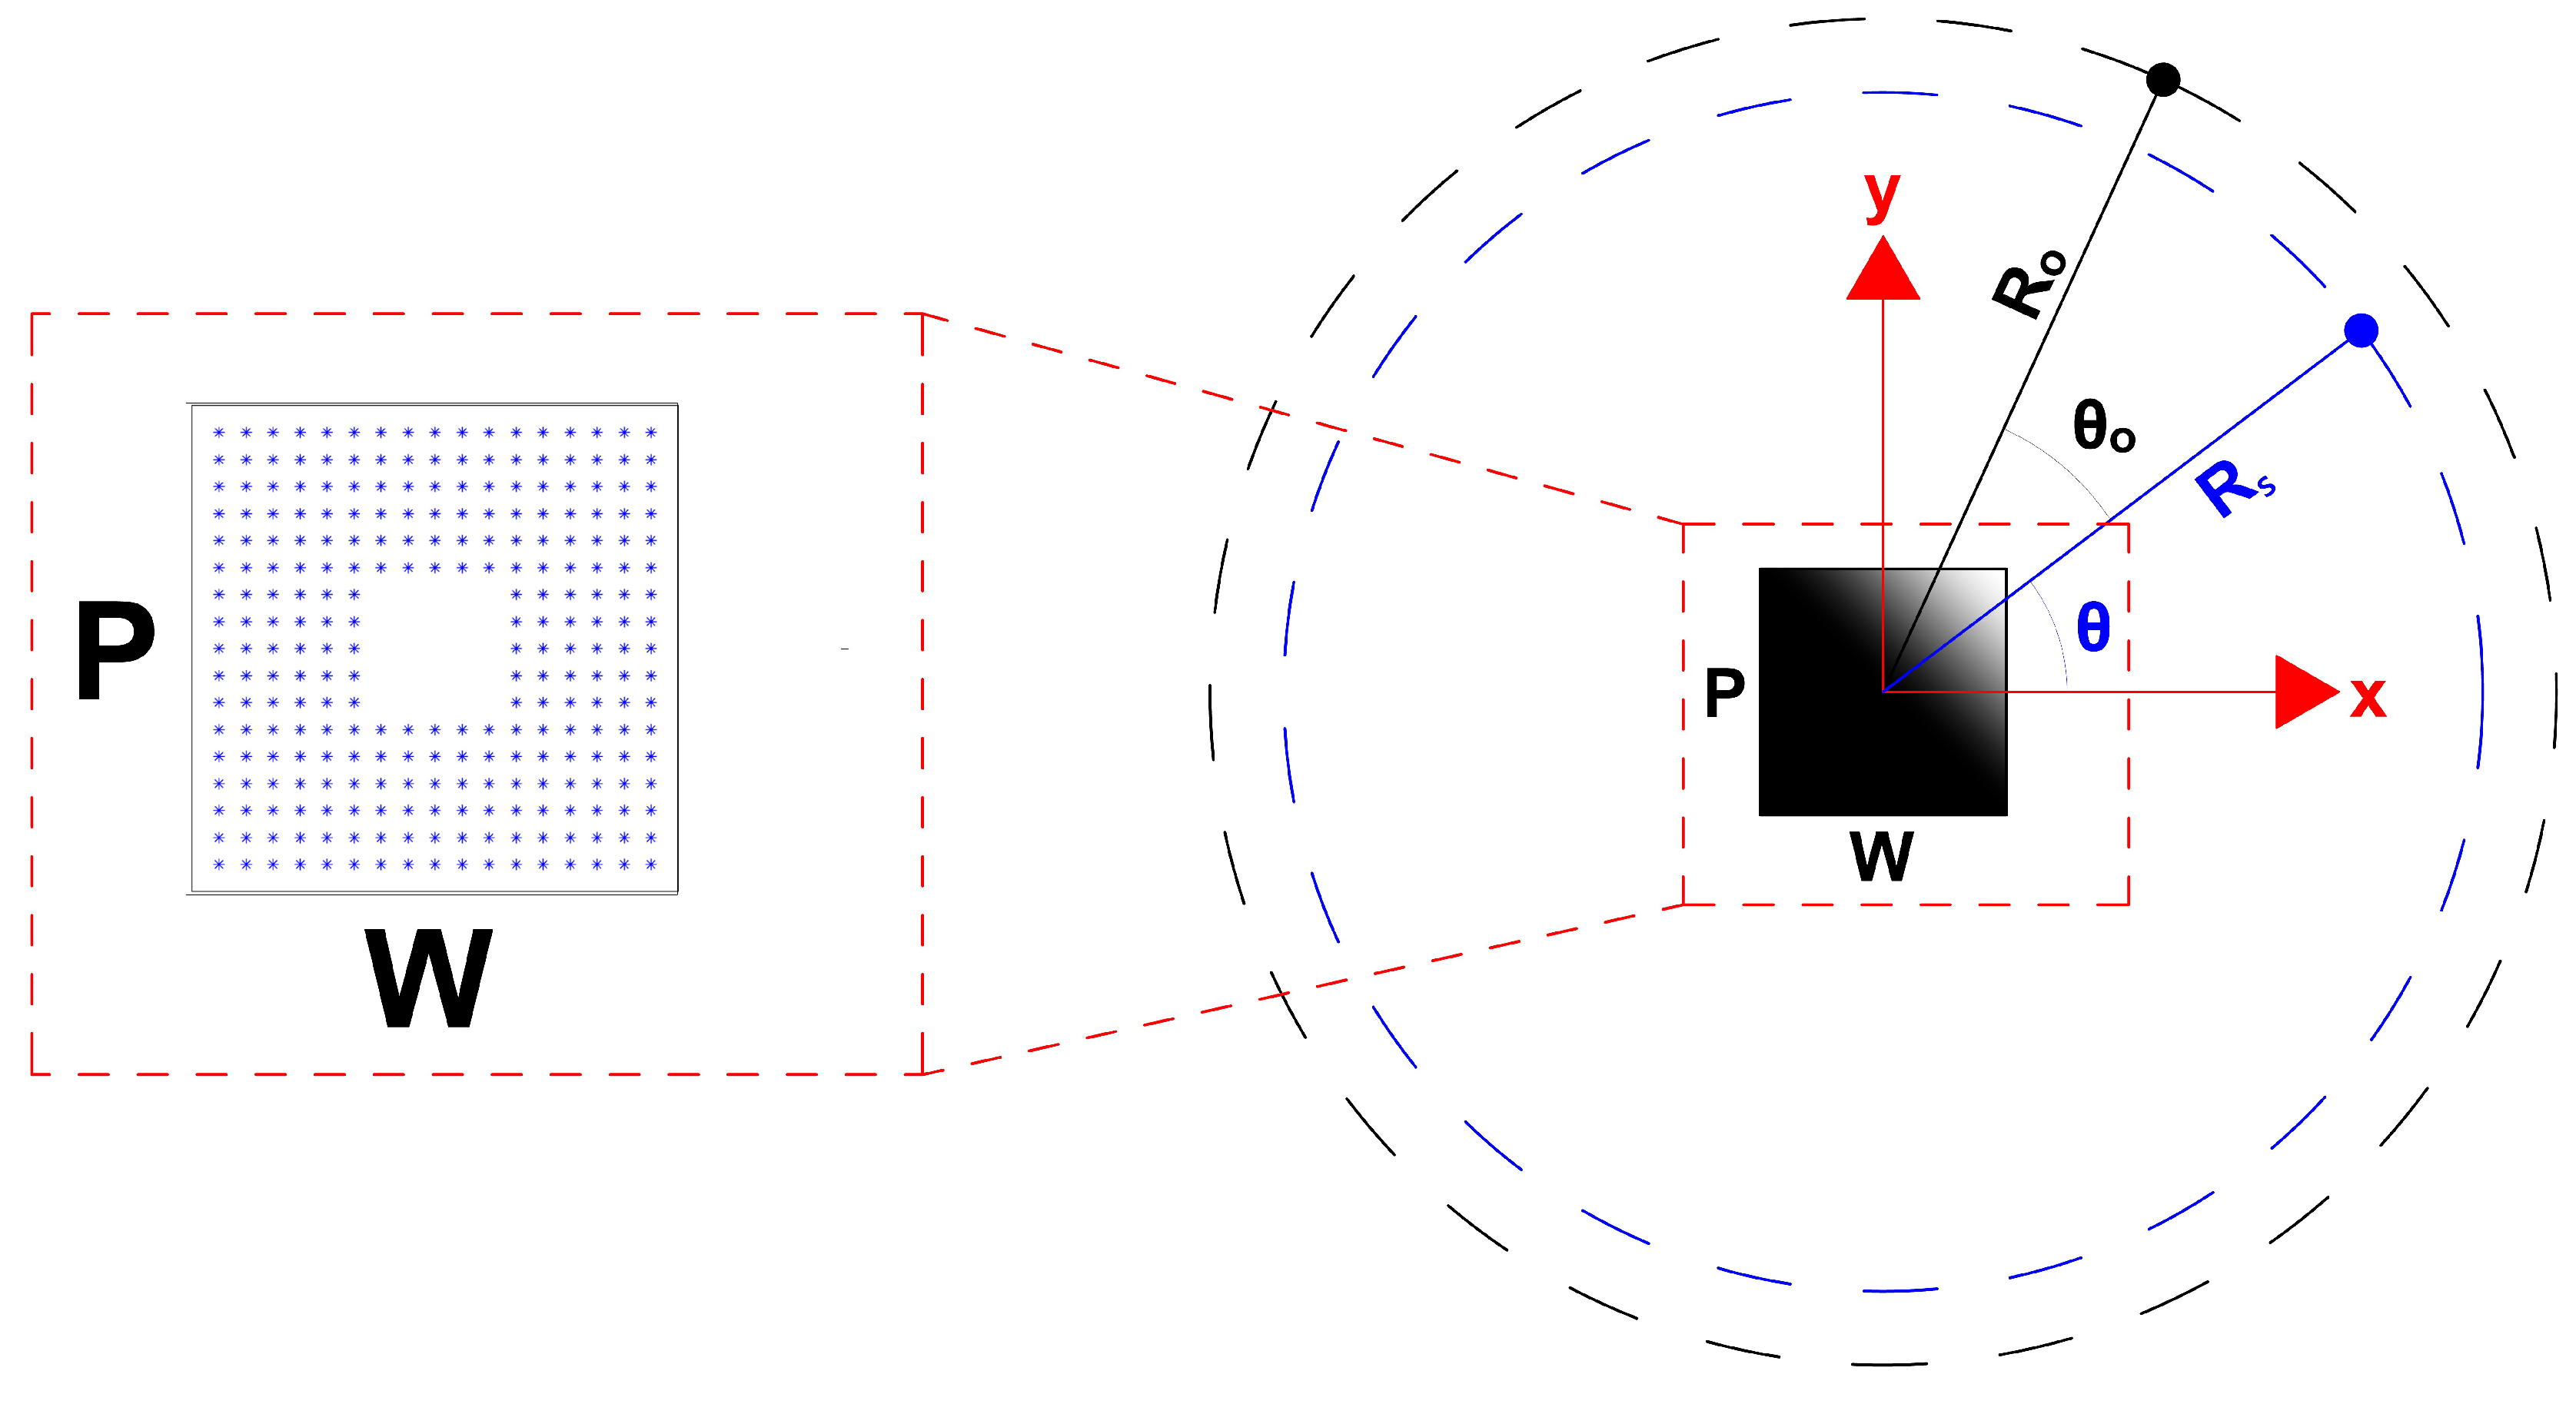
22] multimonostatic illumination along a segment from only one side of the structure under test was considered. Here, we consider measurements on a circle all around the structure, in a multi-bistatic configuration, where the source and observation points scan the circles
and
respectively. In
Figure 3 the measurements geometry and an example of "candidate" positions among which the bars are searched for are depicted. The inversion of the linear operator (
5) is performed by a truncated singular values decomposition (TSVD).
3. Experimental Setup
The laboratory experimental test was conducted in a controlled semi anechoic environment, with panels which guarantees a reflection coefficient at normal incidence of
at
. The measurement setup consists of two horn antennas in the X-band
, one transmitting and one receiving, placed at some distance from the target (i.e. the sample to be investigated). The transmitting and the receiving antennas are connected by coaxial cables to a Vector Network Analyzer (VNA), model "KEYSIGHT P9373A, 300 kHz-14 GHz" (© Keysight Technologies). The operational frequency range represents an innovation in the field of georadar measurements for structural identification. The novelty lies in the fact that standard georadar measurements are typically conducted at frequencies below
. In order to perform measurements all around the target, the antennas are placed in a fixed position and the target rotates. To this scope, the measurement setup includes a rotating table with a diameter of
, moved by means of a stepper motor controlled by a Compumotor S-Drive (© Compumotor Division of Parker Hannifin Corporation, 1997). The laboratory experiment was conducted on several square-section specimens with dimensions of
and a height of
. Some specimens contained only natural dried sand, while others included sand with the presence of steel bars, and some were composed of pozzolanic cement powder (CEM IV/B (P) 32.5 R) with compressive strengths at 2 and 28 days of
and
, respectively, as well as pozzolanic cement powder and steel bars. The steel bars diameter is
and their length
. The specimens were placed at the center of the rotating plate, affixed with an ad-hoc 3D designed support basement with a circular plan on two levels. The lower level has a diameter of
, and the upper level has a diameter of
. This tapered volume solution was conceived to ensure unrestricted rotation of the specimen relative to the footprint of the electromechanical engine. To ensure the vertical positioning of the steel bars within the box-shaped specimen, two square supports of
were created, featuring circular voids with a diameter of
. The geometric models were designed in a CAD environment and transferred to a Bambu Lab X1 Carbon 3D printer (© Bambu Lab EU) with a maximum build volume of
, operating at a maximum hot-end temperature of
. The filament used for printing is a polylactic acid (Bambu Lab PLA Basic) with a density
, tensile strength
, flexural strength
, and elastic modulus
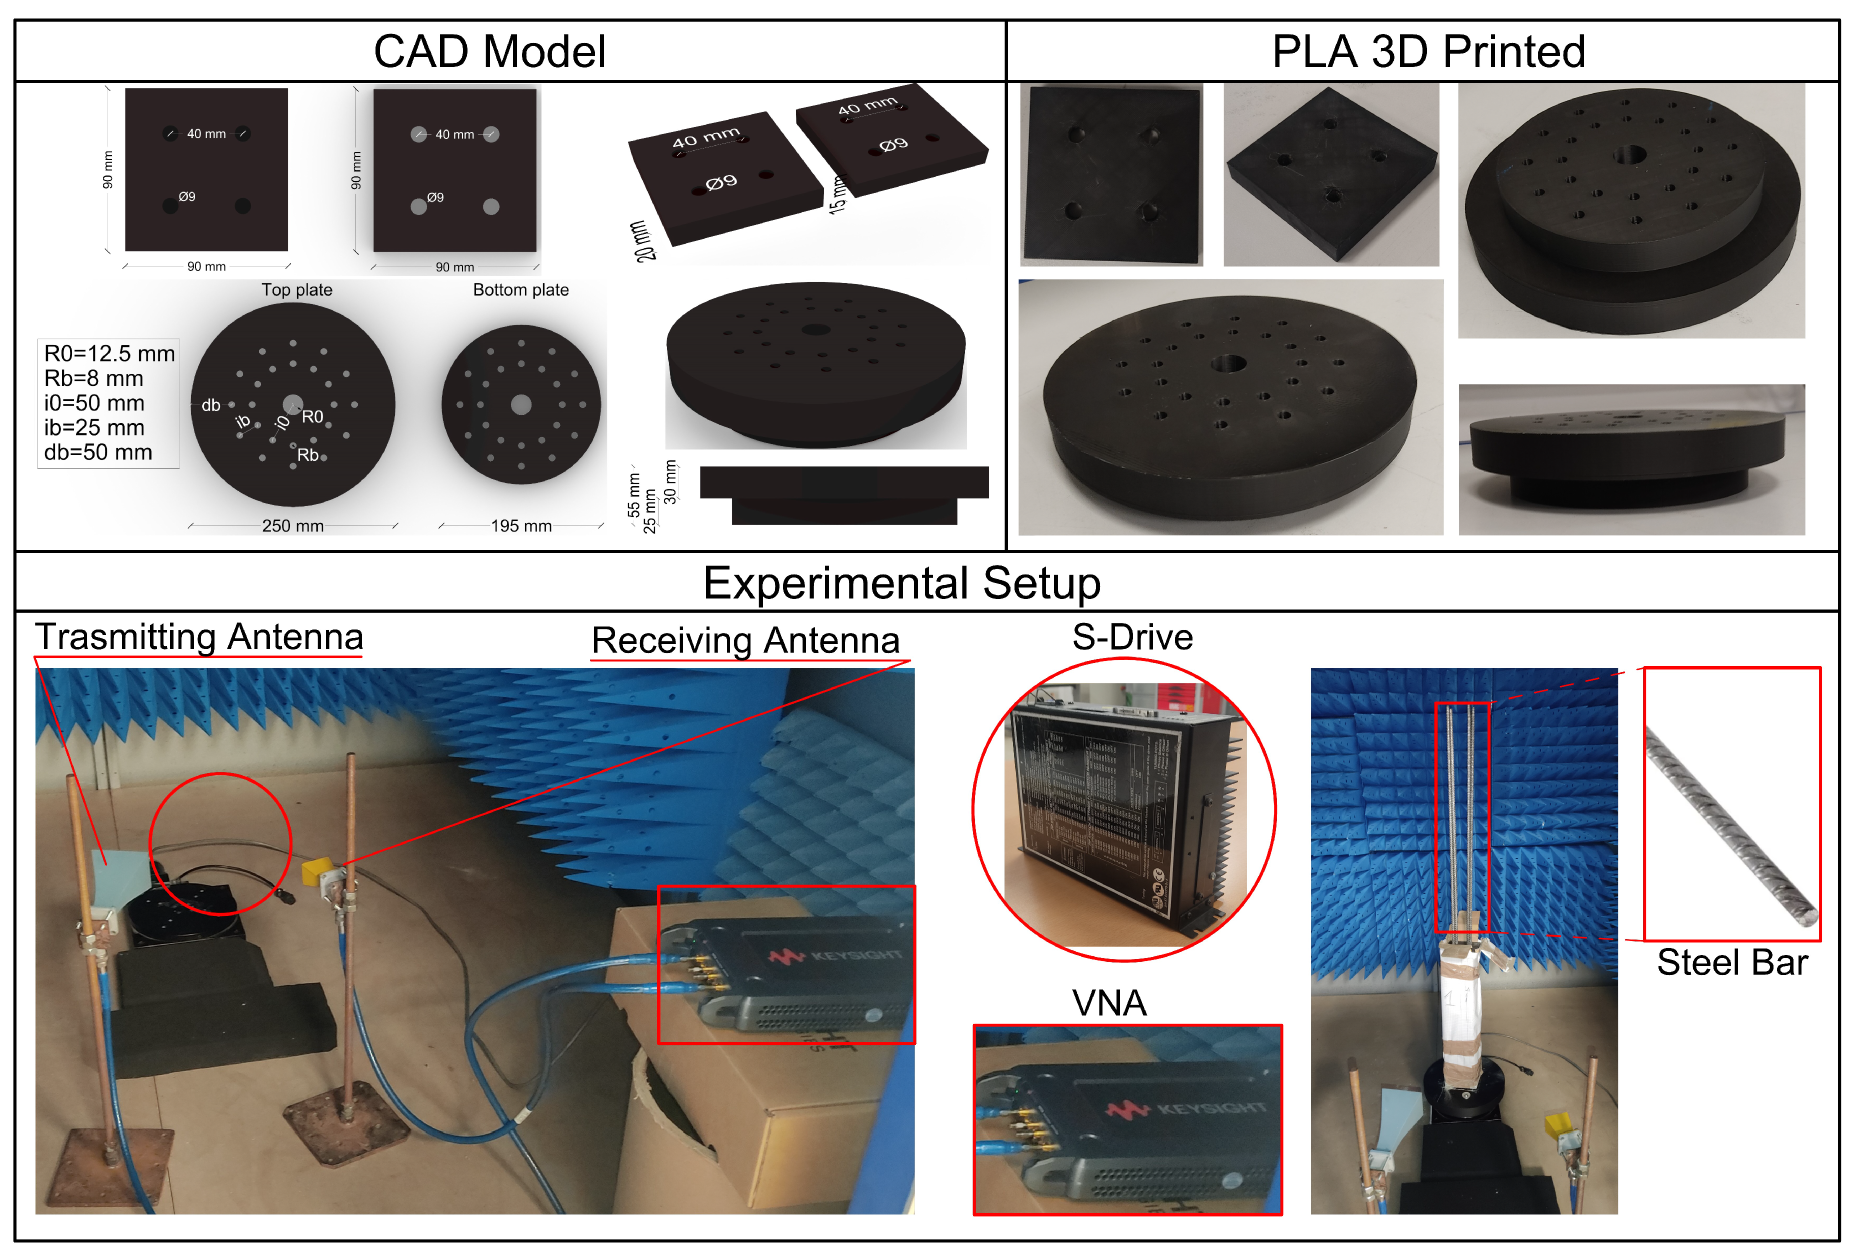
. For clarity and comprehensive information, the entire experimental setup is illustrated in
Figure 4.
Firstly, standard Short Open Load Through (SOLT) calibration of the Vector Network Analyzer (VNA) was performed for all the four scattering parameters () at the end of the cables. This calibration is essential to prevent systematic errors in measurements arising from the non-uniformity of the components comprising the Network Analyzer, aiming to achieve its ideal performance with tolerances of and . The measurement system is controlled via laptop in the Matlab environment (MathWorks Inc.). In particular, movement of the rotating table and VNA data acquisition are synchronized by means of an ad hoc script.
3.1. Measurement Results
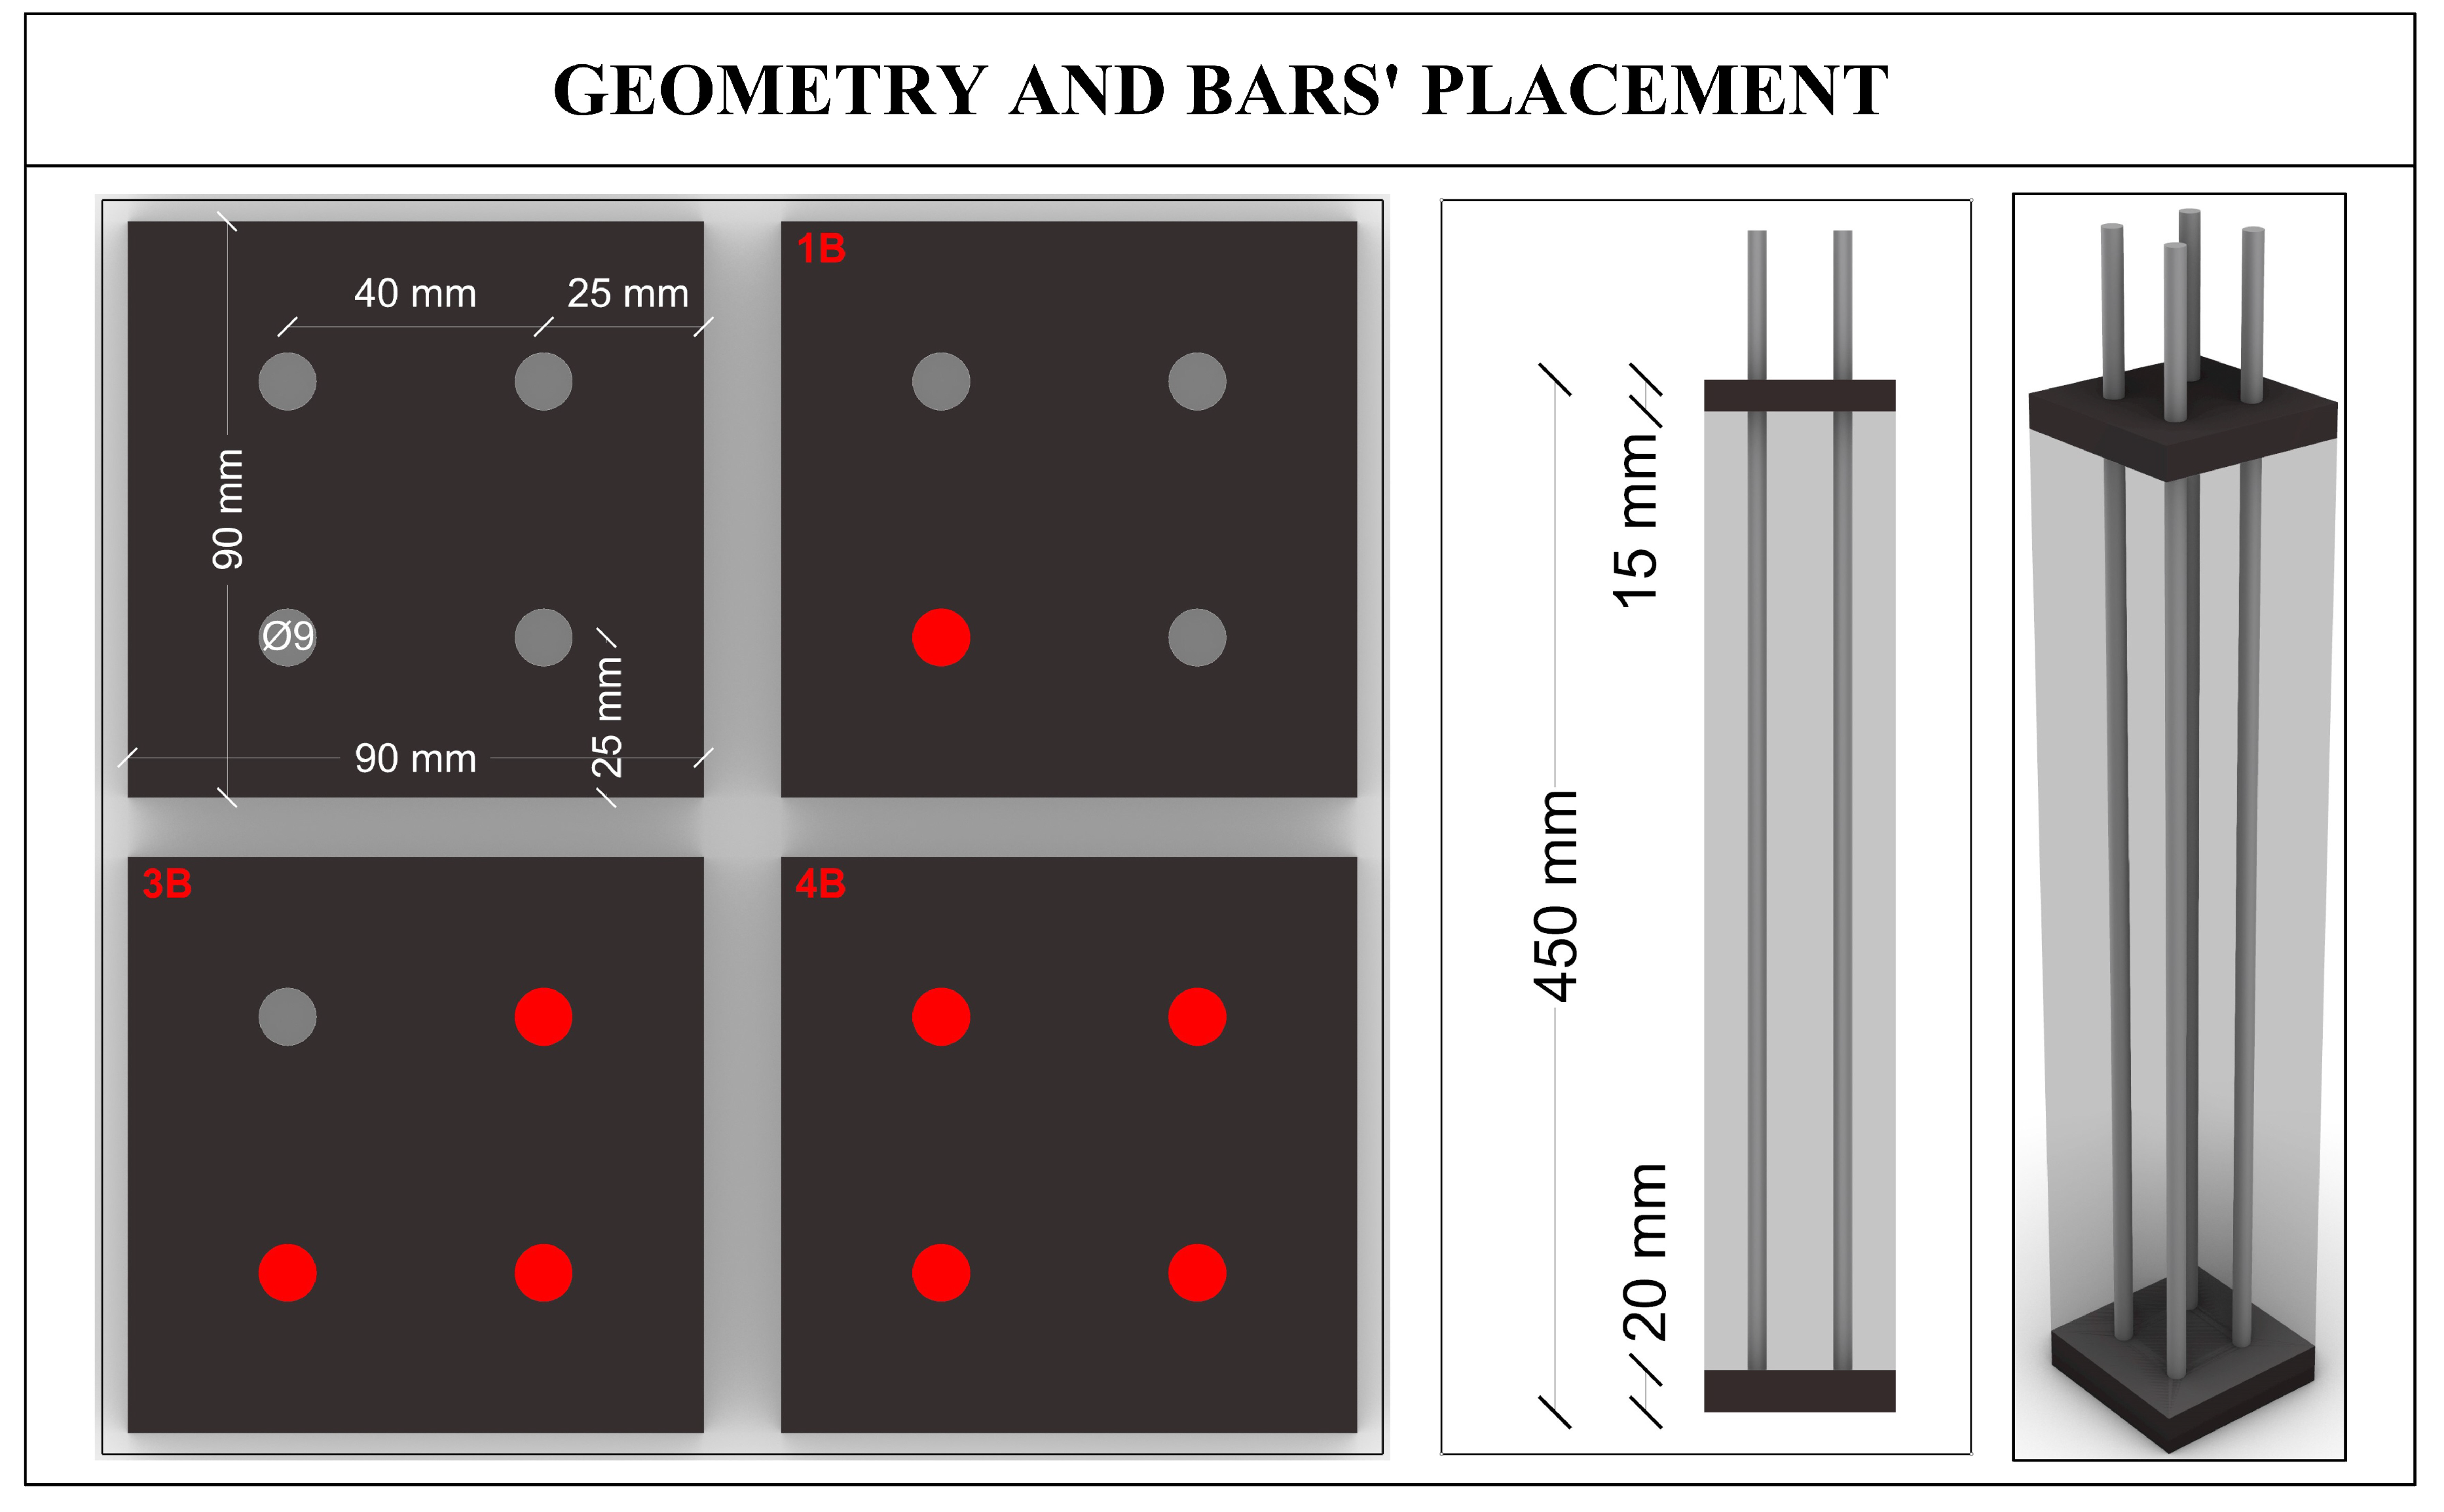
The experimental tests were conducted on the previously described specimens, summarized for clarity in
Table 1 and
Figure 5.
For each measurement, all four scattering parameters
with
were acquired using the VNA for 1601 equispaced frequencies within the
range. In the following, only the
parameter will be referenced, representing the transmission coefficient between the transmitter and receiver antennas ( see
Figure 4). The transmitting and the receiving antennas are placed at the horizontal distance
and
from the rotating table center, respectively, at the stand-off
(see
Figure 3). Measurements on the specimens were conducted by performing a full rotation of the circular plate with an angular step
(resulting in
angular positions for each measurement; the first and last position coincide). This configuration is equivalent to move the antennas over a circle around the target. Firstly, a measurement was taken without specimens to quantify the mutual coupling between the two antennas, which were kept in the same position as during the subsequent measurements on the specimens. Such a mutual coupling is subtracted to measurements in presence of the different specimens. In
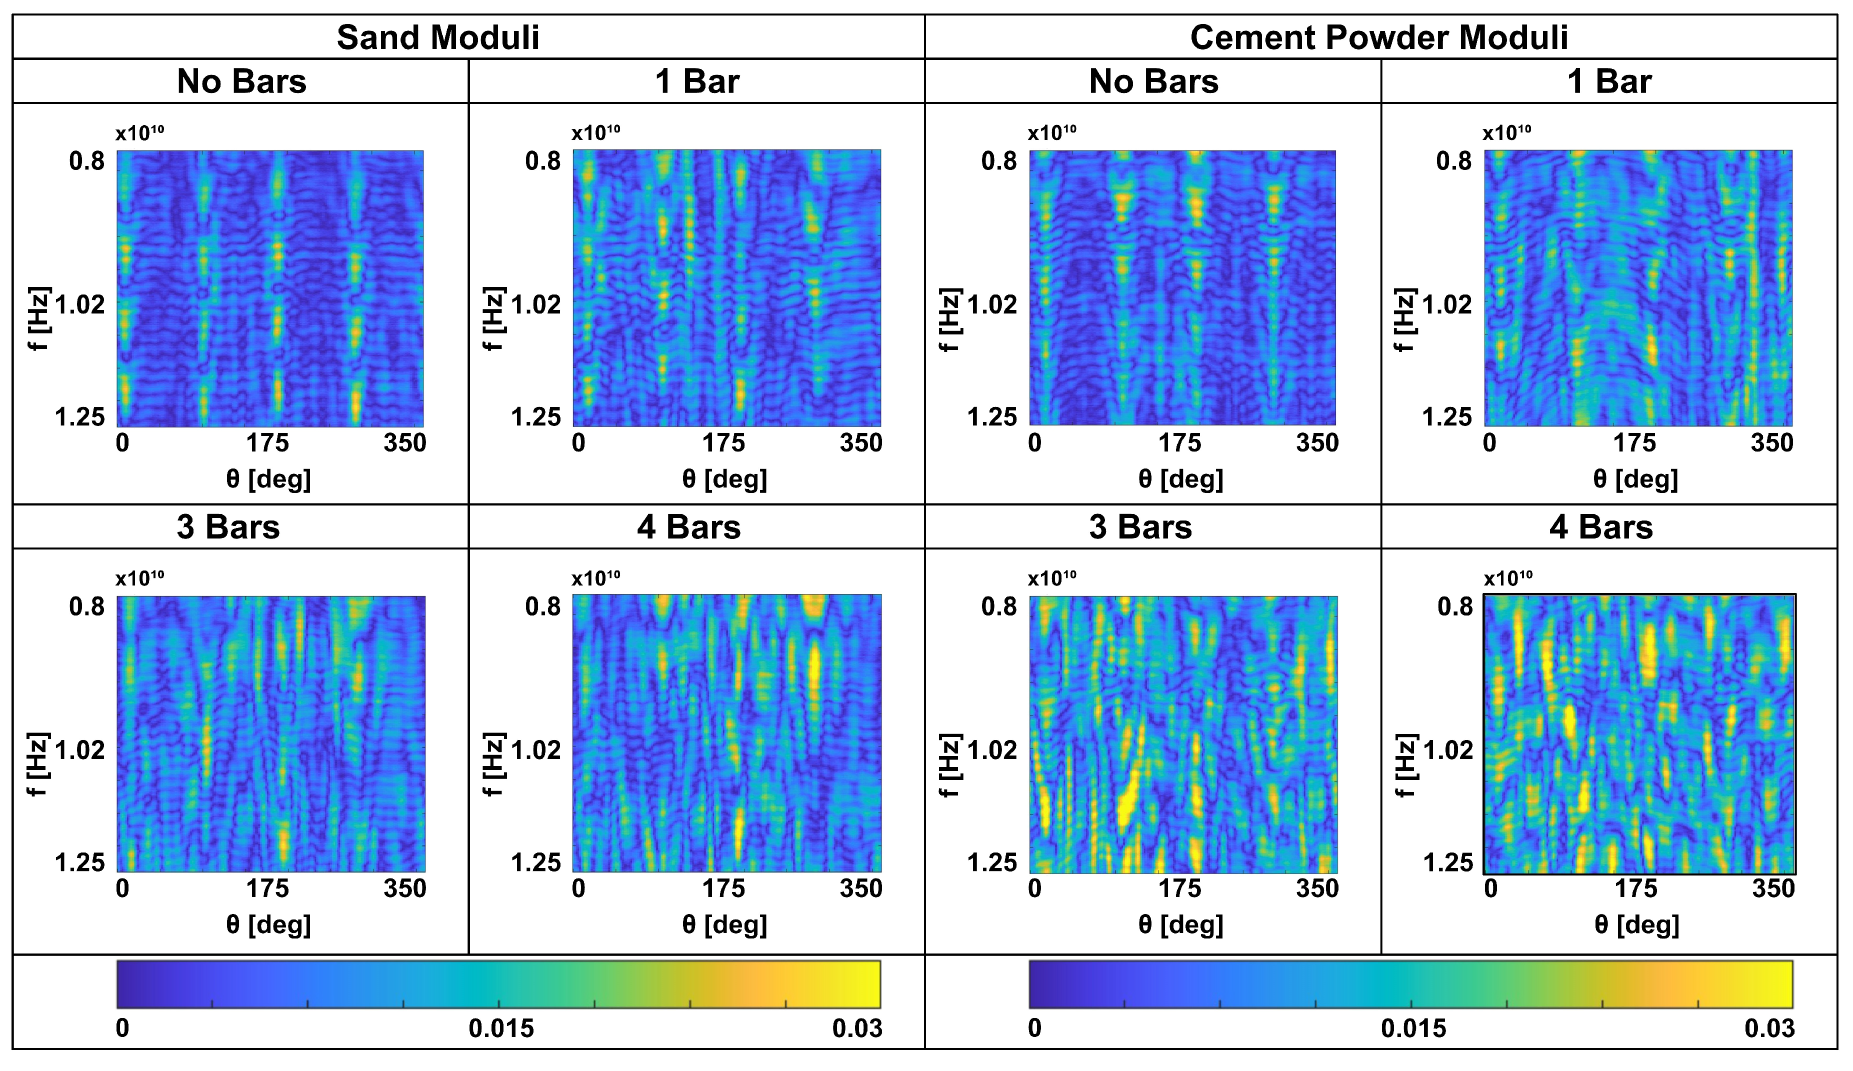
Figure 6 the moduli of the measurements obtained after subtraction of the mutual coupling are shown as a function of the angular position and frequency. It can be appreciated that the overall dynamic, contained below
, is similar for both sand and cement powder targets, with and without bars. Measurements without the bars appear very regular, with four angles where the modulus achieve its maxima. This behaviour is coherent with the fact that there are four angular positions where the transmitting and receiving antennas "see" one of the specimen faces under the same (reflection) angle. Furthermore, it can be appreciated that the presence of the bars significantly modifies the measurements, which from the qualitative point of view appear more "chaotic" as the number of embedded bars increases. This entails that the scattered field measured in the proposed configuration is able to bring information about the inside of the structure. It can be noted that measurements on sand and on cement powder show slightly different amplitudes due to the different material permittivity. As a matter of fact, it is expected that the cement powder has a higher dielectric permittivity than sand, as it is more compact because it has a finer grain. In the laboratory, by means of the measurement of the "flight time" across the specimen, we roughly estimated the cement powder relative permittivity to be
. In order to validate the experimental measurements, a comparison with simulated data is in order. Next section is dedicated to simulation of the field scattered by the cement powder specimens.
4. Numerical Simulation
Scattered field data are simulated using the open-source software GprMax [
24]. It is worth to note that this simulation software provides time-domain analysis. To obtain frequency-domain data, we utilize the available source waveform type
impulse and post-process the data following the procedure suggested in [
25], which simulates a stepped-frequency radar.
We maintain the same geometry and target dimensions as in the experimental measurements: a square target with sides
made of dielectric material with relative permittivity
, representing concrete, with one or more bars embedded. The presence of either 1, 3, or 4 bars is simulated using perfect electrically conducting cylinders with a diameter of
, positioned at the same locations as in the experimental tests (depicted in
Figure 5).
The source is a hertzian dipole scanning a circle of radius , while the observation point scans a circle of radius at a stand-off angle of with steps of . We employ the impulse waveform for the source, and the resulting A-scans are post-processed to obtain data at equispaced frequencies in the X-band range of .
In
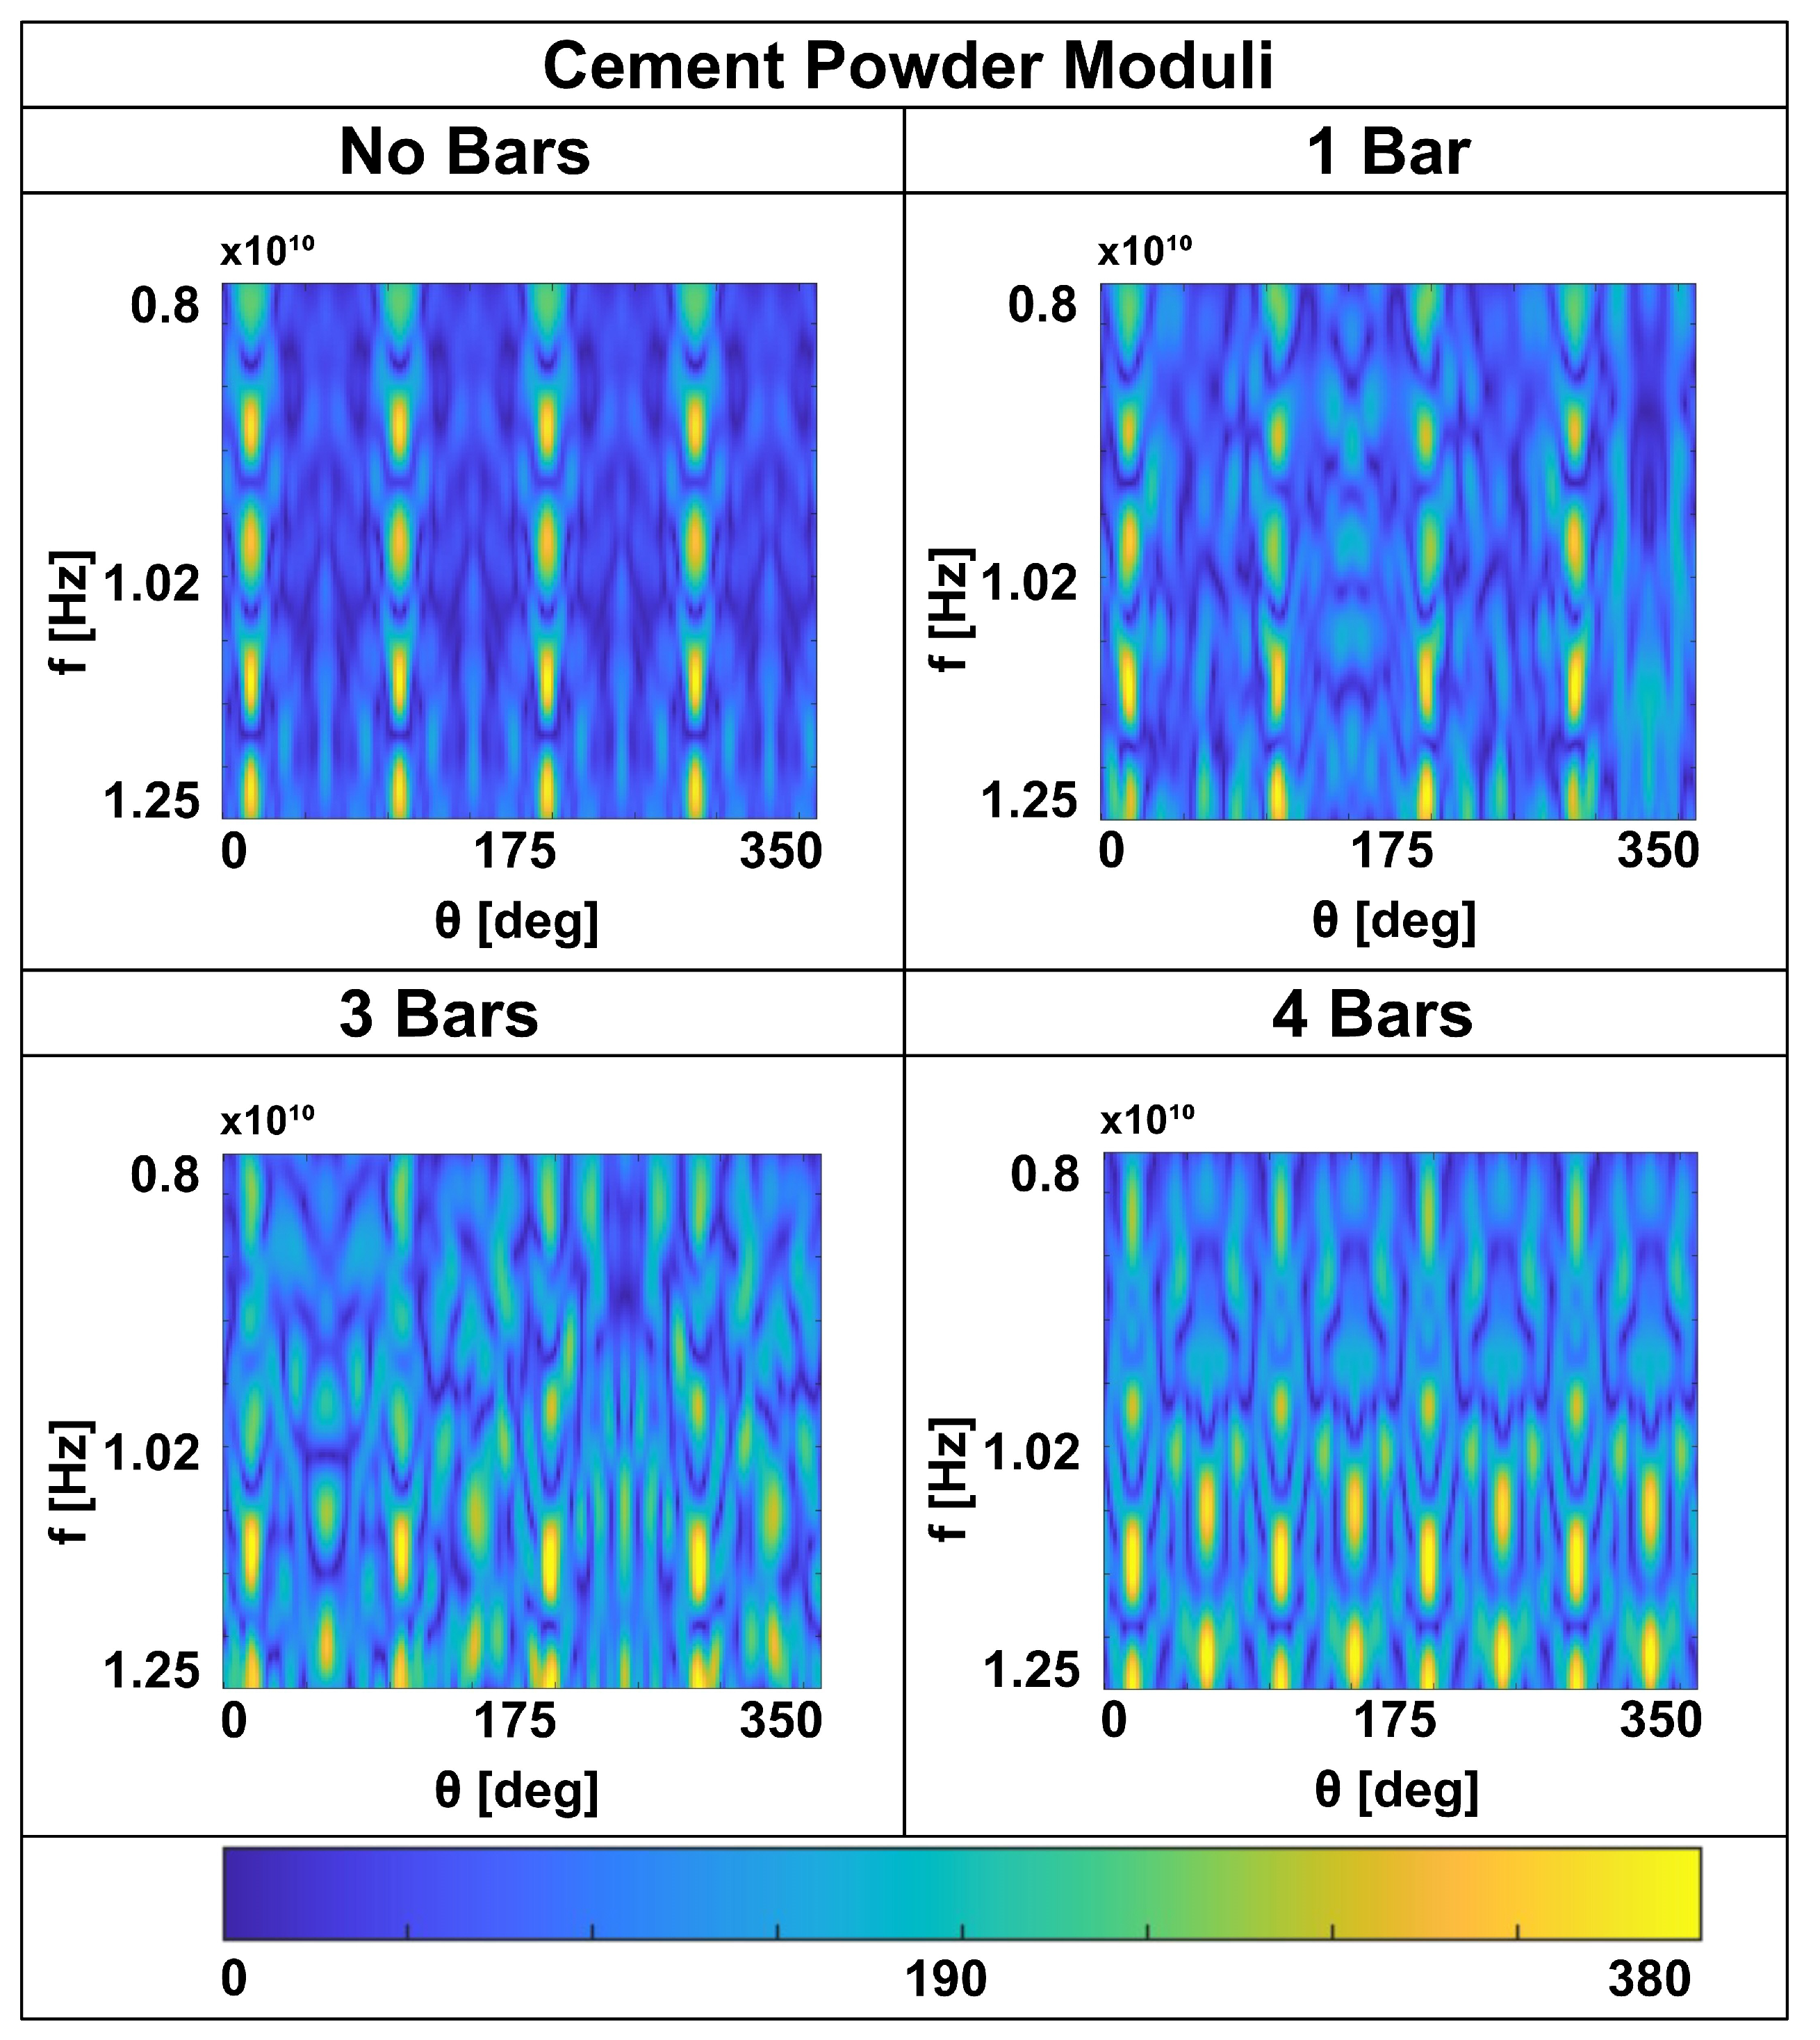
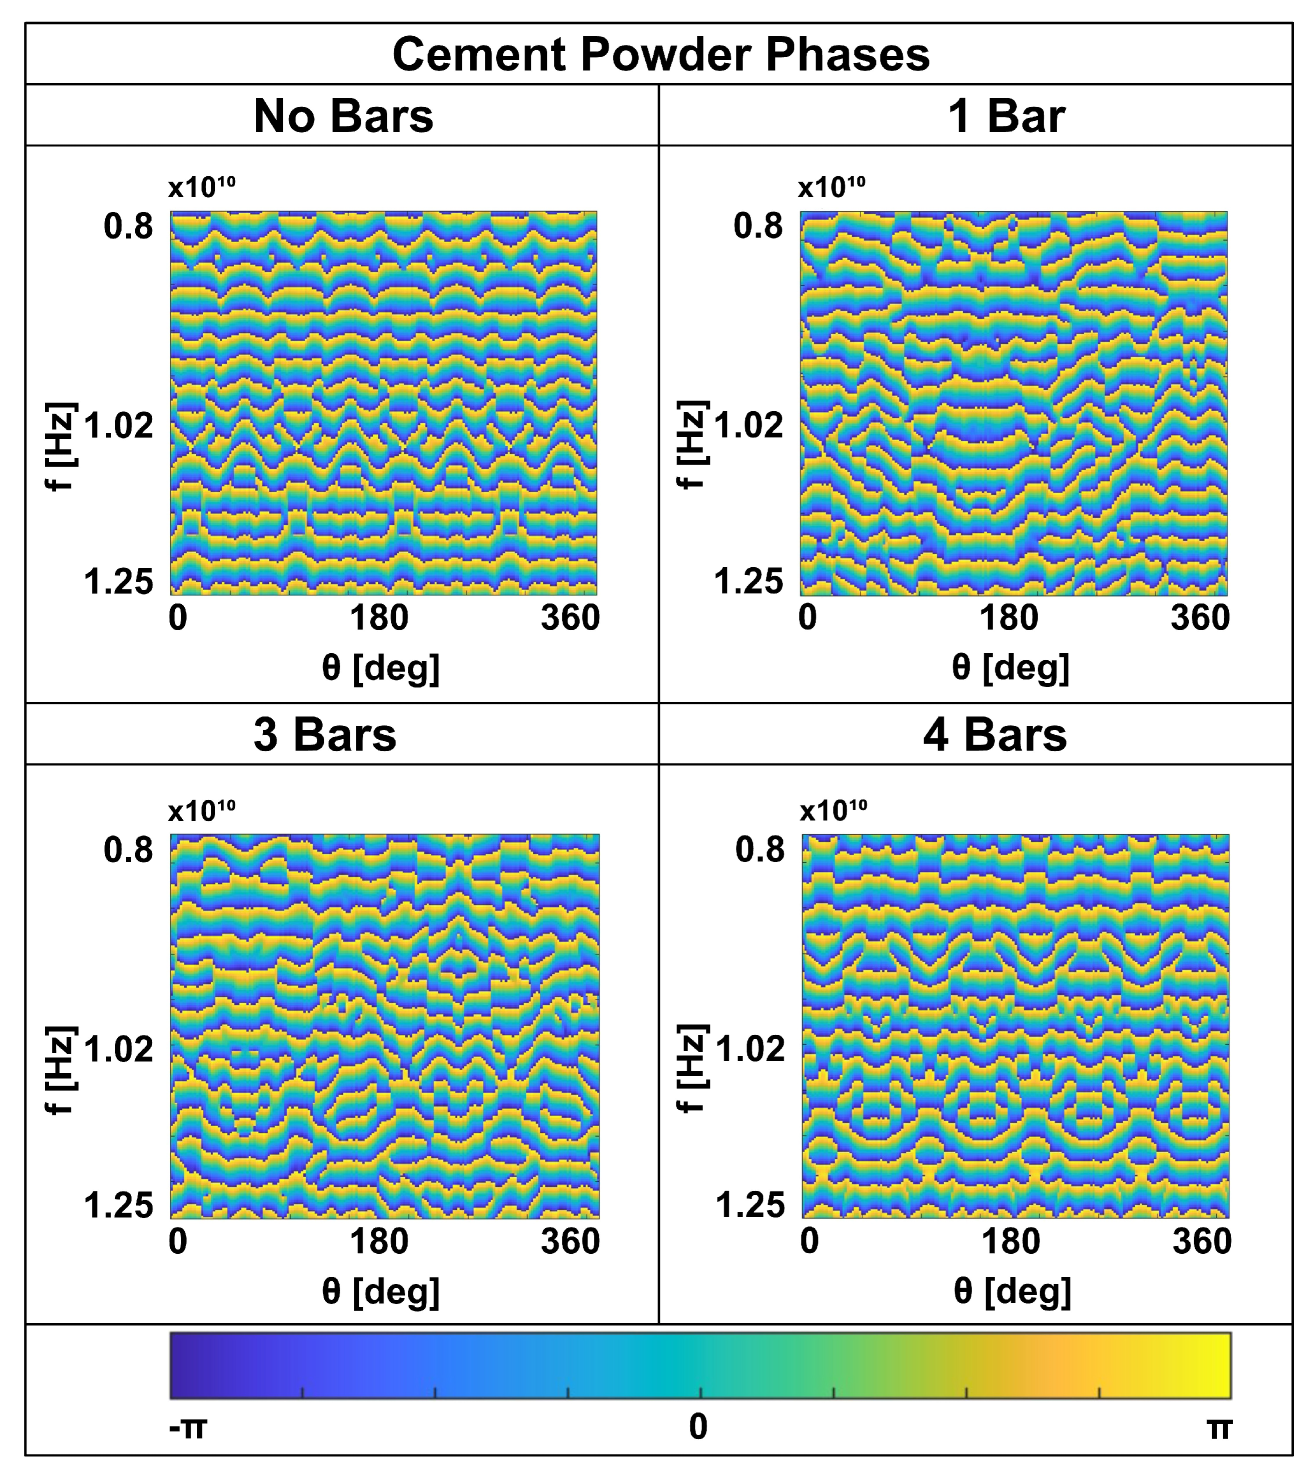
Figure 7 and
Figure 8, we present the moduli and phases of the numerical scattered field data as functions of frequency and angle. Although the numerical simulations exhibit a smoother pattern than the measurements, similar behavior is observed: maxima appear at four angles corresponding to the reflection positions when the dielectric is without embedded cylinders. The presence of bars, which interfere with the field propagating inside the dielectric, significantly alters the modulus and phase of the simulated scattered field. This evidence confirms the feasibility of detecting bars within a concrete structure using non-contact measurements in the X-band frequency range.
In order to analyze further the experimental measurements and to possibly introduce corrections useful for the subsequent detection stage, we compare simulation and experimental results in the time domain. This task is accomplished by performing the inverse fast fourier transform (
ifft) of the available frequency domain data, so obtaining a sort of
radargram. Note that usually radargrams refer to antennas moving on a straight line, whereas in the case at hand the spatial variable accounts for the angular displacement. In
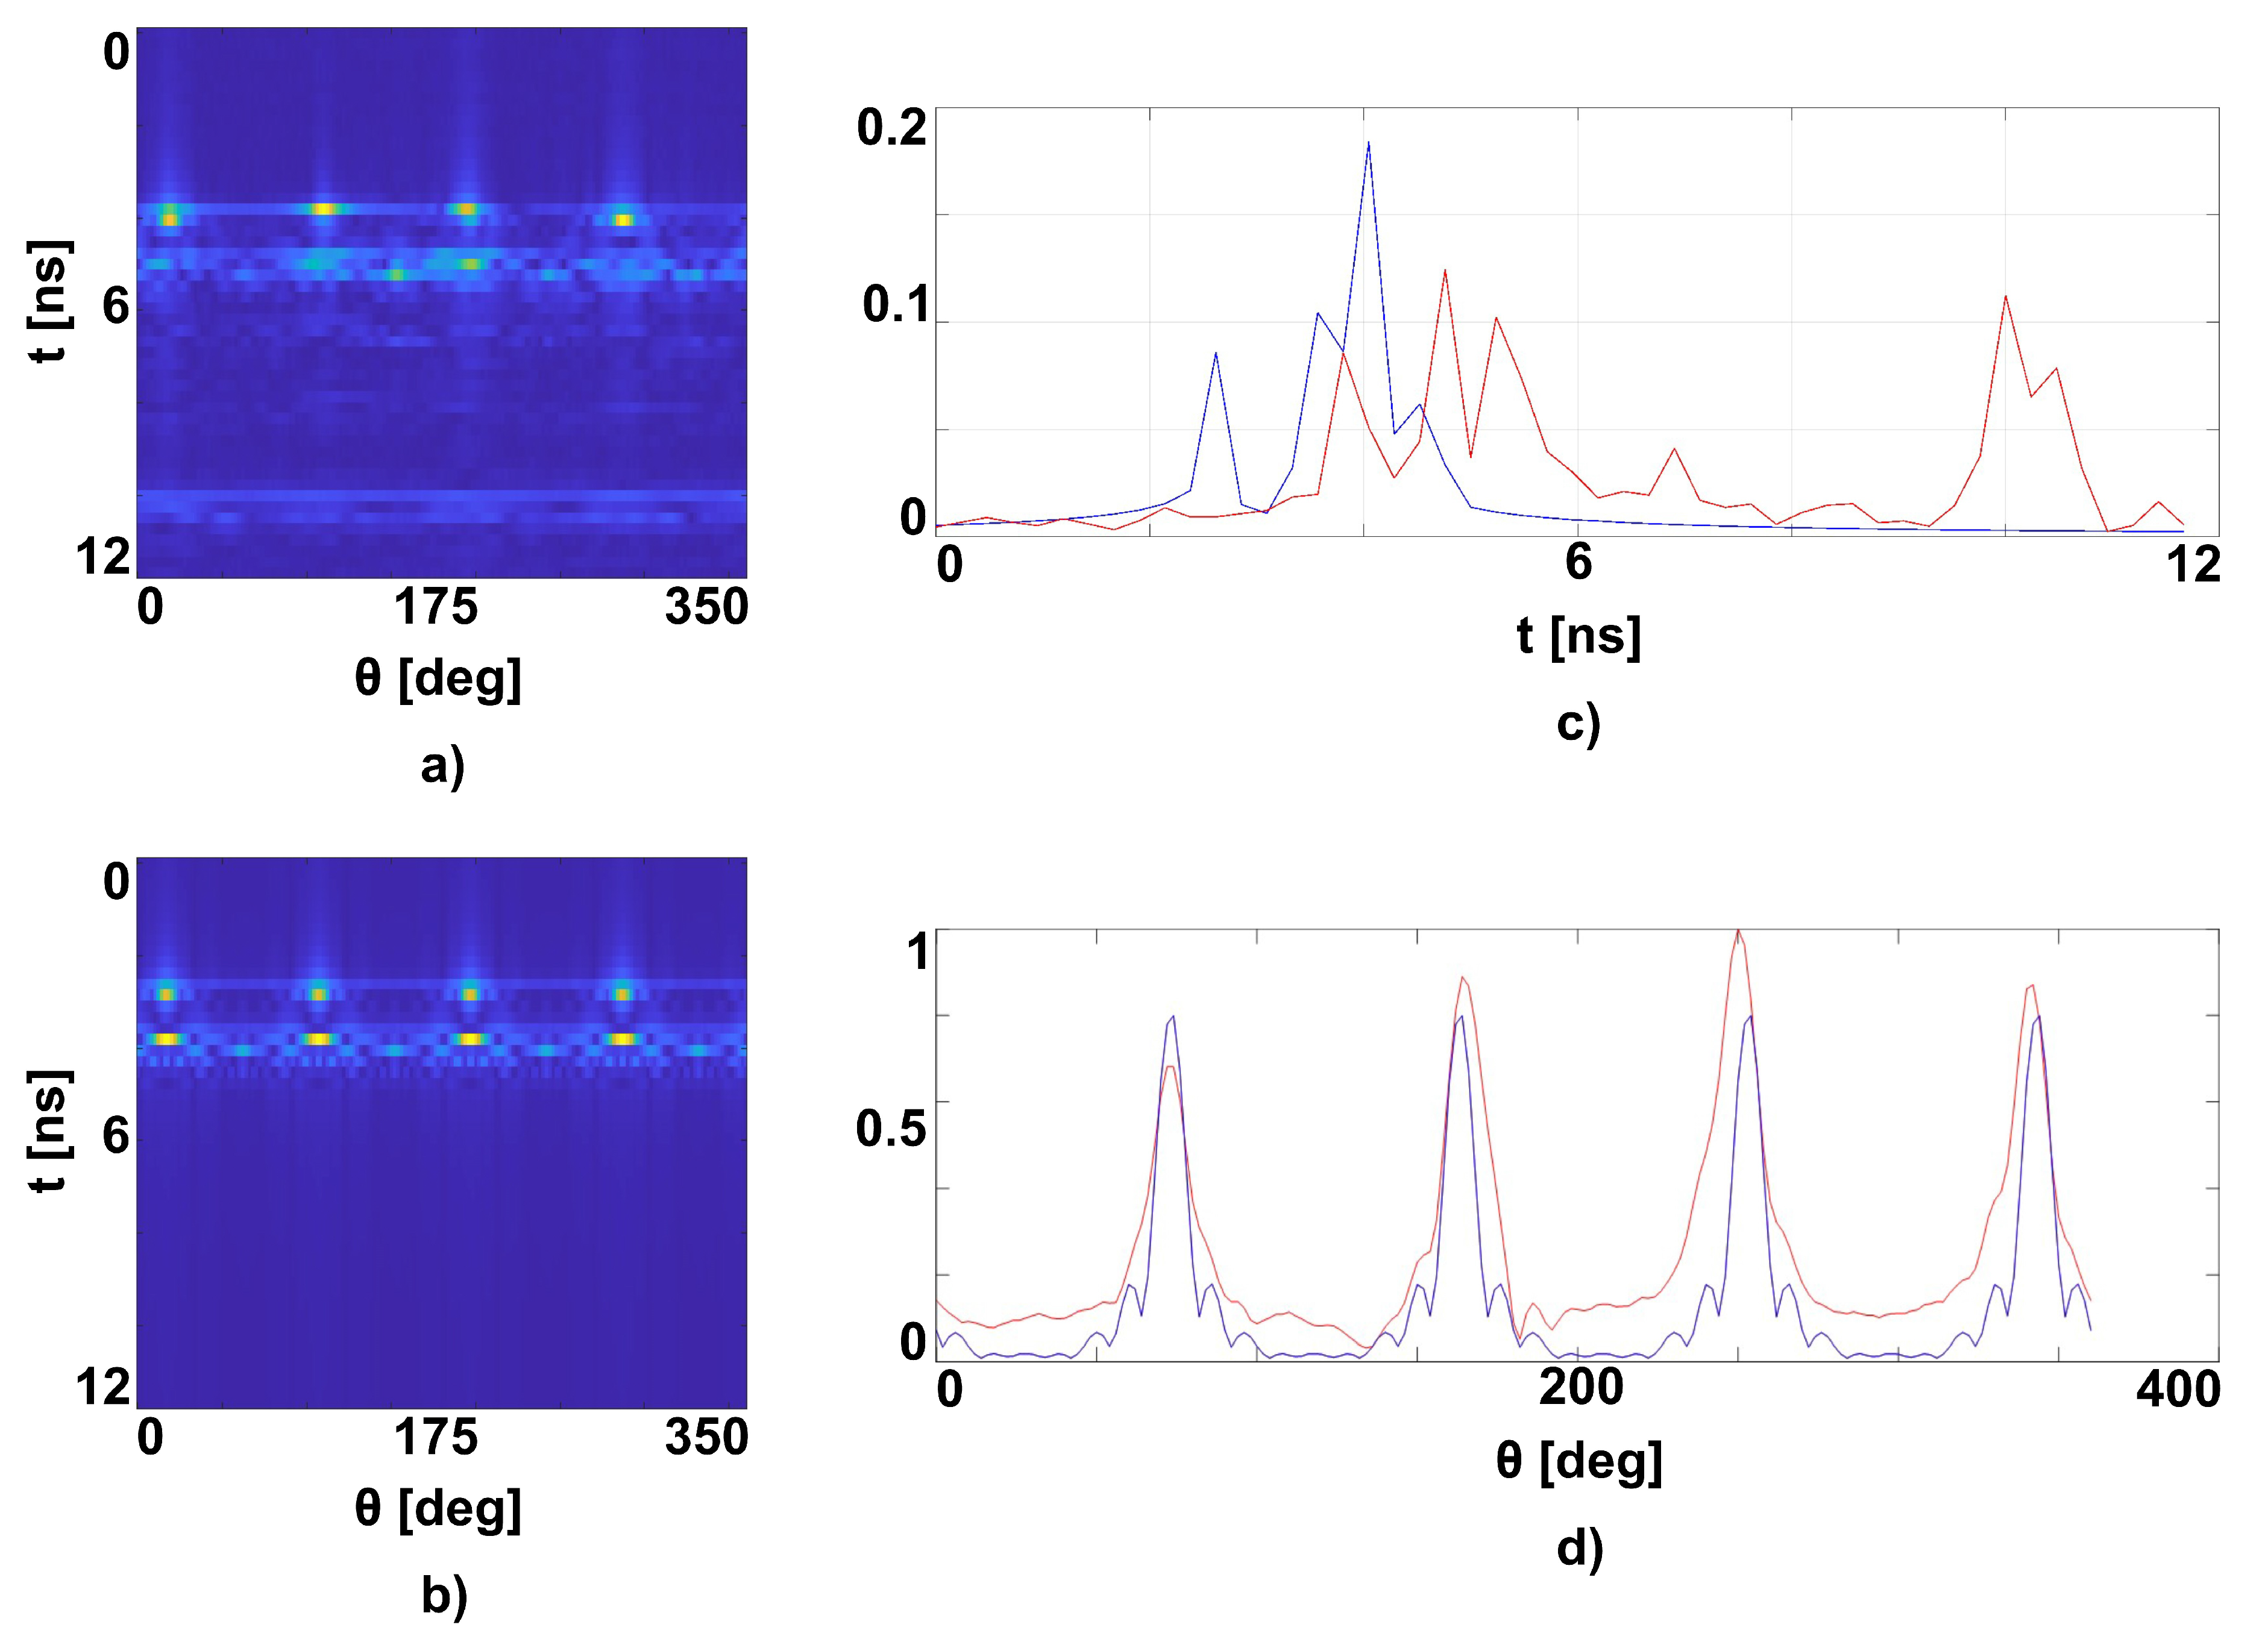
Figure 9 the obtained
ifft results for the GprMax simulated data and the measured data, in case of cement powder without embedded bars, are shown and compared. It is worth to note two things. First, the experimental measurement appears delayed with respect to the simulation. This delay of approximately
can be better appreciated by looking at
Figure 9 (top) where a cut of the radargrams is shown. The cut was made at two different angles because there is a slight shift between measurement and simulation, as can be seen by the same
Figure 9 (bottom) reporting the cut at the time
and
, respectively.
Such shift is due especially to the limited precision of the measurement system alignment. The delay corresponds to a phase shift in the frequency domain data, due to a path difference of
(in air), which is perfectly compatible with the fact that the standard calibration of the VNA is done up to the input of the antennas, and therefore does not consider the path between the connector and the radiating aperture. The measured data reported in
Figure 9 (a) show also a reflection between
and
, due to the not-perfect anechoic environment. Such reflection is responsible of the ripple that is observed in the measurements moduli in
Figure 6. Comparison with simulated data suggests to correct the measurements by adding a linear phase and filtering out reflections coming from objects far from the investigated specimen.
5. Bars Detection
The numerical simulated data reported in the previous section have been processed by using the above summarized algorithm, introduced in [
22]. In particular, Eq. (
5) is discretized by using
equispaced angles
, with
and
equispaced frequencies inside the X-band
, so providing
equations and
unknowns. Inversion is performed by means of TSVD of the obtained matrix. Simulated data have been corrupted by adding gaussian noise so that
, and the singular values truncation index has been chosen accordingly. Finally, a threshold equal to
has been applied to the normalized modulus of the estimated
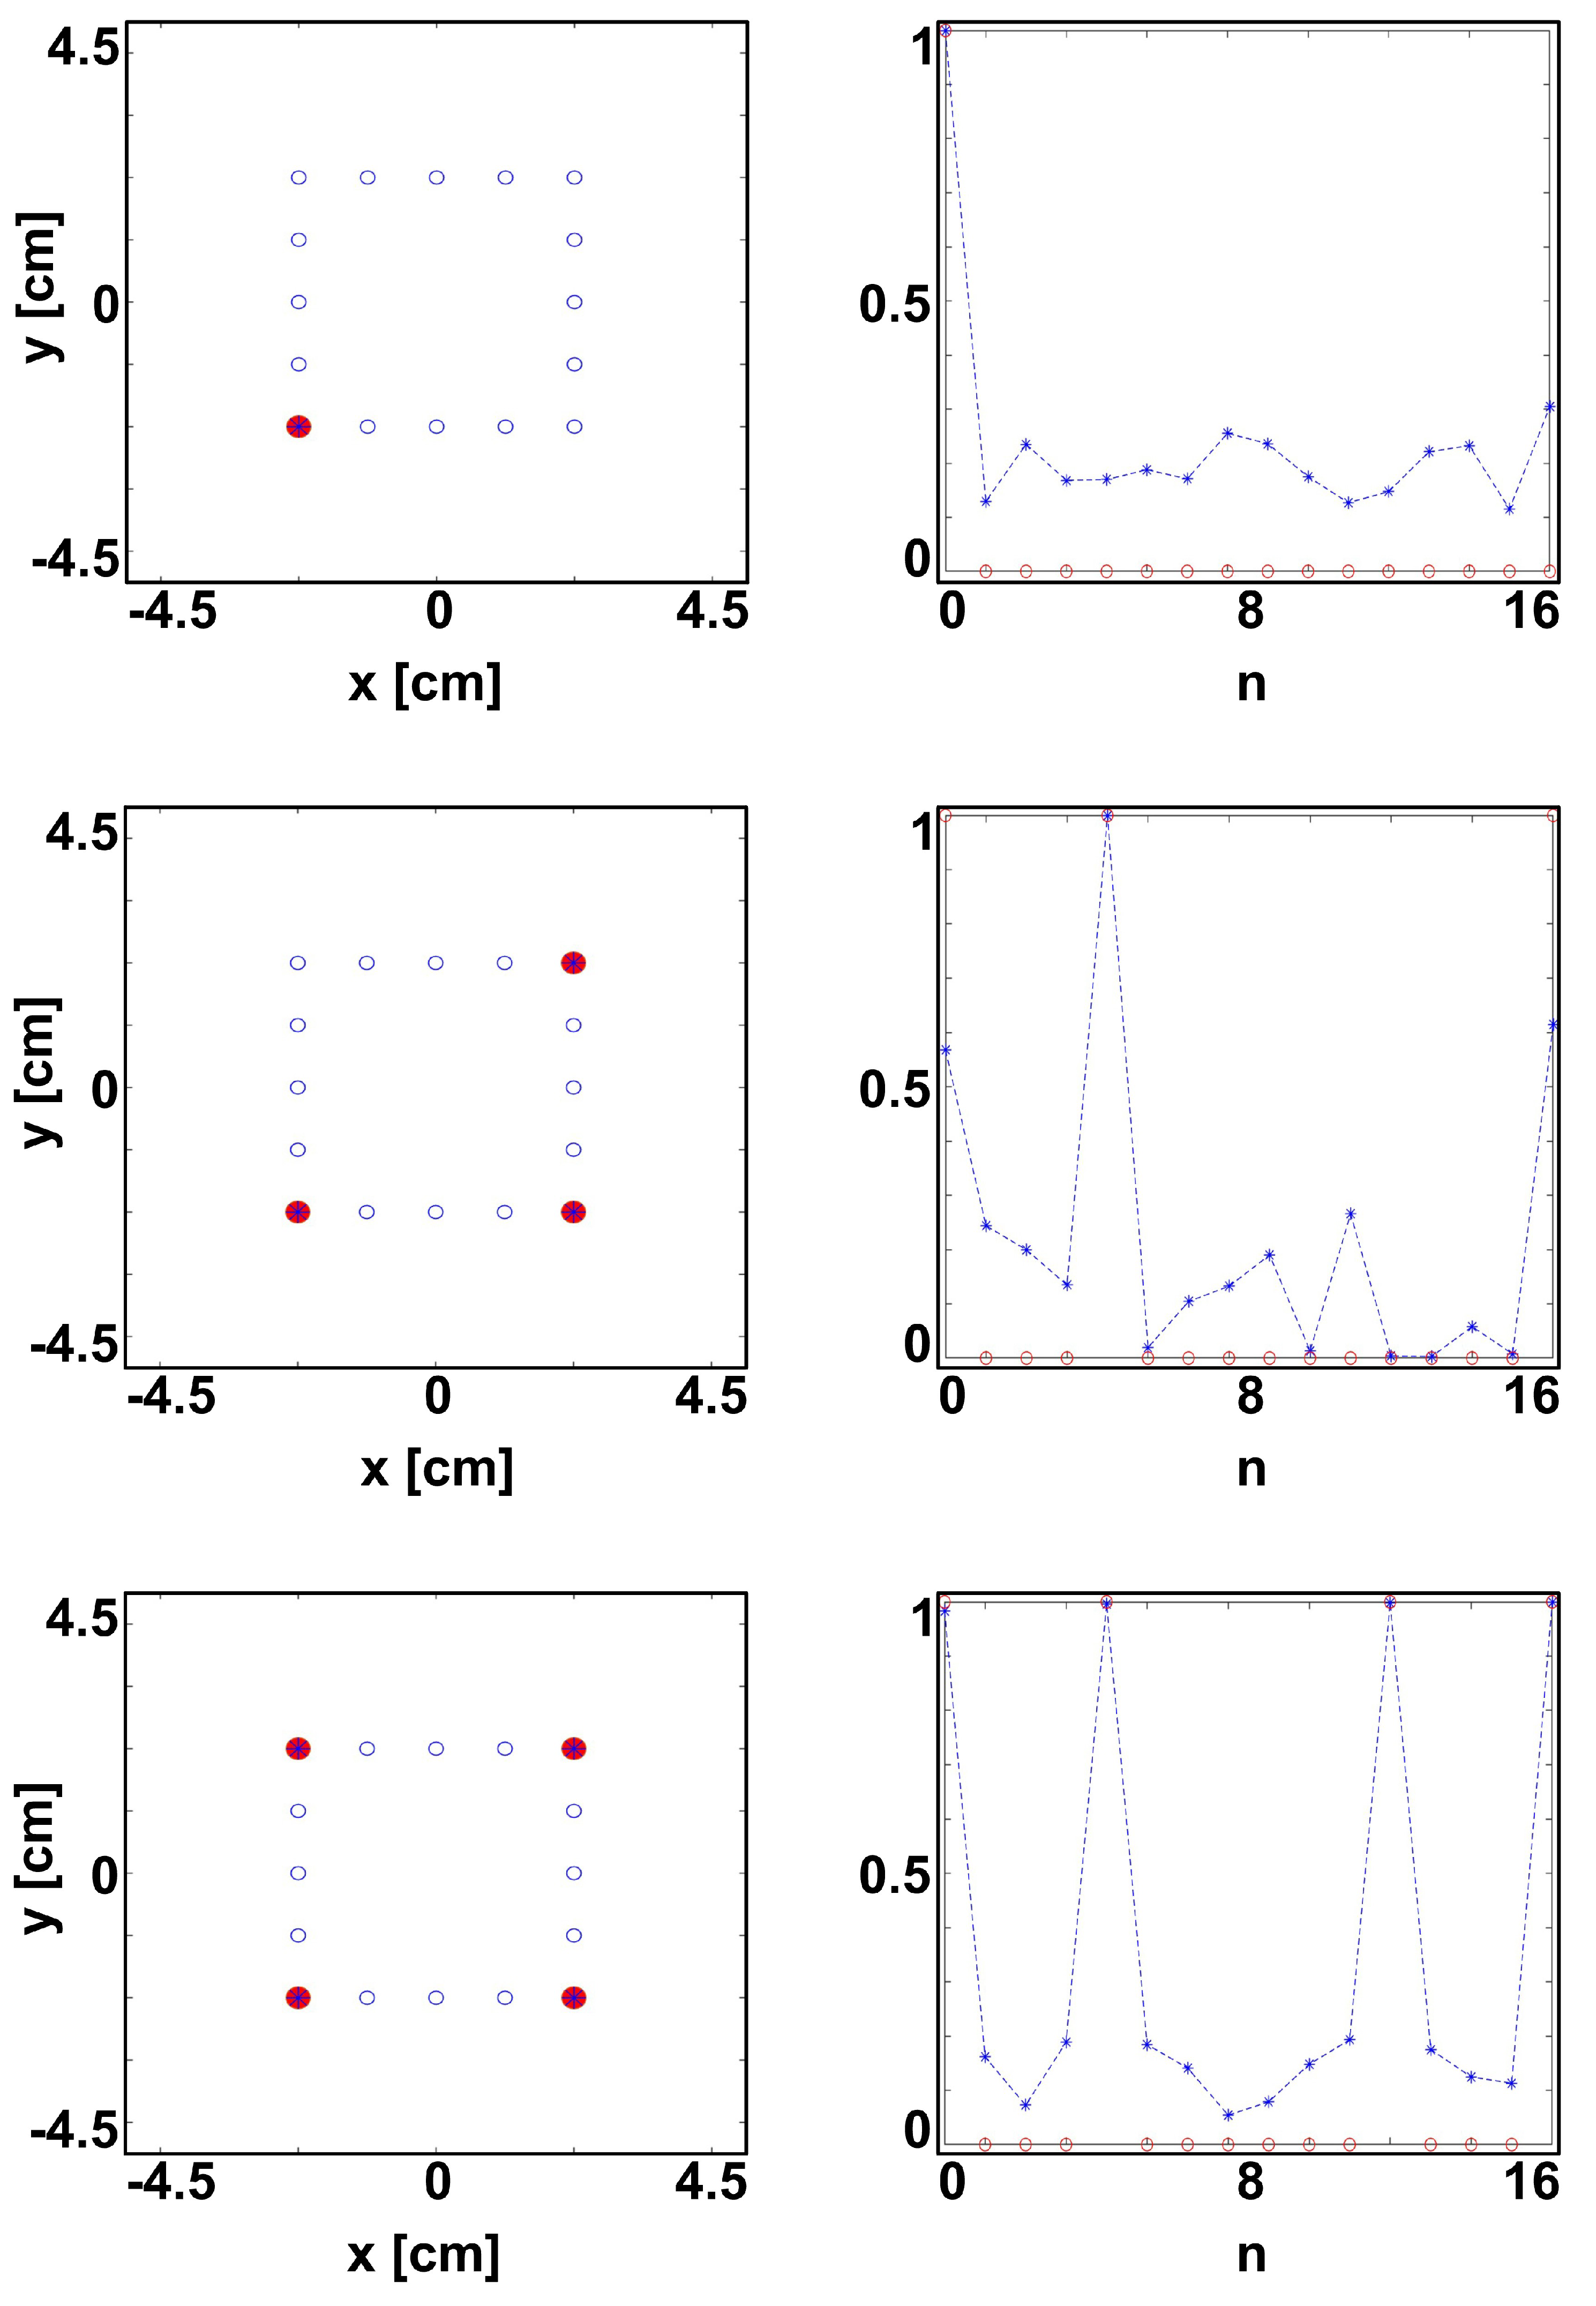
. The inversion results obtained by processing GprMax simulated data are shown in
Figure 10 and confirm the feasibility of detecting and localizing embedded bars by high frequency contactless data.
6. Conclusions
The preliminary experimental results presented in this work represent a step forward in advancing non-destructive testing (NDT) methods for detecting and localizing steel bars within concrete structures. Using contactless method in the X-band spectrum, we have shown the potential to effectively investigate reinforced concrete, laying the groundwork for proactive measures to prevent potential catastrophic failures in existent structures. Noteworthy, using a higher frequency enables the use of lighter equipment and smaller antennas. Our findings highlight the field’s ability to penetrate the concrete, revealing crucial insights into embedded bars through scattered data. By applying a quasi-quadratic inverse scattering technique to numerically simulated data, promising results have been achieved, confirming the reliability of the proposed approach. This success is further supported by a qualitative comparison between experimental and numerical results, reinforcing the consistency of our approach. However, several areas for refinement and improvement have been identified. Firstly, it’s crucial to account for the angular and frequency behavior of antennas in the mathematical model to ensure the accuracy of measurements. Moreover, establishing a precise external morphology and spatial orientation of the target section relative to antennas is essential, particularly considering potential material-induced deformations. Nevertheless, we anticipate that transitioning from powder-based specimens to solid reinforced concrete structures will mitigate some of these challenges encountered in laboratory settings. Additionally, accurately determining concrete’s relative permittivity and conductivity is essential for optimizing the present procedure, although it falls beyond the scope of this study. Preliminary measurements of permittivity values have been experimentally retrieved, achieving a comprehensive knowledge of these properties remains crucial. Finally, by overcoming these challenges the proposed strategy could pave the way for enhancing non-invasive testings further improving structures’ health monitoring and preventing unforeseen disasters.
Author Contributions
Conceptualization, A.B.; methodology, A.B. and S.P.; software, A.B. and S.P.; validation, A.B. and S.P.; formal analysis, A.B.; investigation, A.B. and S.P.; resources, A.B. and S.P.; data curation, A.B. and S.P.; writing—original draft preparation, A.B. and S.P.; writing—review and editing, A.B. and S.P.; visualization, S.P.; supervision, A.B.; project administration, A.B. and S.P.; funding acquisition, A.B. All authors have read and agreed to the published version of the manuscript.
Funding
This work has been supported by the European Union NextGenerationEU, call PRIN 2022, project ARACNE - A RAdar system for Contactless surveys of reiNforced concrEte (grant n. 202225CSP2).
Conflicts of Interest
The authors declare no conflicts of interest.
References
- Bensaber, A.; Boudaoud, Z.; Seghir, N.; Czarnecki, S.; Sadowski, L. The assessment of concrete subjected to compressive and flexural preloading using nondestructive testing methods, correlation between concrete strength and combined method (SonReb). Measurement: Journal of the International Measurement Confederation 2023, 222. [Google Scholar] [CrossRef]
- Yin, T.; Ng, C.; Chen, L.; Kotousov, A. In-situ nonlinear ultrasonic technique for monitoring damage in ultra-high performance fibre reinforced concrete (UHPFRC) during direct tensile test. Measurement: Journal of the International Measurement Confederation 2023, 222. [Google Scholar] [CrossRef]
- Kuchipudi, S.; Ghosh, D. Automated detection and segmentation of internal defects in reinforced concrete using deep learning on ultrasonic images. Construction and Building Materials 2024, 411. [Google Scholar] [CrossRef]
- Alavi, S.; Noel, M.; Moradi, F.; Layssi, H. Development of a machine learning model for on-site evaluation of concrete compressive strength by SonReb. Journal of Building Engineering 2024, 82. [Google Scholar] [CrossRef]
- Jena, B.; Zade, N.P.; Sarkar, P.; Karak, S.K. Sustainable integration of coal mine overburden as a substitute for natural sand in concrete to enhance its mechanical and durability properties. Construction and Building Materials 2024, 411. [Google Scholar] [CrossRef]
- Parhi, S.K.; Patro, S.K. Application of R-curve, ANCOVA, and RSM techniques on fracture toughness enhancement in PET fiber-reinforced concrete. Construction and Building Materials 2024, 411. [Google Scholar] [CrossRef]
- Keo, S.A.; Szymanik, B.; Roy, C.L.; Brachelet, F.; Defer, D. Defect Detection in CFRP Concrete Reinforcement Using the Microwave Infrared Thermography (MIRT) Method—A Numerical Modeling and Experimental Approach. Applied Sciences 2023, Vol. 13, Page 8393 2023, 13, 8393. [Google Scholar] [CrossRef]
- Woldeamanuel, M.M.; Kim, T.; Cho, S.; Kim, H.K. Estimation of concrete strength using thermography integrated with deep-learning-based image segmentation: Case studies and economic analysis. Expert Systems with Applications 2023, 213, 119249. [Google Scholar] [CrossRef]
- Cheng, Z.; Zhao, H.; Long, G.; Yang, K.; Chen, M.; Wu, Z. The Mechanical Characteristics of High-Strength Self-Compacting Concrete with Toughening Materials Based on Digital Image Correlation Technology. Materials 2023, 16, 1695. [Google Scholar] [CrossRef] [PubMed]
- Herbers, M.; Richter, B.; Gebauer, D.; Classen, M.; Marx, S. Crack monitoring on concrete structures: Comparison of various distributed fiber optic sensors with digital image correlation method. Structural Concrete 2023, 24, 6123–6140. [Google Scholar] [CrossRef]
- Xu, X.; Jin, Z.; Yu, Y.; Li, N. Damage source and its evolution of ultra-high performance concrete monitoring by digital image correlation and acoustic emission technologies. Journal of Building Engineering 2023, 65, 105734. [Google Scholar] [CrossRef]
- Palladino, S.; Minutolo, V.; Esposito, L. Hybrid semi-analytical calculation of the stress intensity factor for heterogeneous and functionally graded plates. Engineering Fracture Mechanics 2022, 274, 108763. [Google Scholar] [CrossRef]
- Esposito, L.; Palladino, S.; Minutolo, V. An effective free-meshing and linear Step-Wise procedure to predict crack initiation and propagation. Theoretical and Applied Fracture Mechanics 2024, 130, 104240. [Google Scholar] [CrossRef]
- Sagar, R.V.; Basu, D.J. Damage assessment of reinforced concrete structures under elevated-amplitude cyclic loading using sentry values based on acoustic emission testing. Nondestructive Testing and Evaluation 2023, 38, 612–630. [Google Scholar] [CrossRef]
- Ma, G.; Xie, Y.; Long, G.; Tang, Z.; Tang, C.; Wang, H.; Wei, Y.; Li, J. Experimental study on acoustic emission and surface morphology characteristics of concrete under different fracture modes. Theoretical and Applied Fracture Mechanics 2023, 123, 103702. [Google Scholar] [CrossRef]
- Barrile, V.; Pucinotti, R. Application of radar technology to reinforced concrete structures: A case study. NDT and E International 2005, 38, 596–604. [Google Scholar] [CrossRef]
- Pasculli, D.; Natali, A.; Salvatore, W.; Morelli, F.; Morandi, D. Investigation of reinforced concrete bridges by using a dual-polarized high-frequency GPR. 2018 17th International Conference on Ground Penetrating Radar, GPR 2018 2018. [CrossRef]
- Rhee, J.Y.; Choi, J.J.; Kee, S.H. Evaluation of the Depth of Deteriorations in Concrete Bridge Decks with Asphalt Overlays Using Air-Coupled GPR: A Case Study from a Pilot Bridge on Korean Expressway. International Journal of Concrete Structures and Materials 2019, 13, 1–17. [Google Scholar] [CrossRef]
- Tosti, F.; Ferrante, C. 3 Using Ground Penetrating Radar Methods to Investigate Reinforced Concrete Structures. Surveys in Geophysics 2020, 41, 485–530. [Google Scholar] [CrossRef]
- Dinh, K.; Gucunski, N.; Duong, T.H. Migration-based automated rebar picking for condition assessment of concrete bridge decks with ground penetrating radar. NDT & E International 2018, 98, 45–54. [Google Scholar] [CrossRef]
- Marchisotti, D.; Zappa, E. Feasibility Study of Drone-Based 3-D Measurement of Defects in Concrete Structures. IEEE TRANSACTIONS ON INSTRUMENTATION AND MEASUREMENT 2022, 71, 5010711. [Google Scholar] [CrossRef]
- Brancaccio, A. A Quasi-Quadratic Inverse Scattering Approach to Detect and Localize Metallic Bars within a Dielectric. Applied Sciences (Switzerland) 2022, 12. [Google Scholar] [CrossRef]
- Daniels, D.J. Ground penetrating radar; Vol. 1, Iet, 2004. [CrossRef]
- Warren, C.; Giannopoulos, A.; I. , G. gprMax: Open source software to simulate electromagnetic wave propagation for Ground Penetrating Radar. Computer Physics Communications 2016. [Google Scholar] [CrossRef]
- Day 3 - Impulse response & introduction to SFCW GPR simulation - Dr Antonis Giannopoulos. https://www.youtube.com/watch?v=_FWNeqTr9nc. Accessed: 2024-03-05.
Figure 1.
Attenuation in vs frequency and conductivity for different . Left column ; right column . Top row ; middle row ; bottom row .
Figure 1.
Attenuation in vs frequency and conductivity for different . Left column ; right column . Top row ; middle row ; bottom row .
Figure 2.
Transmitted power density: TE (blue), TM (red); (stars), (circles).
Figure 2.
Transmitted power density: TE (blue), TM (red); (stars), (circles).
Figure 3.
2D measurements configuration: the source and the observation points scan the circles of radius and respectively, at a fixed stand-off angle . The investigated domain is the rectangle . On the left squared zoom blu circles represent the unknown bars’ positions.
Figure 3.
2D measurements configuration: the source and the observation points scan the circles of radius and respectively, at a fixed stand-off angle . The investigated domain is the rectangle . On the left squared zoom blu circles represent the unknown bars’ positions.
Figure 4.
Experimental setup. On the left, the CAD model depicting the supports for the steel bars and the rotating basement. On the right, the supports printed in PLA material. At the bottom, the instrumentation and one of the specimens employed for the experiment in the semi-anechoic environment.
Figure 4.
Experimental setup. On the left, the CAD model depicting the supports for the steel bars and the rotating basement. On the right, the supports printed in PLA material. At the bottom, the instrumentation and one of the specimens employed for the experiment in the semi-anechoic environment.
Figure 5.
Geometry of specimens used in both experimental tests and numerical simulations.
Figure 5.
Geometry of specimens used in both experimental tests and numerical simulations.
Figure 6.
Experimental measurements moduli on specimens with and without bars. Specimen filled with sand (left); specimen filled with cement powder (right).
Figure 6.
Experimental measurements moduli on specimens with and without bars. Specimen filled with sand (left); specimen filled with cement powder (right).
Figure 7.
GprMax numerical simulations of the cement powder target. Scattered field moduli with and without bars.
Figure 7.
GprMax numerical simulations of the cement powder target. Scattered field moduli with and without bars.
Figure 8.
GprMax numerical simulations of the cement powder target. Scattered field phases with and without bars.
Figure 8.
GprMax numerical simulations of the cement powder target. Scattered field phases with and without bars.
Figure 9.
Comparison between experimental measurements (a) and GprMax simulations (b) in time domain in Cement Powder without bars. On the right, cut of the results shown in (a) and (b) are reported: (c) time trace at (measurement, red line) and (simulation, blue line); (d) angular trace at (measurement, red line) and (simulation, blue line) (d).
Figure 10.
Detection and localization by GprMax simulated scattered field data. On the left, candidate (blue circles), actual (red circles) and estimated (blue stars) positions. On the right, estimated is plotted versus the position index.
Figure 10.
Detection and localization by GprMax simulated scattered field data. On the left, candidate (blue circles), actual (red circles) and estimated (blue stars) positions. On the right, estimated is plotted versus the position index.
Table 1.
Number and type of specimens subjected to lab testing. Sand (S), Cement Powder (C), Sand and 1 Bar (S+1B), Sand and 3 Bars (S+3B), Sand and 4 Bars (S+4B), Cement Powder and 1 Bar (C+1B), Cement Powder and 3 Bars (C+3B), Cement Powder and 4 Bars (C+4B).
Table 1.
Number and type of specimens subjected to lab testing. Sand (S), Cement Powder (C), Sand and 1 Bar (S+1B), Sand and 3 Bars (S+3B), Sand and 4 Bars (S+4B), Cement Powder and 1 Bar (C+1B), Cement Powder and 3 Bars (C+3B), Cement Powder and 4 Bars (C+4B).
| SPECIMENS |
|---|
| 90x90x450 mm |
| TEST |
TYPE |
| 1 |
S |
| 2 |
C |
| 3 |
S+1B |
| 4 |
S+3B |
| 5 |
S+4B |
| 6 |
C+1B |
| 7 |
C+3B |
| 8 |
C+4B |
|
Disclaimer/Publisher’s Note: The statements, opinions and data contained in all publications are solely those of the individual author(s) and contributor(s) and not of MDPI and/or the editor(s). MDPI and/or the editor(s) disclaim responsibility for any injury to people or property resulting from any ideas, methods, instructions or products referred to in the content. |
© 2024 by the authors. Licensee MDPI, Basel, Switzerland. This article is an open access article distributed under the terms and conditions of the Creative Commons Attribution (CC BY) license (http://creativecommons.org/licenses/by/4.0/).
