1. Introduction
The Geopyörä breakage test was developed to fulfil a need in the industry for improved precision in the characterisation of an orebody. The method developed addresses this by enabling rapid measurements while measuring input energy and force to fracture every particle [
1]. The outcome is a single test that delivers multiple breakage parameters, bypassing the need for a suite of expensive tests. The target application is in orebody modelling for process performance prediction.
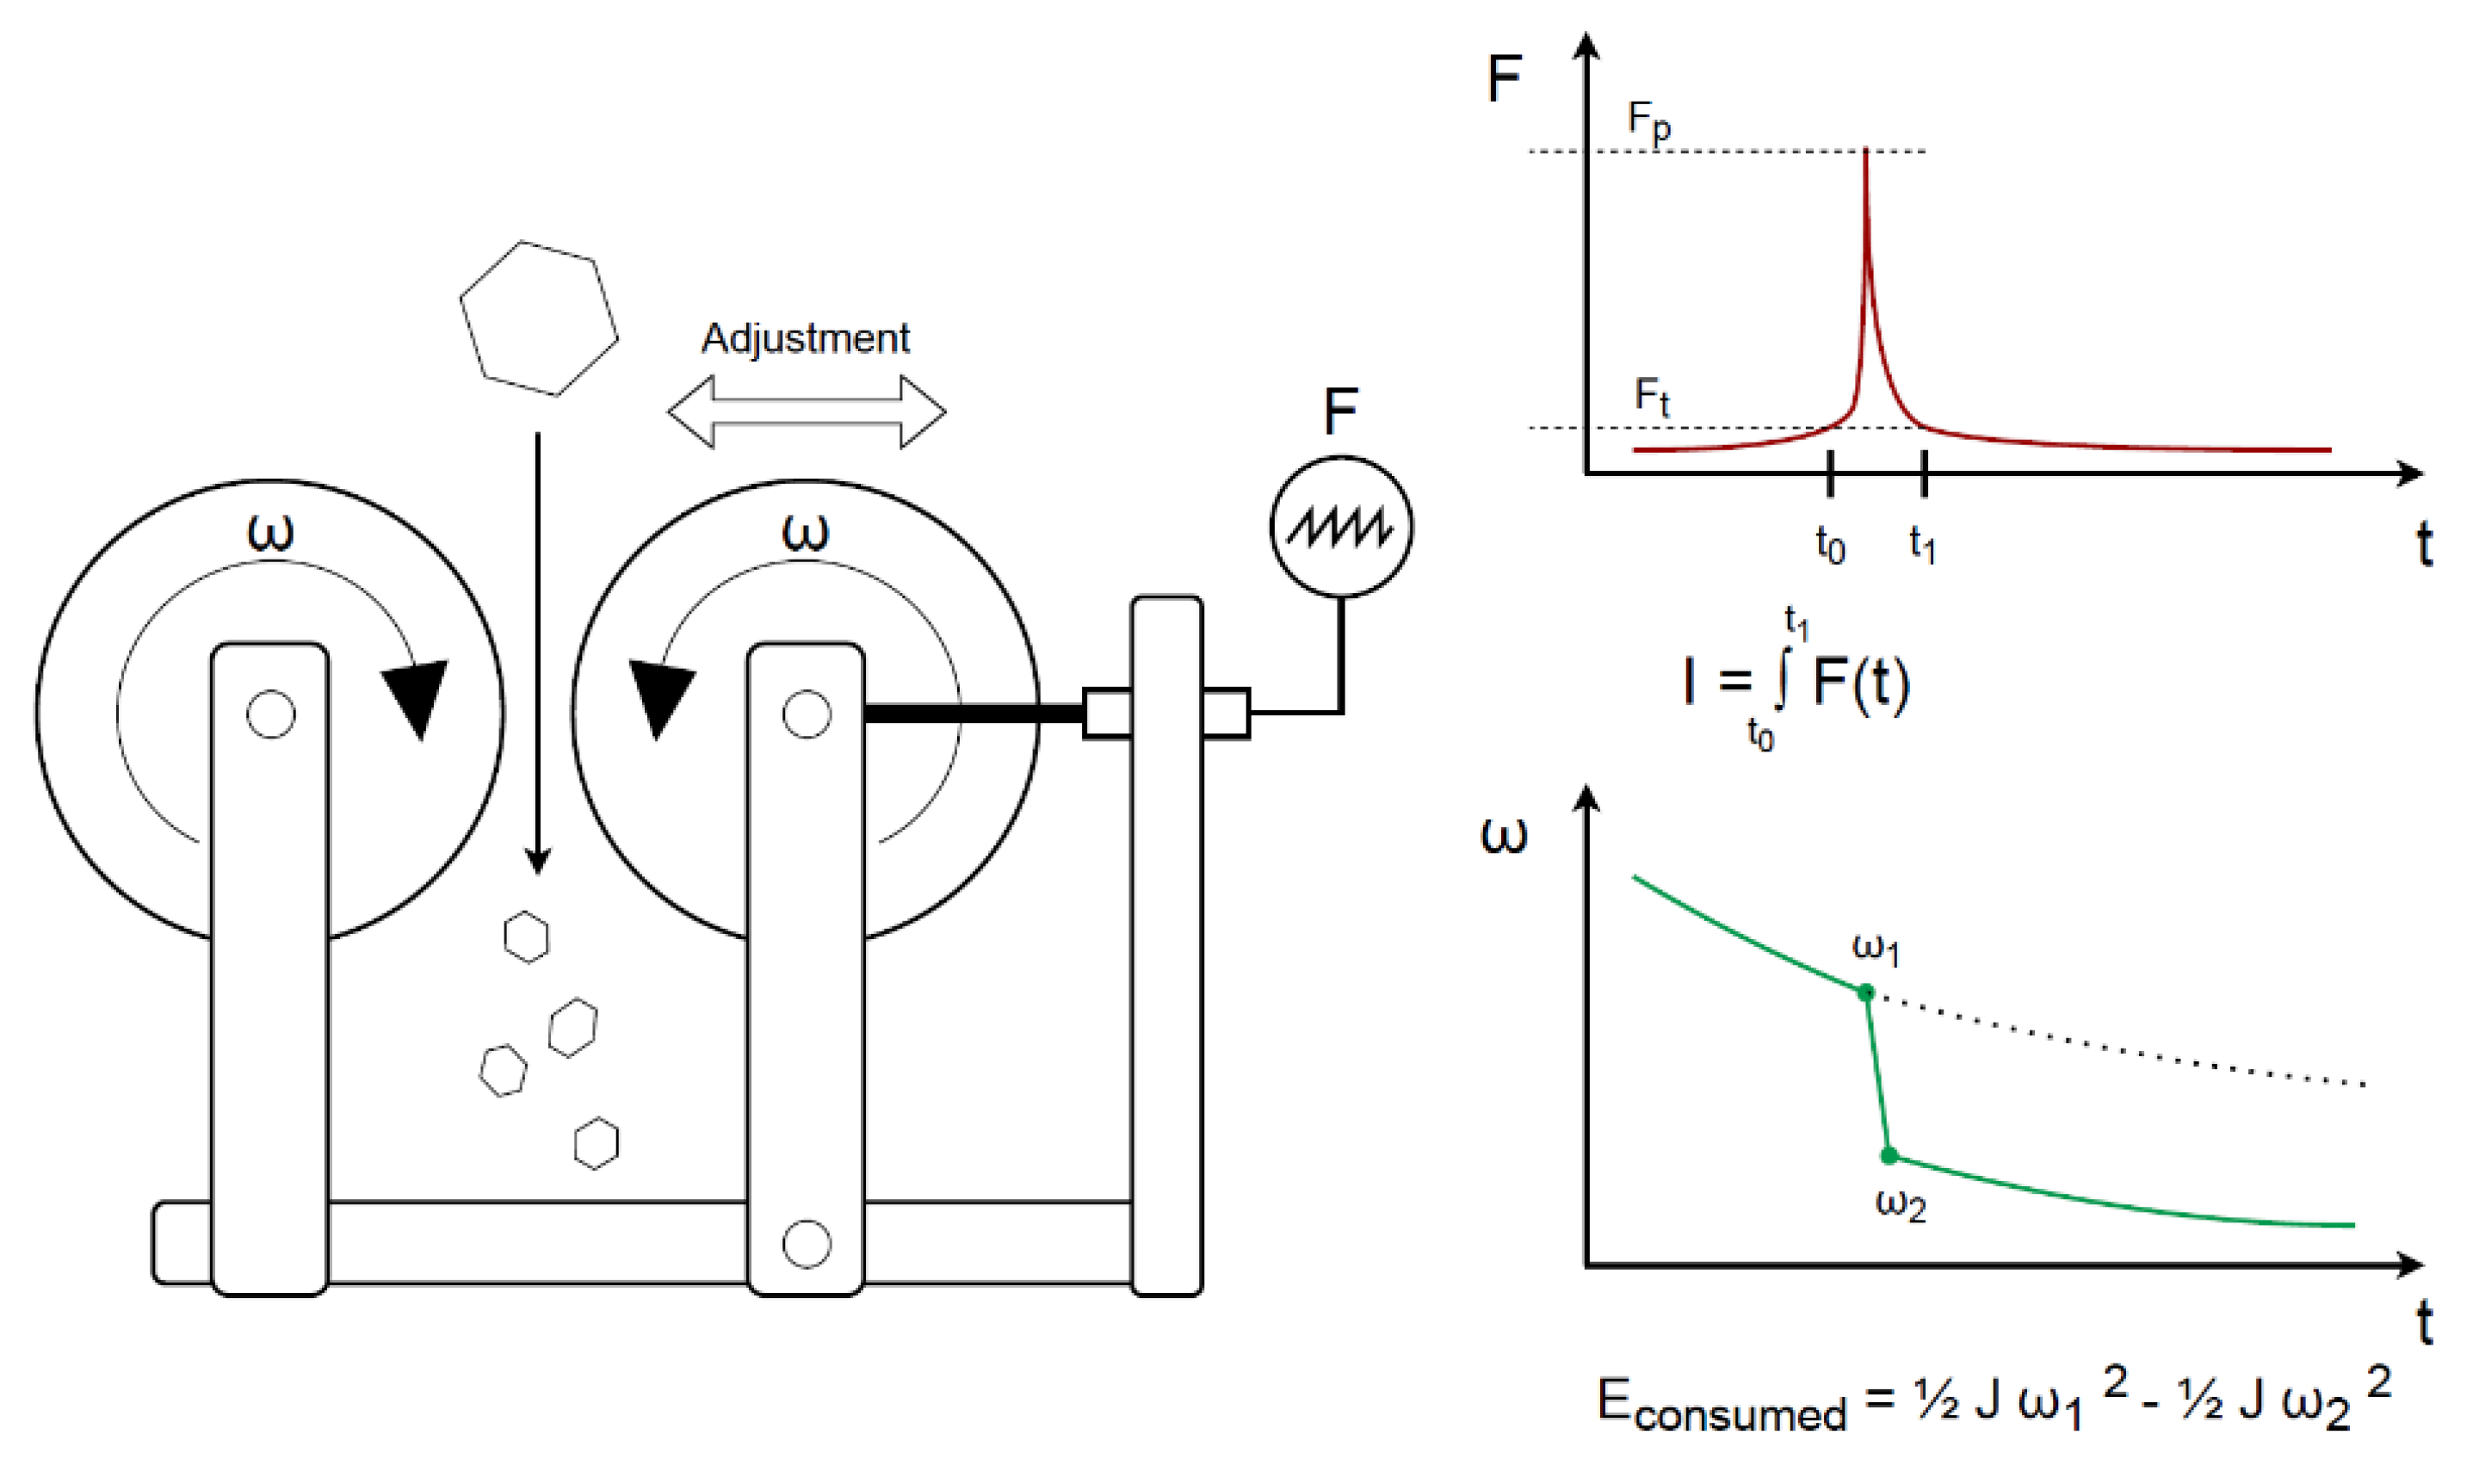
The Geopyörä breakage test concept is to use counter-rotating wheels to nip and crush a rock with a tightly controlled reduction ratio from the feed to a defined gap between rollers, as illustrated in
Figure 2. But before delving into its mechanics and performance, the context of measurement precision compared to current standard test methods should be addressed.
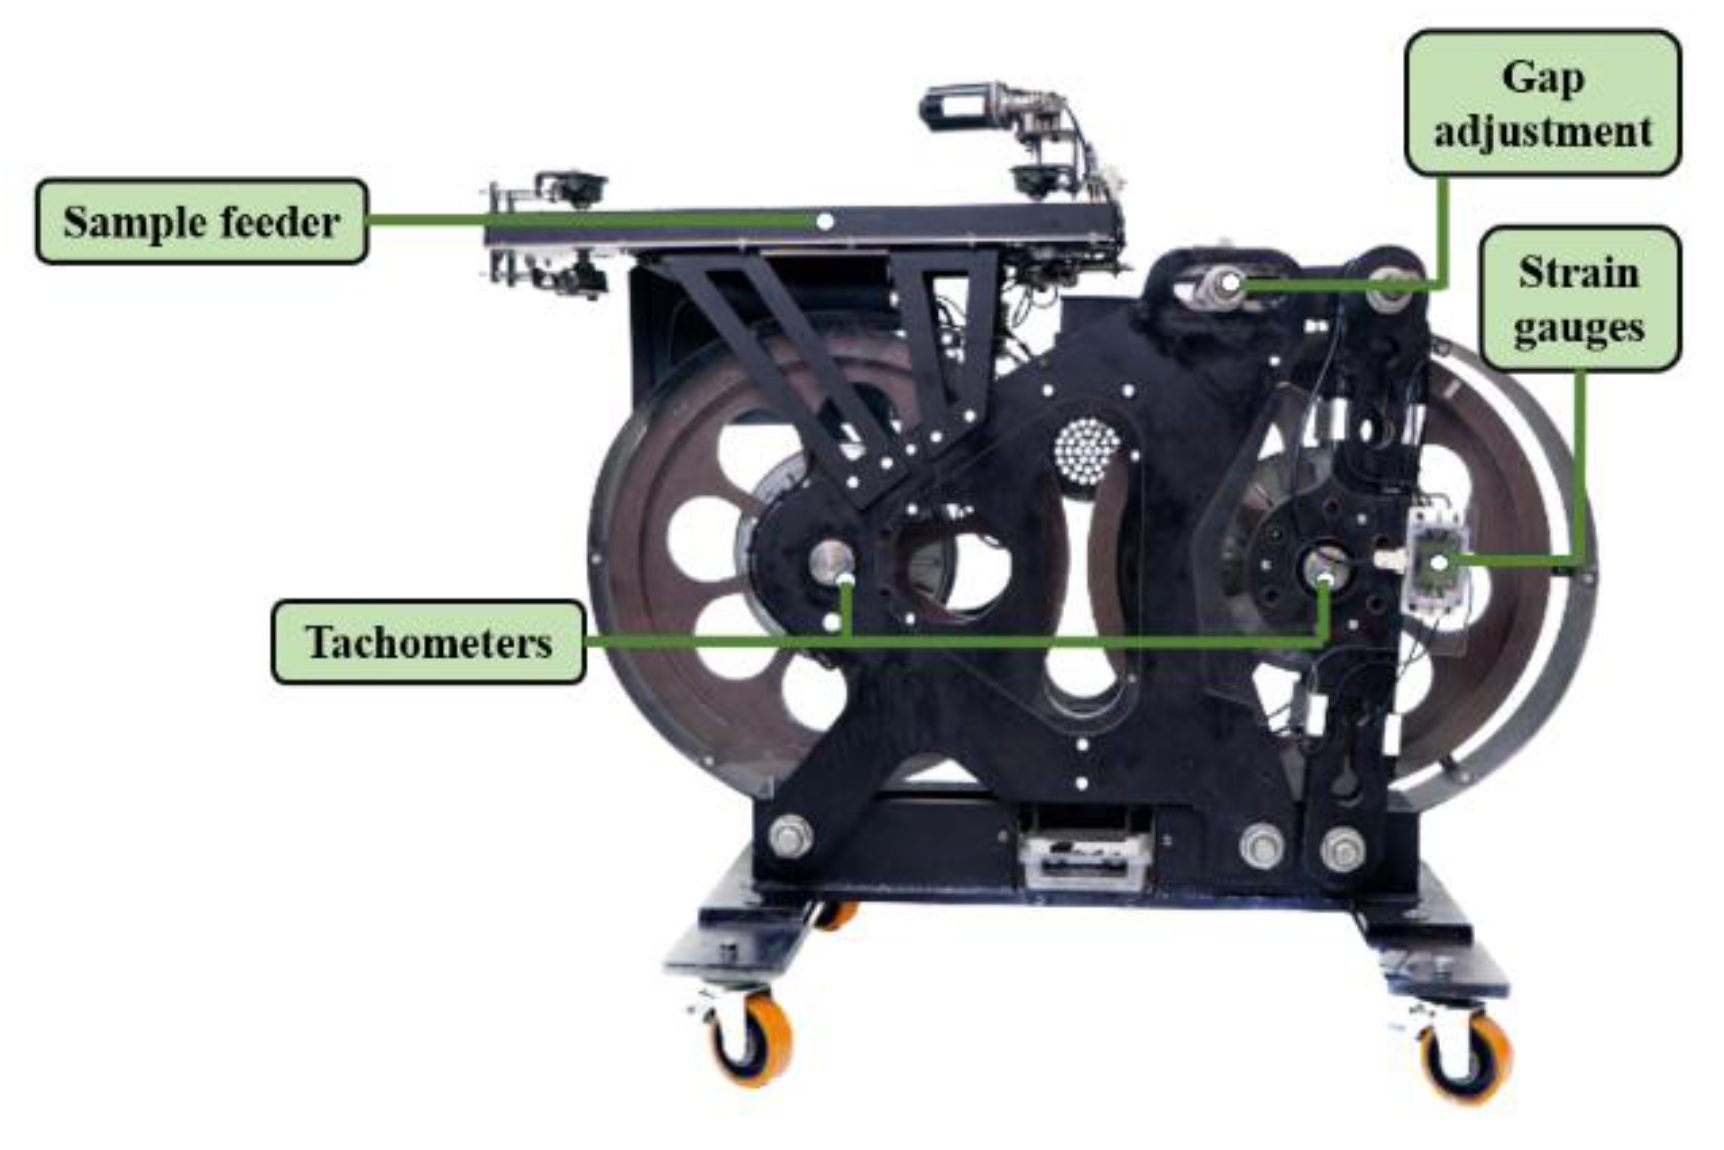
Figure 1.
Geopyörä test equipment.
Figure 1.
Geopyörä test equipment.
Figure 2.
Double Wheel (Geopyörä) breakage test schematic of operation.
Figure 2.
Double Wheel (Geopyörä) breakage test schematic of operation.
The Drop Weight Test is an industry accepted standard test method used to characterise degree of breakage as a function of energy input of a sample of ore using a drop weight apparatus. It is widely used in the mining industry to evaluate the ore's breakage characteristics and to optimize grinding circuit design. The test involves breaking a sample of ore of a specific size fraction using predetermined energy levels and measuring the size distribution of the resulting fragments [
2]. The test results, including the specific energy consumption, Ecs (kWh/t) and the t10 parameter (percentage passing 1/10th of their original particle size), are then used to calculate the ore’s breakage parameters A and b values from equation 1 [
3]
The standard test method requires about 50 kg of rock, so is only suited to bulk samples or requires the compositing of long lengths of precious drill core. Due to these sample constraints and the cost of the test, only a few samples are tested for an entire orebody in the design phase and only occasional samples tested during production. To help overcome these limitations, the standard testing method was modified by Morrell [
4] to enable the use of a reduced mass of sample and thus the application of the DWT to drill core samples. The resultant SMC method has enabled the DWT outcomes to be applied to a far greater extent across drill cores and extend into orebody characterisation. Morrell [
4] also introduced new energy-size reduction equations based on the outputs of the SMC test, demonstrating its validity across several comminution processes. It does however remain somewhat costly and uses 20 kg of core (representing about 15 m of split core). The Geopyörä test aimed to further reduce the uptake barrier to testing more of the drill core within an orebody, thus providing greater resolution to modelling and predicting the mill performance and mine production over the life of a mine.
The purpose of this paper is to assess the accuracy and precision of the Geopyörä breakage test (GPT) energy and force measurements, in order to provide the levels of confidence required by the industry for uptake of this ore characterisation technique. The accuracy was indirectly assessed by comparing the fragmentation (t10 parameter) obtained when testing duplicate samples at the same energy level using the well-established drop weight test (DWT). While the precision (i.e., reproducibility) of the test was evaluated using a Round-Robin methodology [
5], similarly to that reported by Mosher [
6] and Weier [
7] in comparative testing undertaken by over 30 metallurgical laboratories located around the world to determine precision of the Bond test [
8].
1.1. Equipment Description
The testing method is described in some detail in Bueno et al [
1], so only an overview of the pertinent operating principles is provided here. The principle of the method is illustrated in
Figure 2, with idealised force response during a breakage event and change in angular velocity of the wheel during a breakage event. The counter-rotating wheels allow the automated feeding of rocks one at a time through the spinning wheels, with no requirement of stopping, resetting, and sweeping away broken fragments between each rock breakage.
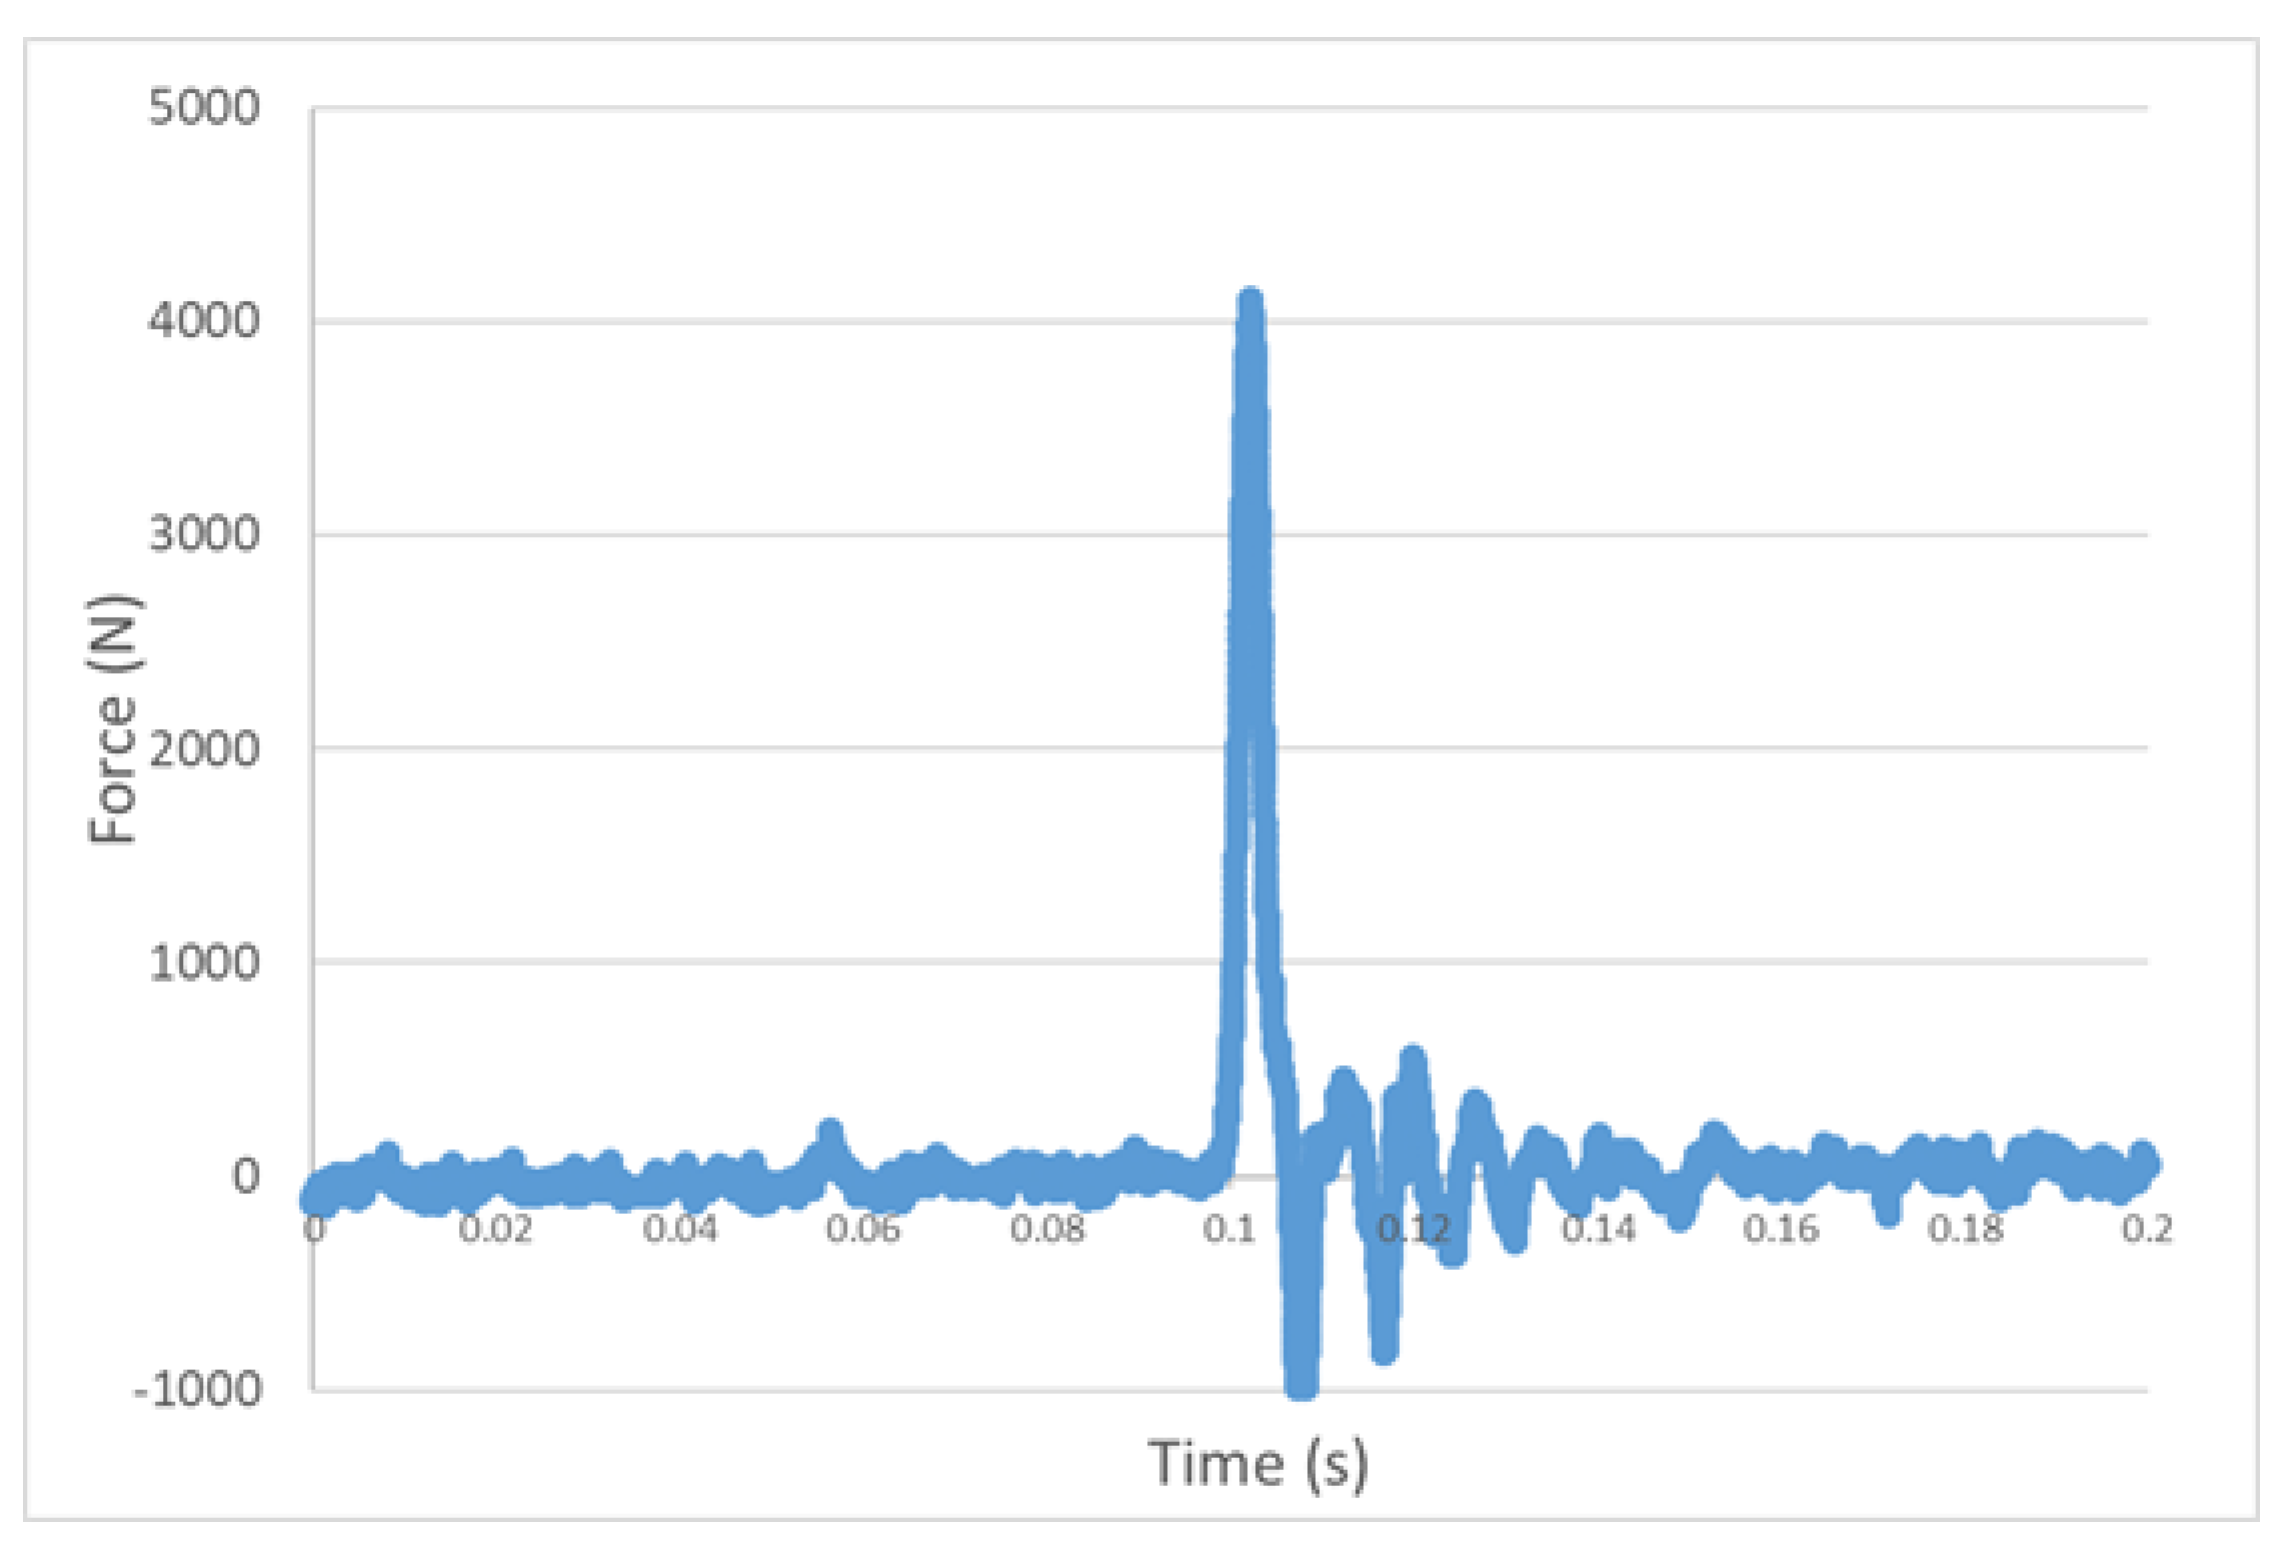
The mechanical set-up enables measurement of the applied force during each breakage event with a loadcell providing a high sampling frequency of 5000 Hz to provide a force-to-fracture value, as illustrated in
Figure 3. The force applied to break a rock with a given degree of compression is a function of the rock compressive strength. The force plot can thus be related to standard rock strength measures, an aspect not explored in this paper. Once the force measured by the load cell due to rock fracture between the wheels surpasses a predetermined threshold (Ft), the recording of force will commence for a specific duration (t1-t0). The highest force peak within this timeframe (Fp) will be registered.
The traditional ore characterisation of drop weigh test (DWT) [
2,
4] control the energy input through the kinetic energy of a falling weight. Regardless of what is absorbed in the fracture event, this is given as the input energy to the breakage event. From this the specific comminution energy (Ecs in J/g or kWh/t) is calculated. In contrast, for the Geopyörä the crushing is conducted at a stiff (fixed) gap and the energy measured through the loss of momentum of the spinning wheels [
1]. Thus, the breakage energy used in characterisation is not a controlled input, but rather a measure of the response of the system to the breakage characteristics of the rock - determined by the applied stress and properties intrinsic to the rock material (mineral composition, texture, grain structure, internal flaws, microcracks, etc.). By varying the degree of reduction, i.e., the ratio of the crushing gap to the particle diameter, a range of breakage energies can be achieved for mapping the response of the rock. It should be noted that the use of fixed energy points on the typical Ecs vs t10 plot, which are then translated to the breakage functions parameters of A and b, is only a matter of standard testing procedure.
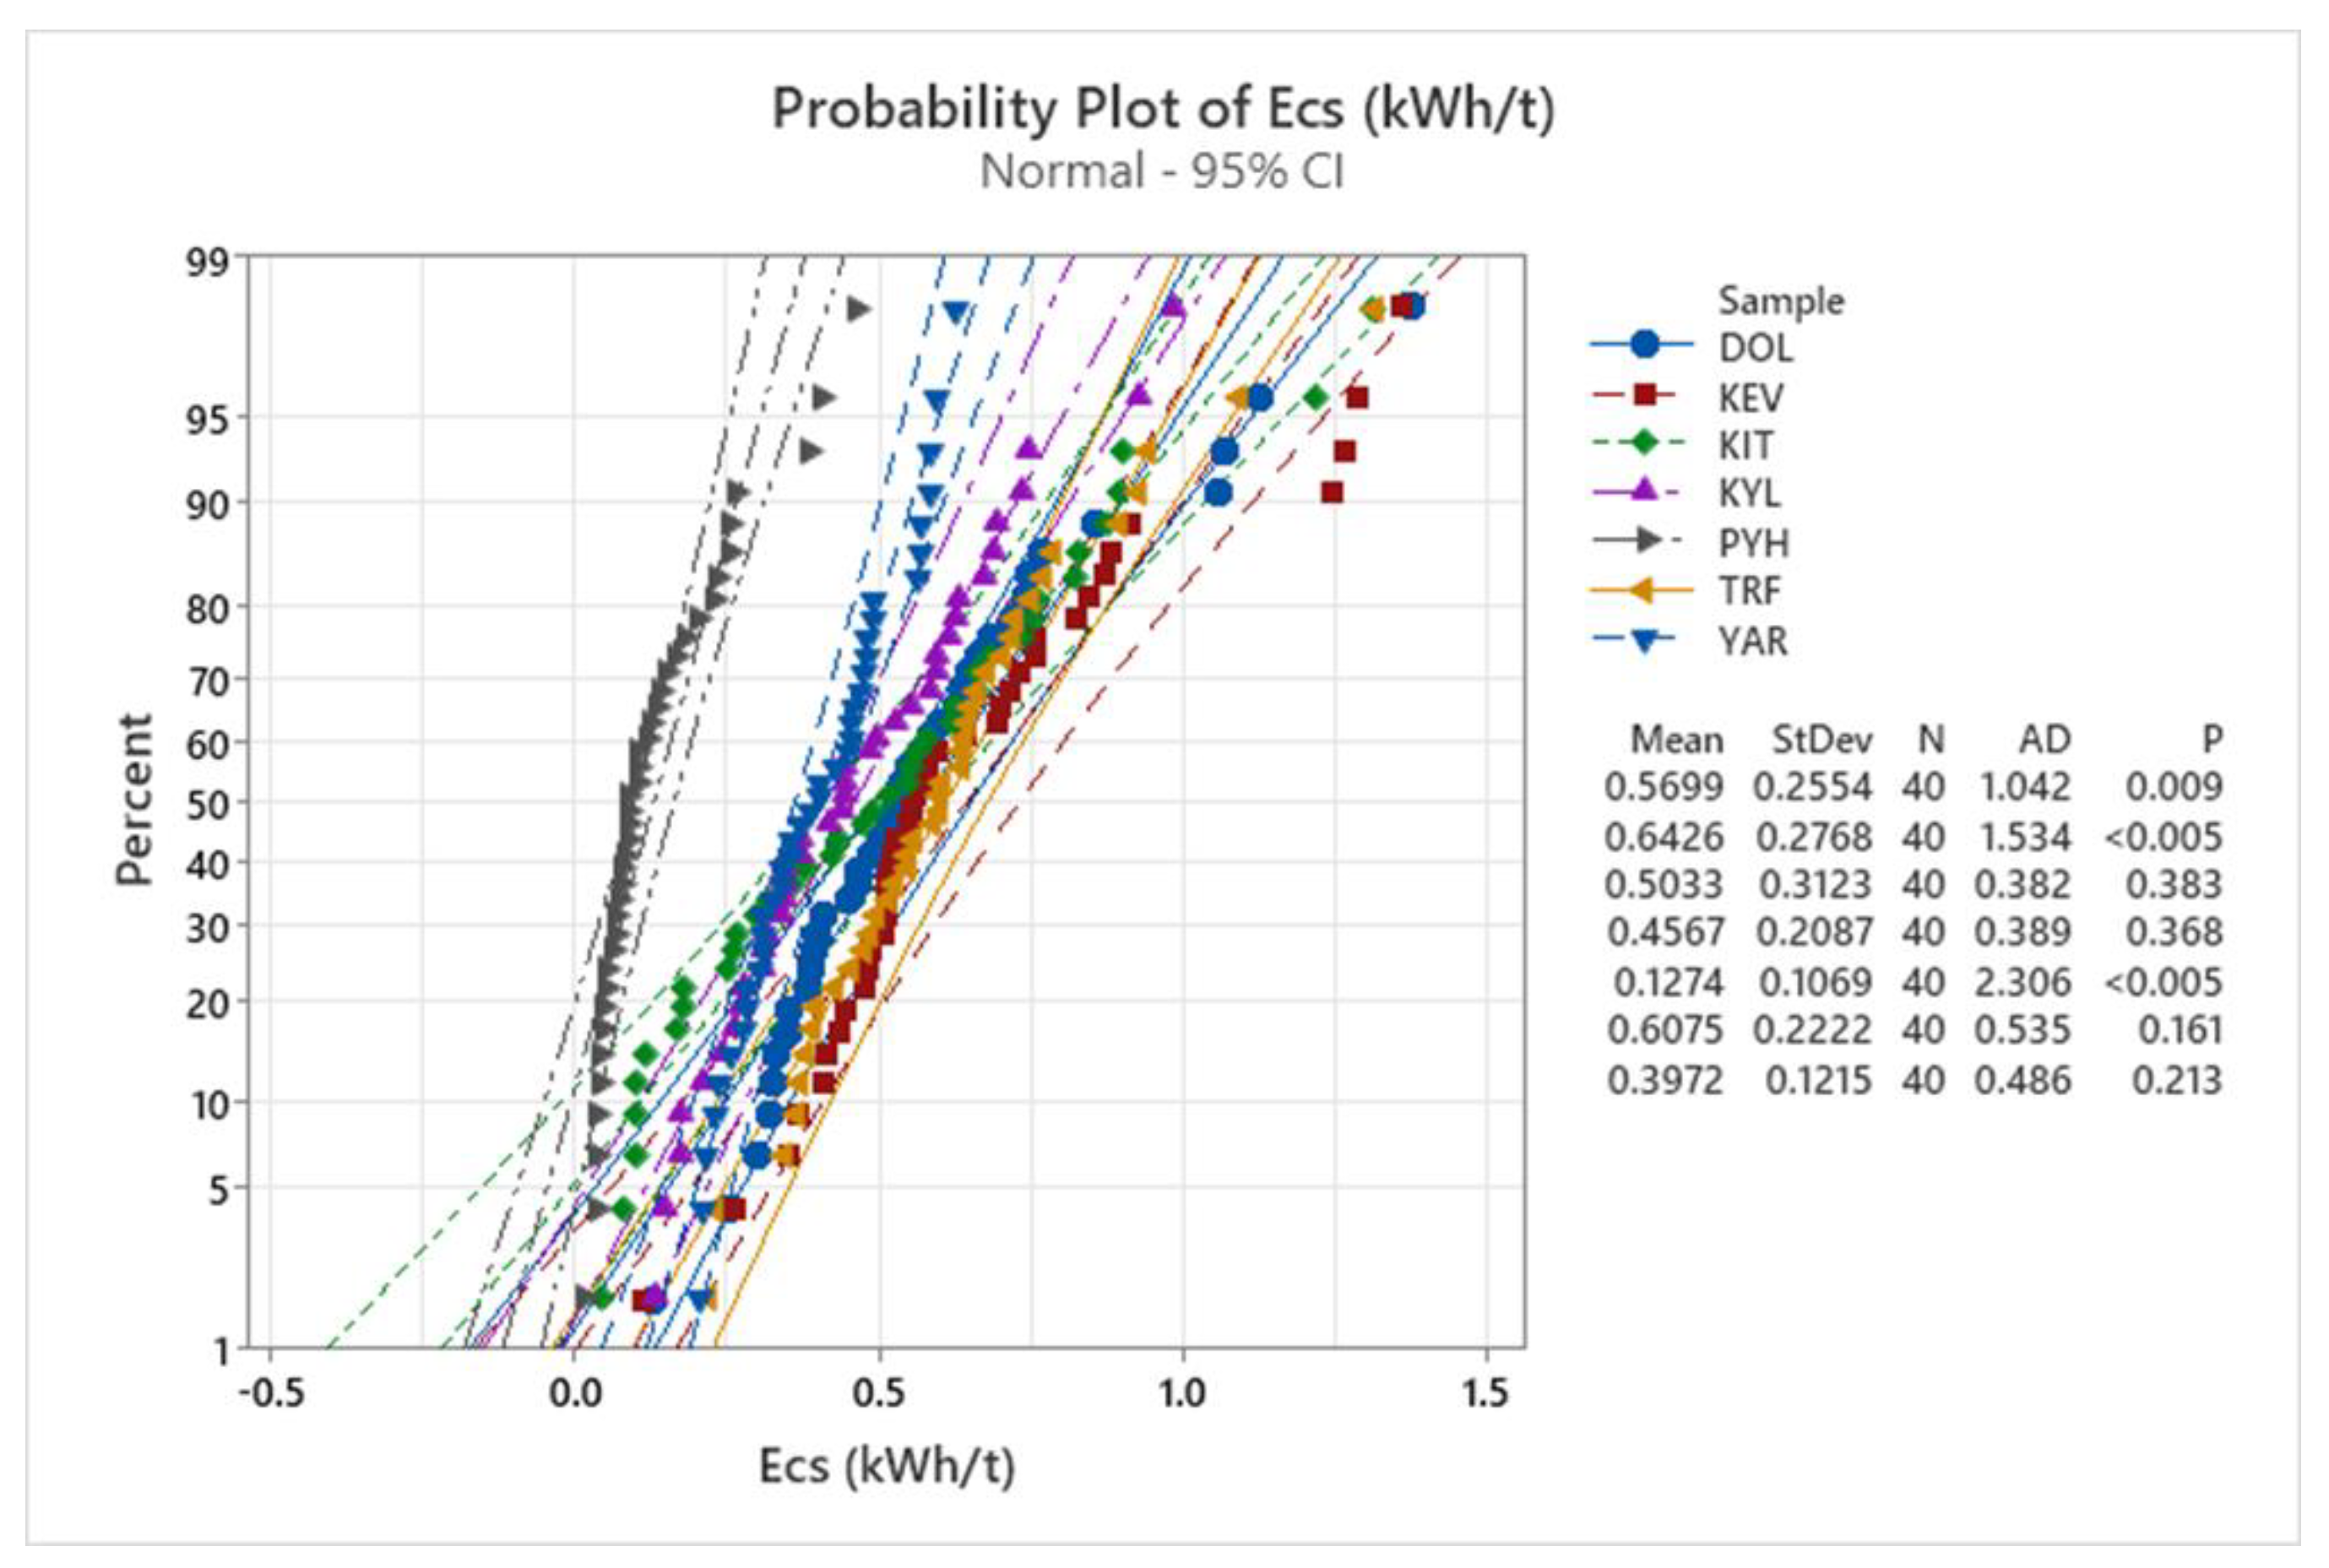
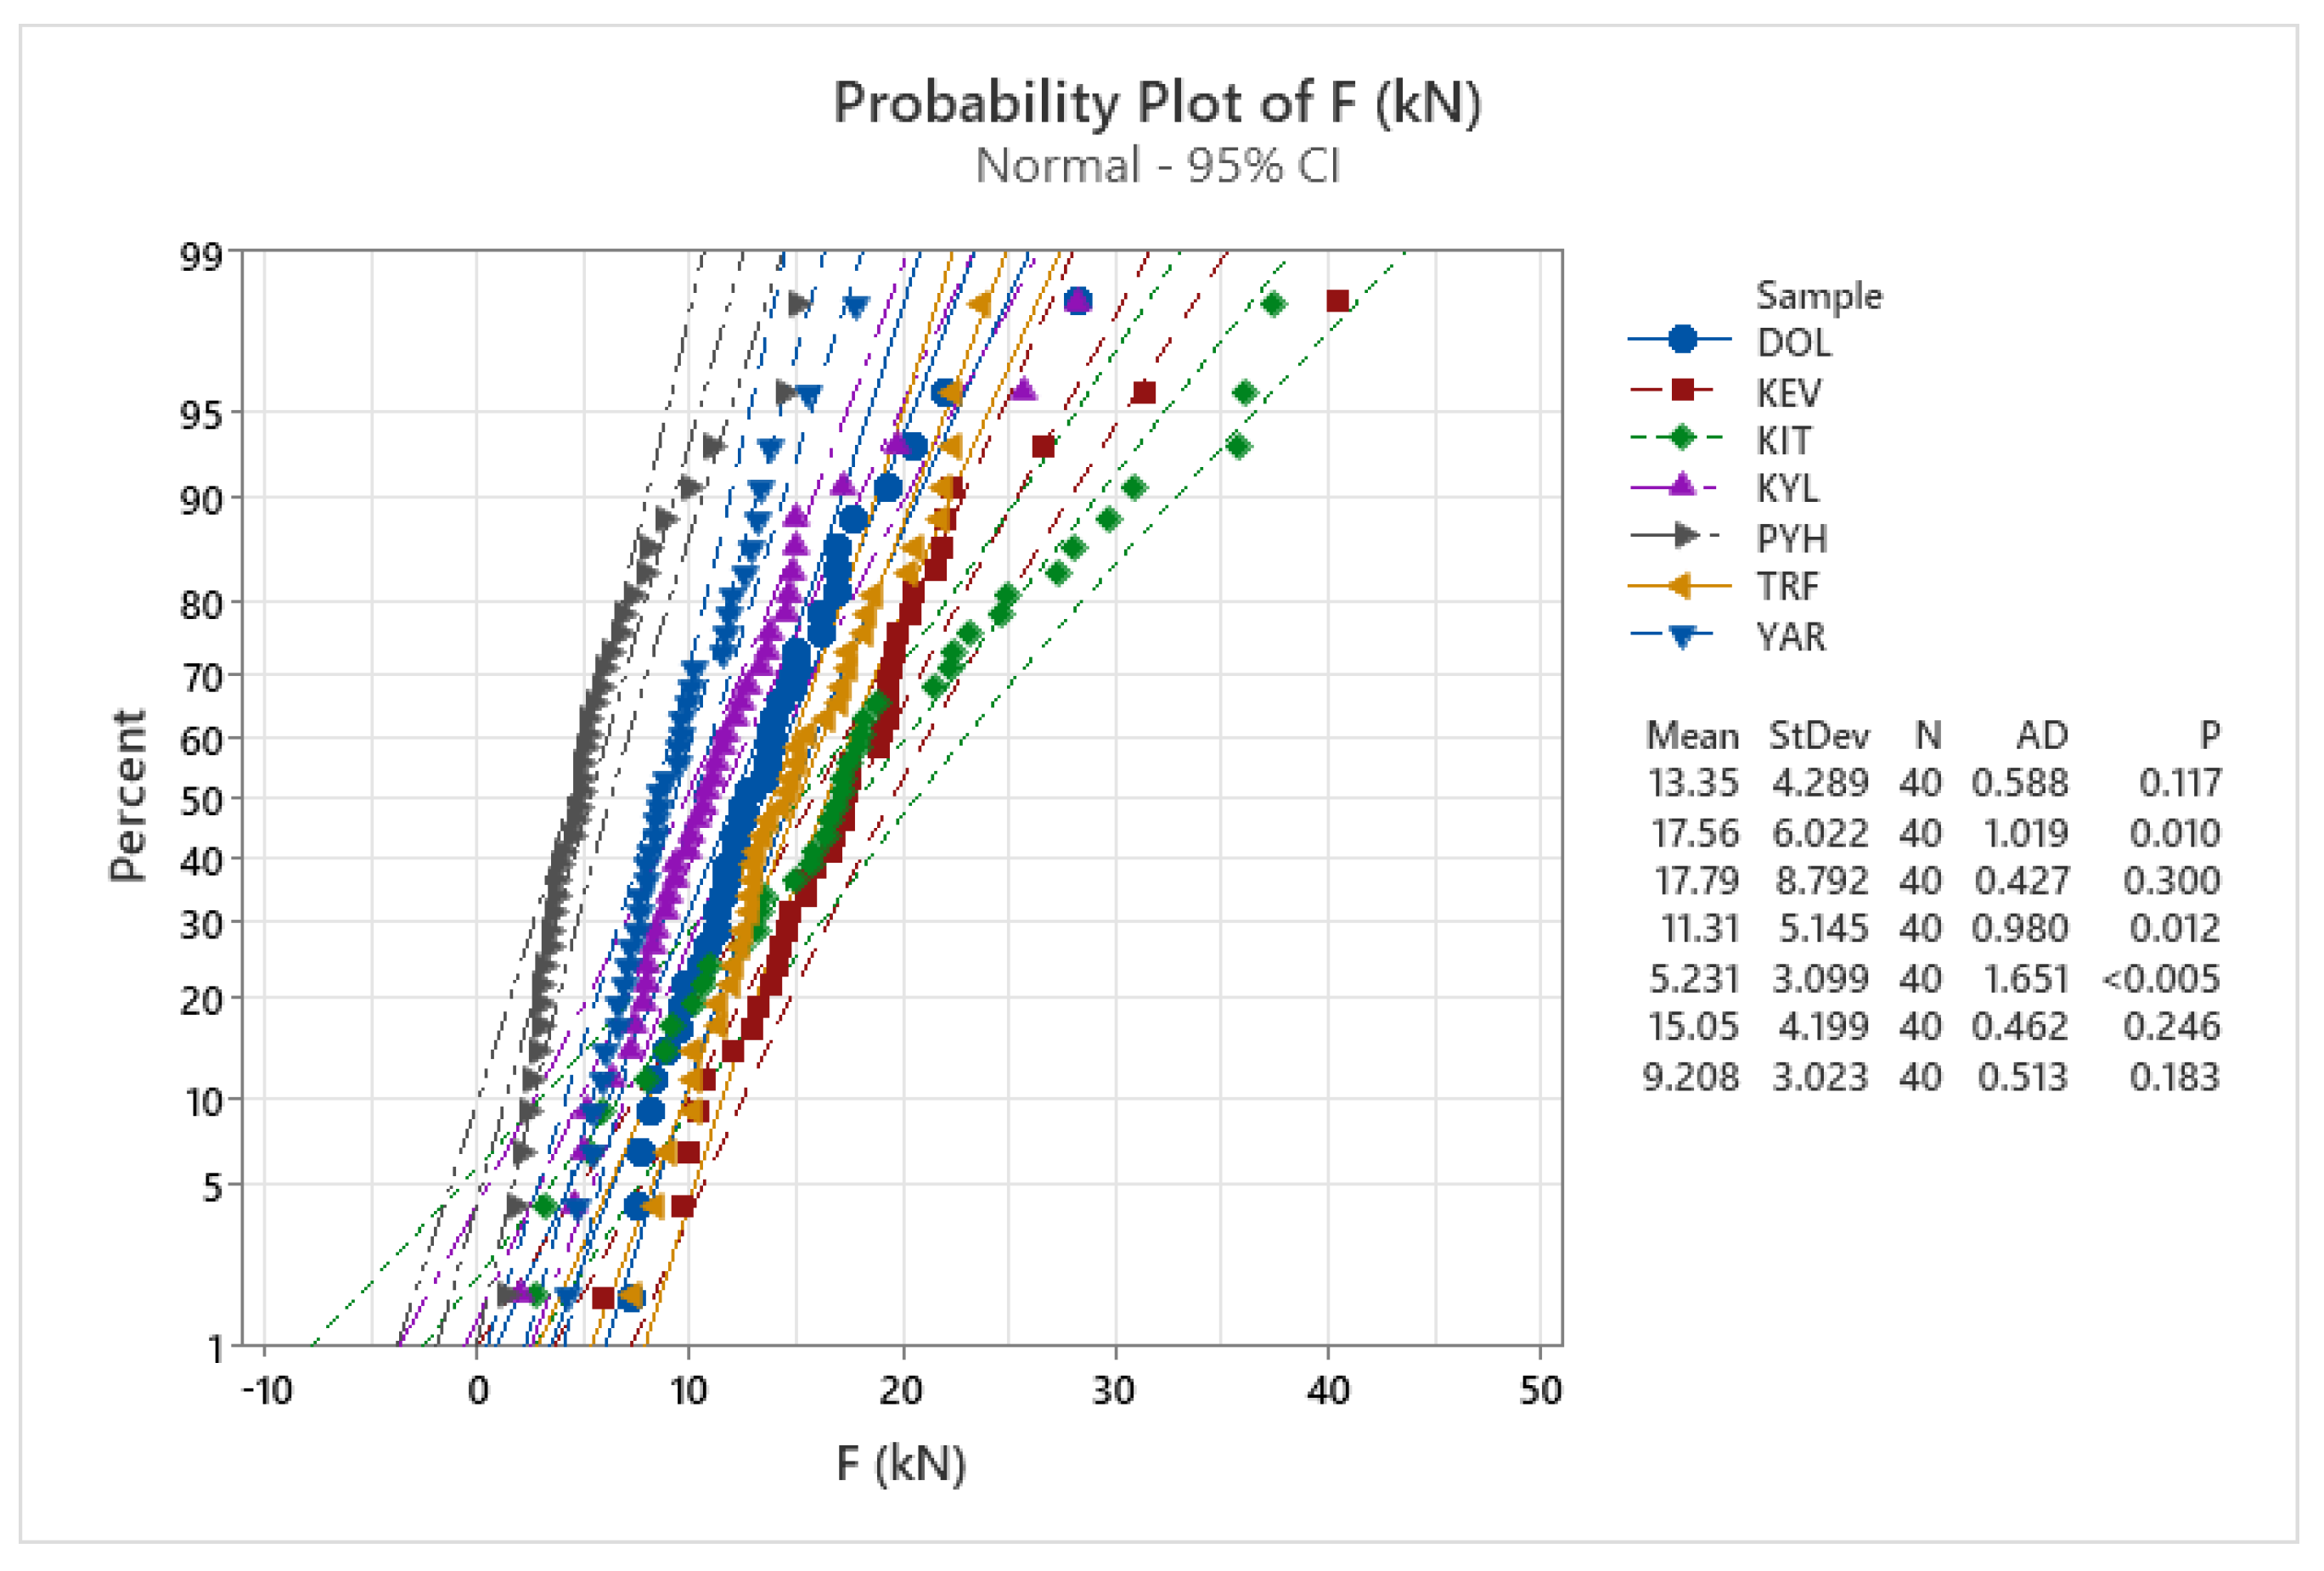
The Geopyörä distinguishes itself from traditional drop weight tests by its ability to measure the breakage force and energy on a per-particle basis within a given sample. This unique feature enables the generation of distinct distributions of breakage energy and force for each sample, as depicted in
Figure 4 and
Figure 5. The detailed nature of these distributions facilitates the application of statistical analyses, including Student's t-test and ANOVA, providing a robust framework for comparing outcomes across varying samples.
The energy consumed in each breakage event is measured via momentum loss of the crushing wheels. Triggered by the release of a rock from the feed system, the power is disconnected from the direct-drive system and the breakage wheels allowed to idle. The resultant momentum loss arising from the rock breakage provides the measure of energy applied to compressing and breaking the rock particle. The losses due to mechanical, back electromotive force and friction are carefully calibrated for every machine and accounted for in the energy calculation [
1].
The mechanical operation of the Geopyörä is described in more detail in [
1] In such a design it is necessary to measure the absorbed energy per rock breakage with sufficient precision, while ensuring non-slip grip and compression of the rocks to the point of fracture.
1.2. Assessing Accuracy
In wishing to assess the accuracy of a new testing device there can be considered two major aspects to verify:
Precision: measurements are reproducible and replicable between different test devices.
Accuracy: the measurement yields a value within a required uncertainty when assessed against an absolute value, such as in the SI standards.
However, there is no ‘truth’ on a breakage energy or rock strength in terms of energy to produce crushed product. This has been explored by a number of researchers trying to define efficiency of comminution devices. Fuerstenau [
9] assessed the absolute efficiency of breakage energy at below 1%, Tromas [
10] concluded the maximum possible efficiency is in the range 2.5% to 7.5%. All devices have an inherent inefficiency. One of the best benchmarks of measuring breakage as a function of energy input is the instrumented loadcell method, in which the energy absorbed by the rock is measured, as opposed to applied energy. The impact loadcell studies of Tavers and King [
11] and of Bourgeois and Banini [
12] provide a measure of the absorbed versus applied energy, with measures varying depending on applied specific energy and with rock competence - softer rocks absorbing less energy than stiffer rocks. Tavares [
13] measured the absorbed energy to vary between 67% and 99% of the applied impact energy. The objective function of determining the accuracy of a new test thus tends to be taken relative to existing tests. The objective at this stage of introducing the new test is to replicate the measures of the DWT, so as to enable these well-accepted measures to be propagated across the orebody in far greater detail than can be achieved using the DWT equipment. Thus, the objective becomes to provide data that matches the standard DWT results.
Accuracy: statistically match the measurements derived from full DWTs.
A complication of comparing to another test, is that the base test has an inherent degree of precision. Thus, the Precision of the DWT should be included in an assessment of accuracy. The work of Tavares and King [
11] illustrates this natural variability with precision measures conducted on the impact load cell (UFLC) apparatus, which is in essence an instrumented DWT. The JK Tech has conducted a study of reproducibility between repeat tests conducted on the JK DWT [
7]. The campaign revealed that when the same rock sample was tested at various laboratories worldwide, the results from the Bond test differed by ±14.2%, and for the SMC test, the difference was ±9.2%. This uncertainty must be incorporated in any test of accuracy.
2. Materials and Methods
The overall approach taken in this work to assess precision and accuracy is through comparative data and repeat tests using carefully sampled ore samples.
2.1. Accuracy Assessment Experiments
Samples from seven different ore deposits with different mineralogy, as is shown in
Table 1, were used in this research. Bulk samples were crushed and sieved to obtain particles of 22x19 mm. From each sample population eight samples of 20 particles were selected. To ensure consistency between duplicate samples, the particle selection methodology of the SMC Test® [
4] was applied, which limits the particle mass to within the mean ±30%.
To assess the accuracy of energy measurement in the Geopyörä test, various tests were conducted. In total, 56 sets of 20 particles were tested, with each ore type having four sets tested using the Geopyörä and four sets subjected to a custom Drop Weight test at the University of Sao Paulo (USP). This resulted in eight sets for each ore type, enabling a detailed analysis of the results.
The Geopyörä tests were conducted with two repeats (1 and 2) performed at a wider gap setting of 50% of the particle size, and other two repeats (3 and 4) carried out at a closer gap setting of 25%. The gap ratio is defined as the proportion between the geometrical mean of the tested particles, which was 20.6 mm in this case, and the gap aperture between the wheels. The gap ratios of 50% and 25% represent low and high specific energy levels, respectively.
The standard drop weight test uses fixed, predetermined energy values, whereas the Geopyörä test measures the actual specific breakage energy of each particle, which is a response of the tested material rather than a test input. As a result, custom drop weight tests were conducted by adjusting the energy input to match the mean specific energies as measured by the Geopyörä test, ensuring that the results were directly comparable to those obtained from the Geopyörä test.
The product of both Geopyörä and drop weight tests were sieved to determine the t10 parameter, which was compared. The hypothesis is that the Geopyörä energy measurements can be quantified by comparing the t10 at equivalent Ecs values to the DWT. This methodology had been previously attempted by Chaves Matus [
14], but he had to use quation 1 to interpolate t10 values at the standard Ecs values used in the JK DWT.
2.2. Precision Assessment (Round-Robin)
Round-robin tests, also known as interlaboratory tests or proficiency tests, are a type of testing where a set of samples are distributed to multiple laboratories or testing facilities to determine their performance and compare results. The samples used in the test are typically prepared in such a way as to represent a range of materials and/or properties that may be encountered in real-world applications [
5].
Each laboratory conducts the same test on the samples and reports their results. The results are then compiled and analysed to determine the degree of variability between the different labs and the accuracy and precision of the testing methods. The data obtained from the round-robin test can be used to identify sources of error and variability in testing methods and to improve the quality and consistency of the testing process.
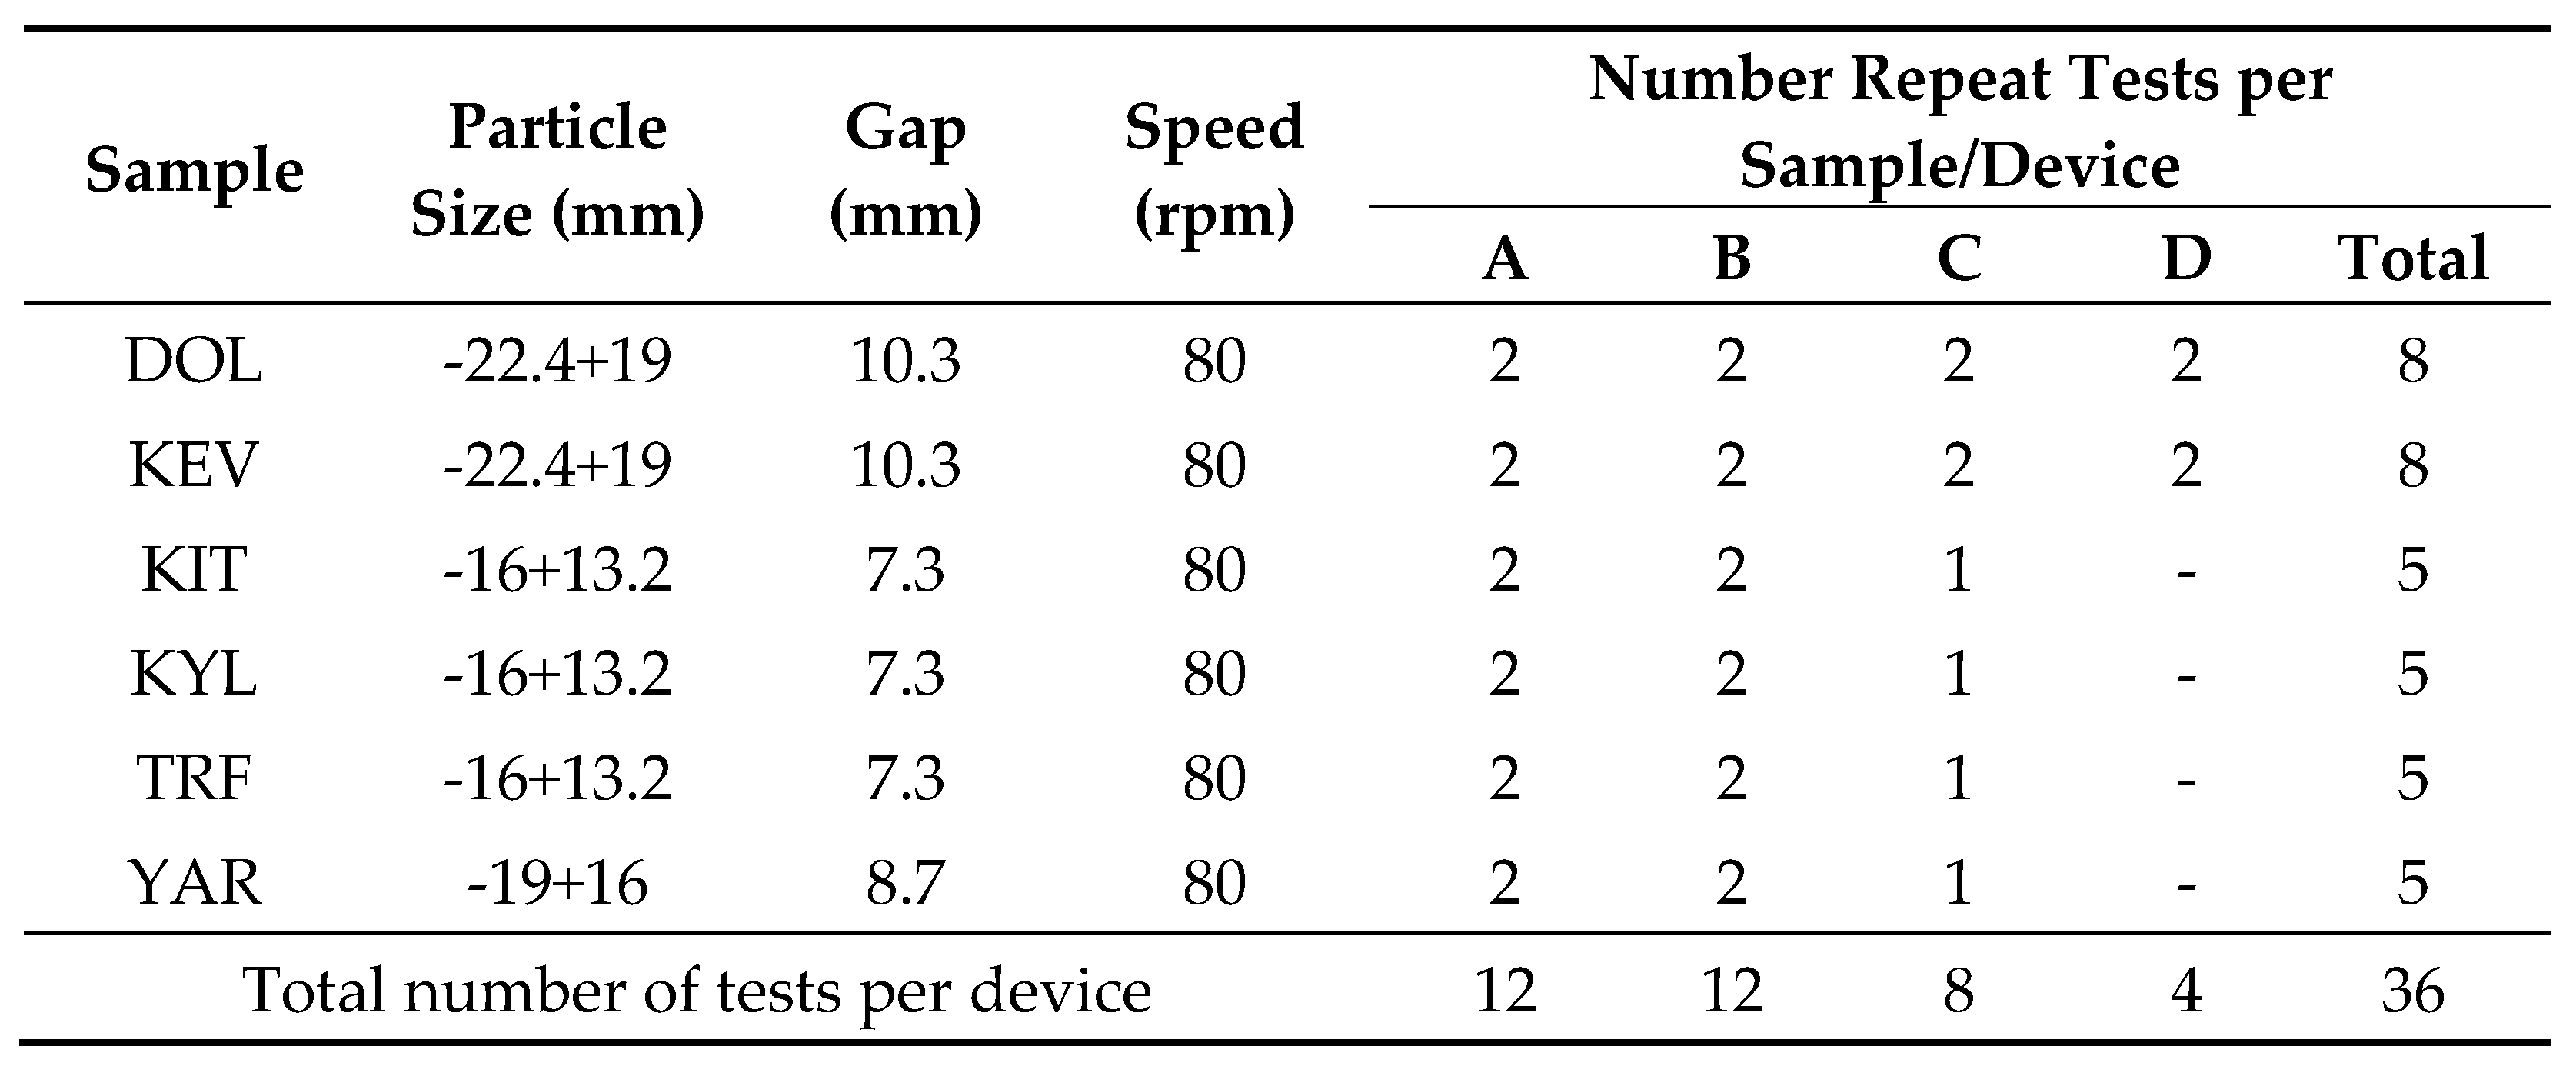
Round-robin tests were conducted with a few duplicate samples from bulk ore samples that had previously been used in the accuracy assessment – except for the PHY ore. The repeat tests were conducted using four different Geopyörä devices/laboratories (anonymised as A, B, C and D) under the same operating conditions (i.e., particle size, gap aperture and wheels speed) for each ore type, which are summarized in
Table 2. The precision of both energy and force measurements were assessed using analysis of variance (ANOVA) tests.
3. Results and Discussion
3.1. Accuracy Assessment
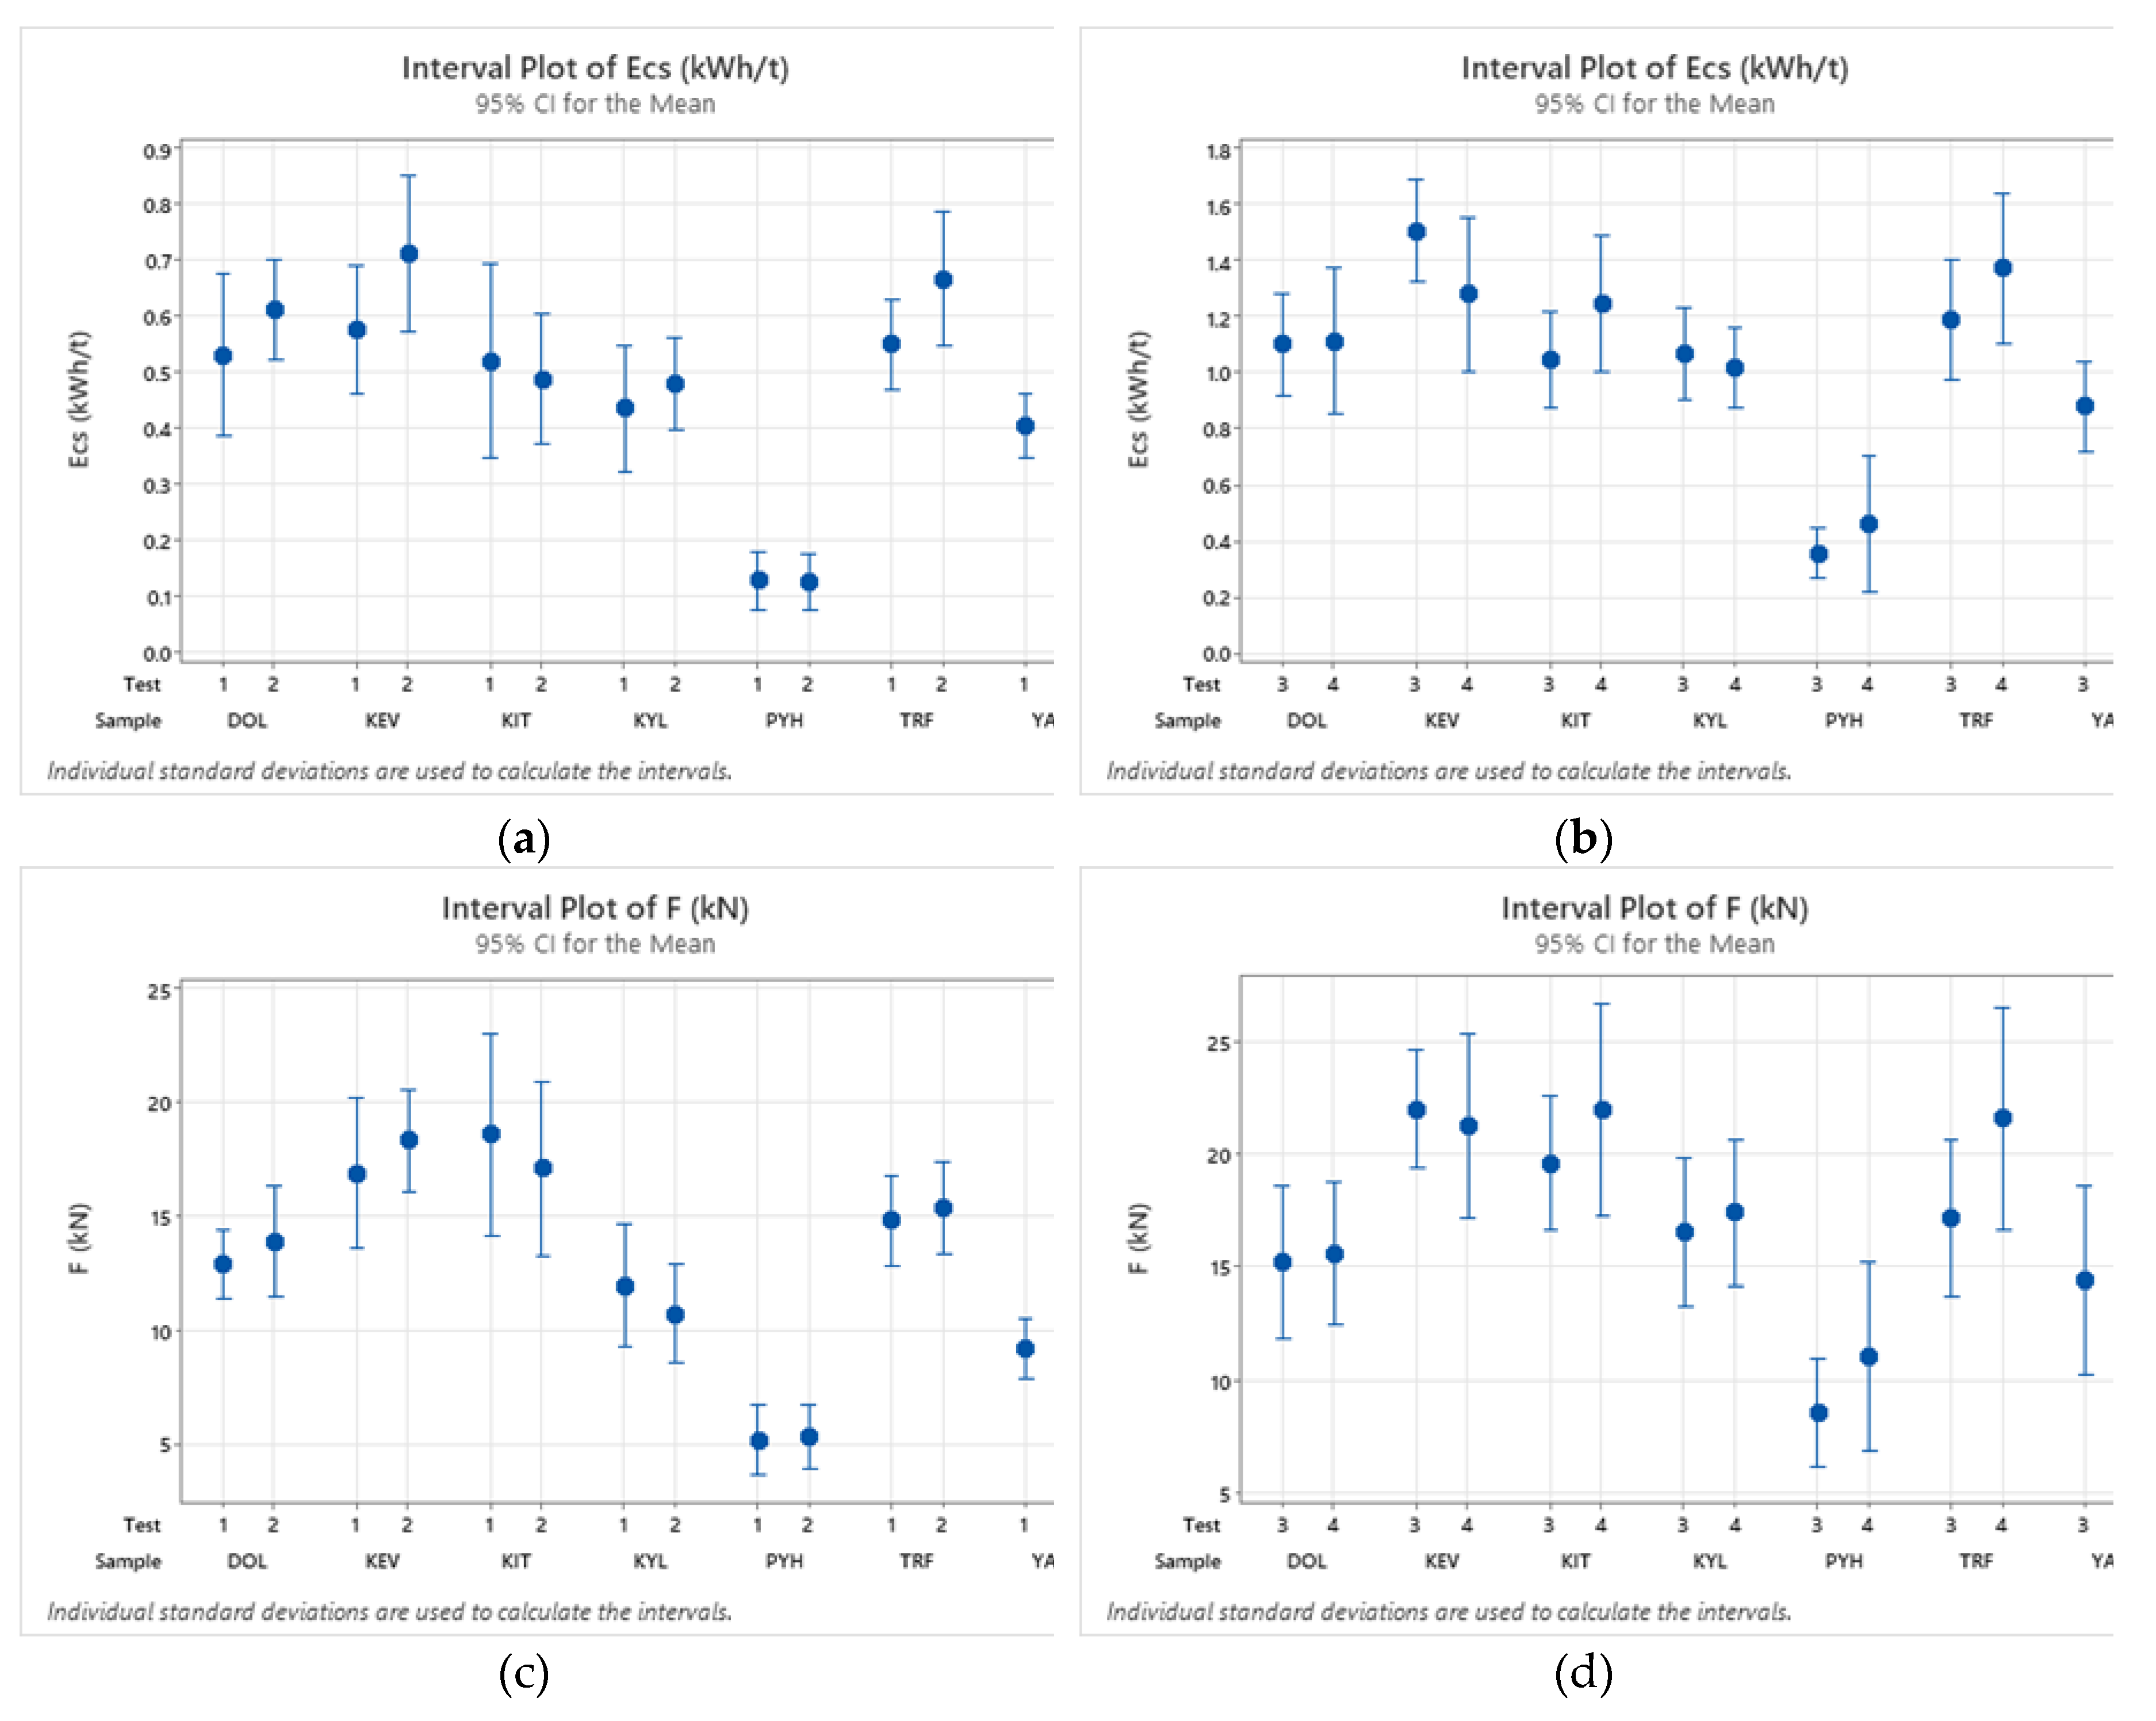
Before sending the duplicate samples for the comparative custom drop weight tests, the precision of the specific energy and force measurements made using the Geopyörä were statistically confirmed by t-test of Student on repeat tests. The mean Ecs and force values with a confidence interval of 95% for both low energy (T1 and T2) and high energy (T3 and T4) repeat tests are plotted as repeat pairs in
Figure 6. The Error bars show 95% confidence limits, allowing a visual assessment of the repeat data for each test overlapping between repeats – which is obeyed for all repeat tests for both Ecs and Force. It can be seen that the tests at higher compression (3 and 4) absorb far higher energy, shown in the graphs on the right, than the ones at lower compression (1 and 2), typically around twice the specific energy. The peak fracture force, shown in the lower plots, does increase with the higher compression of tests 3 and 4, but by a lesser degree than the energy.
The t-test values are presented in
Table 3. If the p-values are less than 0.05, we could reject the null hypothesis that there is no difference between the means and conclude that a significant difference does exist. But since all the p-values were larger than 0.05, we cannot conclude that a significant difference exists with 95 % confidence between pairs of repeat tests.
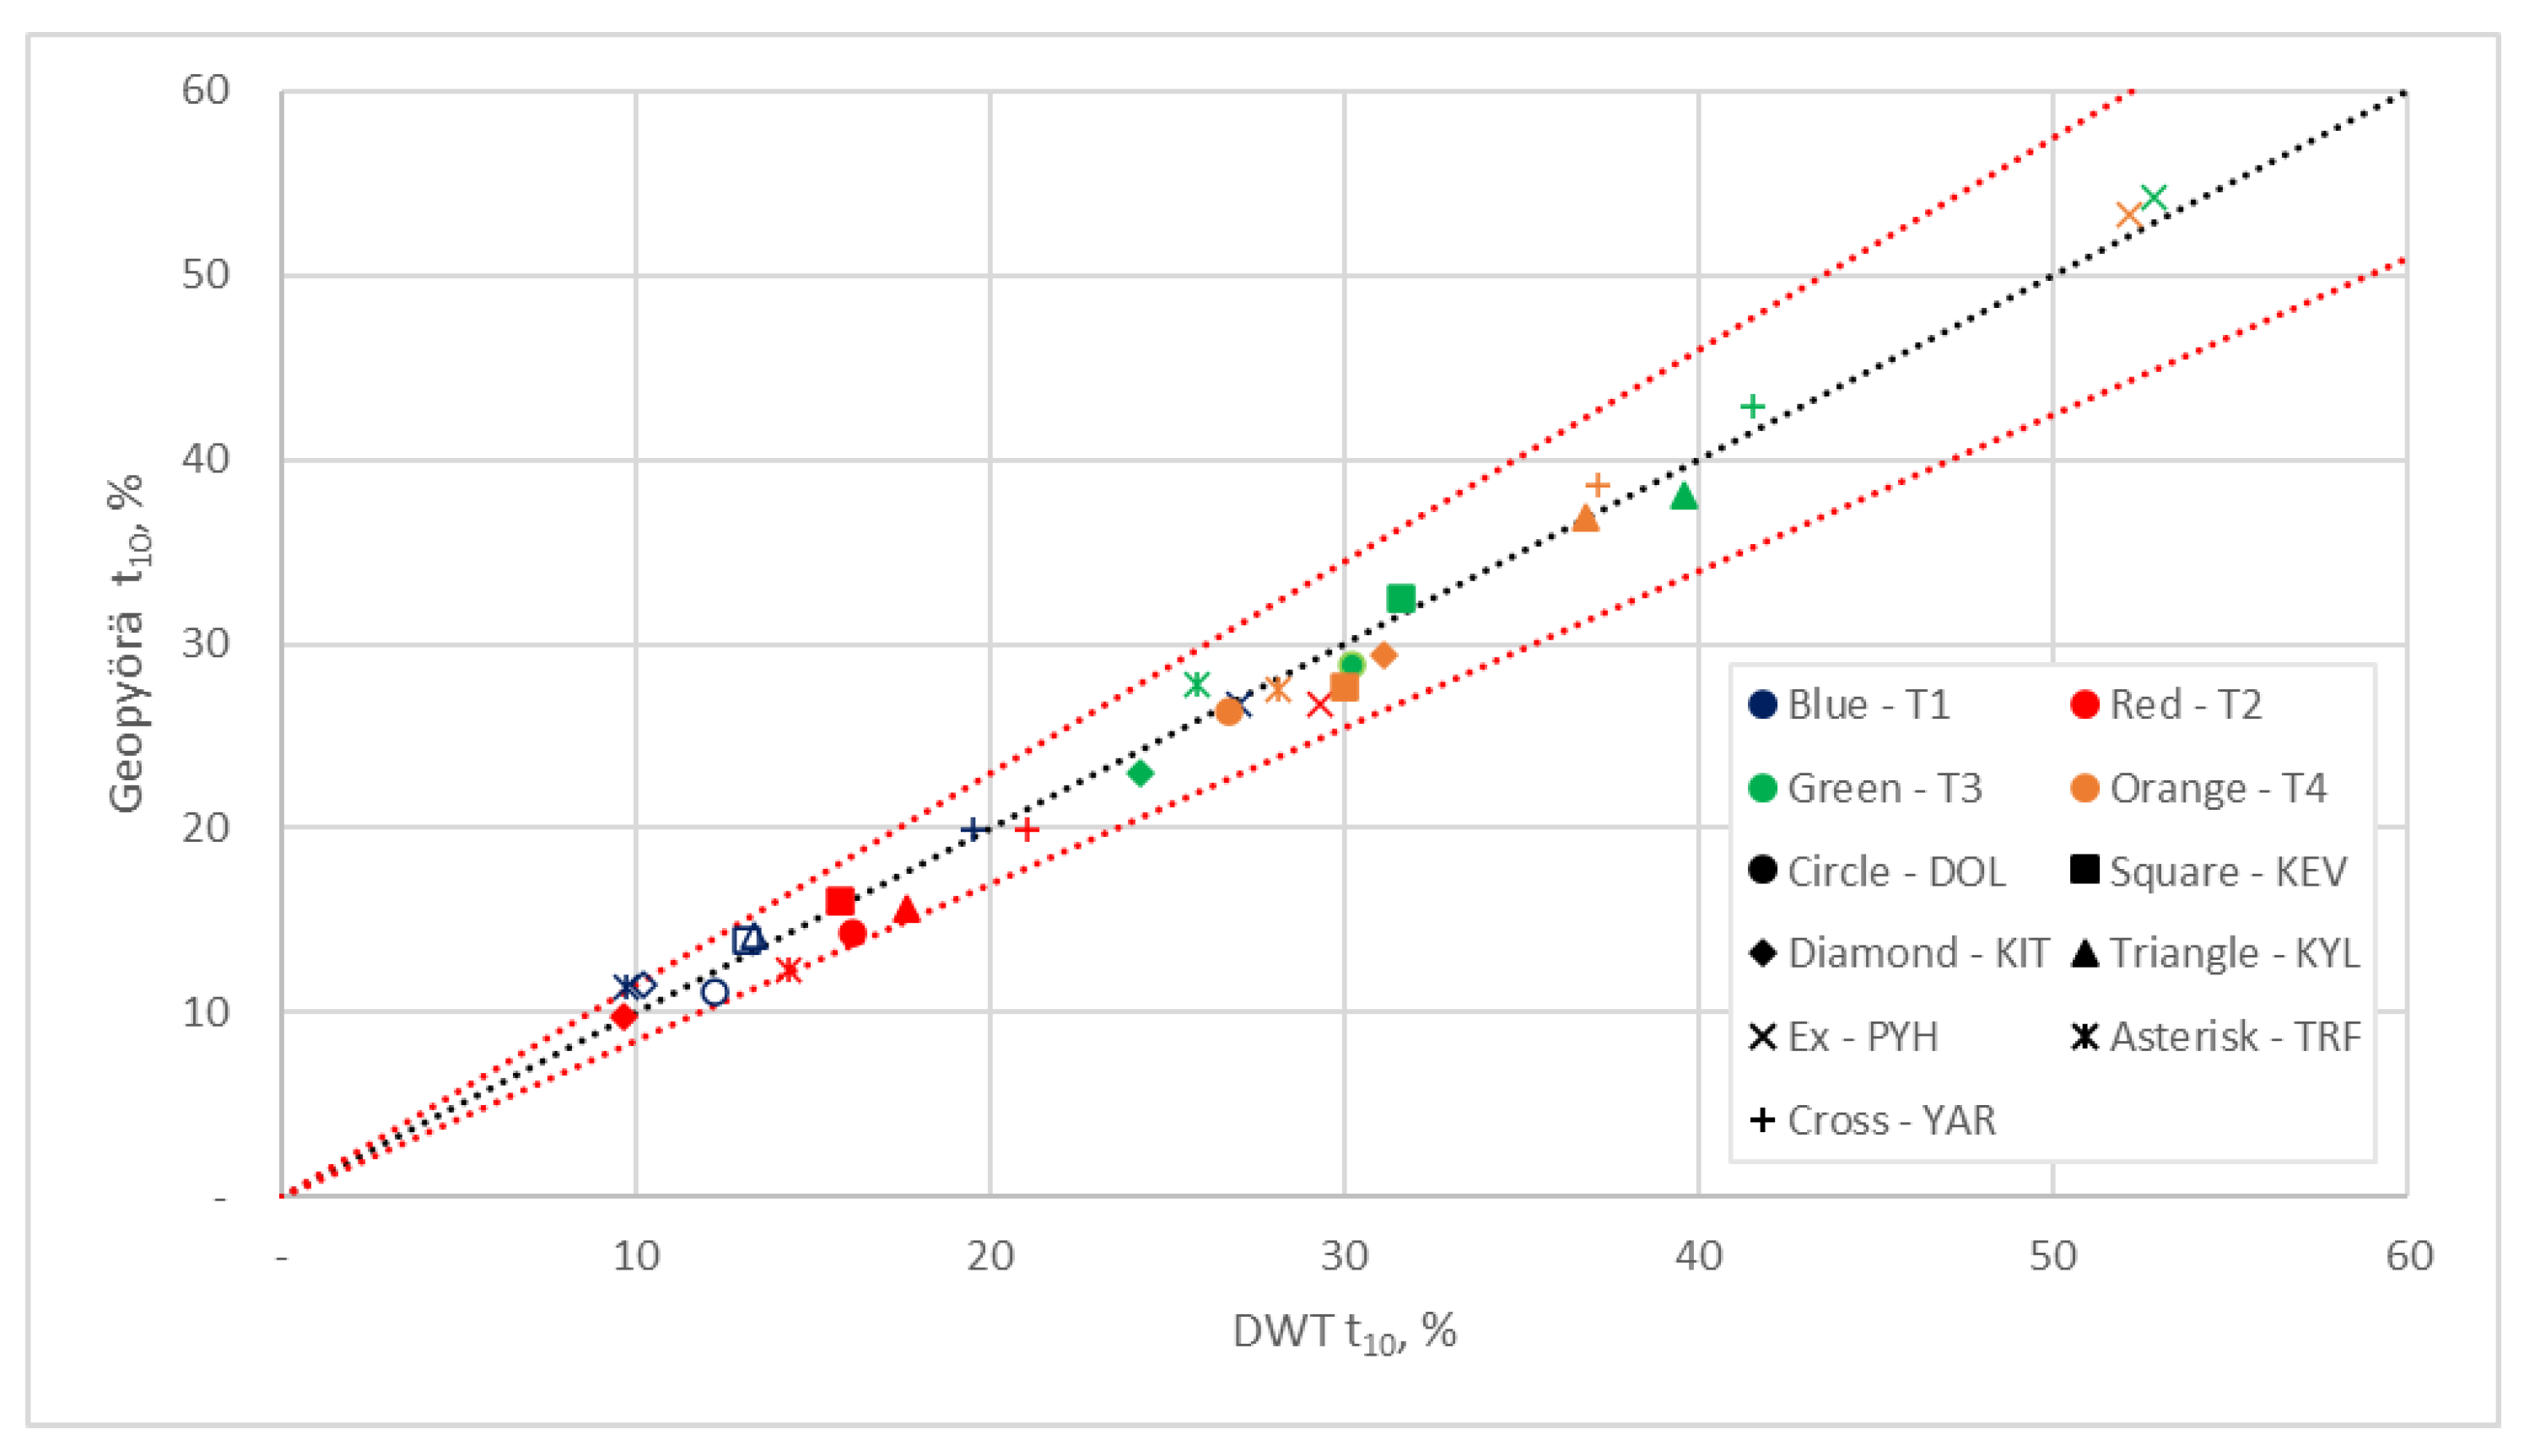
The t10 fragmentation parameter from the products of the Geopyörä and drop weight tests conducted at the same energy levels are presented in
Table 4. No significant difference was observed and the t10 values were within +/-15% of each other, as show in
Figure 7. This indicates that the Geopyörä test energy measurements were accurate and reliable in estimating the breakage characteristics of the tested rock material. Therefore, the hypothesis that the Geopyörä energy measurements are accurate if we obtain the same fragmentation that is obtained when we break the same rock material in a drop weight tester using the same energy input can be confirmed.
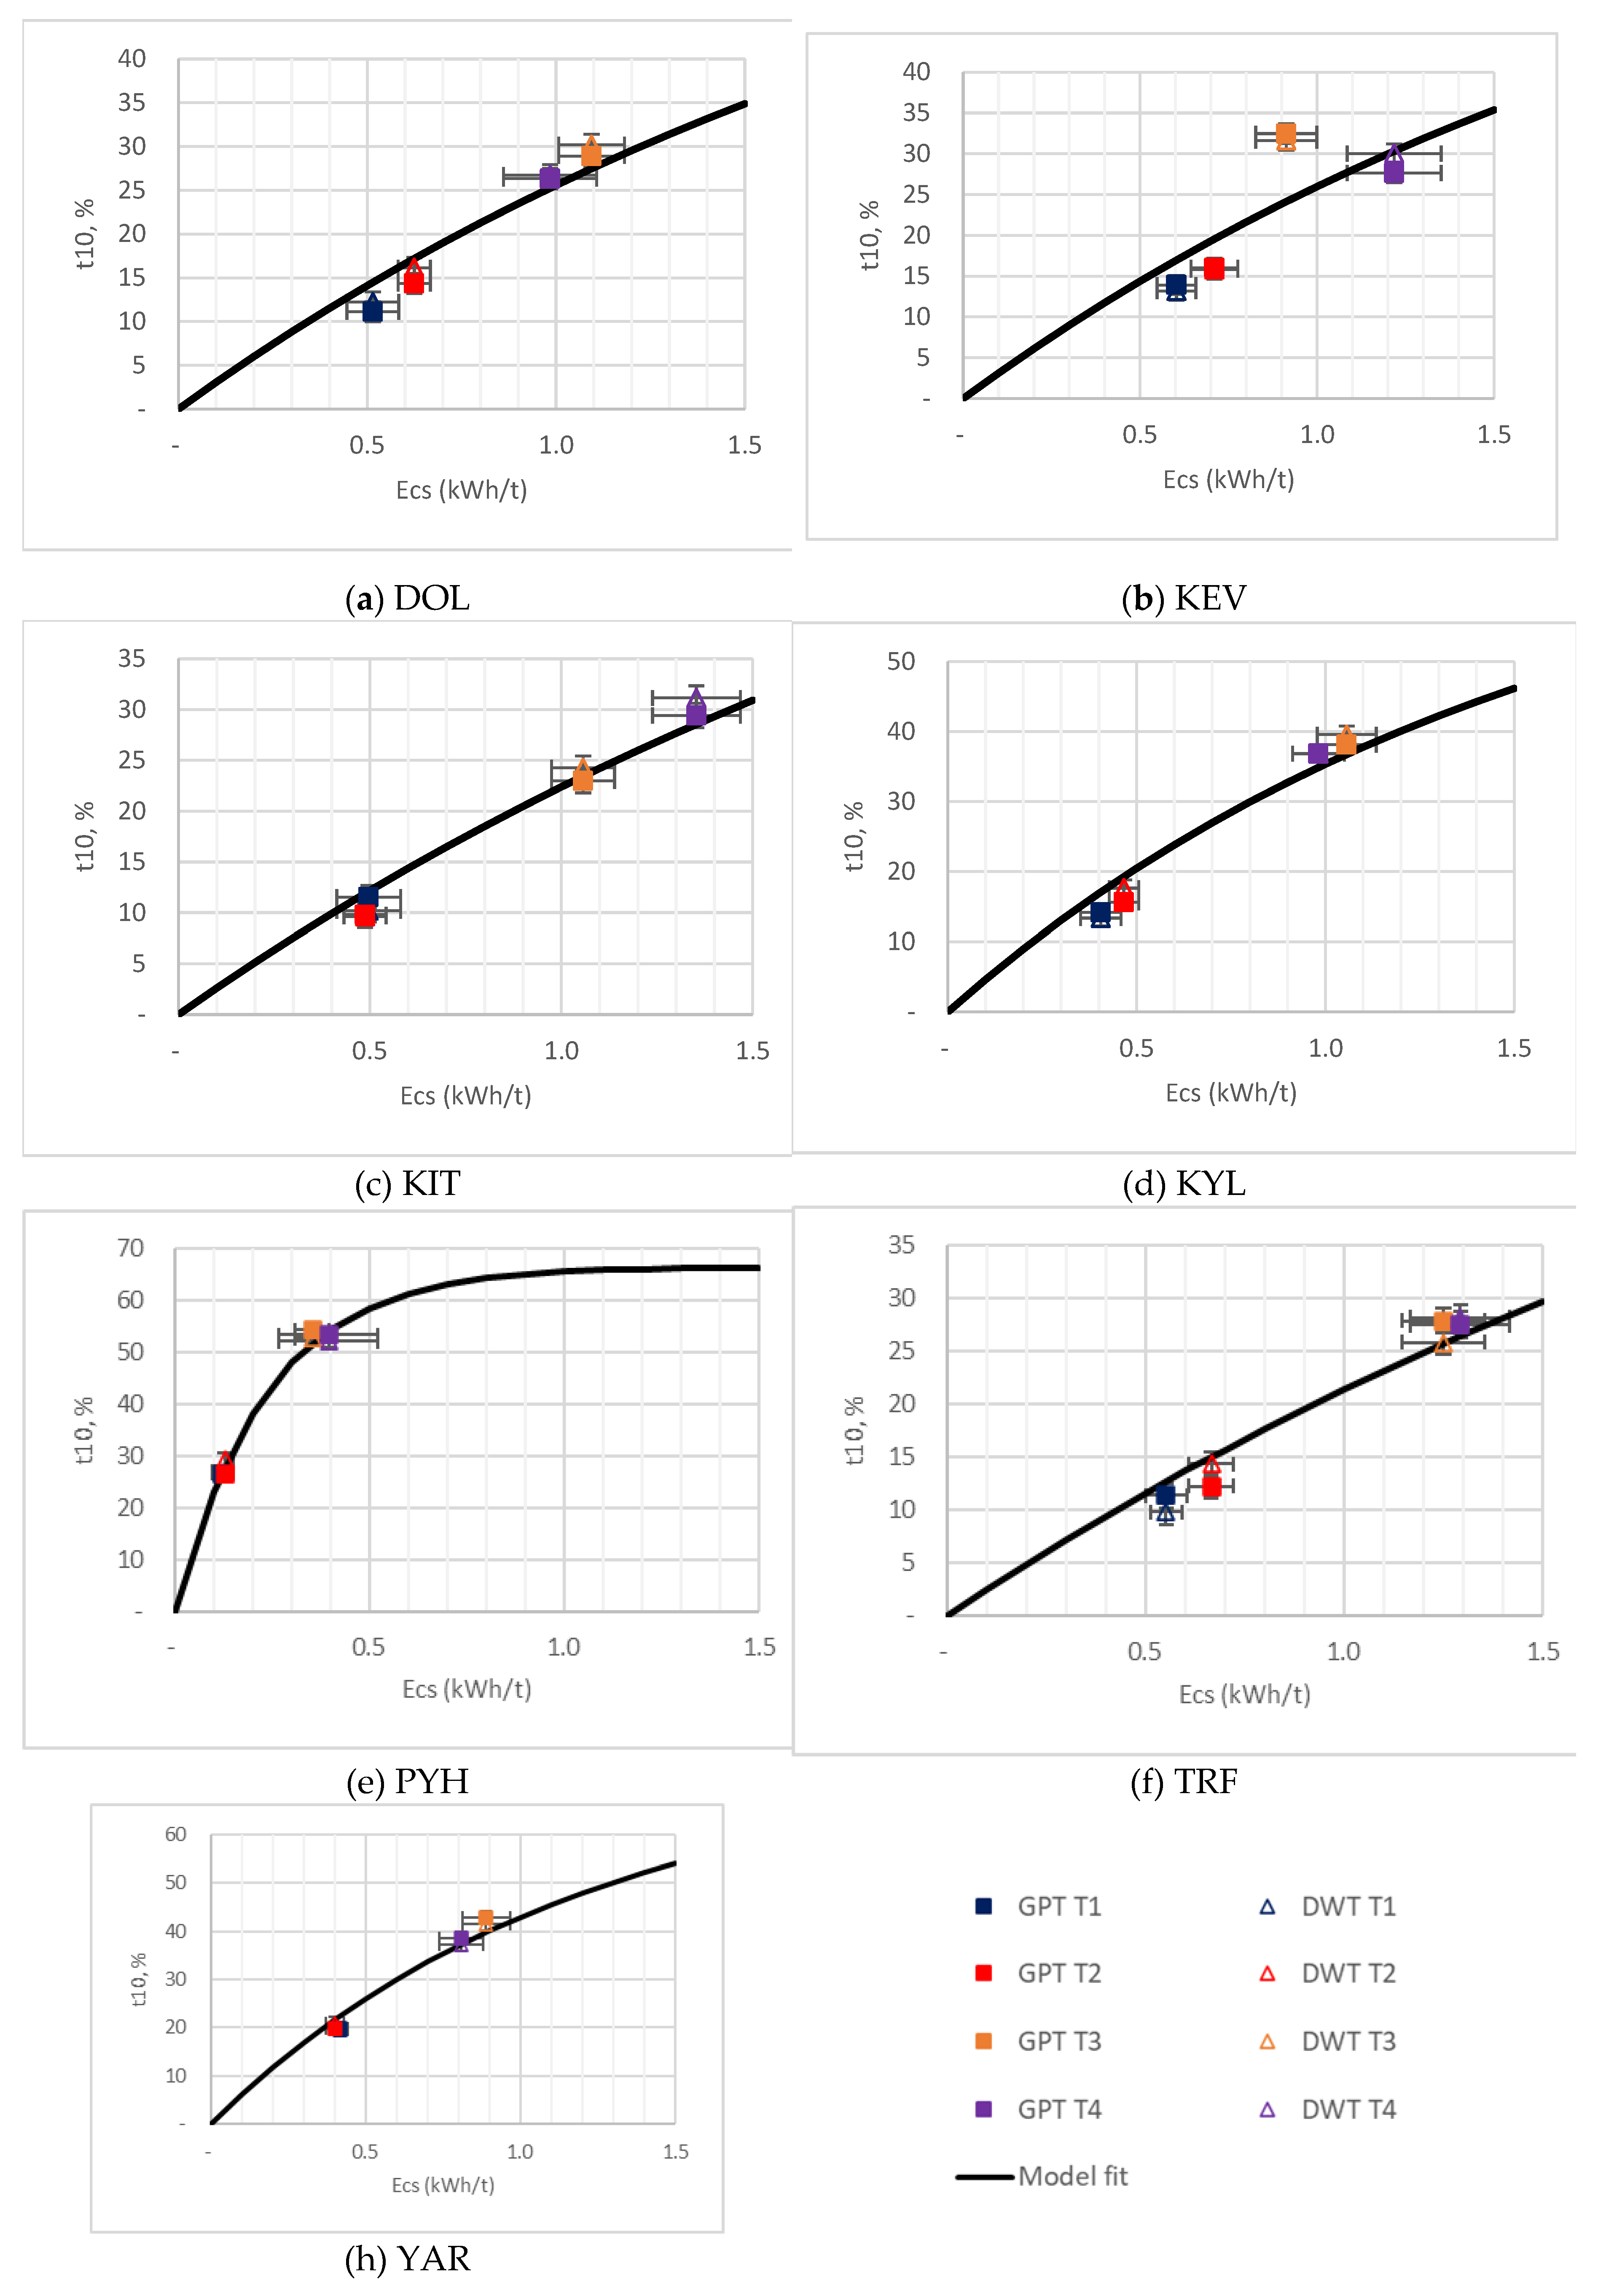
The relationships between Ecs and t10, which are plotted in
Figure 8, were also assessed to identify potential differences in the fitting of parameters A and b of breakage equation 1. Since the Geopyörä and drop weight tests were conducted at the same energies and the measured fragmentation (t10) was practically the same, no significant difference was found in the resulting Axb parameters obtained using the Geopyörä and drop weight data.
As presented in
Table 5, the results were within -2.7 to 6.1% from one another. While this is a confirmation that the Geopyörä test can be a reliable alternative to the DWT in estimating the breakage characteristics of rock material, a more extensive validation is presented in Bueno et al [
15].
3.2. Precision Test Results
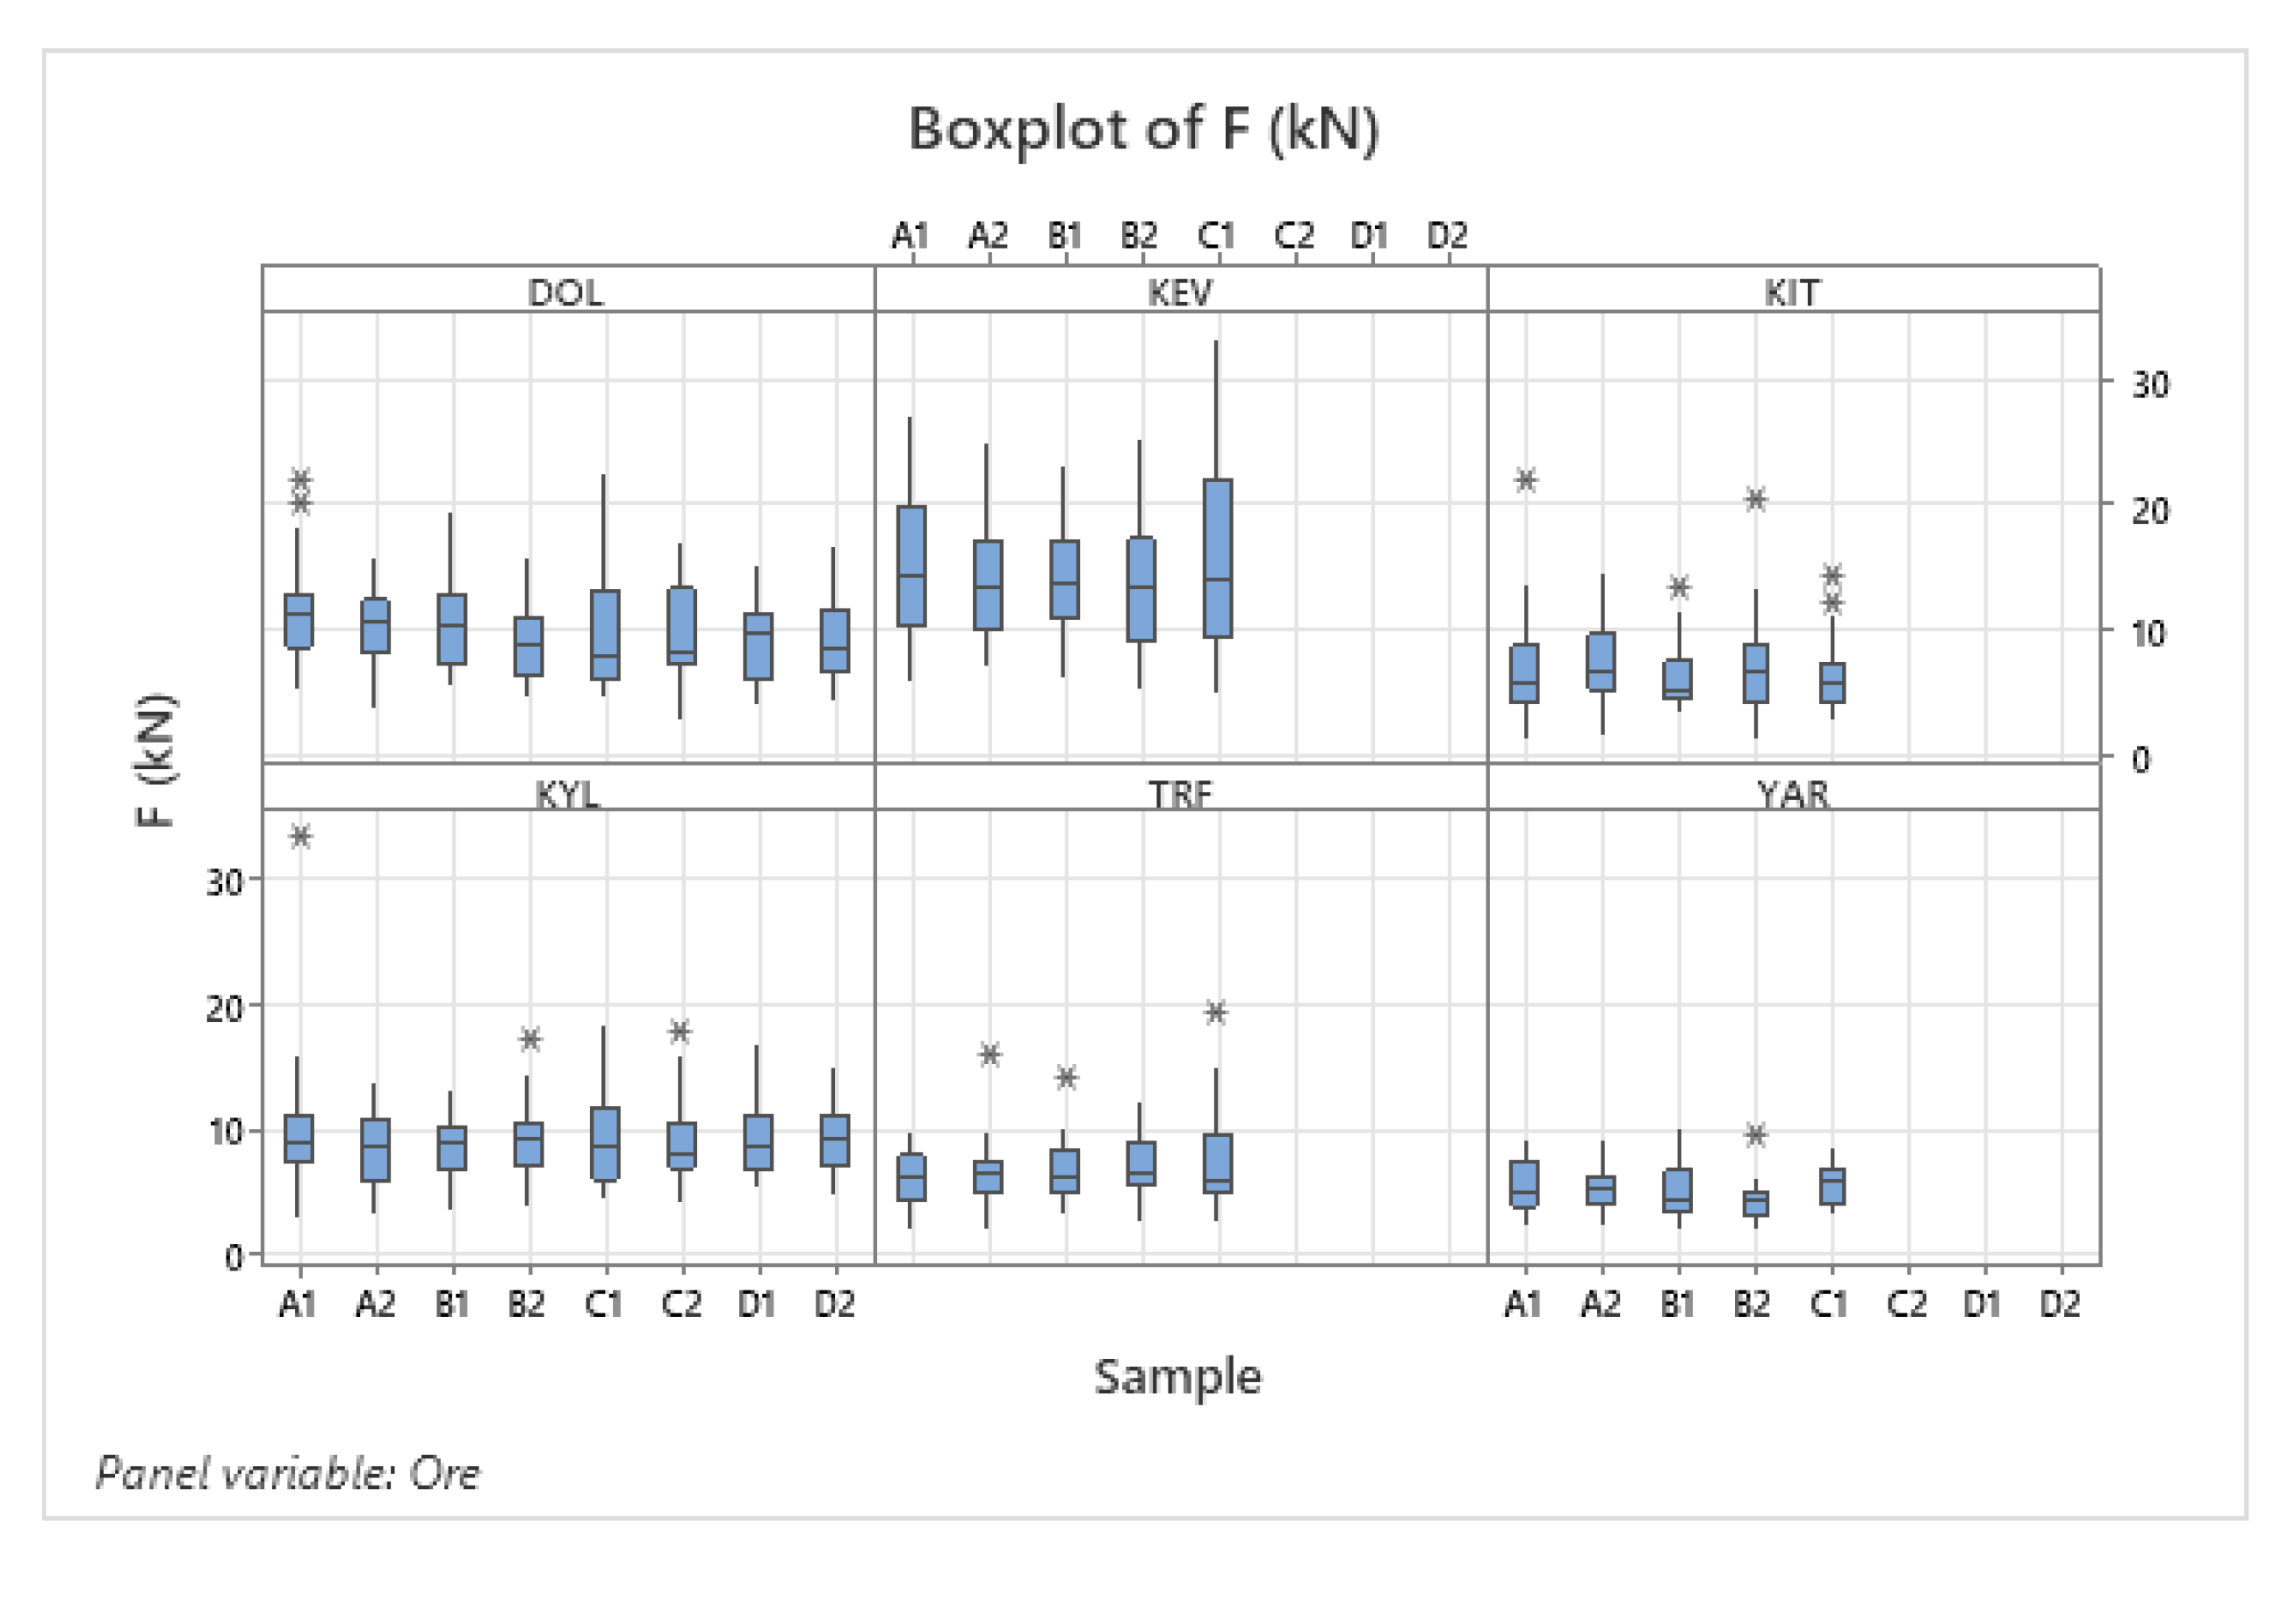
The Geopyörä test measures the specific comminution energy, Ecs (kWh/t), and applied force, F (kN), for each single particle in a sample, resulting in distributions of Ecs and F values. The data obtained for repeat tests conducted with six different ore samples across four devices is presented as box plots in
Figure 9 and
Figure 10. The range of Ecs or Force in any given test represents the natural variability of the ore, within a carefully constructed subsample of near identical rocks, and the difference in rock dimensions within a screened size range. It should be noted that such information is not available for DWT results, as no input data is measured.
A One-Way ANOVA test was conducted to compare the mean Ecs and F values of each test to determine whether they were significantly different or not. The calculated p-values presented in
Table 6 are greater than 0.05, confirming the precision of the tests as there are no significant differences with 95% confidence.
Since there is no significant difference among the tests, the overall precision of the Ecs and force measurements was determined on the basis of the 95% confidence interval of the mean calculated using all the available data for each ore type. The summary results presented in
Table 7 show an average precision of 6.8% for specific energy measurements and 6.3% for force measurements across all different devices and ore types.
4. Conclusions
In conclusion, this study evaluated the accuracy and precision of the Geopyörä breakage test for assessing the specific energy required for rock fragmentation. The results showed that the Geopyörä test provides accurate energy measurements, as confirmed by the close agreement with the results obtained from the custom Drop Weight tests. The precision of the Geopyörä test was also demonstrated through round-robin tests, which showed good agreement of breakage energy and force measurements conducted with several ores and four different devices The repeatability achieved by the Geopyörä test out weight that achieved with commercial drop weight and Bond test. Therefore, the Geopyörä test is a reliable and efficient method for accurately measure the specific breakage energy of rock breakage, with the potential to improve the efficiency and sustainability of mining operations. Further research is needed to investigate the accuracy of its force measurements against other methods, such as the UFLC (Tavares and King, 1998). More extensive round-robin tests with other rock types and across more laboratories will also be conducted in the near future.
Author Contributions
Marcos de Paiva Bueno: Conceptualization, Data curation, Formal analysis, Investigation, Methodology, Resources, Project administration, Writing – original draft, Writing – review & editing and supervision. Thiago Almeida: Formal analysis, Data Curation, Validation, visualization Writing – review & editing and supervision. Leonardo Lara: Formal analysis, Investigation, Data Curation, Validation, visualization, Writing – review & editing and supervision. Malcolm Powell: Writing – review & editing and supervision. Homero Delboni: Resources.
References
- Bueno, M., Torvela, J., Chandramohan, R., Matus, T.C., Liedes, T., Powell, M.S. The double wheel breakage test. Minerals Engineering. 2021, Volume 168, 106905, ISSN 0892-6875. [CrossRef]
- Napier-Munn, T., Morrell, S., Morrison, R., Kojovic, T. Mineral Comminution Circuits: Their Operation and Optimisation. 1996, first ed. Julius Kruttschnitt Mineral Research Centre, Indooroopilly, Australia.
- Narayanan, S.S.; Whiten, W.J. Determination of comminution characteristics from single-particle breakage tests and its application to ball-mill scale-up. 1988, Trans. Inst. Min. Metall. Sect. C, 97, C115–C124.
- S. Morrell, Predicting the specific energy of autogenous and semi-autogenous mills from small diameter drill core samples. 2004, Minerals Engineering, Volume 17, Issue 3, Pages 447-451, ISSN 0892-6875.
- Napier-Munn, T. J. Statistical methods for mineral engineers: How to design experiments and analyse data. 2014. Indooroopilly, Queensland: Julius Kruttschnitt Mineral Research Centre, University of Queensland.
- Mosher, J.B. & Tague, C.B. Conduct and precision of Bond grindability testing. 2001, Minerals Engineering. 14. 1187-1197. [CrossRef]
- Weier, M.L., & Chenje, T. Accuracy of the Bond ball mill test and its implications. 2018, 14th International Mineral Processing Conference & 5th International Seminar on GeoMetallurgy. Santiago, Chile: Procemin-Geomet 2018.
- Bond, F C. Crushing and grinding calculations. 1961, British Chemical Engineering.
- Fuerstenau, D. W., & Abouzeid, A. Z. M. The energy efficiency of ball milling in comminution. 2002. International Journal of Mineral Processing, 67(1), 161-185. [CrossRef]
- Tromas, D. Mineral comminution: Energy efficiency considerations. 2008. Minerals Engineering 21, pp. 613–620. [CrossRef]
- Tavares L.M., and King R.P. Single-particle fracture under impact loading. 1998. International Journal of Mineral Processing, 54, 1–28. [CrossRef]
- Bourgeois, F., & Banini, G. A portable load cell for in-situ ore impact breakage testing. 2002. International Journal of Mineral Processing, 65(1), 31-54.
- Tavares, L.M. Breakage of Single Particles: Quasi-Static. 2007. In Handbook of Powder Technology, Volume 12. ISSN 0167-3785. [CrossRef]
- Chavez Matus, T. The Geopyörä breakage test for geometallurgy. 2020. IMPC 2020: XXX International Mineral Processing Congress, Cape Town.
- Bueno, M., Almeida, T., Powell, MS., Extensive validation of a new rock breakage test. In Proceedings of the SME Annual Meeting, Denver, CO, USA, 26 Feb – 01 Mar 2023.
|
Disclaimer/Publisher’s Note: The statements, opinions and data contained in all publications are solely those of the individual author(s) and contributor(s) and not of MDPI and/or the editor(s). MDPI and/or the editor(s) disclaim responsibility for any injury to people or property resulting from any ideas, methods, instructions or products referred to in the content. |
© 2024 by the authors. Licensee MDPI, Basel, Switzerland. This article is an open access article distributed under the terms and conditions of the Creative Commons Attribution (CC BY) license (http://creativecommons.org/licenses/by/4.0/).
