1. Introduction
Metal packaging is gaining popularity due to its environmental benefits, being 100% recyclable. Its ability to be sterilized with heat, cost-effectiveness, strength, and short filling time also enhance its relevance. The most popular type of metal packaging is food cans, also known as sanitary food cans. The ratio of oxygen transmission rates (ORT) and water vapor transmission rates (WVTR) significantly impacts shelf life [
1]. Metal cans provide a complete barrier against air and moisture, allowing canned food to be stored for at least two years [
2]. Cans increasingly involves combining metal with other packaging materials, such as laminated steel with plastic film. A new PET-laminated TFS sheet of low-carbon aluminum-killed steel for deep drawing processes in food cans has been developed and utilized in industry [
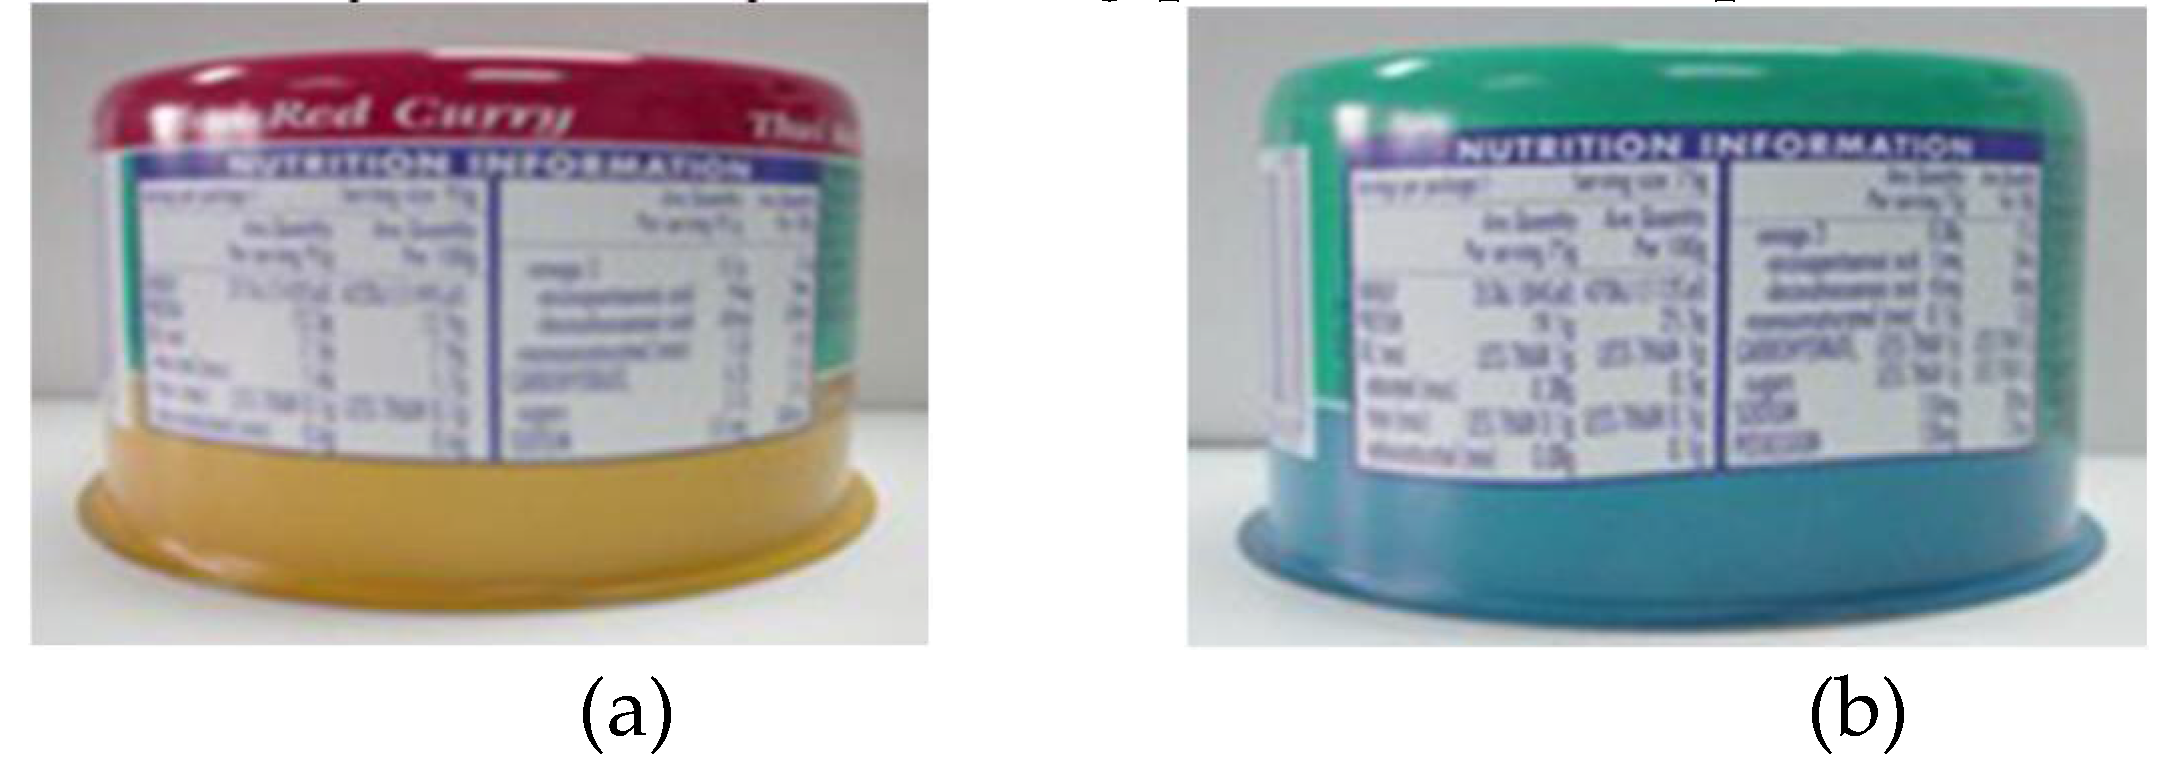
3]. There is an increasing demand among customers for premium packaging solutions. Food can manufacturers have two primary labeling options: 1) paper labeling and 2) distortion printing, as illustrated in
Figure 1. Offset printing involves applying ink and varnish to flat can sheets before the drawing and re-drawing (DRD) process.
Today manufacturing business operators are striving to enhance product quality and accelerate the development of various technologies. Quality is one of leading criteria in a business success. Total productive maintenance (TPM) is deployed inside the metal forming industry to improve metal industry workstations and the overall equipment effectiveness (OEE) is evaluated in [
4]. The deep drawing process is crucial to the metal food packaging industry with a high production rate and excellent dimensional accuracy. Utilizing a very thin steel sheet, which possess high hardness and high yield strength, is a key aspect of this production.
Designing tooling and determining production parameters can be challenging due to the need for extensive trial and error to achieve optimal tooling shapes and production conditions. Advanced computer modeling to simulate metal forming behavior is beneficial in reducing the time and cost associated with trial and error. Waving failure is a significant issue in distortion printing food cans, whereas it is not a concern in traditional cans.
Figure 2 shows an accepted can and a rejected can due to waving defects. For general practice in industry, cans with a waving height greater than 1.0 mm are rejected. Visual inspections in the production line have revealed a scrap rate of 1.59%, significantly higher than the target of 0.25%. A high scrap rate can indicate lower production and quality control efficiency, adversely affecting production output and manufacturing costs.
Finite Element Analysis (FEA) is an important tool for analyzing and designing the drawing and redrawing processes. Discrepancies between FEA and experimental results can arise from numerical errors in the FEA or changes in input variables. Numerous studies have utilized FEA to deterministically solve sheet metal forming problems. For instance, the effects of tooling conditions in the deep drawing process of C.R.1 steel cylindrical cups with an initial thickness of 0.9 mm are studied using FEA and experiments in [
5]. Forming optimization of ultra-low carbon steel with a thickness of 0.7 mm via inverse evolutionary search is discussed in [
6]. Optimization and tolerance prediction of mild steel with thicknesses of 0.725 and 0.775 mm are illustrated using a response surface model in [
7]. For some issues with material models, such as 2090-T3 aluminum alloy with a thickness of 1.6 mm, a strong asymmetry between tensile and compressive behaviors is shown in [
8]. Dual-phase steel (DP600) with a thickness of 1.00 mm is experimentally investigated at large strain in [
9]. Recent interest has emerged in isogeometric algorithms for one-step inverse steel forming with a thickness of 0.8 mm [
10].
To improve quality, it is essential to account for uncertainty in the design process. Several studies have addressed uncertainties in sheet metal forming. A methodology for reliability calculations of structures to estimate the reliability of 0.81 mm sheet metal forming operations using forming limit diagrams (FLD) to assess material breakage is presented in [
11]. A metamodel of linear and quadratic interpolation response surfaces to evaluate the reliability of the sheet metal forming process of an austenitic stainless steel named HyTens 800 with a thickness of 1 mm using the LS-DYNA solver and MCS is presented in [
12]. MCS, the response surface method, and most probable point analysis are used to quantify probabilistic characteristics of shape and dimensional errors in forging and extrusion to minimize systematic errors, as presented in [
13]. A comparison between stochastic and interval methods, two prominent uncertainty quantification techniques, to evaluate their impact on the robustness and predictive accuracy of a sheet metal forming process simulation (specifically, the springback of a simple flanging of 1 mm steel sheet) is presented in [
14].
The uncertainty analysis of deep drawing of Aluminum alloy AA 5754-O with a thickness of 1 mm, using a quarter model of C3D8R, ABAQUS/Explicit solver, and surrogate model, is presented in [
15]. A procedure to evaluate the robustness of defect and cost predictions in quality inspections of low-volume productions (e.g., a few tens per year of a hardness testing machine), addressing how model uncertainties for defectiveness prediction can be assessed and their impact on selecting effective and affordable inspection strategies, is presented in [
16]. A procedure combining Response Surface Methodology (RSM) with Finite Element Analysis (FEA) and Monte Carlo Simulation (MCS) is applied to a real stamping process (LNE 380 steel transmission cross member) to optimize experimental problems with multiple responses, incorporating uncertainties in empirical function coefficients, as presented in [
17].
Most literature focuses on steel with a thickness of approximately 1 mm (not a very thin sheet like this work) and often disregards uncertainty in the process. This work focuses on a relatively new material with a smaller thickness and uncertainty in real production. Also, this paper explores options to reduce the scrap rate relevant to the industry. There are few works in the literature focusing on new industrial food can production with distortion printing to evaluate and improve the scrap rate under waving criteria and uncertainty. This paper subsequentially presents waving defect in food can forming, material parameter identification and scrap rate optimization.
2. Waving Defect in Food Can Forming
The Materials and Methods should be described with sufficient details to allow others to replicate and build on the published results. Please note that the publication of your manuscript implicates that you must make all materials, data, computer code, and protocols associated with the publication available to readers. Please disclose at the submission stage any restrictions on the availability of materials or information. New methods and protocols should be described in detail while well-established methods can be briefly described and appropriately cited.
The manufacturer of food can with distortion printing has serious concern about defects related to the waving requirement. This section outlines the issues associated with distortion printing in food cans, the can forming processes, the analysis of can forming, and the definition of waving failure.
2.1. Distortion Printing in Food Can
Recently, the premium can products industry, which relies on distortion printing, has raised requirements beyond engineering functions. The DRD process is fundamental in manufacturing food cans. The industry defines the product code as ABCxDEF. For example, 307x113 is a can with a diameter of 307 (i.e., 3 + 07/16 inch) and a height of 113 (i.e., 1 + 13/16 inch). Currently, the factory in this study produces DRD food cans follows: 307x113 (40%), 211x109 (20%), 300x103 (16%), 300x200 (14%) and others (10%). This study focuses on the 307x113 DRD as a case study.
Achieving a successful food can with distortion printing requires both the art and science of forming. For the 307x113 DRD, an industrial guideline is shown in
Figure 3 and includes the following recommendations: To minimize the scrap rate, text should not be placed within 6 mm from the bottom edge or within 8 mm from the top or seamed edge. Additionally, graphic designs featuring text or straight lines in these areas are susceptible to distortion issues.
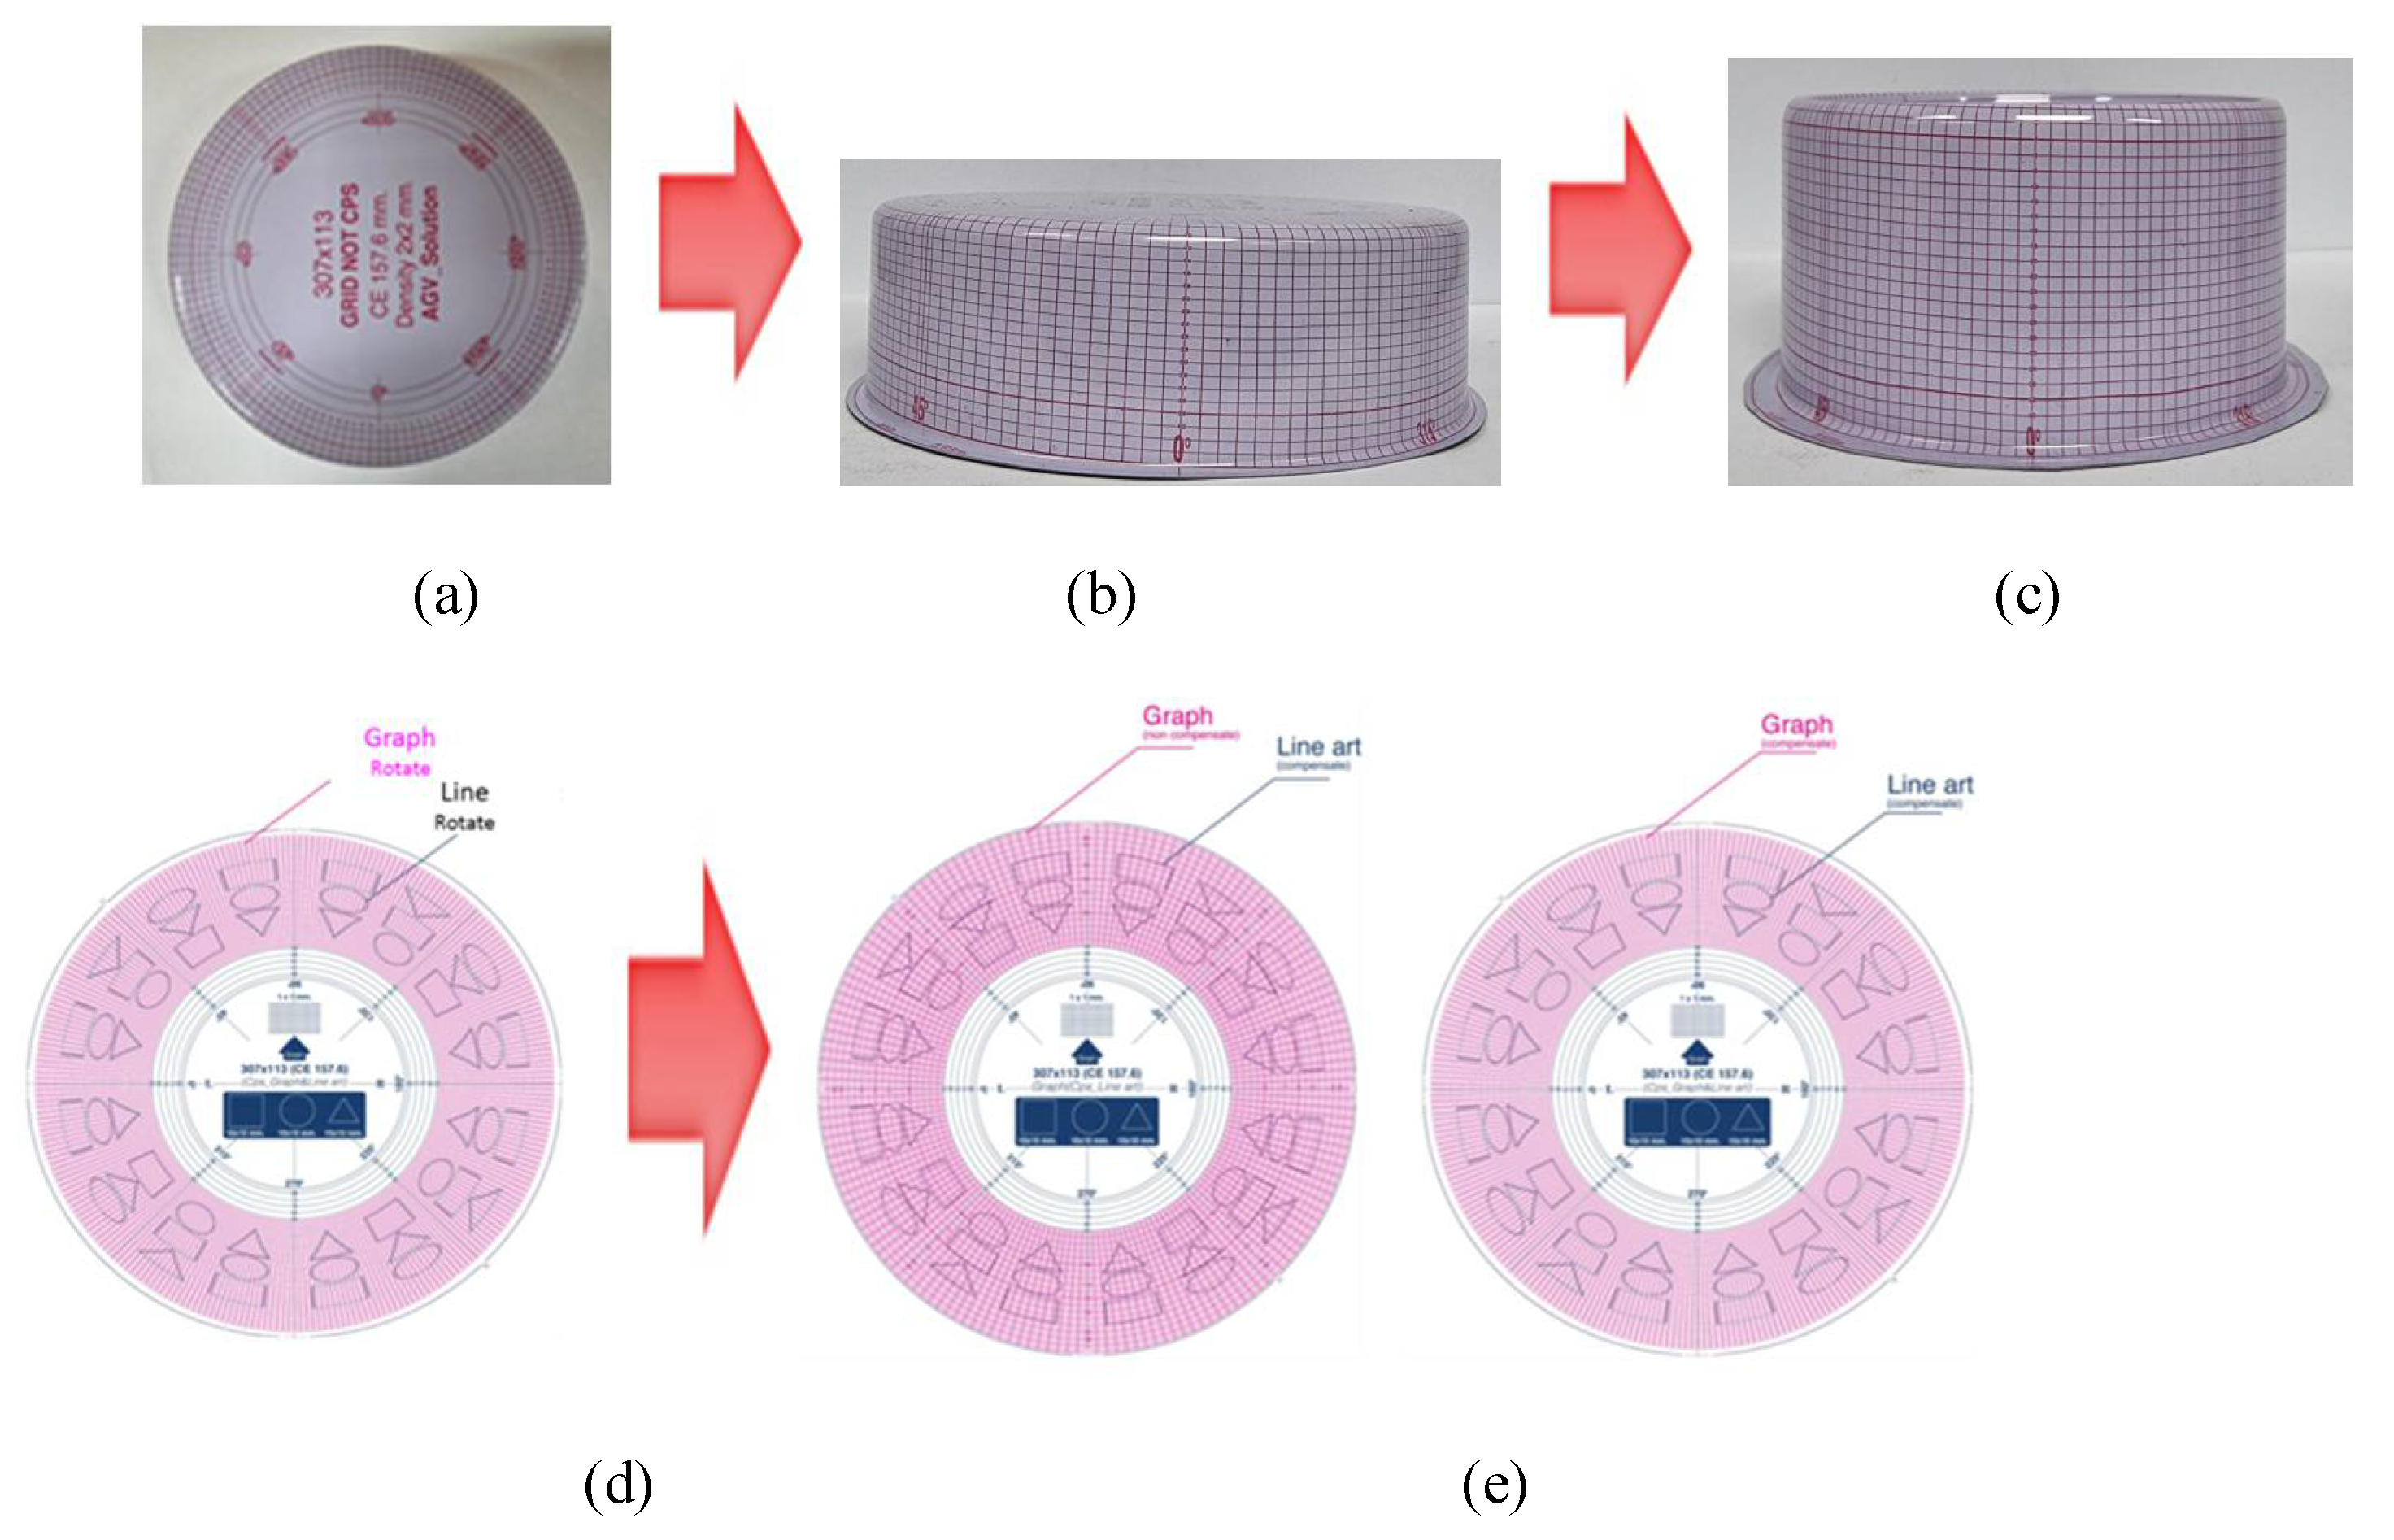
Distortion printing can be analyzed by printing a grid pattern on a flat sheet and then forming into the cylindrical shape of food cans. Grid technology is applied in the food can forming process to produce new designs and prints. There are four stages in distortion printing: (1) a grid is printed on a flat sheet and then a can is formed, (2) The distorted grid is carefully analyzed by measuring the extent of distortion in each square to create a new distorted grid, (3) The new distorted grid is re-printed, and then forming again (if it is not uniform, repeat the process), and (4) Once a uniform grid pattern is achieved, the new results are used to create the distorted artwork required by the customer’s design. The uncertainty is not taken into account here.
Figure 4 shows the design process on a sheet (36 cans per sheet). Grid adjustment can be performed using two methods: compensation and rotation. Compensation involves pushing or pulling from the original grid. These grid adjustment methods are used to avoid waving problems. In a real production, the scrap rate before grid adjustment is 8.33%, or 150 scrap pieces from a test run of 1,800 pieces. After grid adjustment, the scrap rate is decreased to 1.59%, or 5,649 scrap pieces from 356,229 pieces.
2.2. Can Forming Process
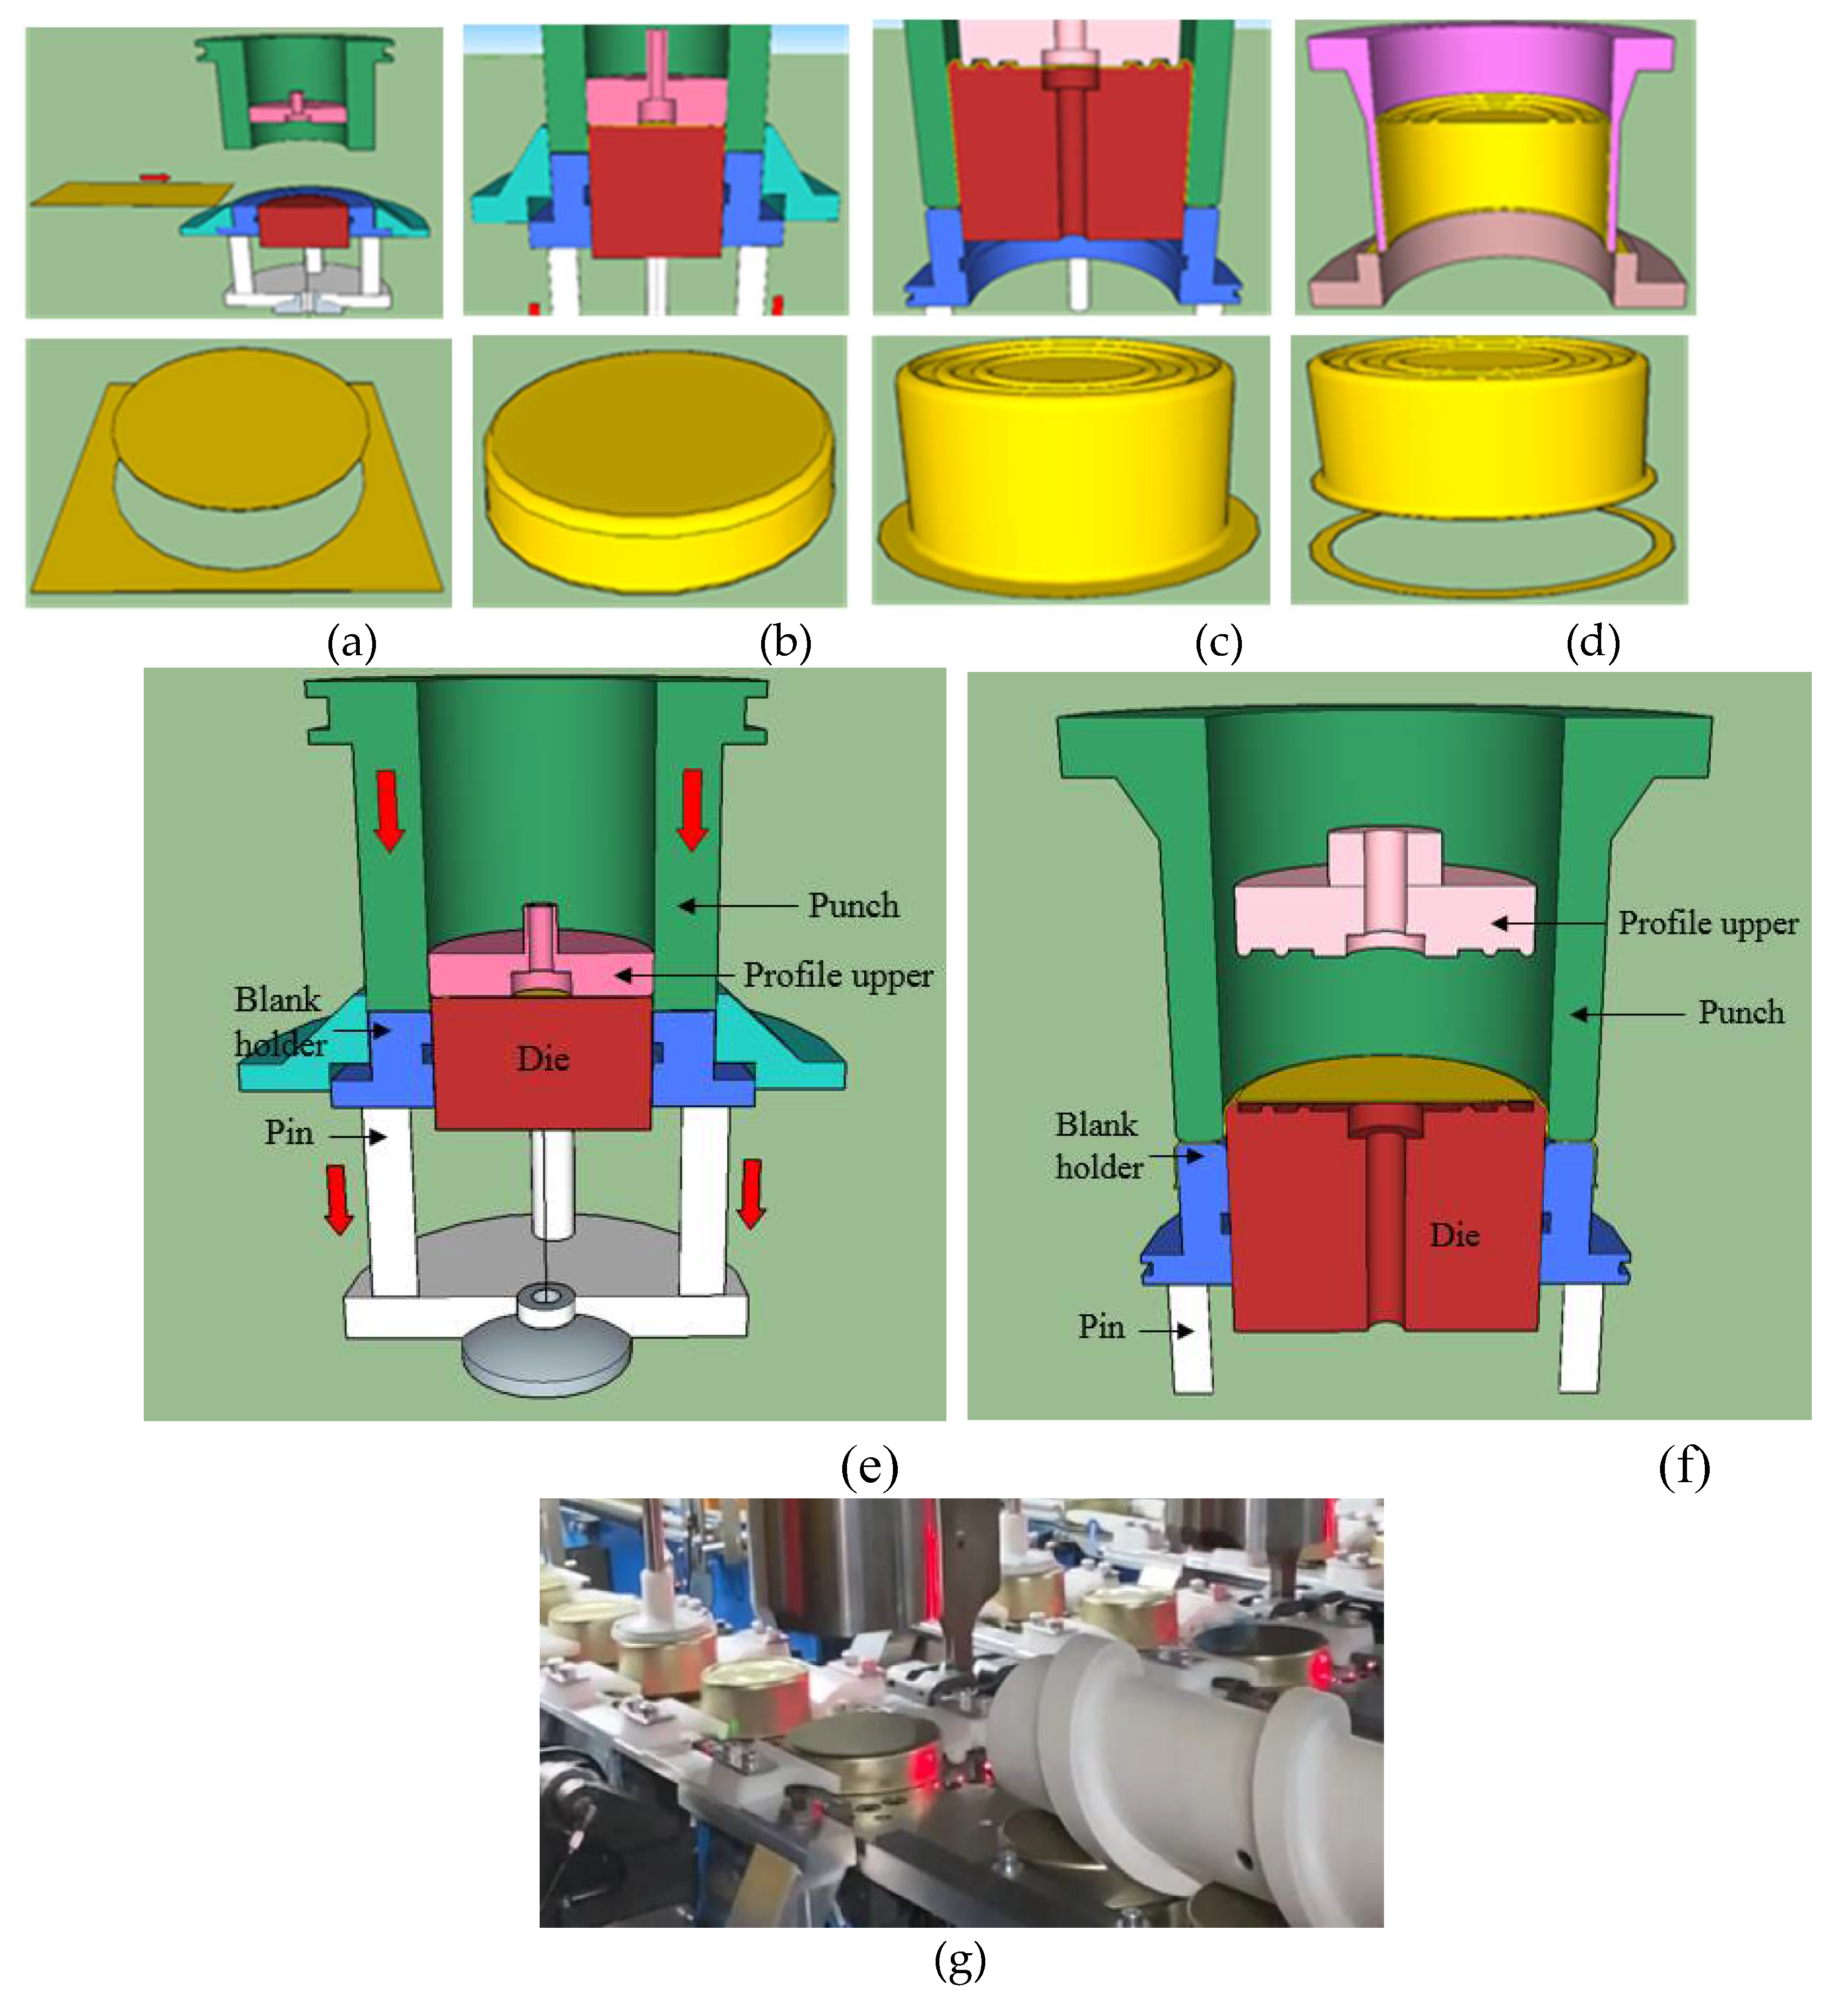
The deep drawing process is a forming technique that occurs under a combination of both tensile and compressive conditions. In the metal packaging industry, deep drawing is typically carried out using rigid tools, which consist of a punch, a die, and a blank holder. The can forming process begins with blanking a flat sheet. After the blank is inserted, the blank holder closes, clamping the sheet between the die and the blank holder. This process slows down the flow of the sheet while it is being drawn, thereby preventing wrinkles from forming under the blank holder. The punch stretches the sheet over the die radius and forms it in the die, with the necessary punch force continually increasing. It is essential that the sheet metal is stretched as much as possible without reaching the material’s limits. The cup then undergoes re-drawing, and the final step is to trim the excess.
DRD process is fundamental in manufacturing food cans. The process for the 307x113 DRD and the relevant tooling are shown in
Figure 5. It begins with blanking a flat sheet and then drawing a cup. The re-drawing process shapes the final form, and the excess flange is trimmed. The initial blank diameter is 157.60 mm, while the outer diameters of the drawing and re-drawing are 114.10 mm and 83.75 mm, respectively. The tooling material used is JIS SKD11.
Lubricant plays an important role in the DRD process. In this production, a lubricant made from white mineral oil is applied to both sides of PET-laminated tin-free steel sheets via rollers before forming. To simulate the DRD process, the coefficient of friction (
COF) is required.
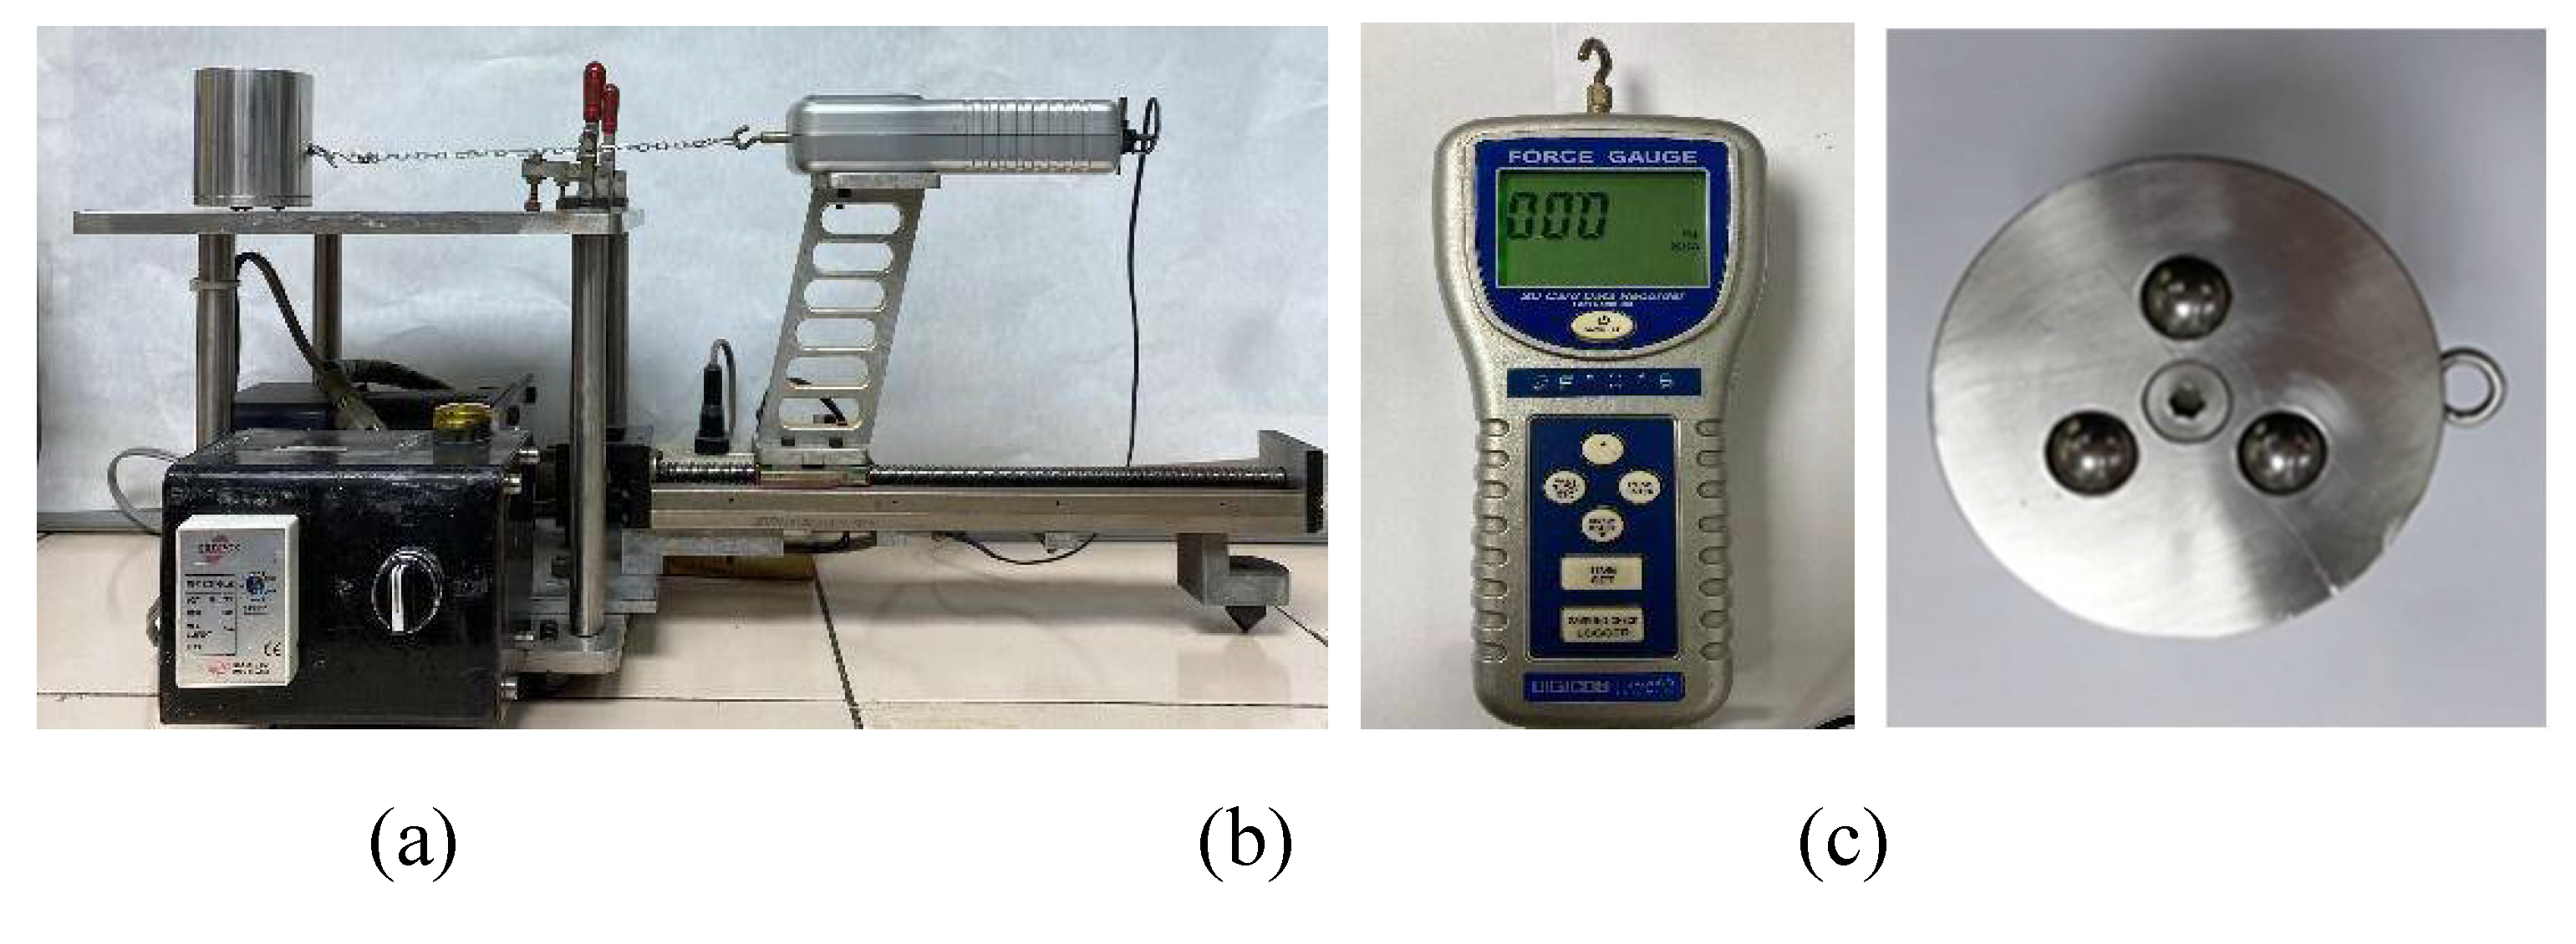
COF of the tin-free steel sheet is measured by using a slip tester and a force gauge (Digicon, model FG-620SD), as shown in
Figure 6. The tester adheres to multiple national and international standards, including ASTM D1894, the standard test method for
COF of plastic film and sheeting. Measured
COF of the tin-free steel sheet after lubricant application is 0.03.
2.3. Analysis of Can Forming
One of the most significant industrial advantages of the deep drawing process is its high production rates. The success of FEA in the design and optimization of metal forming strongly depends on its ability to accurately describe the material’s mechanical behavior. An FEA model needs the following: raw material properties, forming process parameters (e.g., formability, earing and waving evaluation, lubrication or surface properties, blank holder force, and tooling modifications), and the desired shape of the product. This study experimentally investigates the effect of processing and material conditions on food can distortion.
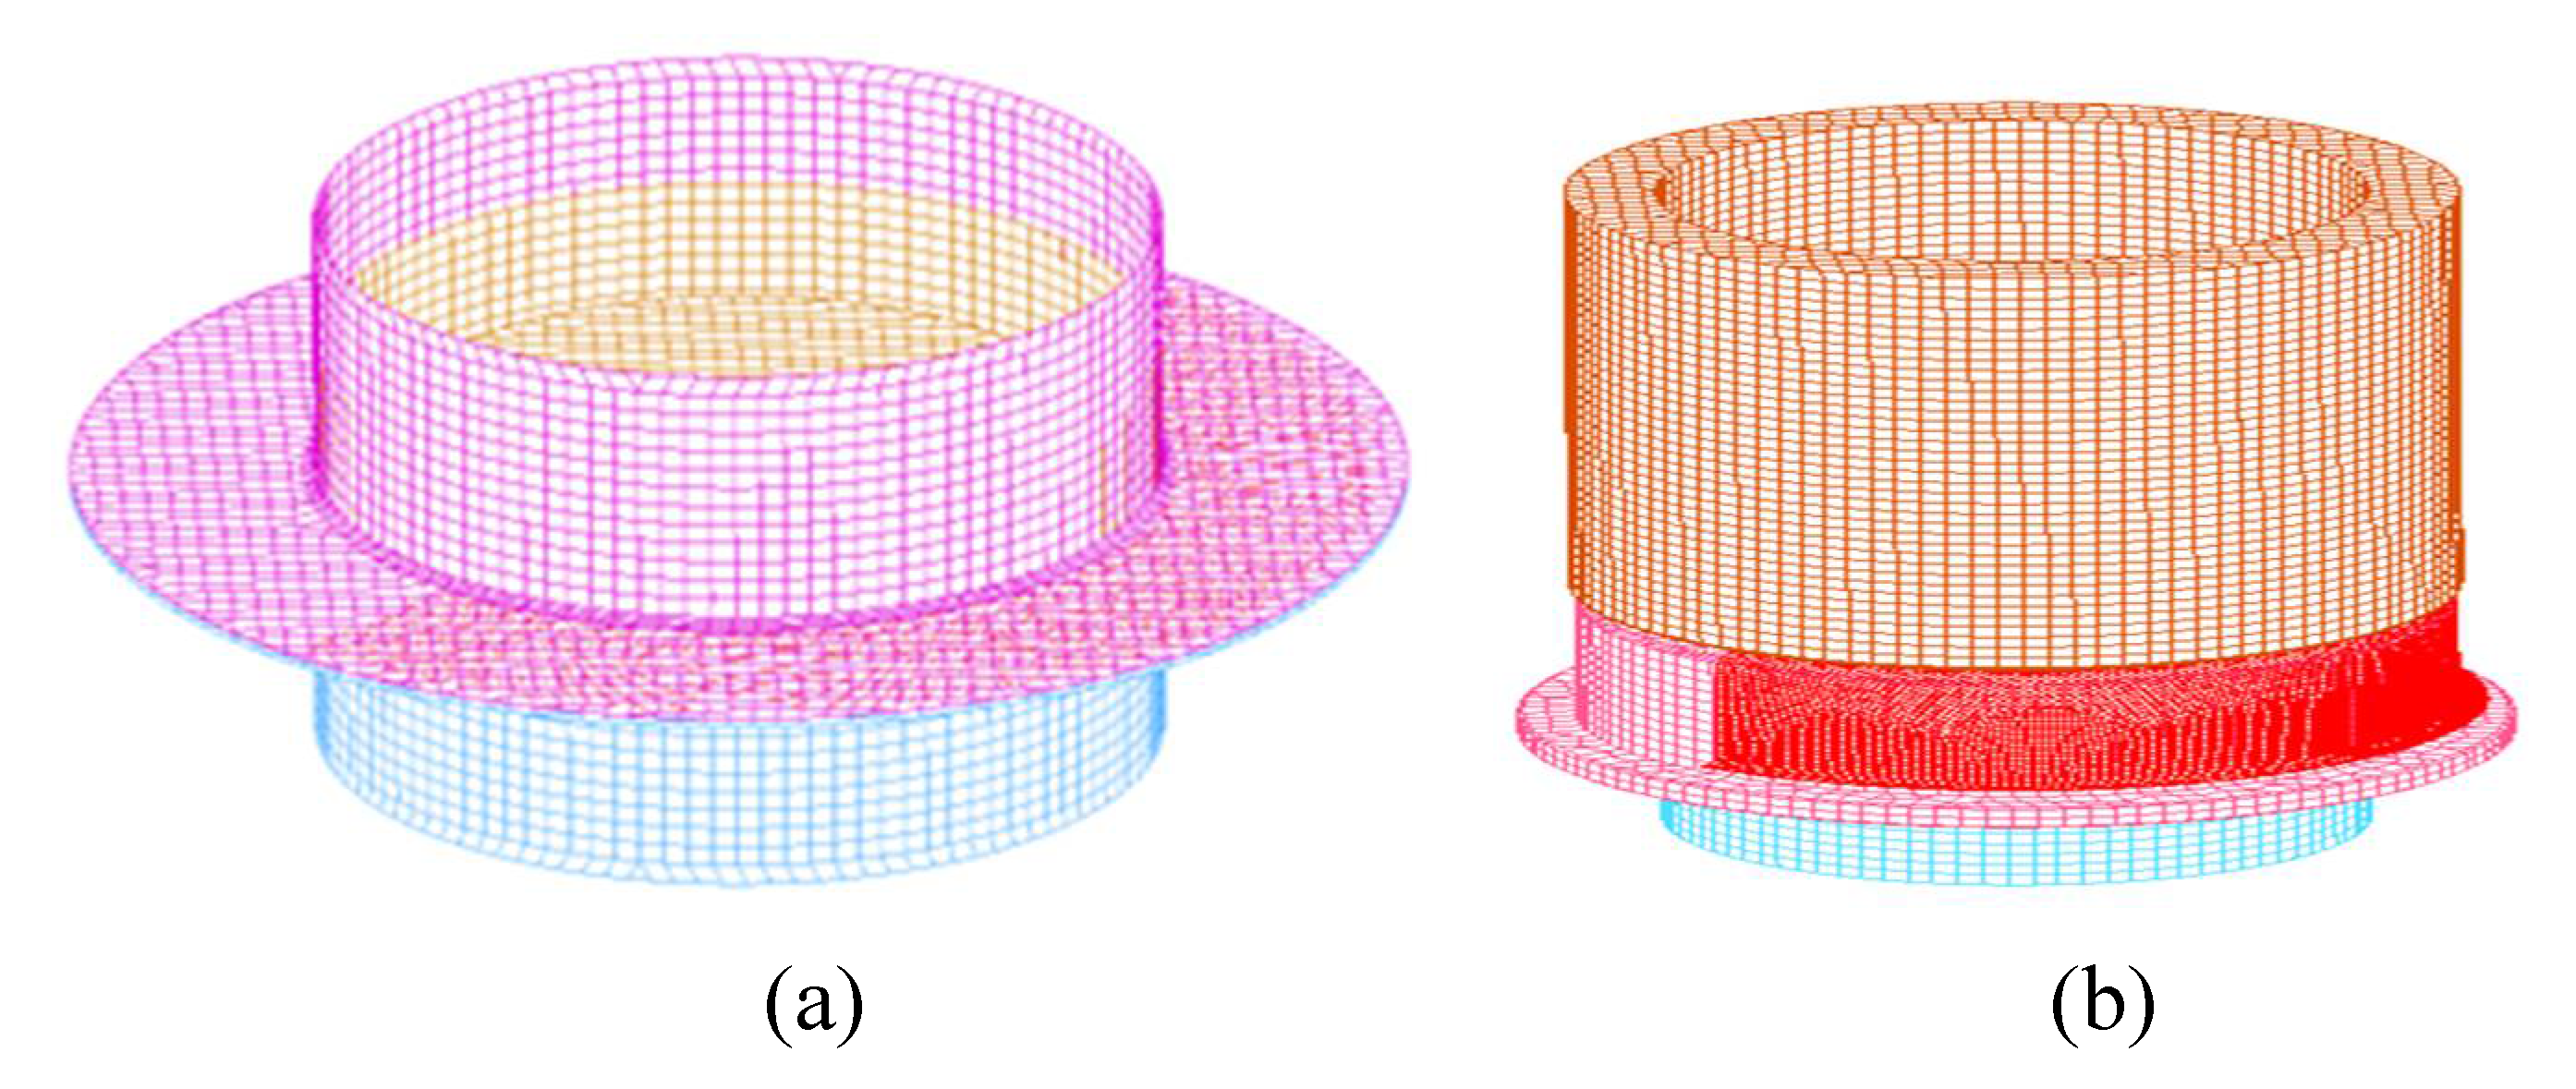
In this study, three-dimensional FEA is utilized. The geometry of the drawing and redrawing processes is shown to be axisymmetric. The geometry of the FEA model is based on the tool set drawings acquired from the actual process. The can forming process is simulated using a nonlinear explicit finite element method, with the LS-DYNA solver adopted for this work. The formed part is modeled as a half model for illustration purposes. The DRD process is shown in
Figure 7.
Shell elements are used to model both the tooling surface and the blank. The tooling is modeled as a rigid body, while the blank is deformable. The tooling speed is set at approximately 1,000 mm/s. For illustration purposes, the formed part is modeled as a half model. A shell element with the Belytschko-Tsay formulation, seven integration points across the thickness, and a shear correction factor of 0.833 is adopted. The material model used is Barlat’89, with an exponent of 6.0 in Barlat’s yield function. The material properties include a Young’s modulus of 207 GPa, a tangent modulus of 100 MPa, a Poisson’s ratio of 0.28, and a mass density of 7.83 g/mm³. The PET-laminated tin-free steel sheet is found to exhibit anisotropy based on tensile tests in
Section 3.
Before using the FEA model developed in this section to further study the process, it must be validated to ensure the accuracy of the simulation results. This validation involves running the FEA model based on the actual process parameters used in the current production line.
2.4. Waving Failure Definition
The definition of waving is illustrated in
Figure 8. Common waving locations in distortion printing are found either on the sidewall of the food cans near the flange after re-drawing. Waving can lead to customer complaints and claims. Despite implementing a modified design layout and corrective actions to address these waving issues, the problem persists.
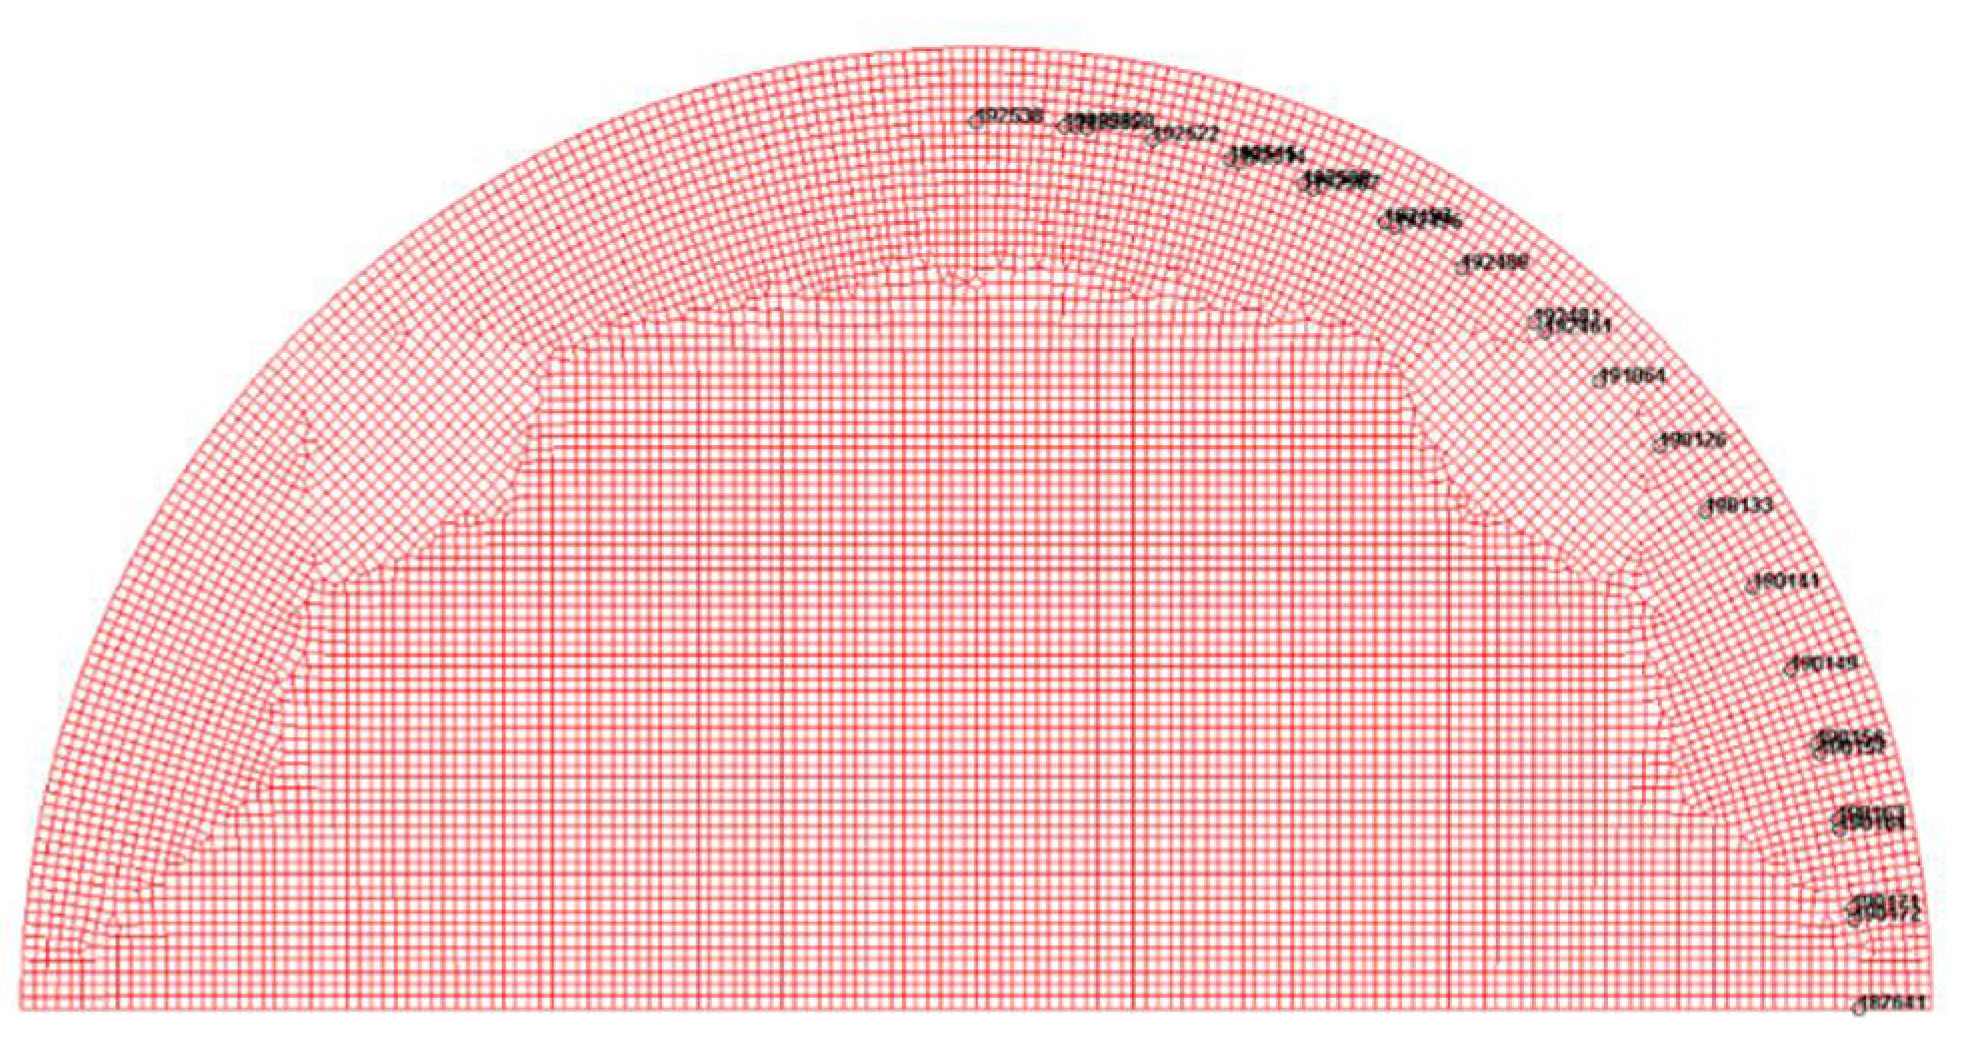
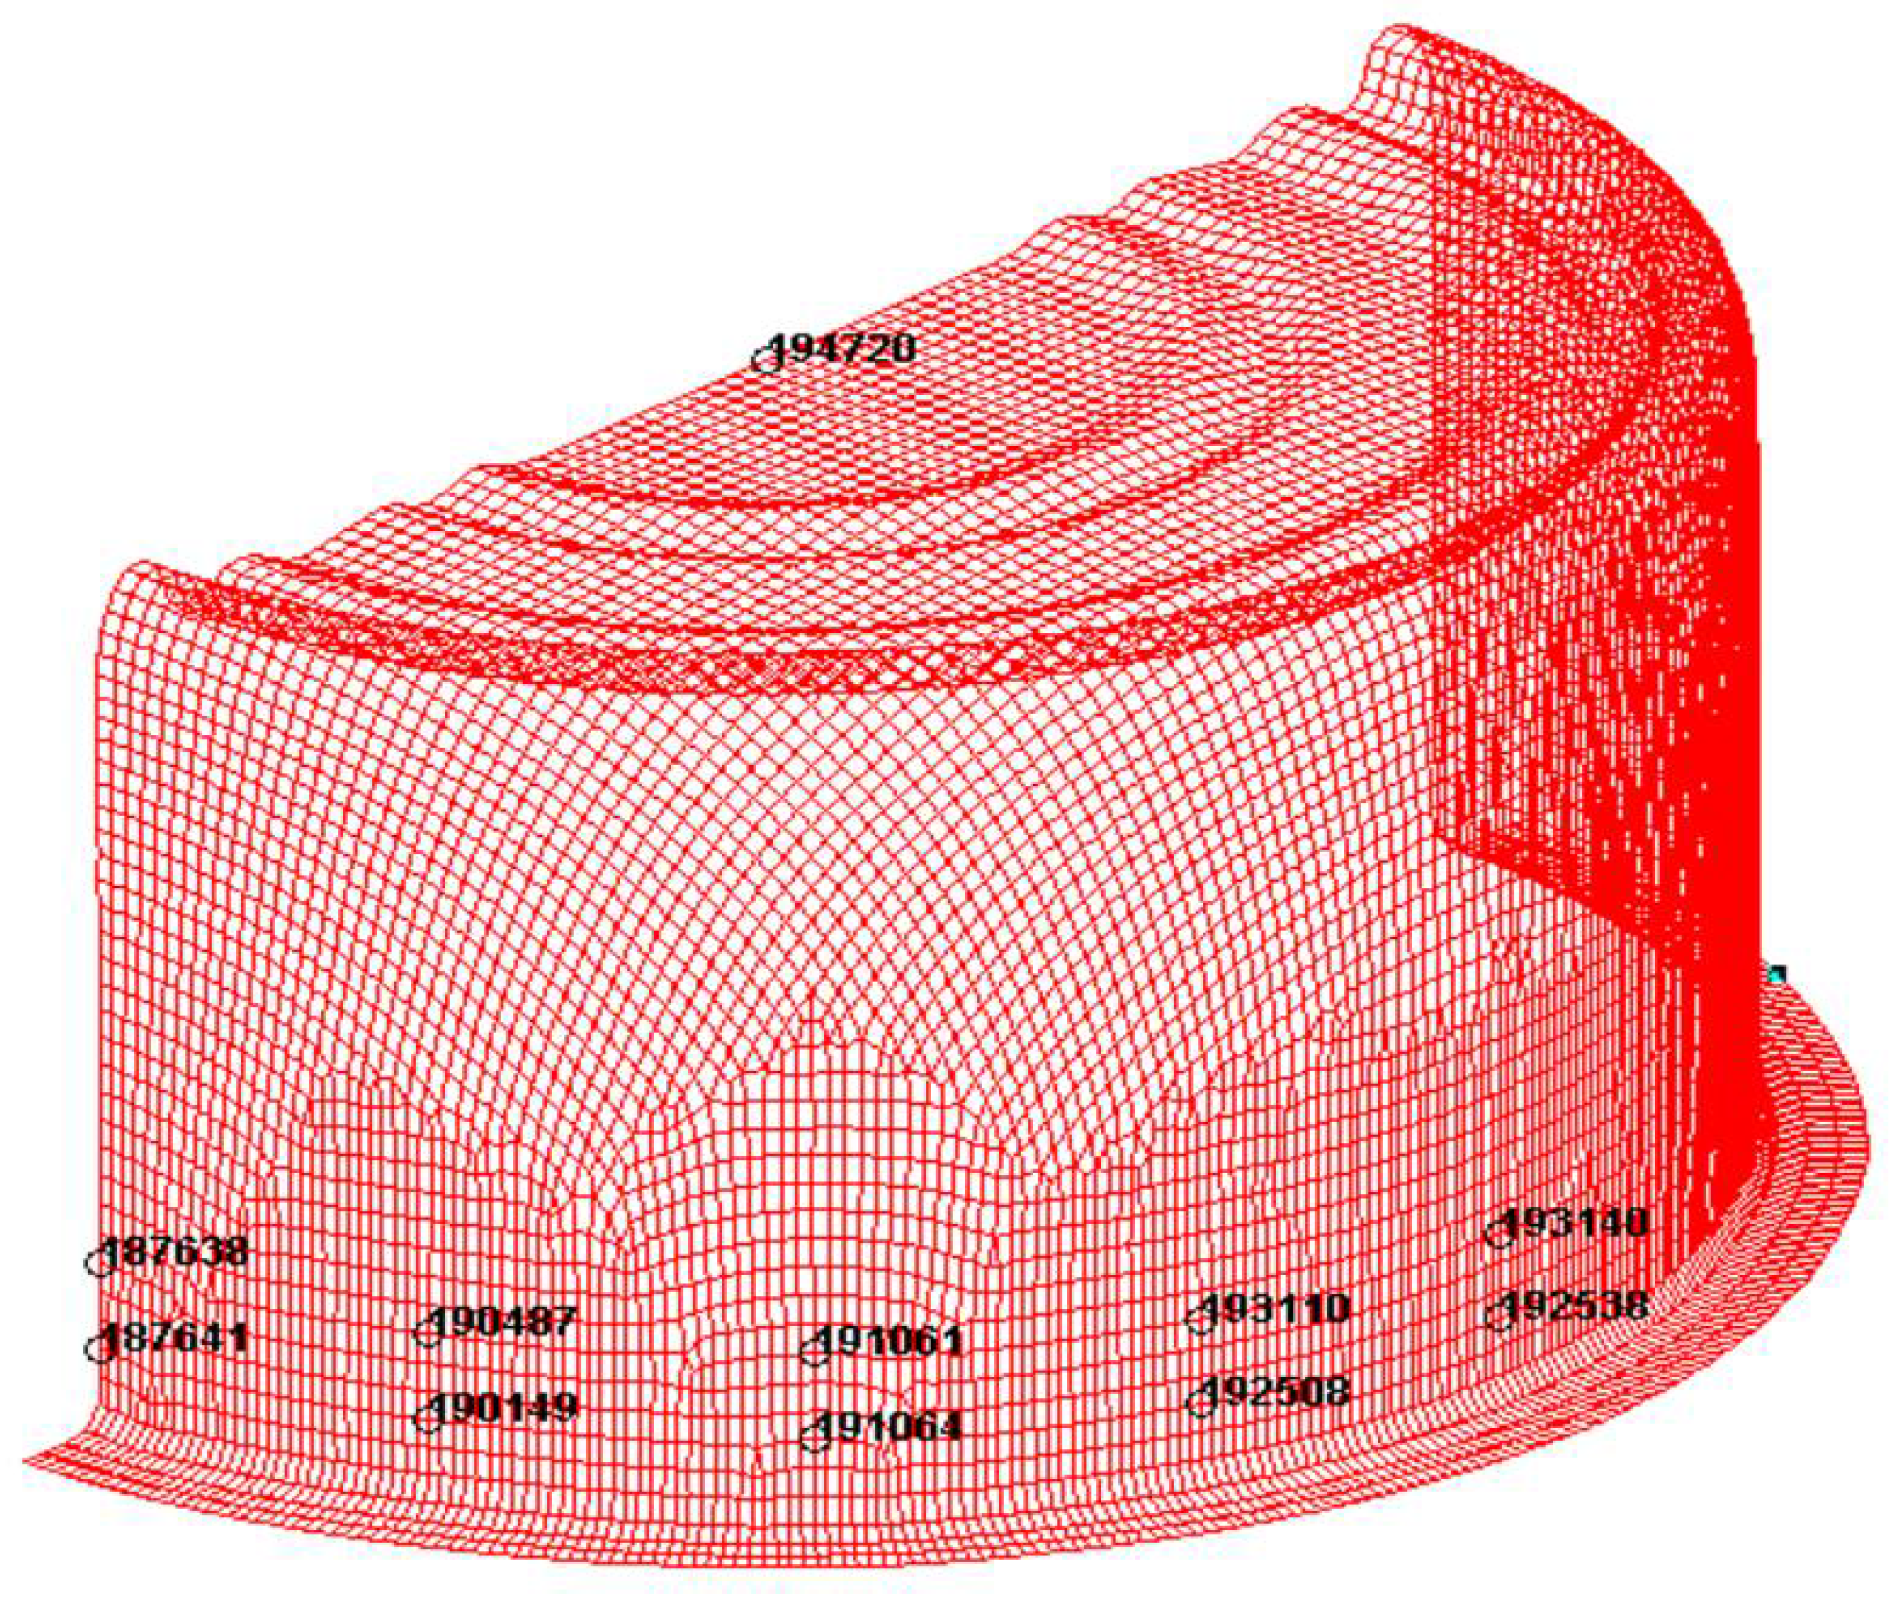
This study also aims to define the waving value using FEA. The center of the half-model blank is identified, with an initial radius of 78.8 mm. To define the waving value from material deformation, a group of nodes with a radius of 72.74 mm (92.3% of the initial radius) is selected, as shown in Figure 10. To accurately capture the waving value, an evaluation of the number of nodes (3, 5, 9, and 17) needed for the calculation is conducted. The distance range between 3, 5, and 9 nodes is approximately the same at 0.09, while that of 17 nodes is larger at 0.21. In this study, the group of 17 nodes is deemed suitable for defining the waving value (
Z and △
Z), as shown in
Figure 9.
All selected nodes have a similar radial distance from the origin. At the end of the forming process, the
Z-coordinates (vertical axis) of all selected nodes are retrieved for further calculation. The waving value (△
Z) is defined as the difference between the maximum and minimum
Z values from all nodes. To avoid overlapping, only five points are shown in
Figure 10.
Z1 represents the lower level, while
Z2 represents the upper level. △
Z1 from
Z1 is always greater than △
Z2 from
Z2. For example, at
COF of 0.03 and
BHF of 24,000 N, △
Z1 and △
Z2 are 0.92 and 0.75 mm, respectively. Consequently, only △
Z from
Z1 is used for waving evaluation.
3. Material Parameter Identification
This section focuses on material parameter identification, a crucial aspect of simulation. Steel for can-making is supplied either as tin plate, which has a very thin layer of tin electro-deposited onto both sides, or as tin-free steel, which contains no tin. The material used in this study is a tin-free steel sheet (SPTFS in JIS G 3315: chromium-coated tin-free steel). Tin-free steel is electrolytic chromium-plated steel consisting of a thin layer of chromium and a layer of chromium oxide deposited on a cold-rolled sheet steel base (black plate), giving it a beautiful, lustrous metallic finish on both sides. Tin-free steel is superior to tinplate for lacquer and plastic film applications, as it does not peel off, whereas tinplate is more prone to lacquer and plastic film peeling. This section includes an investigation of material properties via tensile tests, parameter identification via thickness distribution, and parameter identification via flange length.
3.1. Material Tests
The material used is a tin-free steel sheet known as SPTFS MR DR-8 (JIS G 3315). This tin-free steel sheet has a thickness of 0.16 mm and a hardness of DR-8. It is laminated on both sides with PET film, with a thickness of 13 microns on the outside and 20 microns on the inside. This material offers superior performance in terms of resource conservation, energy efficiency, and environmental protection. The doubly reduced (DR) temper is produced to achieve extremely high yield strength in chromium-coated tin-free steel, as indicated by the Rockwell superficial hardness values (HR3TSm). Using the DR method, the base metal’s thickness is reduced a second time on a temper mill after annealing, increasing material strength while decreasing elongation.
In this application, there are two types of low-carbon steels: 1) Aluminum-killed steel (Al-Killed), which is deoxidized with aluminum during production to remove carbon monoxide, resulting in lower oxygen content and improved surface finish, and 2) Super Ultra Low Carbon (SULC) steel. The cost of SULC is approximately 2% higher than Al-Killed steel. The main difference between these steels, based on the chemical composition of tin mill black plate (TMBP), is the carbon content. Al-Killed steel has a higher carbon content (max 1,600 ppm), while SULC steel has a lower carbon content (max 60 ppm). Other elements are largely the same, with Si = 400, P = 200, S = 500, and Mn = 6,000 (max).
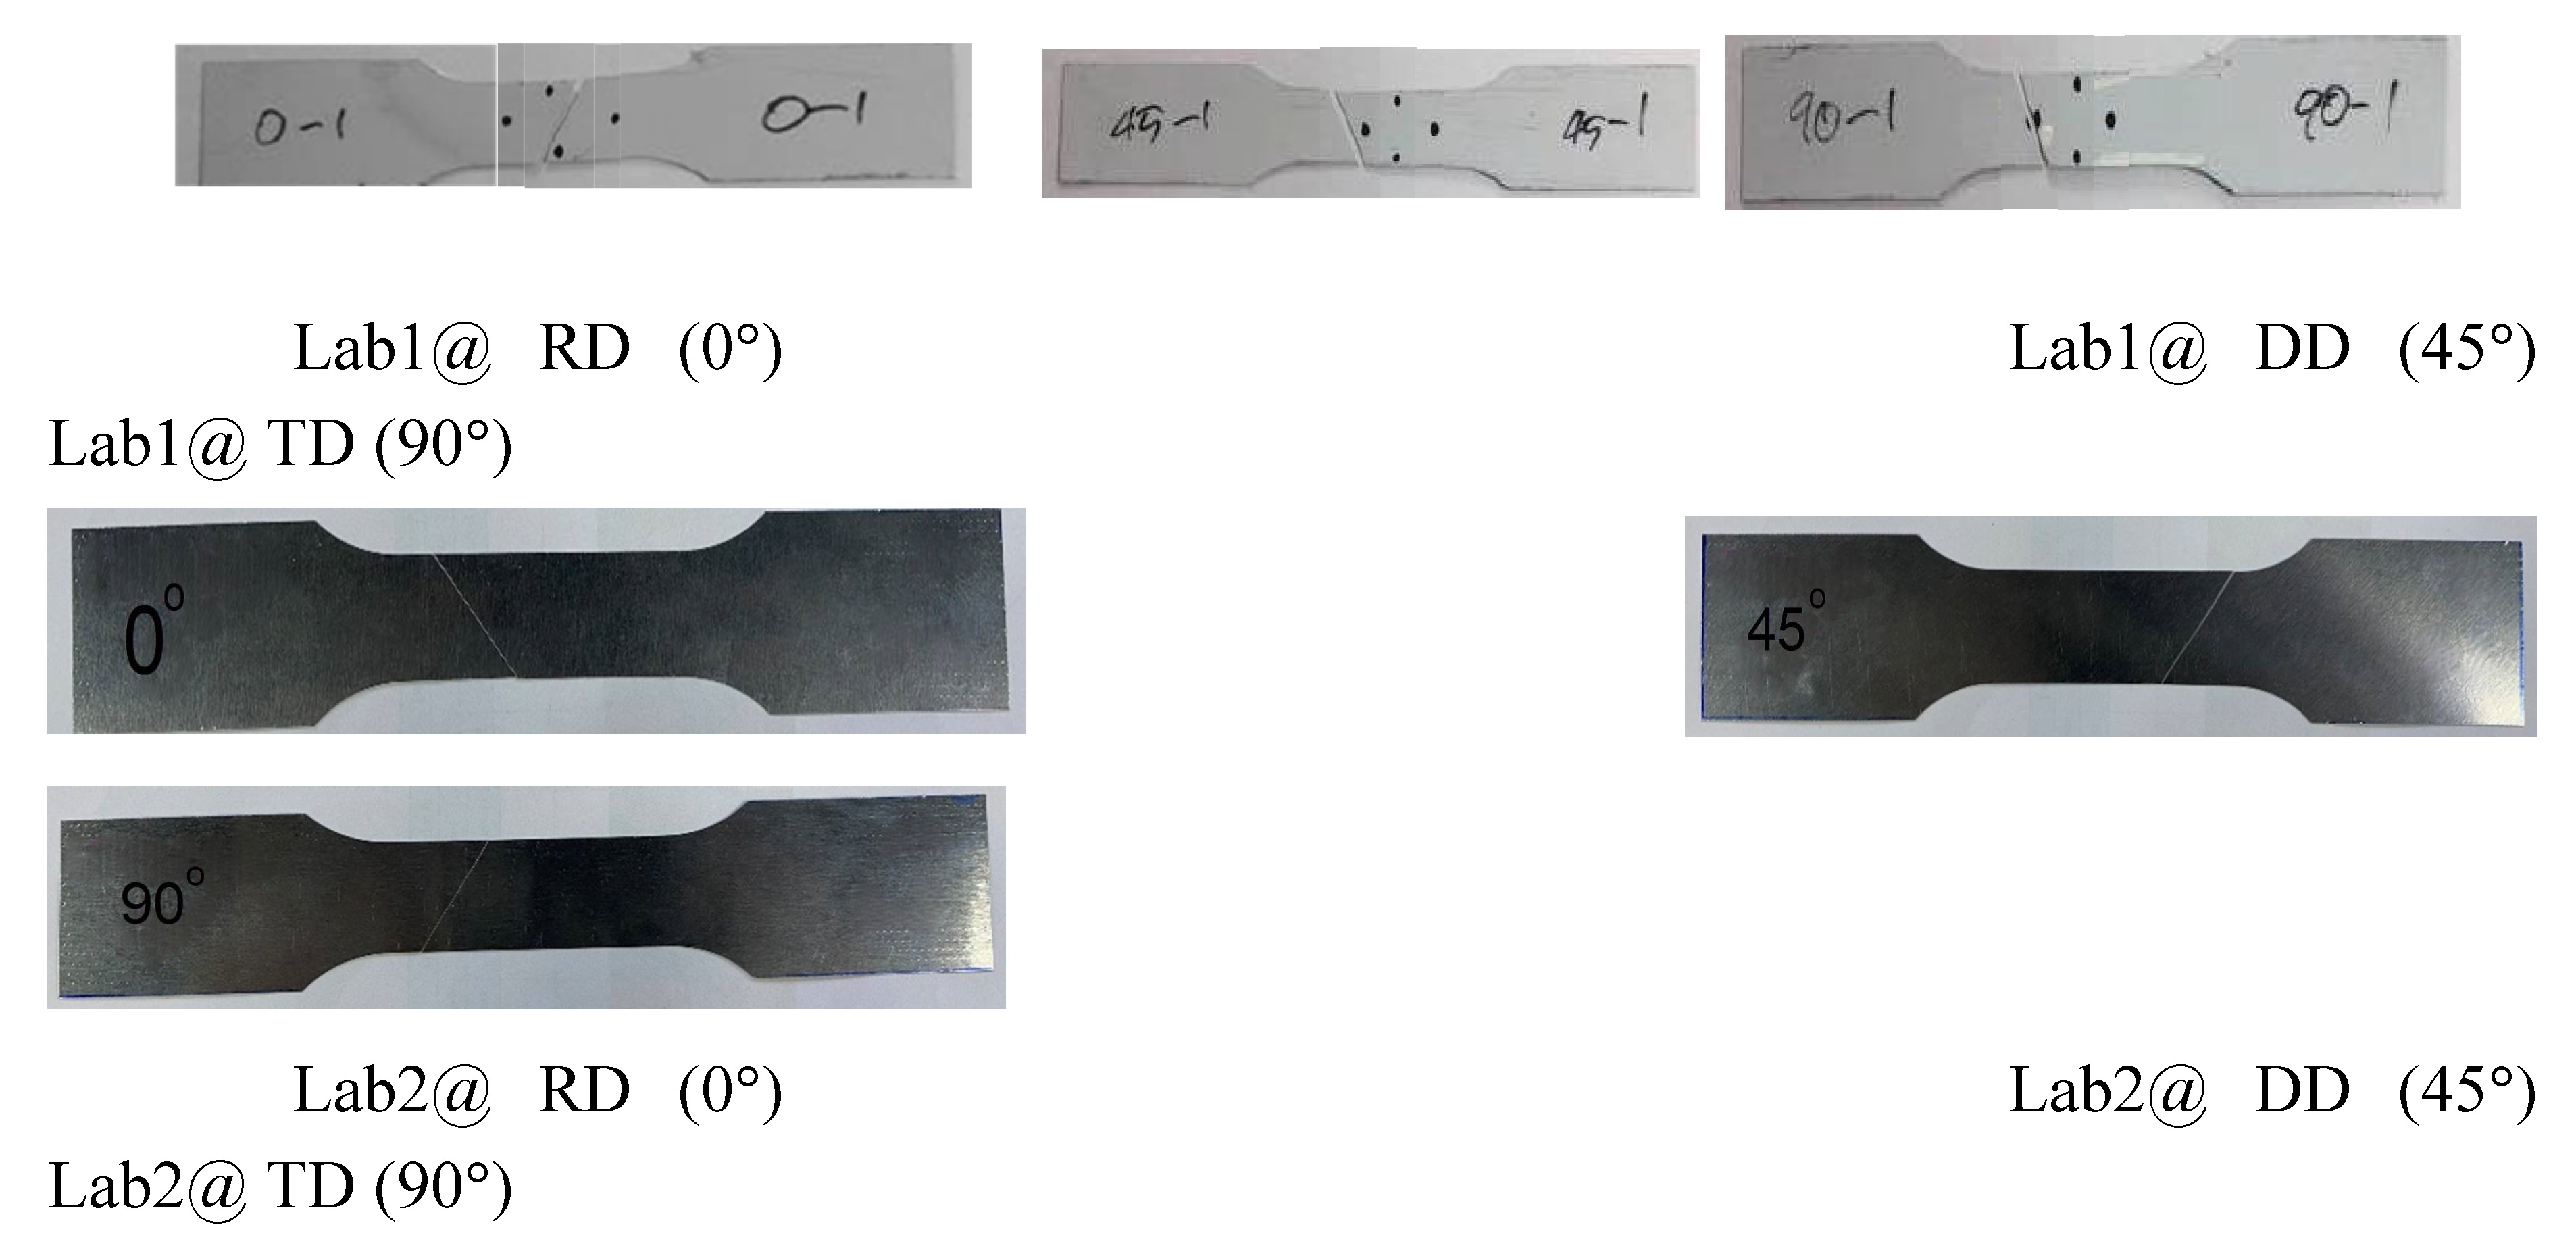
The material properties are not uniform in all directions (anisotropy). Consequently, distortion printing results in waving, leading to a relatively high scrap rate in production. Tensile tests of material properties are conducted in three directions (RD(0°), DD (45°) and TD (90°)) at a speed of 5 mm/min using a Shimadzu Model Autograph AG-X plus 50 kN (Lab3) at 25°C and 51% RH. The test results are averaged from five samples per direction. Both Al-Killed steel and SULC steel have similar yield points and tensile strengths, as shown in
Table 1. SULC offers better earing than Al-Killed, as illustrated in
Figure 11. Therefore, Al-Killed steel is suitable for lacquering, while SULC is more suitable for distortion printing.
In the context of distortion printing, further investigation of SULC is required. Some test results are inconsistent with common standards, such as unusually low
R values. Due to this issue, additional tests from two laboratories are engaged. The averaged results from the three laboratories, across three directions, are shown in
Table 2.
The yield point and tensile strength values obtained from the three laboratories (Lab 1: ASTM E8, Lab 2: DIN 50114, and Lab 3: JIS no.5) show a significant discrepancy. It is important to note that the thinness of the steel sheet may have contributed to these variations, as most testing apparatus are designed for materials with a thickness of approximately 1 mm.
Figure 12 displays the samples subjected to tensile tests in three directions from the three laboratories. The breakage exhibits minimal elongation, and necking is negligible, raising concerns about the accuracy of these tests, particularly R-value at 5% strain. The subsequent sections address the material parameter identification method proposed in this study. The normal anisotropy ratio (
) is an averaged one from
/4. While the planar anisotropy parameter (Δ
) is defined as
. It reflects earing behavior.
3.2. Parameter Identification via Thickness Distribution
This section demonstrates the use of inverse analysis to identify the material parameter, specifically the normal anisotropy ratio (
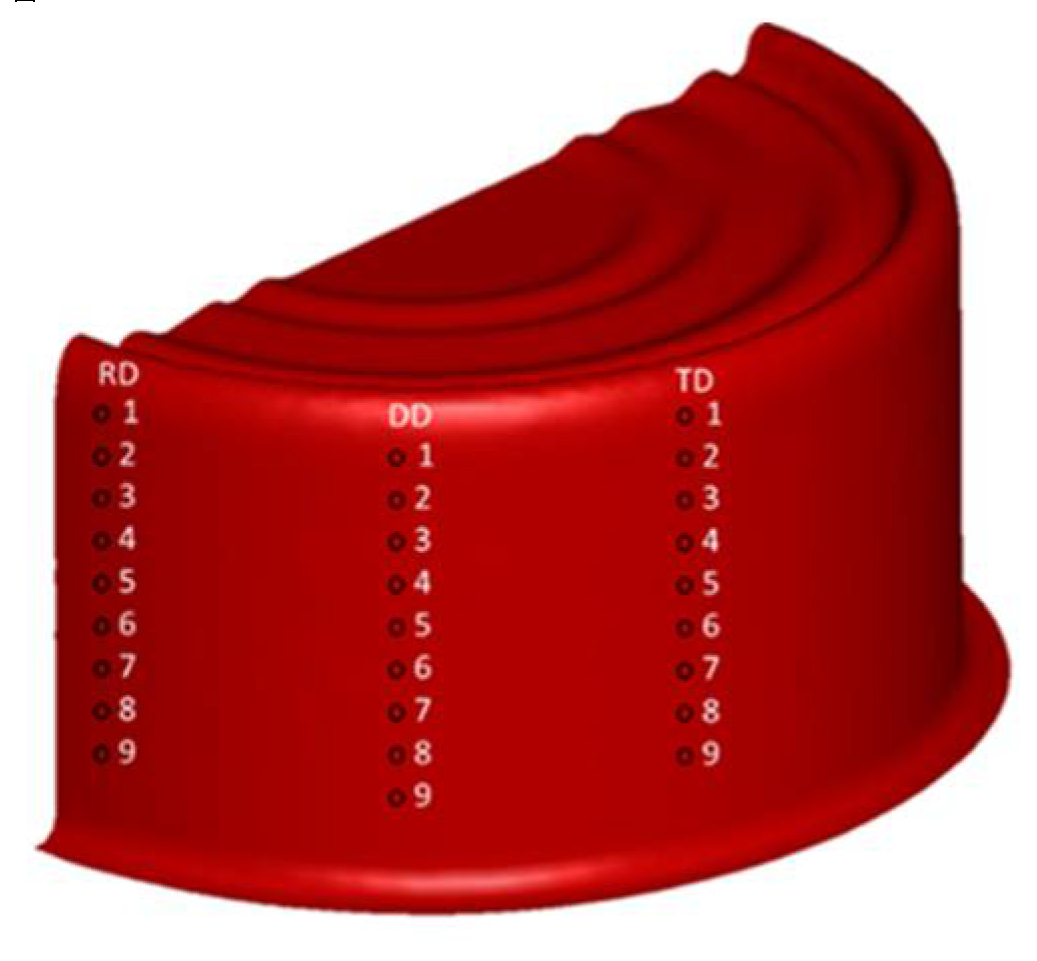
). The thickness distribution, as shown in
Figure 13, serves as the primary criterion. While the initial sheet thickness is assumed to be constant, variations occur in certain areas due to the forming process.
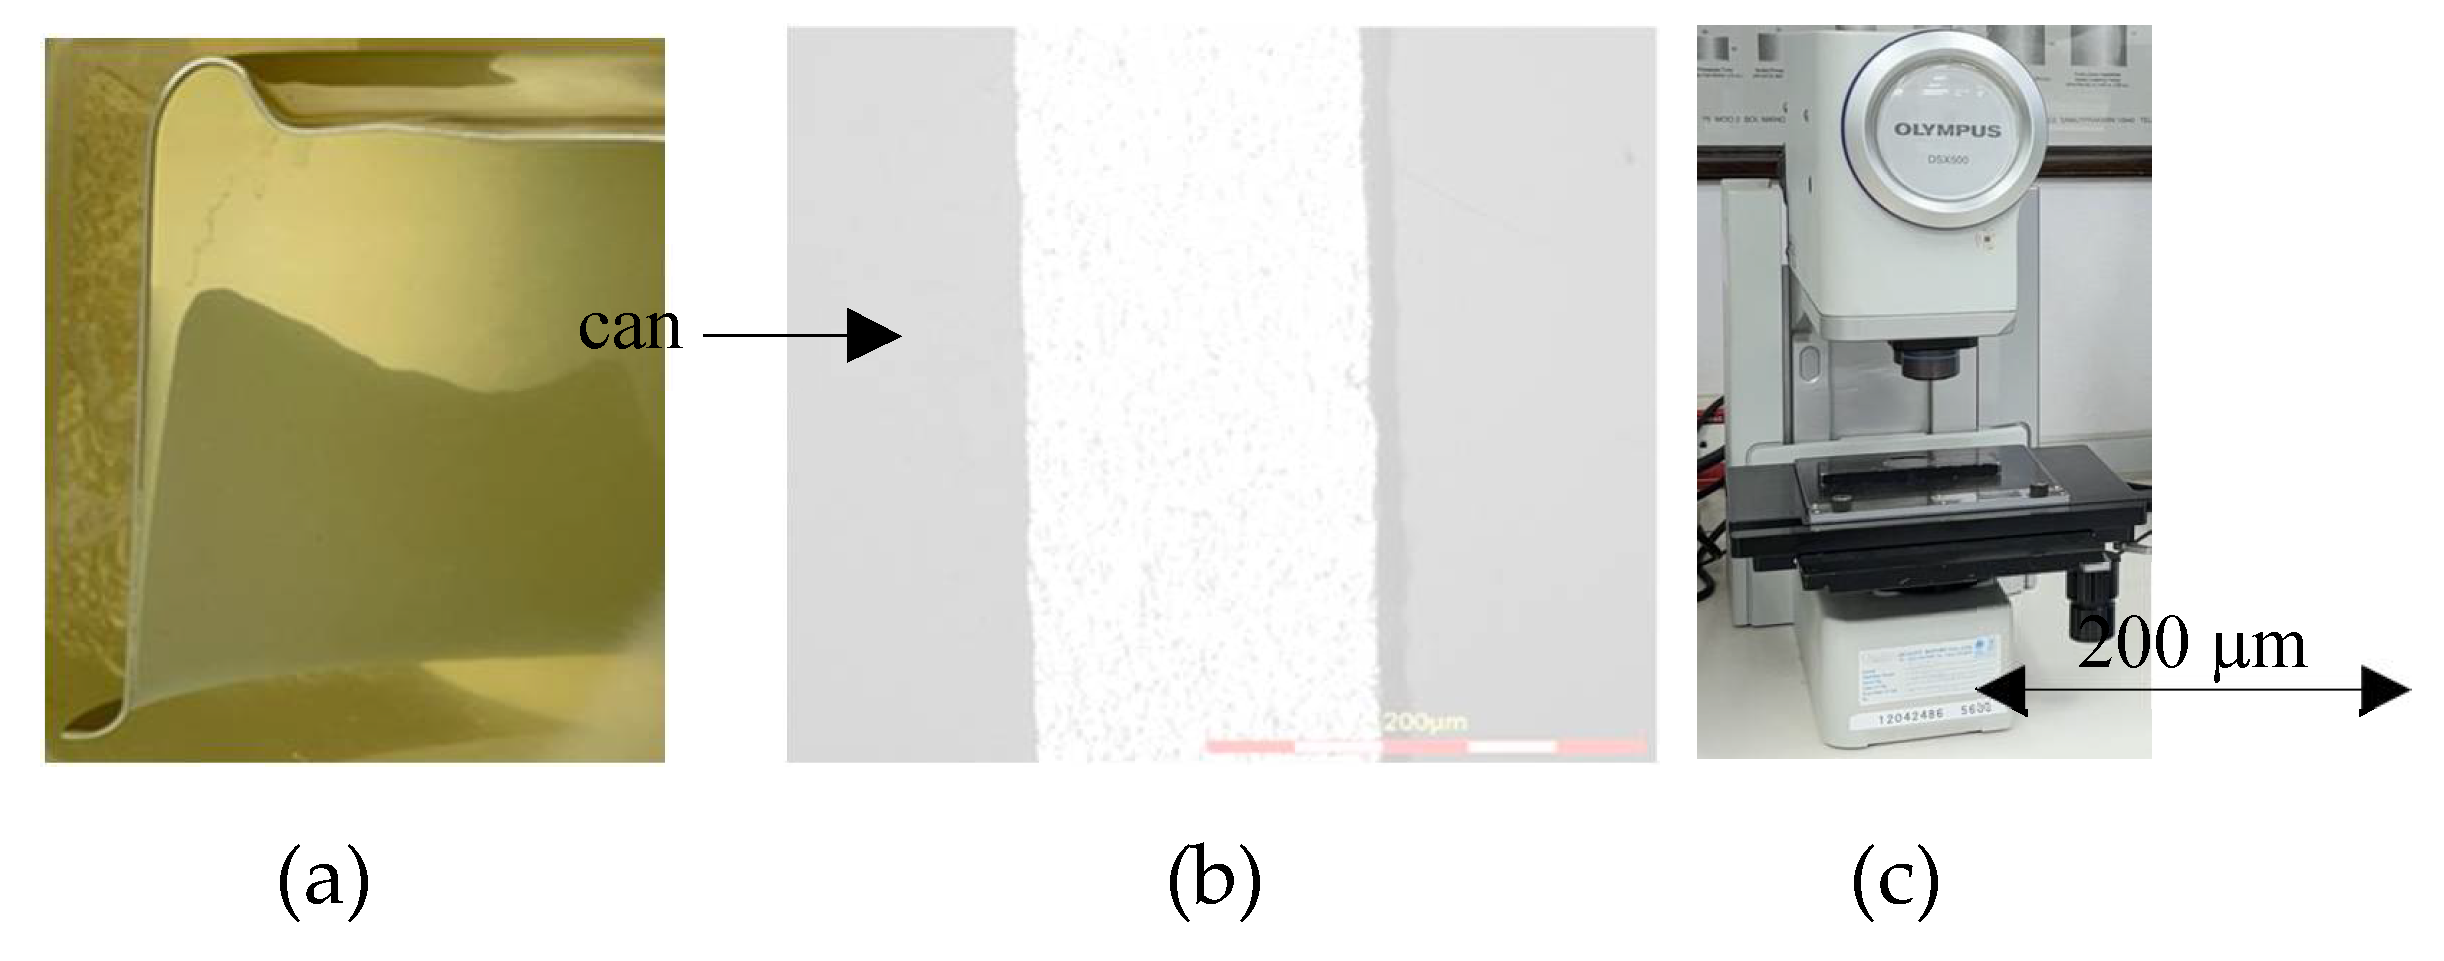
The thickness distribution is examined through a cross-sectional analysis. Specimens are prepared by molding them with resin. Samples are sectioned in three directions (RD, DD, and TD). The molded specimens are ground and polished to reveal the thickness profiles, as shown in
Figure 14. A digital microscope (Olympus, Model DSX500-MSU) with a maximum magnification of 250x, along with an image analysis software, is used to measure the thickness values at nine different locations per direction. For each location, three measurements are taken, and the average value is used to represent the thickness at that location.
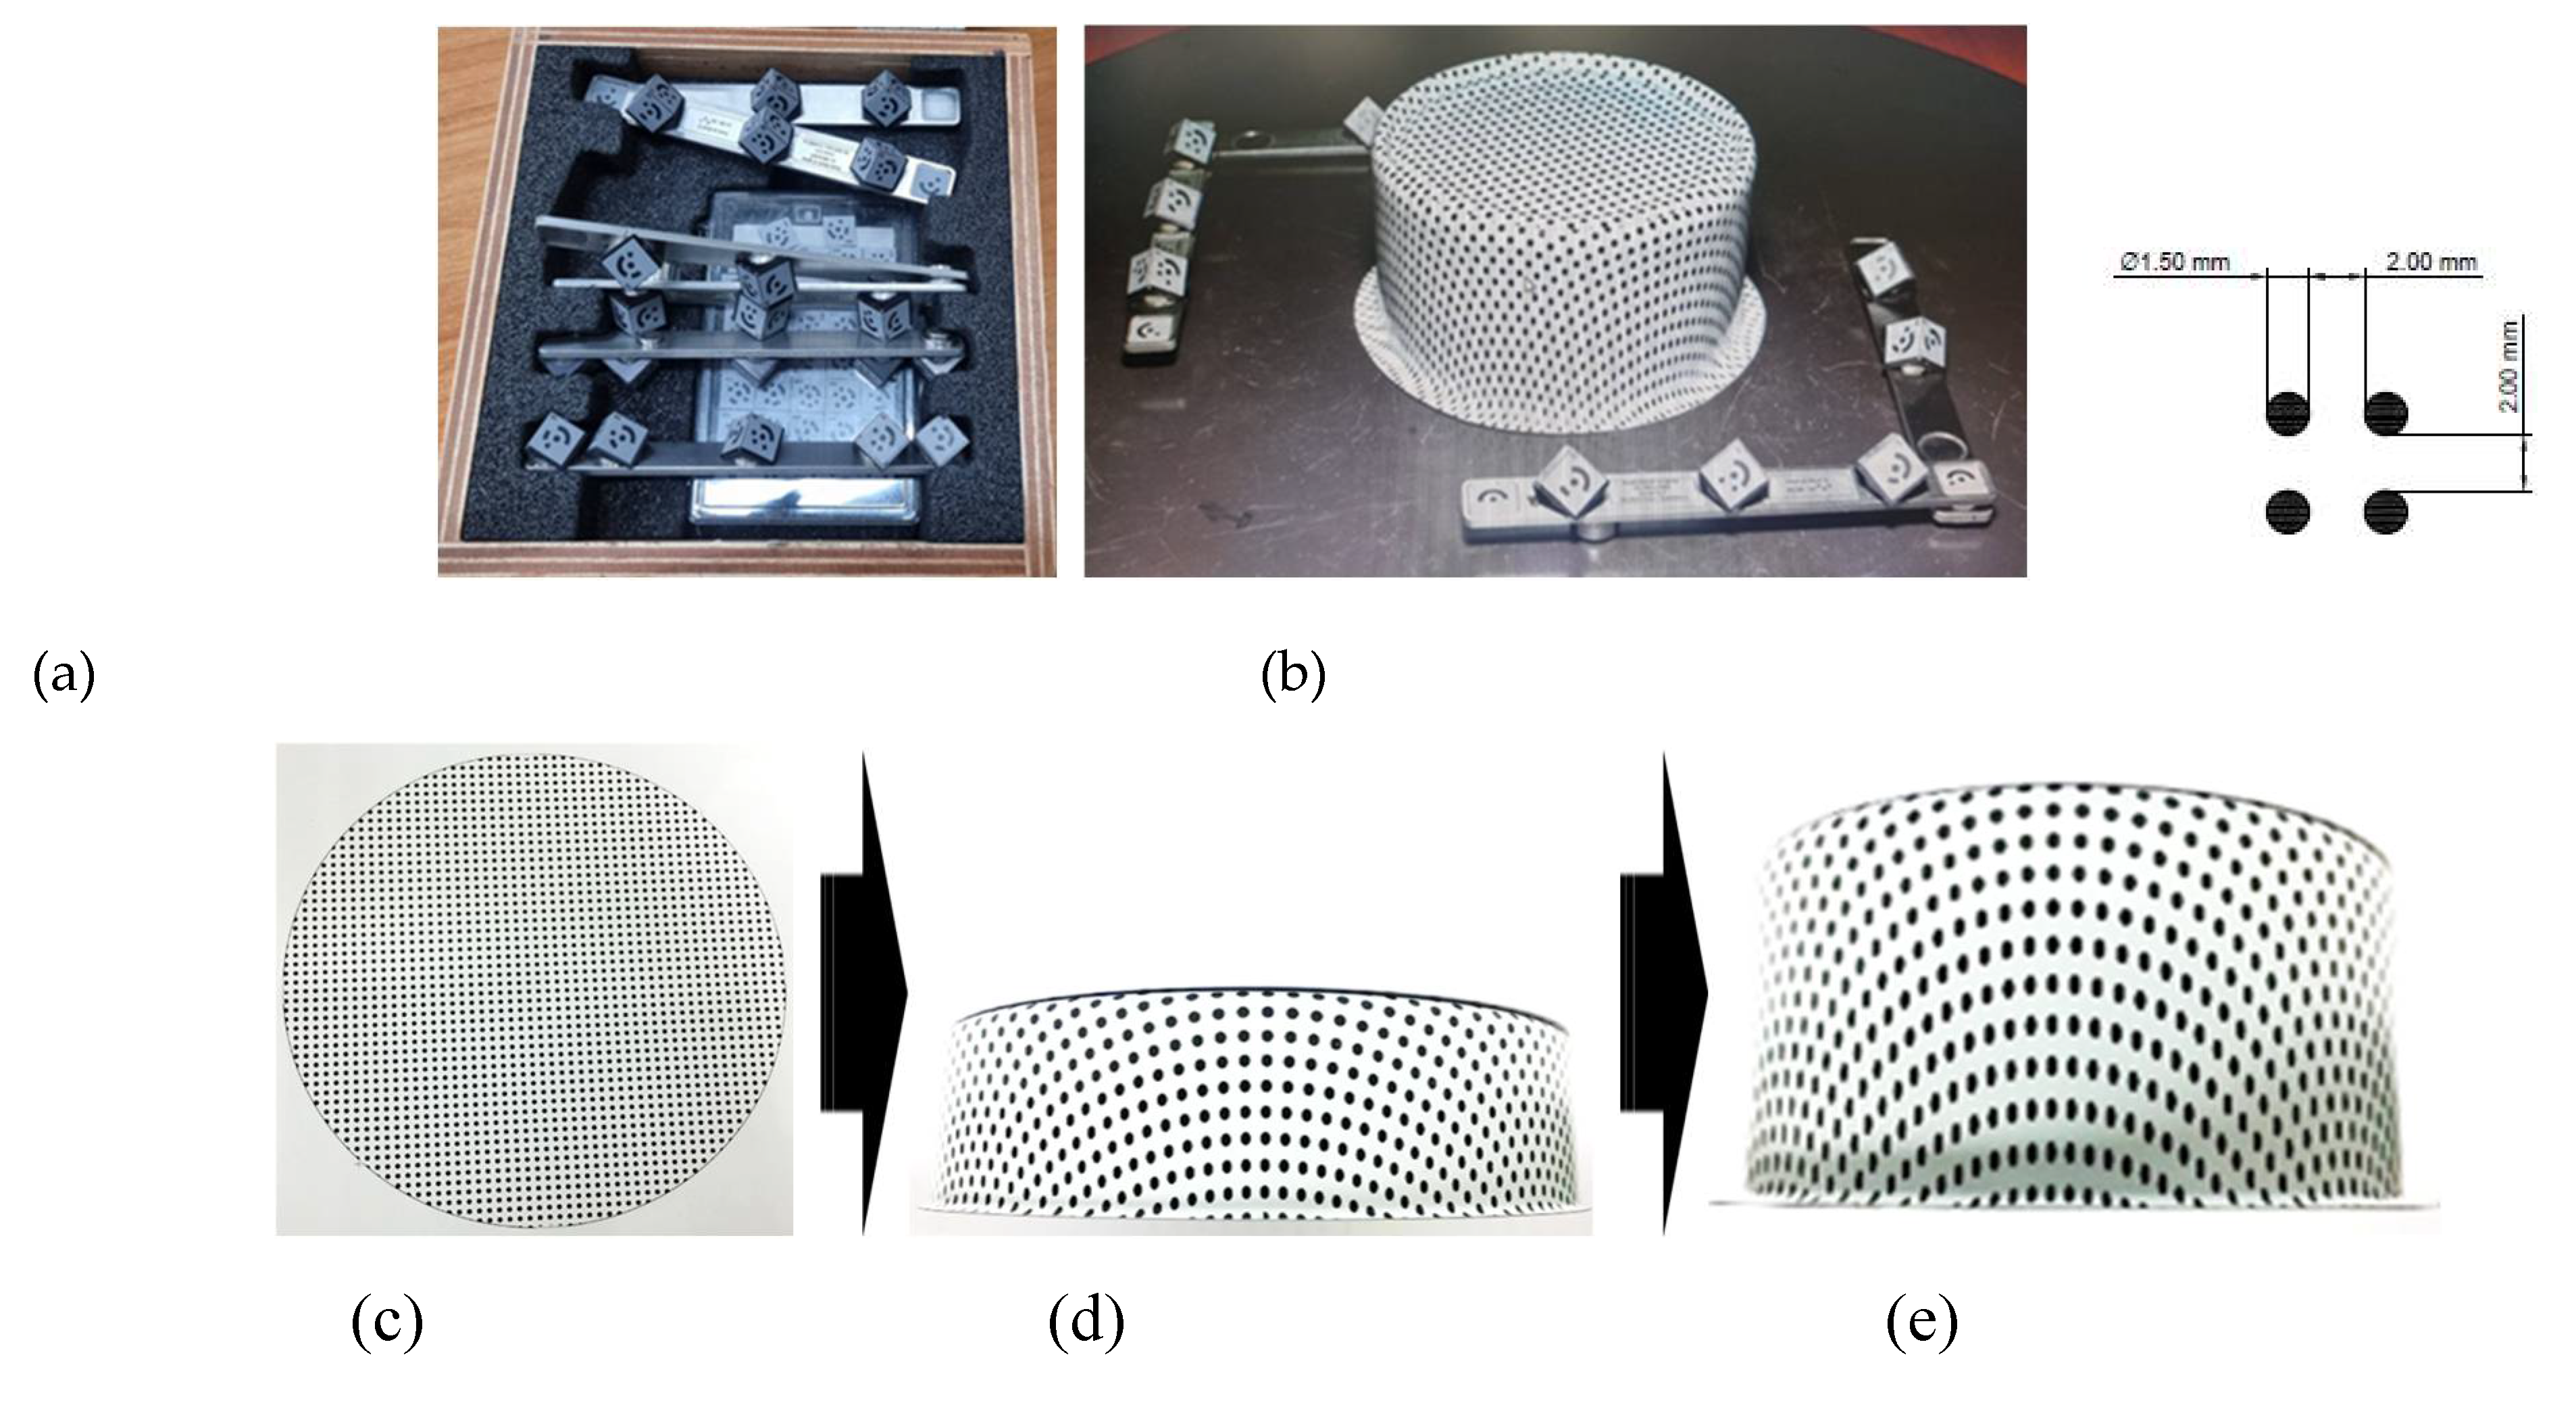
Digital Image Correlation (DIC) is the second technique used to obtain thickness distribution. DIC evaluates the surface strain levels of sheet metal parts after forming. Prior to forming, laminated tin-free steel blanks undergo grid marking using offset printing with a dot pattern (dot diameter of 1.5 mm and spacing of 2.0 mm), as shown in
Figure 15.
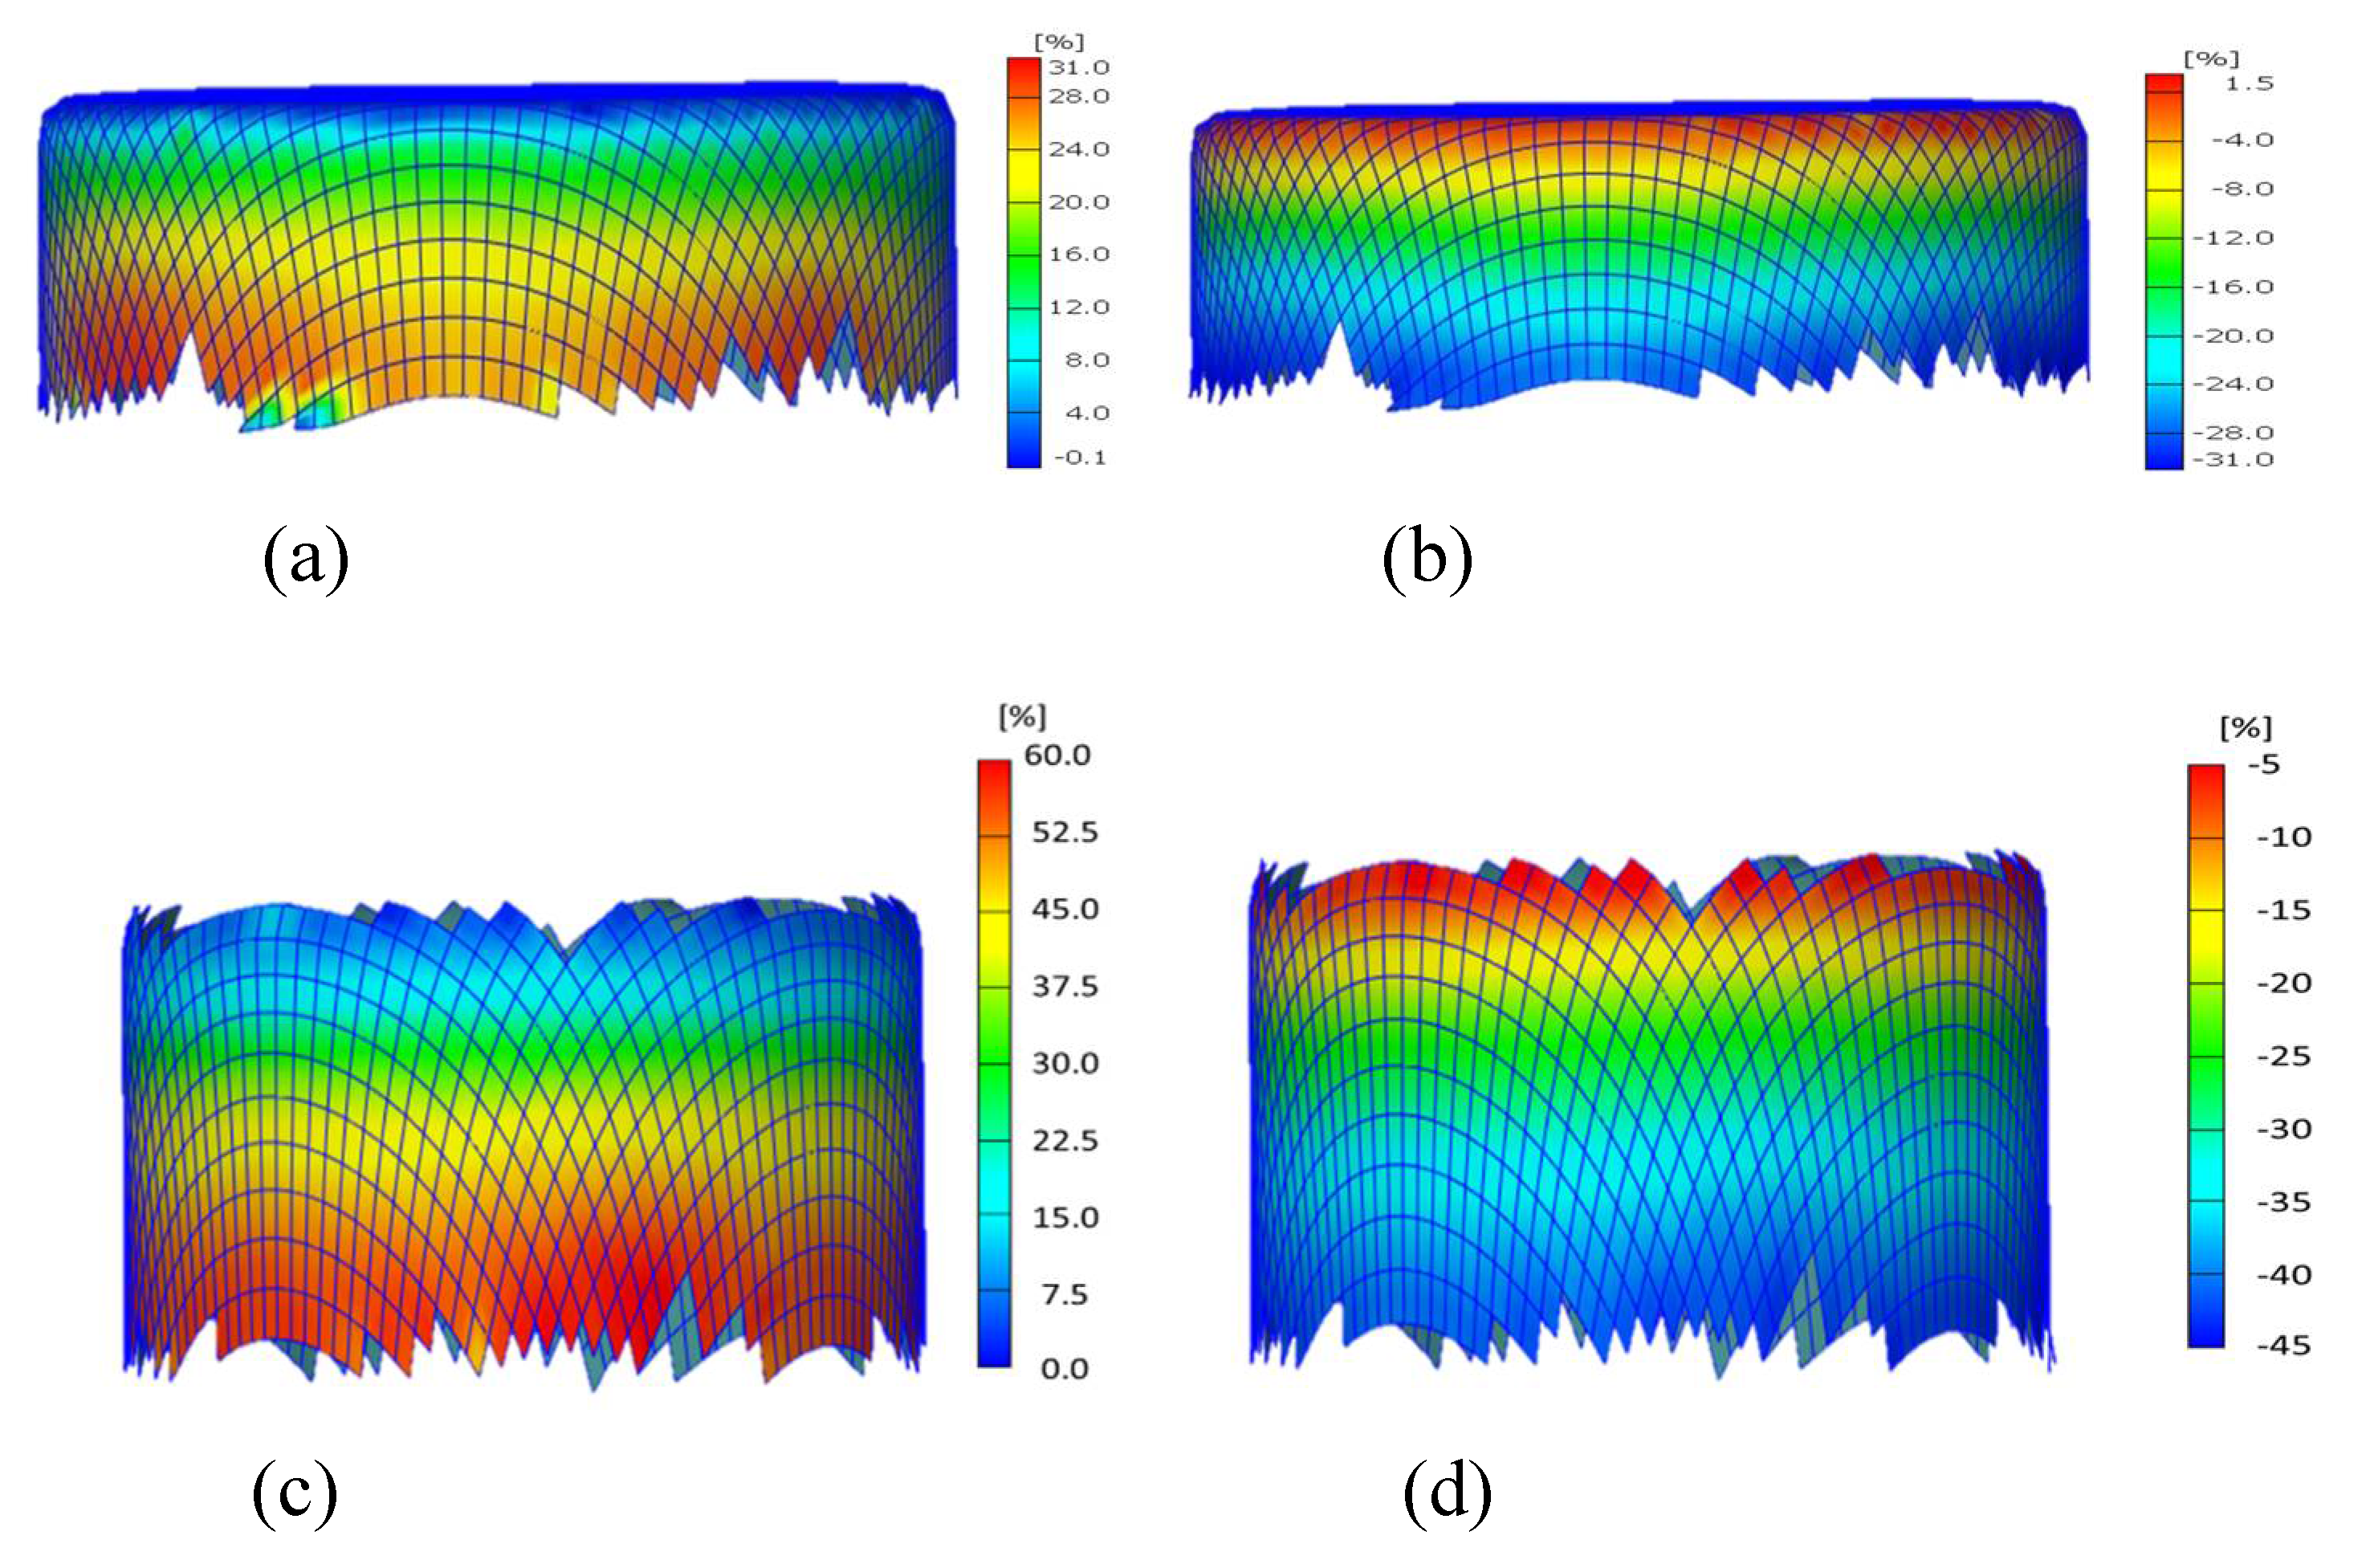
After forming, the laminated tin-free steel sheet is recorded from various viewing angles using the handheld ARGUS system, enabling the measurement of principal strains. The results provide strain distributions on the parts, including major and minor strains. ARAMIS sensors measure statically loaded specimens and parts using a contact-free, material-independent method based on the principle of DIC. Thickness is determined by the major and minor strains, assuming the constant volume deformation, at RD, DD, and TD at nine different locations per direction. The thickness is calculated using the relationship
t =
t0⋅exp(
εt), where
t is thickness,
t0 is base steel thickness of 0.16 mm, major strain (
ε1), minor strain (
ε2),
εt = - (
ε1+
ε2) as shown in
Figure 16.
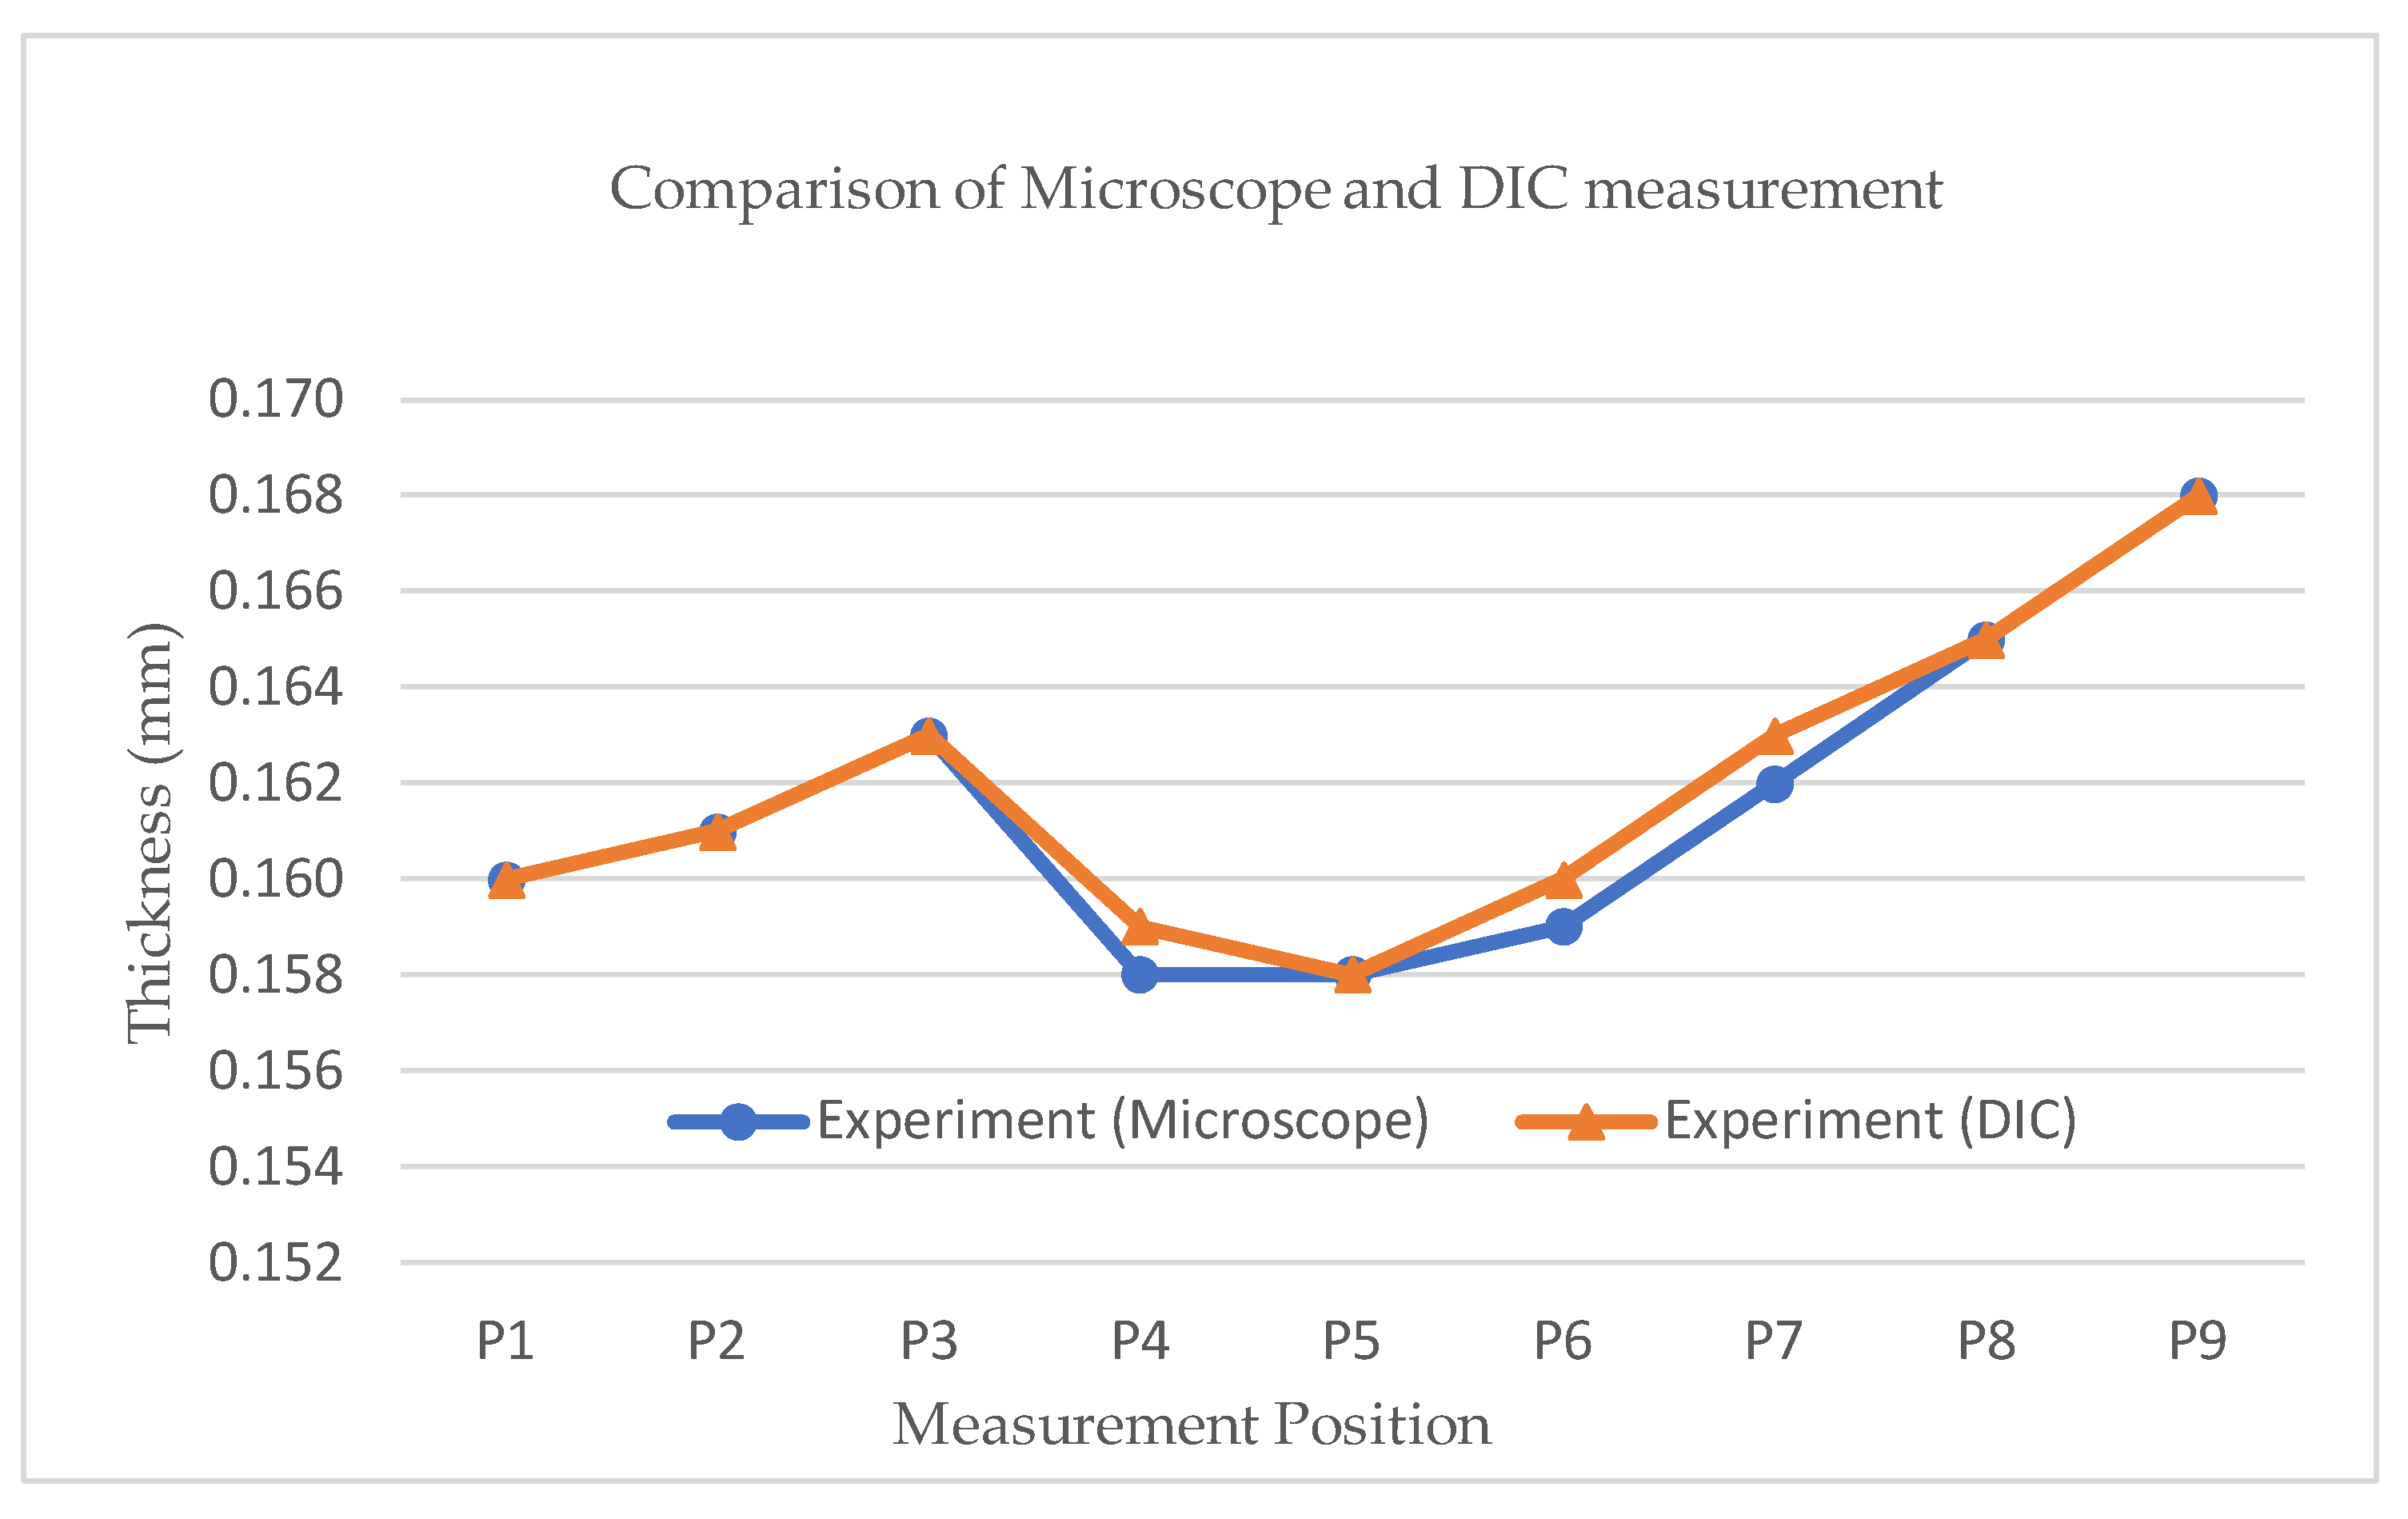
The thickness distribution at nine locations from ten samples on the can wall, obtained through both microscopy and DIC, is compared and presented in
Figure 17. The results from these methods show negligible differences, consistent with trend in [
18].
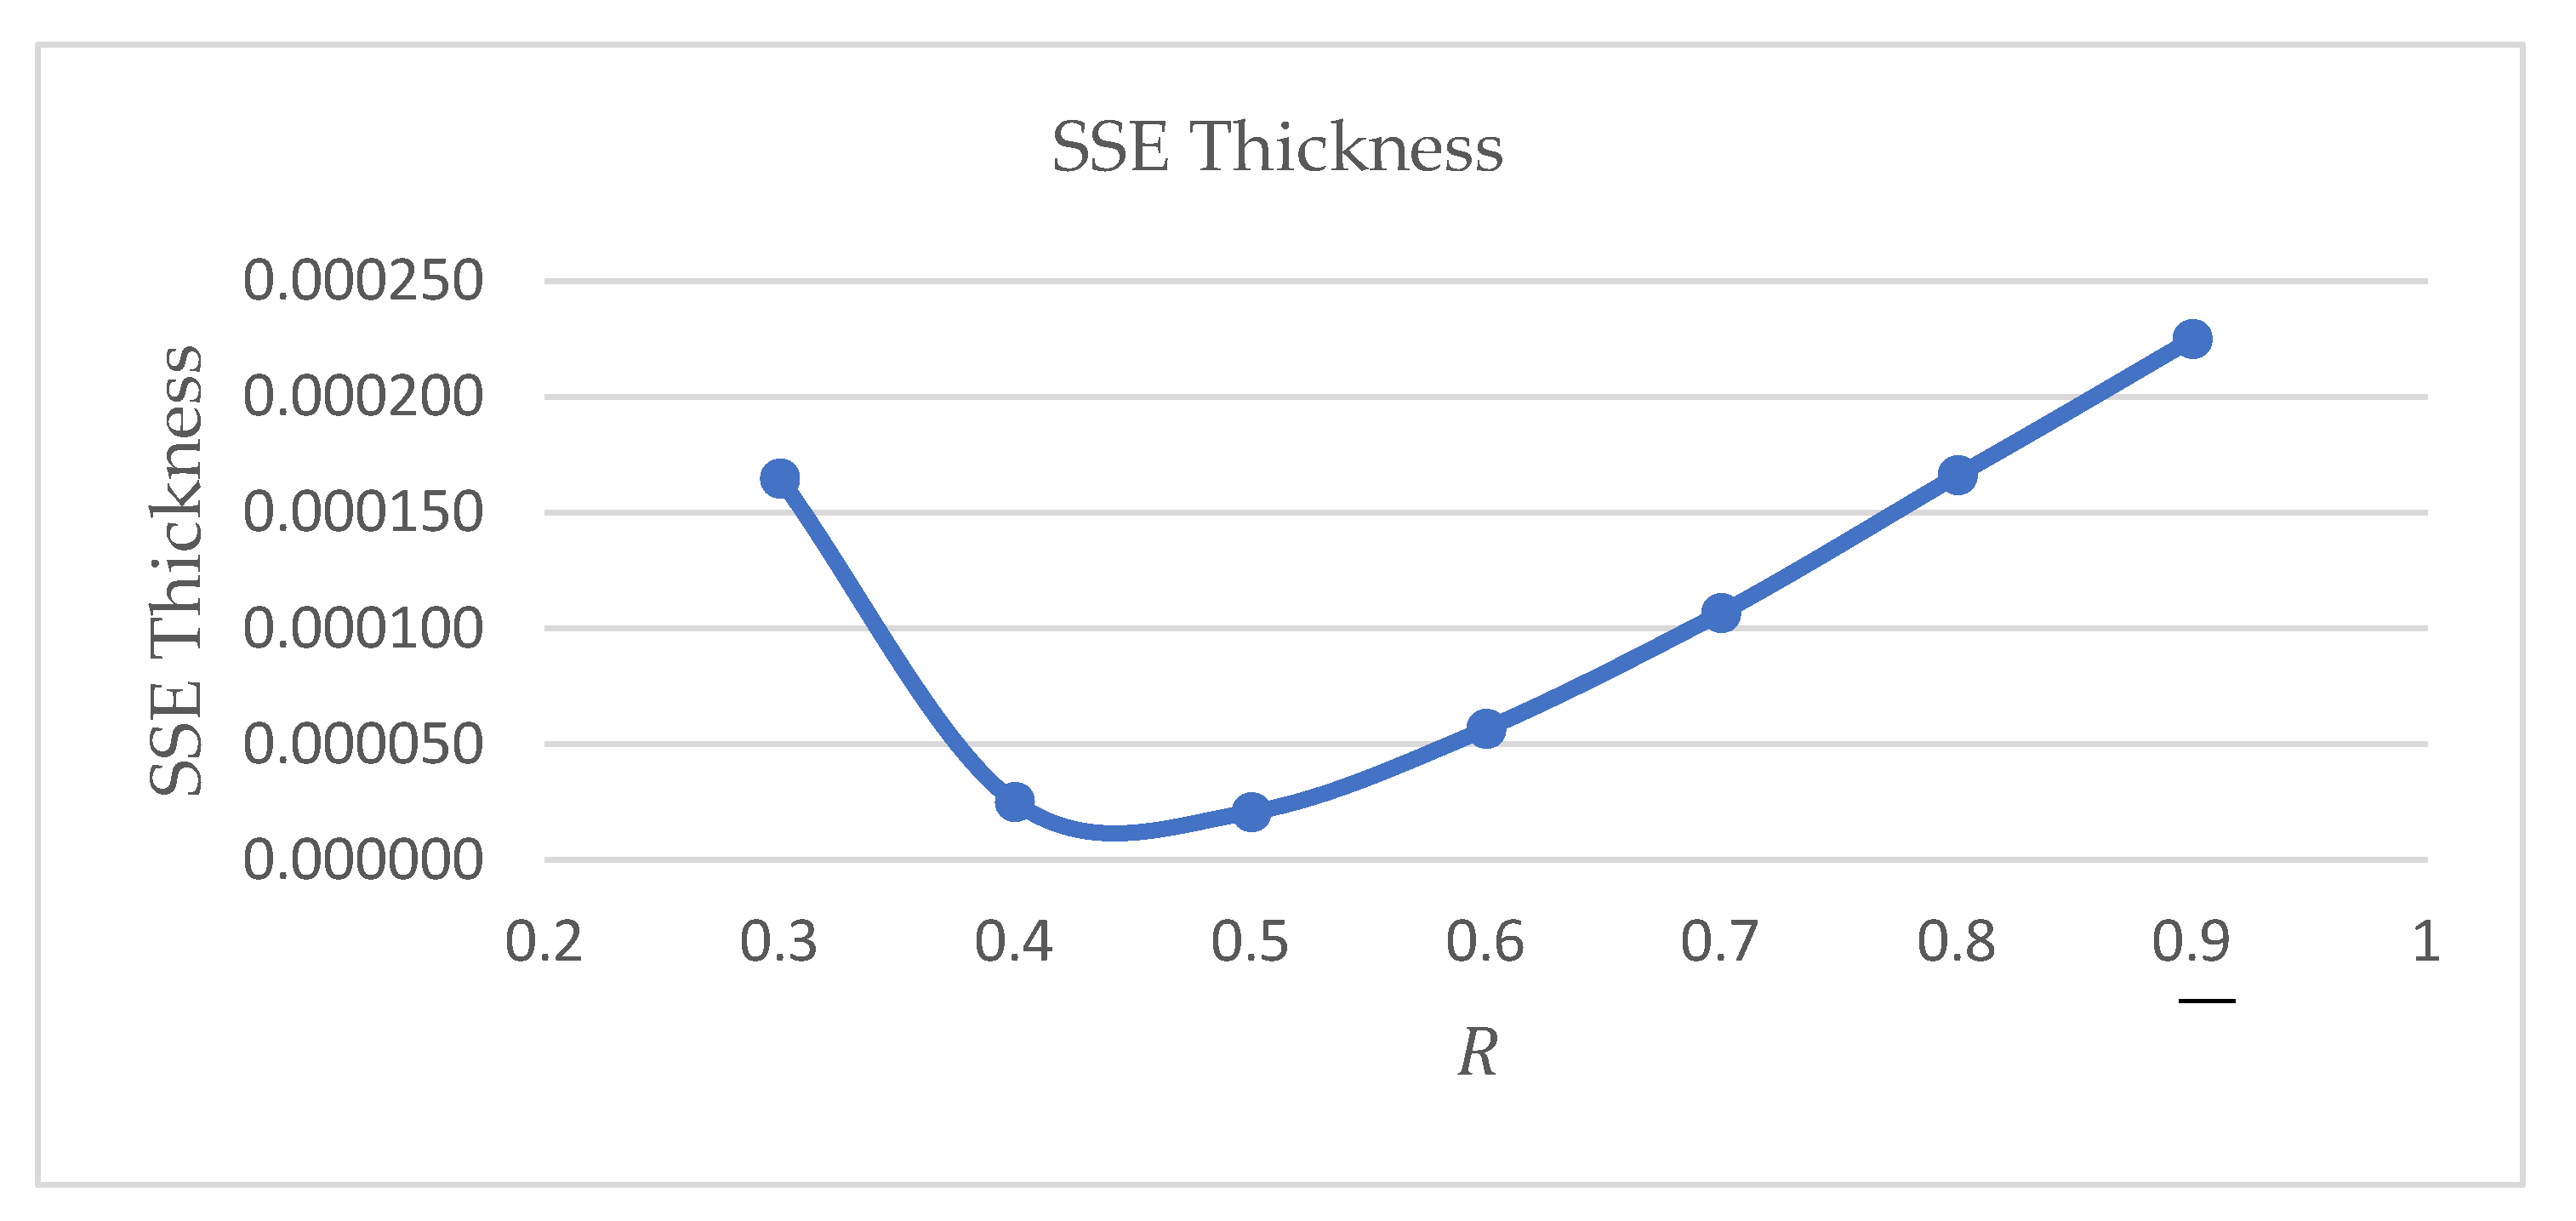
The thickness measurements at the nine locations are further analyzed using the Sum of Squared Error (SSE), also known as the residual sum of squares, which represents the difference between the experimental values and FEA values. A lower SSE indicates a better agreement with the experimental data.
Figure 18 shows SSE thickness in relation to
(dependent variables ranging from 0.3 to 0.9). It indentifies an optimal
value at 0.5 in FEA for die radius of 1.5 mm and
COF of 0.03 as independent variables.
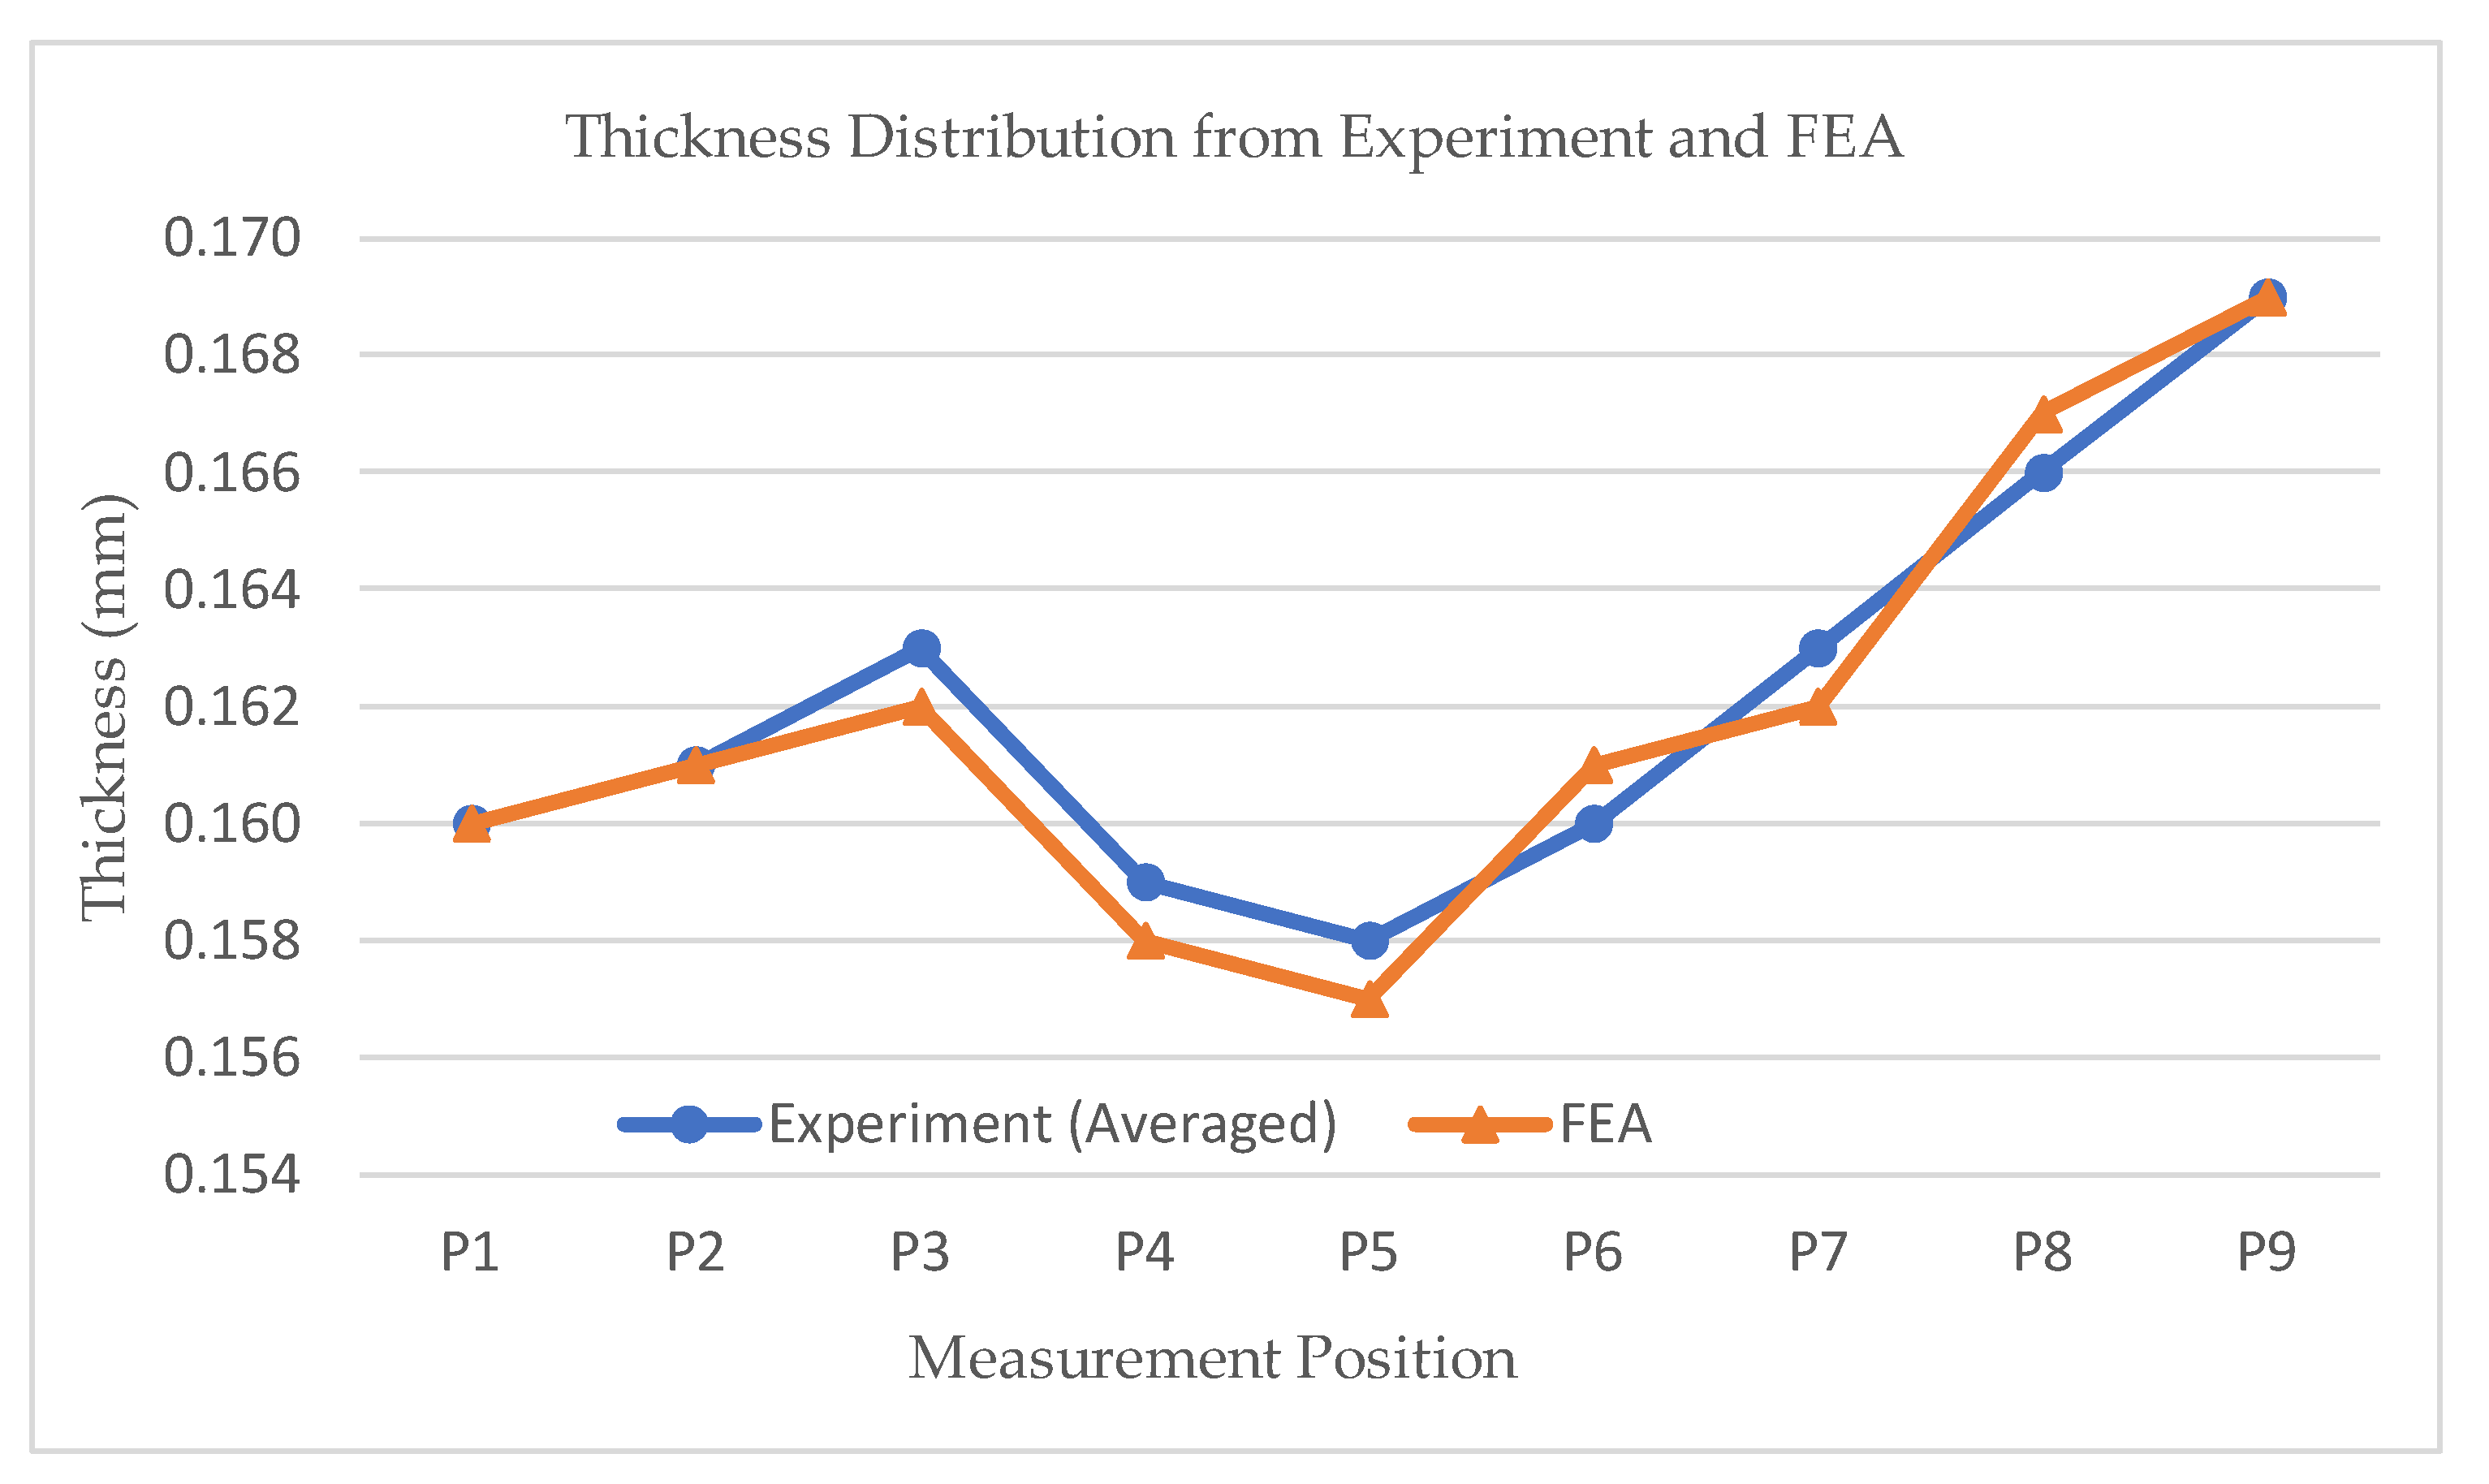
Following the determination of
, a comparison of the average thickness distribution on the can wall between experimental results (averaged from Microscope and DIC) and FEA (with
at 0.5,
COF at 0.03,
BHF at 16,000 N) is shown in
Figure 19. The findings indicate that FEA can accurately predict the average thickness distribution, showing a good agreement with the experimental data.
3.3. Parameter Identification via Flange Length
To identify Δ
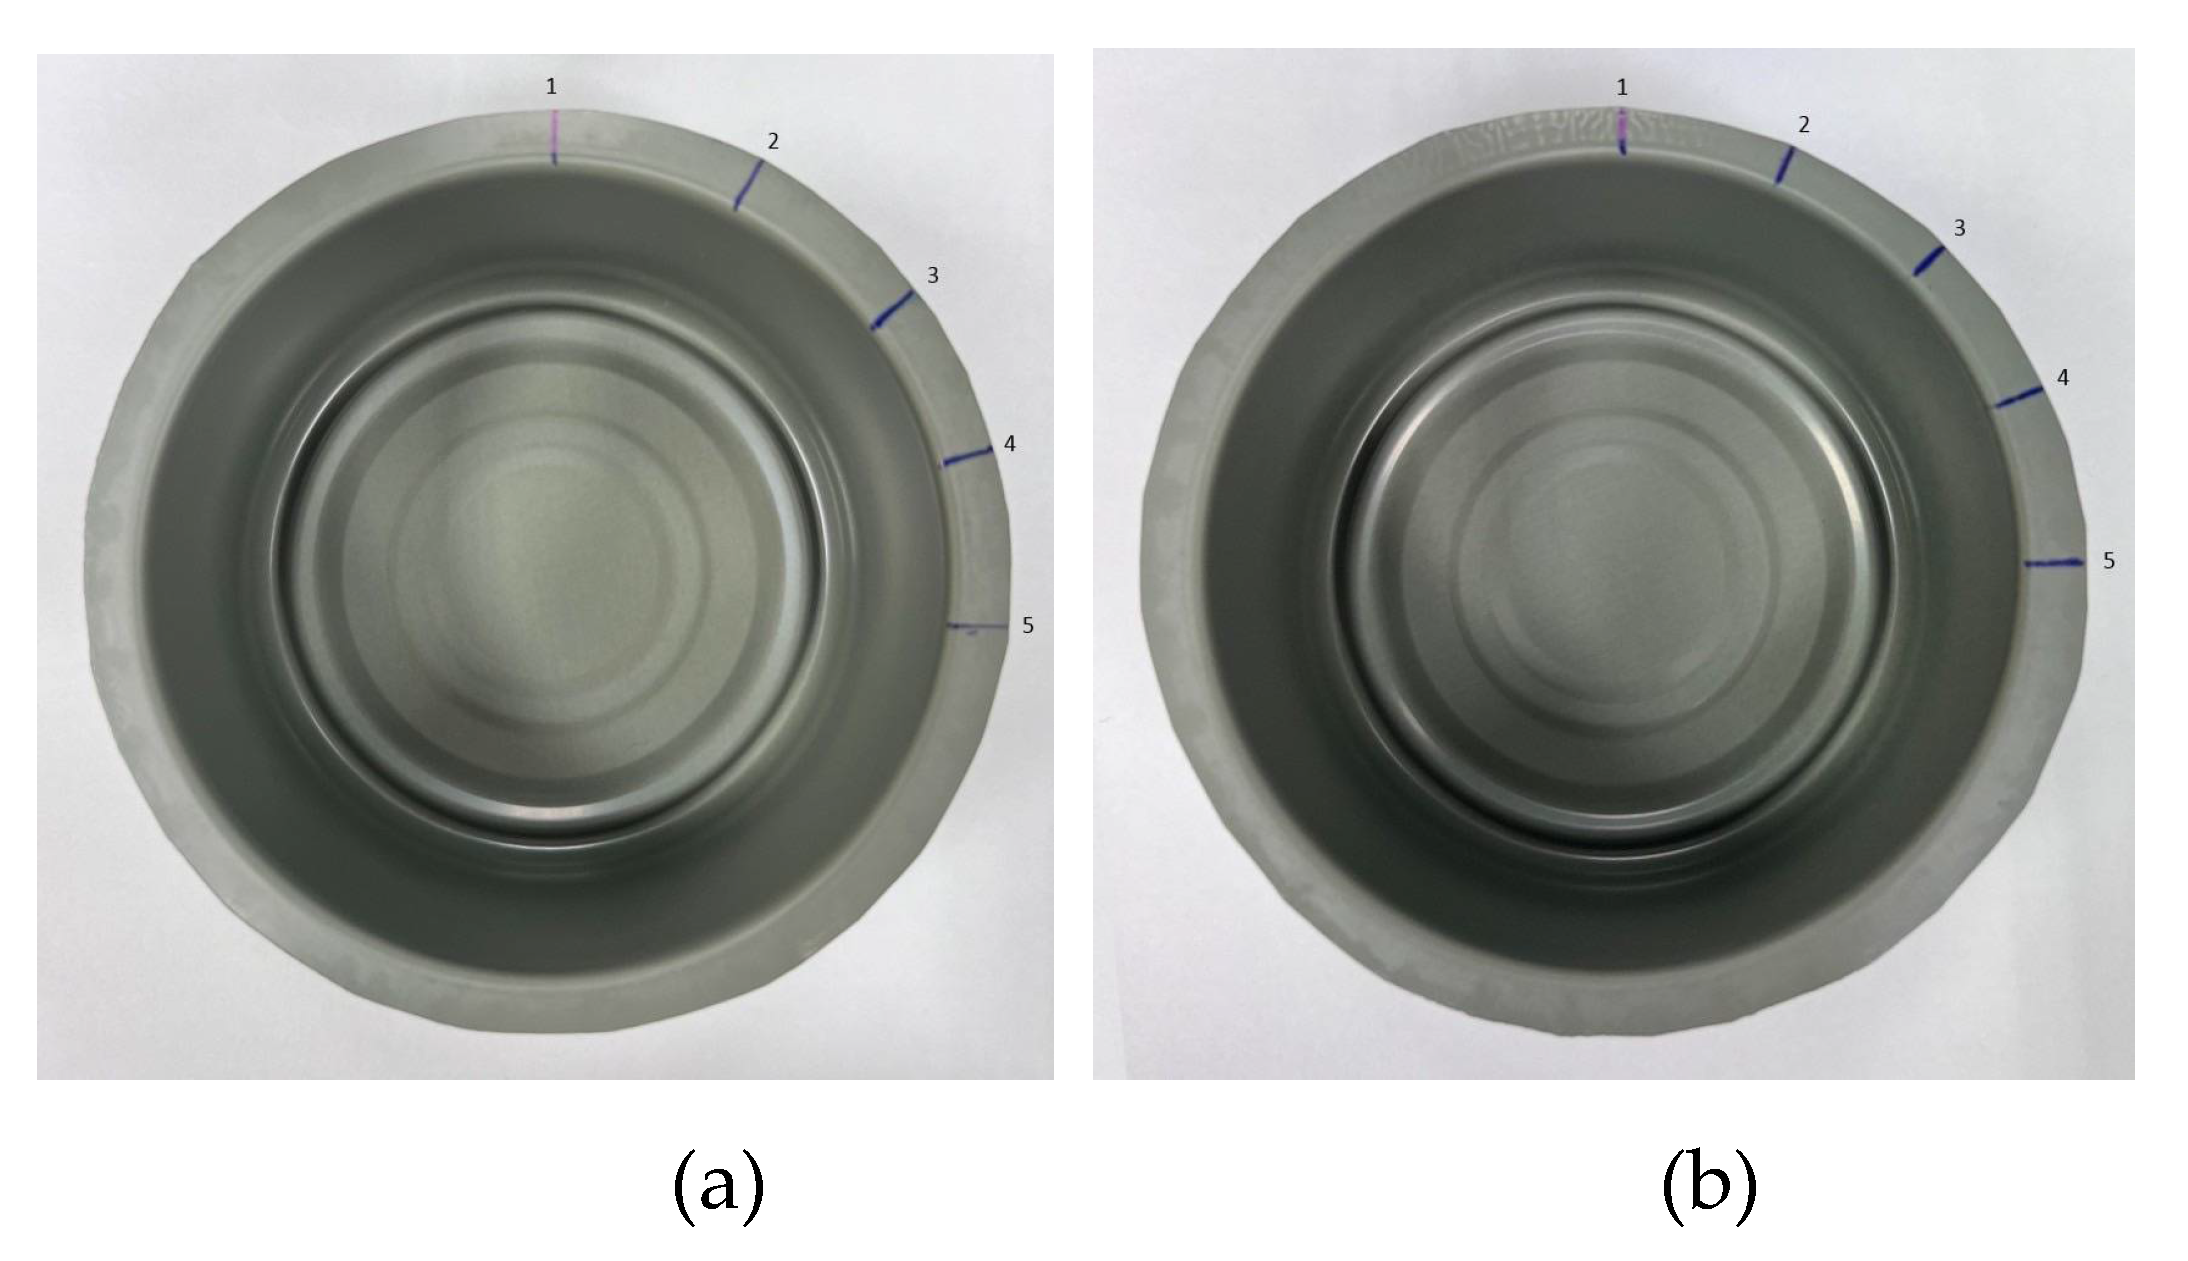
, the flange length of the can in different direction is used. All cans are marked to indicate RD. The flange length at five locations after re-drawing from the experiment is measured using a digital microscope (Keyence, Model VHX-7000) with a maximum magnification of 30x. These five locations for SULC and Al-killed are shown in
Figure 20 (labeled as follows: 1 = RD, 2 = 22.5°, 3 = DD, 4 = 67.5° and 5 = TD).
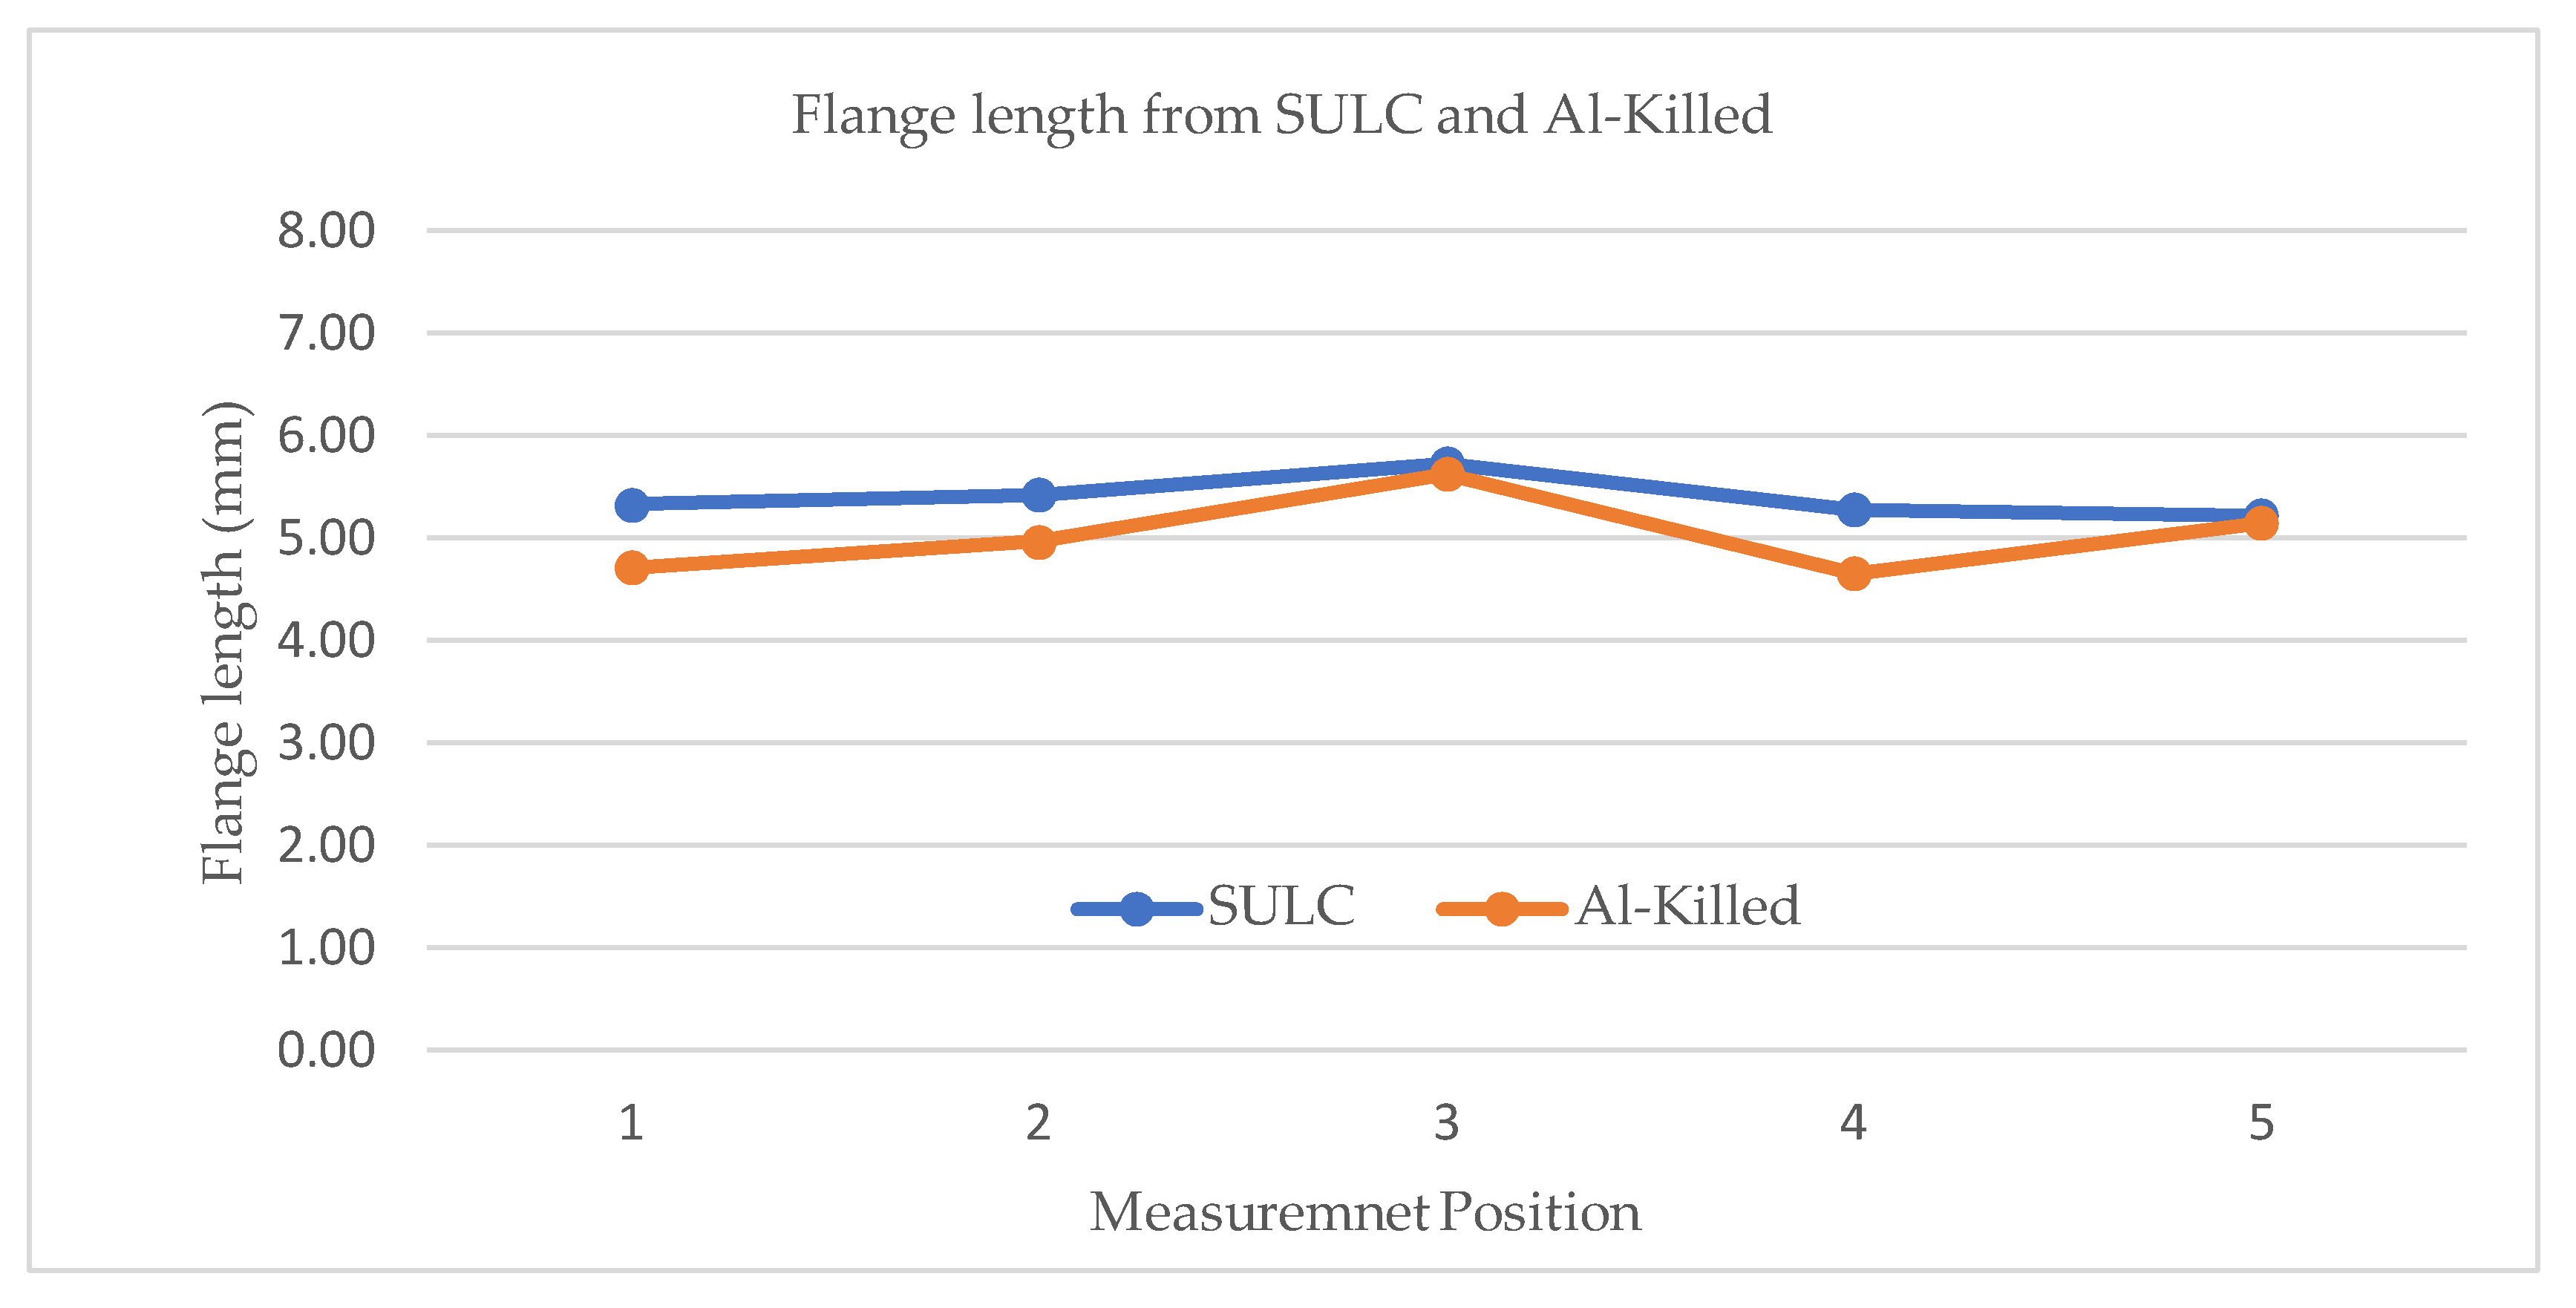
From 10 samples of each type of steel (Al-killed and SULC), the average flange length after re-drawing at five locations is presented in
Figure 21. Al-killed steel exhibits shorter and more nonuniform flange lengths compared to SULC, with ranges of 1.24 mm for SULC and 1.76 mm for Al-killed. For distortion printing purposes, SULC is preferable.
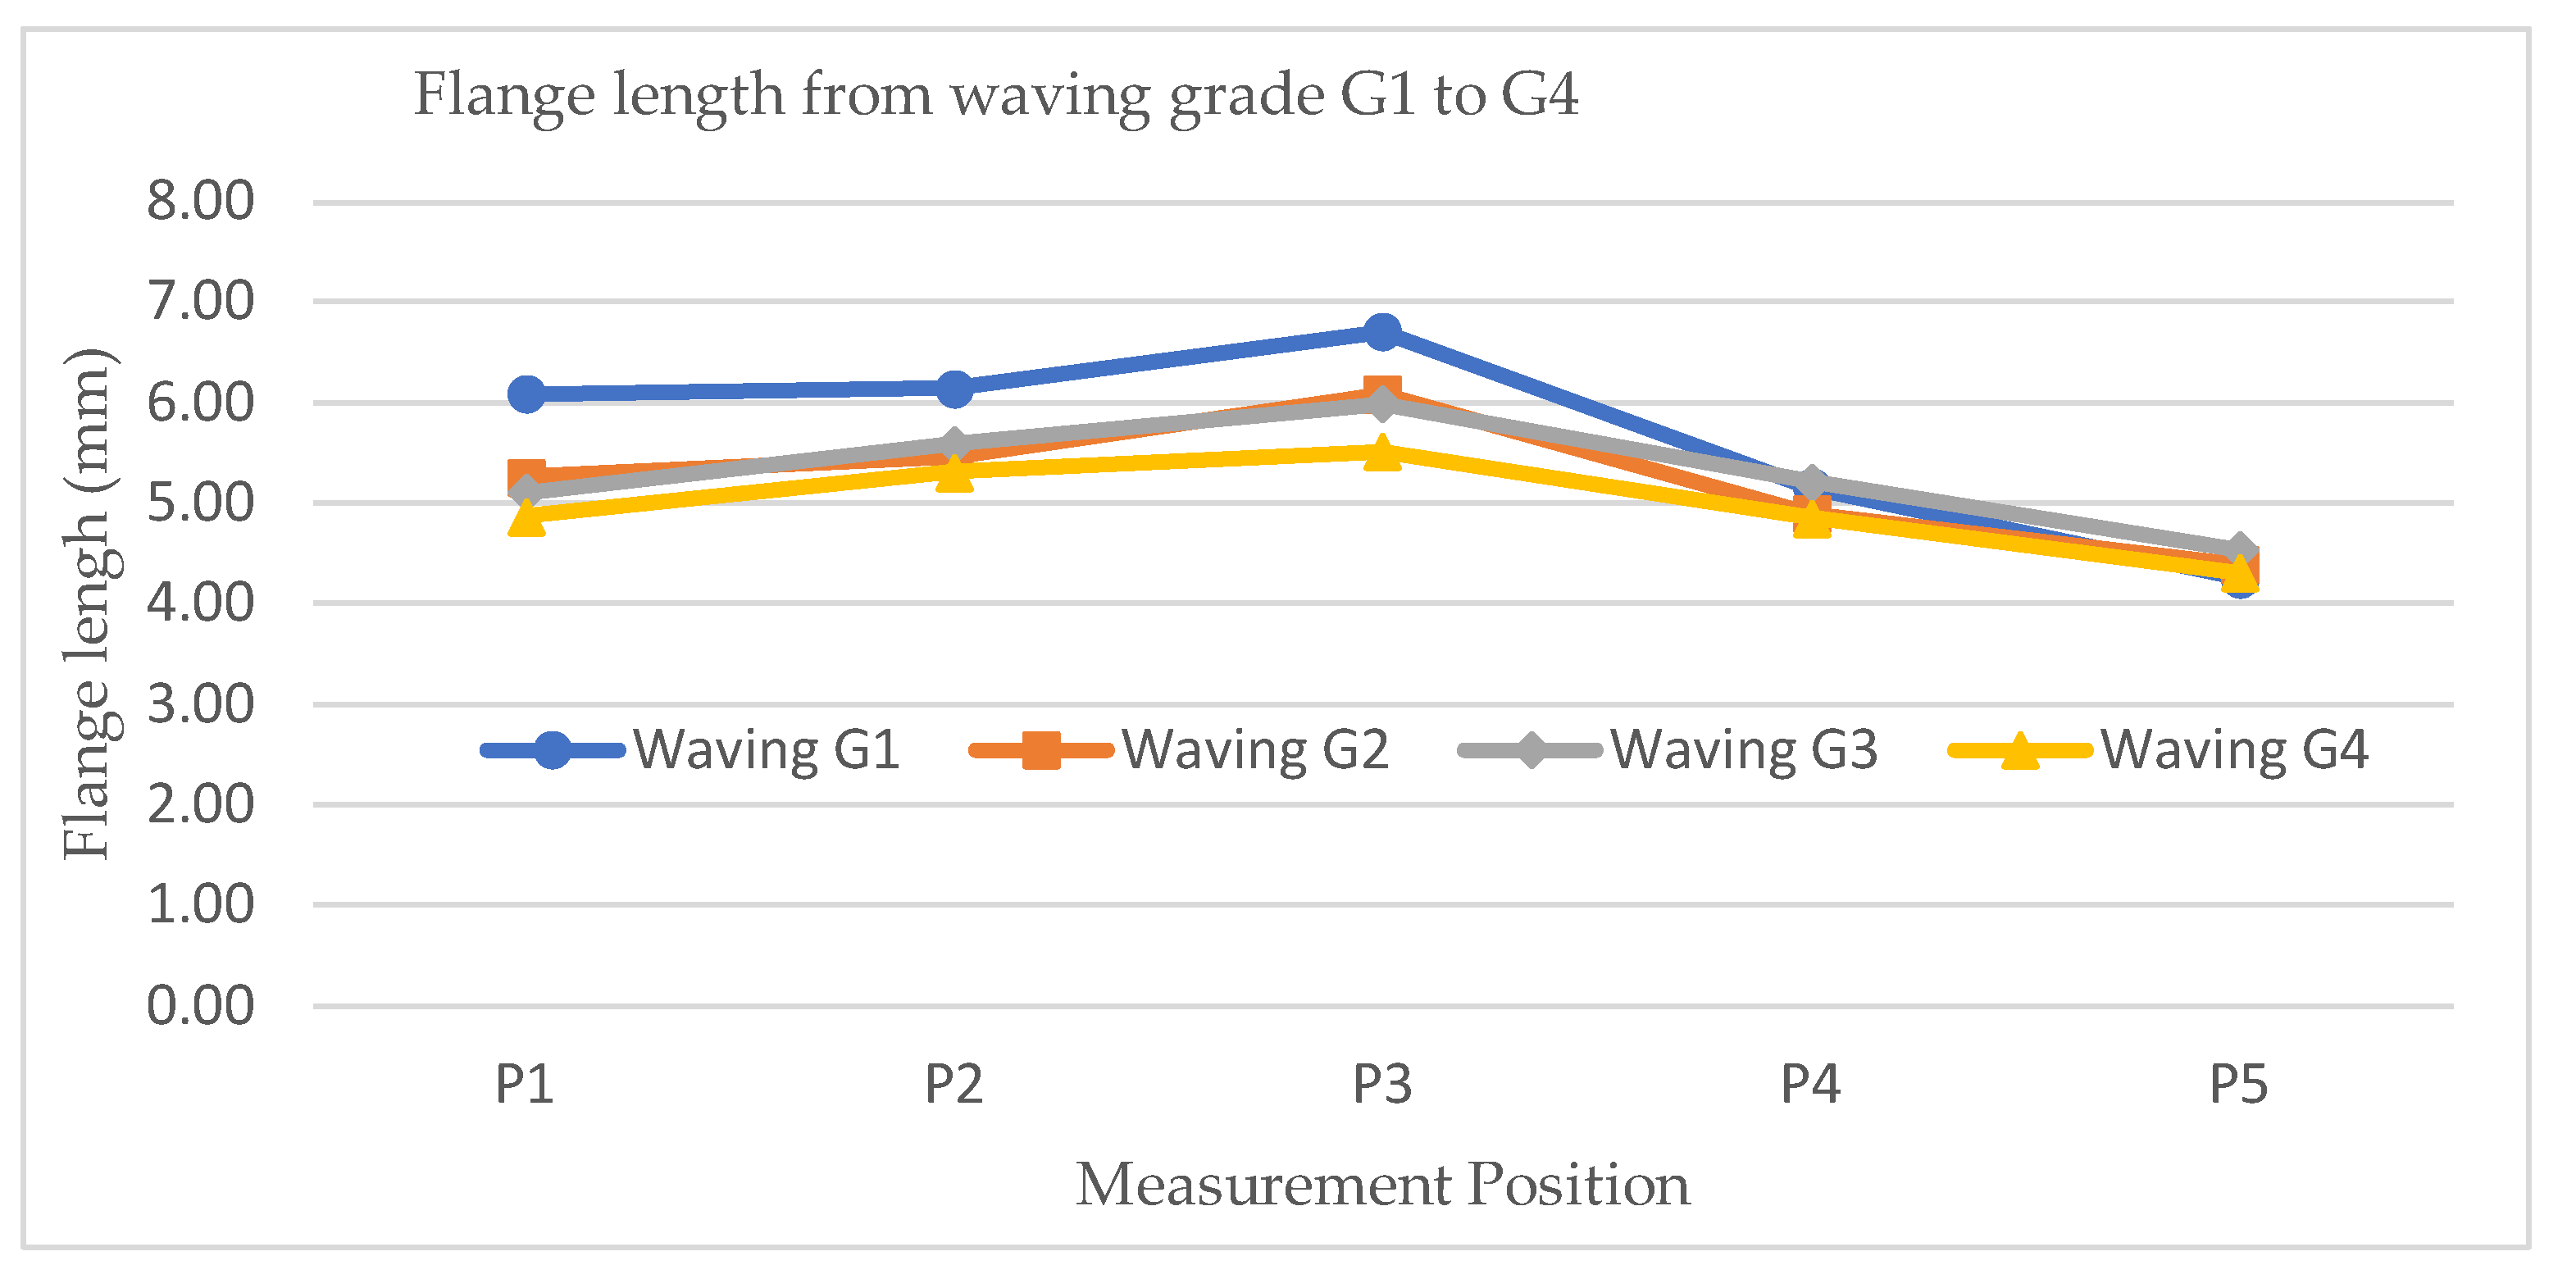
To further investigate production variations, a larger sample size of 1,800 samples are analyzed. These samples are categorized into four groups: G1 (poor, waving height > 2.0 mm), G2 (fair, waving height 1.1 - 2.0 mm), G3 (good, waving height 0.5 - 1.0 mm), and G4 (excellent, waving height < 0.5 mm). Experimental measurements are conducted using a microscope. The flange lengths obtained from each group are presented in
Figure 22. The results indicate the following distribution: G1 (waving height > 2 mm, 0.4%), G2 (waving height 1.1 - 2.0 mm, 1.5%), G3 (waving height 0.5 - 1.0 mm, 55.56%), and G4 (waving height < 0.5 mm, 42.85%). G4 is selected to represent the standard case for further analysis.
FEA with die radius of 1.5 mm,
COF of 0.03,
of 0.5 and △
R value of -0.06 and 0.06 are compared with experimental results (waving G4) in
Figure 23. The trend shows that △
R at -0.06 gives a better agreement with the experiment in terms of the trend. Further parameter adjustments could improve the predictive accuracy.
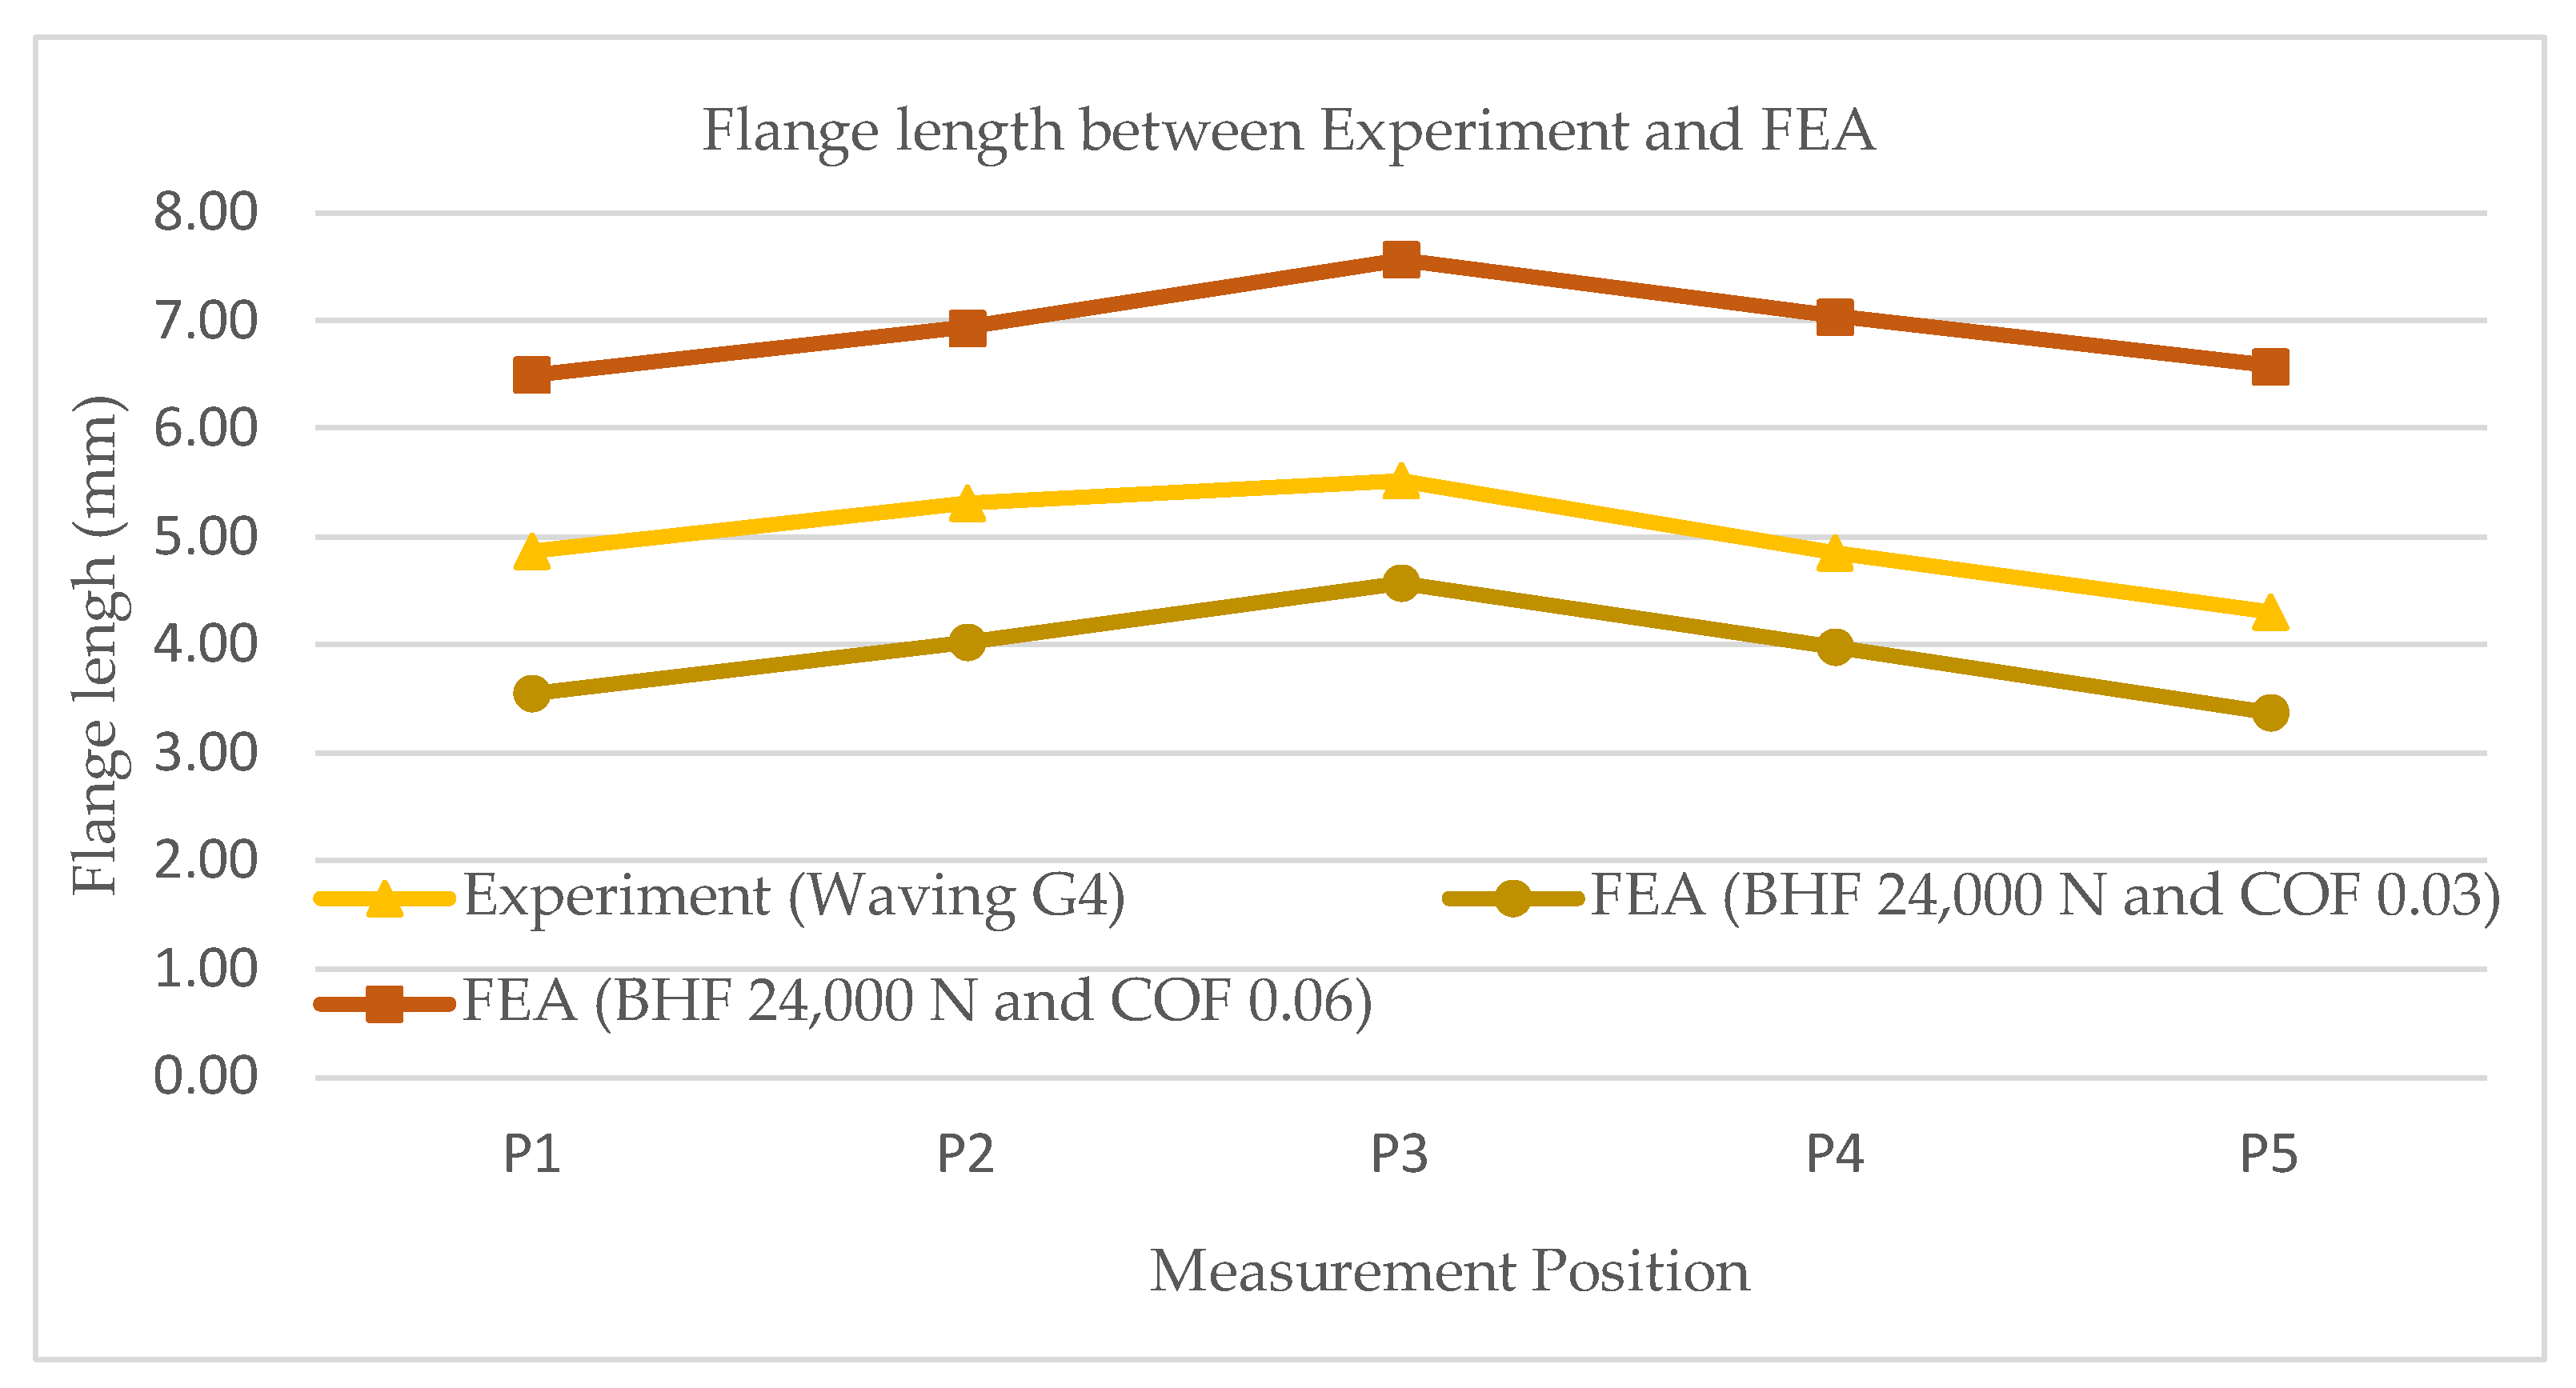
FEA with die radius of 1.5 mm,
of 0.5, △
R of -0.06,
BHF of 24,000 N and
COF of 0.03 and 0.06 are compared with experimental results (waving G4) in
Figure 24. A higher value of
COF results in a greater restraining force leading to a greater flange length. However, the waving values remain largely unchanged (1.19 and 1.06 for
COF = 0.03 and 0.06, respectively).
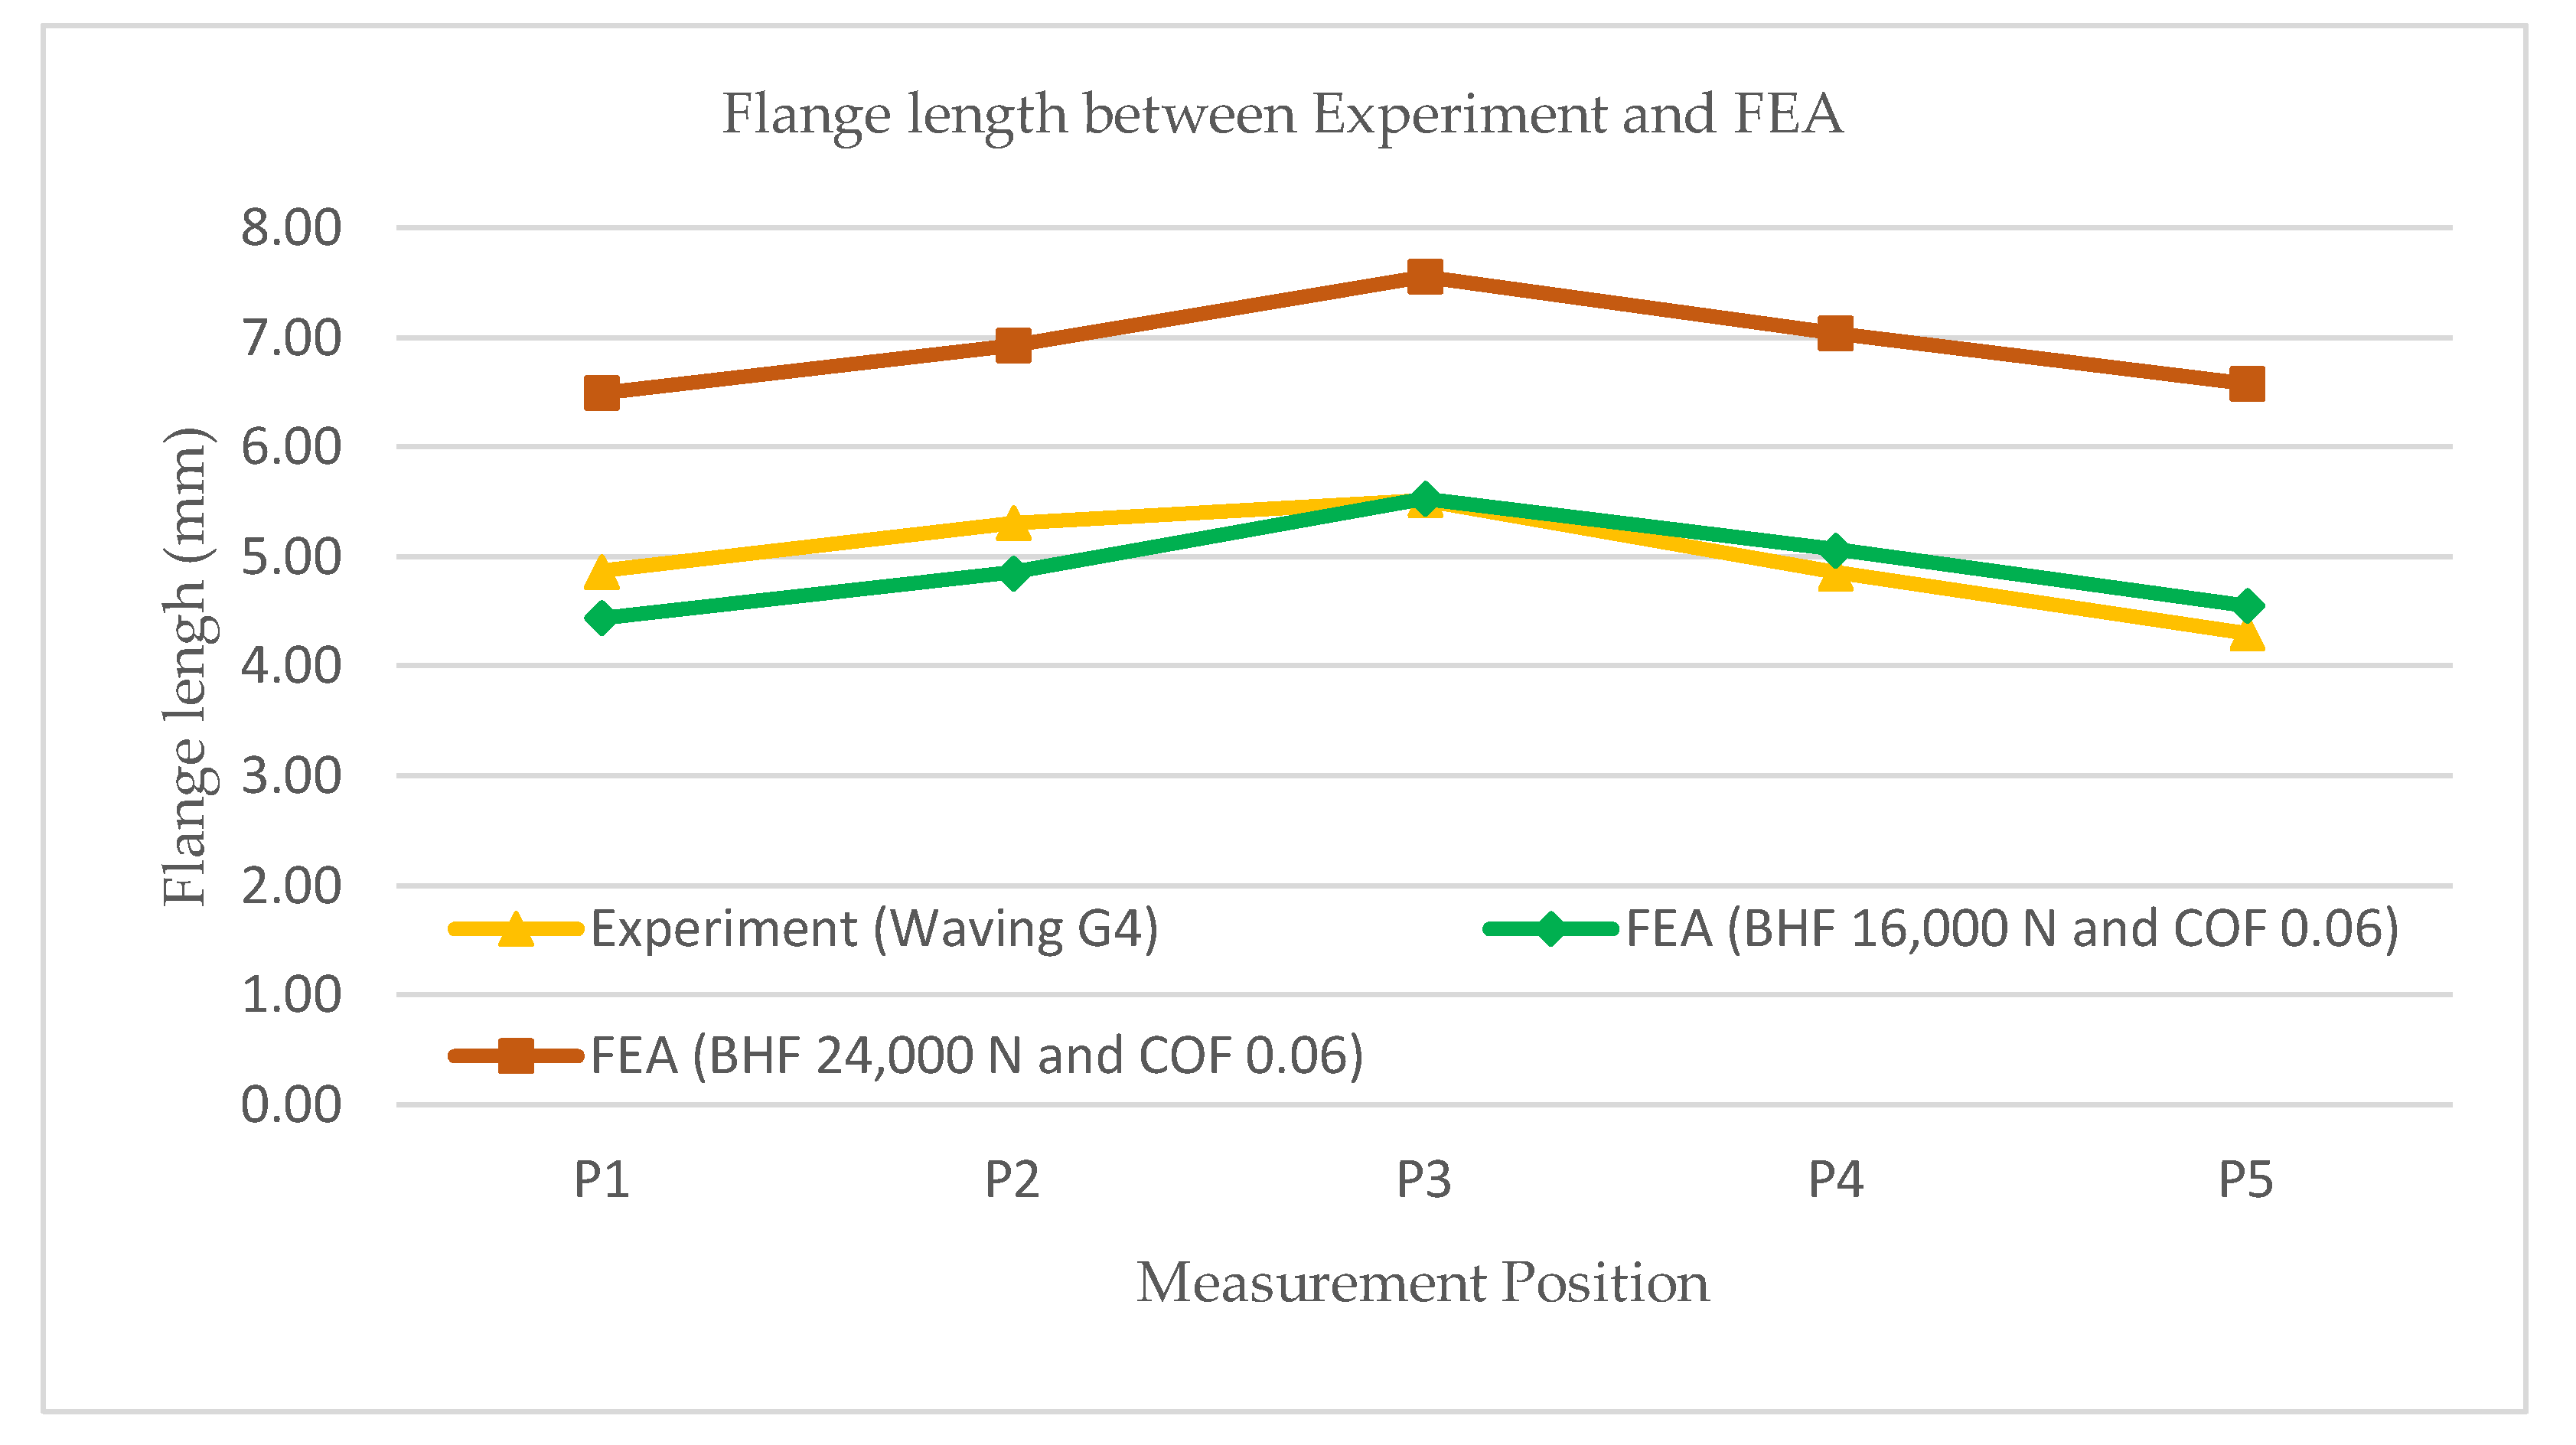
FEA with die radius of 1.5 mm,
of 0.5, △
R of -0.06,
COF of 0.06 and
BHF of 16,000 N and 24,000 N are compared with experimental results (waving G4) in
Figure 25. A higher value of
BHF results in a greater restraining force leading to a greater flange length. However, the waving values remain largely unchanged (1.09 and 1.06 for
BHF = 16,000 and 24,000 N, respectively).
4. Scrap Rate Optimization
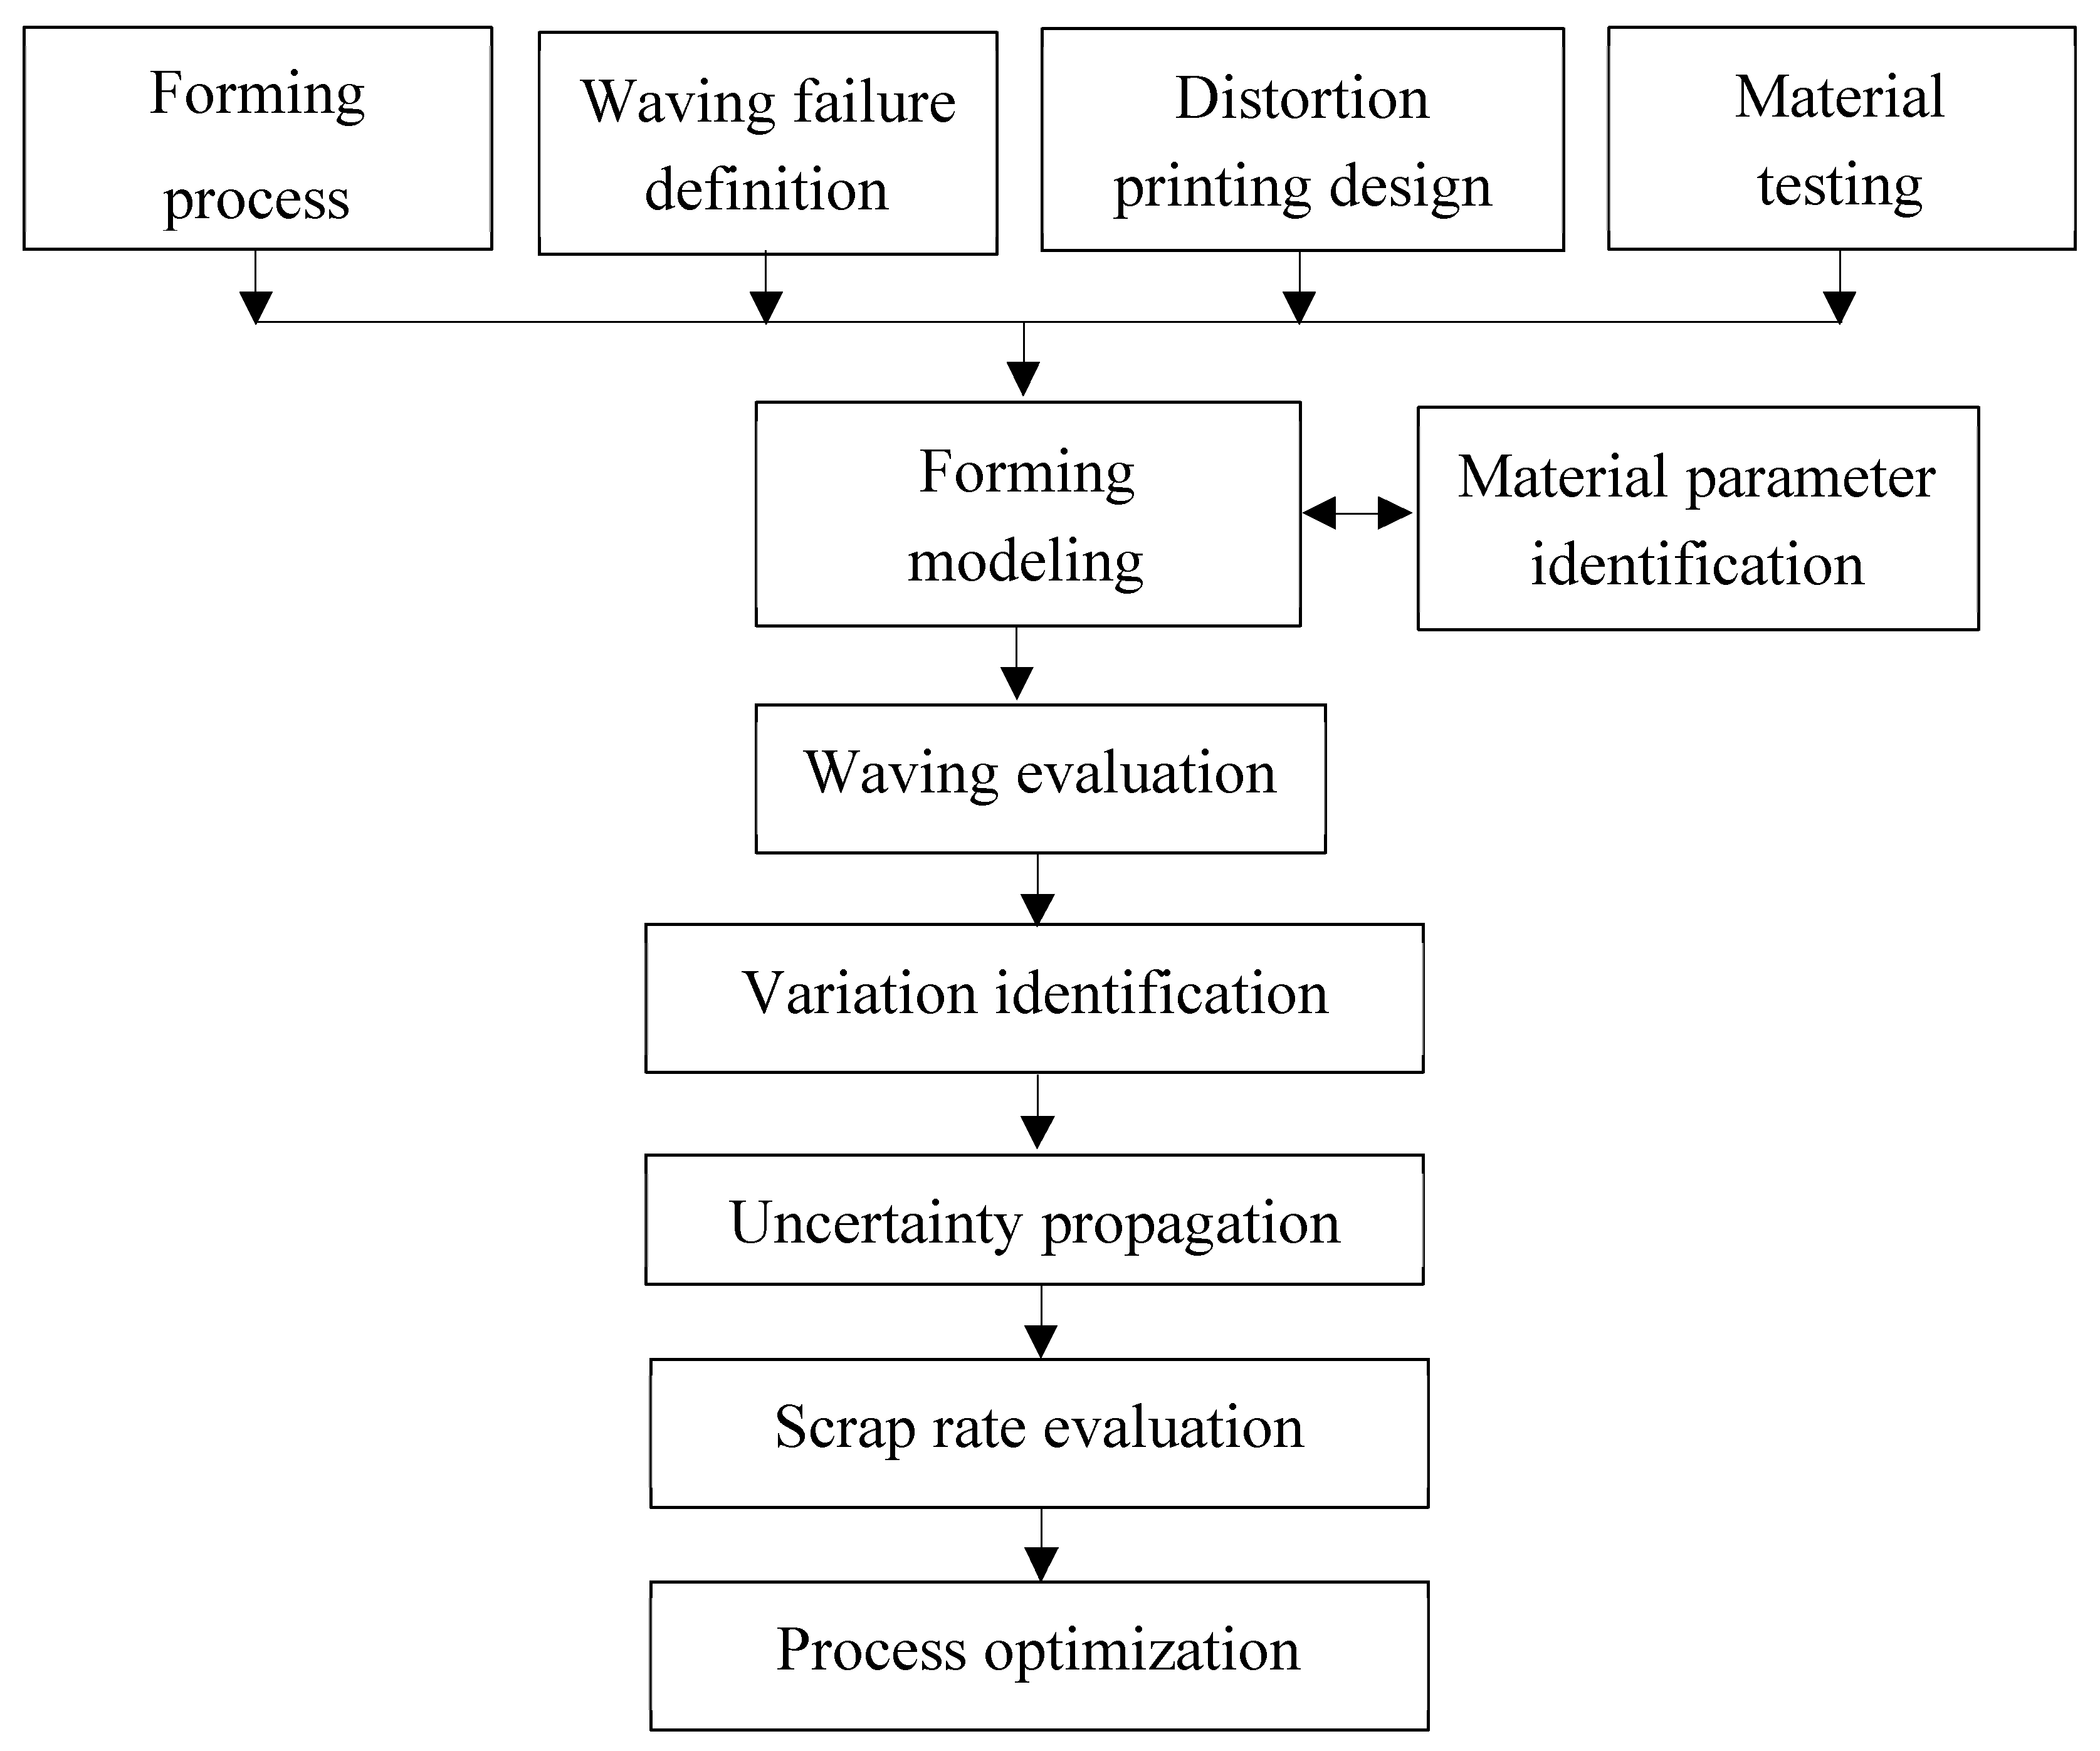
All production processes exhibit some degree of variation, which can lead to scrap or defects in a real DRD production. In can manufacturing systems, these uncertainties arise from various sources. Once these sources are identified and defined, the uncertainty of the forming process can be directly investigated using MCS. However, MCS is resource-intensive. To mitigate this, a metamodel can be employed to reduce the cost of MCS, allowing for the evaluation of the scrap rate. Additionally, process improvements are proposed to enhance the scrap rate. The workflow of this study is proposed and shown in
Figure 26. The forming process, waving failure definition, distortion printing design, and material testing work together to create forming modeling. The model interacts with material parameter identification until the criteria are met. The waving evaluation is incorporated as part of the objective function. Variation is identified for uncertainty propagation, allowing the scrap rate to be evaluated and optimized.
4.1. Uncertainty Propagation via Metamodeling
The approach of uncertainty propagation begins with identifying parameters that exhibit variation. Assuming the tooling configuration is robust or somewhat rigid, this study focuses on five parameters: COF, , △R, δ, and BHF. The R values are defined as follows: , , and . The waving value can be obtained through FEA. While MCS can directly investigate the uncertainty of the forming process, using FEA for uncertainty propagation is resource-intensive. Therefore, metamodeling with Latin hypercube sampling (LHS) is adopted to make MCS more practical.
LHS is a statistical method used to generate a near-random sample of parameter values from a multidimensional distribution. This sampling method is employed to construct computer experiments or for MCS, ensuring that all portions of the uncertain parameters are represented. LHS is utilized to create a sampling space for metamodeling. In MATLAB, LHS can be implemented using the command lhsdesign(n,p), which returns a Latin hypercube sample matrix of size
n-by-
p. In this work,
n = 40 and
p = 5. Once the range of each parameter is defined, the absolute value of each parameter can be obtained. FEA models are then created and evaluated according to the sample matrix. The results are applied to RBF to create a metamodel. The RBF implementation in MATLAB can be referenced from [
19]. Uncertainty propagation is a method that transmits the uncertainties of independent variables through a model to estimate the uncertainty of the response. In this work, the response is the waving value.
The effect of uncertainty from the parameters of interest is investigated using MCS. In this study, MCS with 100,000 samples is conducted in MATLAB. These samples are analyzed to create the probability density function (PDF). The scrap rate (SR) is defined as the ratio of the number of prediction samples with a waving value greater than 1.0 mm. Five parameters are used to define variation in this study. Let N(m,σ) represent a normal distribution with the mean (m) and the standard deviation (σ). The parameters under uncertainty are as follows: The friction coefficient (COF) is defined by N(0.03, 0.003). is defined by N(0.5, 0.05). △R is defined by N(-0.05, 0.006). δ is defined by N(-0.02, 0.003). And the blank holder force (BHF) is defined by N(20,000, 3,000).
4.2. Process Improvement for Scrap Rate
The DRD process is executed using the relevant tooling discussed in
Section 2.2. The punch is shaped according to the customer’s specifications for the base of the part. The DRD process involves complex material flow and force distributions, with the key to successful operation being the ability to control the metal’s flow. Several factors influence the extent of stretch and flow during the metal forming process, including the mechanical properties of the metal, the geometry of the part being formed, friction, and processing conditions.
According to the simulation results, a significant factor in the DRD process is the blank holder radius. It is proposed to explore the blank holder lip (adding radius to the blank holder) as shown in
Figure 27. This exploration is expected to improve the material flow.
There are four scenarios, each defined by the blank holder radius at drawing and redrawing: (
R1,
R2). The scenarios are as follows: Case 1 is (1.5, 1.5). Case 2 is (2.0, 2.0). Case 3 is (2.0,1.5). And Case 4 is (1.5, 2.0). The design space and the waving value from four scenarios are shown in
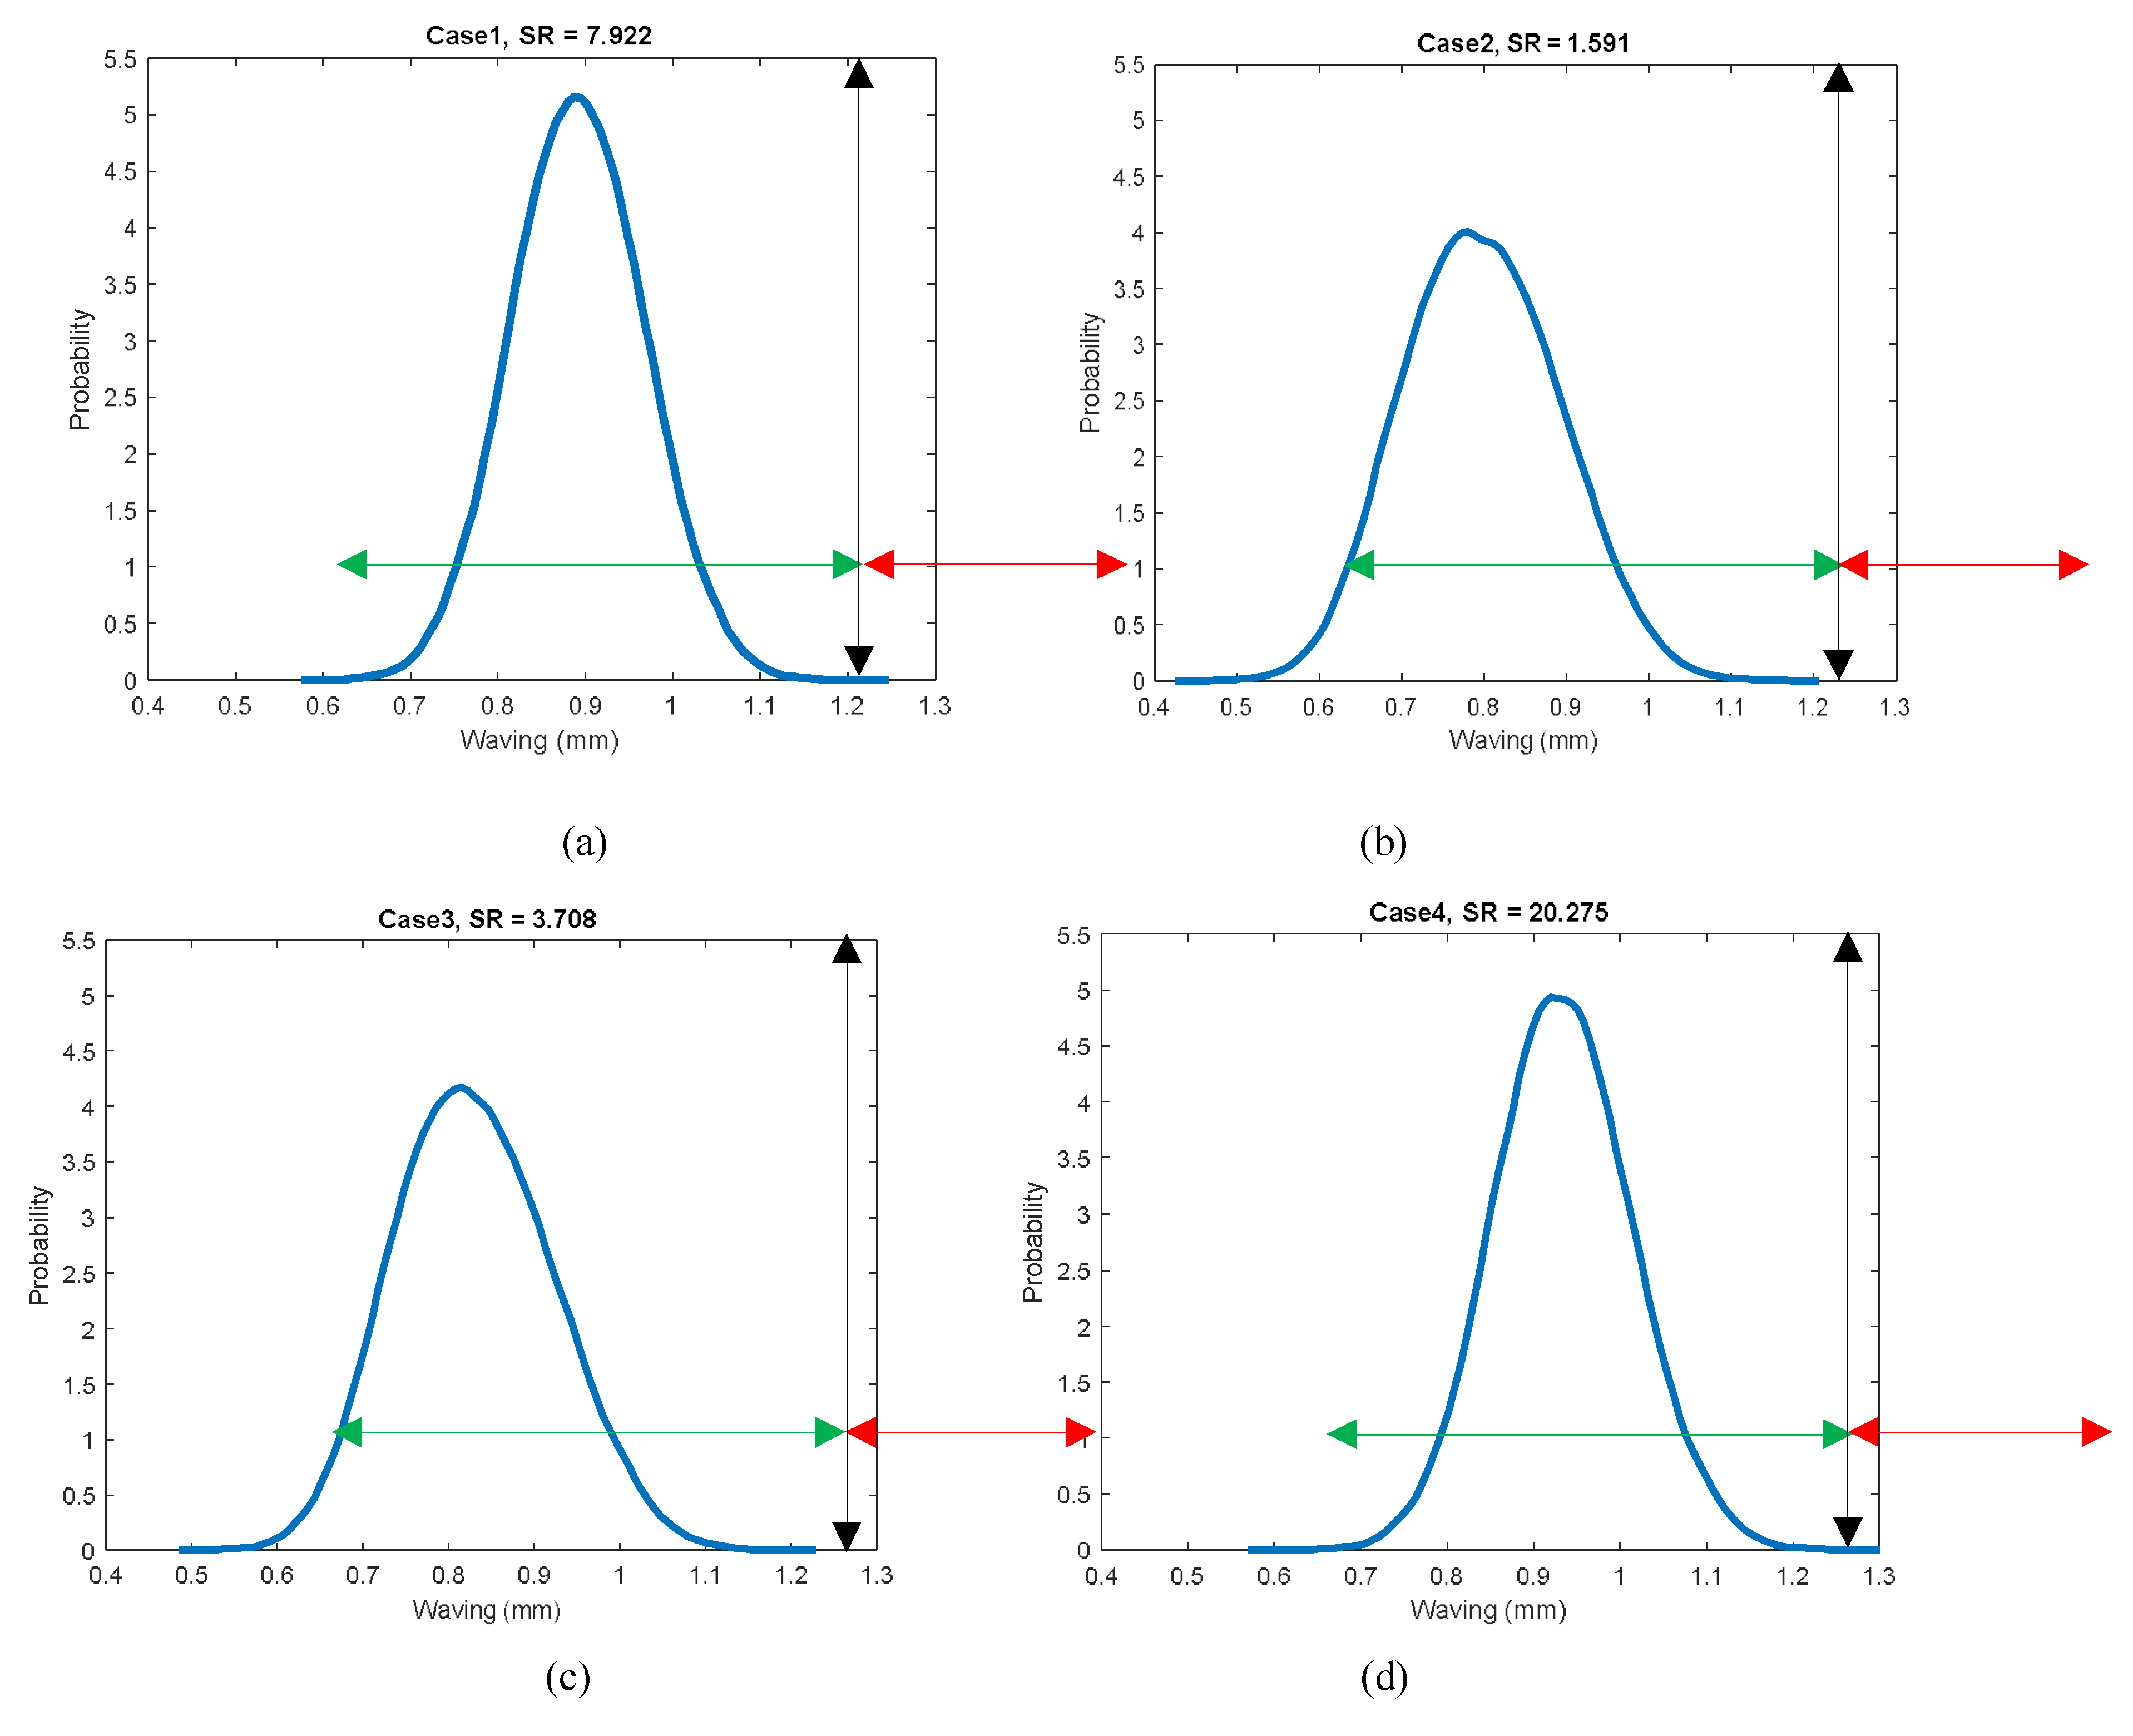
Table 3. These scenarios are evaluated using the uncertainty propagation method presented in the previous section. The results of interest are
SR and PDF of the waving, as shown in
Figure 28.
Uncertainty from these parameters affects SR. COF and BHF may vary due to process control, while the R-value, a material property, fluctuates during manufacturing. The R-value significantly impacts SR due to the nature of the waving. The shape of the PDF from these scenarios is somewhat normally distributed, assuming the inputs follow a normal distribution. The behavior of the input parameter variations depends on real system observations and process control capabilities.
The predicted
SR of 7.9% in Case 1 is similar to the 8.3% obtained in the original case without the compensation and rotation techniques presented in
Section 2.1. Case 2 offers the best scrap rate value, with an estimated
SR of 1.6%, although this is still higher than the industry-desirable rate of 0.25%. In real production, techniques such as compensation and rotation, mentioned in
Section 2.1, are useful for reducing graphical distortion. By analogy, similar improvements could reduce the predicted
SR from 1.6% to an even lower value. However, this study focuses on material flow during the forming process, and such graphical techniques do not impact this evaluation. Additionally, Case 3 may be preferable for industry since the final part shape remains unchanged.
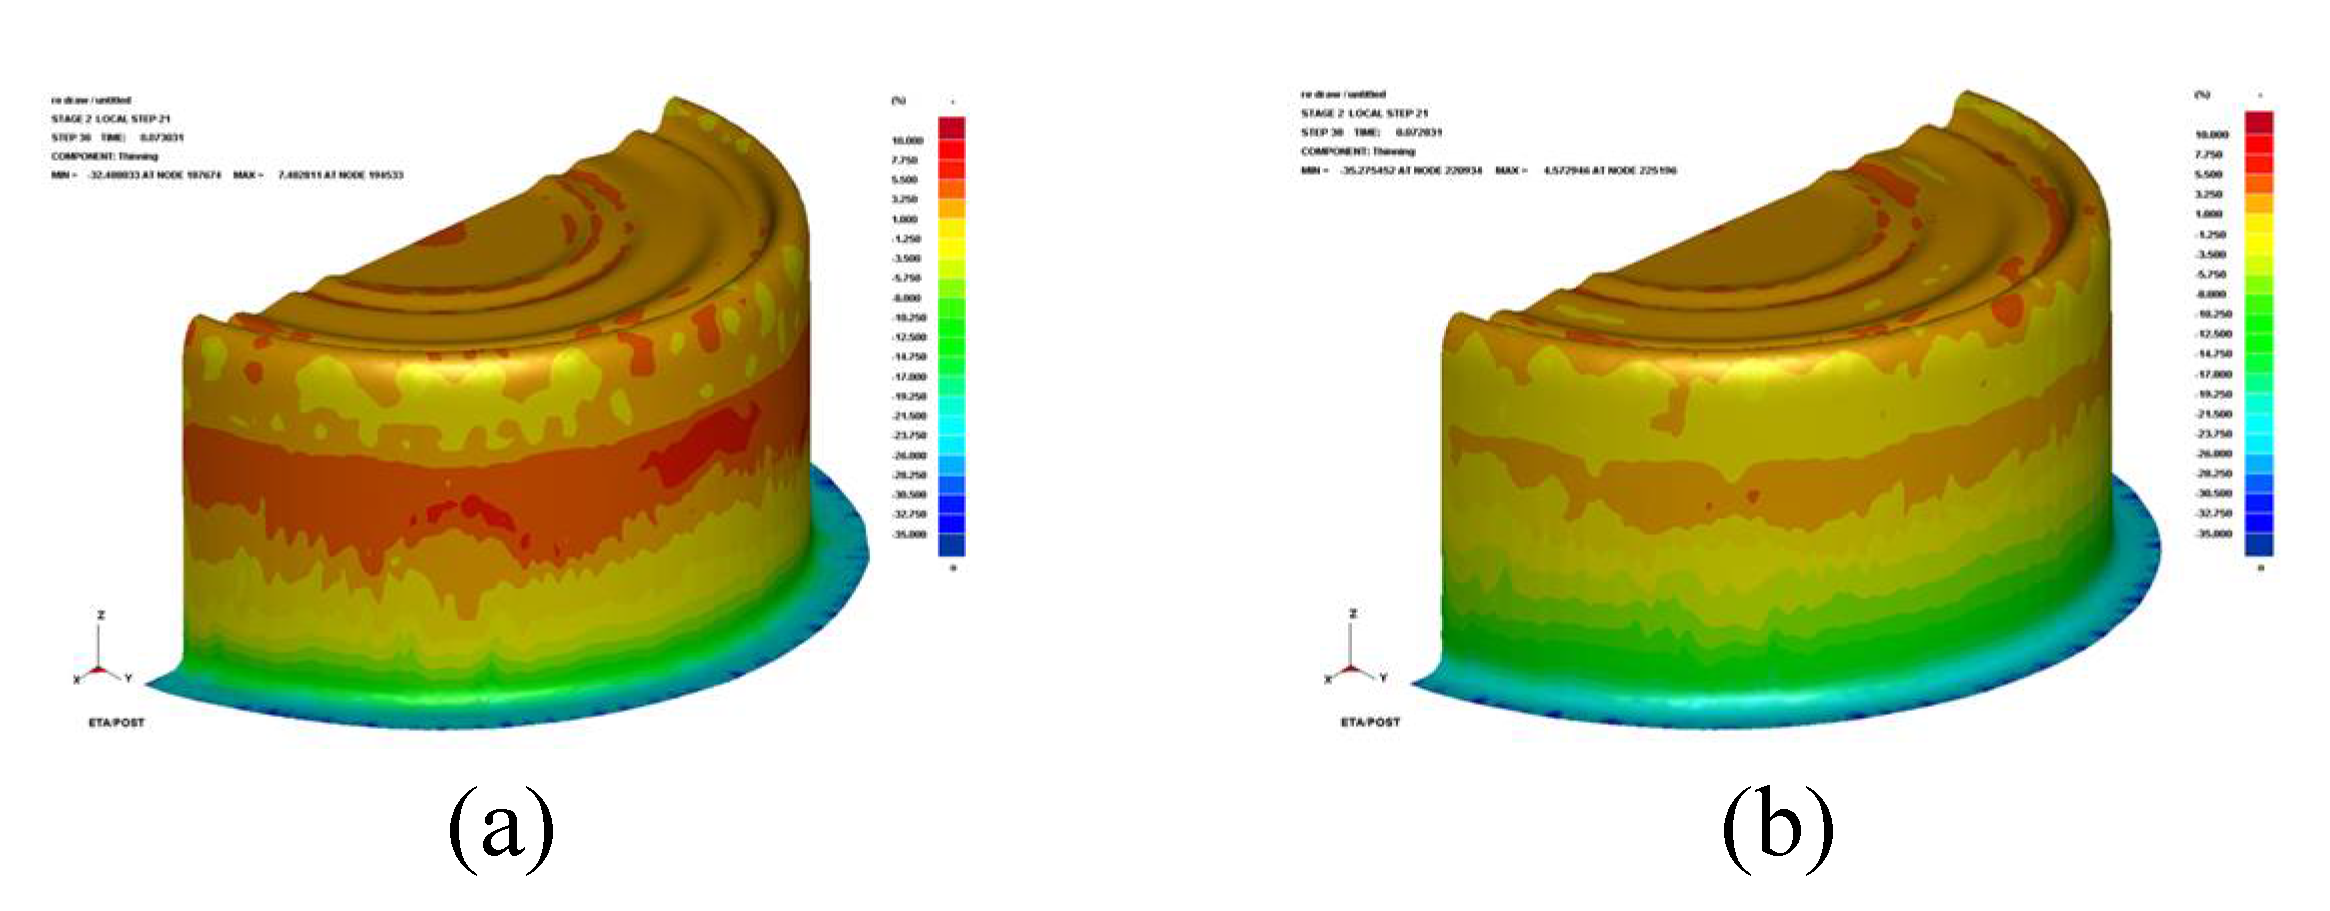
Figure 29 presents an FEA prediction based on the nominal values in Case 2. The improved thinning distribution, observed through reduced deformation and less thinning, indicates a positive impact. Future work could explore and implement further improvements to enhance
SR.
5. Conclusions
The industrial production of food cans has evolved from traditional labeling to premium cans with distortion printing, which have different quality requirements. In addition to traditional formability, waving is now a critical quality requirement. To save materials, modern food cans use stronger materials and a thinner sheet. This study utilizes a double cold-reduced (DR) low-carbon steel sheet and chromium-coated tin-free steel with a thickness of 0.16 mm. An FEA model is developed to simulate the forming process, and a material parameter identification method is proposed and illustrated, achieving a good agreement with real-world data. In response to real manufacturing processes, the scrap rate is the key performance index. This work presents an uncertainty propagation method to estimate the scrap rate in can forming under waving requirements, addressing both uncertain parameters and a large number of design variables. Scrap rate optimization is conducted, and several possible scenarios are proposed and evaluated using the uncertainty propagation method. The predicted results in the base case show a good agreement with observations from real production. Recommendations to improve the scrap rate are also proposed.
Author Contributions
Conceptualization, N.C. and P.T. methodology, N.C. and P.T.; validation, N.C. and P.T.; formal analysis, N.C. and P.T.; investigation, N.C. and P.T.; resources, N.C. and P.T.; data curation, N.C. and P.T.; writing—original draft preparation, N.C. and P.T.; writing—review and editing, N.C. and P.T.; visualization, N.C. and P.T.; supervision, P.T.; project administration, P.T.; funding acquisition, P.T. All authors have read and agreed to the published version of the manuscript.
Funding
The research leading to these results received funding from Thailand Science Research and Innovation (TSRI) under Fundamental Fund 2022
Institutional Review Board Statement
Not applicable
Informed Consent Statement
Not applicable.” for studies not involving humans. You might also choose to exclude this statement if the study did not involve humans. Written informed consent for publication must be obtained from participating patients who can be identified (including by the patients themselves). Please state “Written informed consent has been obtained from the patient(s) to publish this paper” if applicable.
Data Availability Statement
We encourage all authors of articles published in MDPI journals to share their research data. In this section, please provide details regarding where data supporting reported results can be found, including links to publicly archived datasets analyzed or generated during the study. Where no new data were created, or where data is unavailable due to privacy or ethical restrictions, a statement is still required. Suggested Data Availability Statements are available in section “MDPI Research Data Policies” at
https://www.mdpi.com/ethics.
Acknowledgments
In this section, you can acknowledge any support given which is not covered by the author contribution or funding sections. This may include administrative and technical support, or donations in kind (e.g., materials used for experiments).
Conflicts of Interest
The authors declare no conflicts of interest.
References
- Boz, Z.; Sand, CK. A systematic analysis of the overall nutritional contribution of food loss and waste in tomatoes, spinach, and kidney beans as a function of processing. J Food Process Eng 2020, 43, 11–12. [Google Scholar] [CrossRef]
- Andress, E. L.,; Harrison, J. A. So easy to preserve. 2006. 5th edition Cooperative Extension Service, The University of Georgia, Athens.
- Yoichiro, Y.; Hiroki, I.; Toyofumi, W. Development of Laminated Tin Free Steel (TFS) “UNIVERSAL BRITE®” Type F for Food Cans, JFE technical report 2007, 9, 49-53. https://www.jfe-steel.co.jp/en/research/report/009/pdf/009-11.pdf.
- Singh, S.; Agrawal, A.; Sharma, D.; Saini, V.; Kumar, A.; Praveenkumar, S. Implementation of Total Productive Maintenance Approach: Improving Overall Equipment Efficiency of a Metal Industry. Inventions 2022, 7, 119. [Google Scholar] [CrossRef]
- Browne, MT.; Hillery, MT. Optimising the variables when deep-drawing C. R.1 cups. J Mater Process Technol 2003, 136, 64–71. [Google Scholar] [CrossRef]
-
Antonio, CAC; Dourado, NM. Metal-forming process optimisation by inverse evolutionary search. J Master Process Technol 2002, 121, 403–413. [CrossRef]
- Wei, DL.; Cui, ZS.; Chen, J. Optimization and tolerance prediction of sheet metal forming process using response surface model. Comput Mater Sci 2008, 42, 228–233. [Google Scholar] [CrossRef]
- Barros, PD.; Alves, JL.; Oliveira, MC.; Menezes, LF. Study on the effect of tension-compression asymmetry on the cylindrical cup forming of an AA2090-T3 alloy. Int J Solids Struct 2018, 151, 135–144. [Google Scholar] [CrossRef]
- Coppieters, S.; Traphoner, H.; Stiebert, F.; Balan, T.; Kuwabara, T.; Tekkaya, A.E. Large strain flow curve identification for sheet metal. J. Mater. Process. Technol 2022, 308, 117725. [Google Scholar] [CrossRef]
- Jiaa, Q.; Song, X.; Jic, M.; Chaia, H.; Lua, S. Isogeometric algorithm for one-step inverse forming of sheet metal. Comput Methods Appl Mech Engrg 2023, 404, 115778. [Google Scholar] [CrossRef]
- Kleiber, M.; Knabel, J.; Rojek, J. (2004) Response surface method for probabilistic assessment metal forming failures. Int J Numer Methods Eng 2004, 60, 51–67. [Google Scholar] [CrossRef]
- Jansson, T.; Nilsson, L.; Moshfegh, R. Reliability analysis of a sheet metal forming process using Monte Carlo analysis and metamodels. J Mater Process Technol 2008, 202, 255–268. [Google Scholar] [CrossRef]
- Ou, H.; Wang, P.; Lu, B.; Long, H. Finite element modelling and optimisation of net-shape metal forming processes with uncertainties. Comput Struct 2012, 90-91, 13-27. [CrossRef]
- Arnst, M.; Ponthot, J.P.; Boman, R. Comparison of stochastic and interval methods for uncertainty quantification of metal forming processes. C. R. Mecanique 2018, 346, 634–646. [Google Scholar] [CrossRef]
- Huang, C.; Radi, B.; Hami, AE. Uncertainty analysis of deep drawing using surrogate model based probabilistic method. Int J Adv Manuf Technol 2016, 86, 3229–3240. [Google Scholar] [CrossRef]
- Galetto, M.; Verna, E.; Genta, G.; Franceschini, F. Uncertainty evaluation in the prediction of defects and costs for quality inspection planning in low-volume productions. Int J Adv Manuf Technol 2020, 108, 3793–3805. [Google Scholar] [CrossRef]
- Silva, A.F.; Marins, FAS; Oliveira, JBS.; Dias, EX. Multi-objective optimization and finite element method combined with optimization via Monte Carlo simulation in a stamping process under uncertainty. Int J Adv Manuf Technol. 2021; 117, 305–327. [CrossRef]
- Chang, DF.; Wang, JE. (1998) Analysis of draw-redraw processes. Int J Mech Sci 1998, 40, 793–804. [Google Scholar] [CrossRef]
- Alex Chirokov (2022). Scattered Data Interpolation and Approximation using Radial Base Functions (https://www.mathworks.com/matlabcentral/fileexchange/10056-scattered-data-interpolation-and-approximation-using-radial-base-functions), MATLAB Central File Exchange. Retrieved March 28, 2022.
Figure 1.
Food can labels (a) paper labeling; (b) distortion printing.
Figure 1.
Food can labels (a) paper labeling; (b) distortion printing.
Figure 2.
Waving defects in food can production: (a) Accepted; (b) Rejected.
Figure 2.
Waving defects in food can production: (a) Accepted; (b) Rejected.
Figure 3.
Guideline for design of distortion printing.
Figure 3.
Guideline for design of distortion printing.
Figure 4.
Design process of distortion printing: (a) Flat sheet; (b) Drawing; (c) Redrawing; (d) Layout of grid adjustment by rotation; (e) Layout of grid adjustment by compensation.
Figure 4.
Design process of distortion printing: (a) Flat sheet; (b) Drawing; (c) Redrawing; (d) Layout of grid adjustment by rotation; (e) Layout of grid adjustment by compensation.
Figure 5.
DRD process: (a) Blanking; (b) Drawing; (c) Redrawing; (d) Trimming; (e) Drawing tooling; (f) Redrawing tooling; (g) Real production setup.
Figure 5.
DRD process: (a) Blanking; (b) Drawing; (c) Redrawing; (d) Trimming; (e) Drawing tooling; (f) Redrawing tooling; (g) Real production setup.
Figure 6.
Friction tester: (a) Setup; ( b) Force gauge; (c) Weight 2.157 kg.
Figure 6.
Friction tester: (a) Setup; ( b) Force gauge; (c) Weight 2.157 kg.
Figure 7.
DRD simulation via FEA: (a) Drawing; (b) Redrawing.
Figure 7.
DRD simulation via FEA: (a) Drawing; (b) Redrawing.
Figure 8.
Definition of waving.
Figure 8.
Definition of waving.
Figure 9.
Selected nodes used to define waving value.
Figure 9.
Selected nodes used to define waving value.
Figure 10.
Nodes used to define the waving value (Z1, Z2 and △Z).
Figure 10.
Nodes used to define the waving value (Z1, Z2 and △Z).
Figure 11.
Earing and Flange length from different materials: (a) SULC; (b) Al-Killed.
Figure 11.
Earing and Flange length from different materials: (a) SULC; (b) Al-Killed.
Figure 12.
Samples after tensile tests for 3 directions from 3 labs.
Figure 12.
Samples after tensile tests for 3 directions from 3 labs.
Figure 13.
Thickness measurement locations on the side-wall.
Figure 13.
Thickness measurement locations on the side-wall.
Figure 14.
Thickness measurement: (a) Molded specimens; ( b) 250x image; (c) digital microscope.
Figure 14.
Thickness measurement: (a) Molded specimens; ( b) 250x image; (c) digital microscope.
Figure 15.
DIC measurement: (a) Setup; ( b) Grid configuration; (c) Flat sheet; (d) Drawing; (e) Redrawing.
Figure 15.
DIC measurement: (a) Setup; ( b) Grid configuration; (c) Flat sheet; (d) Drawing; (e) Redrawing.
Figure 16.
Strain distribution from DIC: (a) Major strain after drawing; (b) Minor strain after drawing; (c) Major strain after redrawing; (d) Minor strain after redrawing.
Figure 16.
Strain distribution from DIC: (a) Major strain after drawing; (b) Minor strain after drawing; (c) Major strain after redrawing; (d) Minor strain after redrawing.
Figure 17.
Comparison of microscope and DIC measurement.
Figure 17.
Comparison of microscope and DIC measurement.
Figure 18.
SSE average thickness as a function of .
Figure 18.
SSE average thickness as a function of .
Figure 19.
Comparison of averaged thickness distribution from Experiment and FEA.
Figure 19.
Comparison of averaged thickness distribution from Experiment and FEA.
Figure 20.
Flange length measurement locations: (a) SULC; ( b) Al-killed.
Figure 20.
Flange length measurement locations: (a) SULC; ( b) Al-killed.
Figure 21.
Averaged flange length from SULC and Al-Killed.
Figure 21.
Averaged flange length from SULC and Al-Killed.
Figure 22.
Comparison of flange length distribution between waving grade G1 to G4.
Figure 22.
Comparison of flange length distribution between waving grade G1 to G4.
Figure 23.
Flange length distribution from Waving G4 and FEA (Difference of △R).
Figure 23.
Flange length distribution from Waving G4 and FEA (Difference of △R).
Figure 24.
Flange length distribution from Waving G4 and FEA (Difference of COF).
Figure 24.
Flange length distribution from Waving G4 and FEA (Difference of COF).
Figure 25.
Flange length distribution from Waving G4 and FEA (Difference of BHF).
Figure 25.
Flange length distribution from Waving G4 and FEA (Difference of BHF).
Figure 26.
Workflow of the proposed method for scrap rate optimization.
Figure 26.
Workflow of the proposed method for scrap rate optimization.
Figure 27.
Tooling modification at blank holder radius: (a) drawing; (b) redrawing.
Figure 27.
Tooling modification at blank holder radius: (a) drawing; (b) redrawing.
Figure 28.
scrap rate: (a) Case 1; (b) Case 2; (c) Case 3; (d) Case 4.
Figure 28.
scrap rate: (a) Case 1; (b) Case 2; (c) Case 3; (d) Case 4.
Figure 29.
Nominal thinning prediction: (a) before modification; (b) after modification.
Figure 29.
Nominal thinning prediction: (a) before modification; (b) after modification.
Table 1.
Mechanical properties of Al-killed steel and SULC steel (from Lab3).
Table 1.
Mechanical properties of Al-killed steel and SULC steel (from Lab3).
Description |
Al-Killed steel
(Lacquering) |
SULC steel
(Distortion printing) |
| RD |
DD |
TD |
RD |
DD |
TD |
| 1. Yield point (MPa) |
626 |
642 |
672 |
613 |
626 |
662 |
| 2. Tensile strength (MPa) |
626 |
654 |
698 |
614 |
640 |
677 |
| 3. R value |
0.09 |
0.15 |
0.08 |
0.10 |
0.13 |
0.15 |
| 4. Elongation (%) |
1.0 |
2.0 |
2.2 |
1.9 |
1.8 |
1.9 |
Table 2.
Mechanical properties of SULC obtained from 3 laboratories.
Table 2.
Mechanical properties of SULC obtained from 3 laboratories.
| Description |
Averaged results |
| Lab1 |
Lab2 |
Lab3 |
| RD |
DD |
TD |
RD |
DD |
TD |
RD |
DD |
TD |
| 1. Yield point (MPa) |
448 |
423 |
427 |
500 |
519 |
539 |
613 |
626 |
662 |
| 2. Tensile strength (MPa) |
468 |
440 |
434 |
517 |
534 |
567 |
614 |
640 |
677 |
| 3. R value |
.15 |
.10 |
.17 |
.40 |
.54 |
.60 |
.10 |
.13 |
.15 |
| 4. Elongation (%) |
n/a |
n/a |
n/a |
n/a |
n/a |
n/a |
1.9 |
1.8 |
1.9 |
Table 3.
The design space and corresponding waving value.
Table 3.
The design space and corresponding waving value.
| # |
COF |
BHF |
r00 |
r45 |
r90 |
case1 |
case2 |
case3 |
case4 |
| 1 |
0.044 |
21736 |
0.482 |
0.482 |
0.458 |
0.558 |
0.436 |
0.475 |
0.595 |
| 2 |
0.043 |
16136 |
0.472 |
0.538 |
0.452 |
1.220 |
1.126 |
1.157 |
1.250 |
| 3 |
0.011 |
18536 |
0.475 |
0.508 |
0.508 |
0.544 |
0.431 |
0.502 |
0.565 |
| 4 |
0.049 |
16936 |
0.485 |
0.485 |
0.535 |
0.398 |
0.315 |
0.374 |
0.407 |
| 5 |
0.031 |
17464 |
0.458 |
0.458 |
0.545 |
0.490 |
0.418 |
0.439 |
0.509 |
| 6 |
0.018 |
23064 |
0.452 |
0.452 |
0.468 |
0.305 |
0.231 |
0.273 |
0.360 |
| 7 |
0.021 |
22000 |
0.488 |
0.498 |
0.515 |
0.397 |
0.286 |
0.309 |
0.402 |
| 8 |
0.024 |
18800 |
0.402 |
0.548 |
0.502 |
1.504 |
1.395 |
1.435 |
1.530 |
| 9 |
0.053 |
23336 |
0.455 |
0.545 |
0.455 |
1.292 |
1.224 |
1.252 |
1.348 |
| 10 |
0.056 |
16400 |
0.452 |
0.528 |
0.492 |
0.976 |
0.834 |
0.895 |
1.067 |
| 11 |
0.028 |
19064 |
0.465 |
0.465 |
0.475 |
0.377 |
0.239 |
0.292 |
0.411 |
| 12 |
0.054 |
19864 |
0.418 |
0.525 |
0.532 |
1.000 |
0.809 |
0.889 |
1.059 |
| 13 |
0.059 |
22536 |
0.472 |
0.472 |
0.488 |
0.497 |
0.423 |
0.433 |
0.517 |
| 14 |
0.023 |
23600 |
0.425 |
0.535 |
0.505 |
1.300 |
1.215 |
1.257 |
1.395 |
| 15 |
0.046 |
17200 |
0.455 |
0.455 |
0.478 |
0.550 |
0.415 |
0.454 |
0.600 |
| 16 |
0.013 |
20400 |
0.445 |
0.518 |
0.518 |
0.841 |
0.724 |
0.753 |
0.939 |
| 17 |
0.016 |
19600 |
0.432 |
0.542 |
0.485 |
1.226 |
1.150 |
1.211 |
1.329 |
| 18 |
0.041 |
21464 |
0.415 |
0.532 |
0.522 |
1.063 |
0.955 |
0.994 |
1.116 |
| 19 |
0.038 |
22264 |
0.488 |
0.488 |
0.525 |
0.370 |
0.312 |
0.343 |
0.397 |
| 20 |
0.058 |
22800 |
0.462 |
0.505 |
0.528 |
0.710 |
0.650 |
0.665 |
0.745 |
| 21 |
0.029 |
18264 |
0.472 |
0.515 |
0.498 |
0.685 |
0.573 |
0.592 |
0.724 |
| 22 |
0.014 |
21200 |
0.468 |
0.468 |
0.465 |
0.340 |
0.281 |
0.338 |
0.381 |
| 23 |
0.048 |
20936 |
0.492 |
0.492 |
0.482 |
0.539 |
0.421 |
0.455 |
0.557 |
| 24 |
0.051 |
18000 |
0.468 |
0.495 |
0.542 |
0.530 |
0.433 |
0.475 |
0.566 |
| 25 |
0.039 |
16664 |
0.462 |
0.462 |
0.472 |
0.422 |
0.321 |
0.340 |
0.465 |
| 26 |
0.033 |
20664 |
0.418 |
0.522 |
0.538 |
1.011 |
0.825 |
0.851 |
1.023 |
| 27 |
0.036 |
23864 |
0.475 |
0.475 |
0.512 |
0.421 |
0.352 |
0.392 |
0.425 |
| 28 |
0.026 |
19336 |
0.478 |
0.478 |
0.548 |
0.424 |
0.354 |
0.387 |
0.427 |
| 29 |
0.034 |
20136 |
0.512 |
0.512 |
0.462 |
0.580 |
0.524 |
0.552 |
0.600 |
| 30 |
0.019 |
17736 |
0.502 |
0.502 |
0.495 |
0.386 |
0.307 |
0.325 |
0.397 |
| 31 |
0.046 |
18904 |
0.511 |
0.514 |
0.461 |
0.698 |
0.609 |
0.656 |
0.752 |
| 32 |
0.036 |
17104 |
0.456 |
0.456 |
0.529 |
0.392 |
0.365 |
0.379 |
0.412 |
| 33 |
0.057 |
22104 |
0.491 |
0.511 |
0.486 |
0.657 |
0.582 |
0.611 |
0.711 |
| 34 |
0.054 |
21904 |
0.499 |
0.499 |
0.476 |
0.582 |
0.552 |
0.569 |
0.684 |
| 35 |
0.023 |
23504 |
0.486 |
0.489 |
0.536 |
0.330 |
0.297 |
0.314 |
0.340 |
| 36 |
0.029 |
21104 |
0.406 |
0.531 |
0.531 |
1.150 |
1.066 |
1.080 |
1.208 |
| 37 |
0.031 |
22704 |
0.446 |
0.526 |
0.501 |
0.970 |
0.836 |
0.850 |
1.010 |
| 38 |
0.037 |
17504 |
0.479 |
0.479 |
0.479 |
0.477 |
0.298 |
0.347 |
0.492 |
| 39 |
0.019 |
21304 |
0.401 |
0.529 |
0.541 |
1.244 |
1.128 |
1.174 |
1.311 |
| 40 |
0.041 |
16704 |
0.496 |
0.496 |
0.491 |
0.481 |
0.354 |
0.411 |
0.512 |
|
Disclaimer/Publisher’s Note: The statements, opinions and data contained in all publications are solely those of the individual author(s) and contributor(s) and not of MDPI and/or the editor(s). MDPI and/or the editor(s) disclaim responsibility for any injury to people or property resulting from any ideas, methods, instructions or products referred to in the content. |
© 2024 by the authors. Licensee MDPI, Basel, Switzerland. This article is an open access article distributed under the terms and conditions of the Creative Commons Attribution (CC BY) license (http://creativecommons.org/licenses/by/4.0/).


