1. Introduction
Accurately measuring the elastic modulus is vitally important for understanding material properties and engineering design [
1]. Structural ceramics have high melting points, chemical stability, and mechanical strength. They are often used in high-temperature, corrosive environments and under substantial mechanical loads. Therefore, it is important to accurately measure the elastic modulus at high temperatures. The flexural resonance method [
2,
3,
4,
5] has been used to measure the elastic modulus up to 1600°C. Based on the specific cross-section dimensions of the bar sample, elastic modulus can be determined by the flexural and longitudinal mechanical resonance frequencies [
6]. However, the resonance method is conducted on bulk or large-scale samples. Therefore, it can’t be used to measure the local elastic moduli of heterogeneous materials or composite materials with a non-uniform structure. To study the elastic modulus at selective locations of a product, researchers developed several microscale mechanical testing methods, including nanoindentation [
7,
8,
9], bulge test [
10], and in-situ TEM/SEM micropillar compression test [
11,
12]. The challenges associated with these methods are sample preparation, handling, the application of small forces, stress and strain measurement, and conducting tests at elevated temperatures [
13]. In terms of length scale, there is a gap between the bulk scale samples and the nano/micro samples. Thus, in this paper, we aim to demonstrate a straightforward method to characterize the high-temperature, flexural elastic modulus of ceramics at selected locations for miniature samples ~ millimeter scale.
The relationship between the elastic modulus and temperature is rather complicated. It involves changes in the binding energy due to temperatures and the volume change [
14]. At very low temperatures, it is observed that the elastic constant changes with T
4 [
15]. At high temperatures, a linear relationship is observed for elastic modulus for refractory oxides, including MgO, Al
2O
3, MgSiN
2, Si
3N
4, and AlN [
16,
17,
18,
19]. The data can be fit to an empirical relationship proposed by Wachtman [
18]:
where
E0 is the elastic modulus at 0
K;
E is the elastic modulus at elevated temperature
T;
B and
T0 are both fitting parameters. For
T ≫
T0,
E ≈ E0 - B(T - T0), showing a linear relationship [
3]. However, above a critical temperature, elastic modulus for some ceramics has been found to decrease sharply with temperature due to grain-boundary sliding and internal friction [
6,
9].
2. Flexural Test for Measuring Elastic Modulus
Although it is possible to measure high-quality modulus data of metallic materials from the tensile test focusing on the low-strain part of the stress-strain curve [
20], it is generally not feasible to use the same method to achieve an accurate measurement for ceramic materials due to their brittleness, difficulty in making tensile samples and griping them on testing machines. Instead, elastic modulus, for ceramics, is generally measured using the flexural test (static methods) or dynamic methods (sound velocity). Compared with tensile tests, flexural testing in three or four-point bending is able to achieve much larger displacement with smaller forces [
21,
22].
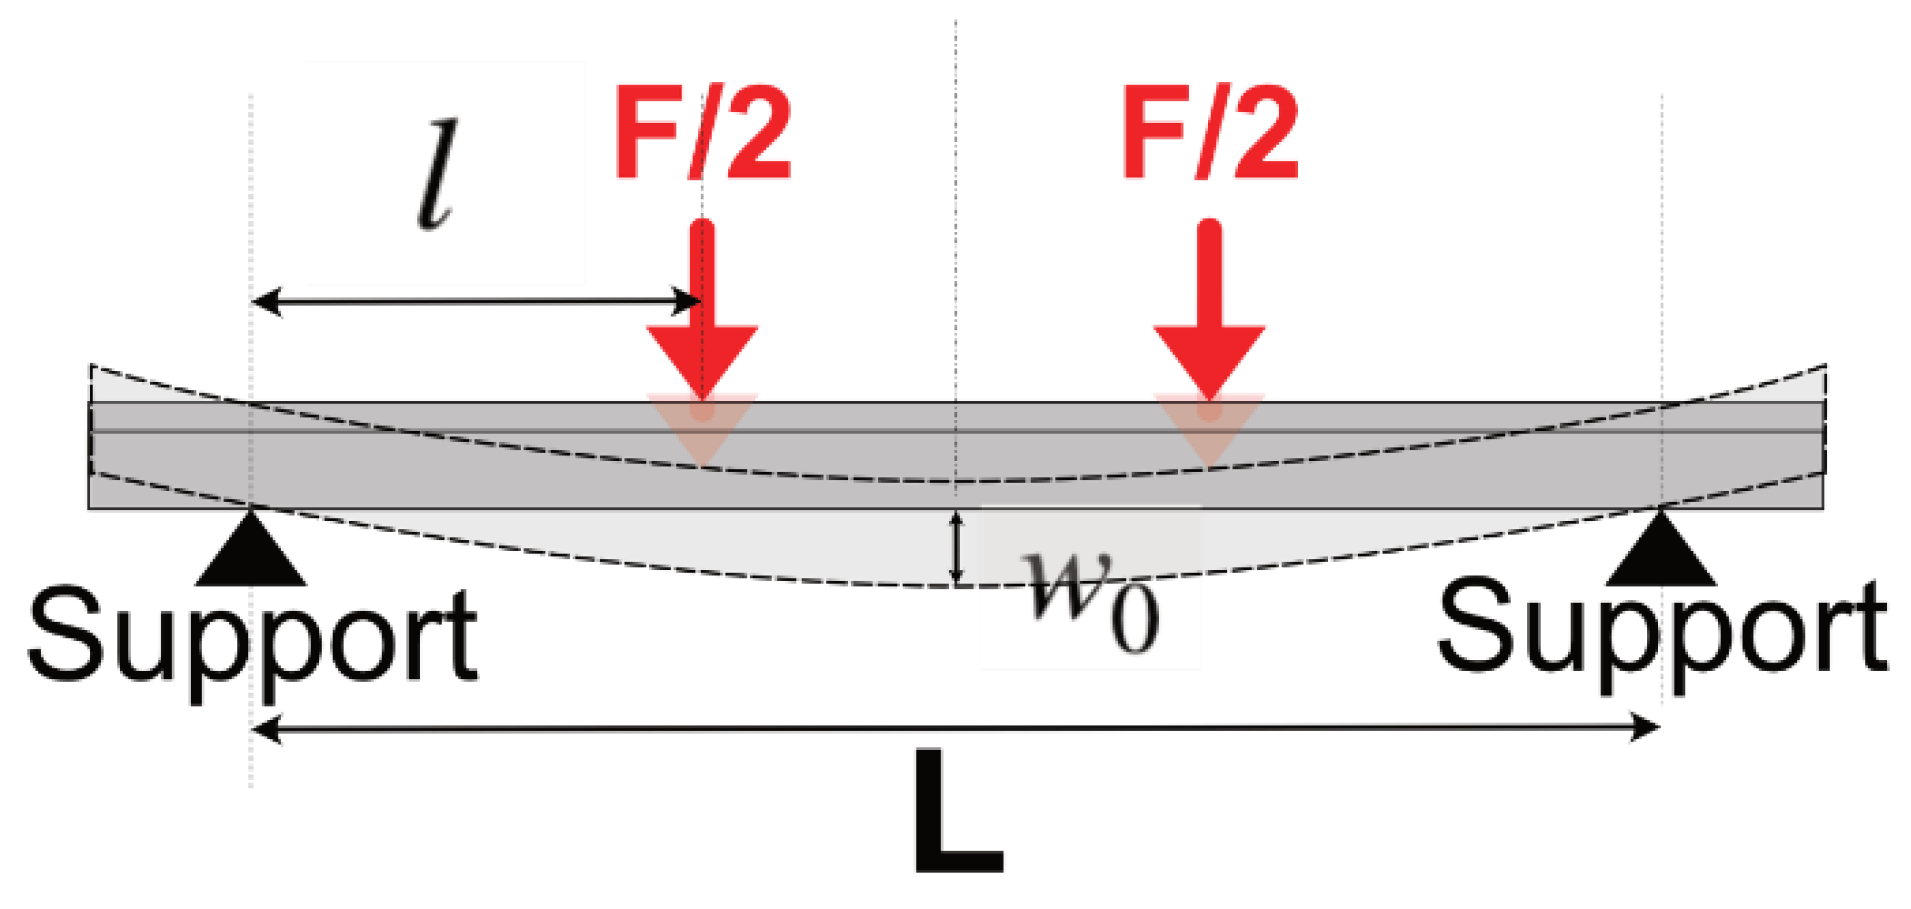
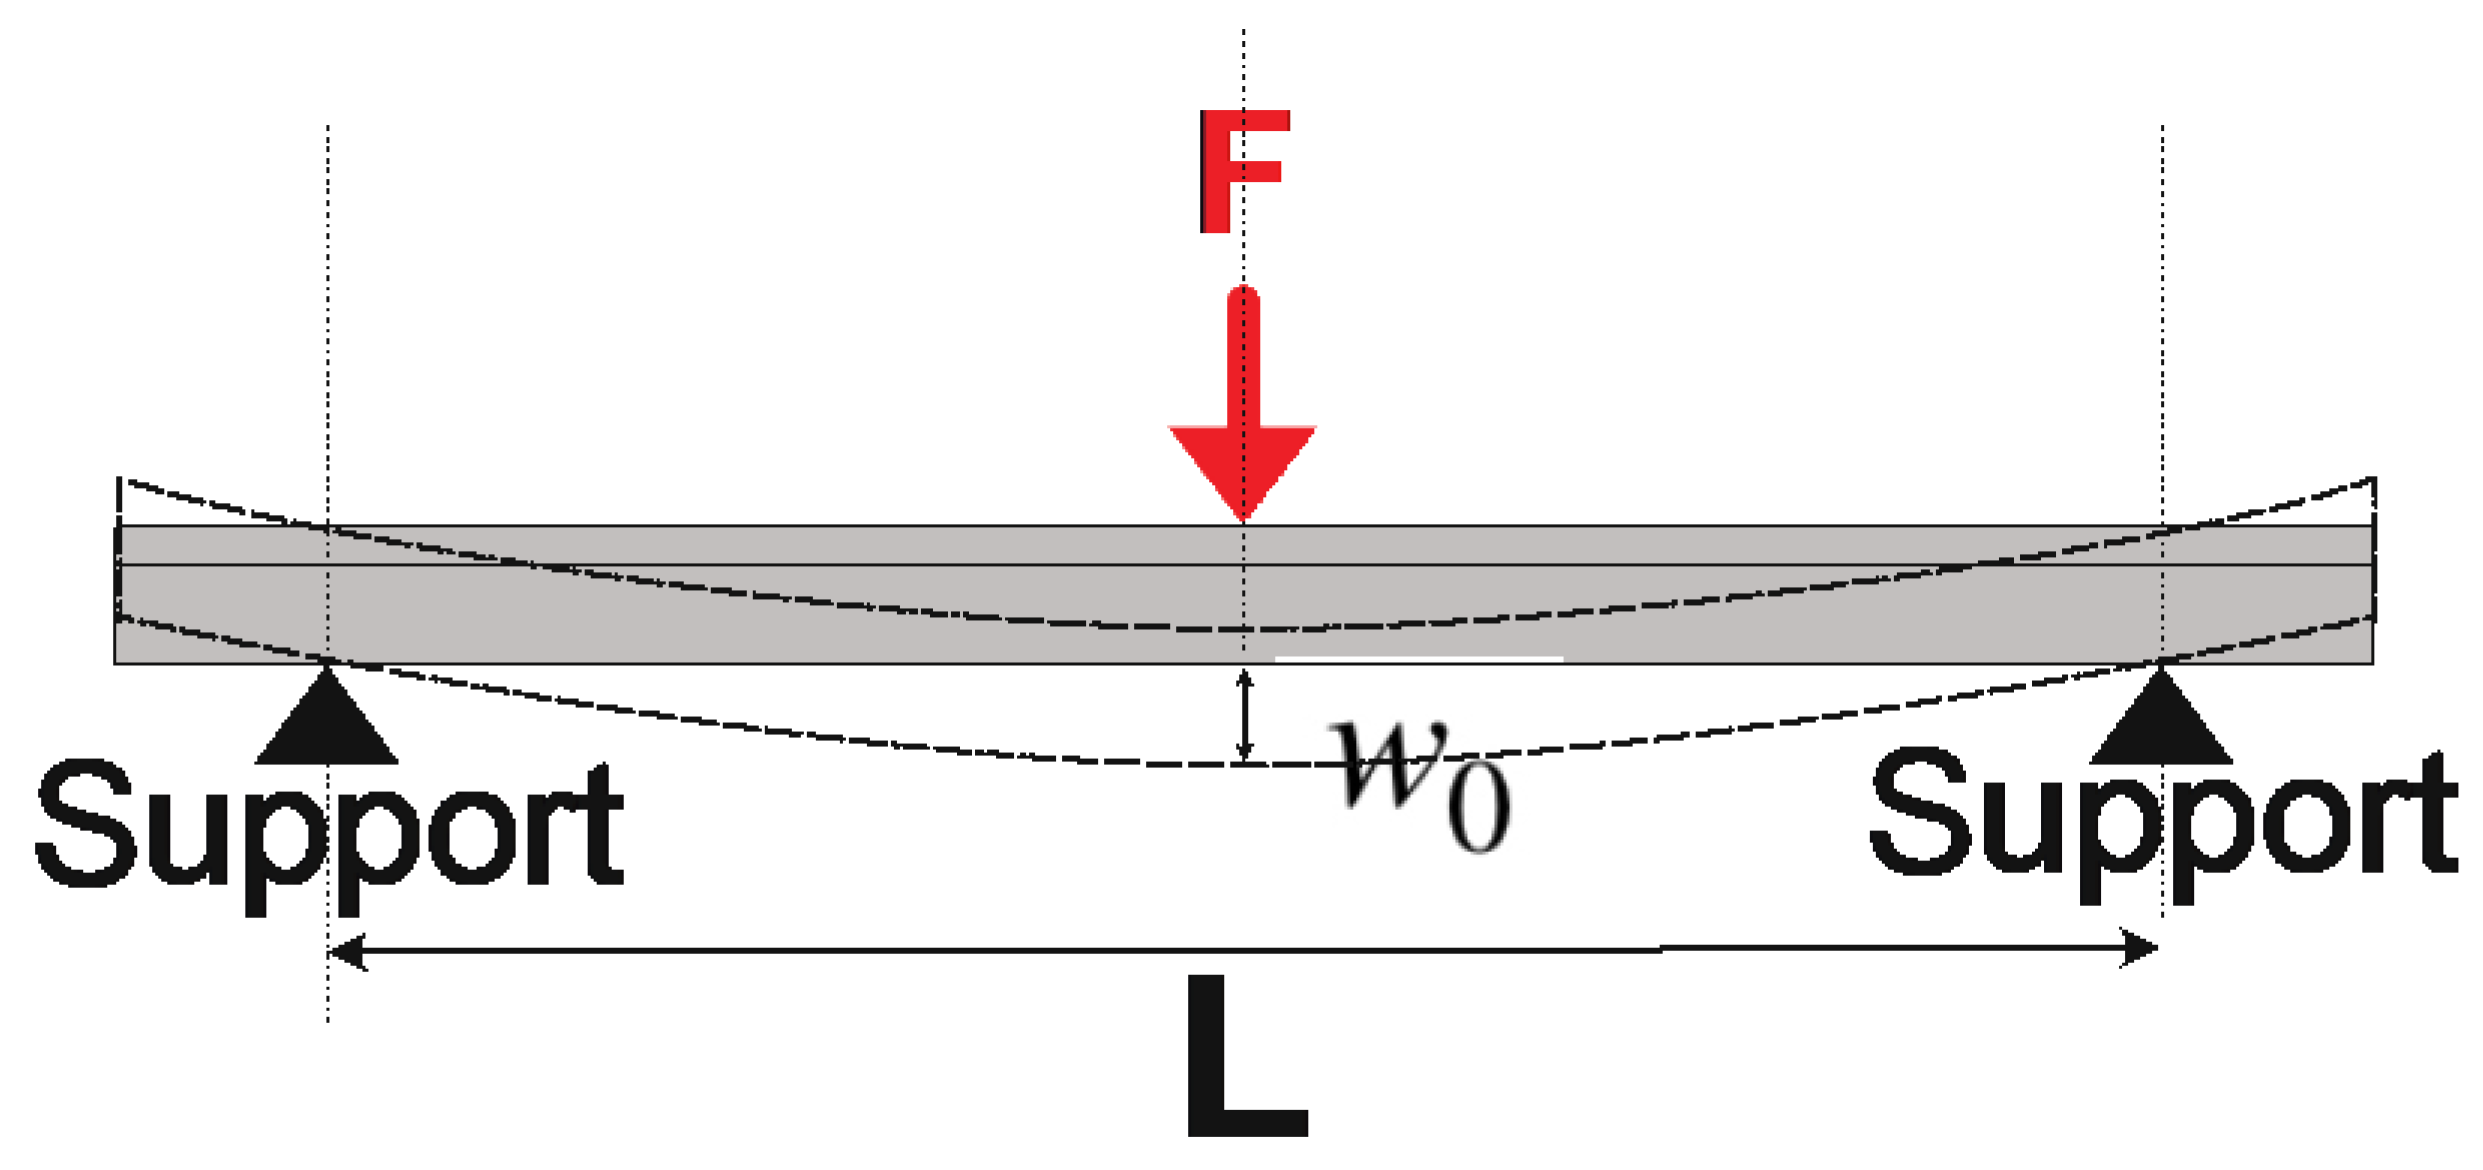
In a four-point flexural test (
Figure 1), the deflection w0 in the center of the beam is given by [
23]:
where
F/2 is the force applied symmetrically at two locations of the test beam;
L is the distance between two outer supports;
l is the distance between the inner loading point and the outer support; and
I is the geometrical moment of inertia of the beam’s cross-section.
With the dimensions of the sample and test set-up, the elastic modulus of the test sample can then be calculated as [
23]:
In this paper, we describe a method to measure the elastic modulus of miniature ceramic samples. The test is based on a four-point flexural test, uses a thermal-mechanical analyzer (TMA, Seko TMA SS6000), and laser machining to make miniature samples from bulk samples. Using the picosecond laser, ceramics can be cut into microbeams with cross-sectional dimensions in the range of ~100 μm. Due to the small dimensions TMA, with relatively low load capability, can be used to perform the flexural test at high temperatures. This process allows the measurement of elastic modulus for miniature samples and also the local modulus of samples extracted from a large part, in which the structural variations are in the range of the sample size. It therefore bridges a relevant length scale – between bulk samples and local measurements at the scale probed by nanoindentation.
3. Experimental Procedure
3.1. Experimental Set-up
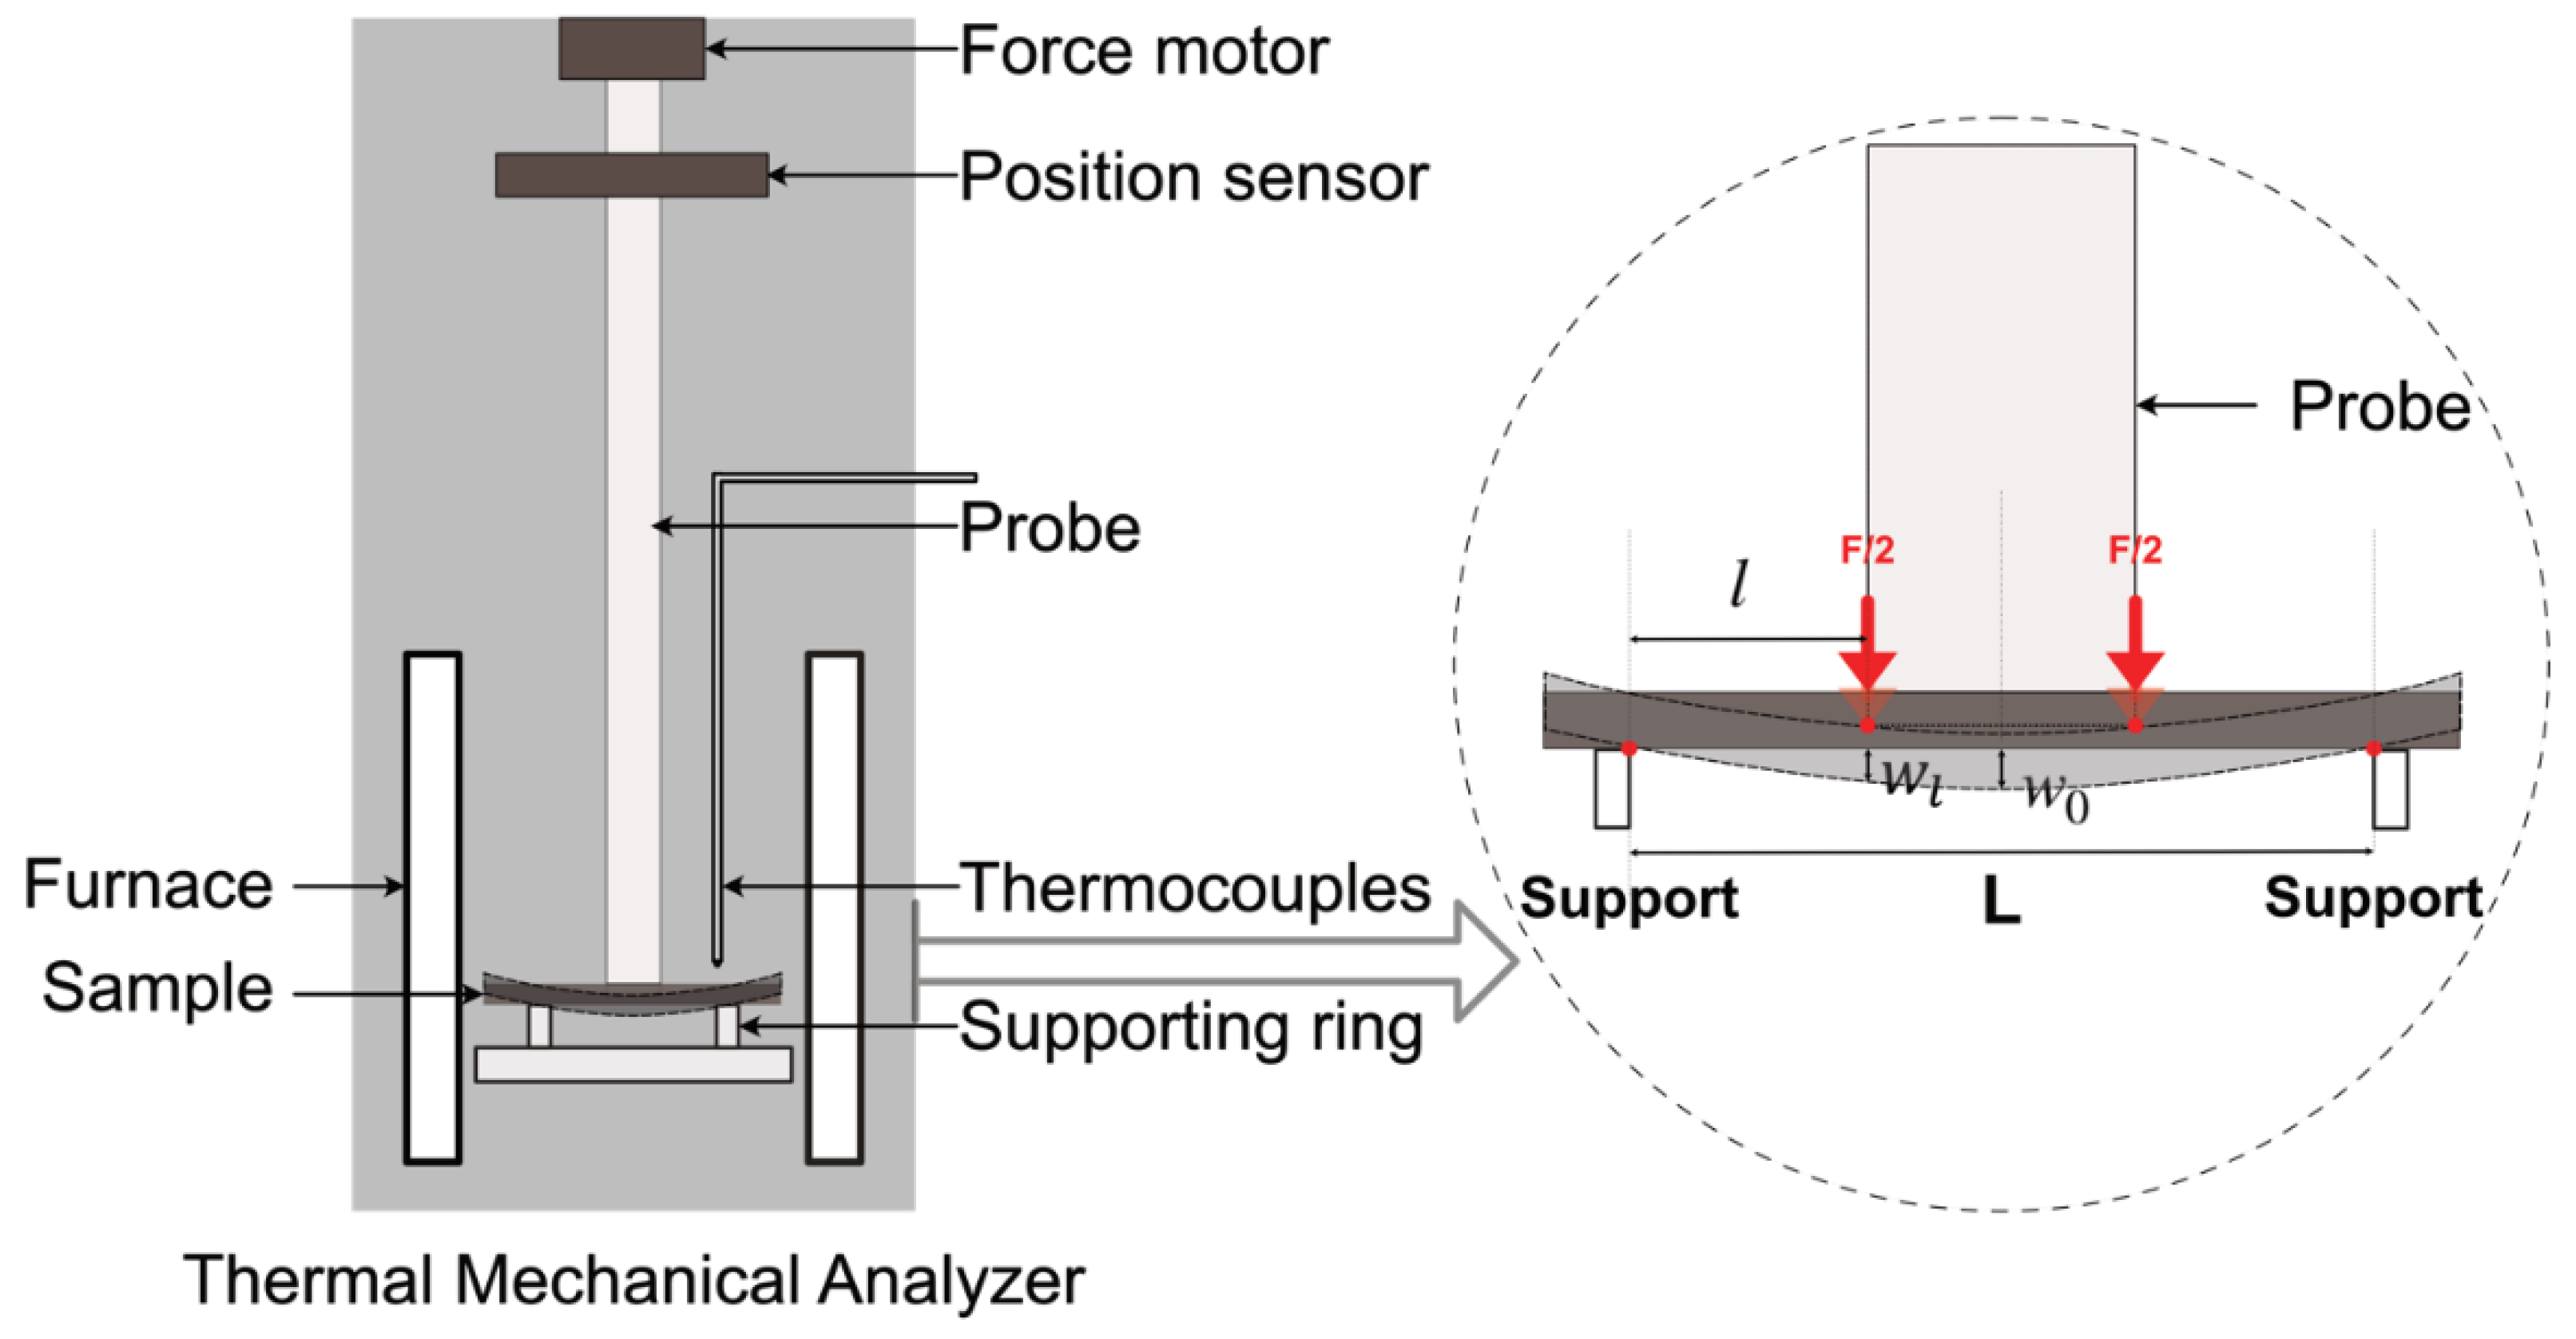
The experimental set-up is shown in
Figure 2. The key factor in obtaining the elastic modulus successfully was the location of the microbeam in the center of the furnace and the placement of the probe symmetrically in the center of the microbeam. The supporting ring is made of high purity alumina with an inner diameter of
L = 8.8 mm. The diameter of the loading probe is 3.4 mm.
High purity alumina (>99.6%, MTI Cooperation, Richmond, CA) substrates with dimensions of 2" × 2" × 0.5 mm were purchased. The grain size and surface roughness were reported to be less than 1 µm and 25 nm, respectively. High purity aluminum nitride substrate with dimensions of 1" × 1" × 0.5 mm (>99%, MTI Cooperation, Richmond, CA). The surface roughness was reported to be less than 10 nm.
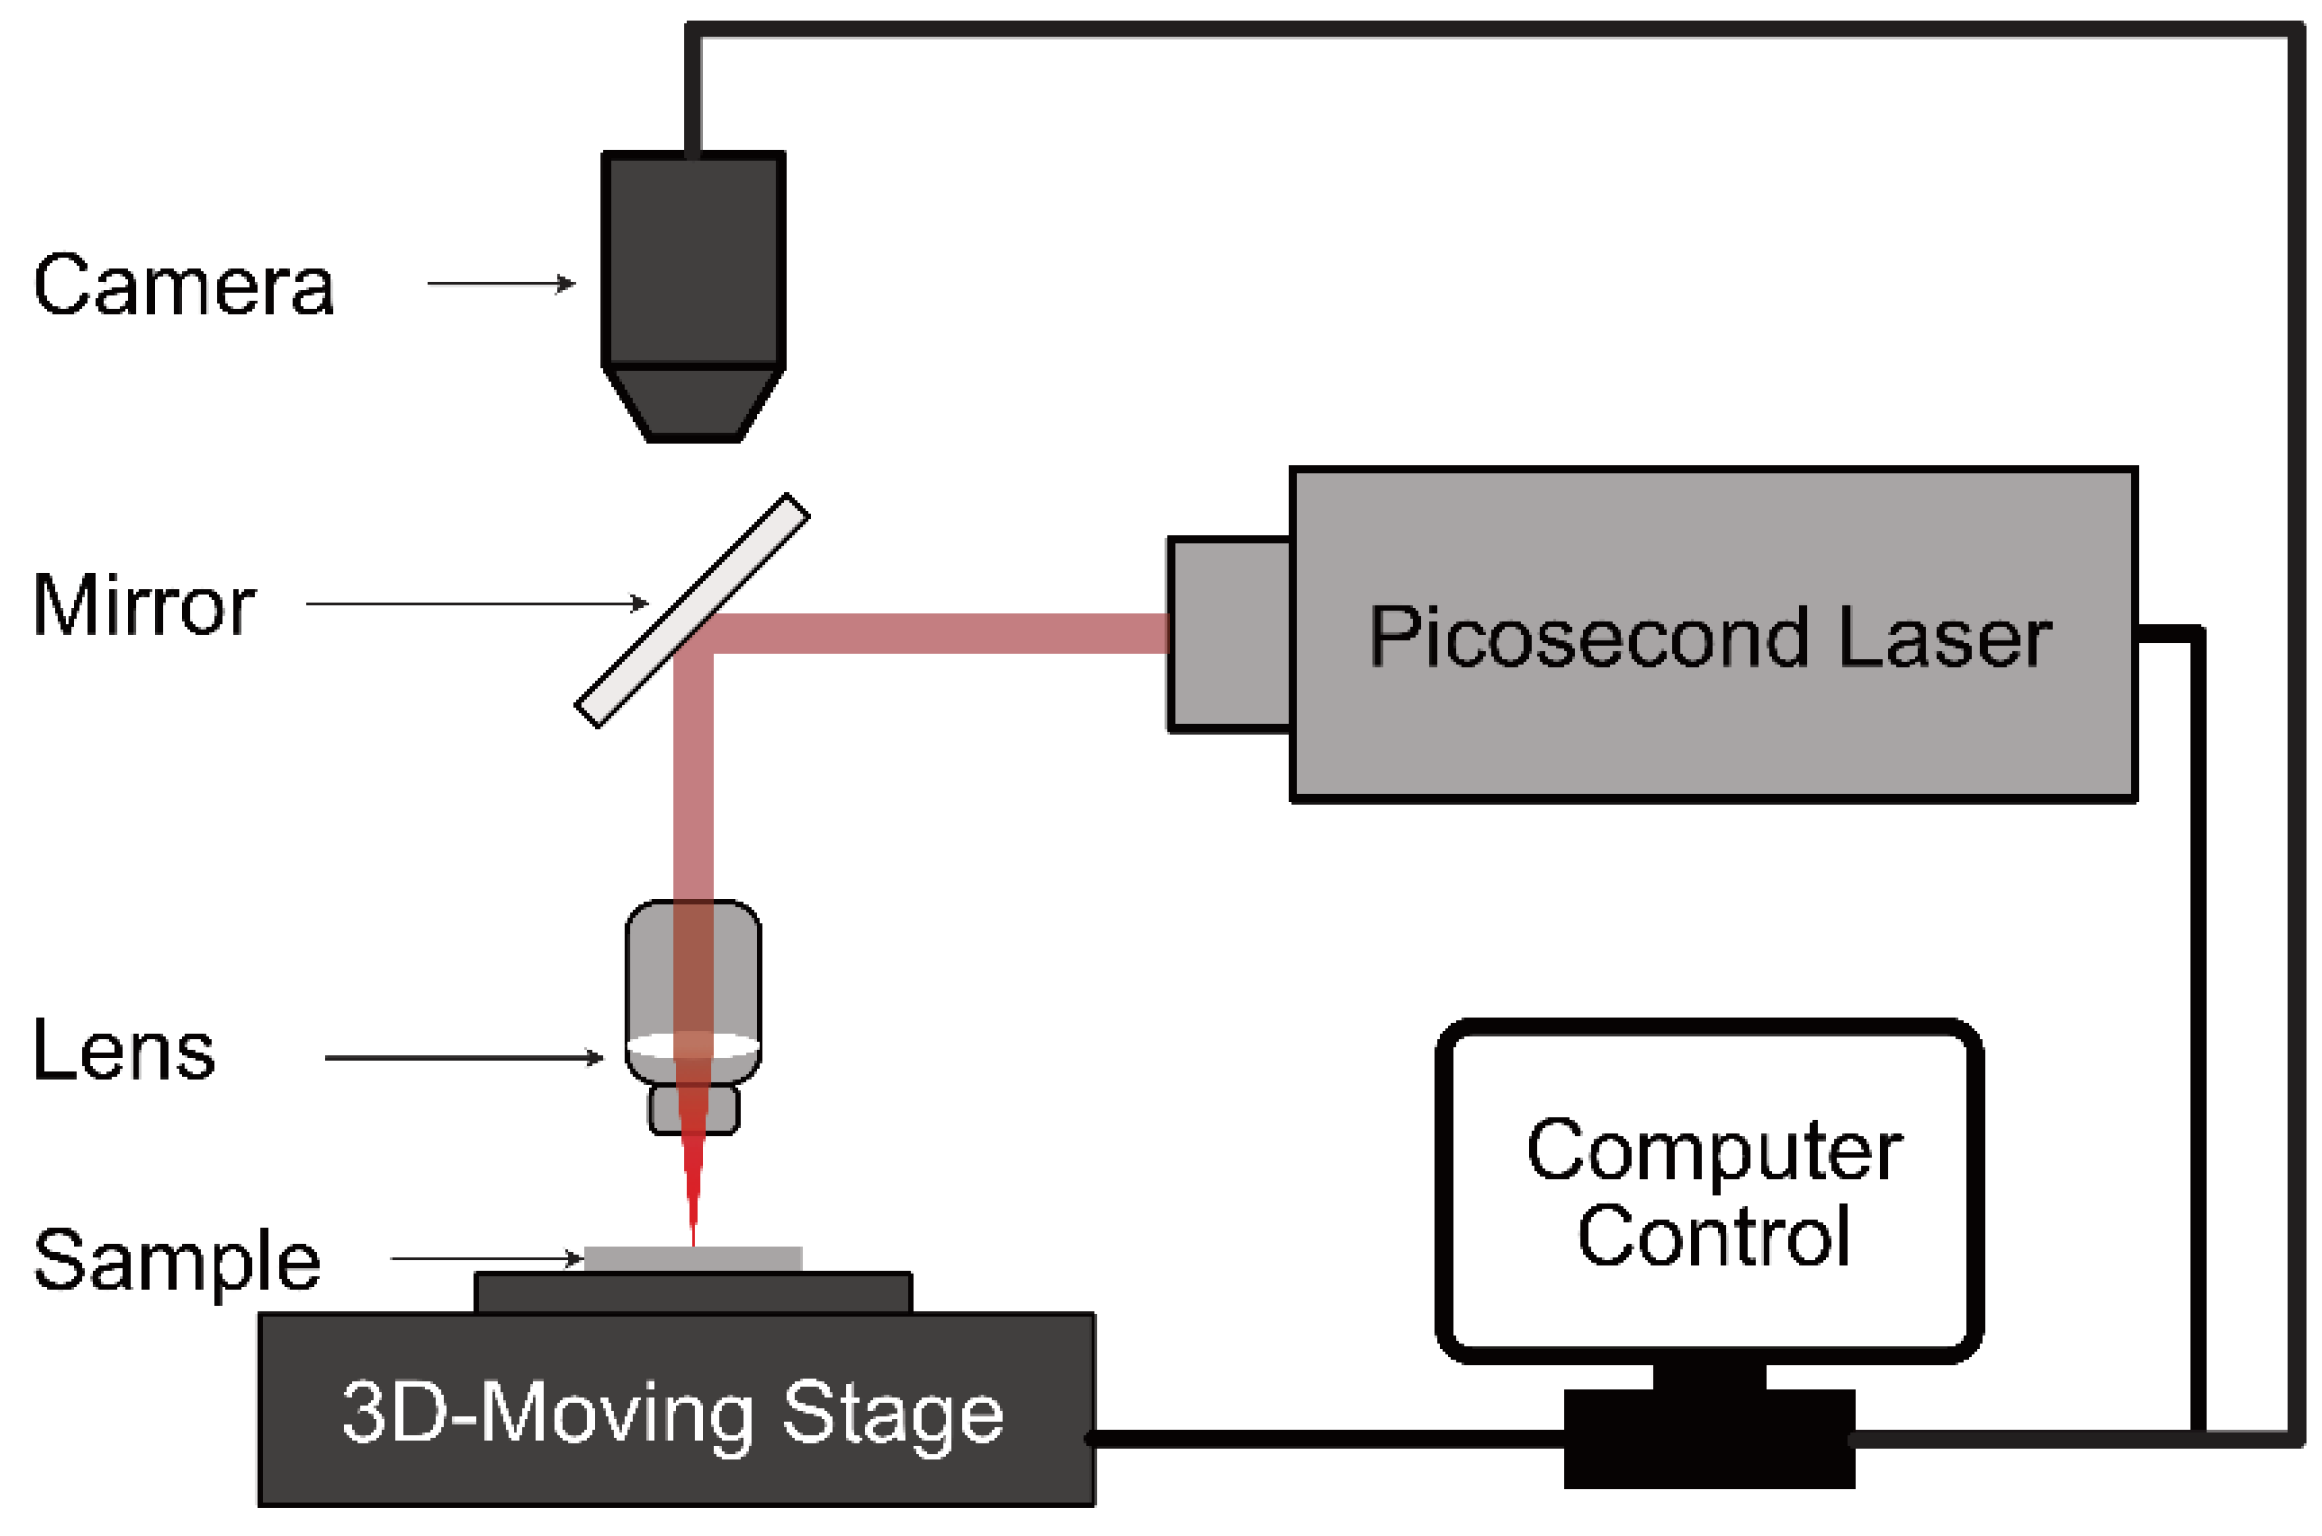
For laser machining, the ceramic substrates were attached to a 3D-moving stage (
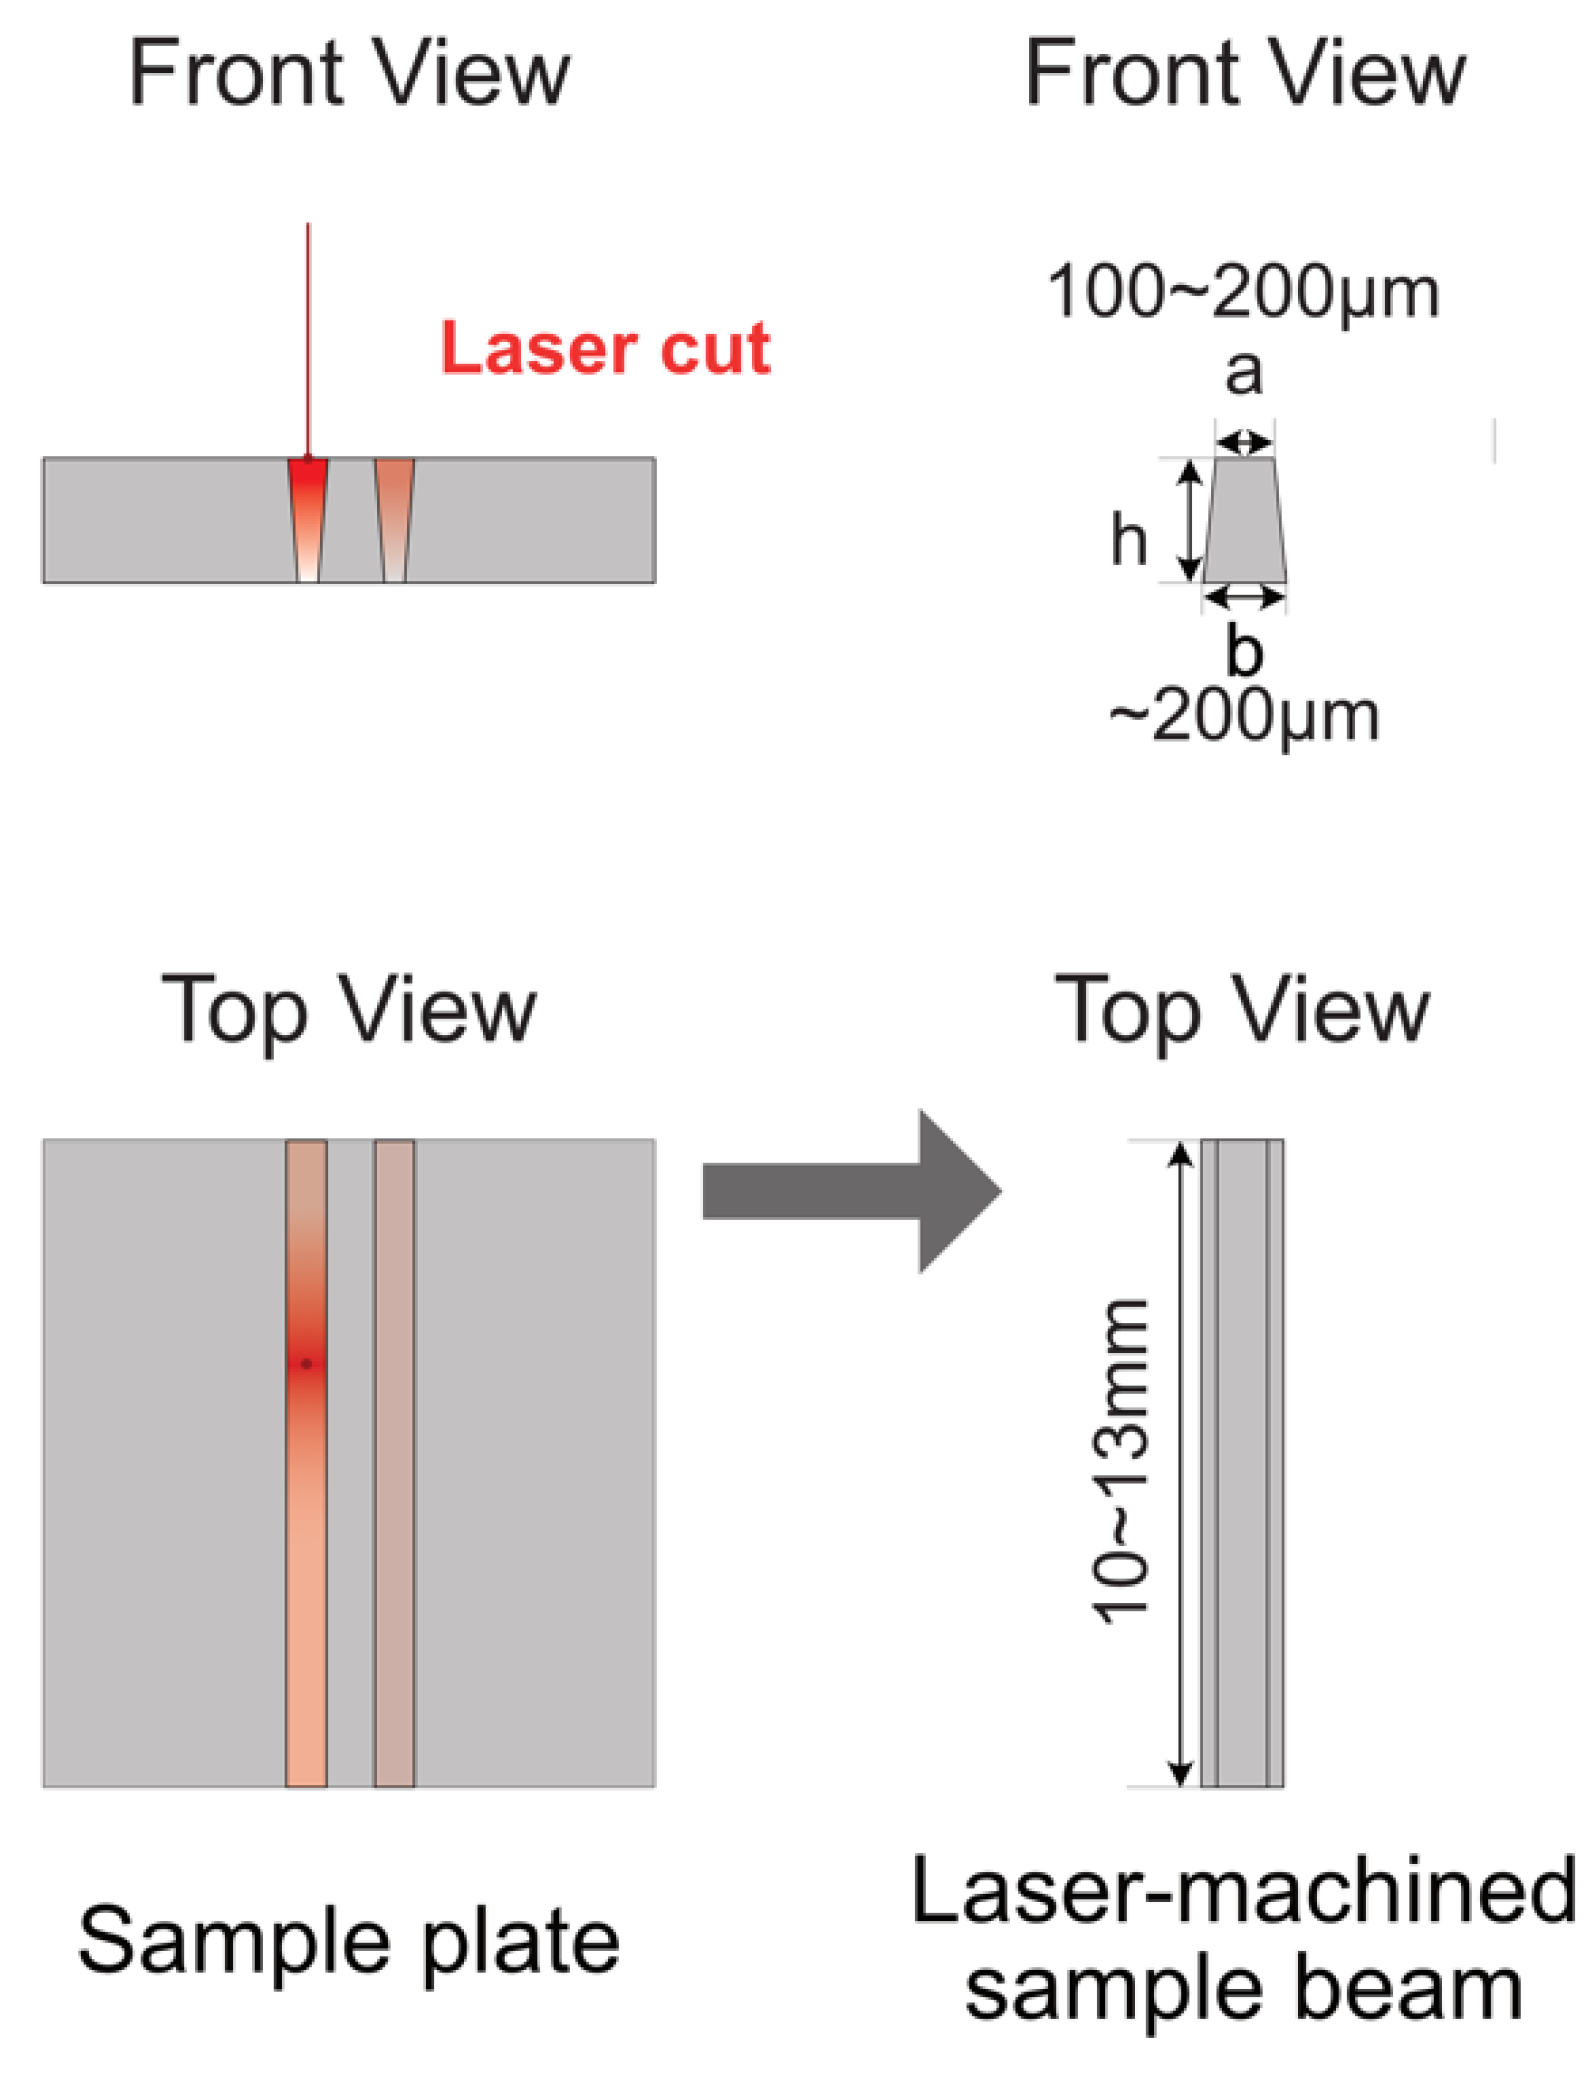
Figure 3). The distance between the lens and the sample substrate was adjusted to ensure the picosecond laser was focused on the top surface of the substrate to start with. The sample substrate moved at a controlled programmed speed to make the cut. Two parallel cuts were performed at the same time to ensure the uniformity of the micro-beam. Depending on the laser power and substrate, repeating the procedure 20 or more times was needed before the focal point of the pico-second laser moved deeper into the substrate. The laser focal step along the z-axis also depends on the laser power and substrate. A typical value in our set-up is 100 µm. Using this setup, the dimensions of a laser-machined micro-beam can be controlled. For our sample, the typical dimensions are shown in
Figure 4, where h is the thickness of the starting substrate. It is important to note that the cross-section of the bean is trapezoidal due to interaction of the laser with the sample and beam divergence.
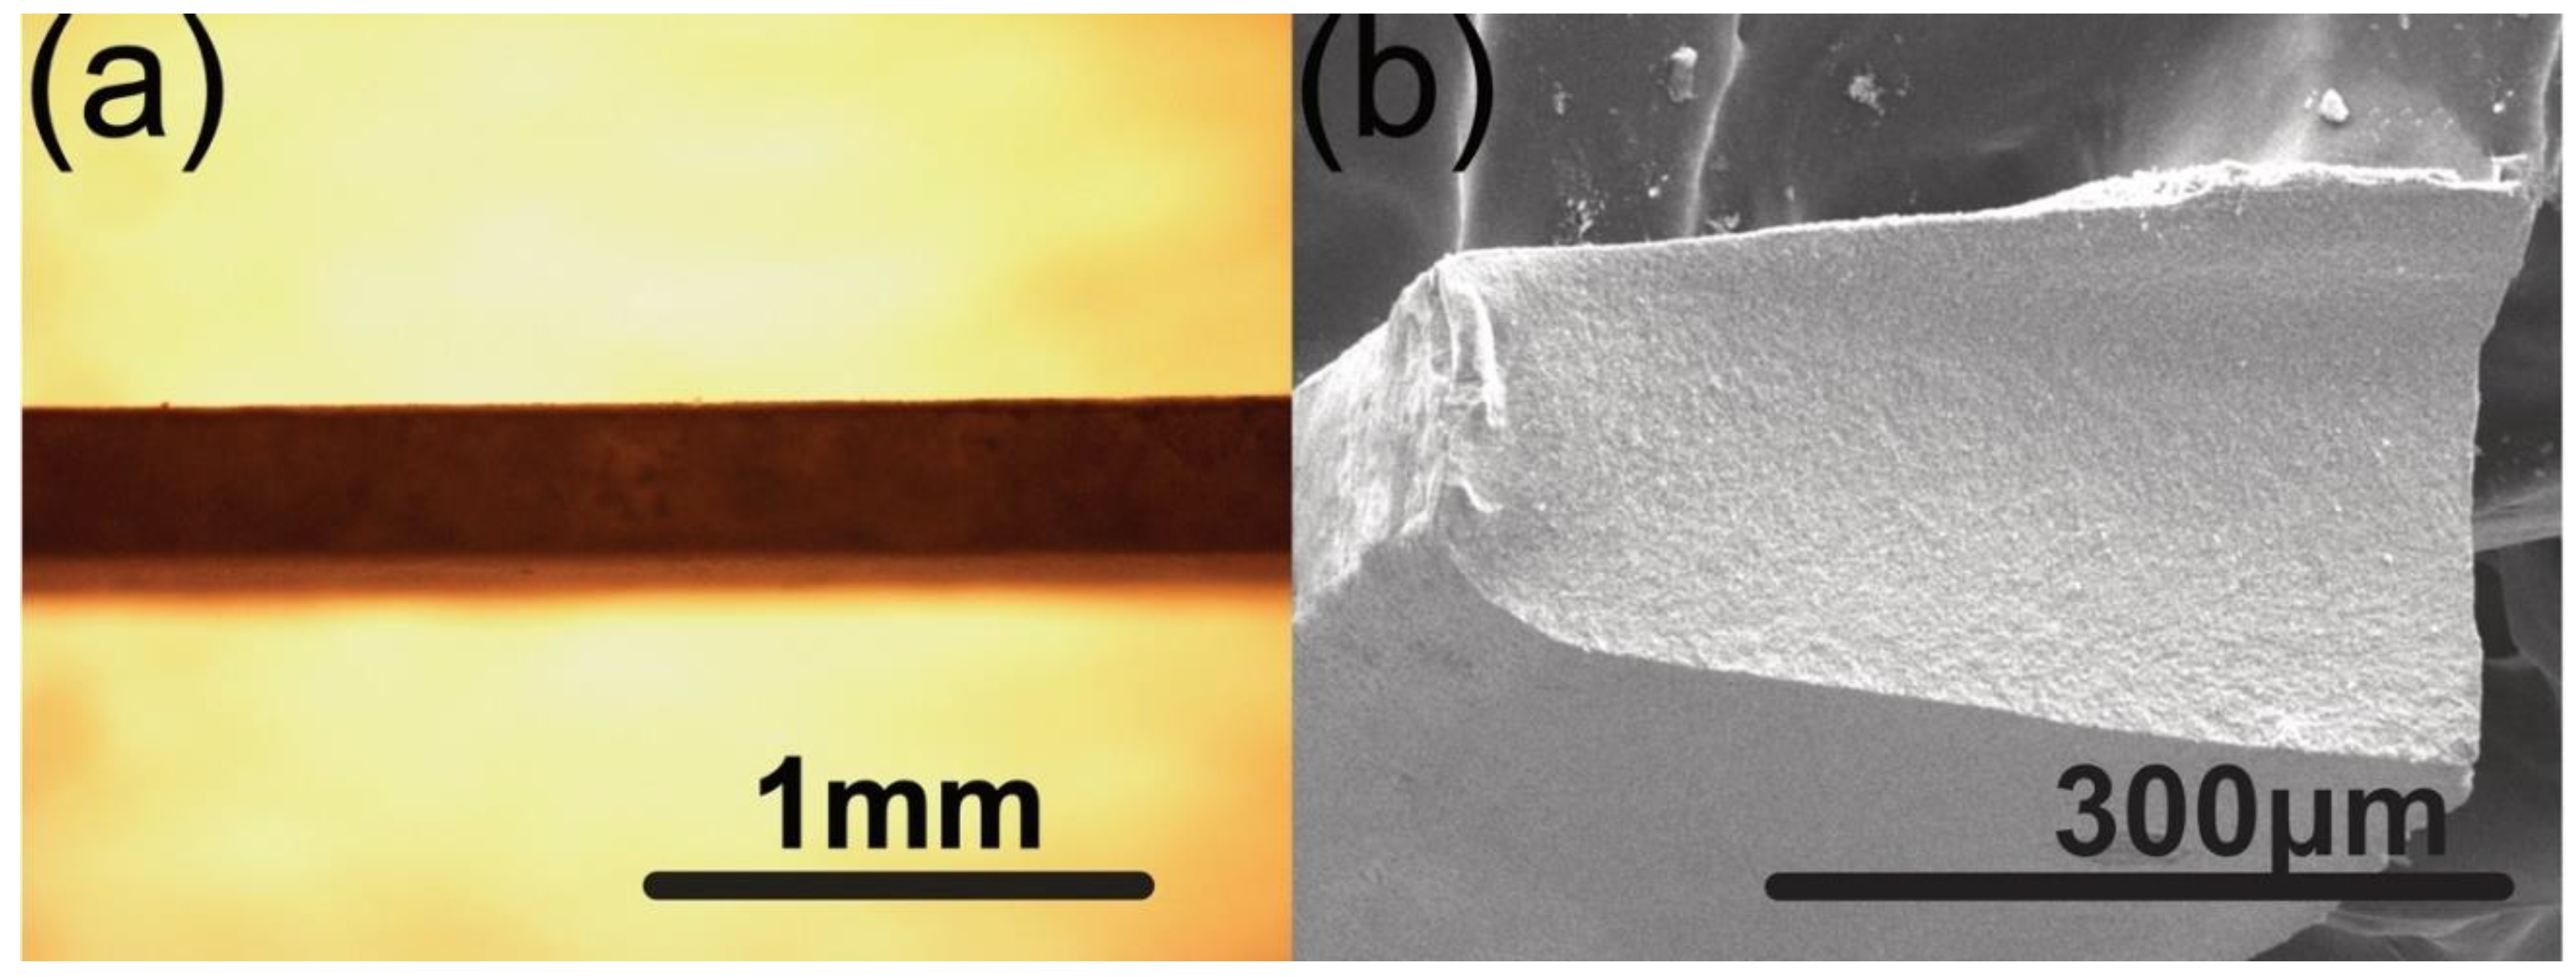
Figure 5a is an optical image of the top view of the laser machined microbeam showing a uniform thickness microbeam.
Figure 5b is an SEM image of the cross-section clearly showing the trapezoidal cross-section of the beam.
3.2. Laser-Machined Micro-Beam and Moment of Inertia
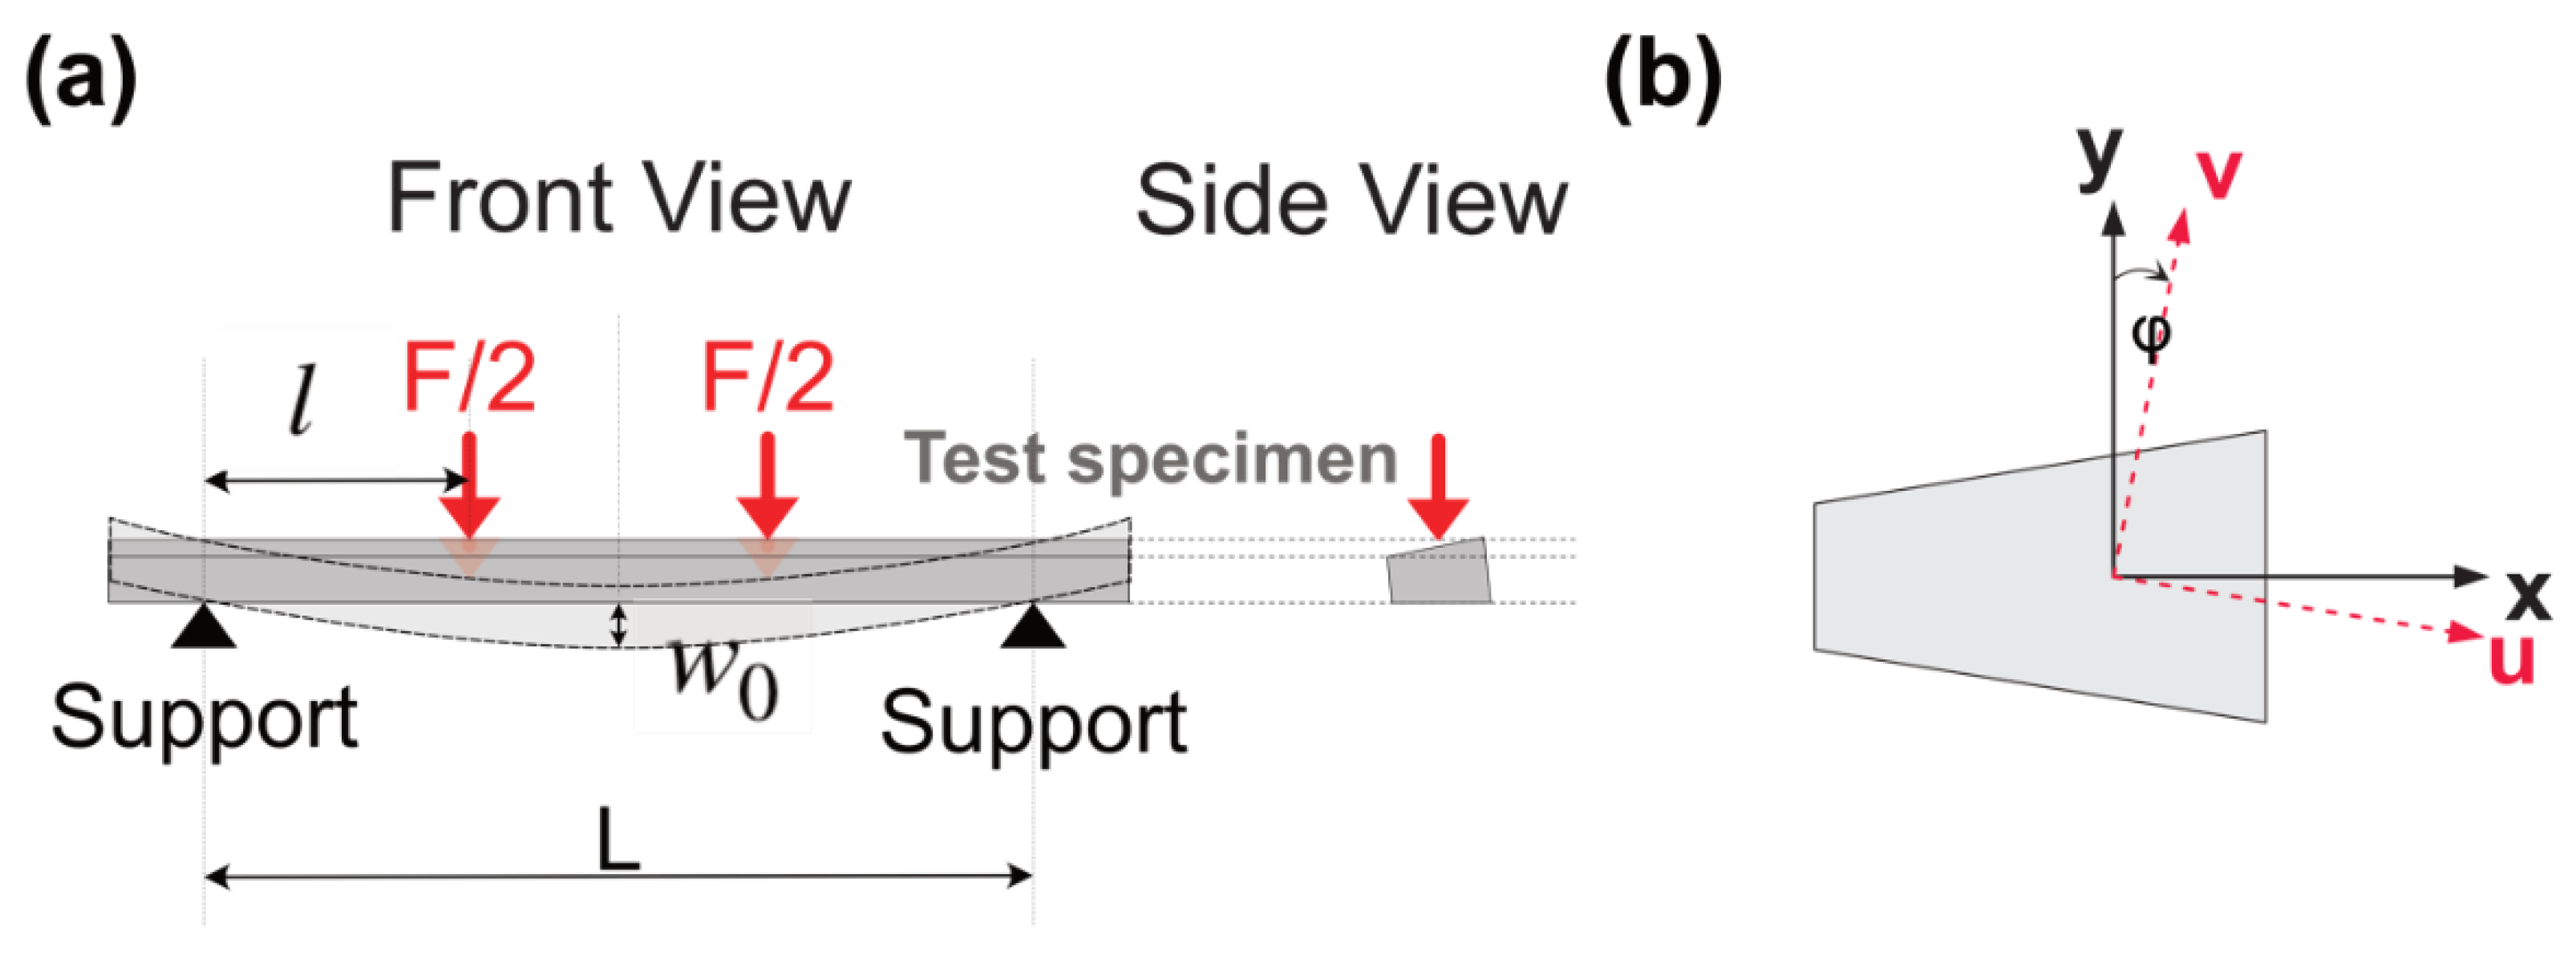
The loading geometry and the sample geometry are shown in
Figure 6. The second moment of inertia of the trapezoidal cross-section beam sample about x and y-axis (
Figure 6b) can be calculated by [
24]:
Considering the axes rotation (
Figure 6) the moment of inertia needs to be modified by the relation [
24]:
In an isosceles trapezoid, with known dimensions of
a,
b, and
h, the rotation angle
φ can be calculated [
25]:
If we assume the trapezoid is symmetrical, Ixy = 0. Then the moment of inertia of the beam sample about the v axis can be calculated using Equation (6).
Here we need to mention that the vertical deflection measured by TMA is the deflection wl at the contact point at the edge of the probe (
Figure 2). The maximum vertical deflection w0 in the center of the beam can be calculated based on the deflection profile along the beam [
24] and the deflection detected by TMA, wl using the geometric parameters shown in
Figure 6a:
3.3. Load and Temperature Program
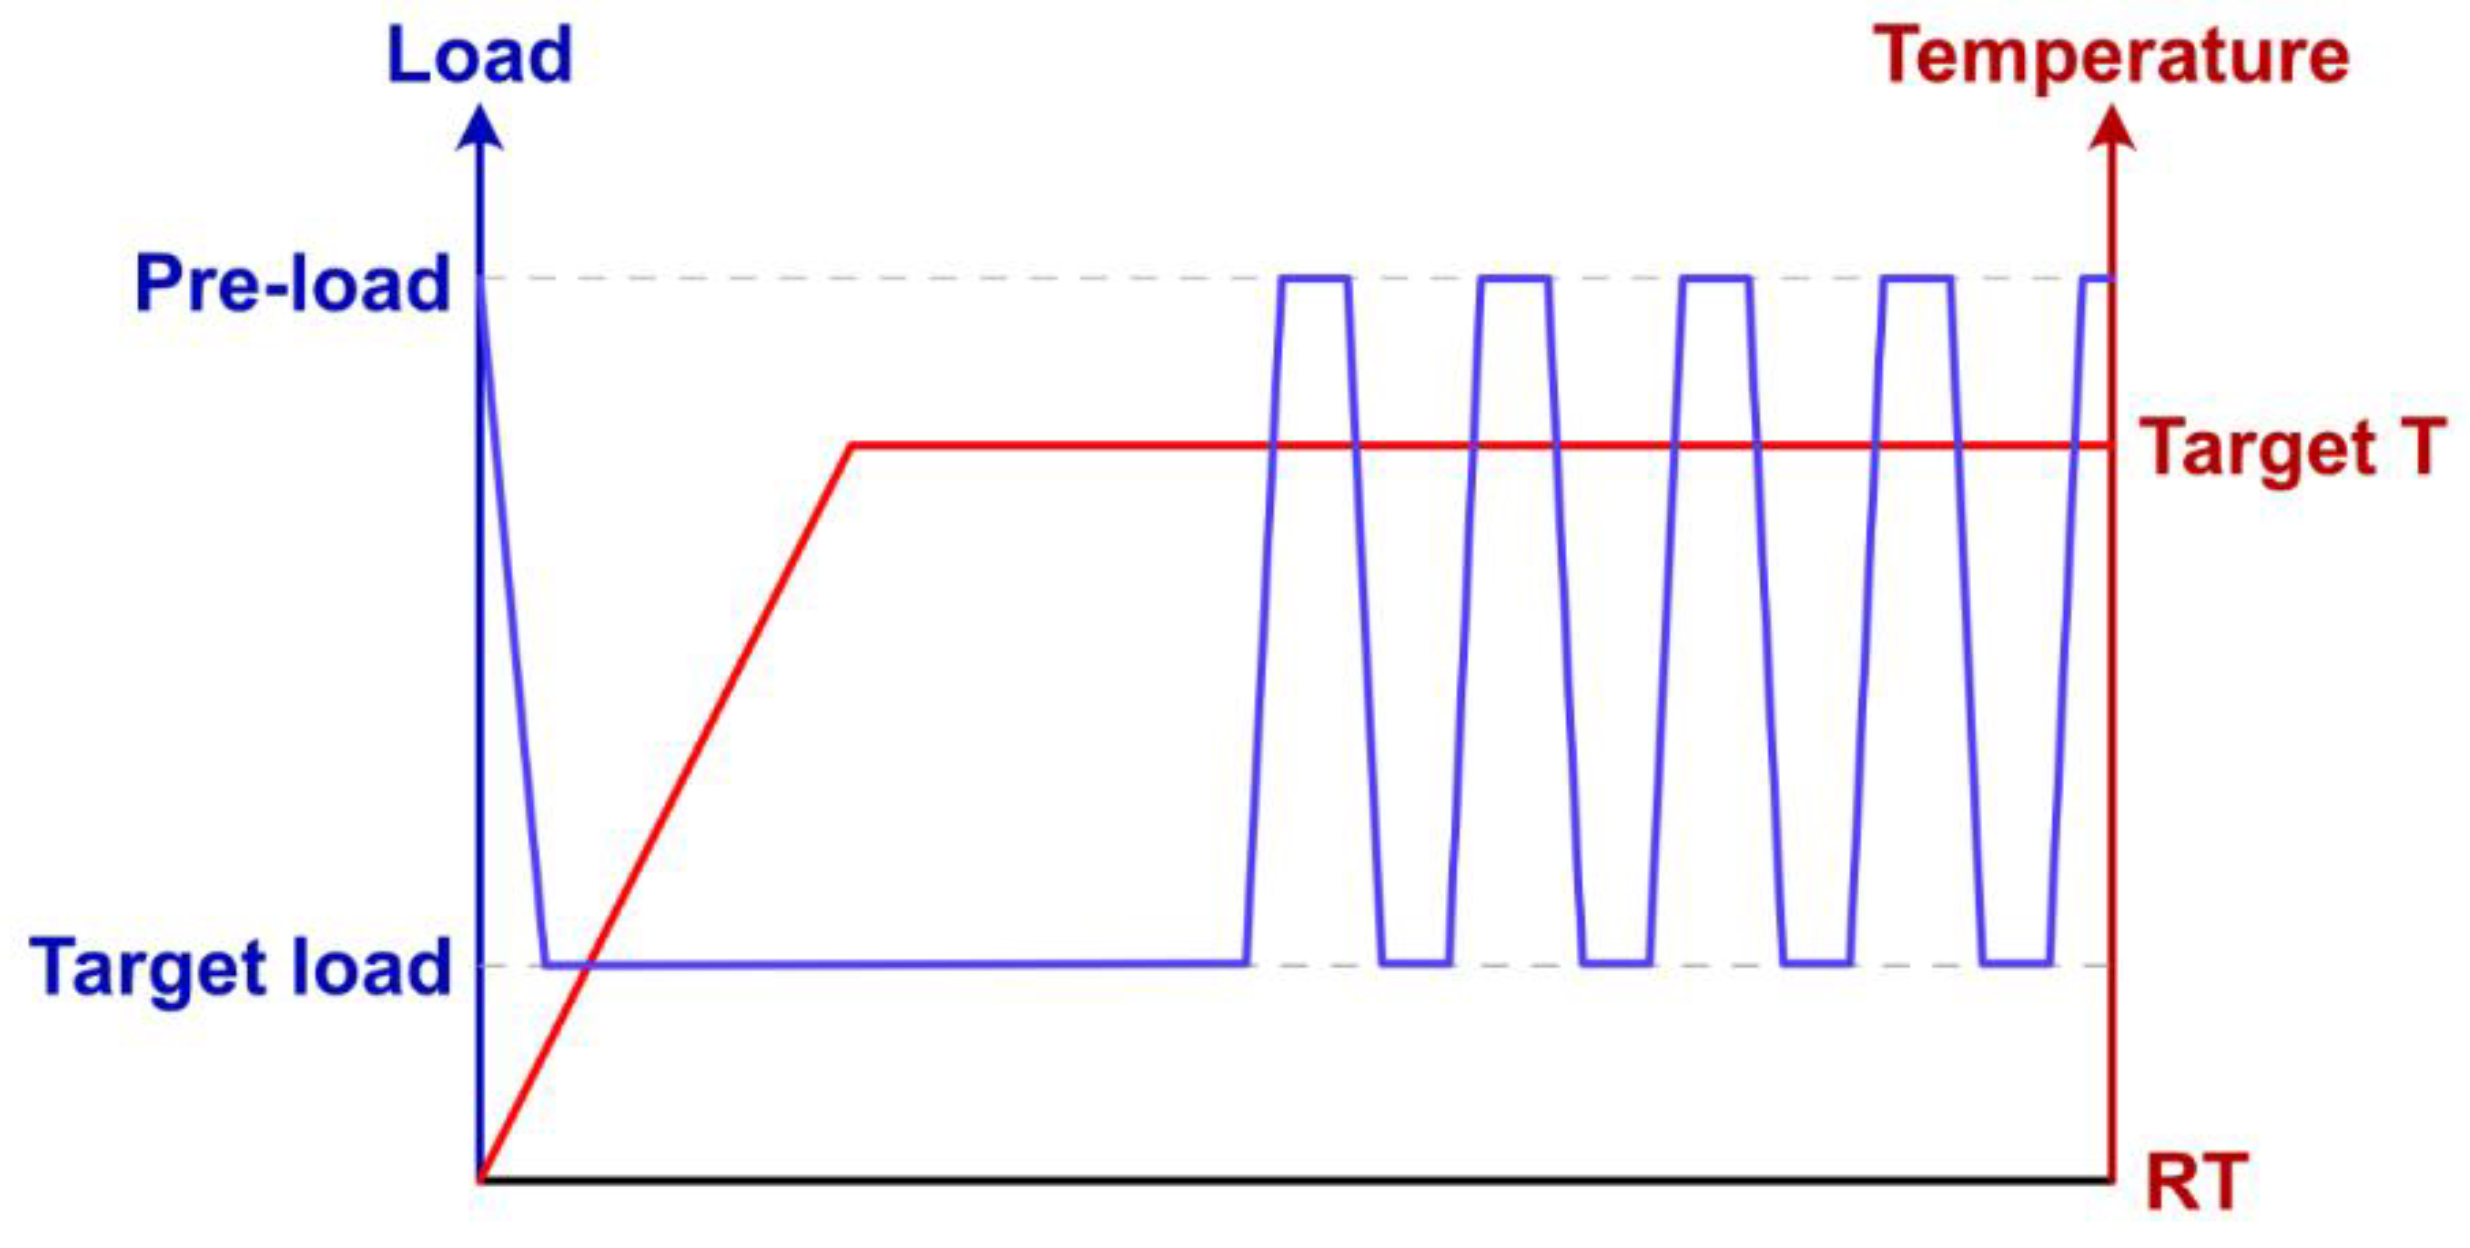
Measurements were made at room temperature, 500°C, 800°C, and 1100°C. The microbeam was placed in the center of the supporting ring, with the TMA probe applying a pre-load of -40 mN (negative sign meaning the loading was compressive) on the microbeam. The supporting ring and the TMA probe were concentric. A target load of -200 mN was realized by increasing the load at a rate of 200 mN/min. This target load was applied by the probe of TMA and held. Then the furnace temperature was raised to the target temperature at 10°C/min and held for 1 hour (for temperature equilibration) before the unloading-loading cycle started. A minimum of five loading and unloading cycles were conducted (between a load of -200 mN and -40 mN). A typical load and temperature profile is shown in
Figure 7.
4. Results and Discussions
The dimensions of the microbeams, as shown in
Table 1, were measured using an optical microscope and SEM. These samples were fabricated through the laser machining process described earlier. The observed variations in the trapezoidal cross-sectional dimensions between samples result from both the material-specific interactions with the laser and the setting of the gradual adjustments in the laser focus during each cutting cycle, which correspond to the increasing depth of the cut.
The elastic modulus was calculated using Equation (3), in which the center point deflection,
w0, is given by Equation (8) and the moment of inertia,
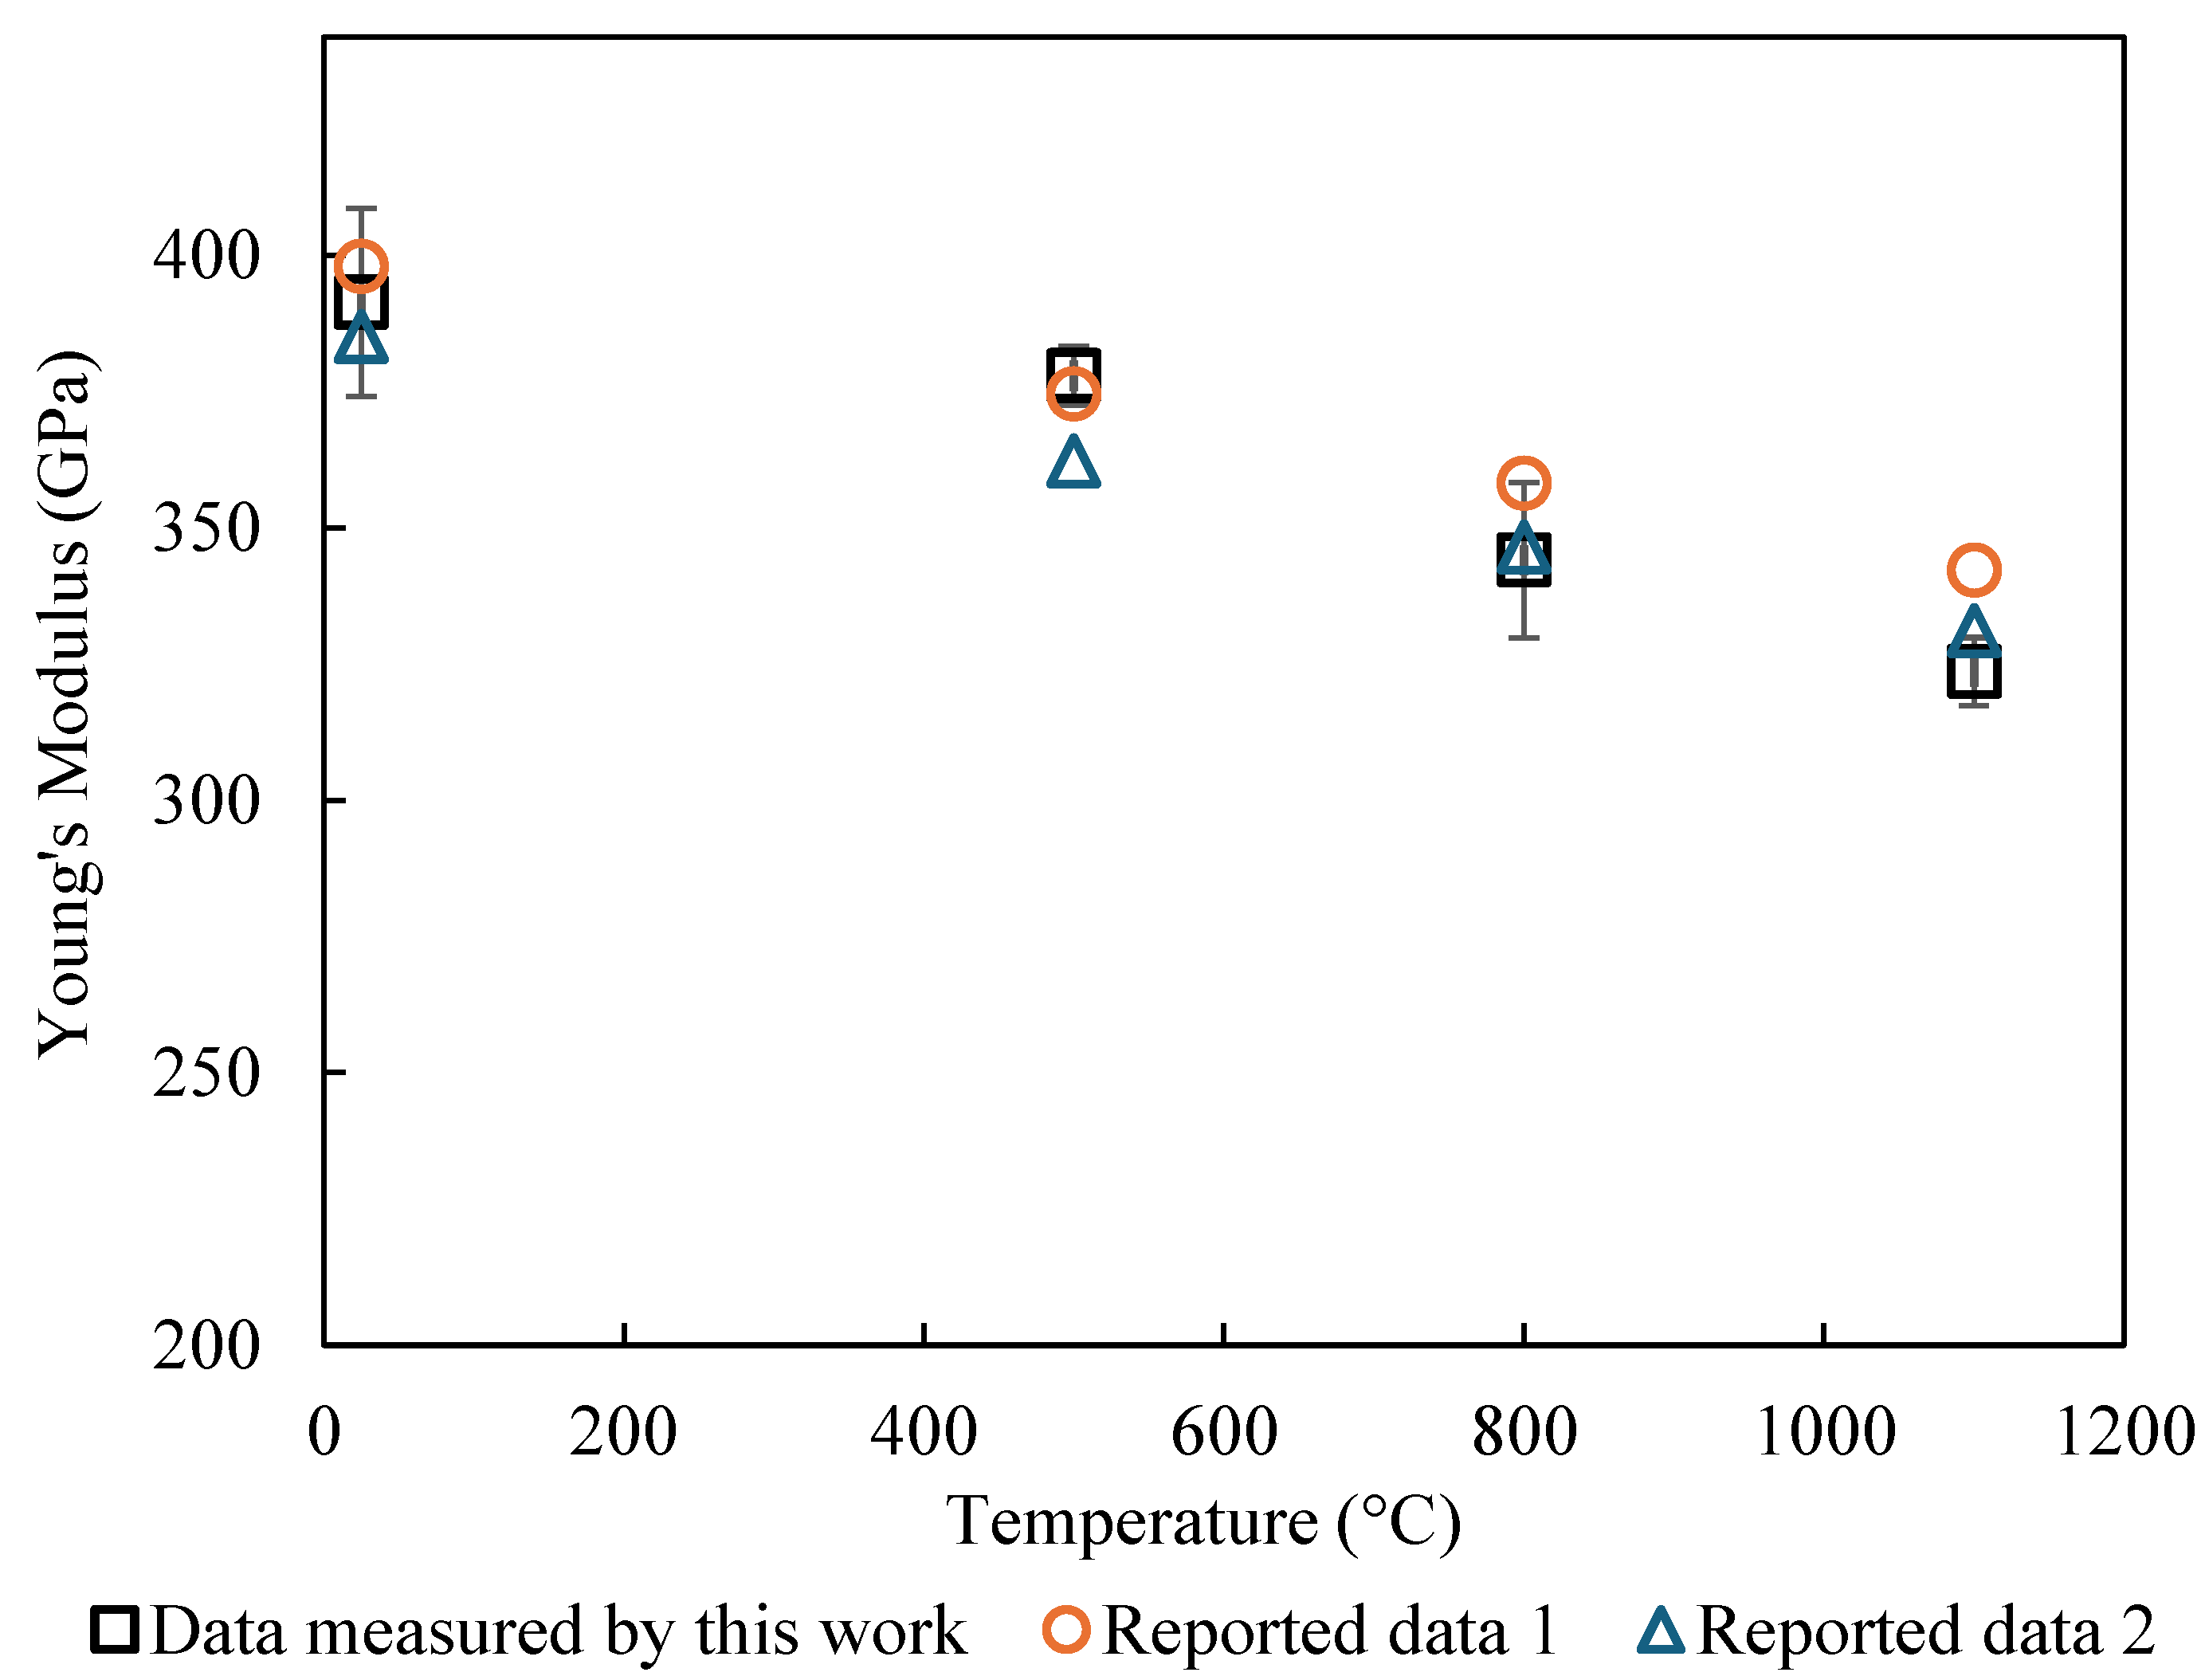
Iv, by Equation (6). The measured values of elastic modulus are shown in
Table 2,
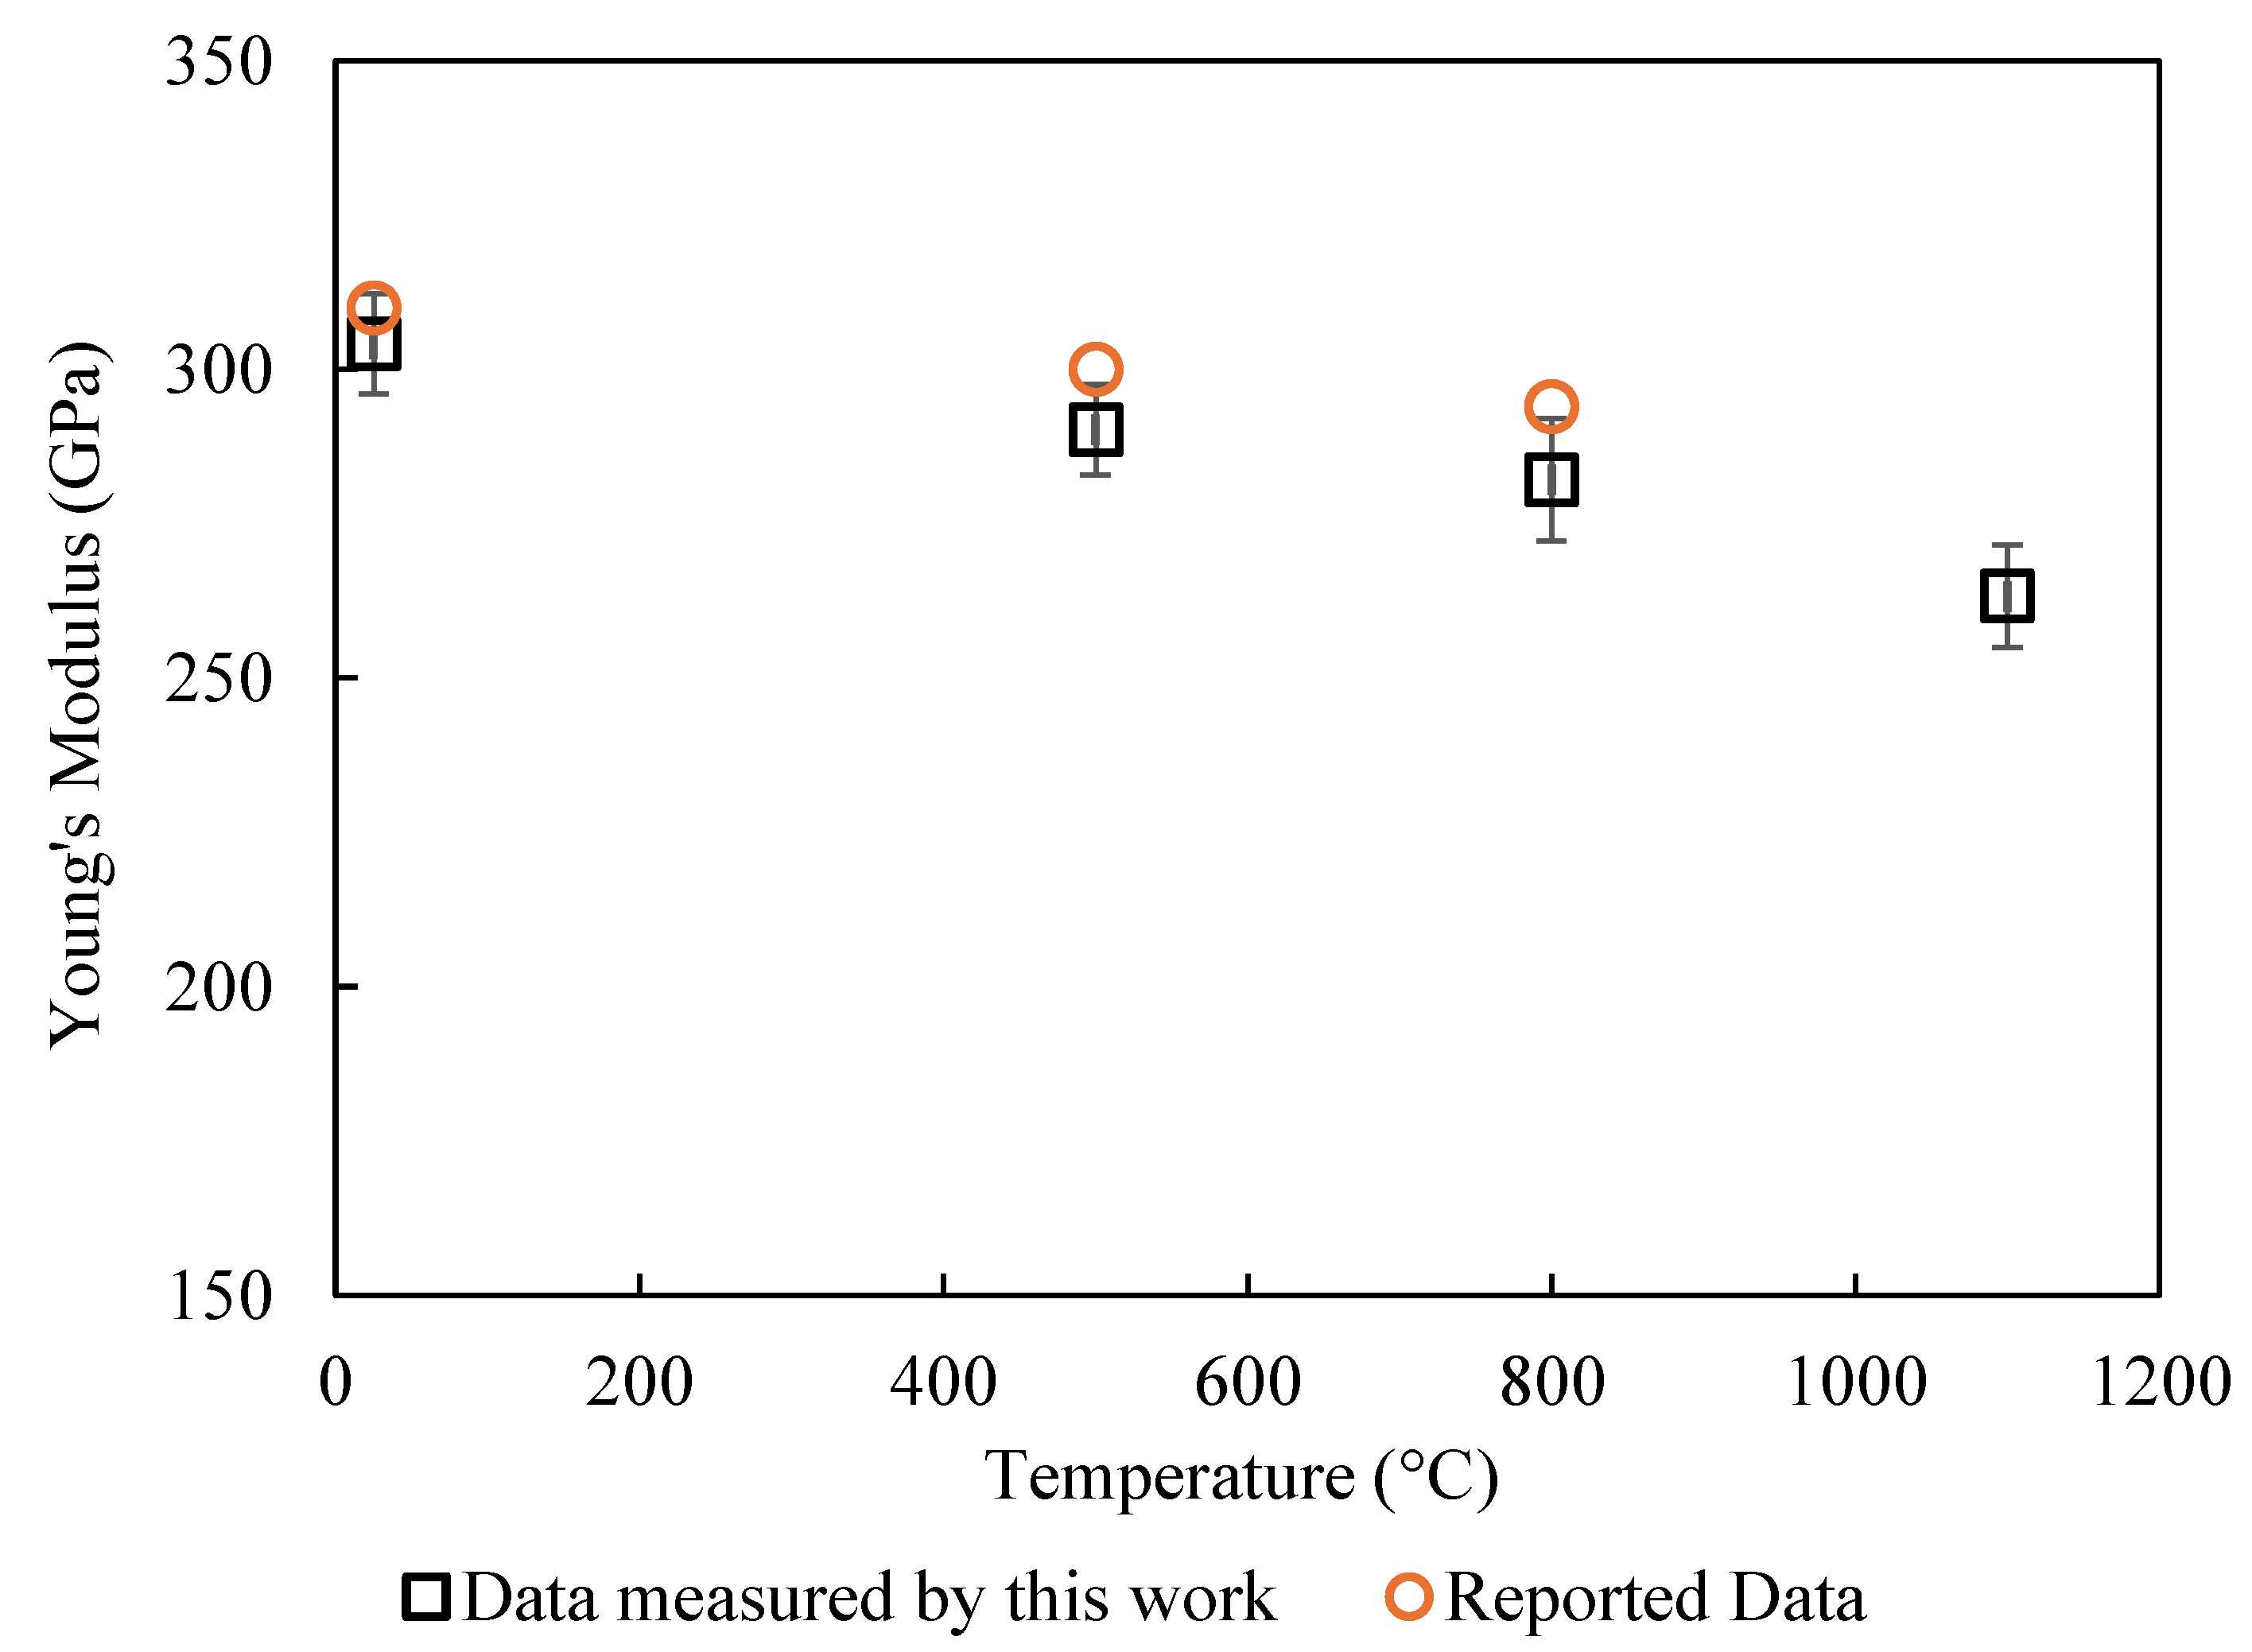
Figure 8 and
Figure 9. The measurement only focused on the initial portion of the stress-strain curve, where the sample behaved more like a linear elastic solid. The temperature dependence of elastic modulus is almost linear for both alumina and aluminum nitride. This agrees with Wachtman’s theory [
18]. The elastic modulus at 1100°C is about 82% of the modulus at 25°C. The results for elastic modulus also agree with the reported data [
3,
16] within 5%.
The unloading and loading cycles were set to start after the target temperature was reached and held for 1 hour. This was equilibrate the temperature and hence the sample dimensions. The high loading rate reduced the TMA drift. Five loading/unloading cycles were performed for each run. The first cycle typically was not stable. This is caused by the "settling-in" of the test piece into the support ring [
1].
Based on Equations (2), (4)–(6), the magnitude of the deflection will decrease sharply with an increase in the cross-section of the microbeam. When the values of
a and
b are close,
φ is close to one, and the deflection of the microbeam will be proportional to
To introduce a high deflection of the sample for a given load, one needs to control the dimension of the microbeam, especially the thicknesses a and b. Based on the limitation of TMA and the high modulus of ceramic microbeams, a typical dimension of the beam, to lead to significant deflection (significantly above the displacement resolution) is a =100 μm, b = 200 μm, h = 500 μm. Because the measured elastic modulus is very sensitive to the dimension of the microbeam, extra attention needs to be paid to carefully measure the dimensions of the microbeam. Even though microbeams were laser-machined into the same size under the same conditions, the dimensions of each sample need to be determined individually. Using optical microscope and SEM, the top width a and bottom width b need to be checked along the entire length to ensure uniformity.
Before the test, a safe maximum testing load can be estimated based on the maximum stress in the sample during the test and the strength of the material. The maximum load during the test should be set high enough to introduce considerable deflection without introducing any micro-cracks. For our microbeams, a maximum load of 200 mN was used.
This baseline drift
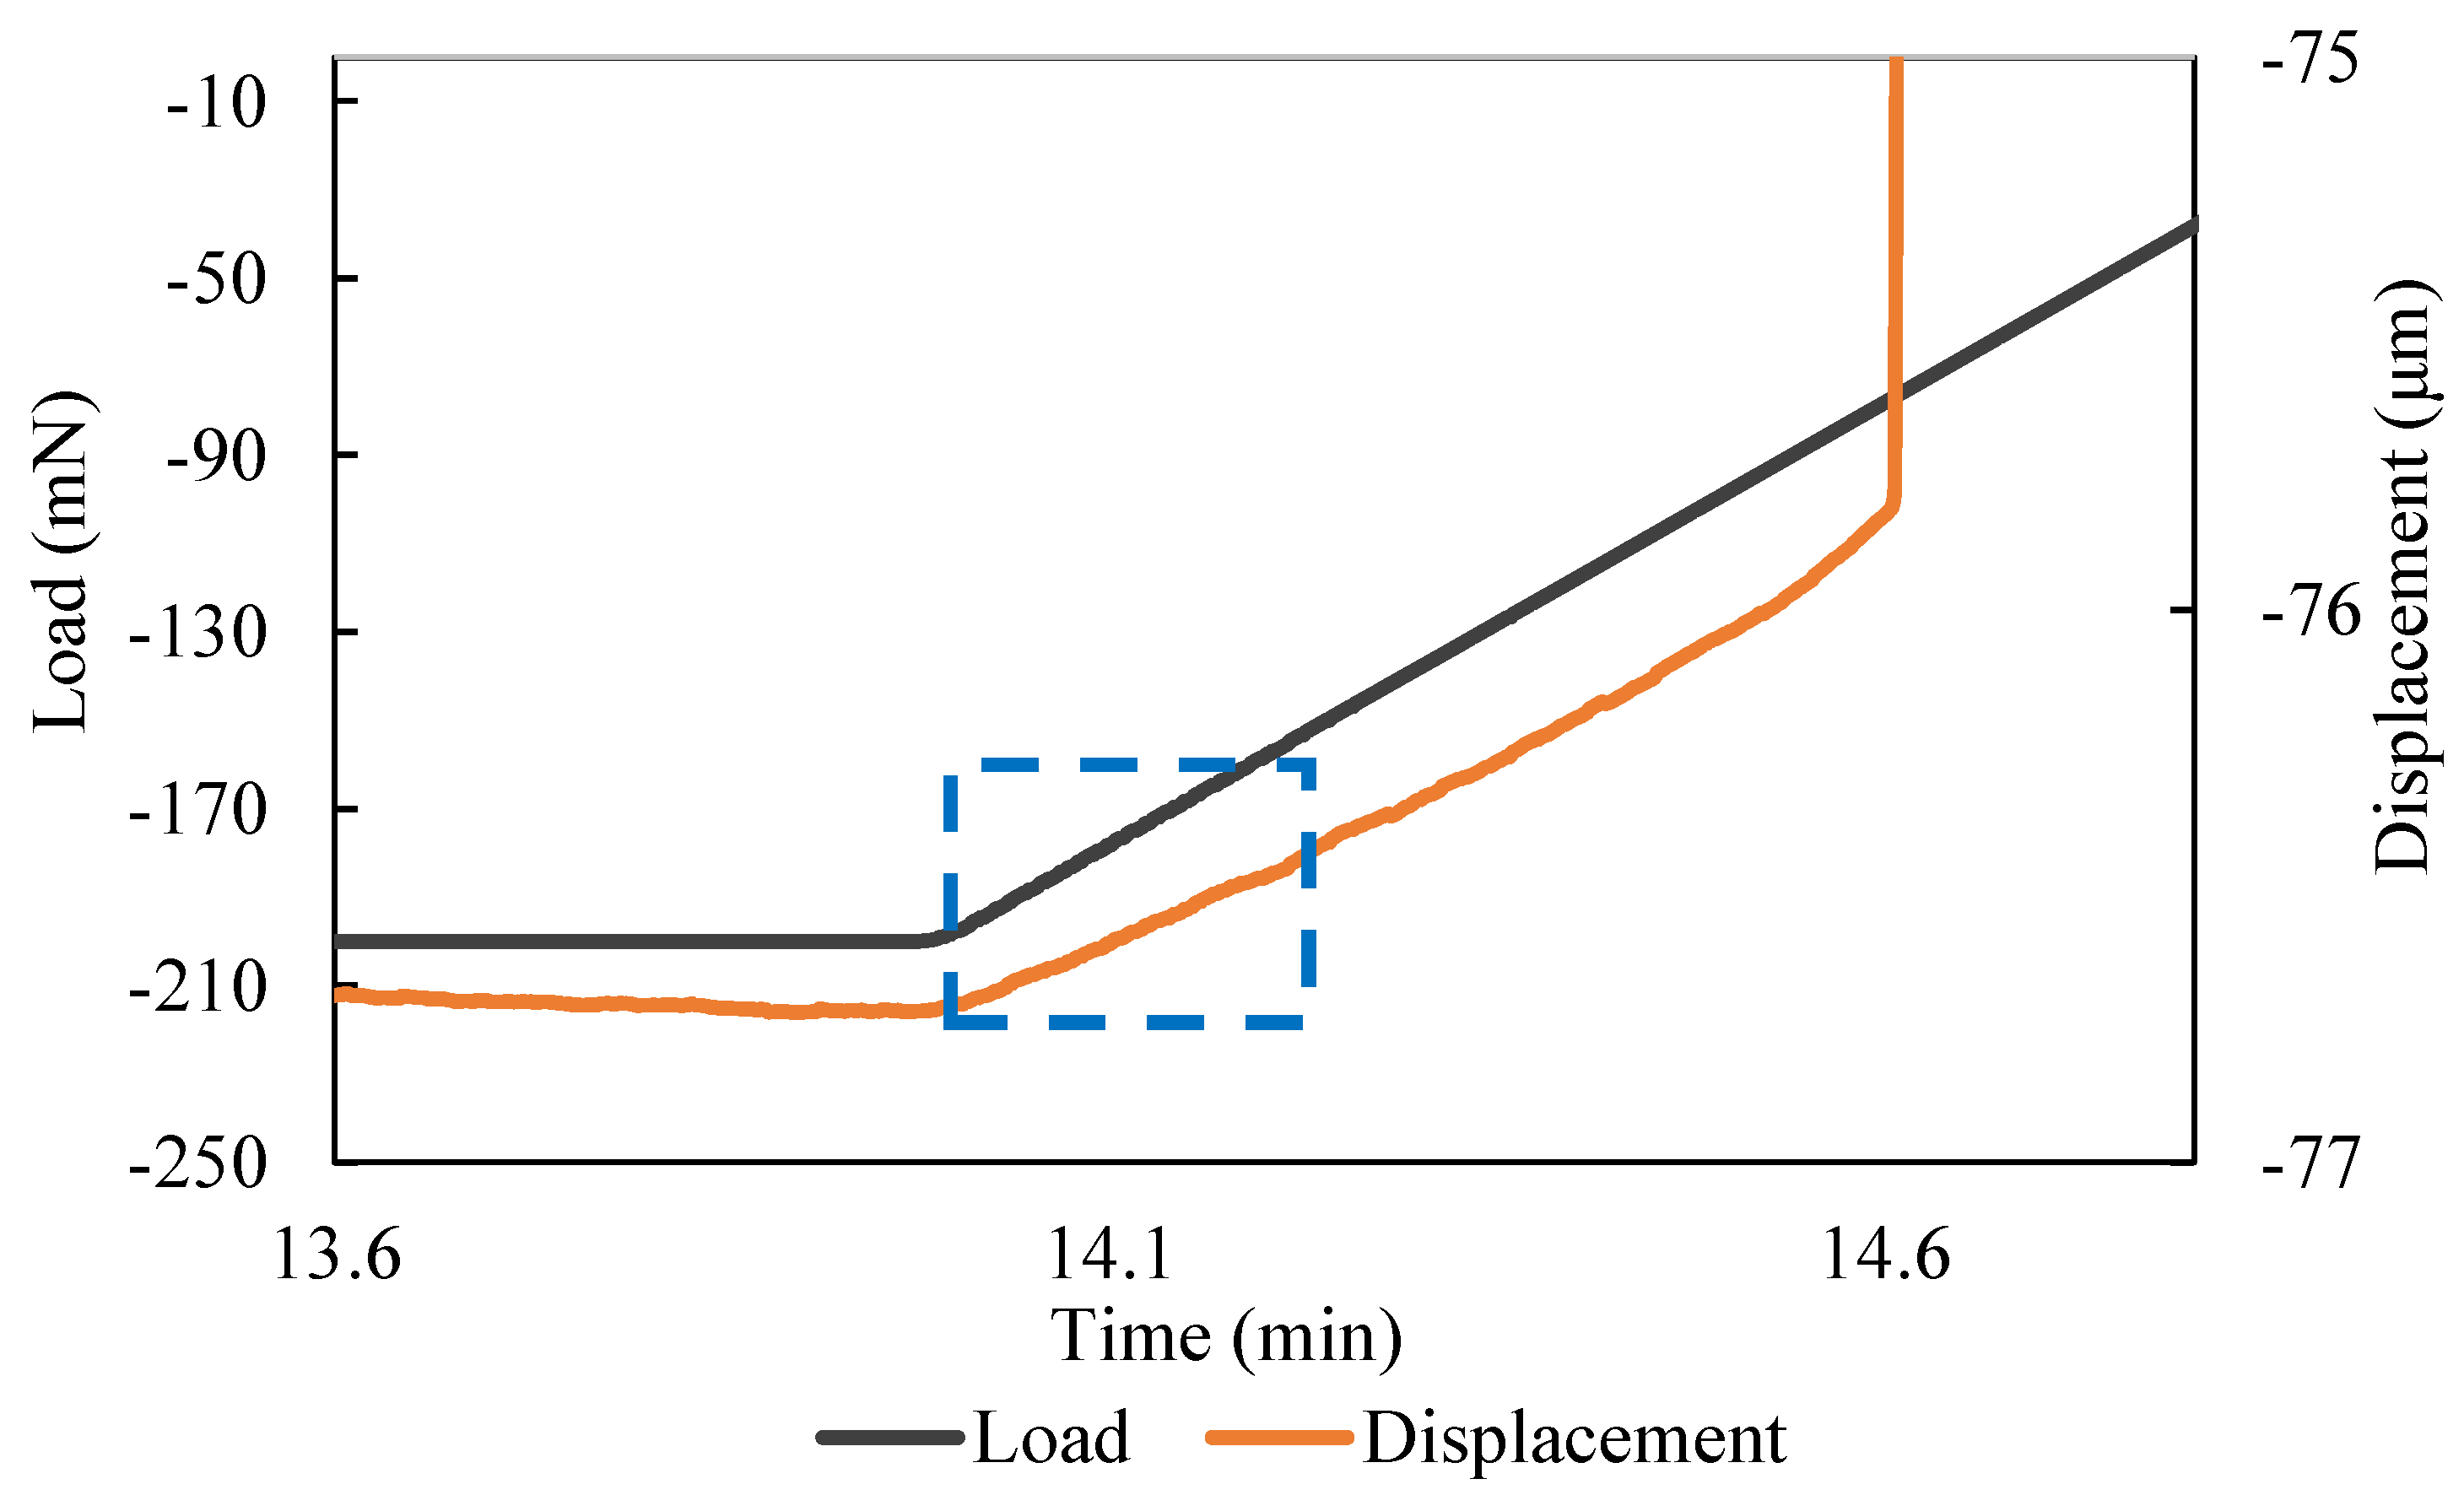
w1 is caused by the system. It can be corrected by replacing the test piece with a thick alumina plate. With the dimensions of the alumina plate, theoretically, the deflection would be neglectable. Therefore, the measured deflection can then be used to correct the baseline drift caused by the system. At high load (in the dotted rectangular area in
Figure 10), the deflection is proportional to the load. The elastic modulus needs to be calculated in this region (the start of the unloading). In this load regime, the test piece is still "settled-in" in the fixture. When the load is low (the end of the unloading stage), the load and deflection are no longer proportional due to the movement of the microbeam.
Since the loading probe and the support rings are of finite width which is not negligible compared to the beam length, the elastic modulus results
E4P, calculated based on the four-point flexural geometry (
Figure 1) were compared with
E3P, the results of the three-point geometry [
24] (
Figure 11a) :
and
EDL, the results of uniformly distributed loaded beam [
24] (
Figure 11b):
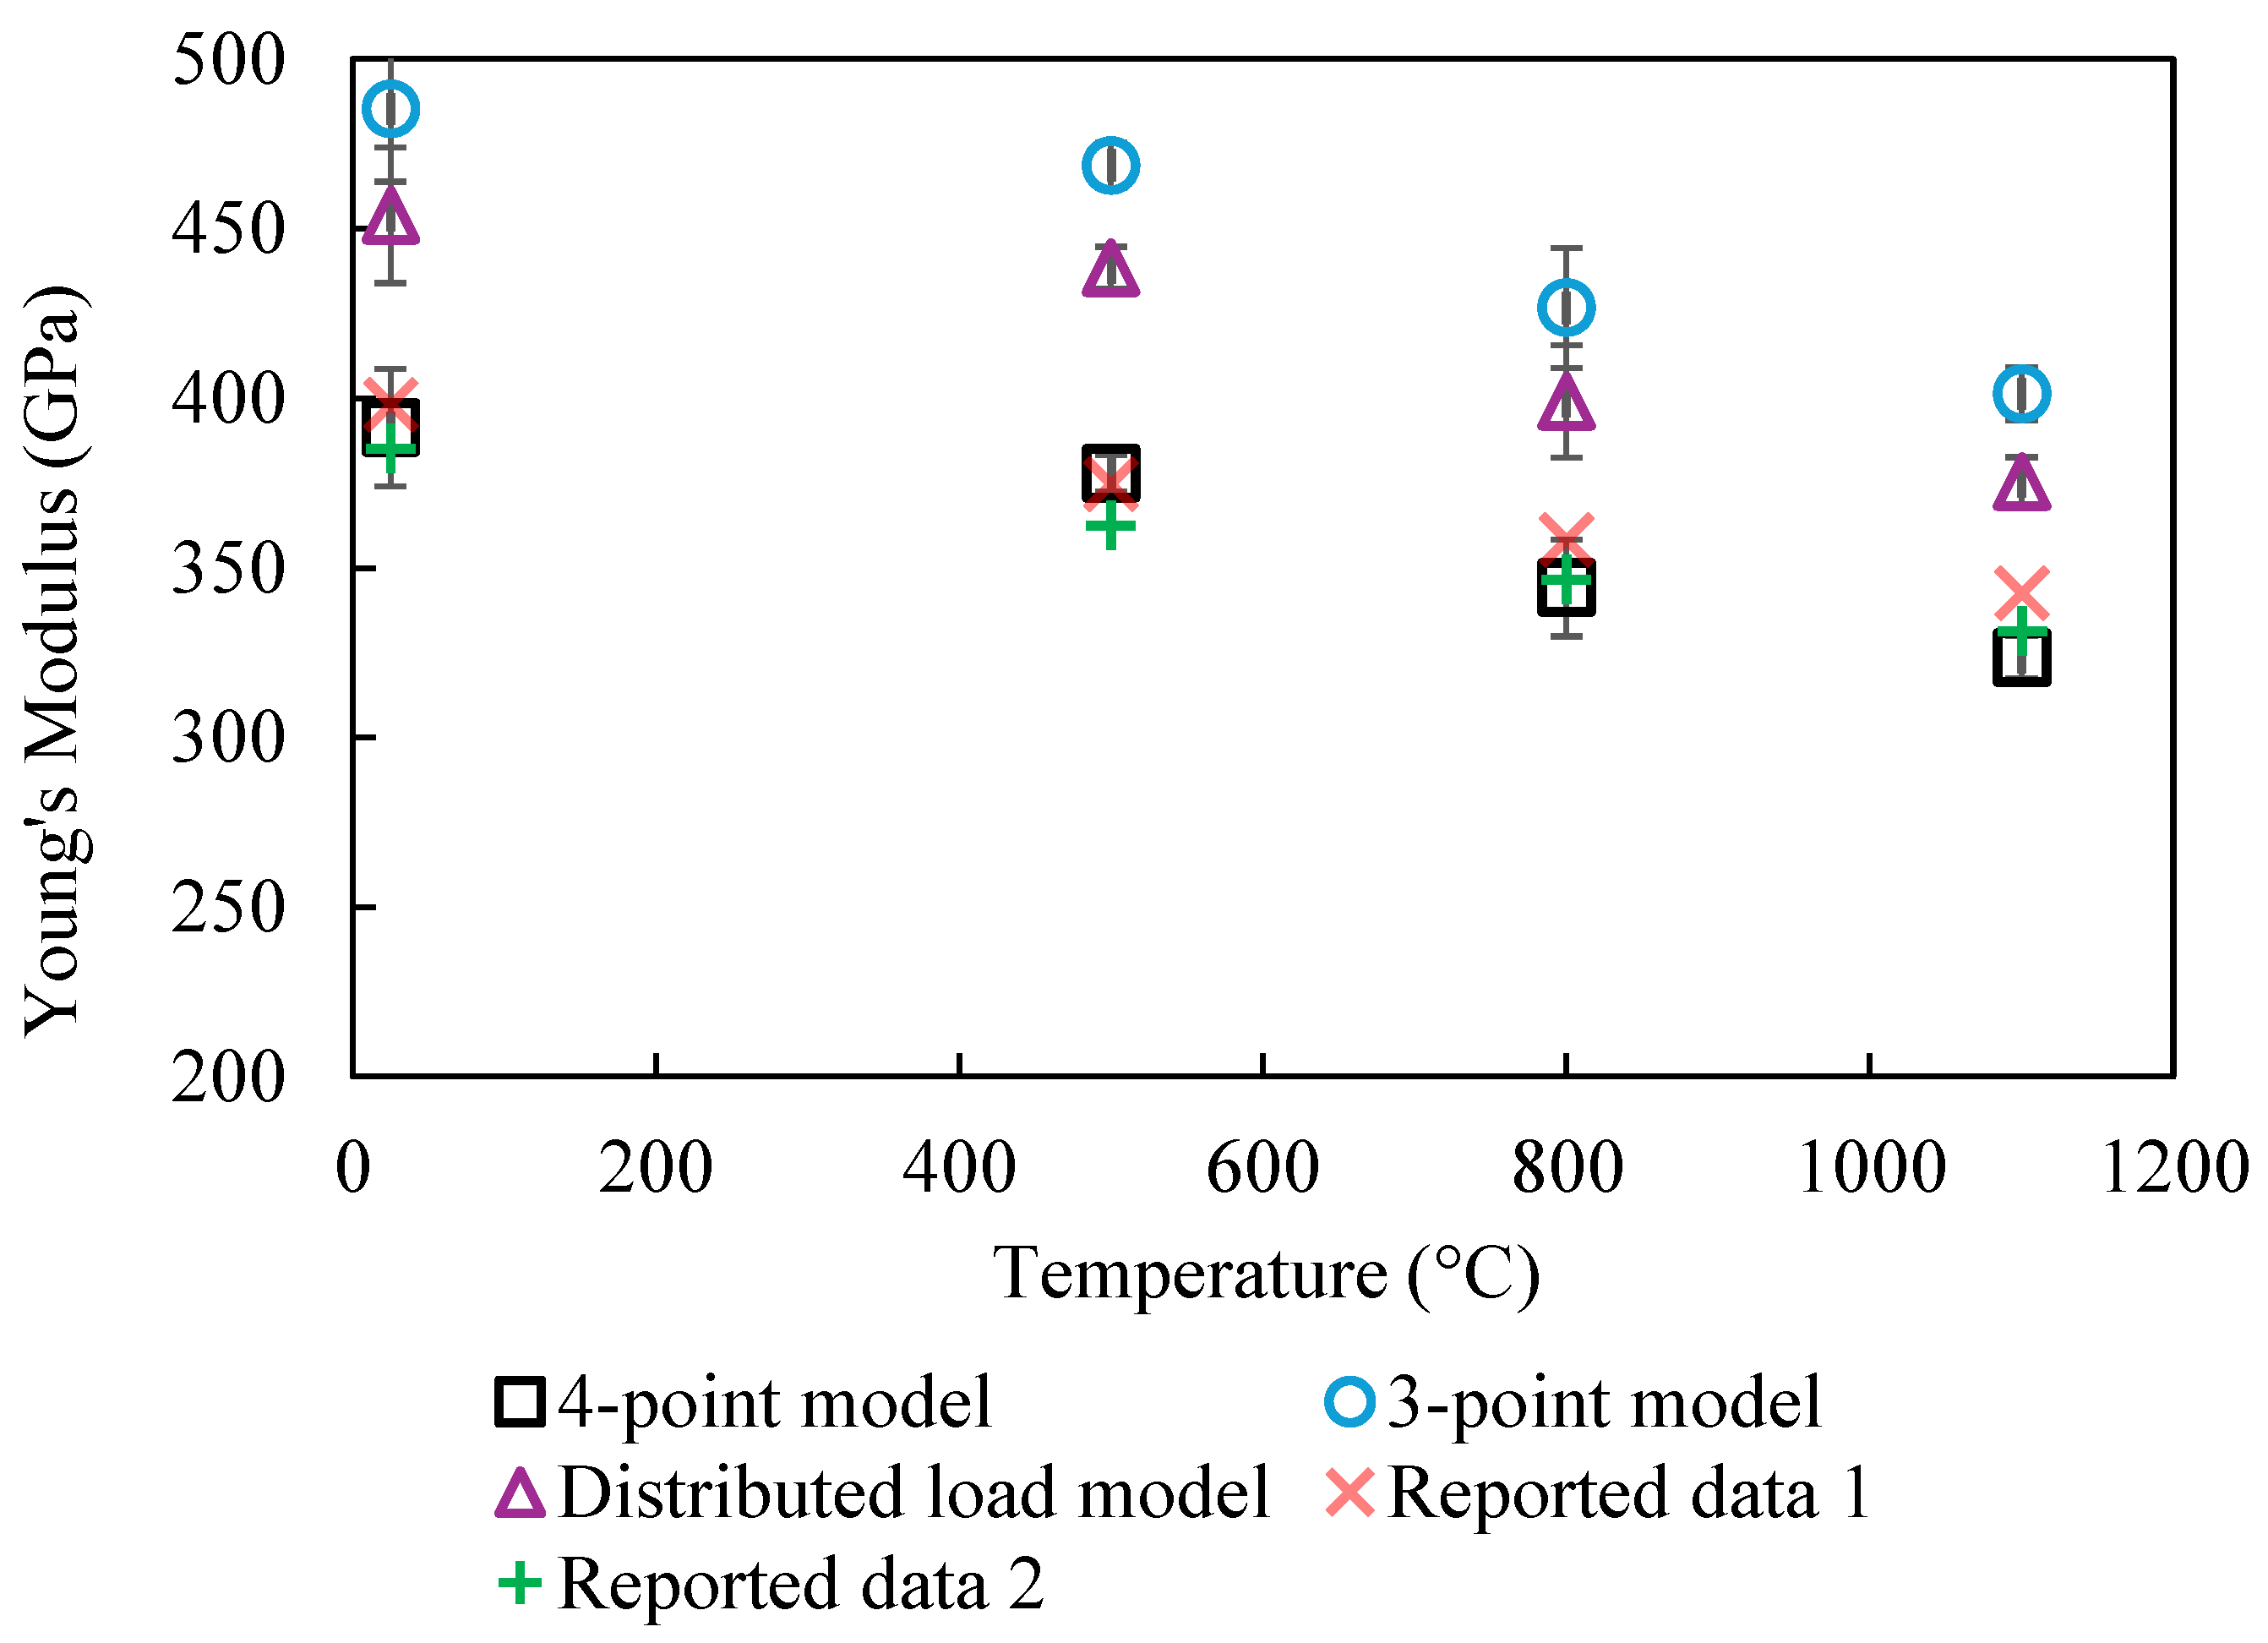
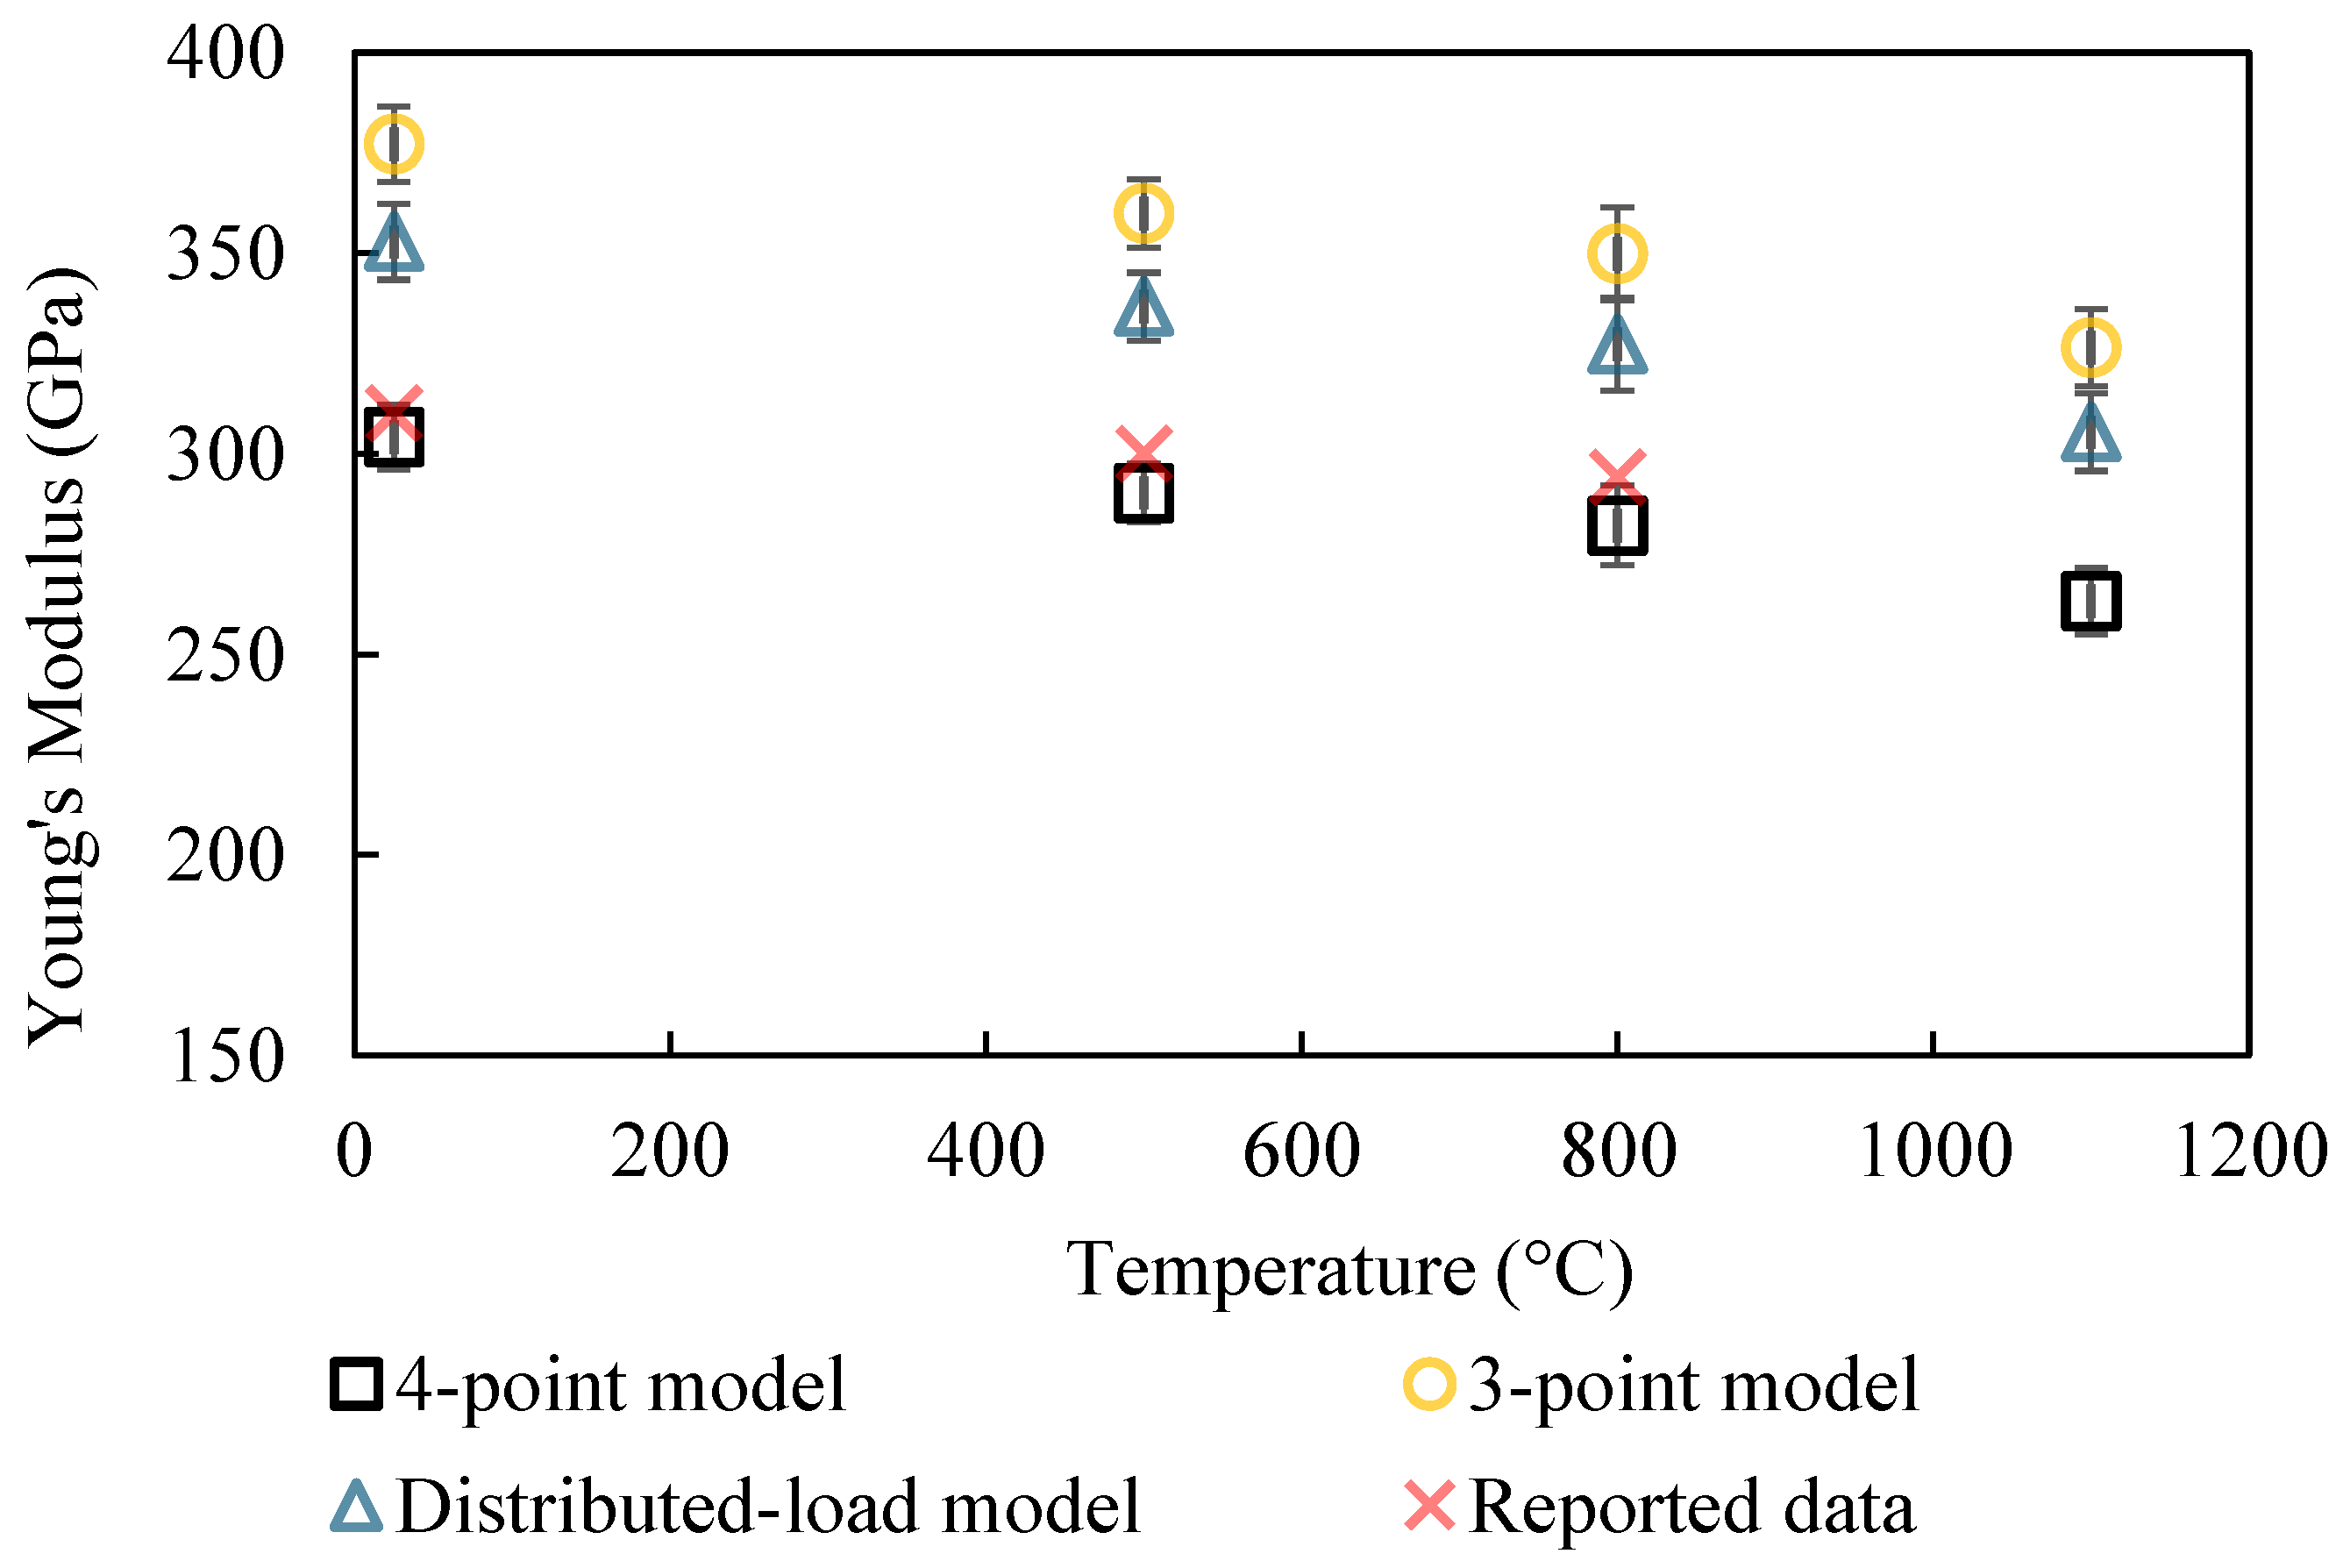
The results of these three geometry are compared in
Figure 12a for Al
2O
3 and
Figure 12b for AlN. These results clearly demonstrate that the 4-point geometry best describes the start of the unloading process during which the measurements are made. The 3-point and distributed-load models result in higher Young’s modulus results, with an average factor of 1.24 times and 1.16 times compared to the values given by 4-point model, respectively (based on the specific dimensions of our setup). This is because at the start of the unloading process, the micro-beam has the highest displacement (
w0). With the smooth surface of the microbeam processed by the pico-second laser, the TMA loading is only in contact with the microbeam at the perimeter of the probe of TMA (
Figure 2). Therefore, at the early stage of the unloading, the geometry can be treated as a 4-point flexure test.
Table 3 compares various elastic modulus measurement methods, highlighting their principles, advantages, and limitations. Traditional tests are straightforward but need bulk samples; resonance methods are non-destructive but are sensitive to dimensions [
1]. Nanoindentation and micropillar testing offer micron-scale measurements but face surface and fabrication challenges [
7,
8,
9,
11,
12]. The novel method here provides localized, high-temperature measurements.
5. Conclusion
A new method of measuring the elastic modulus of ceramics at elevated temperatures based on TMA and laser-machined miniature beams has been developed. The test requires careful measurements of the geometry of the sample. The technique developed in this paper allows the investigation of the elastic modulus at a length scale that is in between the traditional macro-scale (sample sizes of cm and higher) and micro-techniques (sample size of 10 to 100 microns). The length scale used in this test has the ability to both investigate the average properties of small samples and also to probe the localized properties in materials where the inhomogeneity is at the length scale of relevance for this test. The needed corrections to the raw data are discussed together with the different potential loading geometries. A comparison of the experimental results for the reported value of two ceramics shows very good agreement, giving a measure of confidence in the use of this technique.
Author Contributions
Conceptualization, Rajendra K. Bordia and Fei Peng; methodology, Hai Xiao; validation, Rajendra K. Bordia, and Fei Peng; formal analysis, Zhao Zhang; writing—original draft preparation, Zhao Zhang; writing—review and editing, Fei Peng; funding acquisition, Rajendra K. Bordia and Fei Peng. All authors have read and agreed to the published version of the manuscript.”
Funding
This research was funded by DOE/NETL (DE-FE0031826 and DE-FE0032231) and NIH (P20 GM121342).
Data Availability Statement
We encourage all authors of articles published in MDPI journals to share their research data. In this section, please provide details regarding where data supporting reported results can be found, including links to publicly archived datasets analyzed or generated during the study. Where no new data were created, or where data is unavailable due to privacy or ethical restrictions, a statement is still required. Suggested Data Availability Statements are available in section “MDPI Research Data Policies” at
https://www.mdpi.com/ethics.
Conflicts of Interest
The authors declare no conflicts of interest.
References
- Lord, J. D., & Morrell, R. Elastic modulus measurement. Measurement Good Practice Guide, 2007, 98. 2007.
- Yagi, H.; Yanagitani, T.; Numazawa, T.; Ueda, K. The physical properties of transparent Y3Al5O12: Elastic modulus at high temperature and thermal conductivity at low temperature. Ceramics international 2007, 33, 711–714. [Google Scholar] [CrossRef]
- Bruls, R. J.; Hintzen, H. T.; De With, G.; Metselaar, R. The temperature dependence of the Young's modulus of MgSiN2, AlN and Si3N4. Journal of the European Ceramic Society 2001, 21, 263–268. [Google Scholar] [CrossRef]
- Miljojković, J.; Bijelić, I.; Vranić, N.; Radovanović, N.; Živković, M. Determining elastic modulus of the material by measuring the deflection of the beam loaded in bending. Tehnicki vjesnik/Technical Gazette 2017, 24, 1227–1234. [Google Scholar]
- Nonnet, E.; Lequeux, N.; Boch, P. Elastic properties of high alumina cement castables from room temperature to 1600 C. Journal of the European Ceramic Society 1999, 19, 1575–1583. [Google Scholar] [CrossRef]
- Spinner, S.; Reichard, T. W.; Tefft, W.E. A comparison of experimental and theoretical relations between Young’s modulus and the flexural and longitudinal resonance frequencies of uniform bars. Journal of Research of the National Bureau of Standards. Section A, Physics and Chemistry 1960, 64, 147–155. [Google Scholar] [CrossRef] [PubMed]
- Sun, Y.; Chen, P.; Liu, L.; Yan, M.; Wu, X.; Yu, C.; Liu, Z. Local mechanical properties of AlxCoCrCuFeNi high entropy alloy characterized using nanoindentation. Intermetallics 2018, 93, 85–88. [Google Scholar] [CrossRef]
- Pelissari, P. I.; Bouville, F.; Pandolfelli, V. C.; Carnelli, D.; Giuliani, F.; Luz, A. P.; Saiz, E.; Studart, A. R. Nacre-like ceramic refractories for high temperature applications. Journal of the European Ceramic Society 2018, 38, 2186–2193. [Google Scholar] [CrossRef]
- Oliver, W. C.; Pharr, G. M. An improved technique for determining hardness and elastic modulus using load and displacement sensing indentation experiments. Journal of materials research 1992, 7, 1564–1583. [Google Scholar] [CrossRef]
- Kalkman, A. J.; Verbruggen, A. H.; Janssen, G. C. A. M. High-temperature bulge-test setup for mechanical testing of free-standing thin films. Review of scientific instruments 2003, 74, 1383–1385. [Google Scholar] [CrossRef]
- Imrich, P. J.; Kirchlechner, C.; Kiener, D.; Dehm, G. In situ TEM microcompression of single and bicrystalline samples: insights and limitations. Jom 2015, 67, 1704–1712. [Google Scholar] [CrossRef]
- Yano, K. H.; Swenson, M. J.; Wu, Y.; Wharry, J. P. TEM in situ micropillar compression tests of ion irradiated oxide dispersion strengthened alloy. Journal of Nuclear Materials 2017, 483, 107–120. [Google Scholar] [CrossRef]
- Hemker, K. J.; Sharpe Jr, W. N. Microscale characterization of mechanical properties. Annu. Rev. Mater. Res. 2007, 37, 93–126. [Google Scholar] [CrossRef]
- Li, W.; Wang, R.; Li, D.; Fang, D. A model of temperature-dependent Young's modulus for ultrahigh temperature ceramics. Physics Research International 2011, 2011, 791545. [Google Scholar] [CrossRef]
- Born, M.; Huang, K. Dynamical theory of crystal lattices. university press, Oxford, 1996.
- Soga, N.; Anderson, O. L. High-temperature elastic properties of polycrystalline MgO and Al2O3. Journal of the American Ceramic Society 1966, 49, 355–359. [Google Scholar] [CrossRef]
- Shimada, M.; Matsushita, K. I.; Kuratani, S.; Okamoto, T.; Koizumi, M.; Tsukuma, K.; Tsukidate, T. Temperature dependence of Young's modulus and internal friction in alumina, silicon nitride, and partially stabilized zirconia ceramics. Journal of the American Ceramic Society 1984, 67, C–23. [Google Scholar] [CrossRef]
- Wachtman Jr, J. B.; Tefft, W. E.; Lam Jr, D. G.; Apstein, C. S. Exponential temperature dependence of Young's modulus for several oxides. Physical review 1961, 122, 1754–1758. [Google Scholar] [CrossRef]
- Heritage, K.; Frisby, C.; Wolfenden, A. Impulse excitation technique for dynamic flexural measurements at moderate temperature. Review of scientific instruments 1988, 59, 973–974. [Google Scholar] [CrossRef]
- ASTM E8: Standard Test Methods for Tension Testing of Metallic Materials.
- ASTM C1161 - Standard Test Method for Flexural Strength of Advanced Ceramics at Ambient Temperature. ASTM International2013. p. 1-19.
- EN 843-2, Advanced technical ceramics - Monolithic ceramics - Mechanical properties at room temperature - Part 2: Determination of elastic moduli Konstruktionskeramer - Monolitiska keramer - Mekaniska egenskaper vid rumstemperatur - Del 2: Bestämning av. 1995.
- Pronk, A.C. Theory of the Four Point Dynamic Bending Test Part I: General Theory, 2006.
- Gross, D.; Hauger, W. Engineering mechanics 2: Mechanics of Materials; Springer: Berlin/Heidelberg, Germany, 2011. [Google Scholar]
- Semendyayev, I. B. K.; Mühlig, G. M. H. Handbook of Mathematics, 3rd ed.; Springer: Berlin/Heidelberg, Germany, 1997. [Google Scholar]
Figure 1.
Four-point bending test geometry.
Figure 1.
Four-point bending test geometry.
Figure 2.
Elastic modulus measurement set-up for microbeam in TMA.
Figure 2.
Elastic modulus measurement set-up for microbeam in TMA.
Figure 3.
Picosecond laser set-up for laser-machining micro-beams from ceramics.
Figure 3.
Picosecond laser set-up for laser-machining micro-beams from ceramics.
Figure 4.
Geometry of ceramic samples before and after laser-machining.
Figure 4.
Geometry of ceramic samples before and after laser-machining.
Figure 5.
(a) optical microscopy image of the top view of the microbeam (b) SEM image of the cross-section of the microbeam.
Figure 5.
(a) optical microscopy image of the top view of the microbeam (b) SEM image of the cross-section of the microbeam.
Figure 6.
(a) The orientation of micro-beam on TMA; (b) Axes rotation for the moment of inertia calculation.
Figure 6.
(a) The orientation of micro-beam on TMA; (b) Axes rotation for the moment of inertia calculation.
Figure 7.
Load and temperature profile of an elastic modulus measurement.
Figure 7.
Load and temperature profile of an elastic modulus measurement.
Figure 8.
Comparison of the temperature dependence of elastic modulus for Al2O3 between experimental data and reported data (16).
Figure 8.
Comparison of the temperature dependence of elastic modulus for Al2O3 between experimental data and reported data (16).
Figure 9.
Comparison of the temperature dependence of elastic modulus for AlN between experimental data and reported data (3).
Figure 9.
Comparison of the temperature dependence of elastic modulus for AlN between experimental data and reported data (3).
Figure 10.
Part of data used to calculate sample’s elastic modulus is marked in the blue rectangle.
Figure 10.
Part of data used to calculate sample’s elastic modulus is marked in the blue rectangle.
Figure 11.
(a) Three-point bending test geometry.
Figure 11.
(a) Three-point bending test geometry.
Figure 11.
(b) Beam bending test with evenly distributed load.
Figure 11.
(b) Beam bending test with evenly distributed load.
Figure 12.
(a) Comparison of the temperature dependence of elastic modulus for Al2O3 between experimental results, using 4-point, 3-point, and distributed-load geometry, and reported values (16).
Figure 12.
(a) Comparison of the temperature dependence of elastic modulus for Al2O3 between experimental results, using 4-point, 3-point, and distributed-load geometry, and reported values (16).
Figure 12.
(b) Comparison of the temperature dependence of elastic modulus for AlN between experimental results, using 4-point, 3-point, and distributed-load geometry, and reported values (3).
Figure 12.
(b) Comparison of the temperature dependence of elastic modulus for AlN between experimental results, using 4-point, 3-point, and distributed-load geometry, and reported values (3).
Table 1.
Dimension of the alumina and aluminum nitride samples.
Table 1.
Dimension of the alumina and aluminum nitride samples.
| |
Sample # |
(mm) |
) |
) |
) |
| Alumina |
1 |
8.80 |
97 |
275 |
500 |
| 2 |
8.80 |
97 |
290 |
500 |
| 3 |
8.80 |
71 |
245 |
500 |
| 4 |
8.80 |
115 |
255 |
500 |
| Aluminum nitride |
5 |
8.80 |
157 |
240 |
500 |
| 6 |
8.80 |
97 |
228 |
500 |
| 7 |
8.80 |
89 |
243 |
500 |
Table 2.
Comparison of elastic moduli of alumina and aluminum nitride measured in this study and in the literature from room temperature to 1100°C.
Table 2.
Comparison of elastic moduli of alumina and aluminum nitride measured in this study and in the literature from room temperature to 1100°C.
| Temperature刘(°C) |
Alumina (GPa) |
Aluminum nitride (GPa) |
| |
Report in Ref. [16] |
Report in Ref. [16] |
This paper |
Report in Ref. [3] |
This paper |
| 25 |
398 |
385 |
391 |
310 |
304 |
| 500 |
374 |
362 |
378 |
300 |
290 |
| 800 |
358 |
347 |
344 |
294 |
282 |
| 1100 |
342 |
331 |
324 |
- |
263 |
Table 3.
Comparison of Methods for Measuring Elastic Modulus.
Table 3.
Comparison of Methods for Measuring Elastic Modulus.
| Method |
Principle |
Advantages |
Limitations |
| Tensile and flexure tests |
Measures deformation under applied stress |
Simple experimental set-up;刘Standardized and widely used. |
Bulk or large-scale samples;刘 |
| Resonance and impact excitation methods |
Measures natural frequency or response to impact |
Non-destructive;刘High-temperature capability; |
Bulk or large-scale samples;刘Dimensional sensitivity;刘High surface finish requirement;刘Suspension and support issues at high temperature |
| Nanoindentation |
Measures indentation hardness and modulus using a sharp indenter |
Localized measurements (micron scale) |
Sensitive to surface conditions;刘Complexity in analysis. |
| Micropillar testing |
Measures compressing or deforming of small, cylindrical pillars |
Localized measurements (micron scale) |
Fabrication challenges;刘Small stress-strain measurement;刘Complexity in analysis;刘Properties may differ from those of bulk materials. |
| This work |
Measures deformation of laser-machined microbeam under applied stress with a TMA |
Simple result analysis;刘High-temperature testing;刘Easy control of inter atmosphere;刘Localized measurements (millimeter scale) |
Requires precise setup;刘Requires laser micro-machining capability. |
|
Disclaimer/Publisher’s Note: The statements, opinions and data contained in all publications are solely those of the individual author(s) and contributor(s) and not of MDPI and/or the editor(s). MDPI and/or the editor(s) disclaim responsibility for any injury to people or property resulting from any ideas, methods, instructions or products referred to in the content. |
© 2024 by the authors. Licensee MDPI, Basel, Switzerland. This article is an open access article distributed under the terms and conditions of the Creative Commons Attribution (CC BY) license (https://creativecommons.org/licenses/by/4.0/).
