Preprint
Article

Modeling and Measurement of Tool Wear During Angular Positioning of a Round Cutting Insert of a Toroidal Milling Tool for Multi-axis Milling

Altmetrics

Downloads

50

Views

33

Comments

0

A peer-reviewed article of this preprint also exists.

Submitted:

25 September 2024

Posted:

26 September 2024

You are already at the latest version

Alerts
Abstract
The aim of this work is to propose an angular positioning solution for the round cutting insert of an indexable insert torus milling cutter, dedicated to the multi-axis milling process under HSM conditions. The solution was based on the development of a wear model using a nonlinear estimation method with an eigenfunction, the development of a tool life model taking into account parameter of the cutter blade working angle and the method of reference marking and insert mounting, as well as the measurement methodology. The own function adopted to approximate the wear of the tool over its useful life is adequate and provides a prediction accuracy of 90%. The developed procedure for angular positioning and measurement enables the entire cutting edge of the cutting blade to be fully used, so that the total lifespan of the tool as an indexable insert tool is significantly extended. In addition, the measured largest defect values between the worn cutting edge and the nominal outline of the insert indicate the location of “notching” type wear.
Keywords: 
Subject: Engineering  -   Mechanical Engineering

1. Introduction

Positioning is defined as the exact location of a given object relative to an assumed reference point, which is usually the origin of a given Cartesian coordinate system. Positioning is one of the basic operations in many areas of research and scientific disciplines, including basically industry, commerce, and everyday life. The most famous and widely used positioning tool is the Global Positioning System (GPS) [1]. GPS and the Internet, especially the Internet and various electronic-optical-sensoric systems, are currently the most important infrastructures of the global information society. These systems are widely used in navigation, transportation, environmental protection, surveying, public safety, military, etc. Positioning, or more precisely, precise positioning, is also widely used in many areas of mechanical engineering, especially in the era of the Industry 4.0 industrial revolution [2]. In this case, the most tangible examples of precision positioning tasks are: locating the probe of a measuring instrument relative to the measurement target, determining the position of the cutter relative to the workpiece, montage a screw in the target hole using a robot arm, etc. All examples of engineering tasks related to precise positioning described above are supported by advanced systems and technologies, including measurement systems [2,3,4,5,6,7,8,9,10,11,12].
The measurement basis for precise positioning is the latest sensor technologies for single-axis, linear, or rotational measurements. The vast majority of practical applications require positioning in a plane or in a 3D space, and one of the most frequently used is angular positioning. These are realized by multi-axis coordinate measurement methods such as triangulation and multilateration, as well as measurements in Cartesian and polar systems. The work [13] presents the results of measuring the deviation of the shaft diameter after the turning process, using the LTS laser triangulation sensor. A programme was developed and verified whose task is to communicate the PLC controller in the measurement system with the software for recording data obtained from the LTS laser triangulation sensor. In this case, inspection of the manufactured product is one of the most important operations in the technological production process [14]. Based on the test results, the authors concluded that this type of sensor is suitable for measuring the deviation parameter of the diameter of the machined surface. Another important issue is to reduce the positioning error of the rotary table of a multi-axis machine tool. The angular positioning error in this case causes poor quality milling of the workpiece surface. Therefore, in work [15] the authors developed a system to improve this issue, using Laser R-Test to calibrate angular positioning and compensate for positioning errors of the numerically controlled axes of the machine tool. Uncertainty analysis and calibration were implemented to predict the system. As evaluated by the authors of this work, the proposed measurement method can also solve the problems of coaxiality between the measuring devices and the rotary table. The system developed in this work achieves an angular error of 0.00121° for real workpieces, which is smaller than the error achieved by the commercial system, which is approximately 0.0022°. In turn, in work [16] the angular positioning error of the rotary axis caused by the tilt movement error and the spindle radial movement error was analysed and experimentally verified. In addition, the offset value introduced to the encoder was analysed and experimentally verified. Angular positioning is also an important parameter that determines the proper operation of force systems. Hence, in work [17], a non-contact optical sensing method was developed to simultaneously detect the linear and angular position of the rotor of a prototype 2DOF-SRM reluctance motor. In work [18], the authors proposed a method for calibrating the angular positioning deviation of a precision rotary table of a coordinate measuring machine based on a measurement system with a laser marker. The Levenberg-Marquardt algorithm and the singular value distribution transformation were used to calculate the coordinates of the laser marker station. The fixed-interval angular deviation was calibrated using a geometric relationship model between the coordinates of the laser marker station and the rotation angle of the turntable. In work [19] presents an angular position measurement system based on a sensor consisting of a single transmitter and two receiving coils. The mutual inductance between the transmitter coils was spatially modulated using conductive lenses. The measurement results form the basis for estimating the absolute angle. The advantage of this solution is resistance to many harmful factors, such as moisture, poor lighting, or oil contamination. Therefore, this system could be successfully used for angular positioning, e.g., indexable cutter blades. Angular positioning is also important from a military point of view. In work [20], a system was developed based on an algorithm to calculate the angular position of the rocket in real time when it is ready to launch from the rocket launcher. For this purpose, video streams recorded from three different cameras were used. Finally, the algorithm was implemented on a programmable SoPC chip using FPGA programmable array gates. In addition to systems based on sensors or optics, flexible mechanical systems are also used for precise angular positioning [21]. These are usually flexible micro-angular position measurement systems.
The analysis of the current state of knowledge clearly shows that there are no research works in which an attempt was made to develop and analyse a method for precise angular positioning of replaceable cutting blades of indexable cutters. Therefore, such an attempt was made in this work. This is particularly important in terms of extending tool life through rational and full use of the entire length of the cutting edge, especialy round cutting inserts of the torus milling cutters. All considerations will be made for a torus cutter, for which the problem of precise angular positioning is most important due to the round cutting insert. To develop such a method, one must first determine its geometric and kinematic foundations and technological assumptions. The process of multi-axis surface milling of complex parts made of a Ni-based superalloy was adopted as the geometric and kinematic basis. In this process, taking into account the processed material, the tool wear indicator VB [22,23] and the heat affected zone [24,25] become important. Therefore, this indicator was adopted as the main criterion for the method proposed in this work.

2. Fundamentals of the APofRCI Method, Taking into Account Torus Milling Cutter Cutting Blade Wear

In multi-axis face milling, the milling cutter can have any orientation in Cartesian space when machining a sculptured surface, assuming, of course, that there is no collision - in the sense of: undercutting. Consequently, different tool orientations can also be defined for a given toolpath. The geometrical characteristics of the milling cutter used for machining, the geometrical characteristics of the machined surface, and the resulting contact conditions (CWE: cutter-workpiece engagement) between the tool and the machined surface must also be taken into account.

2.1. Definition of the Torus Milling Cutter Axis Orientation

In the present work, in order to obtain the orientation of the tool axis for the kinematic variant of TPL (tool pulling) multi-axis cutting, the inclination angle was used as the process adjustment variable. In the present work, in order to obtain the tool axis orientation for the kinematic variant of TPL (tool pulling) multi-axis cutting, the inclination angle was used as the process adjustment variable. It is the same as the advance angle in this variant. The lead angle β, along with the tilt angle α, is an essential adjustable variable in CAM systems at the pre-processing stage. On the other hand, in the NC code, based on the conversion relationship between angles β and α, the inclination angle setpoint adjustable variable δ obtained in the post-processing stage of the CAM system is derived and, in this version, interpreted by the CNC control of the machine tool. Figure 1 illustrates the set variables of the tool axis, and the conversion relationship is described by Equation (1). Equation (2) defines the condition when the inclination angle is the same as the lead angle.
δ = cos 1 cos α · cos β ,
β = δ ,       w h e n :   α = 0 ° ,
Where: β: the lead angle; α: the tilt angle; δ: the inclination angle.

2.2. Characteristic of the Torus Milling Cutter

In industrial practice, torus cutters are increasingly used in the multi-axis face milling process of TPL. These cutters enable larger cutting widths to be achieved, allowing efficiency to increase and machining time to be reduced. The design of torus cutters also allows higher cutting speeds and feed rates to be used. These are usually folding cutters with indexable Round Cutting Inserts (RCI) for nominal diameters of these cutters from 12 mm.
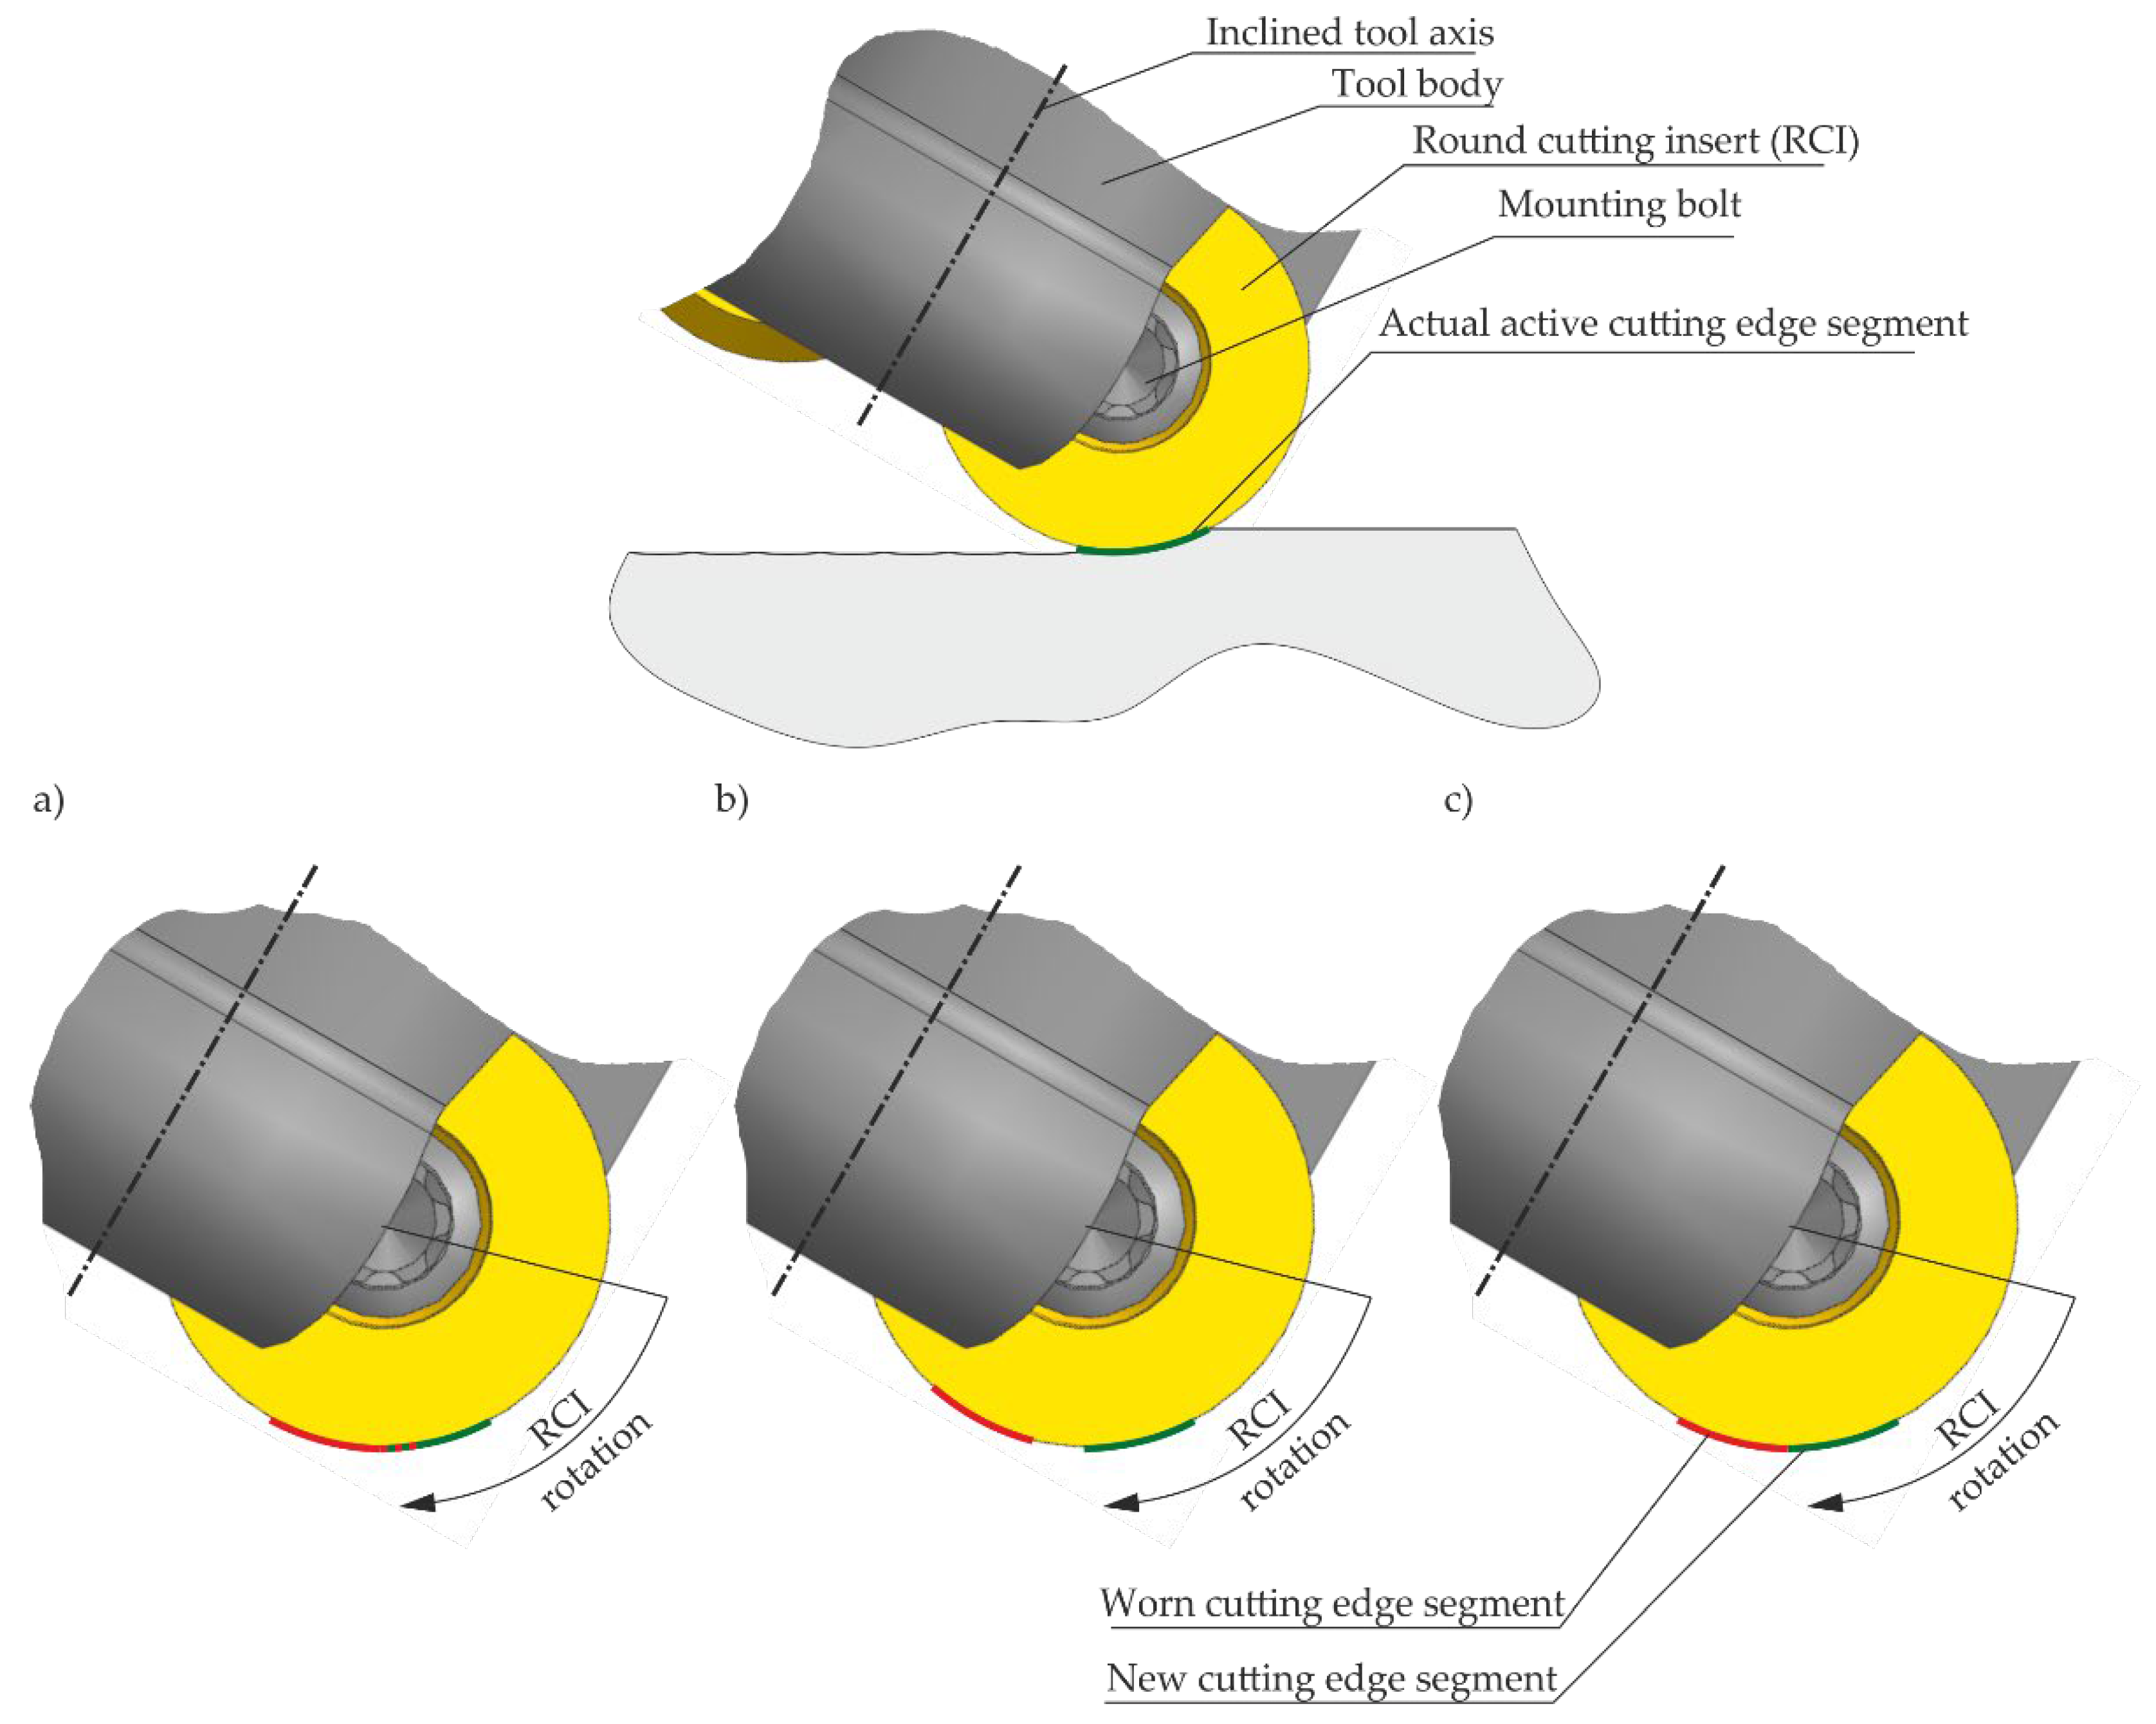
The design advantage of this type of cutter is that the indexable round cutting insert can be rotated around the axis of its mounting hole to use a new, unused cutting edge segment for machining. This allows the tool life to be significantly extended. Currently, this rotation is carried out without any control of the angular position of the round cutting insert, leading to an unreasonable use of the real segments of the cutting edge around its circumference. The tool life decreases. The possible cases are schematically illustrated in Figure 2.
The first illustrated case (Figure 2a) shows the overlap of part of a new cutting edge segment with a worn segment. This erroneous angular position can result in significant deterioration of the technological surface layer and progressive catastrophic tool wear. The second case (Figure 2b) illustrates the occurrence of an excessive gap between adjacent segments after uncontrolled rotation of the RCI. In turn, this erroneous angular position reduces the cutting capacity of the tool due to incomplete use of the entire cutting edge. In contrast, the third case (Figure 2c) illustrates a worn and new segment, directly adjacent to each other. This will only happen if the rotation of the round cutting insert around the axis of the mounting hole is controlled.
The main objective of this article is to develop an angular positioning method of the round cutting insert of the torus milling cutter that allows the full cutting potential of the entire edge of the insert to be exploited by adhering segments with uniform angular dividing.

2.3. Method to Avoid Undercutting the Machined Surface

In order to develop an angular positioning method for round cutting inserts of the torus milling cutter, dedicated to the multi-axis milling process, it is first necessary to determine the minimum required inclination angle δ. The minimum inclination angle required is to ensure that the torus milling cutter axis is positioned in such a way that no undercutting of the workpiece surface occurs. Three surface types were selected in terms of shape: biconcave, saddle concave-convex, and saddle convex-concave. The selected sculptured surfaces are described by a radius of curvature radius ρ parameter (the inverse of the curve curvature) in the feed direction ρ1 and in the direction perpendicular to the feed ρ2, respectively. A negative sign was assumed for the radius of convex curvature and a positive sign for the radius of concave curvature, as illustrated in Figure 3.
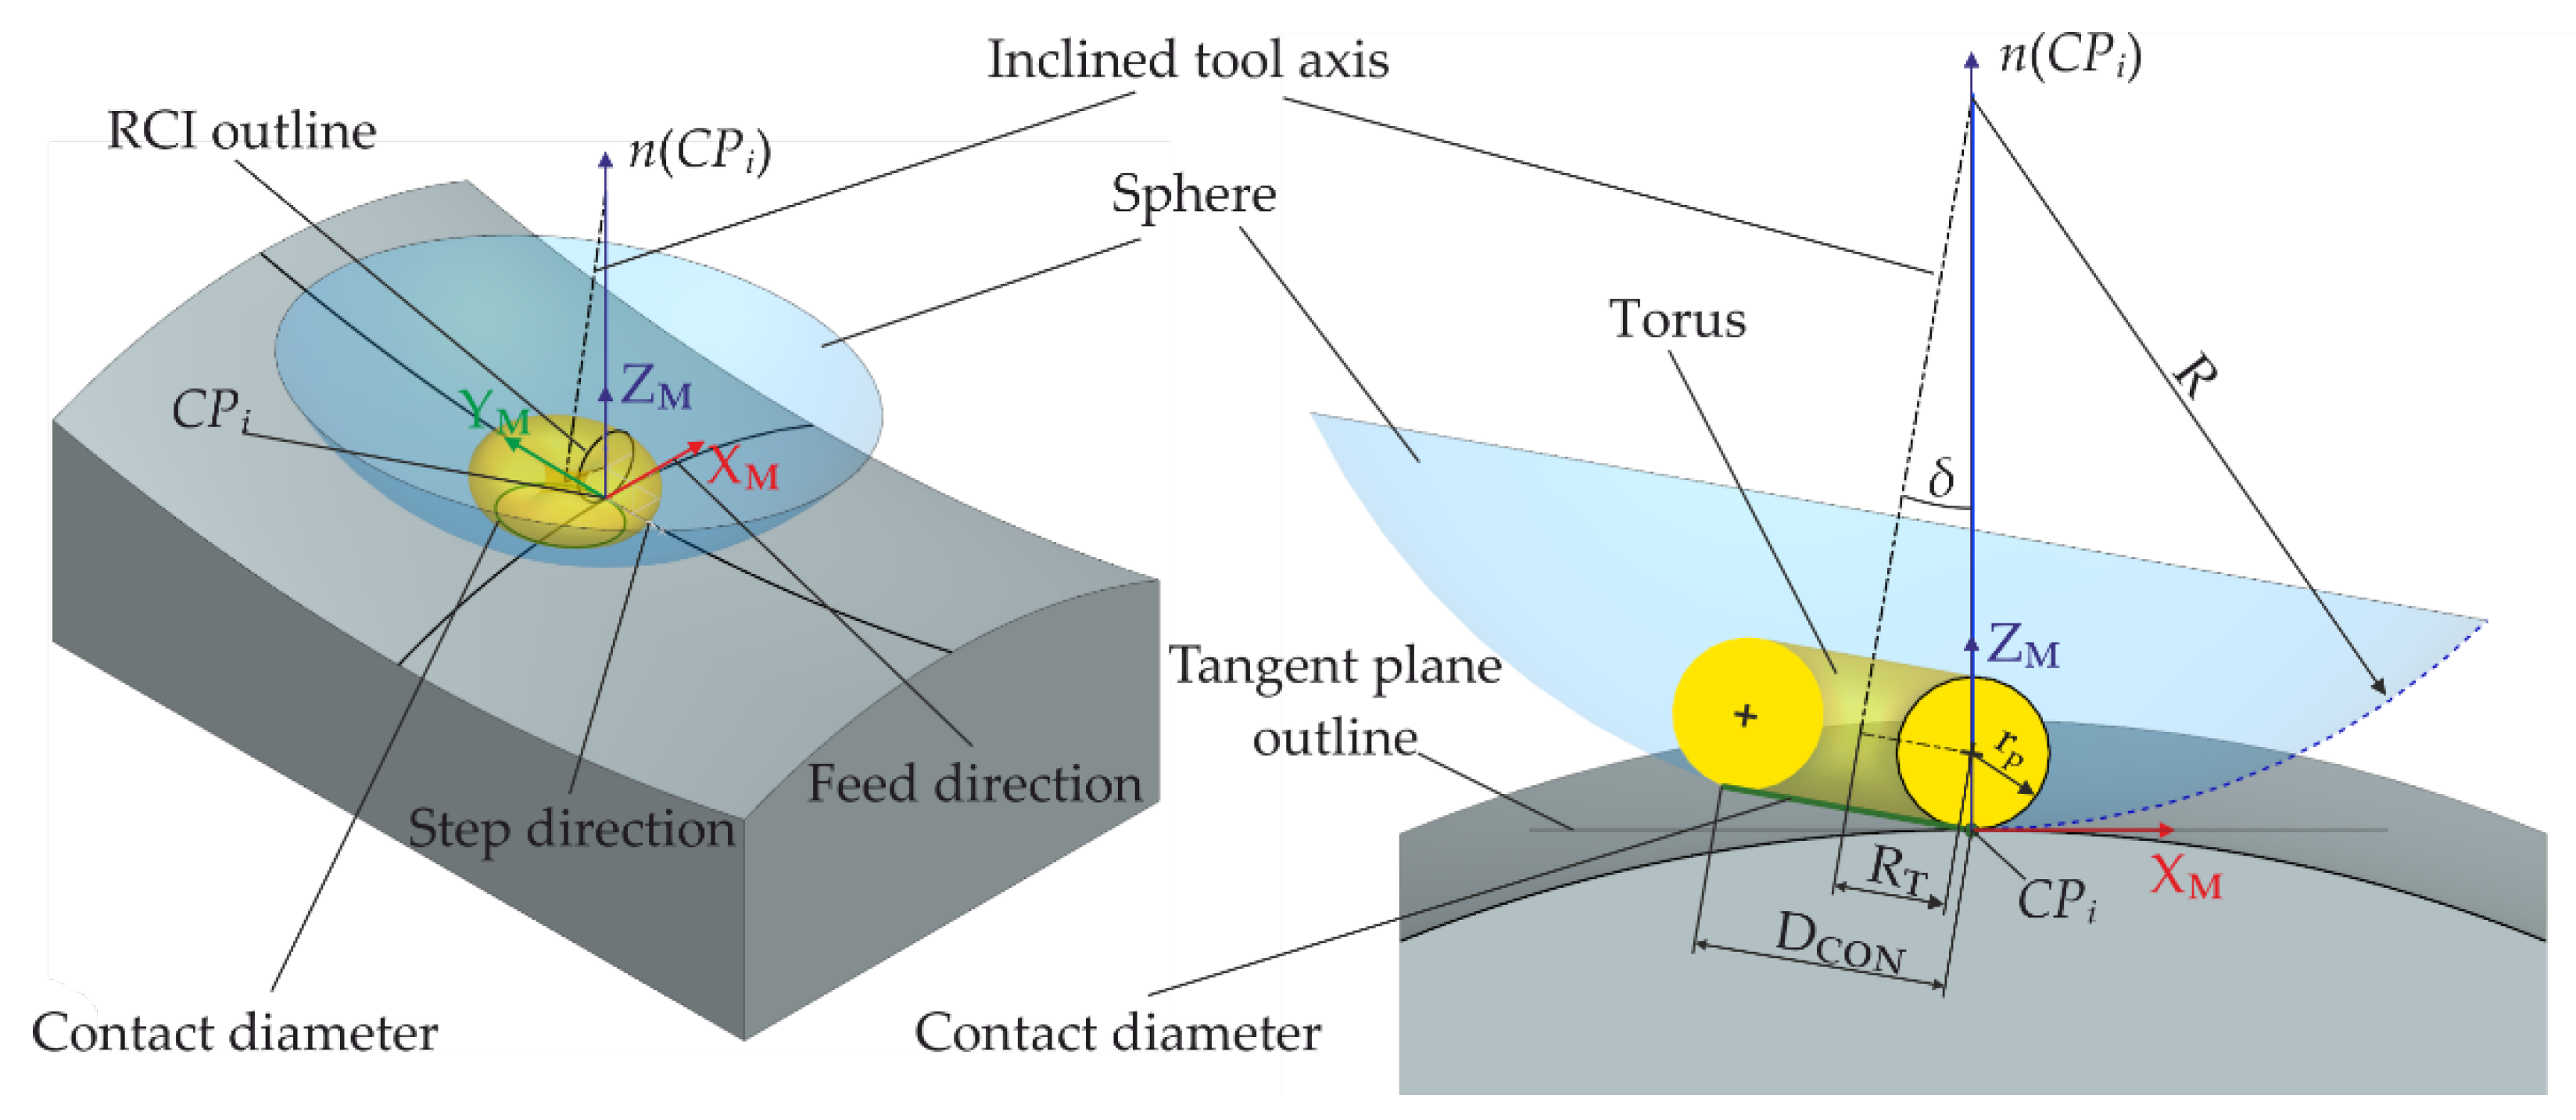
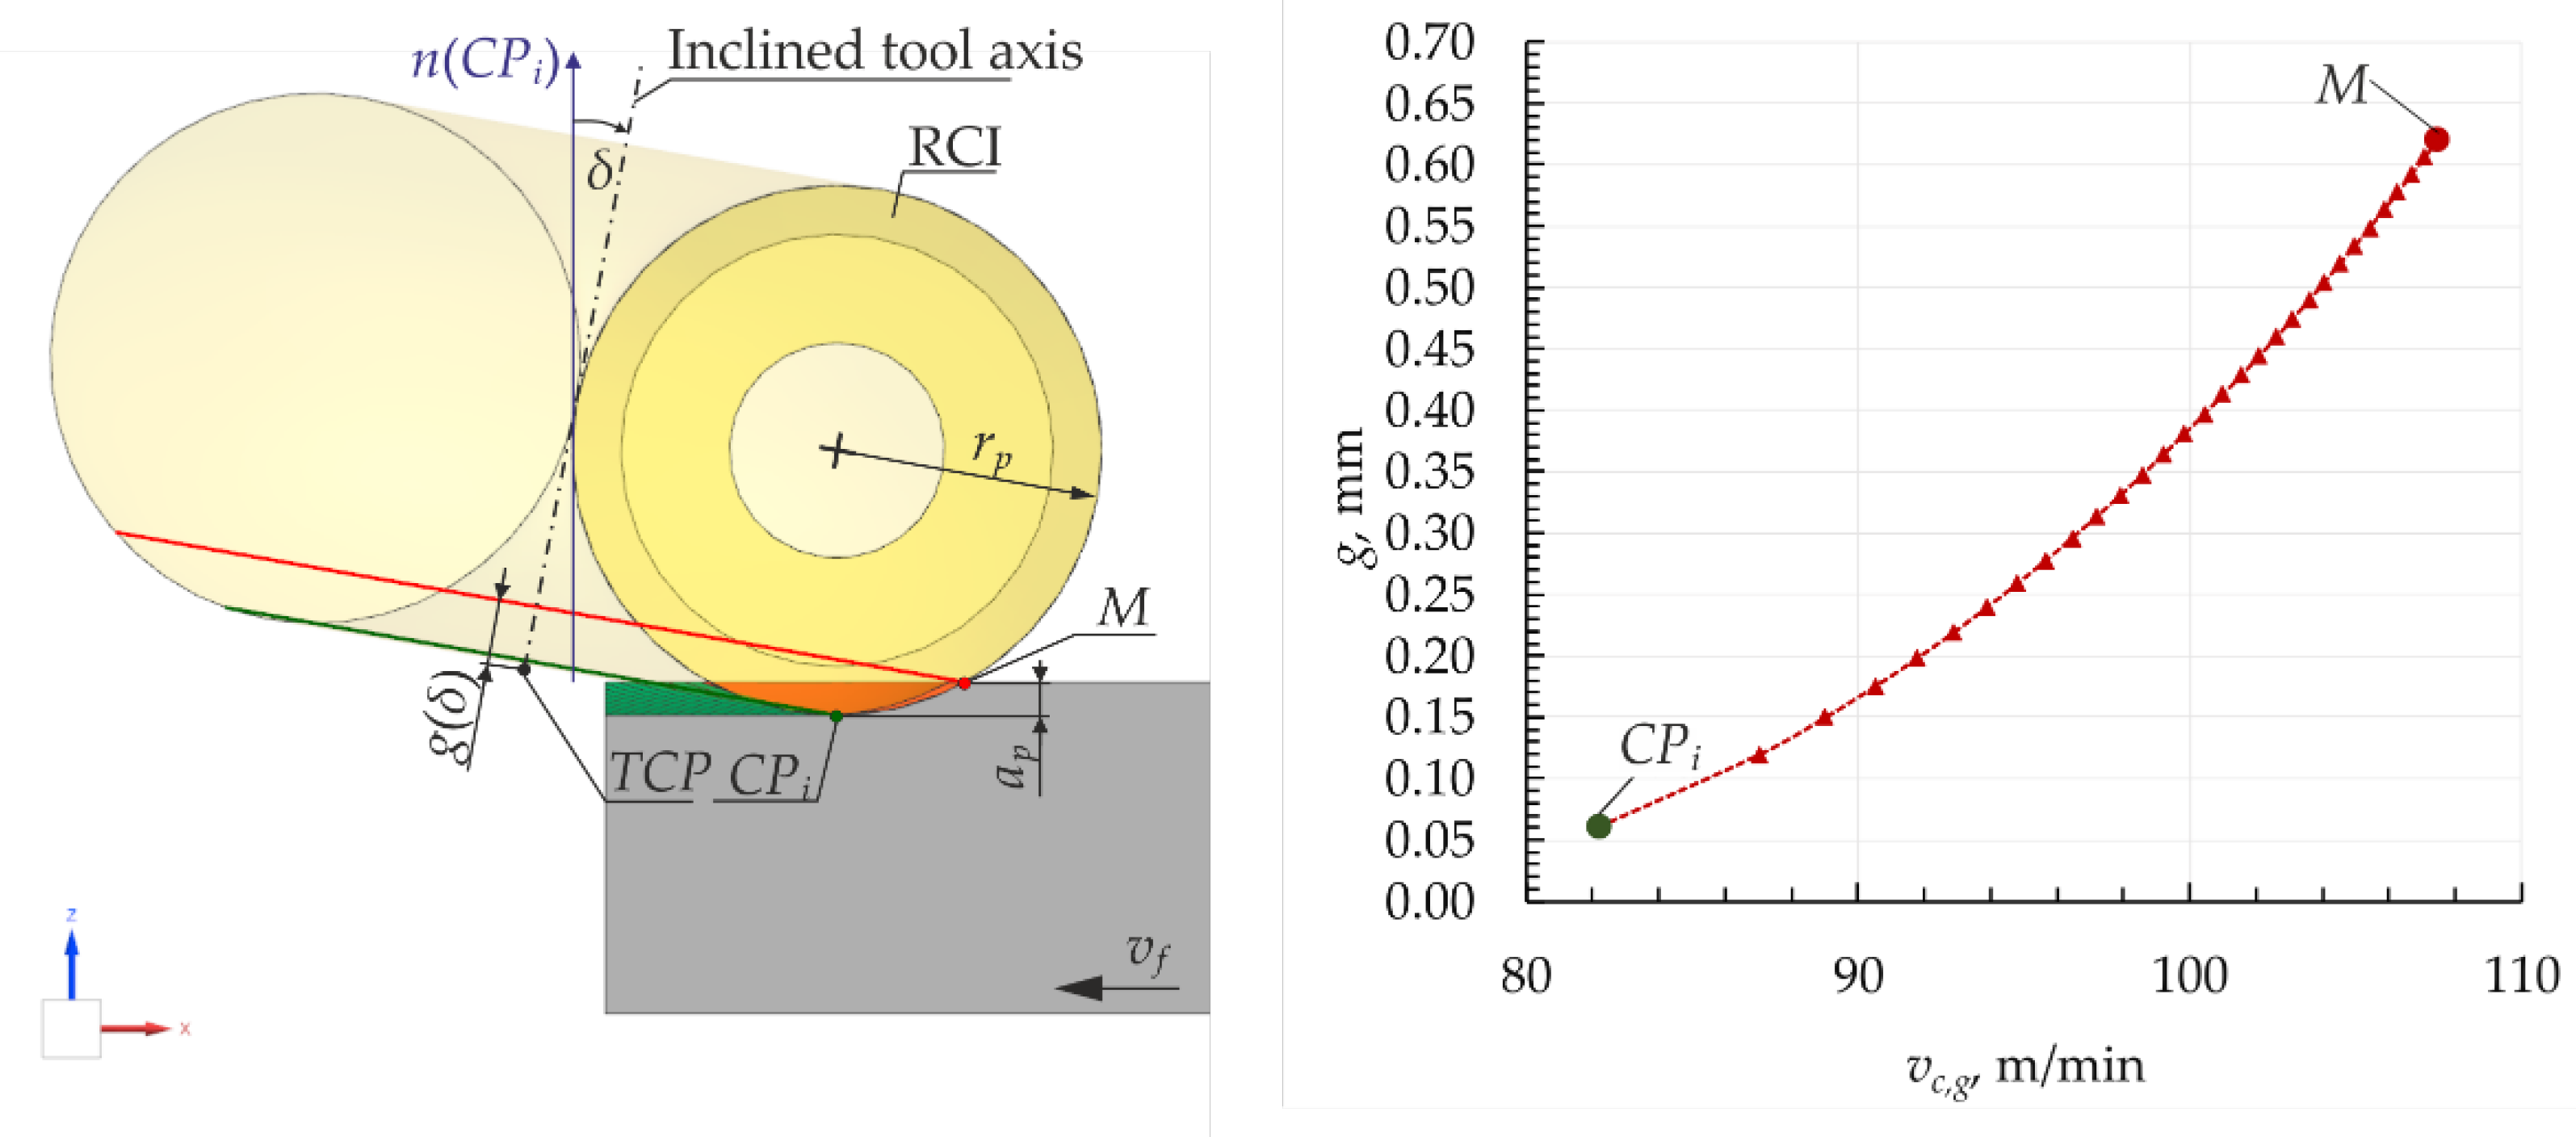
A sphere of radius R was used to determine the position of the tool in a way that excludes the possibility of the torus undercutting the machined surface. This method was first defined by Marciniak [26]. The common part of the sphere and the torus is the contact diameter, and the local position of the tool determines the contact between the torus and the machined surface at the CPi contact point, as shown in Figure 4. The inclination angle δ of the tool axis is defined relatively to the nornal vector n(CPi) of the machined surface at the contact point CPi. In generalising the problem, the machined surface was assumed to be a strictly tangential plane. This plane, in turn, is a simplified model of any type of sculptured surface at the contact point between the torus and the machined surface.
The radius of sphere R can be determined using equation (3).
R = R T sin δ + r p ,
Where: RT: the radius of the torus milling cutter (the tool rotation axis of distance of the torus from the centre of the RCI outline defining it); δ: the inclination angle; rp: the radius of the round cutting insert (the circle defining the torus).
The undercutting of the machined surface by the torus does not occur when relation (4) is fulfilled.
R ρ 1 , ρ 2 ,
Where: ρ1: the smallest radius of concave curvature in the feed direction; ρ1: the smallest radius of concave curvature in the step direction.
The above condition must be met for concave contours (for which the curvature has a positive sign). For convex contours, for δ≥0°, undercutting does not occur.
Hence, equation (5) applies to calculate the minimum inclination angle δmin, depending on the nominal diameter.
δ m i n = sin 1 R T ρ r p ,
It is assumed that there are no large changes in curvature in the immediate vicinity of the contact point CPi in the CWE that could lead to undercutting. Therefore, once calculated, the δmin parameter is used as a constant value along the entire contour of the machined surface and the tool axis is orientated in Cartesian space relative to the normal vector n(CPi) of the machined contour.

2.4. Active Cutting Edge Segment and Active Cutting Belt

Basically, the inclination angle δ is spread and determined in a plane perpendicular to the cutting speed vector vc and passing through the contact point CPi in the CWE, which is the common point of the outline of the machined surface and the cutting edge of the tool blade. The geometry of the cut layer is considered in the same plane. The geometrical parameters of the cut layer have a significant influence on the physical and technological effects of the cutting process, especially multi-axis milling.
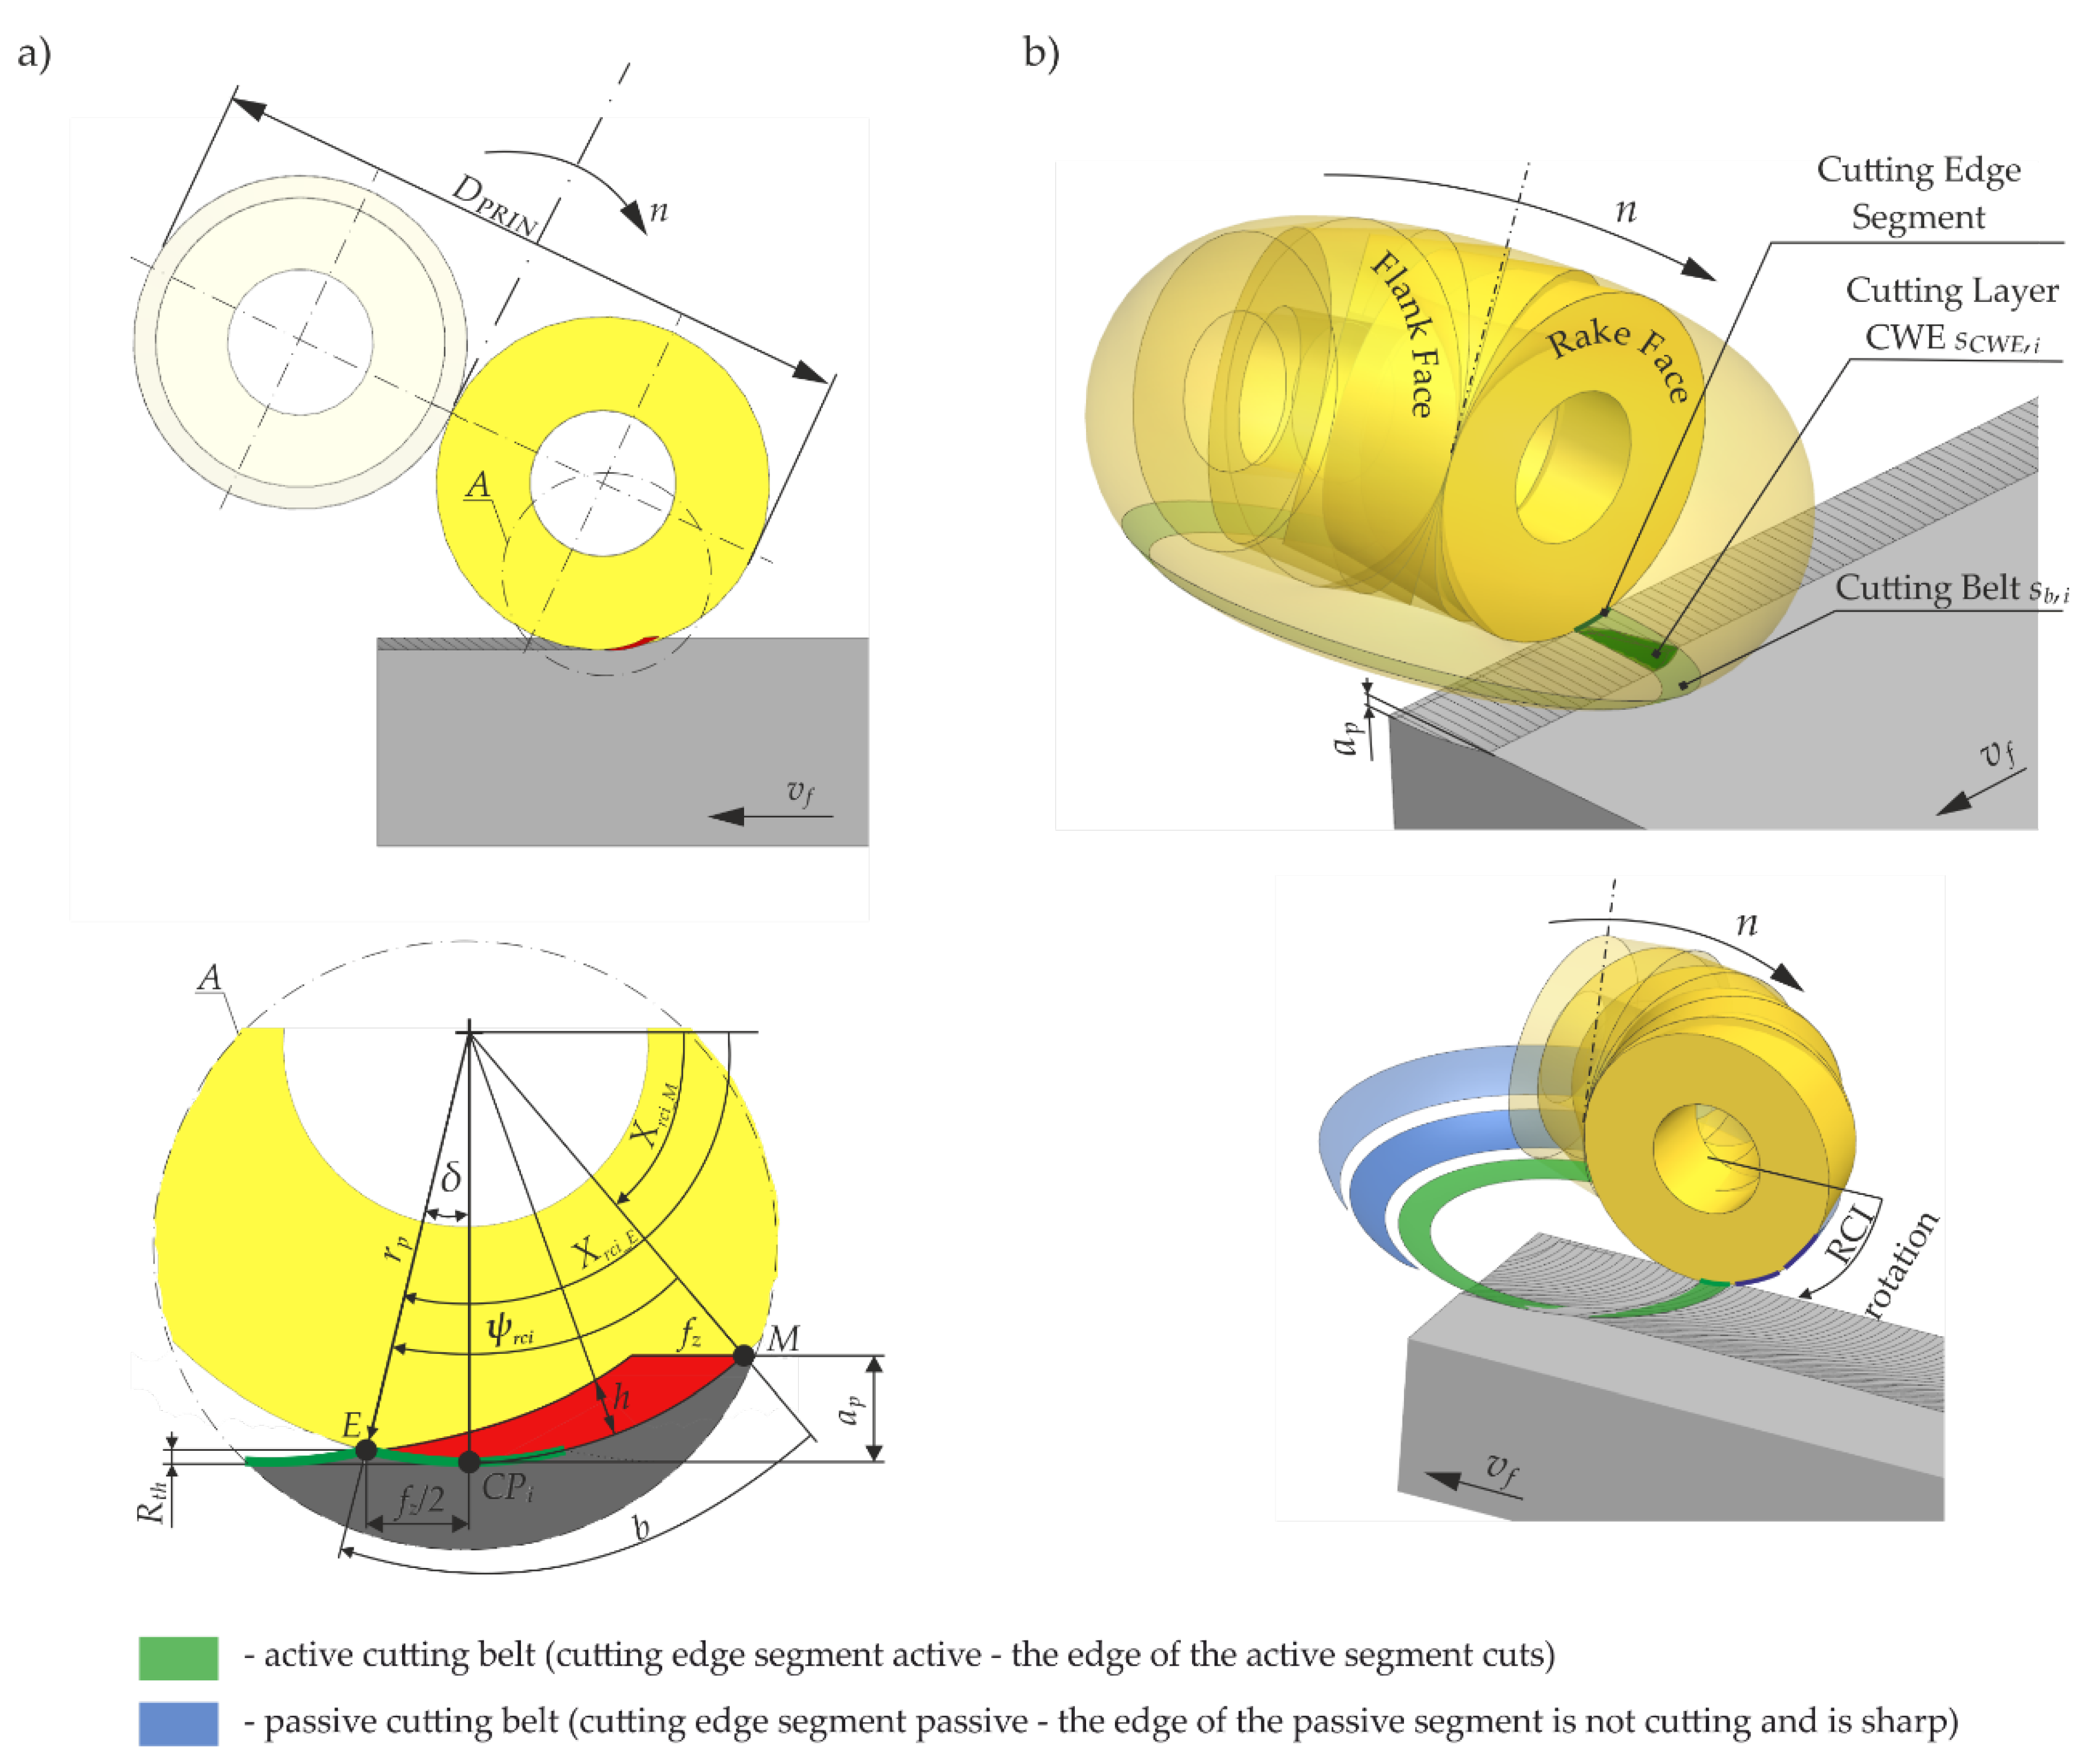
During multi-axis TPL-type milling used the torus milling cutter, the geometry of the cut layer has a characteristic shape, where, due to the kinematic-geomeric system, the thickness of the cut layer h varies along the cutting edge, as shown in Figure 5a. The geometry of the cut layer is influenced by the radius of the round cutting insert rp, the feed per tooth fz, and the depth of cut ap.
By considering the contact conditions in the CWE at the CPi contact point, the angles Χrci_M, Χrci_E and ψrci were determined to determine the maximum cross-sectional limits of the cut layer.
Angle Χrci_M – the angle defining the origin of the cross-section of the cut layer described by formula (6).
Χ r c i _ M = sin 1 1 a p r p ,
Angle Χrci_E – the angle defining the end of the cross-section of the cut layer described by formula (7).
Χ r c i _ E = π 2 + sin 1 f z 2 r p ,
Angle ψrci – working angle of the torus milling cutter, considered in the base plane of the round cutting insert at the CPi contact point, described by formula (8).
ψ r c i = π 2 + sin 1 f z 2 r p sin 1 1 a p r p ,
Relationship (8) is an important and rarely analysed relationship in the literature. It acquires particular importance, especially under the conditions of finish machining, which takes place at very small values of depth of cut ap and feed per tooth fz. Under these cutting conditions, the number of involved cutting blades (active blades) of the tool in the cutting process is zc1 [27]. Knowing the value of the angle ψrci and having the given radius rp of the round cutting insert, the length of the active segment of the cutting edge b can be calculated using the relationship (9).
b = ψ r c i r p ,
Thus, the active cutting belt can be determined (see Figure 5b) for a given inclination angle δ in the CWE. During the movement of the tool, the tool is in contact with the workpiece on a temporary patch of the machined surface, which is called Cutter-Workpiece Engagement (CWE), and the material removed is the cut layer in the form of a chip. The CWE is located on the torus action surface of the tool within the adopted depth of cut ap. As the tool to rotate about its axis, the CWE sCWE,i at the contact point forms a belt sb,i, which was named the cutting belt, which is located on the action surface of the torus milling cutter. At any moment of cutting, the segment on the cutting edge that is inside the CWE is called the active segment of the cutting edge, i.e., the edge of the active segment is cutting at that moment. In addition, segments that are outside the CWE have been identified that are passive cutting edge segments, where the edge of the passive segment does not cut and is sharp.
The angle parameter ψrci in this work is used as the main parameter for the angular positioning of the round cutting insert in the torus milling cutter body, which is a new and original solution and the basis of the angular positioning method of the round cutting insert. In order to know after what time an active cutting edge segment is unusable (for an assumed VB criterion) and what the nature of the wear is at each time interval, both a tool wear model and a tool life model must be developed.

2.5. The Torus Milling Cutter Wear and Life Model

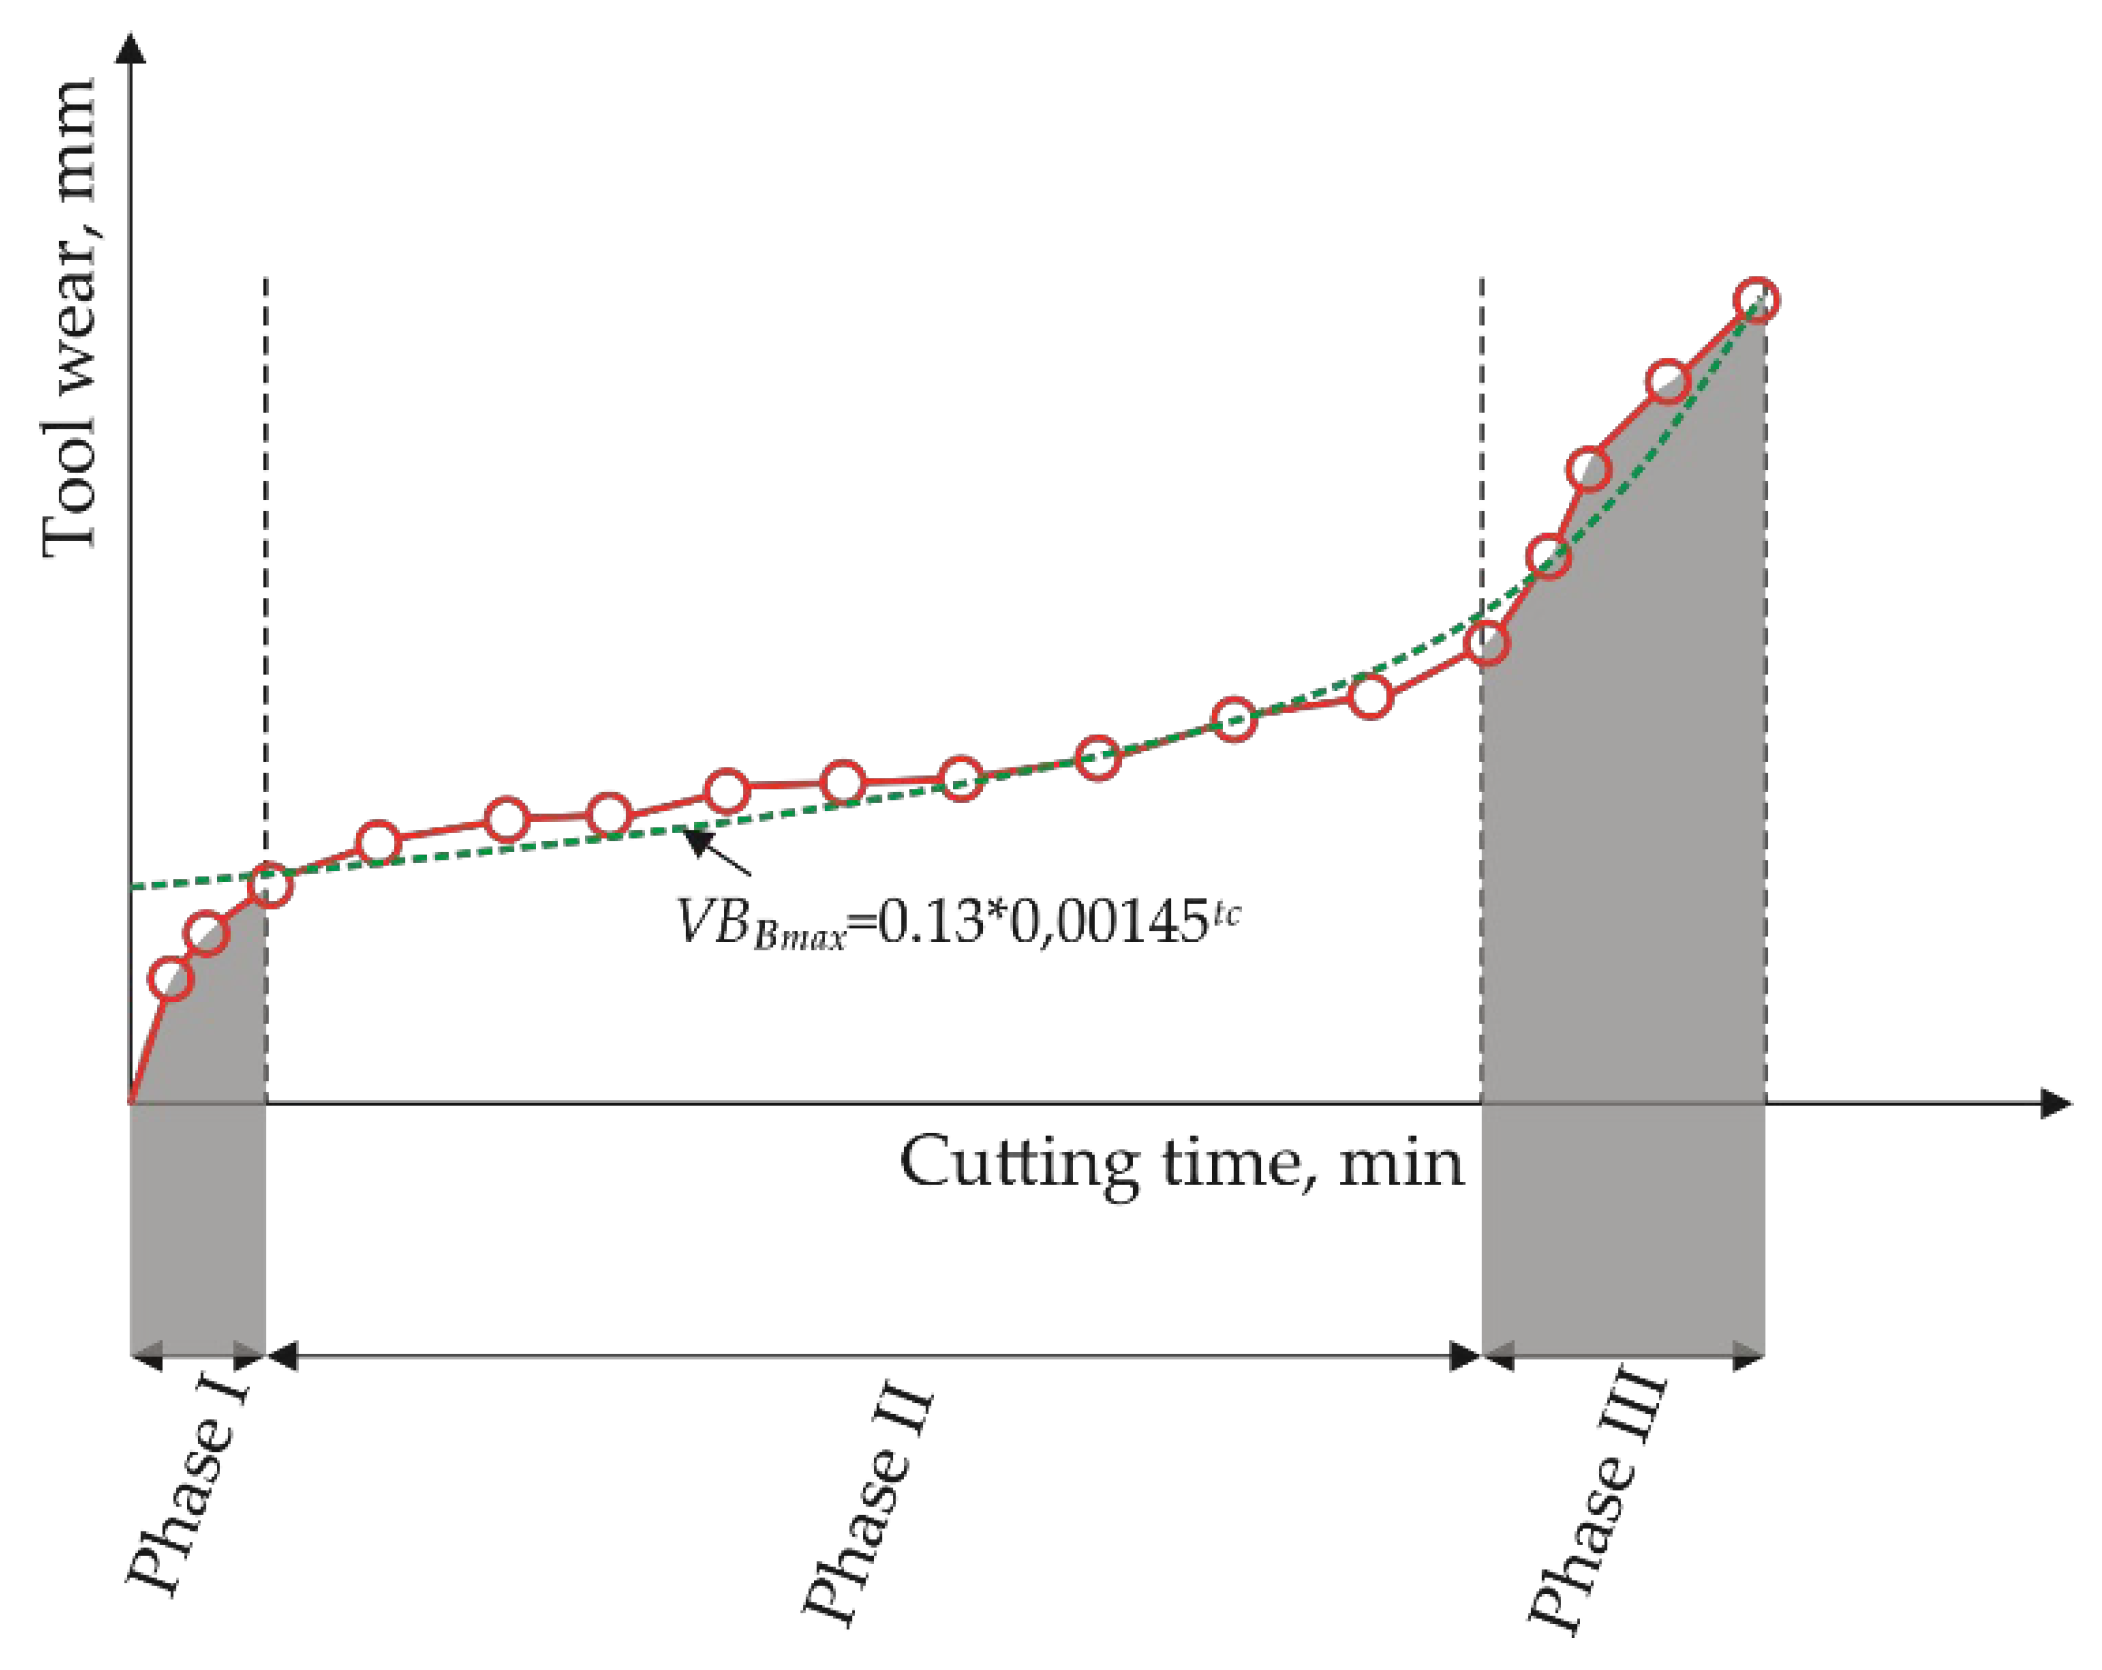
The wear rate of a torus milling cutter reflects the wear rate at any point on the active cutting edge, which is a part in common with the torus action surface and depends on the inclination angle. Importantly, it changes during machining. Figure 6 shows a typical tool wear curve as a function of the cutting time at a certain constant cutting speed. It presents a classic three-phase course. During phase I - the initial phase - tool wear increases dramatically and reaches its baseline value in a short period of time. In phase II, wear and tear of a quasi-linear and difficult predictable nature can be observed. Phase III is characterised by accelerated wear until a critical value associated with blade failure is reached.
Furthermore, for wear modelling (dotted line), i.e., using regression analysis [28,29], phase I can be neglected and the tool wear at any cutting point on the torus action surface can be considered as a variable over time, (such as in accelerated motion) and described by the model of an exponential function, which is expressed by the relation (10).
V B B m a x = b 0 · b 1 t c ,
where VBBmax - maximum abrasion width; an important indicator in multi-axis finish milling, b0 and b1 – coefficients determined for a given material pair, i.e., round cutting insert - workpiece, and machining conditions, tc – cutting time. The b0 and b1 coefficients are constituted on the basis of machinability tests and non-linear estimation analysis.
The tool is used for machining with the declared fixed machining parameters until the tool wear reaches the adopted critical value VBBlim at time Tt. The value of time Tt, i.e., the tool life, is expressed by the relation (11) [30].
T t = C t · v c p · f q ,
where Tt - the tool life, vc - the cutting speed at the selecting cutting point, and f is the feed rate. Ct, p, and q are certain constants for a given material pair, i.e., the material of the round cutting insert-material of the workpiece. These constants are constituted on the basis of calibrated machinability tests. On this basis, the tool life is determined from which the Ct, p, and q factors are calculated.
When milling with a torus milling cutter, with the spindle speed set to an arbitrary and constant value, the cutting speed varies along the cutting edge from the cutter tip point (TCP) towards the tool attachment point in the spindle. The cutting speed vc,g at a point with height g from the apex of the TCP torus milling cutter is expressed by equation (12):
v c , g = 2 π n R T + 2 r p g g 2 1000 ,
where n is the spindle speed, RT is the radius from the rotational axis of the tool to the centre point of the round cutting insert, and rp is the radius of the round cutting insert. As shown in Figure 7, the cutting speed varies significantly given the parameter g along the torus milling cutter axis. The cutting speed values vc,g in this case were simulated for a cutting angle in the range 0°≤ ψrci ≤ 23.4411° in the tool base plane coinciding with the tool’s feed speed plane vf.
Note that, assuming that both feed rate and the spindle speed are constant, the cutting speed vc,g depends only on the latitude g of the adopted cutting point, e.g., the contact point CPi that falls within the length of the active cutting edge segment b. The latitude g is described by the relation (13).
g = r p 1 cos π 2 sin 1 1 a p r p + δ ,
where rp is the radius of the round cutting insert, ap is the depth of cut, δ is the inclination angle.
For further considerations, the symbol Tt,g is adopted to denote the tool wear rate of any point in the length of the active cutting edge segment b (i.e., in the active cutting strip sb,i) at latitude g, as expressed by the relation (14) [22].
T c , g = C t 2 π n R T + 2 r p g g 2 1000 p f q ,

3. Machining and Measurement Conditions

3.1. Materials, Tools and Machining Station

Ni-based superalloy Inconel 718 was selected for machining tests. The TPL machining process was carried out using steel torus milling cutter body R300-016A20L-08L, dedicated to round cutting inserts R300-0828E-PL. The torus milling cutter as an tool assembly have a neutral geometry. The replaceable round cutting inserts are made of fine-grain carbide and coated with TiAlN anti-wear PVD technology. Round cutting inserts with a diameter of 8 mm were fitted into a tool body with a diameter of 16 mm at an overhang of 65 mm.
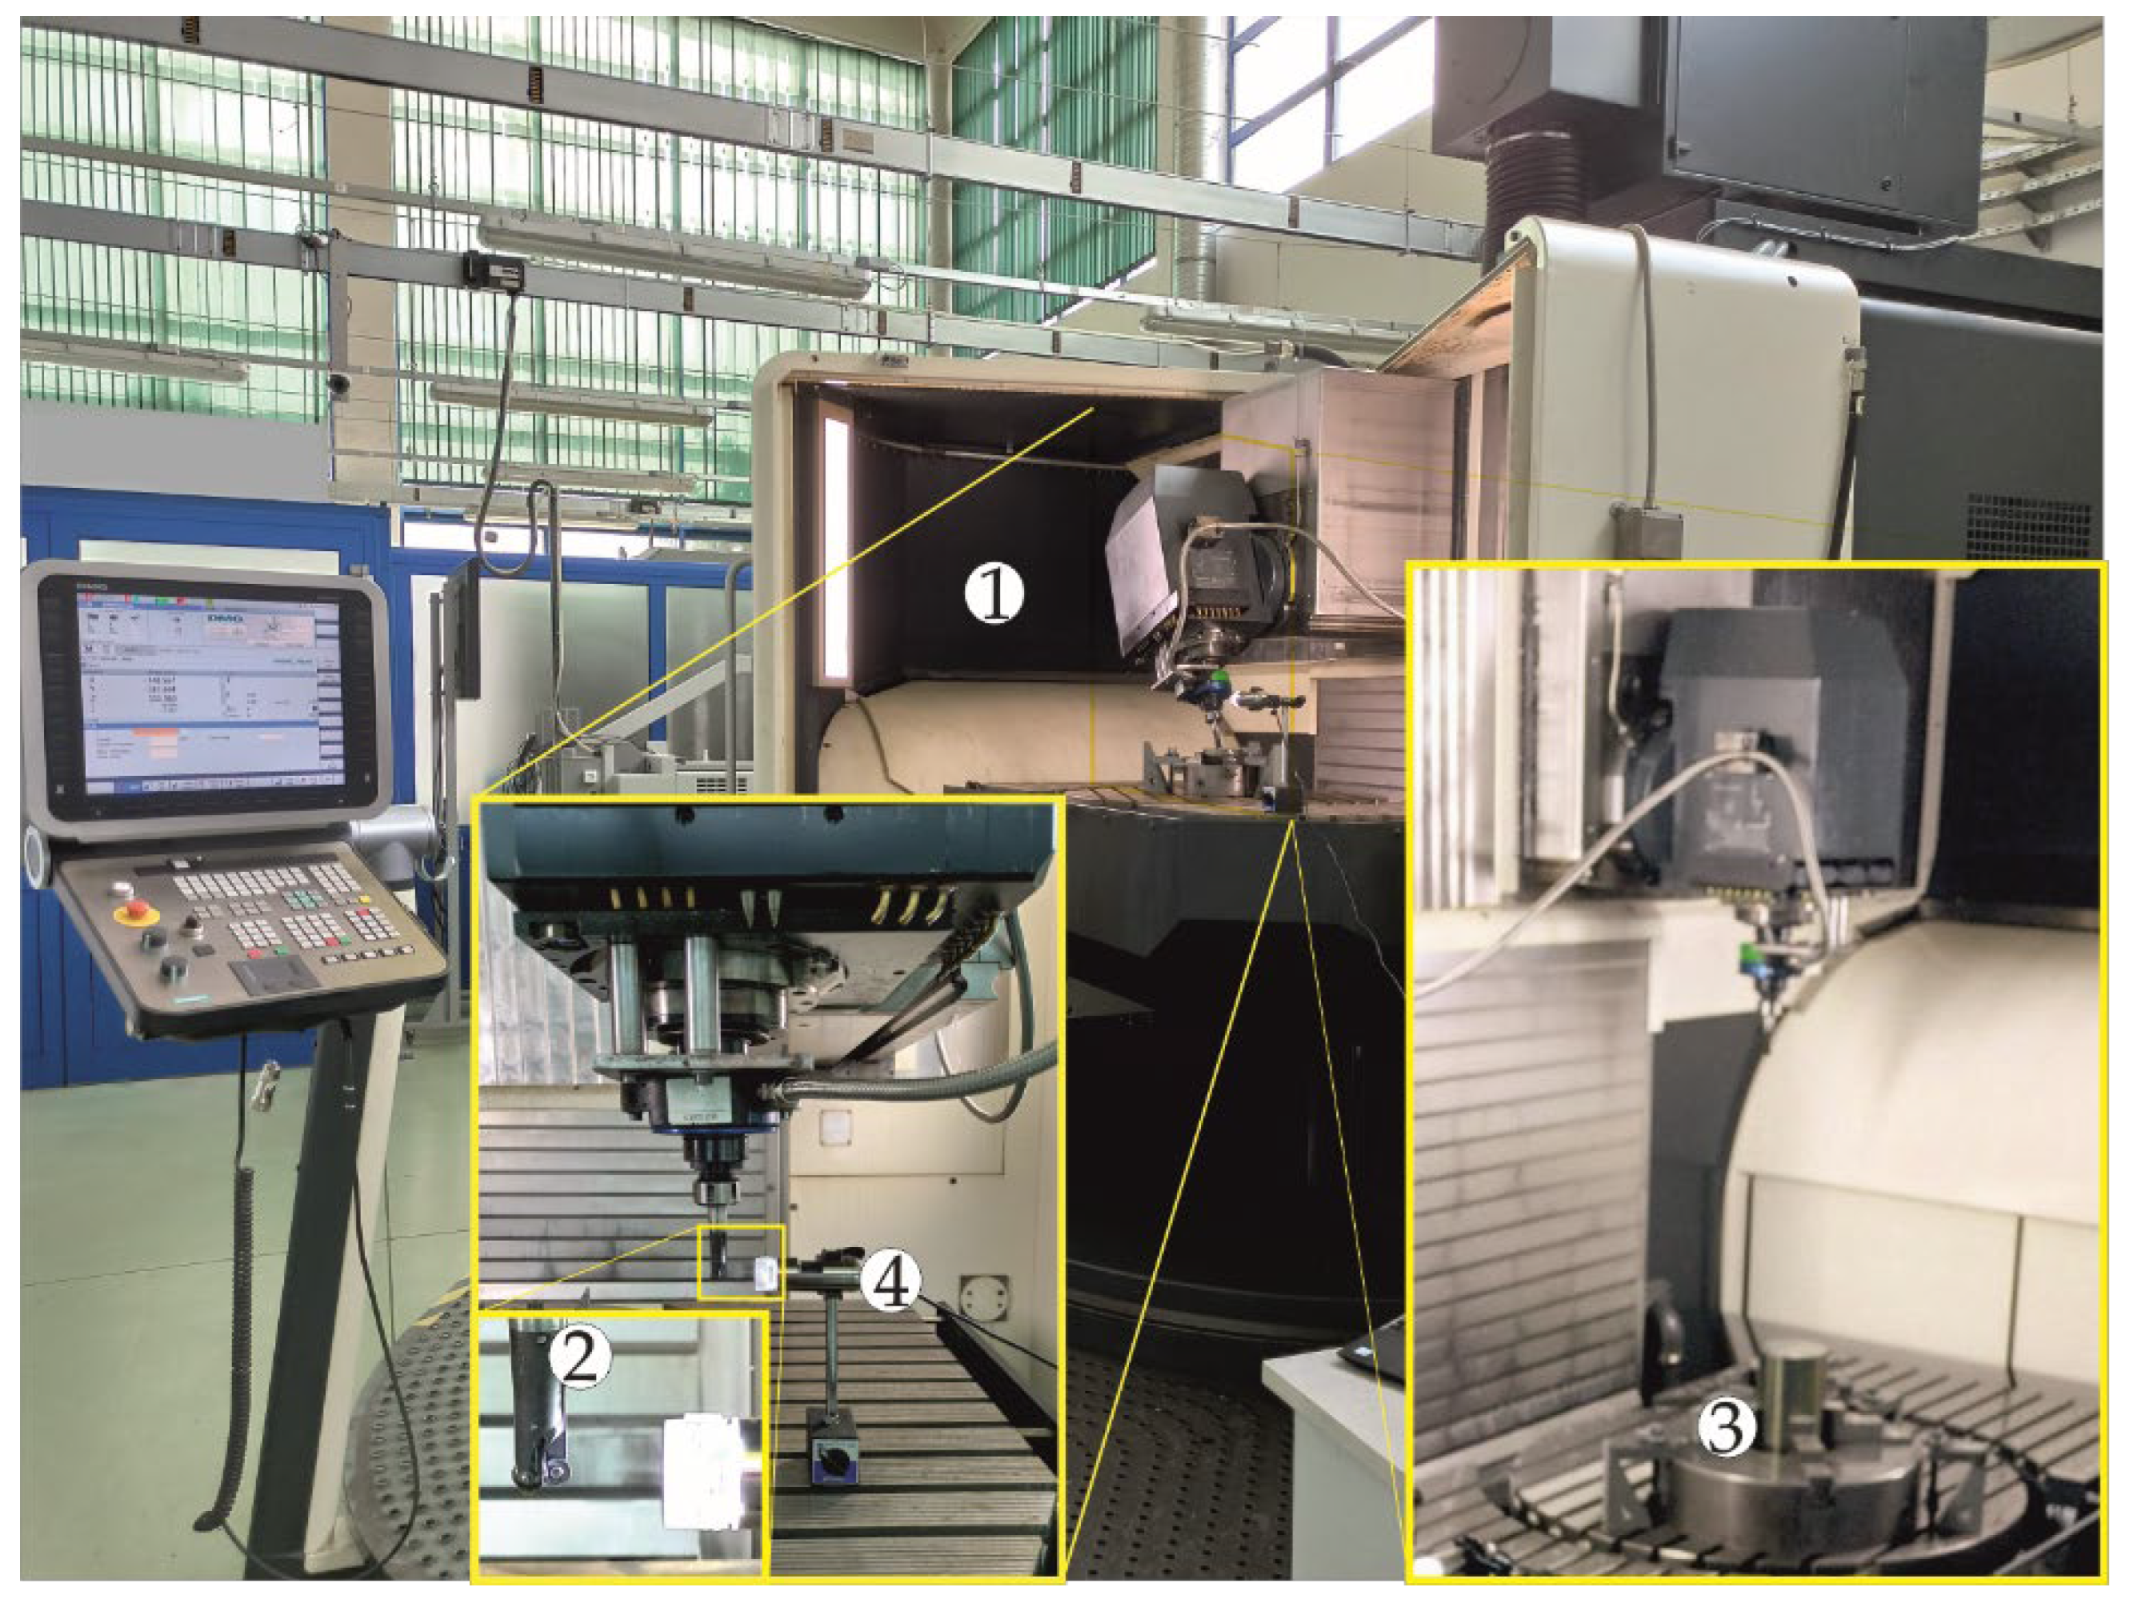
The machining station with experimental set-up is shown in Figure 8. A 5-axis CNC vertical machining centre, model DMU 100 MonoBLOCK, was used to carry out machinability tests in the multi-axis TPL milling process. The tool life was determined by the wear VBBmax located on the lateral surface of the cutting edge until the adopted maximum value of the wear criterion VBBlim was reached. The machining process was interrupted at specific intervals to collect data for modelling and wear calibration. Measurements were carried out using a DinoLite 7000 CE workshop microscope. The above-mentioned experimental workstation is at the equipment of the Department of Manufacturing Technics and Automation, seated in Rzeszów.

3.2. Tool Wear Modelling and Calibration

The research on tool wear and tool life, to develop a model and calibrate tool wear, involved a series of passes in a multi-axis milling process with a torus milling cutter, whose axis was deflected with respect to the normal vector of the machined surface in the feed direction by the inclination angle parameter δ (see Figure 1).
The experimental tests were carried out in two main stages. Flood cooling was used in all cutting tests.In the first stage, by carrying out machinability tests, data were obtained to develop a wear model using a non-linear estimation method. Cutting tests were carried out under HSM (High Speed Machining). A constant cutting speed of vc=140 m/min was determined at the principal diameter of the torus DPRIN (see Figure 5). The inclination angle was determined to be constant throughout the machining and was δ=1.10946°. This angle ensured that the surface machining process was carried out with the greatest efficiency. Consequently, the real cutting speed vc at the CPi contact point of the shaping of the machined surface was 71 m/min. In addition, two criteria were used: uniformly distributed roughness Rth=Rthvf (i.e., the theoretical roughness has the same value in the feed direction as in the direction perpendicular to it) and a wear limit criterion of VBBlim=0.2 mm was adopted. The machining parameters for this stage are shown in Table 1.
In order to obtain more accurate test results, the second stage of the model tests, i.e., wear calibration, was carried out. A relationship was established between the maximum allowable cutting time (MACT) at the CPi contact point of the cutter and its axial distance from the TCP vertex. The relationship was established with constant machining parameters (spindle speed and feed rate) in relation to a fixed tool wear threshold VBBlim=0.2 mm. For the calibration test, the method described by Altintas [30] was adopted, and Figure 7 shows a simple test setup: by continuously machining at a constant angle δ until tool wear reached a threshold of 0.2 mm, MACT was obtained for a cutter axis orientation of 1.10946°. The machining parameters for the calibration test are shown in Table 2.

3.3. Measuring and Auxiliary Equipment

In the conception of the proposed solution, in addition to the development of wear and tool life models, it is also necessary to establish a measurement reference on the circular cutting insert and, relative to it, to make the necessary measurements of the angular position using the cutting blade work angle parameter. In addition, the measurement systems and strategies used should allow the assessment of blade wear.
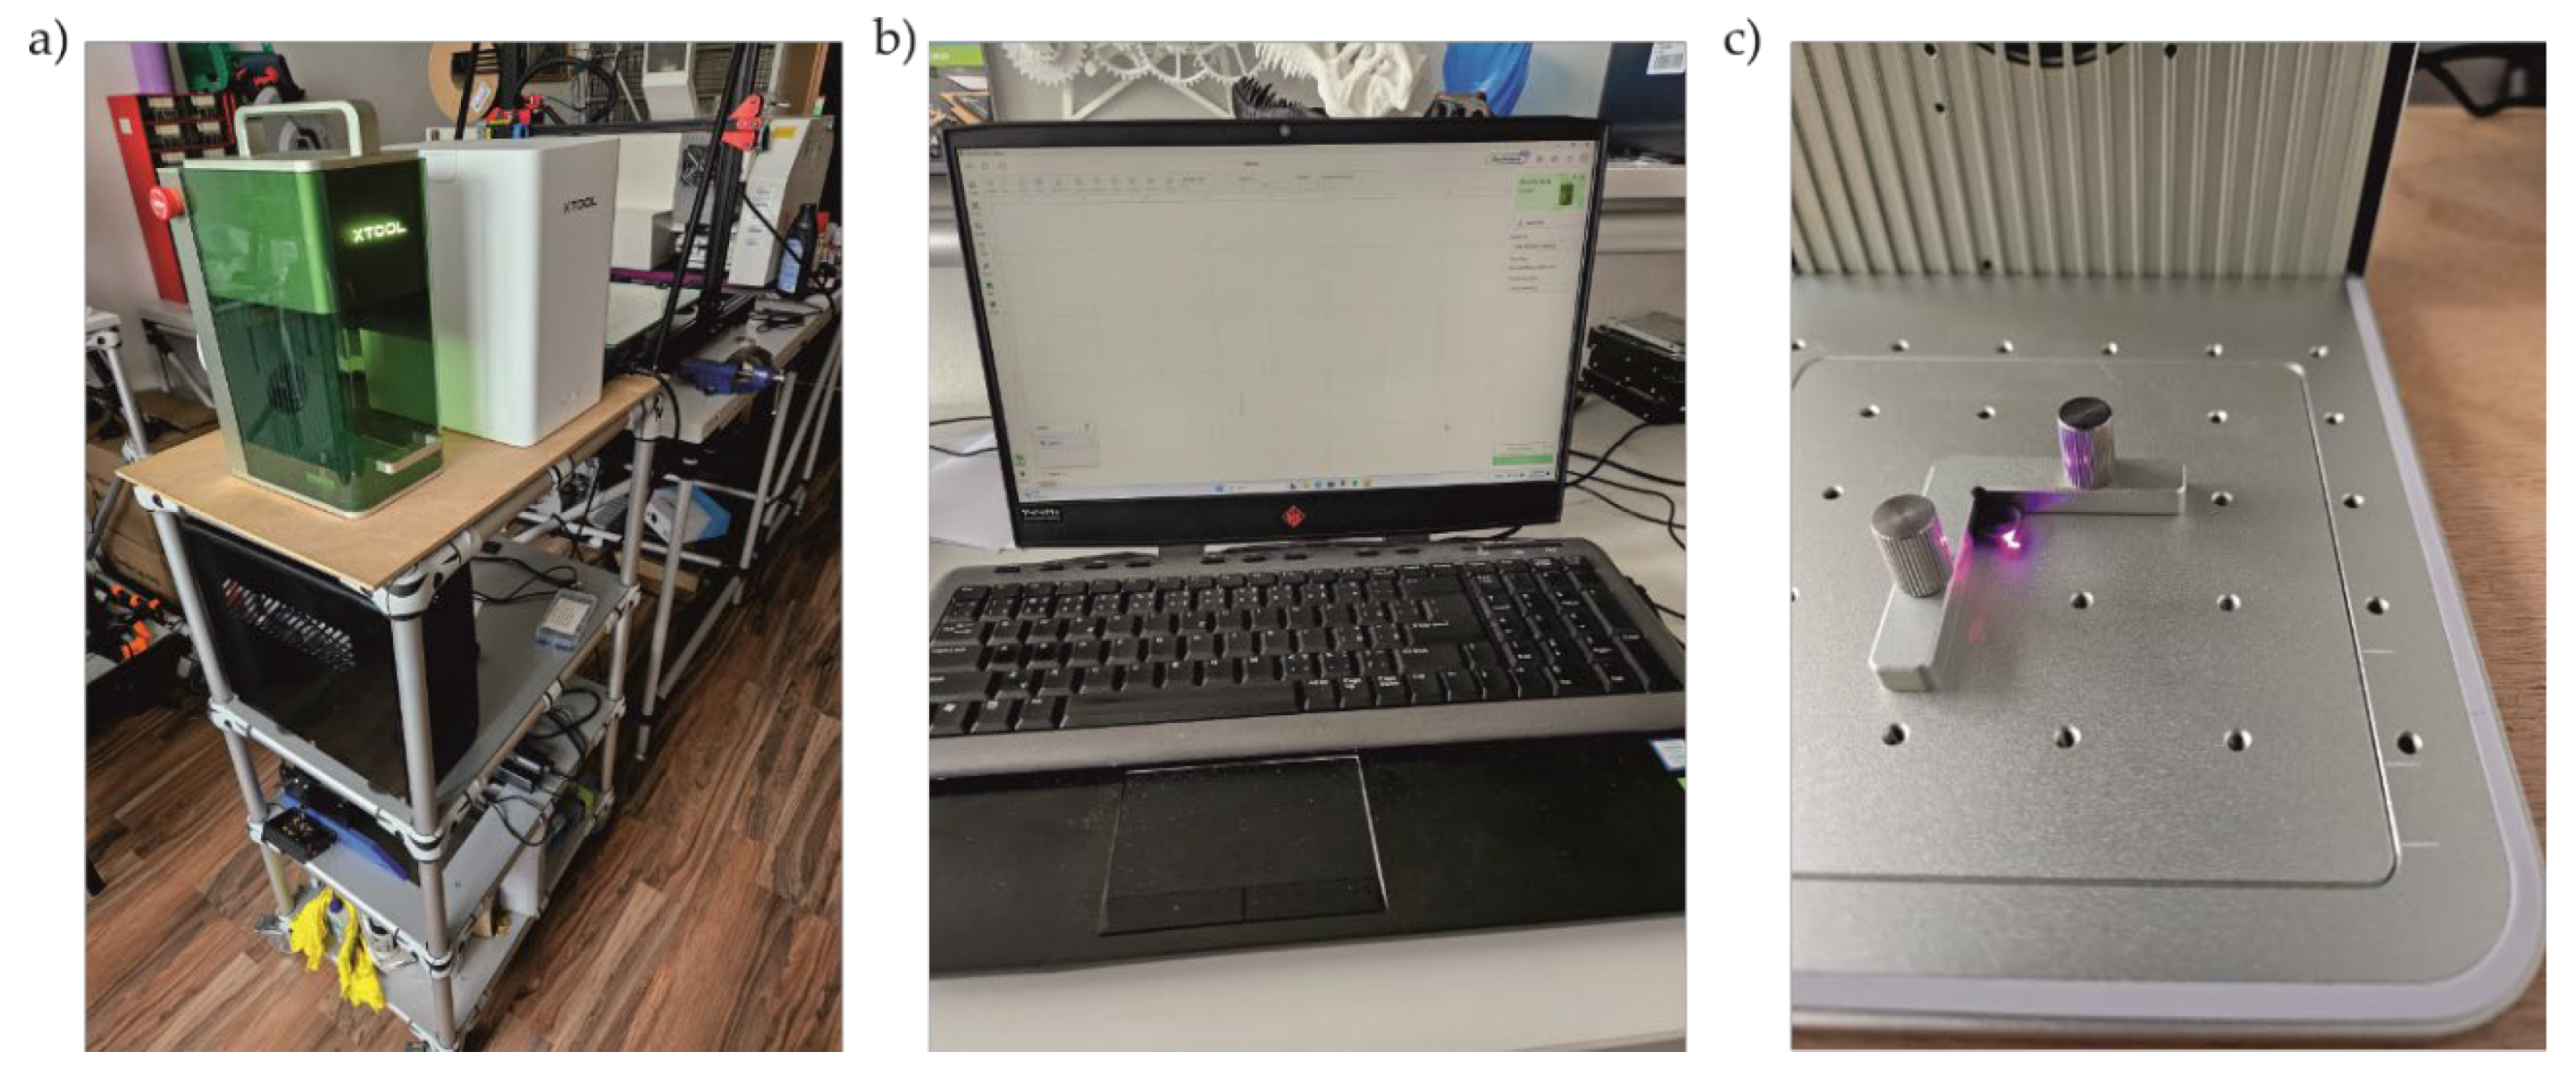
The xTool F1 laser system on the equipment of the Department of Industrial Engineering and Informatics seated in Prešov was used to determine the measurement reference on the round cutting insert, as shown in Figure 9.
It is a system that ensures the engraving of any curve by the action of a laser beam on any part geometry made of any material. The beam movement is programmed in the planar module of the dedicated xTool Creative Space software. The most important parameters of the reference line application are shown in Table 3.
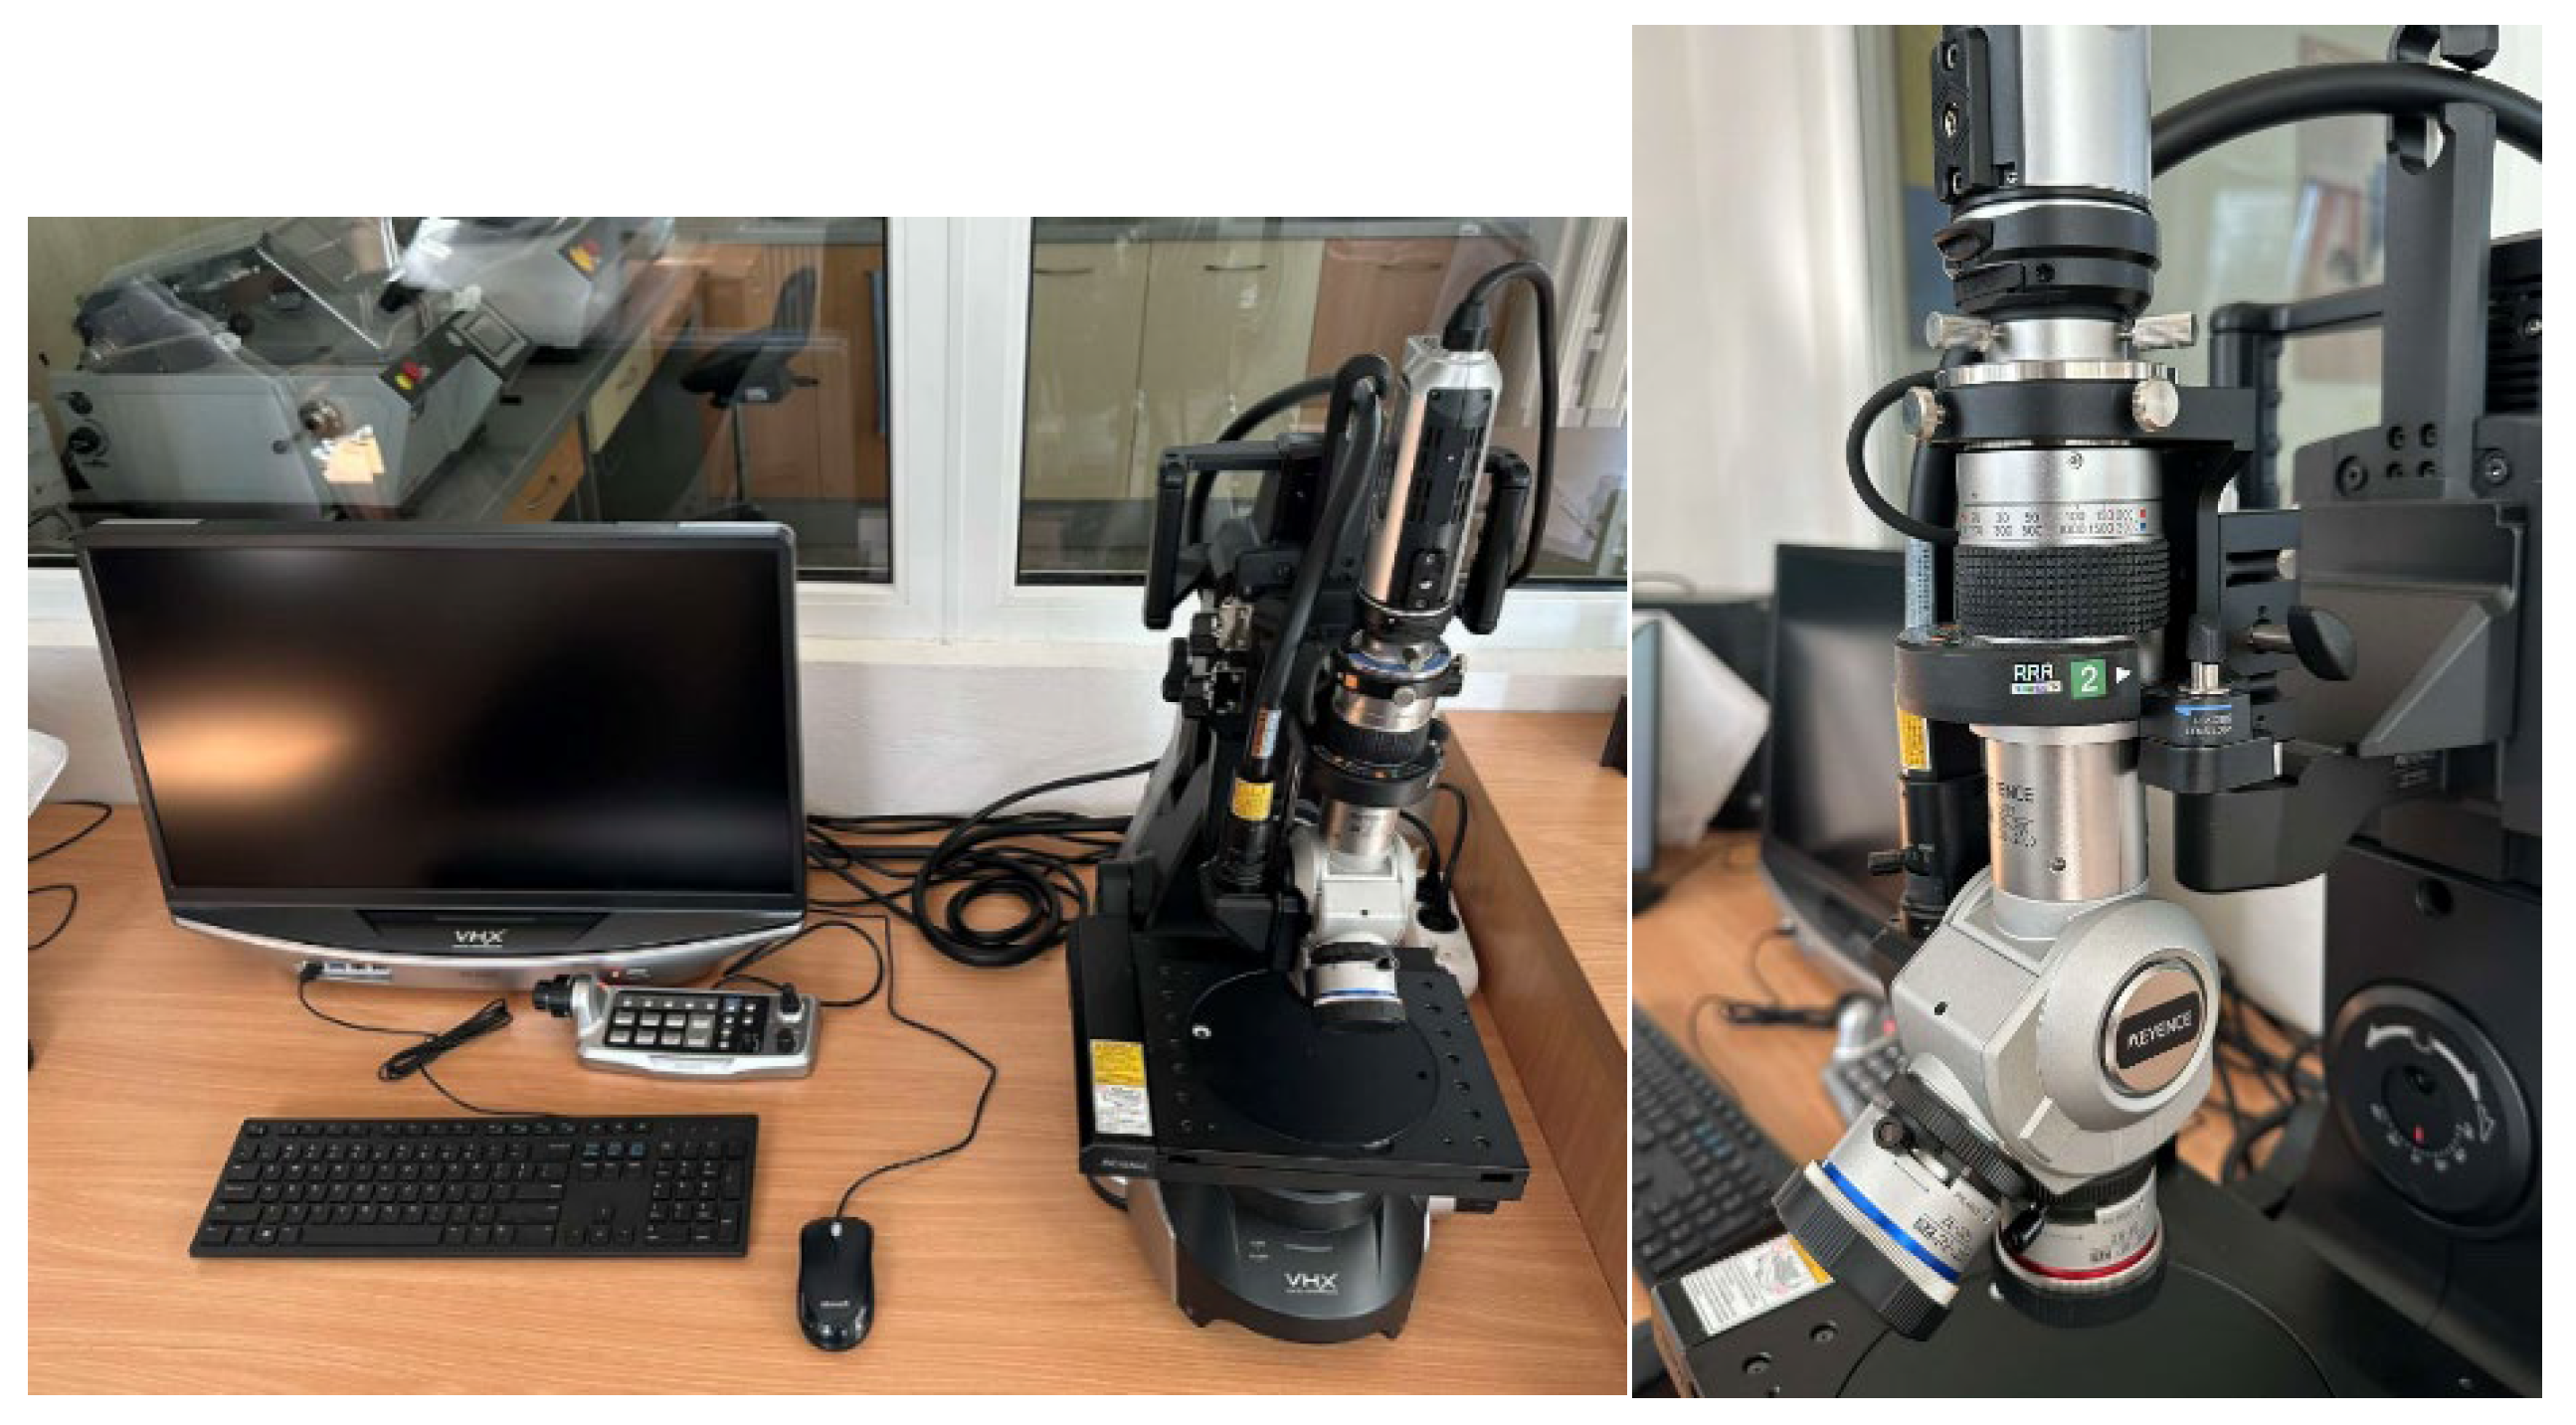
The proper setting of the round cutting insert in the torus milling cutter body and its subsequent angular positioning after reaching the VBBlim threshold according to the prepared models was performed using a KEYENCE VHX 7000 digital microscope, which is equipped by the Department of Automobile and Manufacturing Technologies seated in Prešov, as shown in Figure 10.
The measurement parameters are shown in Table 4.

4. Results and Discussion

4.1. Procedure for Angular Positioning of the RCI of the Torus Milling Cutter

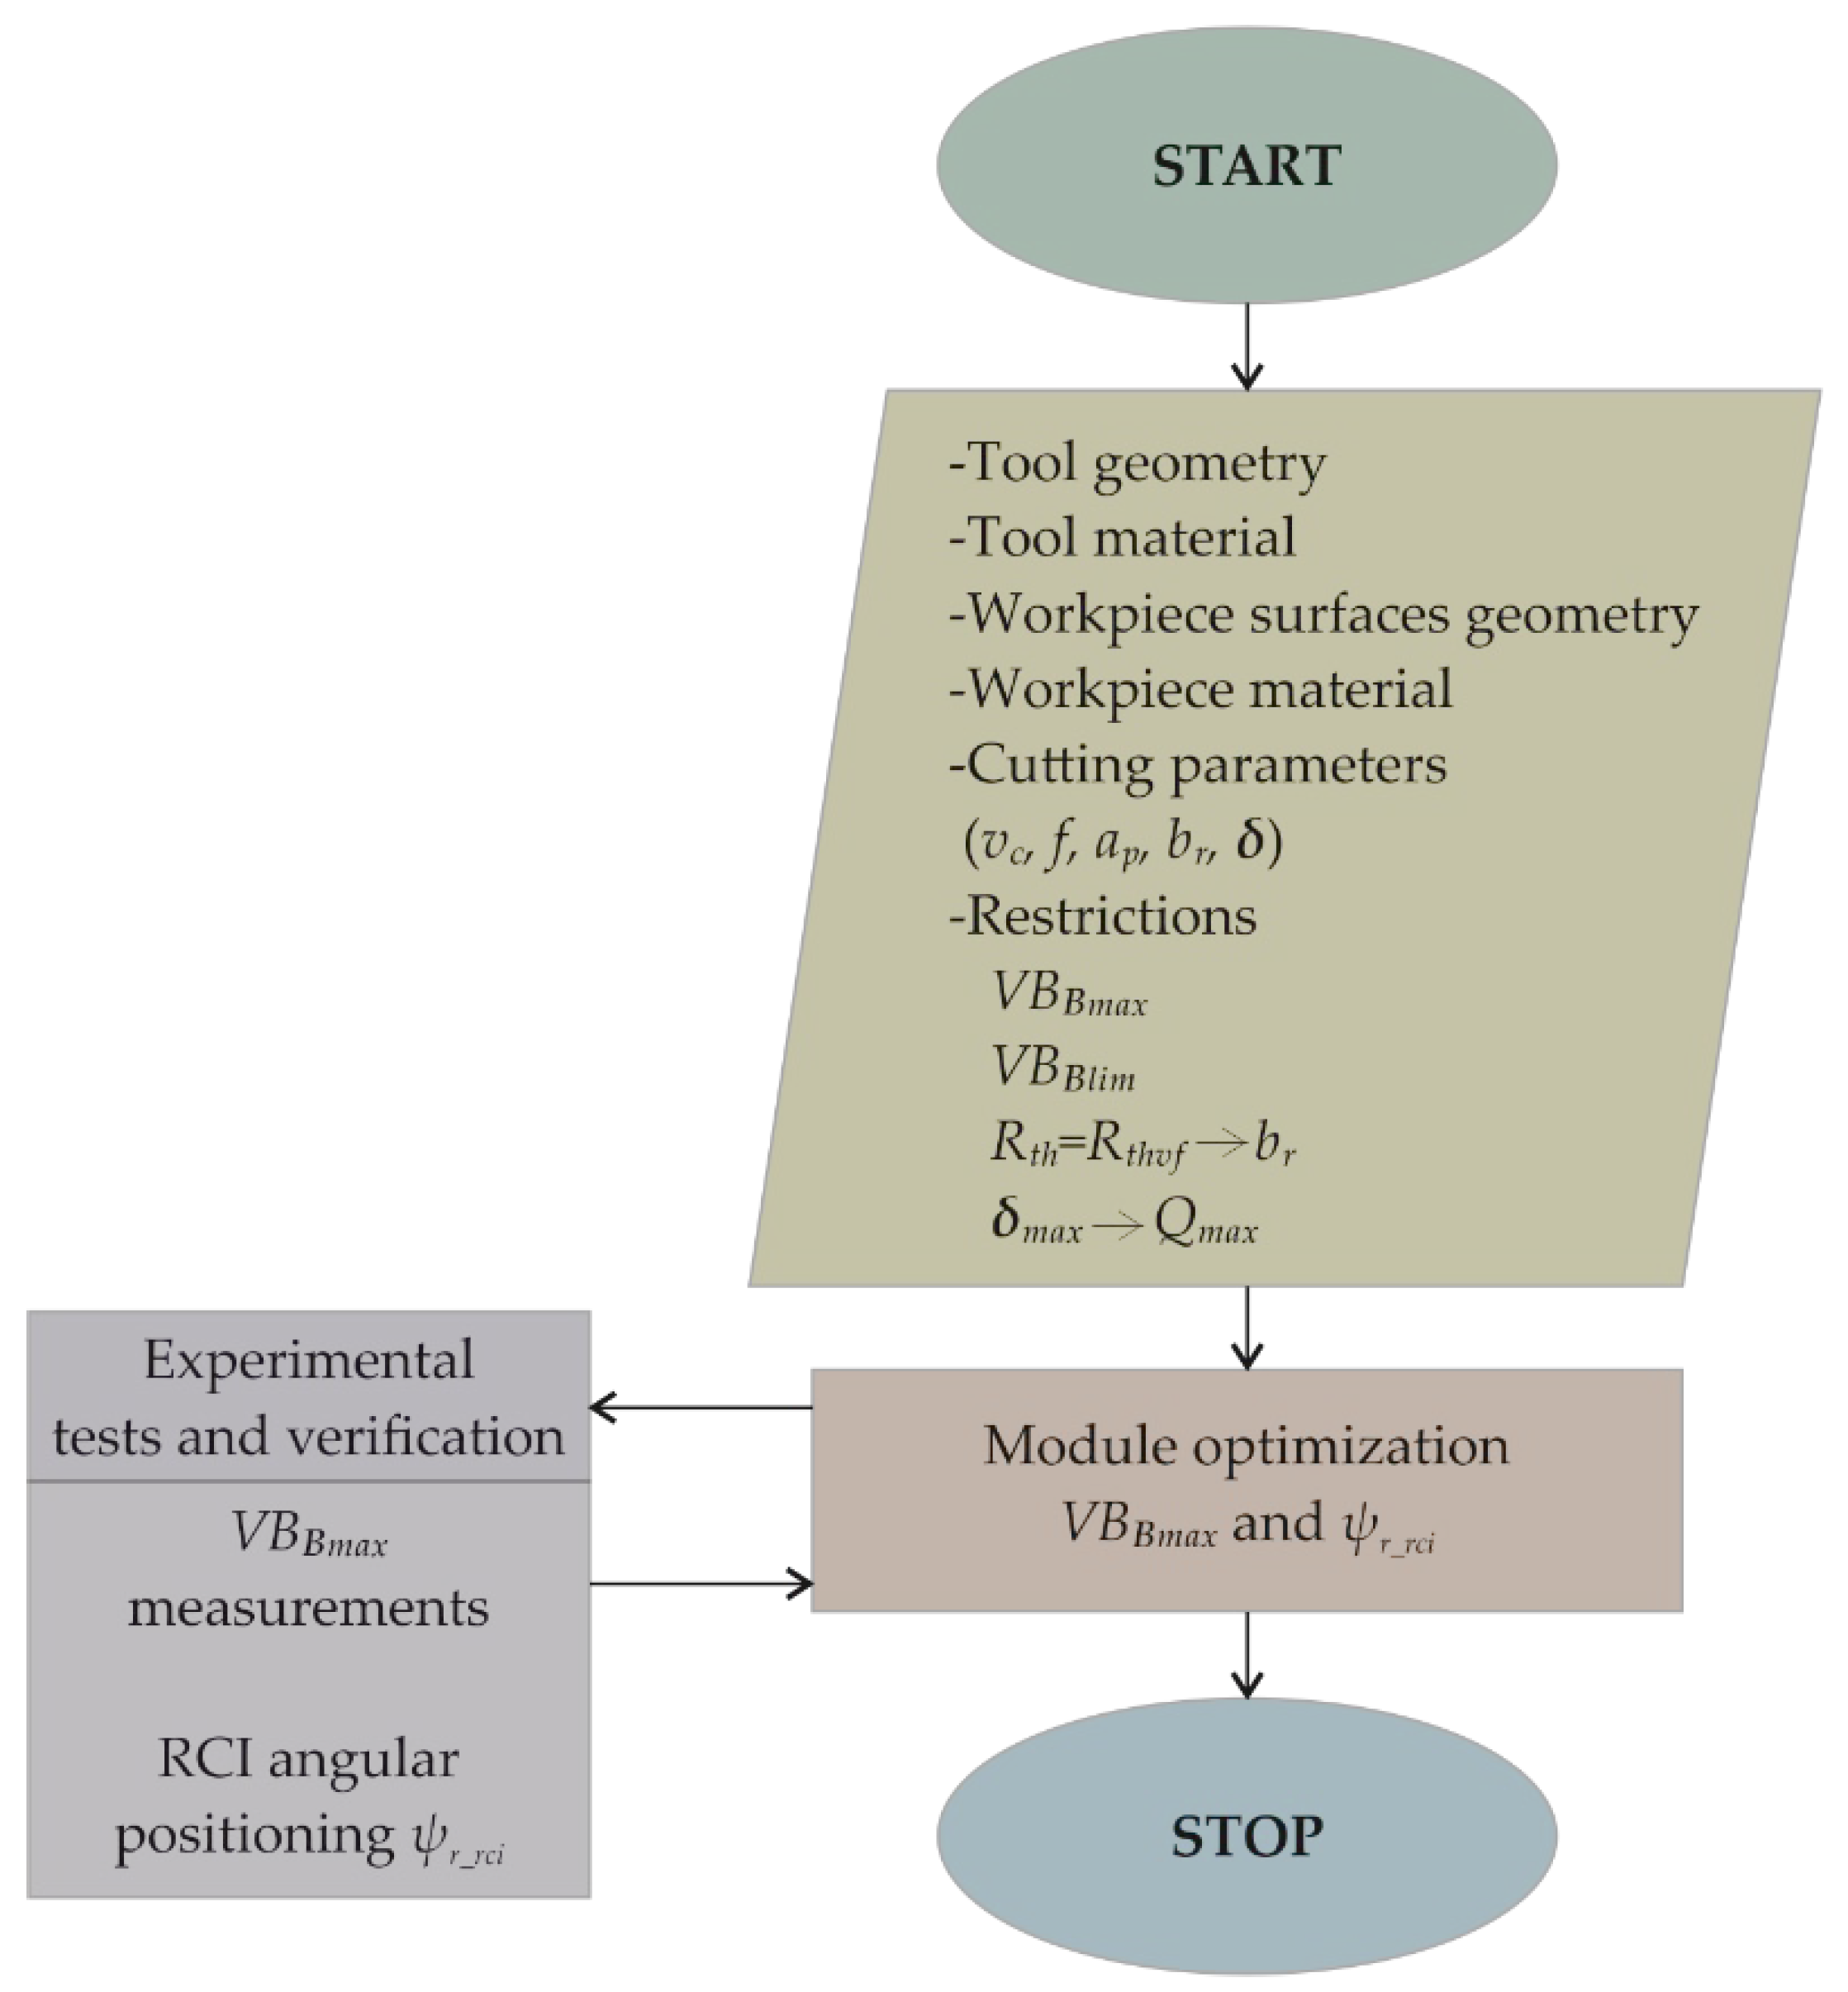
In order to be able to carry out angular positioning of the RCI of the torus milling cutter, a procedure the proposed solution was developed, as shown in Figure 11. This procedure takes into account the basic restriction of tool wear and is dedicated to the multi-axis milling process.
In terms of multi-axis machining, this procedure aims to maximise the volumetric efficiency of the cutting process while fully exploiting the cutting capacity of the tool over its lifetime, and as described by the wear parameter. This makes it possible, on the one hand, to use cutting parameters in the HSM range and, on the other, to use the cutting edge length on the periphery of the insert in a controlled and complete manner. This makes the overall tool life significantly longer.

4.2. Tool Wear and Tool Life Models

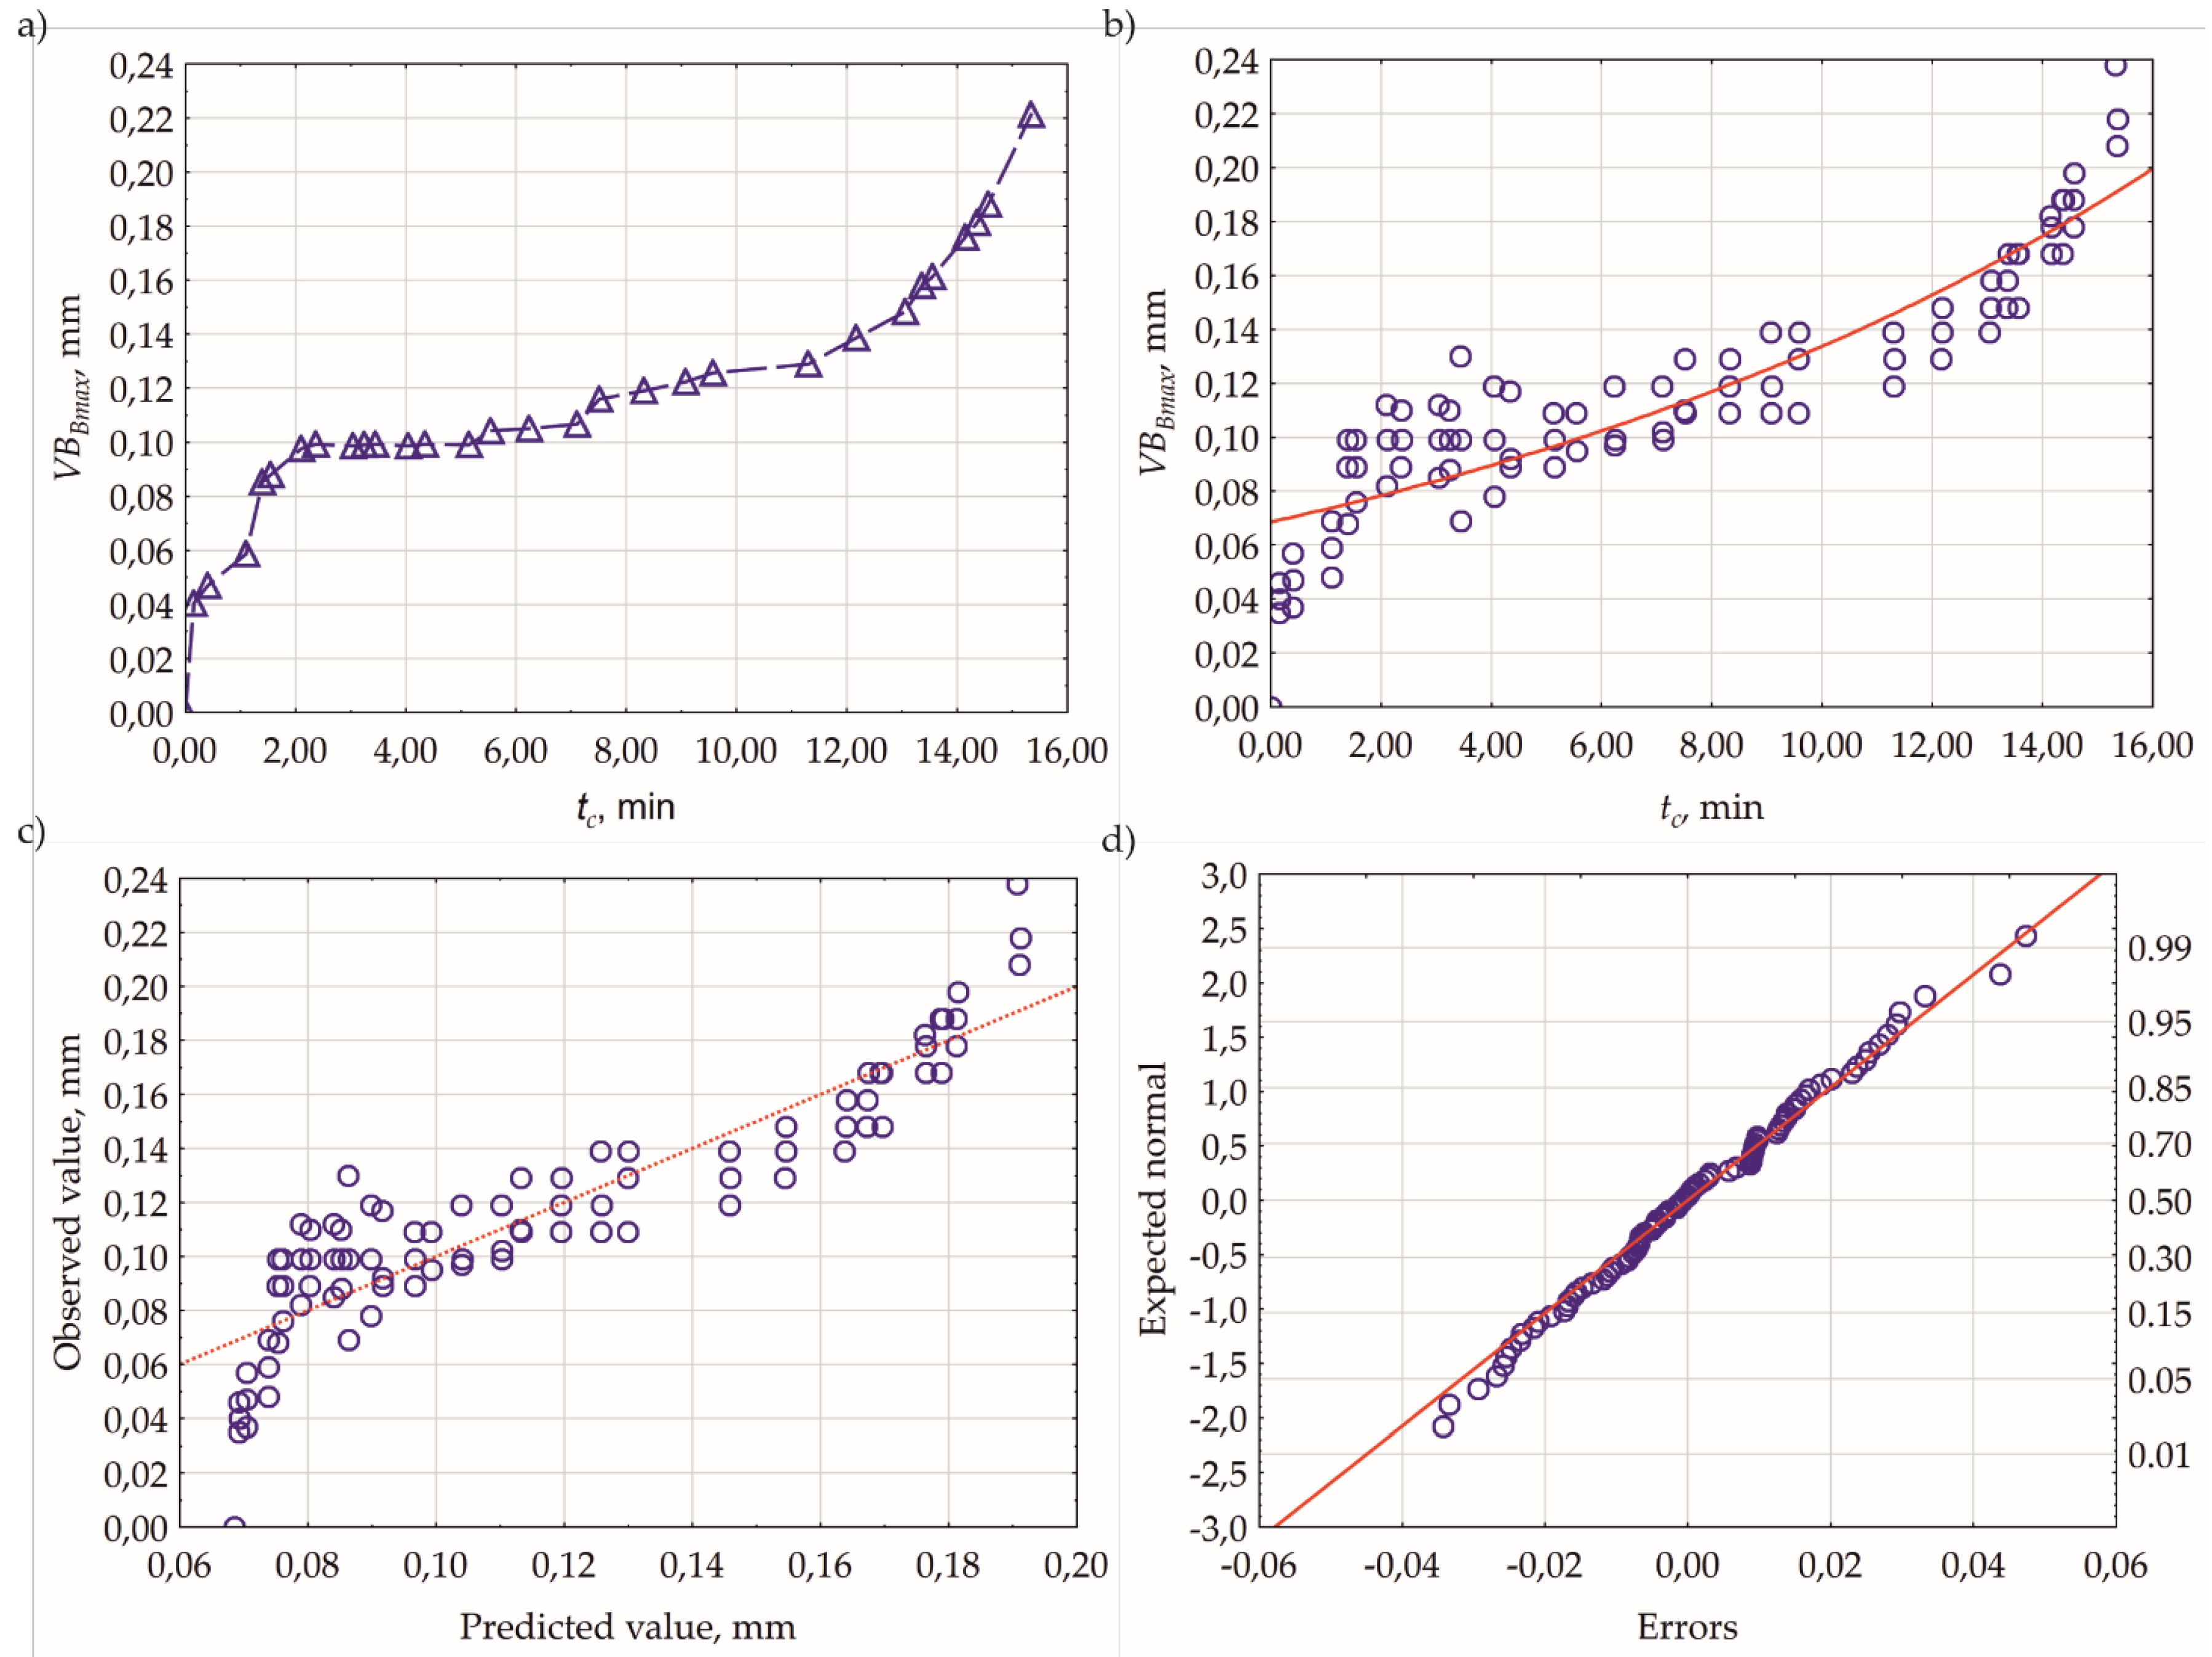
The development of a concept for an angular positioning method for the round cutting insert of a torus milling cutter begins the wear modelling stage. When modelling tool wear, all three phases of the wear curve were taken into account. This is evident from the resulting classic three-phase wear curve that was ottained for the adopted machining conditions, as shown in Figure 12(a). To clarify, it should be mentioned that this drawing shows the first of the three machining tests carried out. The higher number of tests performed is due to the generally accepted principles of statistical analysis and to increase the accuracy of the final model.
As mentioned, wear modelling was carried out using an advanced non-linear ANOVA estimation, as the data obtained cannot be transformed into a linear model. Nonlinear estimation involves calculating the relationship between a set of independent variables (i.e., cutting time tc) and the dependent variable (i.e., tool wear VBBmax). It was assumed that the wear was evenly distributed over the individual cutting blades, i.e., only one cutting blade is active in the individual feed motion sequences, as also observed by Kita [31].
Analysing the resulting data set, it was found that it could be approximated by an exponential function model, as described by relation (10). This is an assumed estimated function. The Least Squares Method (LSM) was adopted as the loss function, while the Levenberg-Marquardt algorithm was used as the estimation method. The method solves a system of linear equations in each iteration to calculate the gradient. A maximum number of iterations of 6000 was adopted, with a convergence criterion of six decimal places. Based on the above, a model relationship was obtained, which is described by Equation (15).
V B B m a x = 0.0685797 · 1.06903 t c ,
Table 5 shows the estimation statistics and results of the ANOVA analysis of variance.
However, Figure 12(b)-(d) show the fitted model function and the observed values, a scatter plot of the observed values against the predicted values, and a probability normality plot, respectively.
Based on the results obtained and the analysis of variance, it was concluded that, within the assumed range of variables under study, the developed model is adequate (F=344.5687) and approximates the predictor variable, ie, tool wear during cutting, with an accuracy of 90%. This is evidenced by a determination coefficient of R=0.90. Furthermore, in the scatter plot (Figure 12(c)), the points lay along a straight line, indicating that the model is appropriate and that the residuals (i.e., errors) are subject to a normal distribution, which in turn is illustrated in Figure 12(d).
Subsequently, a tool life model was developed for HSM machining, that is, in the range adopted in this work according to Table 2. As a result of the machining tests, the so-called calibration, and after performing the necessary calculations, the tool life is described by relation (16).
T c , 0.00075 = 4.2 · 10 6,2 2 π n R T + 2 r p g g 2 1000 3.561149 f 1.931468
Again, an adequate model was obtained, since for an assumed threshold of VBBlim=0.2 mm the lifetime Tc for the CPi point (g=0.00075 mm) is 16.353177 min.

4.3. Measurements and APofRCI

The next stage in the development of the concept for the angular positioning method of a circular cutting insert (APofRCI) torus cutter was measurements.
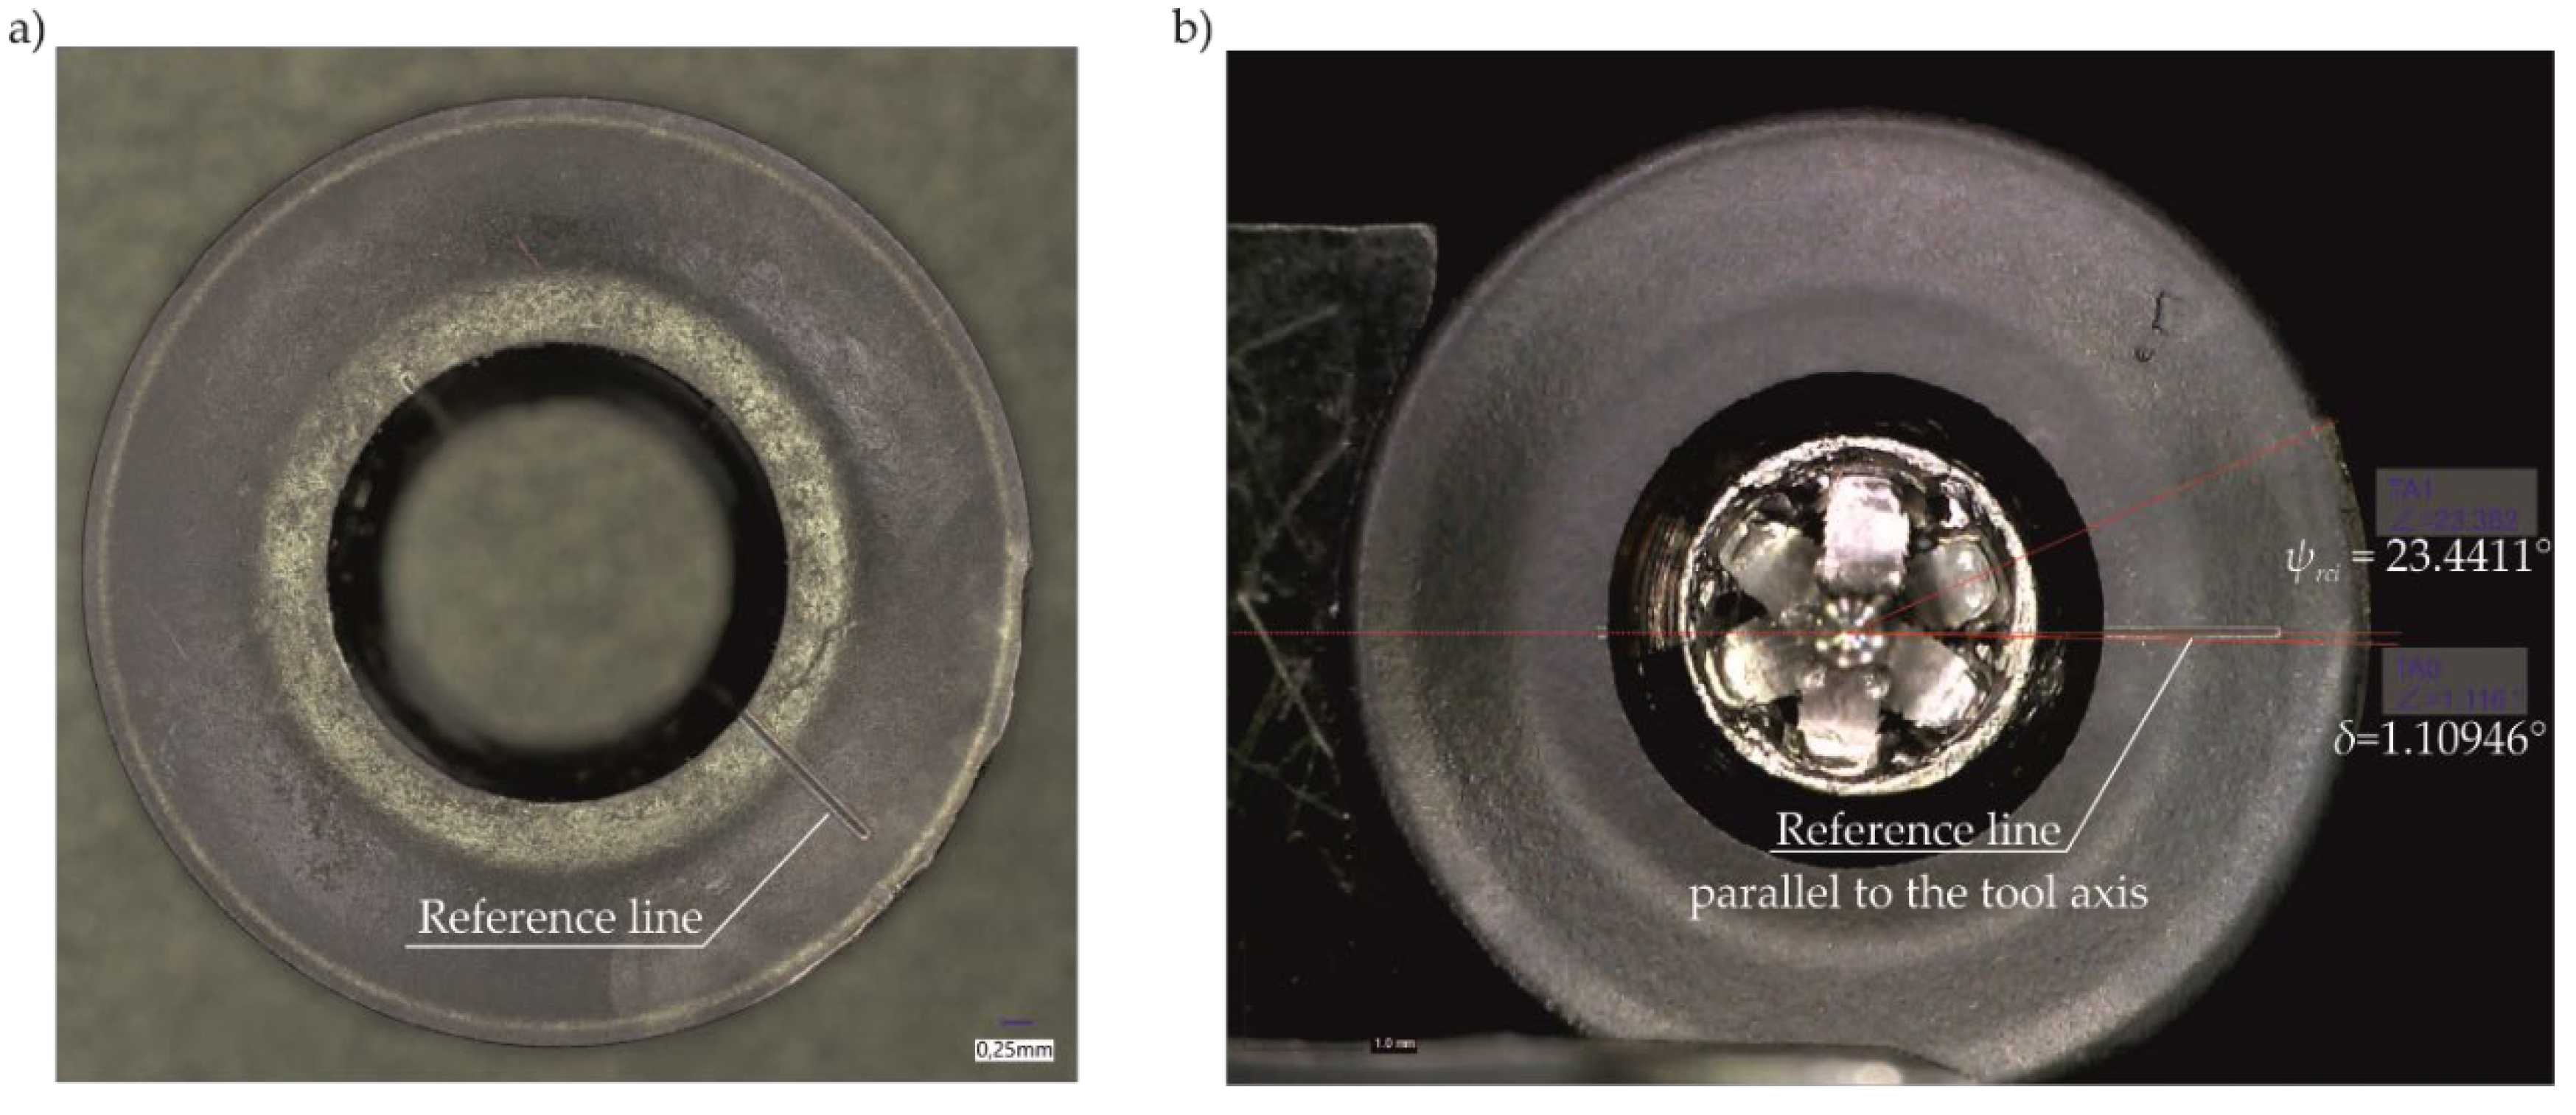
In order to be able to carry out an angle measurement, i.e., measure the angle of the blade in the base plane under given machining conditions, a reference line must first be mark. This line is applied to a round cutting insert. It passes through the centre point of the RCI. In this way, when assembling the tool set (body with inserts), it is possible to position the insert for the first time in such a way that the reference line is parallel from the tool’s axis of rotation, as shown in Figure 13. As can be observed in Figure 13b, the marked trace of the cross-sectional effect of the cut layer on the cutting blade is completely within the limits of the cutting blade working angle.
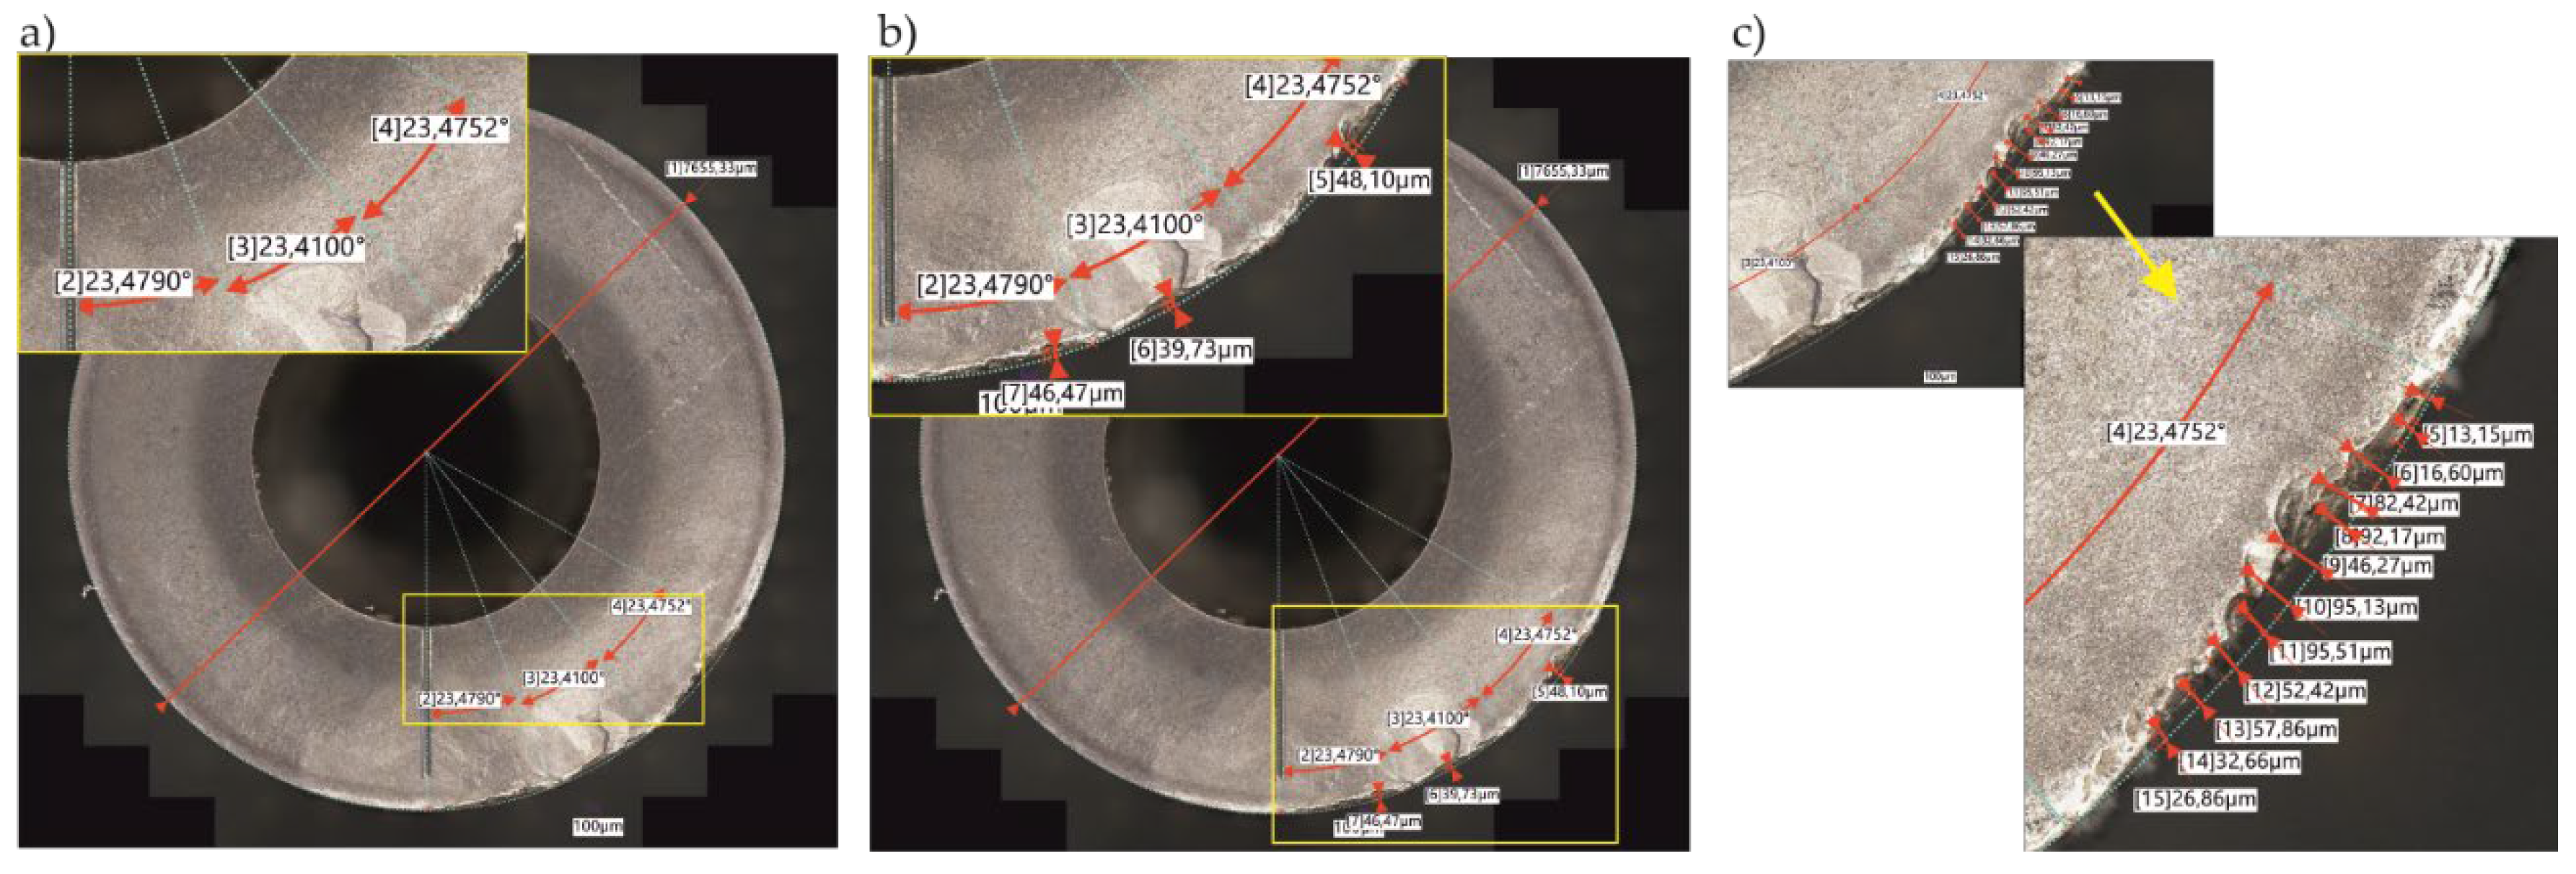
Subsequently, each successive angular positioning of the RCI was realised according to the model dependencies, once the limit value VBBlim was reached. Machining tests, together with angular positioning, were repeated two more times, obtaining three active segments worn on the cutting edge, as illustrated in Figure 14.
Analysing the results obtained from the digital microscope measurement, it was found that all worn segments were within the cutting blade working angle (Figure 14(a)). This demonstrates the correctness of both the models developed and the procedure together with the measurement techniques used. These techniques made it possible to measure the maximum defect, that is, the abrasion of the blade material, as shown in Figure 14(b). It was found that there were differences in the value of the maximum abrasion between the segments, which may be due to the radial runout of the cutting blade. In this case, further research and clarify of the proposed solution should be carried out. In addition, it was also possible to measure the distribution of clash variation relative to the nominal RCI outline, which in turn is shown in Figure 14(c). Maximum abrasion values were obtained in the zone of maximum thickness of the cut layer acting on the cutting blade. And in this case, further research is needed. In conclusion, it can be said that the proposed solution works well not only for angular positioning of the RCI, but also for carrying out analisys on wear mechanisms.

5. Conclusions

This paper proposes a solution for the angular positioning of a circular cutting insert of a torus cutter, dedicated to the multi-axis milling process under HSM conditions. What is significant about this solution is that it allows for the full and predictable use of the entire cutting edge length of the circular insert of the folding torus cutter. The solution is essentially based on: the wear model developed as part of this work, the lifetime model, the way the RCI is marked and assembled, and the measurement methodology. Taking the above into account, a procedure was developed for the angular positioning of the RCI in a torus cutter body. Based on the results obtained and the analyses carried out, the following key conclusions were drawn:
  • The adopted function approximating tool wear over its lifetime is adequate and provides 90% prediction accuracy;
  • The tool life model developed is essentially based on the cutting blade working angle parameter. This makes it possible to predict tool life for different machining conditions and for individual instantaneous positions of the cutting edge in relation to the workpiece surface (3D analysis), which is the subject of further work;
  • The developed procedure for angular positioning and measurement enables the entire cutting edge of the blade to be fully utilised, so that the total lifespan of the tool as an assembly is significantly extended;
  • The proposed solution also allows measurement and analysis of wear mechanisms, which significantly extends the possibilities of angular positioning of the RCI, taking into account its macro- and micro- geometric.
The results obtained allowed to direct further research in the area of tool wear and, more specifically, the prediction of ‘notching’ wear, which in this work was identified as the highest value of the defect between the worn edge and the nominal outline of the RCI from the measurements.
The research leading to these results was carried out within the framework of international cooperation and Michał Gdula’s research internship abroad.

Author Contributions

“Conceptualization. M.G. and J.H.; methodology. M.G.; measurements. M.G and R.V.; modelling and validation. M.G.; formal analysis. M.G.; investigation. M.G., J.H. and R.V.; resources. M.G., L.K. and J.H.; data curation. M.G. and J.H.; writing—original draft preparation. M.G.; writing—review and editing. L.K. and J.H..; visualization. M.G.; supervision. L.K.; project administration. M.G..; funding acquisition. M.G. and L.K. All authors have read and agreed to the published version of the manuscript.”

Data Availability Statement

Data is contained within the article.

Conflicts of Interest

The authors declare no conflicts of interest.

References

  1. Sun, D.; Ding, J.; Zheng, C.; Huang, W. Angular Misalignment Calibration Method for Ultra-short Baseline Positioning System Based on Matrix Decomposition. IET Radar, Sonar & Navigation 2019, 13, 456–463. [CrossRef]
  2. Gao, W.; Kim, S.W.; Bosse, H.; Haitjema, H.; Chen, Y.L.; Lu, X.D.; Knapp, W.; Weckenmann, A.; Estler, W.T.; Kunzmann, H. Measurement Technologies for Precision Positioning. CIRP Annals 2015, 64, 773–796. [CrossRef]
  3. Ivanov, V.; Botko, F.; Dehtiarov, I.; Kočiško, M.; Evtuhov, A.; Pavlenko, I.; Trojanowska, J. Development of Flexible Fixtures with Incomplete Locating: Connecting Rods Machining Case Study. Machines 2022, 10, 493. [CrossRef]
  4. Brillinger, M.; Wuwer, M.; Abdul Hadi, M.; Haas, F. Energy Prediction for CNC Machining with Machine Learning. CIRP Journal of Manufacturing Science and Technology 2021, 35, 715–723. [CrossRef]
  5. Ramos-Fernández, J.C.; López-Morales, V.; Márquez-Vera, M.A.; Pérez, J.M.X.; Suarez-Cansino, J. Neuro-Fuzzy Modelling and Stable PD Controller for Angular Position in Steering Systems. Int.J Automot. Technol. 2021, 22, 1495–1503. [CrossRef]
  6. Kaščak, J.; Gašpár, Š.; Paško, J.; Husár, J.; Knapčíková, L. Polylactic Acid and Its Cellulose Based Composite as a Significant Tool for the Production of Optimized Models Modified for Additive Manufacturing. Sustainability 2021, 13, 1256. [CrossRef]
  7. Abdul Hadi, M.; Brillinger, M.; Wuwer, M.; Schmid, J.; Trabesinger, S.; Jäger, M.; Haas, F. Sustainable Peak Power Smoothing and Energy-Efficient Machining Process Thorough Analysis of High-Frequency Data. Journal of Cleaner Production 2021, 318, 128548. [CrossRef]
  8. Abdul Hadi, M.; Kraus, D.; Kajmakovic, A.; Suschnigg, J.; Guiza, O.; Gashi, M.; Sopidis, G.; Vukovic, M.; Milenkovic, K.; Haslgruebler, M.; et al. Towards Flexible and Cognitive Production—Addressing the Production Challenges. Applied Sciences 2022, 12, 8696. [CrossRef]
  9. Visan, D.A.; Lita, I.; Cioc, I.B. Wireless Control System for Angular Positioning Applications. In Proceedings of the 2013 IEEE 19th International Symposium for Design and Technology in Electronic Packaging (SIITME); IEEE: Galati, Romania, October 2013; pp. 103–106.
  10. Adamczak, M.; Kolinski, A.; Trojanowska, J.; Husár, J. Digitalization Trend and Its Influence on the Development of the Operational Process in Production Companies. Applied Sciences 2023, 13, 1393. [CrossRef]
  11. Hrehova, S. Description of Using Different Software Tools to Analyze the Selected Process. In Proceedings of the 2019 20th International Carpathian Control Conference (ICCC); IEEE: Krakow-Wieliczka, Poland, May 2019; pp. 1–5.
  12. Coranic, T.; Mascenik, J. Experimental Measurement of Dynamic Characteristics of Structural Units. Processes 2023, 11, 3333. [CrossRef]
  13. Jurko, J.; Miškiv-Pavlík, M.; Hladký, V.; Lazorík, P.; Michalík, P.; Petruška, I. Measurement of the Machined Surface Diameter by a Laser Triangulation Sensor and Optimalization of Turning Conditions Based on the Diameter Deviation and Tool Wear by GRA and ANOVA. Applied Sciences 2022, 12, 5266. [CrossRef]
  14. Jurko, J.; Miškiv-Pavlík, M.; Husár, J.; Michalik, P. Turned Surface Monitoring Using a Confocal Sensor and the Tool Wear Process Optimization. Processes 2022, 10, 2599. [CrossRef]
  15. Tran, C.-S.; Hsieh, T.-H.; Jywe, W.-Y. Laser R-Test for Angular Positioning Calibration and Compensation of the Five-Axis Machine Tools. Applied Sciences 2021, 11, 9507. [CrossRef]
  16. Yi-Tsung, L.; Kuang-Chao, F. A Novel Method of Angular Positioning Error Analysis of Rotary Stages Based on the Abbe Principle. Proceedings of the Institution of Mechanical Engineers 2018, Part B: Journal of Engineering Manufacture, 1885–1892. [CrossRef]
  17. Kanno, Y.; Sato, Y. Linear and Angular Position Sensing for Two- Degrees-of-Freedom Motor. International Journal on Smart Sensing and Intelligent Systems 2014, 7, 1–6. [CrossRef]
  18. Chen, H.; Jiang, B.; Lin, H.; Zhang, S.; Shi, Z.; Song, H.; Sun, Y. Calibration Method for Angular Positioning Deviation of a High-Precision Rotary Table Based on the Laser Tracer Multi-Station Measurement System. Applied Sciences 2019, 9, 3417. [CrossRef]
  19. Gietler, H.; Stetco, C.; Zangl, H. Scalable Retrofit Angular Position Sensor System. In Proceedings of the 2020 IEEE International Instrumentation and Measurement Technology Conference (I2MTC); IEEE: Dubrovnik, Croatia, May 2020; pp. 1–6.
  20. Sridharan, M.; Dhandapani, S. Real Time Embedded System Development for Missile Angular Position Acquisition through Image Processing. CSIT 2020, 8, 257–261. [CrossRef]
  21. Diakov, D.; Komarski, D. Micro-Positioning Module for Angular Orientation Position of the Axis of Rotation Analysis. In Proceedings of the 2021 XXXI International Scientific Symposium Metrology and Metrology Assurance (MMA); IEEE: Sozopol, Bulgaria, September 7 2021; pp. 1–6.
  22. Luo, M.; Luo, H.; Zhang, D.; Tang, K. Improving Tool Life in Multi-Axis Milling of Ni-Based Superalloy with Ball-End Cutter Based on the Active Cutting Edge Shift Strategy. Journal of Materials Processing Technology 2018, 252, 105–115. [CrossRef]
  23. Winczek, J.; Gucwa, M.; Mičian, M.; Koňár, R.; Parzych, S. The Evaluation of the Wear Mechanism of High-Carbon Hardfacing Layers. Archives of Metallurgy and Materials 2019, 1111–1115. [CrossRef]
  24. Vandzura, R.; Simkulet, V.; Gelatko, M.; Hatala, M.; Mitalova, Z. Effect of Hardening Temperature on Maraging Steel Samples Prepared by Direct Metal Laser Sintering Process. Machines 2023, 11, 351. [CrossRef]
  25. Mičian, M.; Winczek, J.; Gucwa, M.; Koňár, R.; Málek, M.; Postawa, P. Investigation of Welds and Heat Affected Zones in Weld Surfacing Steel Plates Taking into Account the Bead Sequence. Materials 2020, 13, 5666. [CrossRef]
  26. Marciniak, K. Influence of Surface Shape on Admissible Tool Positions in 5-Axis Face Milling. Computer-Aided Design 1987, 19, 233–236. [CrossRef]
  27. Lazoglu, I.; Liang, S.Y. Modeling of Ball-End Milling Forces With Cutter Axis Inclination. Journal of Manufacturing Science and Engineering 2000, 122, 3–11. [CrossRef]
  28. Knapčíková, L.; Dupláková, D.; Radchenko, S.; Hatala, M. Rheological Behavior Modelling of Composite Materials Used in Engineering Industry. 6.
  29. Pavlenko, I.; Piteľ, J.; Ivanov, V.; Berladir, K.; Mižáková, J.; Kolos, V.; Trojanowska, J. Using Regression Analysis for Automated Material Selection in Smart Manufacturing. Mathematics 2022, 10, 1888. [CrossRef]
  30. Altintas, Y. Manufacturing Automation. Metal Cutting Mechanics, Machine Tool Vibrations, and CNC Design; Second Edition.; Cambridge University Press: University of British Columbia, 2012; ISBN 978-0-521-17247-9.
  31. Kita, Y.; Furuike, H.; Kakino, Y.; Nakagawa, H.; Hirogaki, T. Basic Study of Ball End Milling on Hardened Steel. Journal of Materials Processing Technology 2001, 111, 240–243. [CrossRef]
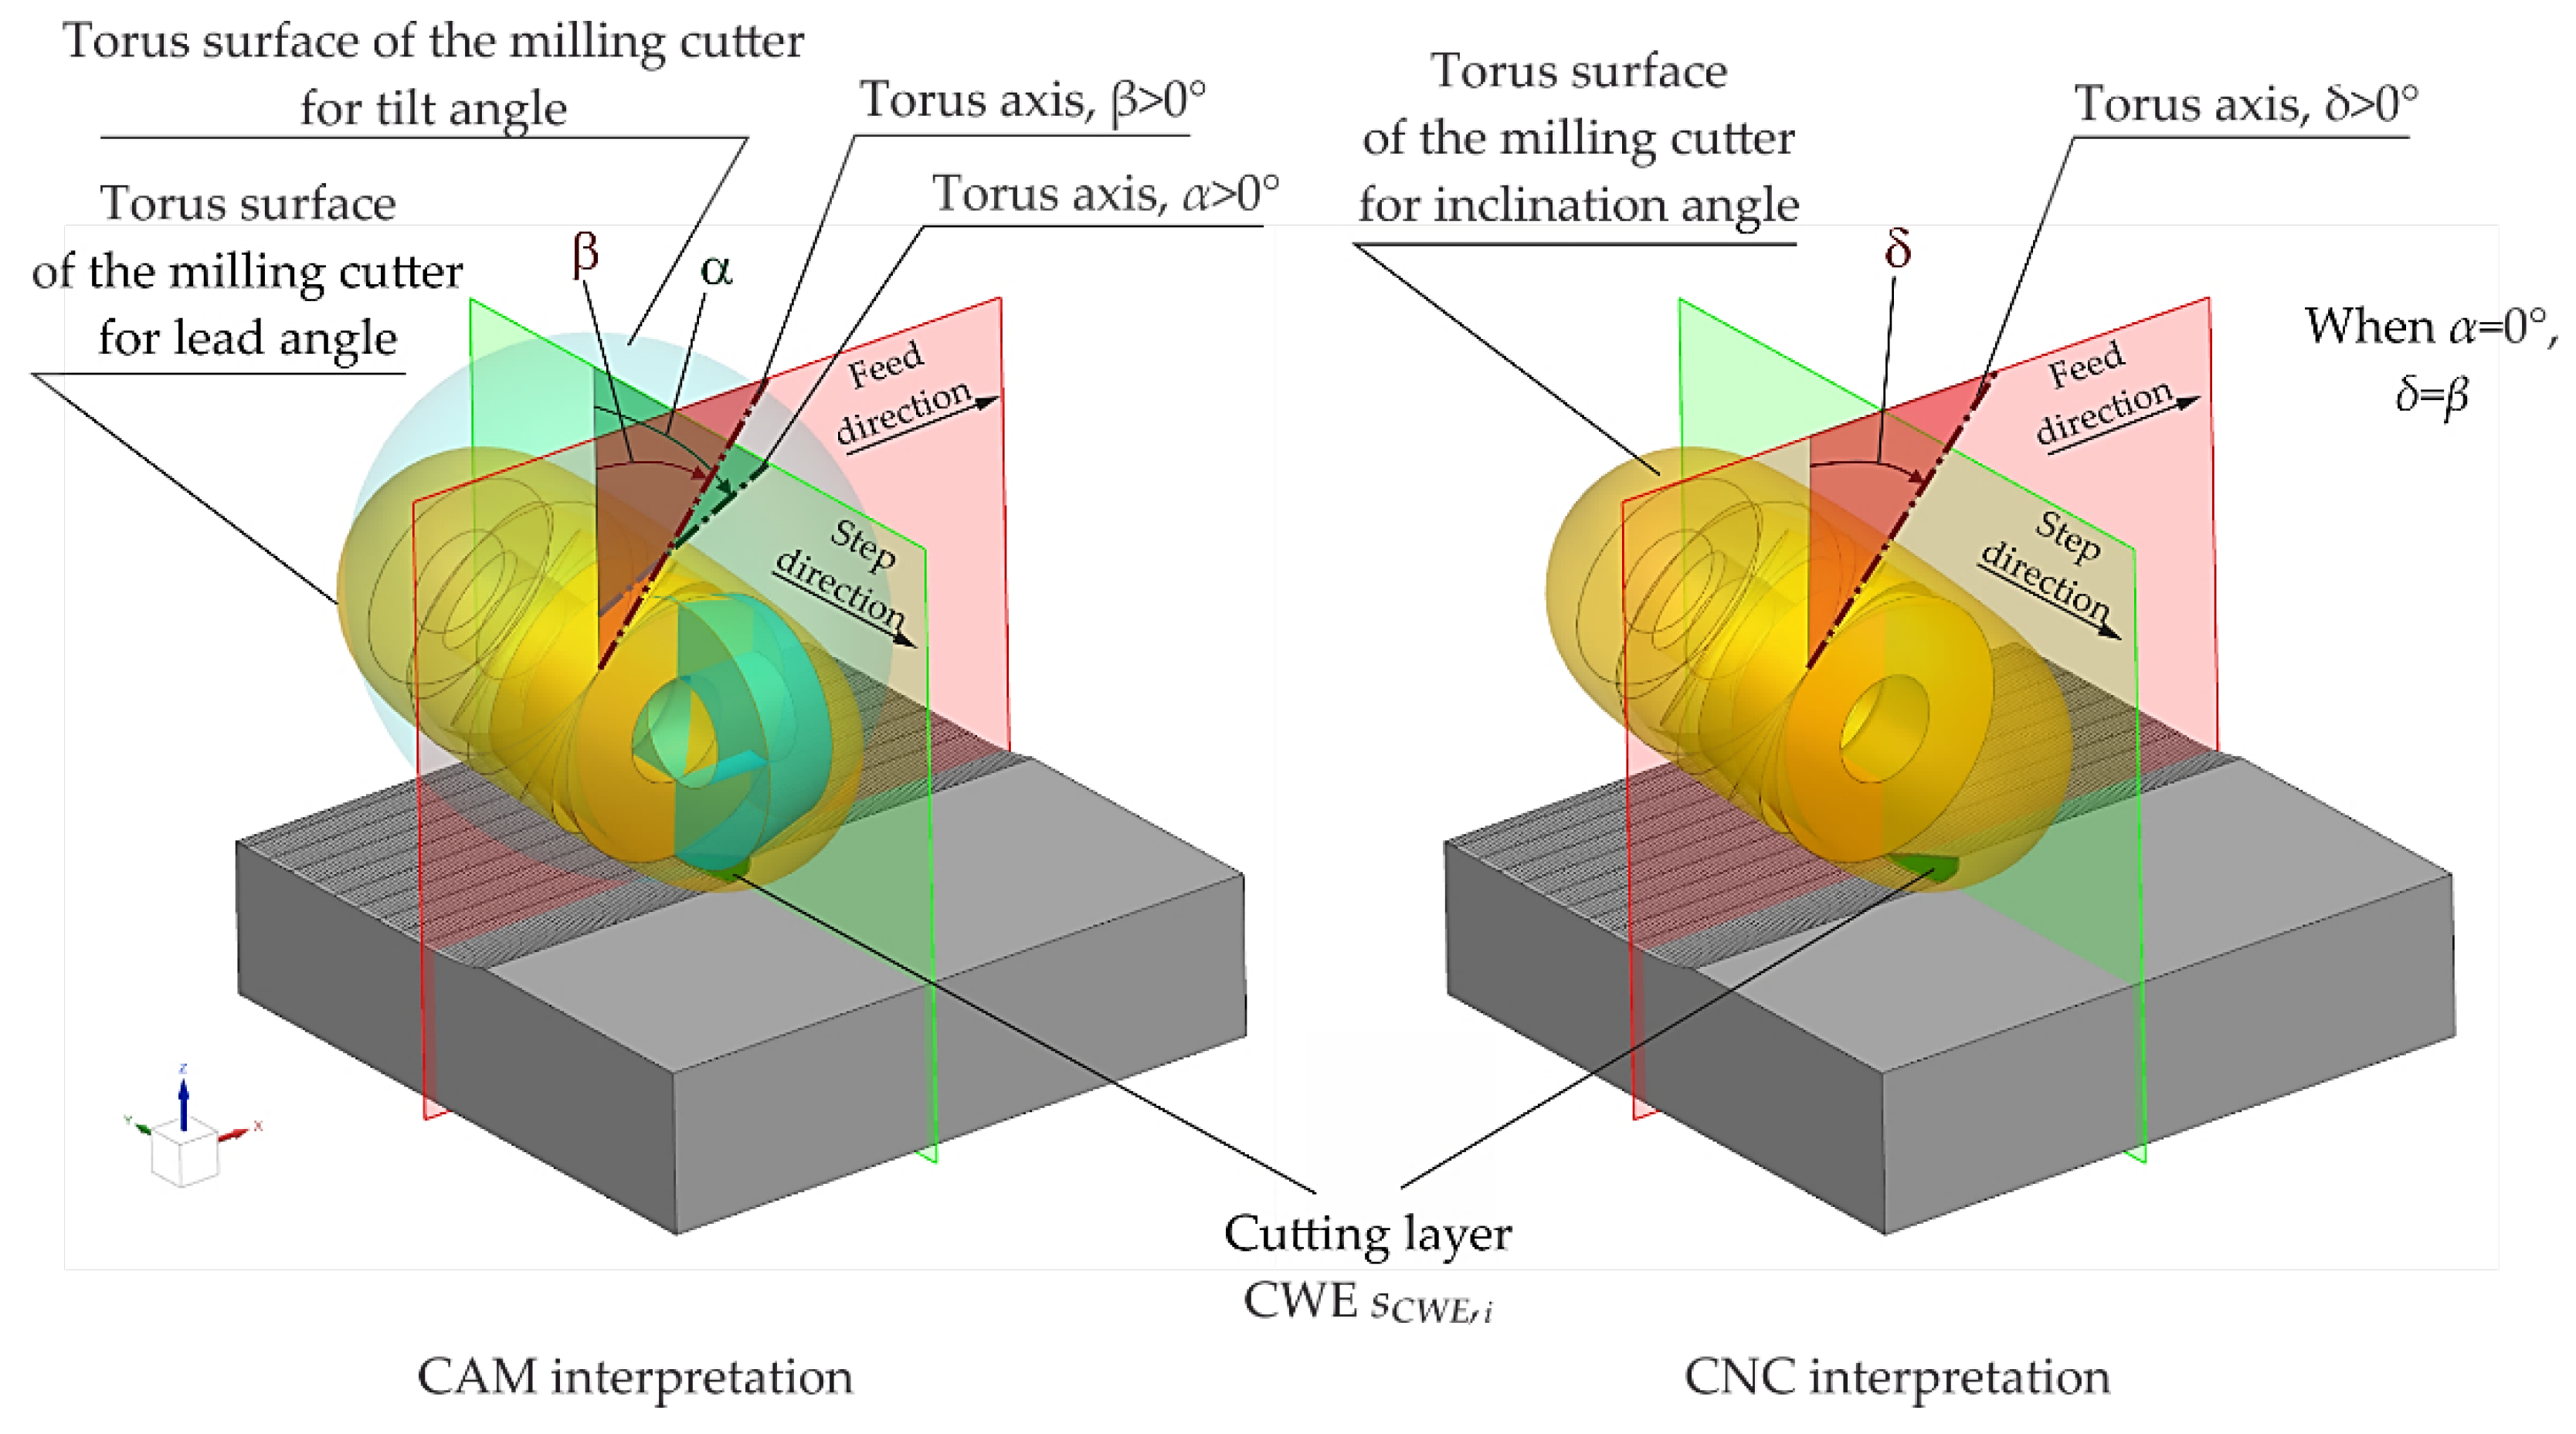
Figure 1. Tool axis orientation and its interpretation at pre-processor and post-processor stages.
Preprints 119320 g001
Figure 2. Possible cases of the round cutting insert rotation: (a) overlapping of a new segment with a worn segment – wrong; (b) too large a gap between segments – wrong; (c) segments adjacent to each other – correct.
Preprints 119320 g002
Figure 3. Types of sculptured surfaces.
Preprints 119320 g003
Figure 4. Method of detecting undercutting of the machined surface by the torus of the cutter.
Preprints 119320 g004
Figure 5. Multi-axis milling using the torus milling cutter: (a) cut layer geometry; (b) active cutting edge segment and active cutting belt.
Preprints 119320 g005
Figure 6. Typical tool wear rate at a constant cutting speed.
Preprints 119320 g006
Figure 7. Cutting speed variation along the tool axis for torus milling cutter. (Tool diameter: 16 mm, round cutting insert radius: 4 mm, spindle speed: 2786 rpm, inclination angle: 10°).
Preprints 119320 g007
Figure 8. Experimental test bench (1. Machining tool, 2. Torus milling cutter, 3. Workpiece, 4. Dino-Lite 7000 CE series digital workshop microscope).
Preprints 119320 g008
Figure 9. Laser engraving workstation: (a) xTool F1 machine; (b) PC workstation with xTool Creative Space software; (c) working space with fixed round cutting insert visible laser dot.
Preprints 119320 g009
Figure 10. Digital 3D microscope used for angular positioning and evaluation of the cutting blade wear.
Preprints 119320 g010
Figure 11. General procedure for the angular positioning of the RCI.
Preprints 119320 g011
Figure 12. Results of non-linear estimation: (a) Wear curve; (b) Fitted model function and observed values; (c) Scatter plot; (d) Error normality chart.
Preprints 119320 g012
Figure 13. Round cutting insert: (a) after laser marking; (b) assembled in the cutter body and subjected to a first measurement verification after the first 20s of operation.
Preprints 119320 g013
Figure 14. Measurement results: (a) correctness of angular positioning; (b) maximum defect values for the segments obtained; (c) distribution of defect values along the worn active cutting edge.
Preprints 119320 g014
Table 1. Cutting conditions for I-st stage of the research.
Inclination angle
δ [°]
Work angle
of cutting blade
ψr_rci [°]
Distance between toolpaths
br [mm]
Axial depth of cut
ap [mm]
Feed per tooth
fz [mm/z]
Cutting speed
(at p. CPi)
vc [m/min]
Criterion
Rth=Rthvf [mm]
Criterion
VBBlim [mm]
1.10946 23.4411 1.6 0.3 0.1549 71 0.0015 0.2
Table 2. Cutting conditions for tool wear calibration.
Test No. Cutting speed
(at p. CPi)
vc [m/min]
Feed rate
f [mm/rev]
Measured tool life
Tt [min]
1 40 0.4 84
2 140 0.4 0.97
3 140 0.2 3.7
Table 3. Laser setting parameters.
Laser set Movement accuracy [mm] Repeat positioning accuracy
[mm]
Up to working speed [mm/s]
2W
1064 nm
0.00199 0.000248 84
Table 4. Measurement equipment and parameters.
Microscope Keyence VHX 7000
Lens ZS-20 with 20-200x zoom
Shooting mode 4K 3D HDR scanning mode with glare reduction
Magnification merging images at 100X zoom
Room temperature 22 °C
Humidity 55%
Table 5. Estimation statistics and results of ANOVA analysis of variance.
Sum of squares Degrees of freedom Mean square F-value p-value R
Regression 1.3271 2.0 0.6635 1867.4383 0.0000 0.90
Residual 0.0305 86 0.0003
Total 1.3577 88
Adjusted grand total 0.1675 87
Regression of the adjusted total 1.3271 2.0 0.6635 344.5687 0.0000
Disclaimer/Publisher’s Note: The statements, opinions and data contained in all publications are solely those of the individual author(s) and contributor(s) and not of MDPI and/or the editor(s). MDPI and/or the editor(s) disclaim responsibility for any injury to people or property resulting from any ideas, methods, instructions or products referred to in the content.
Copyright: This open access article is published under a Creative Commons CC BY 4.0 license, which permit the free download, distribution, and reuse, provided that the author and preprint are cited in any reuse.
Prerpints.org logo

Preprints.org is a free preprint server supported by MDPI in Basel, Switzerland.

Subscribe

© 2024 MDPI (Basel, Switzerland) unless otherwise stated