1. Introduction
Zirconium alloy products, due to their physical and mechanical properties, are used in industries where high requirements are placed on mechanical properties and corrosion resistance in aggressive environments. One of the main areas of use of zirconium alloy products is their usage as construction elements for the production of fuel assemblies (nuclear reactor cores) [
1,
2,
3]. In addition to meeting the requirements for ensuring high mechanical and anti-corrosion properties, the products must have a uniform structure without metallurgical discontinuities [
2]. The heterogeneity of the structure in the finished products may lead to stress concentrations, which may be the cause of failure of fuel assemblies, what in turn may eventually lead to an accident [
4].
There are many zirconium-based industrial alloys used in the nuclear industry. In general, the alloys are differentiated by the presence and content of the elements such as Nb, Sn, Fe, Cr, Ni, and O. The choice of an alloy is related to the purpose of a given constructional element for a specific type of reactor. PWR zirconium with 1% Nb (M5) is used for the making plugs for cladding tubes of reactor fuel assemblies [
5].
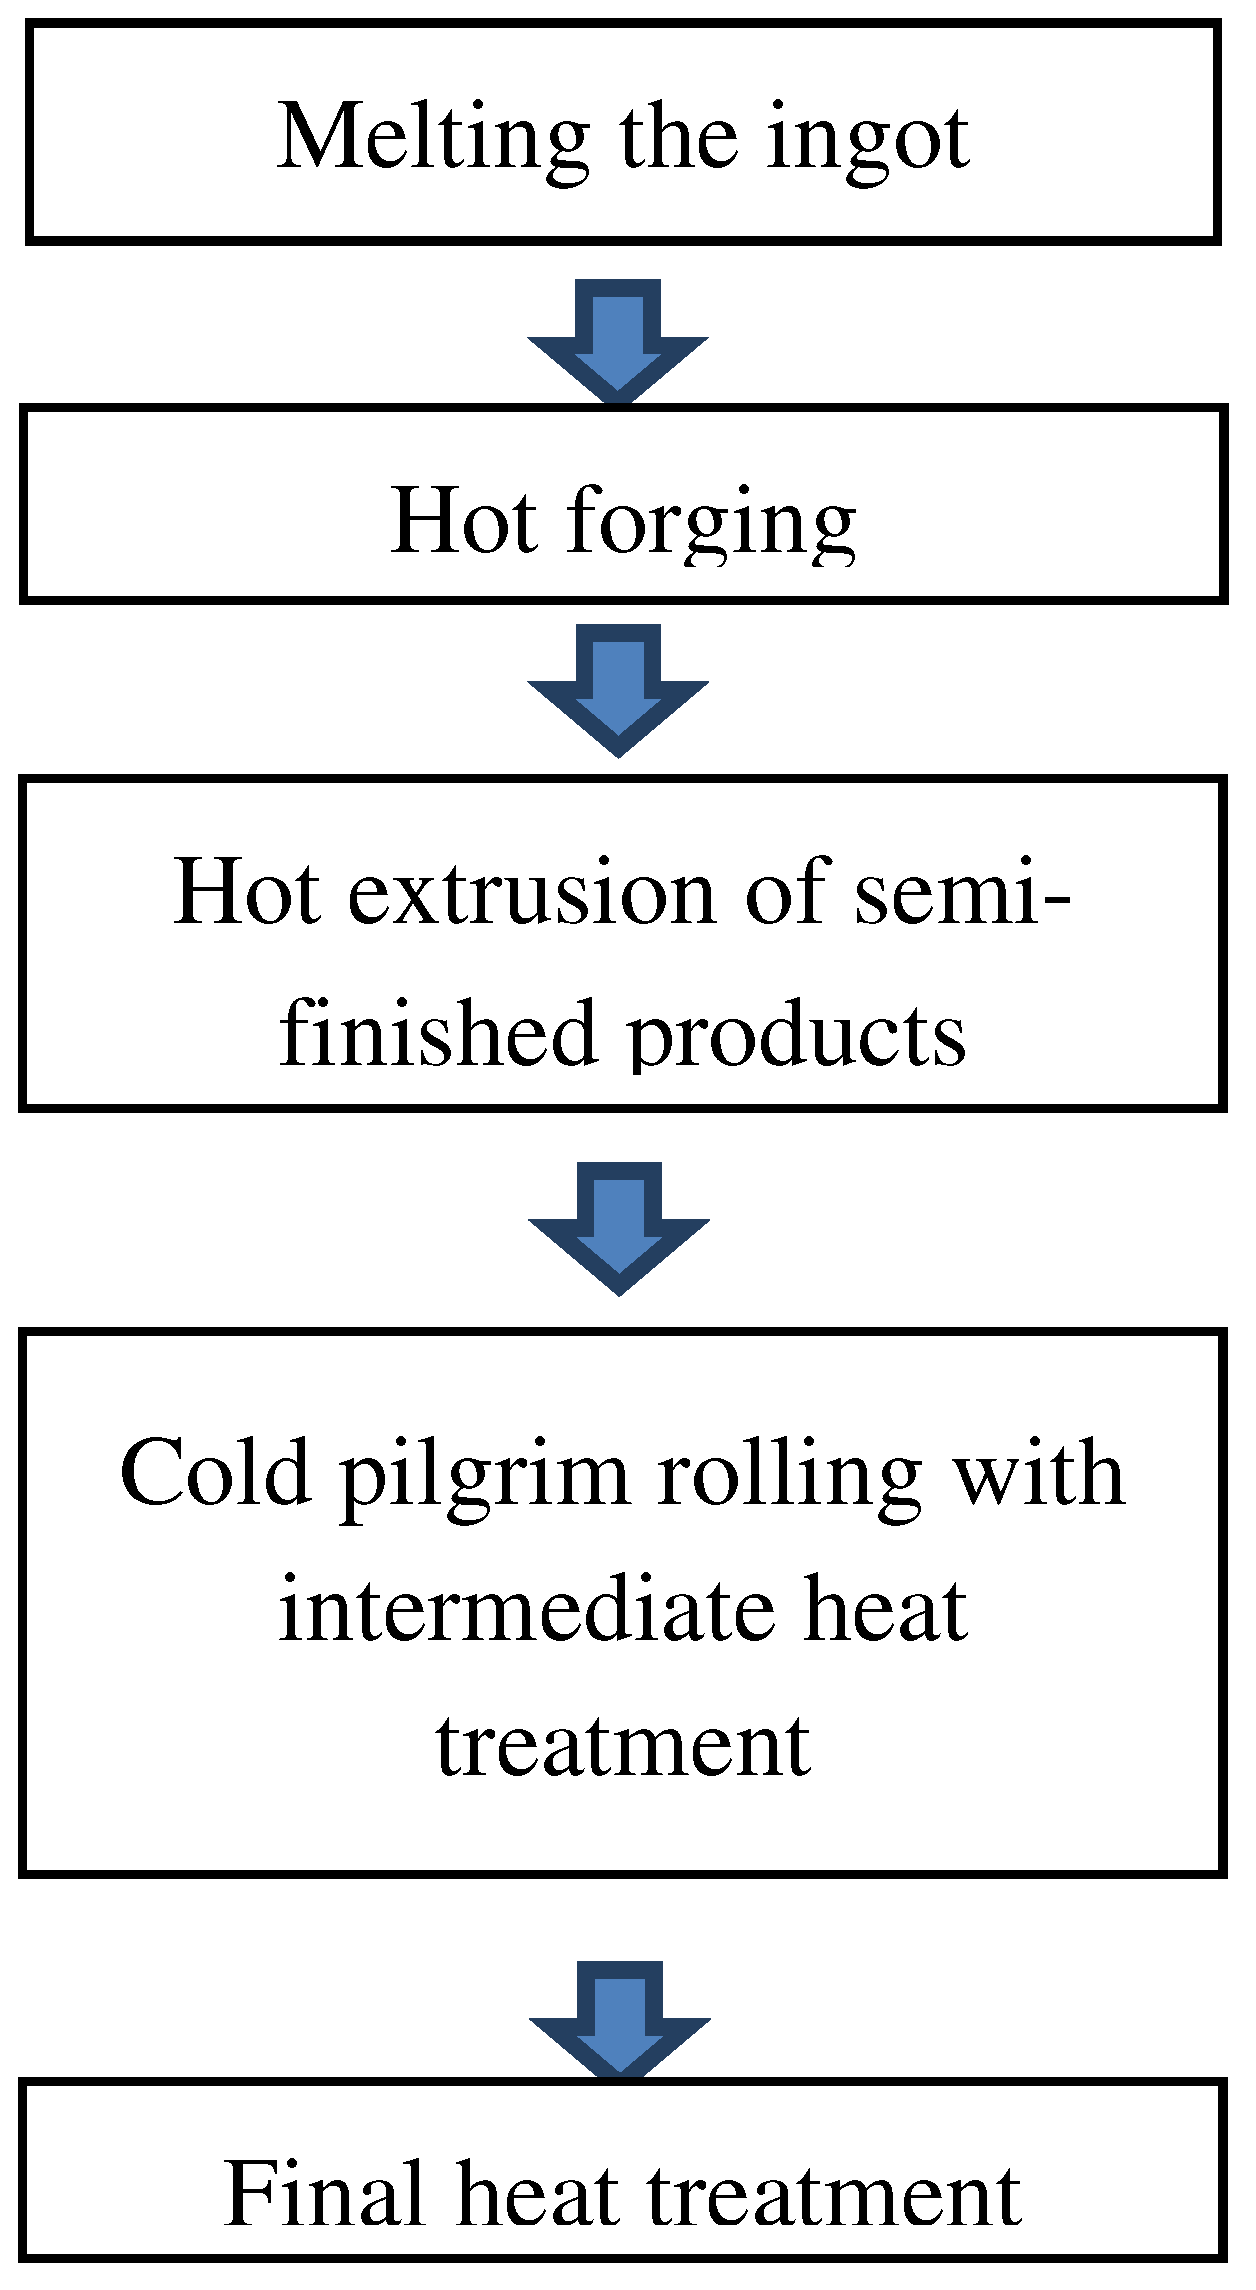
The technology of manufacturing tubes and rods from the Zr-1%Nb alloy includes the following operations [
2,
6]:

Authors of works [
6,
7] stated that in the process of ingot melting, the formation of a piping cavity in the axis of the ingot and of central porosity is inevitable. The formation of metallurgical discontinuities is related to the gradient of the crystallization rate in relation to the volume of the ingot. After melting, the ingots are subjected to ultrasonic testing to find metallurgical discontinuities. However, it is known from the authors’ experience that there may be central porosities with a diameter of up to Ø10 mm in the axial part, and metallurgical voids with a diameter of Ø1.0 mm at a certain distance from the axis of the ingot.
The analysis of the literature shows that there are known methods of closing foundry voids during the hot elongation steel rods [
8,
9,
10,
11,
12,
13,
14,
15,
16], but no studies have been found on the closing of foundry voids in the process of elongating zirconium rods.
The authors in [
17] carried out numerical modelling of the closure foundry voids during the forging operation of Mg alloys bars and physical verification of the obtained results.
In the work [
18], the conditions for closing foundry voids in the forging process of the M5 alloys rods with the use of rhombic and flat anvils were determined. To do this, the investigators used a physical simulator of metallurgical processes Gleeble 3800 and the FORGE software, with which computer simulations of this process were carried out. The use of a combination of computer and physical modelling to determine the parameters of the hot elongation process is effective in terms of material and time costs [
14,
18].
In the work, the authors showed the results of studies on the influence of the geometry of flat trapezoidal and rhombic trapezoidal anvils on the closure of foundry voids in the process of hot forging of the M5 alloy rod. Based on the testing results, recommendations were developed for the technology of hot forging process ensuring the closing of foundry voids occurring in ingots made of the M5 alloy.
2. Methodology of Experimental Research
The zirconium alloy used for the investigation was an M5 alloy with the chemical configuration: zirconium with 1.1 % Nb, 0.05 % Fe – 0.6 % O.
The impact of thermomechanical parameters of the hot elongation of the M5 alloy rod on the plasticizing stress σp was determined using a Gleeble 3800 plastometer.
The tests were carried out in the temperature range of 770 ÷ 950°С [
2,
19,
20]. On the basis of the Zr - Nb phase equilibrium system at the temperature of 870-950 °C, the structure of the metal is characterized by grains in the shape of the A2 unit cell. In the forging temperatures of 750 ÷ 870°C, the structure of Zr is in the zone of α+β [
2]. During the deformation of the zirconium with 1% Nb alloy sample in the specified temperatures, the limit value of the deformation decreases by half [
21]. The authors’ shows that forging process this alloys at temperatures below 750 °C causes to the occurrence of cracks.
Tests were carried out for the deformation speed range from 0.5 s-1 to 5.0 s-1, even though the average deformation speed in the hot elongation of the Zr alloys rods on the hydraulic press is 0.5 s-1 [
19]. But, in the local places of the deformed rods in the shaped tools, the deformation speed is little higher, which is why it was decided to expand the research area.
The main functionality of this method is the ability to obtain relatively large strain values (up to ε = 1.2 [
22]), moreover, it is the most favorable strain state to describe the rheological properties of the material during plastic deformation [
22].
In order to make real use of the results of plastometric tests of the M5 Zr alloys, an approximation of flow curves
was carried out with the use of the generalizing connection – functions of Henzel A., Spittel T. [
23]:
where:
– stress, T – temperature,
– strain,
– strain rate, A, m1−m9 – function coefficients.
The approximation of the testing effects was carried out according to the method [
14] in the FORGE program.
3. Testing Results
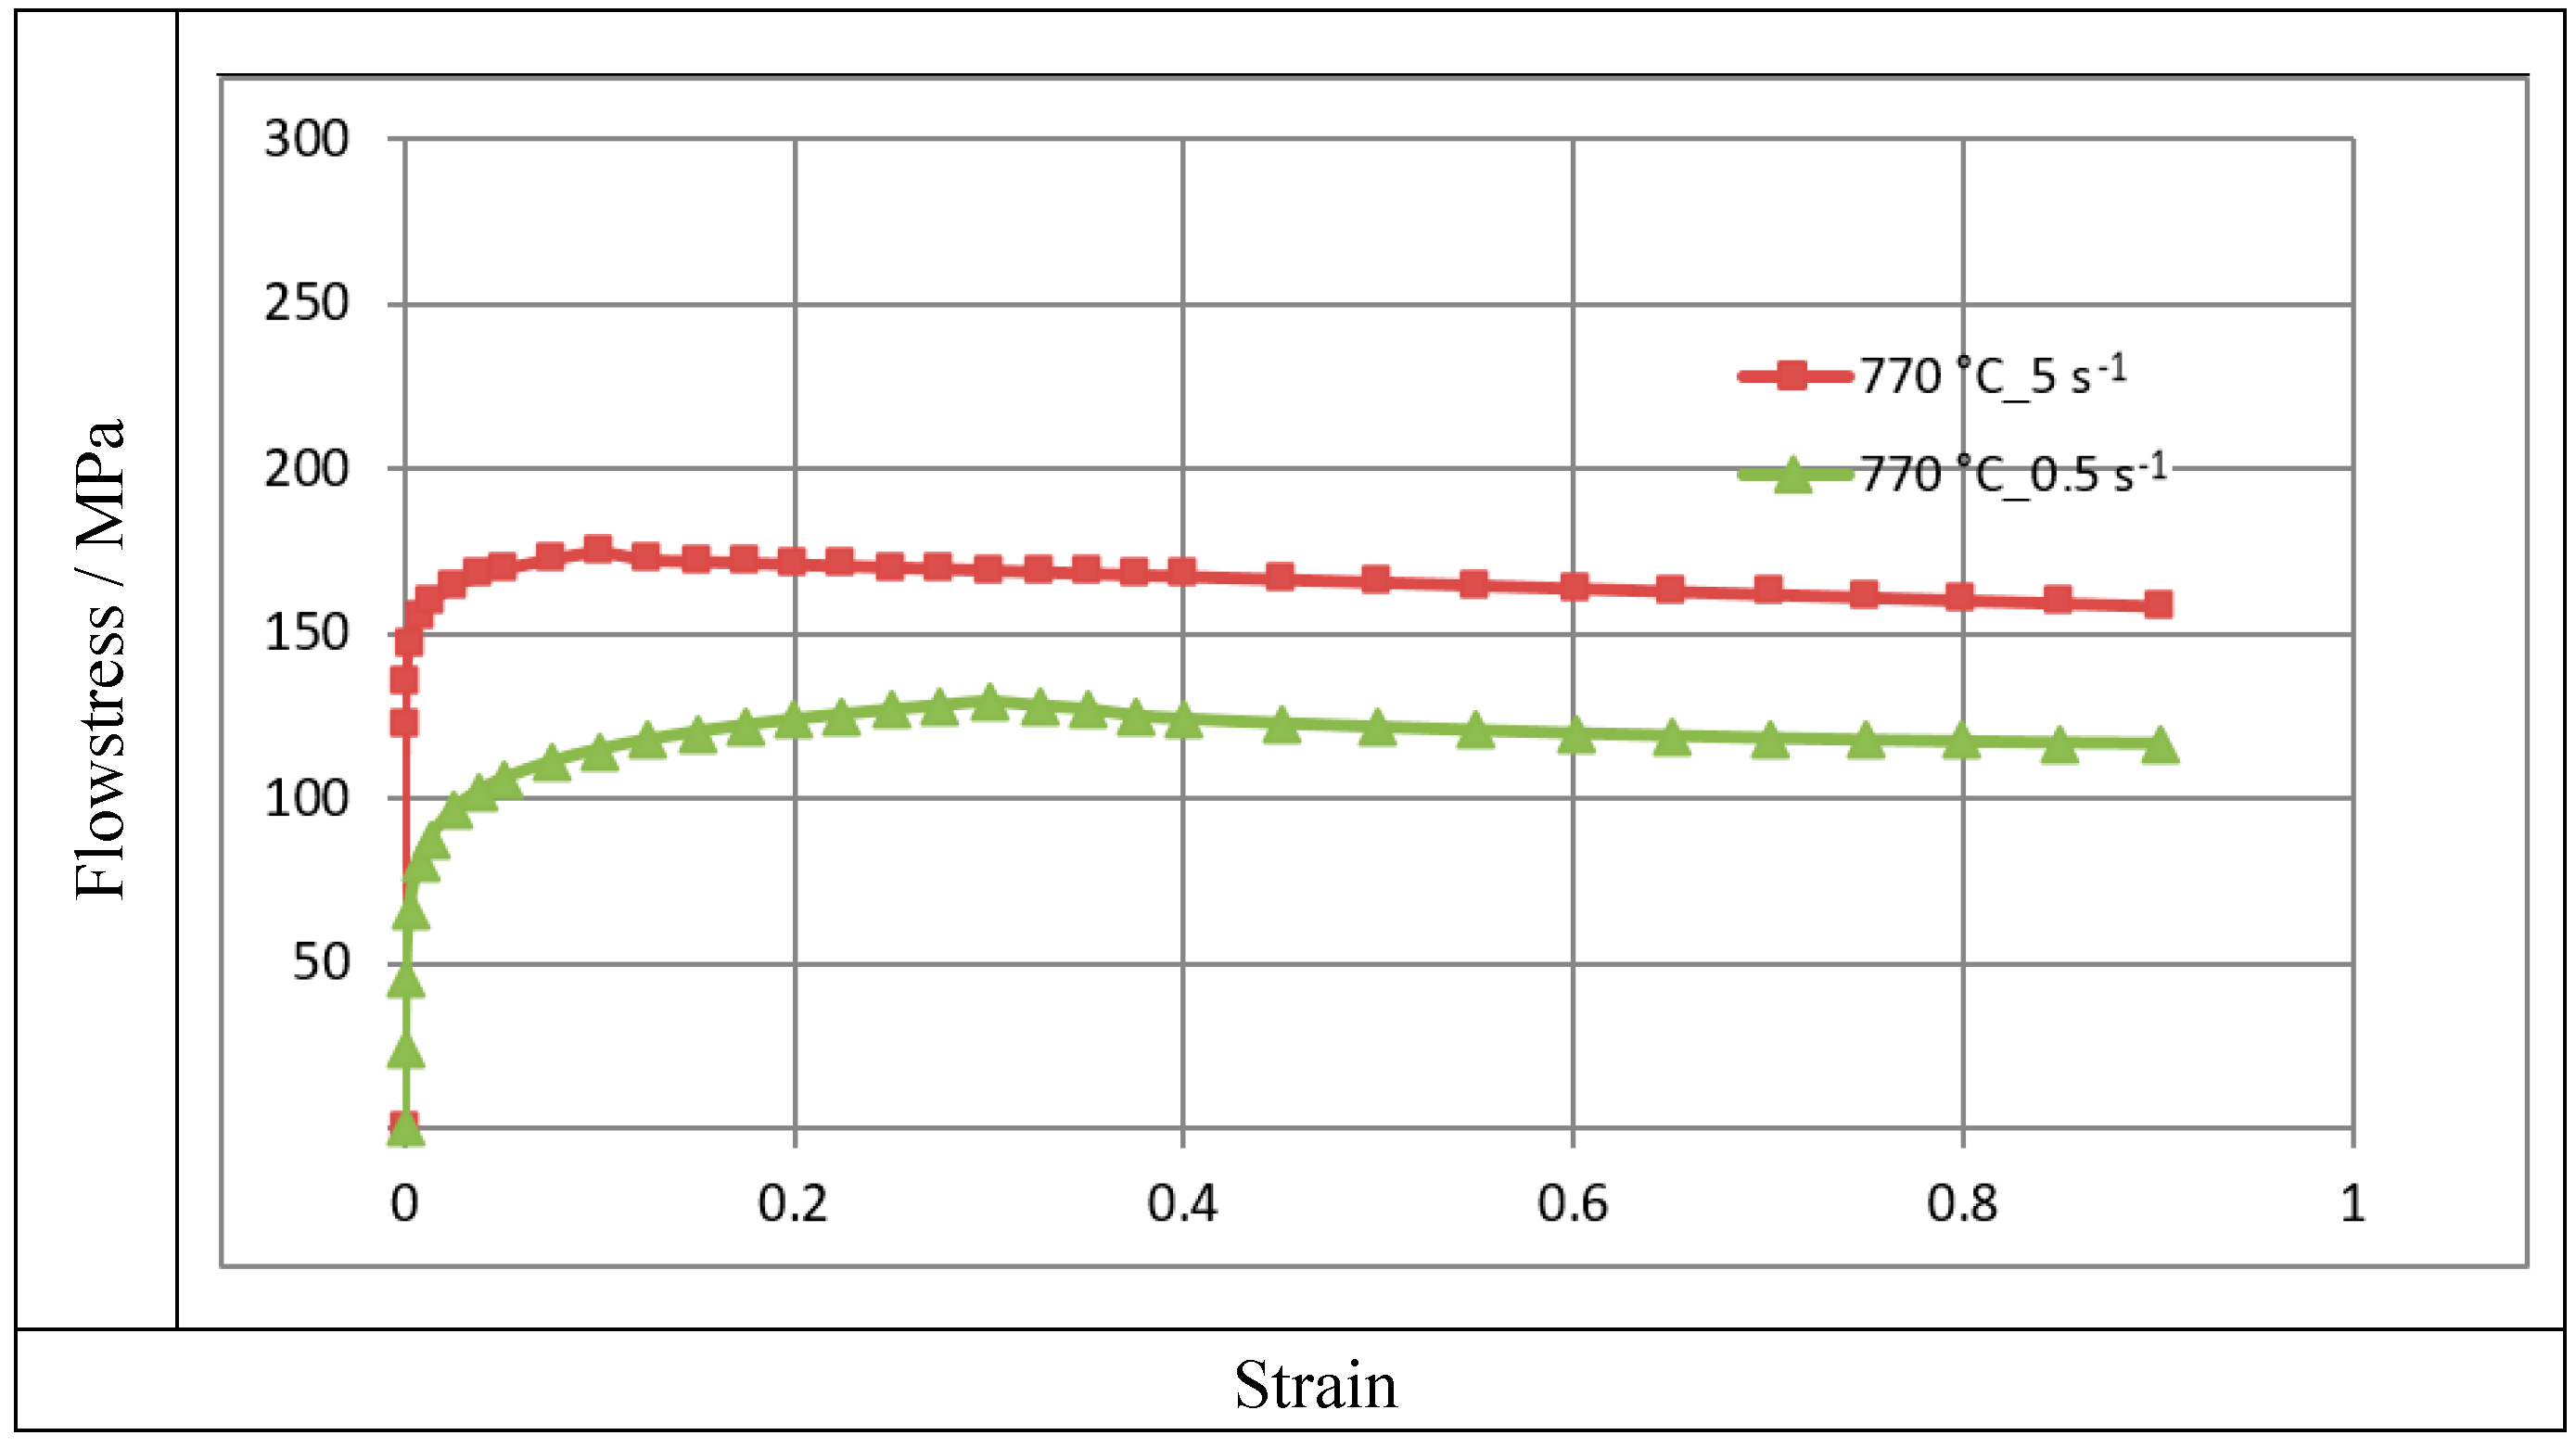
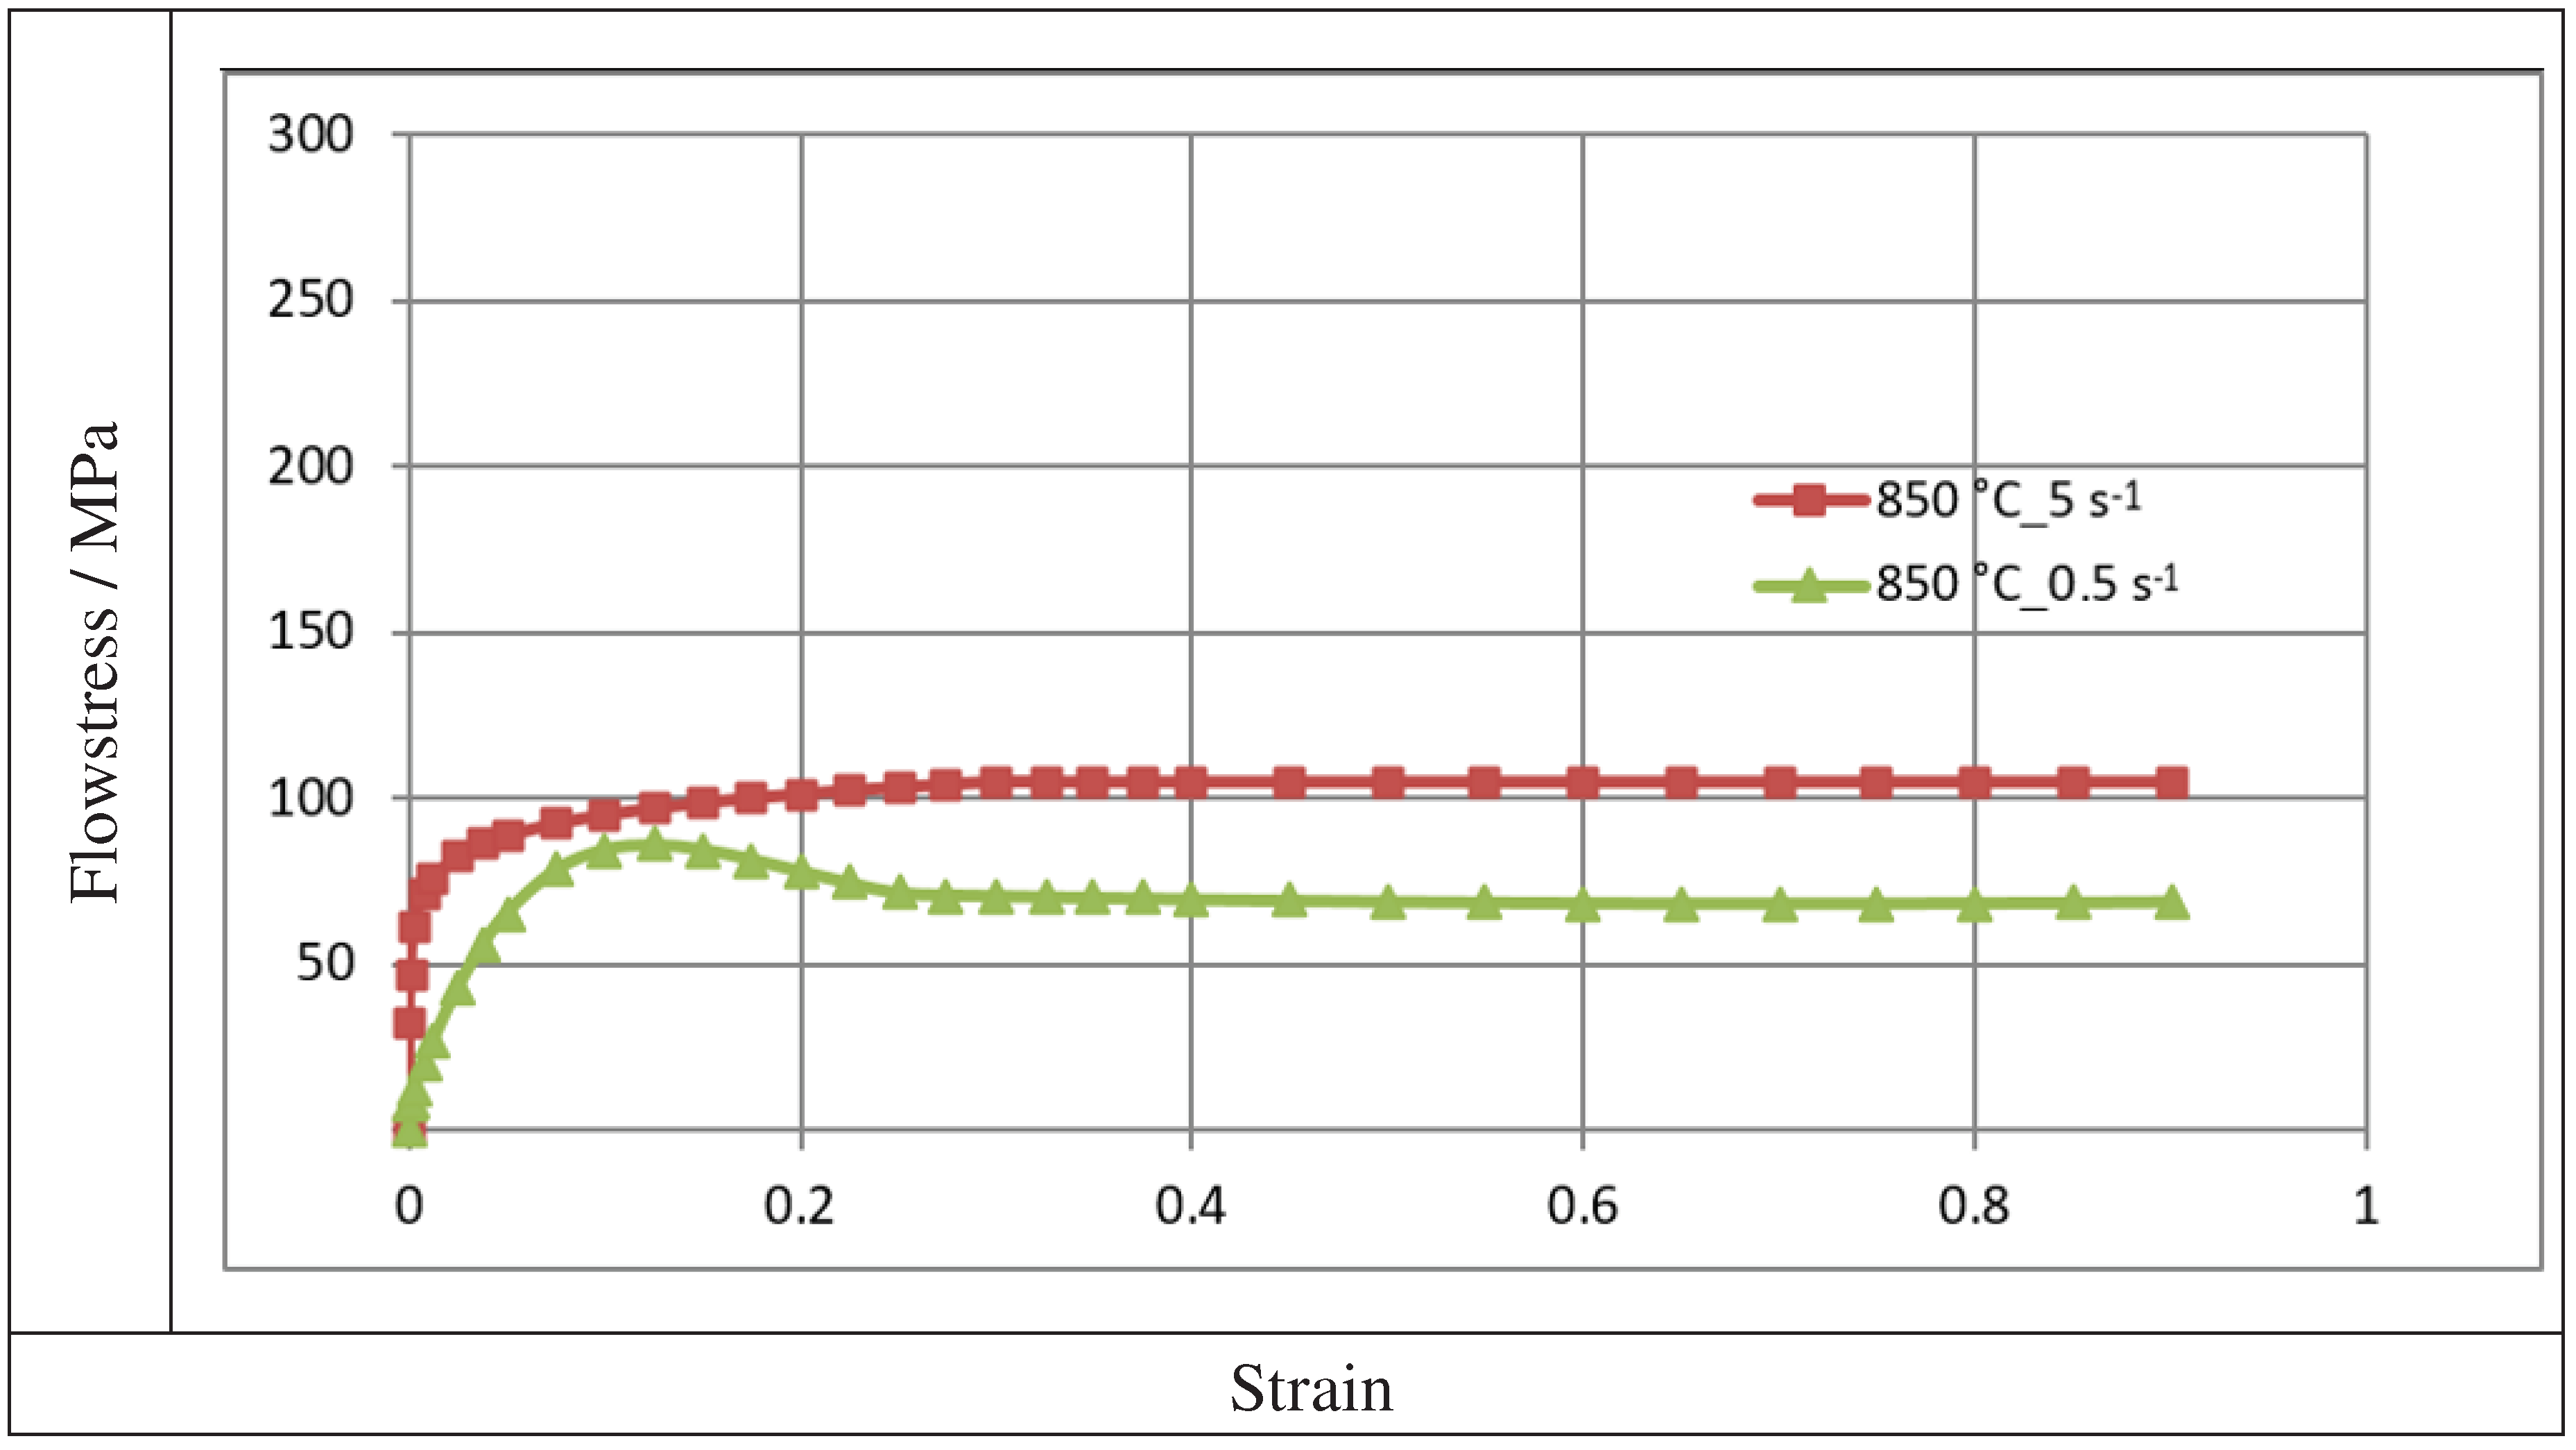
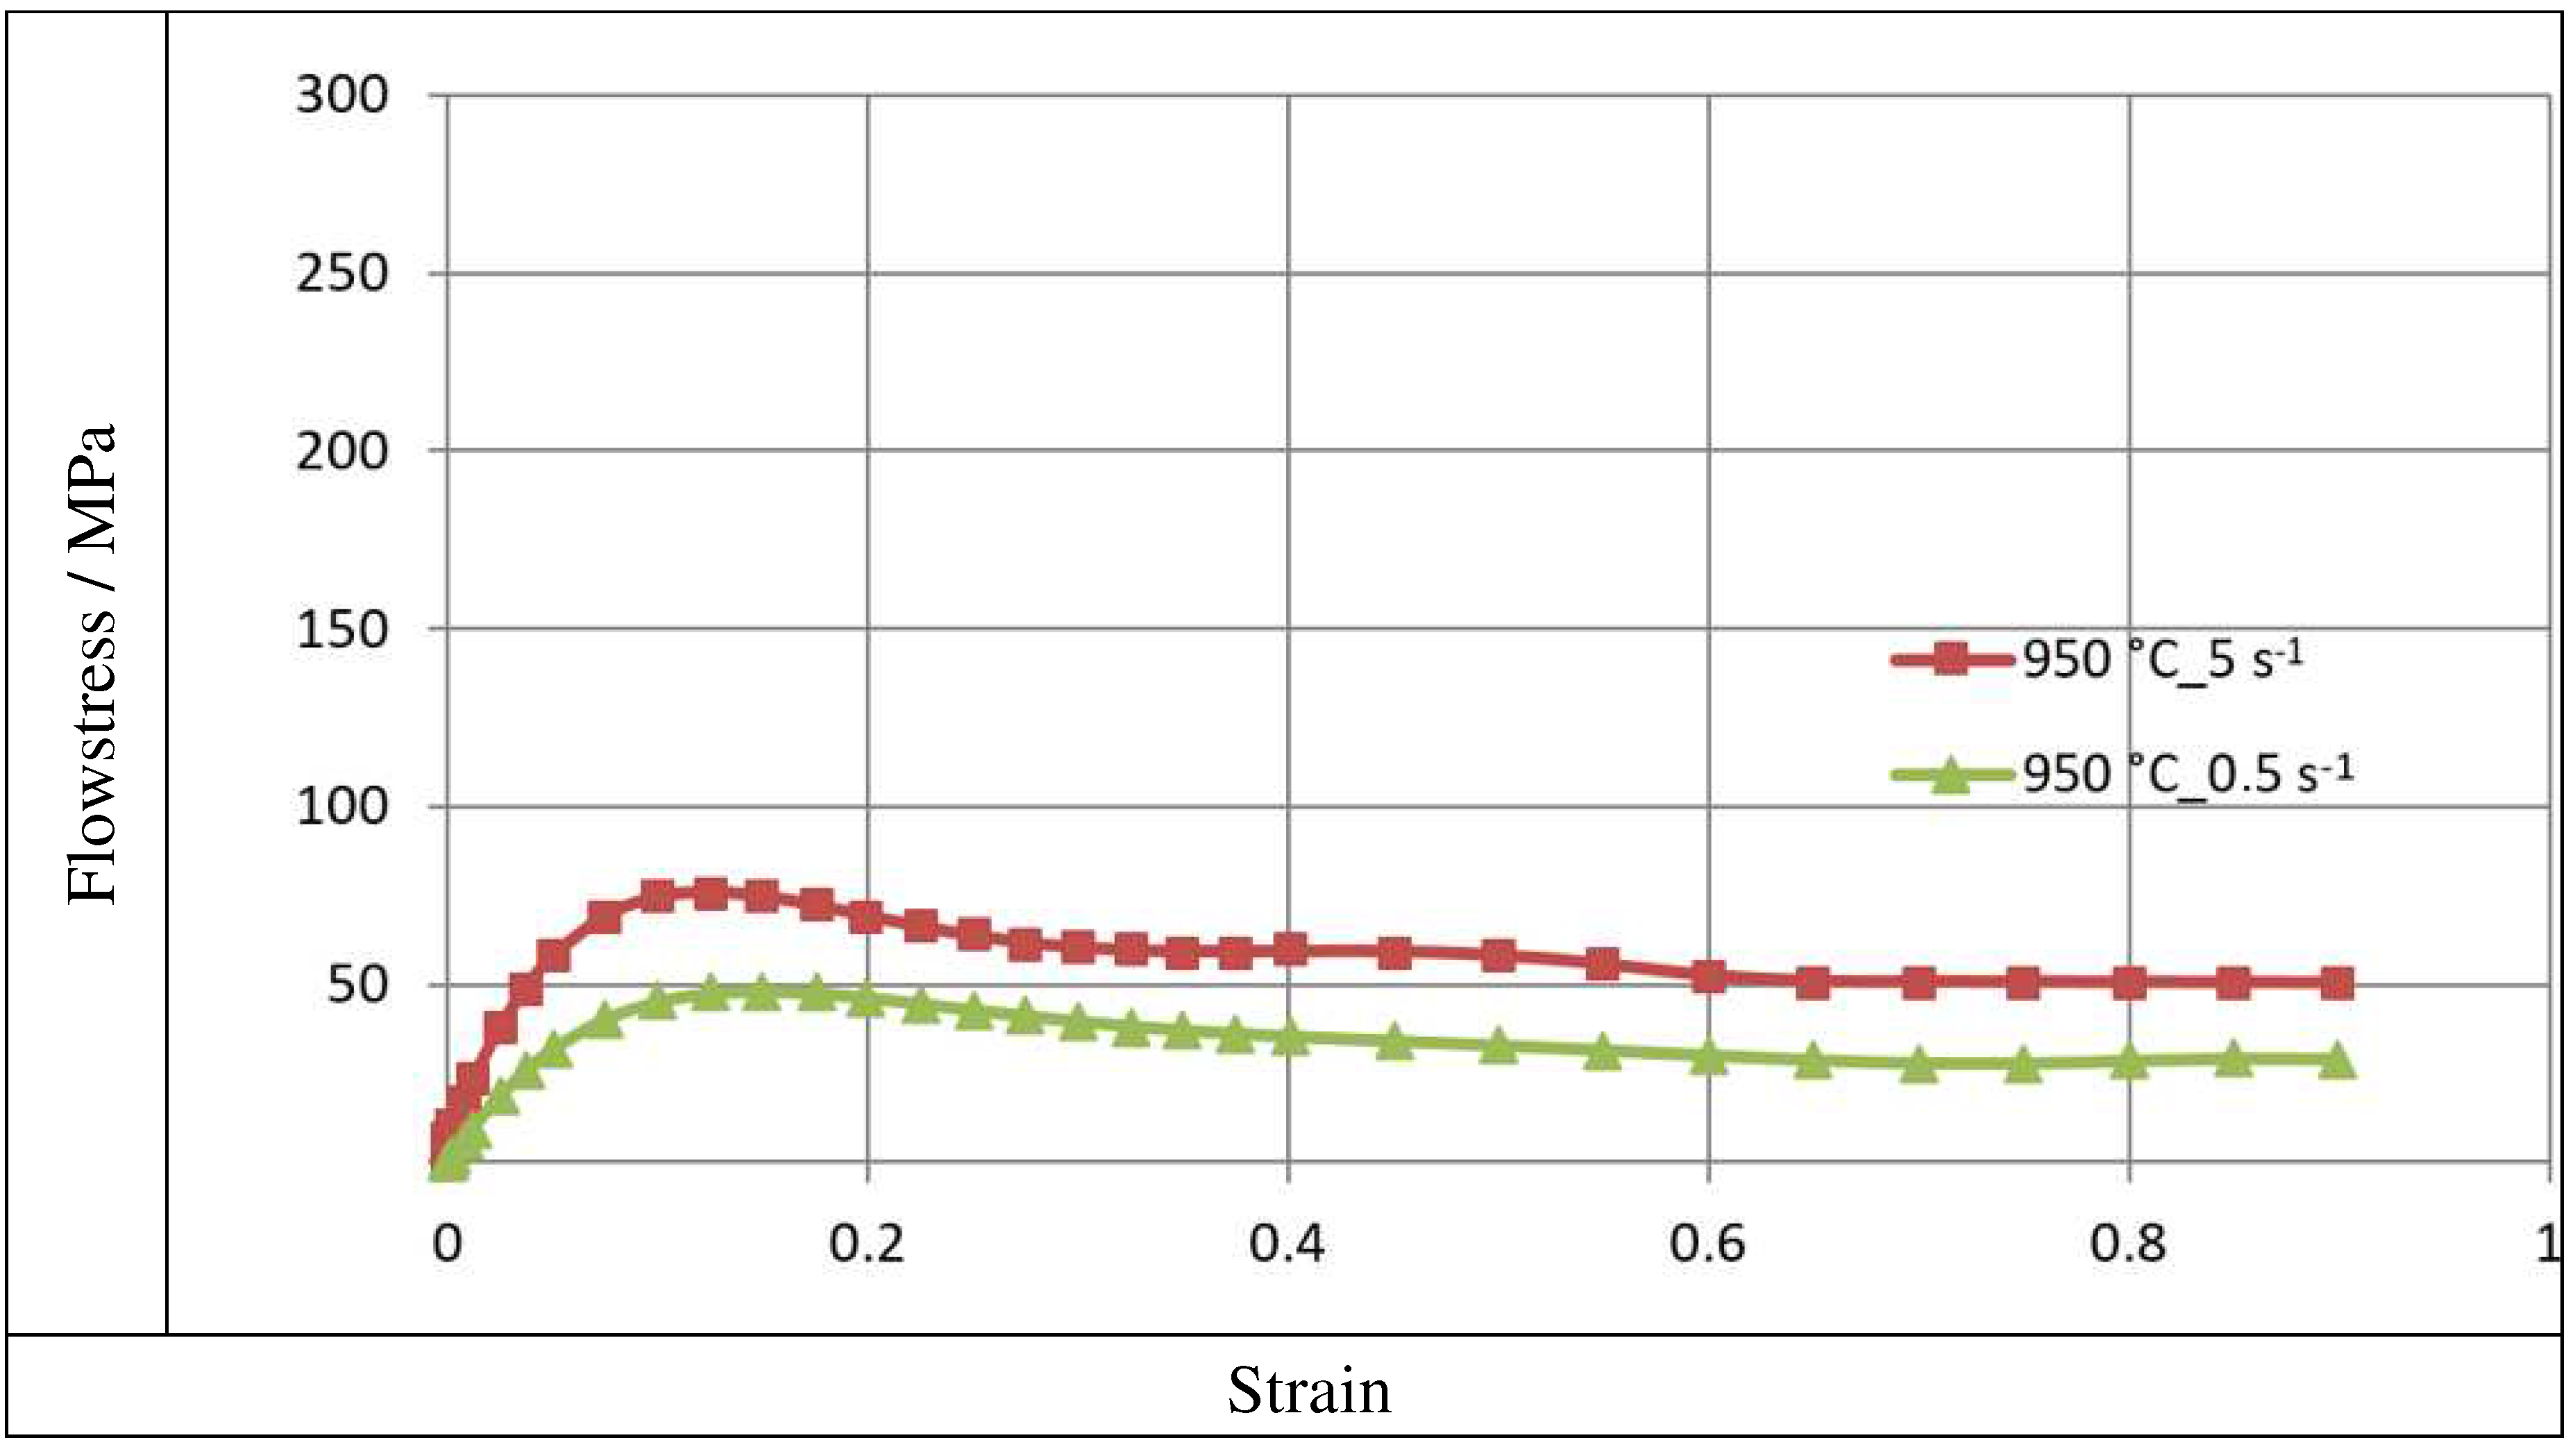
Figure 1,
Figure 2 and
Figure 3 illustration the
curves of the zirconium alloys deformed at T = 770 ÷ 950°C for the deformation speed
from 0.5 s-1 to 5.0 s-1.
Figure 1,
Figure 2 and
Figure 3 shows increase in the temperature of samples T from 770 °C to 950 °C, the value of the plasticizing stress σ
p decreases about 2,5 times. An increase in the deformation speed from 0.5 s-1 to 5.0 s-1 leads to an increase in the plasticizing stress σ
p, and at T = 770°C this increase amounts to ~ 29%. At T = 850 °C, this increase is ~ 36%, and at T = 950 °C it is 43%. The conducted research shows that the increase in the deformation speed affects the plasticizing stress σ
p, which increases, and in addition, the magnitude of this increase is correlated with the temperature.
The plasticity curves for the tested temperature range is varied. For the deformation speed=0.5 s-1 in tested temperature range, the curves reach the max. stress value for a programmed deformation value, as the temperature increases, the maximum plasticizing stress value σp moves towards smaller values of actual deformation.
Data showed in
Figure 2 demonstrations that the curve obtained at deformation speeds
= 0.5 s-1 and
= 5.0 s-1 are of a different character. The max. value of yield stress during deformation speed
= 0.5 s-1 was observed for the value of real deformation ε = 0.12, and with a with continued increase in deformation, a decrease in the value of yield stress was obtained. For the deformation speed
= 5 s-1, the value of yield stress increases to the value of real deformation ε = 0.3 where the curve flattening effect takes place.
This difference may be due to the fact that the dynamic softening process is delayed with the increase of strain rate. Dynamic recrystallization is inhibited and the softening of the material proceeds in accordance with the mechanism of dynamic polygonization. At the temperature T = 862°C, a polymorphic transformation takes place in zircon, the crystal lattice changes from the hexagonal A3 lattice to the spatially centered cubic lattice A2 [
2]. The non-monotonicity of the curve may be caused by the beginning of the polymorphic transformation [
12].
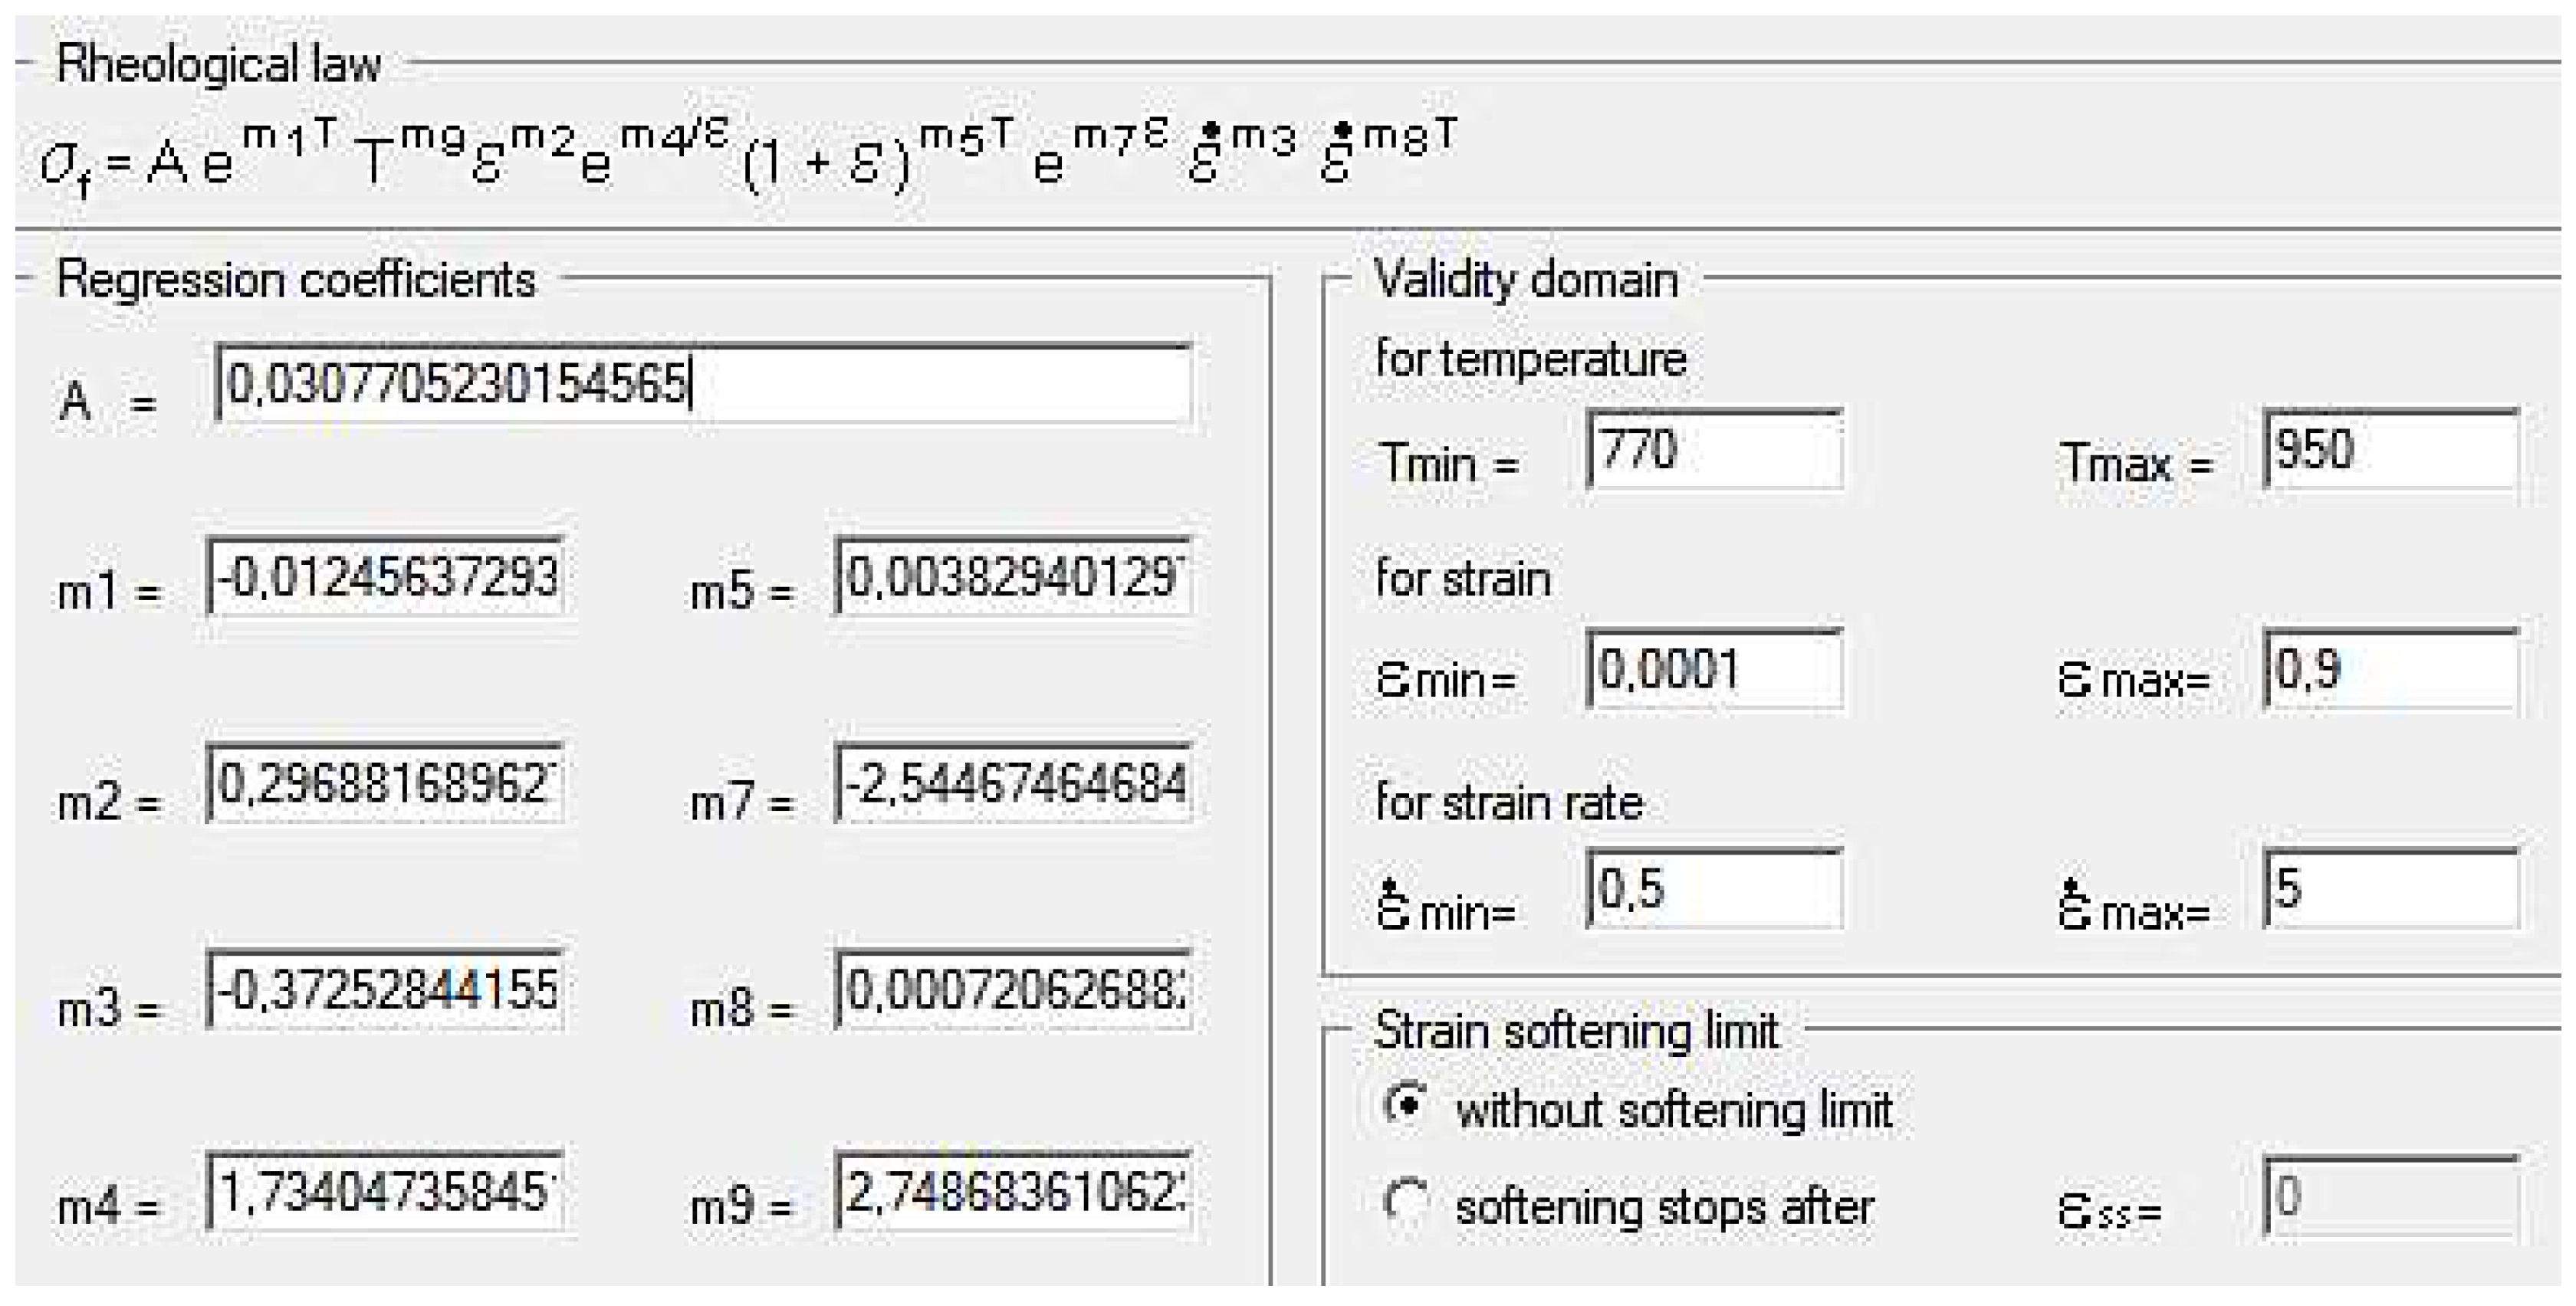
As a effect of approximation of the experimental zirconium alloy curves, Hensel-Spittel coefficients have been determined for the temperature and speed of plastic processing conditions: Т=770 − 950°С,
=0.5−5.0 s -1 (
Figure 4).
The multifactorial equation (1), using the coefficients shown in
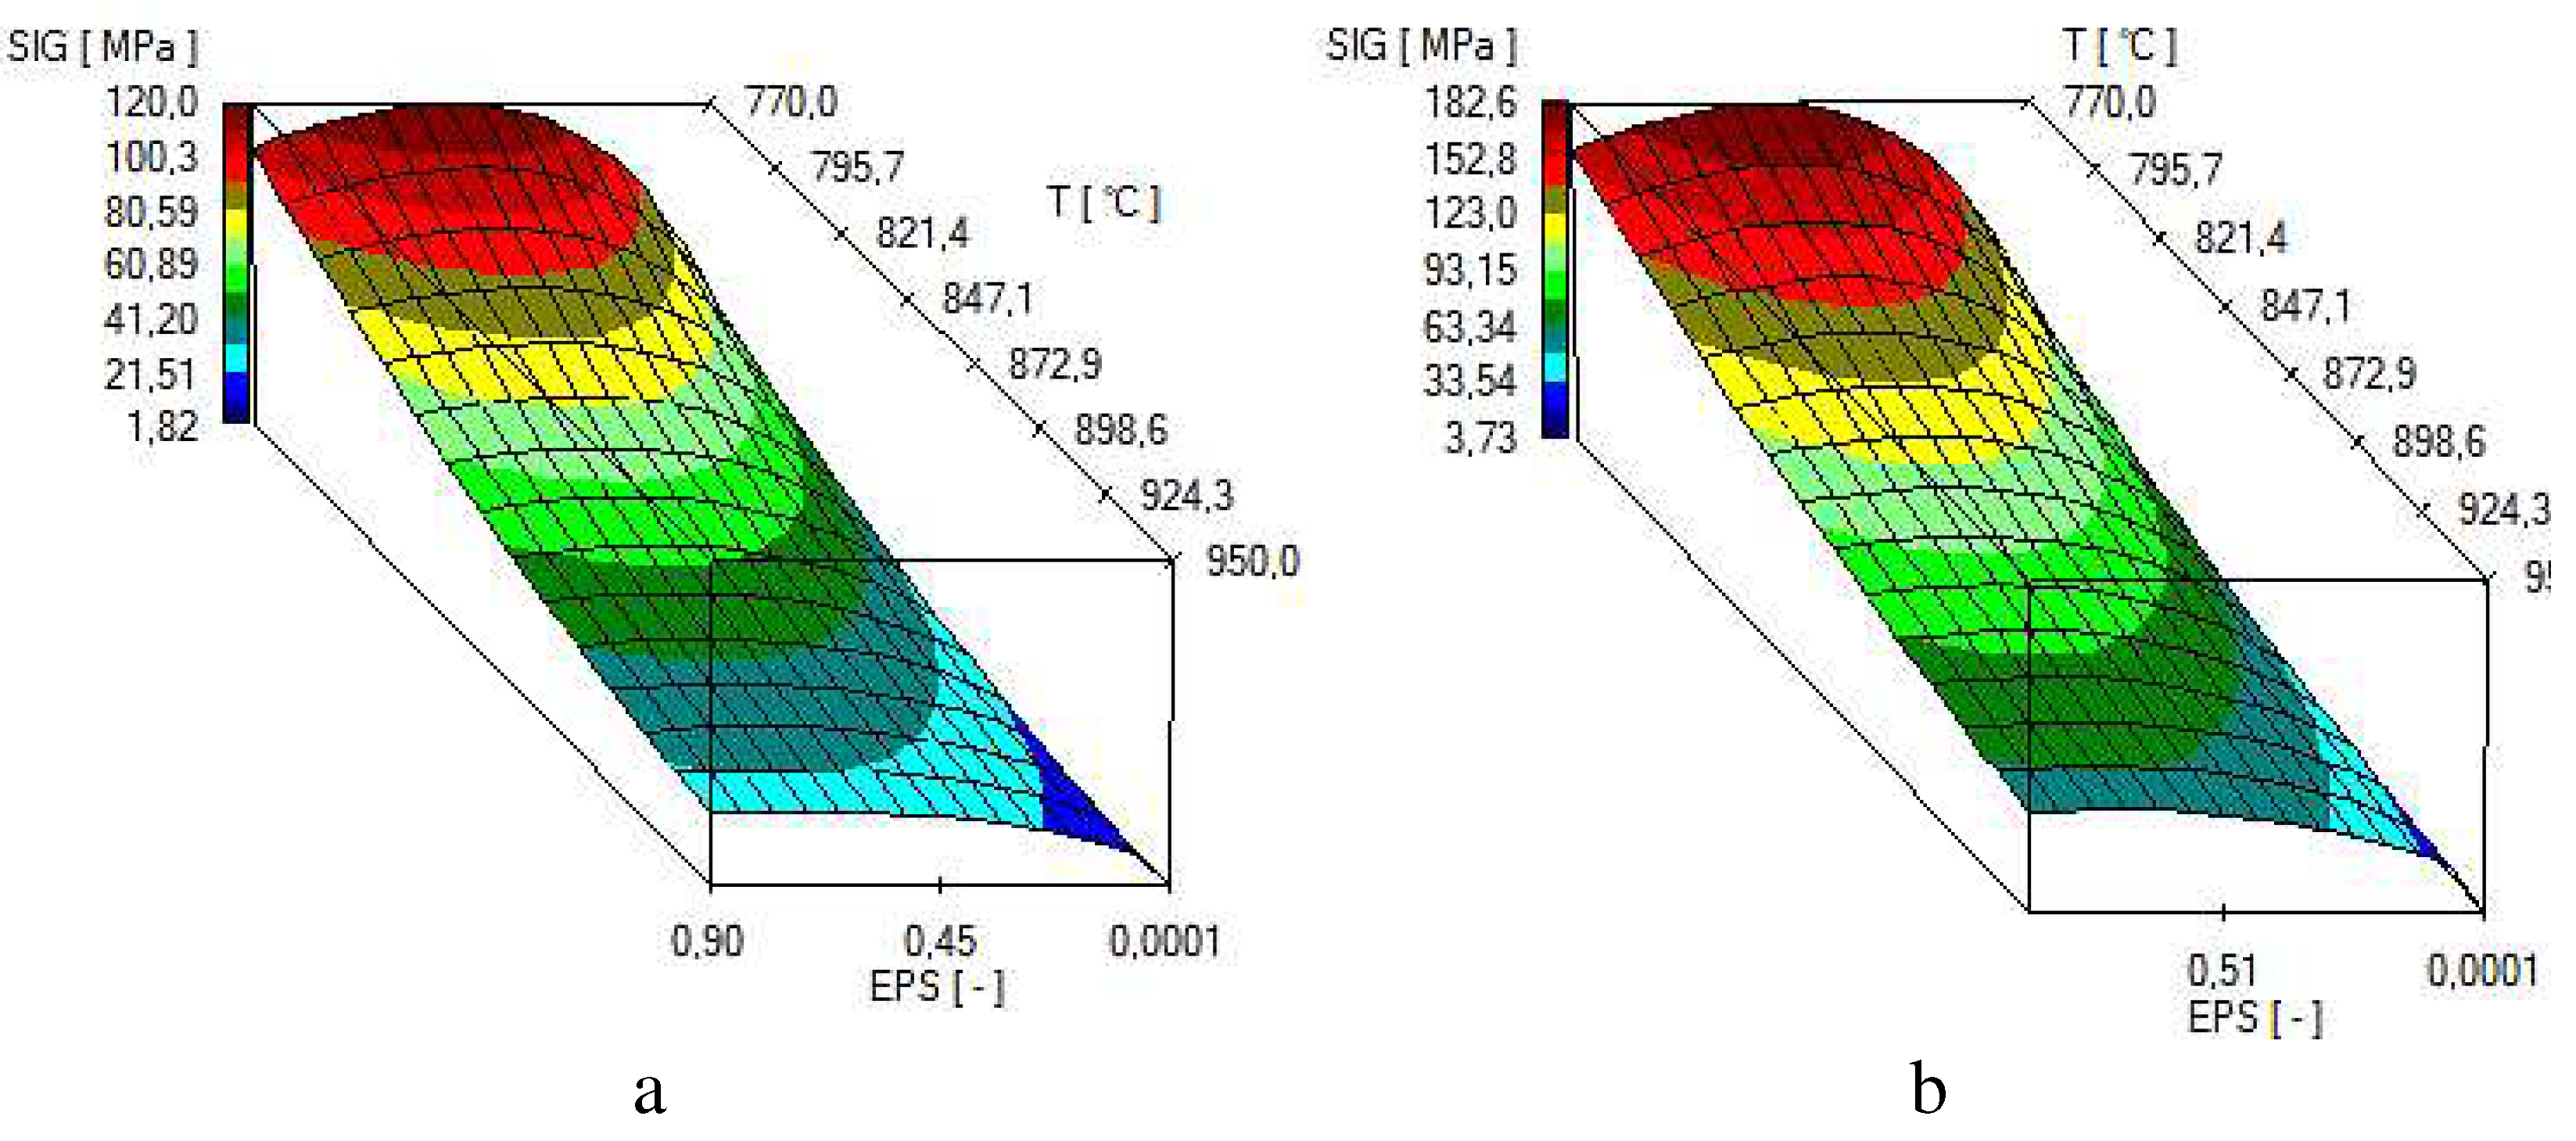
Figure 4 in the process of computer simulation, describes the change in the value of the plasticizing stress of the M5 alloy depending on the thermomechanical parameters of the tested technological processes. The approximation results for the M5 alloy in the temperature range T = 770 − 950 °C and deformation rates from 0.5 s-1 to 5.0 s-1 are shown in
Figure 5 in the form of three-dimensional graphs.
It can be assumed that the coefficients of the approximating function (1) are well-chosen if the average error does not exceed 15% [
24]. For the range of parameters examined in the article, the average error of approximation is about 10%.
4. Purpose and Scope of Work
The objective of the study was to formulate recommendations for the technology of forging elongation that would ensure closing of foundry voids occurring in zirconium alloy, observed after the process of double remelting in a vacuum, in an electric arc furnace. The authors proposed that the operations of hot forging elongation should be performed with the use of flat trapezoidal and rhombictrapezoidal tools.
To achieve the goal of the study, numerical tests of the process of forging ingots in two anvil assemblies were carried out. Modelling of the elongation process was performed using the Forge program based on FEM, with the distributions of the hydrostatic pressure and effective strain being determined on the cross-section of the deformed zirconium alloy after each elongation process.
For tests of forging process, the results of plastometric tests of the zirconium alloy were using the GLEBLLE 3800, based on which diagrams showing the relation between stress and real deformation were developed, and the coefficients of the plasticizing stress function were determined.
Based on the results of numerical research, guidelines for the technology of forging in shaped anvils for closing foundry voids were developed.
The test results should help to improve the structural and mechanical properties of the zirconium alloy through the appropriate selection of the tool shape and technological parameters of the forging process.
5. Methodology of Conducted Numerical Research
The article showed a theoretical analysis of the operation of elongating zirconium alloy rods for two different anvil compositions in order to determine the possibility of closing foundry voids in Zr alloy. Tools were characterized by a various geometrical surface of the deformation basin, which resulted in obtaining various directions and orientations of the pressure, and friction forces in the deformed Zr alloy in the deformation place. The various directions and orientations of forces influenced the mechanism of welding of the foundry voids inside the deformed bars. Constant parameters of the elongation operation were assumed, such as forging initiation temperature, the value of relative compression, and the value of the feed angle.
Computer program FORGE, has been applied to model the forging process in shaped anvils[
25]. Forge enables to run a thermomechanical simulations of, among others plastic forming processes[
26]. A description of the temperature, force, stress, strain and thermomechanical and frictional laws used in the investigation can be found in. For thermal calculations, the Galerkin equation was used, while the strengthening curves were approximated by the Henzel-Spitel equation (
Figure 4). In the work, to simulate the forging process, a thermo-viscoelastic model of a deformed body was used, which is based on the theory of large plastic deformations. A finite element mesh consisting of tetrahedral elements with a base of triangles was generated. The coefficient of friction between the surface of the tools and the bars, adopted according to Coulomb’s law, was μ = 0.3. The heat transfer coefficient between the tools and the zirconium alloy was assumed to be α = 10000 W/m
2K, and the heat transfer coefficient between the zirconium alloy and the environment was assumed to be equal to λ=10 W/m
2K. The environment temperature was to be 25 °C, and the tool temperature was 250 °C. The starting temperature was 950 °C. In all forging steps, a relative 35% crumple was assumed. The speed of the upper tool was v = 8 mm/s, while the lower tool was assumed to be stationary.
In program FORGE the diffusion model has not exist. The inference of foundry voids closing is based on the values of hydrostatic pressure and the temperature of the bar being elongated. Therefore, in the forging process, the aim is to achieve the max possible values of hydrostatic pressure within the foundry voids, as well as to maintain a high temperature close to the temperature at the beginning of forging. During the closing process of the foundry voids, on the right and left sides of the foundry voids, there are high values of hydrostatic pressure On the other hand, at the top and bottom of the closed foundry voids, unfavorable positive medium stresses [
17].
Zr alloy bars with a diameter of 100 mm and a length of l = 50 mm were deformed in two compositions of tools in four forging transitions to a final dimension similar to a cuboid with length l = 233 mm and aapproximately square 41x41 mm base.
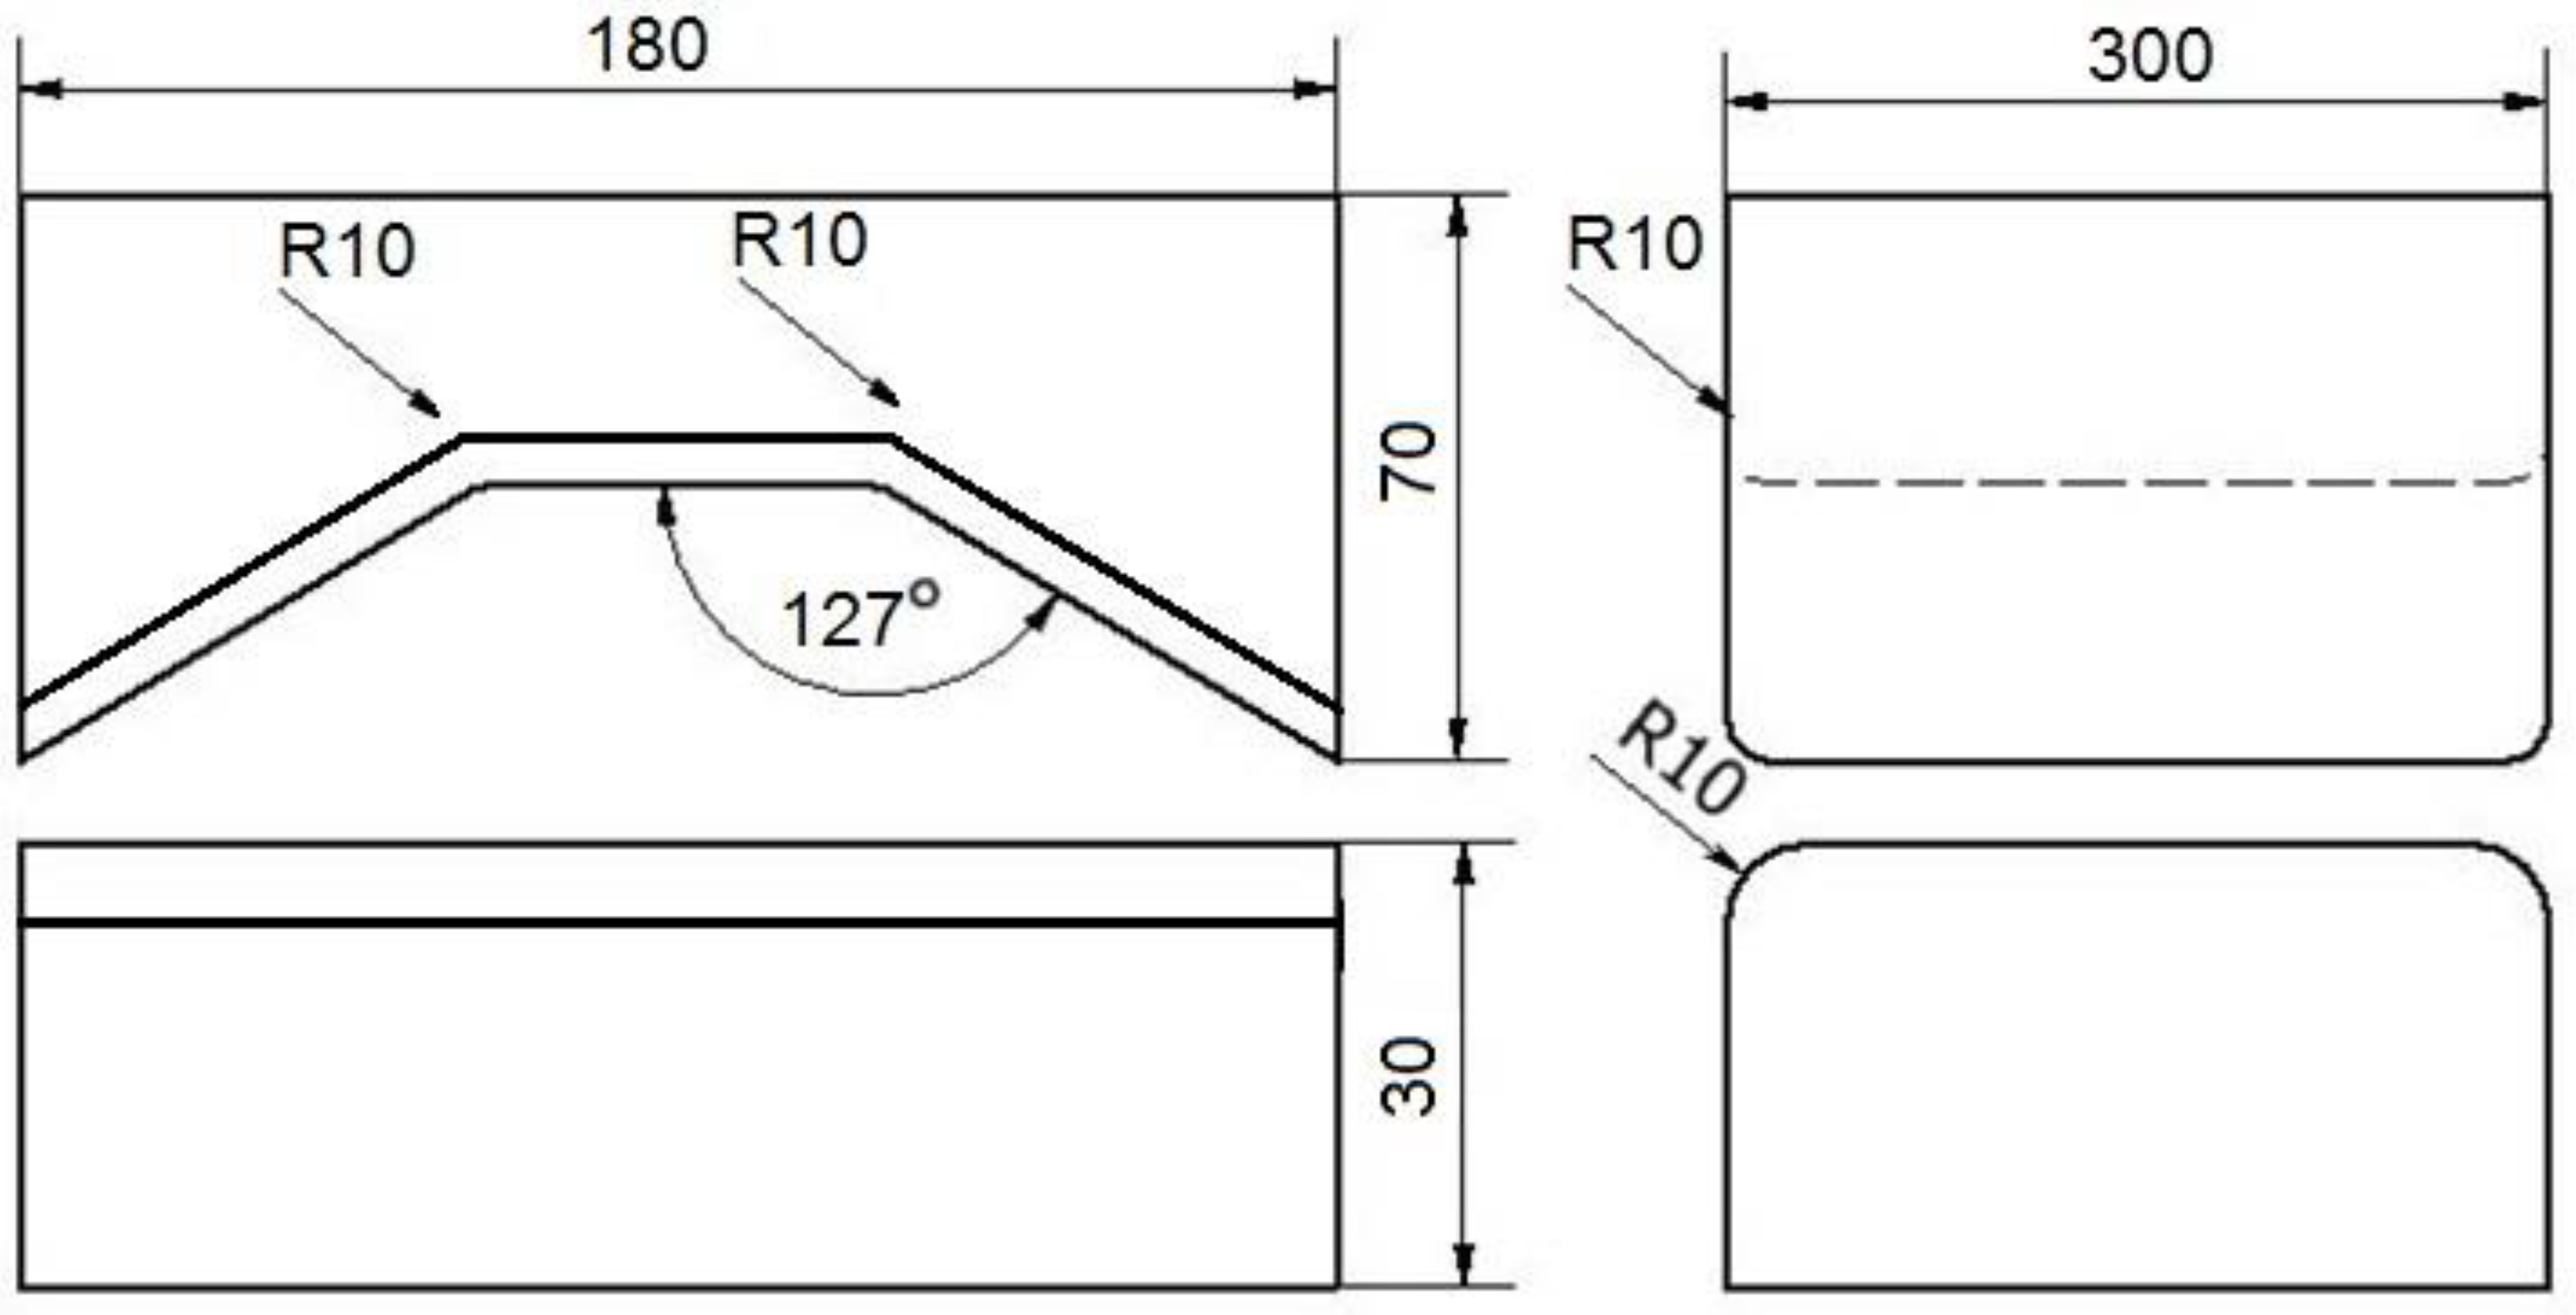
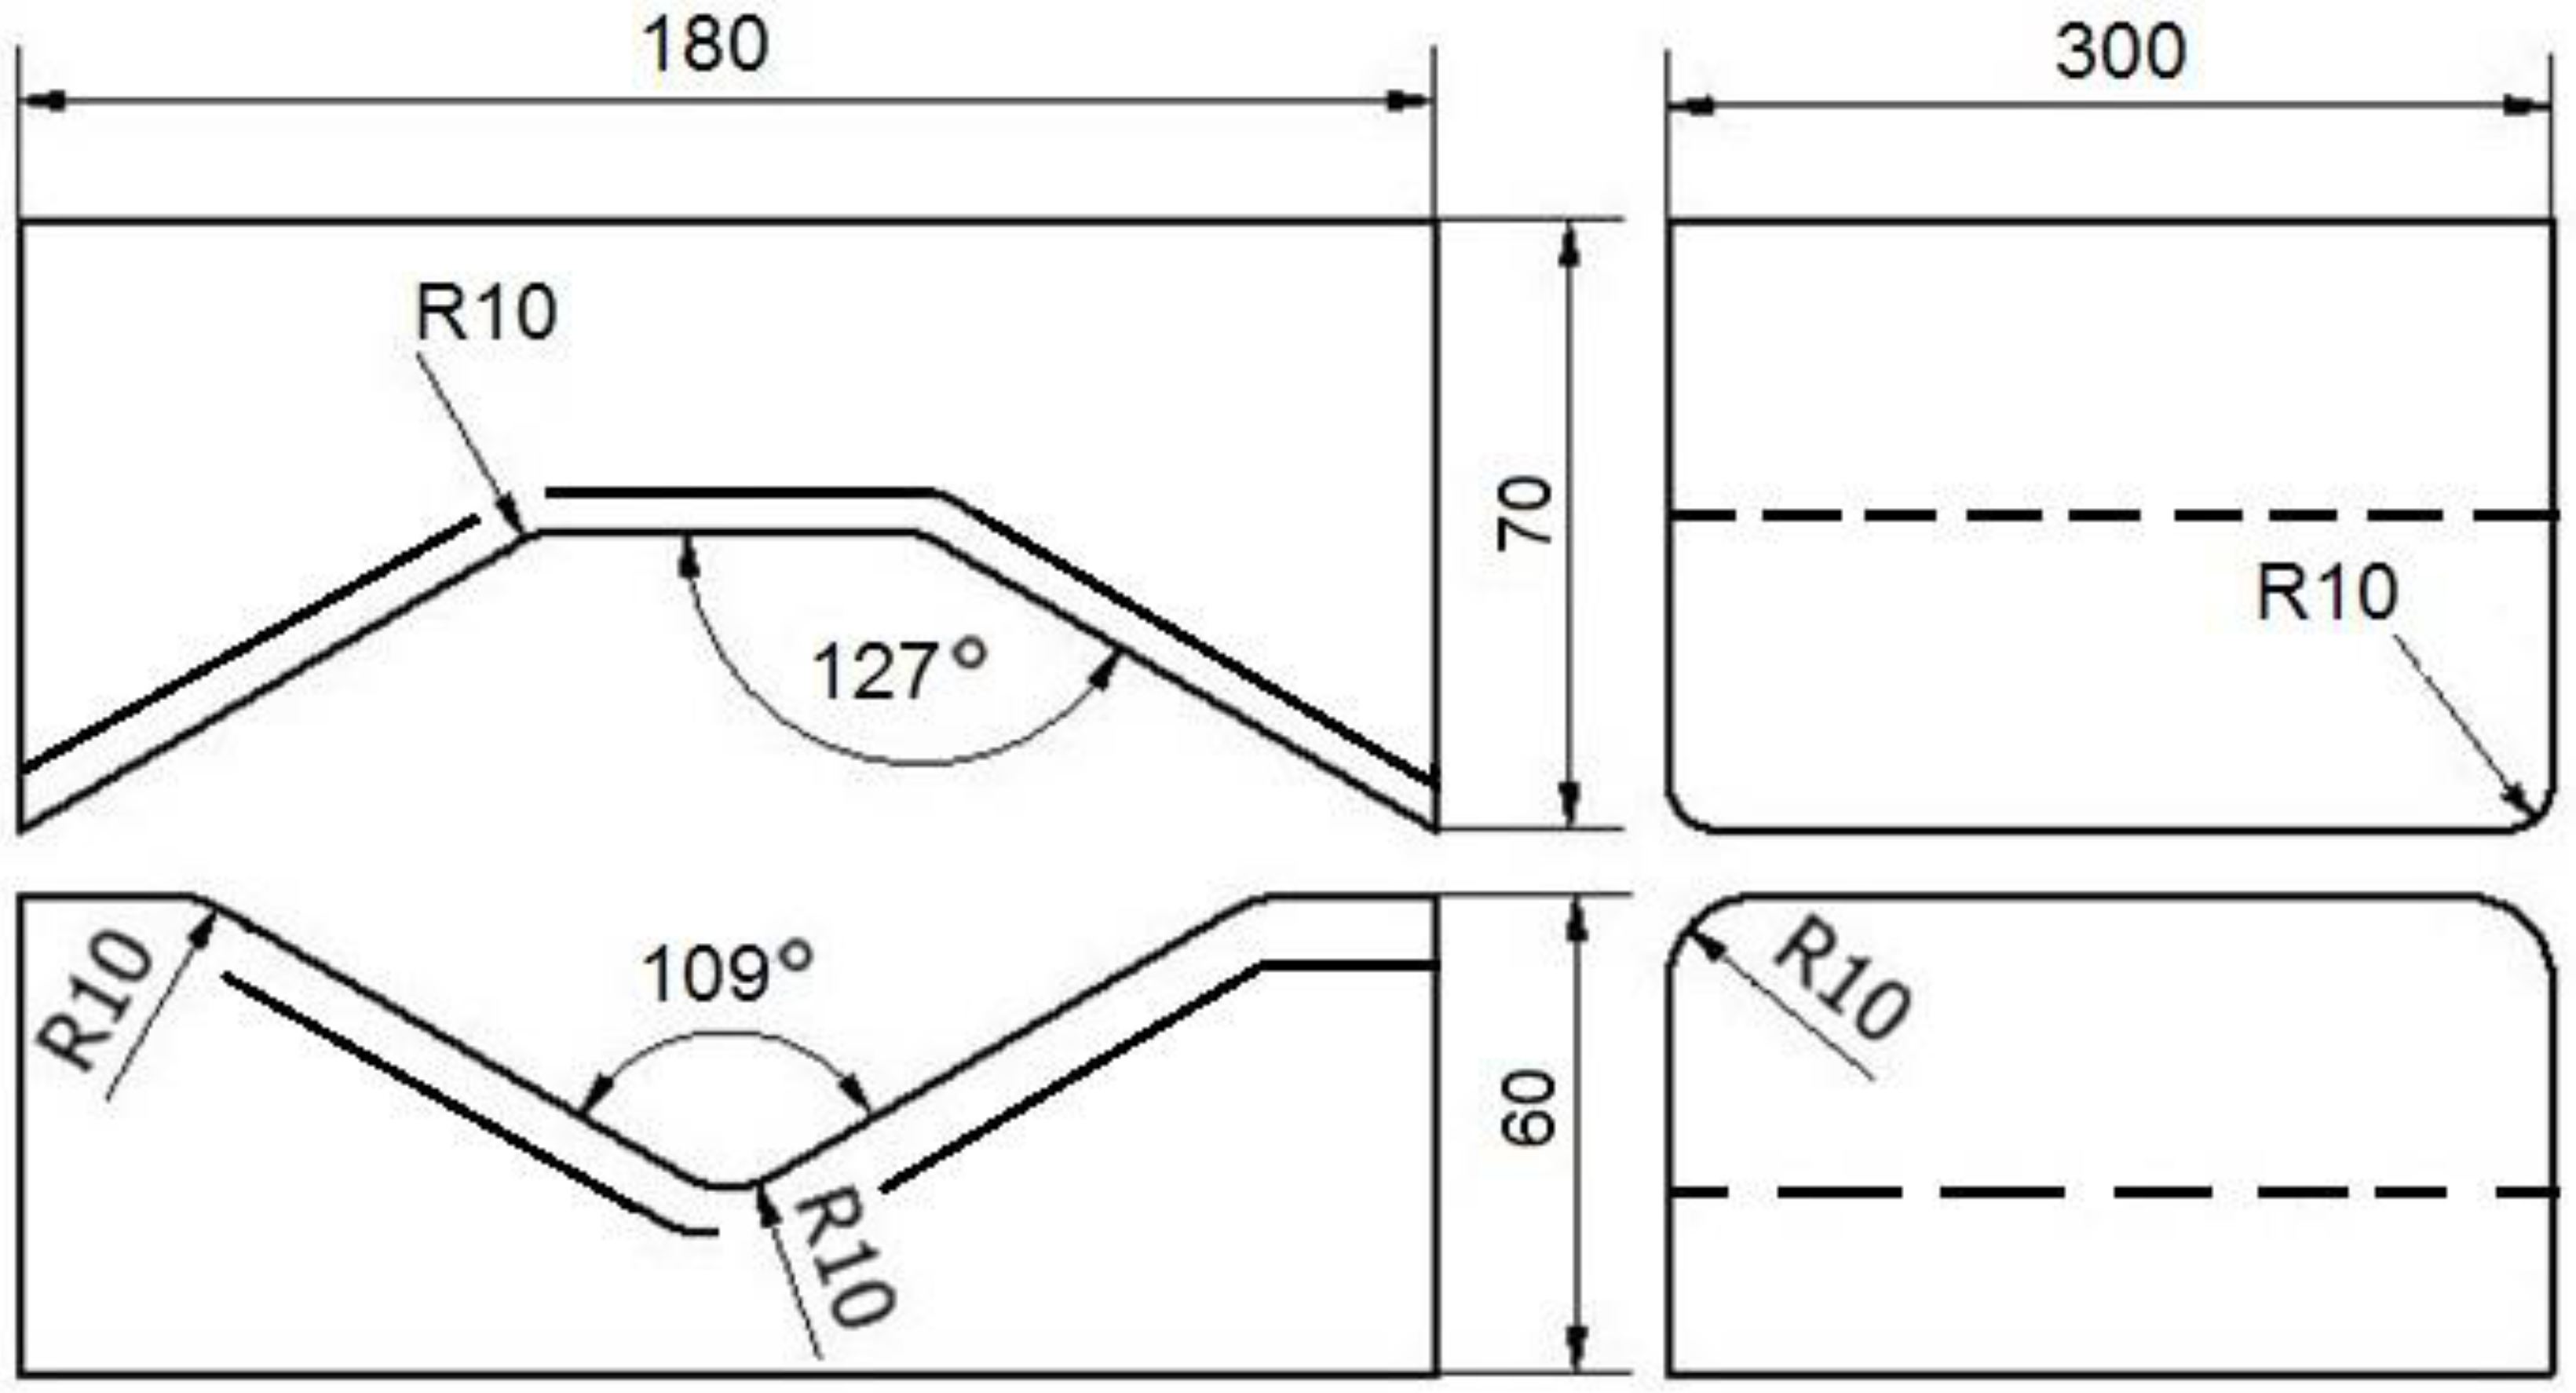
The shape and dimensions of the tools used in the work are showed in
Figure 6 and
Figure 7.
The work describes a graph of the forging operation in flat trapezoidal tools (
Figure 6). During in first step, flat trapezoidal tools were used, in which a bar heated to a temperature of 950 °C was deformed with a relative reduction 35%, then the bar was rotated 90° clockwise. In the second step, the bar using the same anvils, the relative reduction 35% was again applied and it was rotated 90° clockwise. Before the third step, the bar was heated to a temperature of 950 °C, because after the second step, the temperature decreased to 750 °C of the bar, and according to the practice of forging zr alloys, it is impossible to carry out further steps of the forging process. Then, the third and fourth steps were already made in flat tools with a relative reduction 35%. After the third step, the bar was rotated 90° clockwise.
For the rhombic trapezoidal tools (
Figure 7), the procedure was analogous to the forging scheme described above.
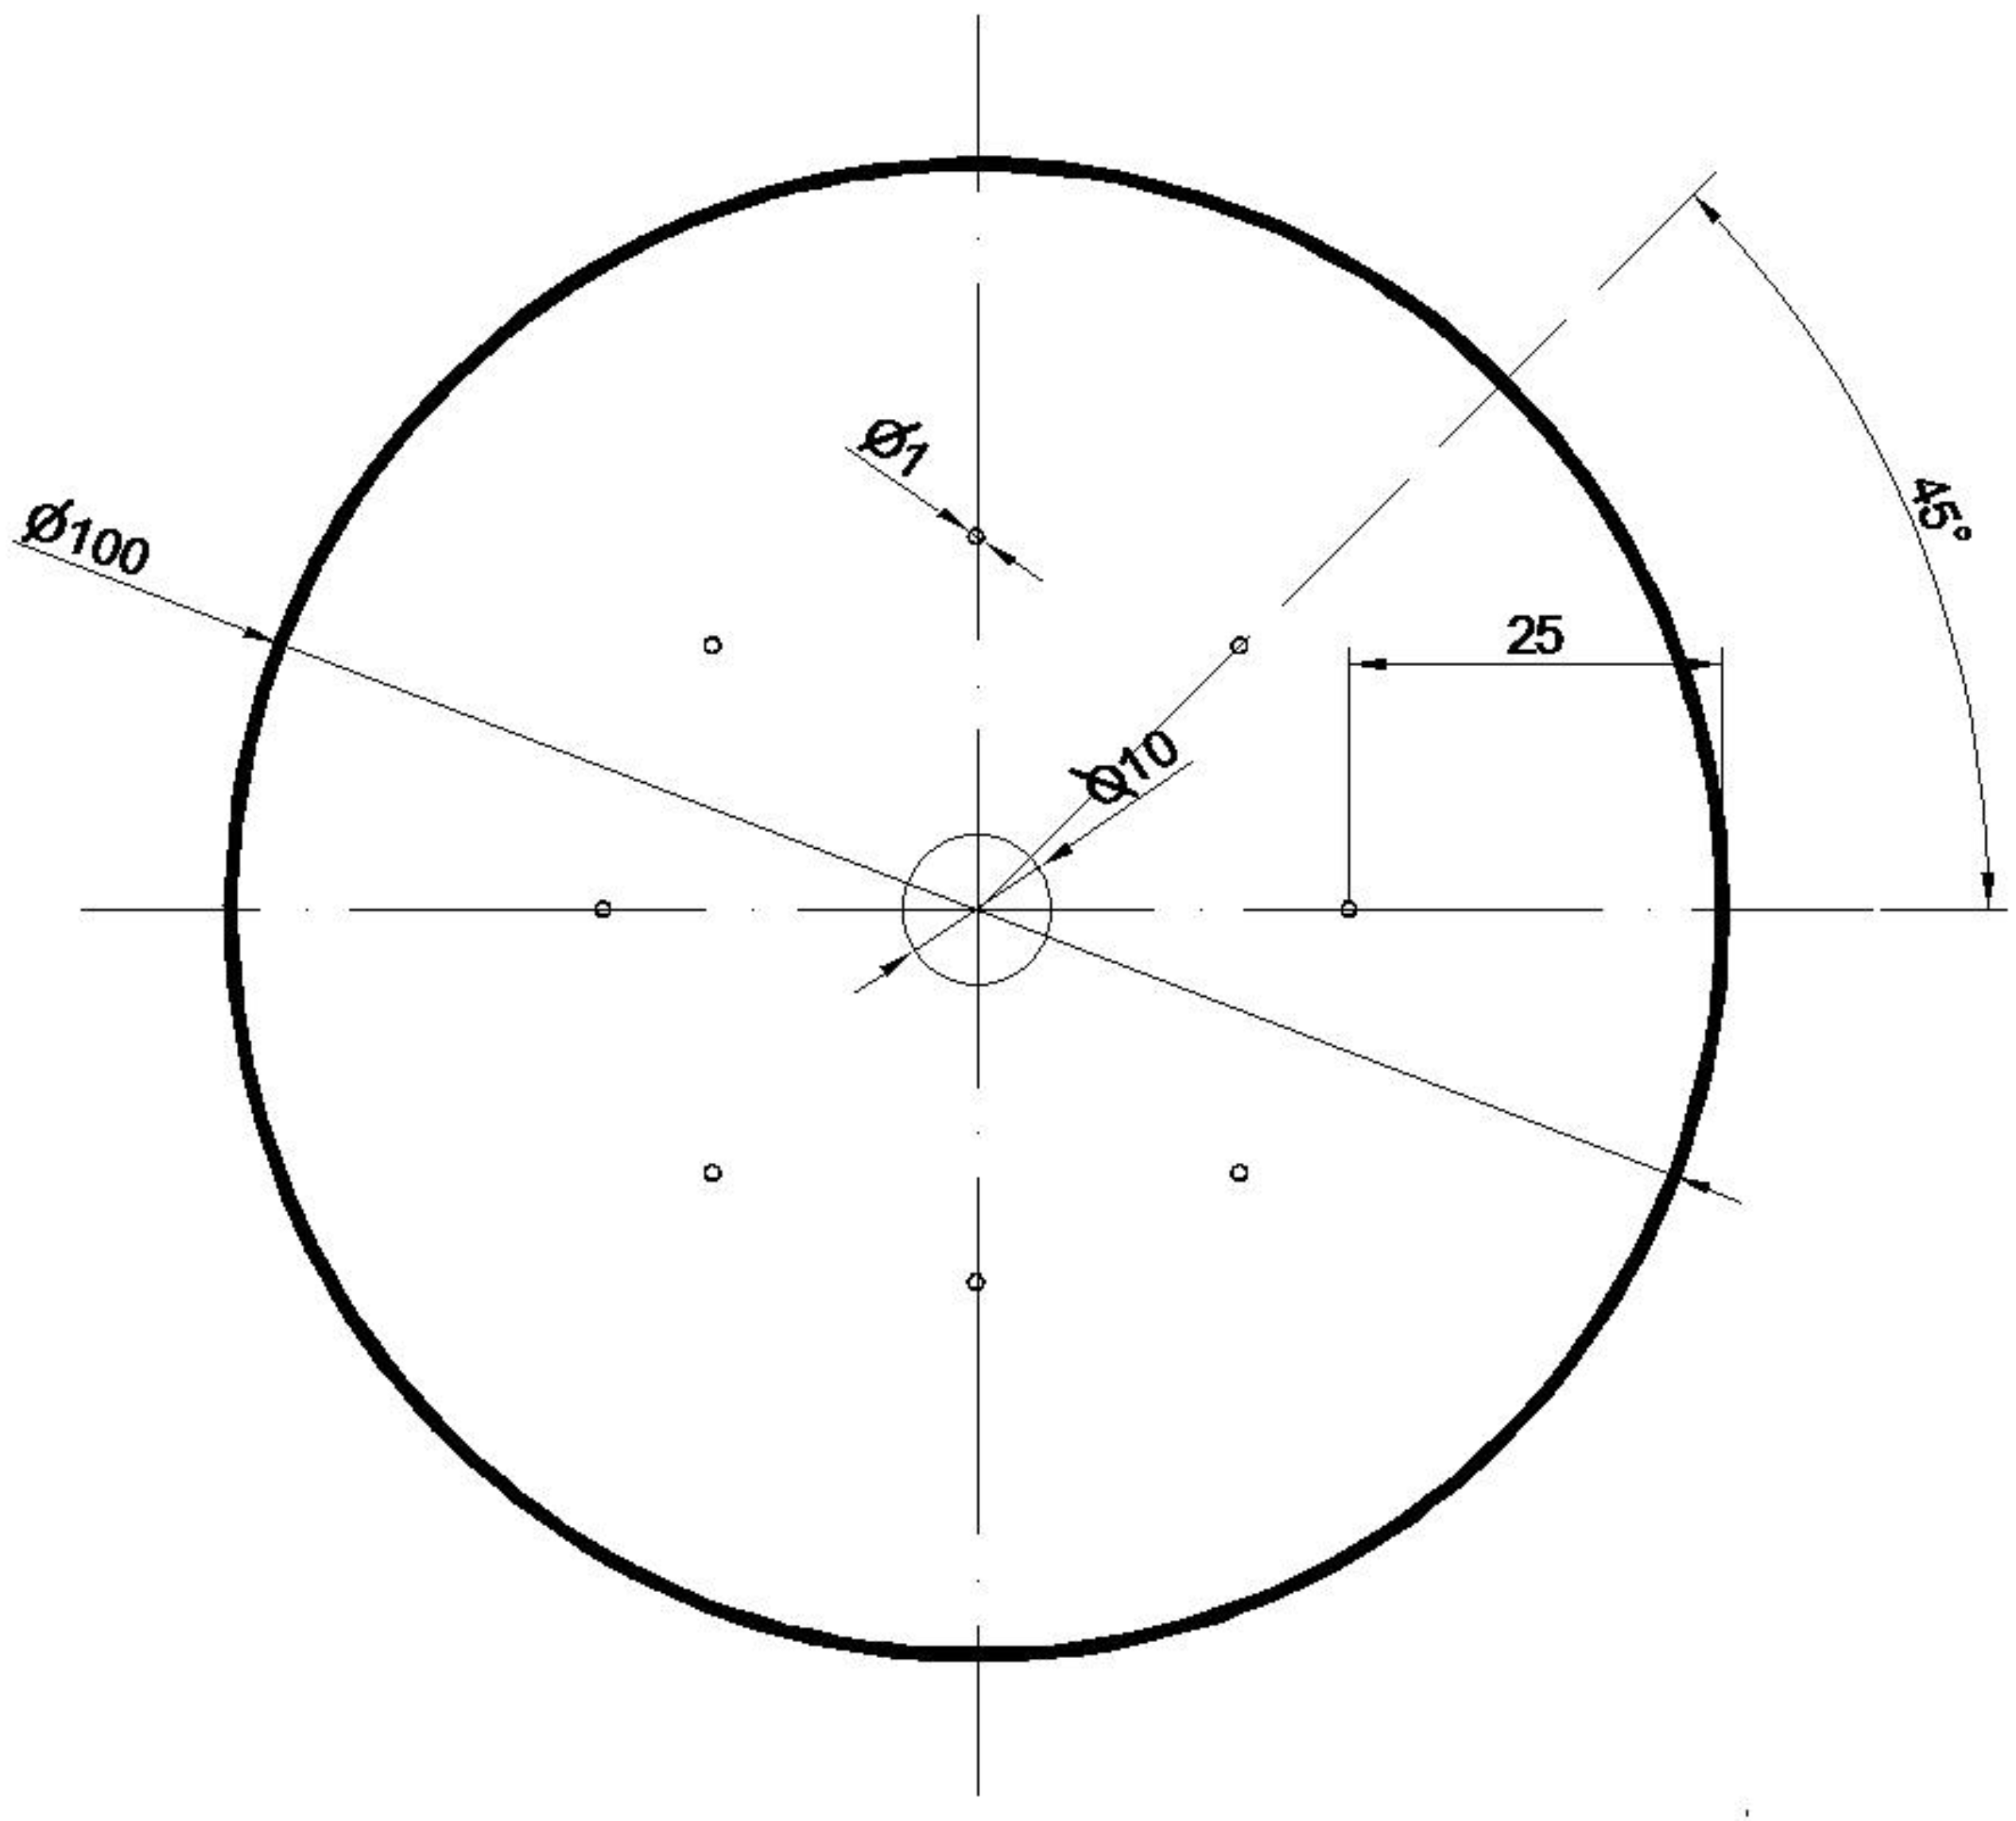
The geometry and distribution of the modelled foundry voids on the end face of the model zr alloy bar are showed in
Figure 8.
The initial model for the forging process was a cylinder with a diameter of 100 mm and a length of 50 mm, in which 9 foundry voids were modeled with a length of charge (50 mm), the first axial one had a diameter of 10 mm, and the other eight with a diameter of 1 mm were distributed around the circumference of the model charge in 25 mm from its axis (
Figure 8). The charge modeled in this way corresponded to the shape of an ingot obtained after double remelting in a vacuum in an arc furnace. Artificially modeled holes simulated internal casting discontinuities such as central porosity and casting voids. Description of these defects can be found in the literature [
27,
28,
29,
30,
31].
The model input and tools were planned with AutoCad. The foundry voids were drawn as cylinders inside the model input. Using the various tool in the programm, the foundry voids were interpreted by the AC program as holes. The model diagram with artificially simulated foundry voids was exported to the Forge program as a file with the “stl” extension. The same was done for all tools compositions. In Forge, using the stl@meshing and volume@meshing tools, a 2D triangular grid was useful to the input and artificially modelled foundry voids, followed by a 3D tetrahedral grid. In totaling, for the correct simulation of the closure of foundry voids and their good formation, the built-in tools Folds@Detection, Self@Contact and Damage were used. Due to the use of the presented tools during the FEM simulation in the areas of welded discontinuities, there were no calculation errors and mesh degeneration. During welding, the discontinuities of the nodal points of the tetrahedral elements in close contact connect, and thus the modeled foundry voids is eliminated. During modeling, there are no errors in the form of interpenetration of nodes of tetrahedral elements around closed discontinuities.
On the basis of the simulations of the closing process foundry voids during the operation of elongating bars made of zirconium alloy in flat and rhombic tools, the volume values of the remaining unwelded foundry voids were determined. The procedure was as follows: after the simulation of the forging process was completed, the stl file with a deformed bar was exported in the forge program to the RinoCeros program, where the tetrahedral element grid was separated in this program and the bar contour elements were removed. After this step, only tetrahedral elements that constitute the contours of the unwelded discontinuities remain. The next step was to merge the previously broken grid of tetrahedral elements. In the last step, using the physical parameters tool in the RinoCeros program, the whole volume of foundry voids for individual forging process was obtained, which is shown in Figure 41.
After the bar forging process was carried out in two anvil compositions, the values of the hydrostatic pressure at the nodal points of the tetrahedra constituting the contour of the unwelded foundry voids were determined as the arithmetic mean of the occurring stresses. The same was done for the value of the effective strain. All the results showed in the article are subject to some error resulting from numerical and collecting the data needed to analyse the results obtained.
6. Analysis of Distribution of Hydrostatic Pressure Values during Forging Process
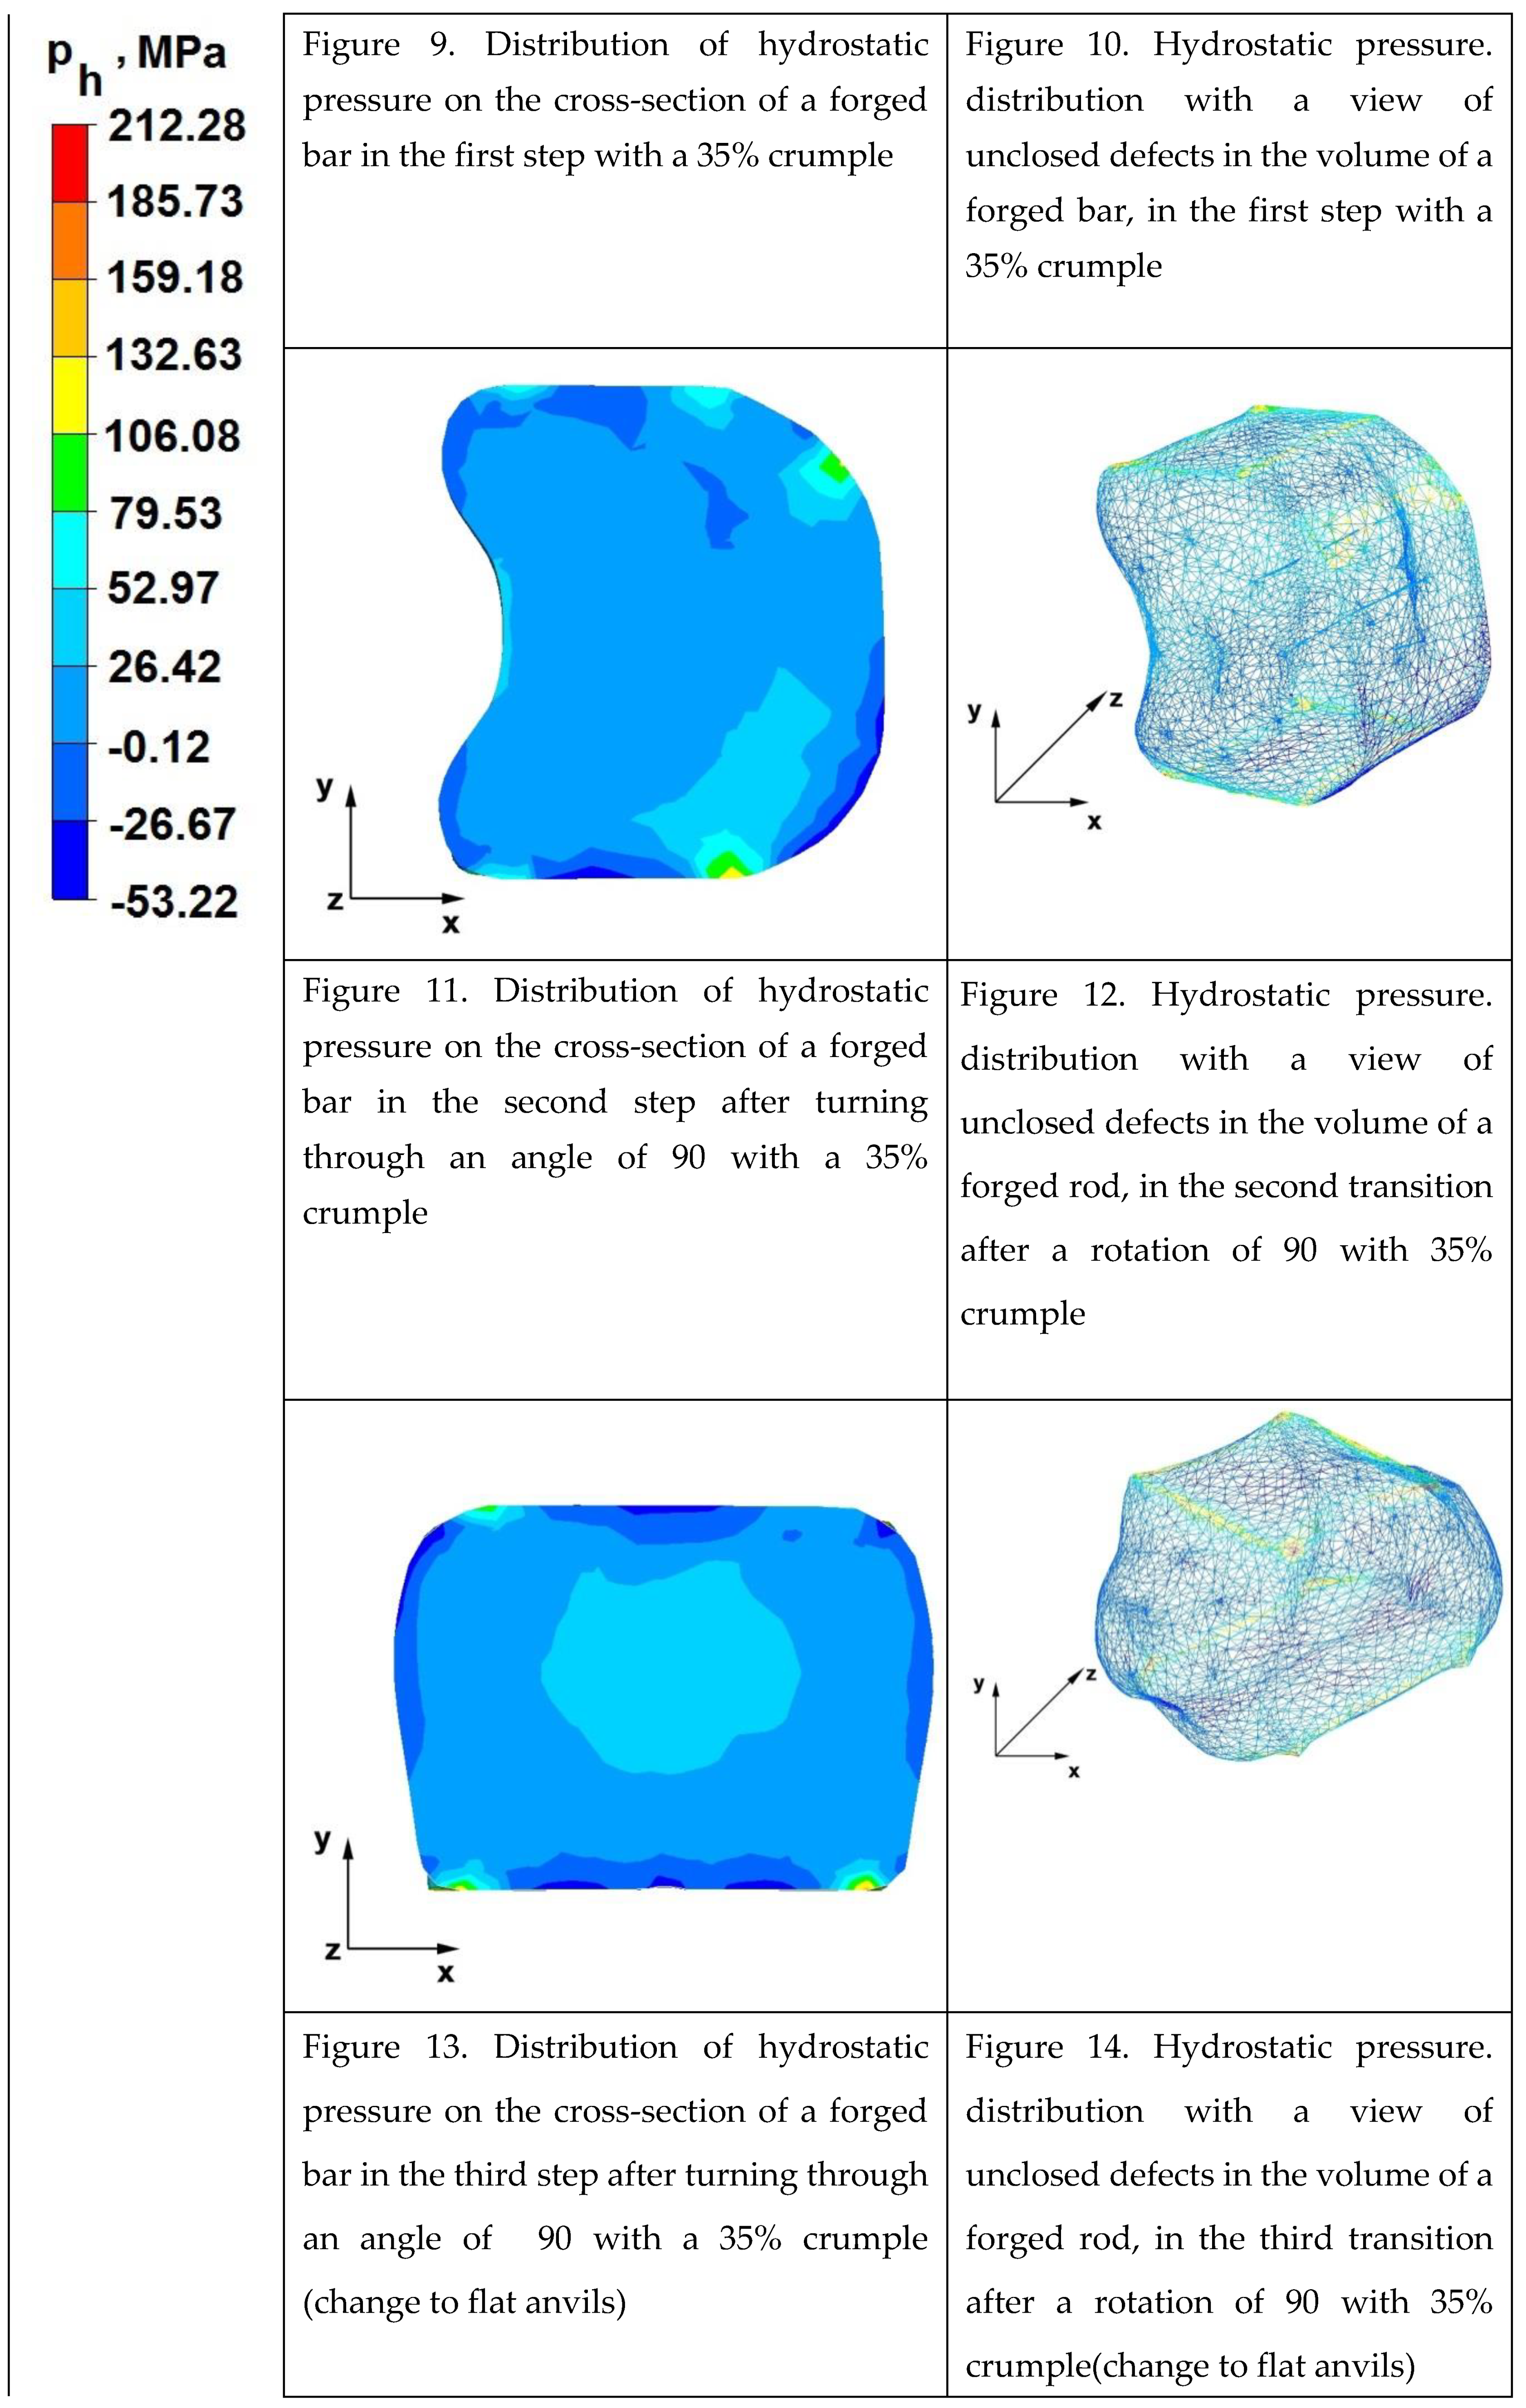
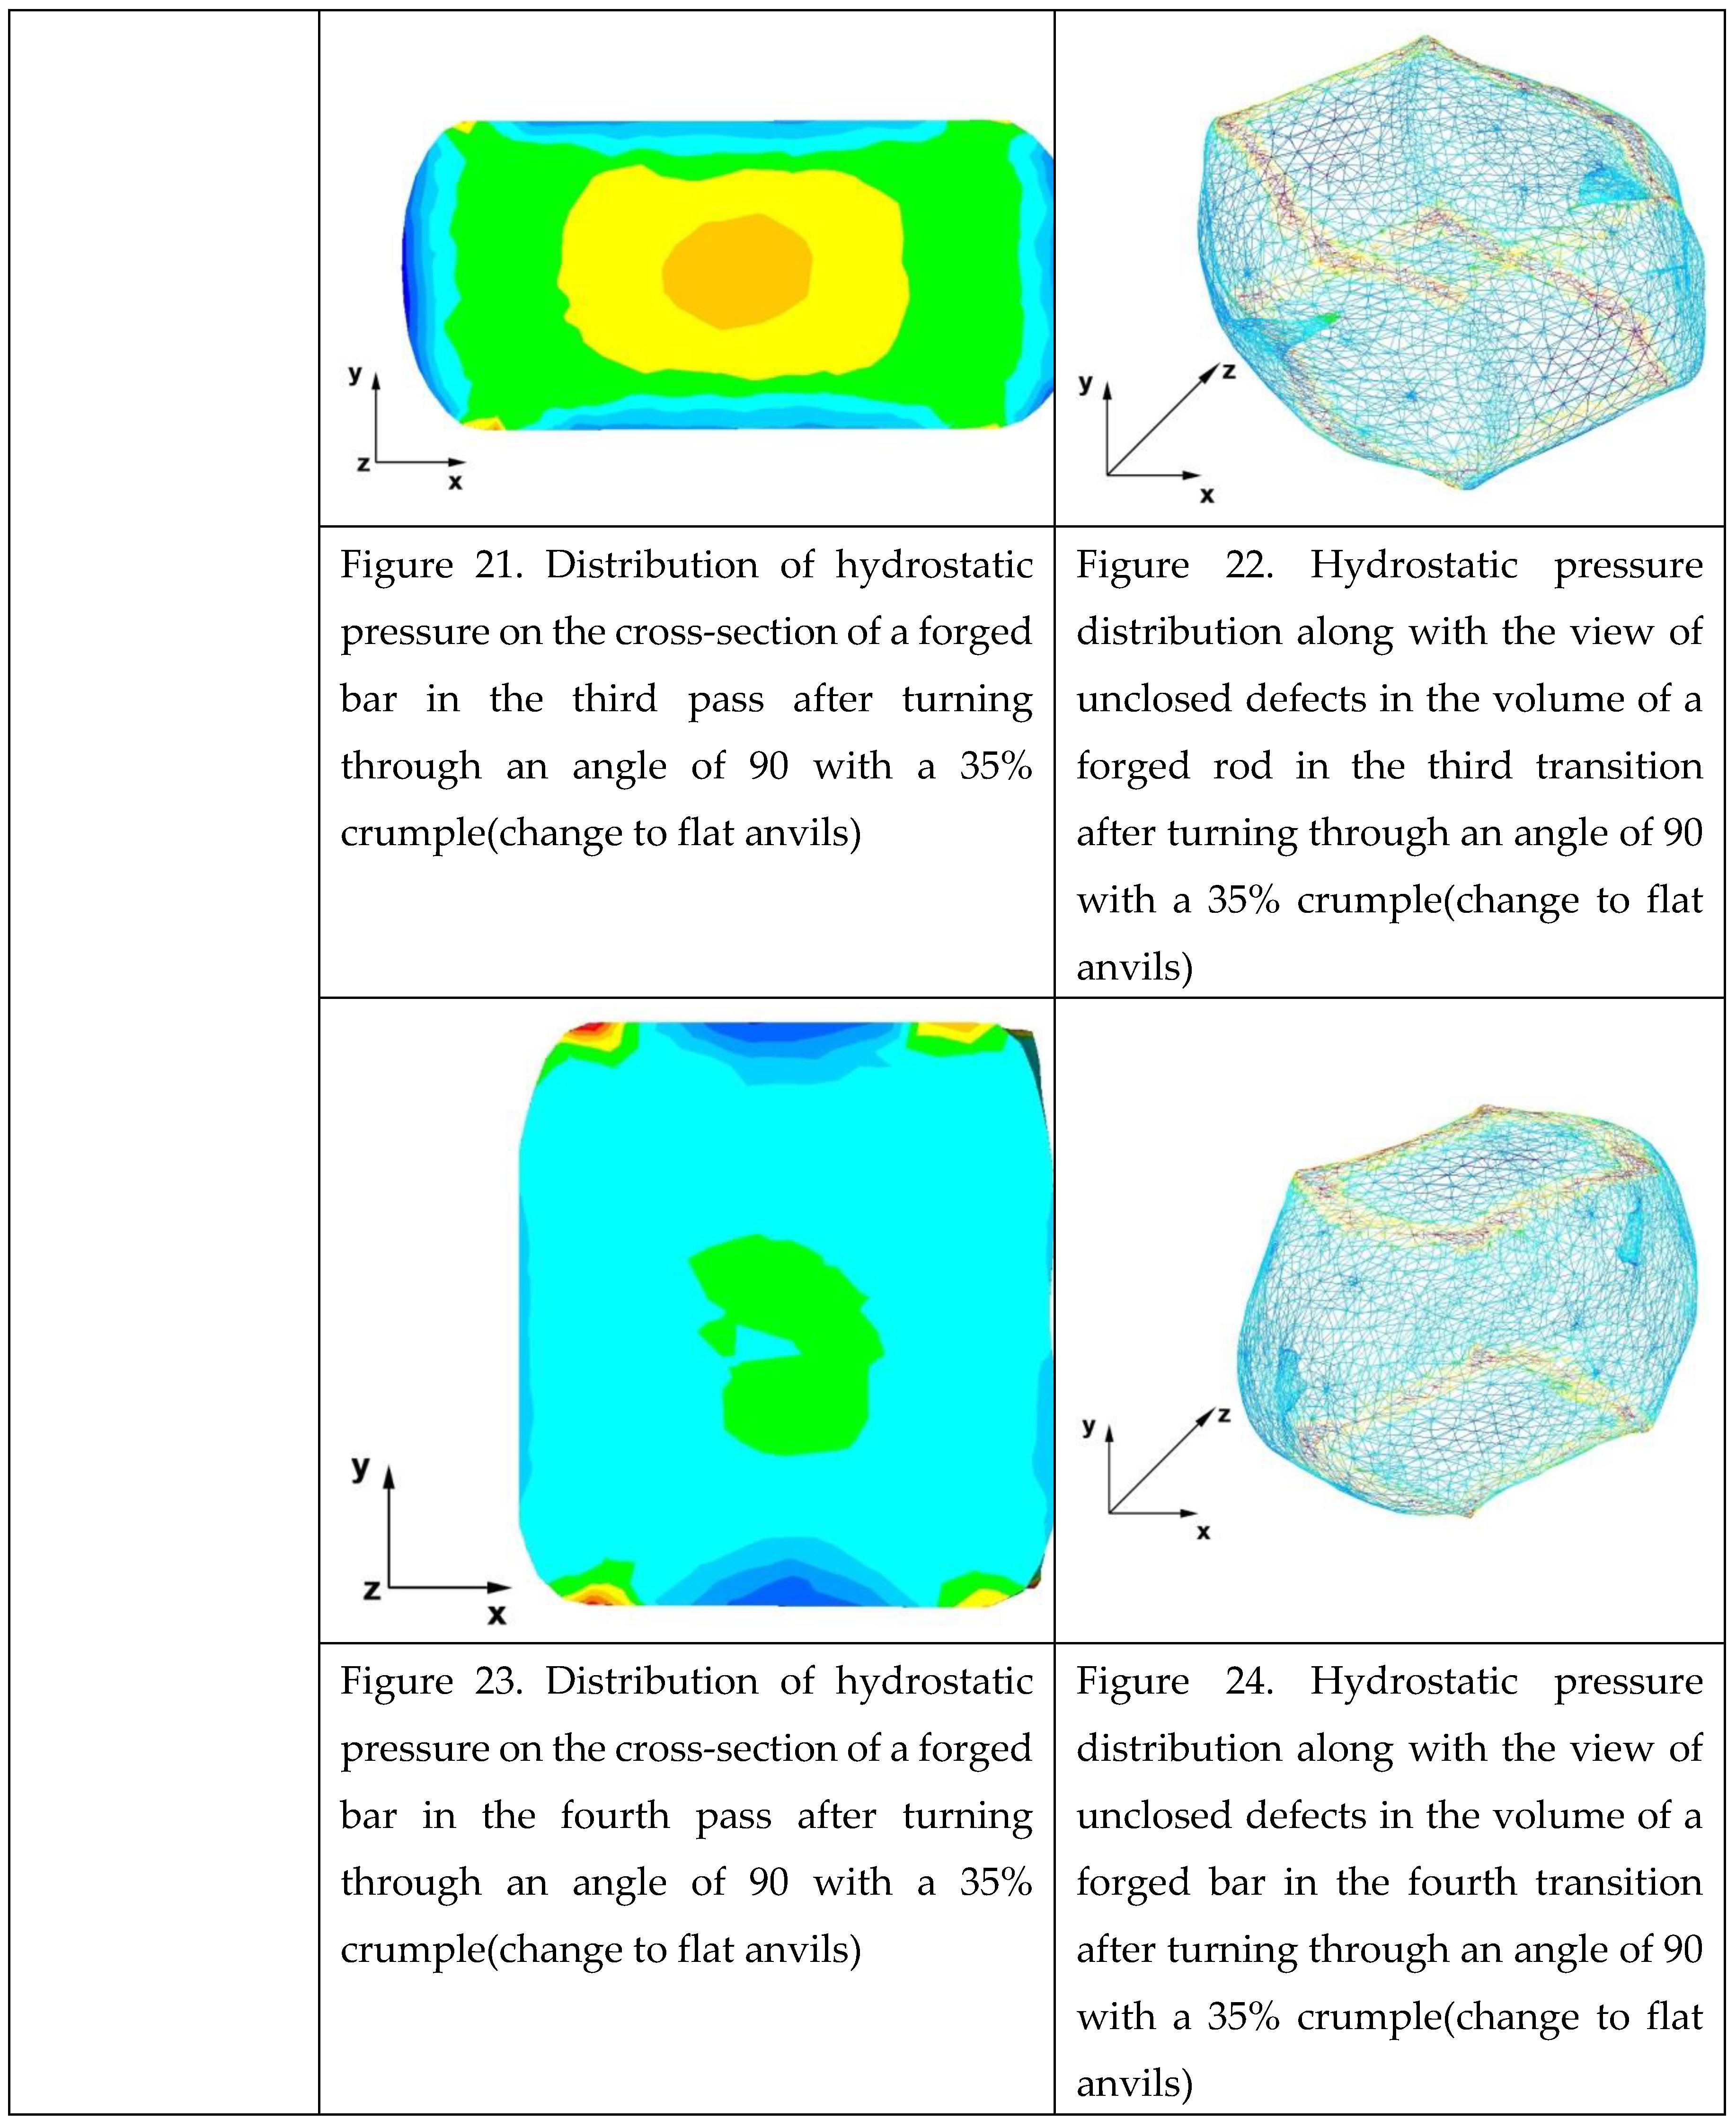
The test effects concerning the hydrostatic pressure distribution during the zirconium alloy bar extension operation in two tool compositions are shown in Figures 9–24.
6.1. Analysis of the Distribution of Hydrostatic Pressure Values during the Forging Process in Flat Trapezoidal Anvils
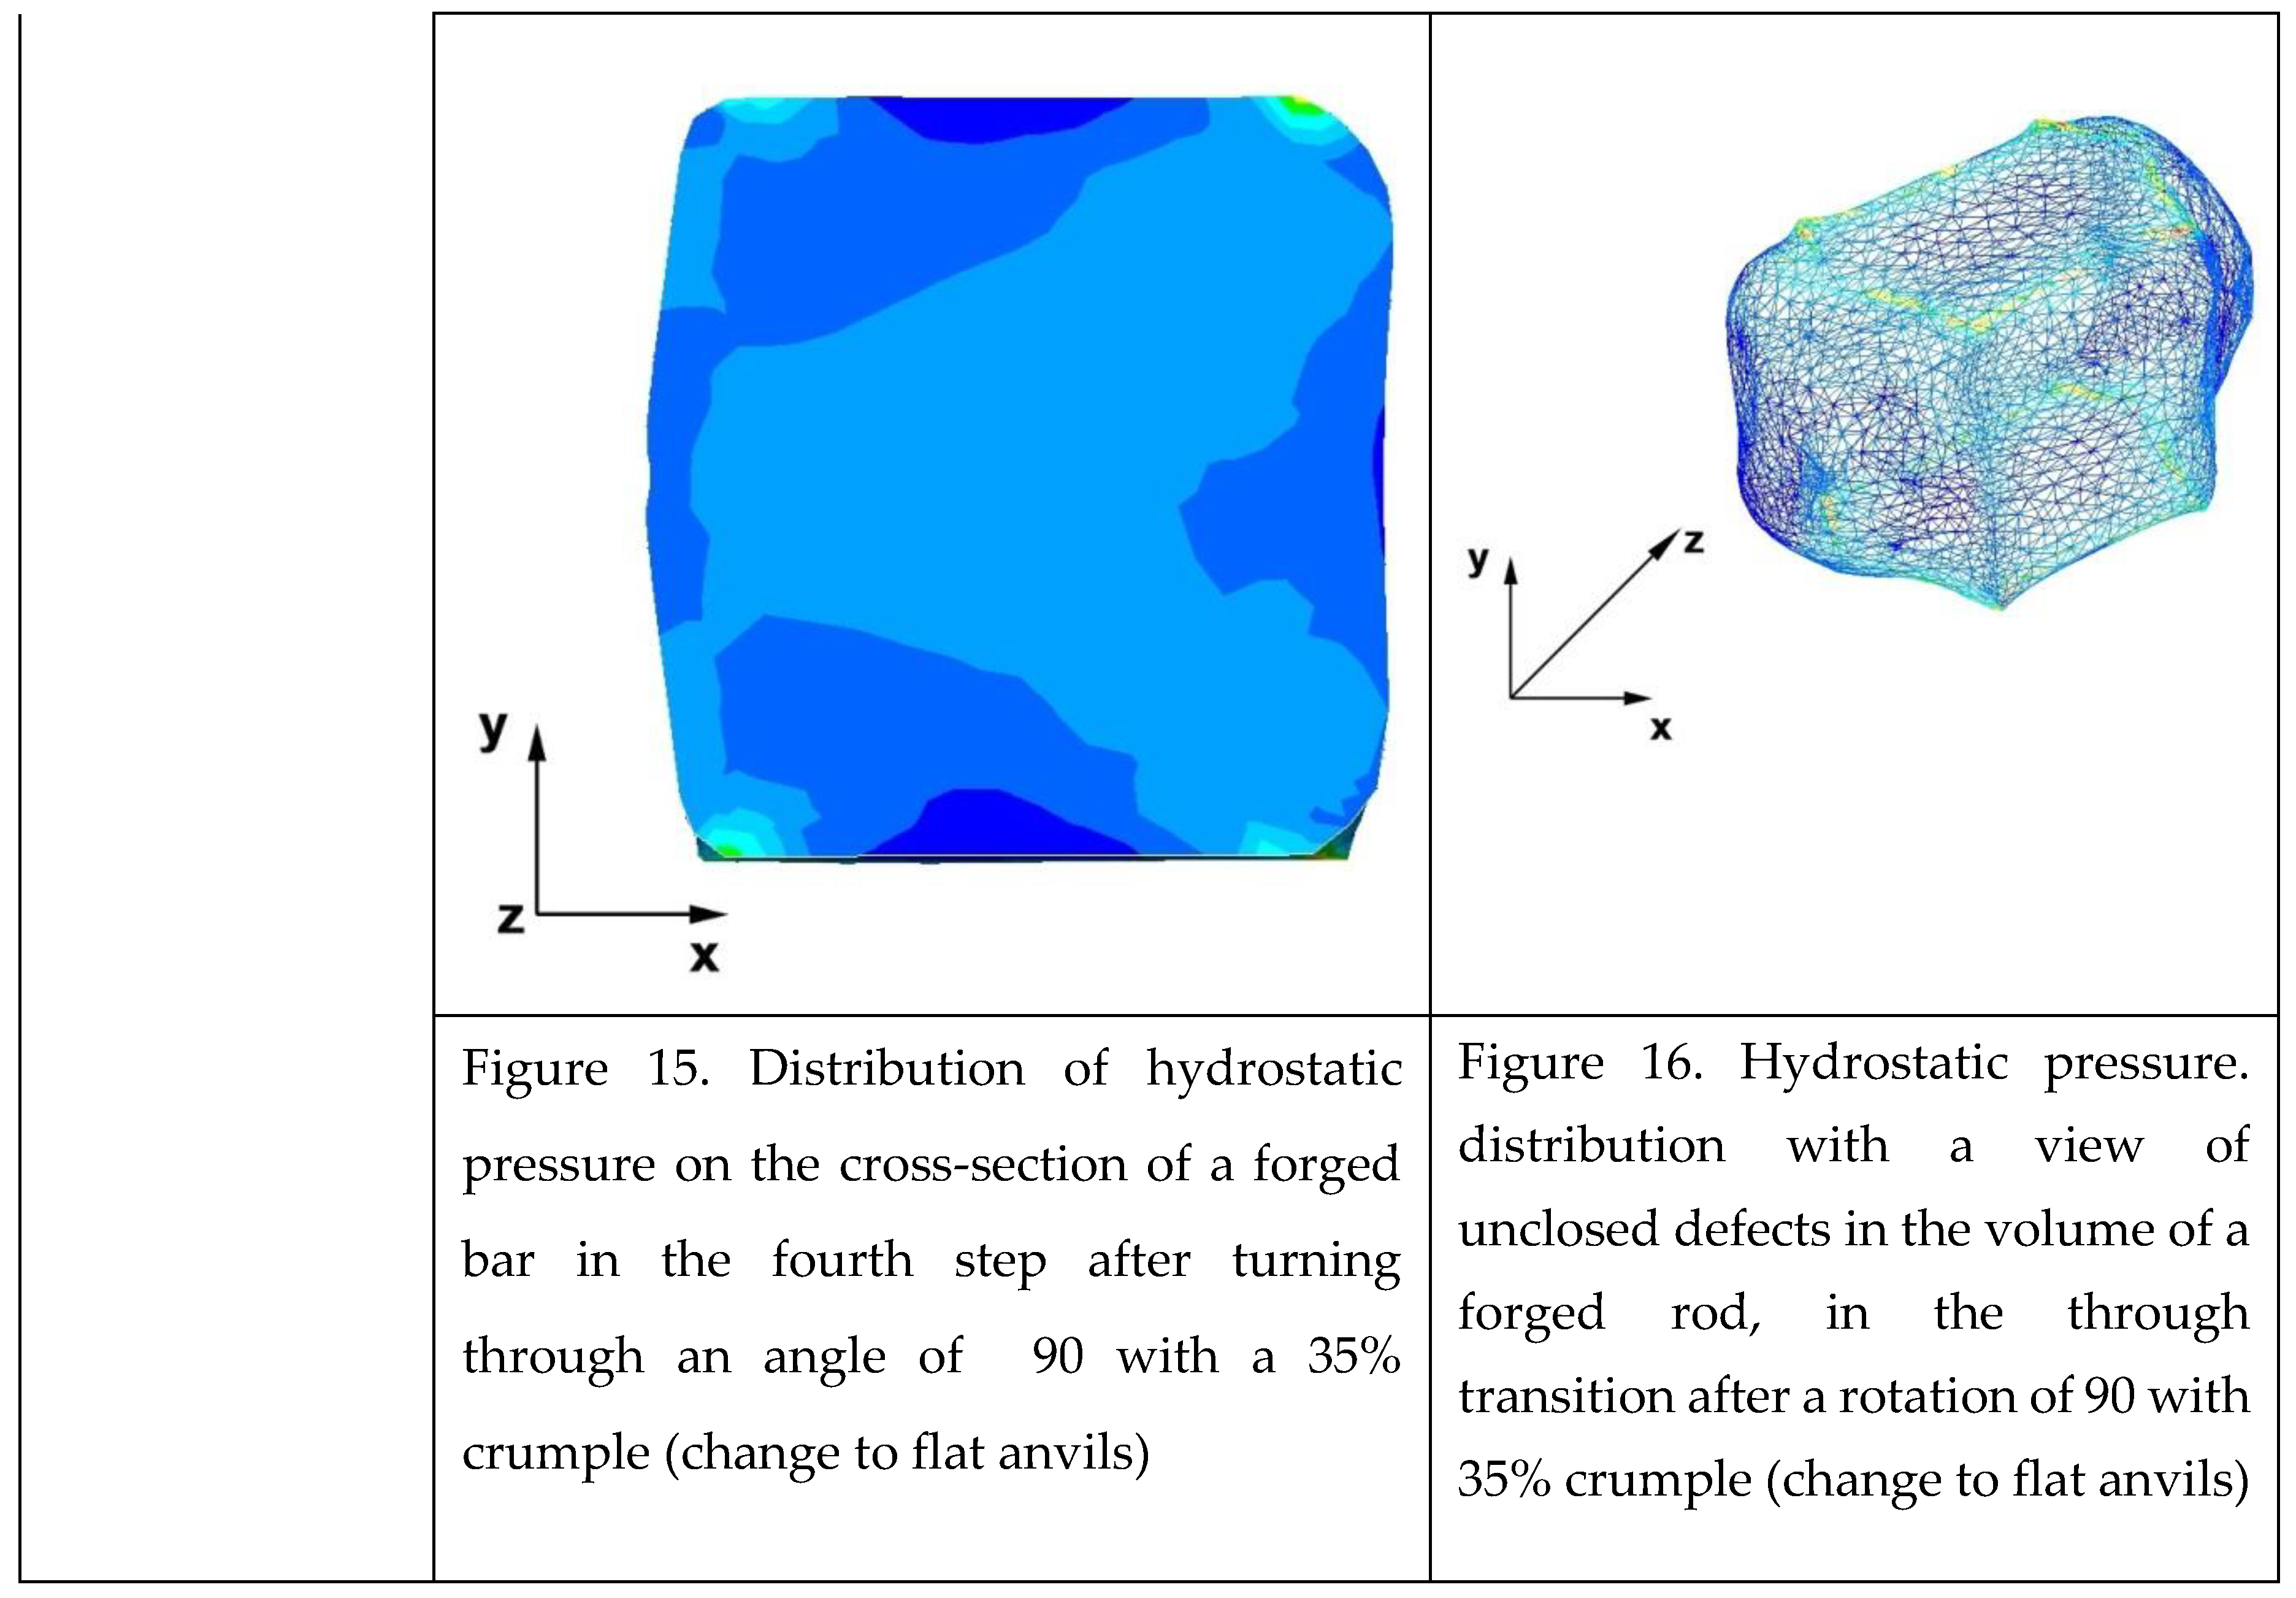
Figures 9–16 presented the distributions of hydrostatic pressure values obtained during the numerical computation of elongating the Zr alloy bar in flat trapezoidal anvils.


The data in Figures 9 and 10 show that the axial foundry voids with a diameter of 10 mm was welded in the first forging step, which means that the use of flat trapezoidal tools results in obtaining the appropriate character of the stress distribution in the axial zones of the deformed rod, which has a positive effect on the closing discontinuities. The value of hydrostatic pressure in the axis of the forged bar was 53MPa. It is especially important, because in the first steps of the forging process, the temperature of the deformed bar does not change, which facilitates welding of the discontinuities. It is also worth noting that after the casting process for ingot moulds, the discontinuities in the axis of the ingot have the largest volume and they are difficult to weld in the further stages of the elongation process. Therefore, it is so important that the compressive stresses of the highest possible value occur in these zones. The use of a flat trapezoidal anvil in the starting bar forging process also favours the process of welding foundry voids in the areas under the operation of the lower flat tool, because, as shown by the hydrostatic pressure distribution (Figure 9), its values are within the range of 26−53MPa. On the other hand, the forging process in flat trapezoidal anvils does not favour the welding of foundry voids located in the places under the action of the upper trapezoidal anvil. The values of compressive stresses in this place from 5 to 25 MPa. There were three unwelded foundry voids left.
Based on the test results shown in Figure 12 and 13, it can be concluded that in the predominant volume of the deformed rod, it is decreasing in the value of the hydrostatic pressure from 53MPa to a value close to zero was noted, which proves its absence. The lack of hydrostatic pressure does not favour the welding of the foundry voids. The only area where the hydrostatic pressure was still present (its value was 26MPa) was the area on the right, impacted by the lower anvil. Two consecutive discontinuities did not fully weld in the second forging step due to the lack of hydrostatic pressure in the area of their occurrence, the value of the average stress was 0.12 MPa there, i.e., it was tensile stress, unfavourable for the welding of the discontinuities.
Figures 13 and 14 show the test results obtained after deformation in the third forging step, where the flat trapezoidal tools were replaced with flat tools and the deformed bar was heated to the starting temperature. The data analysis shows that no unwelded foundry voids were observed in the volume of the deformed bar. In the central deformation zone of the rod, the hydrostatic pressure was 26 MPa. Outside of this zone, there was no hydrostatic pressure.
The data in Figures 15 and 16 show that in the fourth and last elongation step in the entire volume of the deformed rod, no hydrostatic pressure was recorded outside the corner areas. There were positive mean stress values in the range 0.12−53 MPa. The introduction of flat anvils on the last stages of rod formation, after using the trapezoidal flat anvil to introduce high hydrostatic pressure, does not bring the intended effect. During the forging in flat anvils, positive values of average stresses in most areas of the forged rod are observed. This prevents the welding of discontinuities, especially those with large initial dimensions.
6.2. Analysis of the Distribution of Hydrostatic Pressure Values in the Forging Process in the Rhombic Trapezoidal Tools
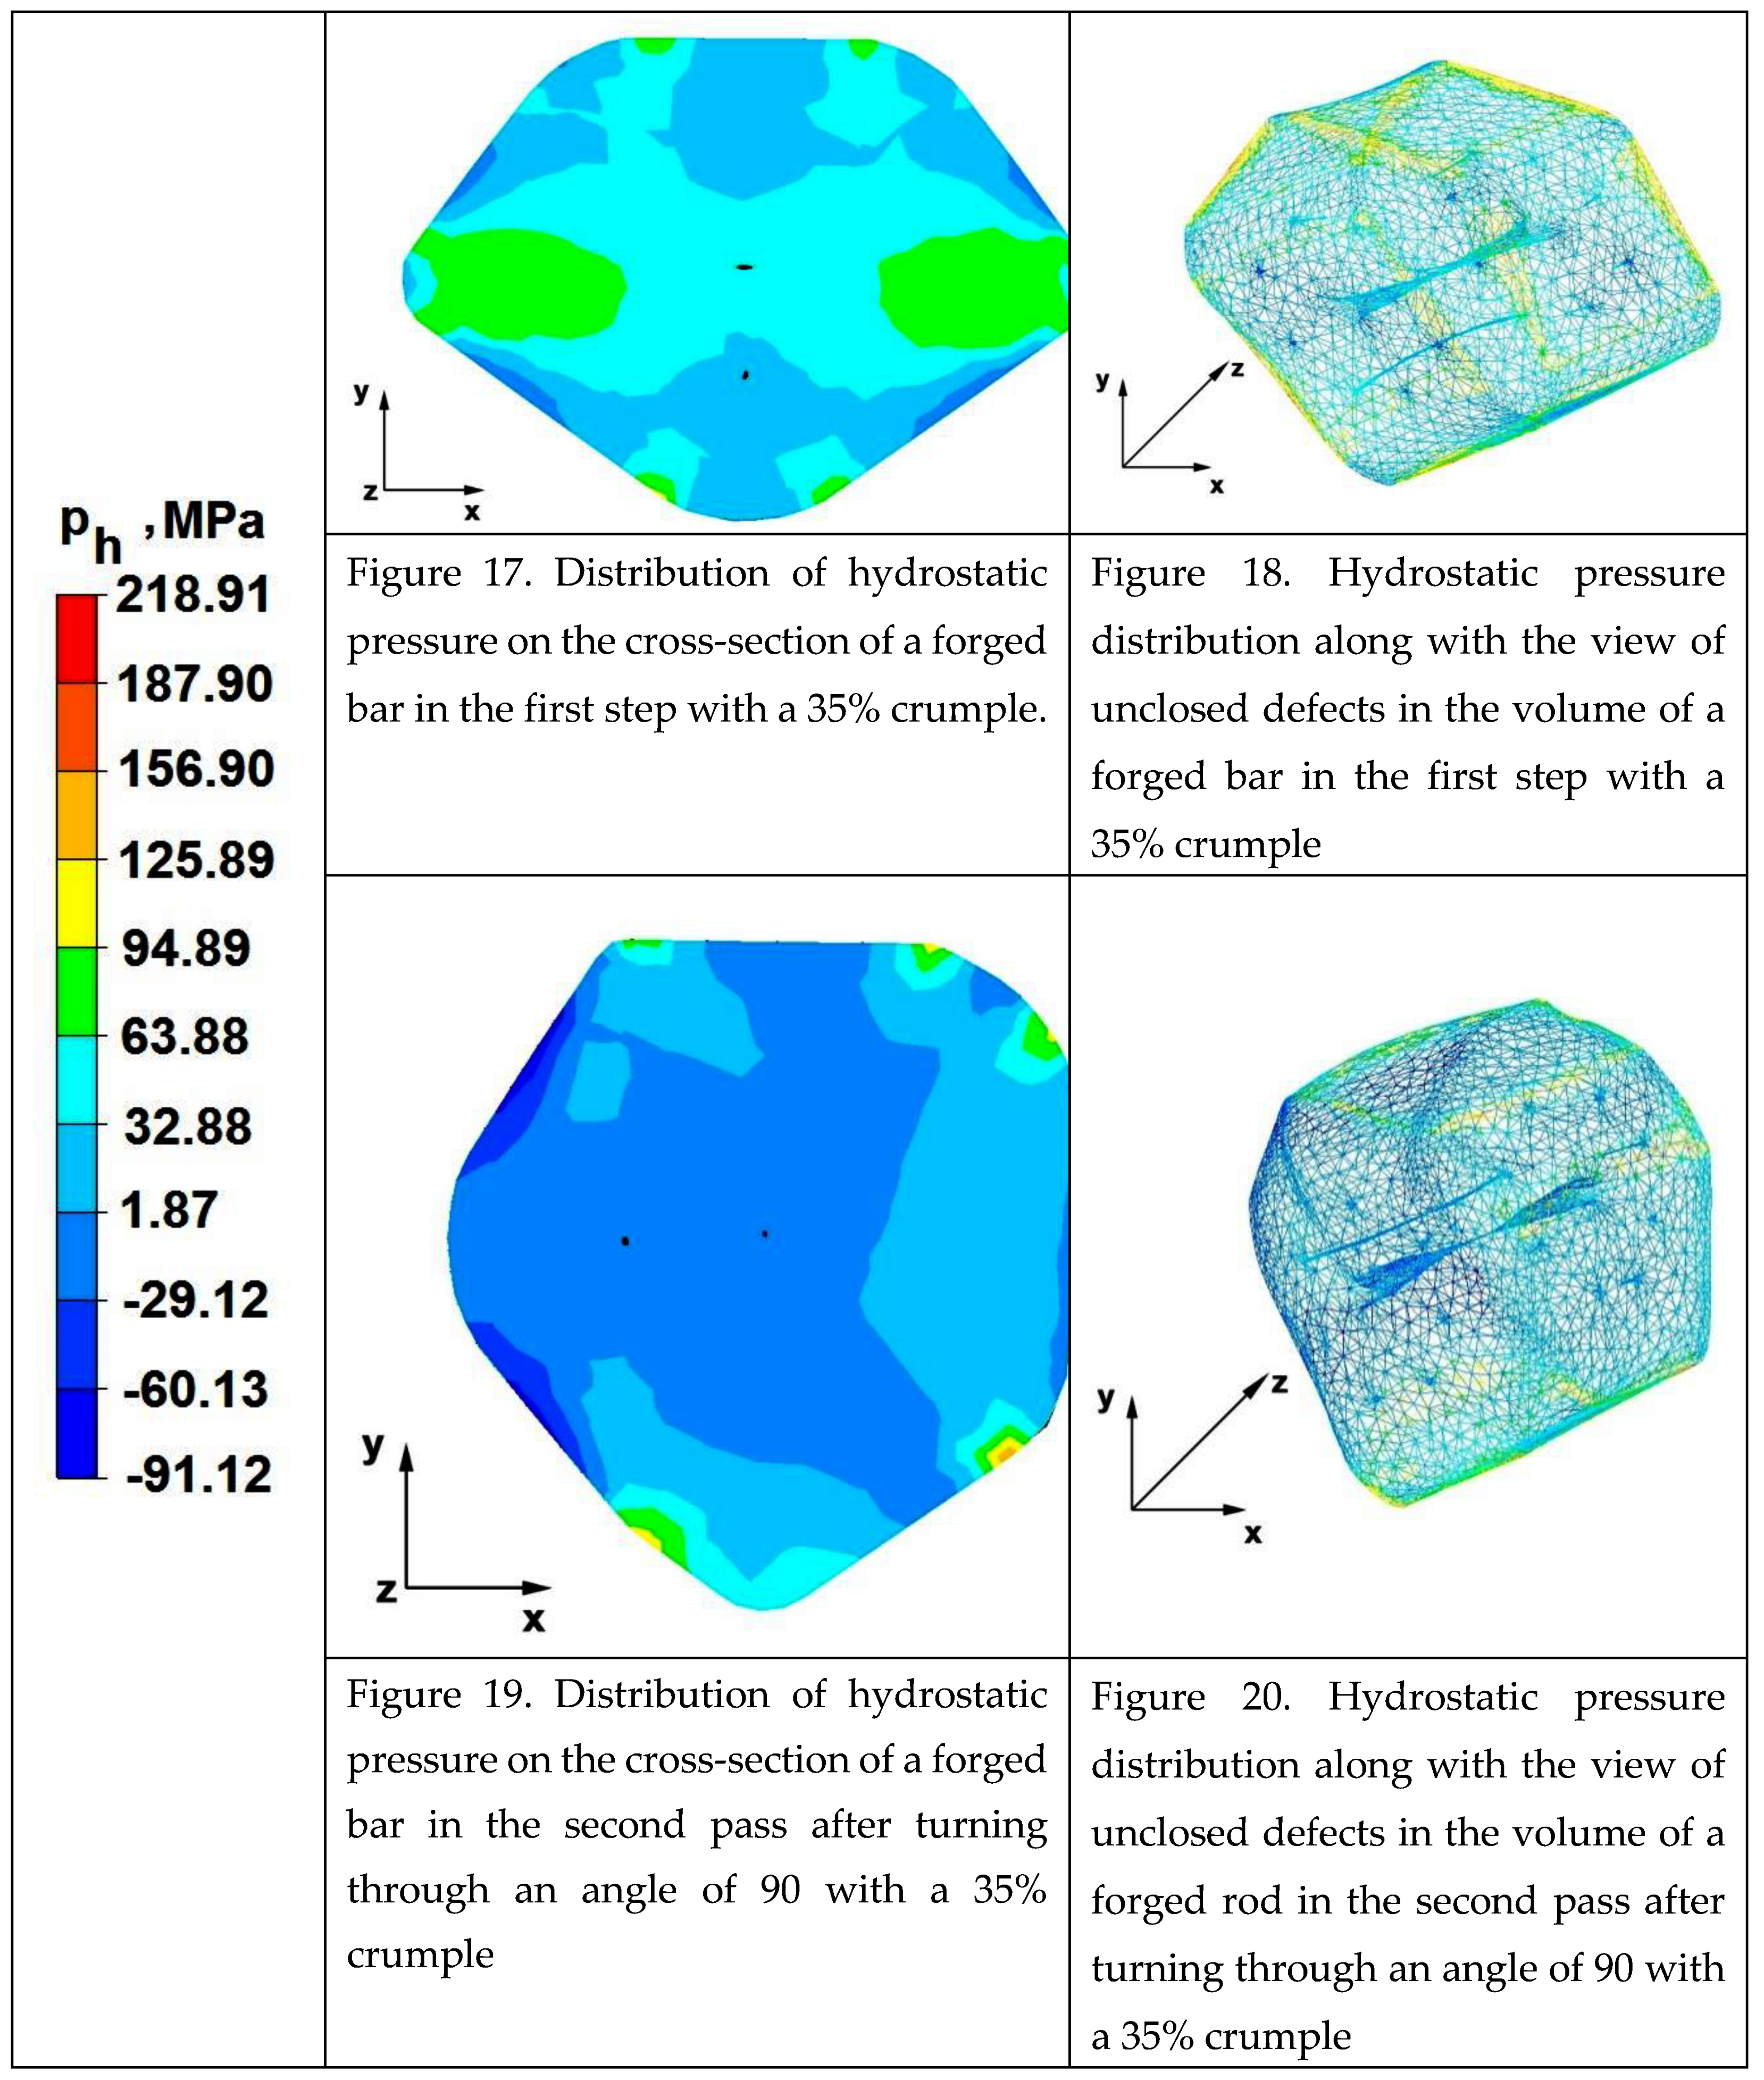
Figures 17–24 show the distribution of hydrostatic pressure values obtained in numerical computation of the elongation of the bar from the zirconium alloy in rhombic trapezoidal tools.


The data in Figures 17 and 18 show that during the implementation of the initial stages of the elongation using rhombic trapezoidal anvils, the axial discontinuity, as well as the discontinuity lying in the zone of impact of the lower rhombic anvil, were not completely welded. In the place of axial discontinuity occurrence, the hydrostatic pressure was 33MPa, while in the place of the occurrence of the second, unclosing foundry voids, it was 2MPa. The pressure value obtained in this place was too low for the process of closing the foundry voids to take place. The value of the hydrostatic pressure of 64MPais sufficient to weld the discontinuities in the corners of the deformed rod along the x axis.
By analysing the data presented in Figures 19 and 20, it can be concluded that in the majority of the volume of the deformed bar in the second forging step, no hydrostatic pressure occurred, and therefore the foundry voids remaining after the first forging step were not closed also in the second step. In these places, no hydrostatic pressure not exist, and the values of positive mean stress ranged from 29 to 60MPa. This proves that in this area tensile stresses occurred, which blocks the closing process of foundry voids.
Figures 21 and 22 show the distribution of hydrostatic pressure on the cross-section of a deformed zirconium alloy rod, previously heated to the initial forging temperature, after the third step, made in flat tools with 35% crumple. No unclosing foundry voids were observed, because in almost the entire volume of the deformed bar, the hydrostatic pressure achieved values of 64−126MPa, what created favourable conditions for the closing of foundry voids.
Based on the data in Figures 23 and 24, it can be found that after the fourth, last step in the entire volume of the deformed bar, the value of the hydrostatic pressure was sufficiently large, which influenced the closing of the foundry voids. The values of hydrostatic pressure occurring in the entire volume of the deformed bar from 33 to 64MPa.
7. The Distribution of Deformation Intensity during the Forging Process
In the aim obtain the deliberate character of the deformations that would facilitate closing of the foundry voids, the authors proposed that the forging process should be carried out in rhombic trapezoidal and flat trapezoidal anvils allowing to control the direction, orientation and magnitude of the vectors of friction and pressure forces acting in the deformation area and to select the appropriate values of the main technological parameters of the forging process.
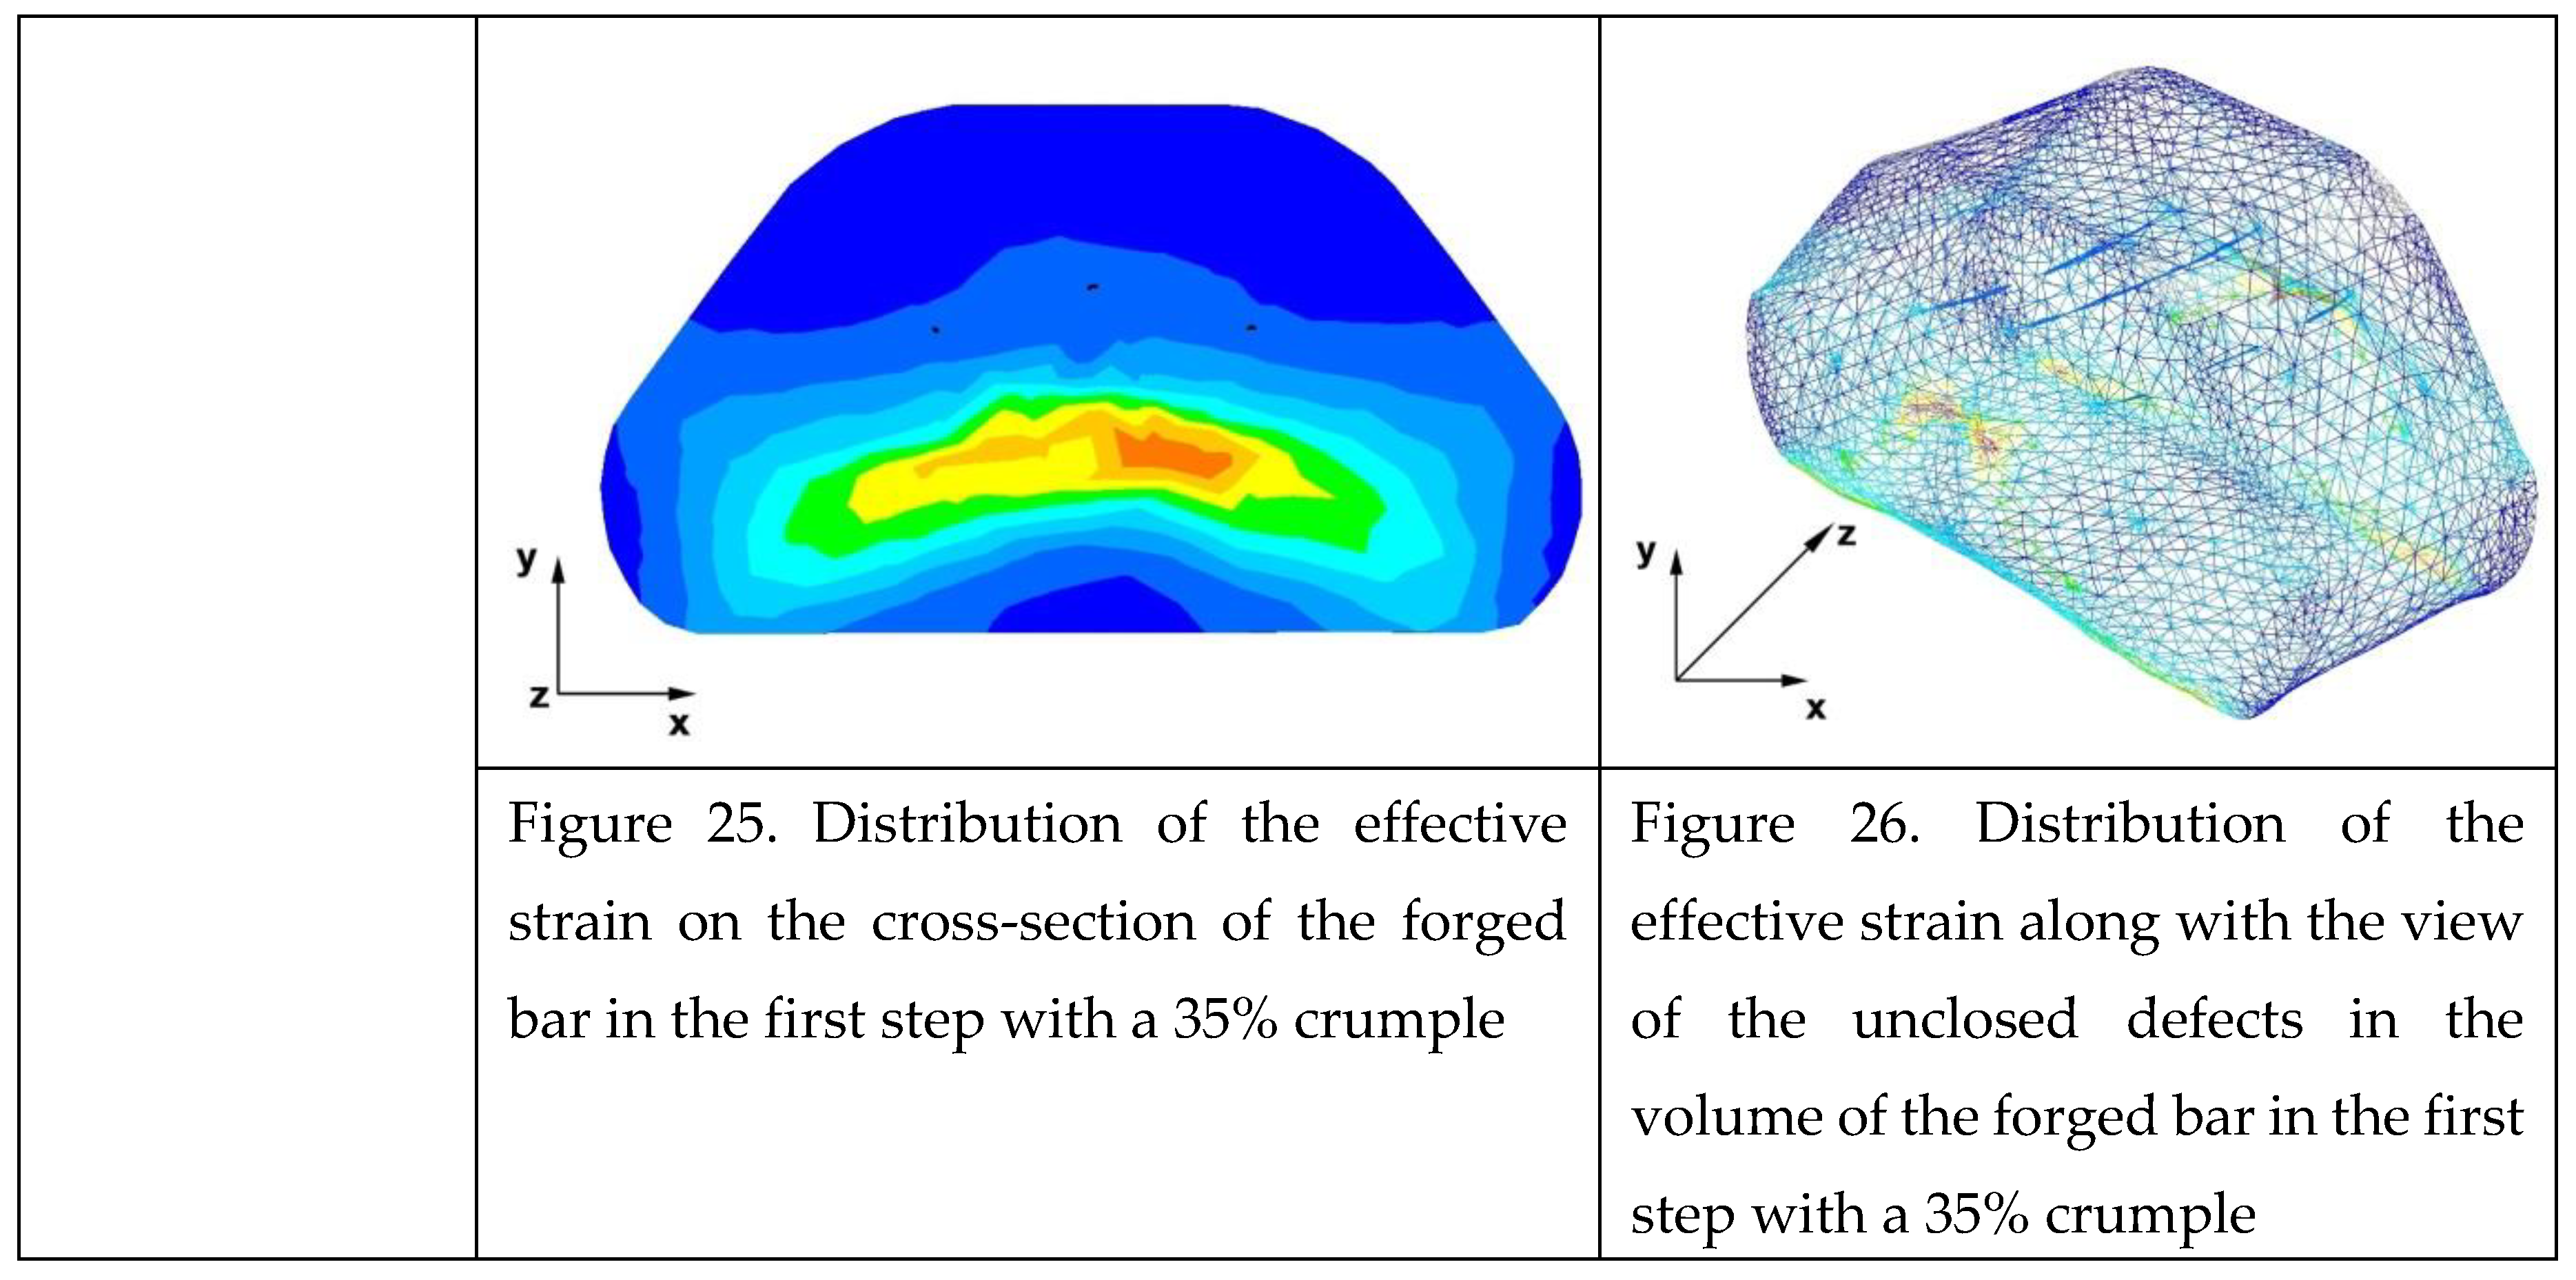
The effects of the investigation on the distribution of hydrostatic pressure in the elongation of the zirconium alloy bar in flat trapezoidal andrhombic trapezoidal anvils are presented in Figures 25–40.
7.4. The Distribution of the Deformation Intensity Values in the Forging Process in Flat Trapezoidal Anvils
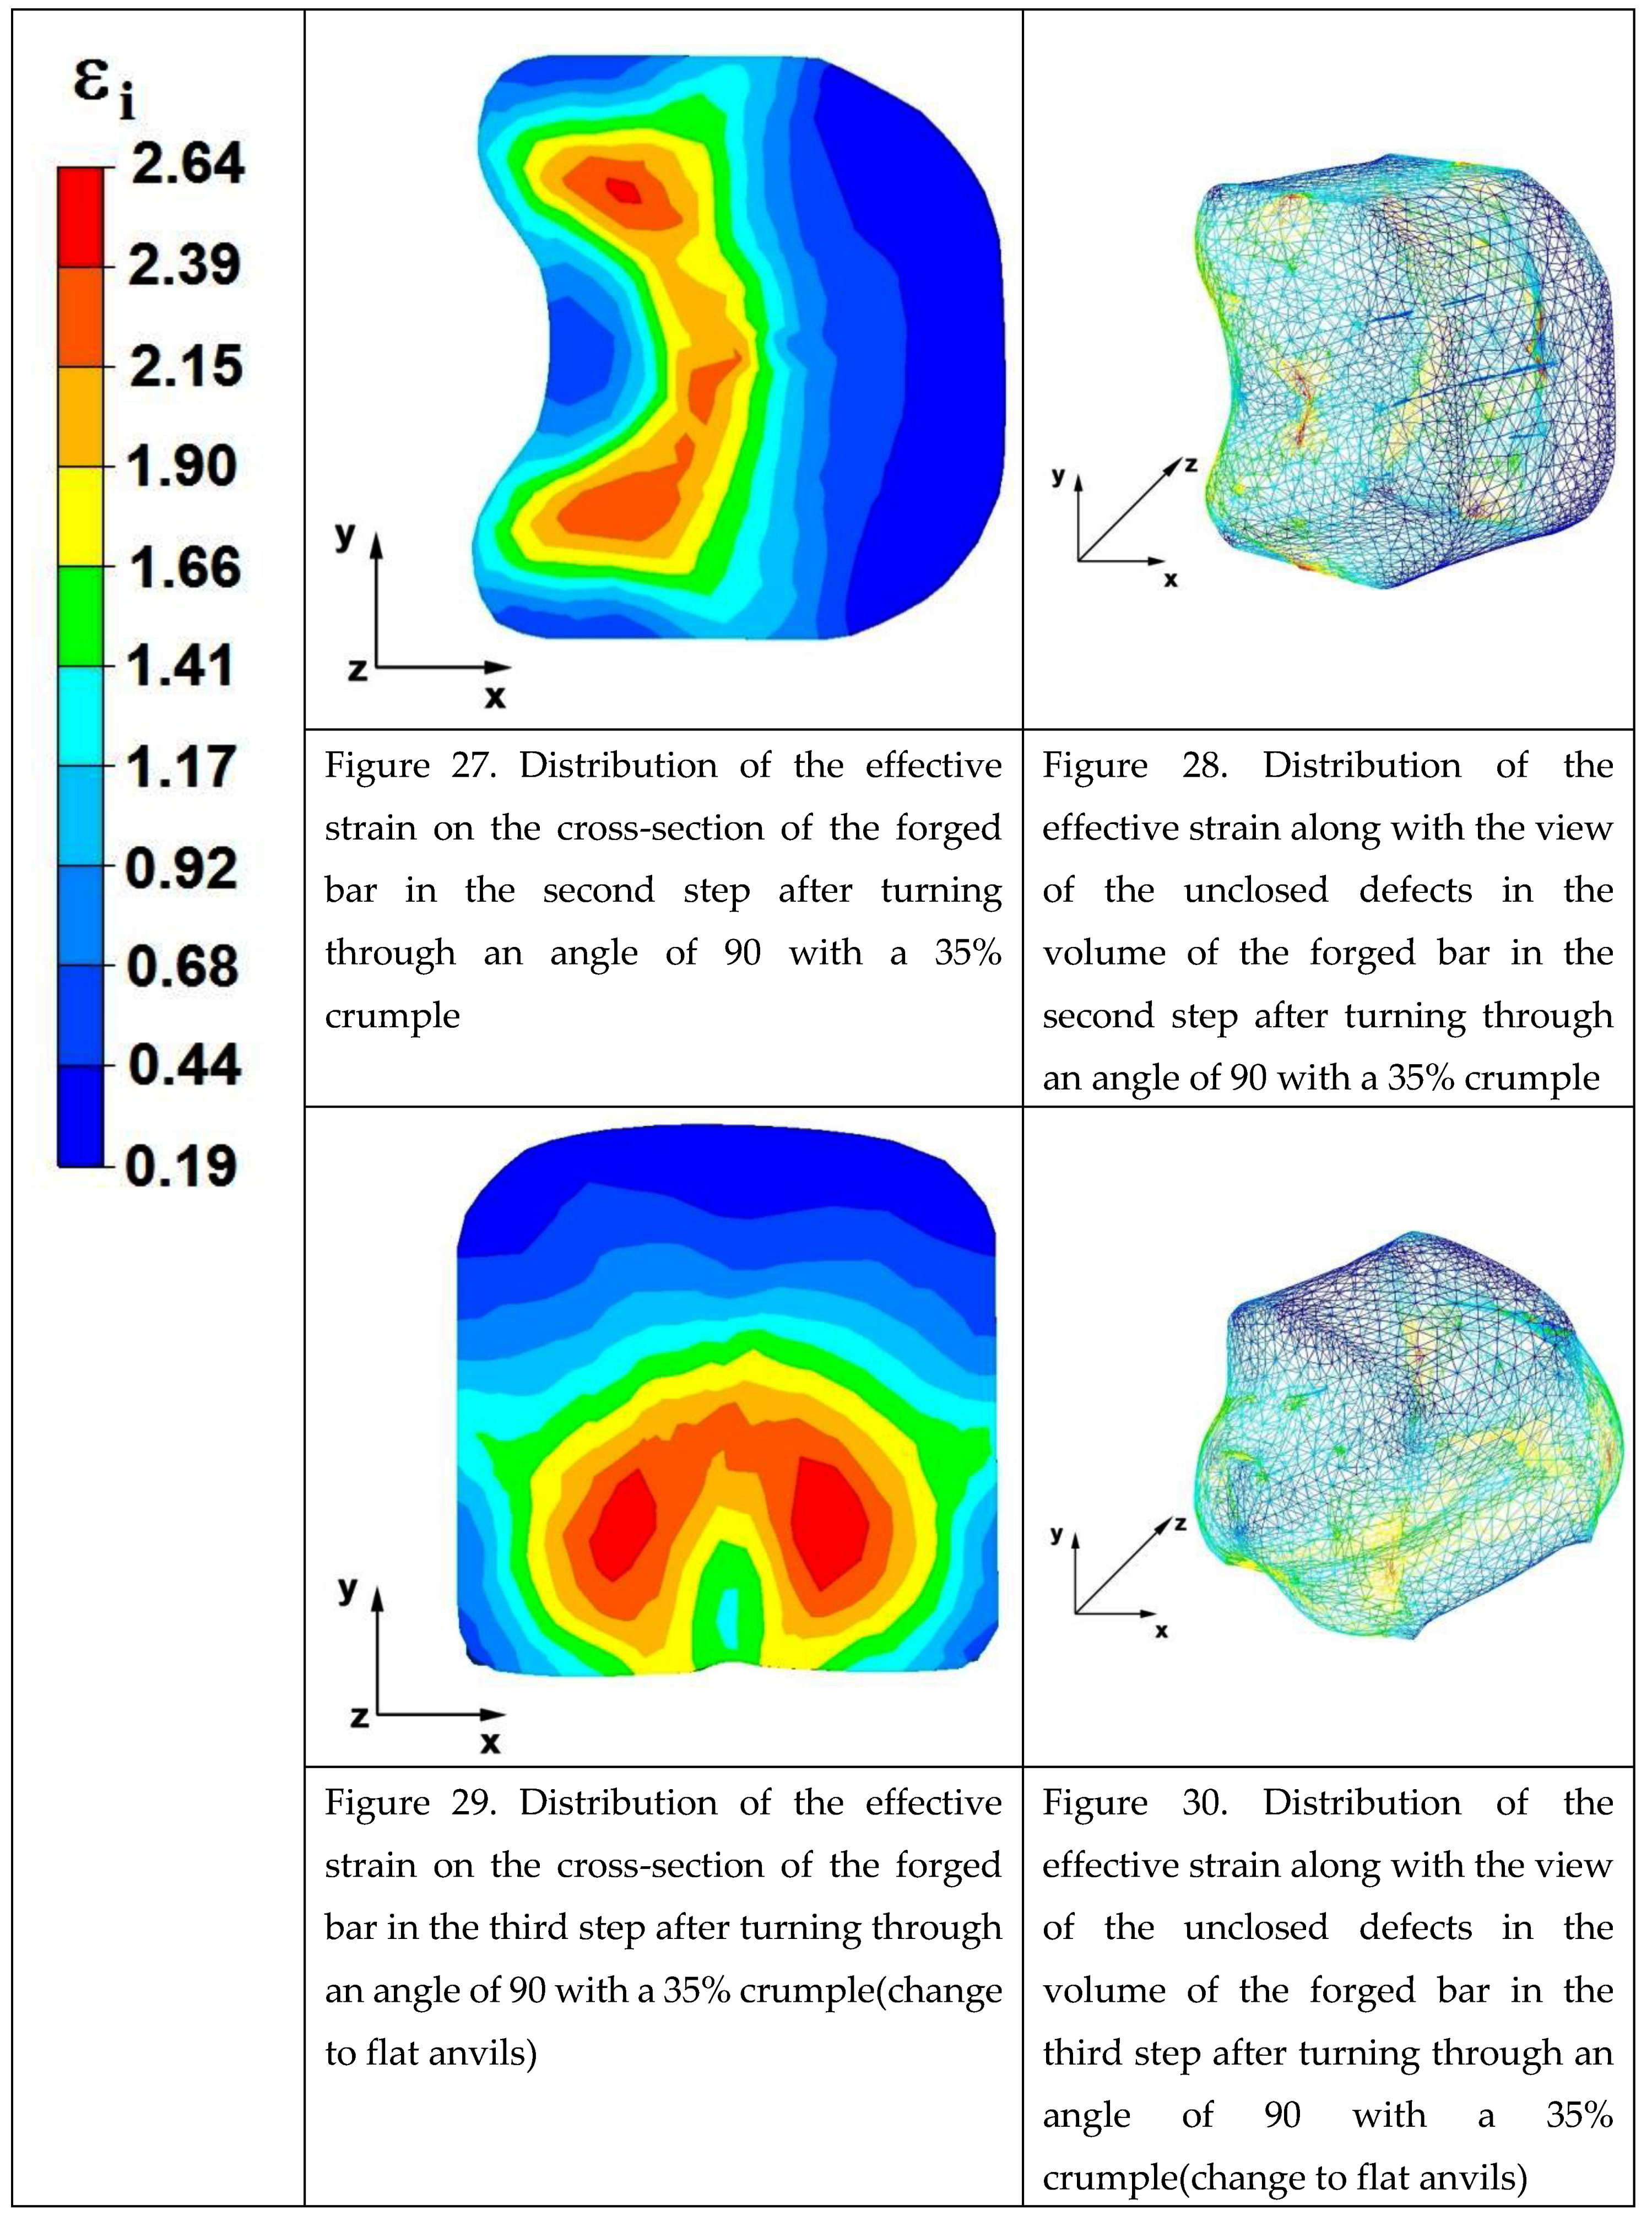
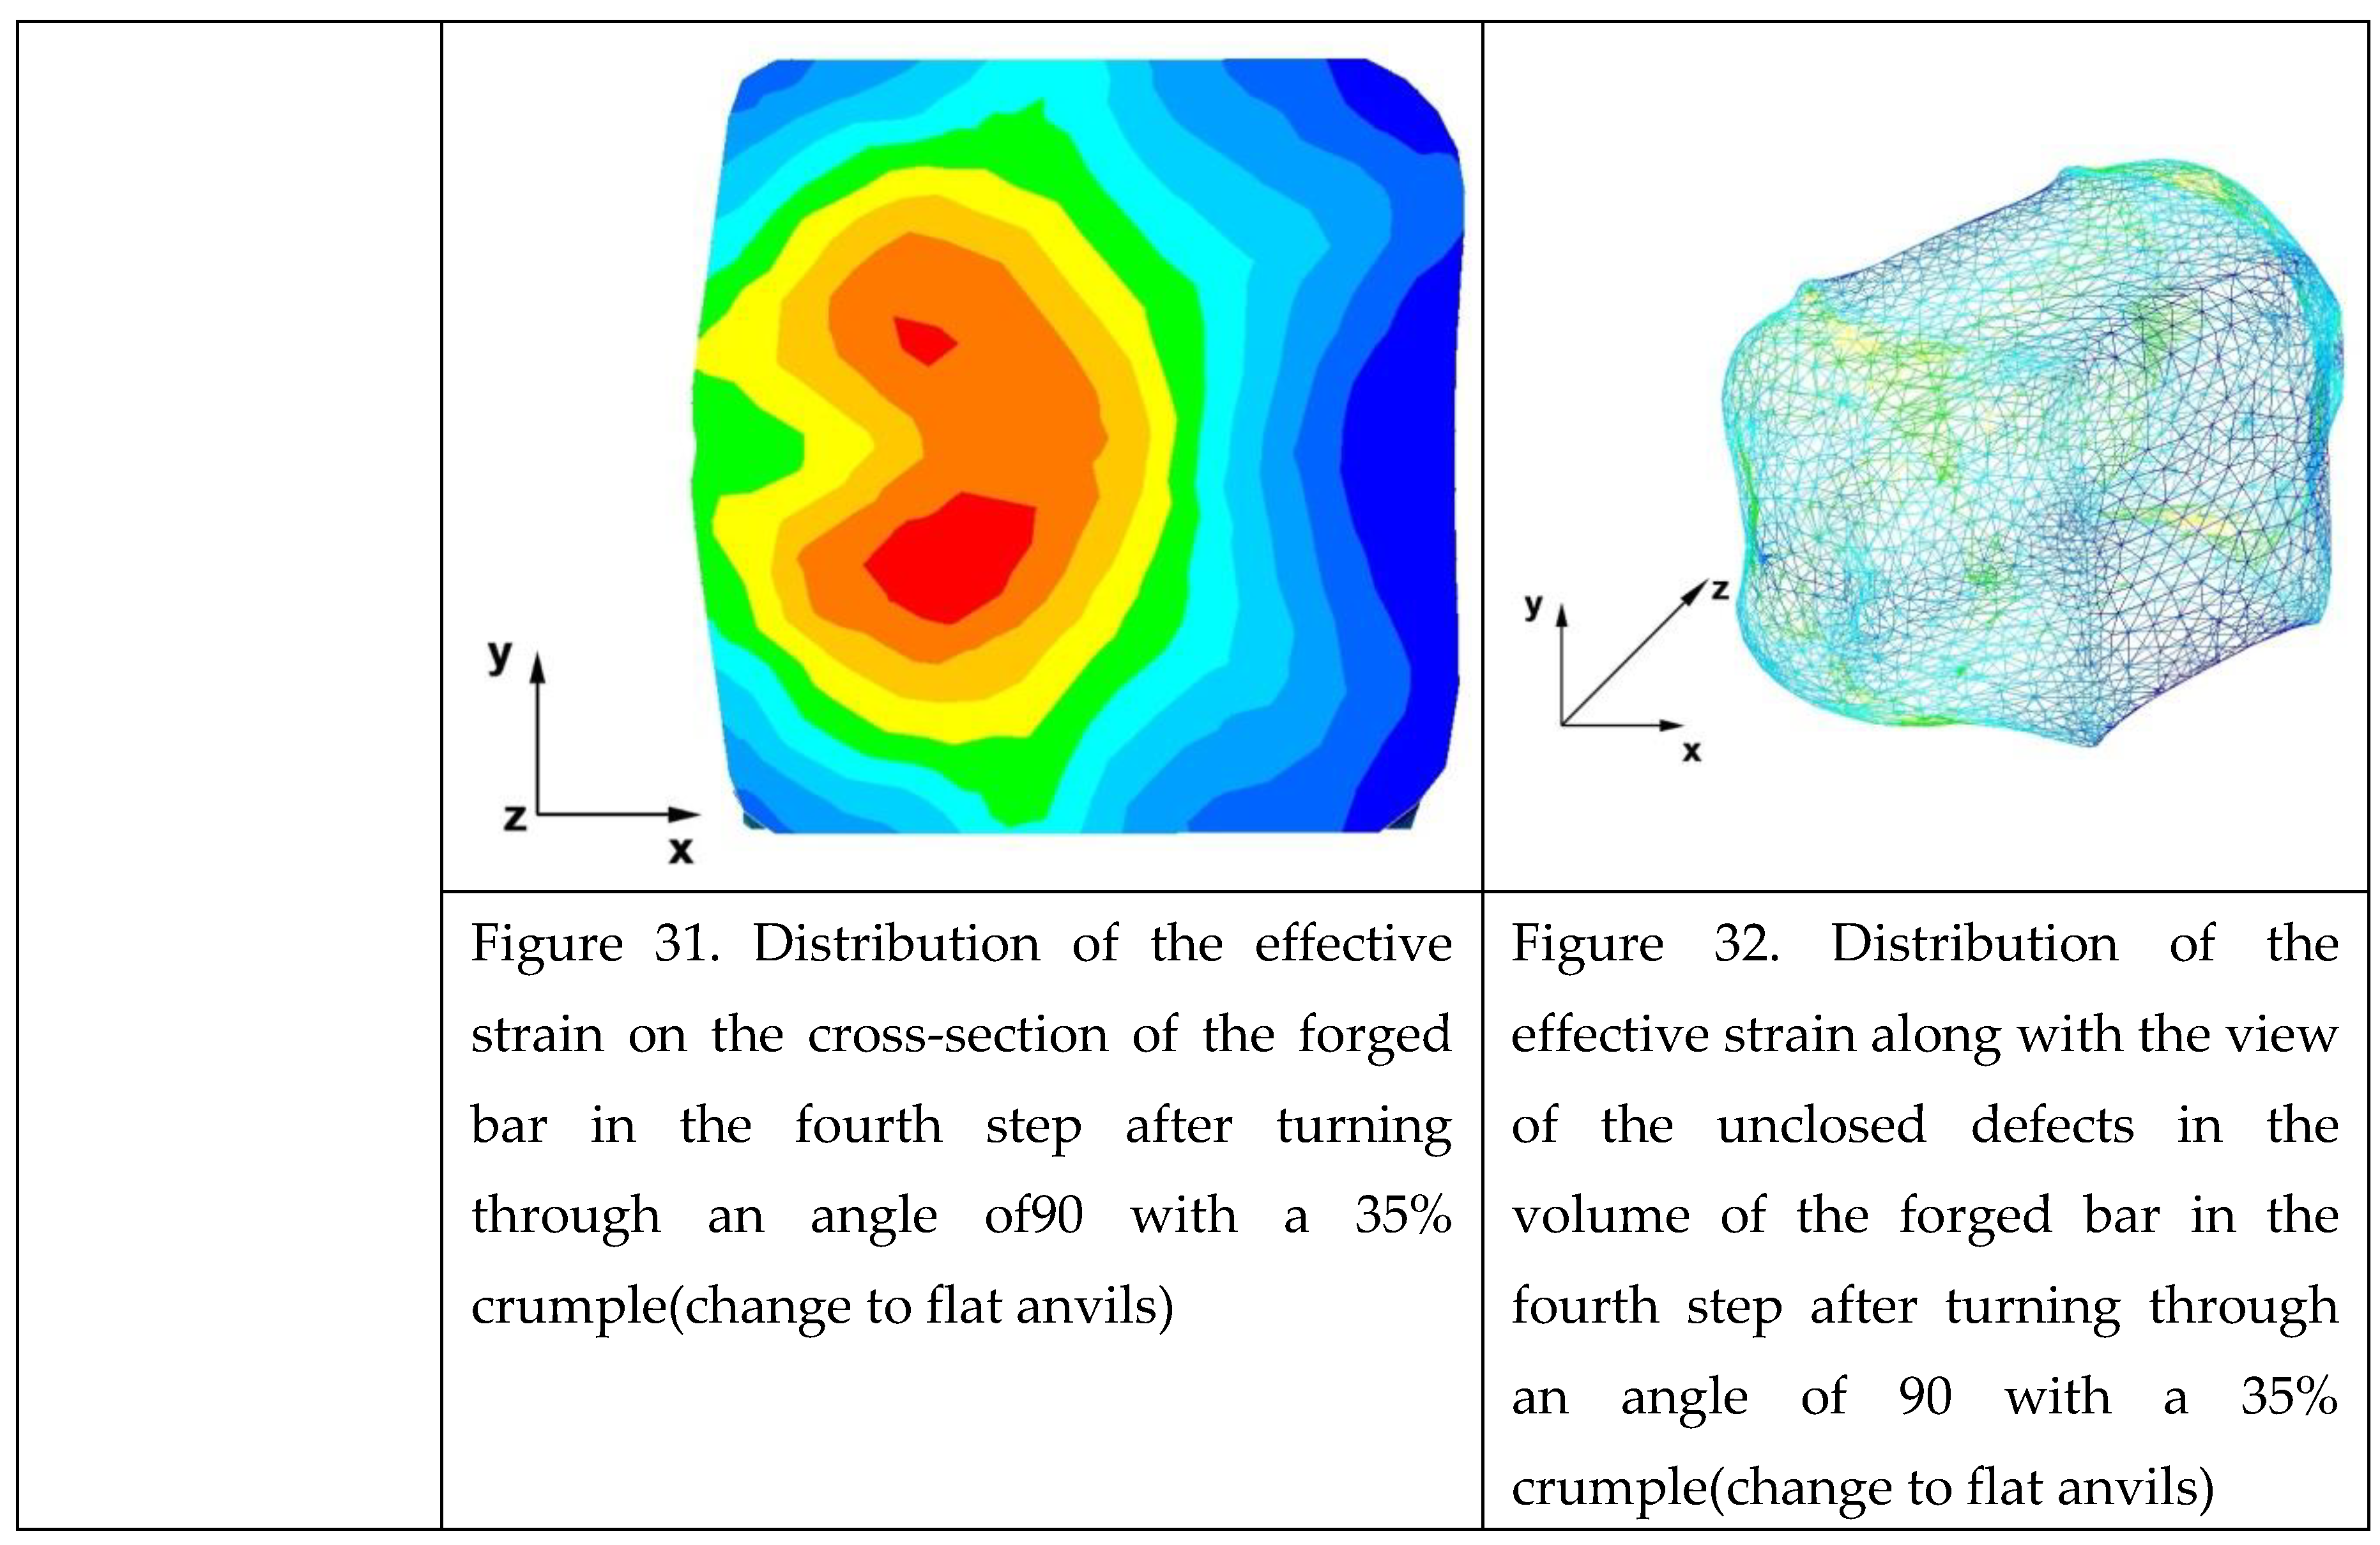
Figures 25–32 show the effective strain distributions obtained during numerical computation of the zirconium alloy bar elongation in flat trapezoidal anvils.


By analyzing the data in Figures 25 and 26, it can be found that the axial discontinuity, as well as the foundry voids under the direct influence of the lower flat anvil, were completely closed after the first forging step. A favourable state of deformation has developed in the metal located in the deformation basin due to the appropriate directions and orientation of frictional forces and pressure forces resulting from the impact of the employed surfaces of the shaped tools on the deformed rod. Such a distribution of forces caused the occurrence of large deformations in the middle and lower place of the deformed bar, leading to the effective strain values ranging from 1.17 to 2.64. Only the discontinuities in the areas of the metal impacted by the upper trapezoidal anvil remained completely unwelded. The values of the effective strain were too small there to allow complete welding of the discontinuities, as they amounted to 0.19−0.44.
The data in Figures 27 and 28 show that after the second step, the foundry voids remaining after the first step were still not completely closed, because in the places of their occurrence the values of the effective strain were too small and amounted to 0.19−0.44. On the other hand, in the area on the left side of the deformed bar, the effective strain values were favourable for the process of closing the foundry voids, as they were in the range 1.41−2.64.
Figures 29 and 30 show the distribution of the effective strain values after the third step and after changing the shaped tools to flat tools, before heating the forged bar to the starting temperature and its rotation by an angle of 90°. The data presented in Figures 69 and 70 show that the foundry voids remaining after the second forging step was completely closed. The values of the effective strain in the middle and lower zone of the deformed bar were high and ranged from 1.41 to 2.64. On the other hand, the distribution of the effective strain values, which was in the range of 0.19−0.92 and thus unfavourable for the welding of discontinuities, was observed in the zone of the bar impacted by the upper anvil.
By analysing the data in Figures 31 and 32, it can be concluded that the values of the effective strain in the last (fourth) step slightly increased. Apart from the small zone to the right of the y axis of the deformed bar, this values were large and ranged between 1.17 and 2.64.
7.5. The Distribution of the Deformation Intensity Values in the Forging Process in the Rhombic Trapezoidal Tools
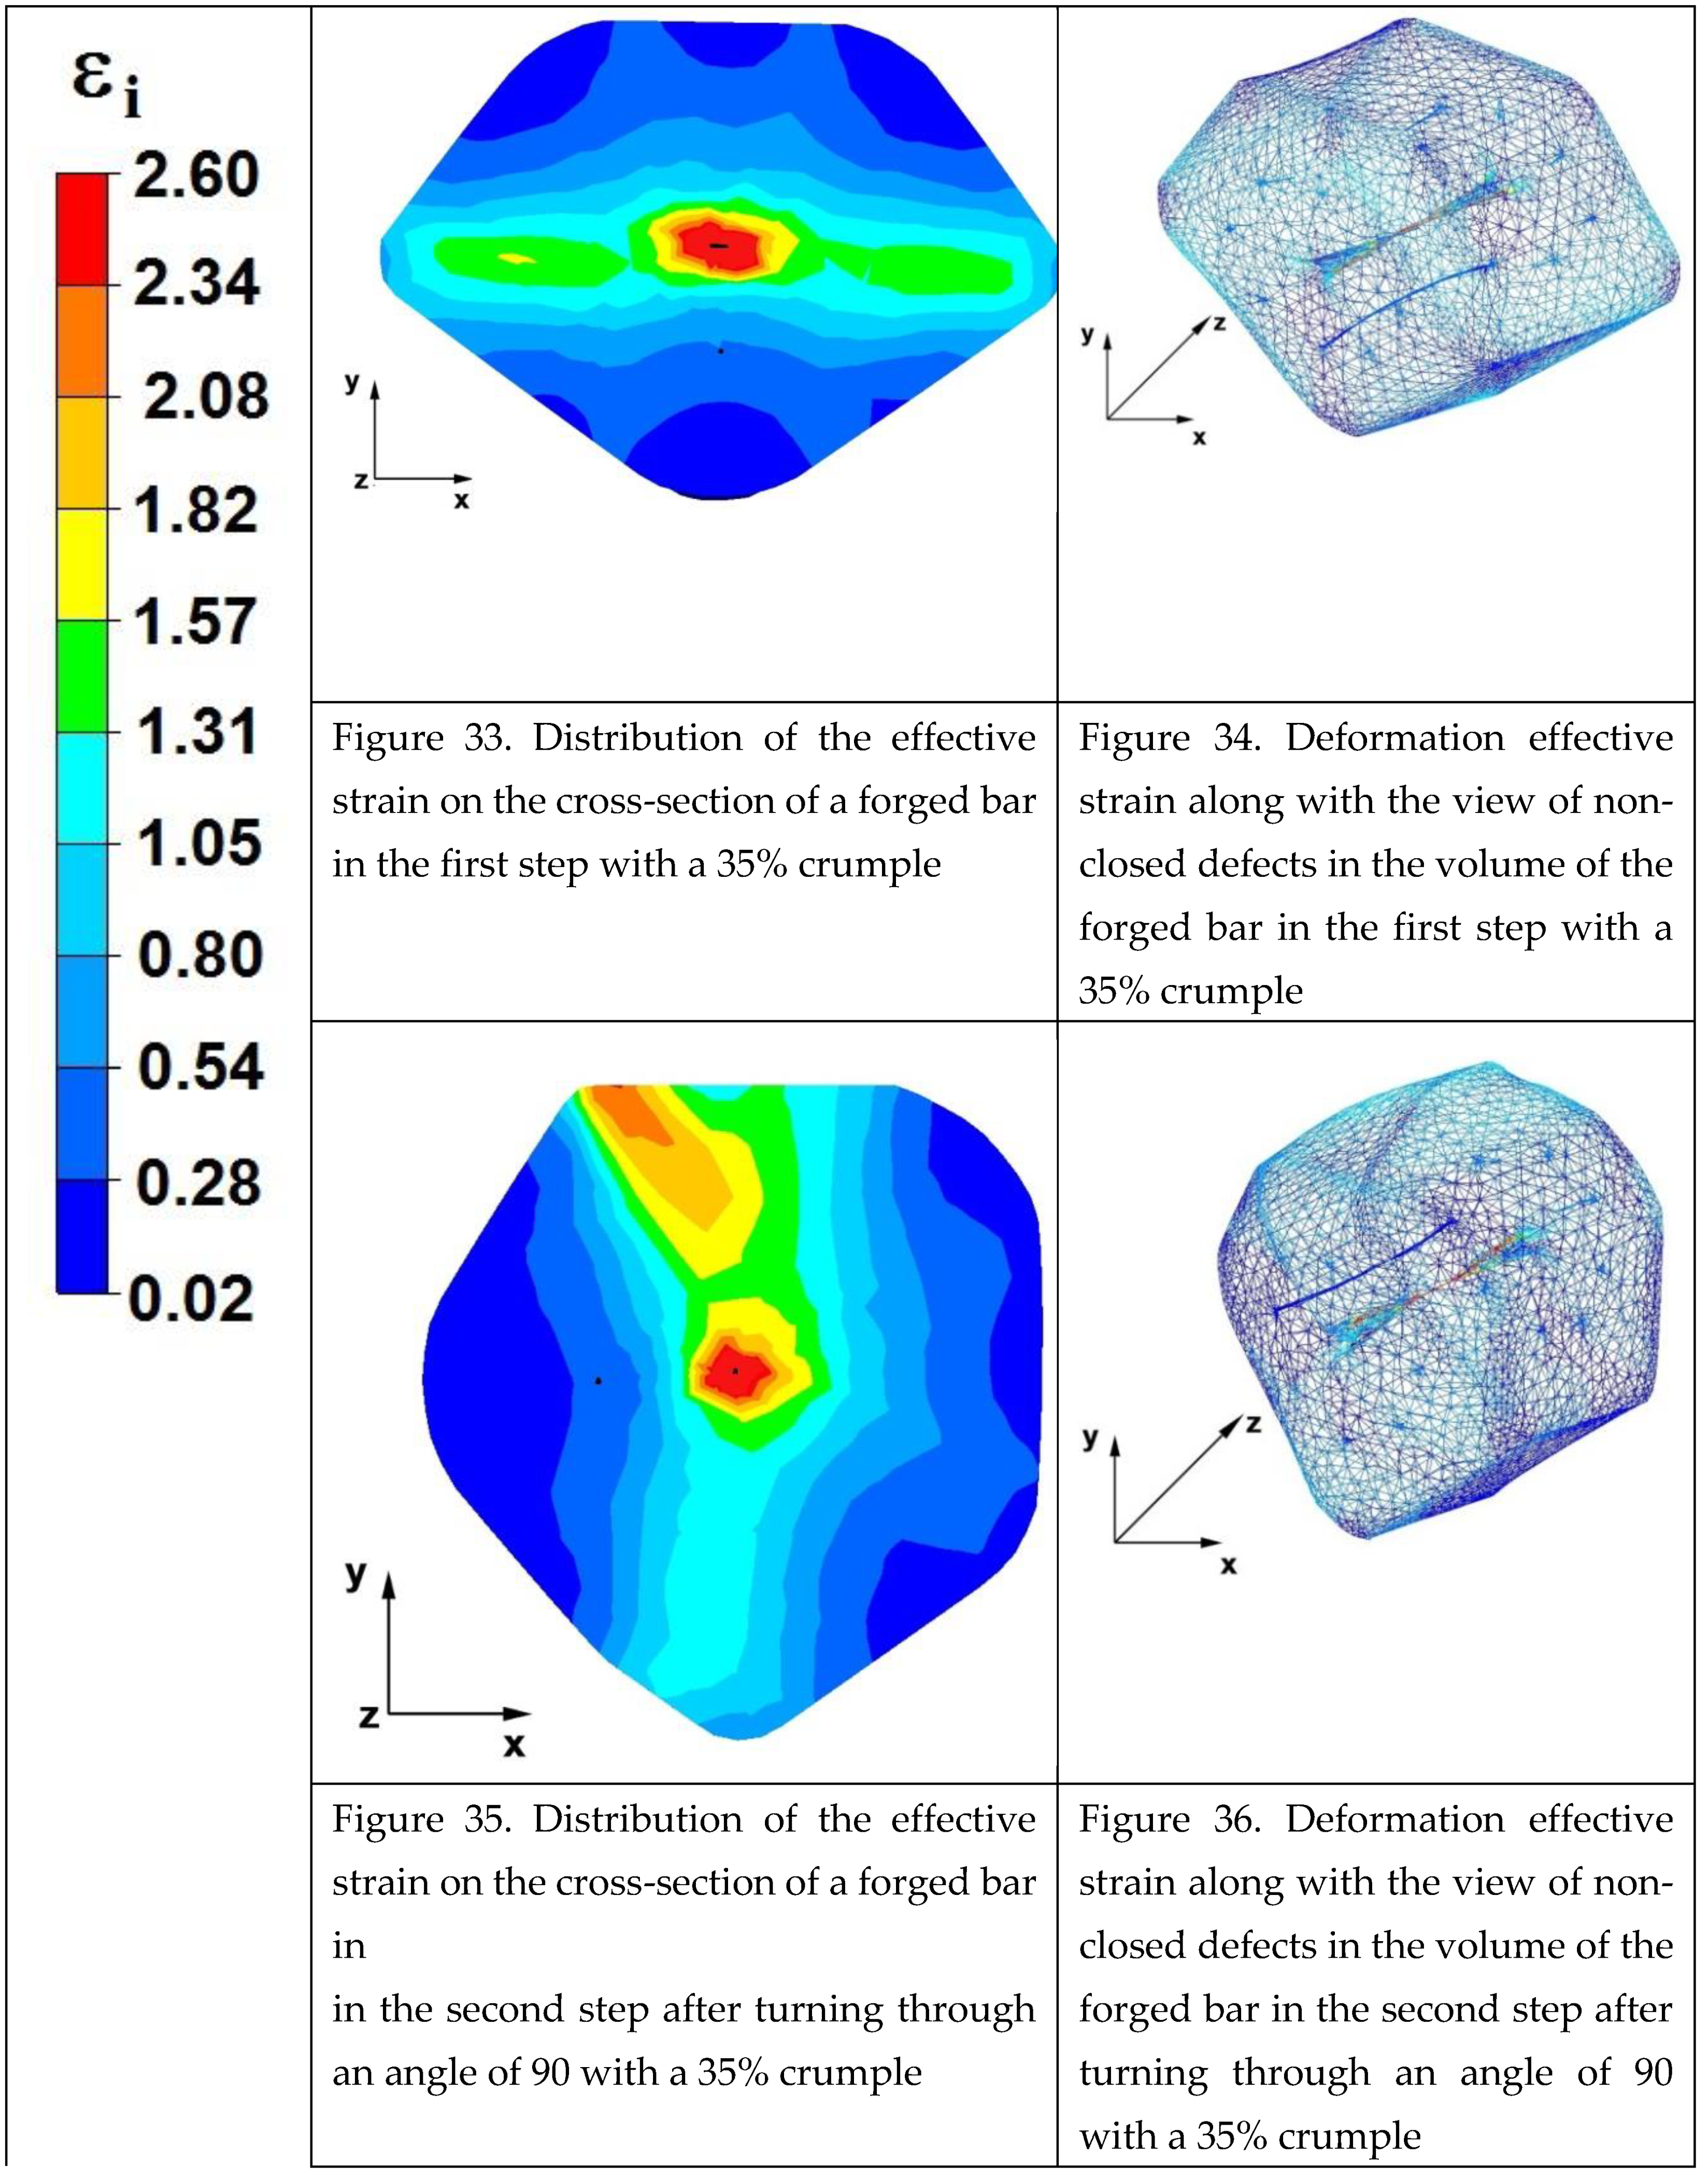
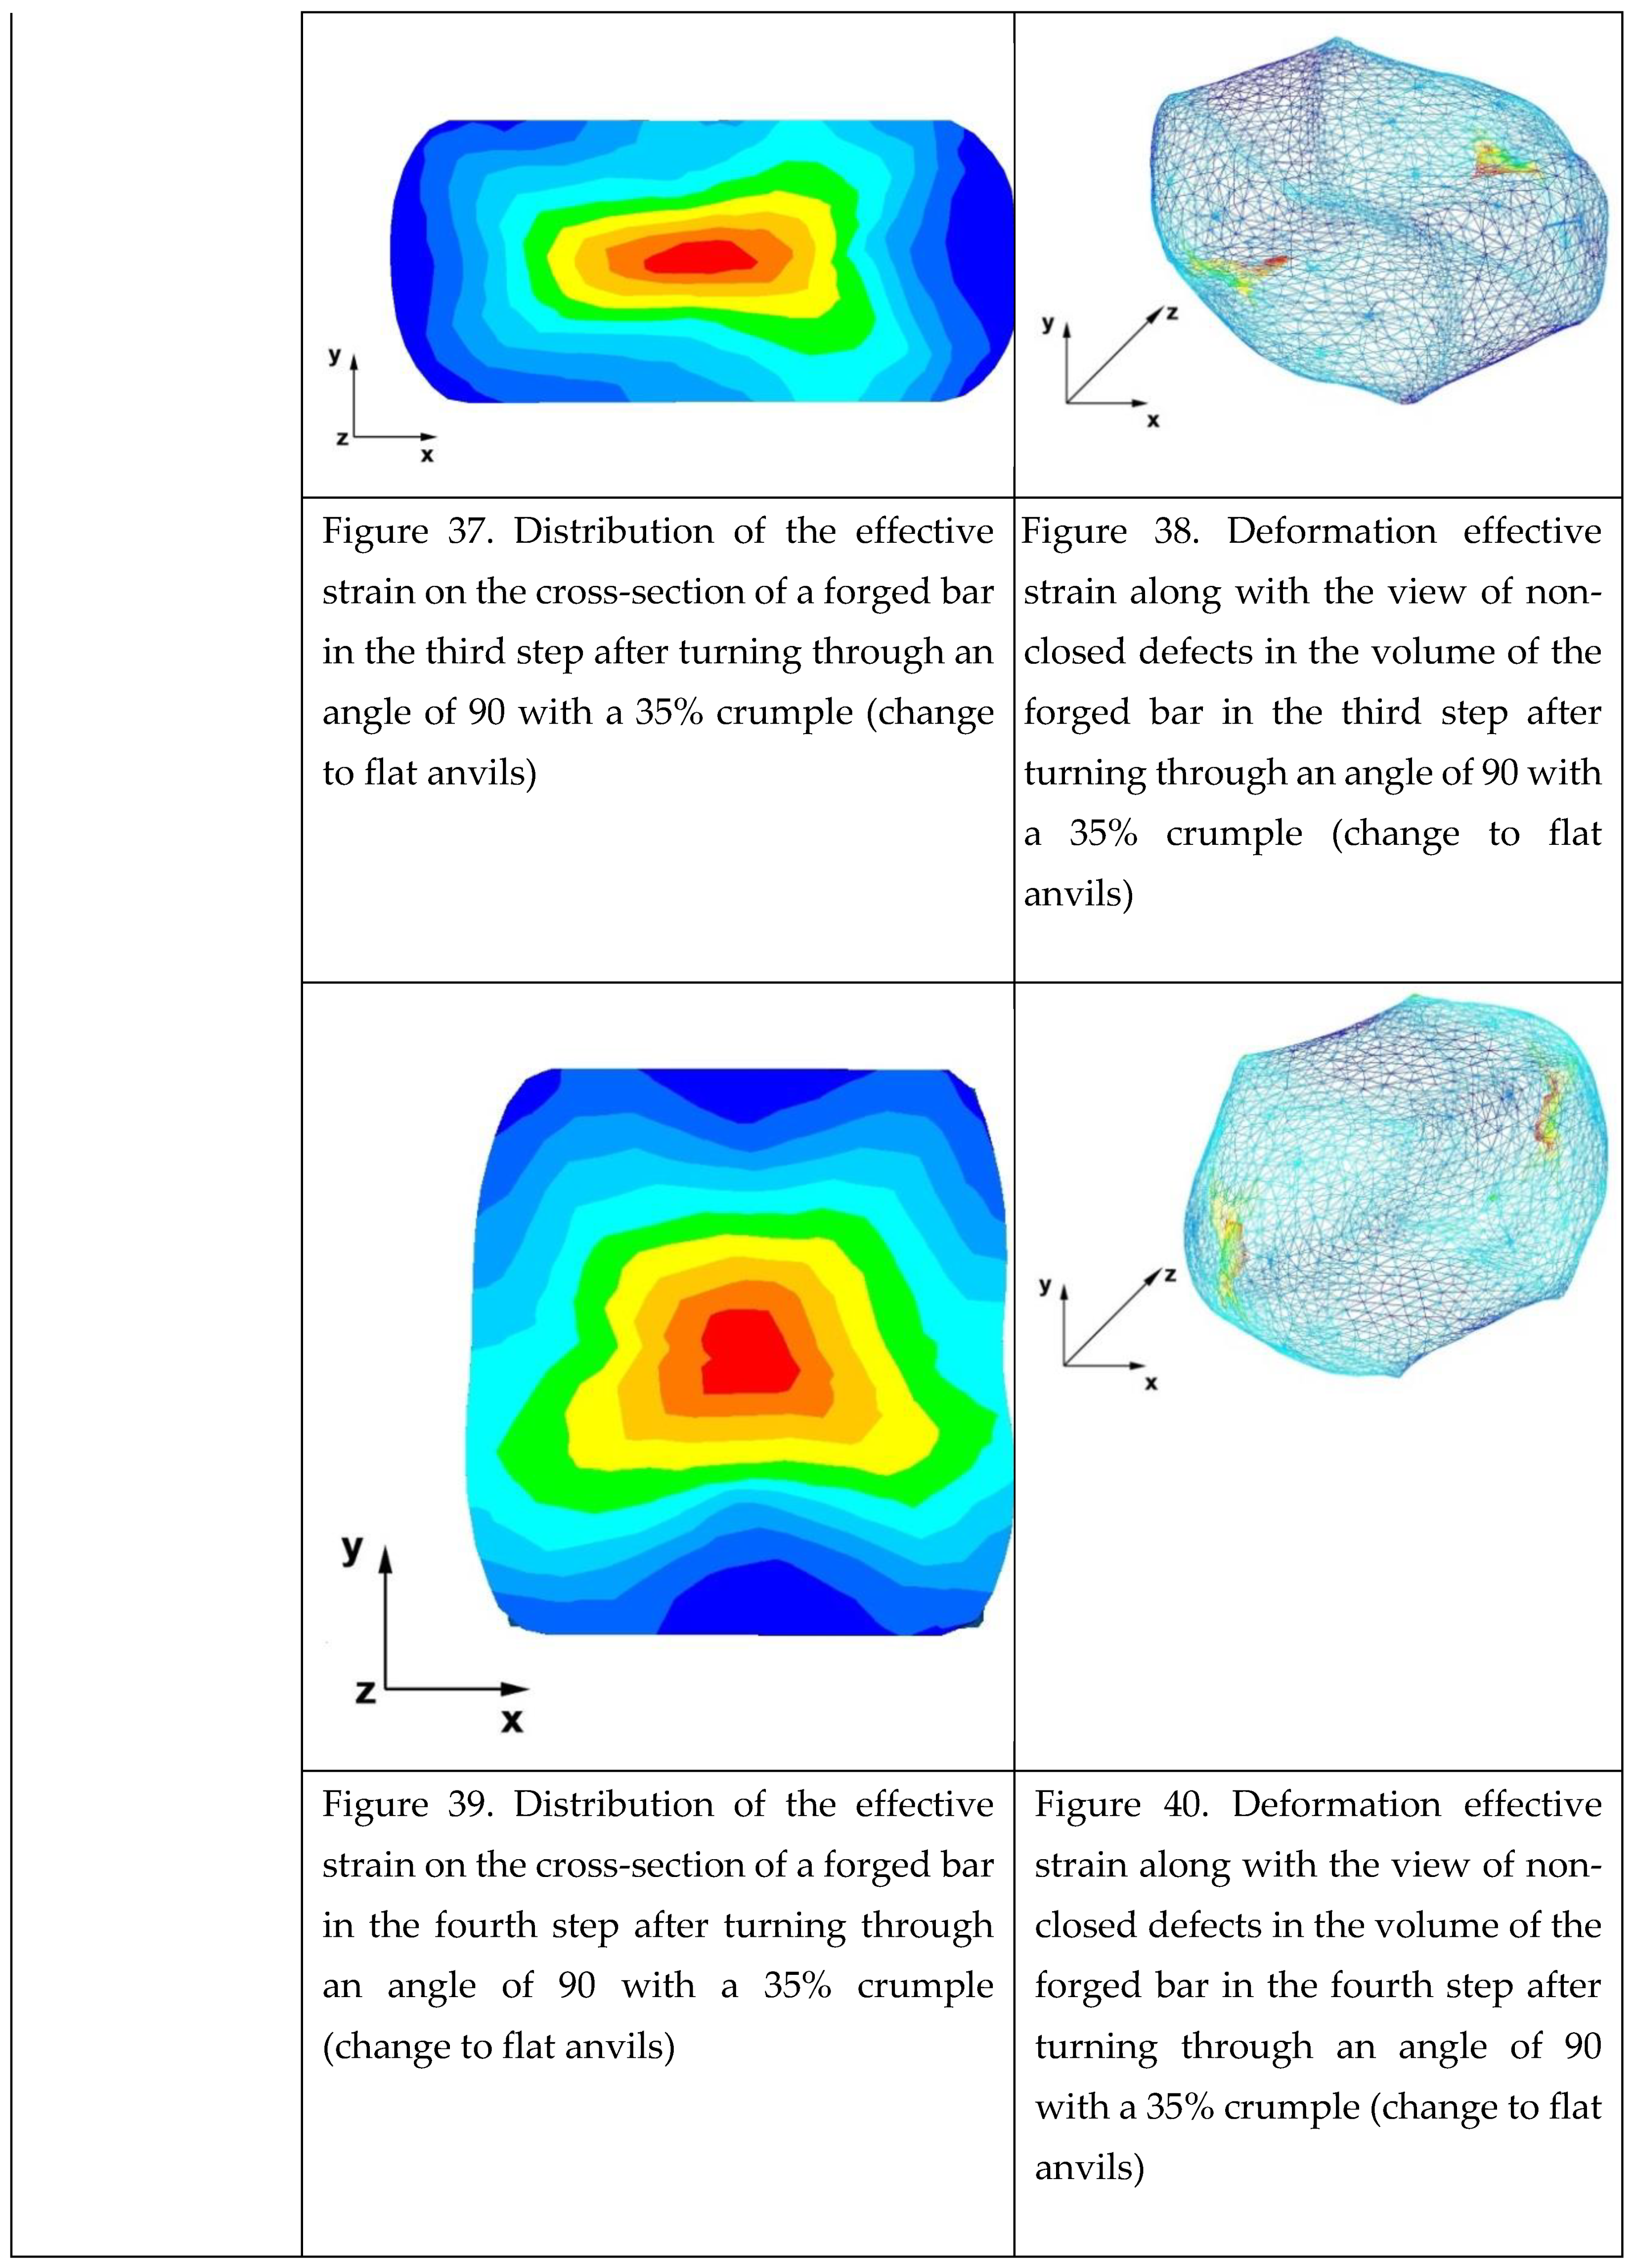
Figures 33–40 show the effective strain distributions obtained in numerical computation of the zirconium alloy bar in rhombic trapezoidal tools.


By analysing the data presented in Figures 33 and 34, it can be funded that in the central areas of the deformed bar the value of the deformation intensity was 2.60, which was insufficient for the complete closing of the axial foundry voids present there. In the lower part of the bar, deformed after the first step, an unclosing foundry voids was also observed, because values of the effective strain in that zone were small, ranging from 0.28 to 0.54. The low intensity of deformations, concentrated in the region of foundry voids, does not have a positive effect on the closing process of foundry voids.
The data in Figures 35 and 36 show that, due to the high value of the effective strain in the second forging transition that was equal to 2.60, the axial foundry voids was partially welded. Also, the foundry voids, now located in the left part of the deformed bar because the bar has been turned by 90°, was not closed due to the presence of a small value of the effective strain equal to 0.28.
From the data presented in Figures 37 and 38, which present the distribution of the effective strain values after the third step, no modelled foundry voids were observed. In most of the cross-sectional zone of the deformed bar, there was a favourable distribution of the effective strain values within the range of 1.05−2.60. Also, based on the data presented in Figures 39 and 40, it can be concluded that on the cross-sectional area of the bar deformed in the fourth step, the values of the effective strain were large (in the range of 1.05−2.60) and facilitated the closure of foundry voids. The exception was the area at the contact surface of the alloy with the anvil, in which the effective strain values were small and fell within the range of 0.02−0.28. However, internal foundry voids never occur in the near surface zones.
8. The Influence of the Anvil Shape on Changes in the Volume of Discontinuities, Hydrostatic Pressure, and the Effective Strain in the ZR Alloy in the First Two Steps
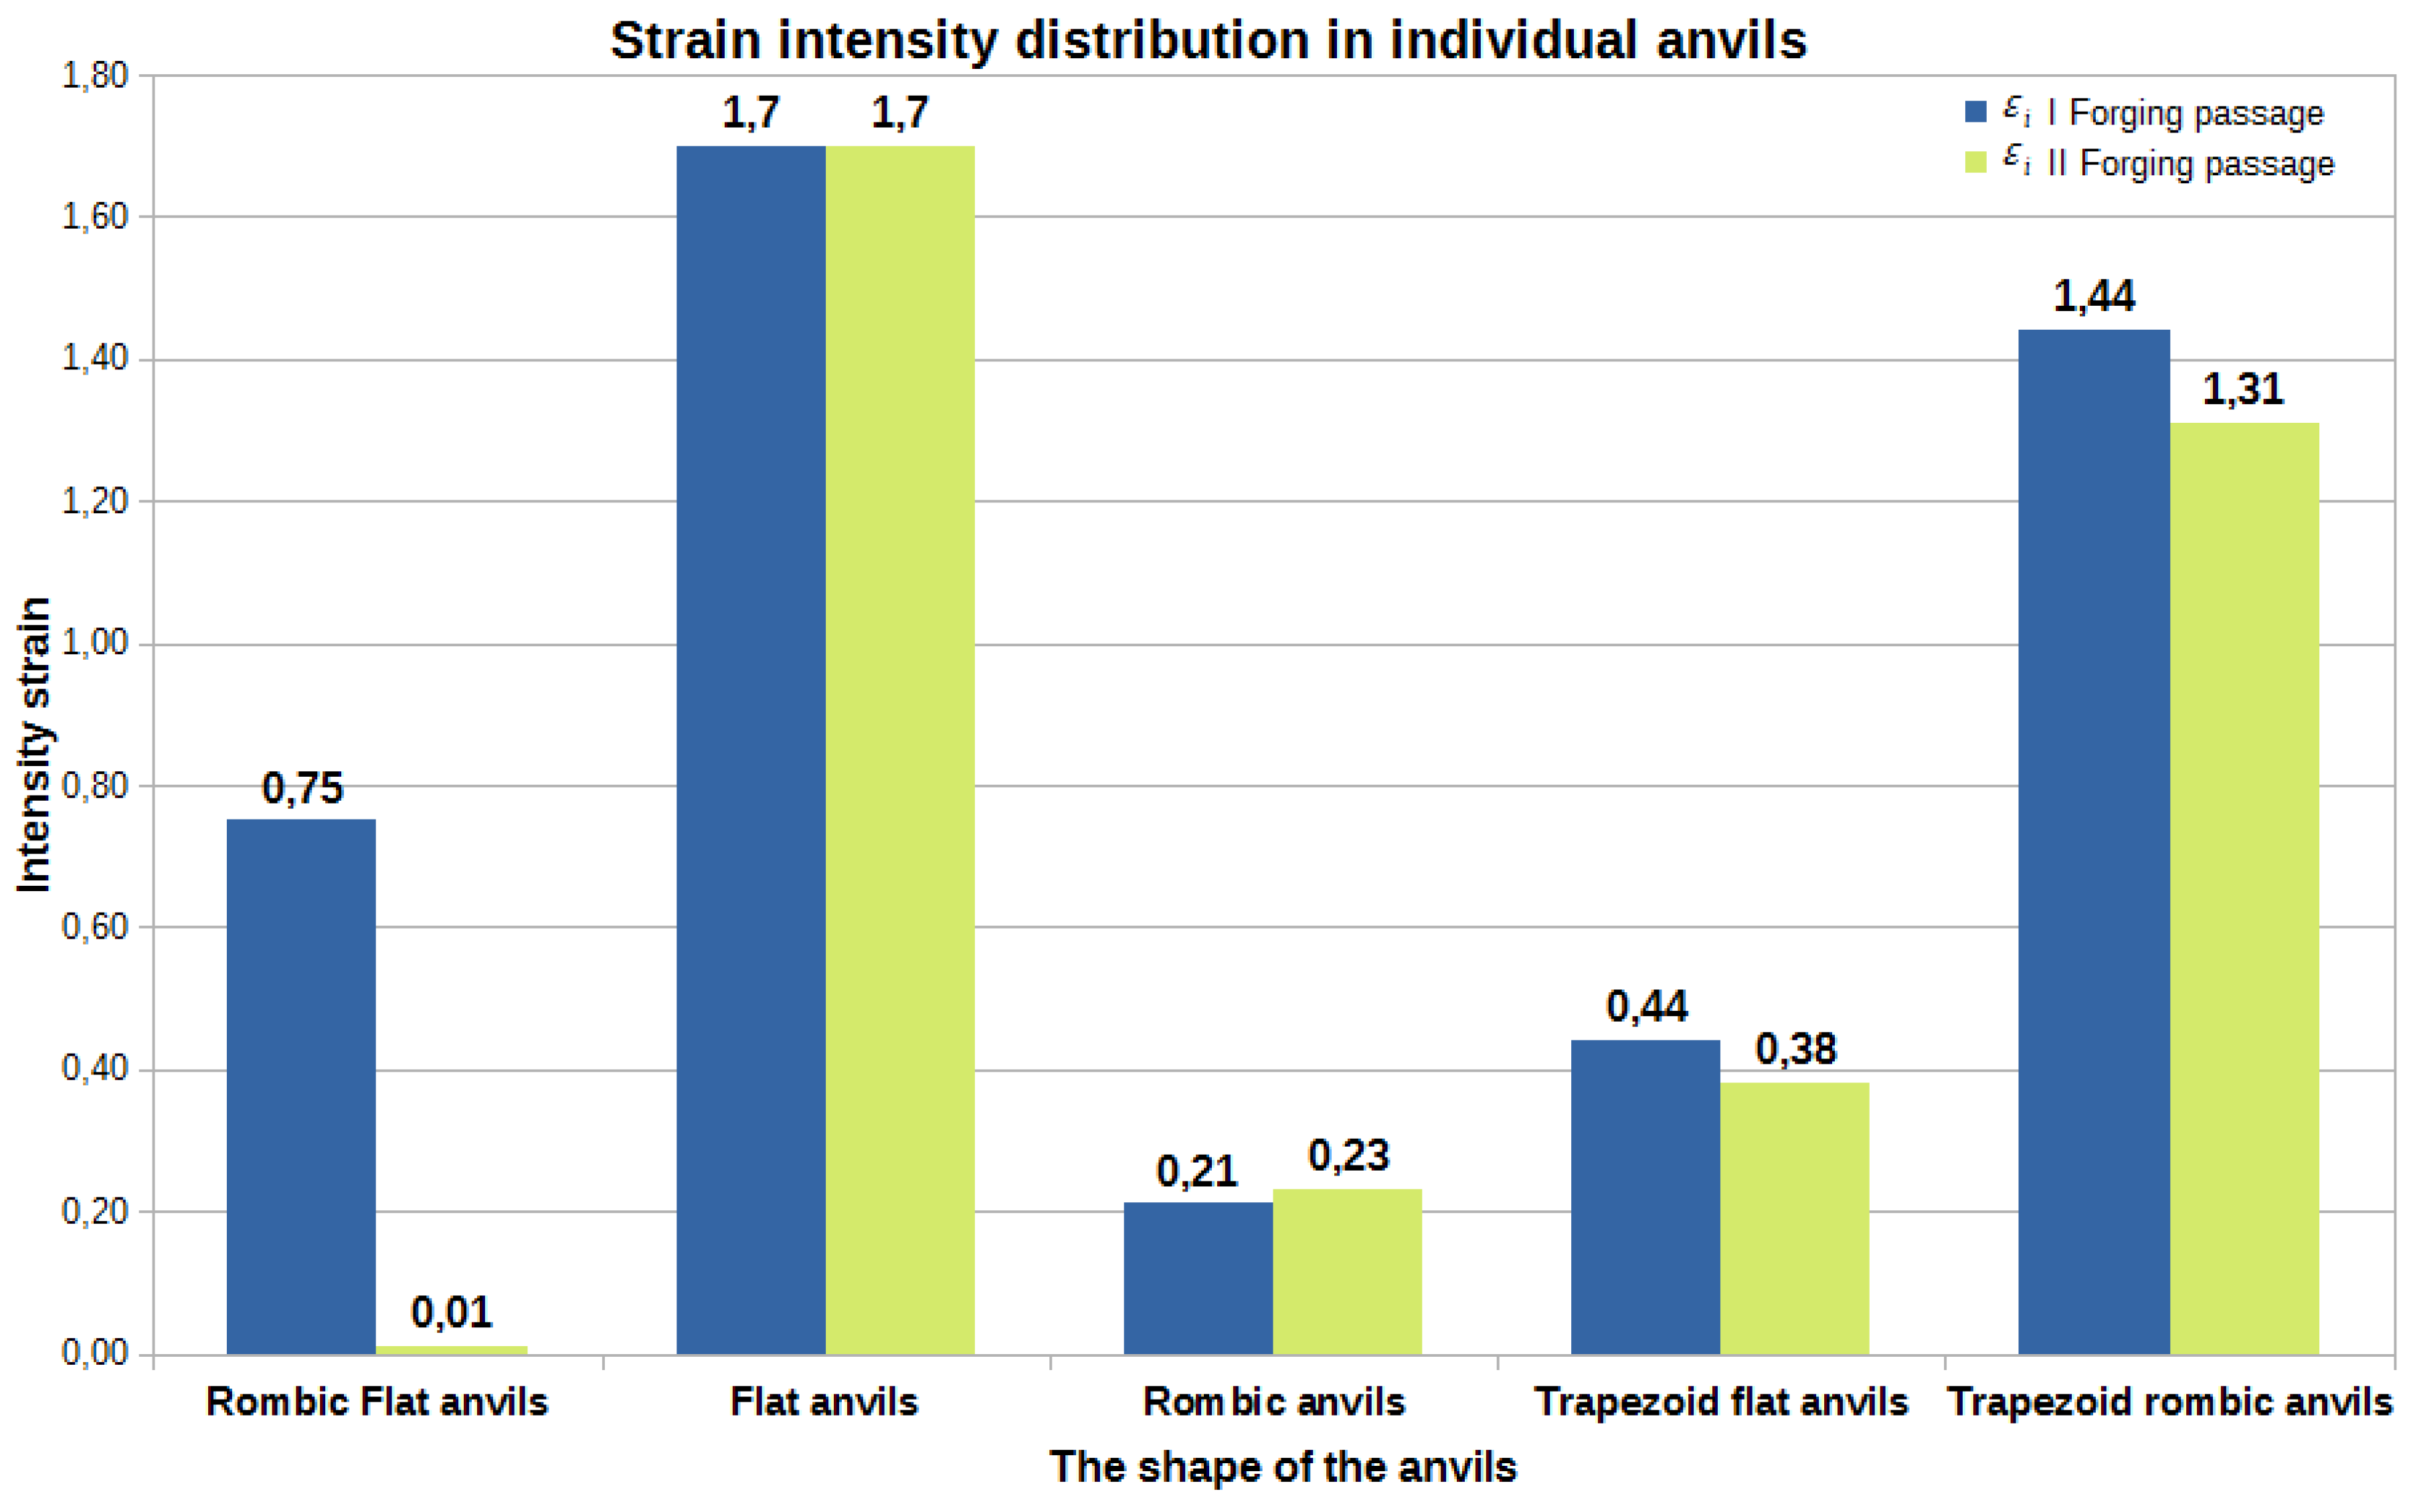
Figures 41–43 show diagram of the total volume of unclosed foundry voids, mean values of hydrostatic pressure, and arithmetic mean values of the effective strain occurring around unclosed foundry voids for the anvils analysed in the article, divided into the first and second steps.
In order to determine the influence of the deformation basin shape on the closing of internal foundry voids, the authors also presented the research results presented in the paper [
18].
By analysing the data presented in Figures 41–43, the authors will try to answer the question of how the shape of the hitting surface surfaces of the tools affects the closing of internal foundry voids.
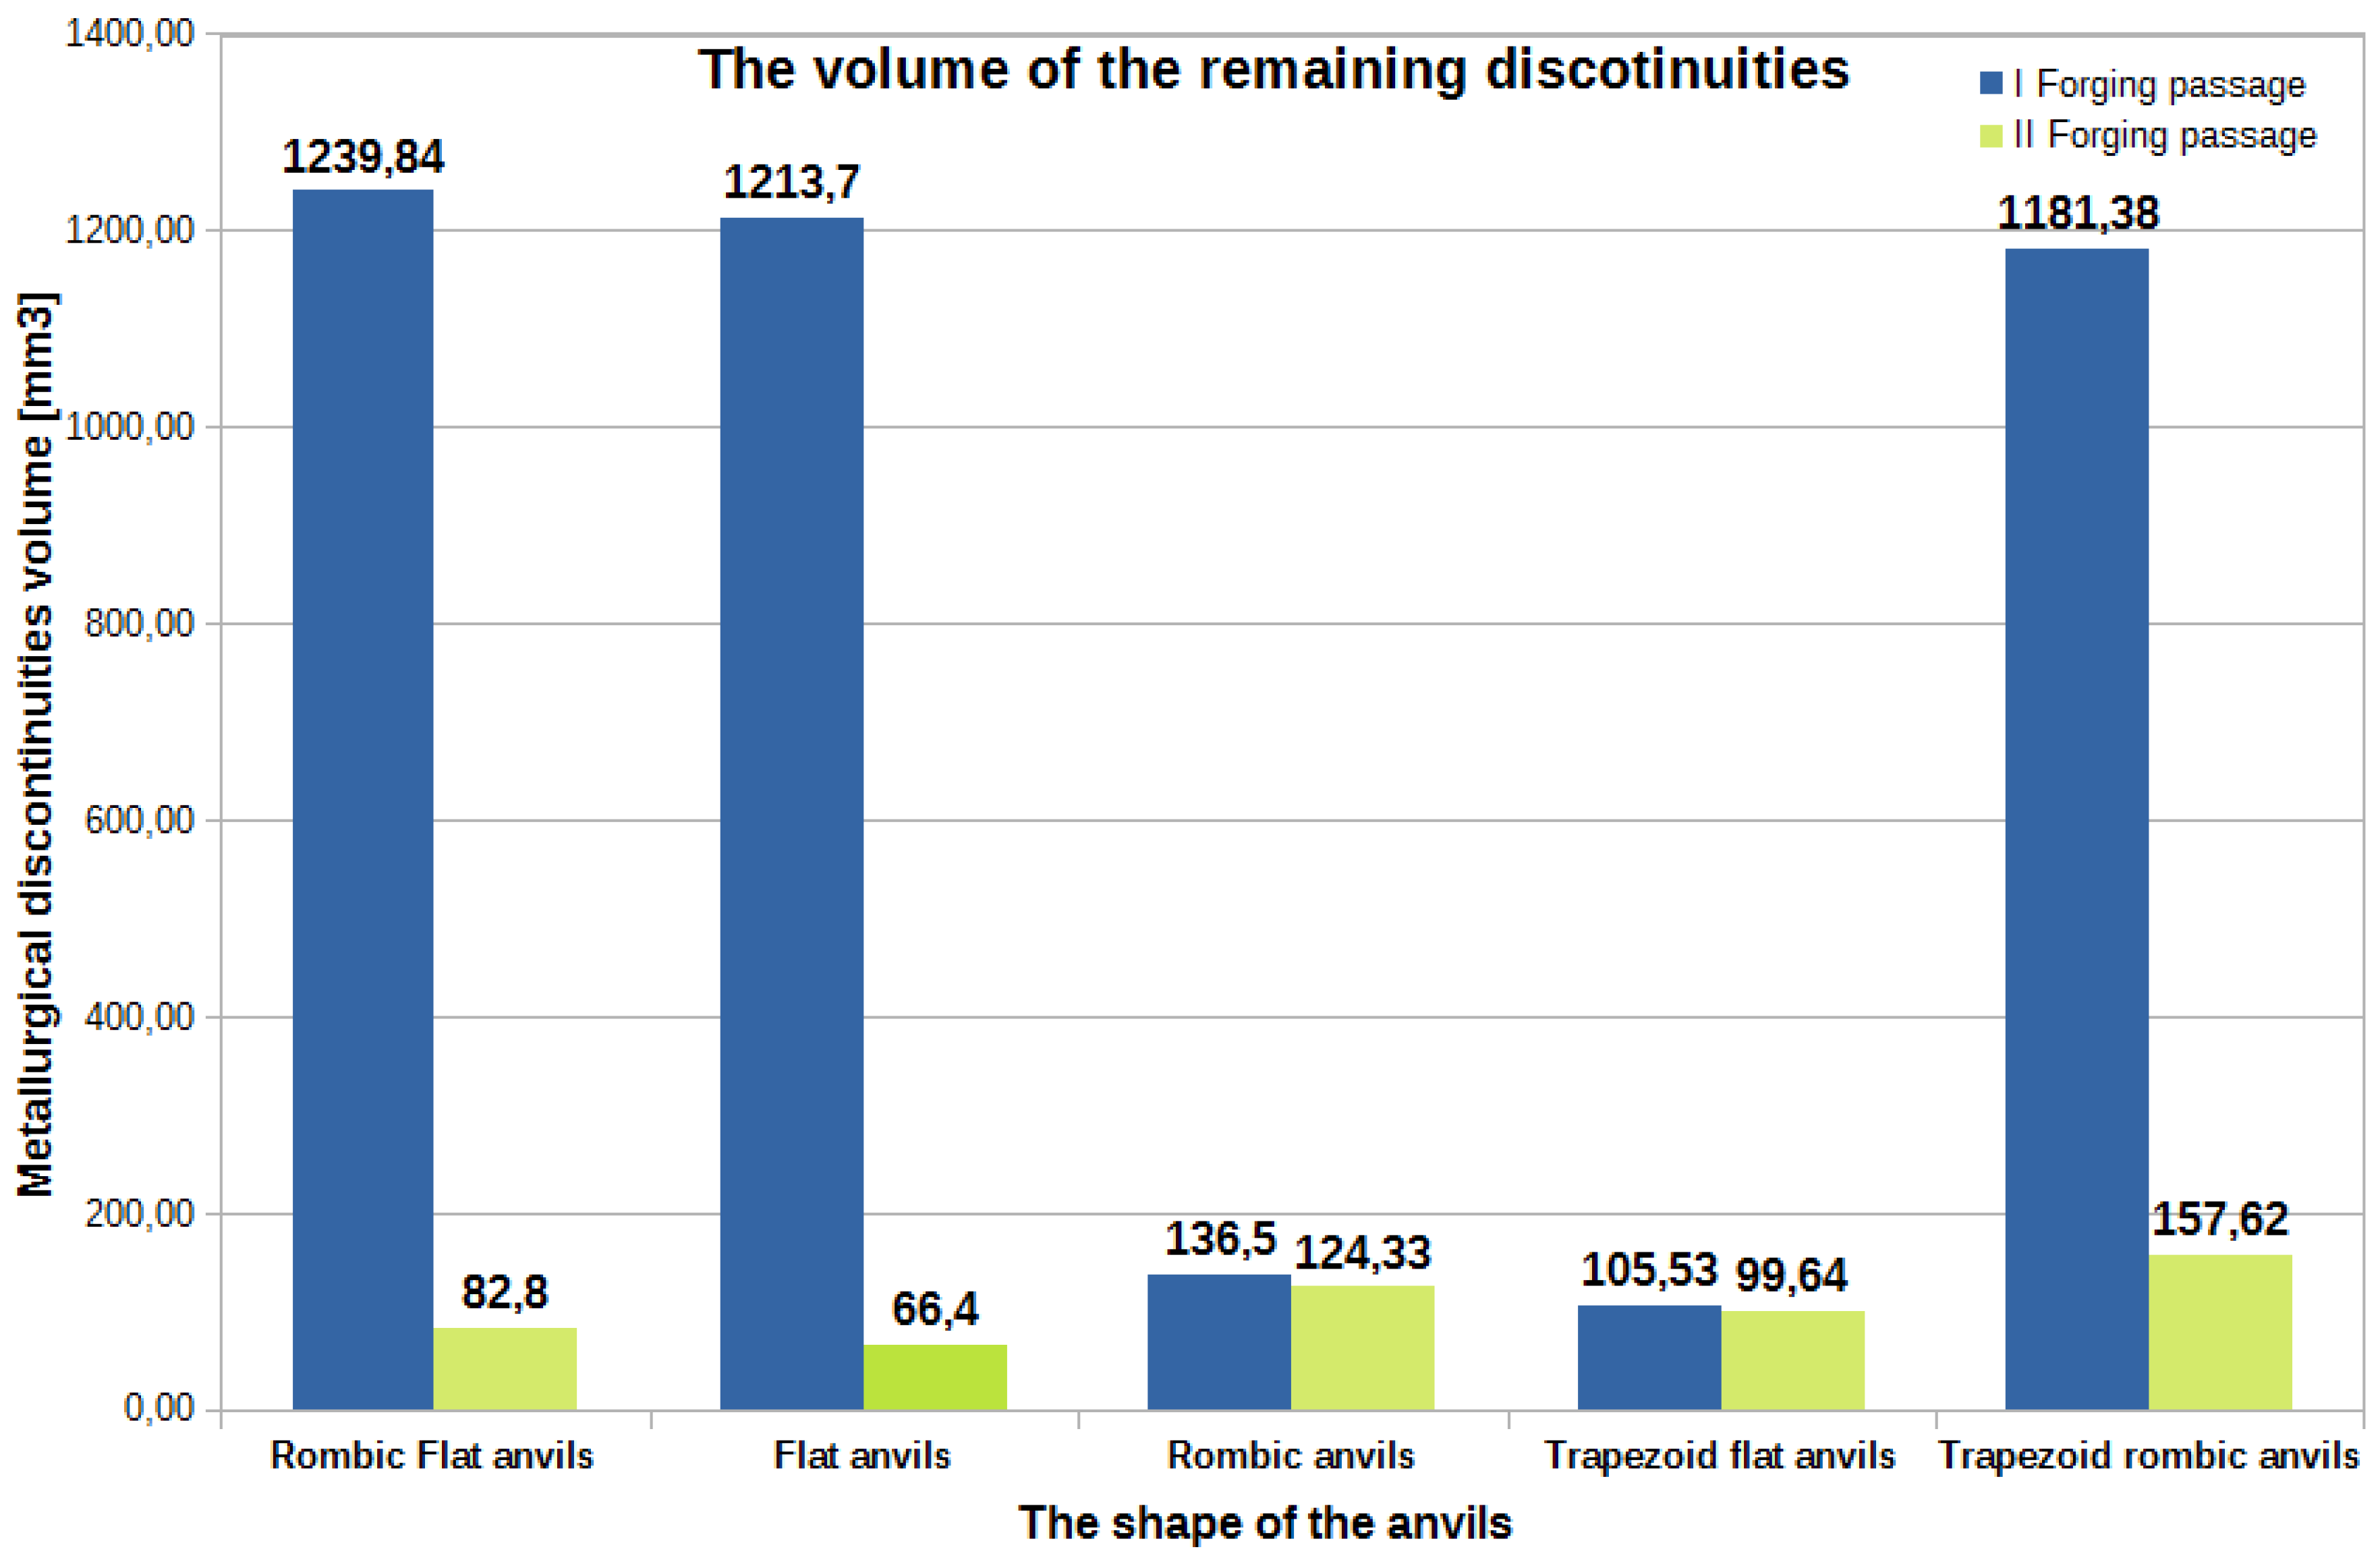
Figure 41.
The total volume of unclosed foundry voids in the volume of a forged Zr alloy bar for two forging step in relation to individual tool compositions.
Figure 41.
The total volume of unclosed foundry voids in the volume of a forged Zr alloy bar for two forging step in relation to individual tool compositions.
By analysing the data presented in Figure 41, it can be found that the best results in terms of closing the foundry voids during the forging process of Zr alloy bars after the first and second steps were obtained for rhombic-flat and flat tools [
18]. After the second step, the values of the total volumes of unclosed foundry voids from 66.40 mm
3 to 82.80 mm
3, which constituted only 1.5% to 2% of the volume of the initially modelled discontinuities. It is worth noting that the total starting value of the volume of all modelled foundry voids was 4239 mm
3. The conducted research shows that the closing of foundry voids can also be performed with the use of rhombic trapezoidal and flat trapezoidal anvils. For these tools, after the first step, an observed reduction in the total volume of foundry voids mounted to 105.53 mm
3 and 1181.38mm
3 respectively. After the second step for these tools, a decrease in the total value of the volume of unclosed foundry voids was noted. The volume of unclosed foundry voids was 99.64 mm
3 and 157.62 mm
3, respectively, which accounted for 2.3% and 3.7% of the volume of the initially modelled foundry voids.
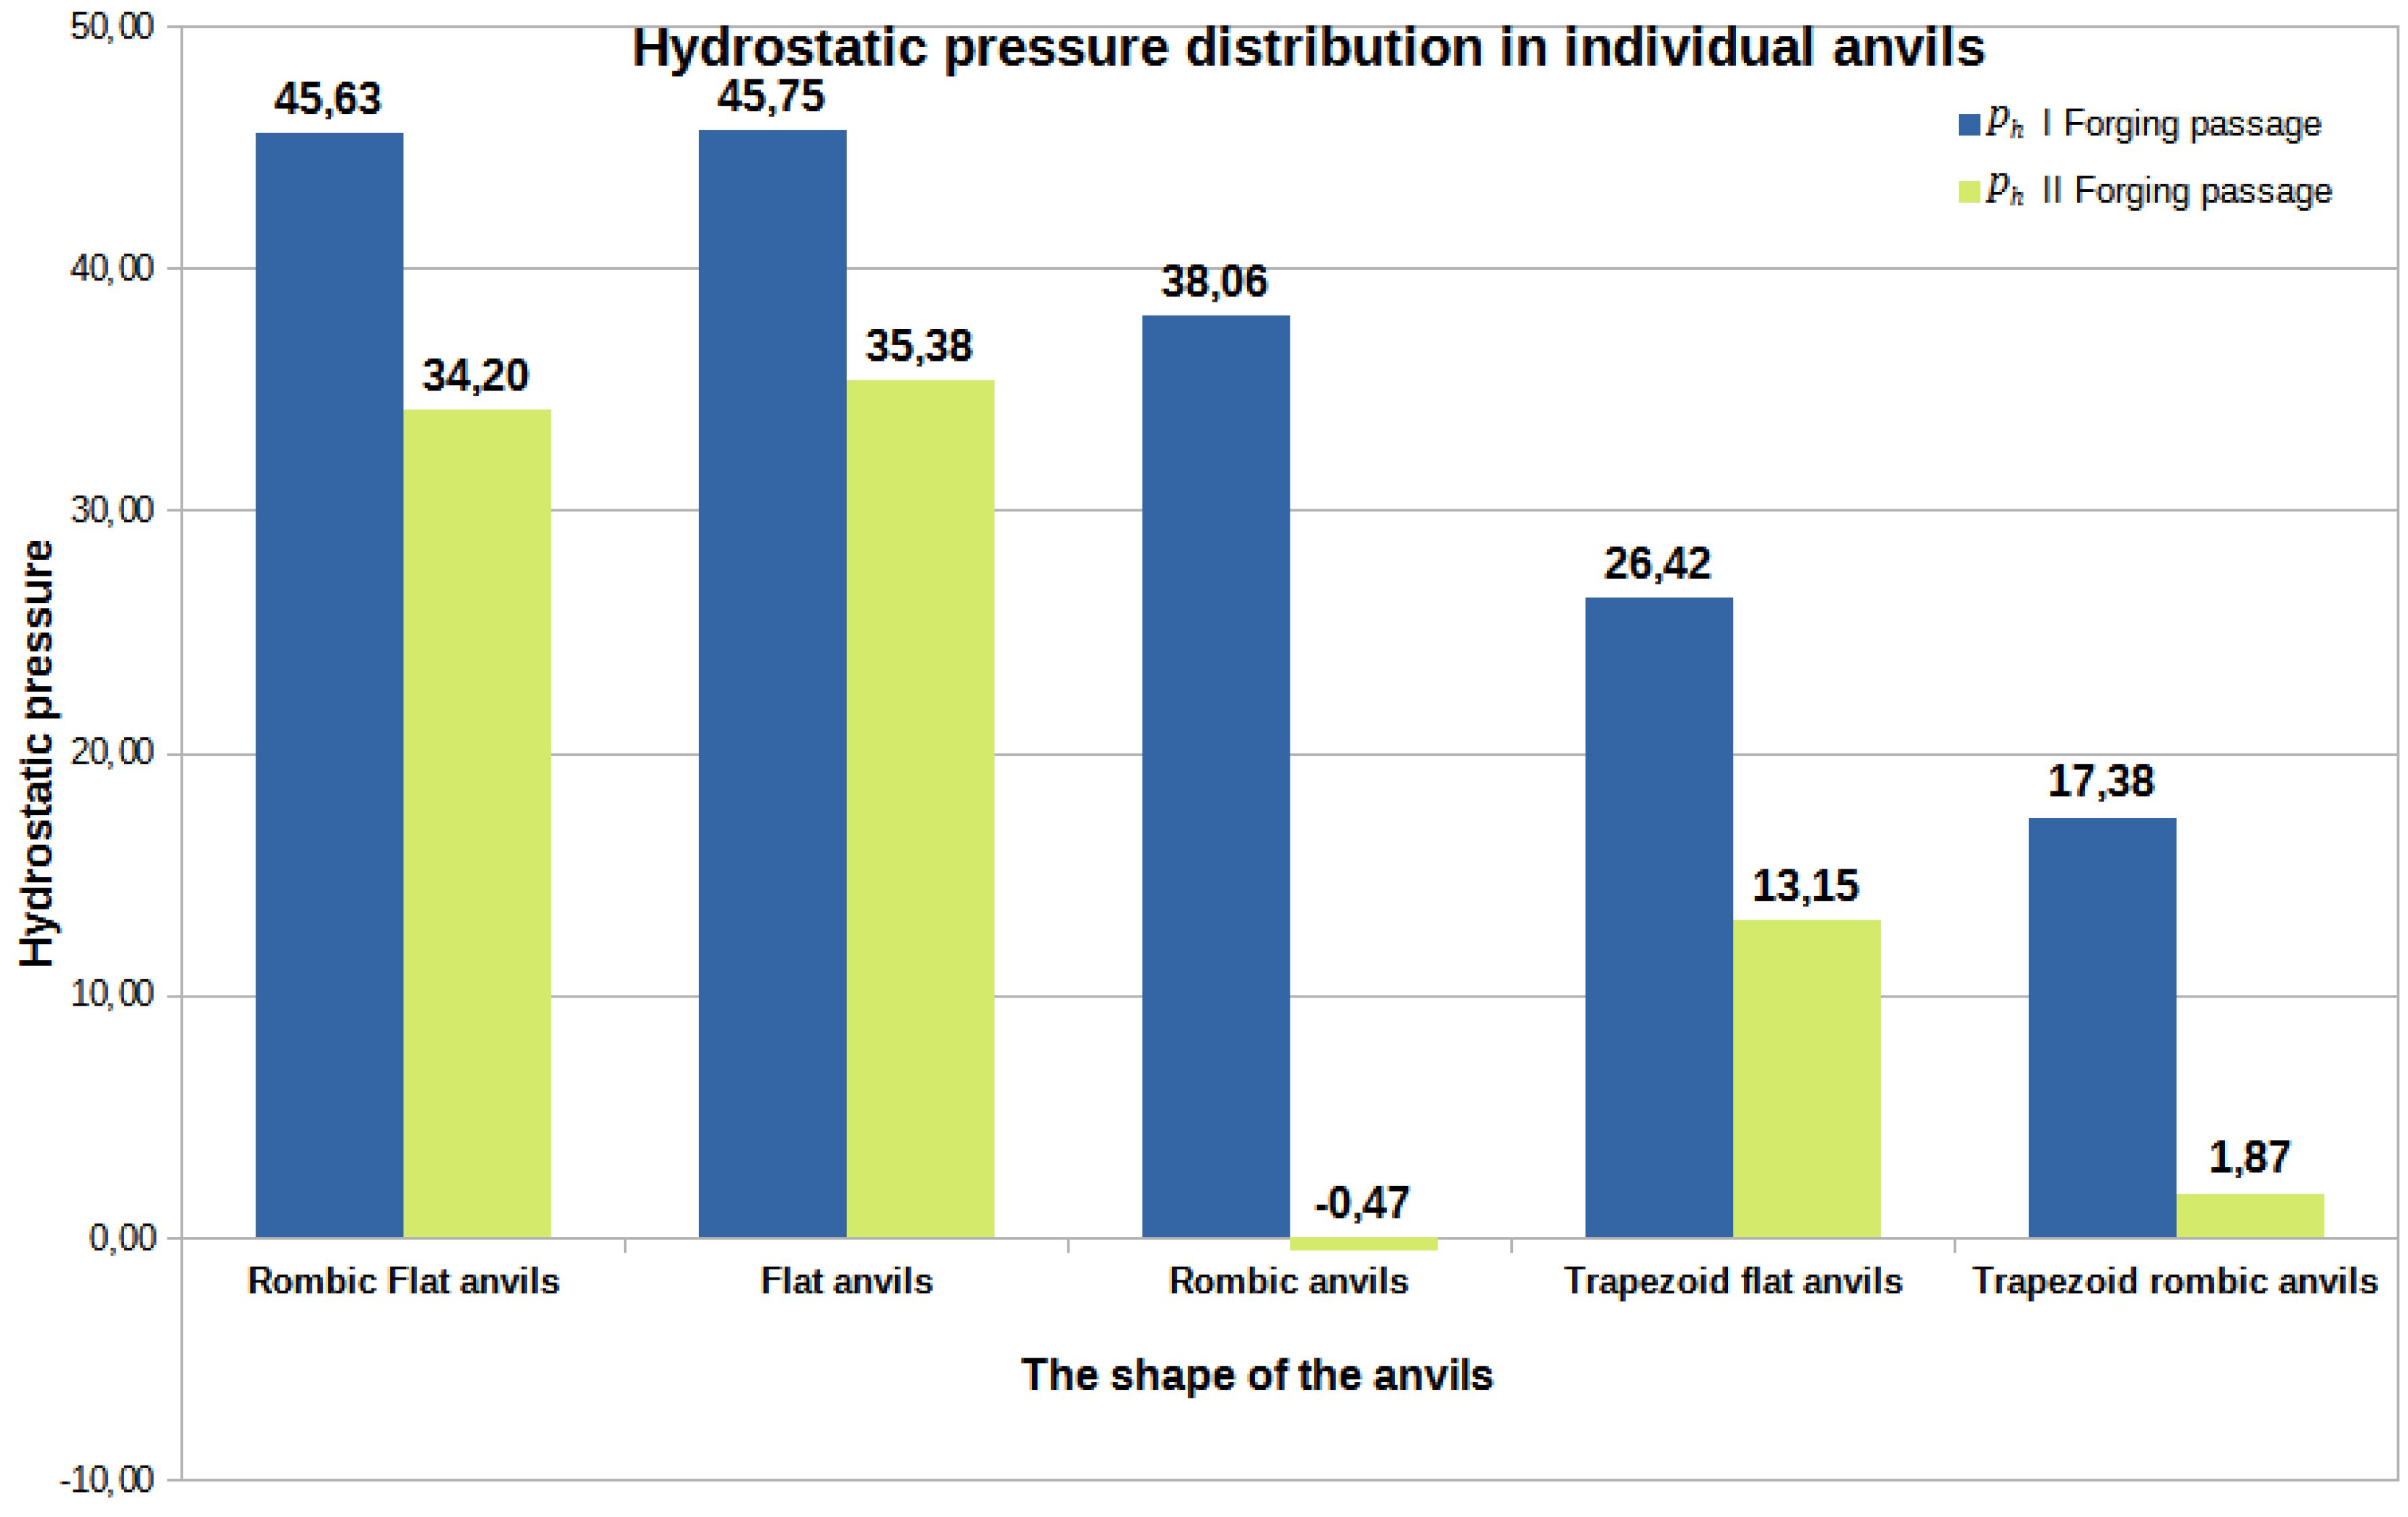
Figure 42.
Tthe arithmetic mean value of the hydrostatic pressure around the unclosed foundry voids in relation to the individual tools compositions.
Figure 42.
Tthe arithmetic mean value of the hydrostatic pressure around the unclosed foundry voids in relation to the individual tools compositions.
Figure 42 also presents data on the value of hydrostatic pressure obtained after forging process in flat and shaped tools presented in the paper [
18] to compare the hydrostatic pressure values obtained for different anvils. The data presented in Figure 42 show that for the assembly of flat trapezoidaland rhombic trapezoidal anvils, the value of the hydrostatic pressure after the first step was similar and amounted to 26 MPa and 17 MPa, respectively. After the second step, a decrease in this value was observed for both the first and the second anvil composition, while for the rhombic trapezoidal anvils the decrease was about 16 MPa.
Based on the analysis of the data showed in Figure 42, it can be found that the highest value of hydrostatic pressure after the first and second steps was obtained for the rhombic-flat and flat tools. The high value of the hydrostatic pressure around the foundry voids is not unambiguous in relation to the total value of the closed foundry voids (Figure 41).
Figure 43 compares the data on the value of the effective strain obtained after the forging process in flat and shaped tools presented in the paper [
18]. The study of the data in Figure 43 shows that the most favourable arithmetic mean value of the effective strain after two steps were obtained for flat tools and it was equal to 1.70. The arithmetic mean values of the effective strain calculated for the bar forging in the remaining tool compositions, except for the rhombic trapezoidal tools, had much lower values. In the implementation of the first two steps in the rhombic trapezoidal anvils, the arithmetic mean value of the deformation intensity after the first transition was 1.44, and after the second transition it was 1.31. They were, however, slightly lower than the values obtained for the deformation in flat anvils. This slightly smaller difference resulted in significant inhibition of the welding process of metallurgical discontinuities after the second forging transition. For trapezoidal anvils, the worst results were obtained in terms of closing of the foundry voids (Figure 41).
Figure 43.
The arithmetic mean value of the deformation intensity occurring around unclosed foundry voids in relation to individual tool compositions.
Figure 43.
The arithmetic mean value of the deformation intensity occurring around unclosed foundry voids in relation to individual tool compositions.
Considering the operations of forging process of the Zr alloy in five different tools compositions, it can be stated that it is favourable, in terms of the closed foundry voids, to maintain the effective strain in the area of the closed foundry voids at the level of 1.70 and higher, and the hydrostatic pressure at the level of 45 MPa and higher.
9. Conclusions
Based on the investigation of the results of the conducted research, the following conclusions were drawn:
The use of different hitting surfaces of the tools to closed internal foundry voids significantly affects their closing.
The most important for the closure of metallurgical discontinuities in the elongation is not only the value of the hydrostatic pressure but most of all the shape of the deformation basin, that affects the distribution of the effective strain.
The highest values of the effective strain were obtained during the operation of forging process zirconium alloy bars in rhombic trapezoidal tools, what proves a good material processing and at the same time contributes to obtaining better mechanical properties of the finished product.
Closing of all modelled metallurgical discontinuities for both anvil compositions was achieved in the third step.
The greatest axial discontinuity was closed in the flat trapezoidal anvils.
When carrying out the elongation operation in order to weld foundry voids, the highest possible values of relative crumple should be used, because high values of crumple affects the formation of stresses and compressive deformations in the local zones of the deformed bar that favour the closing of foundry voids.
After the analysis of the forging process operation in order to weld the internal foundry voids occurring in the Zr alloy ingots, the following guidelines for the forging technology were proposed:
- for the initial stages of the elongation operation, anvils with different working surfaces should be used, thanks to which it is possible to weld the largest (in terms of volume) metallurgical discontinuities in the rod axis. In addition, the use of these anvils results in a good material processing and allows obtaining a homogeneous distribution of mechanical properties in the starting volume of the deformed bar,
- after the first two steps of the forging operation, additional heating of the bar should be applied,
- for the final stages of forging, it seems reasonable to use flat tools due to the higher values of the effective strain and hydrostatic pressure in the volume of the deformed bar,
- in all forging transitions, irrespective of the anvils used, the highest possible values of relative crumple should be used.
The authors intend to verify the obtained modeling results in laboratory conditions in the near future.
References
- Melechow, R.; Tubielewicz, K. Materiały Stosowane W Energetyce Jądrowej [Materials Used in Nuclear Energy]; Politechnika Częstochowska, seria Monografie Nr 86: Częstochowa, Poland, 2002; p. 229. ISBN 9788371931635/8371931638. [Google Scholar]
- Zajmovskij, A.S.; Nikulina, A.V.; Reshetnikov, N.G. Cirkonievye Splavy V Yadernoj Ehnergetike [Zirconium Alloys in Nuclear Power]; Energoatomizdat: Moscow, Russia, 1994; p. 256. ISBN 5-283-03767-3. [Google Scholar]
- Azhazha, V.M.; V′yugov, P.N.; Lavrinenko, S.D. Cirkonij I Ego Splavy: Tekhnologii Proizvodstva, Oblasti Primeneniya [Zirconium and Its Alloys: Production Technologies, Applications]; NNC HFTI: Kharkiv, Ukraine, 1998; p. 89. [Google Scholar]
- Alekseev, A.; Goryachev, A.; Izhutov, A.L. Eksperimental’noeizuchenie v reaktore MIR povedeniya TVELOV VVER−1000 v rezhimah RIA i LOCA [Experimental Study of the Behavior of VVER−1000 Fuel Rods in the MIR Reactor in the RIA and LOCA Modes]. In Proceedings of the X Rossijskaya Konfereciya Poreatornomu Materialovedeniyu, Dimitrovgrad, Russia, 27–31 May 2013; pp. 140–151. [Google Scholar]
- Markelov, V.A.; Novikov, V.V.; Nikulina, A.V.; Shishov, V.N.; Peregud, M.M.; Konkov, V.F.; Tselishchev, A.V.; Shikov, A.K.; Kabanov, A.A.; Bocharov, O.V.; et al. Sostojanie razrabotki i osvoenija cirkonievyh splavov dlja tvjelov i TVS aktivnyh zon jadernyh vodoohlazhdaemyh reaktorov v obespechenie perspektivnyh toplivnyh ciklov i konkurentosposobnosti na mirovom rynke. Voprosy atomnoj nauki i tehniki. Materialoved. I Novye Mater. 2006, N2, 63–72. [Google Scholar]
- Brusnicyn, S.V.; Loginov, Y.U.N.; Mysik, R.K. Defekty Slitkov Chernyh I Cvetnyh Splavov, Prednaznachennyh Dlya Plasticheskoj Deformacii [Defects in Ingots of Ferrous and Non−Ferrous Alloys Intended for Plastic Deformation]; UGTU-UPI: Ekaterinburg, Russia, 2007; p. 167. ISBN 978-5-321-01228-4. [Google Scholar]
- Shved, F.I. Slitok Vakuumnogo Dugovogo Pereplava [Vacuum Arc Remelting Ingot]; Tat’yanyLur’e: Chelyabinsk, Russia, 2009; p. 428. [Google Scholar]
- Banaszek, G.; Berski, S.; Dyja, H.; Kawałek, A. Theoretical modelling of metallurgical defect closing-up processes during forming a forging. J. Iron Steel Res. 2013, 20, 111–116. [Google Scholar] [CrossRef]
- Banaszek, G.; Stefanik, A.; Berski, S. Computer and laboratory modelling of the analysis of closing up of metallurgical defects in ingots during free hot forging. Metallurgy 2005, 44, 25–30. [Google Scholar]
- Banaszek, G.; Stefanik, A. Theoretical and laboratory modelling of the closure of metallurgical defects during forming of a forging. J. Mater. Process. Technol. 2006, 177, 238–242. [Google Scholar] [CrossRef]
- Chen, K.; Yang, Y.; Shao, G.; Liu, K. Strain function analysis method for void closure in the forging process of the large−sized steel ingot. Comput. Master. Sci. 2012, 51, 72–77. [Google Scholar] [CrossRef]
- Lee, M.C.; Jang, S.M.; Cho, J.H.; Joun, M.S. Finite element simulation of pore closing during cylinder upsetting. Int. J. Mod. Phys. 2008, 22, 5768–5773. [Google Scholar] [CrossRef]
- Li, X.; Wu, X.C.; Zhang, Z. Analysis of the relationship between void direction and closure efficiency in forging process. Adv. Mater. Res. 2011, 291–294, 246–250. [Google Scholar] [CrossRef]
- Banaszek, G.; Bajor, T.; Kawalek, A.; Garstka, T. Investigation of the Influence of Open-Die Forging Parameters on the Flow Kinetics of AZ91 Magnesium Alloy. Materials 2021, 14, 4010. [Google Scholar] [CrossRef] [PubMed]
- Saby, M.; Bouchard, P.O.; Bernacki, M. Void closure criteria for hot metal forming. J. Manuf. Process. 2015, 19, 239–250. [Google Scholar] [CrossRef]
- Harris, N.; Shahriari, D.; Jahazi, M. Development of a fast converging material specific void closure model during ingot forging. J. Manuf. Process. 2017, 26, 131–141. [Google Scholar] [CrossRef]
- Banaszek, G.; Bajor, T.; Kawałek, A.; Knapiński, M. Modeling of the Closure of Metallurgical Defects in the Magnesium Alloy Die Forging Process. Materials 2022, 15, 7465. [Google Scholar] [CrossRef] [PubMed]
- Banaszek, G.; Ozhmegov, K.; Kawalek, A.; Sawicki, S.; Magzhanov, M.; Arbuz, A. Investigation of the influence of hot forging parameters on the closing conditions of internal metallurgical defects in zirconium alloy ingots. Materials 2023, 16, 1427. [Google Scholar] [CrossRef] [PubMed]
- Dyja, H.; Kawałek, A.; Ozhmegov, K.V.; Sawicki, S. The thermomechanical conditions of open die forging of zirconium alloy ingots determined by rheological tests. Metalurgija 2020, 59, 39–42. [Google Scholar]
- Dyja, H.; Kawałek, A.; Gałkin, A.M.; Ozhmegov, K.V.; Sawicki, S. Physical modelling of the multi−pass forging of zirconium alloy blanks. In Proceedings of the 23rd International Conference on Metallurgy and Materials, Brno, Czech Republic, 21–23 May 2014; pp. 402–406. [Google Scholar]
- Kawałek, A.; Dyja, H.; Gałkin, A.M.; Ozhmegov, K.V.; Knapiński, M. Physical modelling of the plastic working processes of modified zr−nb zirconium alloy bars and tubes. Metalurgija 2015, 54, 79–82. [Google Scholar]
- Dyja, H.; Gałkin, A.; Knapiński, M. Reologia Metali Odkształcanych Plastycznie [The Rheology of Plastically Deformed Metals]; Politechnika Częstochowska, seria Monografie Nr 190: Częstochowa, Poland, 2010; p. 371. ISBN 978-83-7193-471-1. [Google Scholar]
- Henzel′, A.; Shpittel′, T. Raschetjen Ergosilovyh Parametrov V Processah Obrabotki Metallov Davleniem: Spravochnik [Calculation of Energy−Power Parameters in Metal Forming Processes. Directory]; Metallurgija: Moscow, Russia, 1982; p. 360. [Google Scholar]
- Gerasimovich, A.S. Approksimaciya Zavisimostej Polinomami [Approximation of Dependencies by Polynomials]; Ves’ Sergiev Pasad: Sergiev Posad, Russia, 2013; p. 104. ISBN 978-5-91582-043-1. [Google Scholar]
- Forge 2008 3D Forging Simulation Software: Rheology and Interfaces Module, FPDBase Version 1.3;
Transvalor S.A.: Sophia Antipolis, France, 2008.
- Kawalek, A.; Rapalska−Nowakowska, J.; Dyja, H.; Koczurkiewicz, B. Physical and numerical modelling of heat treatment the precipitation−hardening complex−phase steel (CP). Metalurgija 2013, 52, 23–26. [Google Scholar]
- Banaszek, G.; Kawałek, A.; Ozhmegov, K. Sposób zgrzewania wewnętrznych nieciągłości metalurgicznych we wlewkach ze stopu cyrkonu. Urząd Patentowy Rzeczypospolitej Polskiej (Patent Office of the Republic of Poland), Application number P.441828. 2022; in publishing.
- Falencki, Z. Analysis of Cast Defects; AGH: Cracow, Poland, 1997; p. 141. [Google Scholar]
- Elbel, T.; Kralova, Y.; Hampl, J. Expert System for Analysis of Casting Defects–ESVOD. Arch. Foundry Eng. 2015, 15, 17–20. [Google Scholar] [CrossRef]
- Sika, R.; Rogalewicz, M.; Kroma, A.; Ignaszak, Z. Open Atlas of Defects as a Supporting Knowledge Base for Cast Iron Defects Analysis. Arch. Foundry Eng. 2020, 20, 55–60. [Google Scholar] [CrossRef]
- Mehta, N.D.; Gohil, A.V.; Doshi, S.J. Innovative Support System for Casting Defect Analysis—A Need of Time. Mater. Today−Proc. 2018, 5, 4156–4161. [Google Scholar] [CrossRef]
|
Disclaimer/Publisher’s Note: The statements, opinions and data contained in all publications are solely those of the individual author(s) and contributor(s) and not of MDPI and/or the editor(s). MDPI and/or the editor(s) disclaim responsibility for any injury to people or property resulting from any ideas, methods, instructions or products referred to in the content. |
© 2023 by the authors. Licensee MDPI, Basel, Switzerland. This article is an open access article distributed under the terms and conditions of the Creative Commons Attribution (CC BY) license (https://creativecommons.org/licenses/by/4.0/).
