1. Introduction
Aerospace and automotive are two sectors which are beginning to integrate additive manufacturing (AM) into the production of critical components. In contrast to conventional manufacturing methods, AM offers the benefits of having low material waste and the ability to create highly optimised designs in a single stage [
1]. However, these parts come with a unique range of defects and flaws which, combined with complex designs, presents challenges for the majority of conventional non-destructive testing (NDT) techniques.
Therefore, with this shifting manufacturing paradigm comes a need for rapid and cost-effective NDT techniques at scale for AM components. This is compounded by the acknowledged general need for the creation of suitable NDT reference samples [
2] for technique validation, optimization and demonstration. In order to develop and certify these techniques, reference sample sets must be produced in statistically relevant quantities with controlled representative flaws. Flaw seeding in AM parts commonly focuses on creating delaminations, pores or holes of idealized geometry[
3]. Flaws are achieved via non-optimal build parameters (such as scanning speed or temperature), machining or by inclusion in the original model file. Thermal cracks can be produced, albeit without dimensional control, via variation of the constraints of the part during cooling, or the use of low-weldability alloys [
2].
Outside of additive manufacturing, a common method of seeding flaws is by the use of fatigue or creep-fatigue apparatus. Low cycle, notched specimen fatigue is common, due to the controlled location of initiation as well as requiring relatively fewer cycles to failure. Notches such as those created using electrical discharge machining are commonly used as crack initiation sites [
4]. Fatigue tests may monitor the material failure with extensometers or systems of strain gauges but, in general, monitoring for control of crack sizes is a challenge.
To that end, Yan et al. [
5] measured the propagation of a crack by means of current monitoring over its area. This relies on the fact that voltage measured over a crack relates to the area of material in the cross section. They concluded that there is a strong correlation between predicted crack growth from current measurements and the observed dimensions of propagation after sectioning. Richards et al. [
6] explored the use of compliance measurements during conventional four-point fatigue cycling, successfully deriving a relationship between sample compliance and fatigue crack length.
An alternative method of seeding cracks is through thermal fatigue, whereby a sample is thermally cycled in a specific region using an induction coil placed on an accessible sample surface. Kemppainen et al. [
7] discussed such a technique, indicating a relationship between thermal cycling parameters and surface-breaking crack propagation. However, thermal fatigue cracks are known to be morphologically different from mechanical fatigue cracks in that there are more cracks at the surface and microbranching along the crack length or at the tip [
8]. This renders this technique less suitable where the user wishes to study mechanical failure in parts.
In previous work by Preston et al. [
9], controlled cracks were embedded in ASTM F519 type 1A1 tensile coupons using a combination of dynamic and static loading, achieved via resonance excitation and mass-loading with steel weights (‘bobs’), respectively. This enabled the material to be locally fatigued very quickly, whilst retaining control over the propagation. This is in contrast to conventional fatigue cycling, where the requisite large applied forces limit the cycling frequency to the order of
. In-situ monitoring of crack growth was achieved by tracking the shift in the resonance frequency of the assembly. That work demonstrated that cracks of controlled dimensions could be created in conventional metal components. This paper describes further development of the technique for the controlled generation of contact cracks in AM test coupons. A 'contact crack' is defined as a flaw where the surfaces are extremely close - in partial or direct contact - without bonding in one dimension, having an aspect ratio of length and/or width to opening of several orders of magnitude. At various stages throughout the crack propagation process, the samples are characterised using Nonlinear Resonance (NLR) testing and optical microscopy.
2. Materials and Methods
2.1. Sample-set Description
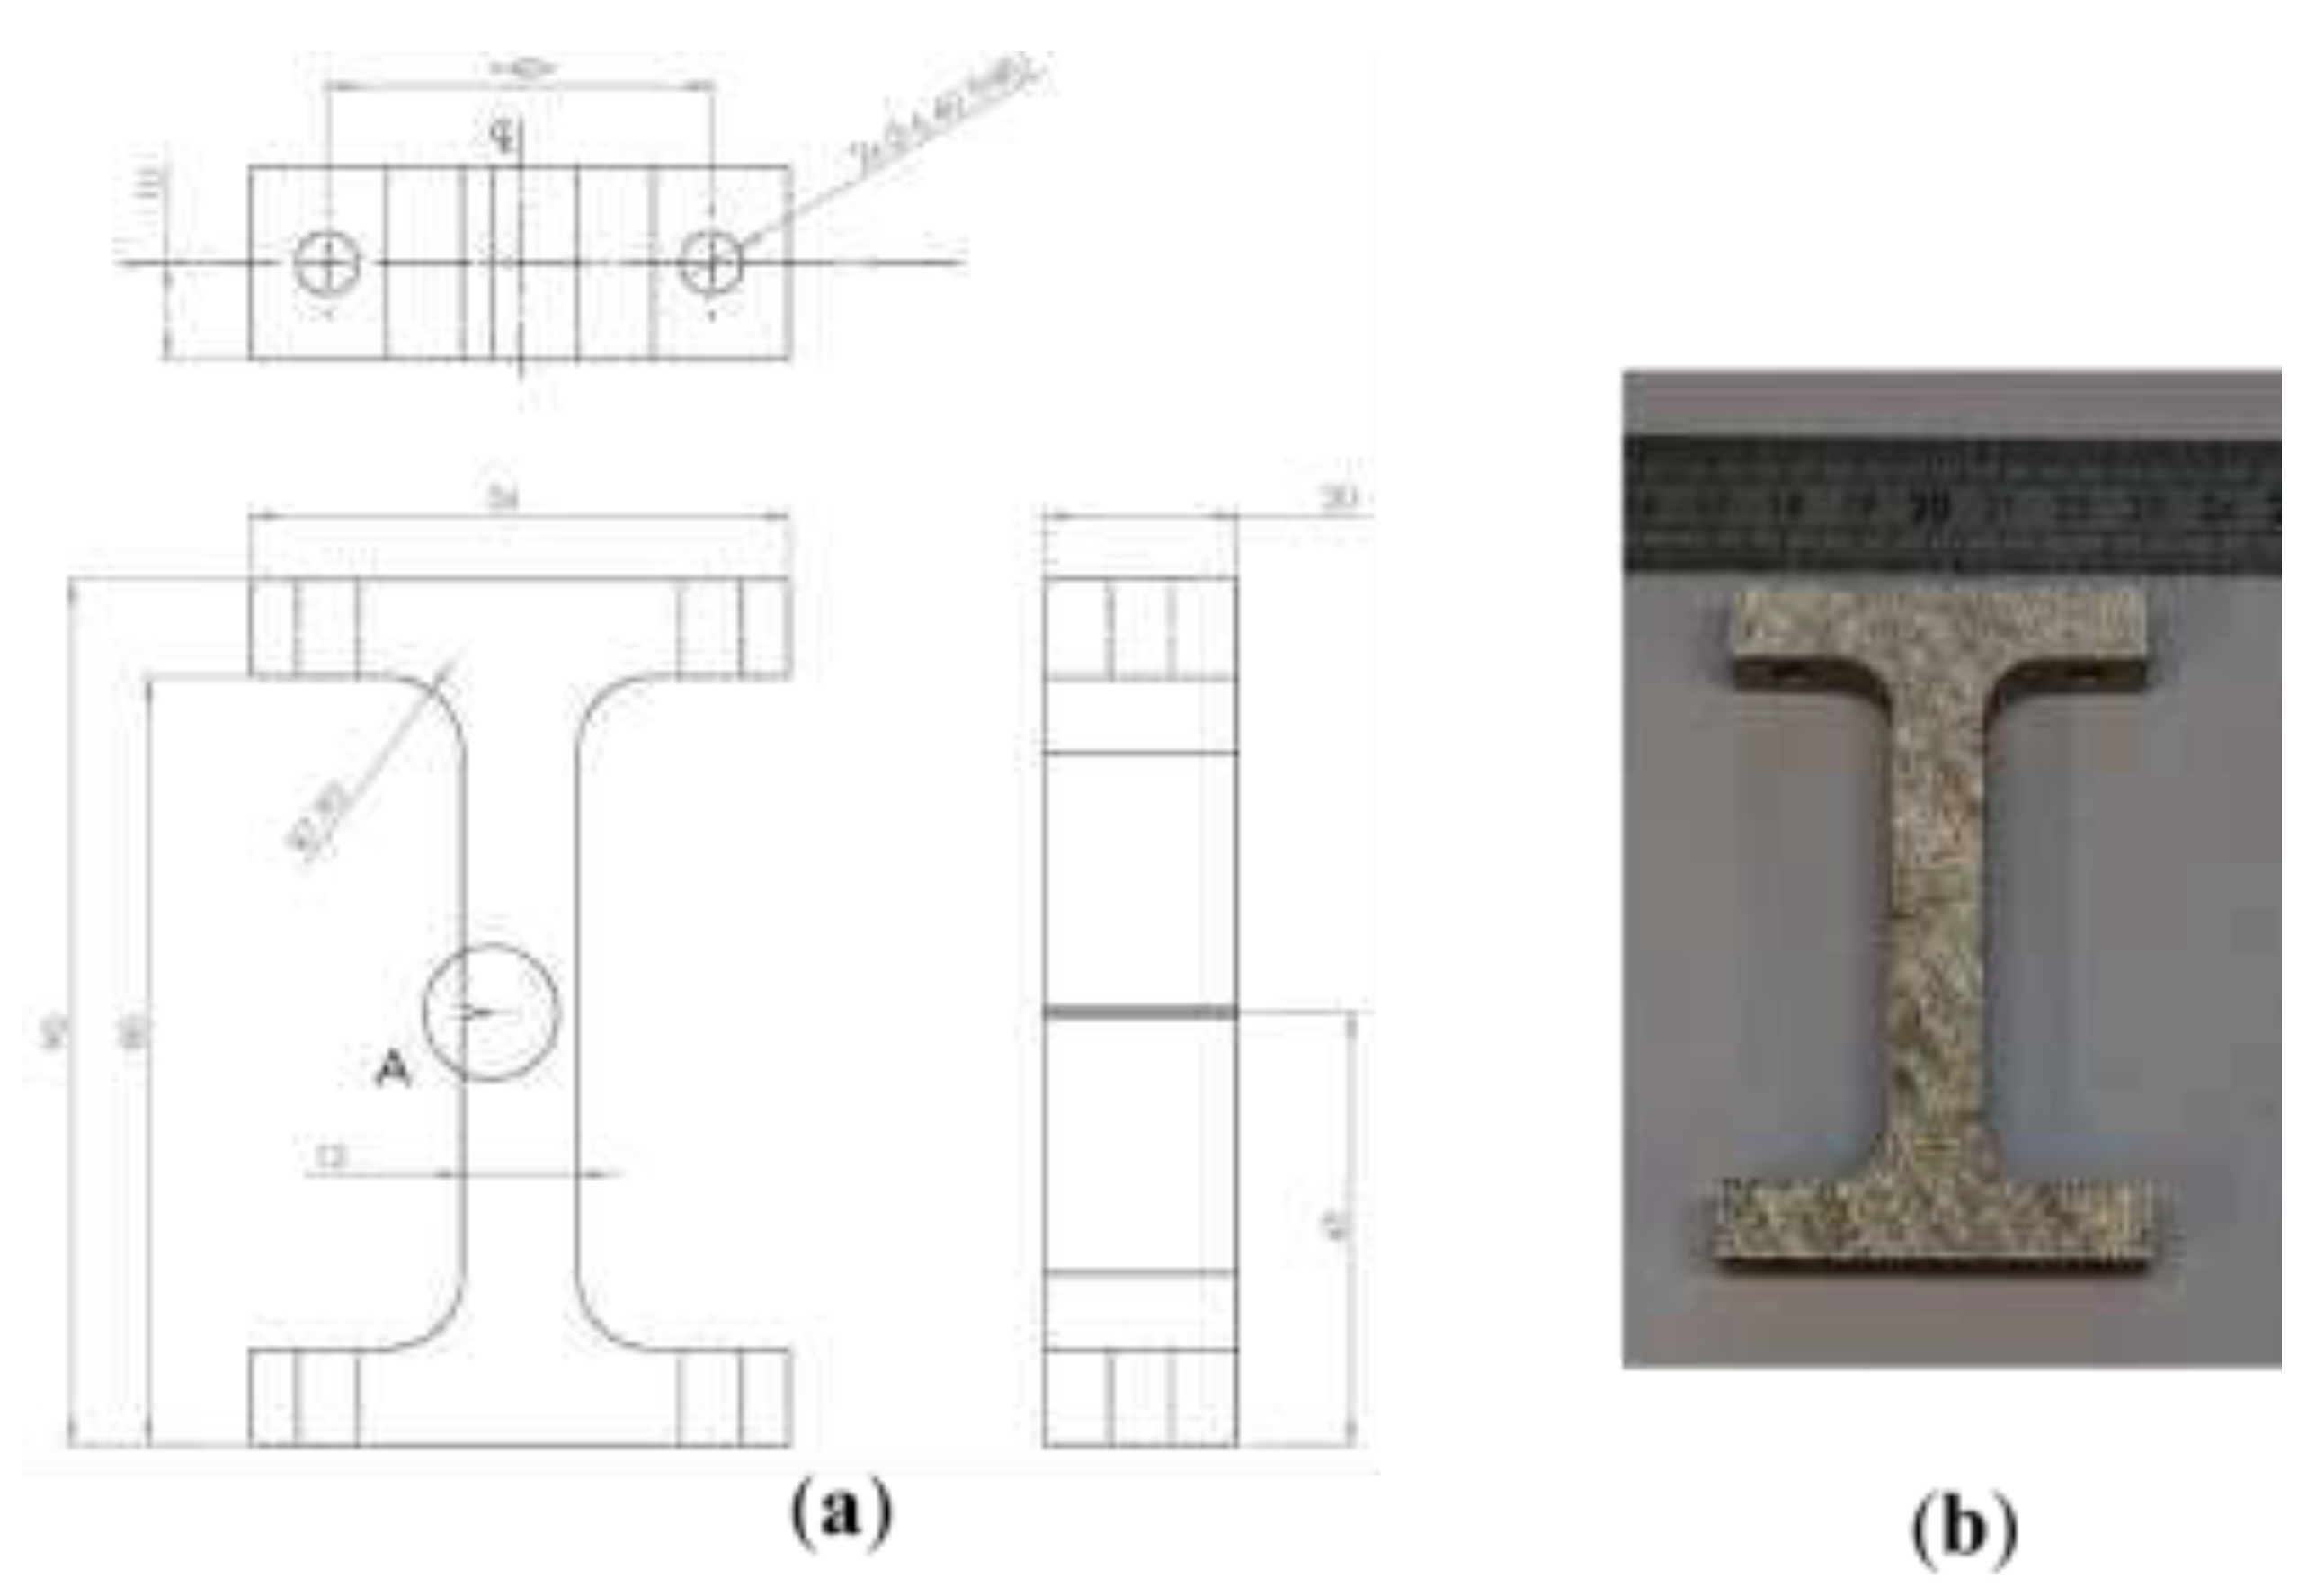
Six test coupons were additively manufactured using 316L stainless steel (Renishaw SS 316L-0407) via laser powder bed fusion (Renishaw AM400). The samples are labelled RD120 to RD125, and are nominally identical. V-shaped notches were included in the original parts, to act as crack initiation sites. The geometry and dimensions of the samples are shown in
Figure 1. Mounting fixtures were included in the design so that the assembly could be constructed in a reproducible manner.
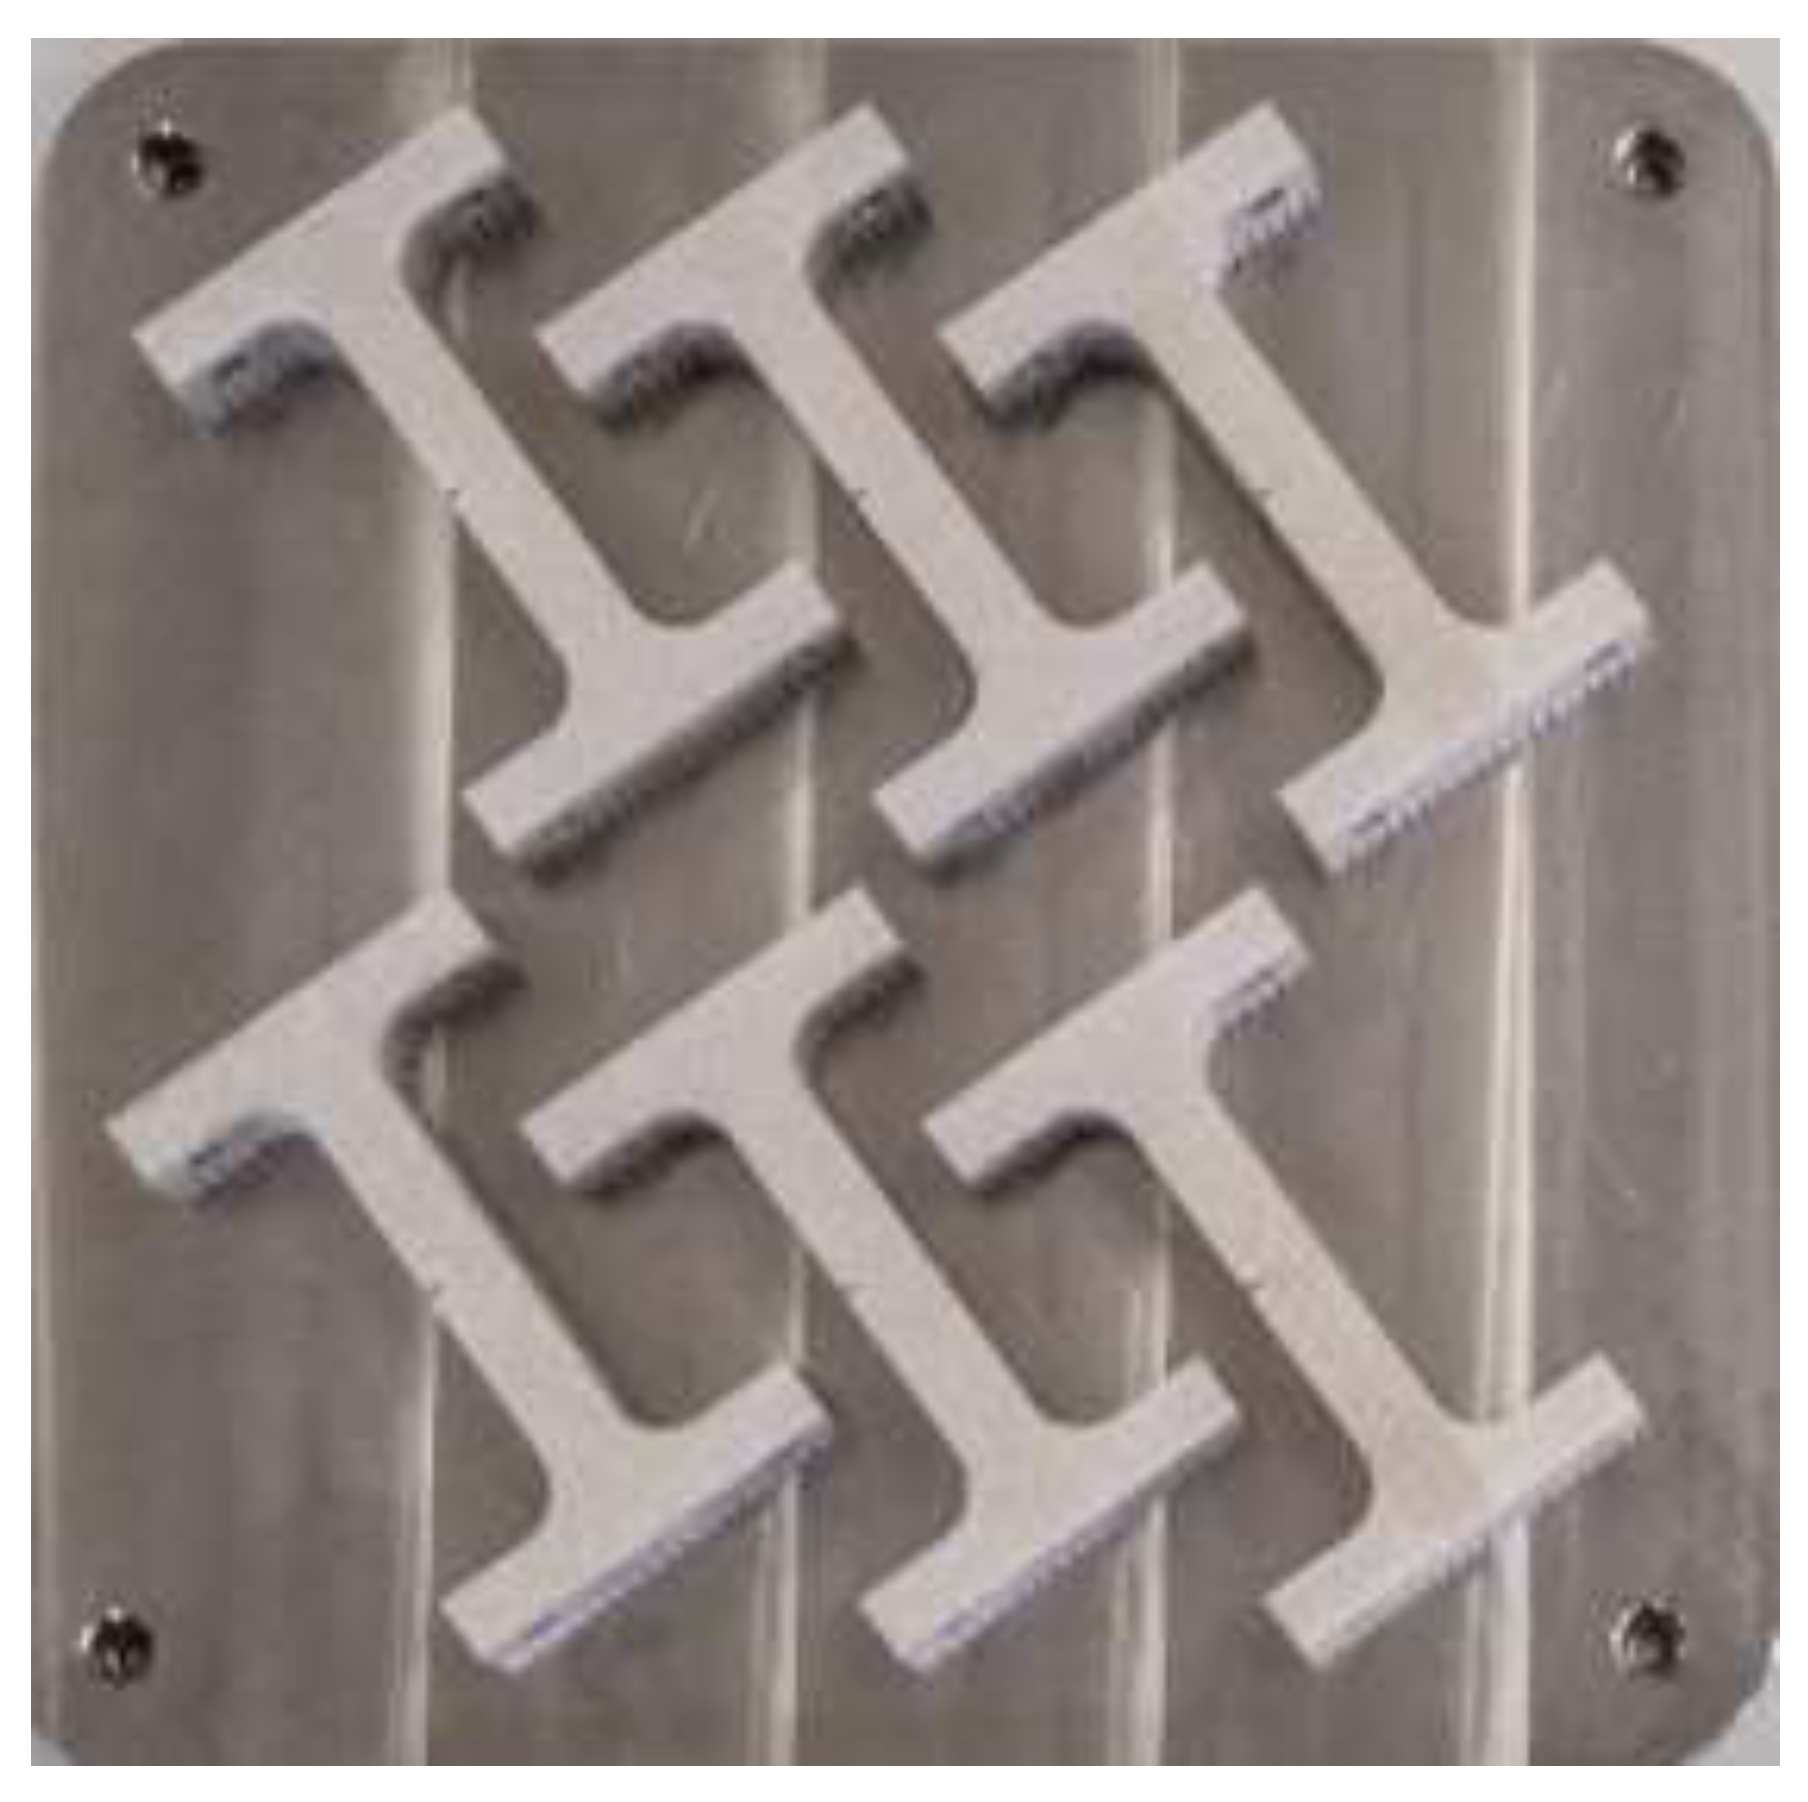
Figure 2 shows the samples on the build-plate, all having the same orientation with respect to the build direction.
2.2. Experimental Setup
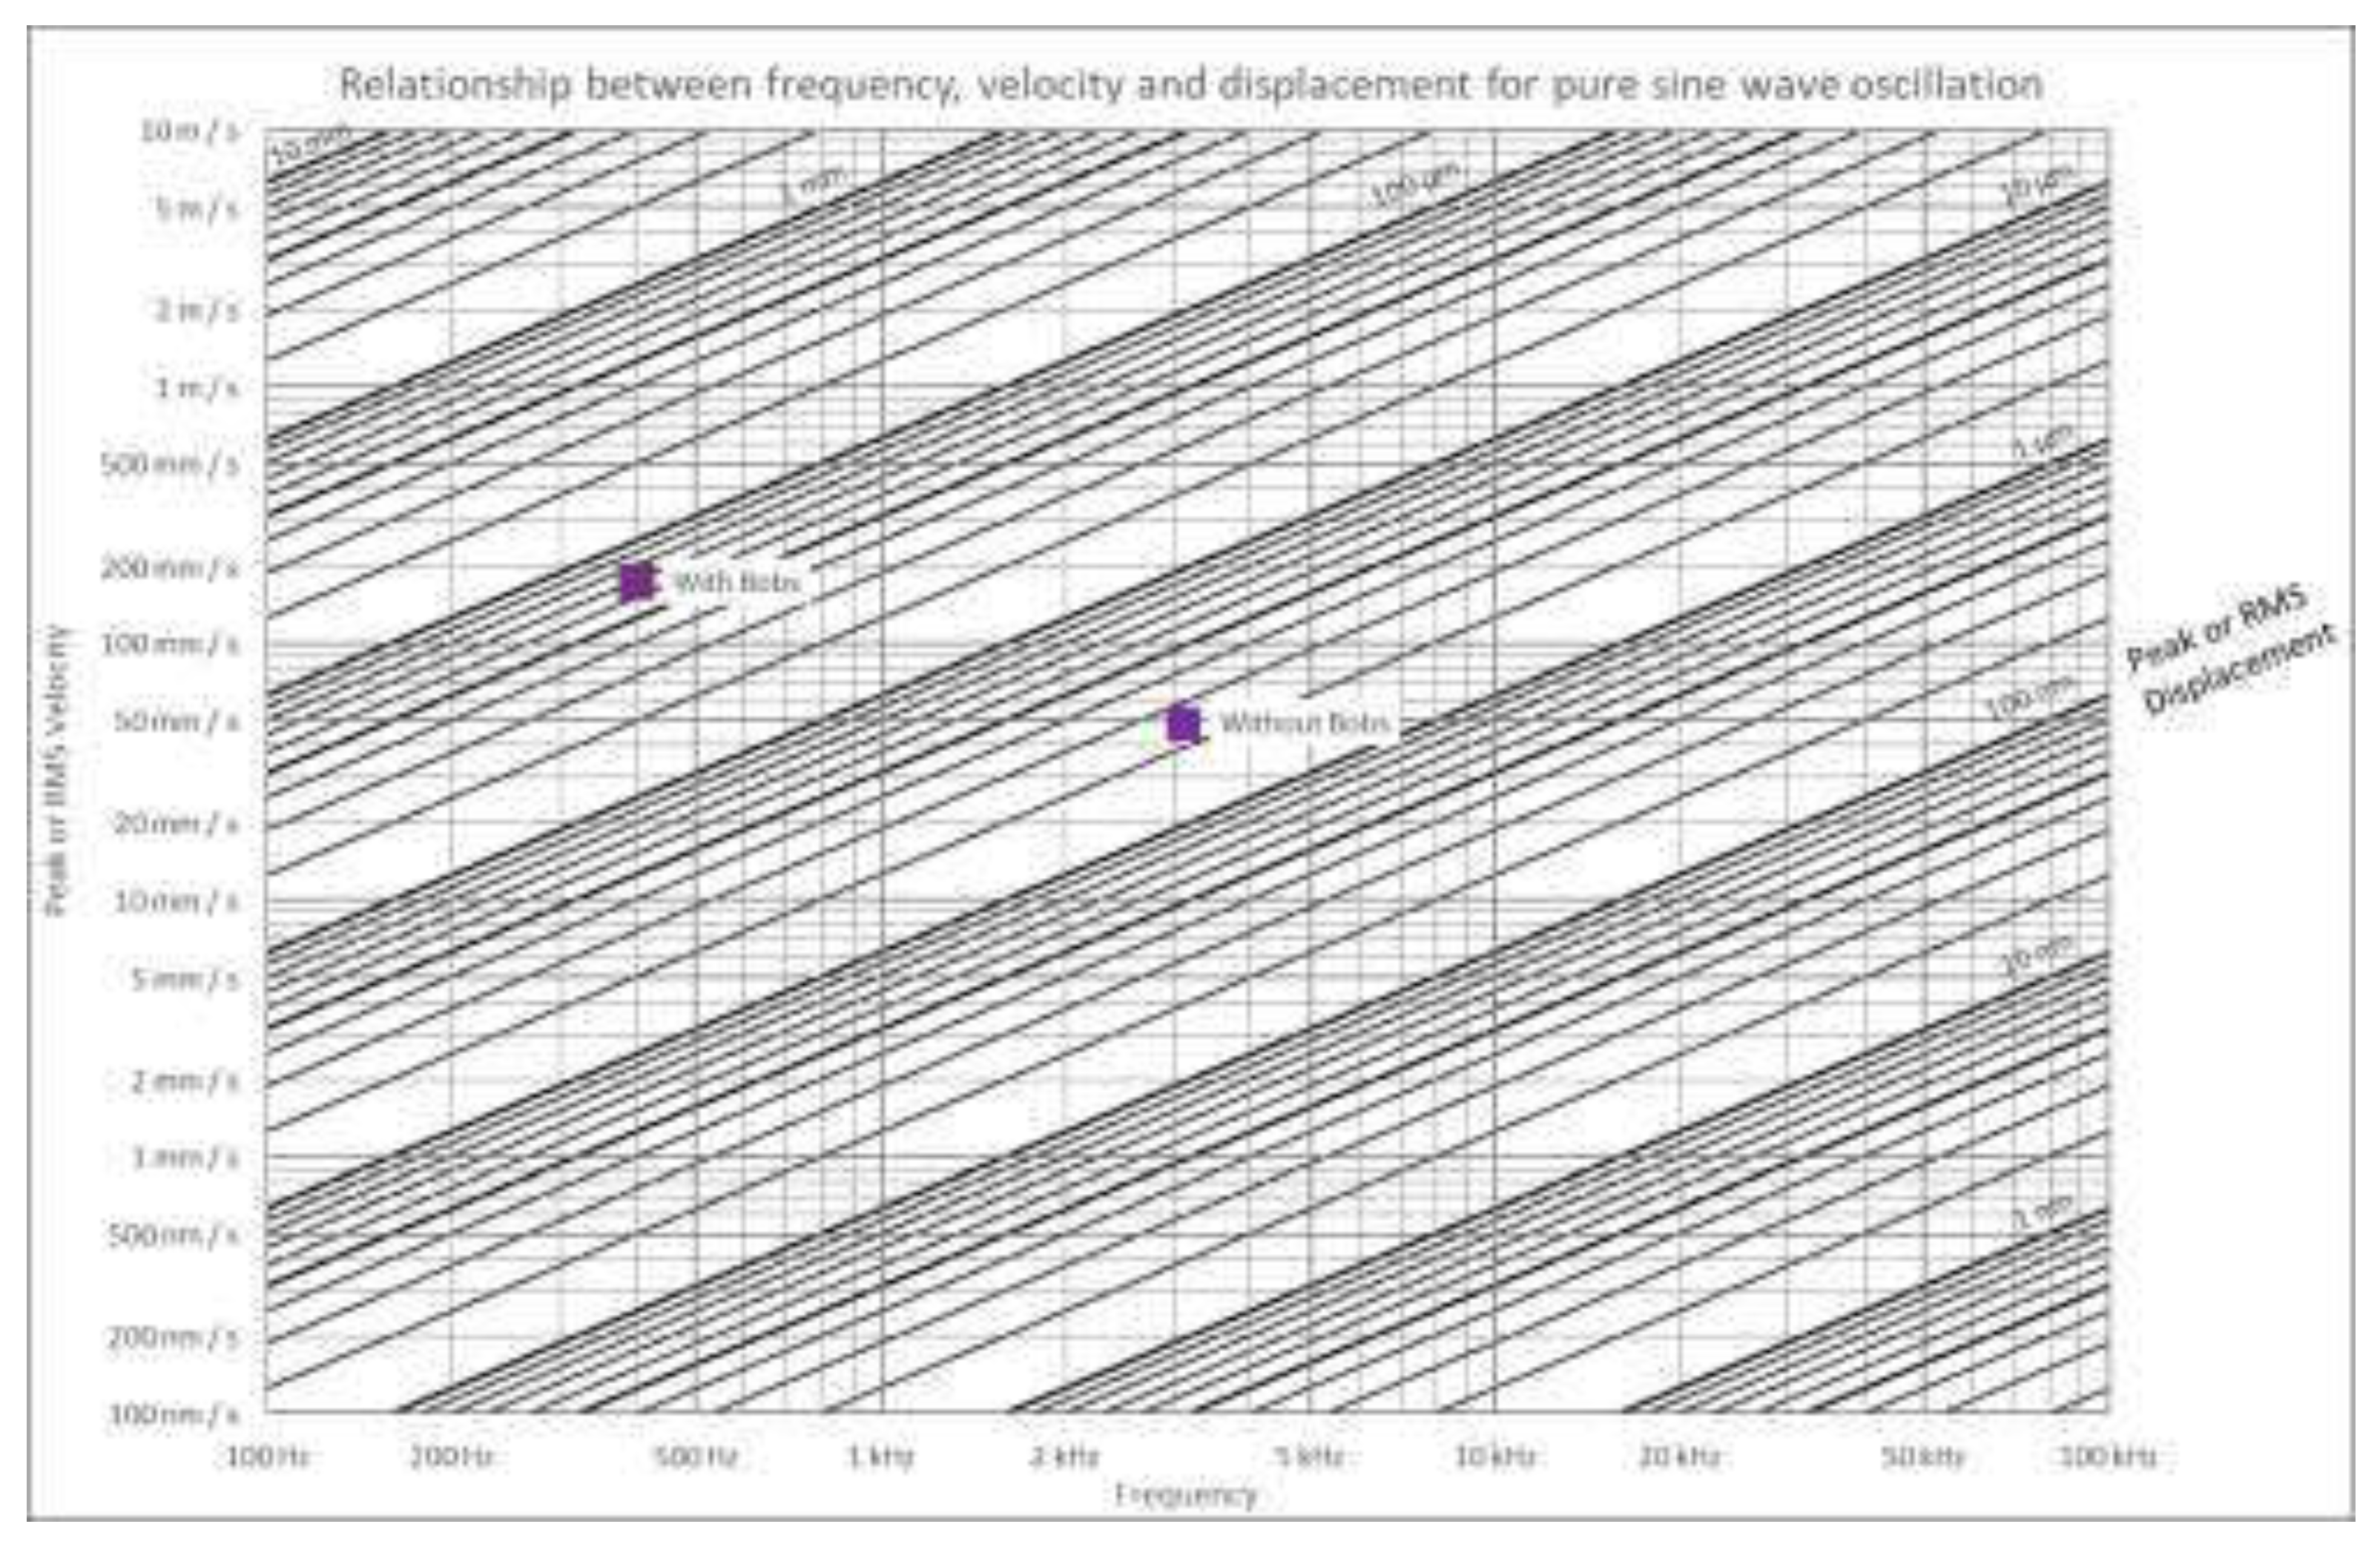
The flaw-induction equipment consisted of weighted samples attached to a suspension system and a large permanent magnet shaker (B&K LDS V406). The 2.35kg cylindrical steel bobs are required to apply static tensile load to the sample and to reduce the resonance frequency to within the range of the system. Such a reduced frequency also exhibits higher displacements, strains and therefore stresses. This is illustrated by the nomogram in
Figure 3, which shows the approximate change in frequency and displacement achieved by adding the steel bobs to the sample. The reduction in frequency is approximately one order of magnitude while the displacement increases by approximately 260%.
The bobs were attached to the sample using four M6 button-head bolts, at a torque of
. The shaker was connected to the top bob using a threaded stainless-steel rod. Laser Doppler Vibrometer (LDV) measurements were taken using a Polytec PDV-100 at a point
from the top surface of the assembly, and were used to monitor the resonance frequency of the system. The initial measured velocity at this this point was approximately
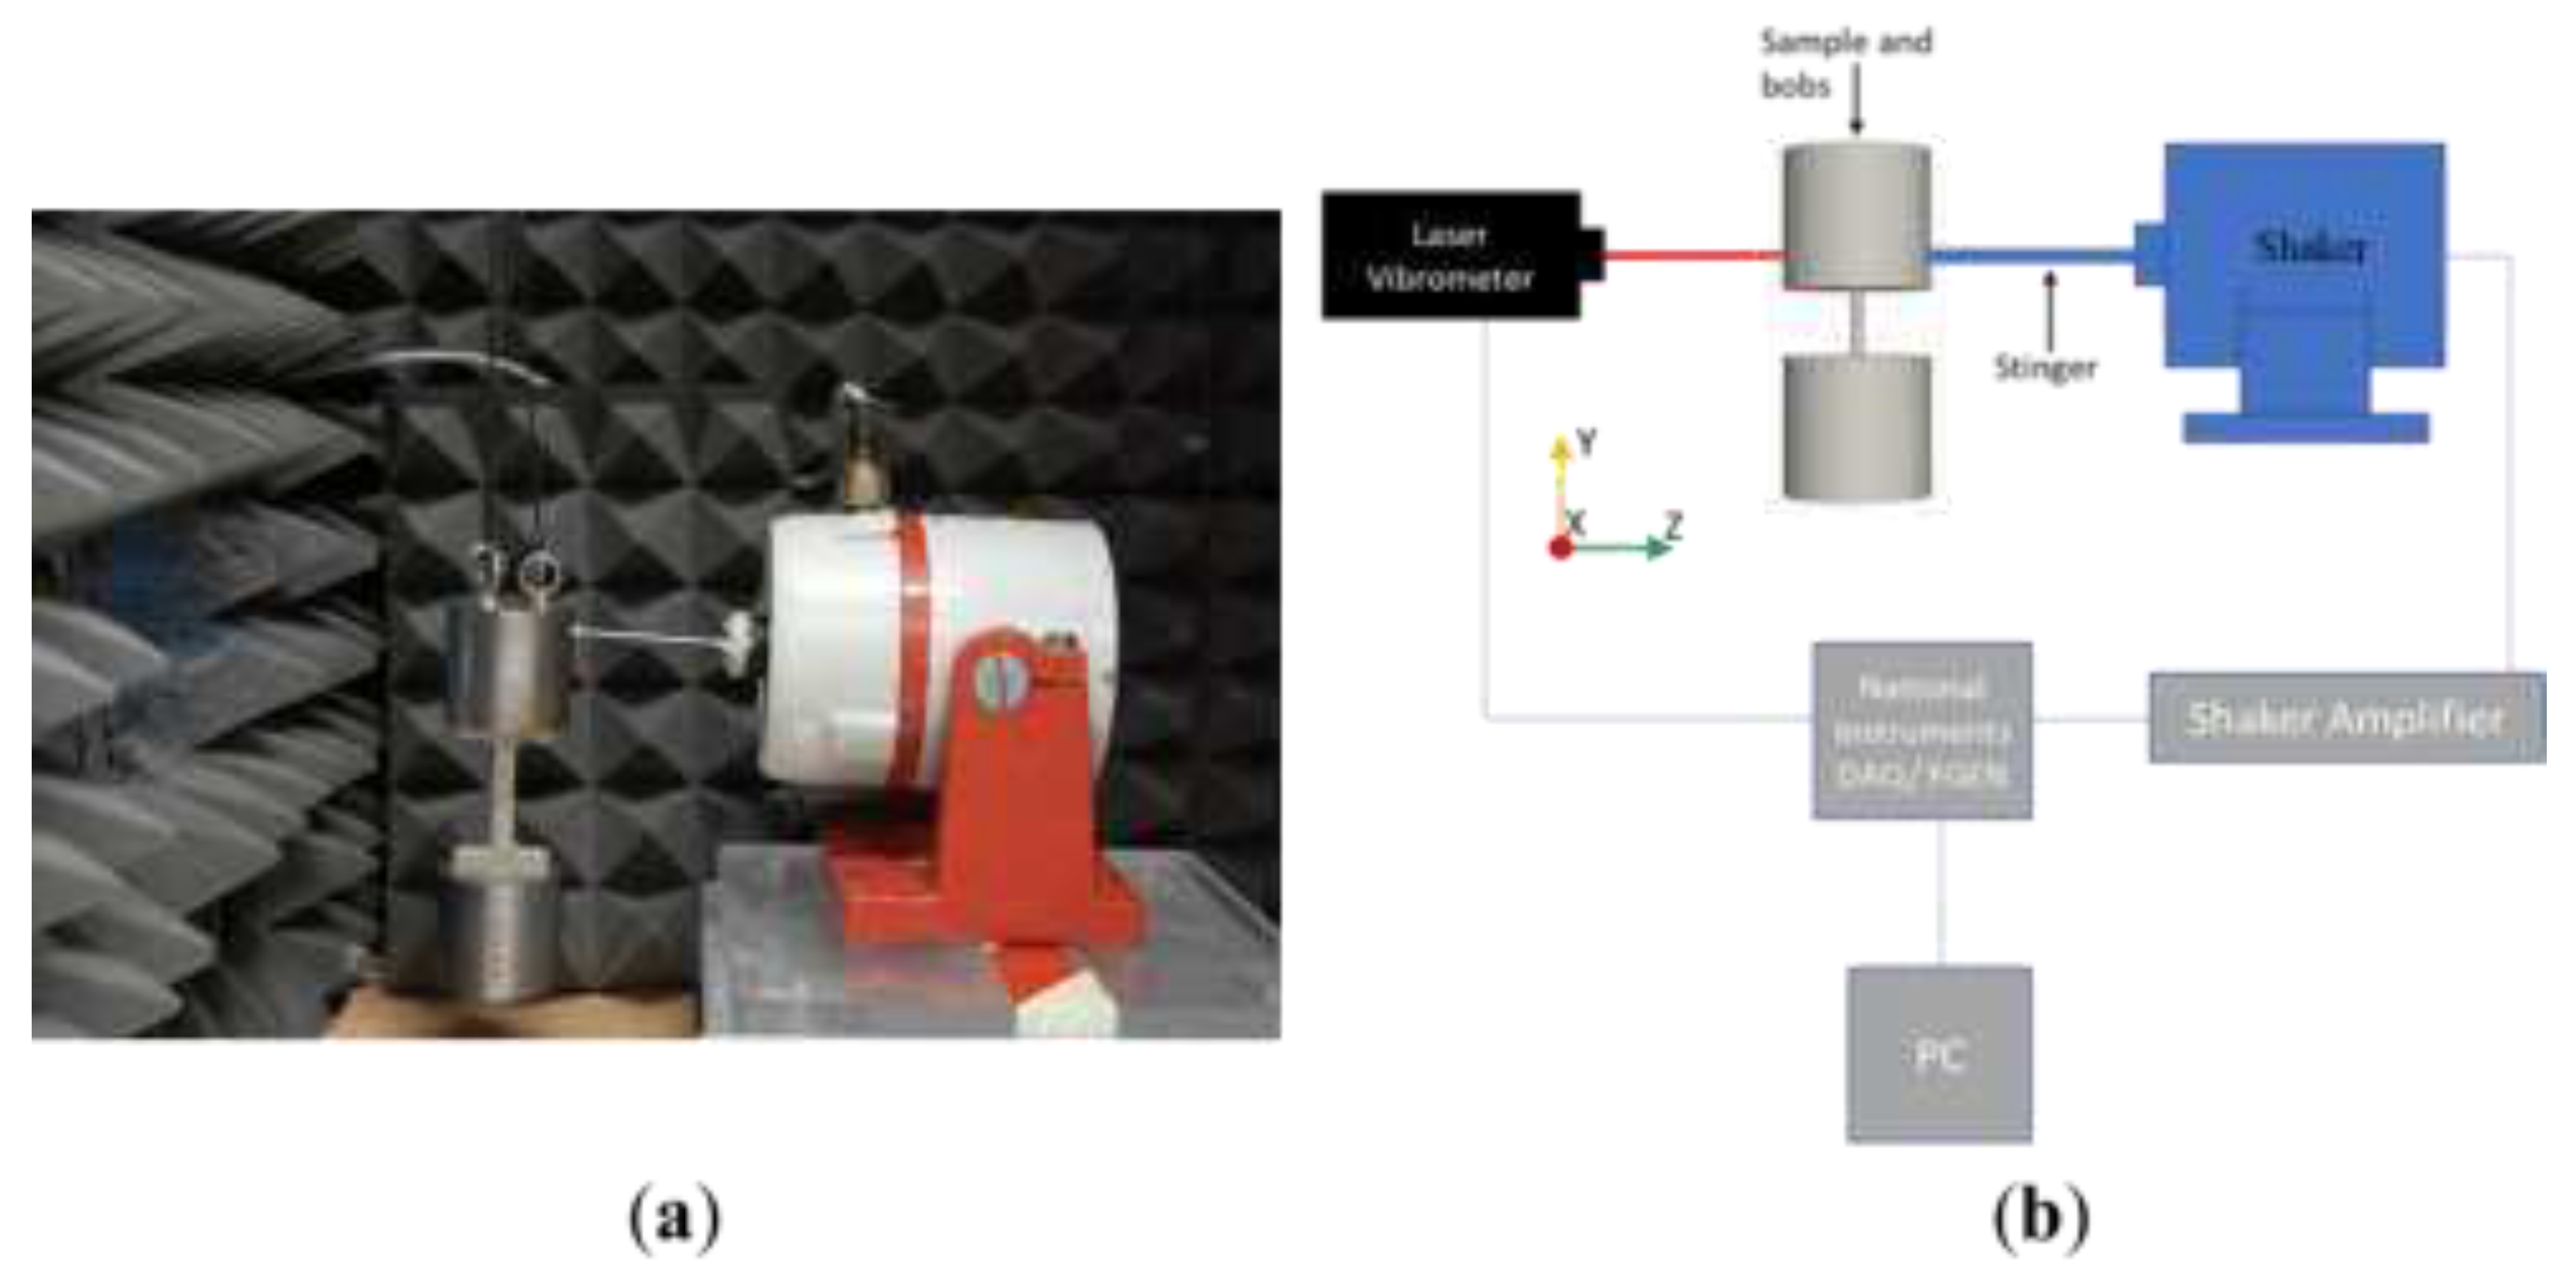
. However, because this technique utilizes whole-body resonance, non-contact measurements can be taken at any point on the assembly. A photograph and a schematic of the setup are shown in
Figure 4.
The purpose of the system is to excite the first flexural resonance mode of the assembly at a sufficiently high amplitude so as to trigger propagation-controlled low-cycle fatigue cracking. Obtaining a precise in-situ measurement of the resonance frequency during the exposure process allows for the monitoring of crack propagation over the course of exposure, and thus enabling the controlled creation of said cracks.
2.3. Finite-Element Modelling
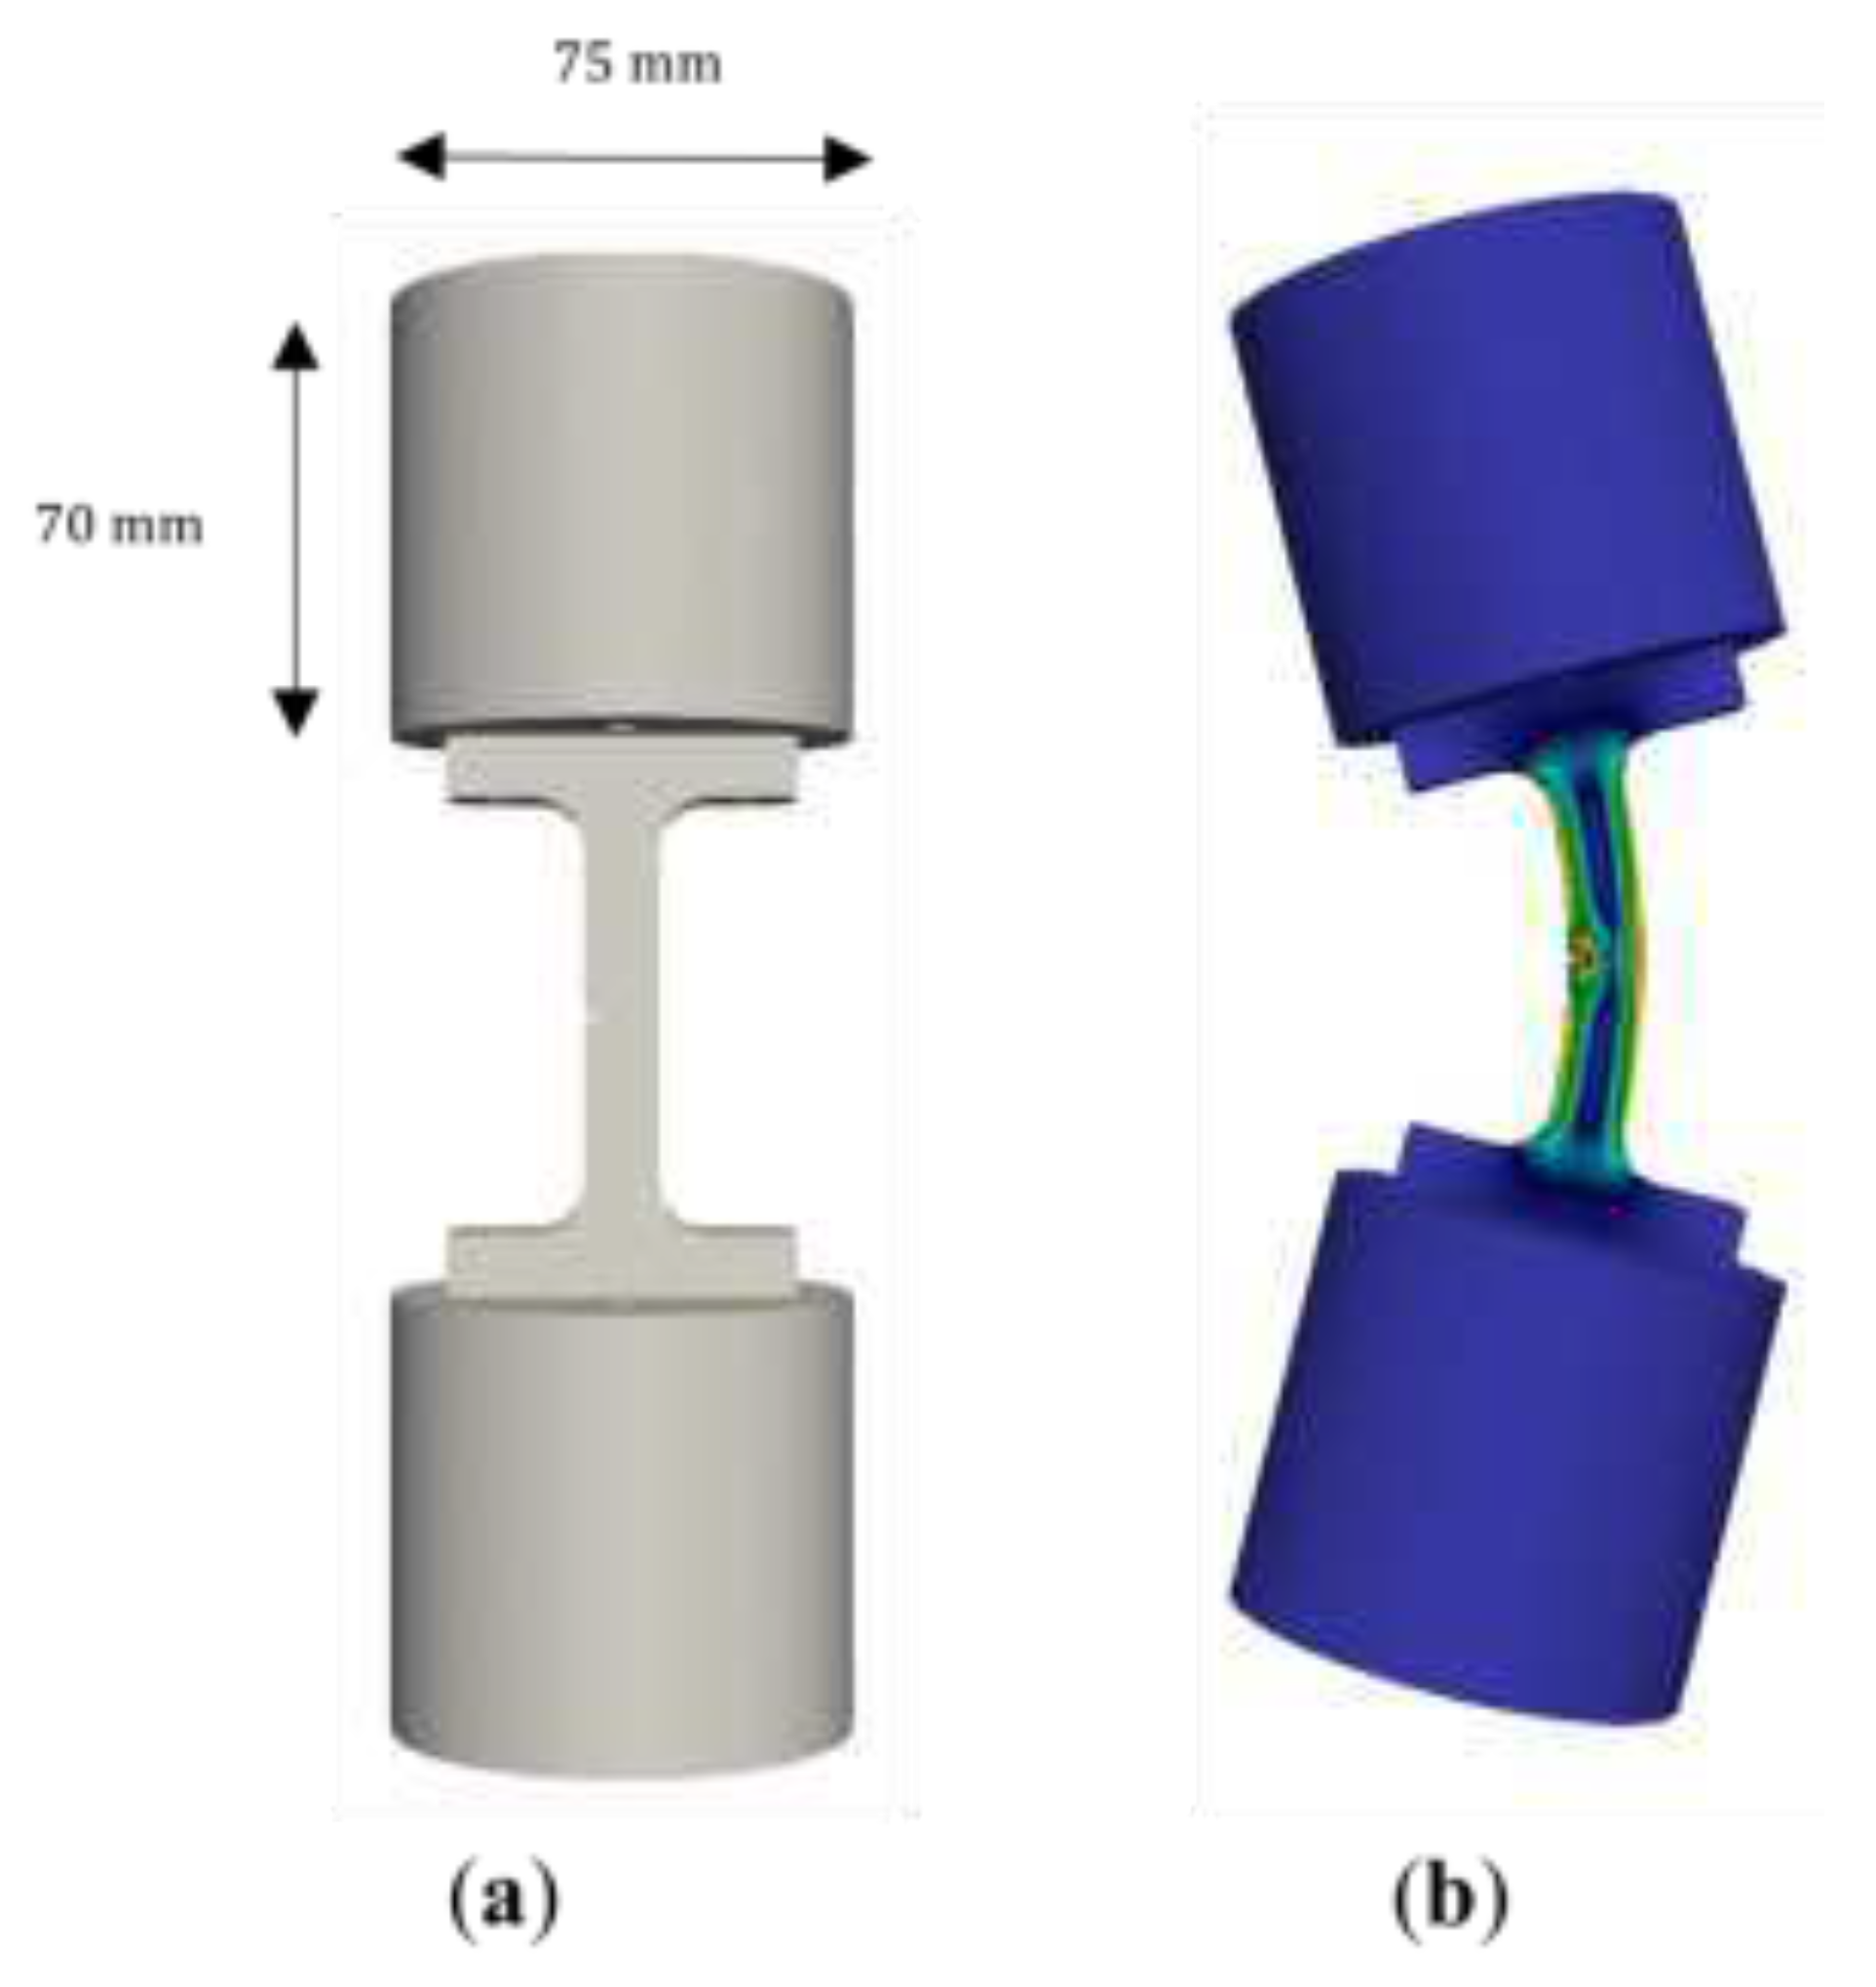
A finite element model was constructed using the CalculiX finite element solver version 1.0.0 to predict the resonance frequencies and mode shapes, with ParaView version 5.10.0 for visualisation of the modes. The model was computed for the samples with the two bobs bolted on the top and bottom (see
Figure 5).
The first flexural mode was the mode of interest for two reasons. Firstly, it concentrates stress in the desired region of the sample, at the tip of the notch. Secondly, being the fundamental mode, it has the highest displacement, making it suitable for an accelerated flaw induction process. The resonance frequency was predicted to be at Hz for the sample-bob assembly.
2.4. Flaw-induction Process and Characterisation
The resonance mode is sine-swept using the shaker (
) for
. A Fast-Fourier Transform (FFT) of the system response, as measured by the LDV, is used to determine the reducing frequency of the resonance as the crack propagates. This frequency is subsequently used as a new centre of the next sine-sweep, and the process repeats. The setup is thus capable of tracking the variation in the resonance frequency with increasing extents of induced damage. The frequency shift,
, is thus defined as:
where
is the resonance frequency of the pristine sample, and
is the resonance frequency of the sample at any particular point along the flaw induction process. This
is taken in this work to be a proxy for the extent of induced damage. Unless otherwise stated, voltage supplied to the shaker was kept constant throughout the exposure process.
To evaluate the fracture point, sample RD120 was taken to complete failure, which was observed at
. To account for any potential variations in the initial conditions of the samples, a 20% safety margin was imposed on the maximum shift,
, induced upon the remaining samples (
). The samples were thus subjected to the frequency shifts tabulated below (
Table 1).
After each damage increment, each sample was removed from the flaw-induction system, detached from the bobs and tested using NLR (Theta Technologies RD1-TT [
10]). Also, the samples were imaged using optical microscopy (Cainda digital microscope [
11]), and the crack dimensions were determined using ImageJ imaging software [
12], as defined in
Figure 6.
NLR testing is an NDT technique which excites components into resonance and measures nonlinear mechanisms associated with crack-like flaws [
13]. Nonlinearity can be observed in strain-dependent measurements, such as harmonic distortion or relative changes in resonance frequency [
14] (in this work, referred to as resonance “drift”).
Samples RD121 and RD123 were subjected to identical treatments, to assess the capability to reproducibly seed controlled cracks of different sizes. To assess the reliability of as an indicator for crack dimensions, as well as the propagation-controlled nature of this process, sample RD122 was subjected to a higher stress step, whereby for the first damage increment, the shaker was driven at twice the voltage as the other samples. Samples RD124 and RD125 were subjected to fewer damage increments, in order to demonstrate the technique’s capability to produce different crack sizes.
3. Results
3.1. Exposure Process
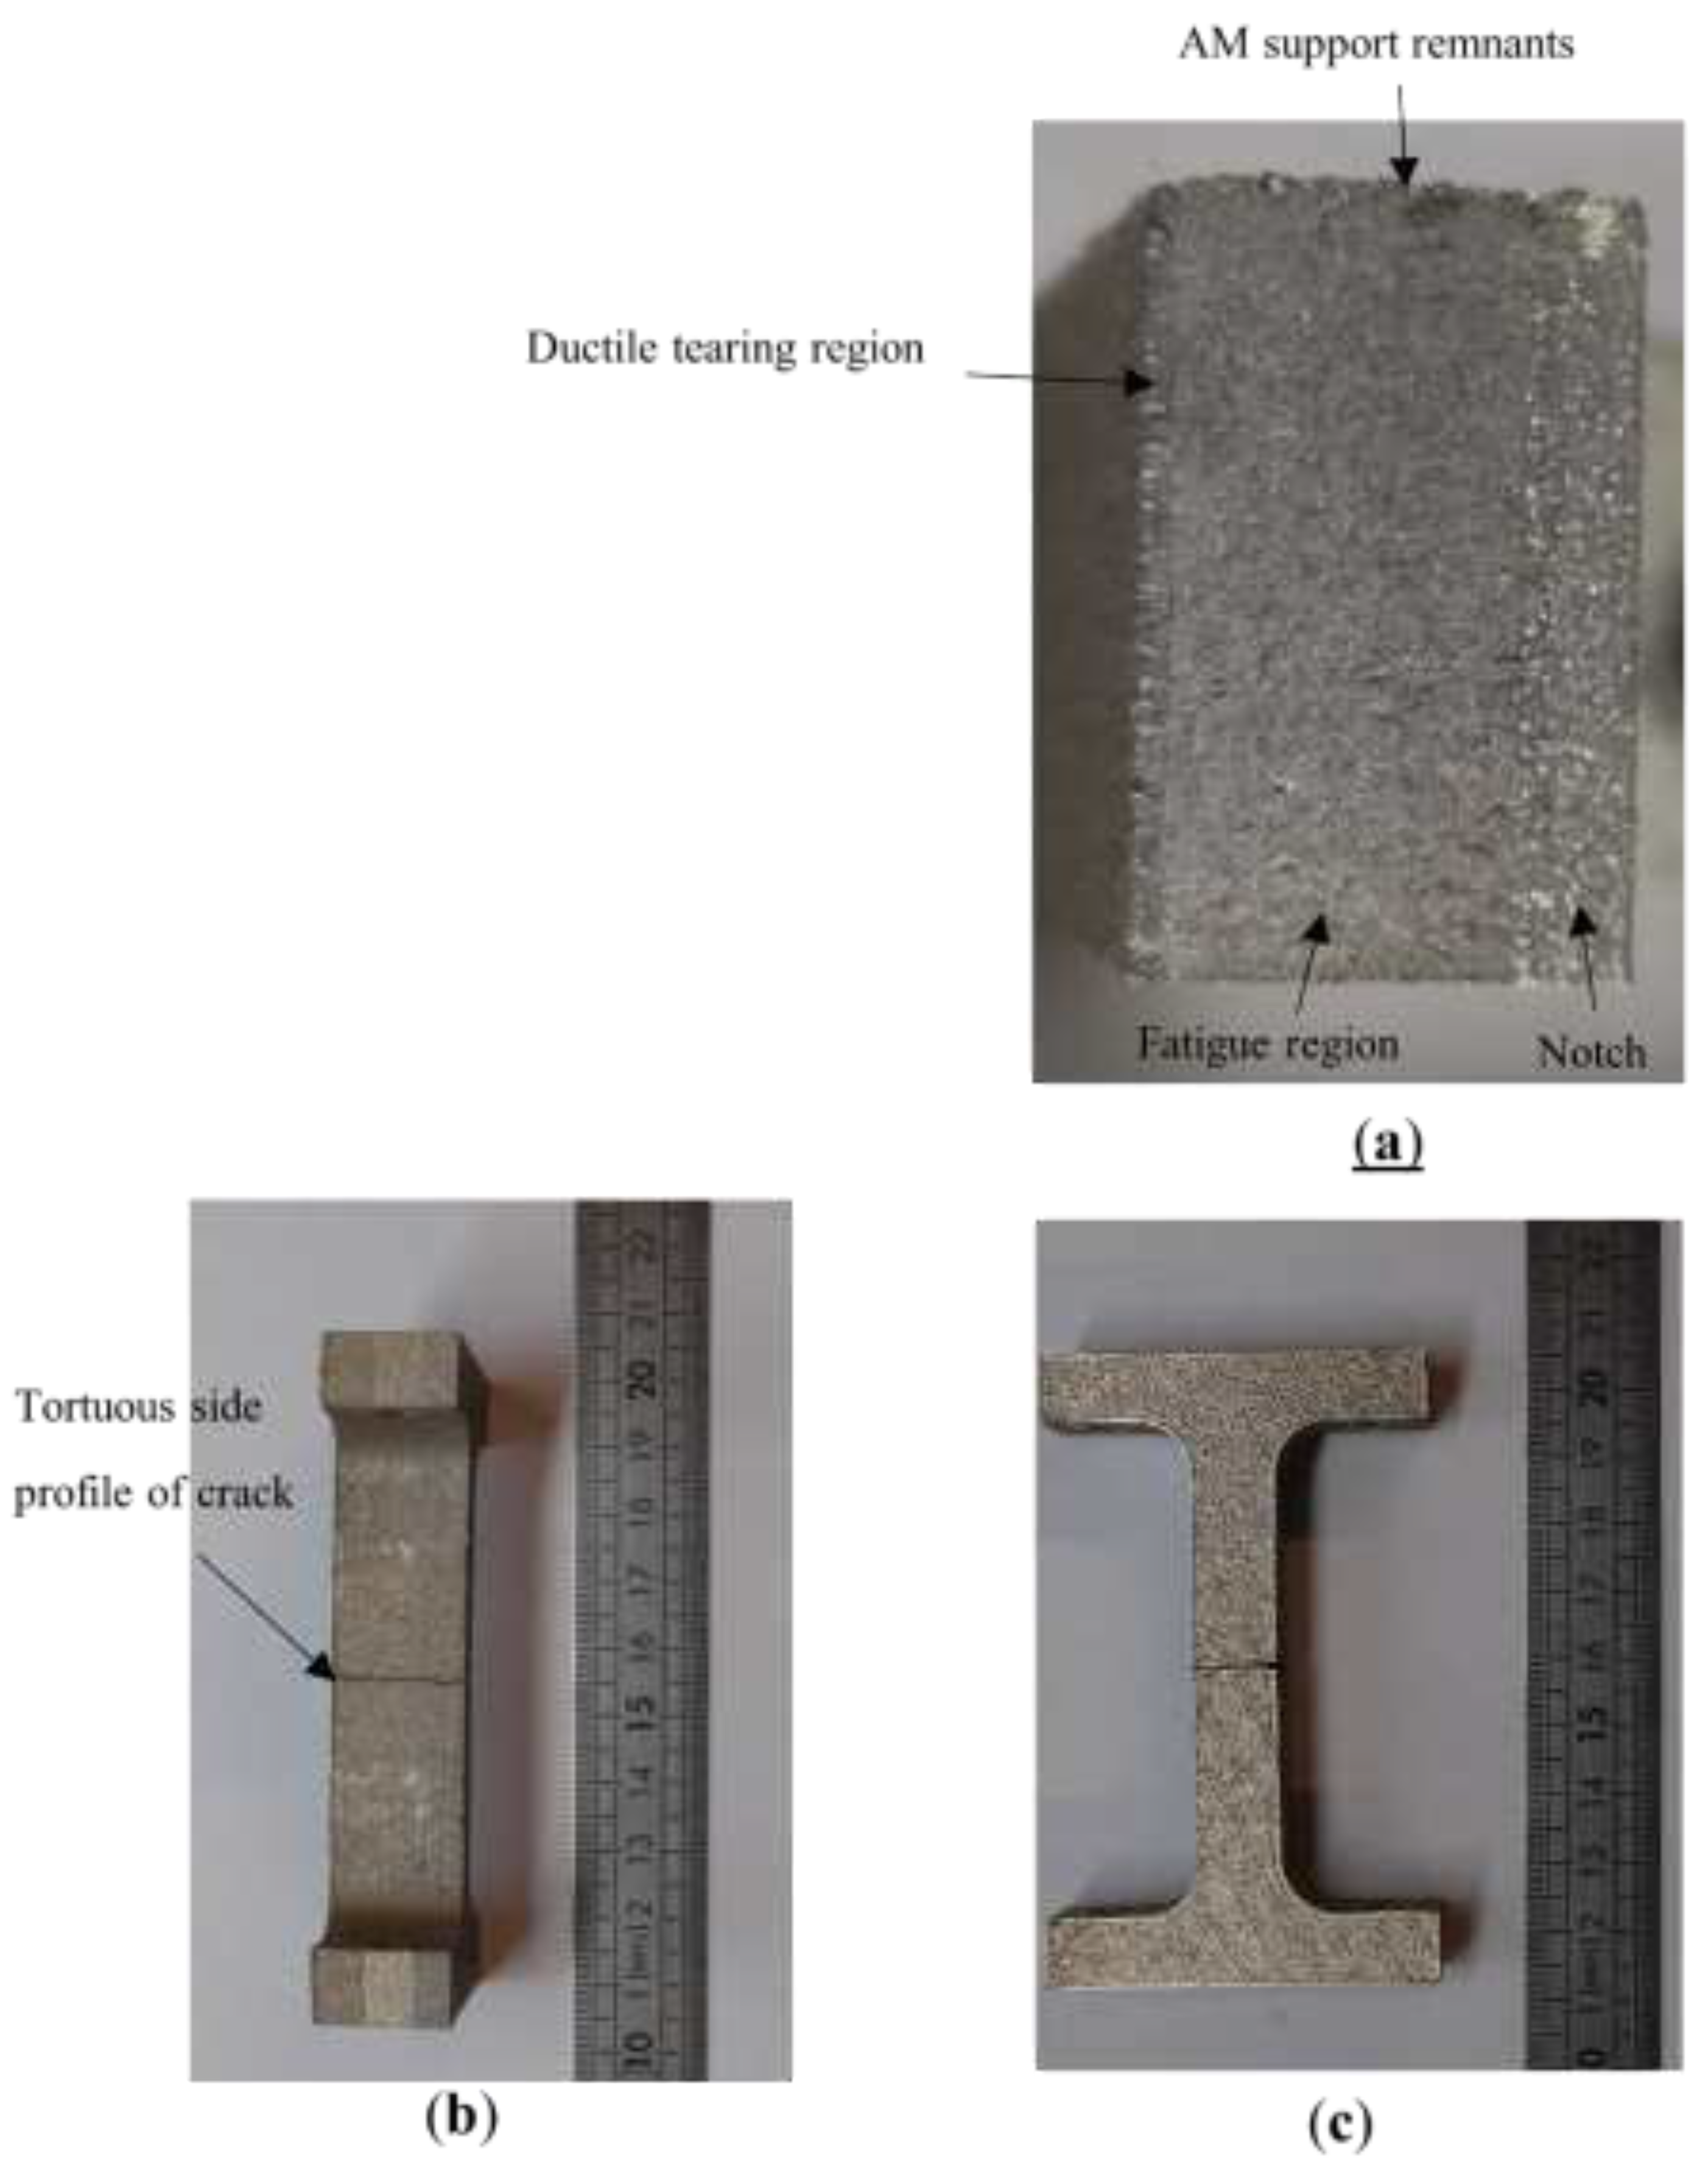
For sample RD120, the crack travelled through the entire thickness of the sample, causing it to break in two as shown in
Figure 7(b) and (c). Note the very high crack tortuosity on the side surface opposite to the notch (
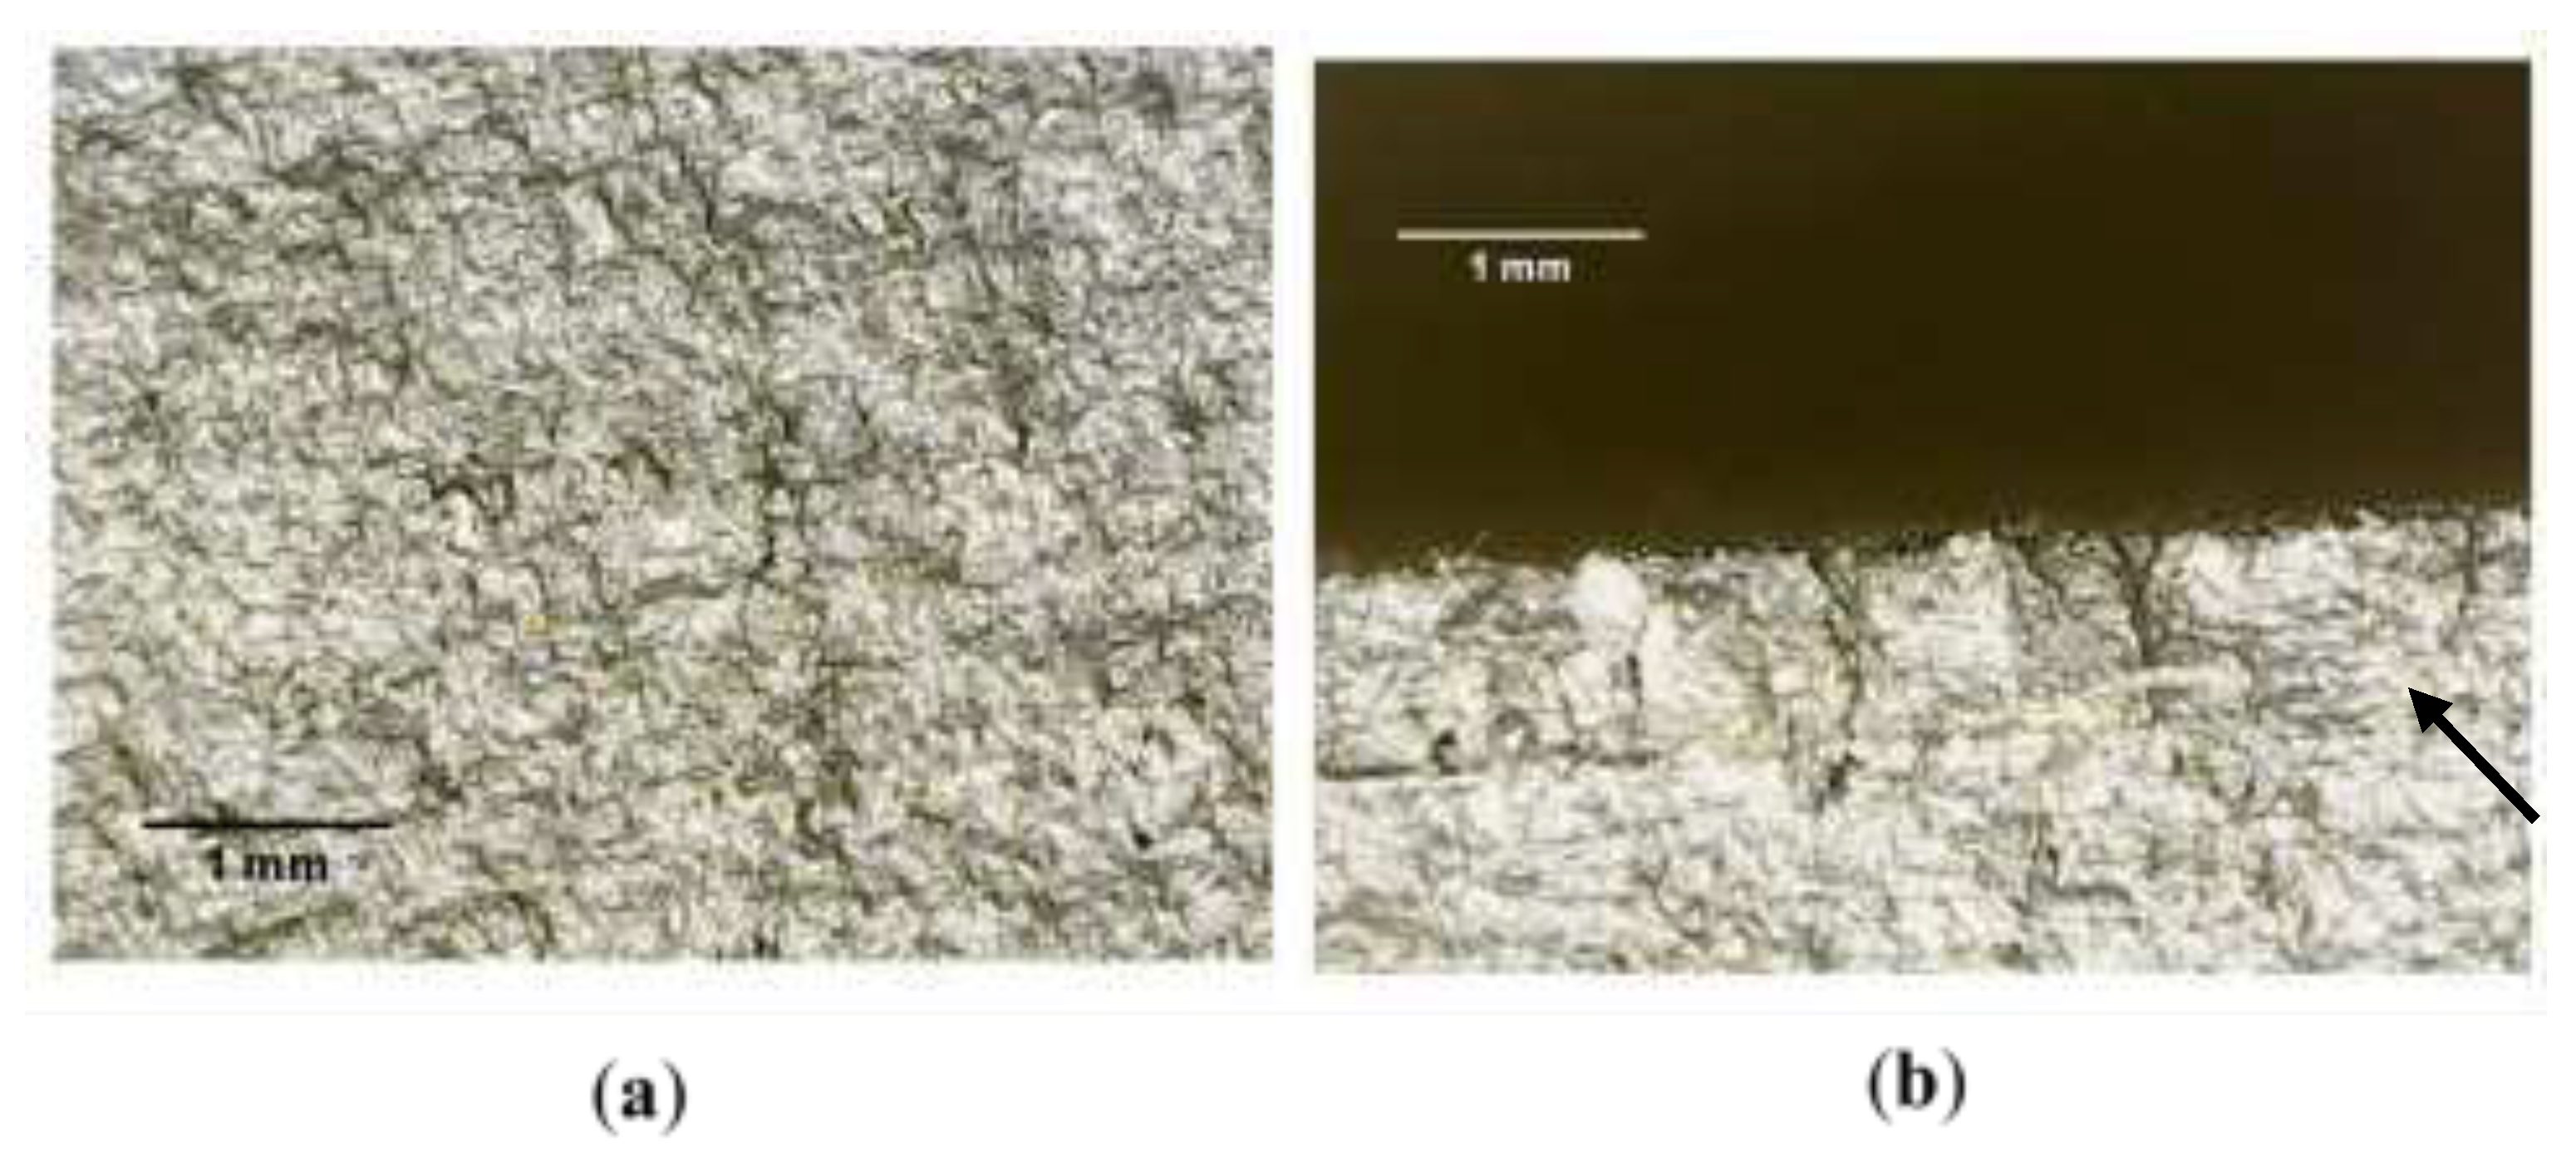
Figure 7(b)). Examination of the crack plane in
Figure 7(a) reveals two distinct regions separated by a linear boundary: a lower-roughness large region, and a higher-roughness smaller region. The regions correspond to two distinct failure mechanisms, with the former corresponding to the slow advance of the resonance-induced fatigue crack, and the latter corresponding to the dominant fast ductile tearing of the final section of the sample [
15].
Figure 7 shows that, in spite of the surface roughness, the fracture plane indicates a macroscopically straight and flat crack morphology ahead of the notch.
During the exposure process, the resonance parameters of the system are monitored in order to track the crack propagation.
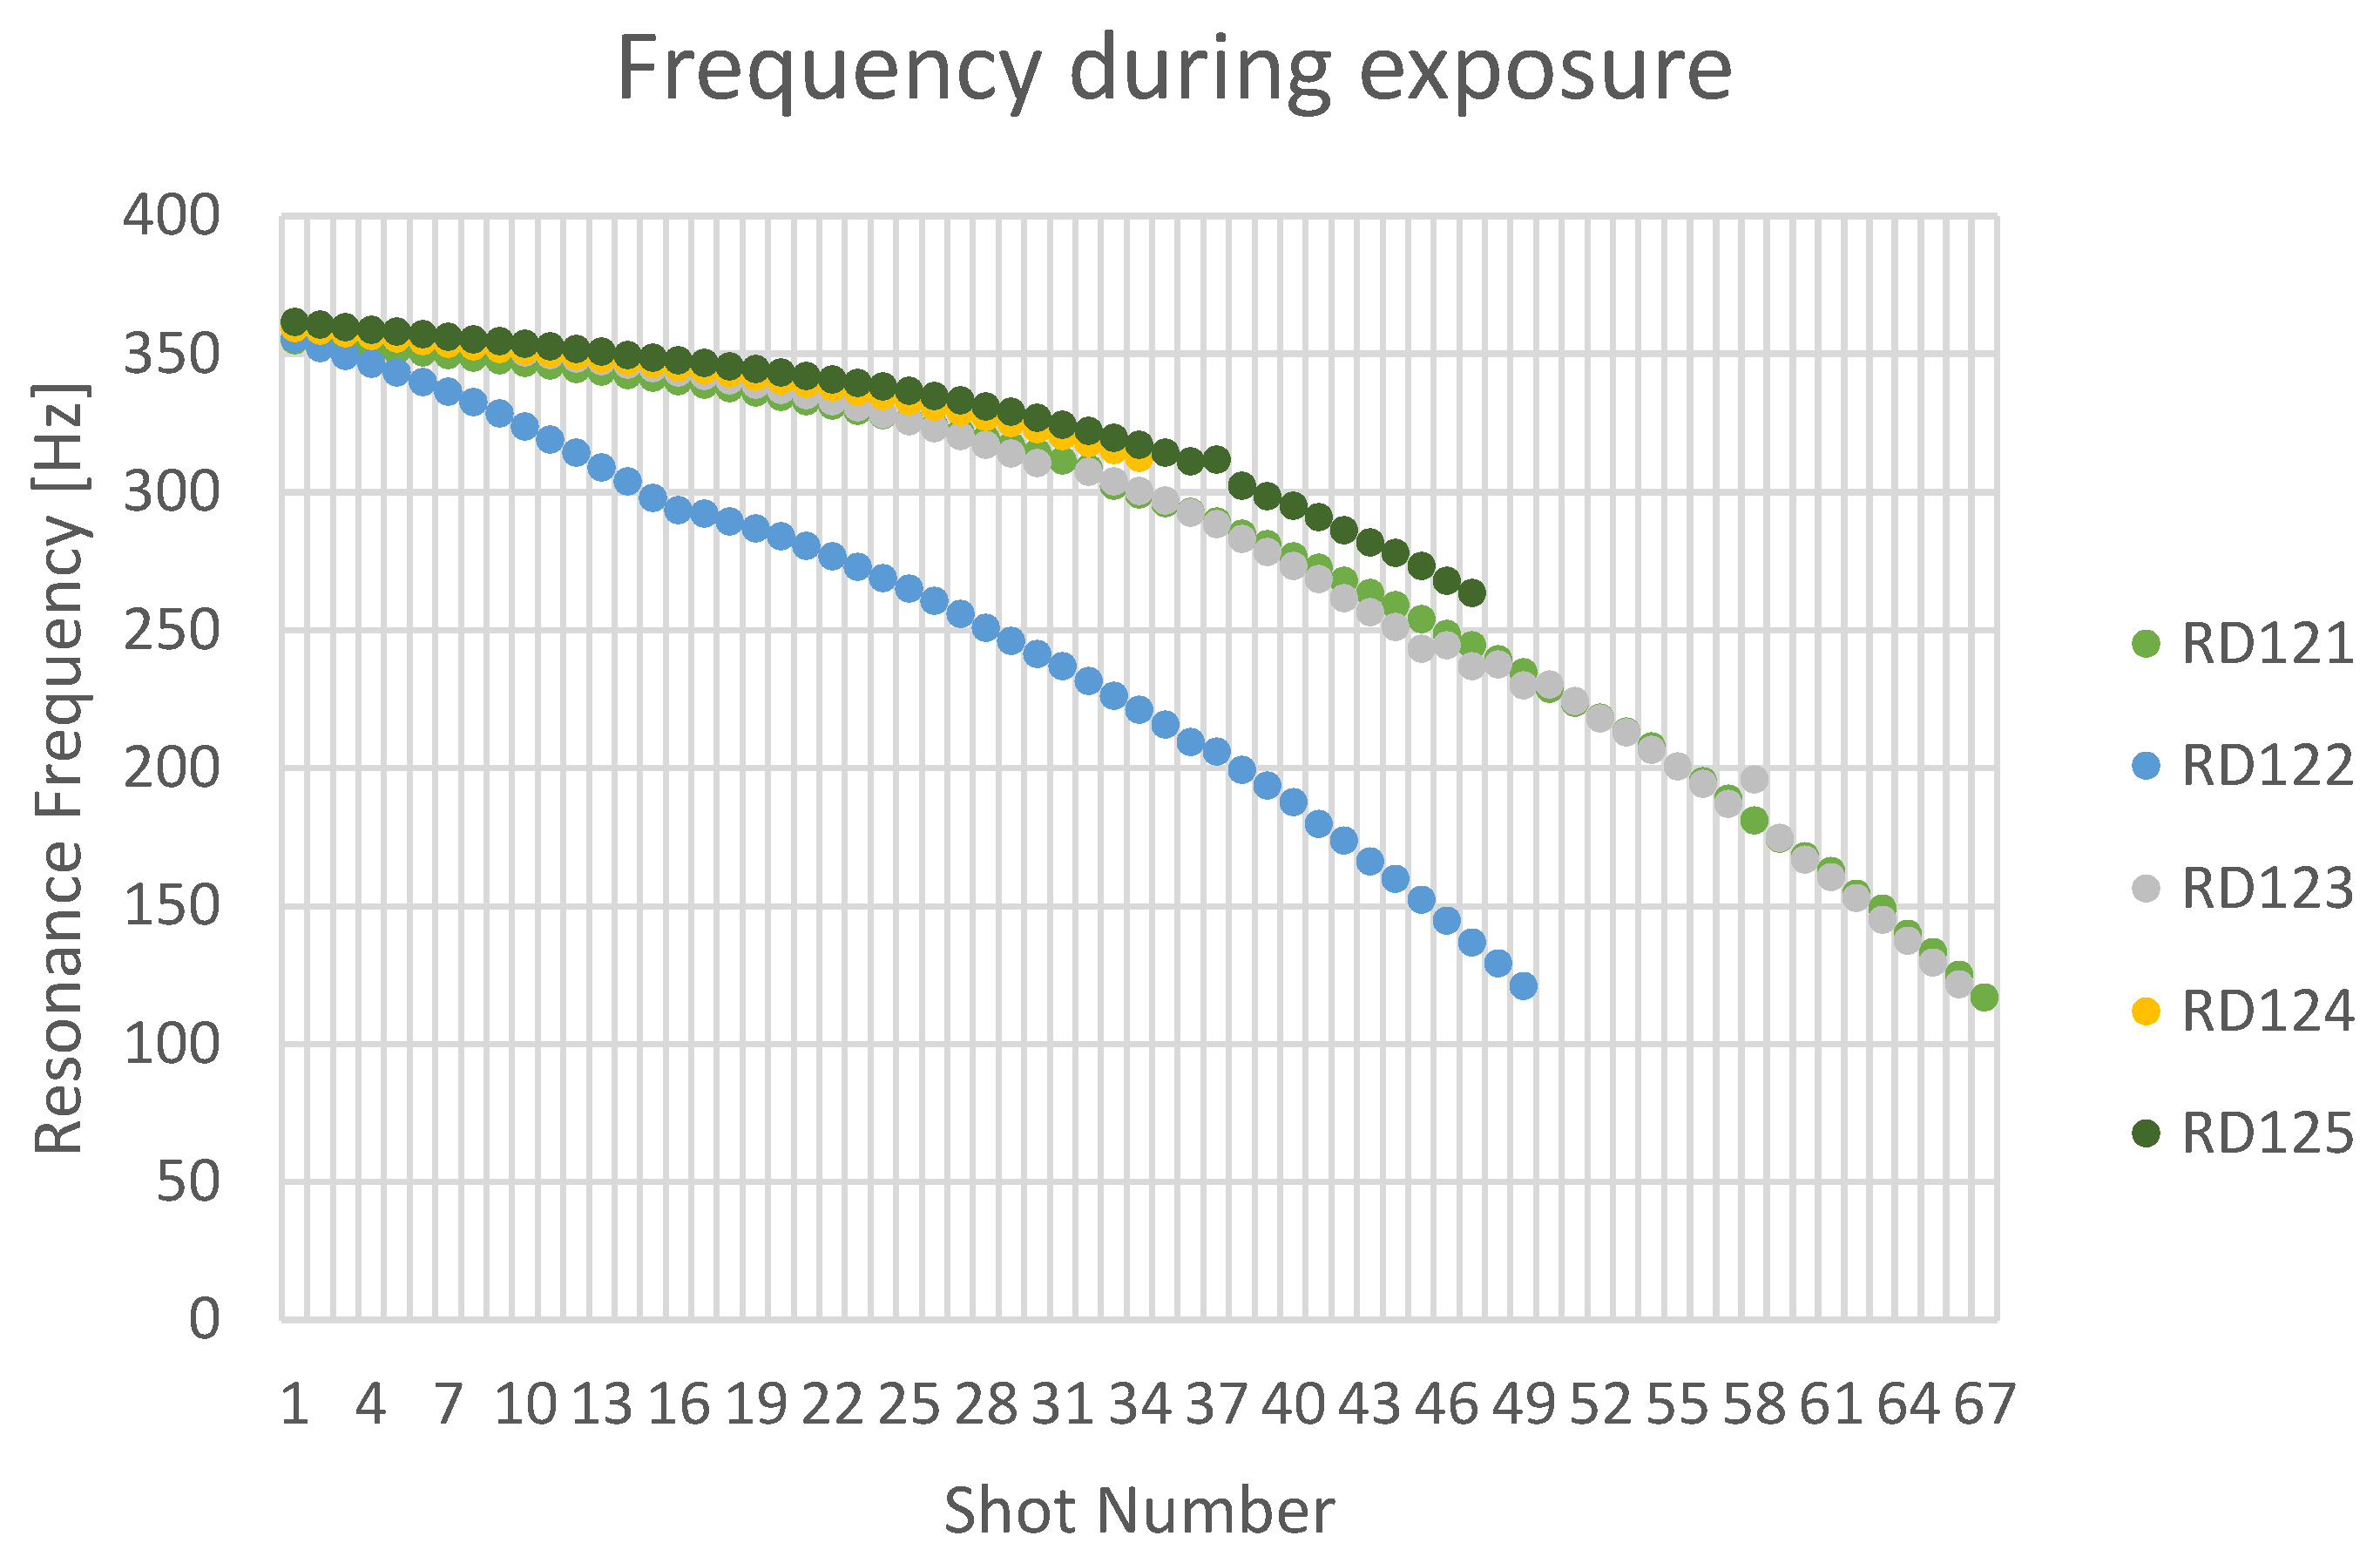
Figure 8 shows the evolution of the resonance frequency of each sample plotted against the number of sweeps performed. It is this measurement that allows for the controlled stopping of the process at different crack propagation extents. The increasing gradient over the course of exposure indicates an increasing crack growth rate. Note the initially accelerated rate for RD122 for the first stage, followed by a curve parallel to the remaining samples. Furthermore,
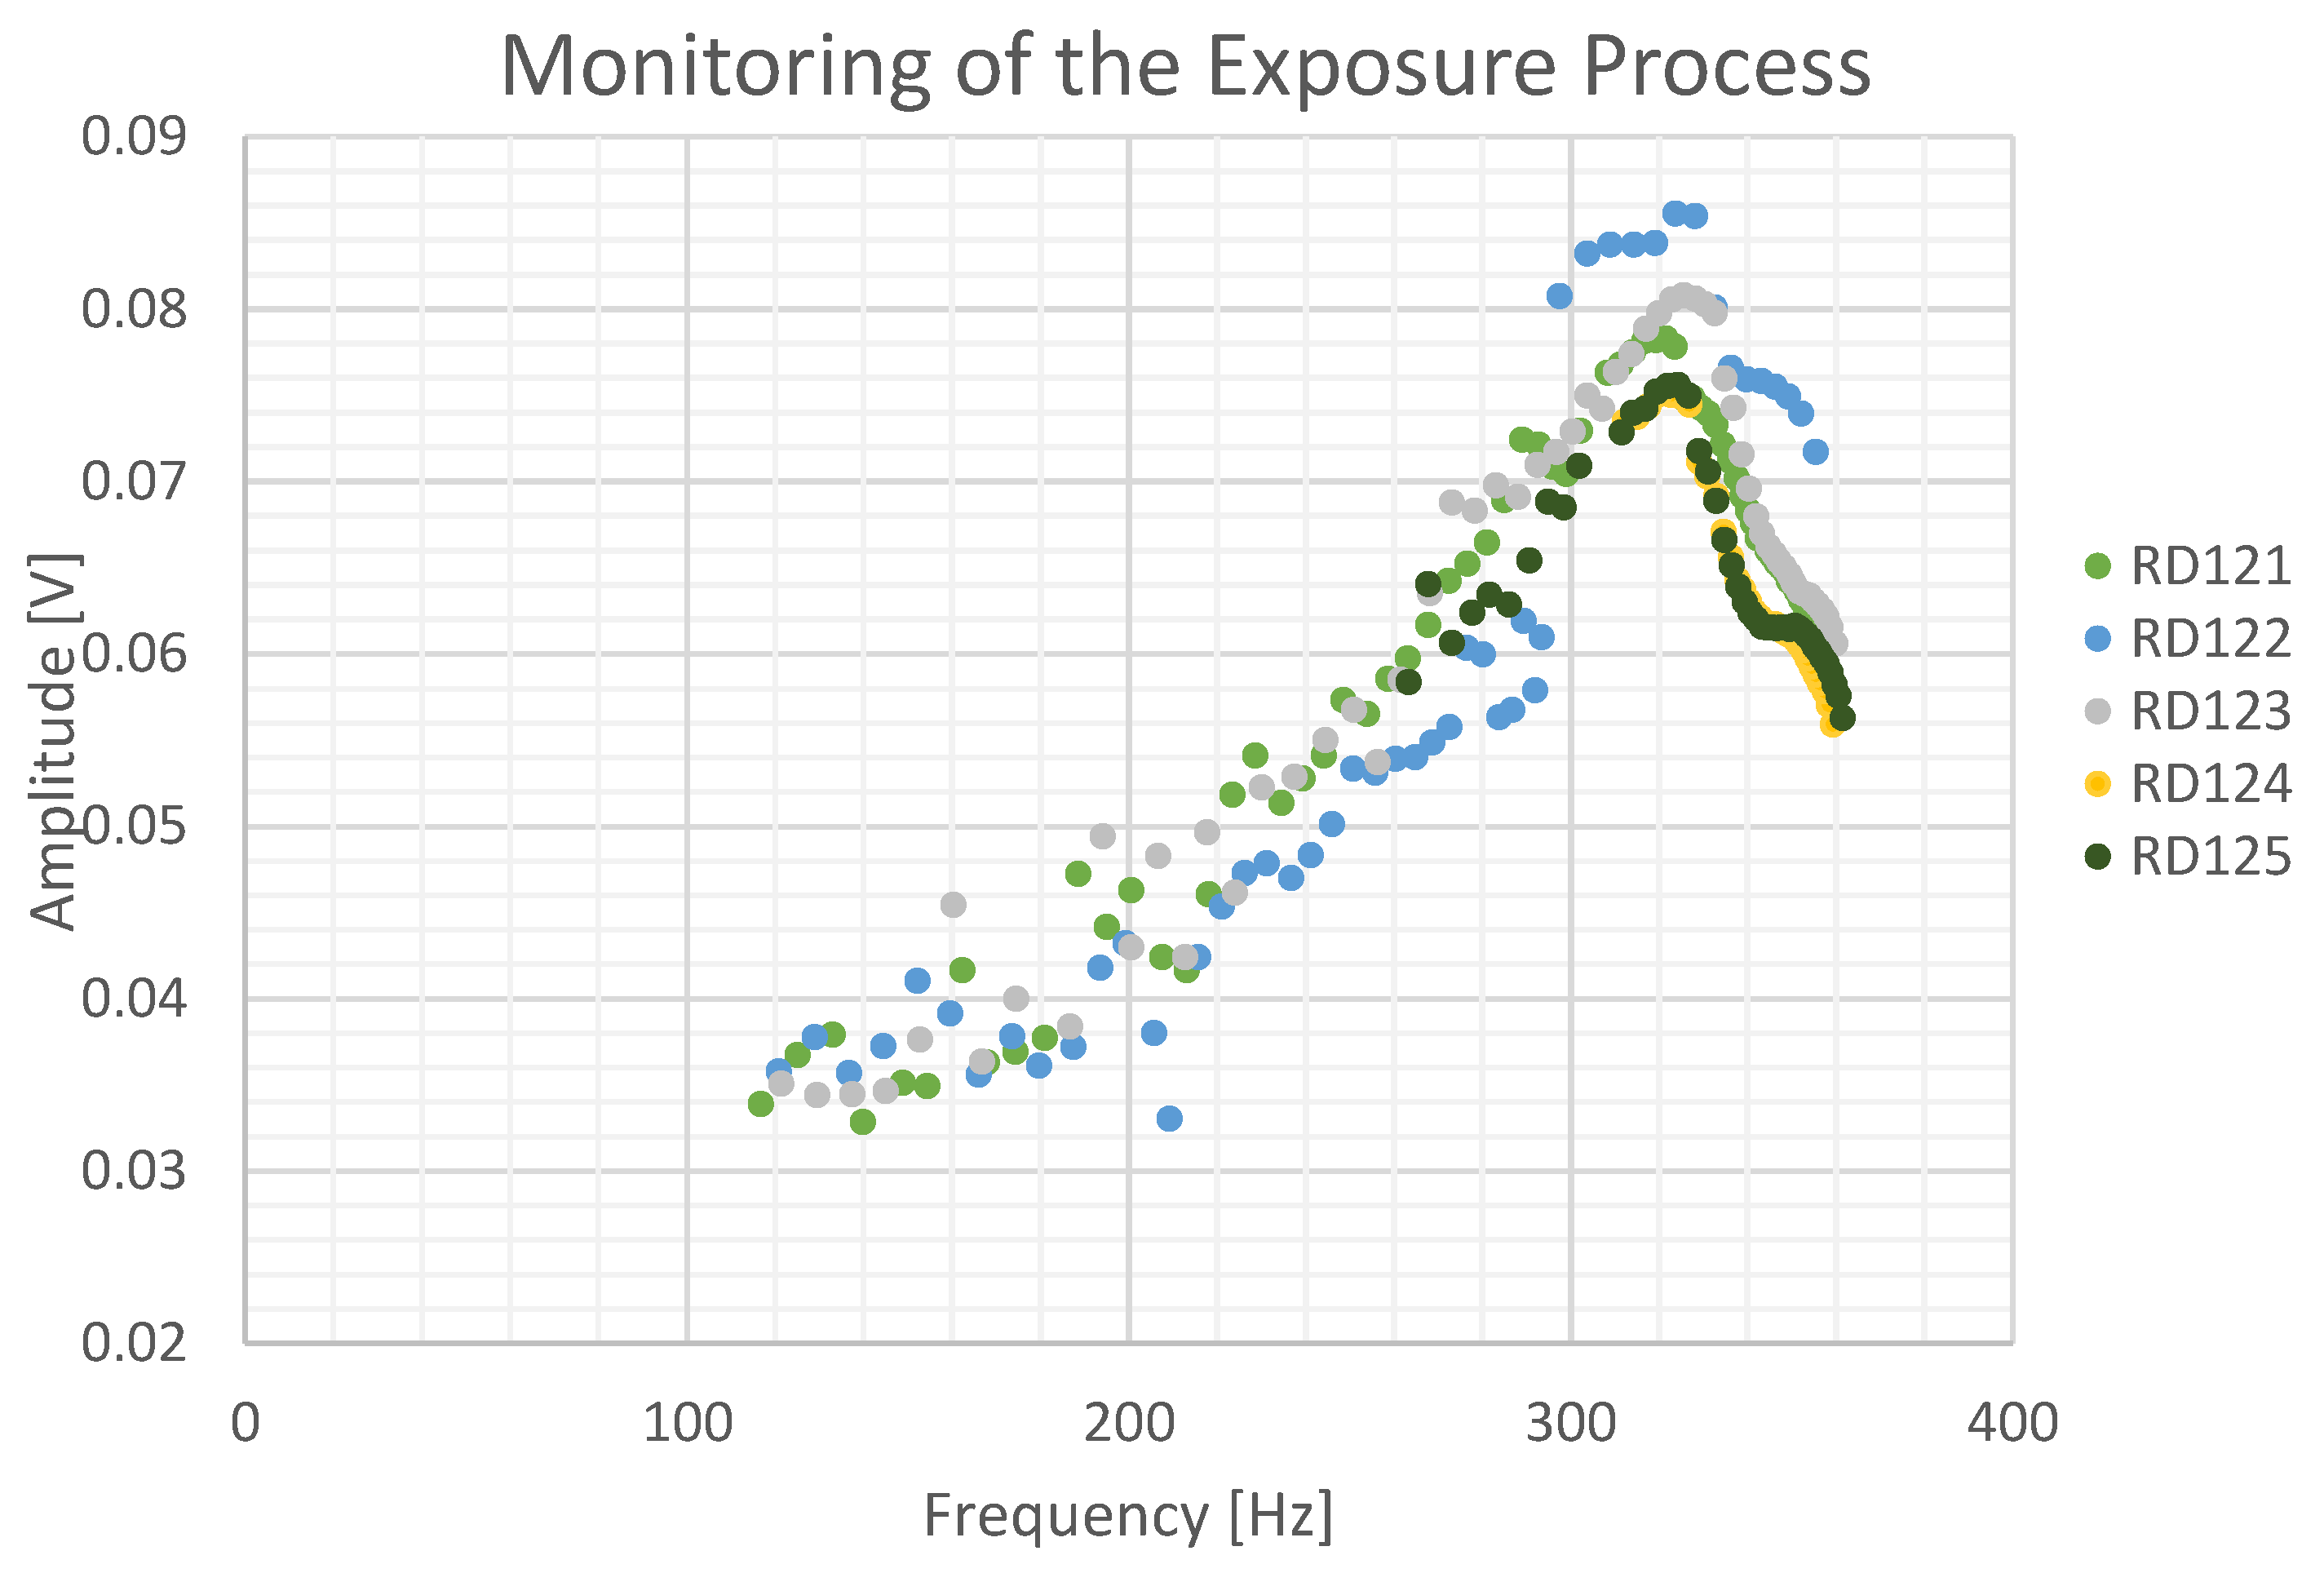
Figure 9 shows resonance peak amplitude in the frequency domain, plotted against resonance frequency for samples RD121 through RD125 throughout the exposure process. In this work, the longest cracks generated (RD121, RD122, RD123) took approximately 15 minutes in the flaw induction system.
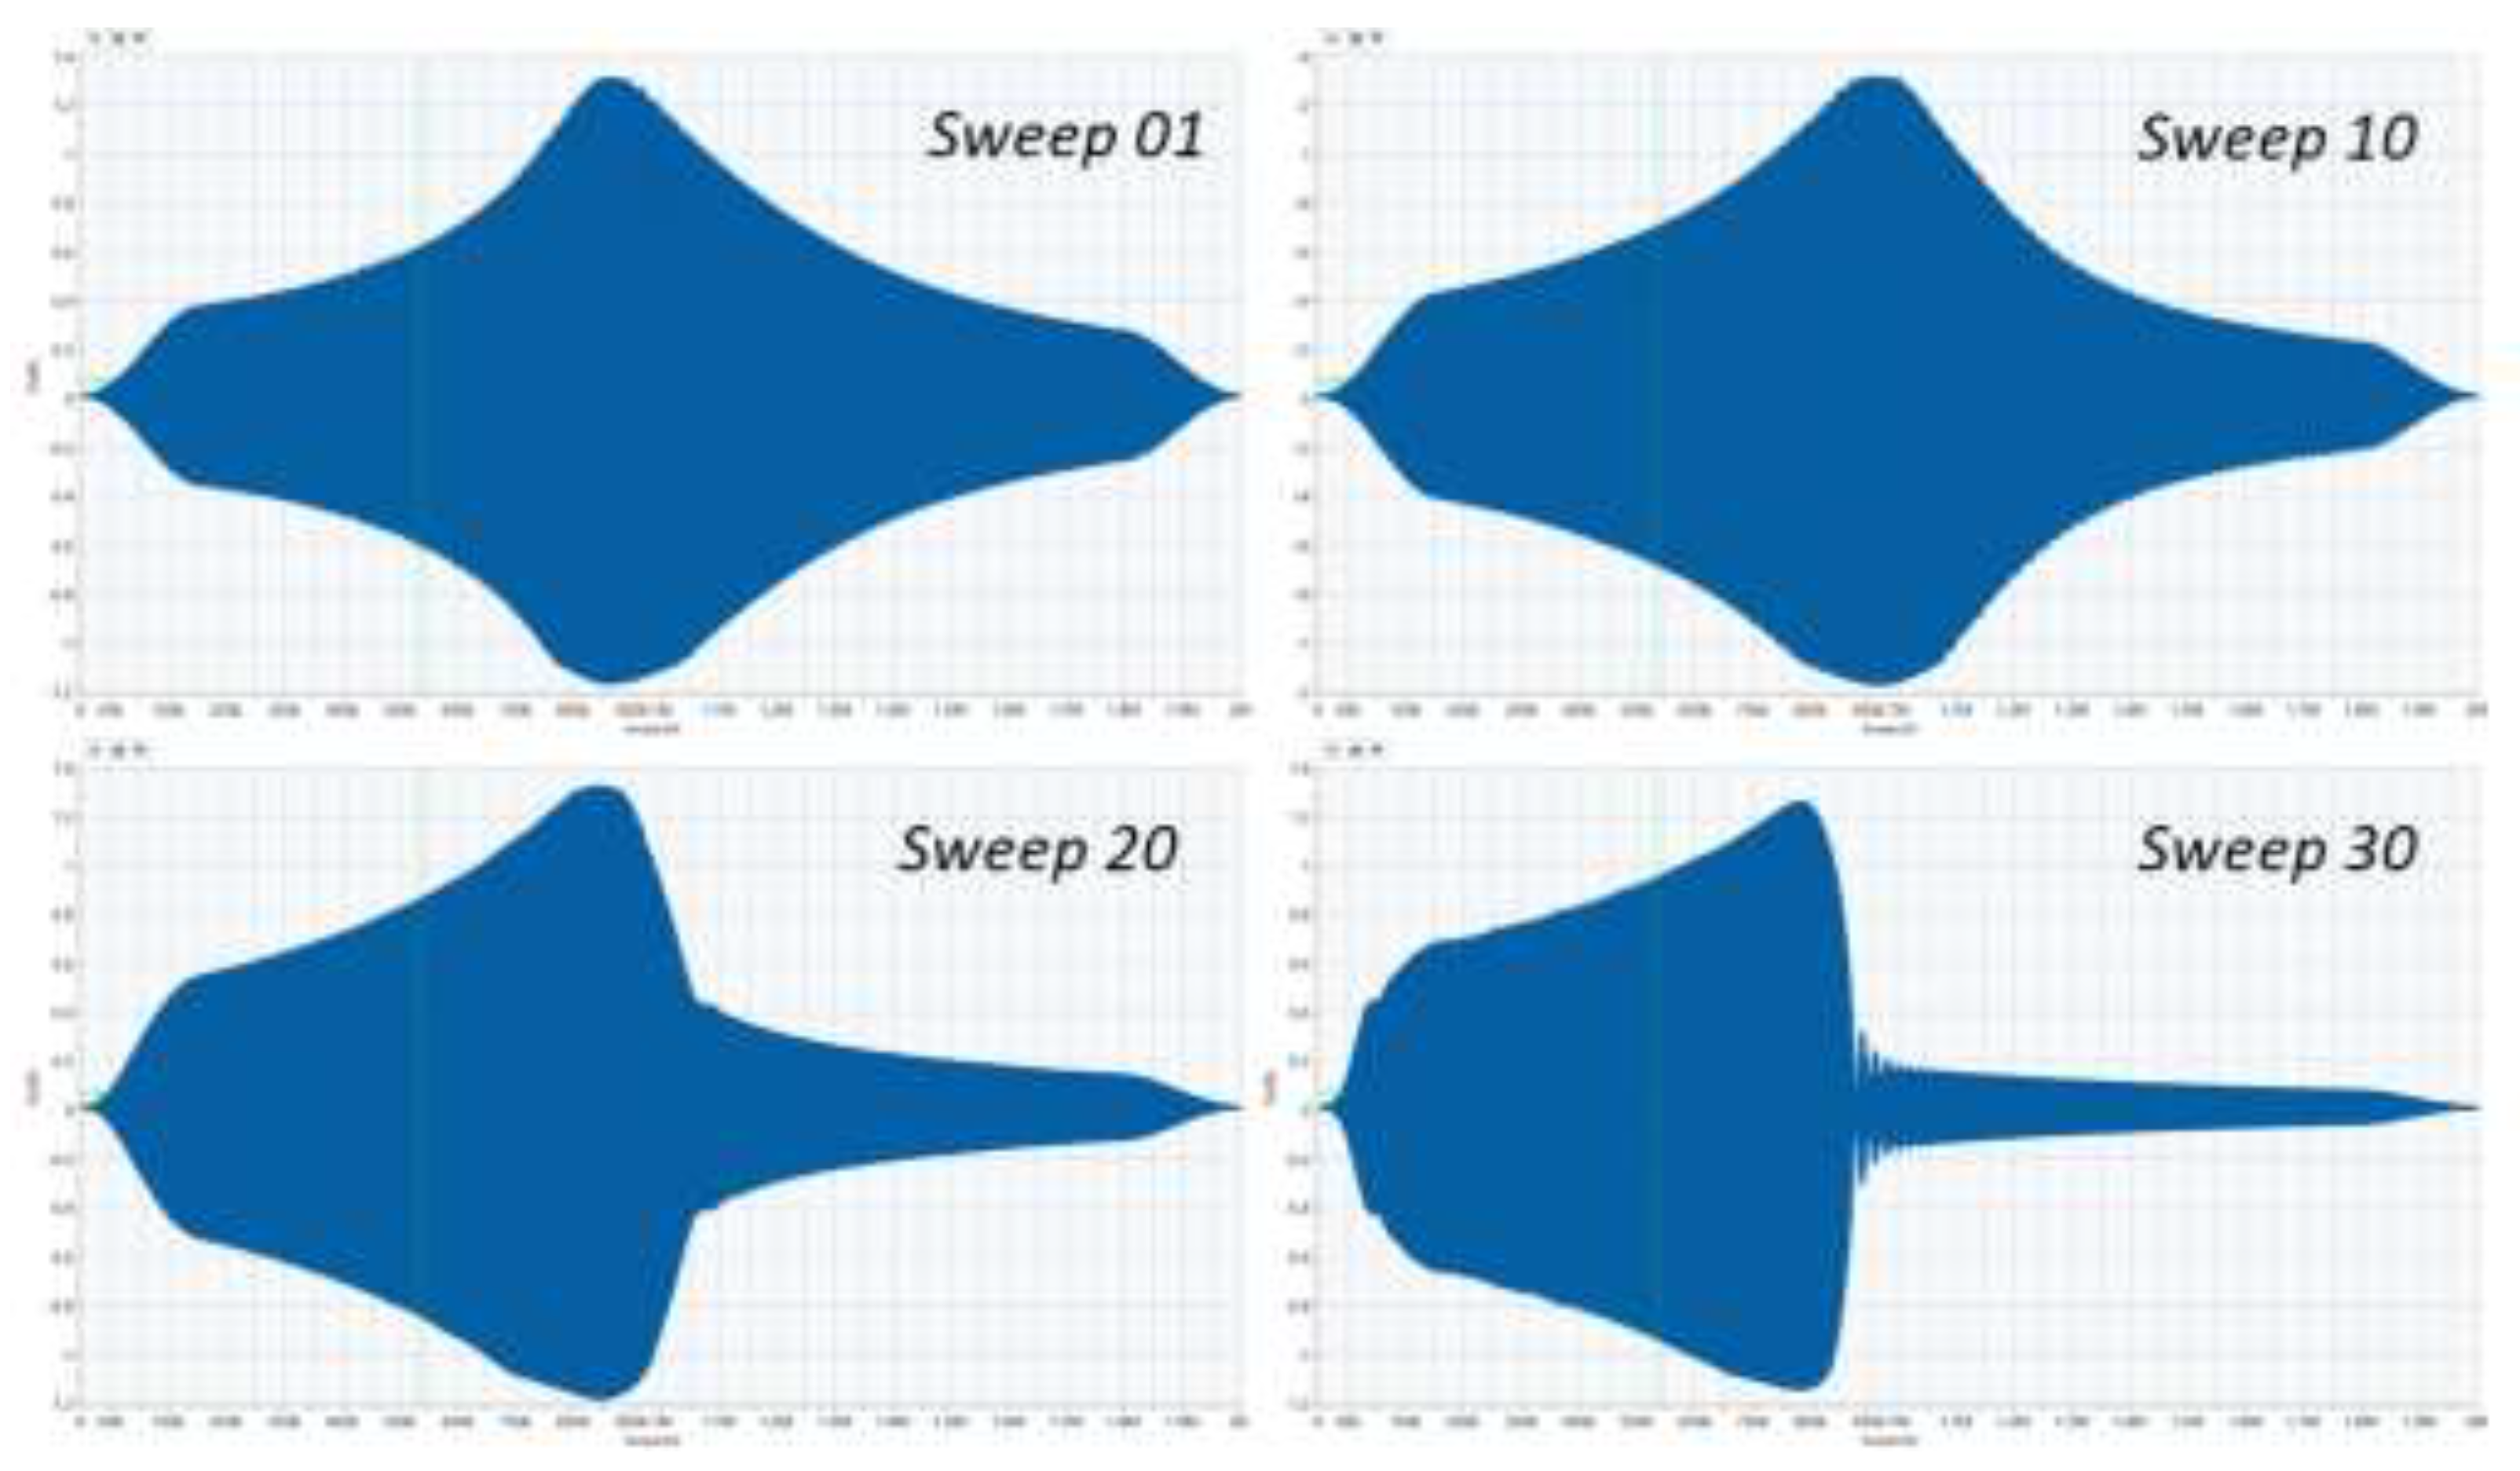
The shape of the resonance peaks also changes over the course of the exposure process, as demonstrated by
Figure 10. The swept peak becomes increasingly less symmetrical, and the transition away from the point of maximum amplitude becomes increasingly abrupt.
3.2. Nonlinear Resonance Results
In order to maximise data from the small sample selection available, Nonlinear Resonance (NLR) characterization was carried out between each stage, tracking the evolution of the crack alongside exposure.
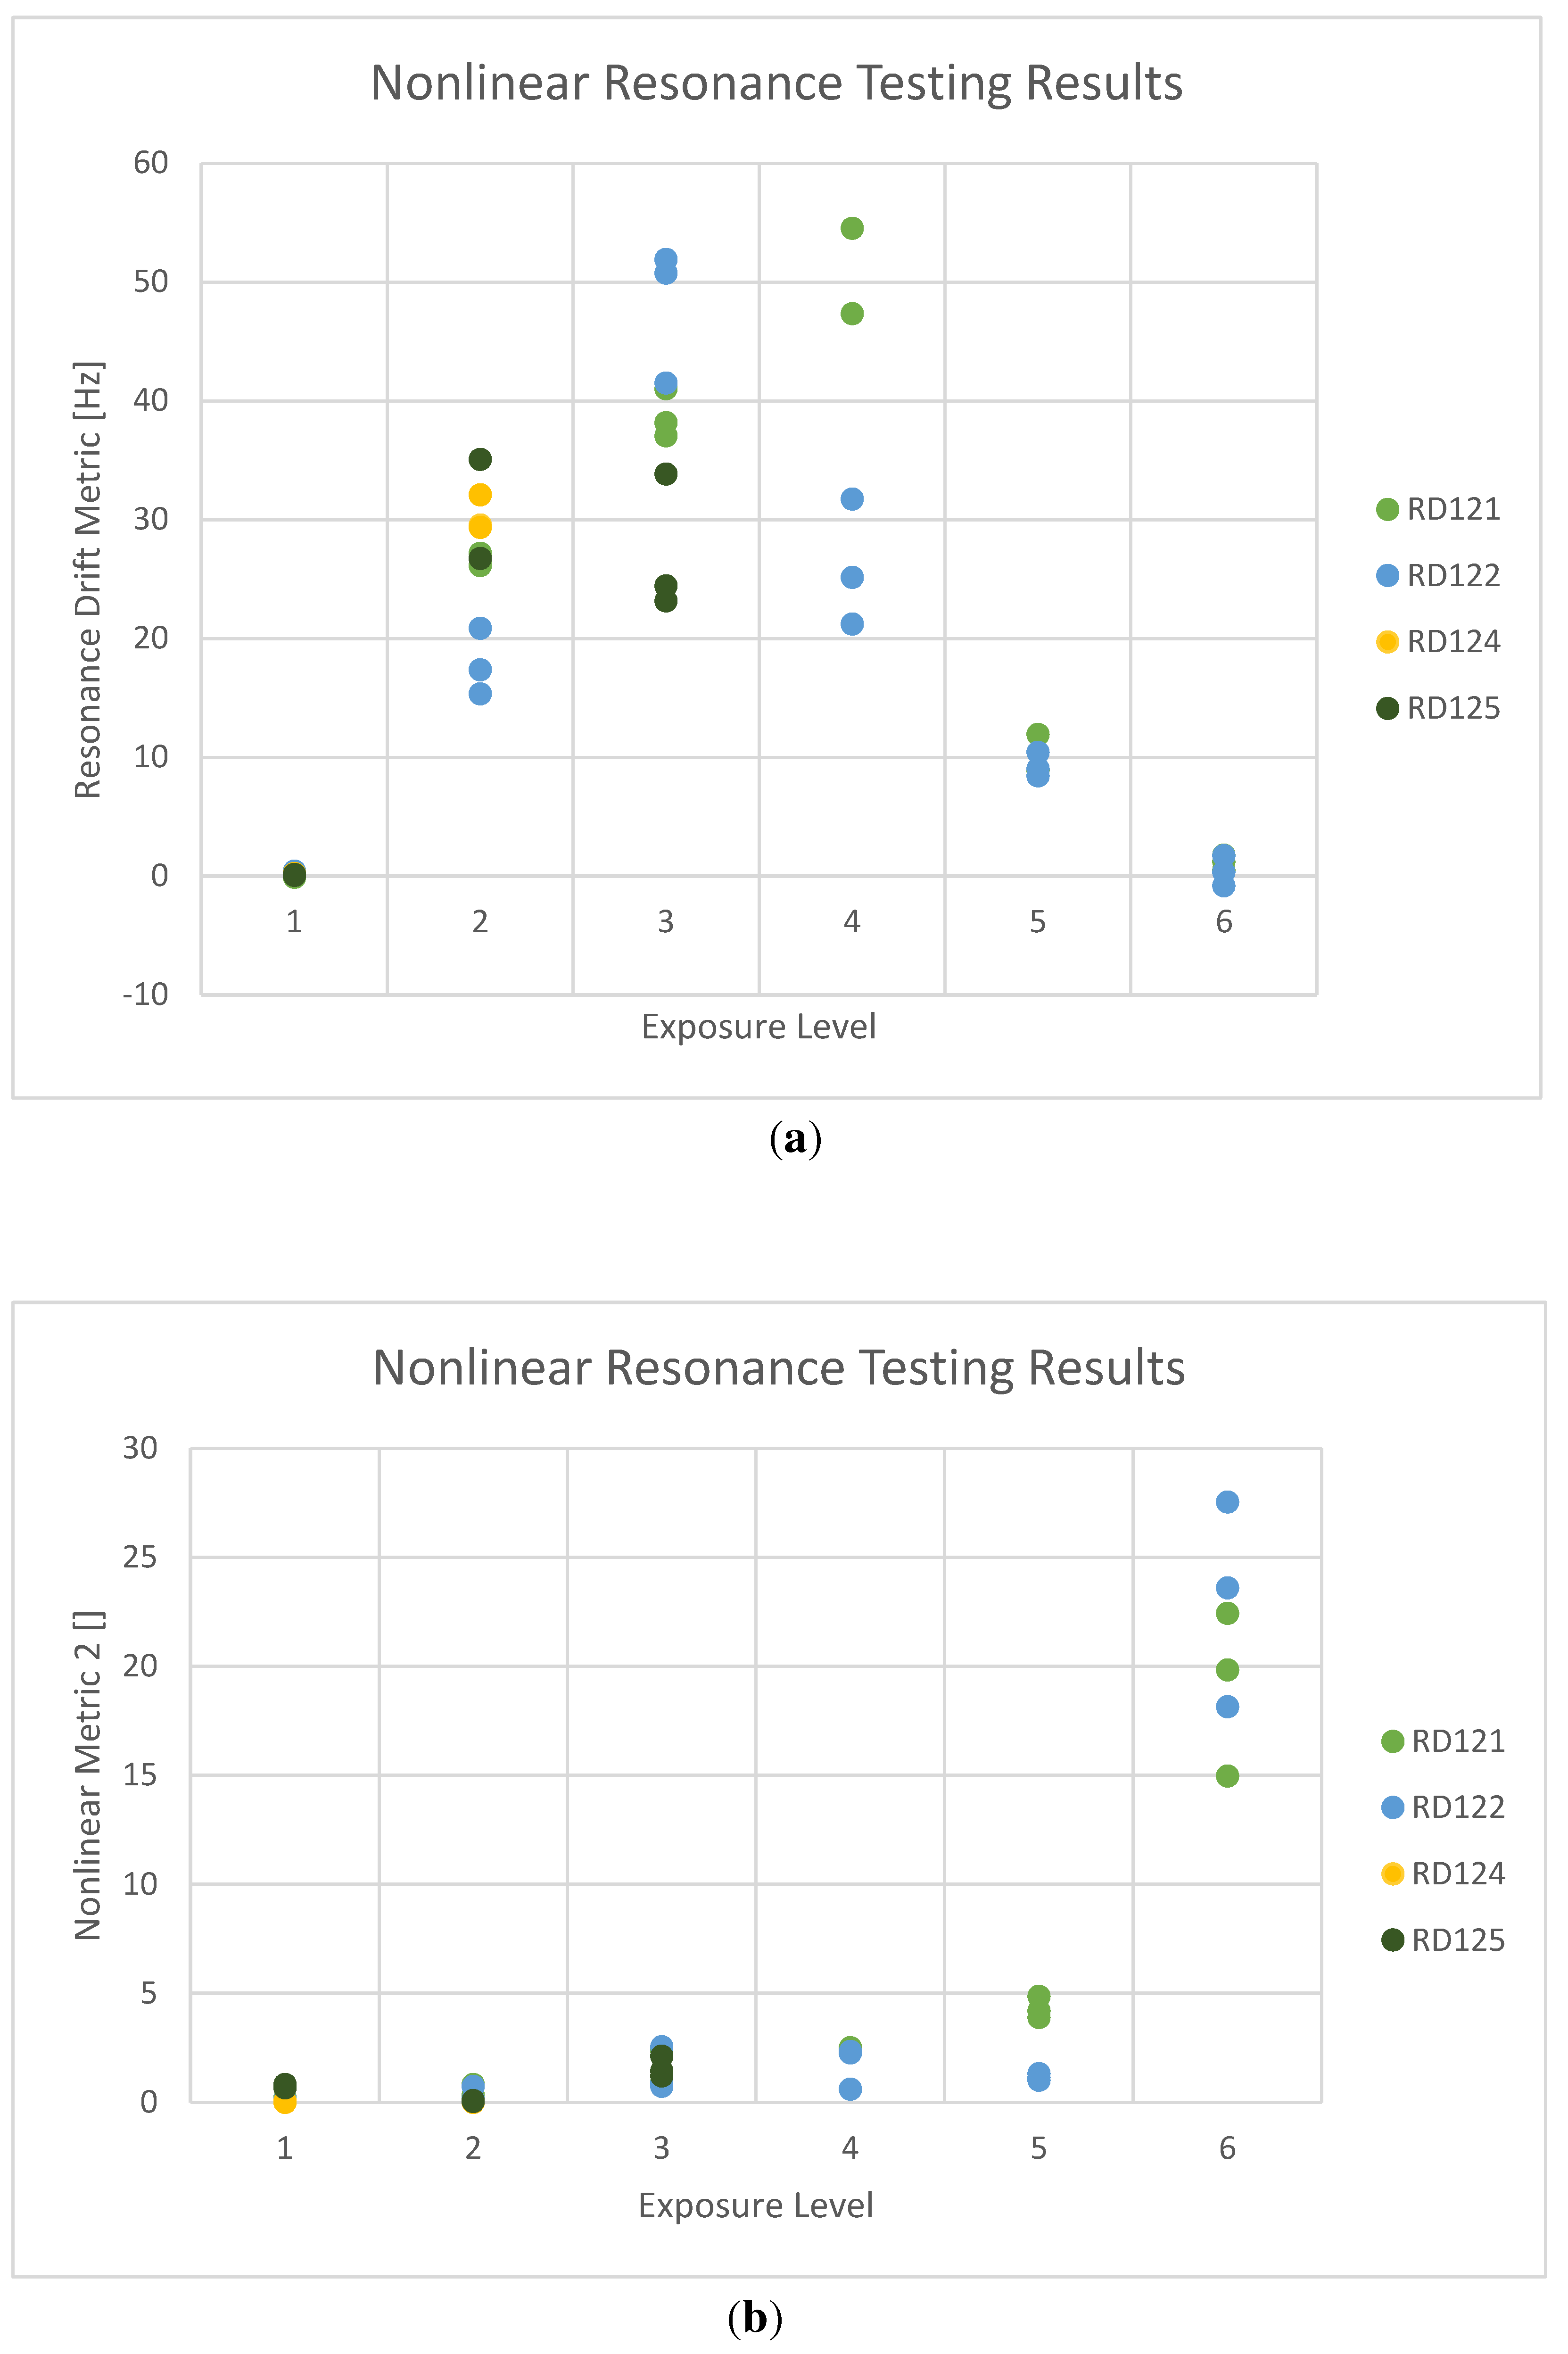
Figure 11 shows the NLR results over three separate measurements on each sample, to ensure reproducibility. Sample RD123 has been omitted from the figure as its measurements were taken at different RD1-TT settings, and are thus not comparable.
The results show that the samples in their ‘as-printed’ states exhibit negligible frequency drift. Drift subsequently experiences a rapid rise with damage stage, before peaking near the second/third stage and dropping off as the crack gets too large. Nonlinear Metric 2, a proprietary algorithm subject to a pending patent application, shows a measured increase for the initial stages of damage, before rising sharply at the final stage.
3.3. Optical Microscopy
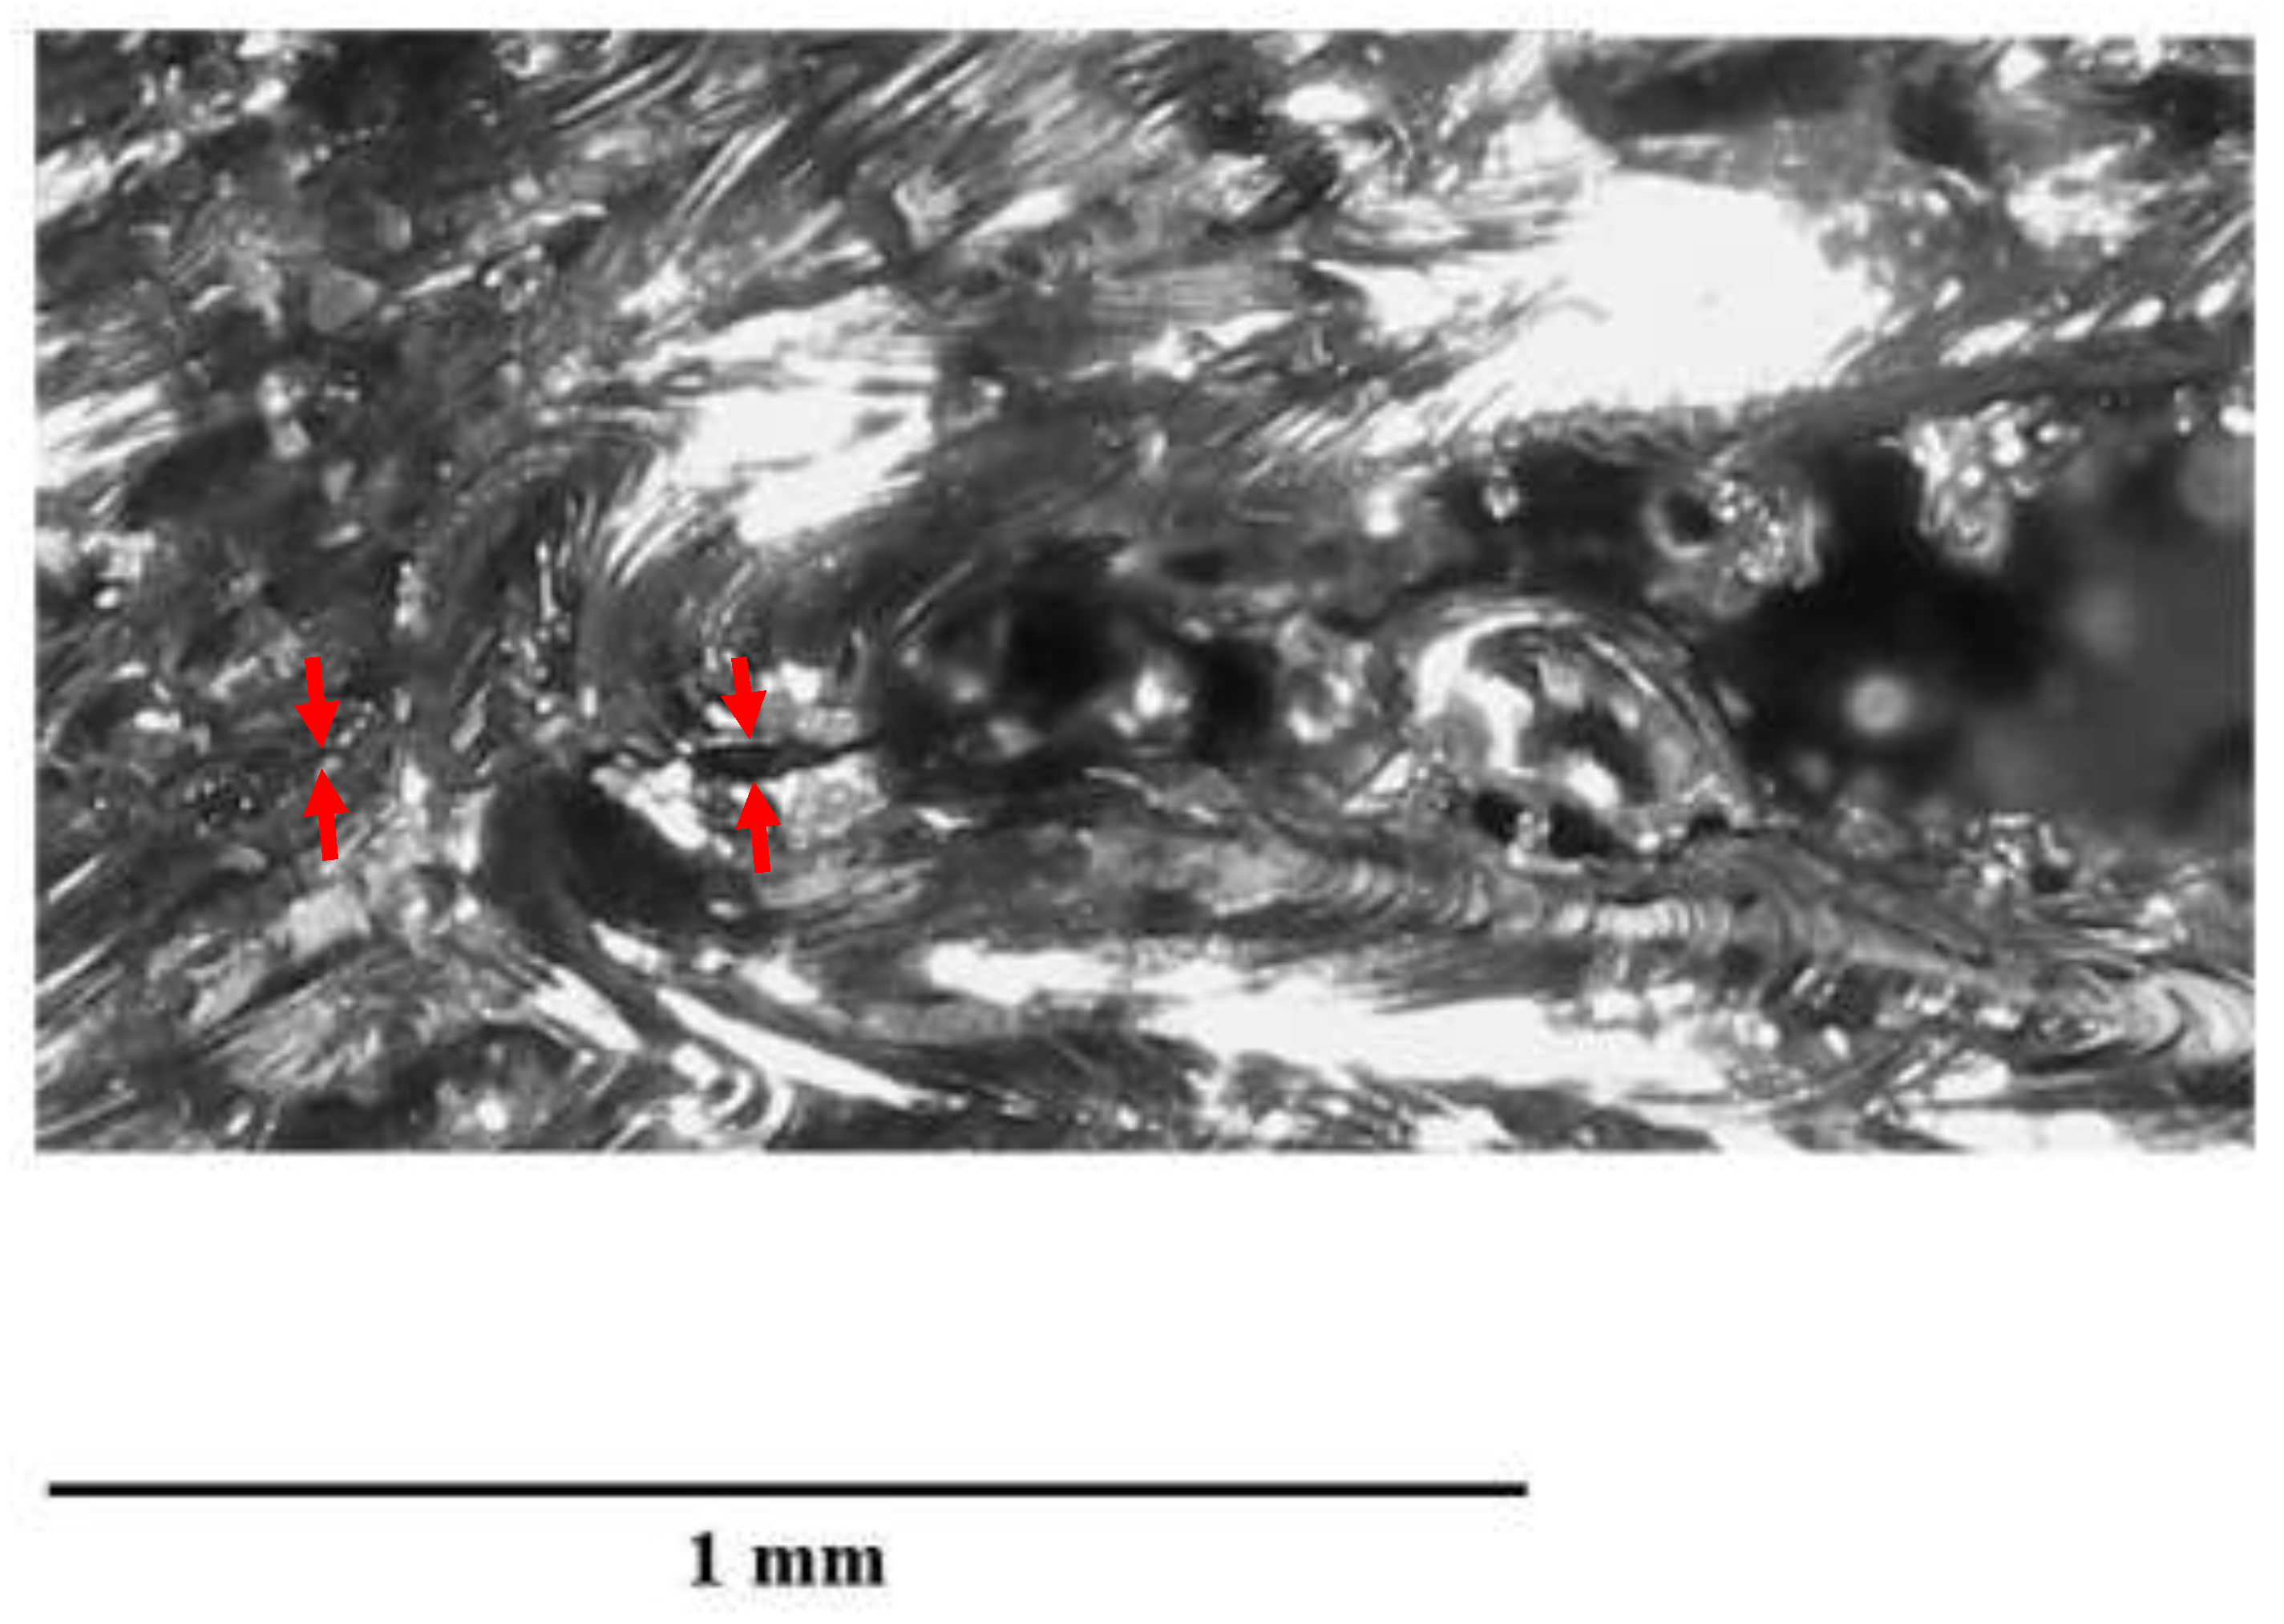
An optical micrograph of the fracture plane of sample RD120 is shown in
Figure 12. Note the clear presence of a boundary between two regions of different roughness, indicated with an arrow.
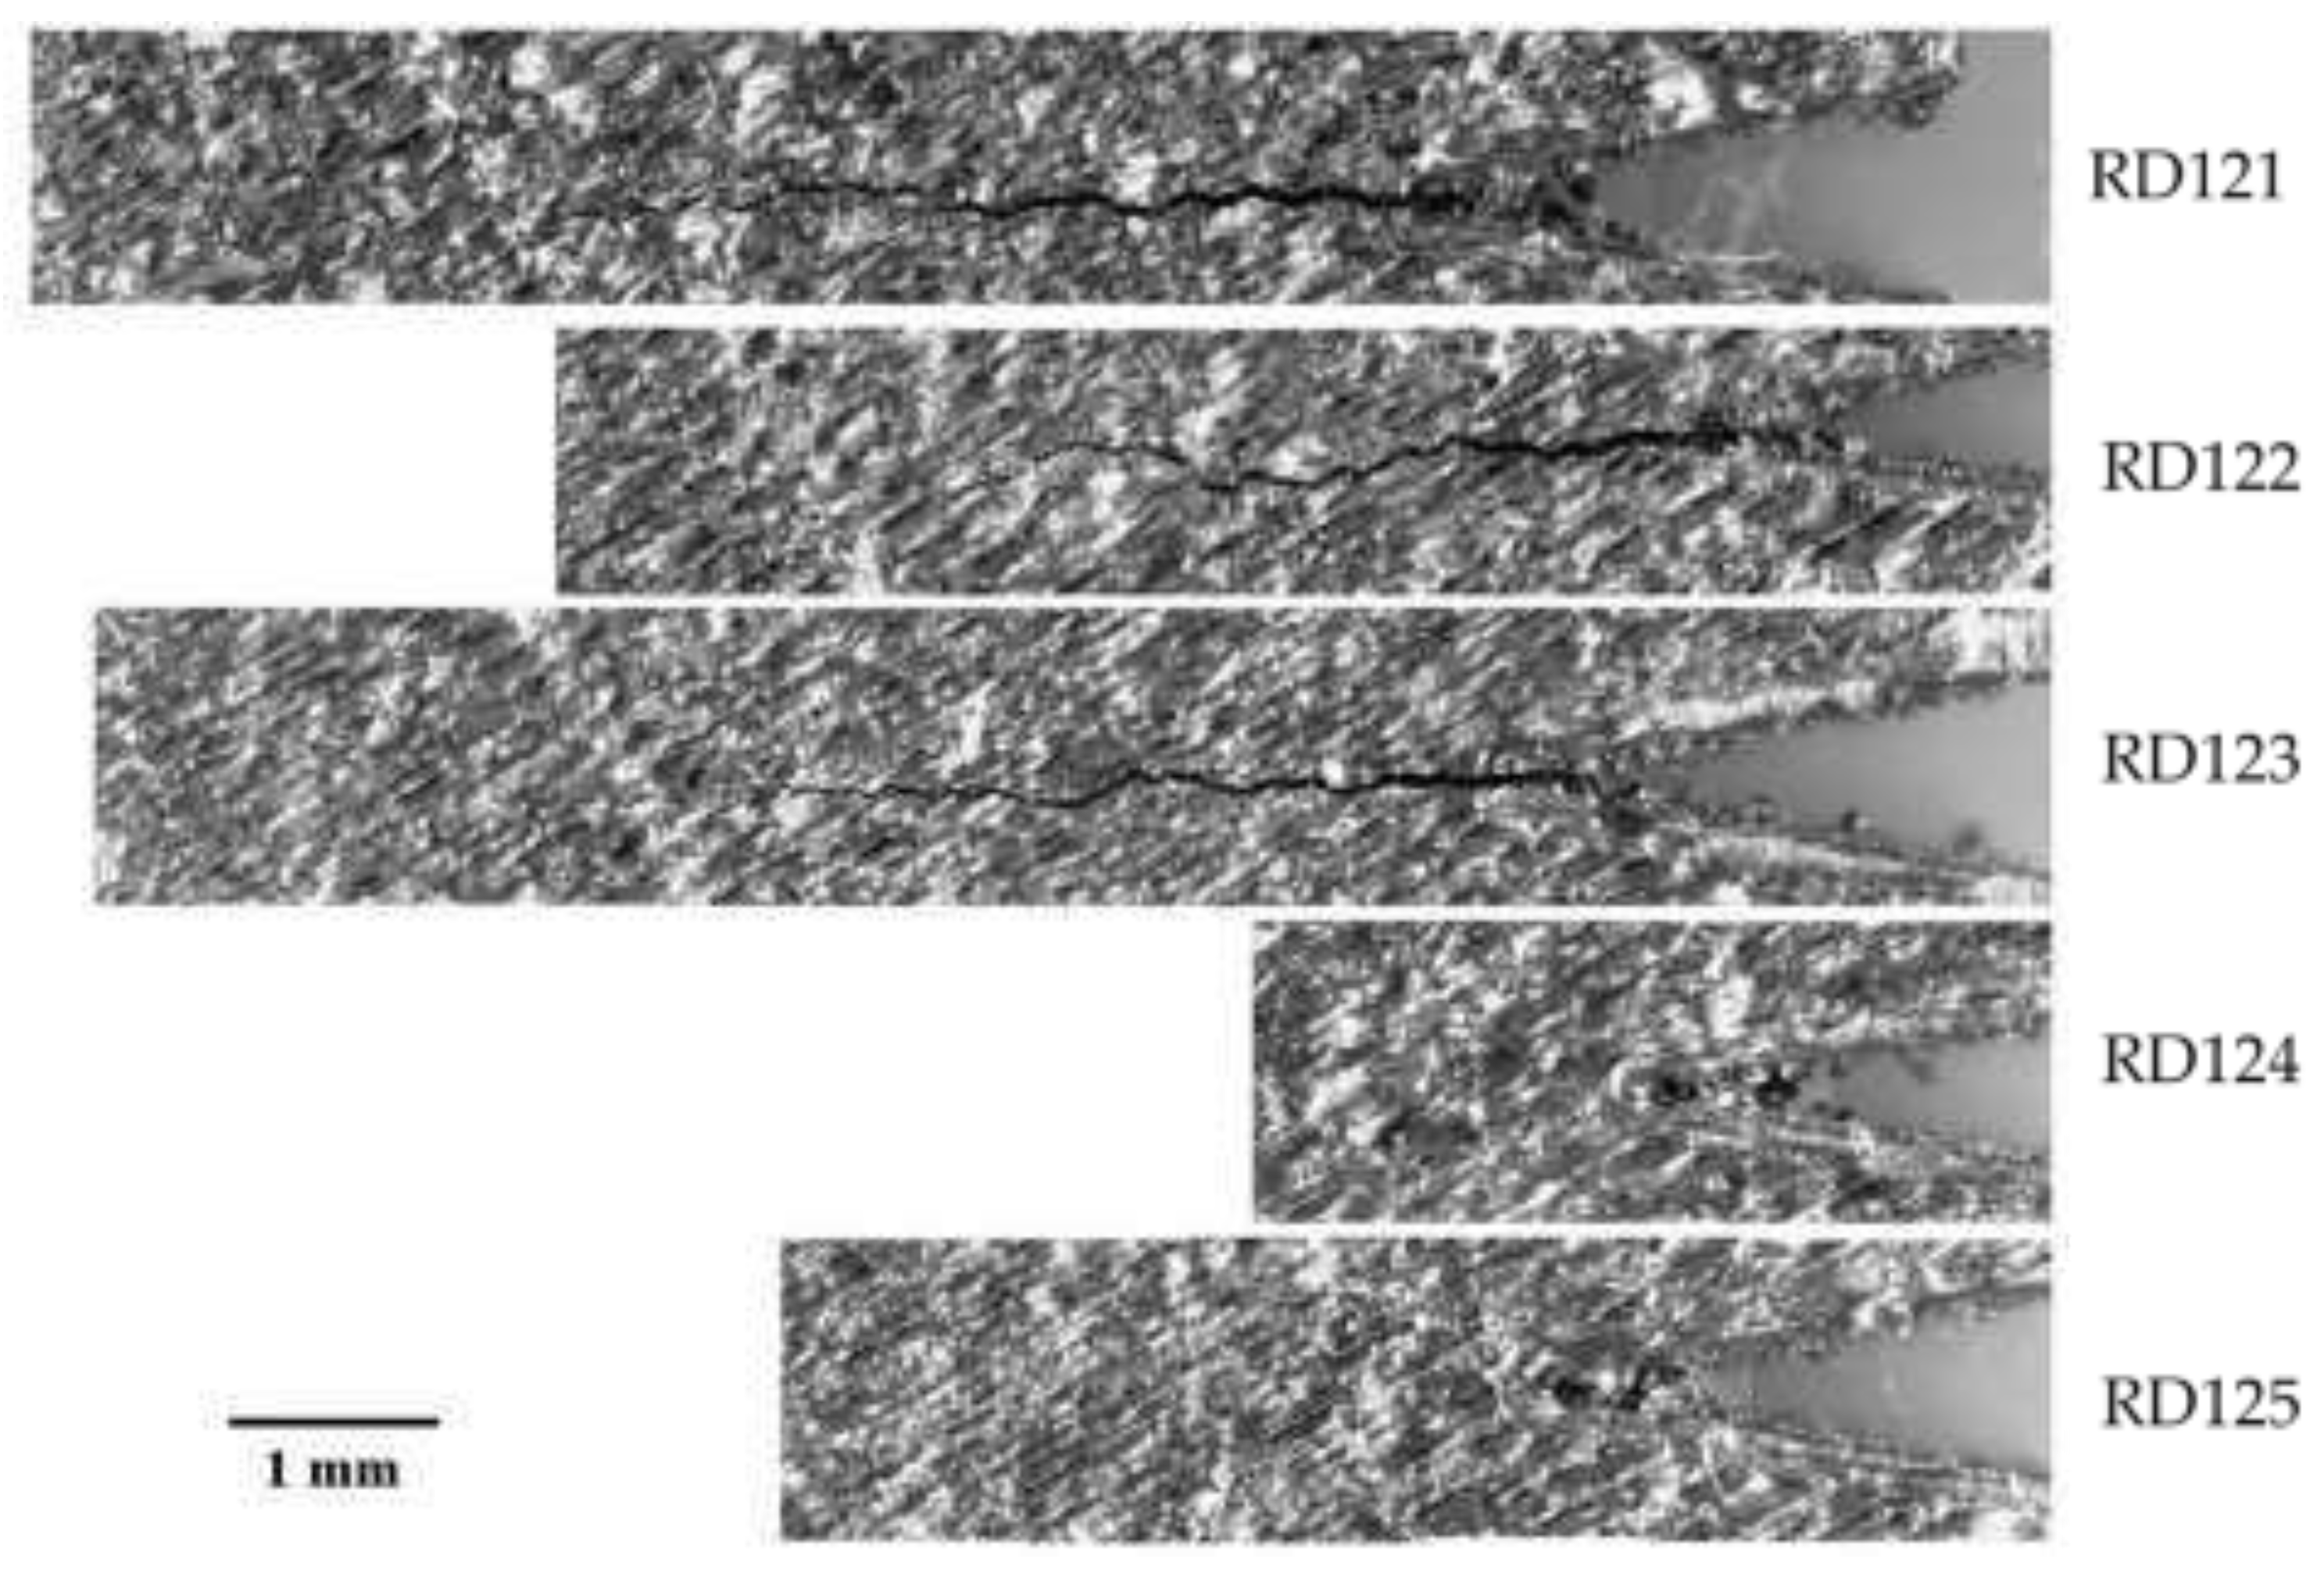
Because the crack plane extended across the entire sample width, the propagation can be observed using optical microscopy on the front face of the remaining samples.
Figure 13 shows the microscope images of the final states of the samples.
Samples RD121-123 have large cracks propagating away from the notch region. Sample RD125 has a smaller crack and sample RD124 has a very small crack which is difficult to see without polishing and, potentially, scanning electron microscopy. A magnified view of RD124 is shown in
Figure 14 with red arrows indicating the crack location.
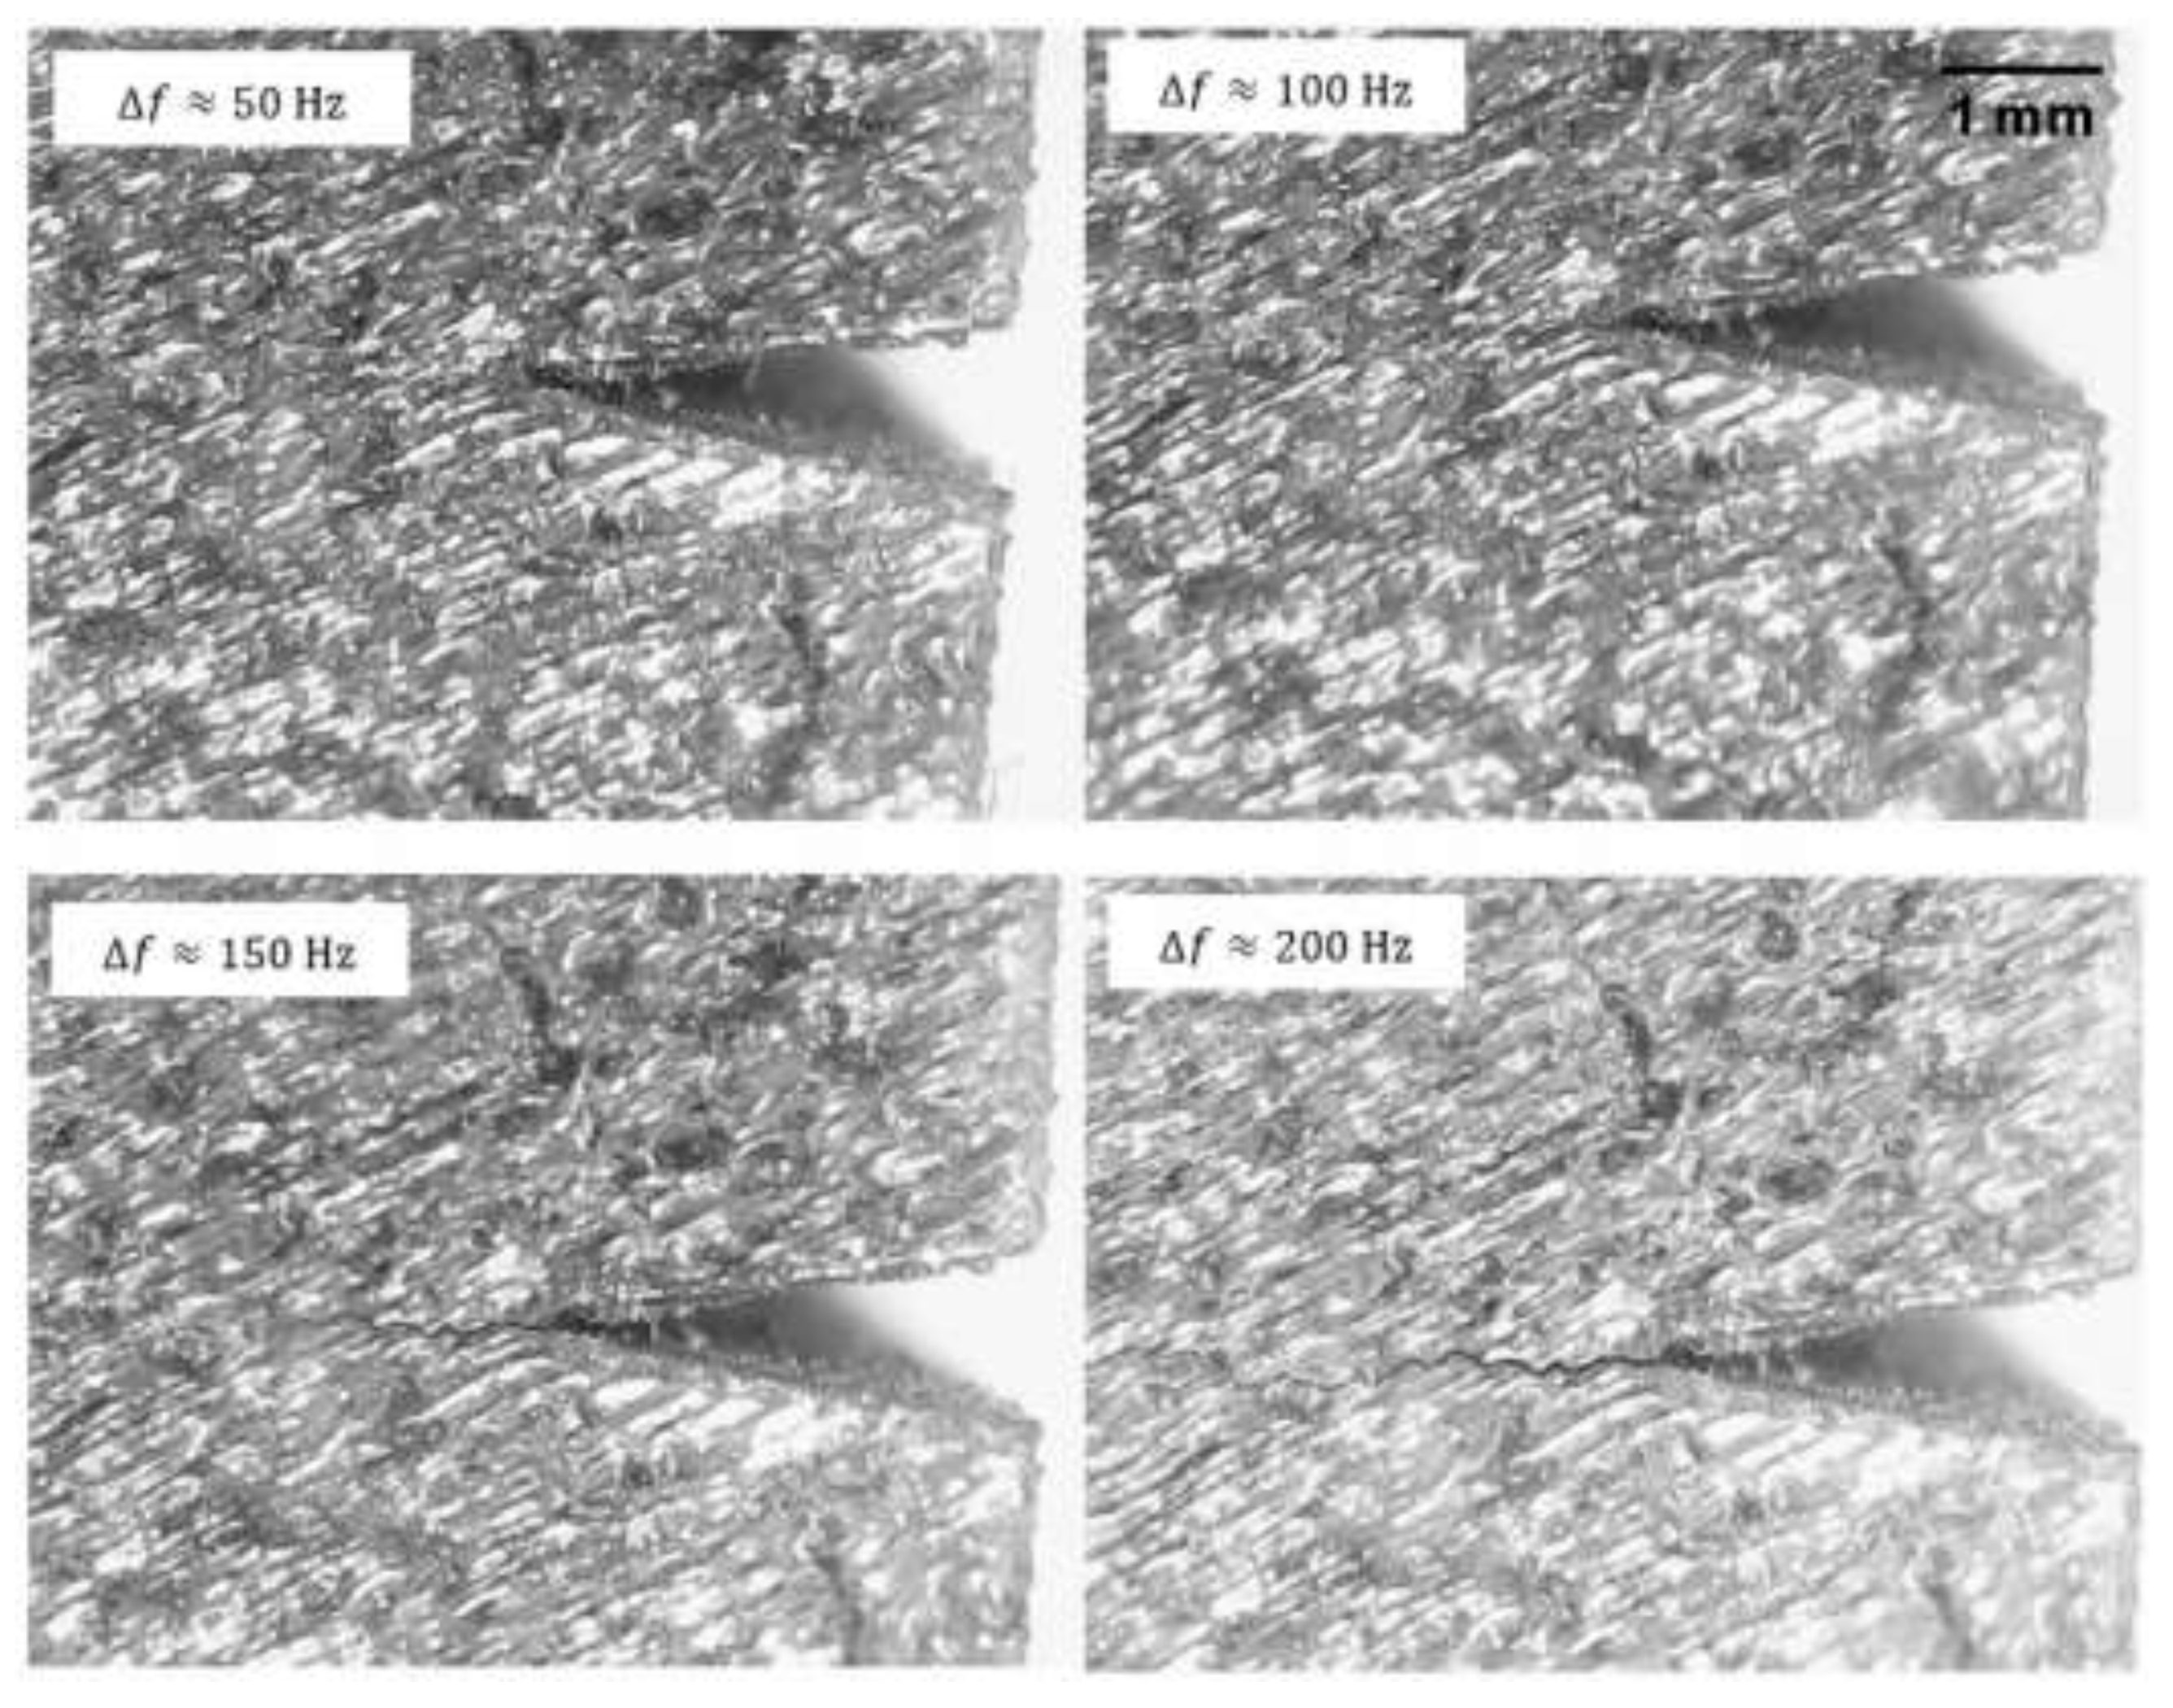
The crack propagation can be observed using microscopy between each of the exposure stages.
Figure 15 shows a crack increasing in length over the increasing Exposure Levels.
From the microscopy and using ImageJ image measurement software, approximate crack lengths and openings can be obtained for the final states of the samples.
Table 2 shows length measurements of the cracks as well as crack opening measurements at the initiation point of the crack.
4. Discussion
The textured topography of the fatigue region indicates inter-granular fracture. The macroscopically flat planar nature of the fracture surface at
to the sample faces indicates a condition of plane strain [
16]. We also note that this crack propagated perpendicular to the build layers.
The results shown in
Figure 8 and
Figure 9 indicate the samples following a consistent trend, in amplitude and frequency, over the course of the exposure process. As the crack propagates, the effective stiffness of each sample decreases, causing the monotonic reduction in resonance frequency of the sample-bob assembly. This is confirmed by Nenadic et al. [
17] who demonstrate using modelling that the resonance frequency of a cracked gear tooth decreases with crack growth.
We note that the samples exhibit an immediate reduction in their resonance frequency, unlike previous work performed on ASTM coupons using this technique. For the latter, the resonance frequency was constant for the majority of exposure, before a steep reduction in frequency leading up to failure. This corroborates the propagation-controlled nature of this fatigue process. The difference is likely due to the sharp notches and rough surface features in the AM samples being efficient stress concentrators, thus acting as pre-existing flaws. Finally, we hypothesize that the spread between different samples in
Figure 8 and
Figure 9 may be in part due to the uneven residual stress characteristic of the additive manufacturing process, as detailed in [
18]. The increasing crack growth rate inferred from
Figure 9 is a consequence of the receding load-bearing cross section of the samples, increasing stress concentration ahead of the crack tip.
The samples all exhibit an initial increase in resonance amplitude, followed by a subsequent decrease. The initial increase may be attributed to the reduced stiffness in the cracked samples. The subsequent decrease may be explained by the increasing crack growth rate towards the end of the process: eventually, during a single sweep, the crack grows by a sufficient amount to shift the resonance of the assembly away from the sweep range. This causes less time to be spent on-resonance during a sweep, which manifests as an abrupt drop in amplitude in the time-domain waveform partway through a sweep, as shown in
Figure 10. Since an FFT measures the power in each frequency bin averaged over the whole sweep, this effect is also responsible for the reduction in frequency-domain amplitude observed in
Figure 9.
The discrete nature of this flaw induction process naturally results in the crack growing in discrete steps. Consequently, differences in the initial conditions of the samples, or in their fatigue histories, gives rise to a “quantization error” in the final crack dimensions (note the
difference, in
Figure 8, between successive frequency points during the final damage increment). Nevertheless, we note that it is possible to mitigate this by using shorter sweeps when the crack approaches its target dimensions, or by using a phase-lock loop to track resonance continuously.
Worthy of note is sample RD122, which exhibits a higher amplitude than the remaining samples for the first increment of shift. This is readily observed in
Figure 8 as a steeper initial gradient. In spite of this, it follows the same general trend for the remainder of the exposure process, and the final crack length is within
of RD123 (
Table 2). This suggests that
is indeed a more important measure of crack dimensions than amplitude history, but further corroboration with a larger sample-set is required.
The NLR results displayed in
Figure 11 confirm the presence of contact flaws in all but the as-built samples, with frequency drift showing high sensitivity to smaller flaws and Nonlinear Metric 2 showing sensitivity to larger flaws. Using a combination of various measures of nonlinearity enables surveying of the entire crack-size range of the samples.
The optical micrographs shown in
Figure 13 show a tortuous morphology of the cracks (albeit less tortuous than the ductile-torn side surface of RD120 in
Figure 12), again consistent with inter-granular fracture.
Table 2 demonstrates the qualitative result that a larger
corresponds to larger crack dimensions. As expected, samples RD121 and RD123 have very similar crack dimensions, to within
for the length. Finally, note that despite the relatively coarse frequency shift increments of approximately
, the crack in RD124 is very small and hardly surface-breaking (
Figure 14). This indicates that any further work investigating finer damage increments must involve sectioning and SEM imaging of the samples to investigate internal crack morphology.
Future work should seek to corroborate these observations with a larger sample-set to assess the statistical viability of the technique, as well as to determine a modelling-assisted quantitative relationship between and crack dimensions. Future implementation of this technique using finer increments will enable evaluation of the sensitivity limits of various NDT techniques.
5. Conclusions
This paper presents a method for the rapid and controlled generation of mechanically fatigue induced cracks in additively manufactured test coupons. The creation of these reference flaws is crucial for the certification of NDT techniques which will enable the adoption of AM for critical applications.
To seed cracks in a controlled manner, a static tensile load is applied using steel bobs, whilst also exciting the system into a high-strain vibration mode. Utilizing resonance allows for cracks to be seeded in a rapid, compact, low force setup. The steel masses reduce the resonance frequency of the sample-bob assembly, increasing the strain at the tip of the notch, which acts as a stress raiser. Because this monitoring technique is non-invasive and utilizes the resonance of the entire sample-bob assembly, it does not require any probes in contact with the sample or near the vicinity of the crack, instead taking measurements with a laser Doppler vibrometer at an arbitrary location on the assembly. Through judicious selection of resonance mode shape and the location of stress-raising features, this technique provides much greater control over crack location, including non-surface breaking cracks, without regard to surface accessibility constraints. Finally, the technique can be very quickly and inexpensively realised, in this study taking a maximum of 15 minutes for seeding of the largest crack, and this timespan can be further reduced by increasing the excitation amplitude or the magnitude of the tensile load. The convenience of this technique makes it ideal for the creation of large sample sets which can be used in statistically significant studies in both AM and NDT.
The experimental work shows successful creation of five reference samples with seeded cracks of lengths between and and openings between and . The crack lengths are controlled using a continuous, non-contact measurement of the resonance frequency, allowing for the creation of very small flaws.
The cracks seeded in these samples were validated using Nonlinear Resonance and optical microscopy, the former confirming the presence of cracking and the latter confirming crack dimensions over the exposure process.
Author Contributions
Conceptualization, James. Watts; methodology, Daniel Preston, Ahmed Ashour and Jacques Wood; formal analysis, Daniel Preston; investigation, Ahmed Ashour and Daniel Preston; resources, Jacques Wood; data curation, Ahmed Ashour; writing—original draft preparation, Ahmed Ashour and Daniel Preston; writing—review and editing, Daniel Sanmartin and Julian Wright; visualization, Daniel Preston; supervision, James Watts; project administration, Daniel Preston. All authors have read and agreed to the published version of the manuscript.
Funding
This research received no external funding.
Data Availability Statement
We encourage all authors of articles published in MDPI journals to share their research data. In this section, please provide details regarding where data supporting reported results can be found, including links to publicly archived datasets analyzed or generated during the study. Where no new data were created, or where data is unavailable due to privacy or ethical restrictions, a statement is still required. Suggested Data Availability Statements are available in section “MDPI Research Data Policies” at
www.mdpi.com/ethics.
Conflicts of Interest
The authors are affiliated with a company which offers non-destructive testing and declare that this work does not constitute any competing interests.
References
- Blakey-Milner, B.; Gradl, P.; Snedden, G.; Brooks, M.; Pitot, J.; Lopez, E.; Leary, M.; Berto, F.; Du Plessis, A. Metal Additive Manufacturing in Aerospace: A Review. Mater. Des. 2021, 209, 110008. [Google Scholar] [CrossRef]
- Additive Manufacturing--Non-Destructive Testing--Intentionally Seeding Flaws in Metallic Parts.
- Obaton, A.-F.; Butsch, B.; McDonough, S.; Carcreff, E.; Laroche, N.; Gaillard, Y.; Tarr, J.B.; Bouvet, P.; Cruz, R.; Donmez, A. Evaluation of Nondestructive Volumetric Testing Methods for Additively Manufactured Parts. In Structural Integrity of Additive Manufactured Parts; Shamsaei, N., Daniewicz, S., Hrabe, N., Beretta, S., Waller, J., Seifi, M., Eds.; ASTM International: 100 Barr Harbor Drive, PO Box C700, West Conshohocken, PA 19428-2959, 2020; pp. 51–91 ISBN 978-0-8031-7686-7.
- Yanishevsky, M.; Martinez, M.; Mandache, C.; Khan, M.; Fahr, A.; Backman, D. Artificial Seeding of Fatigue Cracks in NDI Reference Coupons. Insight - Non-Destr. Test. Cond. Monit. 2010, 52, 664–671. [Google Scholar] [CrossRef]
- Yan, W.-. T.; Holdsworth, S.; Kühn, I.; Mazza, E. Creep–Fatigue Crack Development from Short Crack Starters. Mater. High Temp. 2014, 31, 305–314. [Google Scholar] [CrossRef]
- Richards, M.D.; Weeks, T.S.; McColskey, J.D.; Wang, B.; Wang, Y.-Y. Fatigue Pre-Cracking Curved Wide Plates in Bending. In Proceedings of the 2010 8th International Pipeline Conference, Volume 4; ASMEDC: Calgary, Alberta, Canada, January 1 2010; pp. 237–244. [Google Scholar]
- Kemppainen, M.; Virkkunen, I.; Pitkänen, J.; Paussu, R.; Hänninen, H. Advanced Flaw Production Method for In-Service Inspection Qualification Mock-Ups. Nucl. Eng. Des. 2003, 224, 105–117. [Google Scholar] [CrossRef]
- Ekström, P.; Wåle, J. Crack Characterisation for In-ServiceInspection Planning.
- Preston, D.; Rodriguez Sanmartin, D.; Watts, J.; Wright, J. Controlled Seeding of Contact Cracks in Testpieces for the Evaluation and Validation of Non-Destructive Testing Systems [Preprint]. 2023.
- Non-Destructive Testing for Metal AM Available online: https://thetandt.com/.
- 40-1000X USB Digital Microscope Available online: https://caindahelp.com/40-1000x-usb-digital-microscope-p00092p1.html.
- ImageJ Available online: https://imagej.nih.gov/.
- Solodov, I.; Döring, D.; Busse, G. New Opportunities for NDT Using Non-Linear Interaction of Elastic Waves with Defects. Stroj. Vestn. - J. Mech. Eng. 2018, 57, 169–182. [Google Scholar] [CrossRef]
- Van Den Abeele, K.E.-A.; Sutin, A.; Carmeliet, J.; Johnson, P.A. Micro-Damage Diagnostics Using Nonlinear Elastic Wave Spectroscopy (NEWS). NDT E Int. 34, 239–248. [CrossRef]
- Ashby, M.; Jones, D.R.H. Chapter 14: Micromechanisms of Fast Fracture. In Engineering Materials 1: An Introduction to their Properties and Applications; Butterworth Heinemann, 1996; Vol. 1, pp. 140–154.
- Lynch, S.P.; Wanhill, R.J.H.; Byrnes, R.T.; Bray, G.H. Chapter 13 - Fracture Toughness and Fracture Modes of Aerospace Aluminum–Lithium Alloys. In Aluminum-lithium Alloys; 2014; pp. 415–455.
- Nenadic, N.G.; Wodenscheck, J.A.; Thurston, M.G.; Lewicki, D.G. Seeding Cracks Using a Fatigue Tester for Accelerated Gear Tooth Breaking. In Rotating Machinery, Structural Health Monitoring, Shock and Vibration, Volume 5; Proulx, T., Ed.; Conference Proceedings of the Society for Experimental Mechanics Series; Springer New York: New York, NY, 2011; pp. 349–357 ISBN 978-1-4419-9427-1.
- Murakami, Y.; Takagi, T.; Wada, K.; Matsunaga, H. Essential Structure of S-N Curve: Prediction of Fatigue Life and Fatigue Limit of Defective Materials and Nature of Scatter. Int. J. Fatigue 2021, 146, 106138. [Google Scholar] [CrossRef]
Figure 1.
(a) Engineering drawing of each sample. The circled area labelled ‘A’ indicates the V-notch. (b) Photograph of as-built sample.
Figure 1.
(a) Engineering drawing of each sample. The circled area labelled ‘A’ indicates the V-notch. (b) Photograph of as-built sample.
Figure 2.
Samples had a common orientation on the build-plate.
Figure 2.
Samples had a common orientation on the build-plate.
Figure 3.
Nomogram to show the relationship between frequency, velocity, and displacement for the sample with and without the addition of the steel bobs.
Figure 3.
Nomogram to show the relationship between frequency, velocity, and displacement for the sample with and without the addition of the steel bobs.
Figure 4.
(
a) Photograph of flaw induction system. An LDV is present off-camera, to the left hand side of the image. (
b) Schematic diagram of full setup, after [
9].
Figure 4.
(
a) Photograph of flaw induction system. An LDV is present off-camera, to the left hand side of the image. (
b) Schematic diagram of full setup, after [
9].
Figure 5.
(a) CAD model of sample with bobs attached. (b) Mode shape of first flexural mode, with the color plot showing von Mises stress. Note that absolute values of stress depend on deflection amplitude.
Figure 5.
(a) CAD model of sample with bobs attached. (b) Mode shape of first flexural mode, with the color plot showing von Mises stress. Note that absolute values of stress depend on deflection amplitude.
Figure 6.
Schematic labelling the crack dimensions of interest in this study.
Figure 6.
Schematic labelling the crack dimensions of interest in this study.
Figure 7.
(a) Fracture surface showing two distinct failure mechanisms. The surface at the top of the image is where the sample was bonded to its AM support structure; hence the increased roughness. (b) RD120 side surface after complete failure, with the two halves placed together for illustrative purposes. (c) RD120 front surface after complete failure. Note the higher tortuosity in the side surface compared to the front surface.
Figure 8.
Evolution of resonance frequency against sweep number during exposure.
Figure 8.
Evolution of resonance frequency against sweep number during exposure.
Figure 9.
Evolution in resonance frequency and amplitude during exposure. Each point corresponds to a measurement from a single sine-sweep. Data from all performed sine-sweeps is presented.
Figure 9.
Evolution in resonance frequency and amplitude during exposure. Each point corresponds to a measurement from a single sine-sweep. Data from all performed sine-sweeps is presented.
Figure 10.
Time domain waveforms showing the evolution of sample response through the exposure process.
Figure 10.
Time domain waveforms showing the evolution of sample response through the exposure process.
Figure 11.
Nonlinear resonance testing results gathered between every characterization stage in order to track changes in the samples. (a) resonance drift metric, (b) Nonlinear Metric 2. Three separate measurements are taken for each of the samples to assess the reproducibility of the measurement.
Figure 11.
Nonlinear resonance testing results gathered between every characterization stage in order to track changes in the samples. (a) resonance drift metric, (b) Nonlinear Metric 2. Three separate measurements are taken for each of the samples to assess the reproducibility of the measurement.
Figure 12.
(a) Micrograph of the centre of the fatigue fracture surface of RD120, showing a tortuous topography. (b) Distinct boundary between the fatigue and ductile fracture regions, marked by arrow.
Figure 12.
(a) Micrograph of the centre of the fatigue fracture surface of RD120, showing a tortuous topography. (b) Distinct boundary between the fatigue and ductile fracture regions, marked by arrow.
Figure 13.
Microscopy images of the exposed samples showing cracks propagating inward from the notch.
Figure 13.
Microscopy images of the exposed samples showing cracks propagating inward from the notch.
Figure 14.
Magnified view of sample RD124, red circle highlights a very small crack present at the tip of the notch.
Figure 14.
Magnified view of sample RD124, red circle highlights a very small crack present at the tip of the notch.
Figure 15.
Micrographs of the front surface of RD122, showing the crack length progression with .
Figure 15.
Micrographs of the front surface of RD122, showing the crack length progression with .
Table 1.
Samples tested and their damage increments ().
Table 1.
Samples tested and their damage increments ().
| Sample Name |
Increments |
| RD121 |
|
| RD122 |
|
| RD123 |
|
| RD124 |
|
| RD125 |
|
Table 2.
Approximate crack dimensions as measured from microscopy images.
Table 2.
Approximate crack dimensions as measured from microscopy images.
| Sample ID |
Crack Length [mm] |
Crack Opening at initiation site [mm] |
| RD121 |
|
|
| RD122 |
|
|
| RD123 |
|
|
| RD124 |
|
|
| RD125 |
|
|
|
Disclaimer/Publisher’s Note: The statements, opinions and data contained in all publications are solely those of the individual author(s) and contributor(s) and not of MDPI and/or the editor(s). MDPI and/or the editor(s) disclaim responsibility for any injury to people or property resulting from any ideas, methods, instructions or products referred to in the content. |
© 2023 by the authors. Licensee MDPI, Basel, Switzerland. This article is an open access article distributed under the terms and conditions of the Creative Commons Attribution (CC BY) license (https://creativecommons.org/licenses/by/4.0/).
