1. Introduction
Titanium alloys used in fabricated aerospace structures require joints of high integrity to meet the design requirements. Tungsten inert gas welding (TIG), plasma arc welding (PAW), laser beam welding (LBW) and electron beam welding (EBW) are all processes capable of creating high quality fusion welded joints in titanium alloys. Highly concentrated energy input in high energy beam welding processes permits the generation of a keyhole which allows deep penetration with low total heat input. The microstructural changes are confined in narrow fusion and heat affected zones (HAZ) and residual stresses are relatively low which produces welds with appropriate mechanical and fatigue properties [
1]. TIG and PAW offer the potential to achieve welds of equal quality to EBW or LBW at much lower capital costs. While higher heat input in arc welding processes produces wider weld zones with coarser microstructure, it has been shown that TIG welds can have comparable mechanical properties to EBWs in both cast and wrought base materials [
2].
The microstructures formed in α+β titanium alloys during continuous cooling are complex. The cooling rate affects the transformed β microstructure in the fusion zone and in the HAZ. At cooling rates faster than 410 K/s transformation occurs completely through martensitic transformation forming acicular α’. At lower cooling rates this transformation is gradually replaced by diffusion-controlled Widmanstätten α-formation [
3]. A lower cooling rate mainly leads to a colony-type of microstructure consisting of several aligned and parallel α plates that together forms a “colony”, whereas higher cooling rates favours basketweave-type of structures [
4]. In the alloy Ti-6Al-4V (Ti-64), the as-welded microstructure in arc welding typically consist of a combination of martensitic α’ and fine diffusional transformed α plates. In EBW and LBW, the as-welded microstructure can be entirely martensitic [
1,
5]. Post weld heat treatments (PWHT) are applied to reduce residual stresses, stabilize and homogenize the weld zone microstructure, and to improve ductility [
6]. Microstructural changes occur during post weld heat treatments as the metastable α’ decomposes to equilibrium α and β and the microstructure coarsens [
5,
7,
8,
9].
Low ductility in the fusion zone is a typical feature in α+β titanium alloy welds and has been attributed to large prior-β grain size and an acicular intragranural microstructure [
5,
10,
11]. According to Lütjering et al. [
11], prior-β grain size has a strong influence on ductility. Sundaresan et al. [
12] showed that the ductility of Ti-6Al-4V and Ti-6Al-2Sn-4Zr-2Mo welds could be improved by using pulsing current to reduce prior-β grain size. Poor ductility of acicular microstructures has also been explained by the large area of α-β interfaces per unit volume because cracks have been observed to nucleate at these interfaces [
11]. The low cycle fatigue (LCF) performance of Ti alloy welds is affected by the microstructure of the welds, presence of defects, residual stresses, and loading conditions. According to Lütjering [
11], the LCF strength of a material is a result of two contributing factors: its resistance to crack nucleation and its resistance to micro-crack propagation. In α+β titanium alloys both factors increase with increasing cooling rate from the β phase field. The influence of defects and porosity on crack initiation and fatigue life have been examined by both experimental observations and through theoretical modelling [
13,
14,
15,
16,
17,
18,
19,
20]. Size and location of the pores are important. It has been shown that pores close to or at the surface cause the highest stress concentration.
The welds produced with EBW, LBW, TIG and PAW have different microstructures and different populations of defects in terms of their size and distribution. The effect of these aspects on mechanical properties under different testing conditions has been investigated and is here presented.
2. Materials and methods
A 4 mm thick Ti-6Al-4V sheet material (AMS4911) was used as base material to produce welded samples with TIG, PAW, EBW and LBW. Standard welding parameters were used. EBW, LBW and PAW welds were produced autogenously and for TIG welds a filler wire was used (AMS4954H). The chemical compositions of the materials are given in
Table 1. After welding, a post weld heat treatment at 704°C for 2 hours was applied.
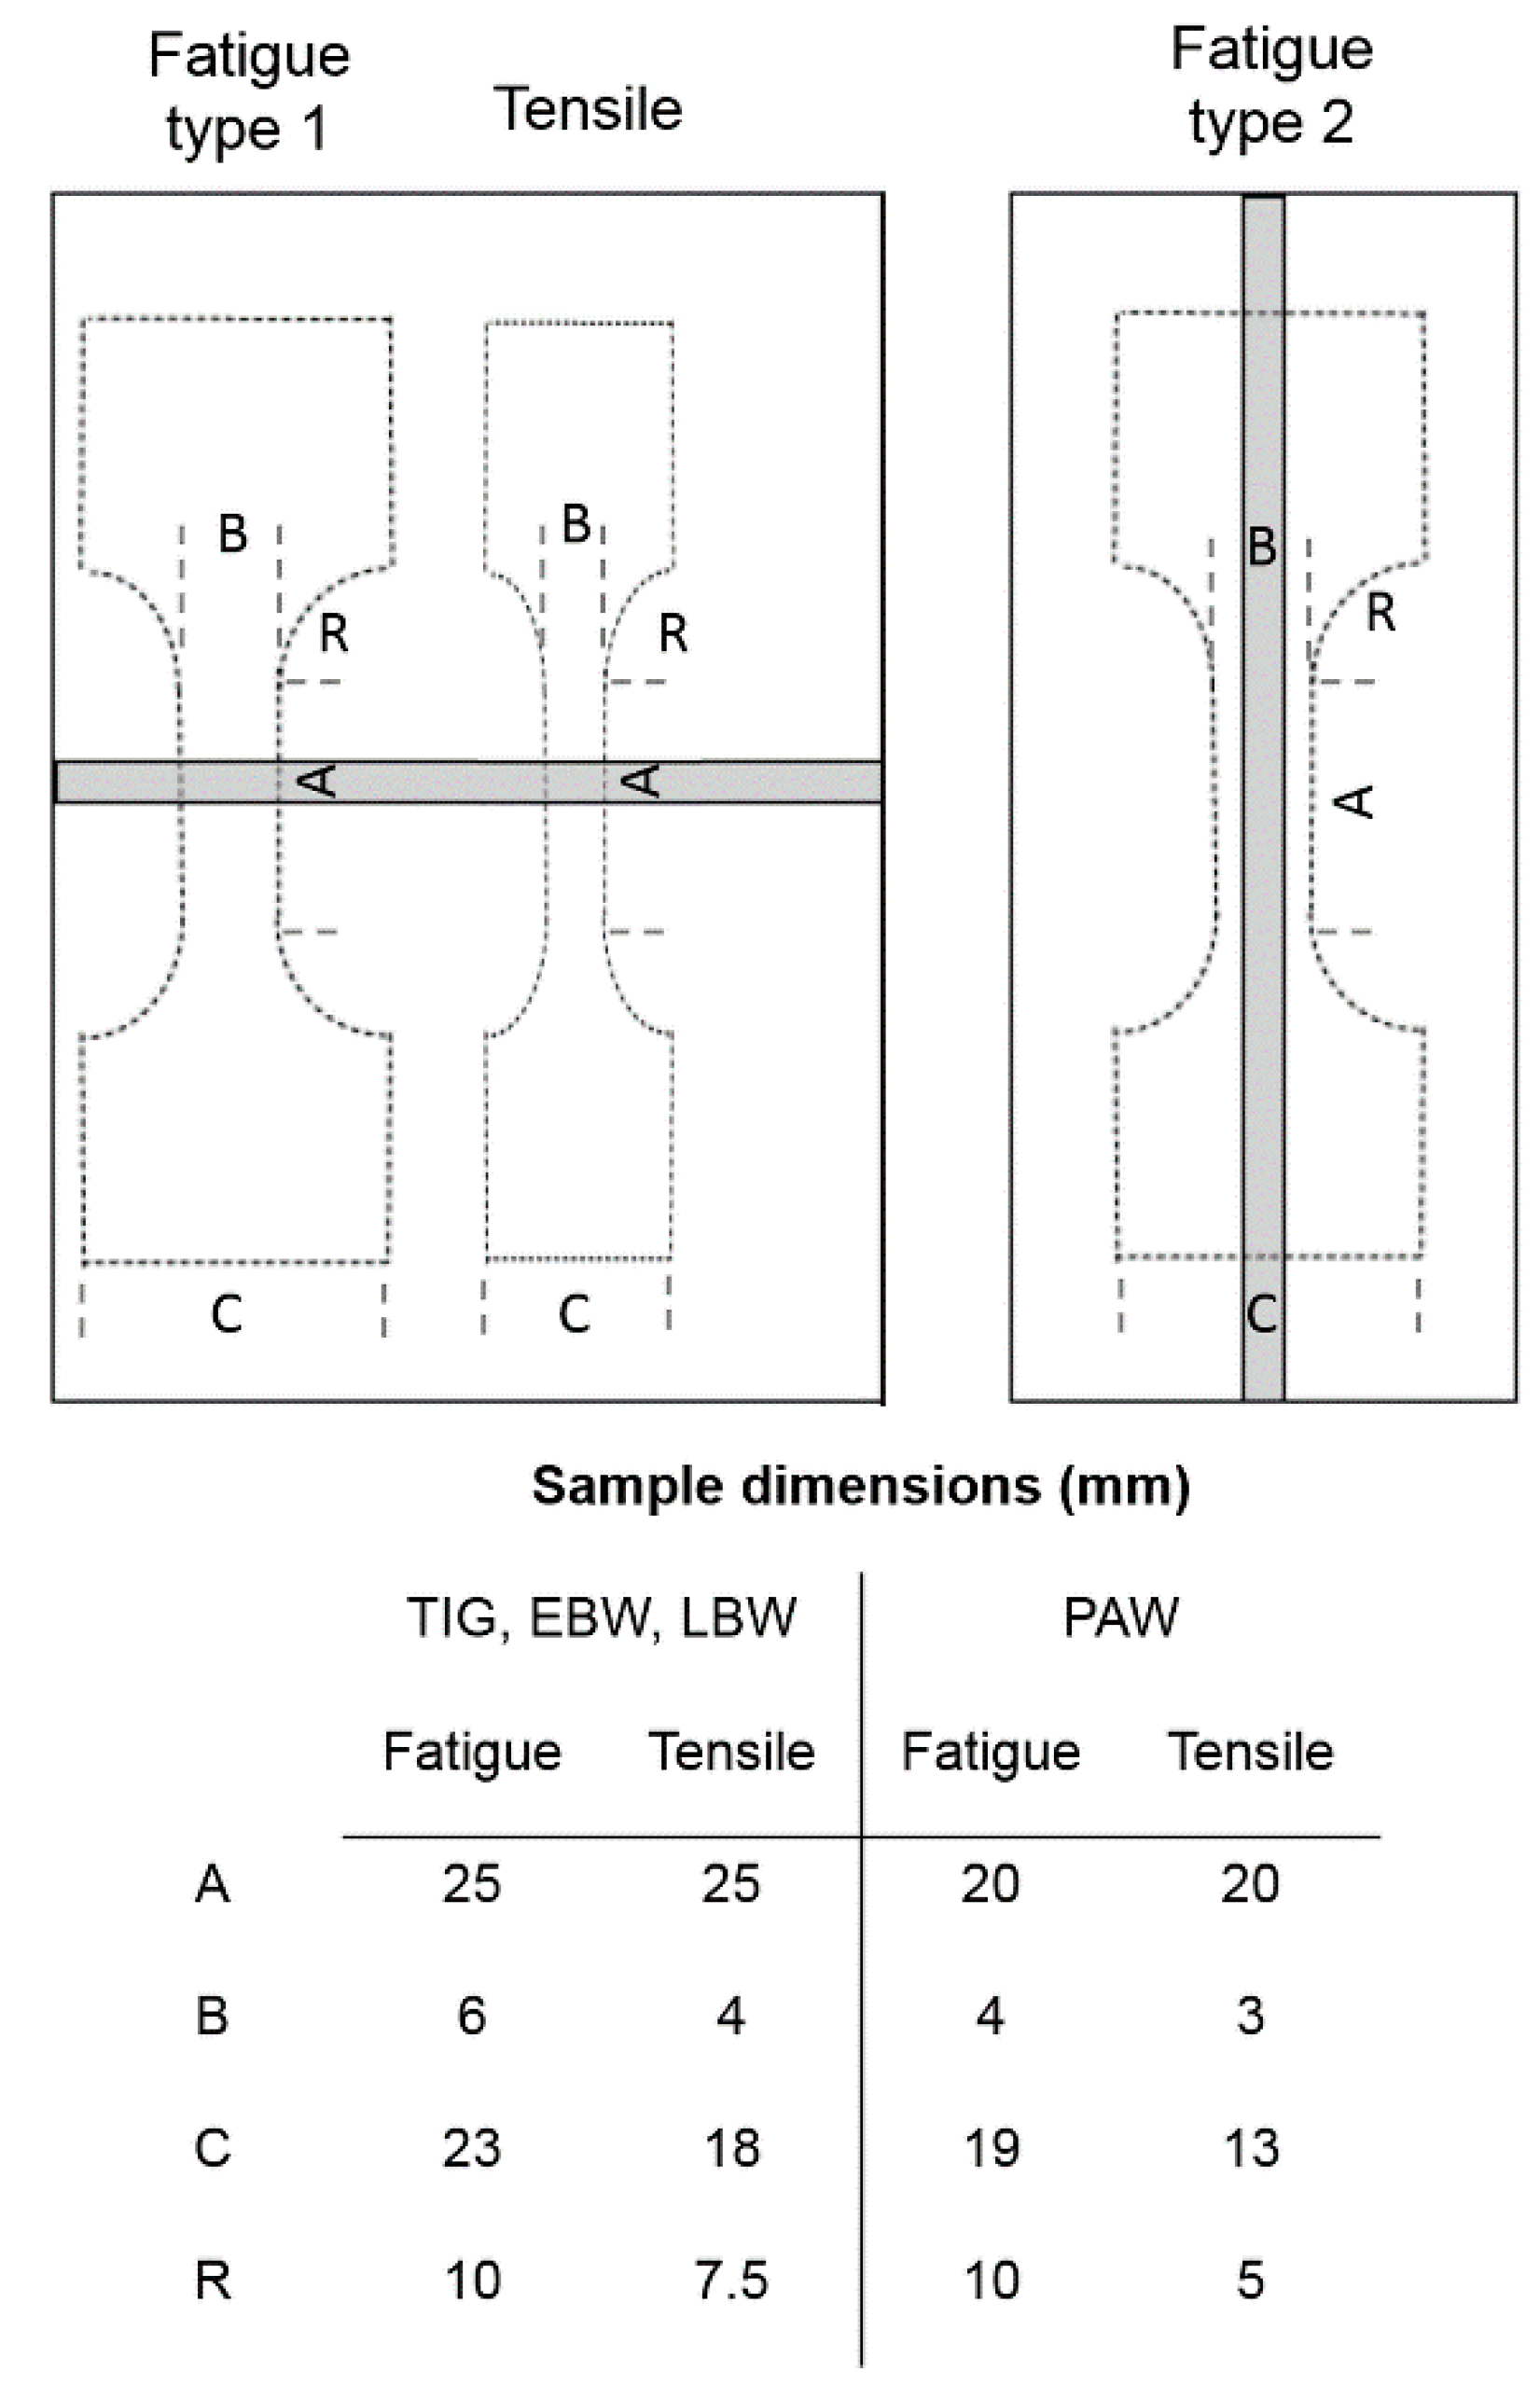
For mechanical testing the external weld geometry was machined off from the tensile test and the low cycle fatigue samples in order to specifically study the effect of microstructure and weld defects on mechanical properties. The strain controlled tensile testing for the base material and for the welds was performed according to ASTM E8 at room temperature and according to ASTM E21 at 250°C. The tensile testing was performed in transverse direction to the weld. Load controlled fatigue testing was performed according to ASTM E466 at room temperature and at 250°C in air atmosphere, with stress ratio R = 0. In addition, a number of LBW samples were not polished after welding in order to investigate the influence from the external weld geometry on the fatigue properties. These samples were tested at 200°C. Fatigue test samples were prepared in both transverse and longitudinal direction to the weld. The number of cycles to fracture and the total stress range were recorded during each test and plotted in a diagram to show the low cycle fatigue strength. The dimensions and the schematic drawings of the samples used for mechanical testing are shown in
Figure 1.
Optical microscope and a LEO Gemini 1550 FEG scanning electron microscope were used to examine the microstructure in the fusion zone (FZ). Sample preparation was done using conventional metallographic techniques for titanium alloys, involving grinding, polishing, and etching using Kroll’s etchant. Micro hardness measurement was performed by using a Shimadzu HMV-2000 machine with a load of 500 g. Post-test fractographic analysis of tensile test samples and LCF samples were performed using a scanning electron microscope. Size and location of pores on the fracture surfaces of LCF samples were determined by measuring the shortest distance to the sample surface.
The oxygen content of TIG and EBW welds in comparison to the base material was measured with JEOL JXA-8500F electron probe micro analyzer (EPMA). Qualitative line scans across the welds were performed using the instrument parameters of 10 kV acceleration voltage, 30 nA beam current with a 100 µm step size and a 5 µm defocused beam.
X-ray microscopic (XRM) investigations were performed on selected LCF specimens using Carl Zeiss Xradia 520 Versa equipment. The scan volume was 3 mm x 5 mm x 8 mm with 4 µm voxel size and 3 mm x 5 mm x 1 mm with 1 µm voxel size.
3. Results and discussion
3.1. Microstructure
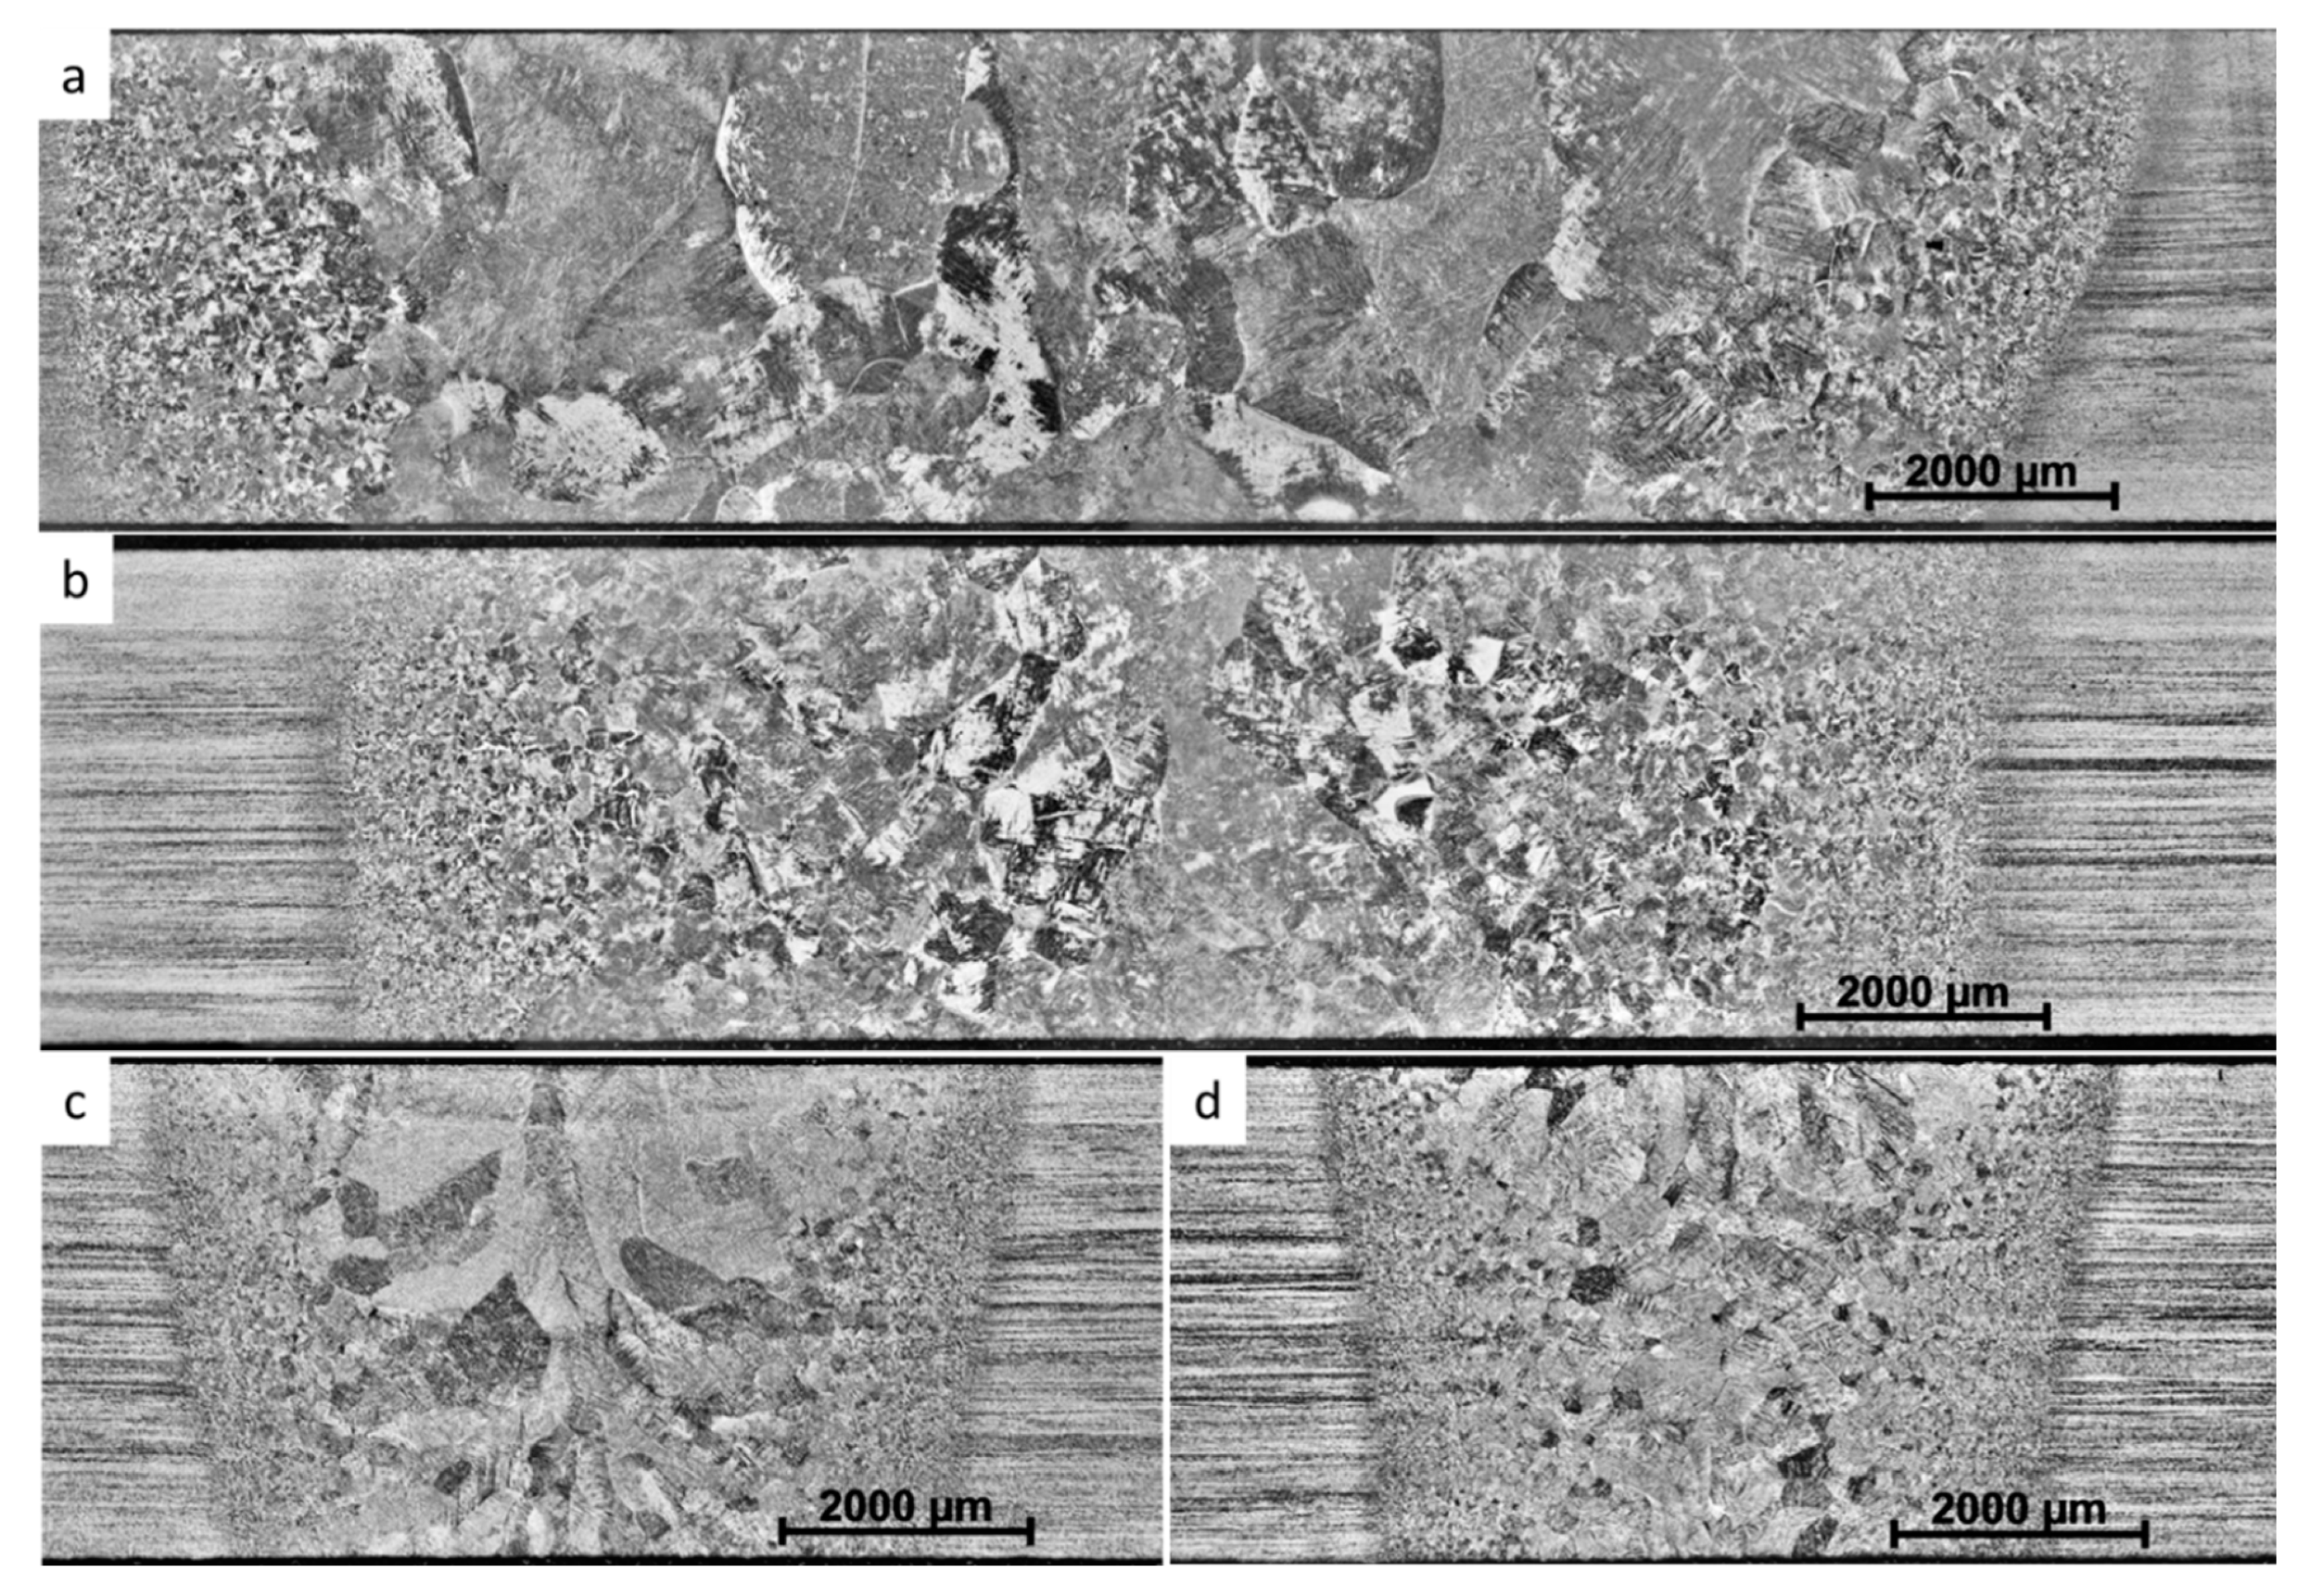
Optical micrographs of the studied post weld heat treated welds are shown in
Figure 2. The heat affected zones (HAZs) are characterized by prior-β grains that gradually get coarser towards the fusion zones. In general, the width of the welds was slightly wider at the top than at the bottom. The dimensions of all examined welds are summarized and average hardness of fusion zones are shown in
Table 2. The TIG weld was widest and contained the largest prior-β grains. The fusion zone (FZ) and prior-β grain size was smaller in PAWs than in TIG welds. Welds produced by EBW and LBW were considerably narrower. LBW had the smallest weld zone and smallest prior-β grain size. Also, the prior-β grains in LBW were more equiaxed as compared to the other welds where prior-β grains are elongated.
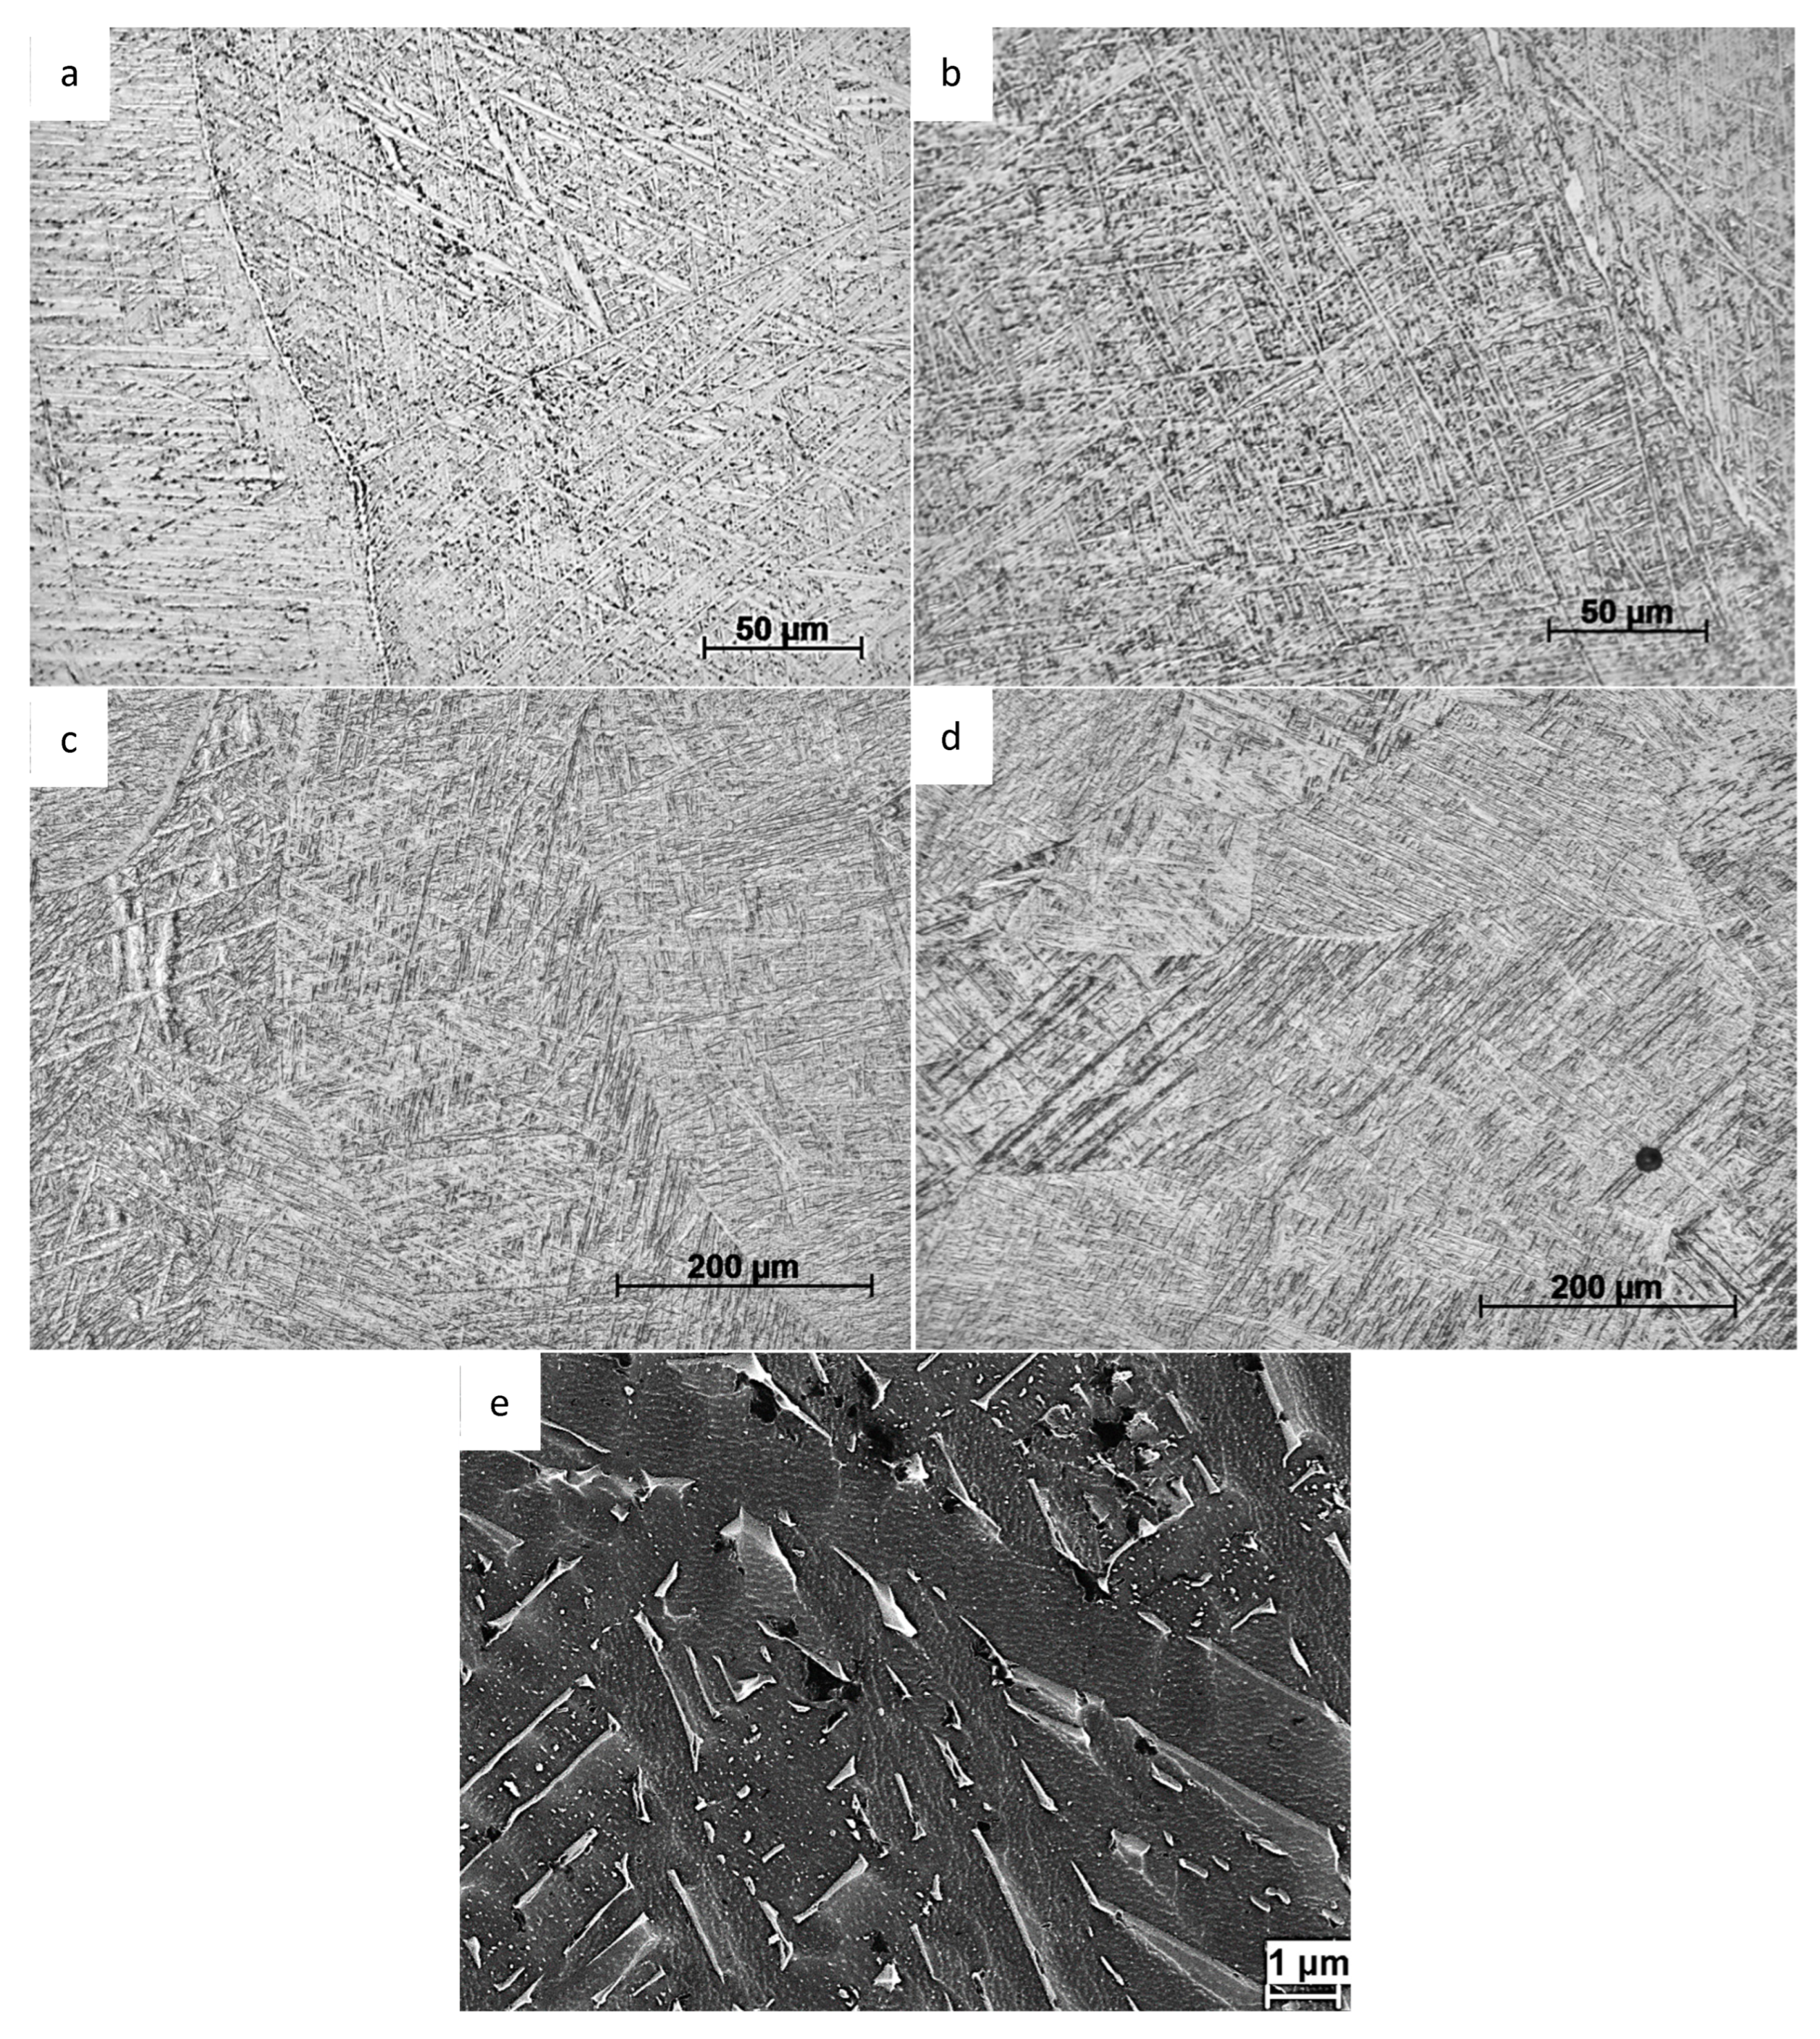
Figure 3 shows the typical microstructures inside prior-β grains in the fusion zones of each type of weld after post weld heat treatment. The microstructure of all the welds consisted of fine α laths separated by thin layers of β phase as shown in
Figure 3e in PAW weld. Inside prior-β grains in TIG and PAW, the microstructure consist of both colony and basketweave type of microstructure. In the TIG welds, the fraction of colony structure was higher than in the other welds. This is because of a higher heat input and slower cooling rate in TIG welds as compared with the other welding processes, which promotes the transformation into a colony type of structure [
4]. In EBW and LBW the α laths were more acicular and they formed a very fine basketweave type of microstructure. In EBW and LBW, grain boundary-α was observed in a few prior-β grain boundaries. In TIG and PAW, the grain boundary-α was more continuous and thicker. The average α lath spacing in EBW and LBW were estimated to be 0.9±0.1 µm and in TIG and PAW the corresponding α lath spacing were estimated to be 1.2±0.1 µm. These values are based on 10 optical micrographs investigated for each weld. In addition, porosity is noticeable in the LBW micrographs.
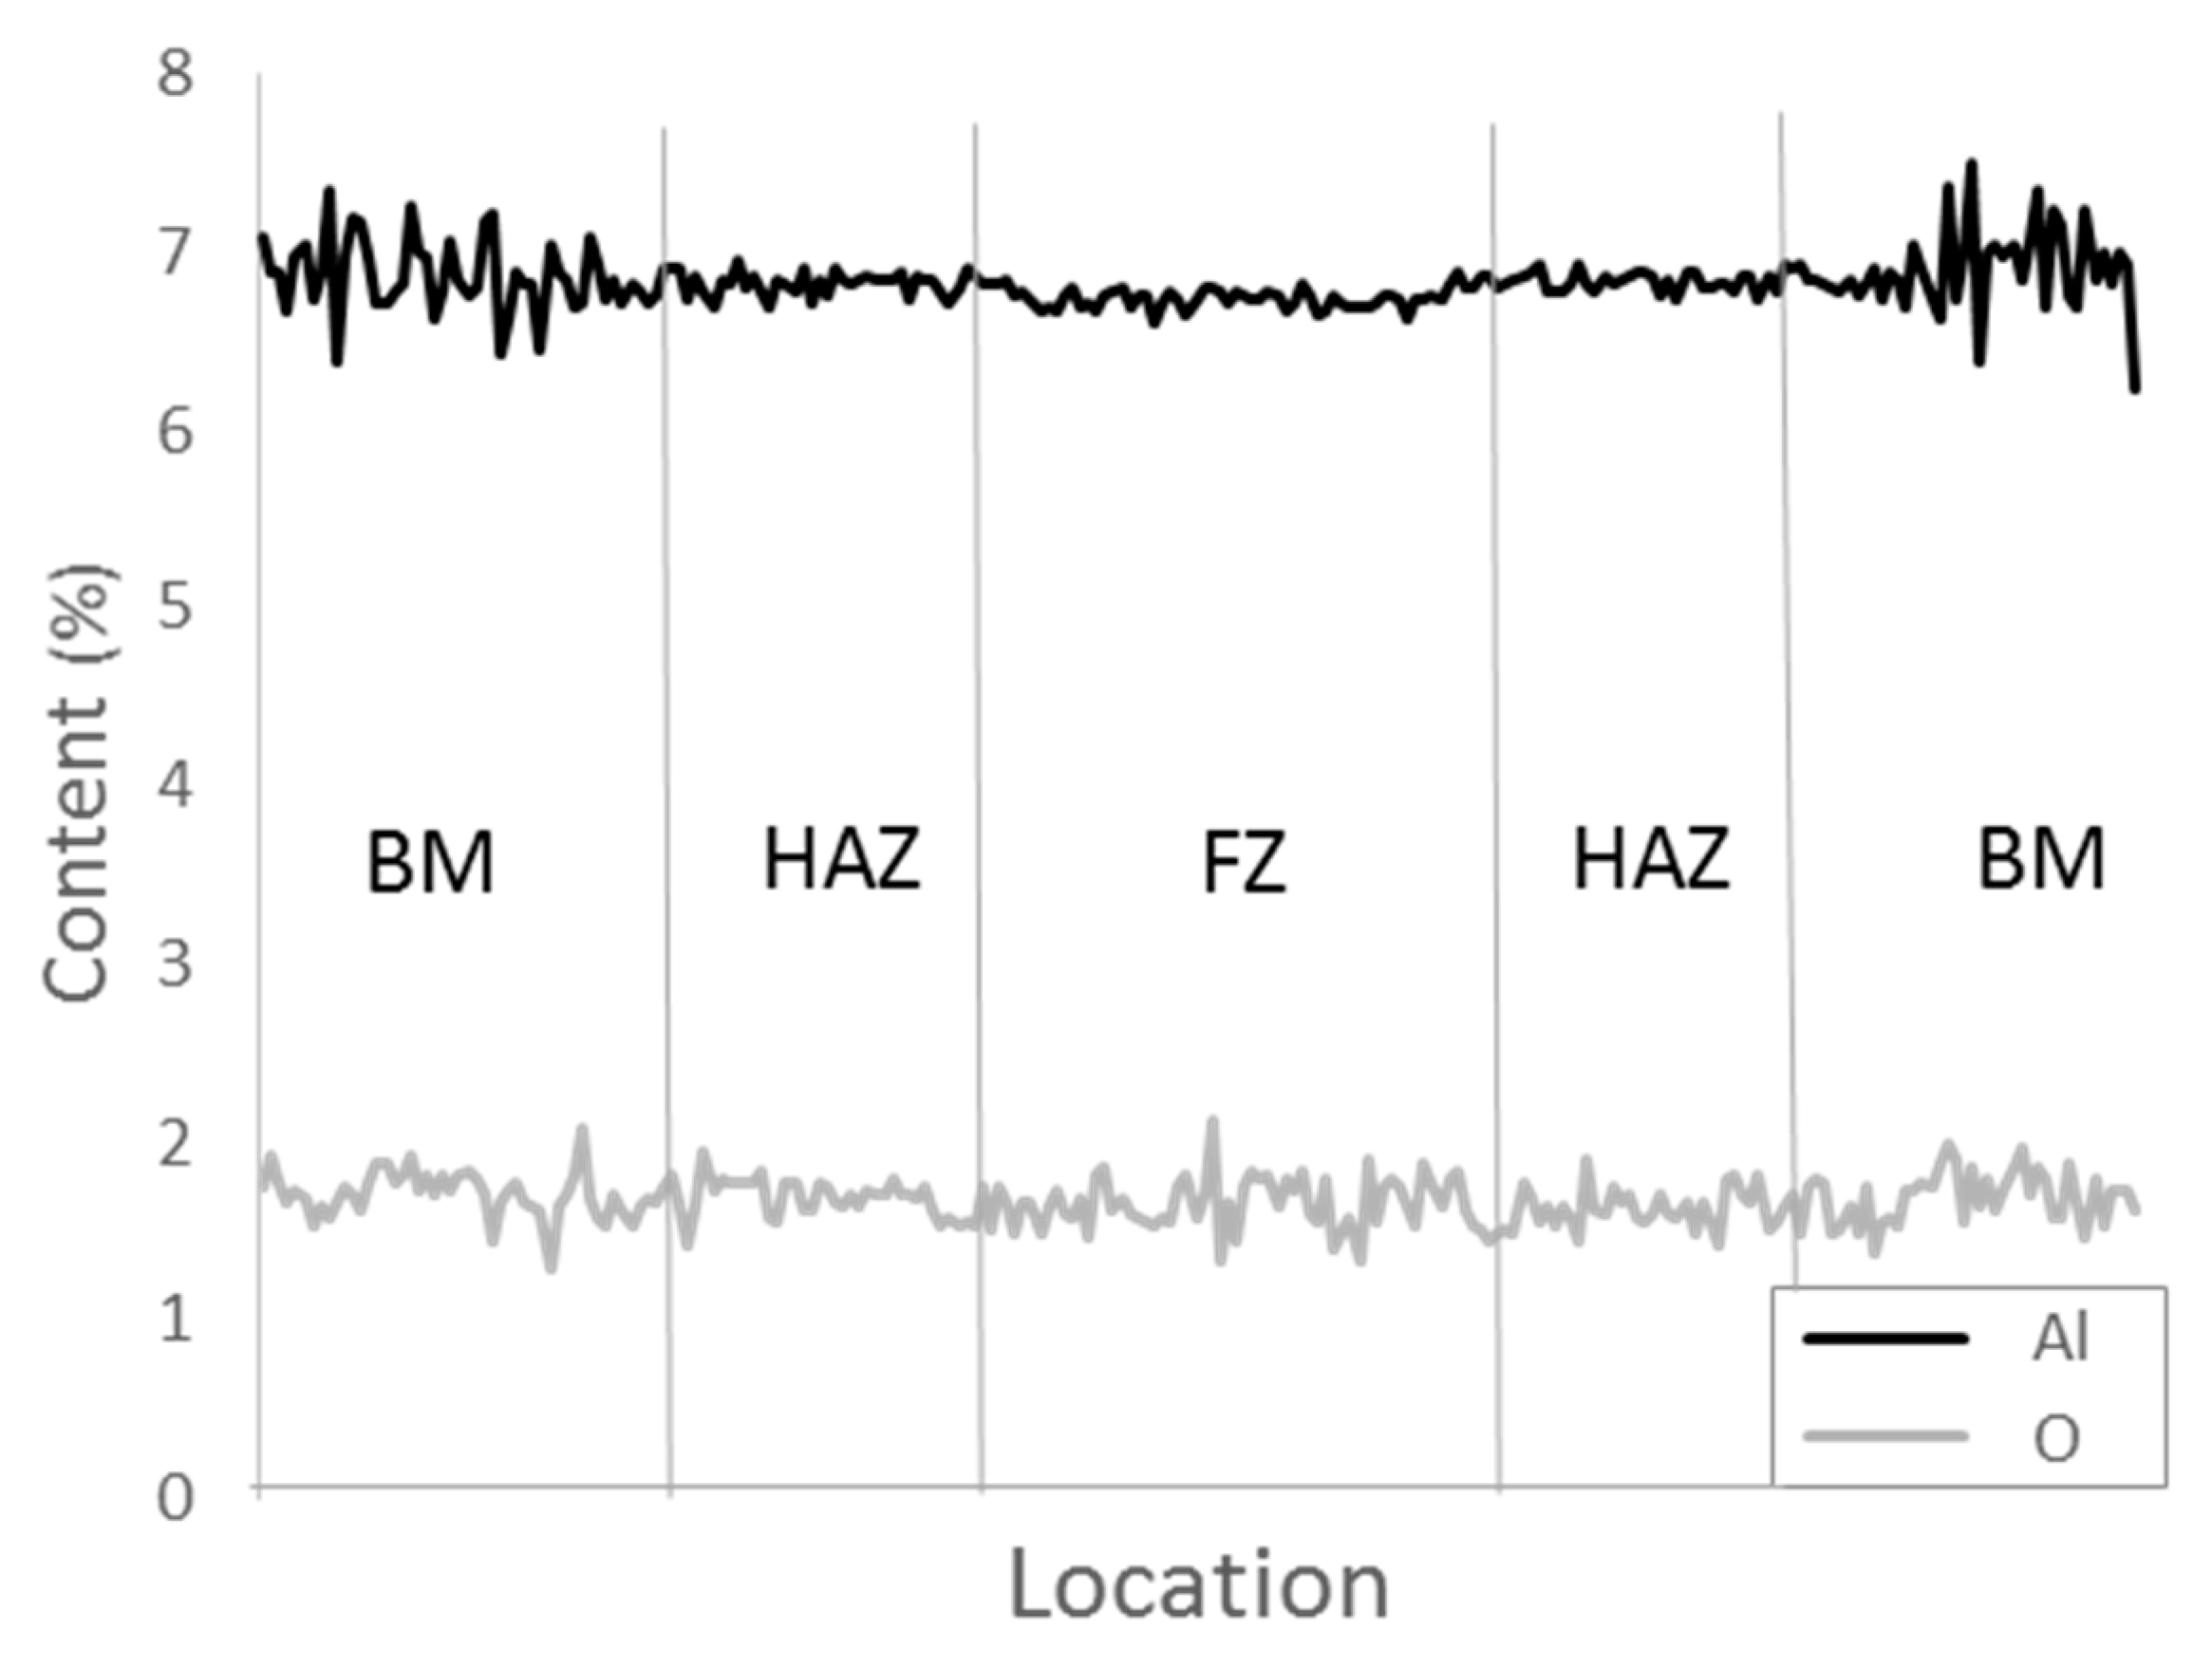
In
Figure 4, a qualitative Electron Probe Micro Analysis (EPMA) line scan across a TIG weld is shown. The absolute values are not correct, however the relative variation between base material and the weld zone are correct. The oxygen content in the base material was 0.12 wt-%. The EPMA results reveal no difference in oxygen content between the base material and weld zones. A small drop in aluminium was observed in fusion zone. Aluminium has a lower boiling point than titanium and vanadium which is why it can vaporize easier during welding process. An EPMA line scan across an EBW showed similar behaviour.
3.2. Tensile properties and microhardness
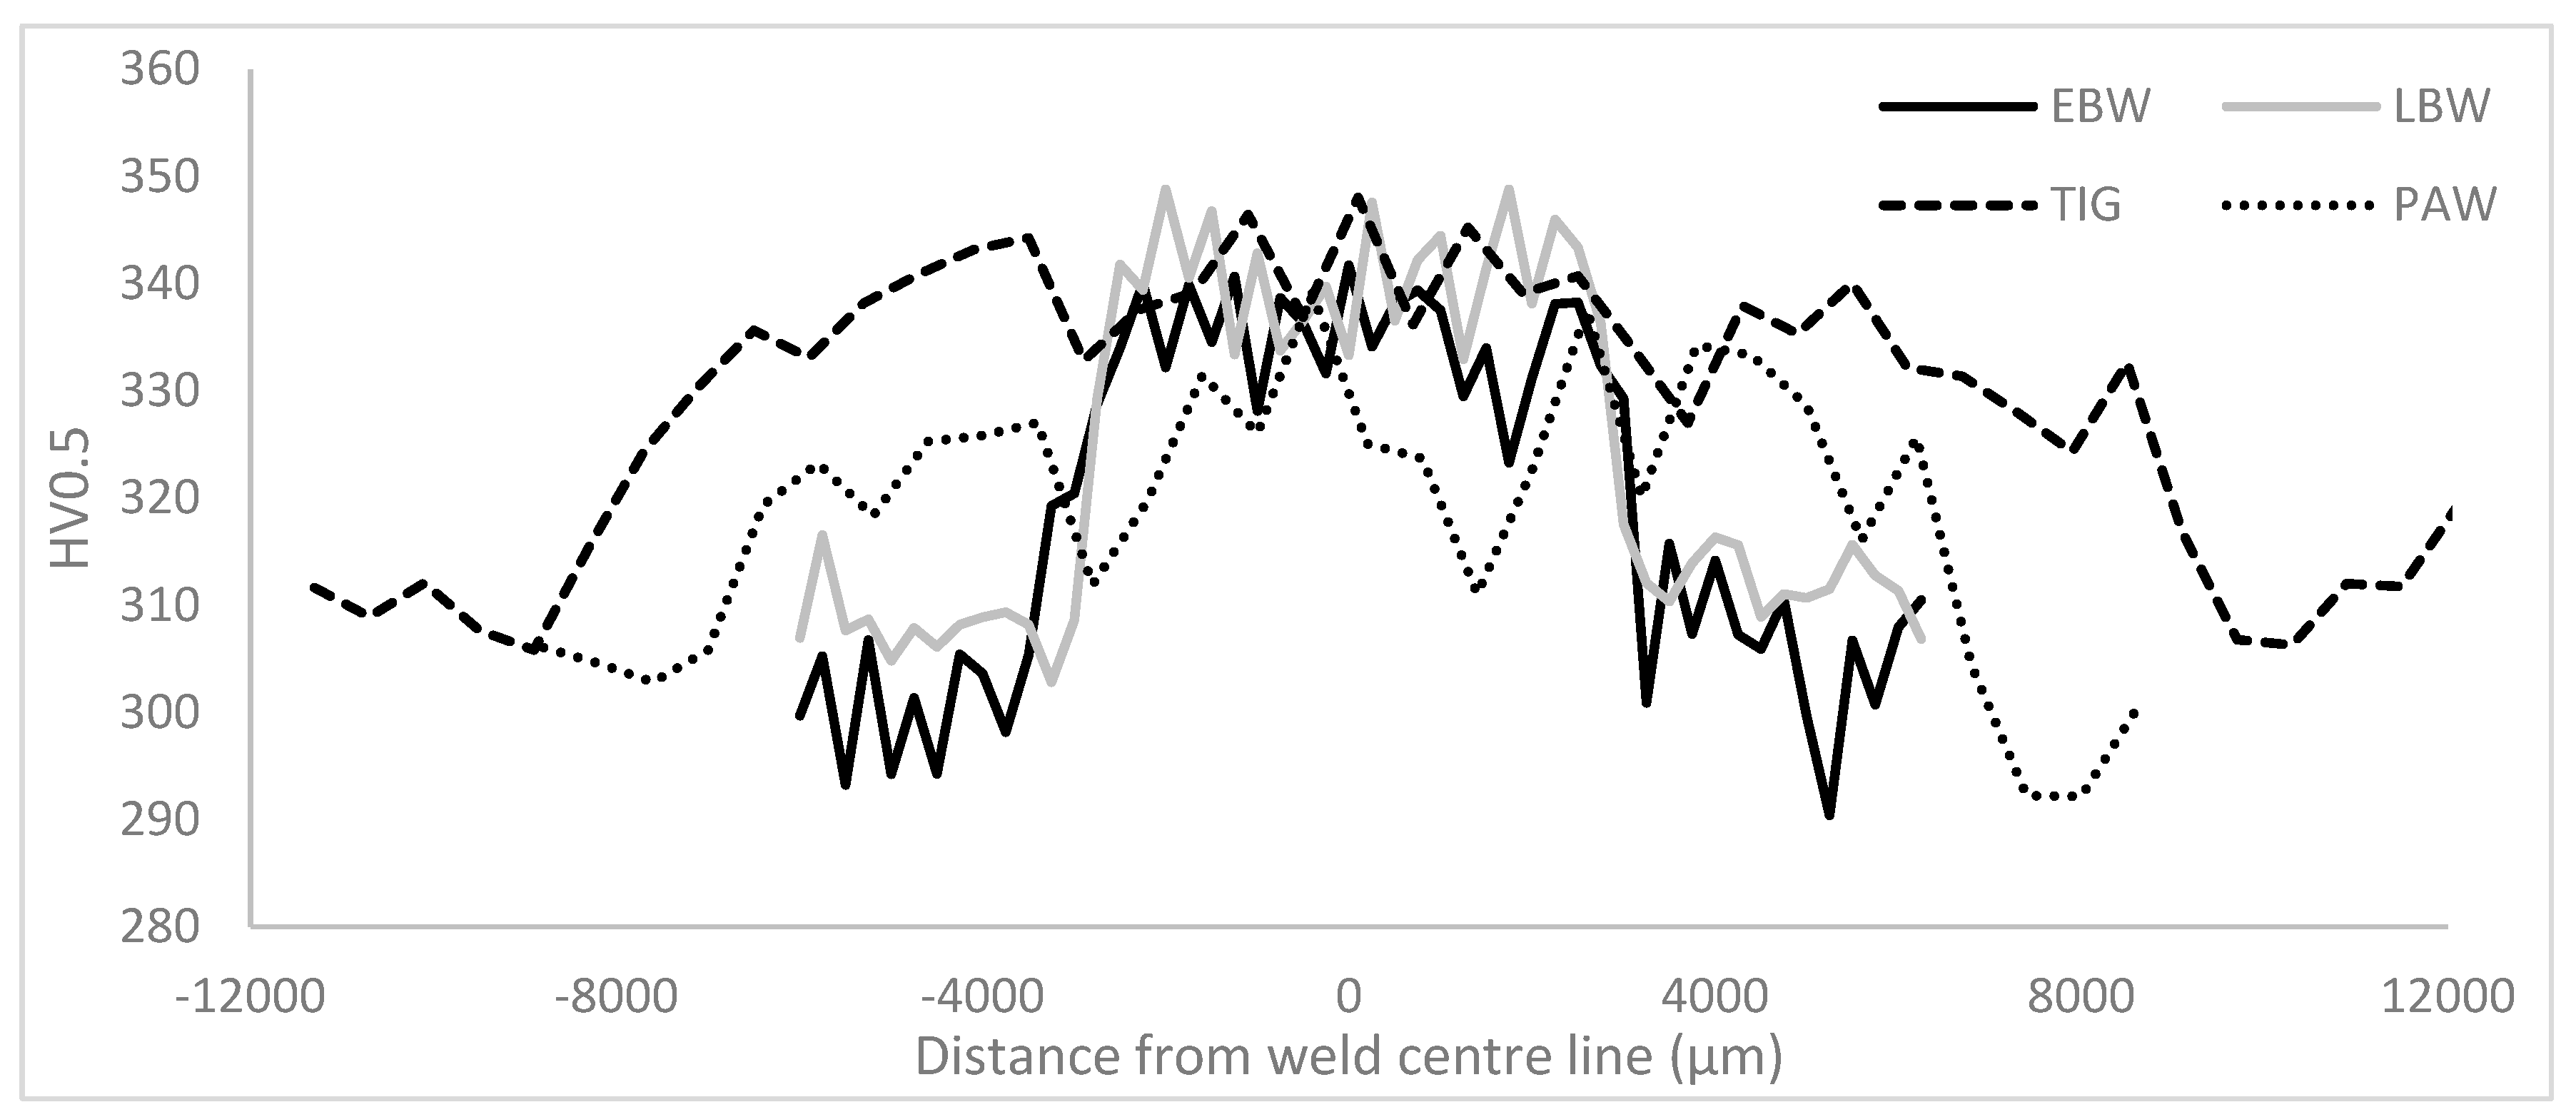
Microhardness profiles across the different weld cross sections are summarized in
Figure 5. In general, all four types of welds showed the similar trend. The hardness was found to be lowest in the base material and increasing through the HAZ, with the maximum hardness located in the fusion zone. The average hardnesses of the weld fusion zones are shown in
Table 2.
The results from tensile testing are given in
Table 3. The base material had higher strength than the welds despite the higher hardness of the welds. Welds produced by EBW and LBW had 3-5% higher strength in comparison to the TIG and PAW welds. Increasing temperature from RT to 250°C reduced strength by approximately 20% in all cases.
The ductility of the welds was lower than the ductility of the base material. The reduction of area for the base material was 44% and the tensile elongation was 16.4% when tested at room temperature. Out of the welds, the LBW had the highest ductility followed by EBW and PAW welds. The TIG weld was found to have the lowest ductility with tensile elongation of only 7%. At elevated temperature, the ductility of the welds improved but not to the level of the base material.
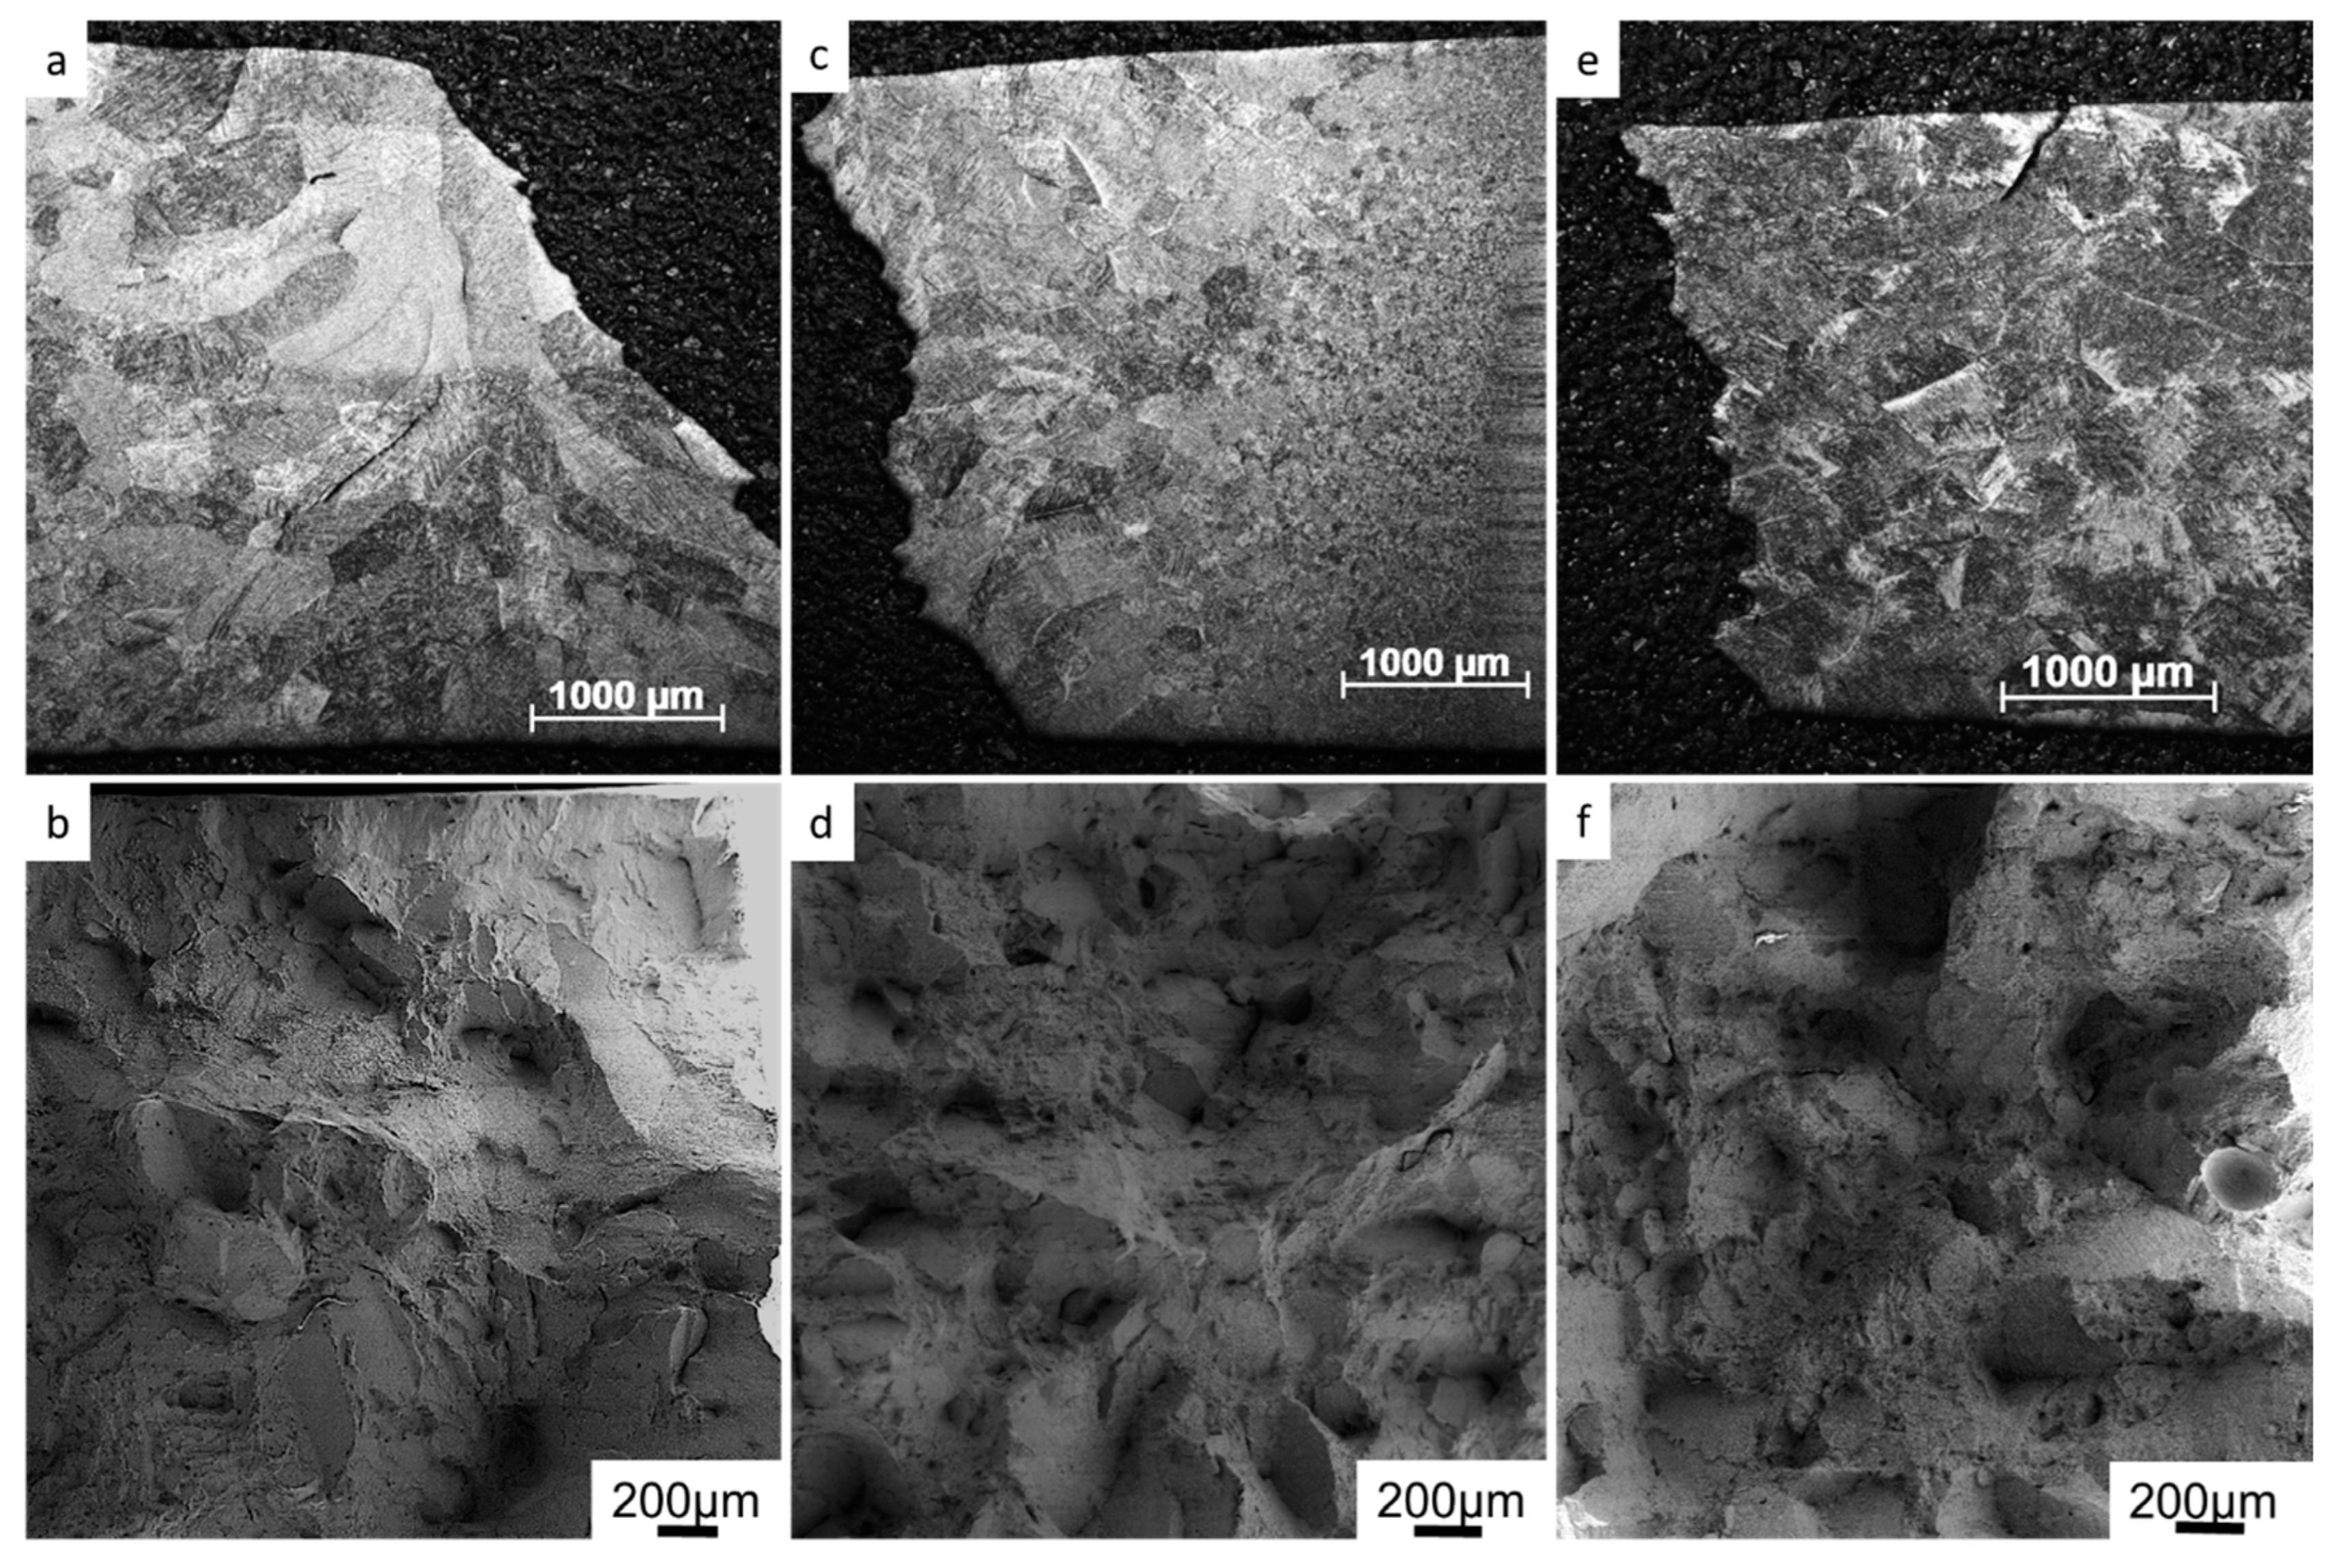
In all welded tensile test specimens the fracture was located in the weld zones. In
Figure 6, etched side views and fracture surfaces of tensile test welds tested at room temperature are shown. In all welds, the fracture was found to be a combination of transgranural and intergranular fracture. Moreover, cracks were also observed along prior-β grain boundaries and through prior-β grains outside the main fracture. Areas of intergranular fracture appear as flat areas in fractographs in
Figure 6b,d,f. The shape and size of these areas correspond to the prior-β grains in the microstructure. Dimples were found in all areas indicating fracture through coalesced micro voids.
3.3. Low cycle fatigue properties
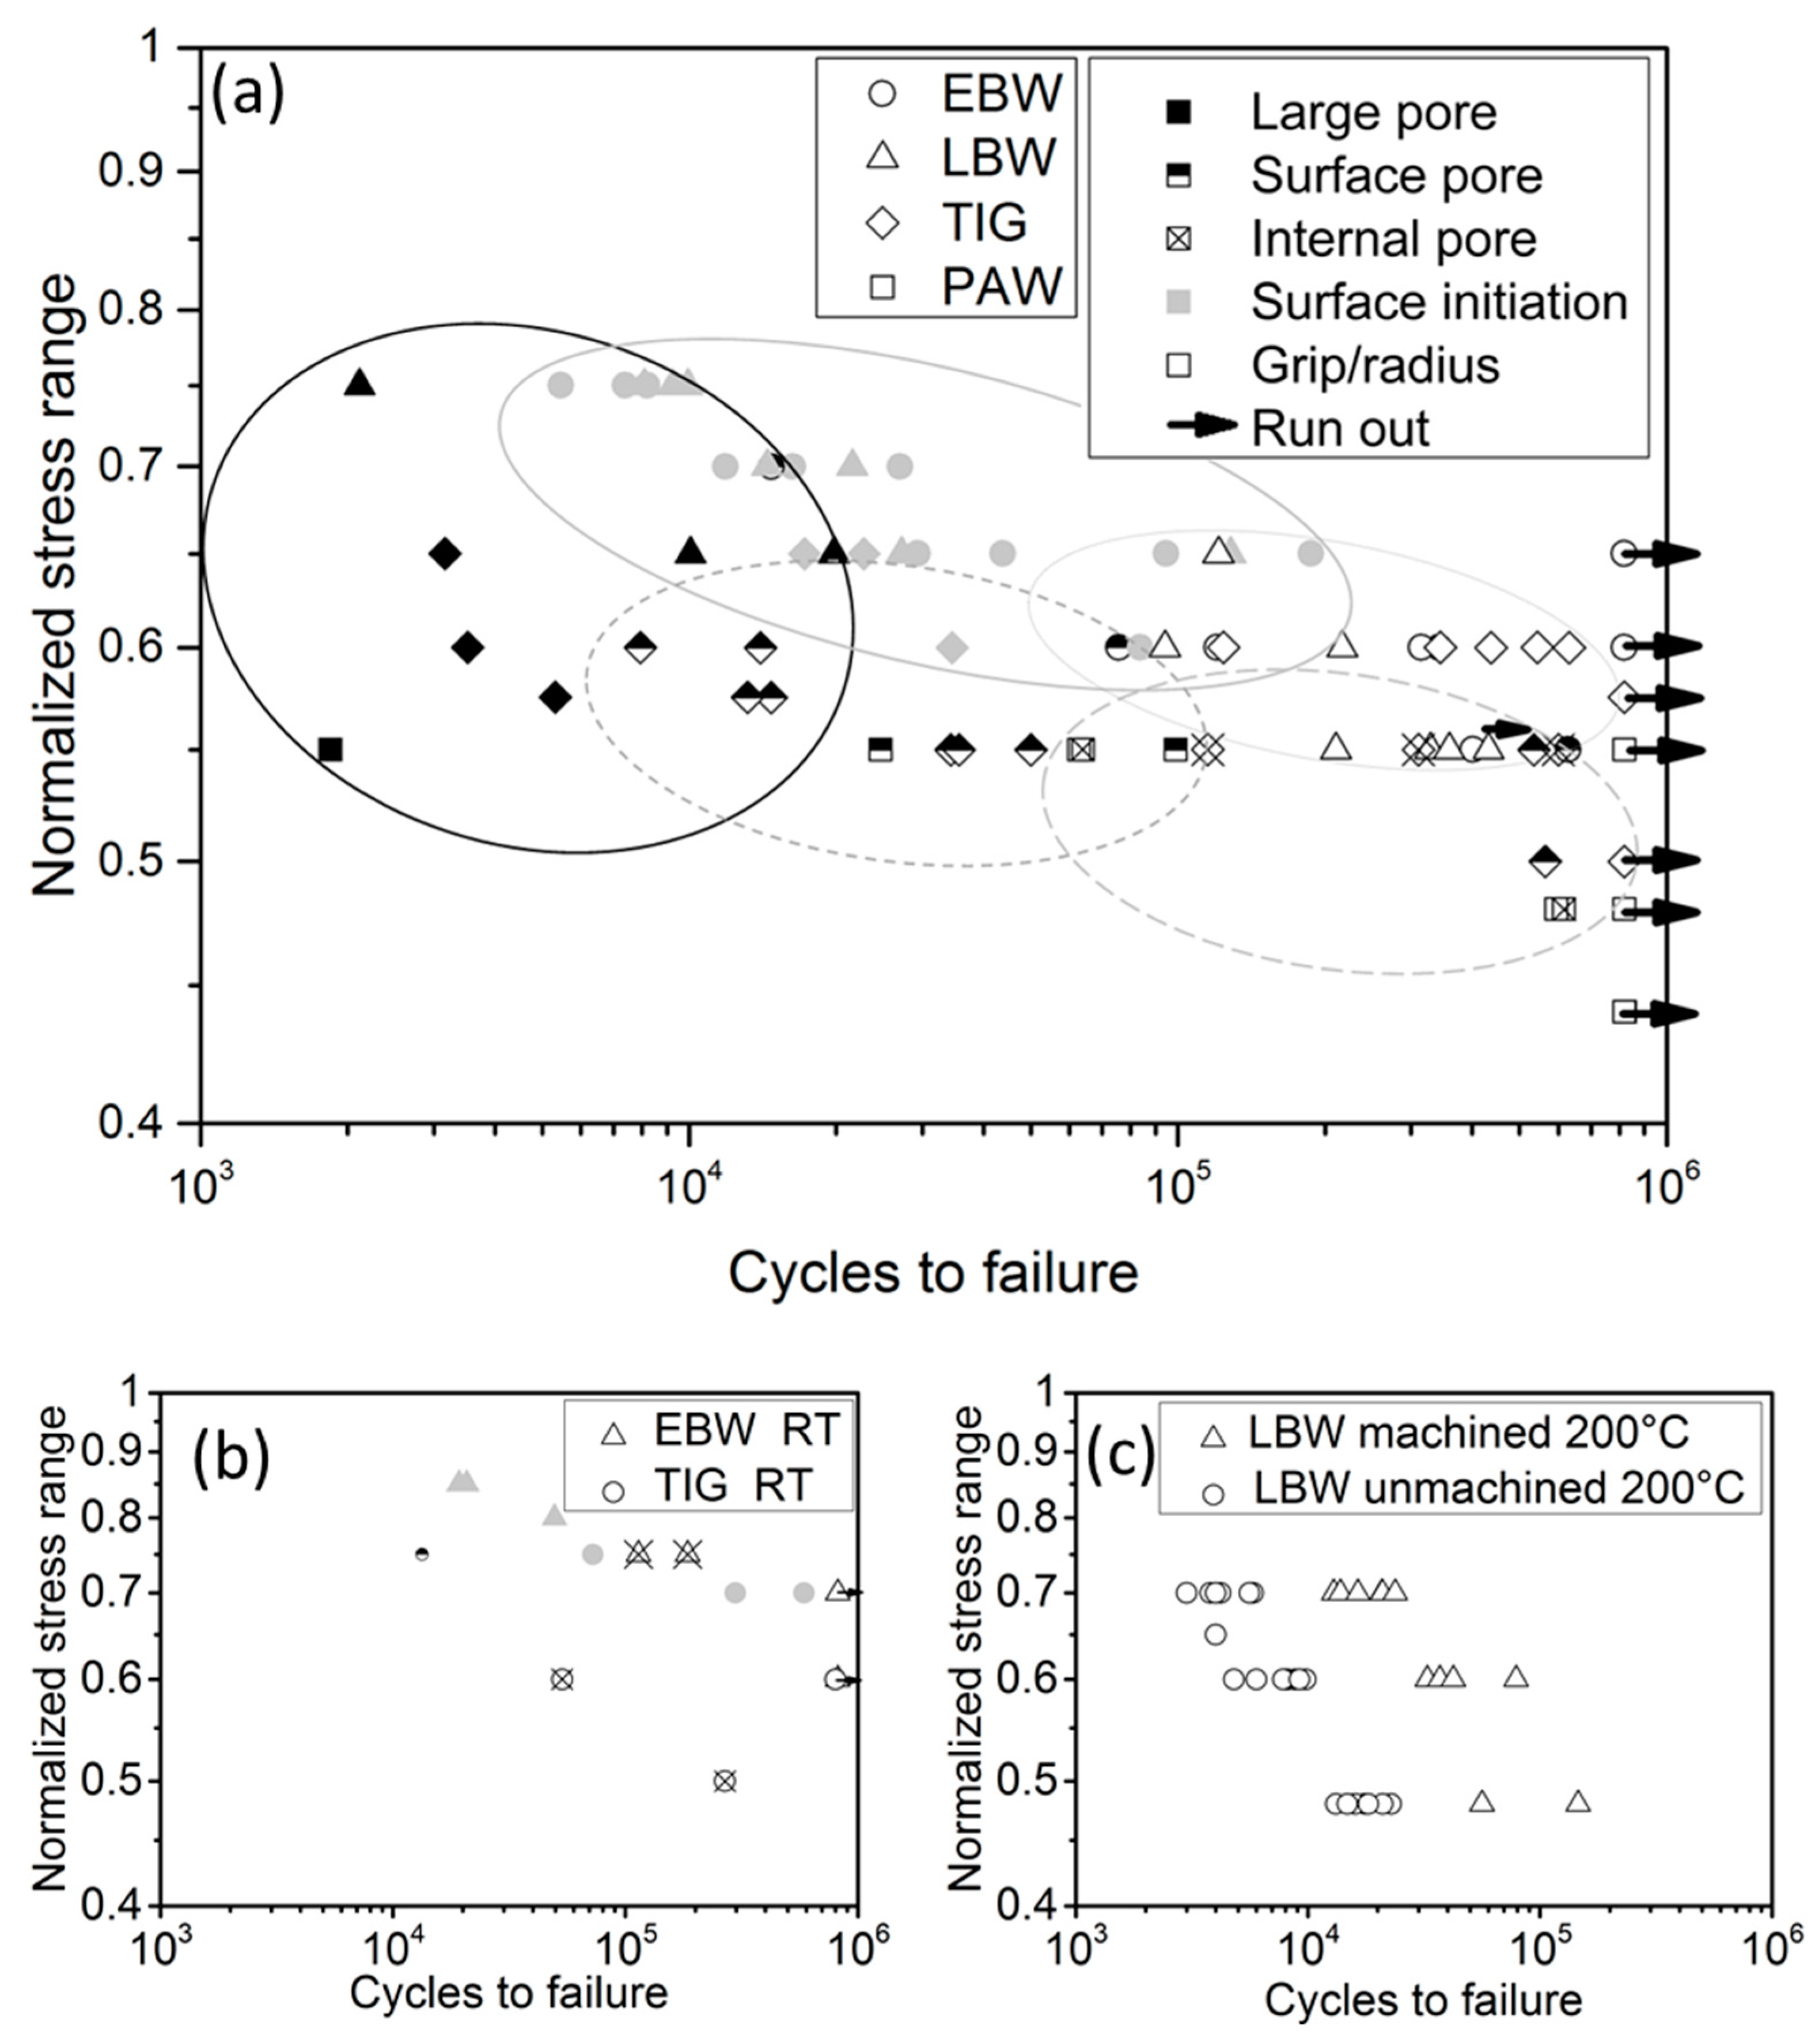
Results from low cycle fatigue testing at room temperature and at 250°C are shown in
Figure 7. The stress range values have been normalized with regard to the highest strain range applied during testing. Crack initiation sites have been categorized as
surface pores,
internal pores,
large pores (>400 µm), and
surface initiation. Each type is indicated by a unique symbol.
At 250°C, welds produced by EBW and LBW were found to have superior LCF performance in comparison to the welds produced by TIG and PAW. EBW seems to have the best LCF performance and also the smallest scatter of data. Most of the LBW samples have a similar fatigue life as the EBW samples, but the scatter of the data for the LBW samples is higher. The main reason for this was the significantly lower fatigue life in a few of the LBW samples caused by large pores. The fatigue strength of welds produced by PAW and TIG was found to be similar to each other. However, because of the limited number of tested samples, these results should be interpreted as indicative rather than as conclusive.
In the LCF tests performed at room temperature (
Figure 7b), the EBW and TIG welds had higher fatigue strength than at elevated temperature. The welds produced by EBW performed better and had considerably smaller scatter than the TIG welds.
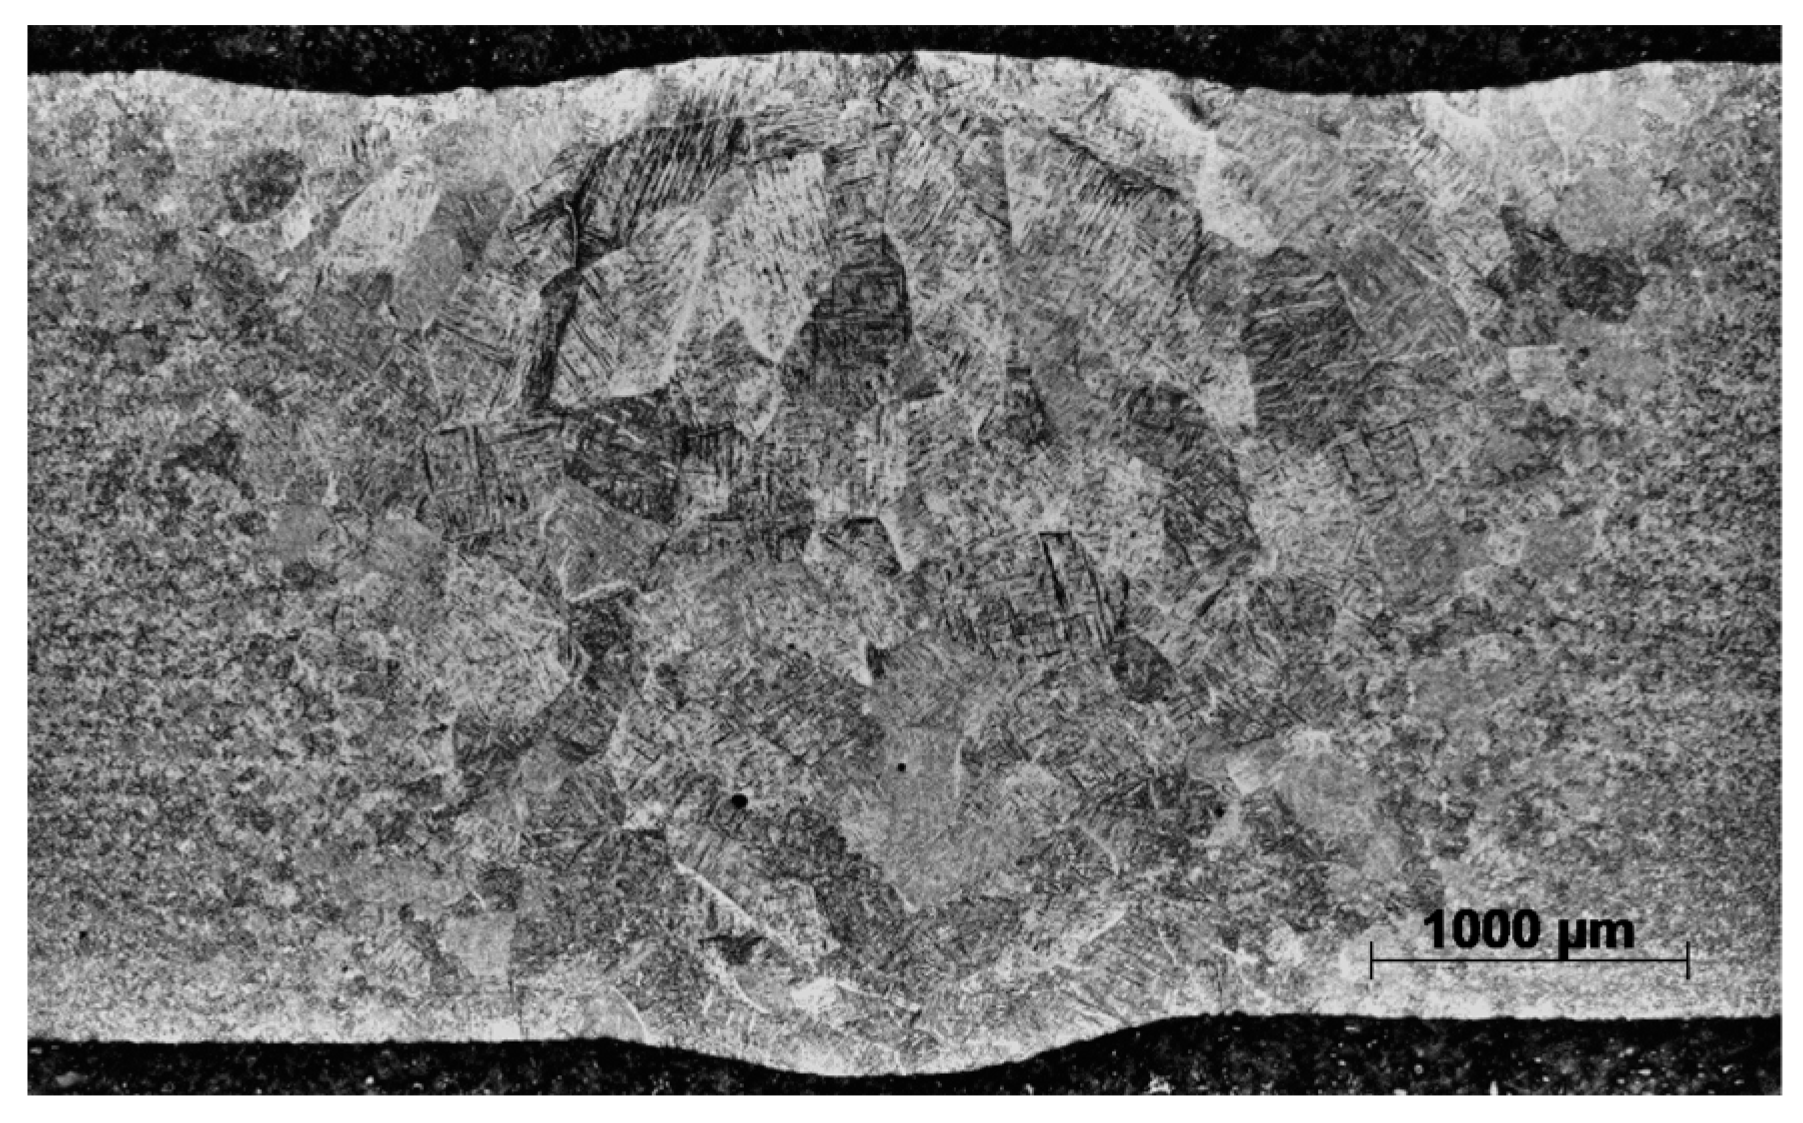
The LCF testing of polished and unpolished LBW specimens showed that the external weld geometry has a significant effect on the fatigue strength. The weld geometry of unpolished LBW is shown in
Figure 8. Weld face underfill was found to be 80-100 µm and root undercut 30-50 µm. As shown in
Figure 7c, the machined samples had 5-10 times longer fatigue life compared with the samples with the external weld geometry kept. In the unpolished specimens, cracks always initiated at the weld toe on the root side and never at internal defects.
3.4. Fractographic investigation
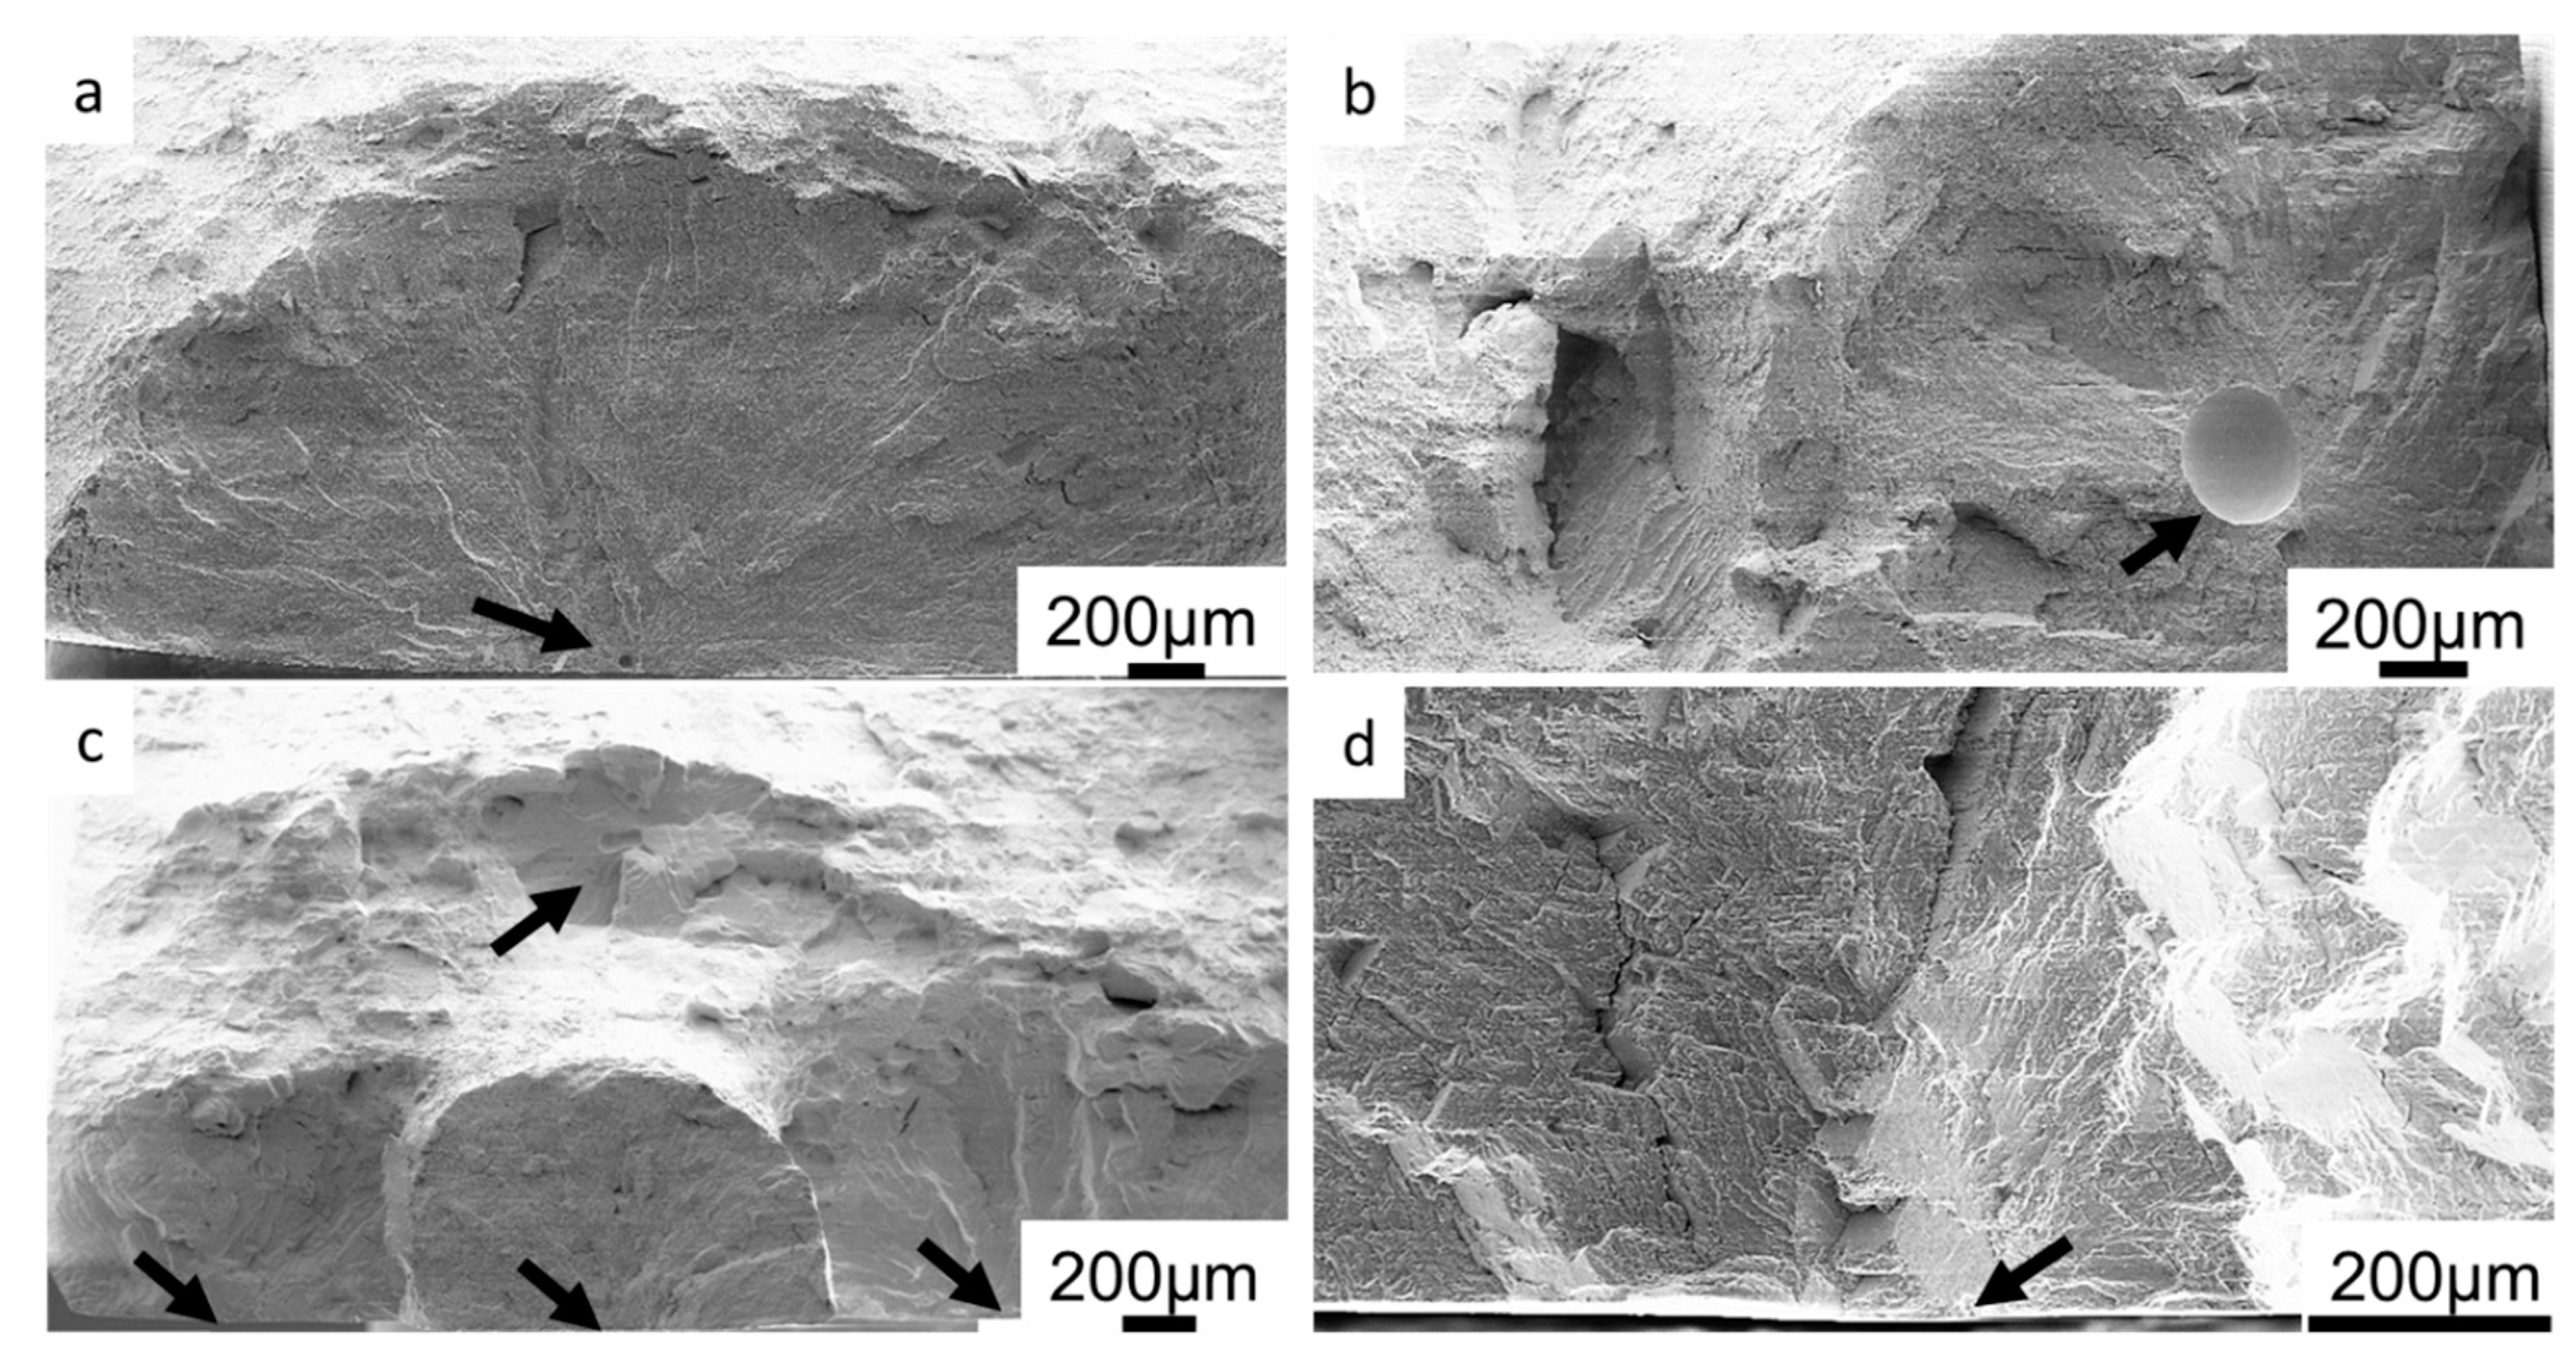
Fractographic investigation of LCF samples with lower fatigue life revealed mainly two characteristics: i) fatigue crack initiation at a large pore in the centre of the sample, or ii) fatigue crack initiation at a pore located close to the surface of the specimen. Fatigue specimens with long fatigue life typically had crack initiation at the surface of the sample. Fracture surfaces showing typical crack initiation sites and crack propagation areas around them are shown in
Figure 9. Arrows indicate the crack initiation sites.
The pores and their size distribution found on the fracture surfaces of the samples tested at 250°C are summarized in
Table 4. In the first row, the total number of samples tested for each type of weld, as well as the number of samples that were eligible for fractographic investigation, is given. In the second row of
Table 4, the total number of pores found on fracture surfaces are given, including those that did not initiate cracks. Specimens that fractured outside of the gage section, or that did not fail during the test, were disregarded from fractographic investigation. In the EBW samples, most of the fracture initiations occurred at the surface of the sample. Out of 28 EBW specimens investigated, 24 have crack initiation at the surface, 2 samples show crack initiation at a small pore close to the surface, and 2 samples at a small internal pore. Most LBW samples also have crack initiation at the surface, and in 3 samples the crack initiation occurred at large pores of approximately 650 µm in diameter. In LBW specimens small pores (<200 µm) which did not initiate cracks are observed on the fracture surfaces. In one LBW sample fatigue crack growth pattern was found around a cluster or pores (
Figure 9c), but even in this sample the main contribution for the fatigue fracture comes from cracks that initiated at the surface. For TIG samples, the average size of a pore initiating a crack is 212 μm. The largest and smallest crack initiating pores found in TIG samples are 436 μm and 58 μm in diameter, respectively. For PAW samples, the average pore size initiating a crack is 113 μm, while the largest and smallest pores initiating a crack are found to be 182 μm and 68 μm in diameter, respectively. In addition, a lack of fusion (LOF) defect was found in one sample. Comparing the pore size distribution in different welds, it can be seen that the pores produced in EBW are the smallest followed by PAW. LBW produced the largest pores and many small pores, which was confirmed by X-ray microscopic (XRM) investigation. The results of XRM study are shown in a following chapter.
In
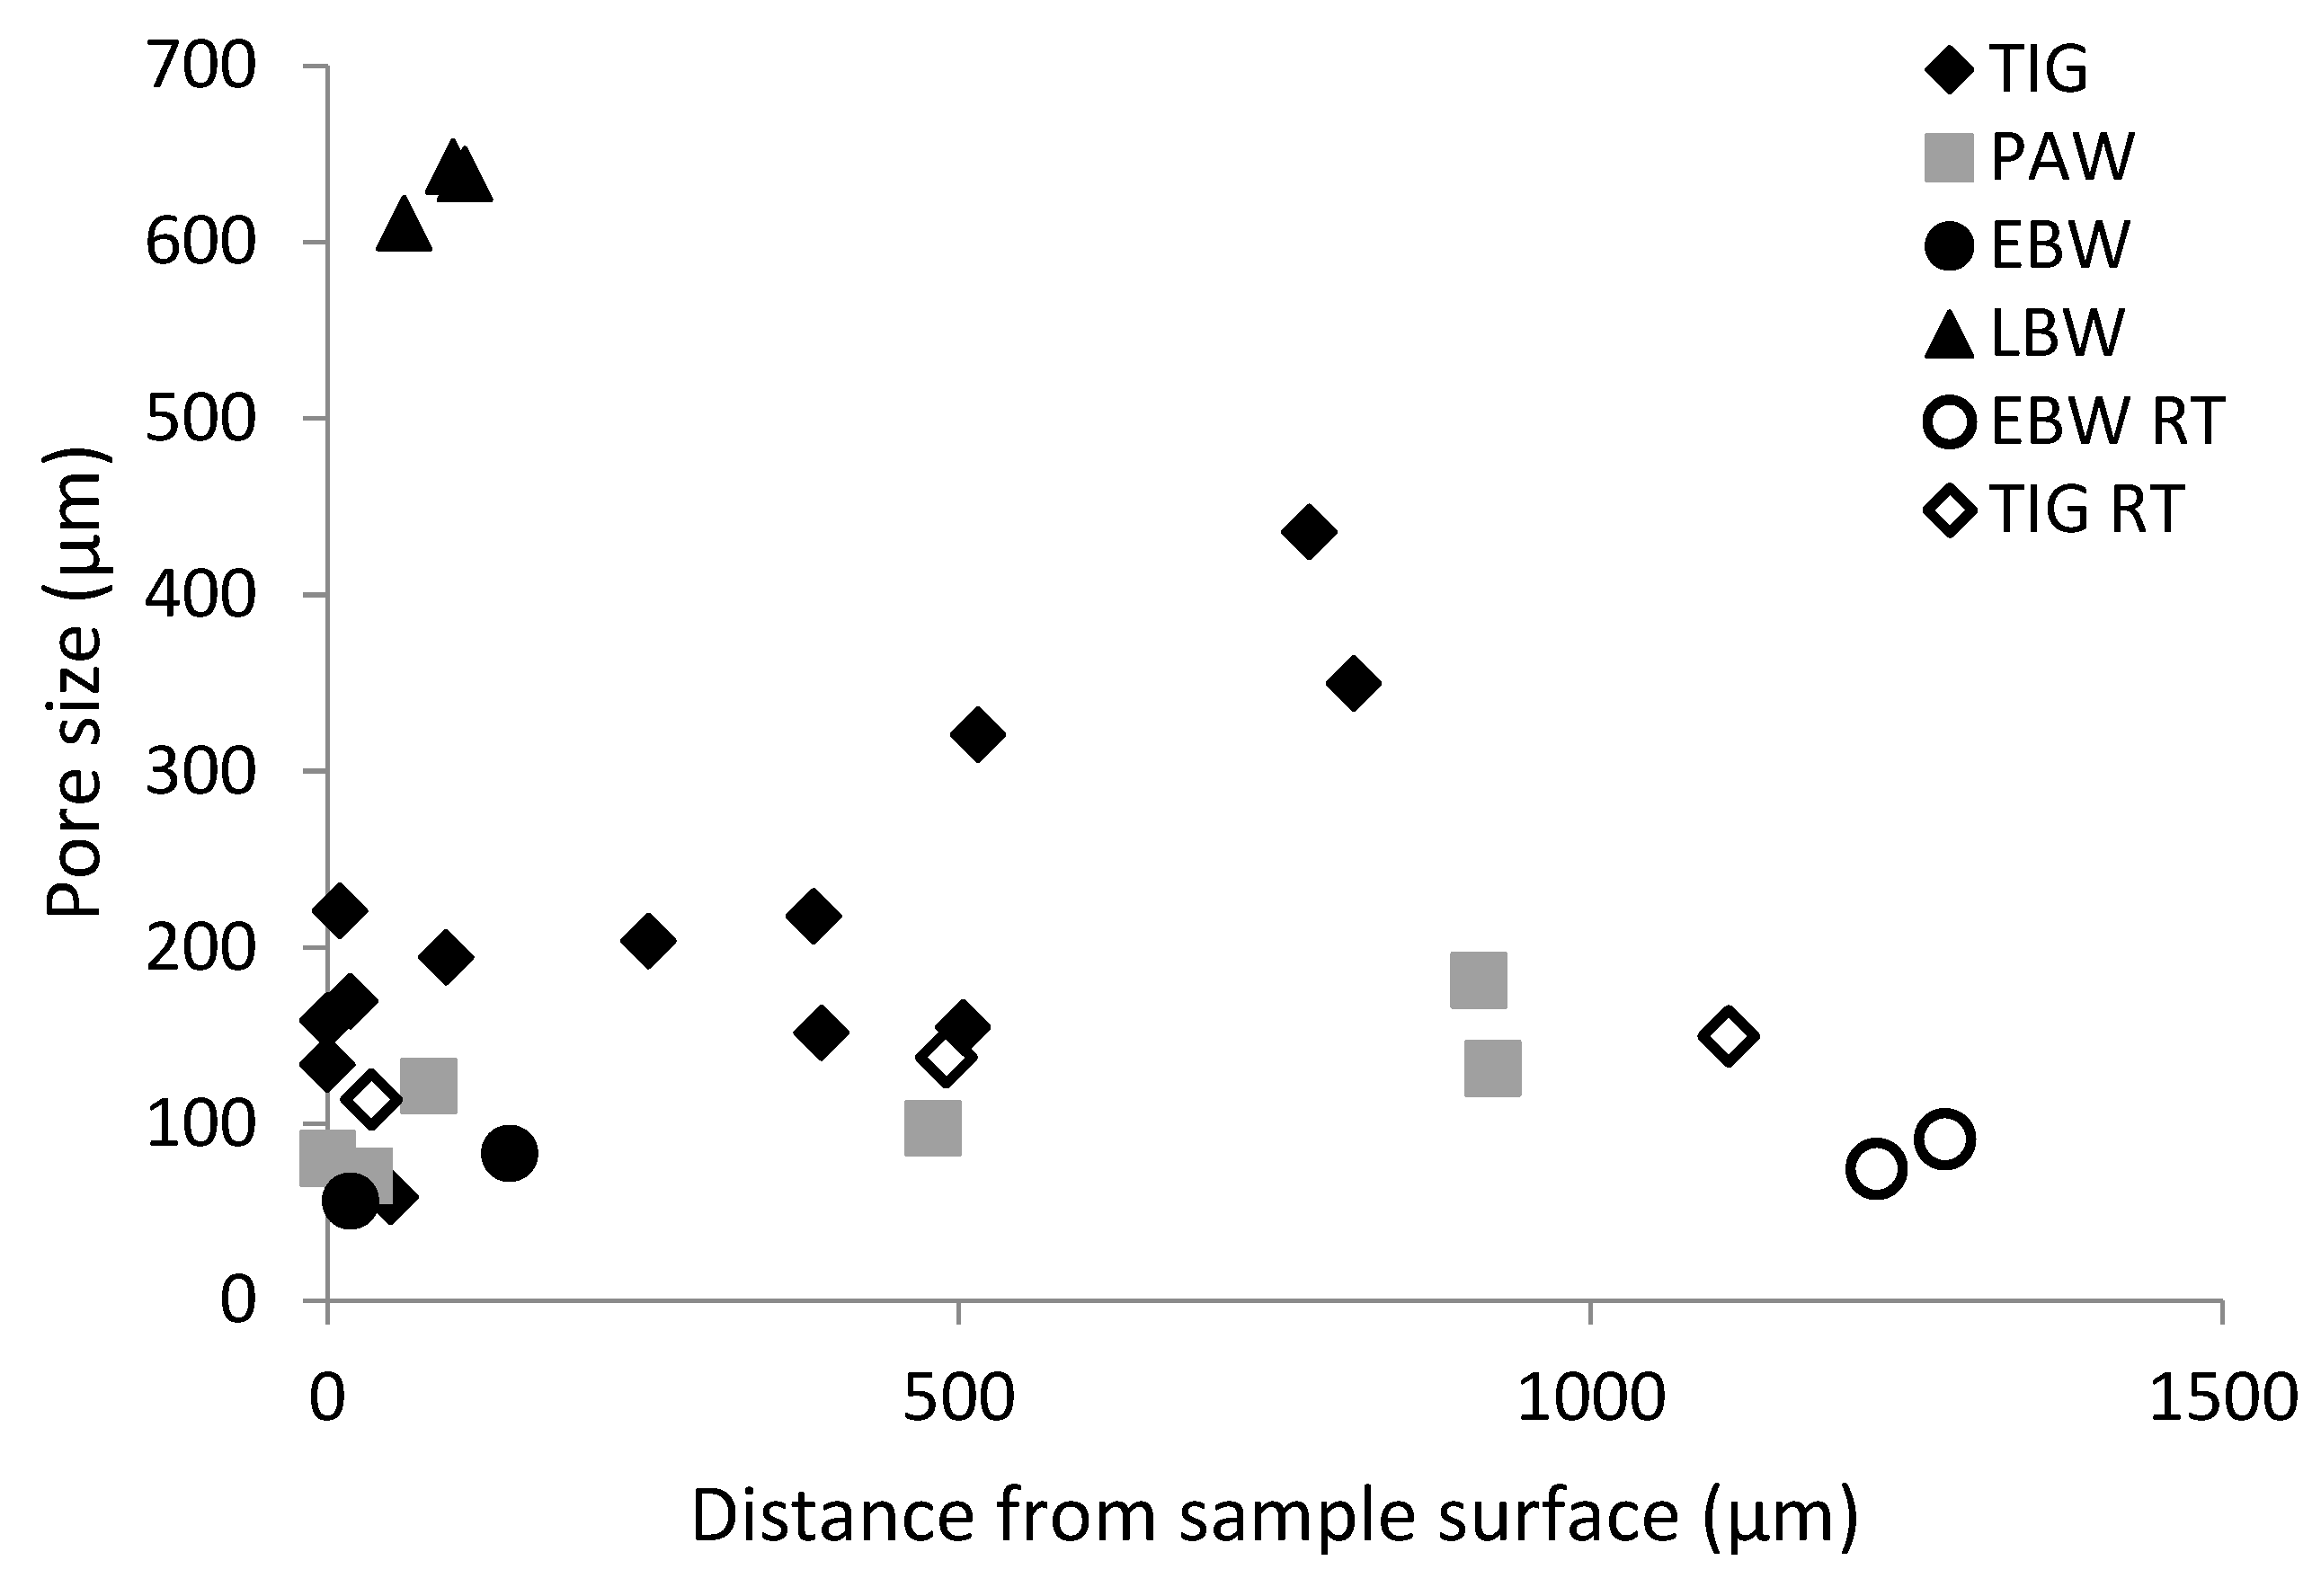
Figure 10, the size of pores which initiated a crack as well as their distance to the sample surface are shown. Approximately half of the pores that initiated cracks had a larger diameter than its respective distance to the surface.
Only pores close to the surface initiated cracks that led to failure in EBW and LBW samples, when tested at elevated temperature. In all other EBW and LBW samples facets were found at crack initiation sites (e.g.
Figure 9d). In TIG and PAW samples, internal pores were also found to initiate cracks.
At room temperature, the influence from internal pores seem to be more pronounced on fatigue performance. Small internal pores are found to initiate cracks at room temperature in EBW and TIG specimens. This was not observed in EBW specimens tested at 250°C.
3.5. X-ray microscopy
X-ray microscopy scans were performed on 2 TIG and a LBW LCF specimens. All the specimens were tested at a normalized stress range of 0.55. The results of the XRM scan of a TIG specimen that failed after 13166 cycles are shown in
Figure 11.
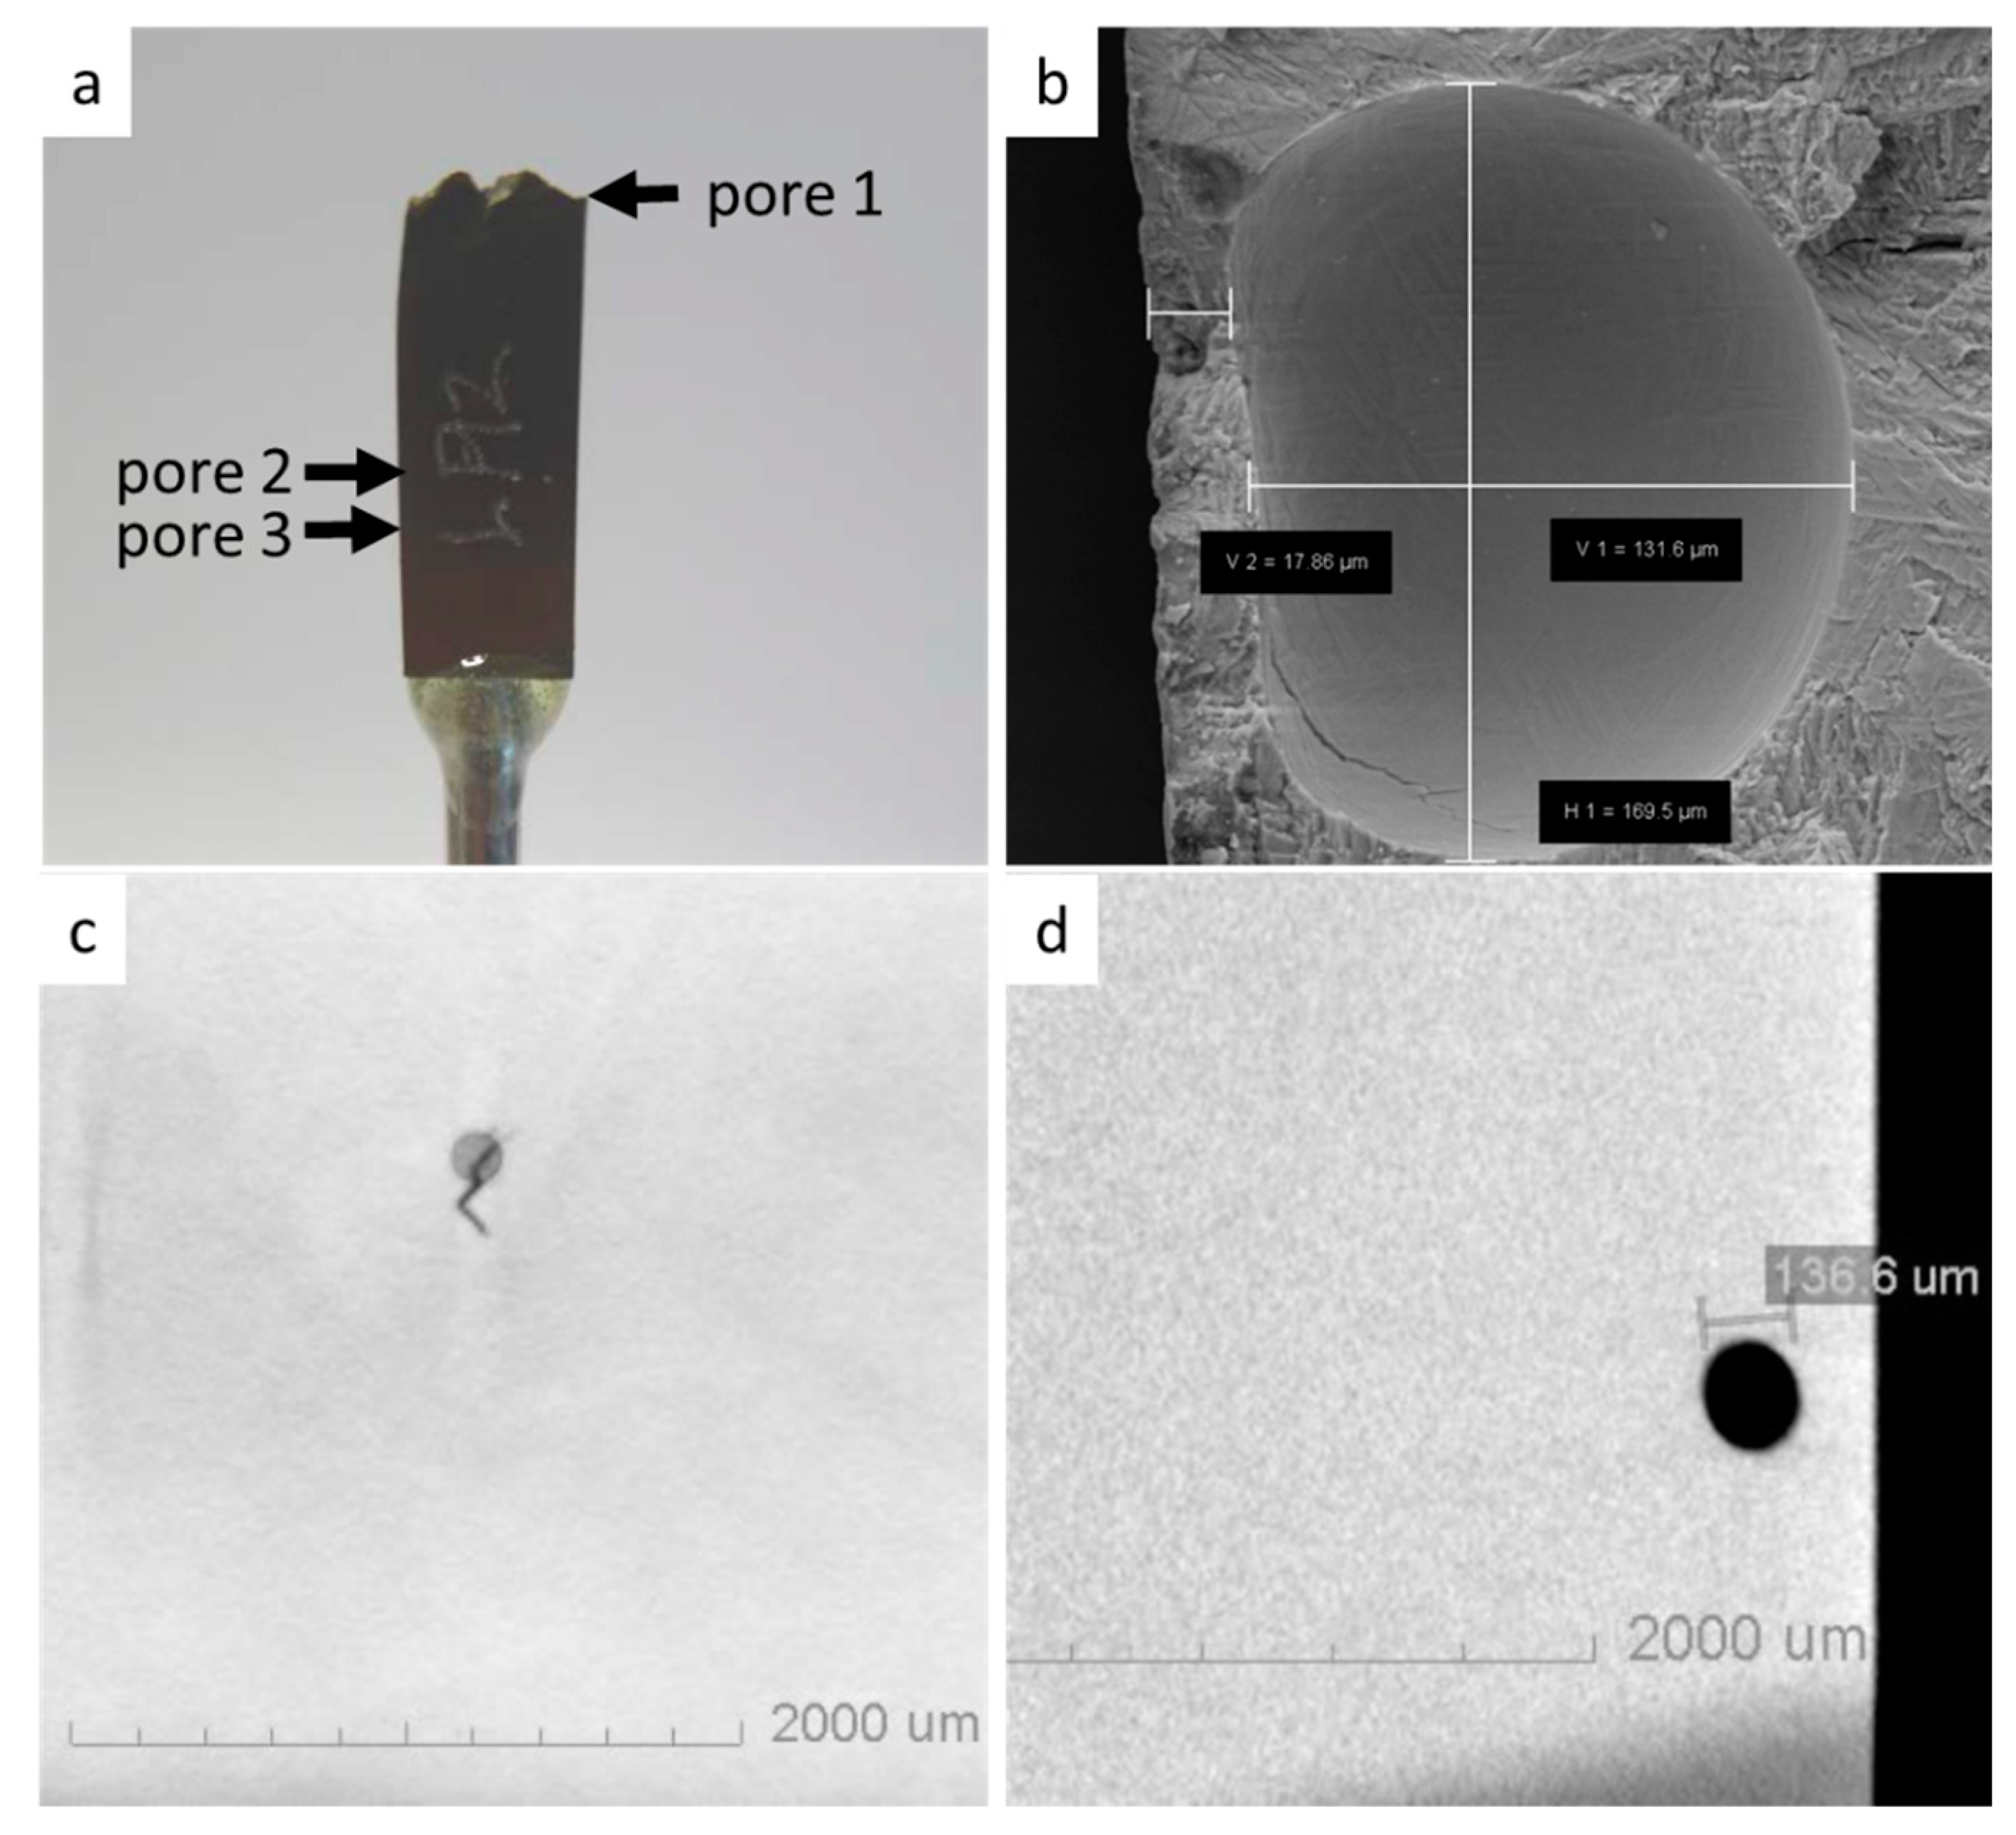
Figure 11b shows a pore on the fracture surface which initiated the crack leading to failure in the TIG welded sample.
Figure 11 c-d shows two 2D virtual slices from the XRM 3D scans of the same specimen. The pore 1 which caused the failure of the sample is 169 µm in diameter. In the XRM scan in
Figure 11c, a surface breaking pore, pore 2, with a diameter of 136 µm was found, which was found to have initiated a crack of approximately 300-400 µm in length. A third pore, pore 3, with a diameter of 148 µm was found located right below the fracture surface (
Figure 11d). Pore 3 did not initiate a crack. The other TIG welded LCF specimen was discontinued after 820 000 cycles since no failure occurred. The XRM scan of this specimen revealed 2 pores with diameters of about 20 µm. No cracks were detected in this specimen.
In
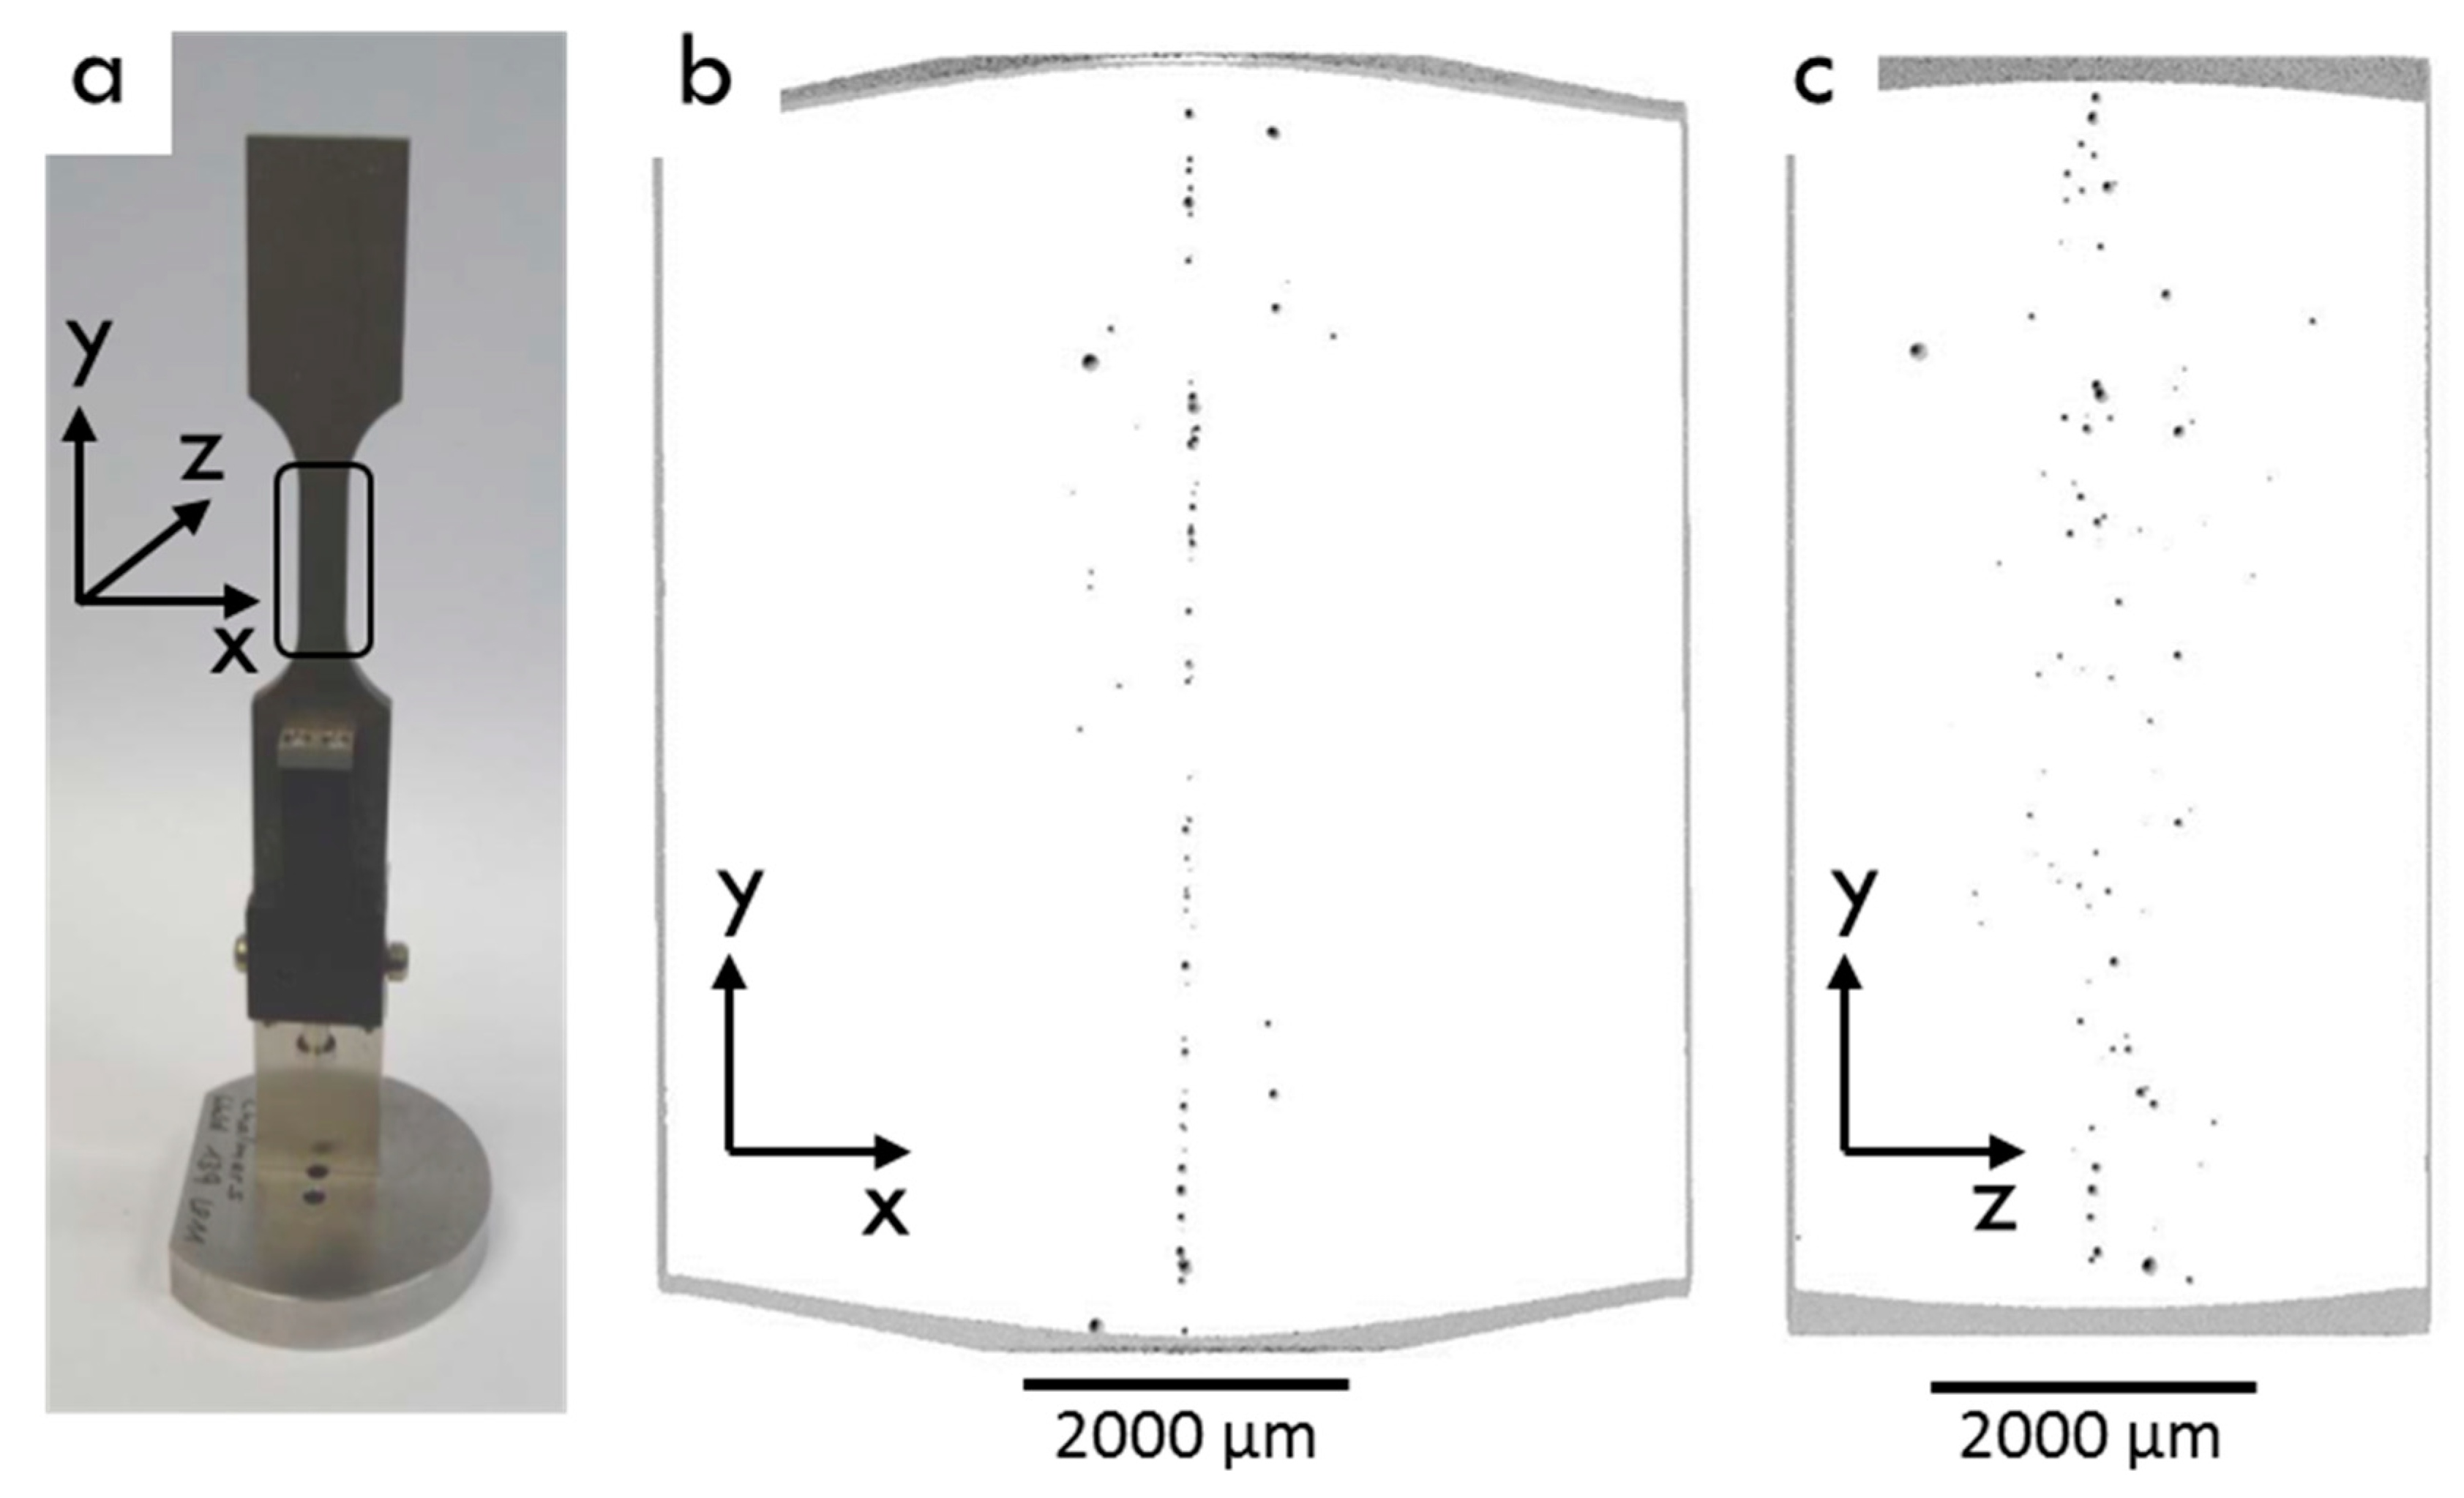
Figure 12, a 3D reconstruction from a XRM investigation of the LBW LCF specimens shown. The test was discontinued after 432 000 cycles with no failure. The XRM investigation shows that the LBW specimen contains continuous porosity along the centreline of the weld. In the z-direction of the sheet, the pores seem to be more scattered but they are still mostly located close to the centre of the weld. No porosity was observed close to the surface of the weld. The pore size along the centreline was normally less than 100 µm in diameter and the pores were mostly scattered. The largest pore detected in this sample was 113 µm in diameter. Interesting to notice is that this amount of pores and their distribution across the weld did not have any significant effect on the fatigue strength under the applied load conditions.
4. Discussion
Welded α+β titanium microstructures are complex. In all type of welds, the microstructure consists of fine α plates separated by thin layers of β phase. The thickness of the individual α plates in EBW and LBW samples is on average below 1 µm and in TIG and PAW on average 1.2-1.3 µm. The microstructure of EBW and LBW welds show features of acicular α’ which is a result of martensitic transformation during fast cooling during welding. Upon post weld heat treatment at 704°C existing martensite has decomposed into α and β phases but alpha laths have retained acicular morphology [
21]. The resulting microstructure in EBW and LBW samples is a fine basketweave type of structure. TIG and PAW processes have larger heat input and slower cooling rates which results in a mixture of martensitic and diffusionally transformed products. TIG welds have more of a colony type of microstructure whereas PAW mainly contains the basketweave type of microstructure. As-welded samples were not available for investigation so changes that occurred during post weld heat treatments are not possible to evaluate in detail.
The microhardness of the EBW, LBW and TIG were at the same level, whereas the PAW had slightly lower hardness. Typically, the maximum slip length defined by α colony size defines the hardness of α+β titanium alloys. Therefore, it was somewhat surprising to find such a high microhardness in the TIG welded specimens despite the relatively coarse microstructure in these specimens. Oxygen and other interstitial elements such as C and N are well known to significantly increase the microhardness in titanium alloys [
11]. In the present work, EPMA was used to evaluate a local increase in amount oxygen could have contributed to the unexpectedly high microhardness values, but no such difference between EBW and TIG welds was found. The yield strength and ultimate tensile strength of the welds were lower than in the base material, despite the higher hardness of the welds. The tensile strength of the TIG weld was lower than that of the EBW and LBW, even if their hardness was similar. The tensile tested weld specimens all fractured in the weld material. The fracture surfaces and etched side views of the fracture showed features of both intergranular and transgranural fracture. The tensile ductility depends on the strength difference between the prior-β grain boundary layer and the intragranular microstructure. In addition the prior-β grain boundary length is related to tensile ductility. The prior-β grain boundary length is related to the prior-β grain size [
11]. Therefore, the larger prior-β grain size found in the TIG welds could explain the lower ductility. TIG welds had the largest prior-β grain size, followed by PAW that also had lowered ductility. LBW had the smallest prior-β grains and also showed the highest ductility. Titanium alloys are very reactive at elevated temperatures and pick up of interstitial elements such as O, N and C during welding has been suggested as a reason for lowered ductility [
22]. As previously mentioned, EPMA measurement did not reveal elevated oxygen levels in TIG and EBW. In TIG welding filler, material was used which may have an effect on mechanical properties. Tensile tests in this study were performed in transverse direction to the weld. The weld joint is a composite with three different zones and is comprised of various microstructures. Thus, the plastic strain could localize in a small area and thereby affect the measured elongation values. It has previously been shown that scattered porosity does not have an effect on static strength [
6]. Here, porosity was found in a PAW and a LBW tensile test fracture surface. The specimens did however not show lower strength or ductility in comparison to the rest of the samples.
Fractography and XRM investigations showed that EBW and PAW produces welds with least porosity and with the smallest pore size. The porosity found in EBW was smaller than 100 µm in diameter and in PAW smaller than 200 µm in diameter. In PAW a lack of fusion defect was also observed. TIG and LBW produced welds with more porosity and of larger size. In LBW continuous porosity with small pore size was found along the centreline in the weld, with occasional large pores at the root side of the weld. In TIG the porosity seemed to be scattered. In some TIG specimens several pores were observed in one fracture surface but on the other hand XRM investigation of a discontinued LCF TIG specimen showed only two 20 µm size pores. LBW and TIG are known to be more susceptible for porosity than EBW and PAW [
23] and the use of filler wire in TIG can increase the risk of porosity.
Total fatigue life is the sum of the cycles it takes to initiate the fatigues crack and the number of cycles it takes for the crack to propagate to a critical size when final fracture occurs. At lower stress ranges the initiation part becomes larger, whereas at high stress range the crack initiation is fairly fast and thus the major part of the total fatigue life is the crack propagation. Crack propagation is normally slower in coarse grained material, whereas crack initiation is inhibited by decreasing “grain size” (i.e. α colony size). Here EBW and LBW welds with finer microstructure performed better than TIG and PAW welds with coarser microstructure. For LCF performance, the resistance to fatigue crack initiation is favoured by a fine microstructure and this seems to be more significant than the resistance to macro crack growth rate favoured by a coarser microstructure. Comparing EBW and PAW, the defects initiating a crack are in the same size range in both welds but welds produced by EBW perform considerably better. In the welds produced by LBW, fractography and XRM showed several pores in the same size range that had not initiated fatigue cracks. Higher hardness, strength and ductility and finer microstructure of EBW and LBW welds seem to be beneficial for LCF performance and make them less sensitive to porosity.
Under cyclic loading, there are a number of micro cracks initiating but only some of the micro cracks keep growing and eventually cause failure. Numerous cracks were observed in individual specimens produced by LBW (
Figure 9c) and TIG (
Figure 11). It is often assumed that under high stress, as around stress raiser such as a pore, cracks initiate almost immediately [
24]. In the present work however, somewhat different findings was made. In the TIG specimen shown in
Figure 11 three pores of similar size and location were found, but only one of the pores induced macro cracks that led to the final fracture. Pore 2 was found to initiate a micro crack and pore 3 had not initiated a detectable crack. This shows that crack initiation at small pores is difficult to predict and may indicate that the time for a pore to initiate a crack is not negligible. Tammas-Williams et al. [
19] found that the surface defects are more harmful than conventional fracture mechanics approach [
18] would predict. The combination of defect size, location, aspect ratio, and proximity to other pores and the surface provided a more accurate prediction of most harmful pores.
As shown in
Figure 7a, the majority of the samples tested at high stress ranges had a crack initiation at the surface of the sample (
Figure 9d), which shows that cracks initiate easily at the specimen surface at high stress ranges. Most EBW and LBW specimens had a crack initiation with a facet at the surface of the sample. Facets in titanium alloys under cyclic loading can occur along basal planes creating flat faceted features on fracture surface at low stress intensity range. Thousands of cycles can contribute to formation of a facet [
25]. Surface initiations with facets were observed in specimens tested at highest stress ranges and surface initiations were not found to occur at normalized stress ranges below 0.6. The specimens with crack initiation at a facet had the highest fatigue lives. At high stress range only large pores (>400 µm), were found to initiate cracks. Large pores were also found to be the most detrimental defect type for the fatigue life. At 250°C, small and internal pores were found to initiate cracks only at lower stress ranges where surface facet initiations did not occur. However, at room temperature, internal pores were found to initiate cracks in TIG and EBW samples at relatively high stress ranges (
Figure 7b). At elevated temperatures, surface cracks become dominant more easily than internal cracks. Sarrazin-Bauduox et al. [
26] showed that in Ti-64 the crack growth rate is higher in air than in vacuum. The effect is more pronounced at elevated temperatures and for small cracks. Cracks initiated by internal defects grow in quasi-vacuum. This is one reason why internal cracks are growing slower than surface cracks and why surface cracks can become dominant more easily. At room temperature the difference in crack growth rate is smaller and cracks initiated by internal pores have bigger chance to become dominant, which may explain why LCF life seemed to be more sensitive to internal pores at room temperature than at elevated temperature. Åkerfeldt et al. [
27] also suggested that increased ductility at elevated temperature might make LCF performance less sensitive to porosity.
5. Conclusions
Welding of titanium alloys is today common practice in manufacturing industries. However, application of welding on more advanced fabrications and cyclic loaded titanium alloy structures puts more emphasis on the importance of complete understanding of the relationship between defects and microstructure correlation with mechanical integrity of welds. Therefore, the present work makes the comparison of four of the most important welding processes for titanium alloys, with regard to unique welding process defect types/distribution and weld microstructures and their relationship with mechanical properties. Based on the present work, the following conclusions are made:
Weld geometry, large pores and pores close to surface were found to be most detrimental to fatigue life.
At room temperature, LCF life was more sensitive to internal porosity than at elevated temperature.
Microstructure has a significant effect on fatigue performance:
Pores initiated cracks in nearly all the samples in PAW and TIG welds whereas in LBW and EBW most fatigue cracks initiated at the surface.
EBW and LBW showed superior fatigue performance over TIG and PAW.
LBW contained porosity but only large pores initiated fatigue cracks.
Acknowledgments
The authors would like to acknowledge the financial support of NFFP (the Swedish National Program for Aeronautical Technology). Moreover, Carl Zeiss in Oberkochen and Dr. Morten Peder Raanes at NTNU are acknowledged for performing XRM and EPMA experiments, respectively.
References
- Akman, E.; Demir, A.; Canel, T.; Sinmazçelik, T. Laser welding of Ti6Al4V titanium alloys. J. Mater. Process. Technol. 2009, 209, 3705–3713. [Google Scholar] [CrossRef]
- Oh, J.; Kim, N.J.; Lee, S.; Lee, E.W. Correlation of fatigue properties and microstructure in investment cast Ti-6Al-4V welds. Mater. Sci. Eng. A 2003, 340, 232–242. [Google Scholar] [CrossRef]
- Ahmed, T.; Rack, H.J. Phase transformations during cooling in alpha + beta titanium alloys. Mater. Sci. Eng. A 1998, 243, 206–211. [Google Scholar] [CrossRef]
- Kar, S.K. Modeling of mechanical properties in alpha/beta-titanium alloys, The Ohio State University, 2005.
- Murthy, K.K.; Sundaresan, S. Fracture toughness of Ti-6Al-4V after welding and postweld heat treatment.pdf. Weld. J. 1997, 76, 81–91. [Google Scholar]
- Short, A.B. Gas tungsten arc welding of α + β titanium alloys: a review. Mater. Sci. Technol. 2009, 25, 309–324. [Google Scholar] [CrossRef]
- Baeslack III, W.A. Technical note: evaluation of triplex postweld heat treatments for alpha-beta titanium alloys. Weld. J. (Research Suppl.) 1982, 62, 197s–199s. [Google Scholar]
- Pederson, R.; Niklasson, F.; Skystedt, F.; Warren, R. Microstructure and mechanical properties of friction- and electron-beam welded Ti-6Al-4V and Ti-6Al-2Sn-4Zr-6Mo. Mater. Sci. Eng. A 2012, 552, 555–565. [Google Scholar] [CrossRef]
- Vilaro, T.; Colin, C.; Bartout, J.D. As-fabricated and heat-treated microstructures of the Ti-6Al-4V alloy processed by selective laser melting. Metall. Mater. Trans. A Phys. Metall. Mater. Sci. 2011, 42, 3190–3199. [Google Scholar] [CrossRef]
- Baeslack III, W.A.; Becker, D.W.; Froes, F.H. Advances in Titanium Alloy Welding Metallurgy. JOM 1984, 36, 46–58. [Google Scholar] [CrossRef]
- Lütjering, G.; William, J.C. Titanium, Springer-Verlag Berlin Heidelberg New York, 2003.
- Sundaresan, S.; Janaki Ram, G.D.; Madhusudhan Reddy, G. Microstructural refinement of weld fusion zones in α–β titanium alloys using pulsed current welding. Mater. Sci. Eng. A 1999, 262, 88–100. [Google Scholar] [CrossRef]
- Shirani, M.; Härkegård, G. Damage tolerant design of cast components based on defects detected by 3D X-ray computed tomography. Int. J. Fatigue 2012, 41, 188–198. [Google Scholar] [CrossRef]
- Yi, J.Z.; Gao, Y.X.; Lee, P.D.; Flower, H.M.; et al. Scatter in fatigue life due to effects of porosity in cast A356-T6 aluminum-silicon alloys. Metall. Mater. Trans. A 2003, 34, 1879–1890. [Google Scholar] [CrossRef]
- Zerbst, U.; Madia, M.; Beier, H.T. A model for fracture mechanics based prediction of the fatigue strength: Further validation and limitations. Eng. Fract. Mech. 2014, 130, 65–74. [Google Scholar] [CrossRef]
- Xu, Z.; Wen, W.; Zhai, T. Effects of pore position in depth on stress/strain concentration and fatigue crack initiation. Metall. Mater. Trans. A Phys. Metall. Mater. Sci. 2012, 43, 2763–2770. [Google Scholar] [CrossRef]
- Fan, J.; McDowell, D.L.; Horstemeyer, M.F.; Gall, K. Cyclic plasticity at pores and inclusions in cast Al-Si alloys. Eng. Fract. Mech. 2003, 70, 1281–1302. [Google Scholar] [CrossRef]
- Murakami, Y. Material defects as the basis of fatigue design. Int. J. Fatigue 2012, 41, 2–10. [Google Scholar] [CrossRef]
- Tammas-Williams, S.; Withers, P.J.; Todd, I.; Prangnell, P.B. The Influence of Porosity on Fatigue Crack Initiation in Additively Manufactured Titanium Components. Sci. Rep. 2017, 7, 1–13. [Google Scholar] [CrossRef]
- Prabhu, A.W.; Vincent, T.; Chaudhary, A.; Zhang, W.; et al. Effect of microstructure and defects on fatigue behaviour of directed energy deposited Ti–6Al–4V. Sci. Technol. Weld. Join. 2015, 20, 659–669. [Google Scholar] [CrossRef]
- Gil Mur, F.X.; Rodríguez, D.; Planell, J.a. Influence of tempering temperature and time on the α′-Ti-6Al-4V martensite. J. Alloys Compd. 1996, 234, 287–289. [Google Scholar] [CrossRef]
- Yung, W.K.; Ralph, B.; Lee, W.B.; Fenn, R. An investigation into welding parameters affecting the tensile properties oftitanium welds. J. Mater. Process. Technol. 1997, 63, 759–764. [Google Scholar] [CrossRef]
- Smith, L.S.; Gittos, M.F. A review of Weld Metal Porosity and Hydride Cracking in Titanium and Its Alloys, report 658, The Welding Institute, 1998.
- Schijve, J. Fatigue of Structures and Materials, Springer Science+Business Media, B.V., 2009.
- Pilchak, A.L.; Bhattacharjee, A.; Rosenberger, A.H.; Williams, J.C. Low ΔK faceted crack growth in titanium alloys. Int. J. Fatigue 2009, 31, 989–994. [Google Scholar] [CrossRef]
- Sarrazin-Baudoux, C.; Lesterlin, S.; Petit, J. Atmospheric influence on fatigue crack propagation in Titanium alloys at elevated temperature, in: Elevated Temperature Effects on Fatigue and Fracture, American Society for Testing and Materials, 1997, pp. 117–139.
- Åkerfeldt, P.; Pederson, R.; Antti, M. A fractographic study exploring the relationship between the low cycle fatigue and metallurgical properties of laser metal wire deposited Ti – 6Al – 4V. Int. J. Fatigue 2016, 87, 245–256. [Google Scholar] [CrossRef]
Figure 1.
Schematic drawings and dimensions of the samples used for mechanical testing.
Figure 1.
Schematic drawings and dimensions of the samples used for mechanical testing.
Figure 2.
Optical micrographs showing the weld cross sections for a) TIG, b) PAW, c) EBW, and d) LBW welds, in 4mm thick Ti-64 sheet material.
Figure 2.
Optical micrographs showing the weld cross sections for a) TIG, b) PAW, c) EBW, and d) LBW welds, in 4mm thick Ti-64 sheet material.
Figure 3.
Optical micrographs of a) TIG, b) PAW, c) EBW and d) LBW welds and e) SEM micrograph of PAW weld. Notice the different magnifications.
Figure 3.
Optical micrographs of a) TIG, b) PAW, c) EBW and d) LBW welds and e) SEM micrograph of PAW weld. Notice the different magnifications.
Figure 4.
EPMA line scan across a TIG weld showing the distribution of aluminium and oxygen across the weld, i.e. in the base material, the heat affected zone and in the fusion zone.
Figure 4.
EPMA line scan across a TIG weld showing the distribution of aluminium and oxygen across the weld, i.e. in the base material, the heat affected zone and in the fusion zone.
Figure 5.
Microhardness profiles across welds produced by EBW, LBW, TIG and PAW, after post weld heat treatment.
Figure 5.
Microhardness profiles across welds produced by EBW, LBW, TIG and PAW, after post weld heat treatment.
Figure 6.
Room temperature tensile tested weld samples. Etched side views and fracture surfaces of a)-b) EBW, c)-d) LBW, and e)-f) PAW.
Figure 6.
Room temperature tensile tested weld samples. Etched side views and fracture surfaces of a)-b) EBW, c)-d) LBW, and e)-f) PAW.
Figure 7.
LCF results a) for welds produced by TIG, PAW, EBW and LBW at 250°C, b) EBW and TIG at room temperature, and c) the effect of weld geometry in LBW. In a) and b), the shape of the symbol indicates the welding process and the fill of the symbol indicate the type of the initiation.
Figure 7.
LCF results a) for welds produced by TIG, PAW, EBW and LBW at 250°C, b) EBW and TIG at room temperature, and c) the effect of weld geometry in LBW. In a) and b), the shape of the symbol indicates the welding process and the fill of the symbol indicate the type of the initiation.
Figure 8.
Optical micrograph of LBW showing the weld geometry.
Figure 8.
Optical micrograph of LBW showing the weld geometry.
Figure 9.
Fatigue fracture surfaces showing different types of crack initiation sites: a) a small pore close to surface (EBW), b) a large internal pore (TIG), c) initiations at surface and at a cluster of pores (LBW), and d) a surface initiation site with a facet (EBW).
Figure 9.
Fatigue fracture surfaces showing different types of crack initiation sites: a) a small pore close to surface (EBW), b) a large internal pore (TIG), c) initiations at surface and at a cluster of pores (LBW), and d) a surface initiation site with a facet (EBW).
Figure 10.
The sizes and location of pores initiating fatigue cracks.
Figure 10.
The sizes and location of pores initiating fatigue cracks.
Figure 11.
TIG welded LCF specimen investigated with XRM: a) overview of the fractured LCF specimen, b) SEM fractograph of pore 1 which initiated the fatigue crack that led to failure of the TIG welded LCF specimen, c) XRM virtual slice of the surface breaking pore 2 which initiated a 300-400 μm long micro crack, and d) XRM virtual slice of pore 3 which did not initiate a crack.
Figure 12.
XRM 3D volume rendering showing distribution of porosity in a fatigue tested but not fractured LCF specimen produced by LBW: a) overview of the LCF specimen, b) View from top of the weld, x-y-plane, and c) view from the side of the weld, y-z-plane.
Figure 12.
XRM 3D volume rendering showing distribution of porosity in a fatigue tested but not fractured LCF specimen produced by LBW: a) overview of the LCF specimen, b) View from top of the weld, x-y-plane, and c) view from the side of the weld, y-z-plane.
Table 1.
Chemical compositions of the Ti-64 sheet and filler wire materials in wt-%.
Table 1.
Chemical compositions of the Ti-64 sheet and filler wire materials in wt-%.
| |
Al |
V |
Fe |
C |
O |
N |
H |
Y |
Ti |
| Sheet |
6.12 |
3.81 |
0.17 |
0.006 |
0.12 |
0.005 |
<0.001 |
<0.005 |
Bal. |
| Filler wire |
5.50-6.75 |
3.50-4.50 |
<0.22 |
<0.05 |
<0.18 |
<0.03 |
<0.015 |
<0.005 |
Bal. |
Table 2.
Measured microstructural features in the different welds.
Table 2.
Measured microstructural features in the different welds.
| |
TIG |
PAW |
EBW |
LBW |
| FZ width top/bottom |
12.3/7.5mm |
7.3/5.8 mm |
3/3 mm |
3/1.8 mm |
| HAZ width |
3.2 mm |
3.0 mm |
1.8 mm |
1.6 mm |
| Maximum prior-β grain size |
3 mm |
2 mm |
1. 5 mm |
1 mm |
| GB-α |
Approx. 1 µm/continuous |
Approx. 1 µm/continuous |
Thin/intermitted |
Thin/intermitted |
| α lath spacing |
1.2-1.3 µm |
1.2-1.3 µm |
0.8-1 µm |
0.8-1 µm |
| HV0.5 |
342±12.9 |
325±15.4 |
335±6.9 |
339±8.6 |
Table 3.
Tensile properties of the welds at room temperature (RT) and at 250°C.
Table 3.
Tensile properties of the welds at room temperature (RT) and at 250°C.
| |
Yield Strength - RT (Mpa) |
Yield Strength - 250 (MPa) |
Tensile Strength - RT (MPa) |
Tensile Strength - 250 (MPa) |
Tensile Elongation - RT (%) |
Tensile Elongation - 250 (%) |
Reduction of Area - RT(%) |
Reduction of Area - 250 (%) |
| BM |
975 |
735 |
1021 |
800 |
16.4 |
17.8 |
44 |
62 |
| TIG |
871 |
596 |
958 |
749 |
7 |
14 |
10 |
38 |
| PAW |
856 |
590 |
954 |
729 |
9 |
14 |
17 |
43 |
| EBW |
940 |
689 |
1014 |
795 |
10 |
15 |
16 |
42 |
| LBW |
931 |
677 |
995 |
773 |
10 |
12 |
23 |
39 |
Table 4.
Summary of results from fractography on samples tested at 250°C. The number of tested specimens, number of surface initiations, initiations at a pore and the size distribution of all pores found on the fracture surfaces.
Table 4.
Summary of results from fractography on samples tested at 250°C. The number of tested specimens, number of surface initiations, initiations at a pore and the size distribution of all pores found on the fracture surfaces.
| Size [µm] |
TIG |
PAW |
EBW |
LBW |
| Samples tested/Eligible for fractography |
26/16 |
19/8 |
40/28 |
23/12 |
| Surface initiation |
3 |
2 |
24 |
9 |
| Initiation at a pore |
13 |
6 |
4 |
3 |
| 0-100 |
3 |
3 |
4 |
15 |
| 100-200 |
10 |
3 |
- |
3 |
| 200-300 |
6 |
- |
- |
- |
| 300-400 |
4 |
- |
- |
- |
| 400-500 |
1 |
- |
- |
- |
| 600-700 |
- |
LOF |
- |
3 |
|
Disclaimer/Publisher’s Note: The statements, opinions and data contained in all publications are solely those of the individual author(s) and contributor(s) and not of MDPI and/or the editor(s). MDPI and/or the editor(s) disclaim responsibility for any injury to people or property resulting from any ideas, methods, instructions or products referred to in the content. |
© 2024 by the authors. Licensee MDPI, Basel, Switzerland. This article is an open access article distributed under the terms and conditions of the Creative Commons Attribution (CC BY) license (http://creativecommons.org/licenses/by/4.0/).
