1. Introduction
With the development of modern machinery manufacturing technology, the fields of aviation, aerospace, communications, medical, and bioengineering have put forward more stringent requirements for the processing quality of critical components [
1,
2]. For complex and brittle materials such as engineering ceramics, optical glass, single crystal silicon, and composite materials that are difficult to process and whose processing accuracy is difficult to maintain, the most commonly used processing method is to grind them with superabrasive grinding wheels [
3,
4,
5]. The grinding process leverages the micro-cutting effect of numerous grains on the grinding wheel’s working surface to remove material. It shows incomparable advantages in high-precision machining of various difficult-to-machine materials. Furthermore, grinding is essential to ensuring the machining accuracy and surface quality of hard and brittle materials. For grinding, the precision of the grinding wheel directly affects the workpiece material removal rate, surface integrity, processing quality and so on. [
6,
7,
8]. Hence, dressing the grinding wheel surface is crucial to maintain its efficiency and precise geometric shape during processing. This can not only keep the grains sharp but also extend the service life of the grinding wheel.
The objective of dressing the grinding wheel is twofold: to achieve a high-precision geometric profile and to ensure an ample number of sharp grains on its surface. Both are vital for the precision grinding process [
9,
10]. Holesovsky et al. [
11] used diamond dressers to conduct a comparative study on the performance of grinding surface roughness, and the results showed that the dressing speed and dressing depth of the grinding wheel have a significant impact on the surface roughness. Palmer et al. [
12] studied the effect of roller dressing on the surface topography, morphology, and characteristics of alumina grinding wheels with different grain shapes, and the study found that very rough grinding wheels are produced at higher feed rates and speed ratios. The dressing is divided into profiling and sharpening. Profiling is to perform micro-cutting on the grinding wheel to achieve the expected geometric profile and accuracy, which is the key to ensuring the accuracy of workpiece grinding. Sharpening is to remove the bond between the grains so that there is a certain chip space between the grains and to make the grains protrude beyond the bond to form a cutting-edge. Compared with fine-grained diamond grinding wheels, coarse-grained diamond grinding wheels have significant advantages in terms of grain geometry, grain-bond holding strength, and dressing material removal amount, but they also make dressing more difficult. To make the surface of the grinding wheel have smooth coarse-grained diamond grains, Riemer et al. [
13] proposed a coarse-grained single-layer metal bond grinding wheel dressing method based on the thermochemical reaction between diamond and iron-based materials. The friction and thermochemical effects between the grinding wheel and the dressing block are used to achieve coarse-grained diamond grinding wheel dressing. Zhang et al. [
14] combined the material water jet system with touch grinding to achieve precise grinding and coarse-grained metal-bonded diamond grinding wheel dressing. Zhao et al. [
15,
16] used ELID technology combined with metal-based diamond dressing wheels to dress electroplated coarse-grained diamond grinding wheels with grain sizes of
, and
, and the low wear rate of the dressed coarse-grained grinding wheel ensures high surface shape accuracy and low machining costs. Due to the high grain hardness and large grain size of electroplated coarsegrained diamond grinding wheels, the grinding wheel characteristics seriously hinder the application of dressing operations. Therefore, it is necessary to improve the understanding of coarse-grained diamond grinding wheel dressing through the surface morphology characteristics of the grinding wheel.
The surface morphology characteristics of the grinding wheel, such as the number of grains, the geometric shape of the grains, and the cutting-edge height of the grains, are indispensable factors in the evaluation and analysis of the grinding performance of the grinding wheel. Nguyen et al. [
17] studied the application of grinding wheel surface topography parameters in the characterization of the grinding process, and the results showed that there is a relationship between the grinding wheel surface topography parameters and surface roughness. Wang et al. [
18] found that the grinding surface morphology characteristics are closely related to the grinding parameters by analyzing and screening the grain trajectories on the workpiece. The surface roughness is improved at small cutting depths as the grinding speed and feed ratio increase. Kacalak et al. [
19] proposed that the machining potential of abrasive tools depends on the grinding wheel structure, the type and performance of grain and bond, the geometric parameters of grain, and active surface morphology. However, it is difficult to measure changes in the surface morphology of the grinding wheel in real-time during actual grinding. To overcome this problem, many researchers have devoted themselves to modeling and simulating the grinding process. Grinding wheel surface topography modeling has gradually become an important method to study the changes in grinding wheel surface topography and its impact on the grinding process. Liu et al. [
20] proposed the basic topographic parameters of grains and two evaluation indices of the grain protrusion degree and the dispersion degree of the grain protrusion area to parametrically evaluate the surface topography of the grinding wheel and a three-dimensional model for the surface topography of the resin-bonded grinding wheel was established. Qiao et al. [
21] proposed a non-Gaussian statistical model to simulate the mill grinding wheel topography based on the distribution characteristics of grains induced by observing the grinding wheel surface topographies with different grain sizes, and 3D parameters of "Birmingham 14" were introduced to assess the grinding wheel surface quantitatively. Chen et al. [
22] used the moving-average model to reconstruct the surface morphology of the grinding wheel based on the measured data on the grinding wheel surface. Liao et al. [
23,
24] digitized the extracted three-dimensional contour features of the grinding wheel through linear transformation, established a moving average model based on the time series method to generate the surface topography of the grinding wheel, and based on this, a method for generating grinding surfaces with different autocorrelation functions and statistical parameters was established. Salisbury et al. [
25,
26] proposed a grinding wheel surface modeling method based on the measured grinding wheel surface and two-dimensional Fourier transform. Existing research indicates that we can quantitatively assess grinding performance using the morphological characteristics of both the grinding wheel and workpiece surfaces. Therefore, predicting the morphological characteristics and roughness of the workpiece surface is of great significance to improving the grinding quality of the grinding wheel after grinding and dressing.
In view of this, this paper aims to establish a morphology evolution model of the coarse-grained diamond grinding wheel surface and workpiece surface based on the dressing characteristics of the grinding wheel to study the evolution of dressing parameters on the morphology characteristics of the grinding wheel surface and workpiece surface. This model fully considers the grinding wheel surface morphology characteristics, such as the number of grains, the geometric shape of the grains, and the cutting-edge height of the grains, and uses numerical modeling to predict the grinding wheel surface and workpiece surface details after dressing. Combined with the dressing and grinding test results of the electroplated coarse-grained diamond grinding wheel, the surface morphology characteristics of the grinding wheel and the changes in the workpiece surface morphology with the protruding height of the grains after dressing were analyzed. Finally, the effectiveness of the model is evaluated by comparing the simulated morphology obtained with the actual morphology observed experimentally.
2. Establishment of surface morphology model
2.1. Shape of the grain
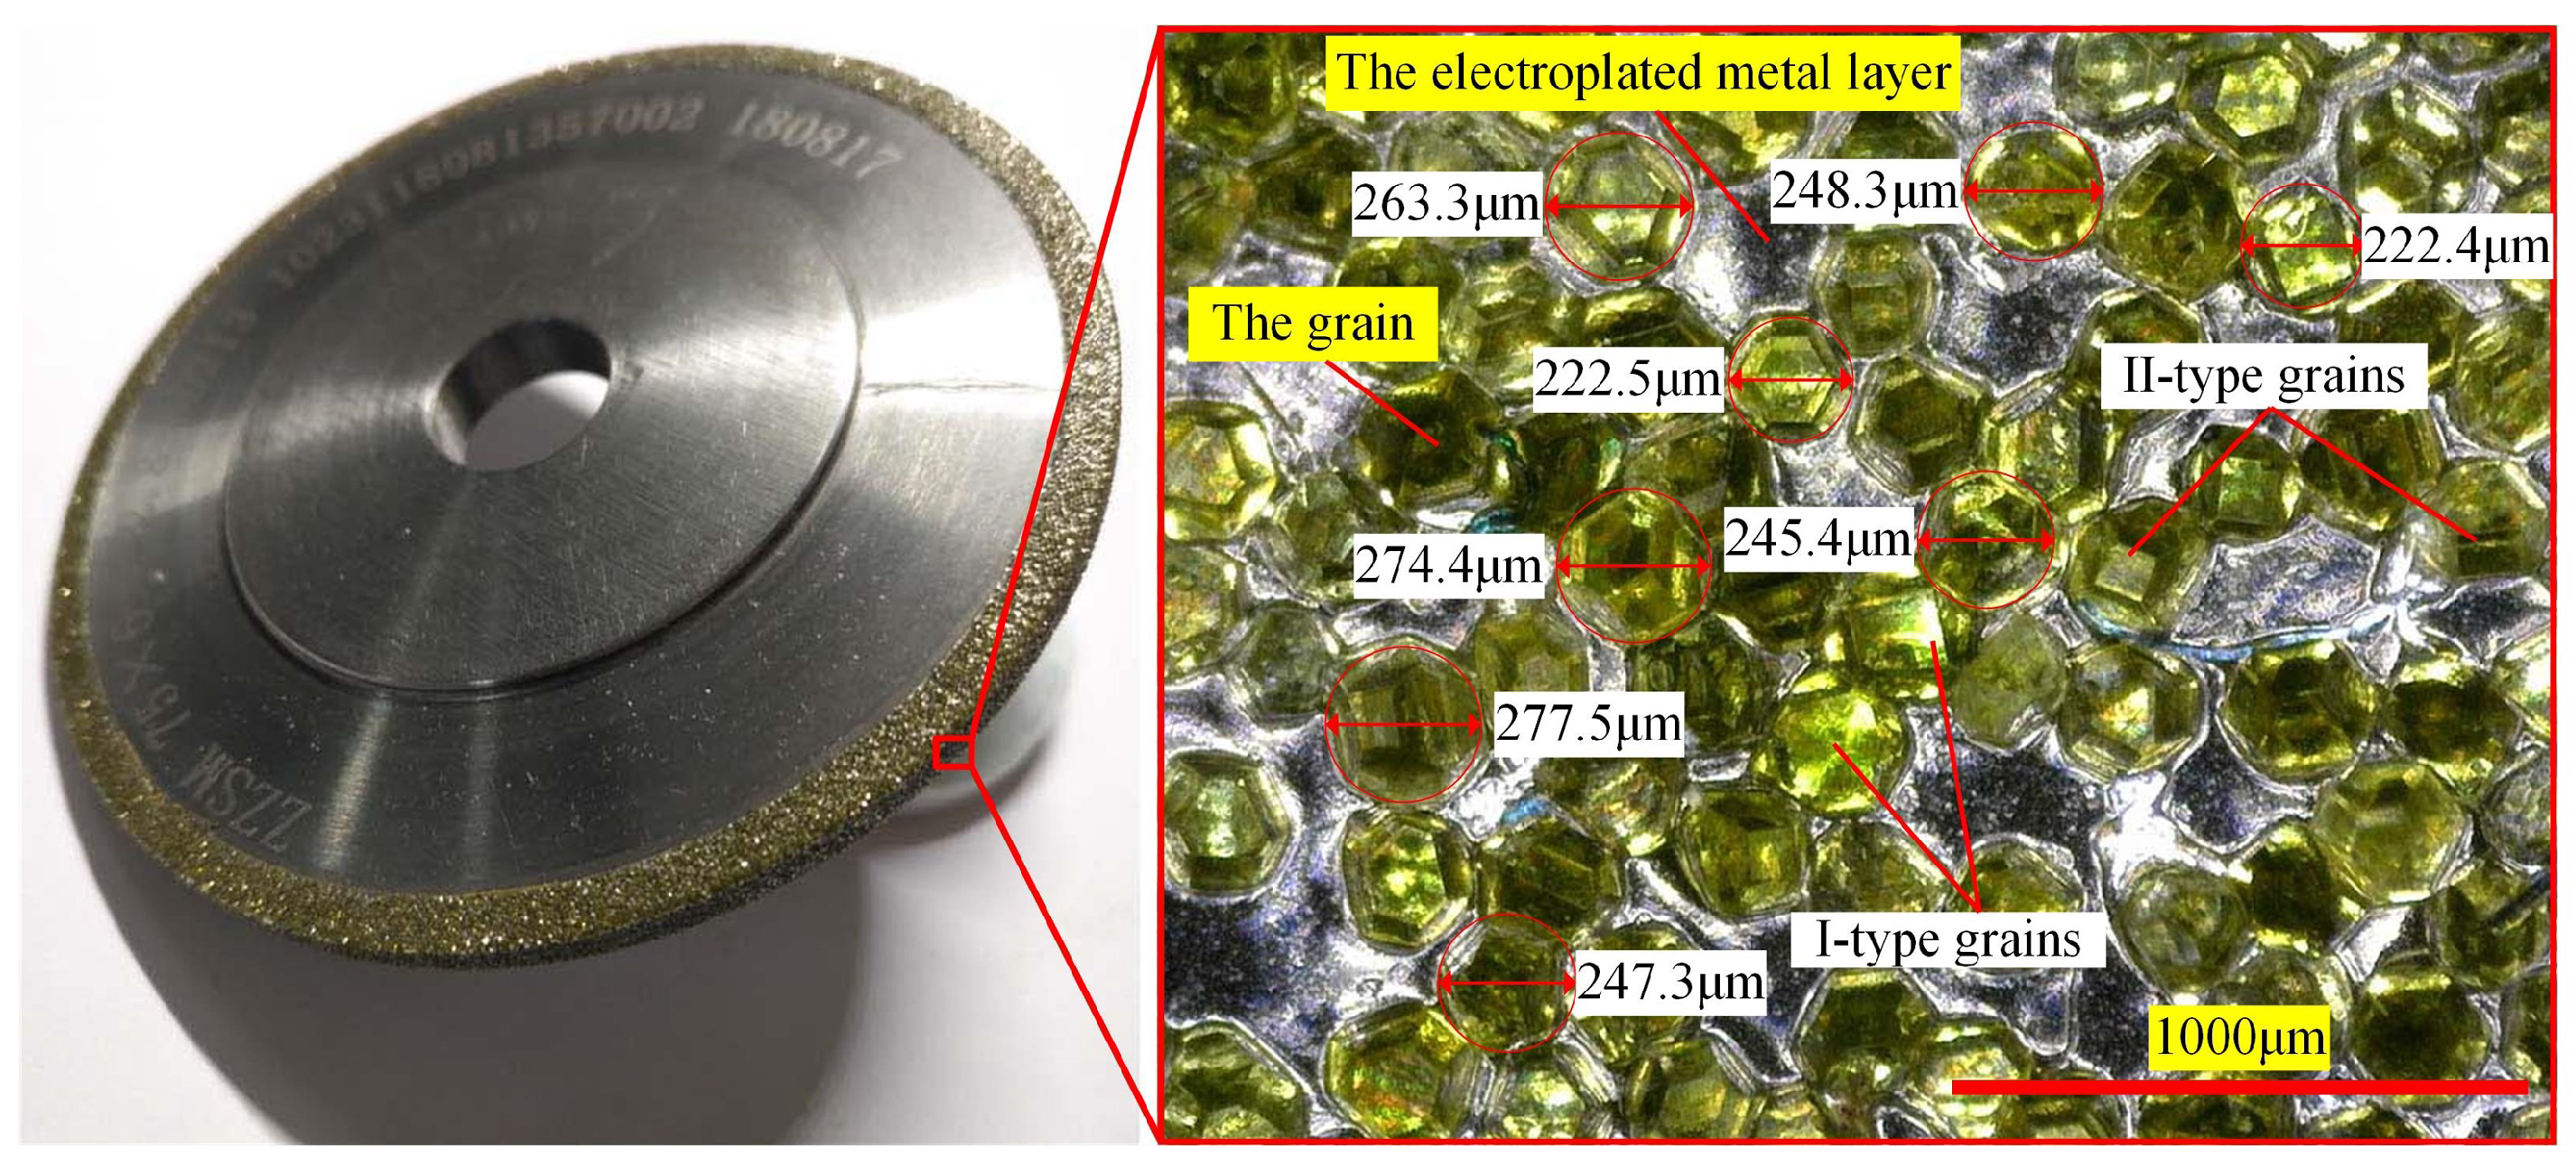
The single-layer electroplated coarse-grained diamond grinding wheel used is shown in
Figure 1. The grains on the grinding wheel are regular in shape, uniform in color, distributed randomly, and exhibit significant protrusion. To thoroughly investigate the impact of the grinding wheel dressing surface on the workpiece’s three-dimensional morphology, our model generates each grain on the surface independently. This generation considers grain parameters, including the grain shape coefficient and grain size. The model also accounts for the randomness of individual grain contours and their distribution on the grinding wheel, enhancing the accuracy of the grinding topography prediction.
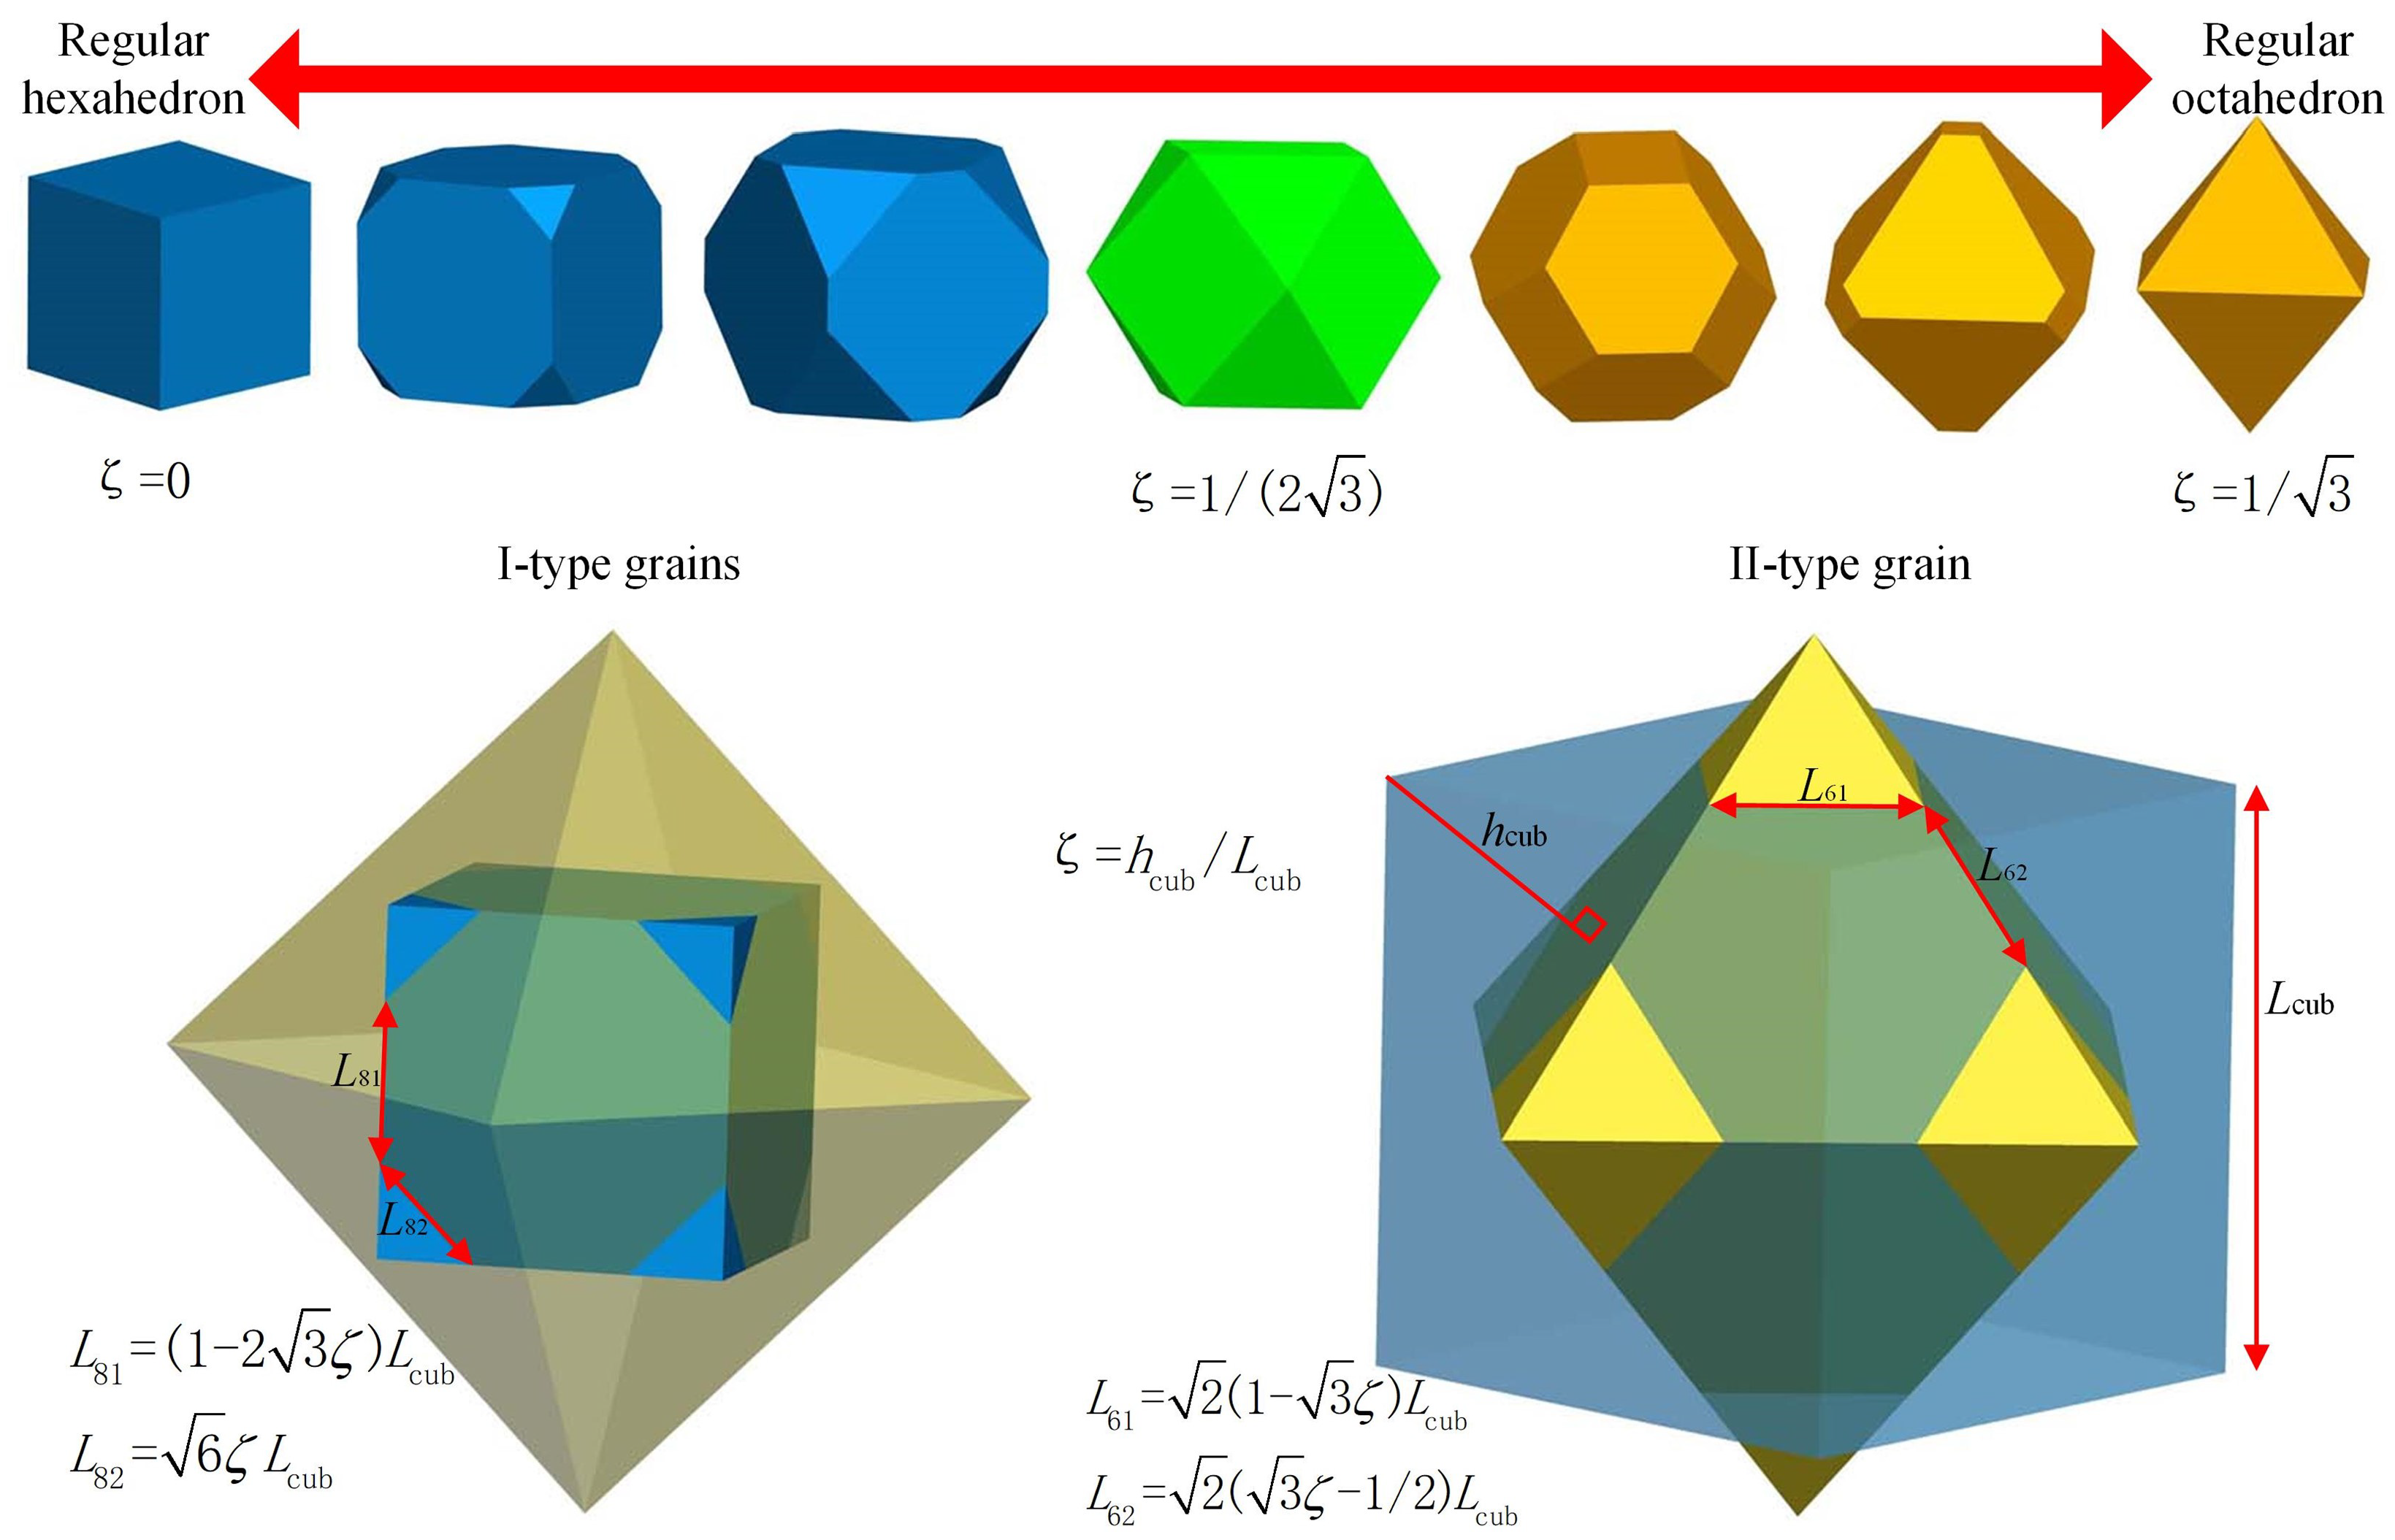
The generation parameters of the grains are independent of each other, so the generated grains are affected by the randomness of the synthesis conditions and have certain differences. The evolution of the crystal shape of grains is shown in
Figure 2. The shape of the grains is formed by truncating regular hexahedrons and regular octahedrons [
27]. The shape of the grains can be described by the shape coefficient
, which is the ratio of the distance
from the vertex of the regular hexahedron to the surface of the regular octahedron and the side length of the regular hexahedron
. If
, the shape of the grain is a regular hexahedron. If
, the grains are I-type grains mainly composed of regular hexahedrons. If
, the grain is a composite shape of a regular hexahedron and a regular octahedron with equal side lengths truncated from each other. If
, the grains are II-type grains dominated by regular octahedrons. If
, the shape of the grain is the regular octahedron.
Based on the evolution of the grain shape, the size of the grains depends on the truncation size of the regular hexahedron and the regular octahedron. Therefore, the maximum diameter
of the grains is shown in Eq. (1):
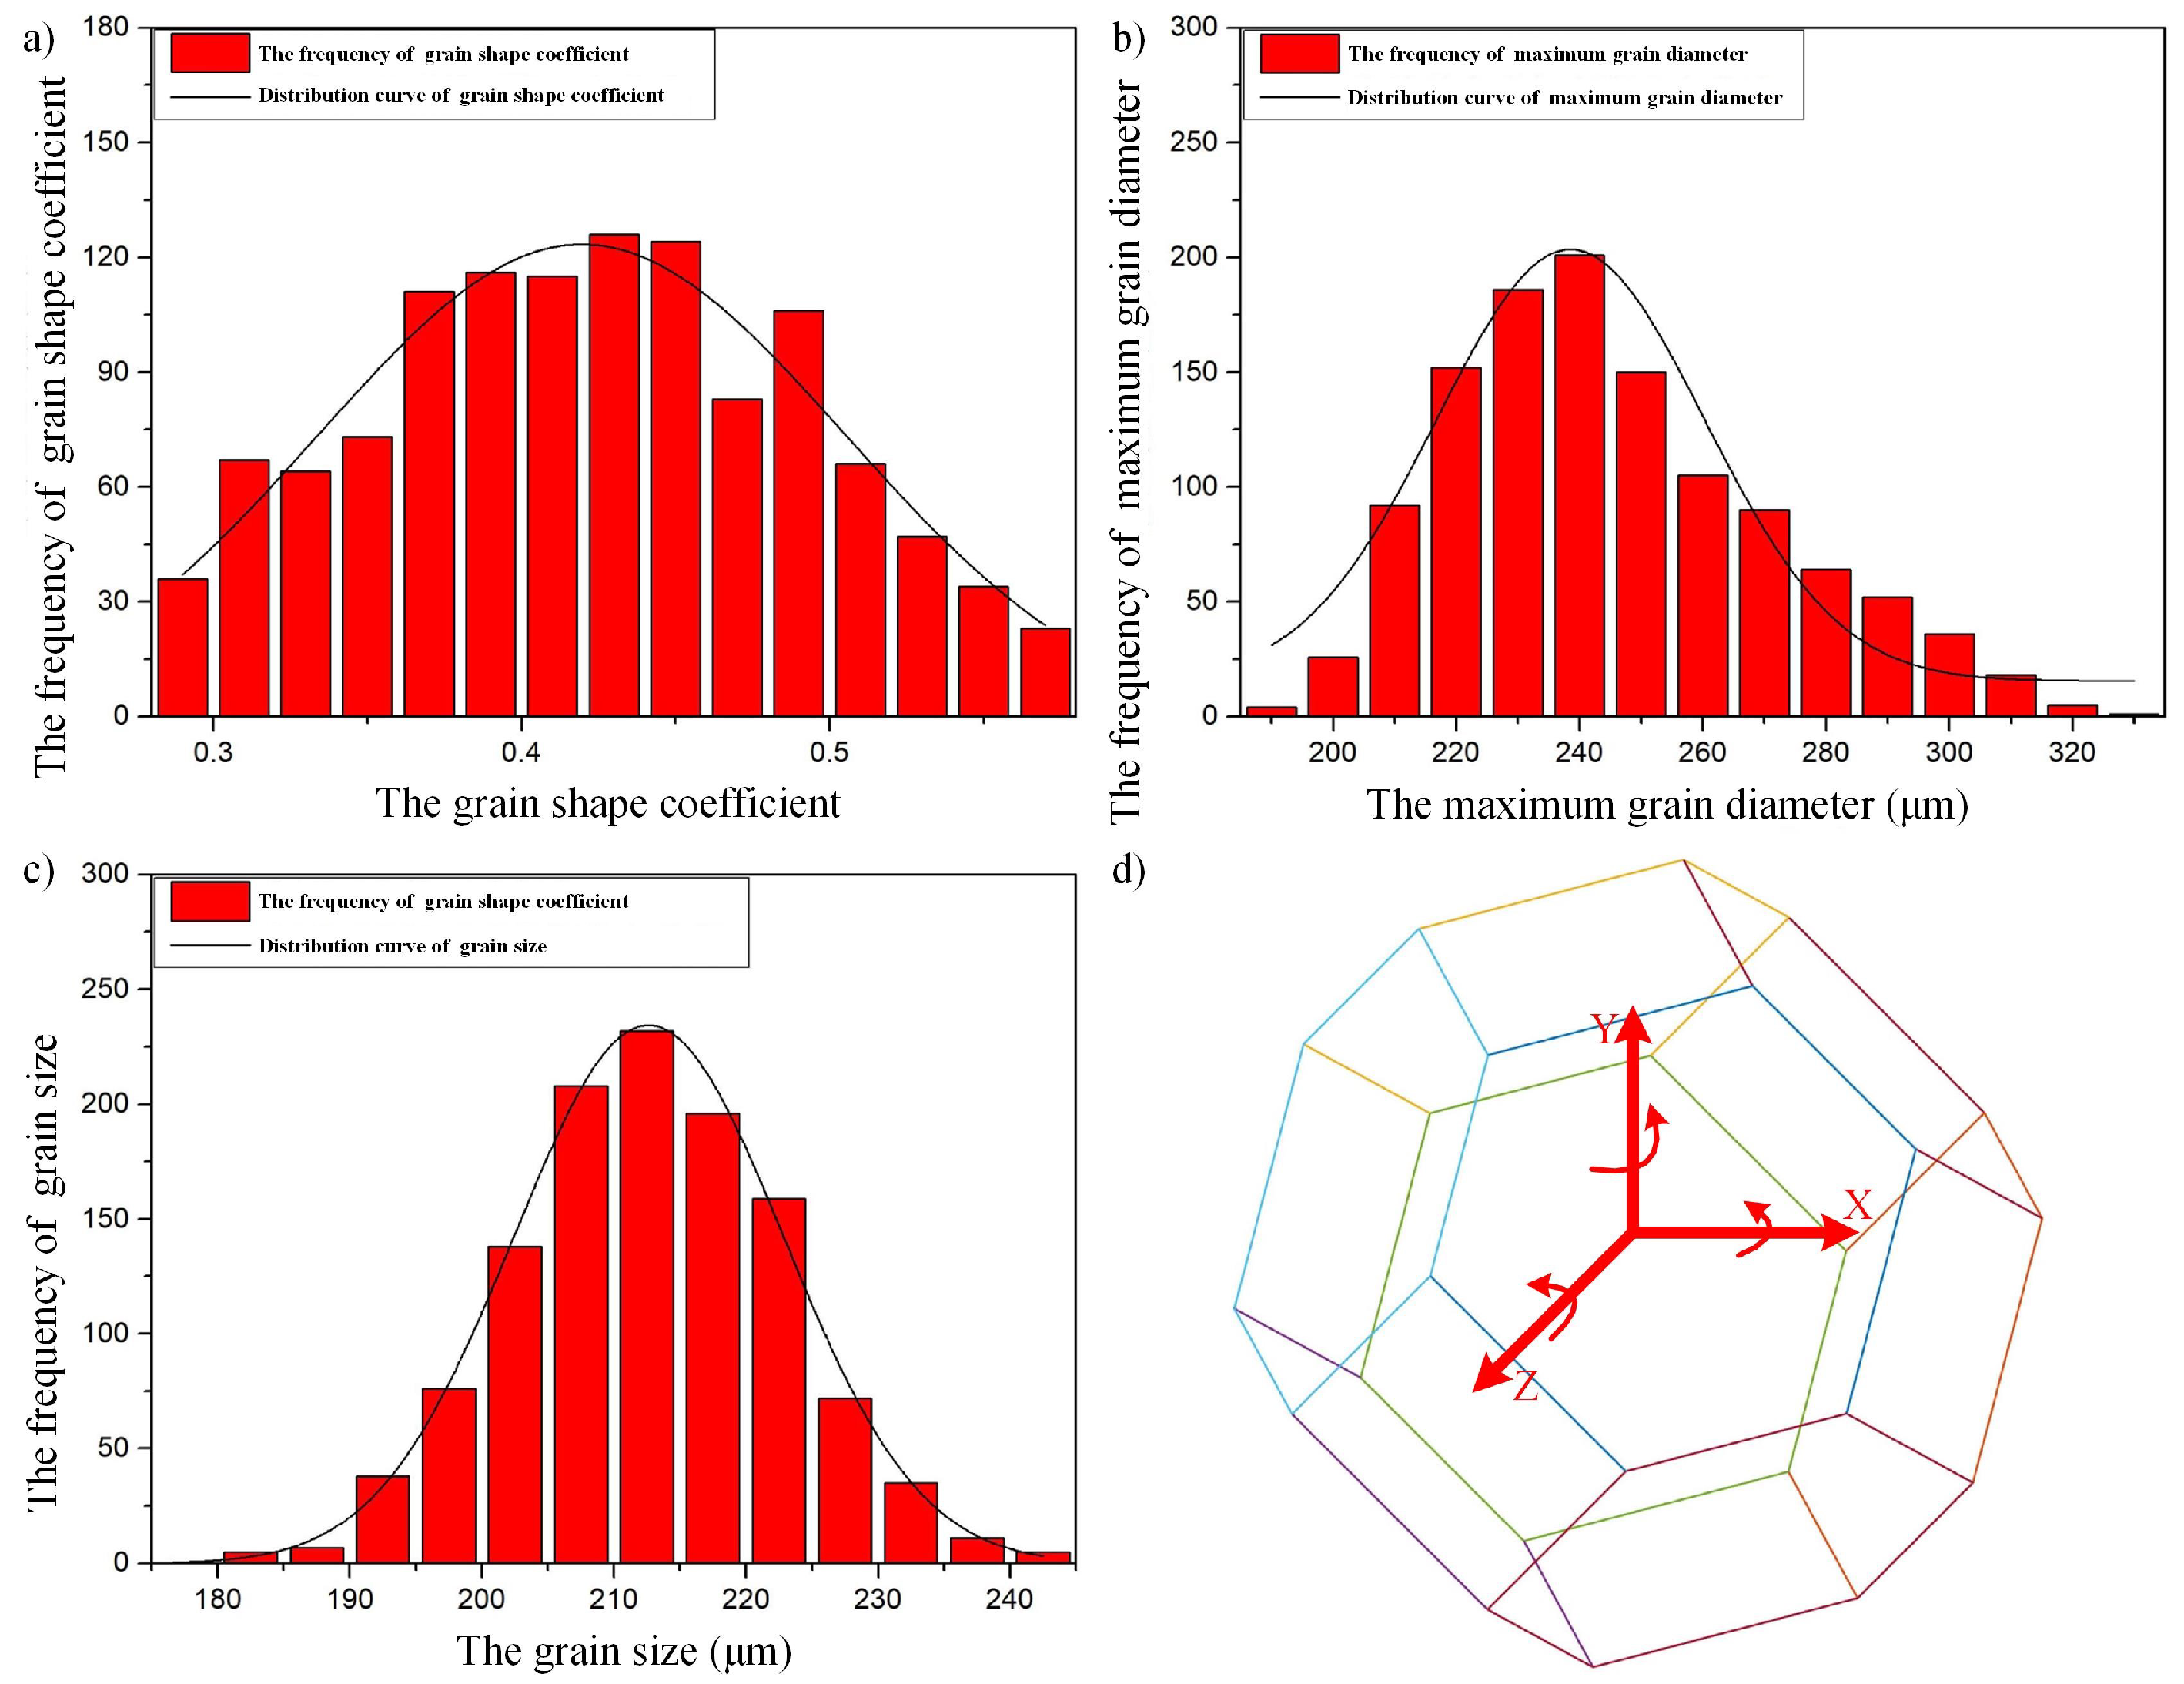
During the grinding process, the material removal and surface morphology of the workpiece are closely related to the shape/size of the grains. The normal distribution
of the grain shape coefficient and the normal distribution
of the maximum grain size
is applied to the generation of the surface grain; the grain size is calculated using the grain maximum diameter and grain shape coefficient, and thereby generating the specific contour of the grain. The schematic diagram of grain parameters and grain placement orientation used for modeling the surface topography of the grinding wheel is shown in
Figure 3. The grain rotates around the
axis and obeys a uniform distribution of
.
The rotation angles of the grains around the
, and
axes on the surface of the grinding wheel are
, and
, respectively. The coordinates
A of any point on the surface of the grain is
, and the coordinates after rotation are
. It can be expressed as Eq. 2 :
In the formula,
-The initial position of any point of grain.
- The position after adjusting the orientation of any point of the grain.
- The rotation angle of grain around the
, and
axes.
2.2. Spatial orientation of the grains
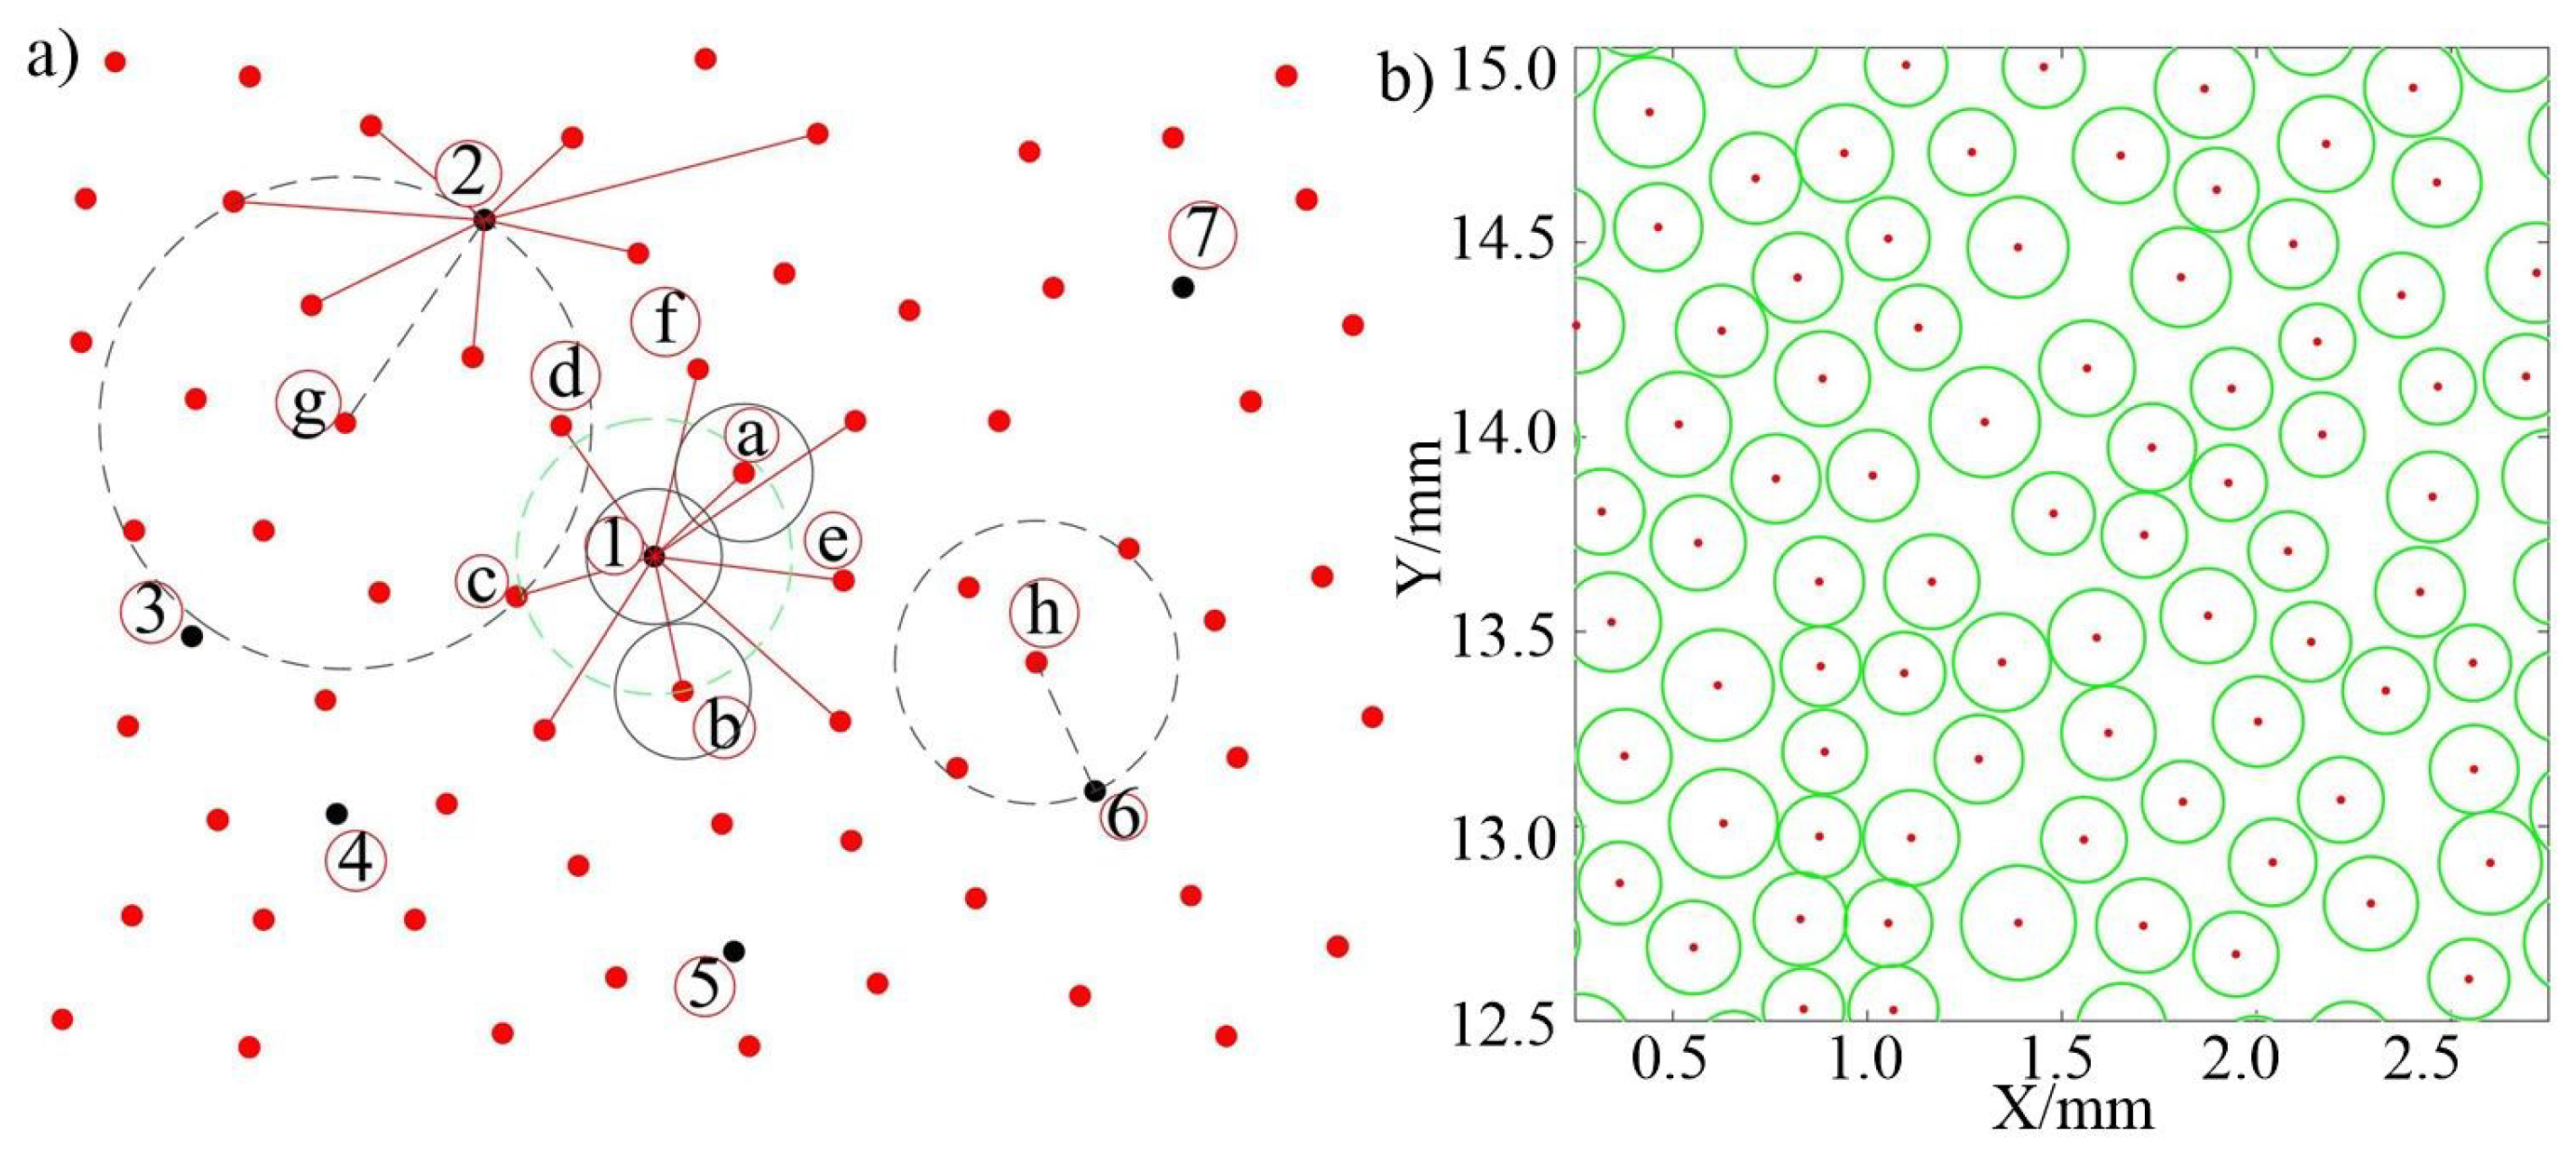
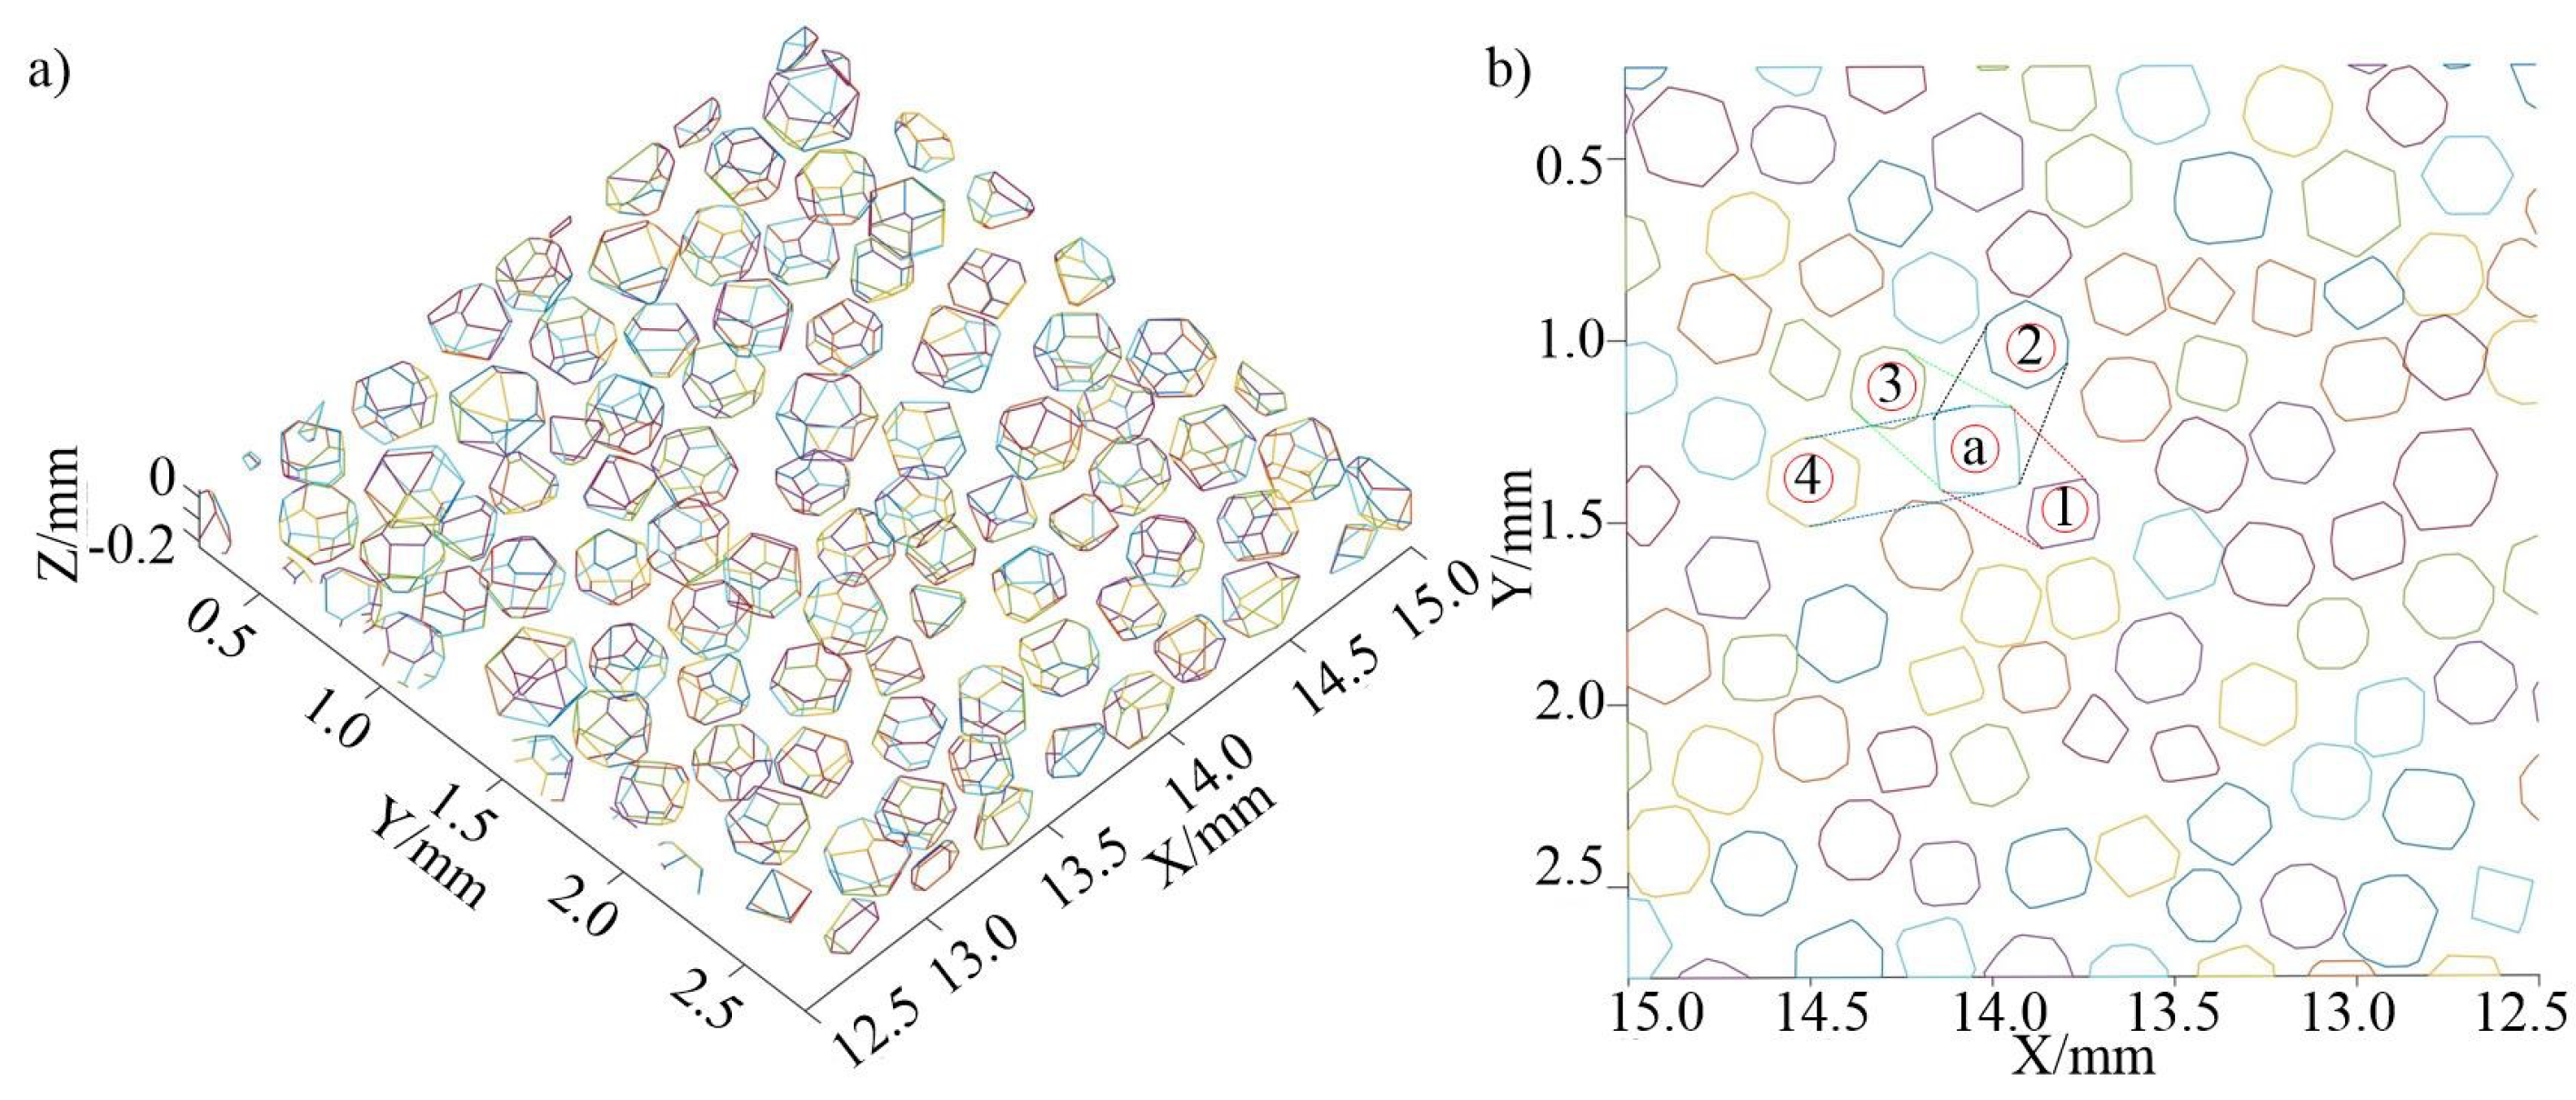
To make the grains evenly distributed on the surface of the grinding wheel, the best-candidate sampling algorithm is used to set the grain density and grain spacing, as shown in
Figure 4 to avoid the interference of multiple grain overlap on the model accuracy [
28]. As shown in
Figure 4(a), points 1-6 in the figure are known points, and other red points are candidate points. The spacing between points
a and 1 is the smallest near grain 1. However, the maximum diameter circle of point
a intersects with the maximum diameter circle of point 1 , so it is not the best-candidate point. The maximum diameter circle of point 1 is nearly tangent to the maximum diameter circle of point
b, but the spacing between the two points is greater than the sum of the radii of the maximum diameter circle of the grain, so point
b is the best-candidate grain. The grain distribution in some areas of the grinding wheel surface generated by the best-candidate method is shown in
Figure 4(b). It can be found that the maximum diameter of the grains changes randomly, and the grains are randomly distributed in the plane area, so it is a relatively ideal grain distribution.
On the basis of generating the center position of the grain, the grain profile of the grinding wheel surface was generated based on the geometric relationship of the grain corner points and the random deflection of the grain on the X/Y/Z axis is shown in
Figure 5(a), and the center height of the grain is set to
. The shape, spatial orientation, size, and regional position distribution of grains all change randomly. In measuring grain spacing, grains that align closely on a straight line are termed adjacent grains. Controlling grain spacing primarily involves managing the distance between these adjacent grains. To be consistent with the actual measurement of the grain spacing and spacing ratio, the projection of the grain profile in the plane area as shown in
Figure 5(b) is used to judge adjacent grains. During the evaluation, we calculate the projected area of the two grain profiles. If there are no projection profiles of other grains in the projected area, then the group of grains is adjacent grains. Otherwise, it is not. In the figure, grains 1-4 are located near grain
a, and there are no other projection profiles between grains 1-3 and grain a in the projected area, making them adjacent grains. However, since the projected area between grain 4 and grain a contains the profile of grain 3 , they are not considered adjacent.
Further optimization of the protruding height and spatial position of the grains can be carried out using Eq. (3), which compares the statistical data of the grain spacing and protrusion height with the actual measured data. Randomly select any grain spacing within the interval that needs to be adjusted, and randomly generate the corresponding adjustment amounts
, where
i is the grain serial number,
are the initial positions of the grain center,
is the adjusted position of the grain center. If the position of the grain does not interfere with adjacent grains after incremental adjustment and the spacing or height adjustment direction is consistent, the current adjustment is accepted.
In the formula,
-The initial position of grain center.
-The adjusted position of the grain center.
-Random adjustment amount of the grain center in the
, and
z directions.
2.3. Grinding wheel surface topography model generation and dressing
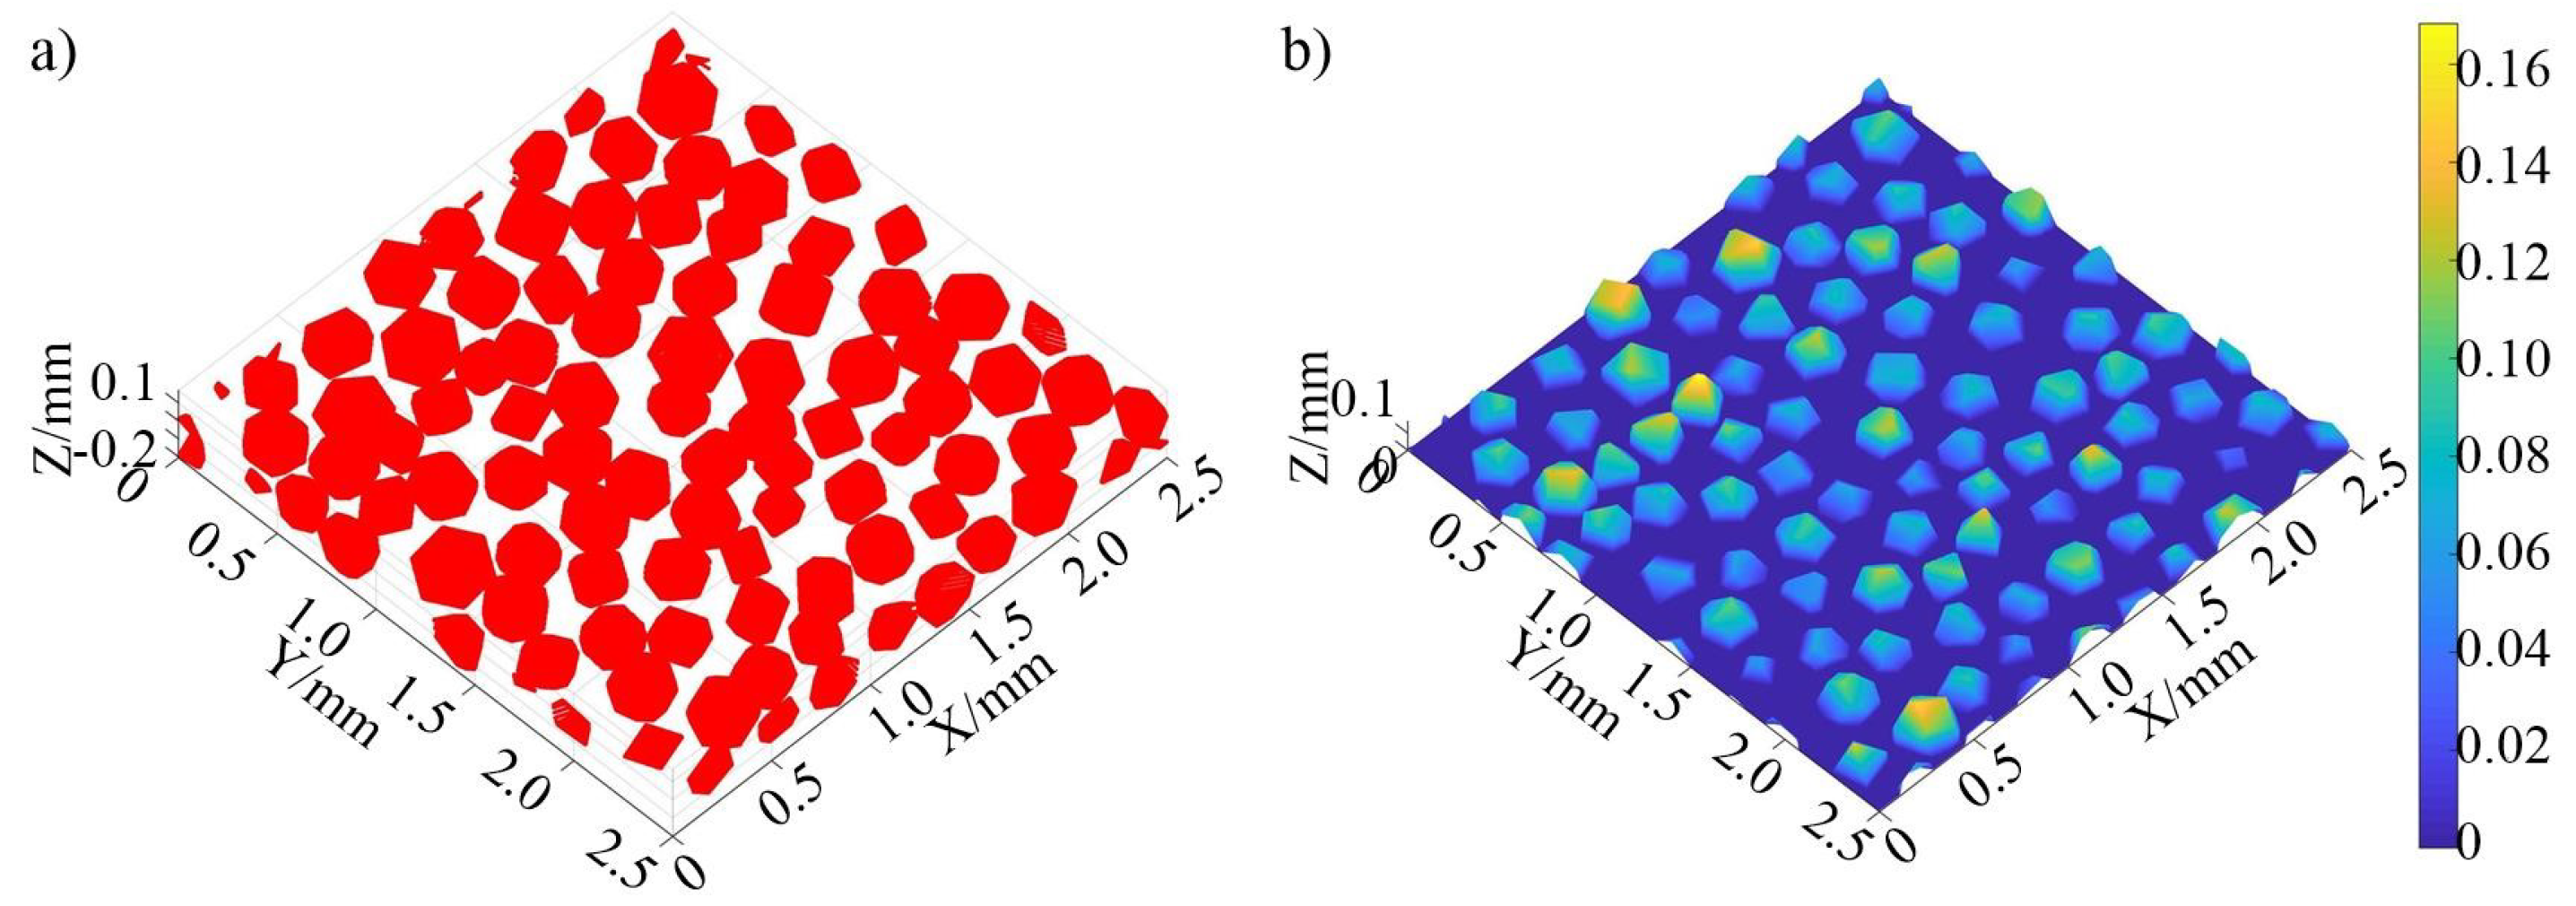
The scatter plot of the grains on the grinding wheel surface obtained by calculating the positions of the grain surface points is shown in
Figure 6(a). Since the surface of the electroplated metal layer is far lower than the maximum protruding height of the grains and the top surface of the grains after dressing, so the surface height of the electroplated layer is set is the average height, which is
. It can be seen from the depth difference between the grains and the surface of the electroplated metal layer in
Figure 6(b) that the protruding height, size, and orientation of the grains are randomly distributed, and the maximum protruding height of the grains is
.
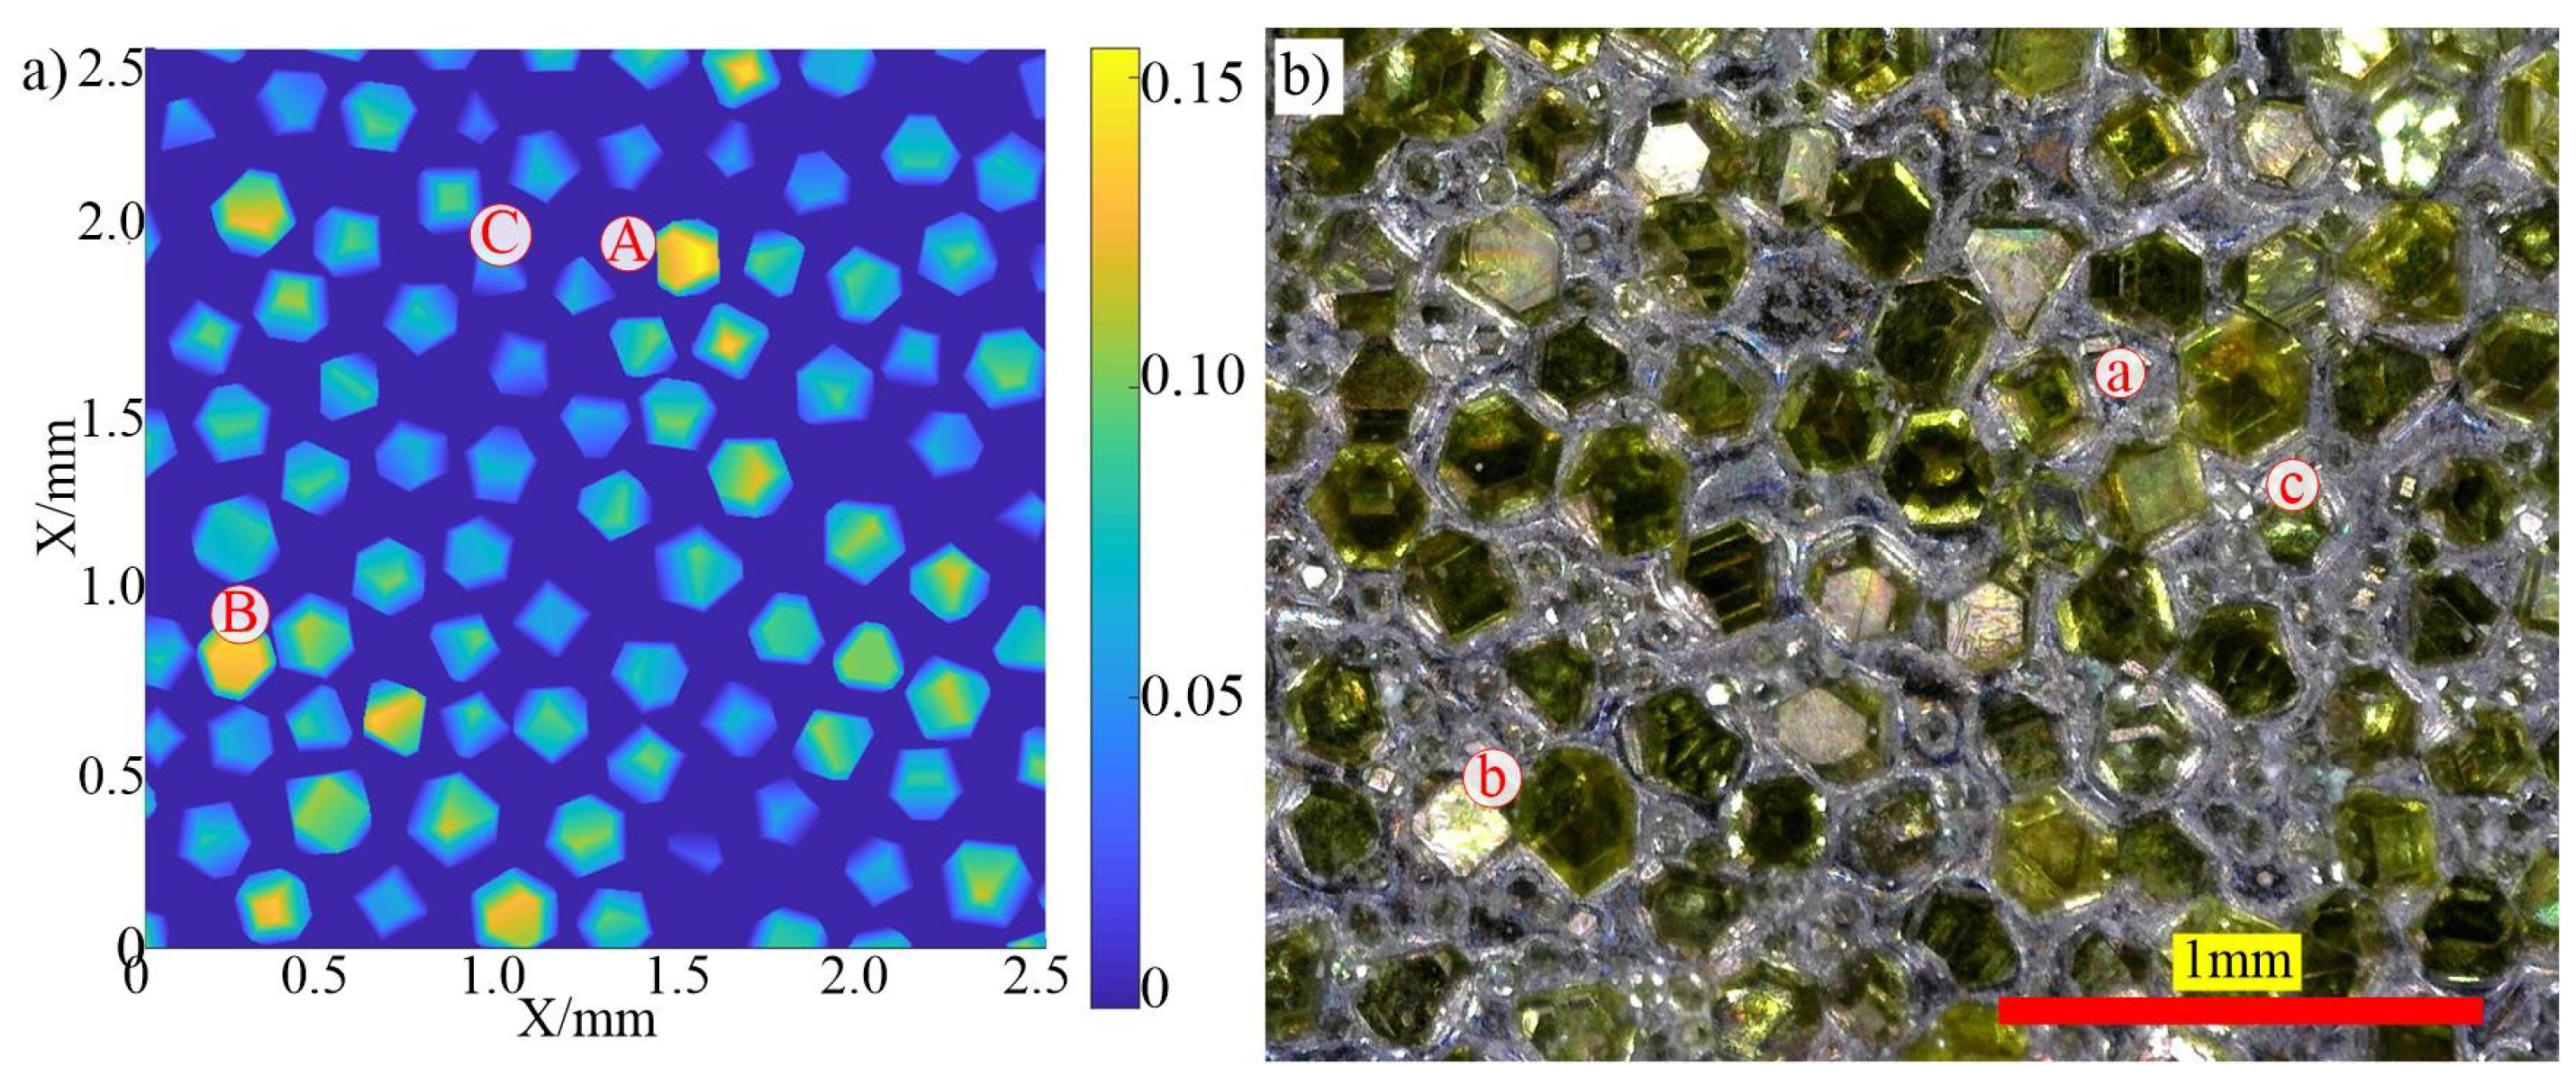
To verify the effectiveness of the grinding wheel surface simulation model, the simulated morphology of the grinding wheel surface was compared with the actual morphology of the grinding wheel surface, and the results are shown in
Figure 7. The density of grains on the surface of the simulated grinding wheel is 12.64 pieces
, the density of grains on the surface of the actual grinding wheel is 12.48 pieces
, and the shape, arrangement, and protrusion height of the grains are relatively similar. In the figure, grains
, and
b are the grains with larger protruding heights, while
C and
c are smaller-sized grains with lower protruding heights.
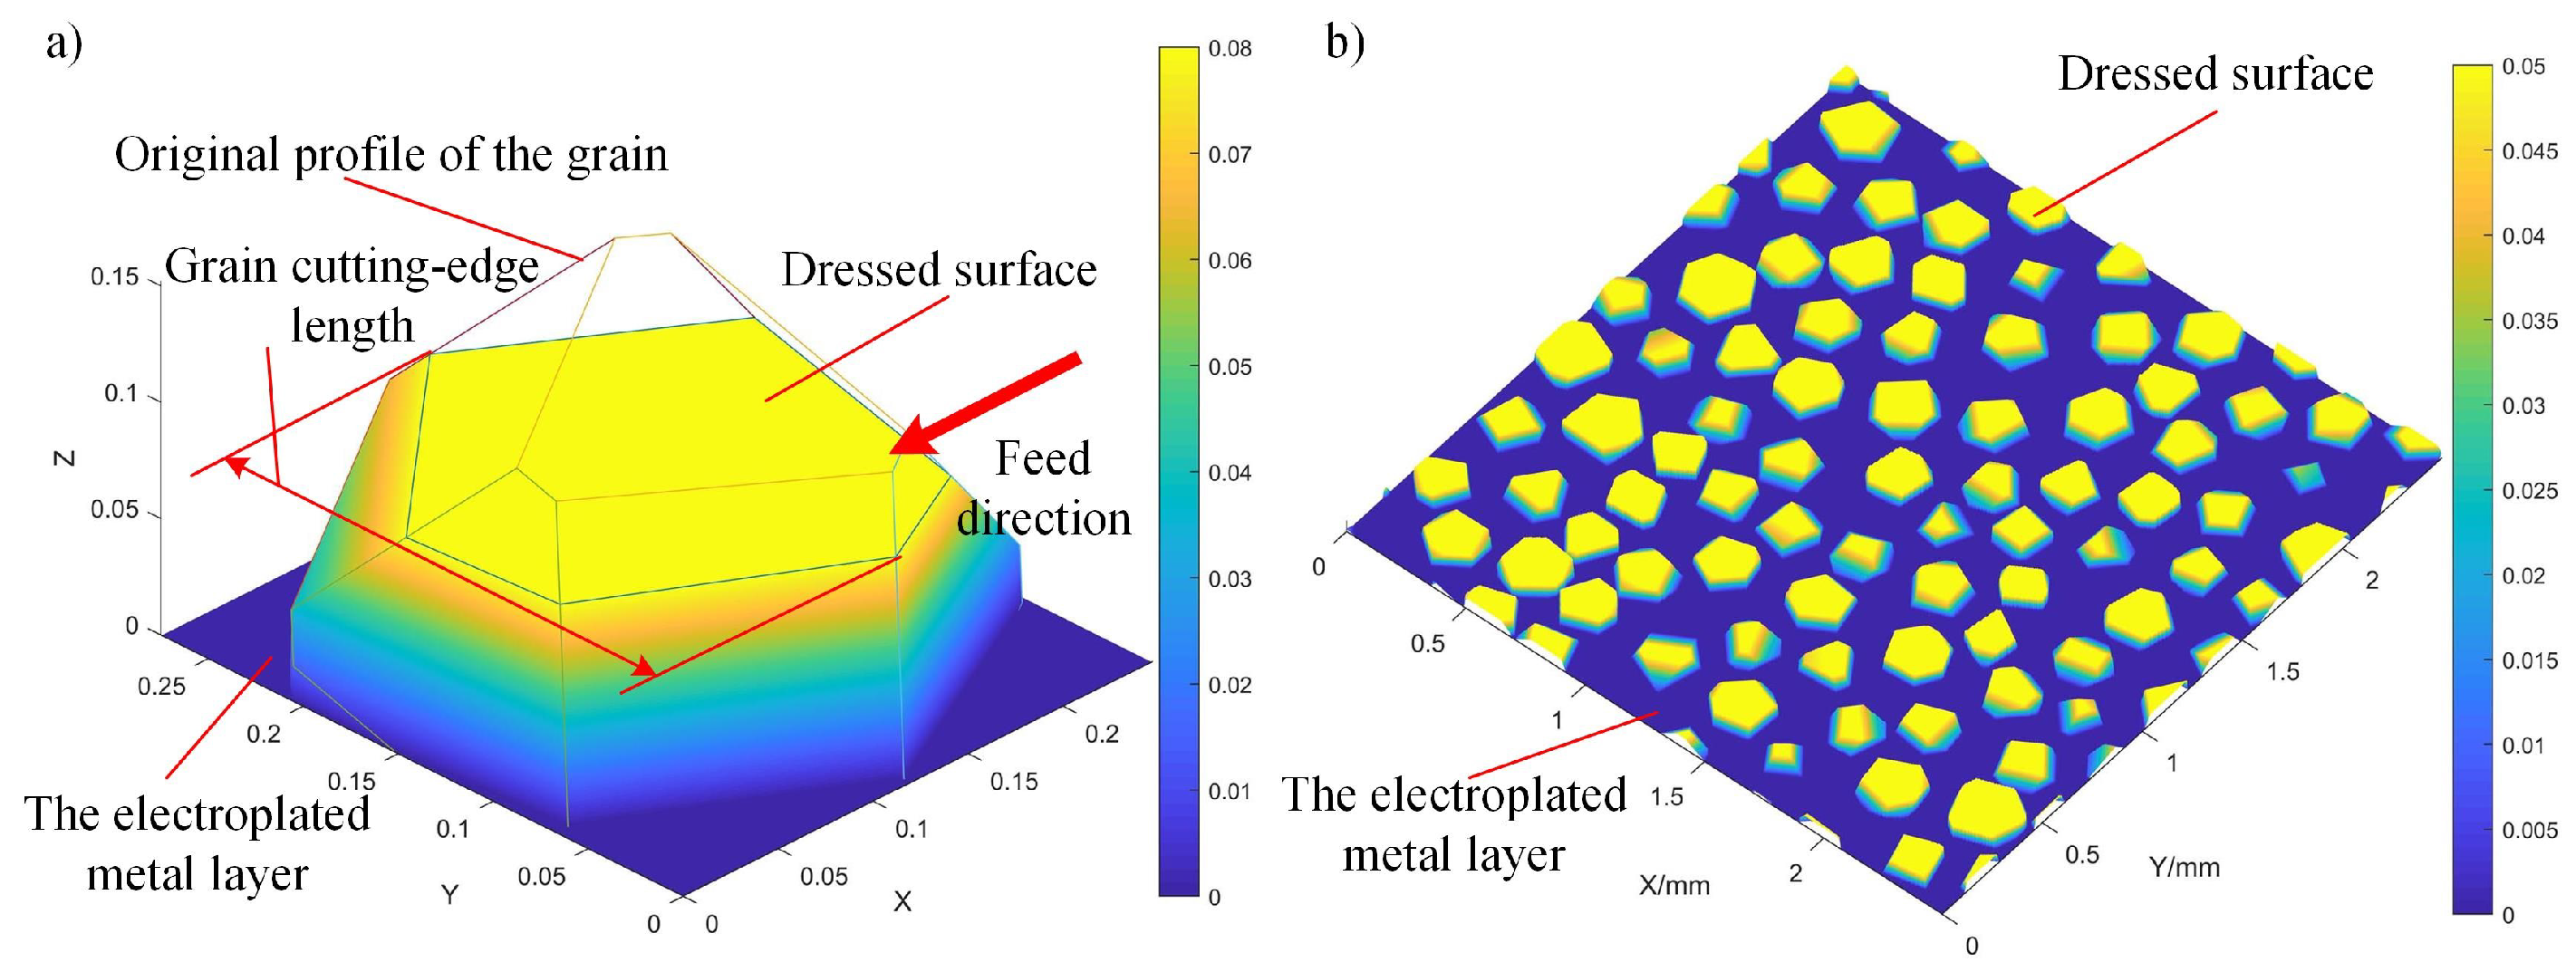
To obtain a consistent protruding height and an ideal grinding wheel profile shape, the surface of the electroplated coarse-grained diamond grinding wheel needs to be dressed before grinding to increase the effective grain density and the width of the single grain cutting-edge. The simulated dressing morphology formed by removing the grain tip is shown in
Figure 8(a). The shape of the plane is a polygon formed after the dressing plane intersects with the grain surface. The cutting-edge width of the grain is defined as the projected length of the top surface of the grain in the feed direction after dressing. According to the simulated surface morphology of grinding wheel after dressing, as shown in
Figure 8(b), it can be found that although the grains maintain a consistent protrusion height after dressing, the top surface area and profile of the grains are restricted by the size and initial protrusion height of the grains.
2.4. Workpiece surface model generation
By establishing a grinding wheel grinding workpiece surface simulation model, the evolution of the grinding wheel surface morphology after dressing on the workpiece surface material removal behavior can be explored. To obtain the surface morphology of the workpiece after grinding and to predict the surface roughness, it is necessary to make the ideally designed grinding wheel surface closer to the actual grinding wheel surface. As shown in
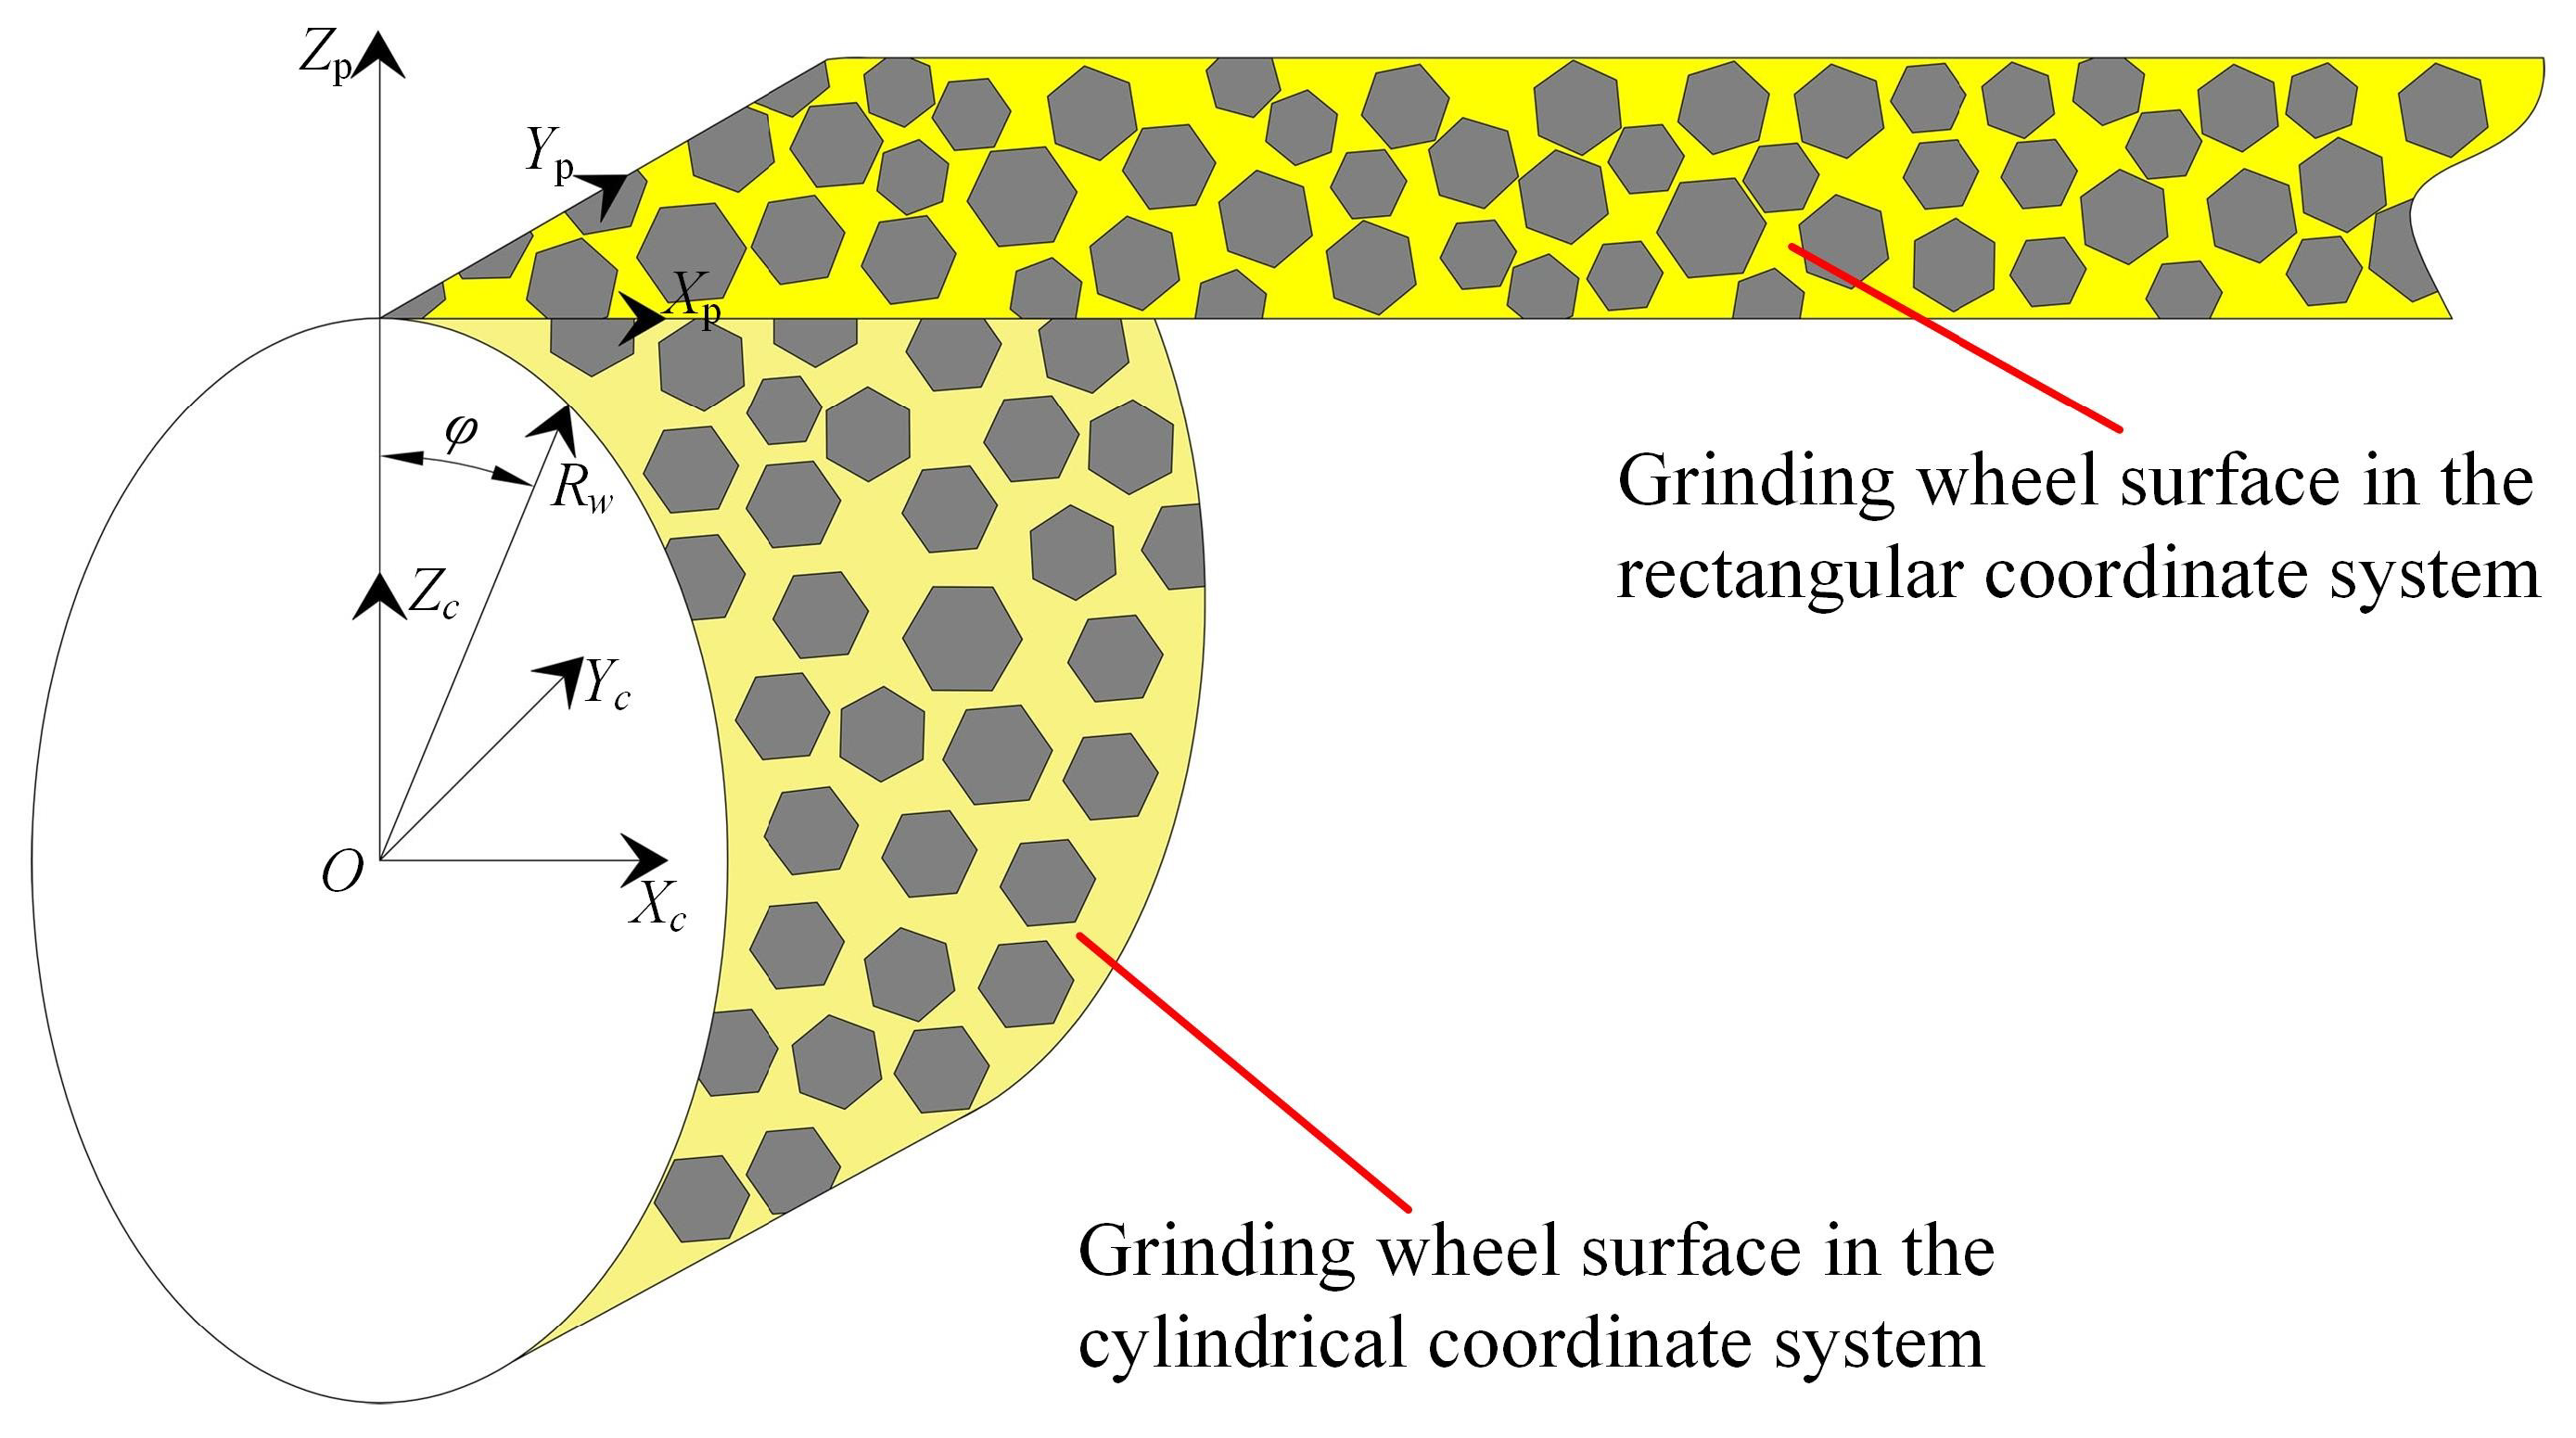
Figure 9, the grinding wheel surface modeled in the rectangular coordinate system is converted into the grinding wheel surface in the cylindrical coordinate system, and the grinding processing behavior between the grinding wheel surface and the machined workpiece surface is simulated according to the given grinding process parameters. The grinding wheel surface in the rectangular coordinate system
can be transformed into the grinding wheel surface in the cylindrical coordinate system
,
through Eq. (4):
In the formula,
-The coordinates of the plane grinding wheel surface in the Cartesian coordinate system.
-The radial coordinates, angle, and axial coordinates on the grinding wheel surface.
-Grinding wheel surface reference radius.
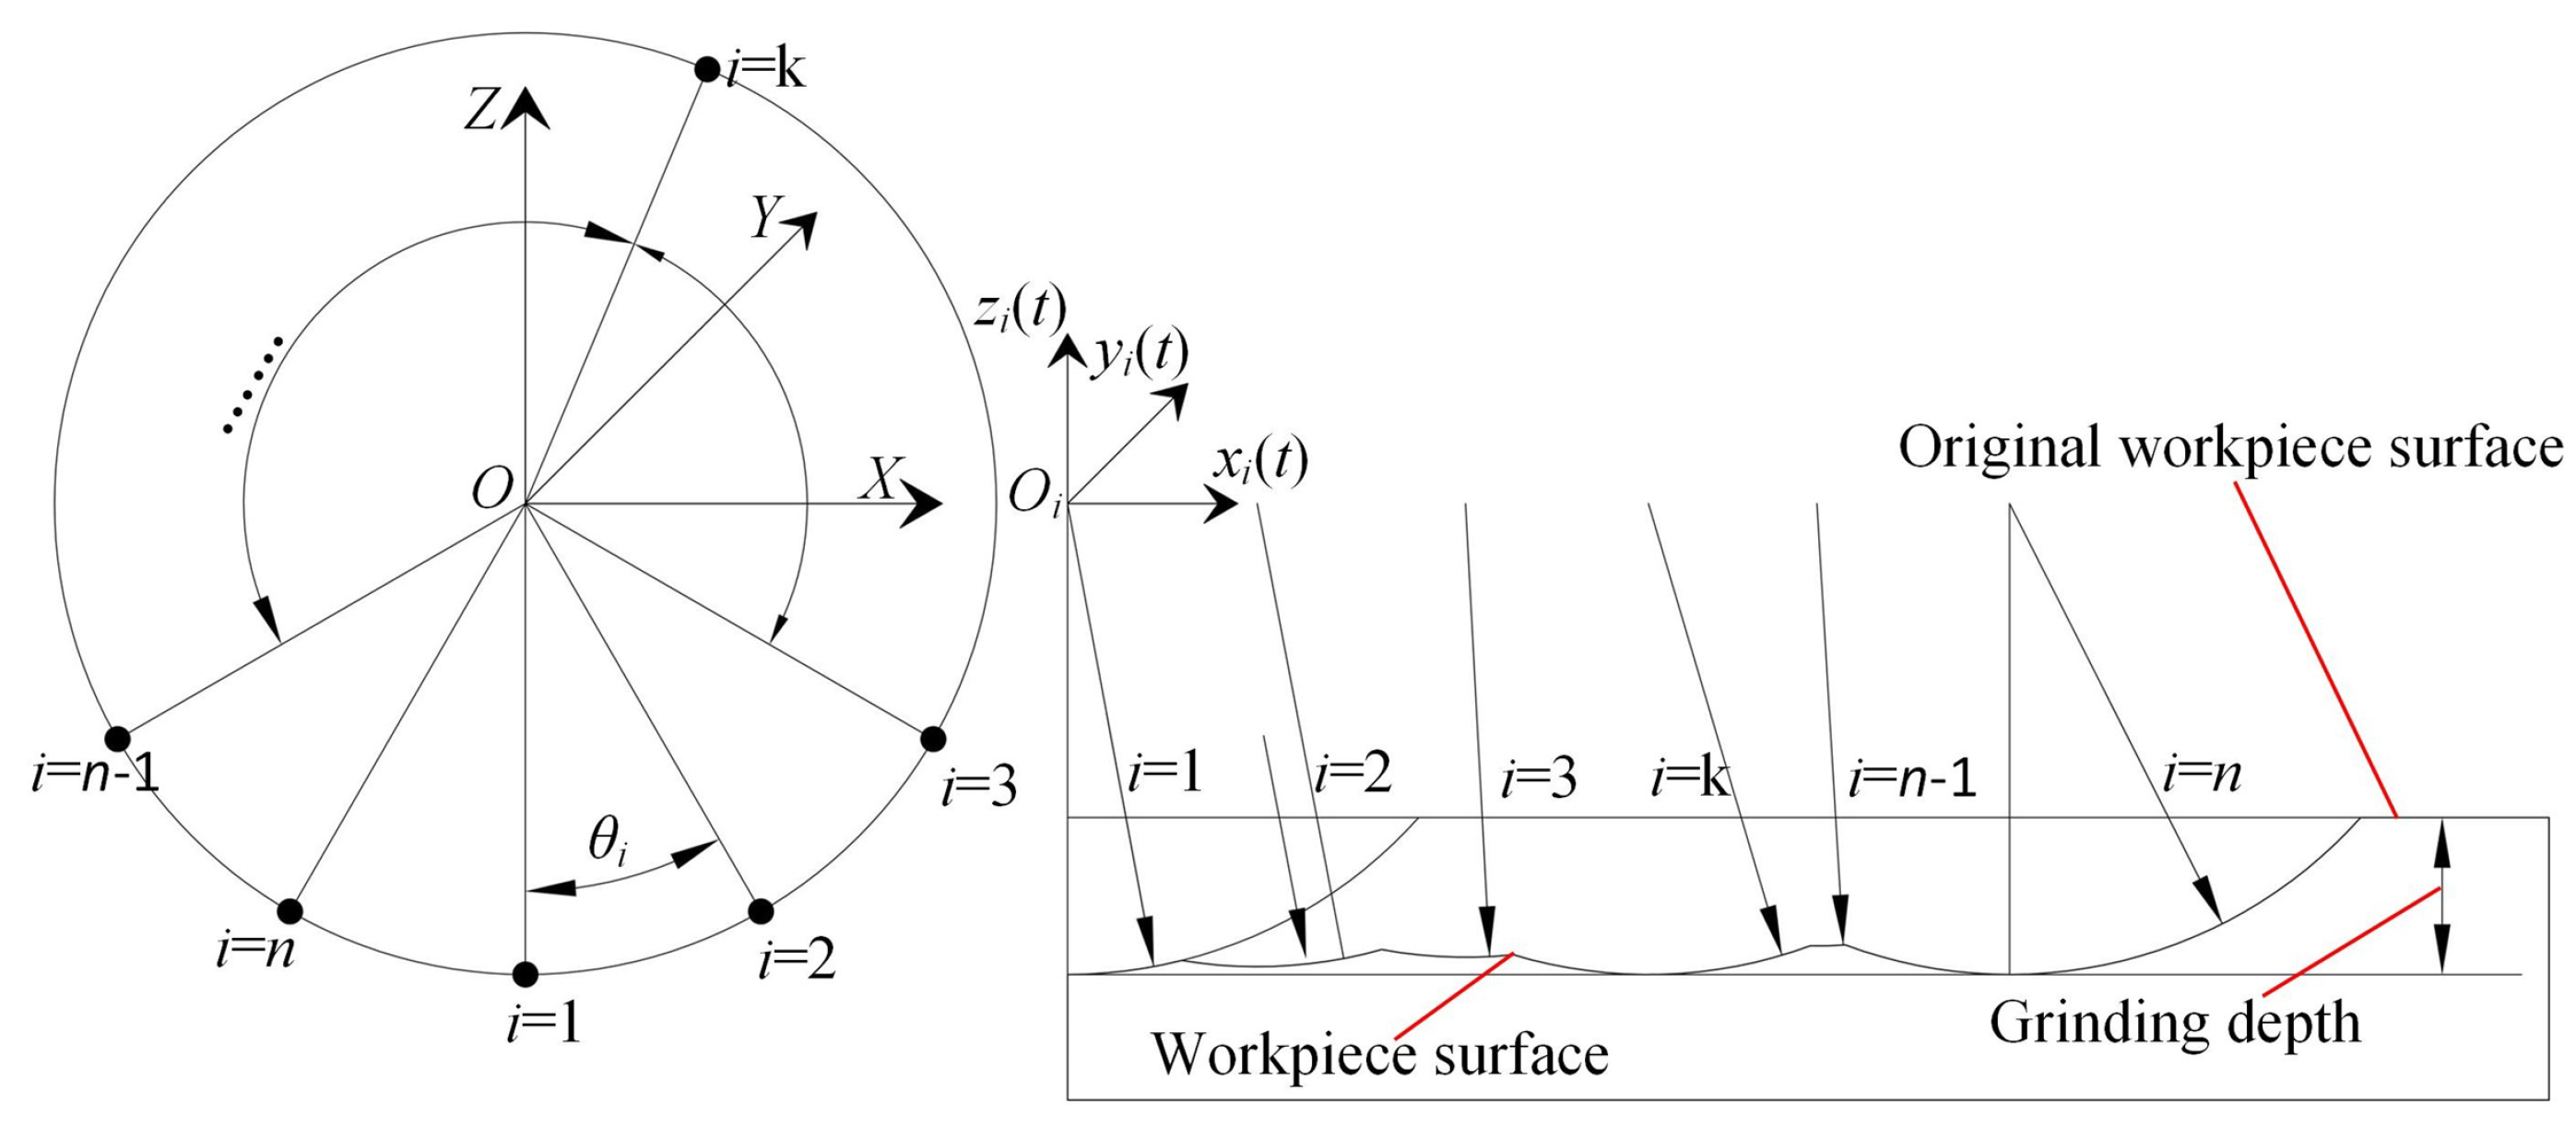
During the grinding process, different grains on the same circumference of the grinding wheel surface pass through the workpiece surface in sequence as time increases. As the grinding time continues, the trajectory formed by the interference of the previous grain on the workpiece may be covered by the trajectory of the subsequent grain, that is, the workpiece surface topography is constantly iterated. The cutting effect of all grains on the same circular trajectory jointly achieves the removal of workpiece material and the formation of the final machined surface. The grinding process is shown in
Figure 10.
The number of grains on the same circular trajectory is
n, and the angle between any point
i on the grinding wheel surface and the starting point of the grinding process is
. The movement trajectory of the grain
i changing with time can be expressed as Eq. (5) [
29]:
In the formula, -The coordinates of any point i on the grinding wheel surface at time -The radial radius of the grinding wheel surface at any point i.
The effective grains on the grinding wheel surface sequentially cut through the workpiece surface as time increases or the grinding wheel rotates. After all the grains on the surface of the grinding wheel pass through the workpiece surface point
, the lowest value of all grains at that point is the surface height of that point. Therefore, any point
on the grinding wheel surface can be expressed as Eq. (6). The height
z of any point on the workpiece surface is obtained by calculating the minimum value of each grain passing through the point through Eq. (6), and taking the minimum value of all values.
In the formula, -The time for any point on the surface of the grinding wheel passing the coordinate point x in the direction of the workpiece surface. -The height of any point i on the surface of the grinding wheel passing the coordinate point x in the direction of the workpiece surface. -The coordinates of any point on the workpiece surface.
For a more accurate prediction of the grinding effect, it’s essential to consider not only the kinematic relationship between the grains and the workpiece but also to integrate the workpiece material removal mechanism into the model. In precision grinding of hard and brittle materials, the workpiece material is mainly removed by a plastic mechanism, so it is assumed that the interaction between the grains and the workpiece surface in the model is plastic removal. After grinding simulation using an undressed grinding wheel with the diameter of
and the width of
at the linear speed of
, the feed speed of
, and the grinding depth of
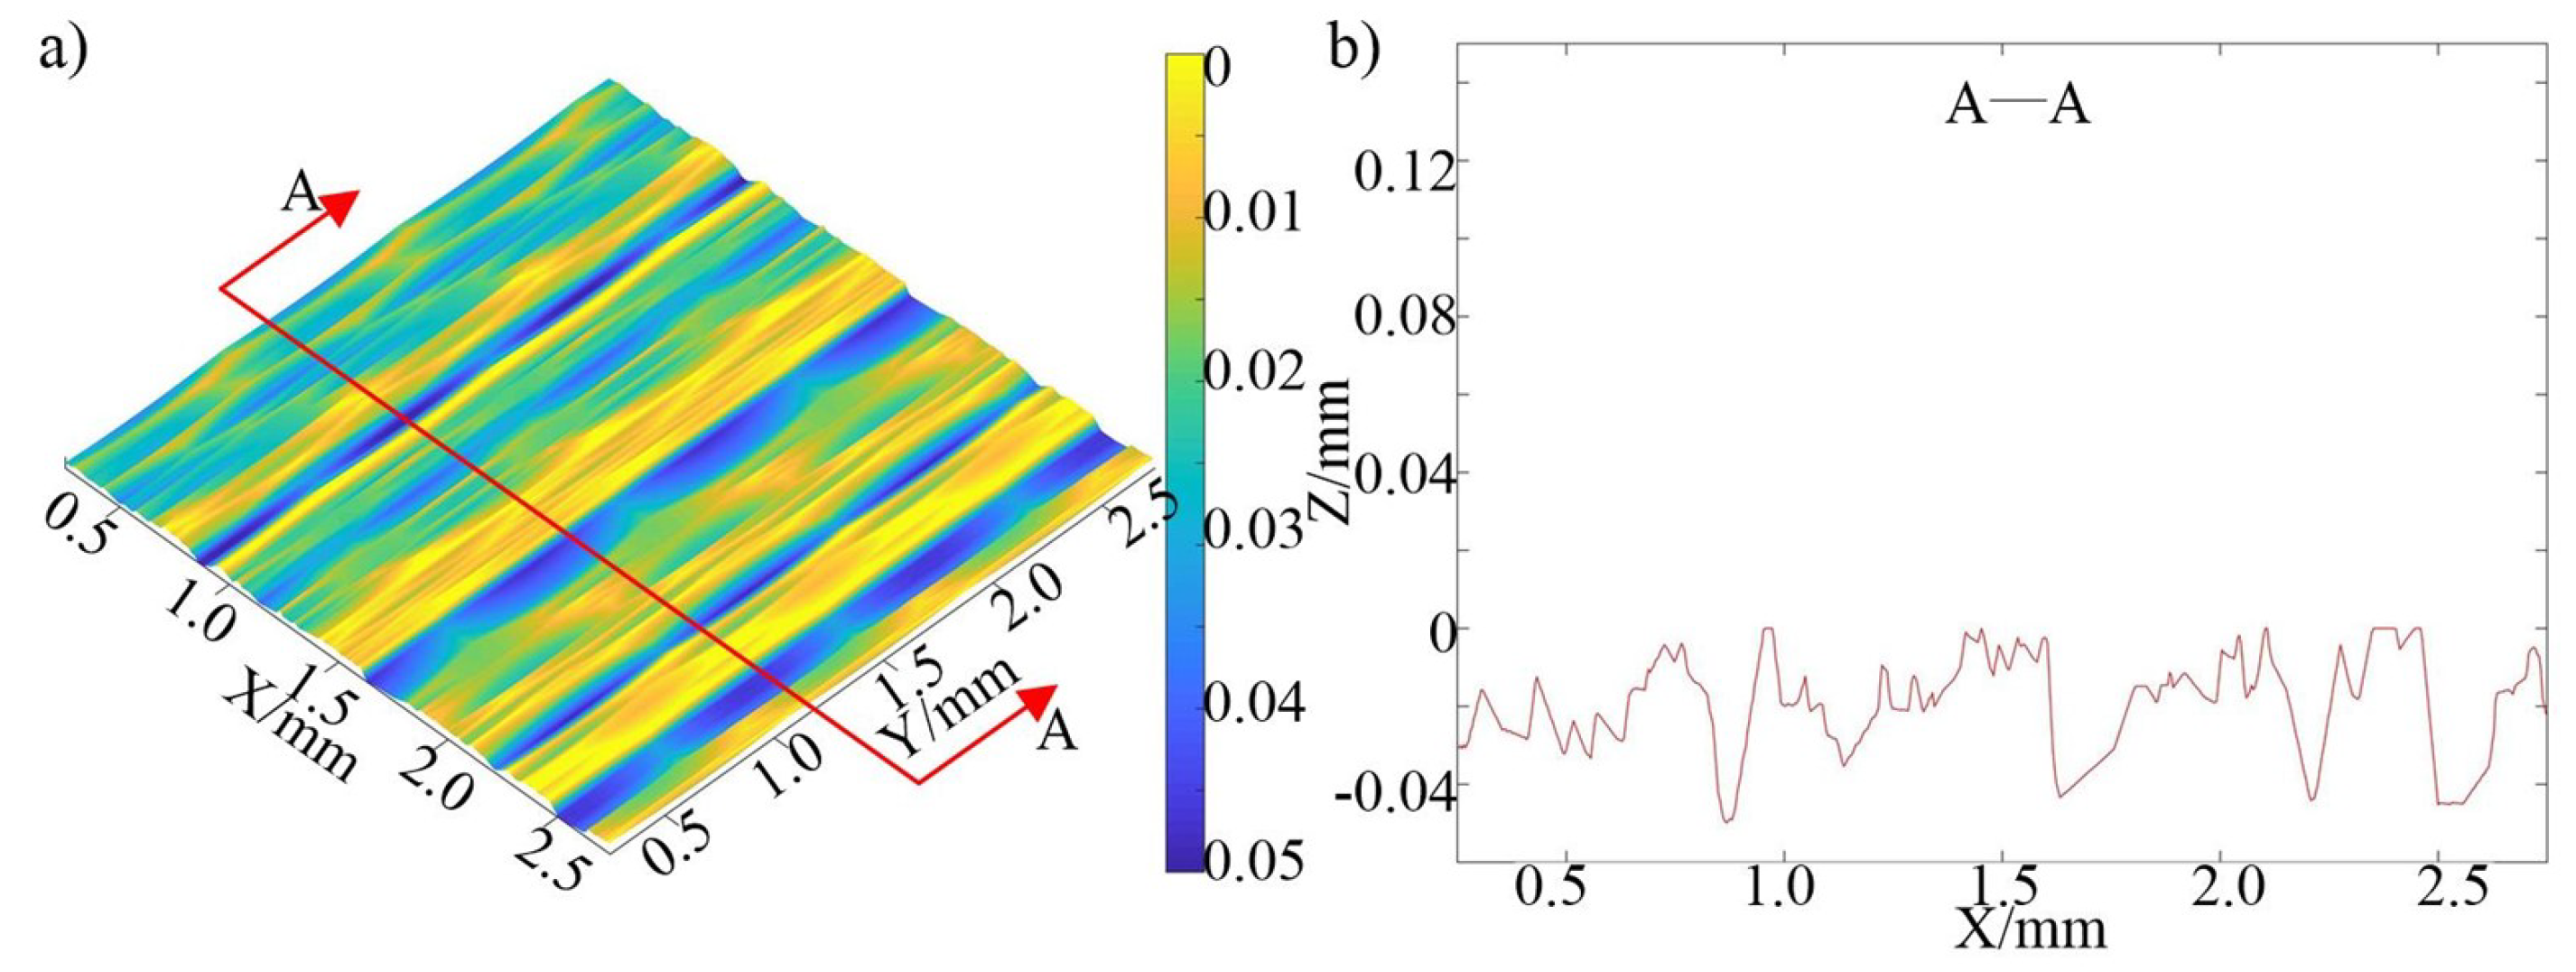
, the workpiece surface morphology and cross-sectional profile with the length and width of
can be obtained as shown in
Figure 11. The figure indicates that the simulation analysis, through theoretical calculations, can closely match the three-dimensional morphology of the actual workpiece surface. This offers valuable theoretical guidance for optimizing the grinding wheel dressing plan.
3. Experimental process
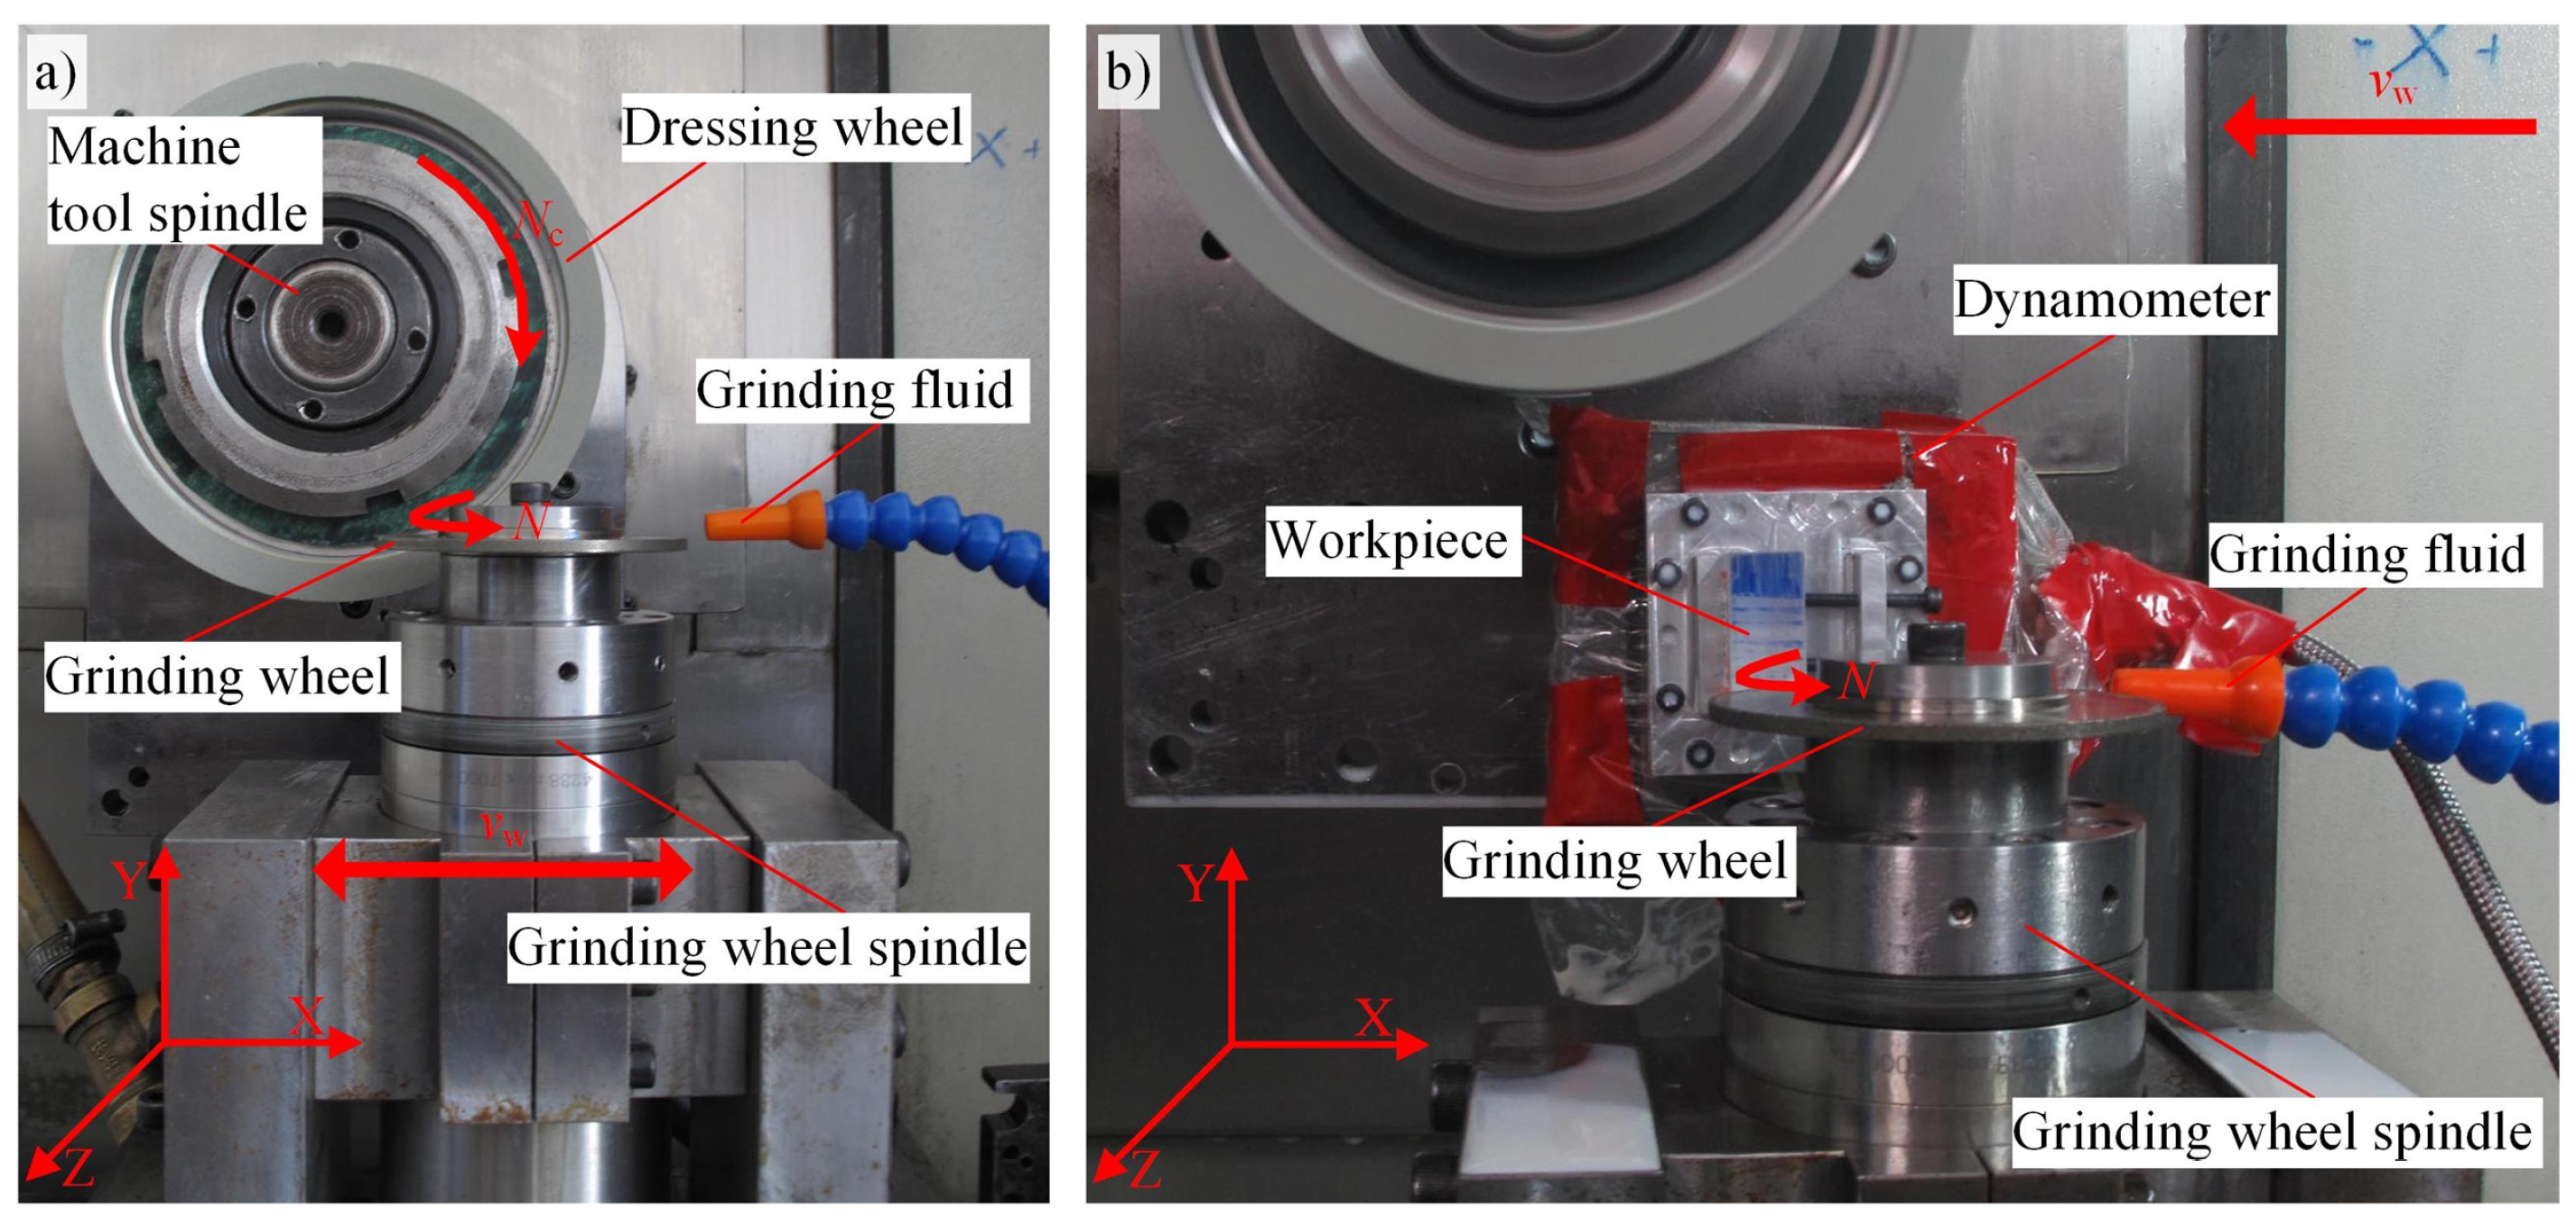
The electroplated coarse-grained diamond grinding wheel dressing and grinding processing device are shown in
Figure 12. We investigated how grain protrusion height affects surface morphology and roughness using precision dressing on coarse-grained diamond grinding wheels. Initially, we conducted a dressing experiment on the electroplated coarse-grained diamond grinding wheels. The dressing device is shown in
Figure 12(a). A ceramic bonded fine-grained diamond dressing wheel was used on the surface grinding machine tool (MUGK7120 × ) to adjust the protruding height of the grains on the surface of the electroplated coarse-grained diamond grinding wheel. Among them, the protruding height of the grains was the statistical average value of the height difference between grains and the surface of the surrounding electroplated metal layer. Three grinding wheel working surfaces with grain protrusion heights of
, and
were dressed. During the dressing process, the dressing wheel speed
was
, the grinding wheel spindle speed
N was
, the dressing wheel reciprocating feed speed in the
-axis direction was
, and the single feed depth was
. The grain size of ceramic bonded fine-grained diamond dressing wheel was D76
, the outer diameter of the grinding wheel was
, and the inner diameter was
. The grain size of electroplated coarse-grained diamond grinding wheel was D213
, the grinding wheel diameter was
, the width was
, the grain burial depth was about
, and the average grain density was
. The single dressing feed depth of the electroplated coarse-grained diamond grinding wheel was
. Post-dressing, we utilized a super-depth-of-field three-dimensional microscope (VHX-500F) to inspect the grinding wheels with respective grain protrusion heights of
, and
.
In the second step, the grinding experiments of optical glass BK7 by electroplated coarsegrained diamond grinding wheels with different grain protrusion heights were carried out. The grinding processing experimental device shown in
Figure 12 (b) was used on the surface grinding undressed grinding wheels and dressed grinding wheels with grain protrusion heights of
,
, and
were used to grind the optical glass BK7 workpiece. The BK7 workpiece, characterized by its hard and brittle nature, was crafted from optical glass. The size of the workpiece used in the experiment was
. The material properties of optical glass BK7 are shown in
Table 1. The grinding process parameters were a grinding wheel speed of
, feed speed of
, and grinding depth of
. Post-grinding, we examined the surface texture and roughness of both the grinding wheel and the BK7 optical glass workpiece using instruments like the white light interferometer (Zygo NewView 8300) and the ultra-depth of field three-dimensional microscope (VHX-500F).
4. Results and discussion
4.1. Effect of dressing parameters on grinding wheel surface morphology
Surface dressing of electroplated coarse-grained diamond grinding wheels aims to achieve optimal surface precision and uniform grain protrusion height. During the dressing process, all grains are dressed to form the overall morphology of the grinding wheel. The morphological evolution of individual grains is the basis for studying the evolution of the surface morphology of the grinding wheel [
30,
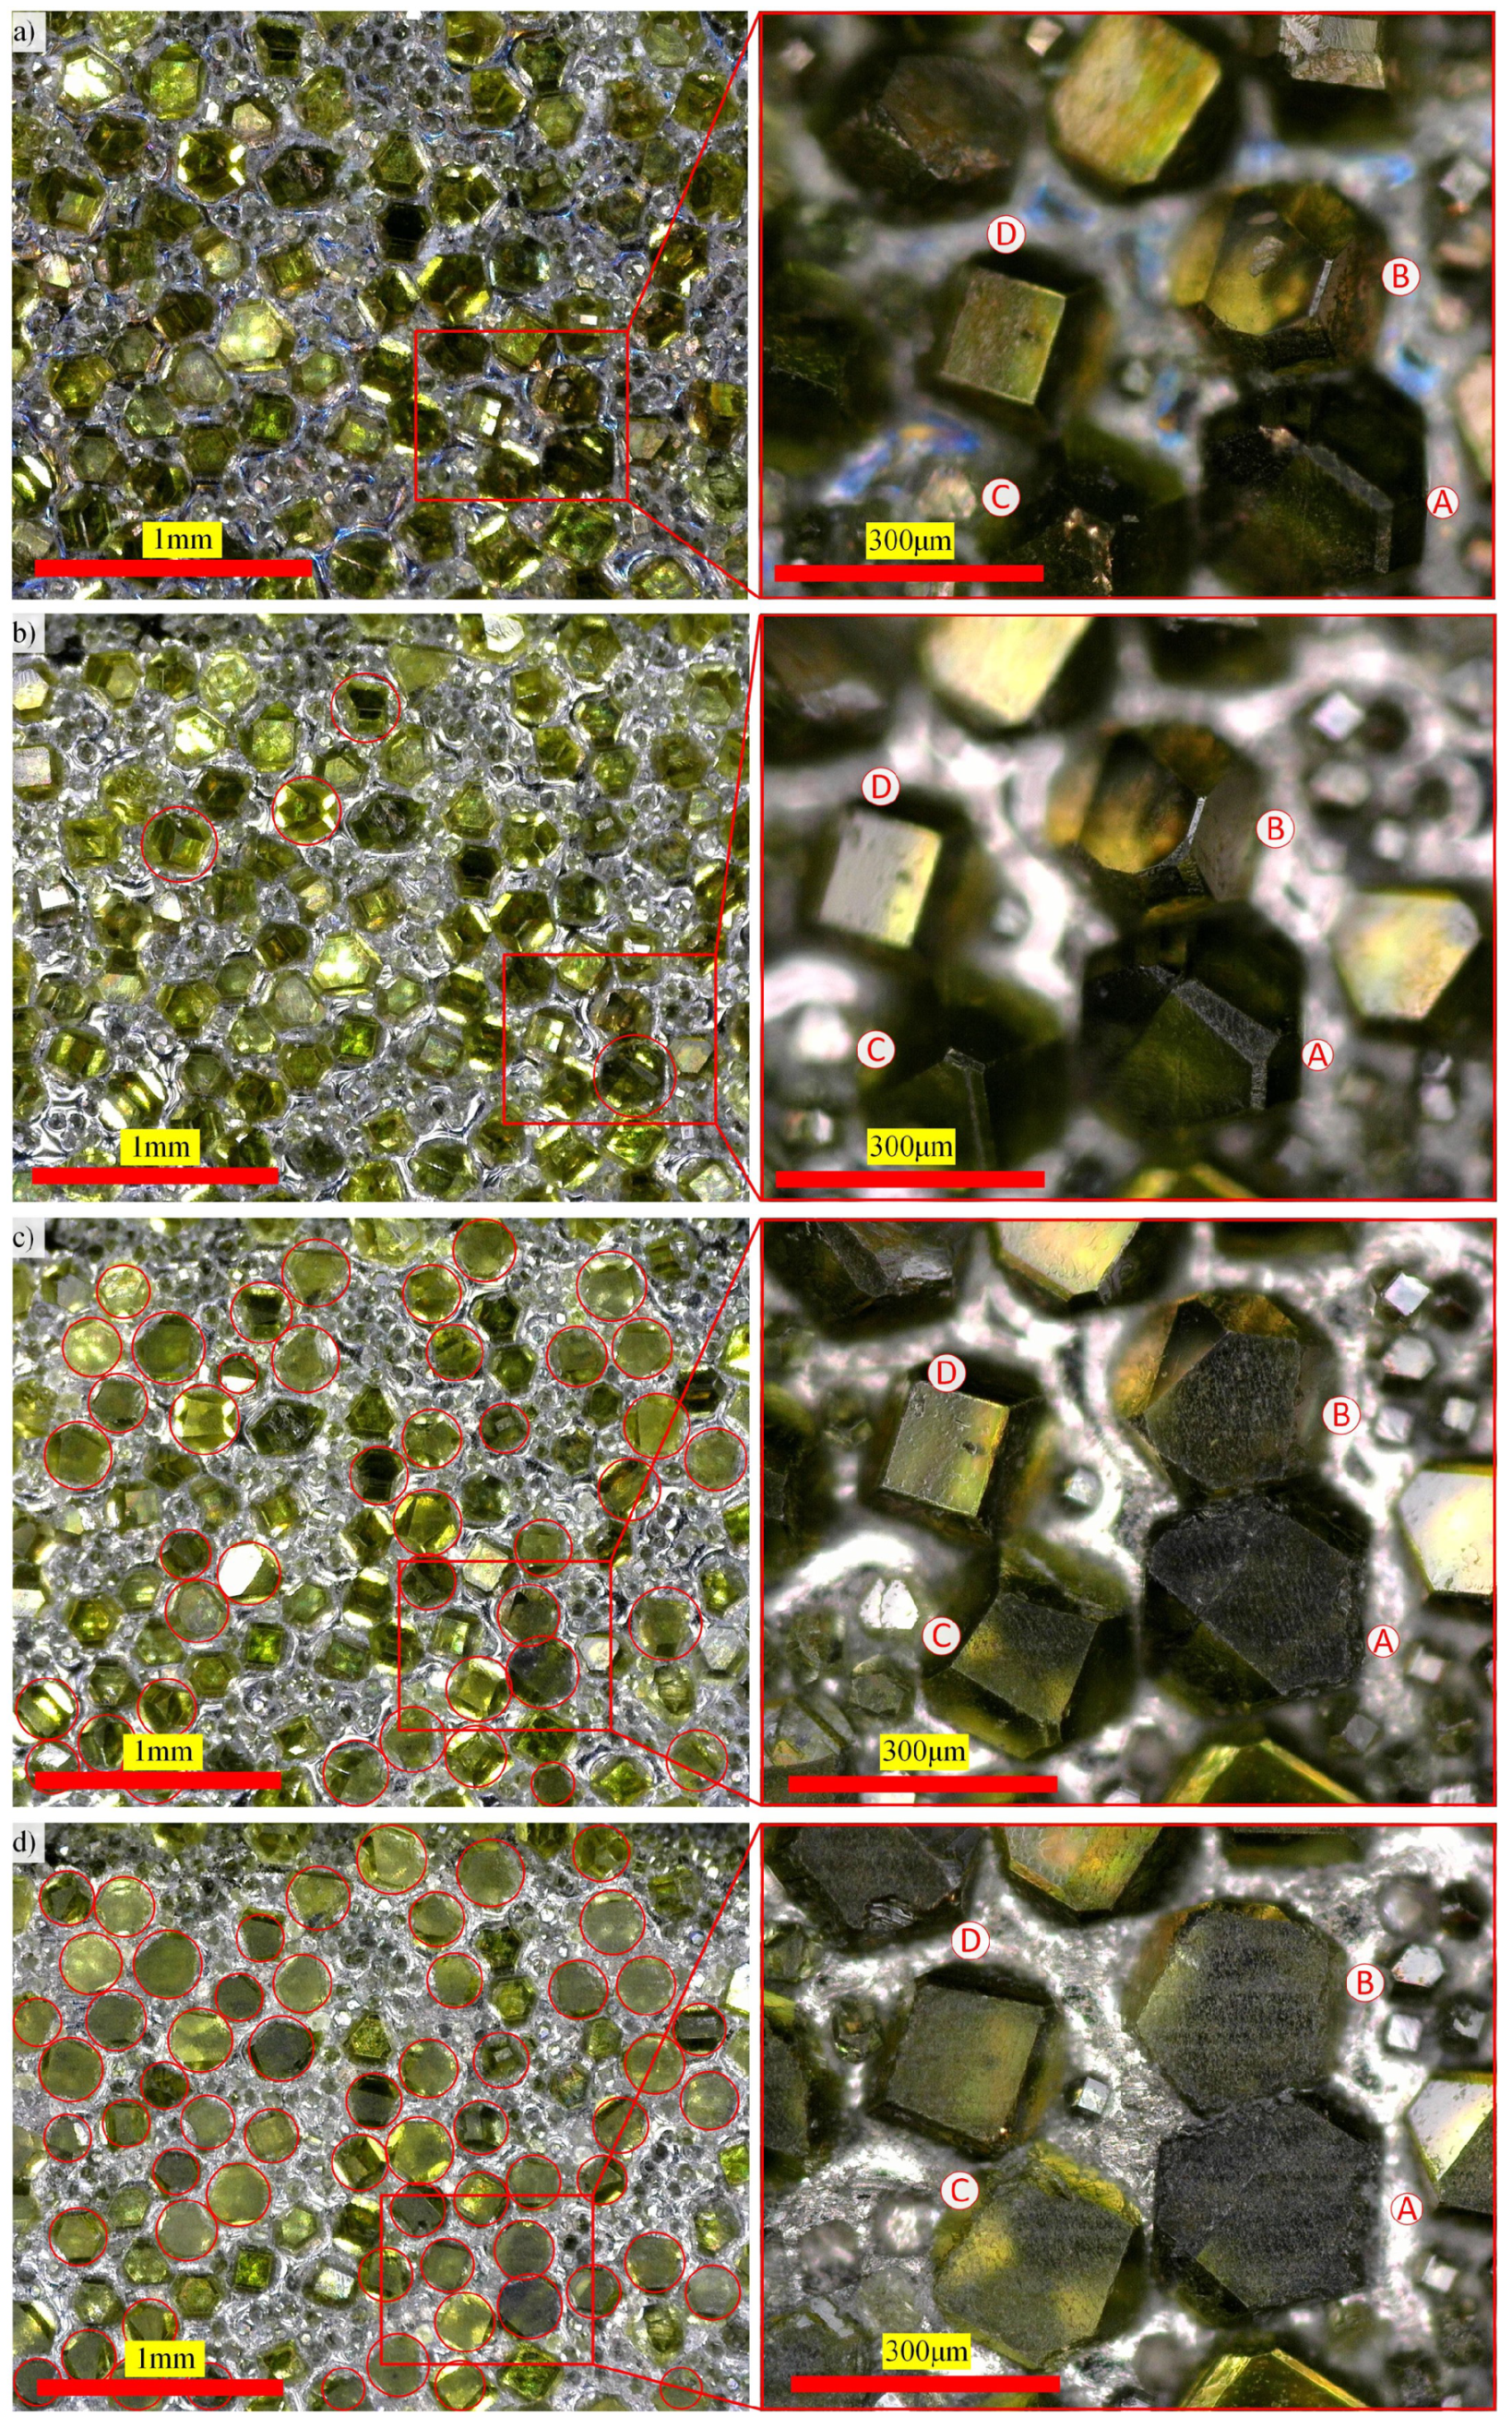
31]. Compare the surface morphology of the dressed grinding wheel and the undressed grinding wheel and mark the dressed grains on the surface with red circles, and the results are shown in
Figure 13.
Figure 13(a) displays the undressed grinding wheel surface, where the grain’s position, protrusion height, and orientation are random, with almost none exhibiting a flat top surface. The grinding wheel surface with an average grain protruding height is
after dressing, as shown in
Figure 13(b). It can be seen that only a small number of grains with larger protrusion height, such as grain
A, have been dressed and formed a smaller dressed surface. Other grains, such as
, and
D, did not show traces by dressing. The grinding wheel surface with an average grain protruding height is
after dressing, as shown in
Figure 13(c). Most grains, such as grains
, and
C, are dressed and form top surfaces. There are still a small number of grains, such as grain
D that are not dressed because the protruding height of the grain itself is lower than the dressing height threshold. The grinding wheel surface with an average grain protruding height is
after dressing, as shown in
Figure 13(d). Except for a few grains whose endpoint positions are lower than the surface of the electroplated metal layer, the rest of the grains are dressed and form larger top surfaces of the grains. Additionally, post-dressing, all grains stay intact on the grinding wheel surface with no grain detachment observed during the process.
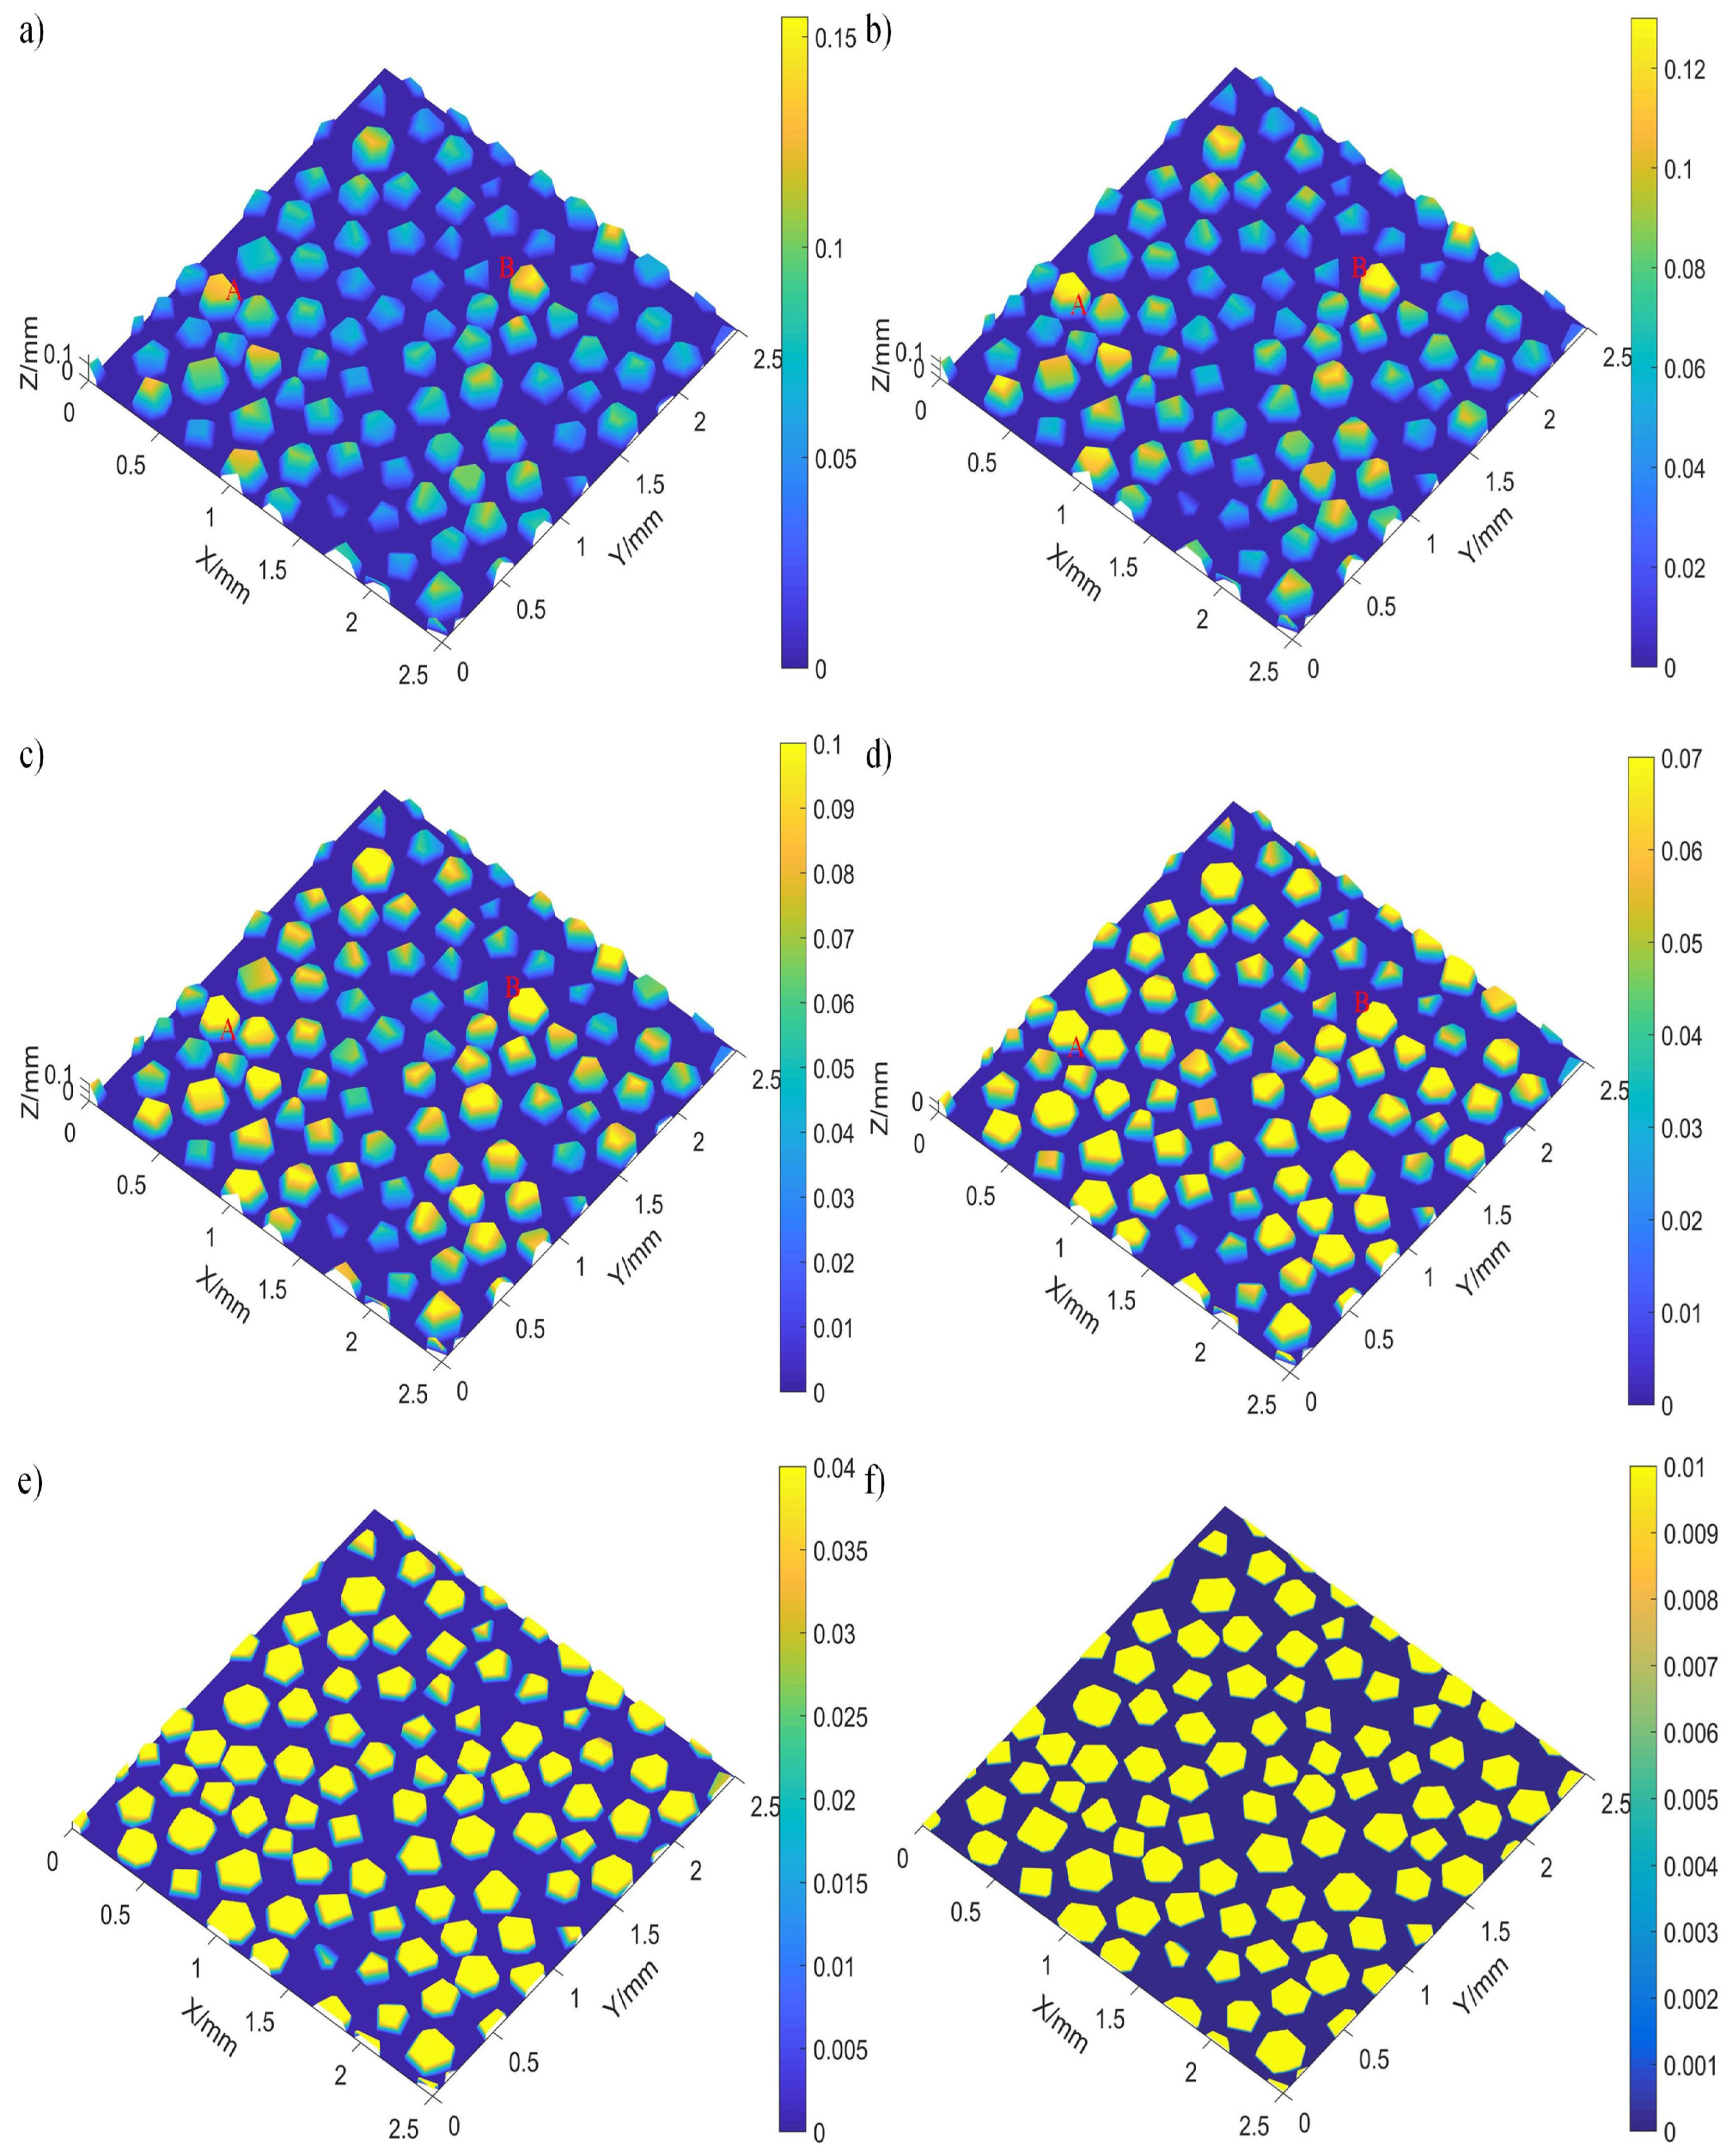
The surface morphology of the grinding wheel is constructed based on parameters such as the size and distribution of grains, the results are shown in
Figure 14. The model’s projected evolution of the grinding wheel’s surface morphology aligns with the actual observed morphology. Grains are randomly distributed on the surface of the undressed grinding wheel. A small number of larger grains, such as grains
A and
B, have a maximum protruding height, and the maximum initial grain protruding height in its area reaches
. When the protruding height of the grains on the grinding wheel before dressing is greater than the dressing height threshold, the tips of the grain is cut flat, thereby forming the top surface with a certain area. The figure illustrates that with increasing dressing depth, the grain’s protruding height diminishes. Conversely, both the grain’s top surface and length grow, peaking when dressed to a protruding height of
.
Figure 15 shows the change in the number of effective grains with the protruding height of the grains. It can be seen from the figure that as the protruding height of the grains decreases, the effective grain density gradually increases. After the grain protruding height is less than
, the dynamic grain density reaches a stable value, that is, almost all grains are dressed. Continuing to reduce the protruding height of the grains will only increase the length of the grain cutting edge and the area of the grain top surface, but it has no effect on the effective grain density.
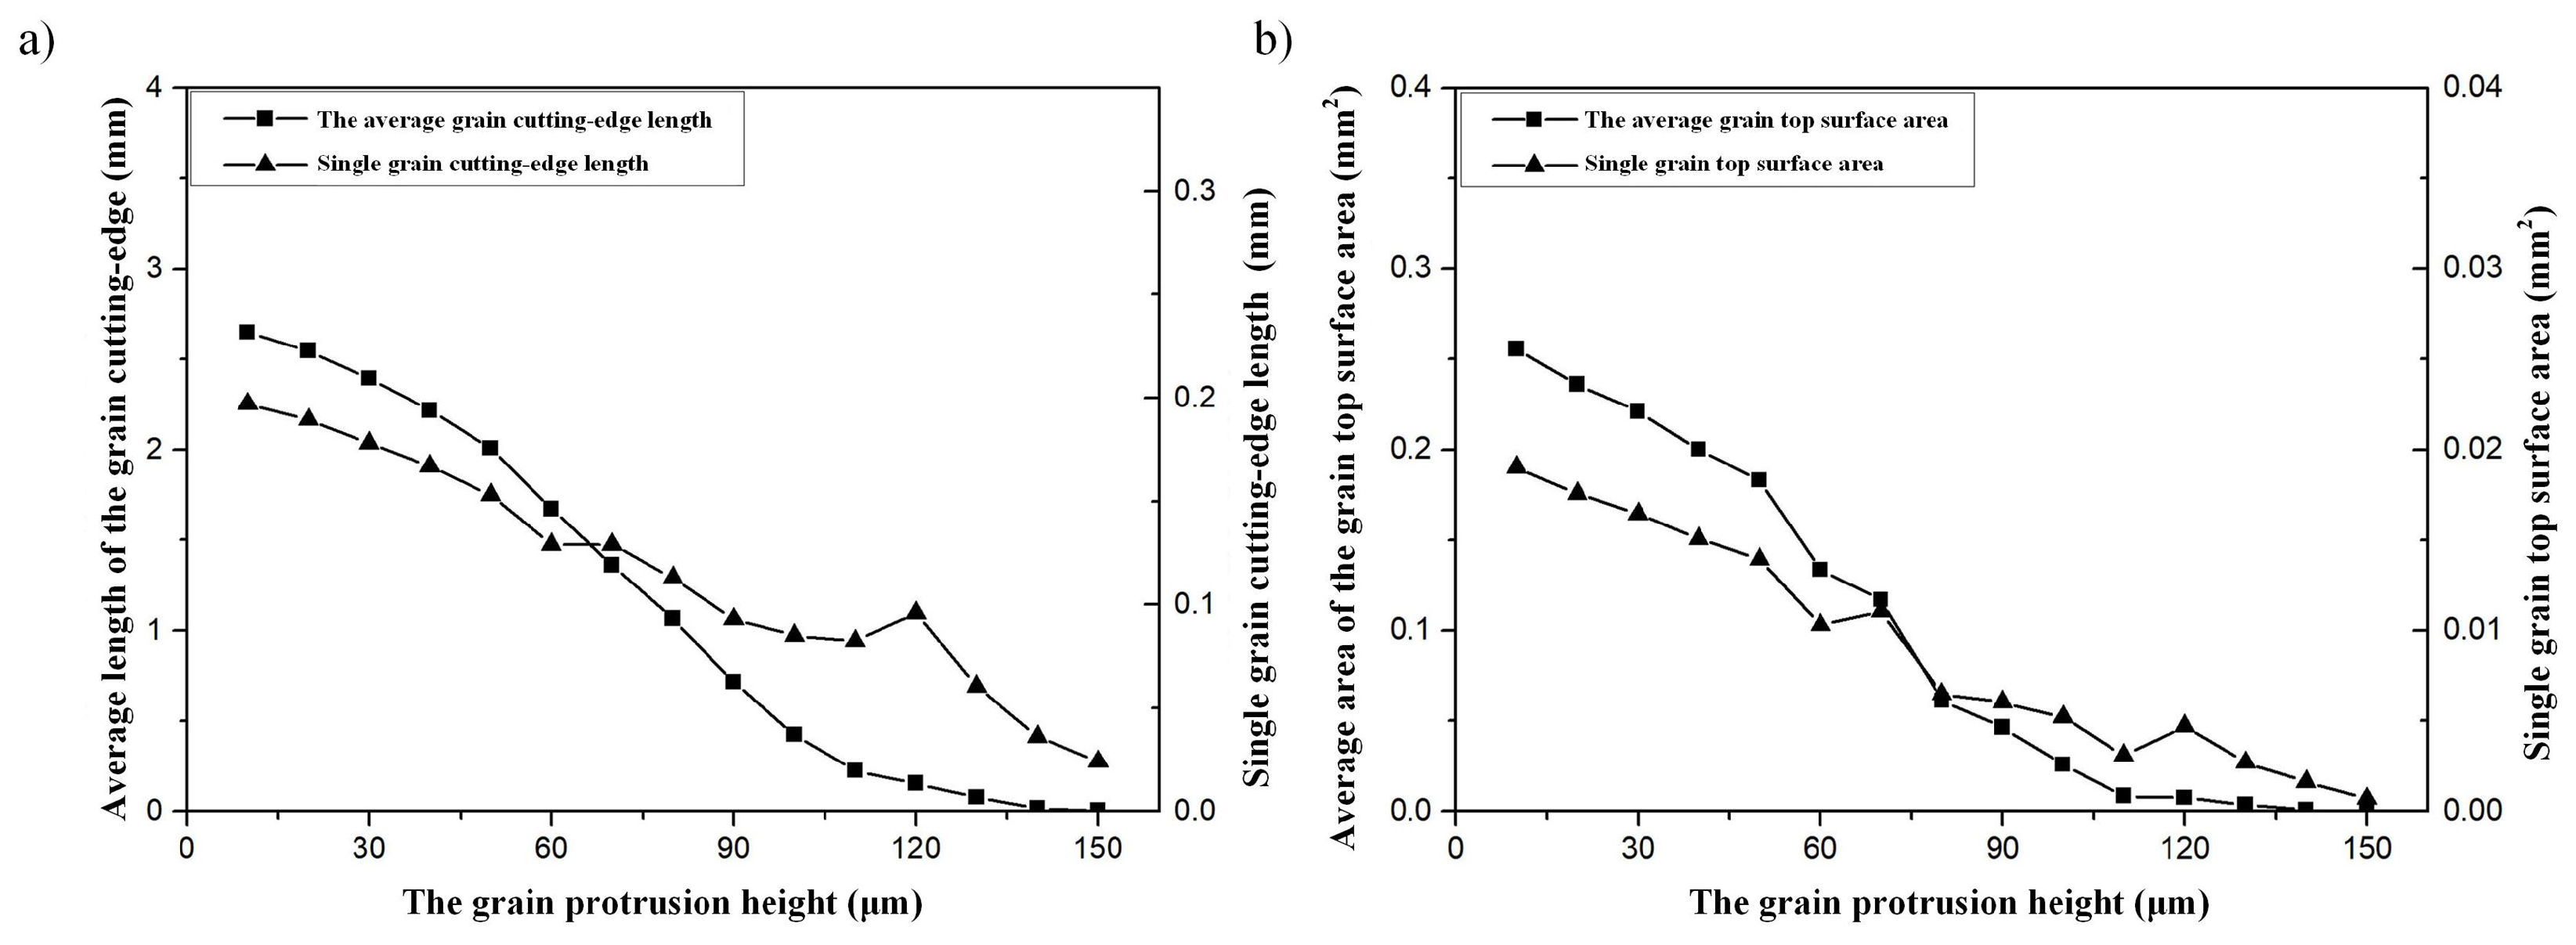
Figure 16 shows the changes in the profile parameters of the grain top surface with the protruding height of the grain. The figure reveals that, as the grain’s protruding height decreases, parameters such as the average cutting-edge length, individual grain cutting-edge, average top surface area, and individual top surface area per unit all increase. Therefore, under the same grinding conditions, grains with lower protrusion height can have longer cutting-edge to participate in the removal of workpiece material. However, an increase in the top surface area of the grain may result in a significant increase in the normal force. After the grain protrusion height is lower than 40-50
, the effective grain density and grain cutting-edge length change more gently as the grain protrusion height decreases, and the surface morphology of the grinding wheel gradually becomes stable. In essence, with increasing grain dressing feed depth, grains on the grinding wheel’s surface begin to flatten, enhancing the contact area with the dressing wheel. Properly adjusting the protruding height of grains will help increase cutting-edge length and top surface area of each grain. However, over-dressing the grinding wheel neither boosts grain grinding efficiency nor does it lighten the grain’s material removal burden.
4.2. Effect of dressing parameters on workpiece surface morphology
The cutting groove width, grinding trajectory interference, and other morphological features on the workpiece surface can reflect the size, shape, distribution position, and wear condition of the grains during the grinding process [
32]. The surface topography of grinding processing is generally characterized by surface roughness, the surface roughness parameters
and
can more accurately characterize the differences in surface topography than the line roughness
and
. The surface roughness parameter
is the average value of the height difference between each point on the surface relative to the average plane, and
is the root mean square value of the height difference between each point on the surface relative to the average plane. Surface roughness
and
can be expressed as:
In the formula, A is the plane area. is height of each point on the surface. is length elements in directions.
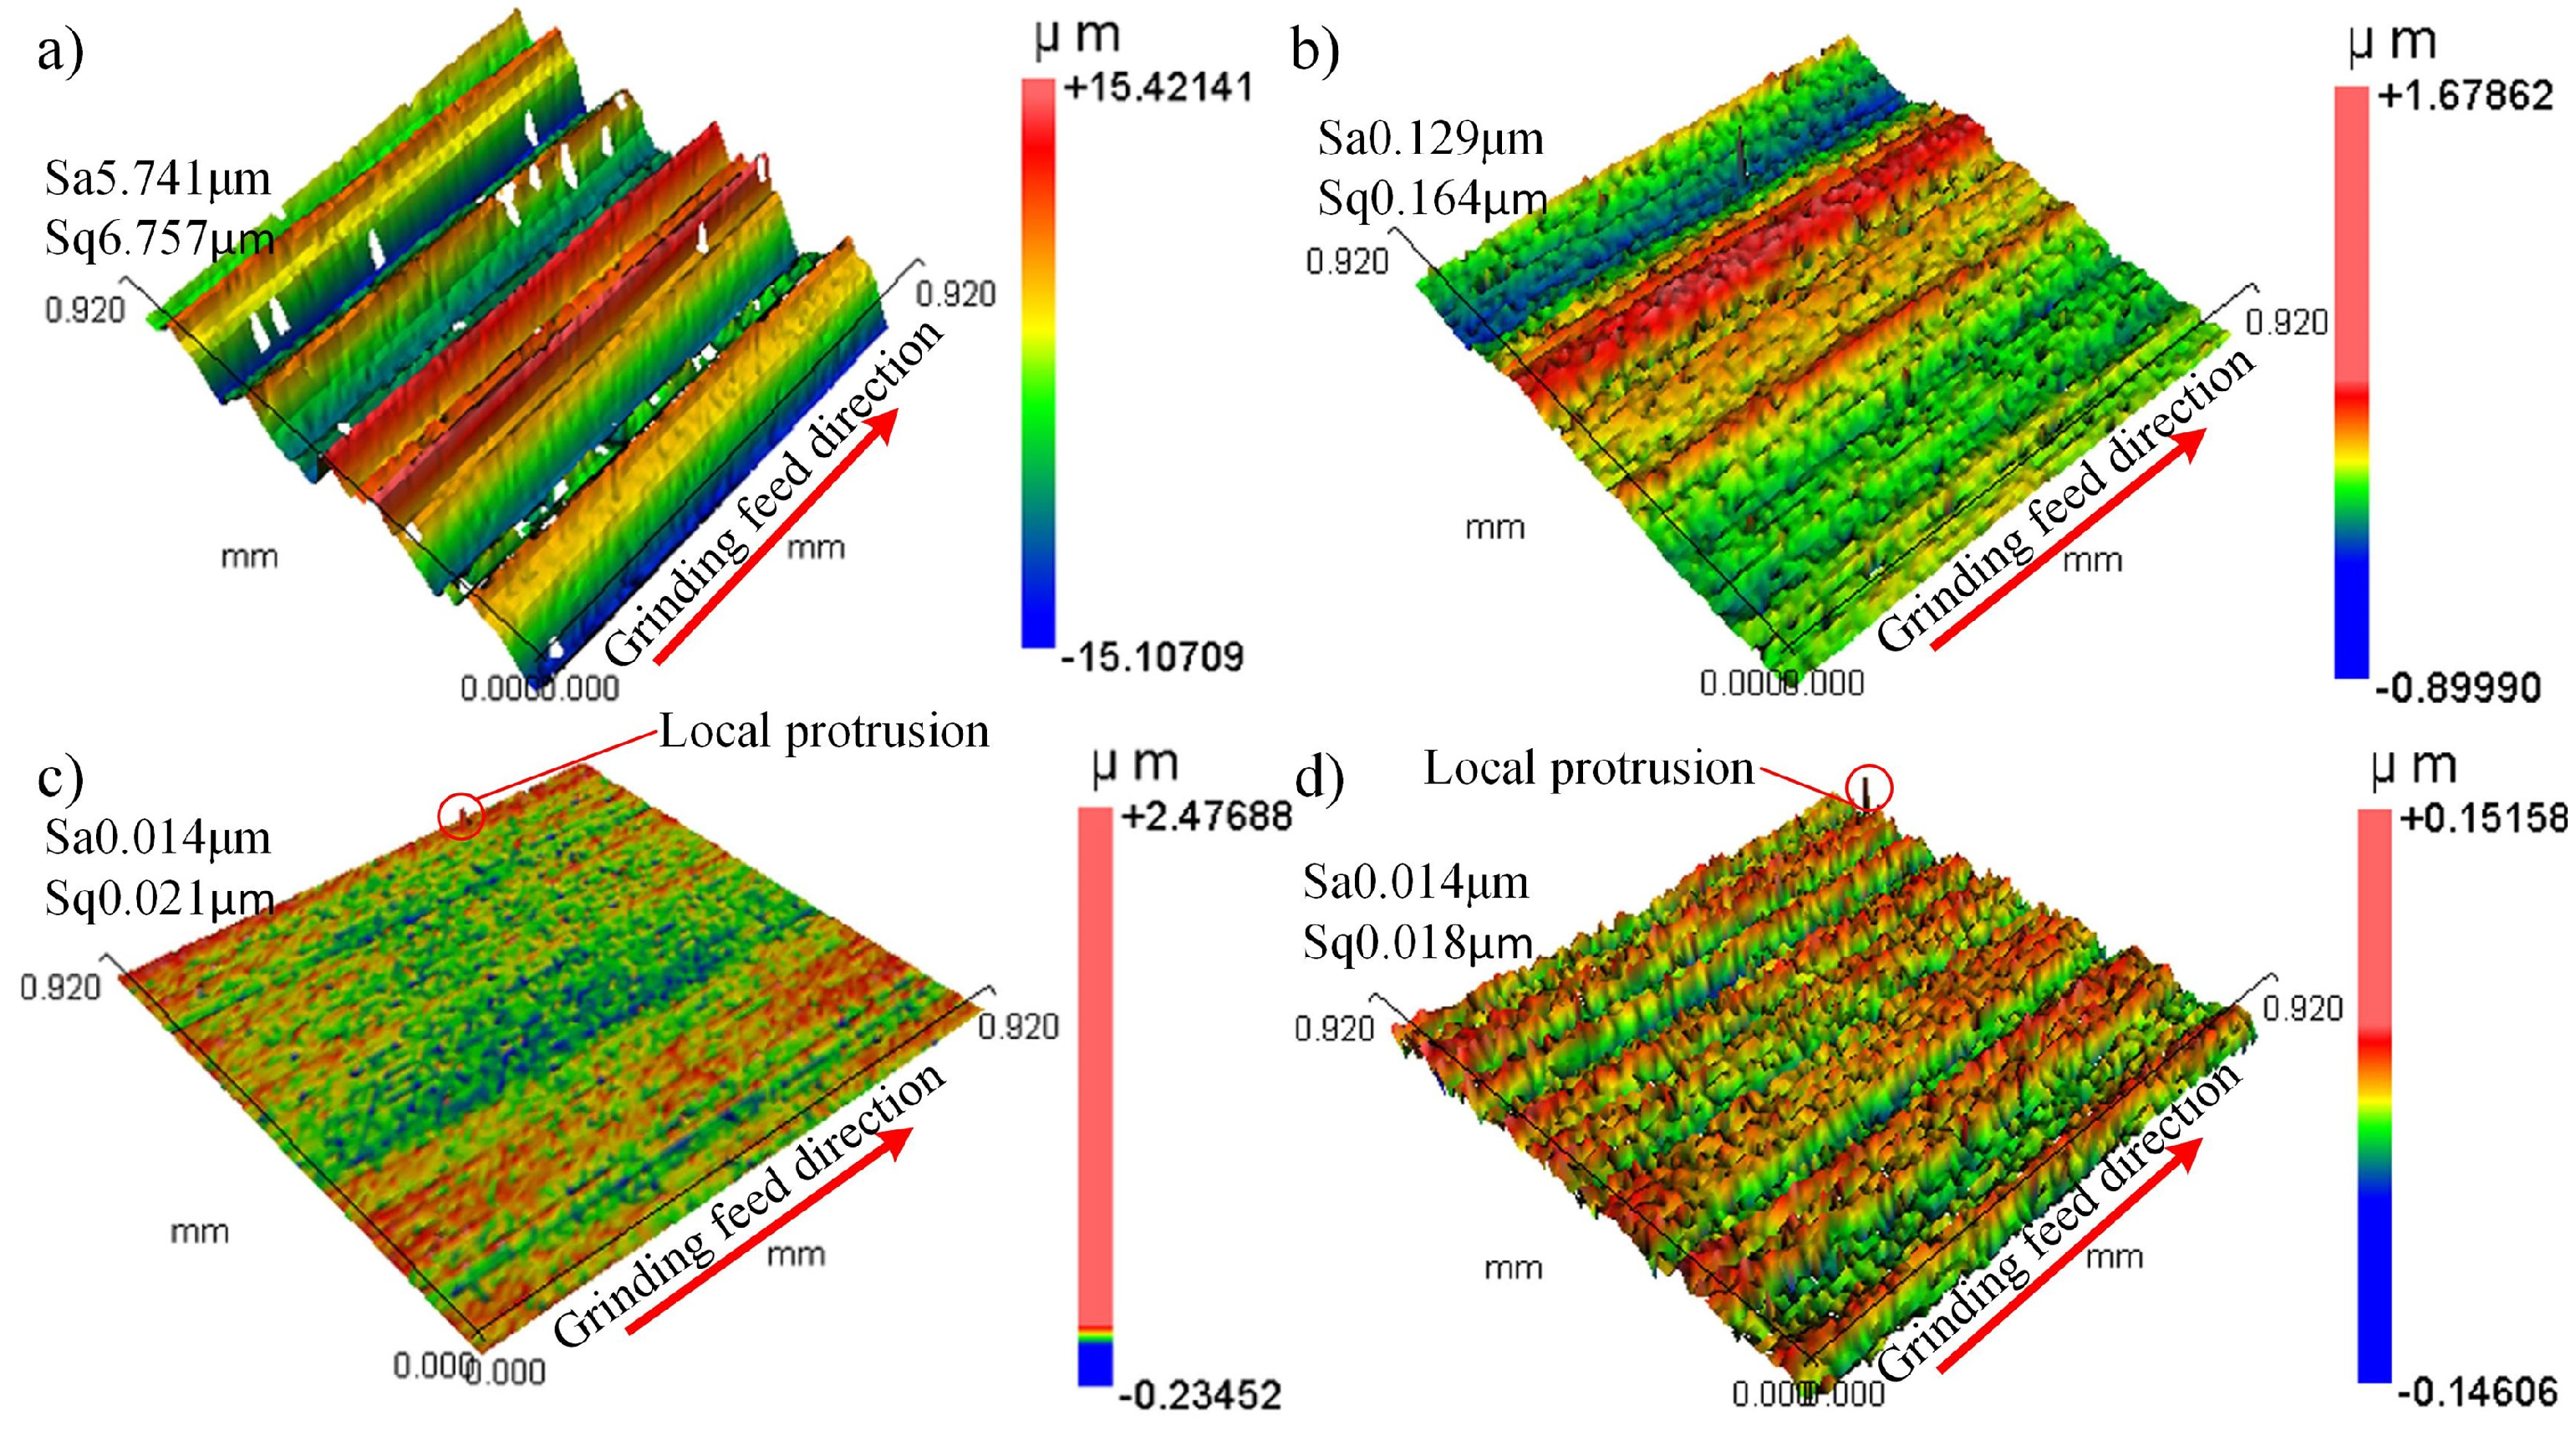
Figure 17 shows the workpiece surface morphology after grinding with the dressed diamond grinding wheel and the undressed diamond grinding wheel. Fig. 17(a) shows the workpiece surface morphology after grinding by the undressed grinding wheel. The workpiece surface roughness
and
. Large-diameter grain grinding forms pronounced grooves on the workpiece surface, resulting in height variations up to
.
Figure 17(b) shows the workpiece surface morphology after grinding by the dressed grinding wheel when the grain protrusion height is
. The workpiece surface roughness is
and
. Although shallow grooves from grain scribing remain, they have reduced the surface profile height difference by
compared to the undressed wheel.
Figure 17(c) shows the workpiece surface morphology after grinding by the dressed grinding wheel when the grain protrusion height is
. The workpiece surface roughness
and
. The surface profile height difference is only
lower than that of the undressed grinding wheel. This is due to the measurement points on the workpiece surface caused by dust, grinding debris, and other contamination, resulting in local protrusion on the workpiece surface.
Figure 17(d) shows the workpiece surface morphology after grinding by the dressed grinding wheel when the grain protrusion height is
. The workpiece surface roughness is
and
. The height difference of the surface profile is reduced by
compared with the undressed grinding wheel, and there are only a few grinding marks on the workpiece surface. The roughness
and
of the workpiece surface decreased by
and
, respectively, as the dressed grinding wheel grain protrusion height decreased from
to
.
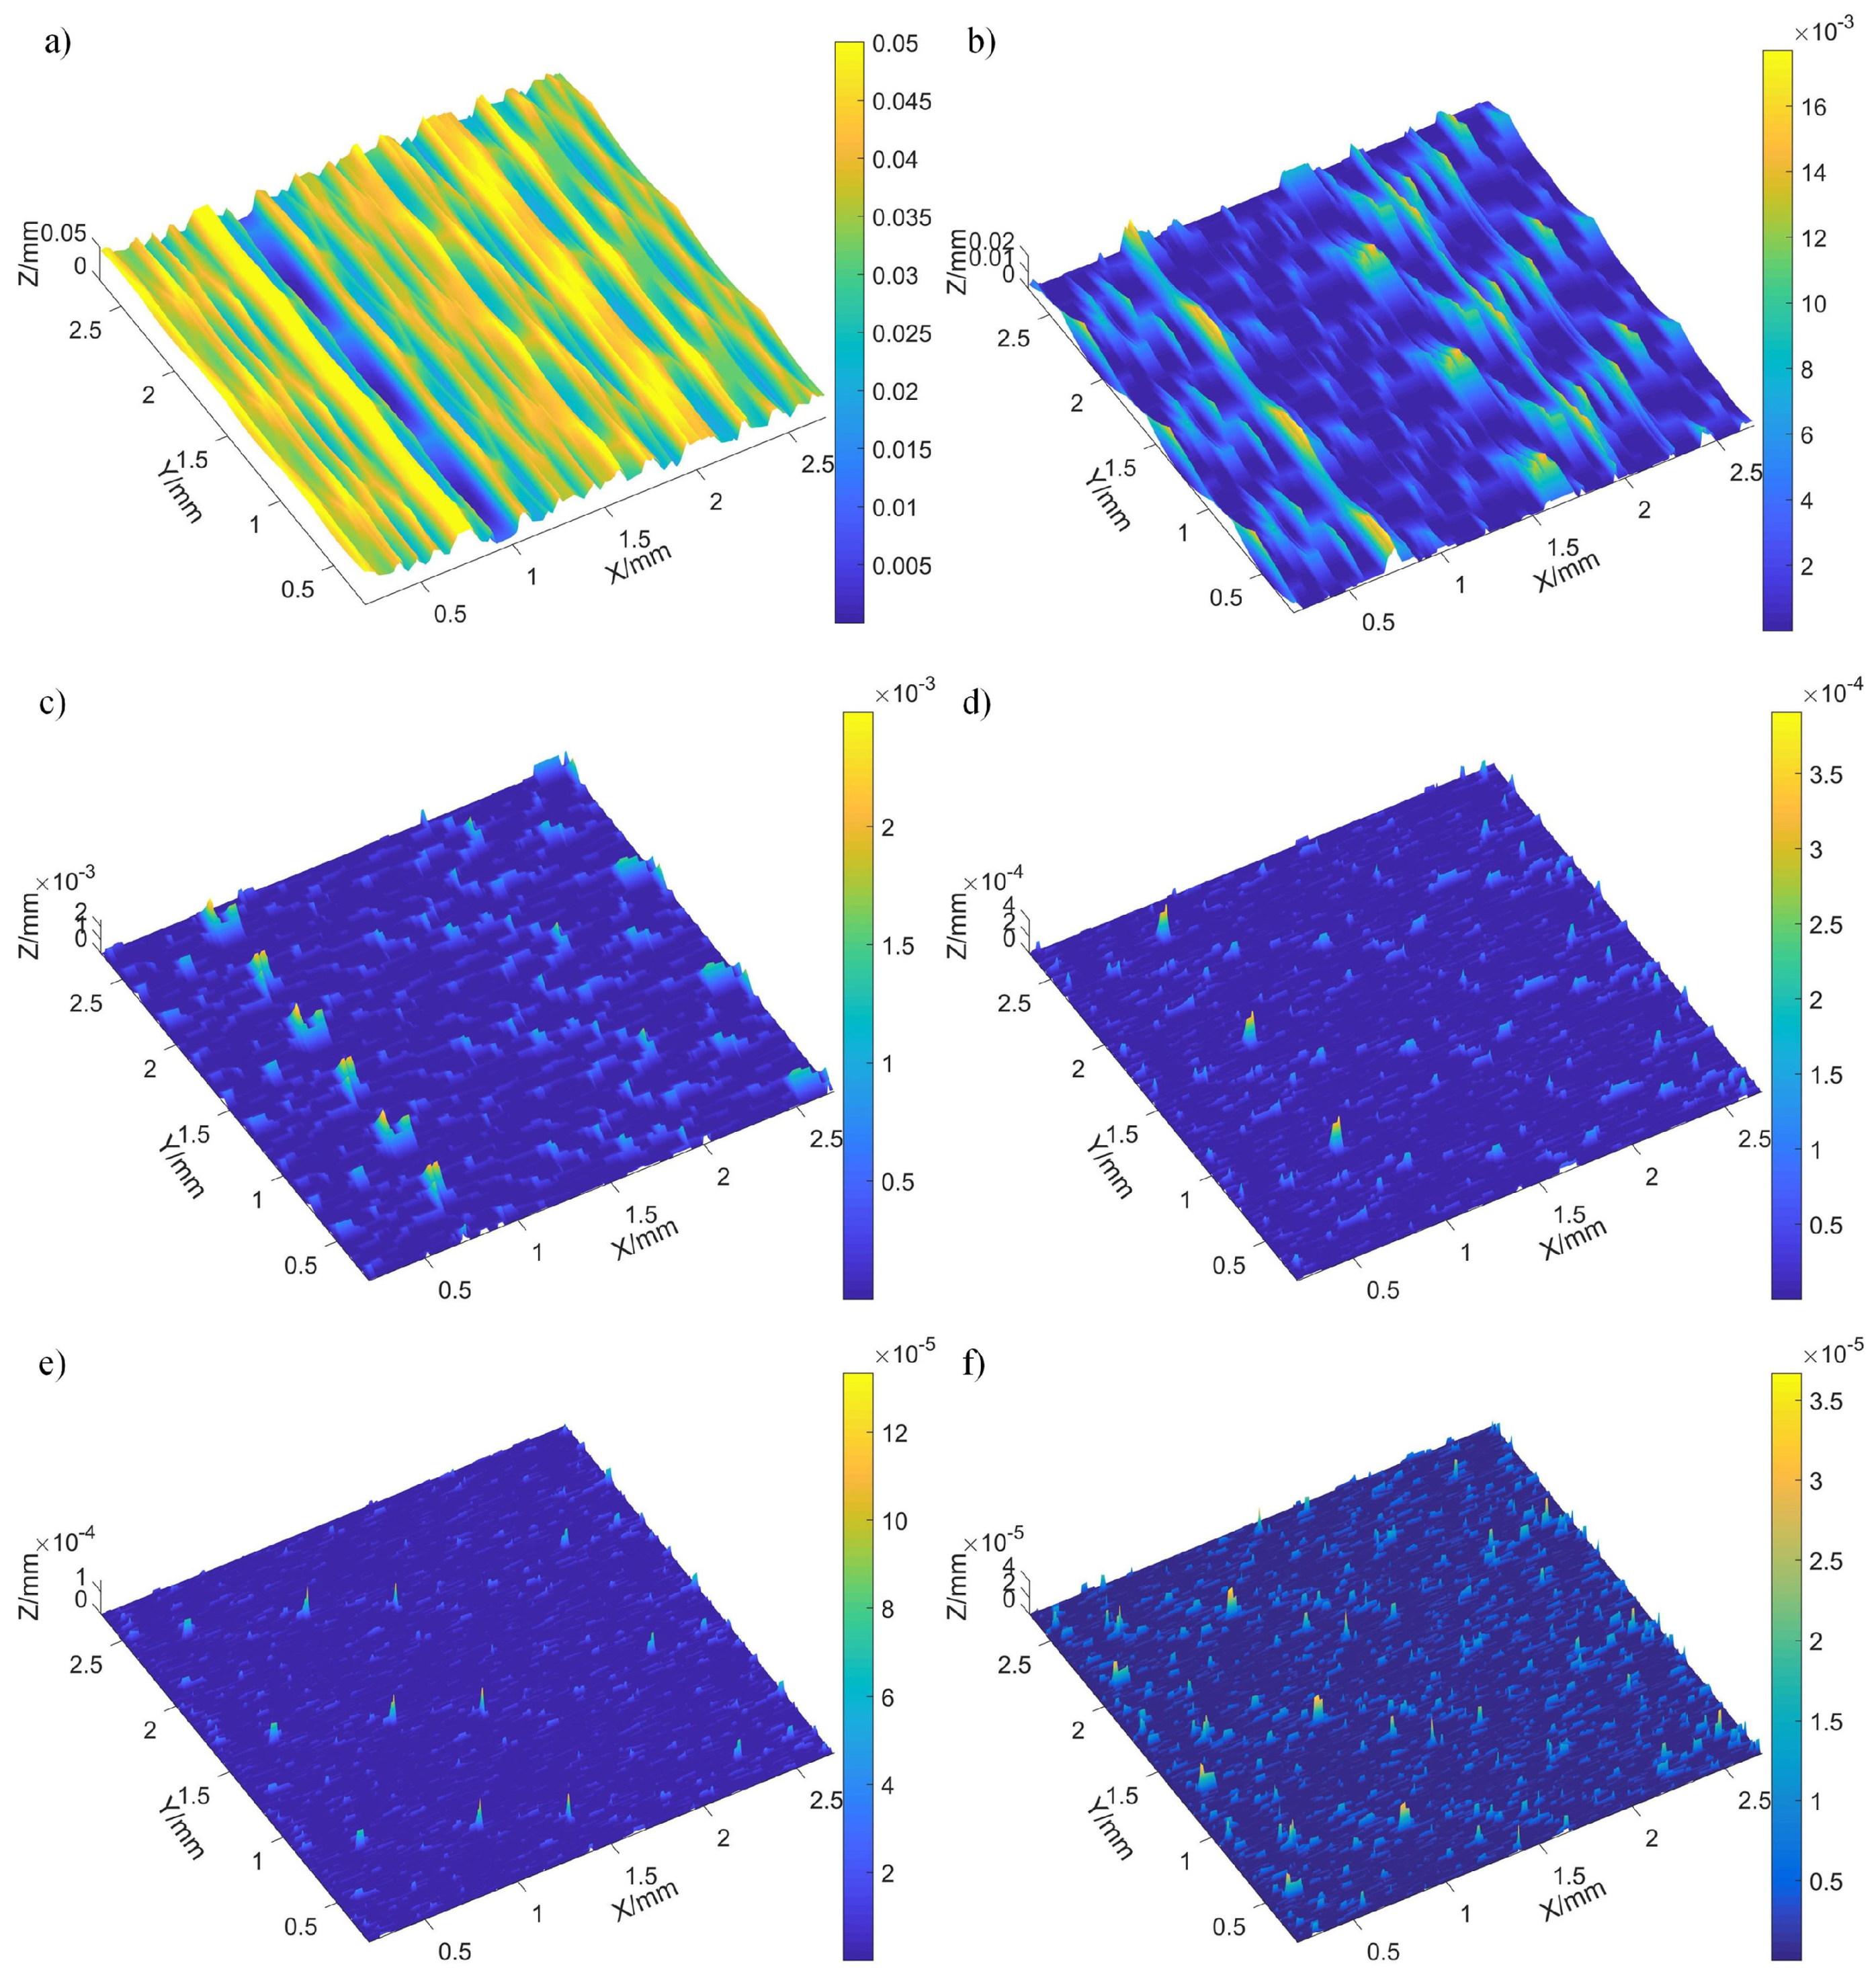
The profile changes of the grains caused by grinding wheel dressing are brought into the grinding wheel surface prediction model, and the results are shown in
Figure 18. It can be seen from the figure that the workpiece surface by the simulated undressed grinding wheel is also distributed with grooves with large differences in depth and width, and the maximum height of the local protrusions on the workpiece surface even reaches
. When the protrusion height of the grains decreases from
to
, the local protrusion height of the workpiece surface gradually decreases from
to
. Compared with the undressed grinding wheel, the reduction in surface roughness
and
of the dressed grinding wheel is
and
, respectively. The relative error between the decrease value in surface roughness after simulated grinding and the decrease value in surface roughness after actual grinding is within
, which shows that the simulated morphology of the grinding surface has a high degree of agreement with the actual grinding morphology.
Figure 19 shows the changes in workpiece surface roughness
and
with the protruding height of the grains on the dressed grinding wheel surface. It can be seen from the figure that the surface roughness decreases rapidly with the decrease of the grain protrusion height. As the grain’s protrusion height on the grinding wheel decreases, the effective grain density and grain cuttingedge length stabilize, resulting in an increased contact area between the grains and the workpiece. A reduced grain protrusion height leads to thinner undeformed chips and more uniform micronotches on the workpiece surface. In addition, when the protruding height of the grains is
, the workpiece surface has theoretically obtained extremely low surface roughness. Further reducing the protruding height of the grains will have minimal effect on the surface roughness change. In summary, dressed grinding wheels enhance the workpiece surface smoothness compared to their undressed counterparts, promoting a higher surface quality. At the same time, the protruding height of the grains is a direct factor that leads to changes in the material removal performance of a single grain. As the grain’s protrusion height on the dressed grinding wheel reduces, the grinding process yields a smoother surface.
5. Conclusions
This study investigated morphological characteristics of grinding wheels—including the number, geometric shape, and protrusion height of grains—and subsequently developed a model for the surface morphology of the coarse-grained diamond grinding wheel during the grinding process. Thus, the prediction of grinding surface morphology was achieved. By integrating both simulation and experimental data on grinding wheel and workpiece surface morphology, this study elucidated the effects of parameters like grain protrusion height, grain size, and orientation on the resultant surface morphology of the workpiece. The specific conclusions are as follows:
The surface morphology results obtained by simulated grinding were consistent with the surface morphology results obtained by actual grinding. Experiments on grinding wheel dressing validated the accuracy and applicability of our surface morphology models for both the grinding wheel and the workpiece. On this basis, the influence of the protruding height of grains on the surface morphology and surface roughness was explored.
During the dressing process, the cutting-edge length per unit area of the grinding wheel surface and the area of the grain top surface gradually increased as the protruding height decreased. Dressing significantly enhanced the count of active grains on the grinding wheel’s surface, facilitating increased participation in workpiece material removal. However, when the grinding wheel was dressed until the grain protrusion height was , the effective grain density gradually slowed down with the increase of the grain protrusion height and finally reached a stable state.
Compared with the undressed grinding wheel, the workpiece surface roughness and after grinding by the dressed grinding wheel were reduced by and , respectively. The grain of the electroplated coarse-grained diamond grinding wheel was dressed to a uniform cutting-edge height, which helped to reduce the height difference of the workpiece surface profile. As the dressing depth of the grinding wheel increases, the protruding height gradually decreases, and the surface rougness of the grinding process decreases rapidly. When the protruding height of the grain was less than , the surface roughness of the grinding process reached the nanometer level.
Author Contributions
S.D.: visualization, investigation, writing—review and editing, validation and data curation. Y.X.: conceptualization, methodology, software, investigation, formal analysis, writing-original draft. M.W.: (corresponding author) conceptualization, funding acquisition, resources, supervision, writing—review and editing. B.N.: investigation, funding acquisition, resources, writing—review and editing.
Funding
This work was financially supported by Young Fund of National Natural Science Foundation of China (No. 52005461) and National Key Research and Development Program of China (No. 2021YFB3400403).
Data Availability Statement
The datasets used and analyzed during the current study are available from the corresponding author upon reasonable request.
Acknowledgments
We would like to thank all the study participants and the staffs of Sichuan Precision and Ultra-Precision Machining Engineering Technology Center for their cooperation.
Conflicts of Interest
The authors declare no conflicts of interest.
References
- Guo, C.; Shi, Z.; Mullany, B.; Linke, B.; Yamaguchi, H.; Chaudhari, R.; Hucker, S.; Shih, A. Recent advancements in machining with abrasives. Journal of Manufacturing Science and Engineering 2020, 142, 110810. [Google Scholar] [CrossRef]
- Brinksmeier, E.; Riemer, O.; Rickens, K.; Berger, D. Application potential of coarse-grained diamond grinding wheels for precision grinding of optical materials. Production Engineering 2016, 10, 563–573. [Google Scholar] [CrossRef]
- Yao, Z.; Gu, W.; Li, K. Relationship between surface roughness and subsurface crack depth during grinding of optical glass BK7. Journal of Materials Processing Technology 2012, 212, 969–976. [Google Scholar] [CrossRef]
- Deja, M.; List, M.; Lichtschlag, L.; Uhlmann, E. Thermal and technological aspects of double face grinding of Al2O3 ceramic materials. Ceramics International 2019, 45, 19489–19495. [Google Scholar] [CrossRef]
- Yin, J.; Xu, J.; Ding, W.; Su, H. Effects of grinding speed on the material removal mechanism in single grain grinding of SiCf/SiC ceramic matrix composite. Ceramics International 2021, 47, 12795–12802. [Google Scholar] [CrossRef]
- Baidakova, N.; Orlova, T. Influence of abrasive grain geometrical characteristics on the grinding quality. Procedia Engineering 2017, 206, 194–199. [Google Scholar] [CrossRef]
- Li, P.; Jin, T.; Xiao, H.; Chen, Z.; Qu, M.; Dai, H.; Chen, S. Topographical characterization and wear behavior of diamond wheel at different processing stages in grinding of N-BK7 optical glass. Tribology International 2020, 151, 106453. [Google Scholar] [CrossRef]
- Jawahir, I.; Brinksmeier, E.; M’saoubi, R.; Aspinwall, D.; Outeiro, J.; Meyer, D.; Umbrello, D.; Jayal, A. Surface integrity in material removal processes: Recent advances. CIRP annals 2011, 60, 603–626. [Google Scholar] [CrossRef]
- Deng, H.; Xu, Z. Dressing methods of superabrasive grinding wheels: a review. Journal of Manufacturing Processes 2019, 45, 46–69. [Google Scholar] [CrossRef]
- Klocke, F.; Linke, B. Mechanisms in the generation of grinding wheel topography by dressing. Production Engineering 2008, 2, 157–163. [Google Scholar] [CrossRef]
- Holesovsky, F.; Pan, B.; Morgan, M.N.; Czan, A. Evaluation of diamond dressing effect on workpiece surface roughness by way of analysis of variance. Tehnički vjesnik 2018, 25, 165–169. [Google Scholar]
- Palmer, J.; Ghadbeigi, H.; Novovic, D.; Curtis, D. An experimental study of the effects of dressing parameters on the topography of grinding wheels during roller dressing. Journal of Manufacturing Processes 2018, 31, 348–355. [Google Scholar] [CrossRef]
- Riemer, O.; Mutlugünes, Y. Thermo-chemical dressing of coarse grained diamond grinding wheels. Advanced Materials Research 2012, 565, 211–216. [Google Scholar] [CrossRef]
- Zhang, Z.; Yao, P.; Zhang, Z.; Xue, D.; Wang, C.; Huang, C.; Zhu, H. A novel technique for dressing metal-bonded diamond grinding wheel with abrasive waterjet and touch truing. The International Journal of Advanced Manufacturing Technology 2017, 93, 3063–3073. [Google Scholar] [CrossRef]
- Zhao, Q.; Guo, B. Ultra-precision grinding of optical glasses using mono-layer nickel electroplated coarse-grained diamond wheels. Part 1: ELID assisted precision conditioning of grinding wheels. Precision engineering 2015, 39, 56–66. [Google Scholar] [CrossRef]
- Zhao, Q.; Guo, B. Ultra-precision grinding of optical glasses using mono-layer nickel electroplated coarse-grained diamond wheels. Part 2: Investigation of profile and surface grinding. Precision Engineering 2015, 39, 67–78. [Google Scholar] [CrossRef]
- Nguyen, A.T.; Butler, D.L. Correlation of grinding wheel topography and grinding performance: A study from a viewpoint of three-dimensional surface characterisation. Journal of Materials Processing Technology 2008, 208, 14–23. [Google Scholar] [CrossRef]
- Wang, X.; Yu, T.; Dai, Y.; Shi, Y.; Wang, W. Kinematics modeling and simulating of grinding surface topography considering machining parameters and vibration characteristics. The International Journal of Advanced Manufacturing Technology 2016, 87, 2459–2470. [Google Scholar] [CrossRef]
- Kacalak, W.; Lipiński, D.; Szafraniec, F.; Zawada-Tomkiewicz, A.; Tandecka, K.; Królczyk, G. Metrological basis for assessing the state of the active surface of abrasive tools based on parameters characterizing their machining potential. Measurement 2020, 165, 108068. [Google Scholar] [CrossRef]
- Liu, W.; Deng, Z.; Shang, Y.; Wan, L. Parametric evaluation and three-dimensional modelling for surface topography of grinding wheel. International Journal of Mechanical Sciences 2019, 155, 334–342. [Google Scholar] [CrossRef]
- Qiao, G.; Dong, G.; Zhou, M. Simulation and assessment of diamond mill grinding wheel topography. The International Journal of Advanced Manufacturing Technology 2013, 68, 2085–2093. [Google Scholar] [CrossRef]
- Chen, C.; Tang, J.; Chen, H.; Zhu, C. Research about modeling of grinding workpiece surface topography based on real topography of grinding wheel. The International Journal of Advanced Manufacturing Technology 2017, 93, 2411–2421. [Google Scholar] [CrossRef]
- Liao, D.; Shao, W.; Tang, J.; Li, J.; Tao, X. Numerical generation of grinding wheel surfaces based on time series method. The International Journal of Advanced Manufacturing Technology 2018, 94, 561–569. [Google Scholar] [CrossRef]
- Liao, D.; Shao, W.; Tang, J.; Li, J. An improved rough surface modeling method based on linear transformation technique. Tribology International 2018, 119, 786–794. [Google Scholar] [CrossRef]
- Salisbury, E.J.; Domala, K.V.; Moon, K.S.; Miller, M.H.; Sutherland, J.W. A three-dimensional model for the surface texture in surface grinding, part 1: surface generation model. J. Manuf. Sci. Eng. 2001, 123, 576–581. [Google Scholar] [CrossRef]
- Salisbury, E.J.; Domala, K.V.; Moon, K.S.; Miller, M.H.; Sutherland, J.W. A three-dimensional model for the surface texture in surface grinding, part 2: grinding wheel surface texture model. J. Manuf. Sci. Eng. 2001, 123, 582–590. [Google Scholar] [CrossRef]
- Vargas, G.E.; Wegener, K.; Kuster, F.; Schroeter, R.B. Simulation of the hone broaching process with diamond tools. Journal of the Brazilian Society of Mechanical Sciences and Engineering 2014, 36, 325–333. [Google Scholar] [CrossRef]
- Mitchell, D.P. Spectrally optimal sampling for distribution ray tracing. In Proceedings of the Proceedings of the 18th annual conference on Computer graphics and interactive techniques, 1991; pp. 157–164.
- Liu, Y.; Warkentin, A.; Bauer, R.; Gong, Y. Investigation of different grain shapes and dressing to predict surface roughness in grinding using kinematic simulations. Precision Engineering 2013, 37, 758–764. [Google Scholar] [CrossRef]
- Heinzel, C.; Borchers, F.; Berger, D.; Ehle, L. Surface and material modifications of tempered steel after precision grinding with electroplated coarse grained diamond wheels. Procedia CIRP 2016, 45, 191–194. [Google Scholar] [CrossRef]
- Kimura, F.; Horio, K.; Grimme, D.; Rickens, K.; Zhao, Q.; Heinzel, C. Dressing of coarse-grained diamond wheels for ductile machining of brittle materials. In Proceedings of the Towards Synthesis of Micro-/Nano-systems: The 11th International Conference on Precision Engineering (ICPE) August 16–18, 2006, Tokyo, Japan. Springer, 2007, pp. 305–307.
- Zhou, W.; Tang, J.; Chen, H.; Zhu, C.; Shao, W. A comprehensive investigation of plowing and grain-workpiece micro interactions on 3D ground surface topography. International Journal of Mechanical Sciences 2018, 144, 639–653. [Google Scholar] [CrossRef]
Figure 1.
Electroplated coarse-grained diamond grinding wheel.
Figure 1.
Electroplated coarse-grained diamond grinding wheel.
Figure 2.
Schematic diagram of theoretical grain morphology.
Figure 2.
Schematic diagram of theoretical grain morphology.
Figure 3.
Grain parameters for grinding wheel modeling: a) The grain shape coefficient, b) The maximum grain diameter, c) The grain size, d) The grain direction.
Figure 3.
Grain parameters for grinding wheel modeling: a) The grain shape coefficient, b) The maximum grain diameter, c) The grain size, d) The grain direction.
Figure 4.
Diagram of the best-candidate sampling method and its generated grain distribution: a) Schematic of best-candidate sampling, b) Grain distribution.
Figure 4.
Diagram of the best-candidate sampling method and its generated grain distribution: a) Schematic of best-candidate sampling, b) Grain distribution.
Figure 5.
Three-dimensional grain profile on the grinding wheel surface and its projected area. a) Three-dimensional profile of the grains b) Projection profile of the grains.
Figure 5.
Three-dimensional grain profile on the grinding wheel surface and its projected area. a) Three-dimensional profile of the grains b) Projection profile of the grains.
Figure 6.
Point cloud of modeled grains and surface topography of the grinding wheel surface: a) Point cloud, b) Surface topography.
Figure 6.
Point cloud of modeled grains and surface topography of the grinding wheel surface: a) Point cloud, b) Surface topography.
Figure 7.
The simulated and actual grinding wheel surface: a) Simulated surface, b) Actual surface.
Figure 7.
The simulated and actual grinding wheel surface: a) Simulated surface, b) Actual surface.
Figure 8.
Schematic of grain dressing and grinding wheel surface with protrusion height after wheel dressing: a) The grain after dressing, b) Grinding wheel surface with protrusion height .
Figure 8.
Schematic of grain dressing and grinding wheel surface with protrusion height after wheel dressing: a) The grain after dressing, b) Grinding wheel surface with protrusion height .
Figure 9.
Coordinate transformation for grinding wheel surface.
Figure 9.
Coordinate transformation for grinding wheel surface.
Figure 10.
Formation process of grinding work-piece surface.
Figure 10.
Formation process of grinding work-piece surface.
Figure 11.
Simulate grinding processing surfaces and their cross-sectional profiles: a) Surface morphology, b) Cross-sectional profile.
Figure 11.
Simulate grinding processing surfaces and their cross-sectional profiles: a) Surface morphology, b) Cross-sectional profile.
Figure 12.
Grinding wheel dressing and grinding experimental setup: a) Dressing setup, b) Grinding setup.
Figure 12.
Grinding wheel dressing and grinding experimental setup: a) Dressing setup, b) Grinding setup.
Figure 13.
Surface topography with different grain protrusion height: a) Undressed grinding wheel, b) Grain protrusion height , c) Grain protrusion height , d) Grain protrusion height .
Figure 13.
Surface topography with different grain protrusion height: a) Undressed grinding wheel, b) Grain protrusion height , c) Grain protrusion height , d) Grain protrusion height .
Figure 14.
Dressed grinding wheel surface with different grain protrusion height: a) Undressed grinding wheel surface, b) Grain protrusion height , c) Grain protrusion height , d) Grain protrusion height , e) Grain protrusion height Grain protrusion height .
Figure 14.
Dressed grinding wheel surface with different grain protrusion height: a) Undressed grinding wheel surface, b) Grain protrusion height , c) Grain protrusion height , d) Grain protrusion height , e) Grain protrusion height Grain protrusion height .
Figure 15.
Variance of the dynamic effective grain number with the grain protrusion height.
Figure 15.
Variance of the dynamic effective grain number with the grain protrusion height.
Figure 16.
Variance of grain cutting-edge length and top surface area with the grain protrusion height: a) cutting-edge length, b) Top surface area.
Figure 16.
Variance of grain cutting-edge length and top surface area with the grain protrusion height: a) cutting-edge length, b) Top surface area.
Figure 17.
Workpiece surface topography after grinding with different grain protrusion height grinding wheels. a) Initial grinding wheel surface b) Grain protrusion height c) Grain protrusion height d) Grain protrusion height .
Figure 17.
Workpiece surface topography after grinding with different grain protrusion height grinding wheels. a) Initial grinding wheel surface b) Grain protrusion height c) Grain protrusion height d) Grain protrusion height .
Figure 18.
Modeled workpiece surface after grinding with different grain protrusion height grinding wheels. a) Undressed grinding wheel, b) Grain protrusion height , c) Grain protrusion height , d) Grain protrusion height , e) Grain protrusion height , f) Grain protrusion height .
Figure 18.
Modeled workpiece surface after grinding with different grain protrusion height grinding wheels. a) Undressed grinding wheel, b) Grain protrusion height , c) Grain protrusion height , d) Grain protrusion height , e) Grain protrusion height , f) Grain protrusion height .
Figure 19.
Workpiece surface roughness after grinding with different grain protrusion height grinding wheels.
Figure 19.
Workpiece surface roughness after grinding with different grain protrusion height grinding wheels.
Table 1.
Physical and mechanical attributes of optical glass BK7.
Table 1.
Physical and mechanical attributes of optical glass BK7.
| Density (g/) |
Poisson’s ratio |
Elastic Modulus (GPa) |
Shear modulus (GPa) |
Thermal conductivity [W/(m·K)] |
Specific heat capacity (J/g·℃) |
Annealing point (℃) |
Softening Point (℃) |
| 2.51 |
0.206 |
82.0 |
34.0 |
1.114 |
0.858 |
557 |
719 |
|
Disclaimer/Publisher’s Note: The statements, opinions and data contained in all publications are solely those of the individual author(s) and contributor(s) and not of MDPI and/or the editor(s). MDPI and/or the editor(s) disclaim responsibility for any injury to people or property resulting from any ideas, methods, instructions or products referred to in the content. |
© 2024 by the authors. Licensee MDPI, Basel, Switzerland. This article is an open access article distributed under the terms and conditions of the Creative Commons Attribution (CC BY) license (http://creativecommons.org/licenses/by/4.0/).
