1. Introduction
Additive manufacturing (AM), also known as 3D printing or rapid prototyping, involves the fabrication of an object through the sequential application of thin layers of a material specified by a design executed in 3D modeling software (CAD - computer-aided design) [
1,
2] or from data obtained from computed tomography (CT), cone-beam computed tomography (CBCT), or scanning [
3].
The technology of printing began in the 1980s for the production of prototypes, models, and casting patterns [
4], based on the patent applied for stereolithography printing acquired by Chuck W. Hull [
5]. Following the first patent, various technologies were developed. In 2009, the American Society for Testing and Materials (ASTM), which regulates techniques and standards for a wide range of materials, products, systems, and services, defined seven categories for all existing 3D printing technologies, as described in the ISO/ASTM 52900-15 standard: stereolithography (STL), material jetting (MJ), binder jetting, powder bed fusion (SLS), sheet lamination, and direct energy deposition [
6]. These technologies can also be classified according to the material layering method, such as stereolithography, selective laser sintering, digital light processing, PolyJet, and fused deposition modeling, which are applied in the fabrication of dental prostheses [
7,
8,
9].
The most widely used printers in dentistry are SLA and DLP types, derived from the technique in which the printing platform is immersed in resin polymerized by ultraviolet (UV) or LED (set of lamps) light. The laser/LED draws a cross-section of the object to form each layer, repeating this process numerous times until the final construction of the printed piece [
3,
5,
10]. Various materials such as plastic, metal, ceramic, and polymers, among others, can be applied to this processing technique, which has advantages over subtractive methods (milling), such as reduced material waste and the ability to construct complex geometric structures [
7].
3D printing has numerous applications and has been implemented in various fields such as medical and dental. In medicine, the technology is used in orthopedics, neurosurgery, cardiac surgery, maxillofacial surgery, and other specialties [
11]. In dentistry, this technology has been employed to eliminate numerous technical steps necessary for the fabrication of prosthetic restorations [
12,
13], as well as to enable the creation of study models, prototypes of anatomical structures to facilitate diagnosis and treatment planning, surgical guides, occlusal splints, orthodontic appliances, permanent and temporary restorations [
3].
The technique used for the fabrication of temporary restorations can be divided into direct and indirect methods according to the manufacturing process. In the direct method, restorations are immediately fabricated on tooth preparations, while in the indirect method, crowns are manufactured from gypsum models or files obtained from intraoral scanning, and then installed on tooth preparations. Although the direct method is faster, it has more disadvantages, such as exothermic reaction, and excessive heat released during the resin polymerization process, which can cause thermal trauma to the dental pulp. The residual monomer present in the polymer used in the direct fabrication method can also injure the oral mucosa, causing blisters or allergic stomatitis. Additionally, there is undesirable polymerization shrinkage of the resin caused by the reduction of atomic distance in the low molecular weight of the monomers used, leading to dimensional changes in marginal, occlusal, and interproximal regions. The indirect method, on the other hand, eliminates the risks of thermal and chemical reactions to the tooth and mucosa. Crown adaptation to the tooth is increased because the polymerization process is carried out extra-orally. Thus, it is essential to observe the characteristics of each technique in the selection of a material, such as working time, ease of fabrication and repair, biocompatibility, dimensional stability during and after fabrication, availability, and color stability [
14]. Various materials for temporary restorations are available, such as acrylic resin, commonly used for its cost-effectiveness, aesthetic acceptance, and versatility, although it presents tissue toxicity and thermal irritation. Another material used is bis-acrylic resin, introduced to reduce issues with conventional acrylic resin. More recently, the use of 3D printing resins has been implemented, capable of faithfully reproducing restorations with precise dimensions and reduced fabrication time [
15,
16].
The recent use of 3D printers for obtaining temporary restorations already shows that the mechanical behavior of these resins is satisfactory [
17]. Other studies have analyzed repair options, showing that surface treatments increase the bond strength between these 3D printing resins and conventional resins (such as bis-acrylic, methyl methacrylate-based, PMMA, or Bis-GMA), demonstrating that repair is possible in case of intraoral failure. However, studies on adhesive strength with the dental substrate or cement are still limited, requiring further investigation into the 3D printing resins. The aim of this study is to understand a 3D printing resin through microstructural, mechanical, and optical characterization.
2. Materials and Methods
2.1. Sample Manufacturing
The samples were designed in 3D modeling software (Rhinoceros 6.0) according to the selected design for each test (disk, square, and bars). The generated file was exported in STL format to the slicing software of the Anycubic printer, allowing the establishment of all printing parameters (support type, layer exposure time, printing angle, and layer thickness). After saving the parameters, the samples were printed on the Anycubic printer, cleaned in isopropyl alcohol for 4 minutes in an ultrasonic bath, dried with absorbent paper, and polymerized in a photopolymerizer (Anycubic). Different post-curing times (no curing, 16 minutes, 32 minutes, and 1 hour) were applied for FT-IR analysis, Knoop microhardness, color and translucency analysis, flexural strength, and scanning electron microscopy (SEM). The remaining tests were conducted with a standardized post-curing time of 1 hour.
2.2. FTIR-spectroscopy (Fourier-Transform-Infraroodspectroscopie)
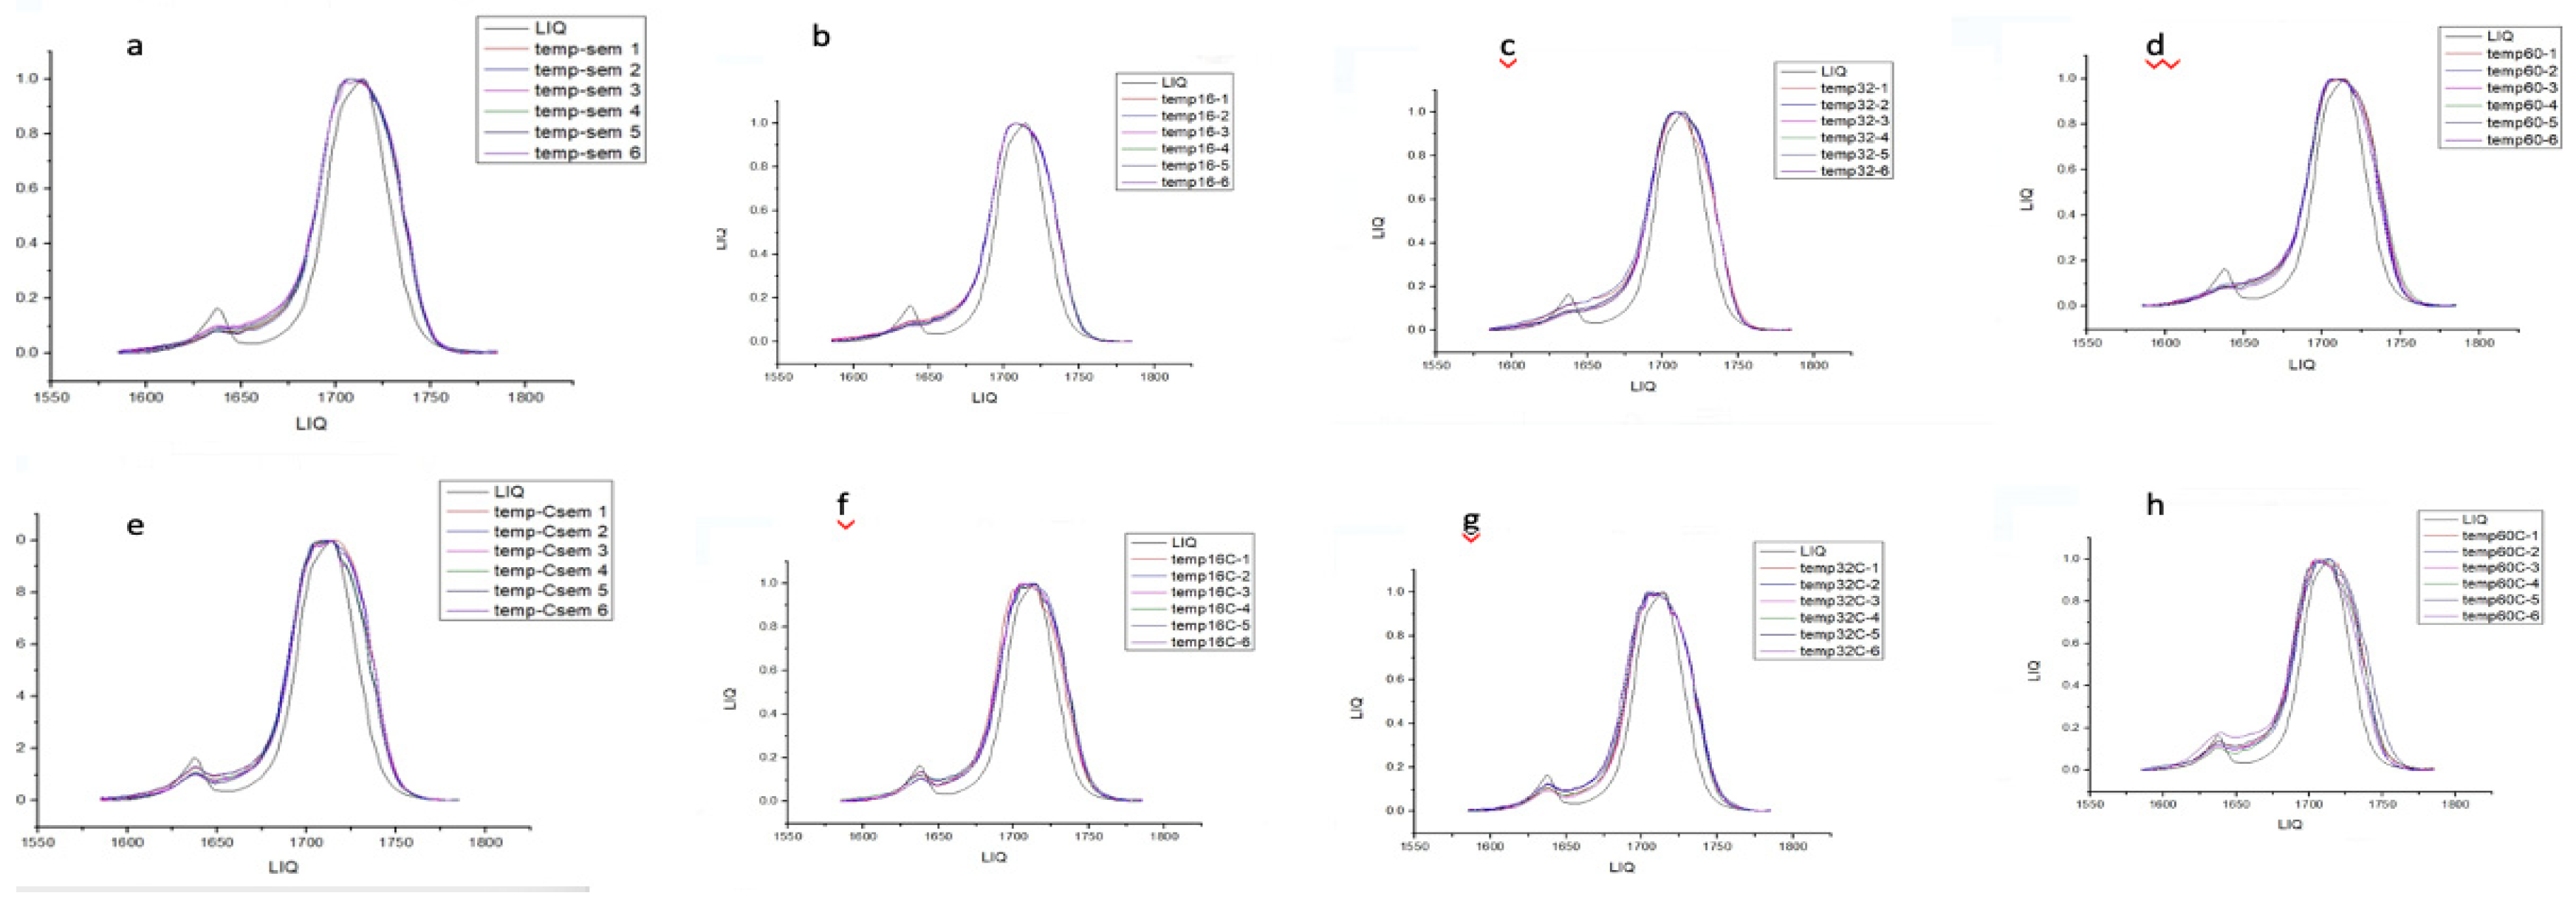
The samples were printed in bar format with dimensions of 25 x 10 x 3 mm and cured for different times (no curing, 16 minutes, 32 minutes, and 1 hour). Immediately after curing, the samples were cleaned with isopropyl alcohol to remove residual monomers and dried with absorbent paper. The polishing of the samples was standardized and carried out using rubber points with three different grits (coarse, medium, and fine) and a felt disc for final polishing using an electric motor. Immediately after polishing, the samples were sectioned. In this way, FT-IR readings were taken at different points on the samples (surface and center), in addition to readings of the liquid material for baseline analysis.
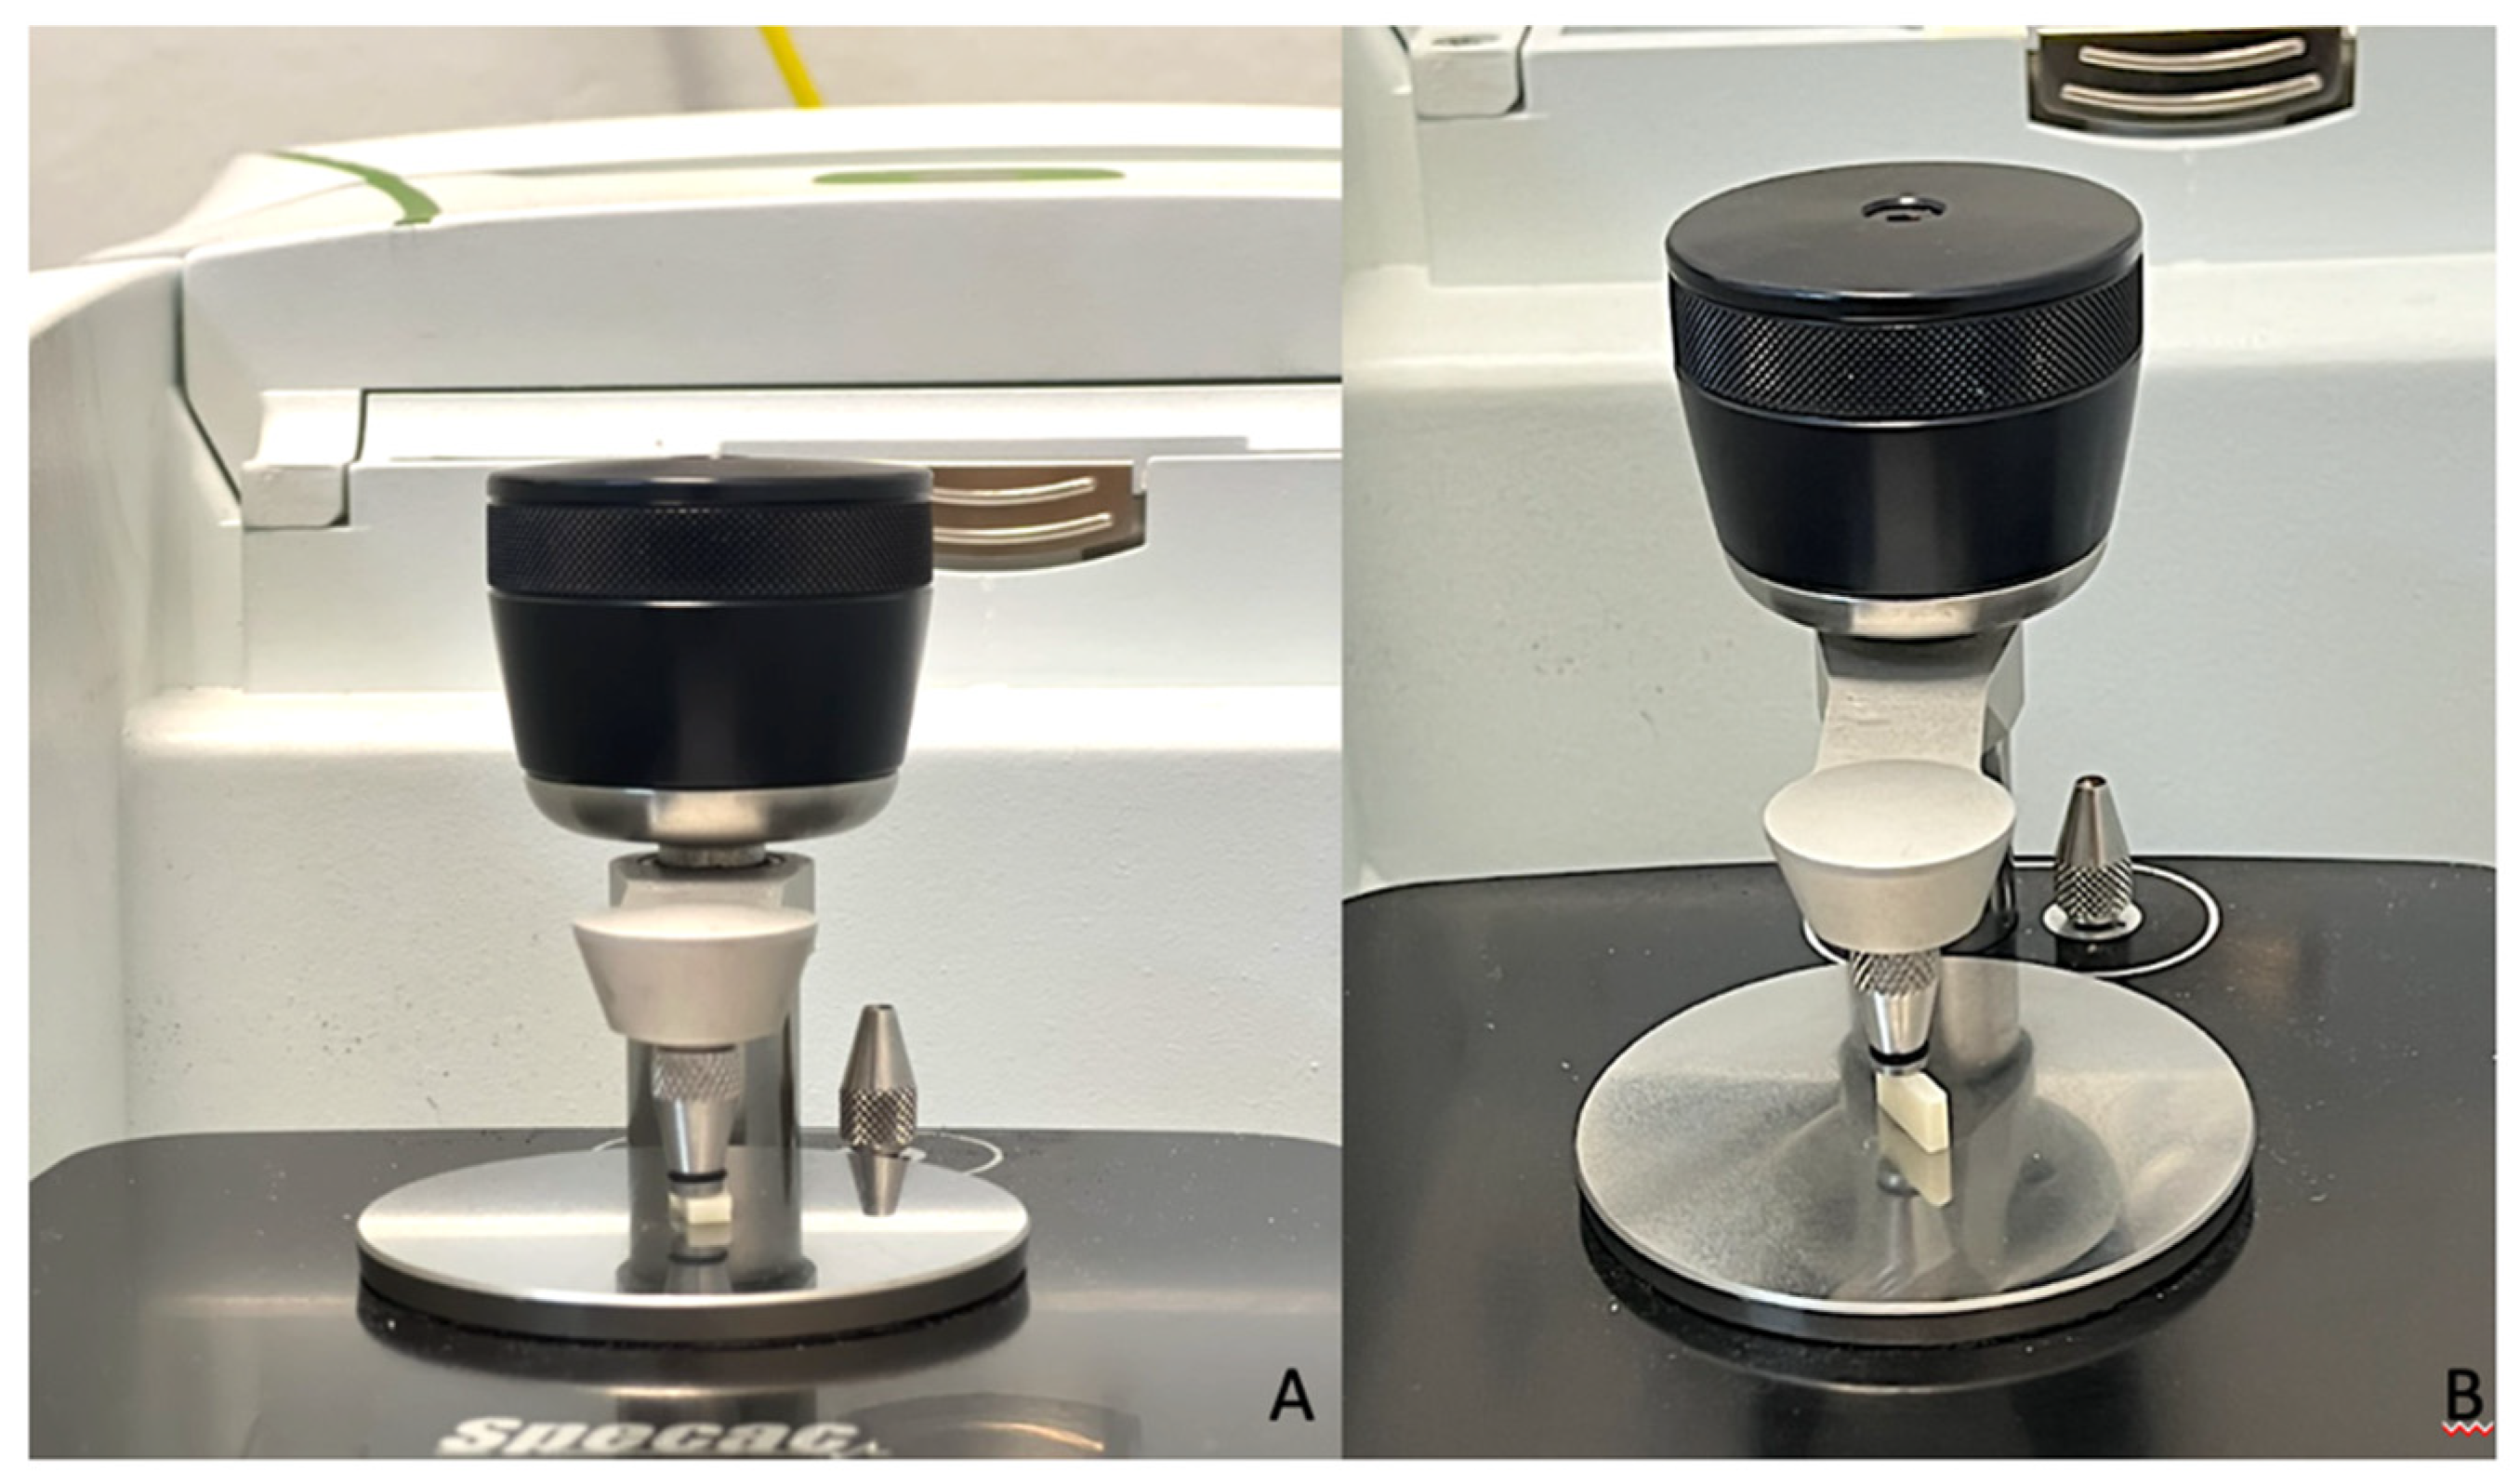
The spectrum was recorded in absorbance mode using a diamond crystal plate and obtained with a resolution of 4 cm⁻¹ in the spectral range of 500–4000 cm⁻¹. The experiment was conducted three times for each of the evaluated groups (
Figure 1). In each spectrum, the absorption band heights of aliphatic and aromatic C=C bonds were measured at 1585 and 1785 cm⁻¹, respectively. The degree of conversion (DC) was calculated using the formula described in the literature [
18].
2.3. Scanning electron microscopy
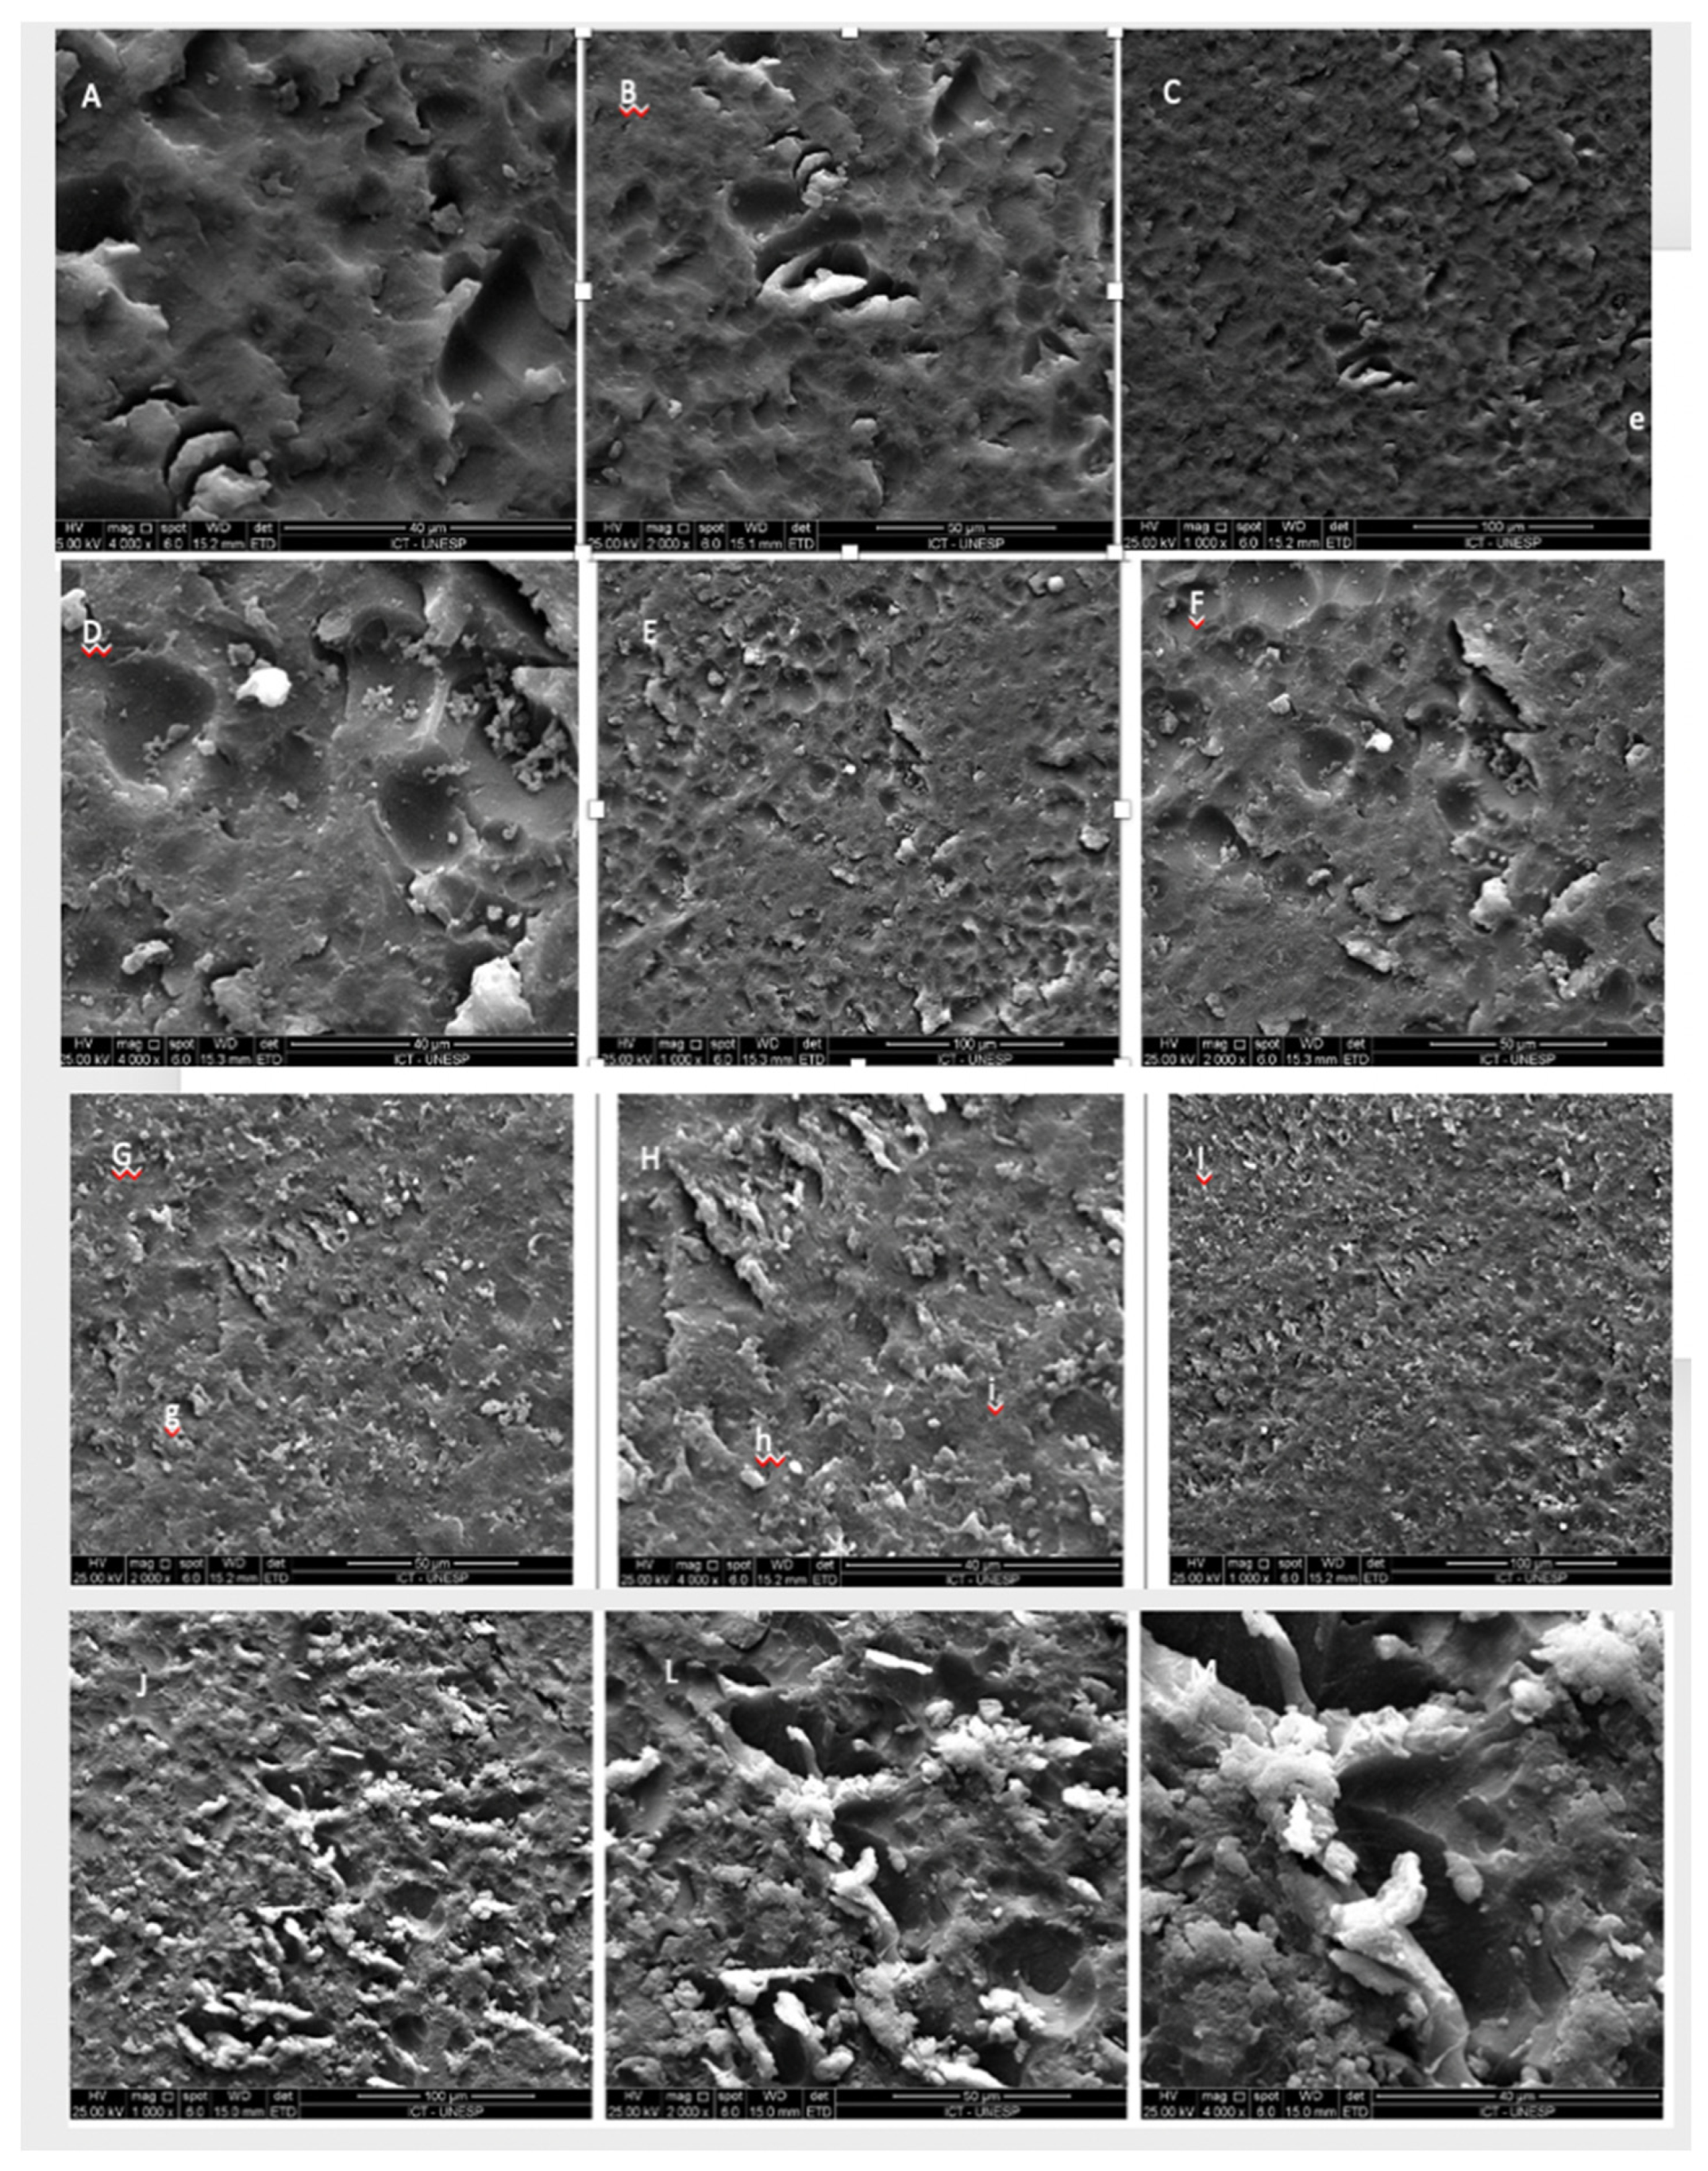
The samples were cleaned in isopropyl alcohol in an ultrasonic bath and dried with absorbent paper, then packaged in gauze without contact with the operator's hands to avoid contamination of the surface. After preparation, the samples were gold-sputtered. Four specimens were observed under the microscope (uncured, 16 min, 32 min, and 1 hour of curing).
2.4. Three-point bending flexural strength
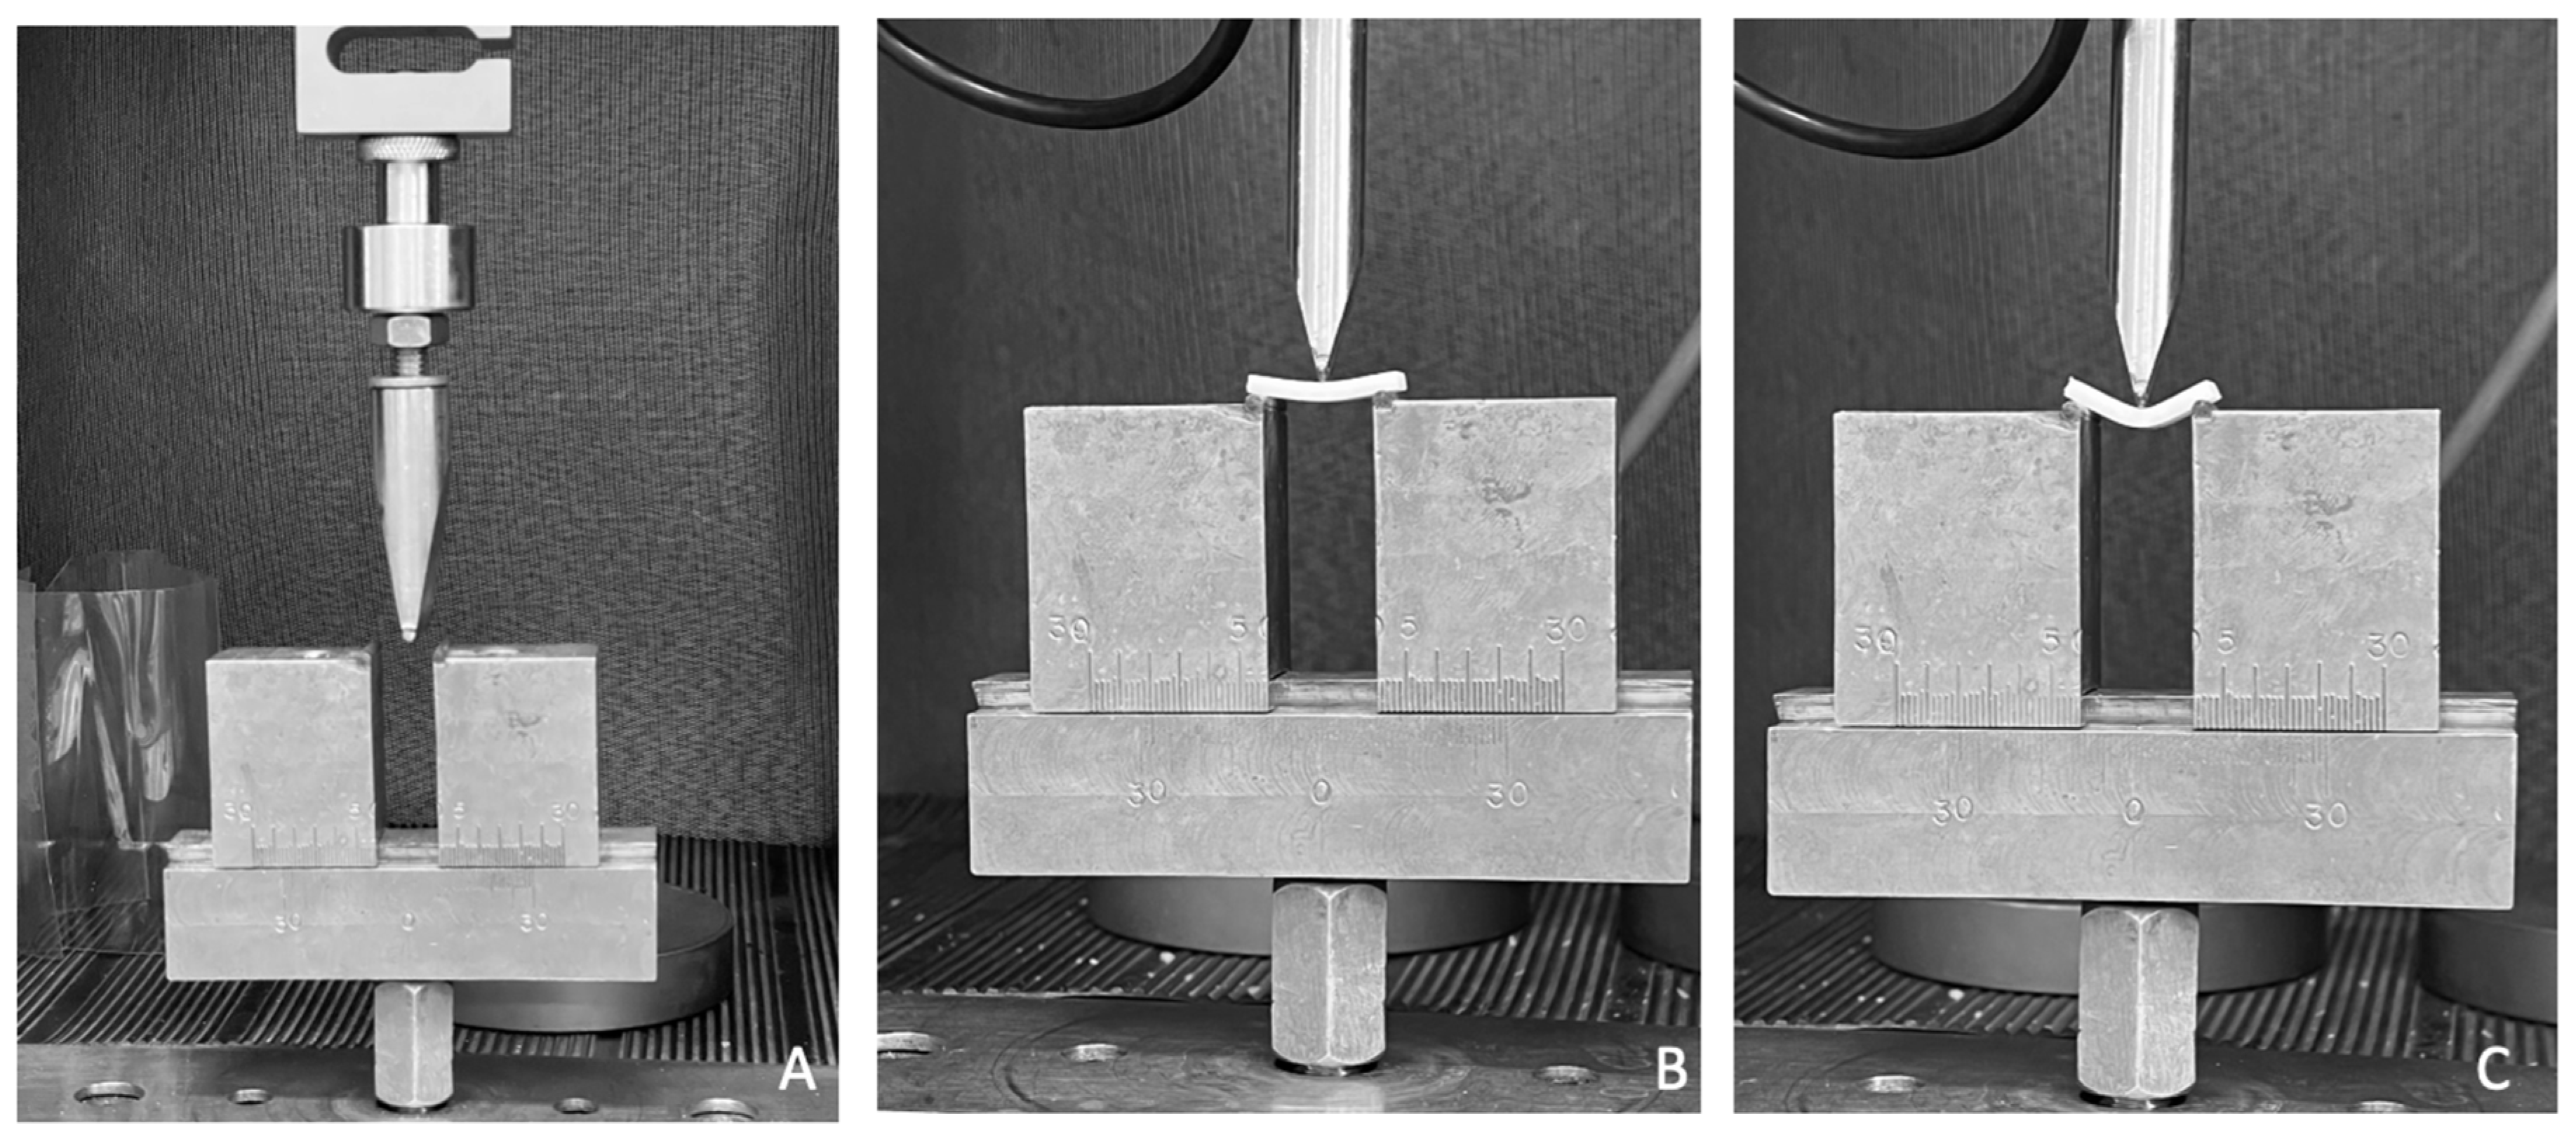
The samples were designed in Rhinoceros 6.0 and printed in the dimensions described in ISO 4049 (25x10x3 mm) on the W3D printer from Wilcos (Wilcos do Brasil - Petrópolis, RJ). They were positioned on a specific bending device at a distance of 20mm, and a load of 100 Kgf was applied until the specimen fractured. The values were obtained in N. The flexural strength (σ) was calculated in mega pascals using the following equation σ = 3Fl/2bh^2, where F is the fracture load in newtons, l is the span between supports in millimeters, b is the width of the specimen in millimeters, and h is the height of the specimen in millimeters.
Figure 2.
A universal testing machine configured for the flexural strength test; A: specimen positioned for the start of the bending test; B and C: images showing the deformation of the specimen before fracture.
Figure 2.
A universal testing machine configured for the flexural strength test; A: specimen positioned for the start of the bending test; B and C: images showing the deformation of the specimen before fracture.
2.5. Knoop microhardness
For microhardness analysis, a Knoop indenter was used in the microhardness tester (Shimadzu HMV-G21DT). The specimens were 12x12mm squares printed on the Anycubic printer following the standards described in
Table 2. In the test, a load of 300 gr was applied for 15 seconds [
16], and 3 indentations were made at 3 points on the surface. The test was repeated after the hydrothermal aging of the samples carried out in a thermocycler (Biopdi Termocycle), in which 2 thousand cycles were performed in baths of 30 seconds in water at 55 degrees and baths of 30 seconds in water at 5 degrees. The obtained values were evaluated by one-way ANOVA and Tukey 95%.
2.6. Color and Translucency Analysis
For color analysis, 3D files in the form of 12x12 cm disks were created in Rhinoceros software version 6.0. The file was exported in STL format, and in the printer slicing software, printing patterns were determined (described in
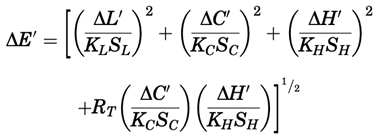
Table 2). In this way, 40 disks were printed. After printing, the samples were cleaned with isopropyl alcohol and cured in a photopolymerizer for different times (no cure [control], 16 min, 32 min, and 1 hour). Twenty-four hours after curing, two readings were taken on each disk in the spectrophotometer (Easy shade, VITA Zahnfabrik), against black, white, and gray backgrounds, to assess color and translucency based on the CIELab system. After the readings, the samples were individually packaged, labeled, and aged in a thermocycler (Biopdi Termocycle) for 2 thousand cycles in baths of 30 seconds in water at 55 degrees and baths of 30 seconds in water at 5 degrees. The values found before and after aging were treated using the formula below:

4. Discussion
Additive manufacturing is gaining increasing prominence in dentistry, given significant advancements in printing technologies and materials. Therefore, understanding the properties of polymers used for prostheses and other structures is crucial to ensure effectiveness and quality. This study evaluated the mechanical and optical characteristics of a temporary printing resin.
Mechanical properties of printing resins have been relatively understudied, considering the vast array of commercially available materials, the number of technologies, and the recent implementation and clinical use of additive manufacturing. The technology used in this study was Direct Light Processing (DLP), widely available commercially and clinically used. The chosen material was Resilab Temp (Wilcos do Brasil), a resin recommended for temporary prosthesis fabrication.
Several factors, such as printing parameters, layer thickness, slicing, printing orientation, material composition, and post-processing parameters, directly affect the final product [
19]. Therefore, this study assessed the influence of three different post-curing times on mechanical analyses. Based on the results, the post-processing times with the best performance for flexural strength were 16 minutes and 1 hour, with strengths exceeding 80 MPa. Similar values were found in other studies comparing conventional, milled, and printed polymers, which conducted flexural strength and surface hardness tests.
The flexural strengths of the evaluated resins were as follows: Nextdent Base with 84.5 MPa, NextDent's Ortho Rigid with 75 MPa, and Bego's Varseo Wax with a superior value of 117.2 MPa. These results are related to resin compositions. Varseo Wax from Bego, for example, has a higher resistance value due to the addition of ceramic nanoparticles. Although the other brands have similar values, their clinical indications differ from the resin used in this study, and the study did not provide information on printing patterns and printer types, preventing direct comparison [
20,
21].
Regarding surface hardness, the mentioned resins had different averages, ranging from 123.19 MPa for NextDent Base to 28.5 MPa for Varseo Wax. This value is similar to the Knoop microhardness result for Resilab Temp used in this study, with 28.4 MPa. This hardness value decreased after sample aging, consistent with other studies. Soto-Montero et al. [
21] compared four types of printing resins (Resilab Temp - Wilcos do Brasil, Cosmos - Yller, Prizma - 3D Bio, and Smart Print - SMA Tech), all indicated for temporary restorations, with the study achieving better results for Resilab Temp and Prizma with 15 minutes of curing.
Factors such as construction orientation and printing angle affect material properties, product accuracy, and even biocompatibility. The printing angle used for sample manufacturing in this study was 120 degrees, following Park et al. [
2], who showed that angles of 135 degrees and 120 degrees reduce internal gaps, increasing adaptation and stability. Osman et al. (2017) stated that the 135-degree angle is best for DLP printers, enhancing accuracy [
22]. Meanwhile, Alharbi et al. (2016), using different angles in molar crowns, claimed that the 120-degree angle provides greater dimensional precision and requires less support surface in crowns [
23].
The degree of conversion is crucial for investigating resin mechanical performance and biocompatibility since it is directly related to material fracture resistance, hardness, and solubility. A low composite conversion can result in free, unreactive monomers that may dissolve in humid environments, leading to material degradation and compromising the restoration's longevity. The degree of conversion obtained from FT-IR analysis in the best-performing group was 46% on the surface and 37% at the center of samples with 1 hour of post-curing. In contrast, Bergamo et al. [
24] found a conversion degree of 66.5% in a printing resin (Cosmos Yller) with the same indication as the resin used in this study, with the conversion degree increasing by 5% after aging. The optical properties of the temporary material must be satisfactory, especially for restorations used in the aesthetic sector, requiring stability and resistance to possible color changes when exposed to the oral environment, which is constantly in contact with different substances and temperatures. This study conducted color and translucency analyses of Resilab Temp immediately and post-processing at different times (60 minutes, 32 minutes, 16 minutes, and without curing) and after thermal aging.
This study revealed no difference between post-curing times regarding color change and translucency. A previous study [
20] evaluated four different types of printing resin (Cosmos-Yller, Prizma-3D Bio Prov, Smart Print-SMA Tech, and Resilab Temp-Wilcos do Brasil) using a methodology similar to ours, comparing post-processing times (0, 5, 15, and 20 minutes) and obtained different results regarding color change, comparing time and resins. Analyzing isolated post-processing times and the resin used in our study (Resilab temp), we noted similar results, showing stability in this material, while regarding translucency, the authors mentioned differences between resins but did not indicate differences between post-curing times for each resin.
There is a reference value in the literature regarding acceptability and perceptibility levels for color changes. Paravina et al. [
25] define that ΔE00 values of 0.80 refer to the 50:50% perceptibility level, and ΔE00 of 1.80 refers to the 50:50% acceptability level. Following these reference values, all groups are within the acceptability level except the aged 32-minute group. However, only the 1-hour group is within the perceptibility level. It is essential to reiterate that this study used CIEDE2000, which corrects CIElab, improving acceptability and perceptibility determination. In addition, it would be pertinent to consider the influence of association printing parameters, such as layer thickness and curing time, on the mechanical properties of the 3D-printed resin, as well as the possible impact of alternative post-curing methods [
26].
