Preprint
Article

Shot Peening Effect on Wet Sliding Wear in 0.9% NaCl of 17-4PH Stainless Steel Fabricated by Additive Manufacturing

Altmetrics

Downloads

146

Views

51

Comments

0

A peer-reviewed article of this preprint also exists.

Submitted:

08 February 2024

Posted:

09 February 2024

You are already at the latest version

Alerts
Abstract
17-4PH steel is a widely used grade for precipitation hardening. The growing demand for modern materials with high corrosion and tribological resistance has led to its increased use for the production of medical devices. With additive manufacturing (AM), complex functional shapes can be achieved for medical applications. Direct laser metal sintering (DMLS) technology makes it possible to obtain products with complex architectures, but it also faces various challenges, including imperfections in the surface layer of products due to the use of 3D printing technology itself. This study analyzed the abrasive wear resistance in 0.9% NaCl solution of 17-4PH steel produced by DMLS technology. In order to improve the properties of the surface layer after 3D printing and to improve the tribological wear resistance of the steel, a shot peening (SP) process using CrNi shot and ceramic beads (based on ZrO2) was applied. The chemical and phase composition of the materials obtained, Vickers hardness, surface roughness, and microscopic and SEM imaging were investigated. Tribological tests were carried out using the ball-on-disc method, and the surfaces that showed traces of abrasion to identify wear mechanisms were subjected to SEM analysis. The chemical composition was in accordance with the EOS manufacturer's declarations, and the presence of austenite and martensite was found in the post-production state, while a higher content of martensitic phase was found in the case of peened samples due to phase transformations. The surface hardness of the peened samples increased more than twice, and the post-treatment roughness increased by 12.8% after peening CrNi steels and decreased by 7.8% after peening ZrO2 relative to reference surfaces. Roughness has an identifiable effect on sliding wear resistance. Higher roughness promotes material loss. After the SP process, the coefficient of friction increased by 15.5% and 20.7%, while the wear factor (K) decreased by 25.9% and 32.7% for the samples peened with CrNi steels and ZrO2, respectively. Abrasive and adhesive mechanism were dominant featured with slight fatigue. The investigation showed a positive effect of SP on the tribological properties of DMSL 17-4PH.
Keywords: 
Subject: Engineering  -   Mechanical Engineering

1. Introduction

Steel 17-4PH alternatively termed as AISI 630 (1.4542) is designed for precipitation hardening by which it is possible to improve the strength parameters of this alloy [1]. This is a kind of steel which is characterized by good corrosion resistance and high strength. When produced by conventional methods such as casting, it shows a martensitic structure, while after additive manufacturing it is an austenitic-martensitic steel often with a ferrite [2]. The final microstructure depends on the composition of the steel powder as well as the manufacturing condition and parameters, thus, it is hard to predict the final martensite to austenite ratio [3]. Studies have shown that additively-manufactured steel has similar and sometimes even better mechanical properties than the steel produced by traditional methods [4]. Additive technologies allow the production of structures often impossible to produce by traditional methods and, despite the high cost, are cost-effective for a small batch or unit production [5]. According to Laleh et al. [6] the metal parts built directly from AM metal are often not ready for use in the as-built state, as their properties may not be optimized for their application, and the processing steps of final AM metals can account for about 27% of any costs. Despite its many advantages, the DMLS process encounters some imperfections related to the state of the surface layer of the products, among others. Even taking into account the optimal parameters of the printing technology recommended by manufacturers of metal powder laser sintering systems, the surface layer of products may contain unmelted grains of metal powder or pores, which are formed as a result of the collapse of the welding pool [7]. The above-mentioned surface imperfections can reduce the performance of such products. Most damage to the machine parts (stress cracks, abrasive or corrosive wear) originates from the defects occurring precisely in the surface layer. Research [8,9] for alloys dedicated for medical applications indicate that favorable surface layer properties can be obtained by shot peening treatment. The effect of SP treatment of 17-4PH steels from additive technologies on tribological characteristics is not yet sufficiently explored. Most researchers focus on heat treatment as a method that is claimed to improve the properties of the steel [10]. As studies have shown, it does have a significant effect. However, the properties of 17-4PH steel can also be significantly improved by SP [11]. This is sometimes a highly desirable treatment that allows hardening of selected outer surfaces leaving a ductile and elastic core. SP is a peening process that uses the kinetic energy of the shots to plastically deform the surface being shot, usually imparted to them by a jet of compressed air [12]. There are also other methods such as ultrasonic impact peening, laser shot peening or cavitation peening [13]. The mechanism of strengthening during the SP process increases the number of dislocations in the near-surface layer, grain fragmentation occurs, residual compressive stresses are introduced and dislocation density is increased [14]. The result has the potential to reduce roughness, increase hardness [15] and improve fatigue strength [16]. The SP process also reduces structural defects such as cracks, voids and gas pores [17]. These properties, as well as easy implementation, make it a highly effective tool for improving resistance to tribological and fatigue processes [18]. 17-4PH steel is used for the production of biomedical devices as knee-replacement surgery device, surgical forceps, retractor blades and rings set used in a spinal surgery procedure, etc. [19]. Therefore, bearing in mind the above-mentioned areas of application, among others, resistance to abrasive wear in the environment of body fluids seems to be crucial. The corrosion resistance itself has already been studied by the authors of this paper, where the results were reported in several [20,21]. At that time, rather promising results were obtained for CrNi, ZrO2 and glass shot surfaces with regard to corrosion behavior. Very few researchers have attempted to describe the abrasive wear resistance of 17-4PH steel and especially when it was additively manufactured. Most of research in this field is conducted under ball-on-disc condition [22,23,24]. Esfandiari i Dong [23] studied the effect of wear resistance of heat-treated 17-4PH steel produced by conventional production (forming), which was additionally subjected to plasma nitrating. A ball-on-disc friction pair system was used in combination with dry sliding conditions combined with 3.5% NaCl solution. Abrasive and adhesive wear were identified for the non-nitrided samples. In contrast, the non-nitrided surfaces were worn significantly milder and characterized by micro-abrasion and oxidation wear.
Esfandiari and Dong [23] studied the effect of wear resistance of heat-treated 17-4PH steel produced by conventional production (forming), which was additionally subjected to plasma nitrating. A ball-on-disc friction pair system was used in combination with dry sliding conditions combined with 3.5% NaCl solution. Abrasive and adhesive wear were identified for the non-nitrided samples. In contrast, the non-nitrided surfaces were worn significantly milder and characterized by micro-abrasion and oxidation wear.
Sanjeev et al. [25] compared laser based powder bed fusion (LB-PBF) 17-4PH steel with the wrought one. Wear performance was investigated using ball-on-disc method in dry sliding conditions with the load of 10 N and 30 N as well as in lubricated condition (specimens were submerged in oil). It was noted that mostly abrasive mechanisms occurred. Lower wear rates were observed for LB-PBF in dry sliding conditions when compared to the wrought material. The LB-PBF 17-4PH SS, on the other hand, exhibited greater wear compared to the wrought 17-4PH SS in lubricated condition. This behavior was explained by the thinner lubricant layer formed on the surface as a result of the greater surface roughness of the LB-PBF samples. Adhesion was the dominant wear mechanism in the dry condition, while abrasion and surface fatigue were the wear mechanisms in the lubricated condition, regardless of the technology in which the steel samples were manufactured. The papers [25,26] pointed out the poor tribological properties of 17-4PH steel for forming (due to its lower surface hardness) compared to typical high-carbon bearing steels. On the other hand, an earlier study by the authors [21] indicates that surface hardness can be improved by shot peening treatment which in turn translates into higher resistance of DMLS 17-4PH under technically dry friction conditions. Not only can surface layer condition and the environment influence tribological behavior, but the key ones according to Mahesh et al. [26] are three factors: normal load, sliding distances and sliding velocity. They demonstrated, that load is a more dominant factor relative to the sliding distance and sliding velocity in affecting the wear volume loss and specific wear rate.
As far as the authors' knowledge goes, no description on the tribological behaviour wear resistance in 0.9 % NaCl solution of this steel grade produced with DMLS technology is presented in the literature, especially in the context of its uses as medical devices. Above that, most of the research have been conducted in the heat-treated state or for steel produced by traditional methods. Giving the gap in this field, the authors have undertaken this study to investigate DMLS 17-4PH steel wear resistance in 0,9 % NaCl solution. Additionally, the novelty of this work is the use of steel directly after DMLS fabrication and the use of the SP process to improve its tribological properties under environmental conditions.

2. Materials and Methods

2.1. Material and treatments

Material manufacturing was performed with DMLS technology, and 6 samples were made using an EOS M280 printer. GP1 gas atomized powder by EOS was also used for fabrication with the following process parameters: laser power was 200 W, thickness of the sinter layer was 0.02 mm, the laser spot size was 0.1 mm. Nitrogen was used as a shielding gas during fabrication. The obtained specimens were in the shape of disks with a diameter of 30 mm and a height of 6 mm. After manufacture, the test material was cleaned in an ultrasonic cleaner and then air dried with compressed air. Figure 1 shows the design of the resulting discs highlighting the top and lateral surfaces. SEM images revealed unmelted powder particles along with satellites and impurities on the lateral surface. The top surface revealed voids defects (which are formed by the collapse of the welding pool) and also not entirely melted powder particles along the splashes. Half-overlapping laser paths and scales resulting from the cooling of the weld pool were also revealed. Although the disks were printed according to the optimal parameters recommended by the manufacturer EOS, they bear surface defects typical for this additive method. Therefore, such surface characteristics of the obtained specimens further justify the need for shot peening treatment.
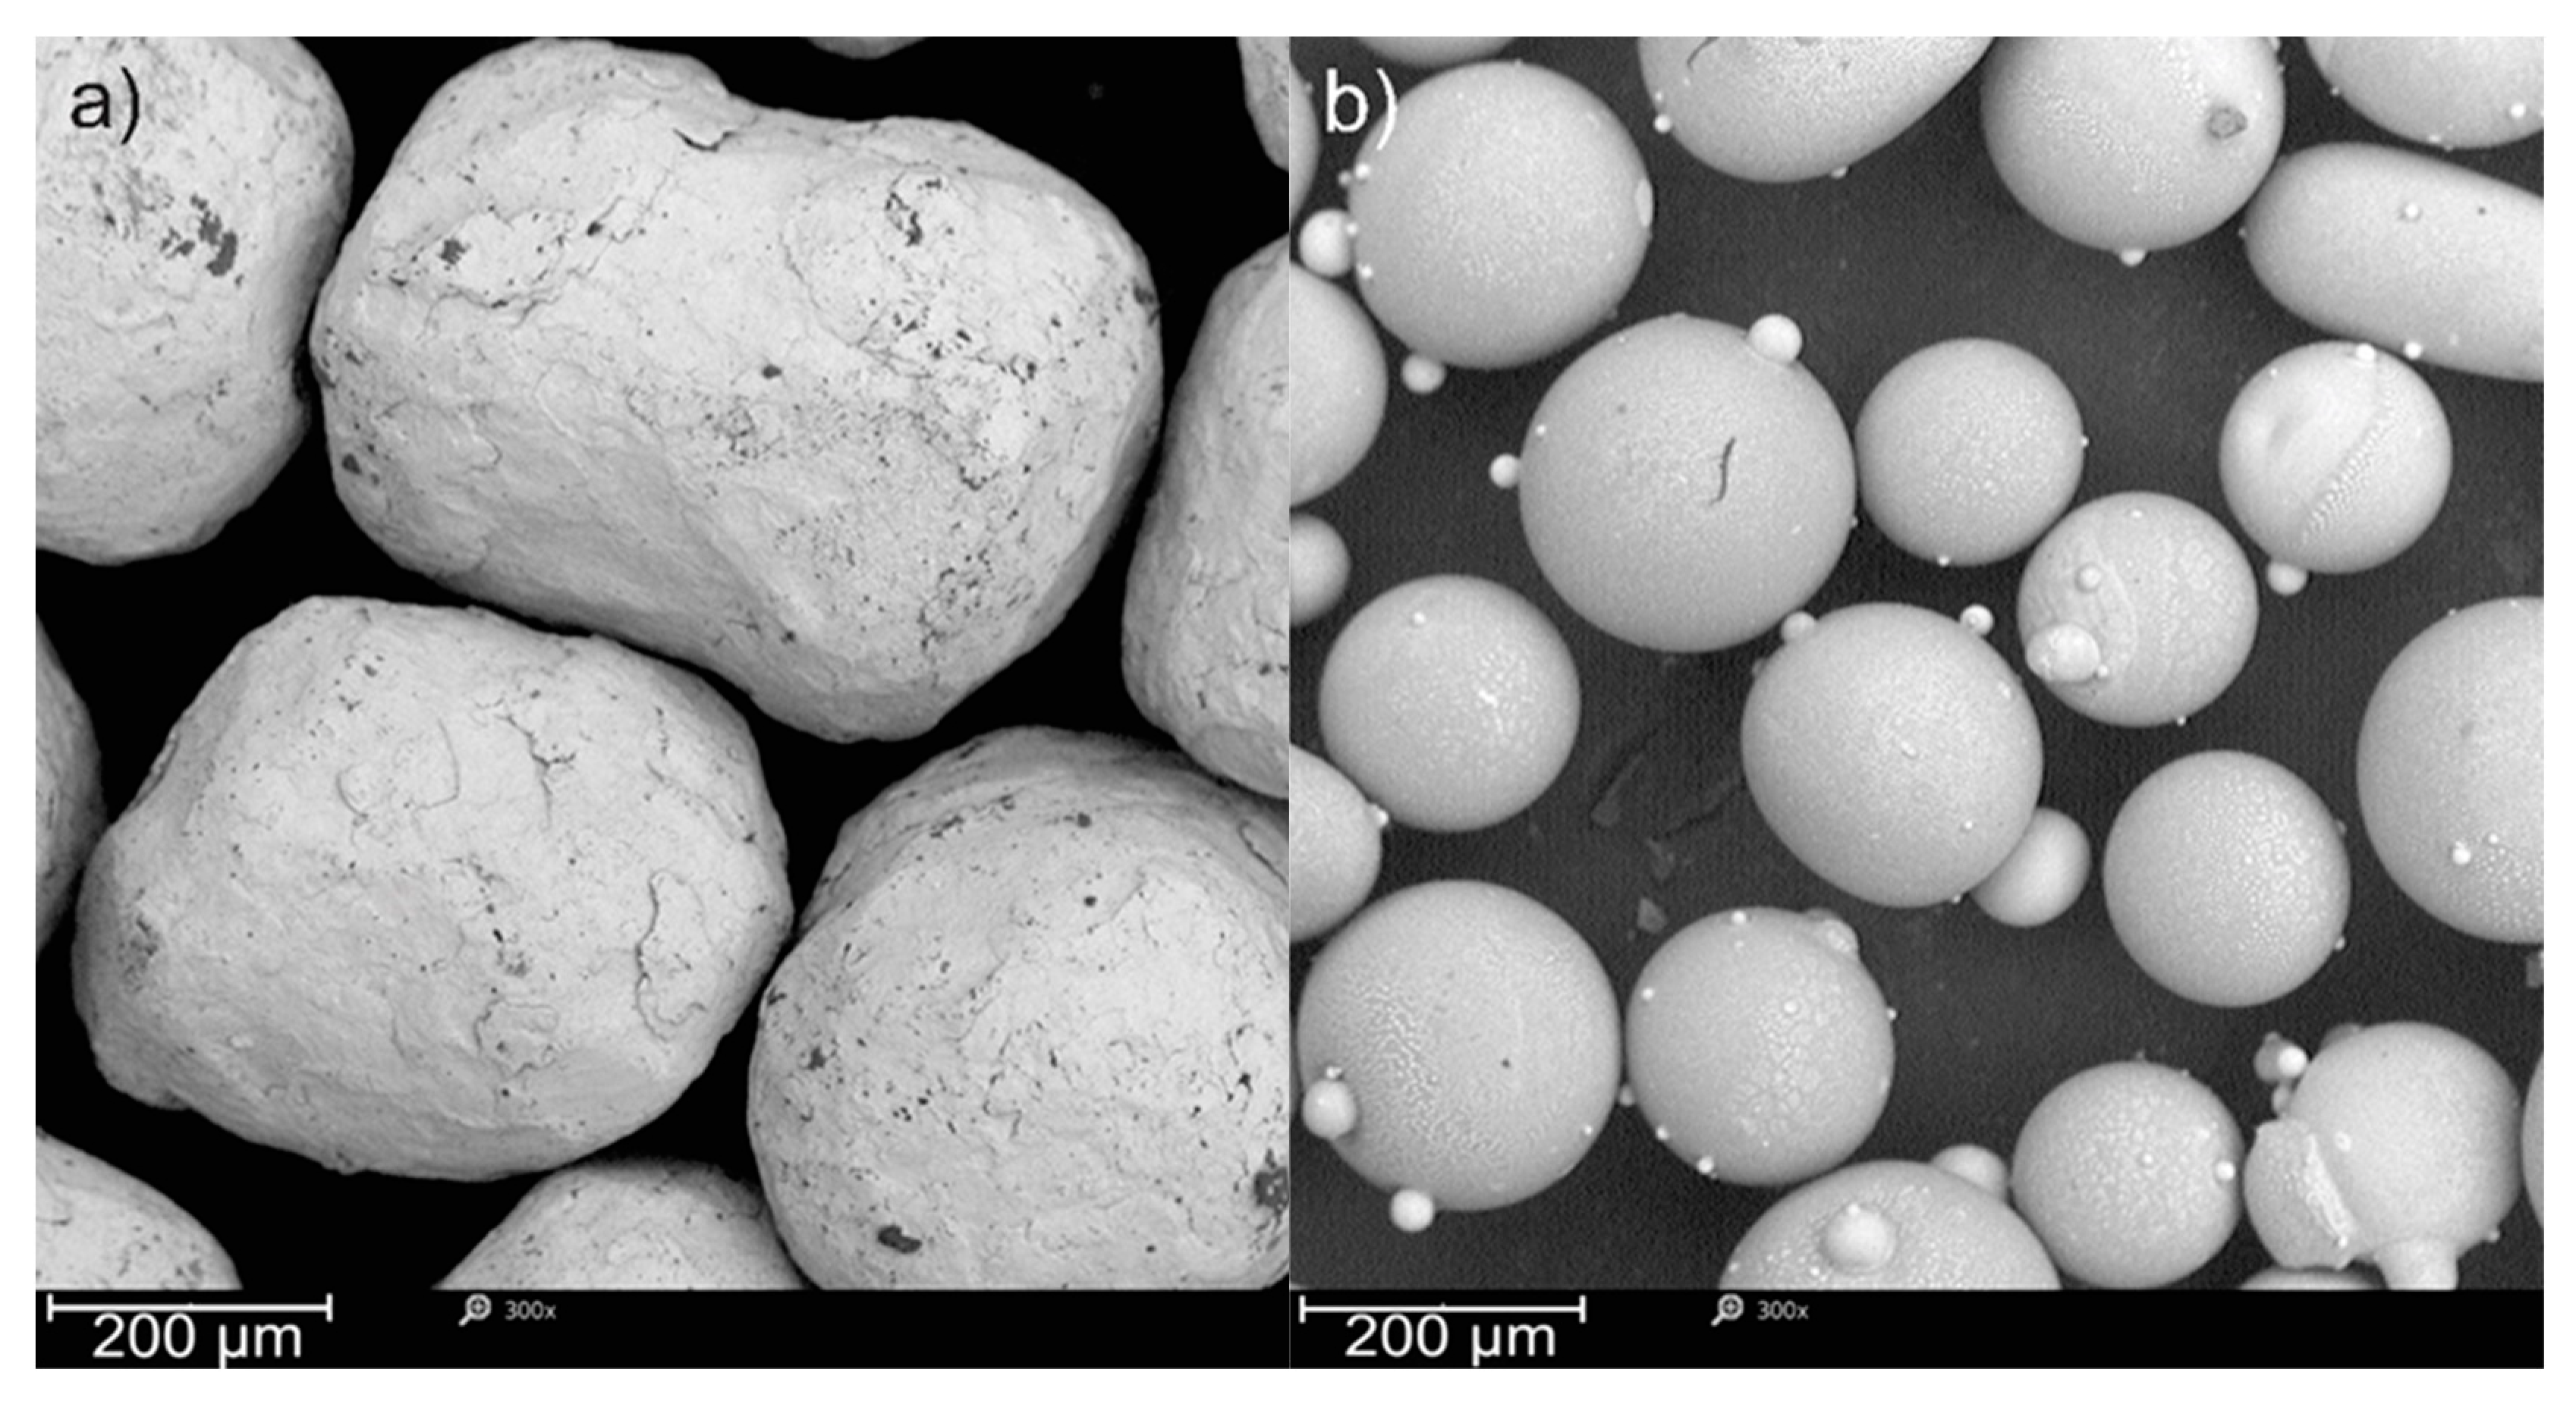
Following the fabrication of the specimens, the peening process with ceramic and steel balls shown in Figure 2 and Table 1 was carried out at constant parameters. Pressure of 0.4 MPa, the peening time of 60s and the surface nozzle distance of 20 mm have been applied. SP was performed on the top surface of the samples (top surface) using a Peenmatic micro 750S (IEPCO, Switzerland). Figure 1 shows the morphologies of the powders used in the SP process. The powders (Kuhmichel Abrasiv GmbH) used were characterized by an average grain size of 400-900 μm for CrNi shots, while the average size of ceramic particles was about 125-250 μm. The ceramic particles were mainly characterized by a spherical shape with satellites, while the CrNi shots particles were characterized by an irregular shape but close to the spherical one.

2.2. Characterisation

The chemical composition was investigated using the Magellan Q8 spark emission spectrometer. Five sparks burn-throughs were made for each sample to calculate the mean values. The chemical composition testing was performed in order to confirm that the used materials are within the specification of the manufacturer as well as ASTM A564 and ISO EN10088-1 standards.
In order to investigate the microstructural characteristics, the metallographic specimens were prepared. Specimen’s preparation was done by cutting the discs after peening and preparing the metallographic specimens that were flooded with epoxy resin. The specimens were ground against the papers ranging from #600, #800, #1200 #1800 #2200 grit and then polished with a 3 µm diamond suspension. Etching was carried out in Kalling's 1 and Marble's reagent, after which the samples were polished again. Reagent selection was based on ASTM E407-07(2015). Metallographic specimens were examined using a Nikon MA200 optical microscope at x200 magnification [20]. The surface texture morphology after shot peening tests was evaluated using a Phenom ProX scanning electron microscope (Phenom World, Waltham, MA, USA) with EDS at 500x magnification using topographic mode.
The phase composition was investigated in room temperature using a high-resolution X-ray diffractometer (XRD, Empyrean, Panalytical) with Cu K-α radiation and Ni-filter with a generator voltage of 40 kV and a current of 30 mA. The specimen parameters were determined with the use of the High Score Plus software package (Panalytical). A proportional detector was used for detecting radiation. The specimens were measured in the Bragg–Brentano geometry over a range 2θ = 30° to 100° with step size of 0.01° and counting time of 6 s per data point were applied. The fixed divergence slit of 1/4° was used together with the beam mask of 5 mm. The crystalline phase in the samples was identified using the High Score Plus software package with Crystallography Open Database.
To determine the effect of shot peening process on roughness, the roughness tests were conducted using a Dektak 150 contact profilometer (Veeco Instruments, USA). Measurements were made using a stylus with a rounding radius of 2 µm at a measuring length of 5 mm and under a load of 3 mg; twelve measurements were made for each sample at randomly selected locations. The average value was calculated from 12 measurements. To account for the effect of texture, there were made 6 horizontal and 6 perpendicular to the scanning direction of the laser beam.
Hardness measurements of the modified surfaces were made at load of 300gf - 2.942 N (HV0.3, respectively), dwell time was set at 15s, a Vickers's FM-700 micro-hardness tester with an ARS 900 automatic system (Future-Tech Corp., Japan) was used. Ten indentations were made for each group of specimens at randomly selected locations.
Wear tests were performed on a ball-on-disc tribotester (CSM Instruments, Switzerland) in a 0.9% NaCl solution (at 100 ml volume) at 22°C. Balls made of Al2O3 (hardness 1680 HV0.5) with a diameter of 6 mm were used as a counterbody. Three repetitions were performed, the tests were carried out under a load of 25N with a linear speed of 1.88 cm/s at a radius of 3 mm. The total test distance was 100 m, during which the change in the coefficient of friction was recorded. The degree of wear was determined based on the wear coefficient K:
K = W e a r   v o l u m e A p p l i e d   f o r c e   ×   s l i d i n g   d i s t a n c e m m 3 N 1 m 1
The wear volume was calculated according to [25] by integrating the area across the wear track profile (using the 12 measurements) and then multiplying by the circumference length of the track. The surface of the wear tracks of the tested materials after tribological tests was evaluated using a Phenom ProX scanning electron microscope.

3. Results

3.1. Structure analysis

High precision measuring instruments enable to establish chemical composition with sufficient accuracy. The chemical composition according to ASTM A564, EN10088-1 and test results is given Table 2. The chemical composition test revealed the chemical composition of 17-4PH grade steel in accordance with the manufacturer declaration. In accordance with ASTM A564 and EN10088-1 standards, the tested 17-4PH steel alloy meets the composition specifications quoted in the previously mentioned standards. In a previous study [20], the powder composition was similar to this obtained in the final element and are similar to obtained in this study. However, the obtained chemical composition results differ slightly when C and Cu content is compared to study on GP1 powder reuse [27].
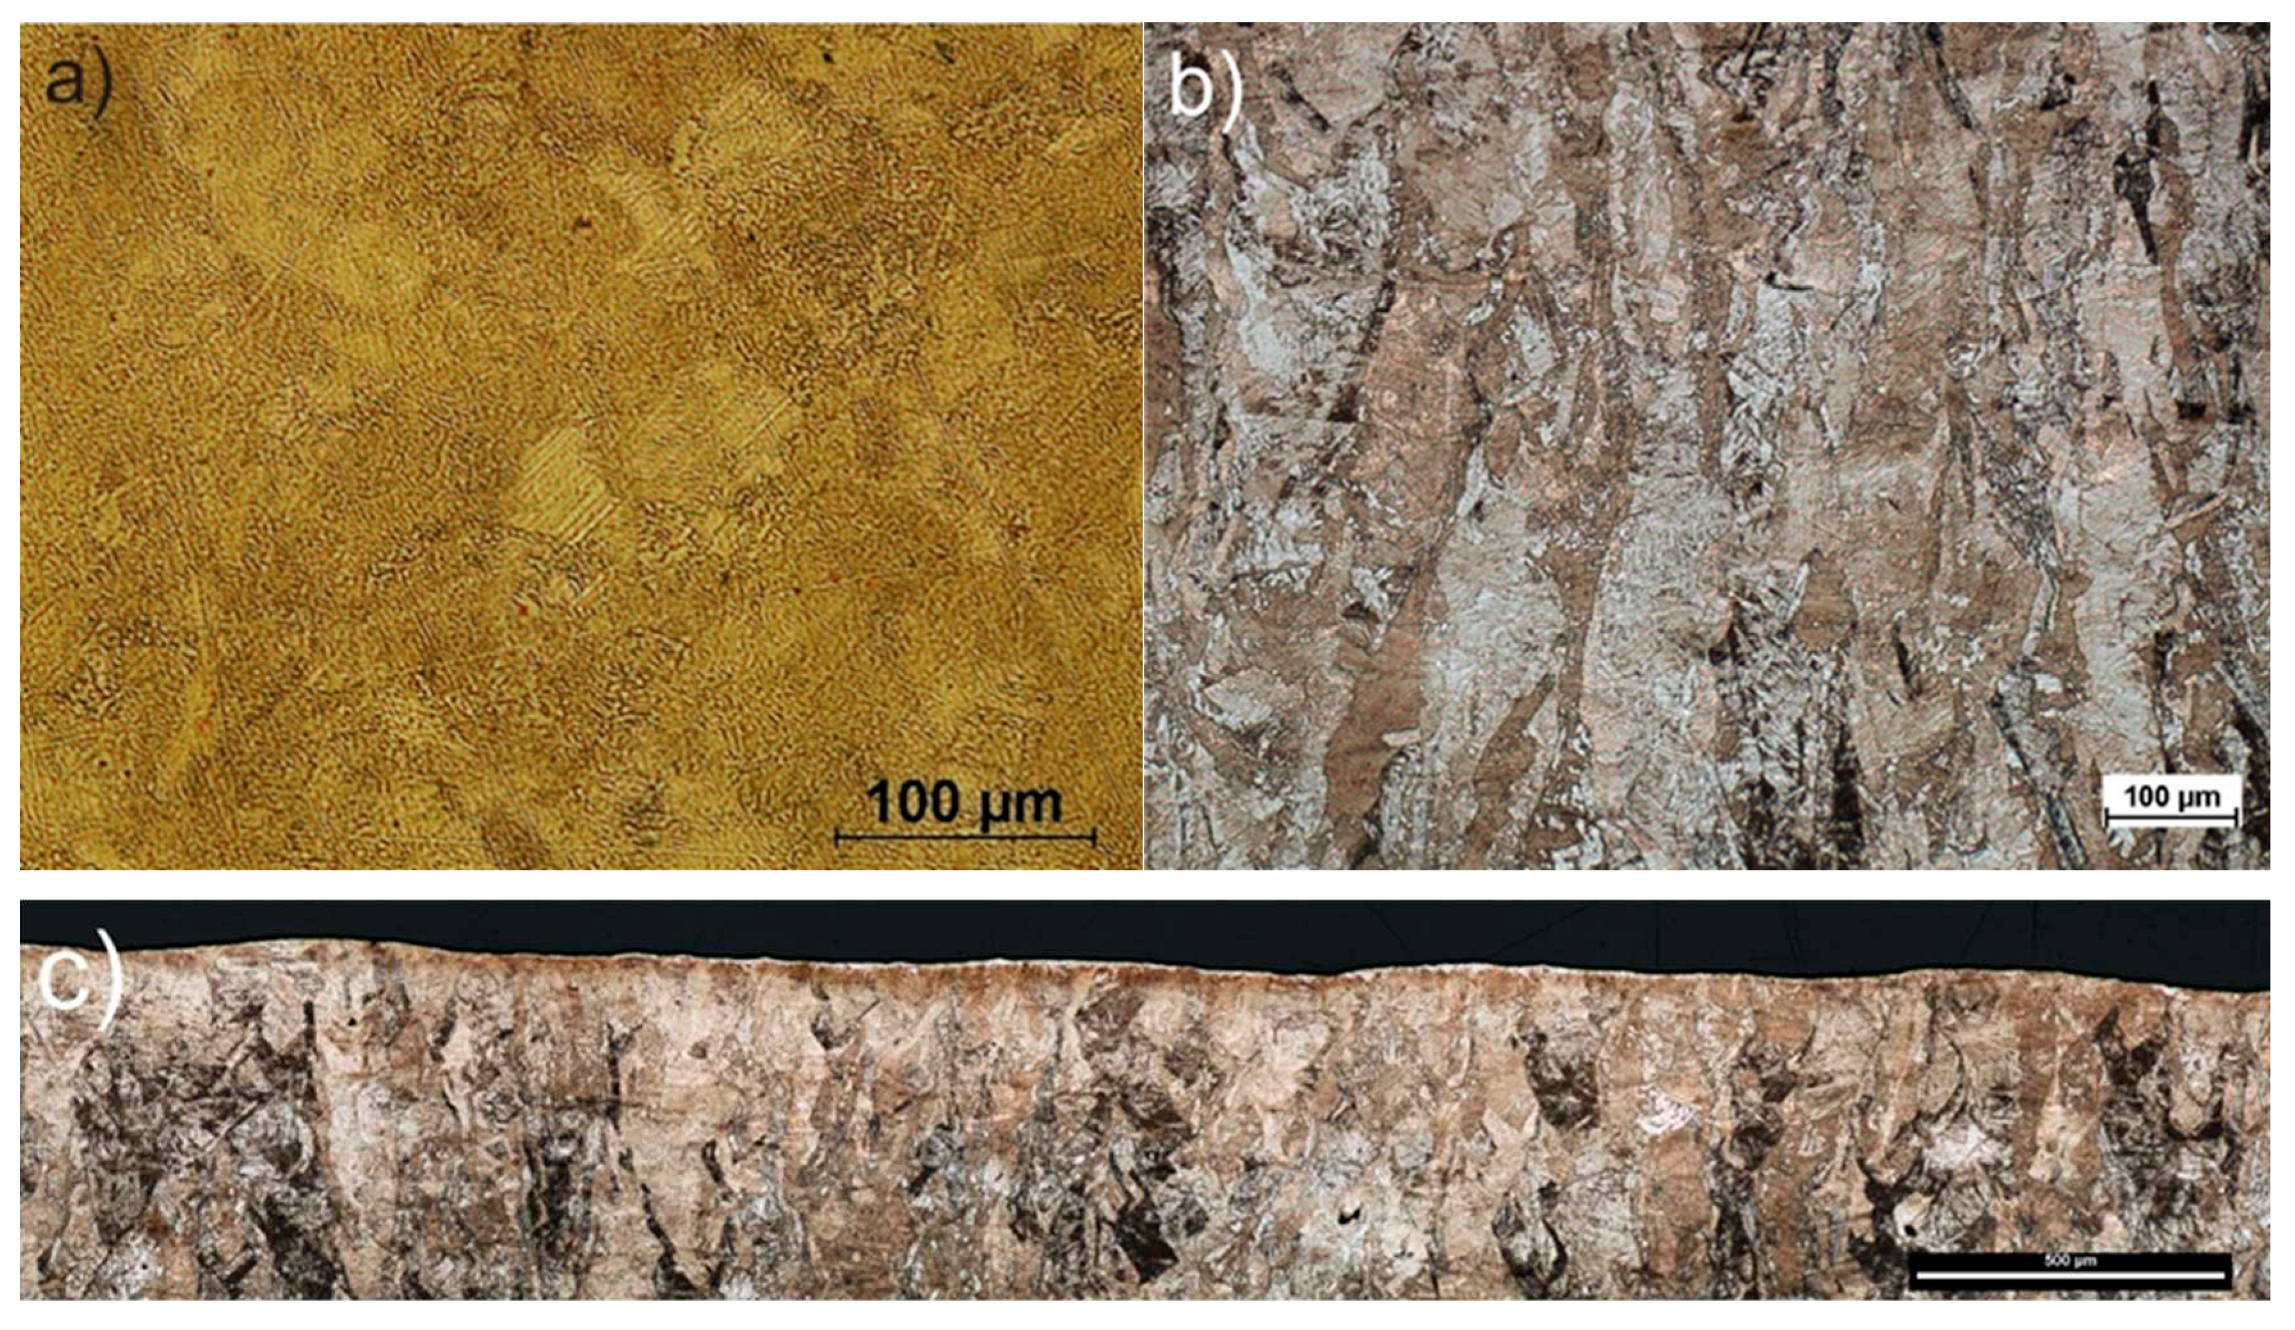
The microstructures shown in Figure 3 revealed a fine-grained austenitic-martensitic structure (Figure 3a) and overlapping fish scales (distinct melt pools - Figure 3c) with columnar grains molded in accordance with the building direction (Figure 3b). According to Clare et al. [28], they are overlapping austenite grains while the martensitic phase from this perspective is more irregular with grains arranged both parallel and transversely. However, the perpendicular cross section to the building direction also suggests that it perhaps may be the laser paths.
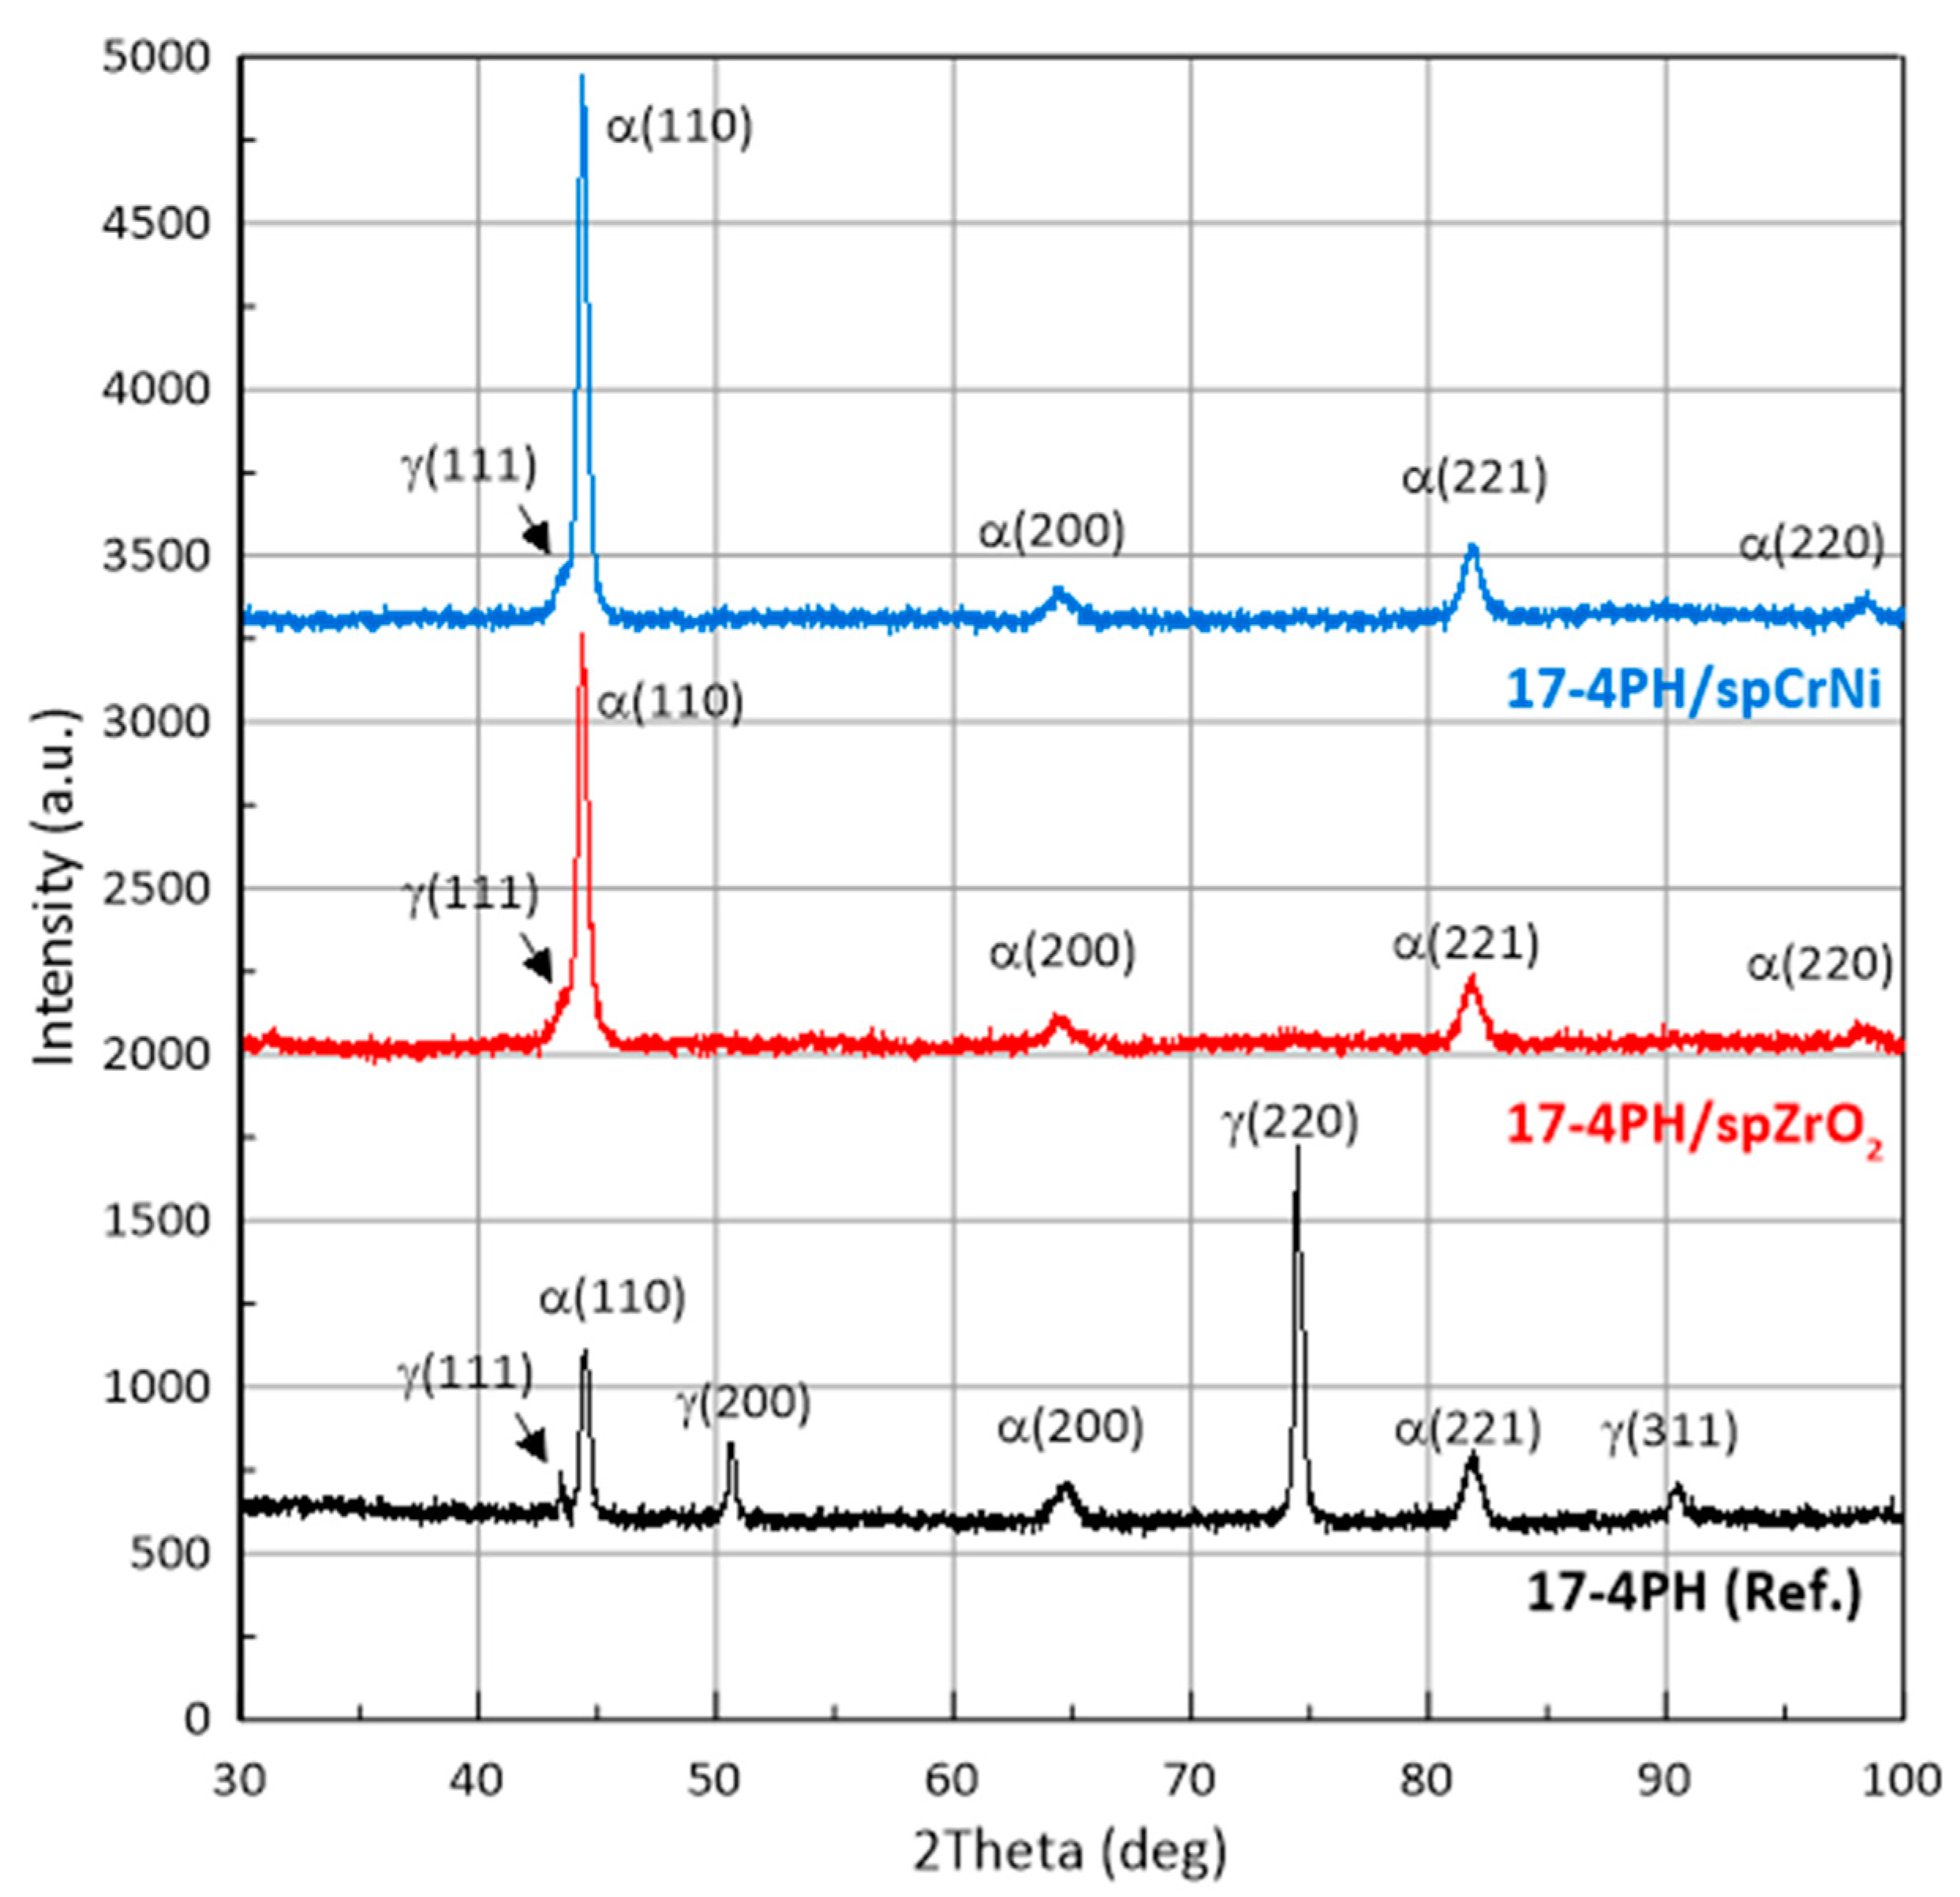
In order to study the SP process on the structure of 17-4PH steel, X-ray scattering measurements and phase analysis were carried out. Figure 4 shows diffraction profiles for 17-4PH steel before and after the shot peening process using ZrO2 and CrNi balls. It is easy to see the difference between XRD profiles for steel before and after the SP process. The steel before treatment shows an austenite-martensite structure, as evidenced by the occurrence of peaks characteristic of austenite located at around 2θ = 43.5°, 50.6°, 75.5° and 90.4°, and the peaks correspond to martensite located at around 2θ = 44.5°, 64.6° and 81.8°. On the other hand, the XRD profiles for steel after the SP process for both types of balls showed the same set of diffraction peaks differing in relative peak intensities. The peak positions correspond to the martensite structure. Only a relatively low intensity peak is revealed for 2θ = 43.5° correspond to austenite. The individual phases and associated planes are marked at the diffraction peaks in the figure. The disappearance of the austenite peaks in the XRD profiles after the SP process indicates the presence of phase transitions. In addition, a significant increase in the intensity of the (110) coming from martensite peak in relation to (200), (221) and (220) peaks in the profiles for samples after the SP process indicates that the phase transition had a preferred (110) plane orientation parallel to sample surface. As a result of the analysis, it was found that the positions of the peaks both before and after the SP process, corresponding to the individual phases, differ less than 0.12°. However, the analysis of the FWHM peak values showed that the size of martensite grains after the SP process decreased from 22 nm to 15.6 nm and 18.5 nm for ZrO2 and CrNi balls, respectively. On the other hand, the performed Rietveld analysis allowed to determine the proportion of the number of individual phases. It was calculated that the sample before the SP process consists of 55% martensite and 42% austenite, and the sample after the SP process consists of 86% martensite and 14% austenite for ZrO2 balls and 89% martensite and 11% austenite for CrNi balls, respectively. The obtained results are consistent with the results in the literature.
A similar result was obtained by Michela et al. [29], only the initial samples had a more martensitic structure. This was evident in the absence of distinct peaks from austenite, as well as high hardness after forming. In turn, Wang et al. [30] used a two-stage shot peening using cast iron balls and then ceramic balls with a hardness above 700 HV to determine the effect of the SP process on the phase composition of conventional 17-4PH steel. The research compares the surfaces of the matrix and the laser-hardened layer, where the SP process was carried out with large-diameter spheres (1mm and 0.1mm). It was found that SP induced the transformation of austenite to martensite, as evidenced by the disappearance of the austenite peaks in the XRD profile. Moreover, the shift of the martensite peak positions was less than 0.1°. Changes in grain size, occurrence of micro-strains and dislocation density were also observed. Eskandari et al. [31] also found a phase transition from austenite to martensite.

3.2. Surface morphology

SEM imaging in topographic mode allowed for the visualization of the surface both before and after the peening process (Figure 5). The surface visible on the left immediately after fabrication is characterized by overlapping traces of the laser beam passage, above which "splashes" and unmelted powder particles are visible. However, the surface quality was high and observed defects that are common for this kind of fabrication. The steel peened top surface, on the other hand, is characterized by an irregular structure with hills and valleys. Top surfaces after SP using ceramic beads can be easily distinguished, as it is characterized by smaller irregularities, while they are full of craters and dents caused by the impact of particles of both spherical and irregular shape. The irregular shape of some depressions is due to the fragmentation of the peening medium. The localization of the bead medium particles in the surface was also observed, in accordance with the Kameyama and Komotori model [32]. The presence of fixed peening medium particles was also confirmed for the ZrO2 peened sample using EDS. However, the presence of CrNi steel particles is difficult to confirm using EDS, and this is due to the similar elemental composition to peened 17-4PH steel.
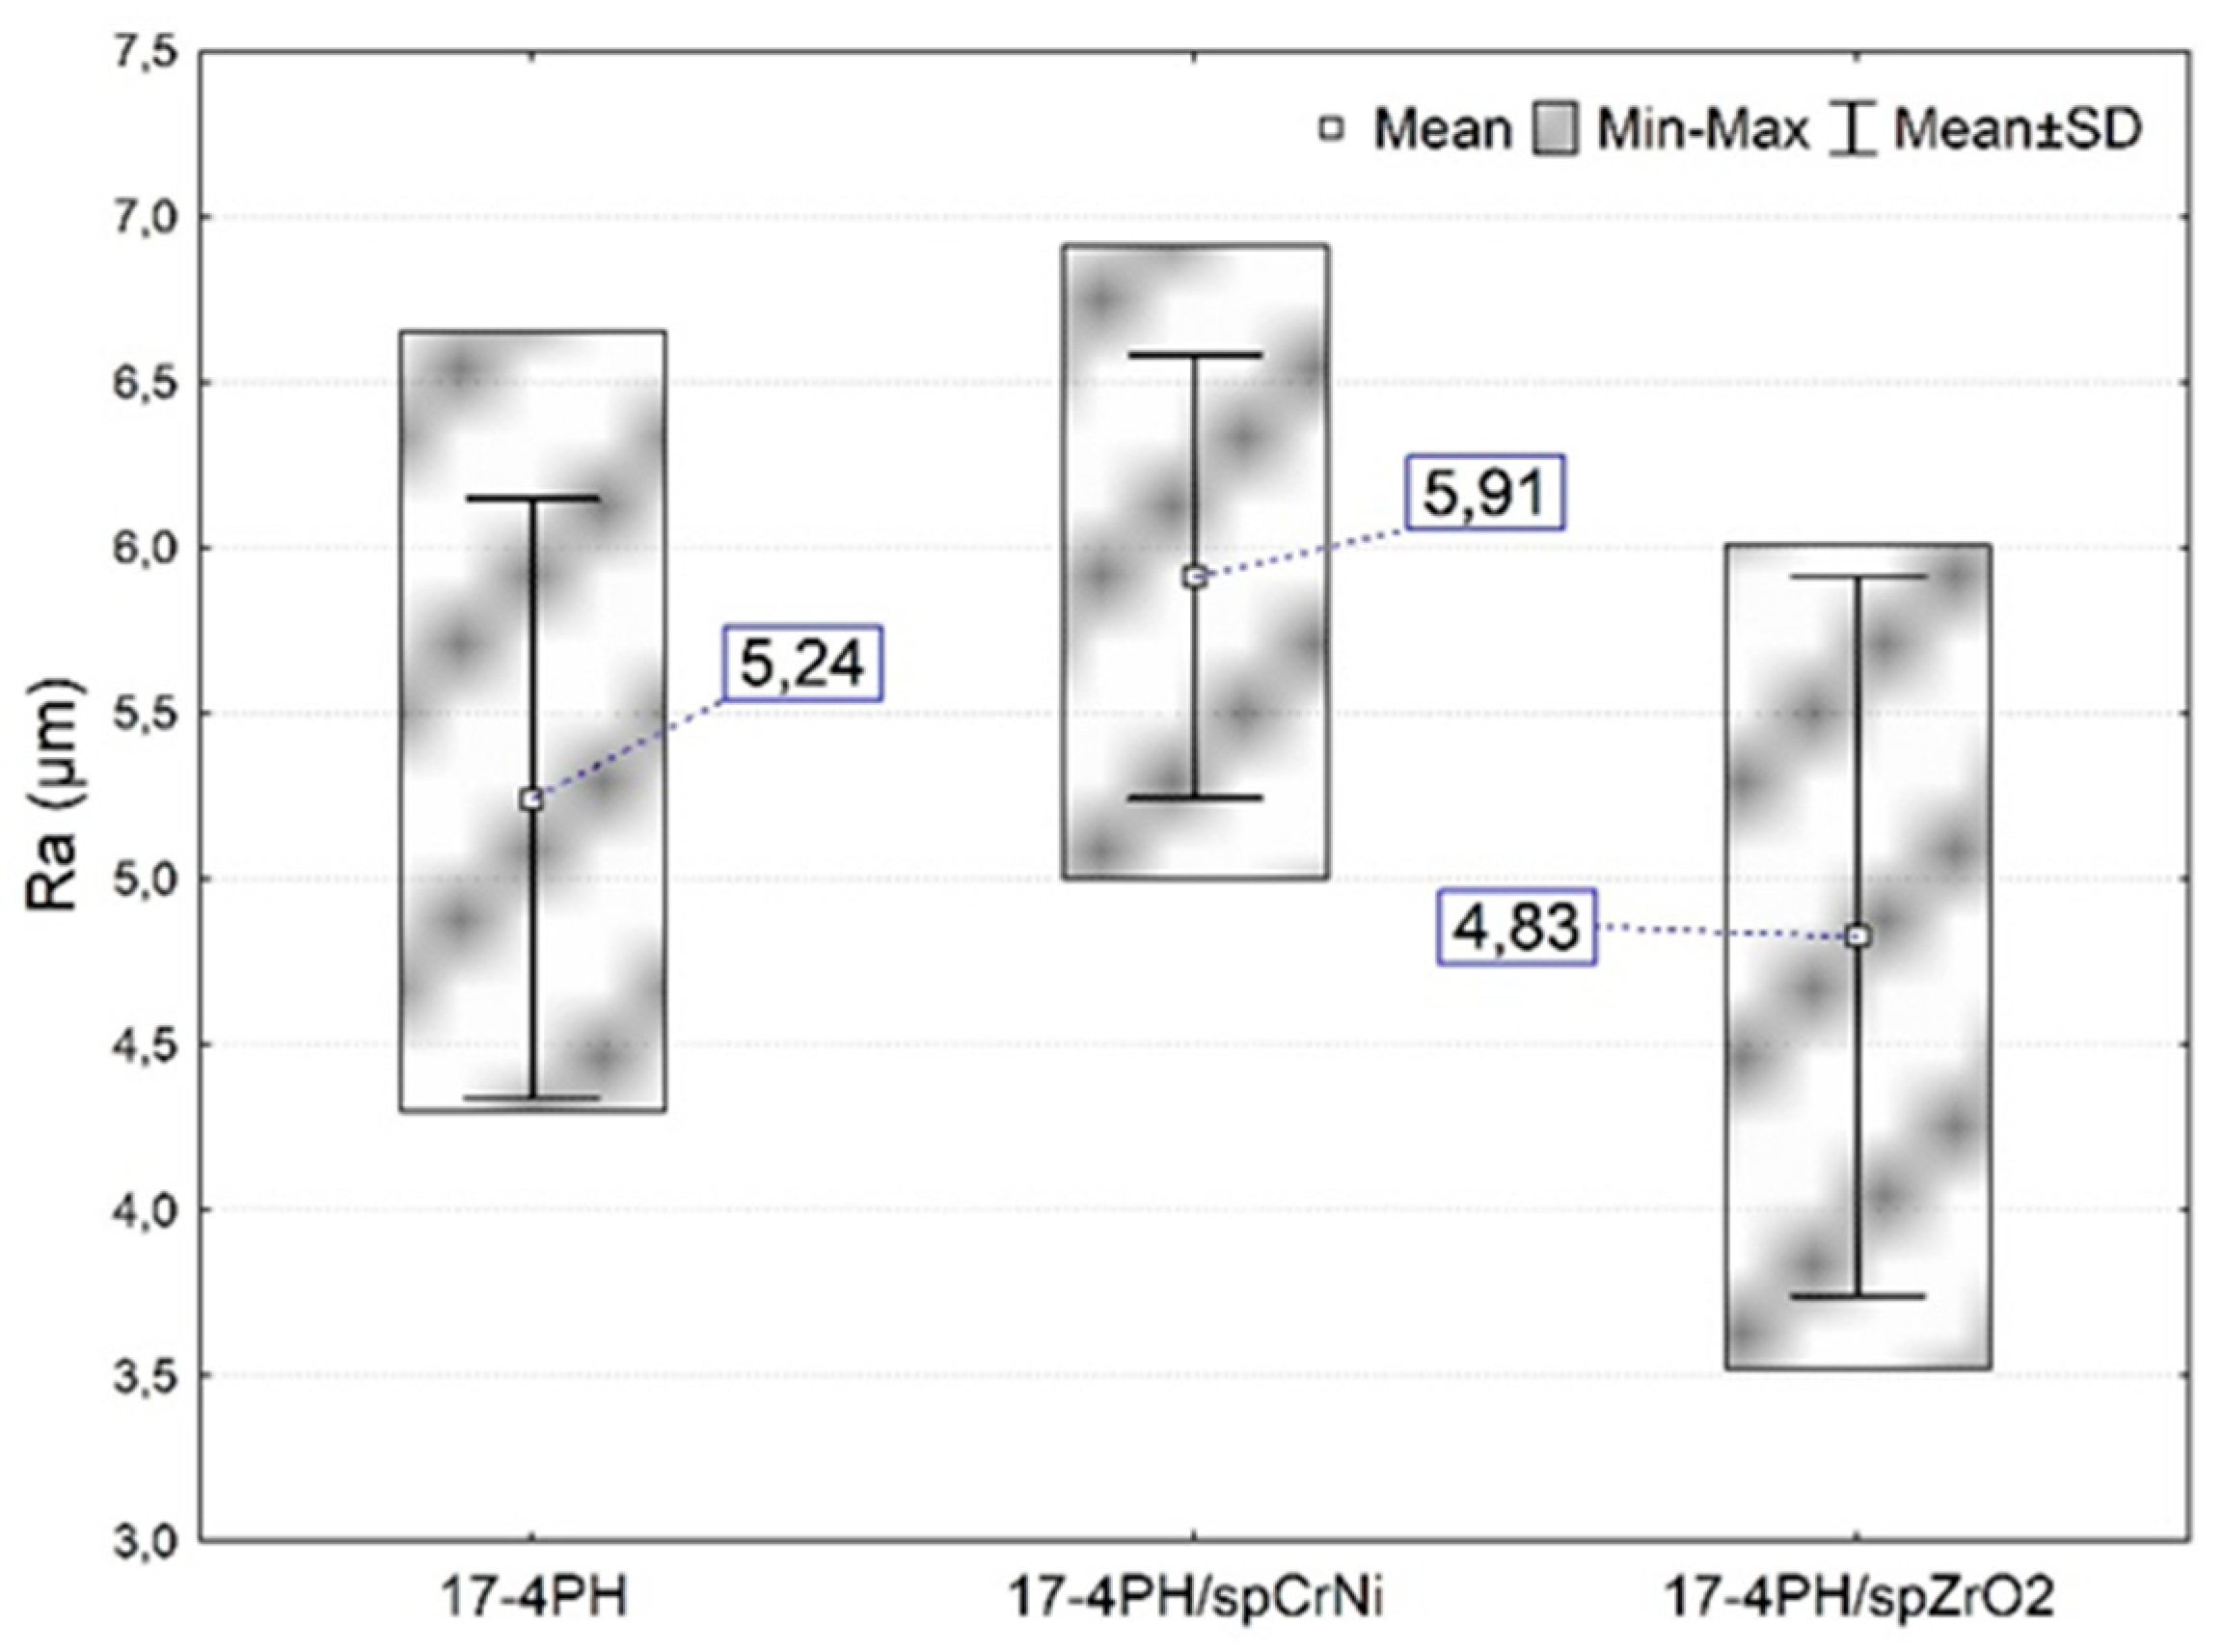
The results from the roughness (Figure 6) correspond with the SEM observations of the surfaces. The treatment with ZrO2 ceramic beads shows a smoother surface, and the lowest values of the roughness parameter Ra are recorded for these surfaces. In contrast, the treatment of CrNi steels with a shot causes much greater plastic deformation and an increase in roughness even relative to the reference surface. At the same time, it should be born in mind that this result for the 17-4PH/spCrNi sample was obtained at almost twice the size of the peening medium (vs. ZrO2). Comparing the results of roughness with respect to the surface immediately after printing, there is an increase of 12.8% in the Ra parameter for the surfaces treated with CrNi steels and a decrease of 7.8% for the surfaces treated with ceramic beads. Overall, the DMLS horizontally-built material exhibits significantly rougher texture in comparison to wrought steel. According to the research by Mower and Long [33] Sa for laser sintered surfaces is 3-5 um. In turn, the magnitude of peened surface roughness depends primarily on the type, size and geometry of shot, which has already been confirmed in research studies [34,35]. Dorr et al. [34] (for shot size in the range of 300-600 µm and also Aymen et al. [35] for shot size in the range of 125–450 µm found a proportional increase in surface roughness associated with the use of a larger size shot.

3.3. Hardness

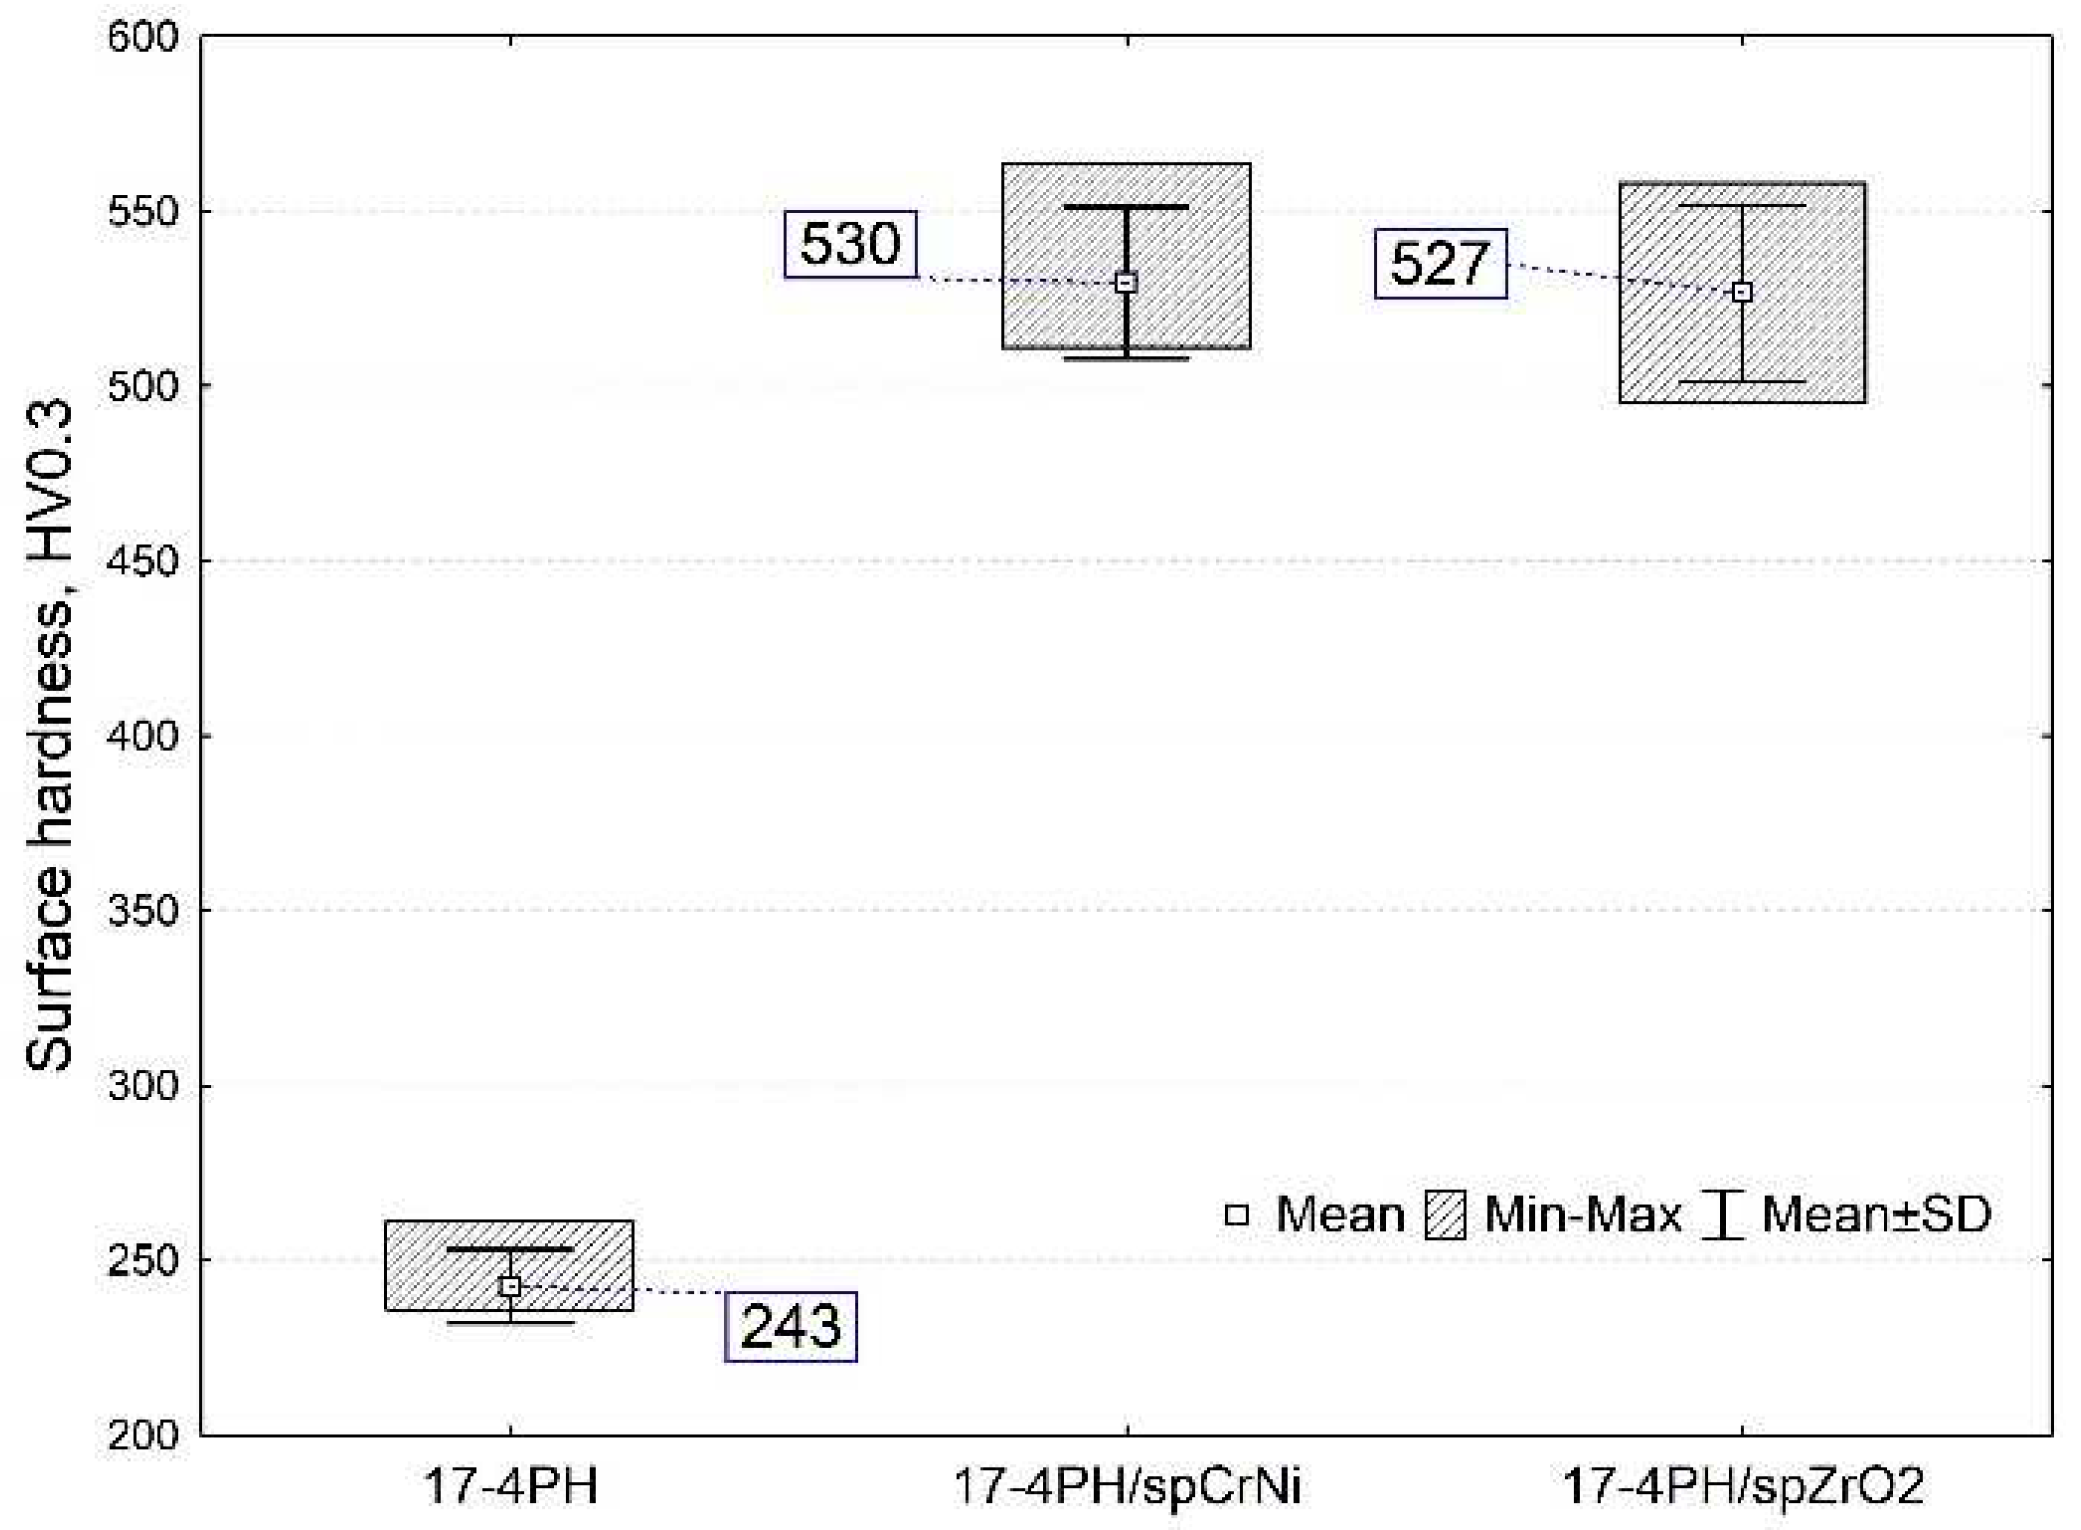
The results of the surface hardness tests are shown in Figure 7 An increase in average hardness values was observed for all machined surfaces (by 116.8÷118.1% on average) compared to the reference samples. Although the highest surface hardness was obtained for the sample 17-4PH/spCrNi, there were no statistically significant differences in hardness for surfaces treated with CrNi shot and ceramics. It is worth recalling that the hardness values for the surfaces treated with ceramic beads were obtained while using a nearly 2.5x smaller shot size. The larger size and weight provide greater impact energy, which in turn, translates into greater hardness. At the same time, the choice of a ceramic with a smaller grain size means that in the same unit of time a greater number of ceramic balls hit the surface, which results in a higher intensity of the treated surface. In general, the material is strengthened by plastic deformation in the surface layer, at which point the density of dislocations increases. Nevertheless, in the case of ceramic balls, the fragmentation of ceramics occurs during the impacts against the surface. Hard fine particles get buckled (driven in) by successive impact shots, as already documented in Figure 5c. This phenomenon results in a locally significant increase in hardness, which further compensates for the lower impact energy of ceramic beads.
The average hardness for the untreated samples was 243HV0.3, which is comparable to what is claimed by the manufacturer EOS GmbH (230 ± 20HV). In addition, the average hardness values obtained are similar to the literature data for 17-4PH steels obtained by other additive technologies: Oh et al. [36] 264HV (laser metal deposition), Chen et al. [37]- 265±6HV (selective laser melting) Cheruvathur et al. [38] 258 ± 8HV (laser powder bed fusion). The results showed that shot peening was an efficient cold working method. Analyzing the results from the experiment with the literature, it is apparent that the shot peening for 17-PH steel produced in AM allows to obtain surface hardness is significantly higher than by heat treatment, and so as the literature data shows, for instance: 312±17HV [38] and 403 HV [36] and 382±10HV [7]. Such a shot peening treatment will be particularly beneficial when a condition is desired in which the surface of the material is hard and the core is plastic. Wang et al. [39] have determined that the surface hardness has a saturation value when peening intensity reaches a certain value from which hardness will no longer increase. They demonstrated that when the peening intensity was increased from 0.3 mmA to 0.6 mmA, the hardness of the hardened 17-4PH steel increased by just about 3-4%.

3.4. Tribological behaviour

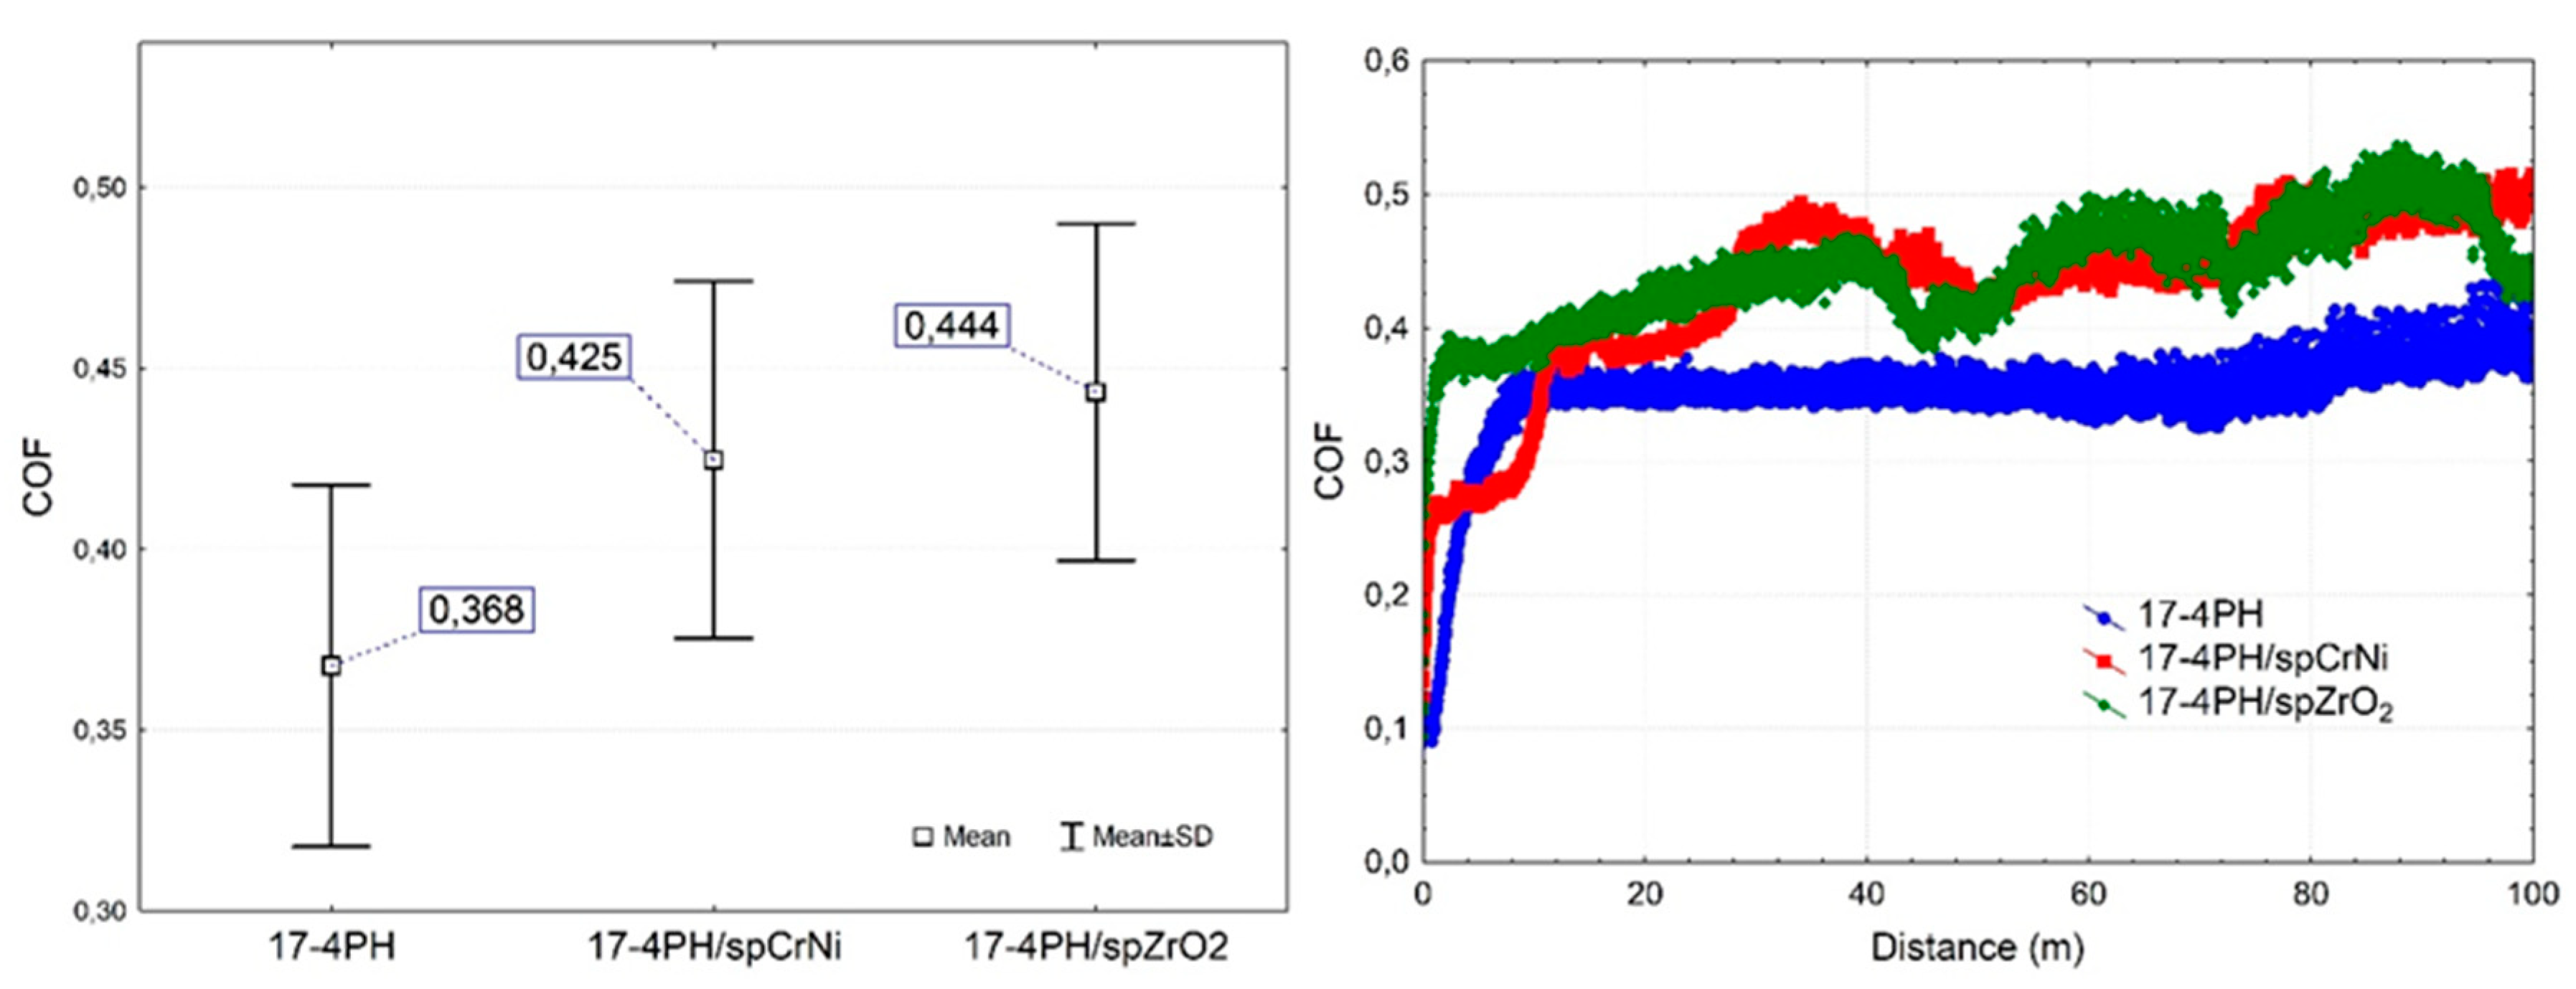
The results of the tests of wear sliding in 0.9% NaCl solution are presented in Figure 8. The observed lower values of the coefficient of friction (COF) for the reference samples are due to the presence of unmelted grains (see Figure 1) after the laser sintering process of metal powder, and the COF itself appears almost stable over the entire route. Slightly higher average COF values are observed for the treated surfaces, with no statistically significant differences. COF for the surface peened with CrNi shot is slightly lower compared to the surface treated with the ceramic balls. This situation can be explained by the higher surface roughness of the CrNi shot peened surfaces. In turn, higher surface roughness results in tip shear and film lubrication effects at the initial stage of the tribological test. Despite similar COF performances just at distances up to about 30m (Figure 8b), significantly lower values are recorded for sample 17-4PH/spCrNi compared to 17-4PH/spZrO2. In addition, the higher COF values generated for 17-4PH/spZrO2 can be explained by the residual hard ceramic particles embedded in the surface layer, which are a natural obstacle to the counterbody [21,32].
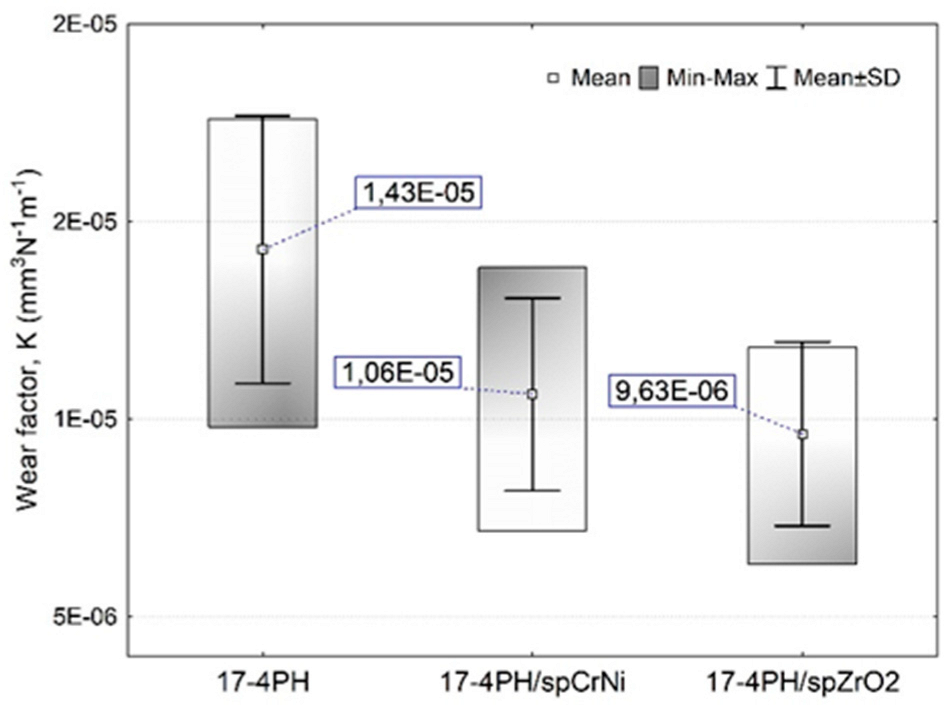
Figure 8c shows the results of the wear coefficient K of the tested materials. An increase in wear resistance was observed for all surfaces subjected to shot peening. At the same time, the highest wear resistance was observed for the surfaces modified with ceramic beads, where, in comparison with the reference surface, it is characterized by a nearly 32.7% lower K coefficient. In turn, the modification of the surface with CrN steels shot caused, in relation to the reference surfaces, a decrease in the wear coefficient by 25.9%.
Comparing the wear results obtained in this work to the tests under technically dry friction conditions reported in the paper [21], one can also see more favorable tribological properties for surfaces treated with ceramic balls. Then, comparatively, for the surface peened with ceramic balls (using the most intensive peening parameters), a decrease in the wear coefficient of nearly 35.6% was obtained. AlMangour and Yang [40] also reported an increase in wear resistance for shot peened surfaces. The strengthening process was carried out in two steps, by shot peening the surfaces first with aluminum oxide and then, with glass beads. An increase in wear resistance was then achieved by approx. ~60.9%. The authors explained that the obtained effect was significantly enhanced through the improved grain-refinement effect and the formation of fine-structured surface layers, stronger surface layer, lower surface roughness and higher microhardness of the DMLS treatment samples. Wang et al. [41] have found that the improvement of wear properties of the peened sample results mainly from the harder surface layer, which reduces the degree of plowing and micro-cutting under the lower load and alleviates plastic removal and surface fatigue fracture under the higher load.
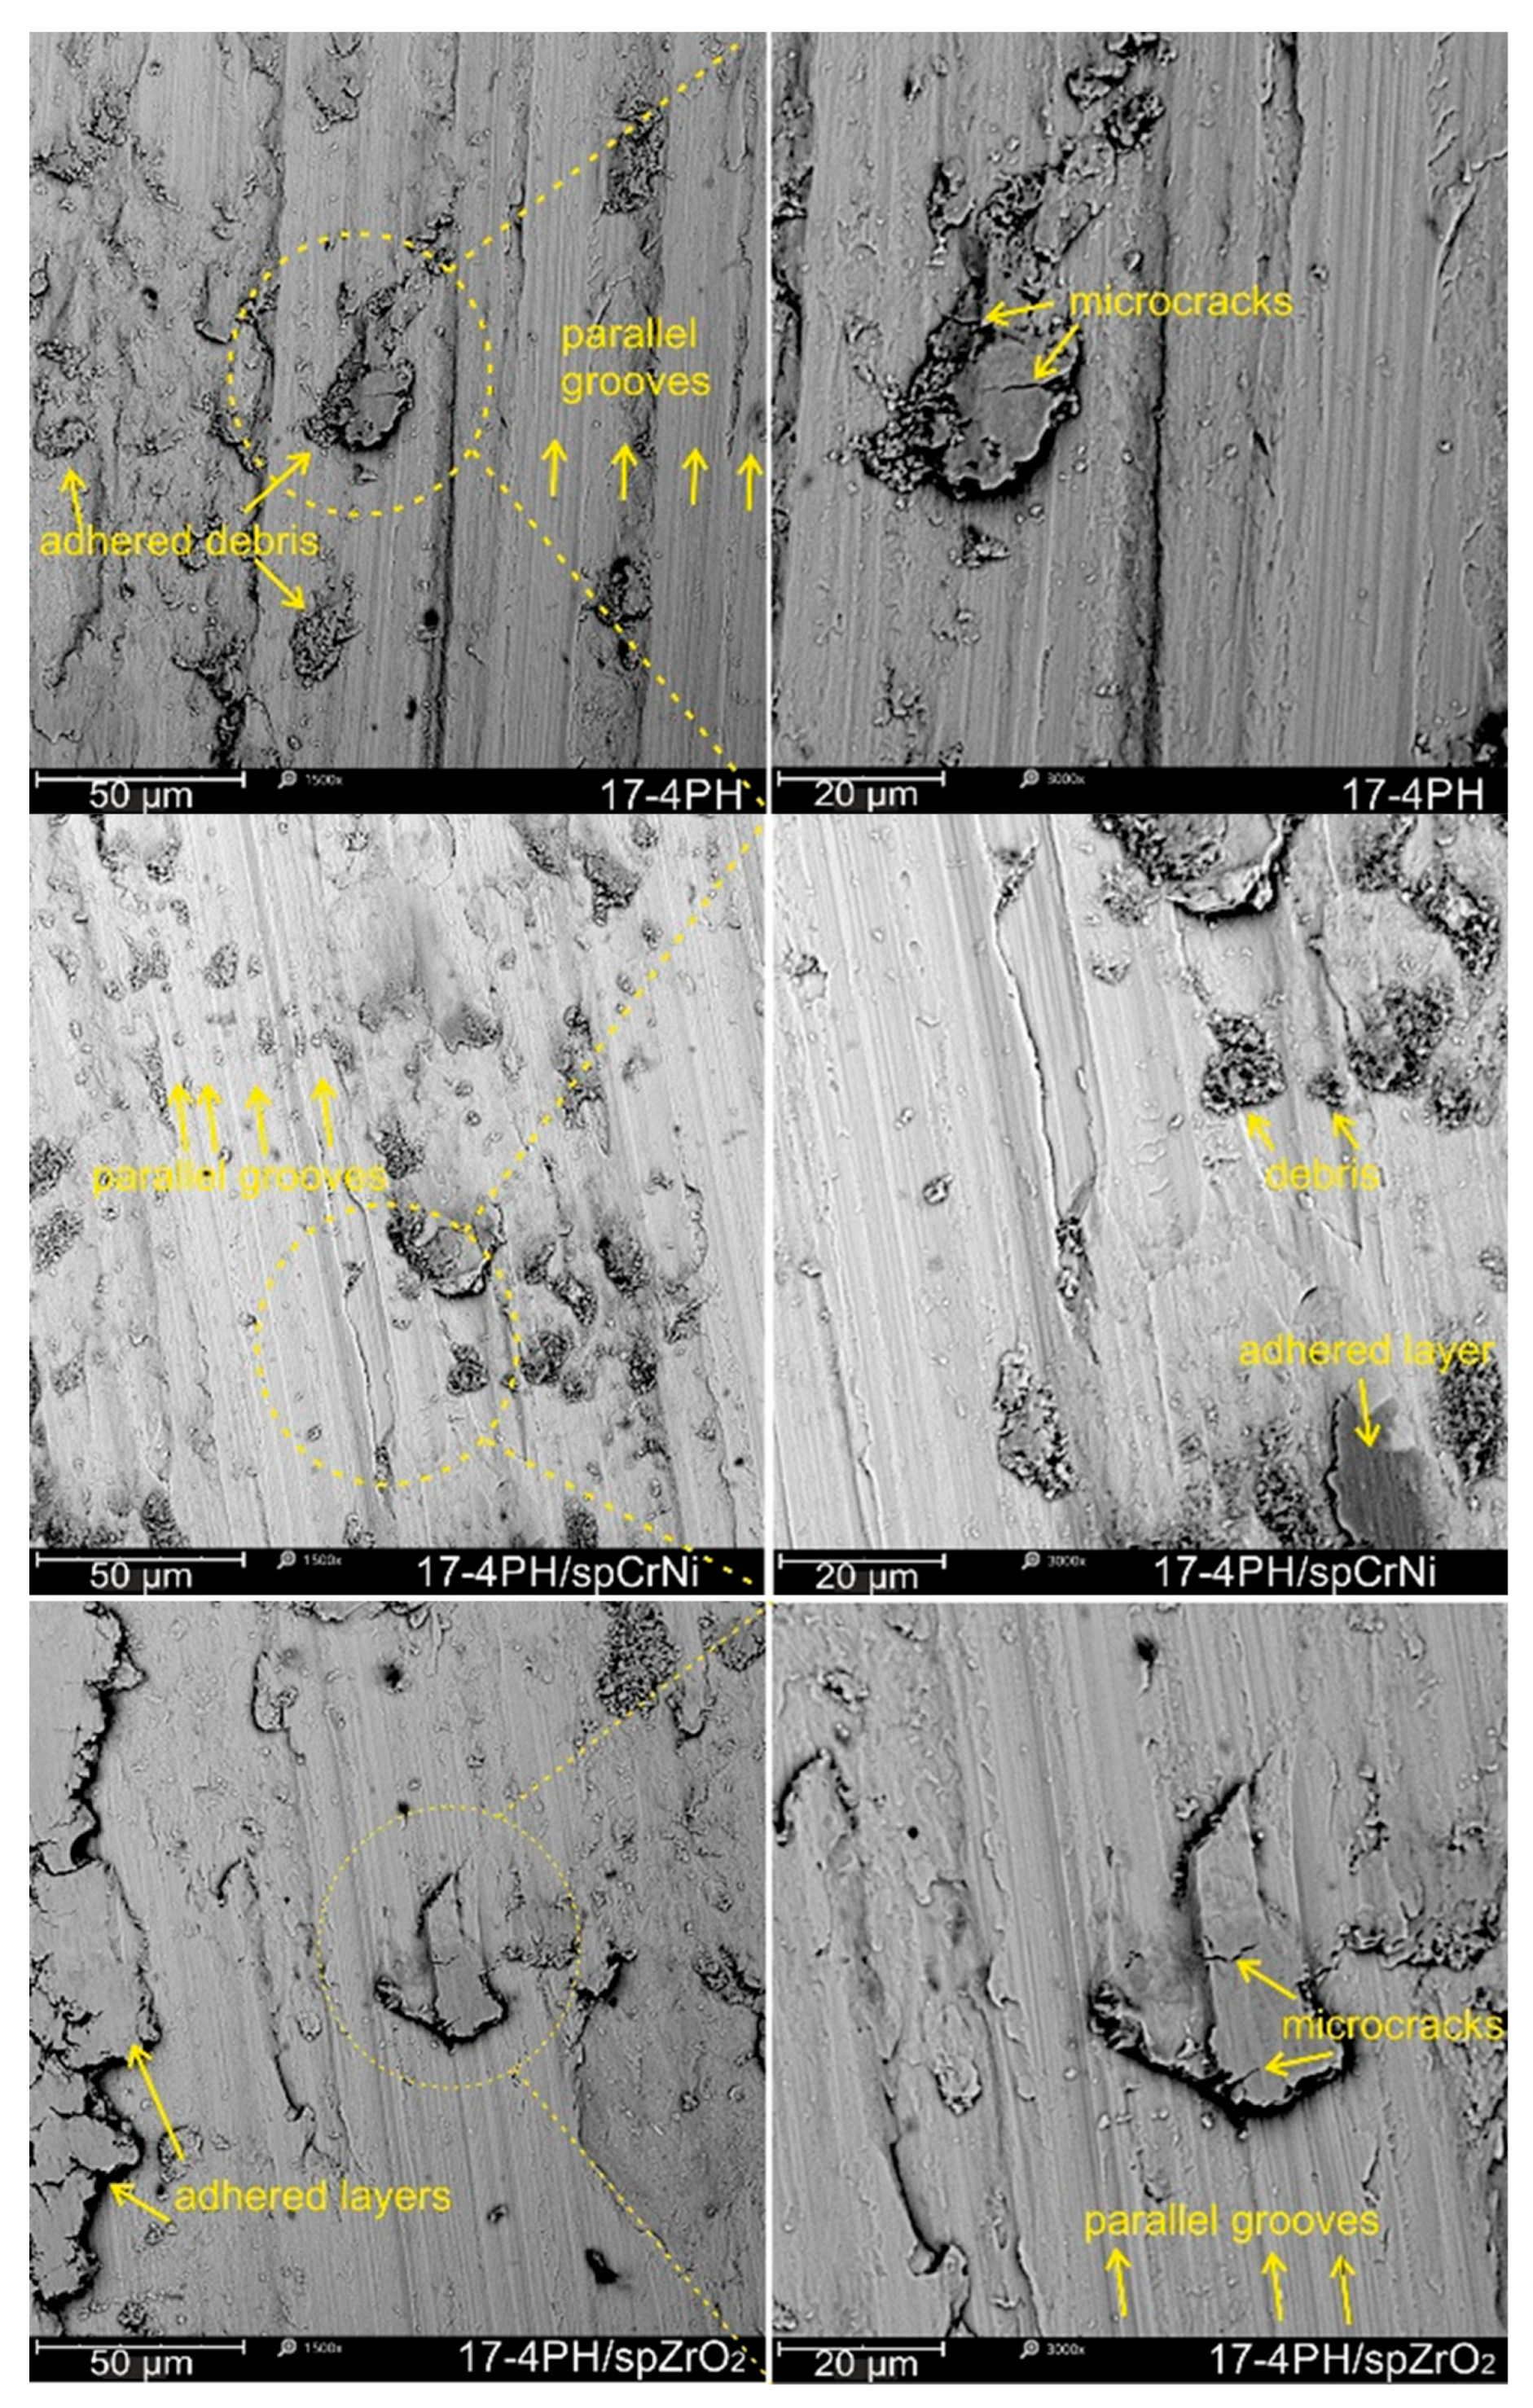
Generally wear is dominated by surface contact, surface severe plastic deformation is expected to have a considerable effect on wear mechanism [40]. SEM images of the worn surfaces are presented in Figure 9. Parallel abrasive and adhesive wear mechanisms predominated on all analyzed surfaces. The abrasive wear mechanism was mainly determined by long parallel grooves along the direction of counterbody movement. Furthermore, adhesion of secondary wear products transported by the counterbody was observed along the wear marks. In addition, as a result of repeated penetration of the same volume of material by the counterbody, fatigue damage manifested by microcracks occurs. In contrast Yang et al. [42] indicate that fatigue cracks are mainly associated with tests at high loads. While analyzing the wear tracks after tests in 0.9%NaCl and comparing the results with respect to wear tests performed at higher speeds (0.1 m/s) under technically dry friction conditions described in an earlier paper [21], the fatigue damage leading to spalling is not observed here. Thus, the observed fatigue mechanism is not as intense as in the case of technically dry friction.
In accordance with AlMangour and Yang [40] in the case of peened samples made with DMLS technology forming a strain-hardened tribolayer that protects the stainless steel from further plowing and spalling, that results in a change in the wear mechanism of the strain-hardened tribolayer from abrasive to adhesive. The adhesive and abrasive wear mechanism for the untreated 17-4PH steel were identified by Esfandiari and Dong [23] during tests in 3.5% NaCl solution. Similar conclusions were drawn by Sanjeev et al. [25] indicating two dominant wear mechanisms: abrasion grooves and smearing, with tribological tests conducted in dry sliding wear condition.

4. Conclusions

Based on the experimental results, it was found that:
  • Austenite originating peaks including (200, 220, 311) are reduced in the samples after SP, the increase of peak intensity was noted for 110 indications. Strain inducted austenite phase transformation.
  • The SP process of 17-4PH steel leads to the austenite-martensite phase transition, accompanied by the texture of martensite grains in the direction <110> perpendicular to the surface of the sample.
  • CrNi steel shot peened surfaces showed an overall increase of 12.79 % Ra mean value when compared to reference. In addition, SP with ZrO2 allowed a reduction in Ra parameter by 7.82 %.
  • The peening process almost doubled the surface hardness of 243 to ~530 HV0.3 for CrNi steel and ZrO2 peened samples, respectively. The increase of 118.1% and 116.9% in hardness for CrNi steel and ZrO2 peened surfaces, respectively, was noted.
  • The peening process with both steel balls and ceramic shots had a favorable effect on the wear resistance of DMLS steel in 0.9%NaCl solution.
  • Similar hardness parameters, roughness and condition of the surface layer were a determinant factor affecting the tribological wear resistance in peened samples.
  • ZrO2 shot peened surface proves to have a slightly better wear resistance compared to the CrNi steel shots. Then, the overall reduction of wear factor (K) relative to the reference surface was significant and reached 25.9 %, 32.7 % for 17-4PH/spCrNi and 17-4PH/spZrO2 samples, respectively.
  • SEM observations of the wear marks revealed two dominant, parallel mechanisms of abrasive wear determined by paraller grooves and adhesive wear related to the transfer of secondary wear products.

Author Contributions

Conceptualization, M.W. and A.Ś.; methodology, M.W. and M.S.; software, A.Ś.; validation, M.W., M.S. and D.Ch.; formal analysis, A.Ś.; investigation, M.W., D.Ch. M.T; resources, AŚ and M.S.; data curation, A.Ś.; writing—original draft preparation, M.W., A.Ś.; writing—review and editing, M.W., D.Ch., M.S and M.T.; visualization, M.W and AŚ .; supervision, M.W.; project administration, M.W.; funding acquisition, M.W. and M.S. All authors have read and agreed to the published version of the manuscript.

Funding

The APC publication fee was fully covered by the authors’ voucher

Institutional Review Board Statement

Not applicable.

Acknowledgments

The project was financed by Union of Lublin Universities in the framework of the program "INTERPROJECT " (Grant nr: INT/005/2022/I-N)

Conflicts of Interest

The authors declare no conflicts of interest.

References

  1. Yeli, G.; Auger, M.A.; Wilford, K.; Smith, G.D.W.; Bagot, P.A.J.; Moody, M.P. Sequential Nucleation of Phases in a 17-4PH Steel: Microstructural Characterisation and Mechanical Properties. Acta Materialia 2017, 125, 38–49. [Google Scholar] [CrossRef]
  2. Sun, Y.; Hebert, R.J.; Aindow, M. Effect of Heat Treatments on Microstructural Evolution of Additively Manufactured and Wrought 17-4PH Stainless Steel. Materials & Design 2018, 156, 429–440. [Google Scholar] [CrossRef]
  3. Andreacola, F.R.; Capasso, I.; Pilotti, L.; Brando, G. Influence of 3d-Printing Parameters on the Mechanical Properties of 17-4PH Stainless Steel Produced through Selective Laser Melting. Frattura ed Integrità Strutturale 2021, 15, 282–295. [Google Scholar] [CrossRef]
  4. Hsu, T.-H.; Chang, Y.-J.; Huang, C.-Y.; Yen, H.-W.; Chen, C.-P.; Jen, K.-K.; Yeh, A.-C. Microstructure and Property of a Selective Laser Melting Process Induced Oxide Dispersion Strengthened 17-4 PH Stainless Steel. Journal of Alloys and Compounds 2019, 803, 30–41. [Google Scholar] [CrossRef]
  5. Ranjan Pradhan, S.; Singh, R.; Singh Banwait, S. Comparison of DMLS and DMLS-Waste Assisted Investment Casting. Materials Letters 2022, 324, 132782. [Google Scholar] [CrossRef]
  6. Laleh, M.; Sadeghi, E.; Revilla, R.I.; Chao, Q.; Haghdadi, N.; Hughes, A.E.; Xu, W.; De Graeve, I.; Qian, M.; Gibson, I.; et al. Heat Treatment for Metal Additive Manufacturing. Progress in Materials Science 2023, 133, 101051. [Google Scholar] [CrossRef]
  7. Aleksander Świetlicki; Mariusz Walczak; Mirosław Szala; Marcin Turek; Dariusz Chocyk Effects of ageing heat treatment temperature on the properties of DMLS additive manufactured 17-4PH steel. Bulletin of the Polish Academy of Sciences Technical Sciences 2023. [CrossRef]
  8. Żebrowski, R.; Walczak, M. Effect of the shot peening on surface properties and tribological performance of Ti-6Al-4V alloy produced by means of DMLS technology. Archives of Metallurgy and Materials 2019, 377–383. [Google Scholar] [CrossRef]
  9. Ferri, O.M.; Ebel, T.; Bormann, R. High Cycle Fatigue Behaviour of Ti–6Al–4V Fabricated by Metal Injection Moulding Technology. Materials Science and Engineering: A 2009, 504, 107–113. [Google Scholar] [CrossRef]
  10. Lashgari, H.R.; Adabifiroozjaei, E.; Kong, C.; Molina-Luna, L.; Li, S. Heat Treatment Response of Additively Manufactured 17-4PH Stainless Steel. Materials Characterization 2023, 197, 112661. [Google Scholar] [CrossRef]
  11. Qin, E.; Chen, G.; Tan, Z.; Wu, S. Shot Peening and Thermal Stress Relaxation in 17-4 PH Stainless Steel. J. of Materi Eng and Perform 2015, 24, 4578–4583. [Google Scholar] [CrossRef]
  12. John, M.; Kalvala, P.R.; Misra, M.; Menezes, P.L. Peening Techniques for Surface Modification: Processes, Properties, and Applications. Materials 2021, 14, 3841. [Google Scholar] [CrossRef] [PubMed]
  13. Soyama, H.; Korsunsky, A.M. A Critical Comparative Review of Cavitation Peening and Other Surface Peening Methods. Journal of Materials Processing Technology 2022, 305, 117586. [Google Scholar] [CrossRef]
  14. Świetlicki, A.; Szala, M.; Walczak, M. Effects of Shot Peening and Cavitation Peening on Properties of Surface Layer of Metallic Materials—A Short Review. Materials 2022, 15, 2476. [Google Scholar] [CrossRef] [PubMed]
  15. Matuszak, J. Analysis of Geometric Surface Structure and Surface Layer Microhardness of Ti6Al4V Titanium Alloy after Vibratory Shot Peening. Materials 2023, 16, 6983. [Google Scholar] [CrossRef] [PubMed]
  16. Bazri, S.; Mapelli, C.; Barella, S.; Gruttadauria, A.; Mombelli, D.; Liu, C. Mechanical and Tribo-Metallurgical Behavior of 17-4 Precipitation Hardening Stainless Steel Affected by Severe Cold Plastic Deformation: A Comprehensive Review Article. J Braz. Soc. Mech. Sci. Eng. 2022, 44, 247. [Google Scholar] [CrossRef]
  17. Sadeghi, E.; Pant, P.; Jafari, R.; Peng, R.L.; Karimi, P. Subsurface Grain Refinement in Electron Beam-Powder Bed Fusion of Alloy 718: Surface Texture and Oxidation Performance. Materials Characterization 2020, 168, 110567. [Google Scholar] [CrossRef]
  18. Wang, Z.; Jiang, C.; Gan, X.; Chen, Y.; Ji, V. Influence of Shot Peening on the Fatigue Life of Laser Hardened 17-4PH Steel. International Journal of Fatigue 2011, 33, 549–556. [Google Scholar] [CrossRef]
  19. Dehghan-Manshadi, A.; Yu, P.; Dargusch, M.; StJohn, D.; Qian, M. Metal Injection Moulding of Surgical Tools, Biomaterials and Medical Devices: A Review. Powder Technology 2020, 364, 189–204. [Google Scholar] [CrossRef]
  20. Świetlicki, A.; Walczak, M.; Szala, M. Effect of Shot Peening on Corrosion Resistance of Additive Manufactured 17-4PH Steel. Materials Science-Poland 2022, 40, 135–151. [Google Scholar] [CrossRef]
  21. Walczak, M.; Szala, M. Effect of Shot Peening on the Surface Properties, Corrosion and Wear Performance of 17-4PH Steel Produced by DMLS Additive Manufacturing. Archiv.Civ.Mech.Eng 2021, 21, 157. [Google Scholar] [CrossRef]
  22. Liu, R.L.; Yan, M.F. Improvement of Wear and Corrosion Resistances of 17-4PH Stainless Steel by Plasma Nitrocarburizing. Materials & Design (1980-2015) 2010, 31, 2355–2359. [Google Scholar] [CrossRef]
  23. Esfandiari, M.; Dong, H. The Corrosion and Corrosion–Wear Behaviour of Plasma Nitrided 17-4PH Precipitation Hardening Stainless Steel. Surface and Coatings Technology 2007, 202, 466–478. [Google Scholar] [CrossRef]
  24. Bressan, J.D.; Daros, D.P.; Sokolowski, A.; Mesquita, R.A.; Barbosa, C.A. Influence of Hardness on the Wear Resistance of 17-4 PH Stainless Steel Evaluated by the Pin-on-Disc Testing. Journal of Materials Processing Technology 2008, 205, 353–359. [Google Scholar] [CrossRef]
  25. Kc, S.; Nezhadfar, P.D.; Phillips, C.; Kennedy, M.S.; Shamsaei, N.; Jackson, R.L. Tribological Behavior of 17–4 PH Stainless Steel Fabricated by Traditional Manufacturing and Laser-Based Additive Manufacturing Methods. Wear 2019, 440–441, 203100. [Google Scholar] [CrossRef]
  26. Davanageri, M.; Devananda, R.; Rangaswamy, Hanumantharaya.R. Tribological Wear Behavior of AISI 630 (17-4 PH) Stainless Steel Hardened by Precipitation Hardening. American Journal of Materials Science 2016, 2016, 6–14. [CrossRef]
  27. Alamos, F.J.; Schiltz, J.; Attardo, R.; Aboud Gatrell, B.; Tomonto, C.; Budzinski, J.; McGuffin-Cawley, J.; Pelletiers, T.; Schmid, S.R. Effect of Powder Reuse on Orthopedic Metals Produced through Selective Laser Sintering. Manufacturing Letters 2021, S2213846321000407. [Google Scholar] [CrossRef]
  28. Clare, A.T.; Mishra, R.S.; Merklein, M.; Tan, H.; Todd, I.; Chechik, L.; Li, J.; Bambach, M. Alloy Design and Adaptation for Additive Manufacture. Journal of Materials Processing Technology 2022, 299, 117358. [Google Scholar] [CrossRef]
  29. Michla, J.R.J.; Ravikumar, B.; Prabhu, T.R.; Siengchin, S.; Kumar, M.A.; Rajini, N. Effect of Nitriding on Mechanical and Microstructural Properties of Direct Metal Laser Sintered 17-4PH Stainless Steel. Journal of Materials Research and Technology 2022. [Google Scholar] [CrossRef]
  30. Wang, Z.; Luan, W.; Huang, J.; Jiang, C. XRD Investigation of Microstructure Strengthening Mechanism of Shot Peening on Laser Hardened 17-4PH. Materials Science and Engineering: A 2011, 528, 6417–6425. [Google Scholar] [CrossRef]
  31. Eskandari, H.; Lashgari, H.R.; Ye, L.; Eizadjou, M.; Wang, H. Microstructural Characterization and Mechanical Properties of Additively Manufactured 17–4PH Stainless Steel. Materials Today Communications 2022, 30, 103075. [Google Scholar] [CrossRef]
  32. Kameyama, Y.; Komotori, J. Effect of Micro Ploughing during Fine Particle Peening Process on the Microstructure of Metallic Materials. Journal of Materials Processing Technology 2009, 209, 6146–6155. [Google Scholar] [CrossRef]
  33. Mower, T.M.; Long, M.J. Mechanical Behavior of Additive Manufactured, Powder-Bed Laser-Fused Materials. Materials Science and Engineering: A 2016, 651, 198–213. [Google Scholar] [CrossRef]
  34. Dörr T; Hilpert M; Beckmerhagen P; Kiefer A; Wagner L Infuence of Shot Peening on Fatigue Performance of High-Strength Aluminum-and Magnesium Alloys.; Warsaw, 1999.
  35. Ahmed, A.A.; Mhaede, M.; Wollmann, M.; Wagner, L. Effect of Micro Shot Peening on the Mechanical Properties and Corrosion Behavior of Two Microstructure Ti–6Al–4V Alloy. Applied Surface Science 2016, 363, 50–58. [Google Scholar] [CrossRef]
  36. Oh, W.J.; Son, Y.; Cho, S.Y.; Yang, S.W.; Shin, G.Y.; Shim, D.S. Solution Annealing and Precipitation Hardening Effect on the Mechanical Properties of 630 Stainless Steel Fabricated via Laser Melting Deposition. Materials Science and Engineering: A 2020, 794, 139999. [Google Scholar] [CrossRef]
  37. Chen, D.; Daoud, H.; Scherm, F.; Klötzer, B.; Hauck, C.; Glatzel, U. Stainless Steel Powder Produced by a Novel Arc Spray Process. Journal of Materials Research and Technology 2020, 9, 8314–8322. [Google Scholar] [CrossRef]
  38. Cheruvathur, S.; Lass, E.A.; Campbell, C.E. Additive Manufacturing of 17-4 PH Stainless Steel: Post-Processing Heat Treatment to Achieve Uniform Reproducible Microstructure. JOM 2016, 68, 930–942. [Google Scholar] [CrossRef]
  39. Wang, Z.; Jiang, C.; Gan, X.; Chen, Y. Effect of Shot Peening on the Microstructure of Laser Hardened 17-4PH. Applied Surface Science 2010, 257, 1154–1160. [Google Scholar] [CrossRef]
  40. AlMangour, B.; Yang, J.-M. Improving the Surface Quality and Mechanical Properties by Shot-Peening of 17-4 Stainless Steel Fabricated by Additive Manufacturing. Materials & Design 2016, 110, 914–924. [Google Scholar] [CrossRef]
  41. Wang, Z.B.; Tao, N.R.; Li, S.; Wang, W.; Liu, G.; Lu, J.; Lu, K. Effect of Surface Nanocrystallization on Friction and Wear Properties in Low Carbon Steel. Materials Science and Engineering: A 2003, 352, 144–149. [Google Scholar] [CrossRef]
  42. Yang, Y.; Zhu, Y.; Khonsari, M.M.; Yang, H. Wear Anisotropy of Selective Laser Melted 316L Stainless Steel. Wear 2019, 428–429, 376–386. [Google Scholar] [CrossRef]
Figure 1. Top and lateral surface characteristic of tested material.
Preprints 98562 g001
Figure 2. Shots particles morphology: a) ZrO2 b) CrNi steel.
Preprints 98562 g002
Figure 3. Optical microscopy different microstructure features: a) top surface, b) and c) lateral surface.
Preprints 98562 g003
Figure 4. XRD patterns of 17-4PH steel before and after the shot peening process using ZrO2 and CrNi balls.
Preprints 98562 g004
Figure 5. SEM micrographs of top surfaces a) As-build, b) CrNi shoot peened, c) ZrO2 peened.
Preprints 98562 g005
Figure 6. Comparison of mean arithmetic average roughness- Ra.
Preprints 98562 g006
Figure 7. Vickers surface hardness of un-peened and SP DMLS samples.
Preprints 98562 g007
Figure 8. Result of the wear test sliding: a) COF mean and standard deviation values b) COF with regard to distance and c) wear factor.
Preprints 98562 g008aPreprints 98562 g008b
Figure 9. SEM morphologies of the worn surfaces.
Preprints 98562 g009
Table 1. Chemical composition of shot peening media (wt. %) according to manufacturer (Kuhmichel Abrasiv GmbH).
Ceramic beads
ZrO2 SiO2 Al2O3 CaO TiO2 Fe2O3
61.98 27.77 4.57 3.47 0.34 0.14
CrNi steel shots
Cr Ni Si Mn C Fe
16-20 7-9 1.8-2.2 0.7-1.2 0.05-0.2 Bal.
Table 2. Chemical composition (wt. %) of as-fabricated 17-4PH grade steel.
C Si Mn S Cr Mo Ni Cu Co Nb V N Fe
As-build 0.043 0.694 0.665 0.051 15.18 0.121 4.503 4.734 0.096 0.028 0.054 0.088 Bal.
ASTM A564 <0.07 <0.7 <1.5 - 5–17 <0.6 3–5 3-5 - 5*C–0.45 - - Bal.
EN 10088-1 <0.07 1 <1 - 15-17.5 <0.5 3–5 3-5 - 0.15–0.45 - - Bal.
Disclaimer/Publisher’s Note: The statements, opinions and data contained in all publications are solely those of the individual author(s) and contributor(s) and not of MDPI and/or the editor(s). MDPI and/or the editor(s) disclaim responsibility for any injury to people or property resulting from any ideas, methods, instructions or products referred to in the content.
Copyright: This open access article is published under a Creative Commons CC BY 4.0 license, which permit the free download, distribution, and reuse, provided that the author and preprint are cited in any reuse.
Prerpints.org logo

Preprints.org is a free preprint server supported by MDPI in Basel, Switzerland.

Subscribe

© 2024 MDPI (Basel, Switzerland) unless otherwise stated