1. Introduction
In 2004, after continuous experiments and analysis by Taiwanese scholar Ye, it was projected that five or more primary alloying elements might be additional to a material at an equivalent dose, and such materials were known as “multi-principal high-entropy alloys (HEAs)” [
1,
2,
3,
4]. This splits the standard idea and suggests that the high entropy impact of multi-principal alloys doesn’t solely result in the microstructures of intermediate phases within the material that have an effect on the alloy’s properties, however additionally ends up in the formation of solid solutions within the material’s microstructure, that a lot of stable in their totally different cuboidal or hexagonal structures. Compared to ancient alloys, entropic alloys have glorious properties like extremely high strength [
5,
6], great ductility [
7], good catalytic qualities [
8], strong resistance to irradiation [
9], elevated resistance to corrosion [
10], and outstanding resistance to wear [
11]. In recent years, the event of HEAs systems has created well progress, and with amorphous materials and composite materials are known as the three most promising materials of the twenty-first century.
The distinctive characteristics of HEAs provide glorious performances, however they’re pricey. Therefore, from the perspective of improving performance and reducing costs, the HEA coatings with glorious performances on the surface of affordable base materials to enhance the surface performance of materials are proposed. High entropy alloy coatings were deposited on the surface of the metal workpiece to be repaired or modified, which can greatly improve the mechanical properties of the surface of the metal workpiece, such as microhardness, tensile strength, corrosion resistance and wear resistance. Currently, the surface modification and repair technology represent the most popular preparation process for high-entropy alloy coatings. It can be categorized into laser cladding technology [
12,
13], plasma cladding [
14,
15], thermal spraying [
16], cold spraying [
17], electron-beam sputtering technology [
18], electrochemical deposition technology [
19], etc. As compared to the commonly used methods, plasma cladding technology has the subsequent advantage characteristics including high powder deposition rate, low dilution rate, high cladding efficiency, wide selection of cladding materials and sensible method controllability so that it was preferred to prepare HEA coatings.
CoCrFeNiMn is an important new HEA material, that features a unifacially face centered cubic (FCC) structure with high strength, good plasticity, ductility and fracture toughness, and so that it has nice potential for engineering applications. During the preparation of the coating by plasma transfer arc cladding, the quick heating and cooling characteristics of the alloy create the elements solidify before they can diffuse, leading to a lot of segregation and internal stress concentration that affects the coating’s properties. Heat treatment of metal workpieces can achieve the purpose of eliminating defects generated during the preparation process, refining grain size, eliminating segregation, reducing welding residual stress, and homogenizing the microstructure and properties of the alloy [
20,
21]. Sha et al [
22] found that laser coated AlCoCrFeNiTi0.5 coatings formed a homogeneous and fine composition during heat treatment at 900 °C annealed for 5 h. The hardened coatings showed an improvement of about 73.5% compared to the as-deposited coatings, and the hardened coatings showed a 92.5% lower loss of wear mass and a 50% reduction in wear width compared to the as-deposited coatings.Hao et al [
23] found that the mechanical properties of the coating surface and the bond strength of the coating were improved by tempering NiCoCrAlYTa prepared by HVOF spraying technique. Lin et al [
24] prepared FeCoCrNiAl coatings by supersonic atmospheric plasma spraying technique. Then, vacuum heat treatment was carried out at 600°C and 900°C. They found that the microstructure of the coatings was refined after heat treatment, and the grain refinement helped to improve the hardness and wear resistance of the coatings. Munitz et al [
25] allotted heat treatment of the AlCoCrFeNi alloy at 650-975°C, the phase with BCC structure between the dendrites of the alloy transformed into a tough and brittle σ phase, resulting in a rise within the microhardness of the alloy. At 1100 °C, the σ phase remodeled into a phase with BCC structure and led to the softening of the alloy. Li et al [
26] treated the AlCrFeNi
2Ti
0.5 alloy and found that the tensile strength of the alloy was augmented to 600 MPa, malleability was improved and elongation was double that of the as-cast alloy below the result of precipitated particles and solid solution strengthening phases, achieving a joint improvement in strength and malleability of the high-entropy alloy. He et al [
27] found that the strength of CoCrFeNiNb
0.25 alloy was considerably improved once the alloy was heat treated at 750 °C, whereas the compressive physical property was nearly unaffected. Zhang et al [
28] investigated the microstructural changes, phase stability, and properties of CoCrMoNbTi
0.4 alloy at completely different annealing temperatures. The properties of the alloy were magnified considerably after heat treatment. Especially, the microhardness and compressive strength of the alloy reached 959±2 HV
0.5 and 1790 MPa, severally, at associate hardening temperature of 1200 °C due to an increase in the proportion occupied by the diffusely distributed secondary phase. Zhang et al [
29] investigated the changes in properties of Al
0.5CoCrFeNiSi
0.2 alloy subjected to aging treatment at 700-1100 °C. It was found that at aging temperatures below 1000 °C, the σ-phase precipitated between the dendrites, inflicting the alloy to exhibit important hardening and lower tensile strain; whereas higher than 1000 °C, the aging temperature made higher tensile strain than the as-cast one because of the disappearance of the dendrites and also the coarsening of the microstructure. Niu et al [
30] found that the tensile properties and strength of Al
0.5CoCrFeNi alloy were significantly improved by the increased duration of heat treatment, and also the alloy exhibited glorious tensile properties.
Most of the studies done by previous scholars mainly focused on the effects of the cladding process parameters on the microstructure and properties of the coatings, but did not investigate the effects of the heat treatment process (e.g., temperature and holding time) on the grain size and properties of the coatings after plasma cladding. In a previous work, CoCrFeNiMn coating was prepared on a cast iron substrate using PTA technology to improve the properties of the substrate, and the effects of plasma cladding current on the microstructure and the friction and wear properties of the CoCrFeNiMn coatings were mainly investigated [
31]. The preferred wear resistance was achieved when the plasma arc current was 65 A. In this work, the coating prepared with 65A current was selected for the study. Thermal analysis of the coatings was carried out to develop the appropriate heat treatment process, and then the effects of temperature and holding time on the microstructure, phase composition, microhardness and friction and wear properties of the HEA coatings were investigated.
2. Materials and Methods
2.1. Preparation of the HEA coatings
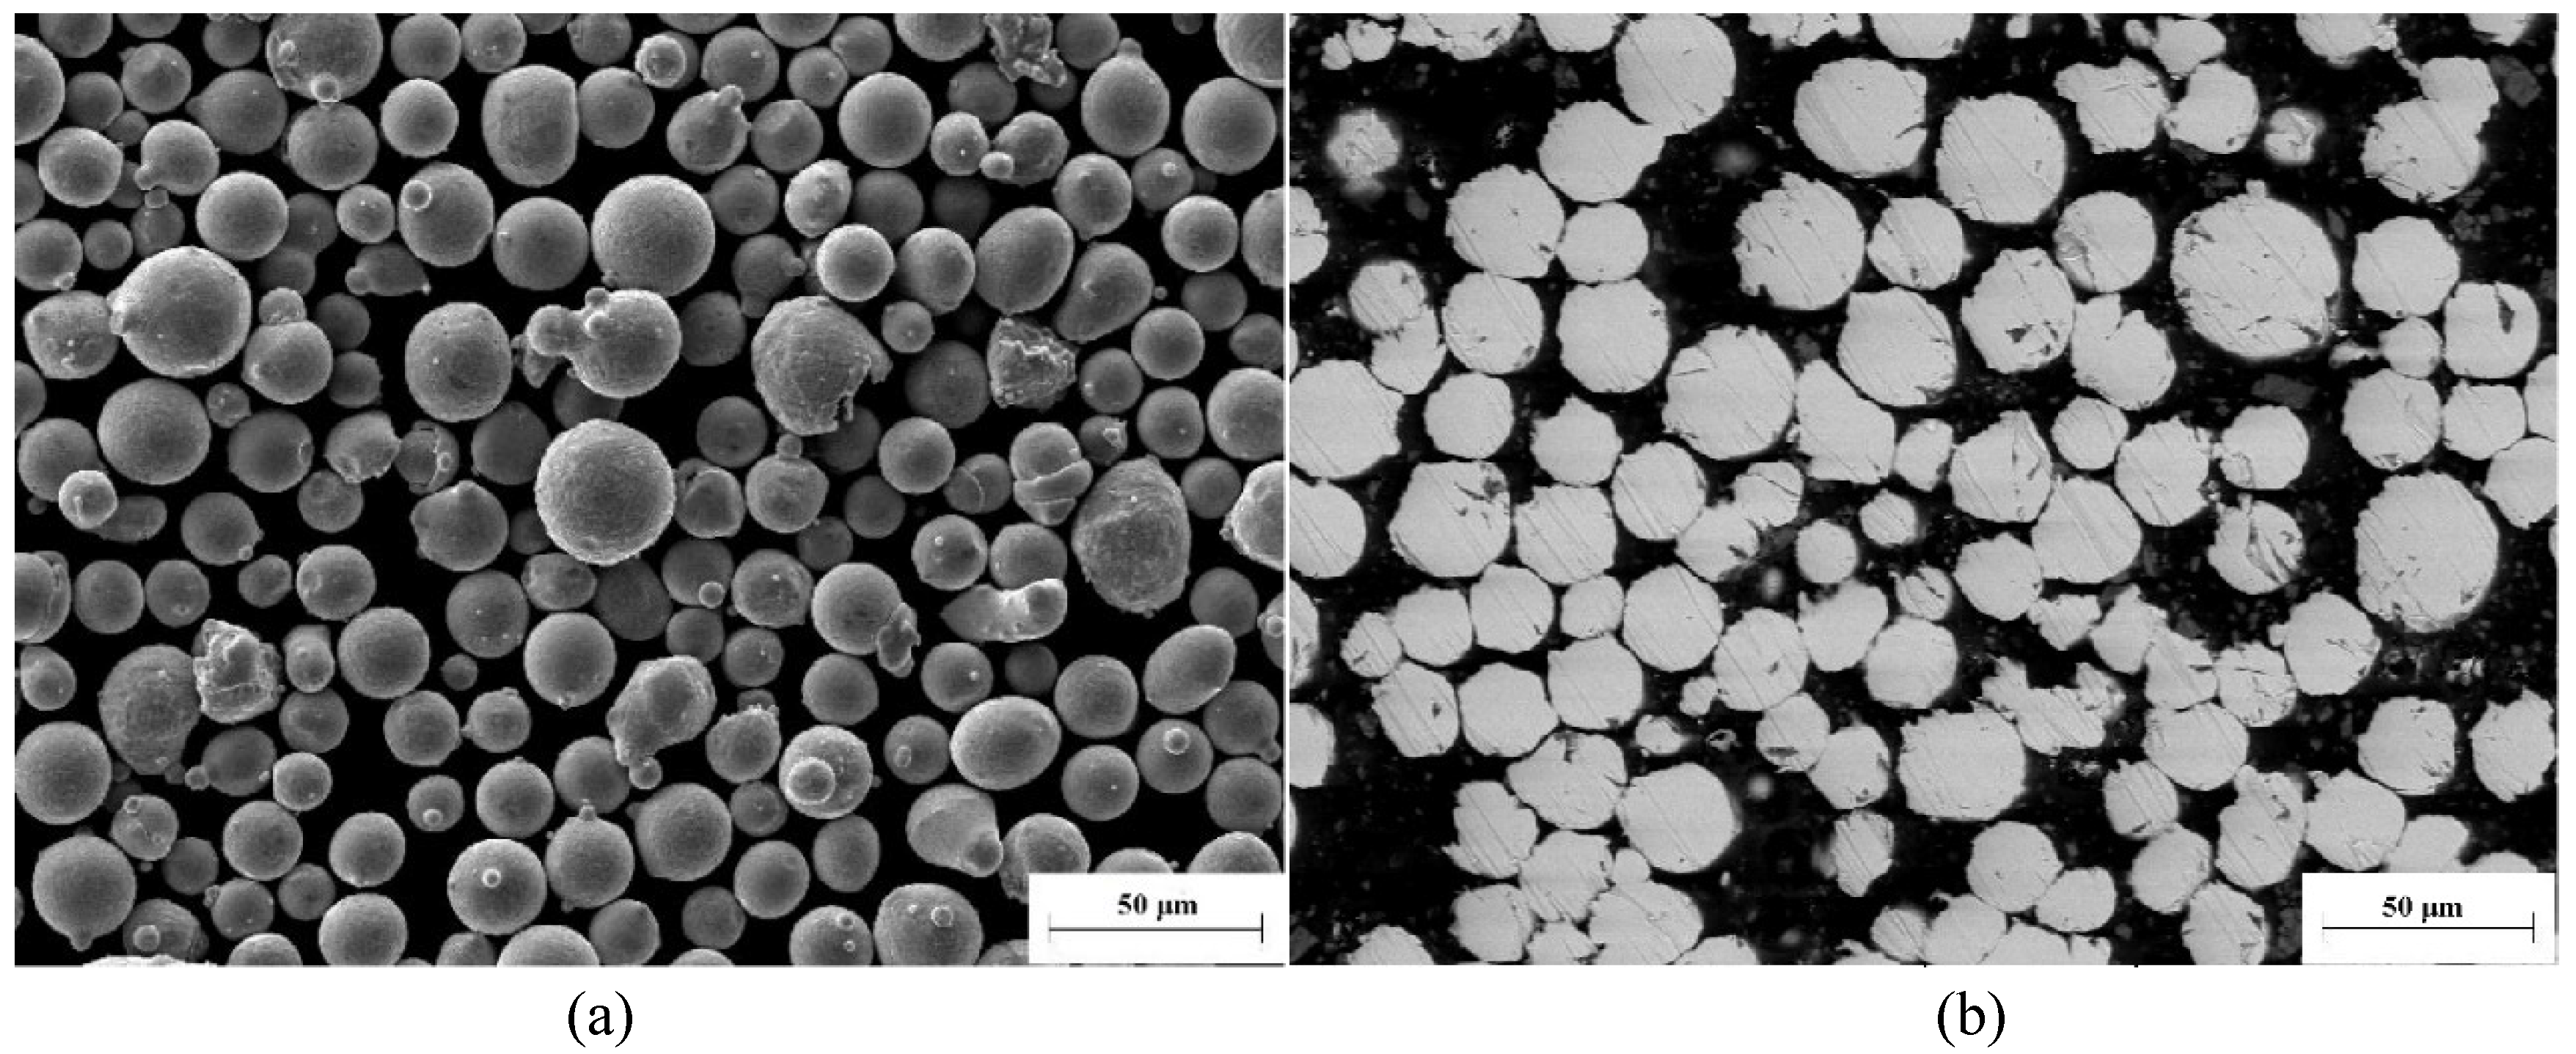
The metal powder chosen for this work is an equal atomic ratio CoCrFeNiMn powder (Beijing Avemite Powder Metallurgy Technology Co., Ltd., Beijing, China), which were spherical in shape with particle size ranging from 15 to 53 µm, as shown in
Figure 1. The chemical compositions of the powders were summarized in
Table 1. The X-ray diffraction pattern of the powder was shown in
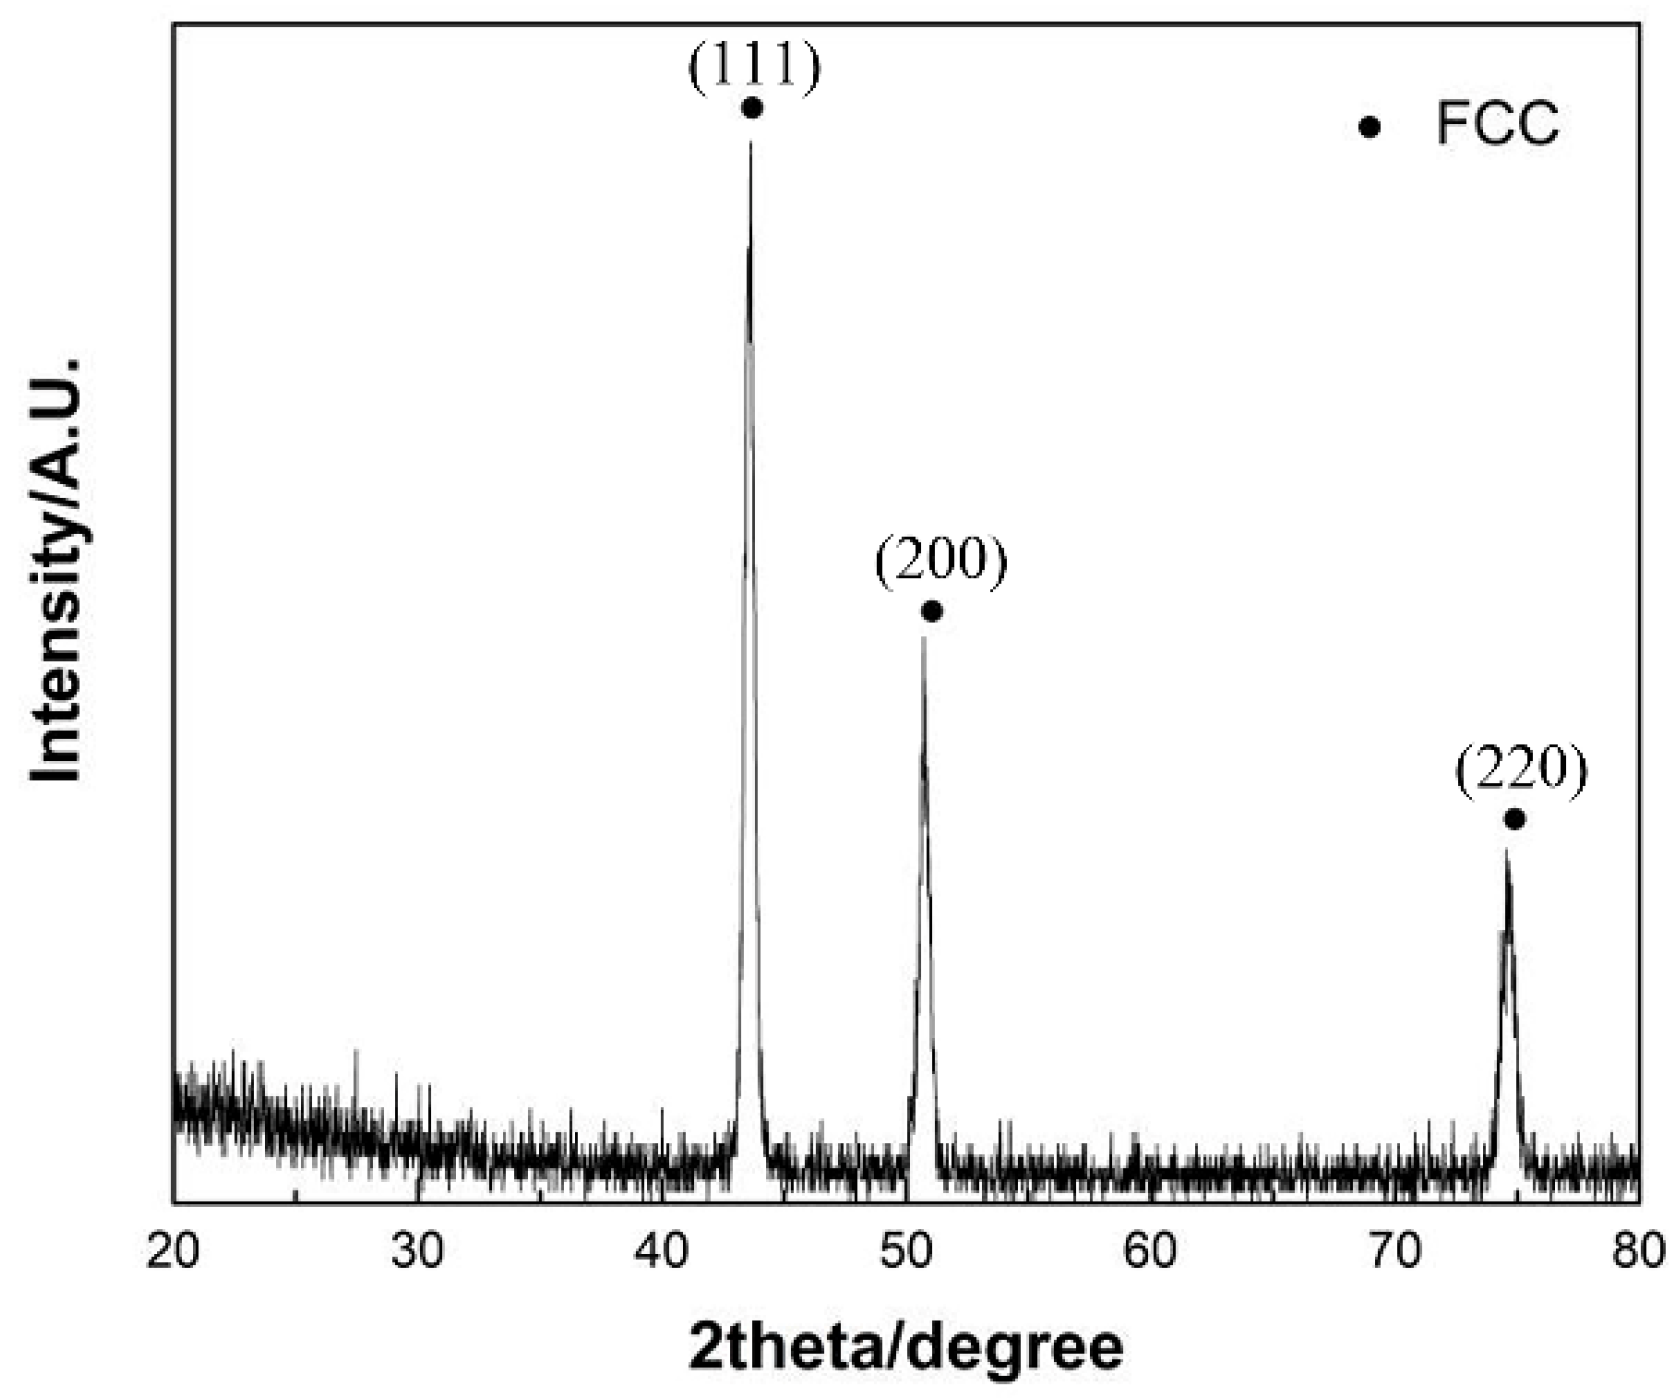
Figure 2, which shows that the powder has a single FCC phase structure. The powder was fabricated on the surface of cast iron with a size of 100 × 100 × 10 mm using a plasma welder model DML-V03BD manufactured by Shanghai Dom Machinery Co., Ltd.
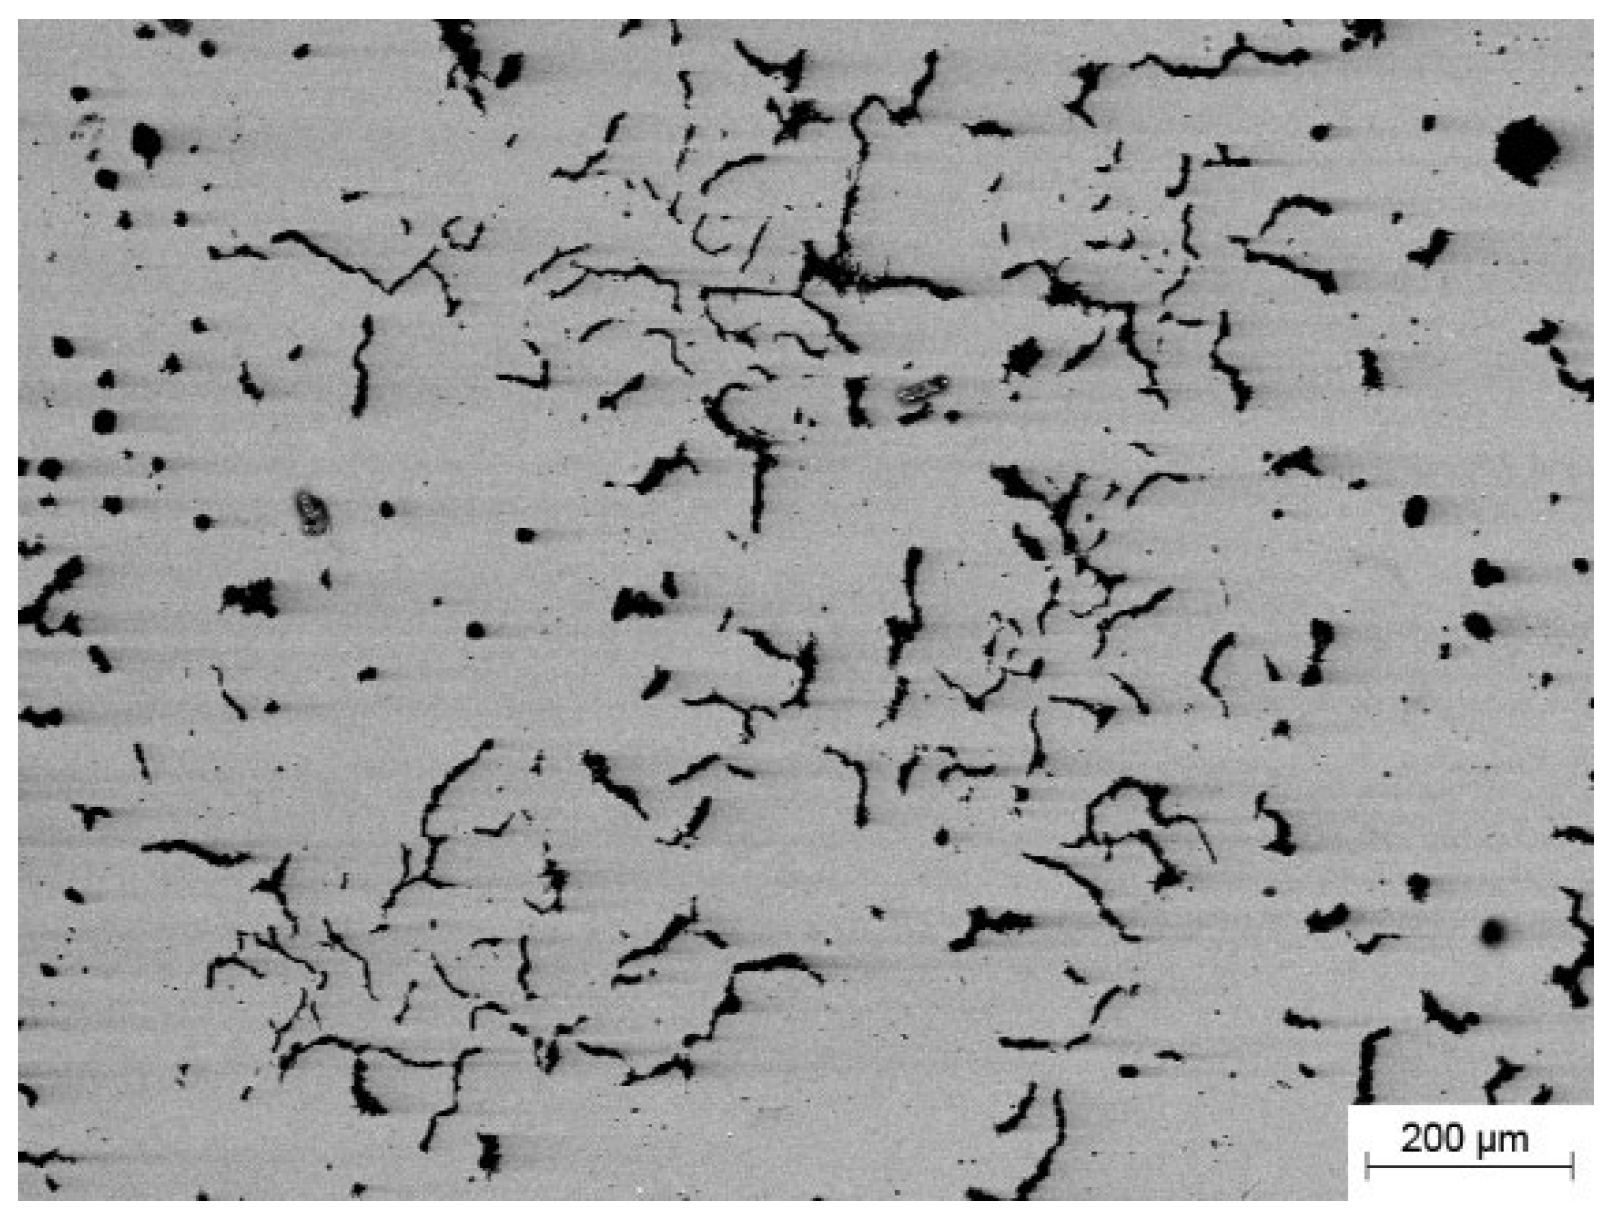
Figure 2 shows the X-ray diffraction pattern of the CoCrFeNiMn powder, which has a single FCC phase structure. The CGI consisted mainly of worm-like graphite as well as ferrite as shown in
Figure 3.
Table 2 shows the chemical composition of the CGI. The CGI substrates were cleaned with acetone and dried in an oven. Meanwhile, the CoCrFeNiMn powder was dried at 150°C for 30 minutes before depositing. Based on the previous work [41], the following plasma deposition parameters were chosen for this work: the distance between the plasma torch and the substrate was kept at 10 mm and the scanning speed was 10 mm/min. The ion gas flow rate and protective gas flow rate were 2.0 liters/minute and 8.0 liters/minute, respectively. The powder feed rate was maintained at 10 r/min. The overlap width of the multilayer cladding was 4 mm. The plasma arc current was 65 A.
2.2. Heat treatment processes
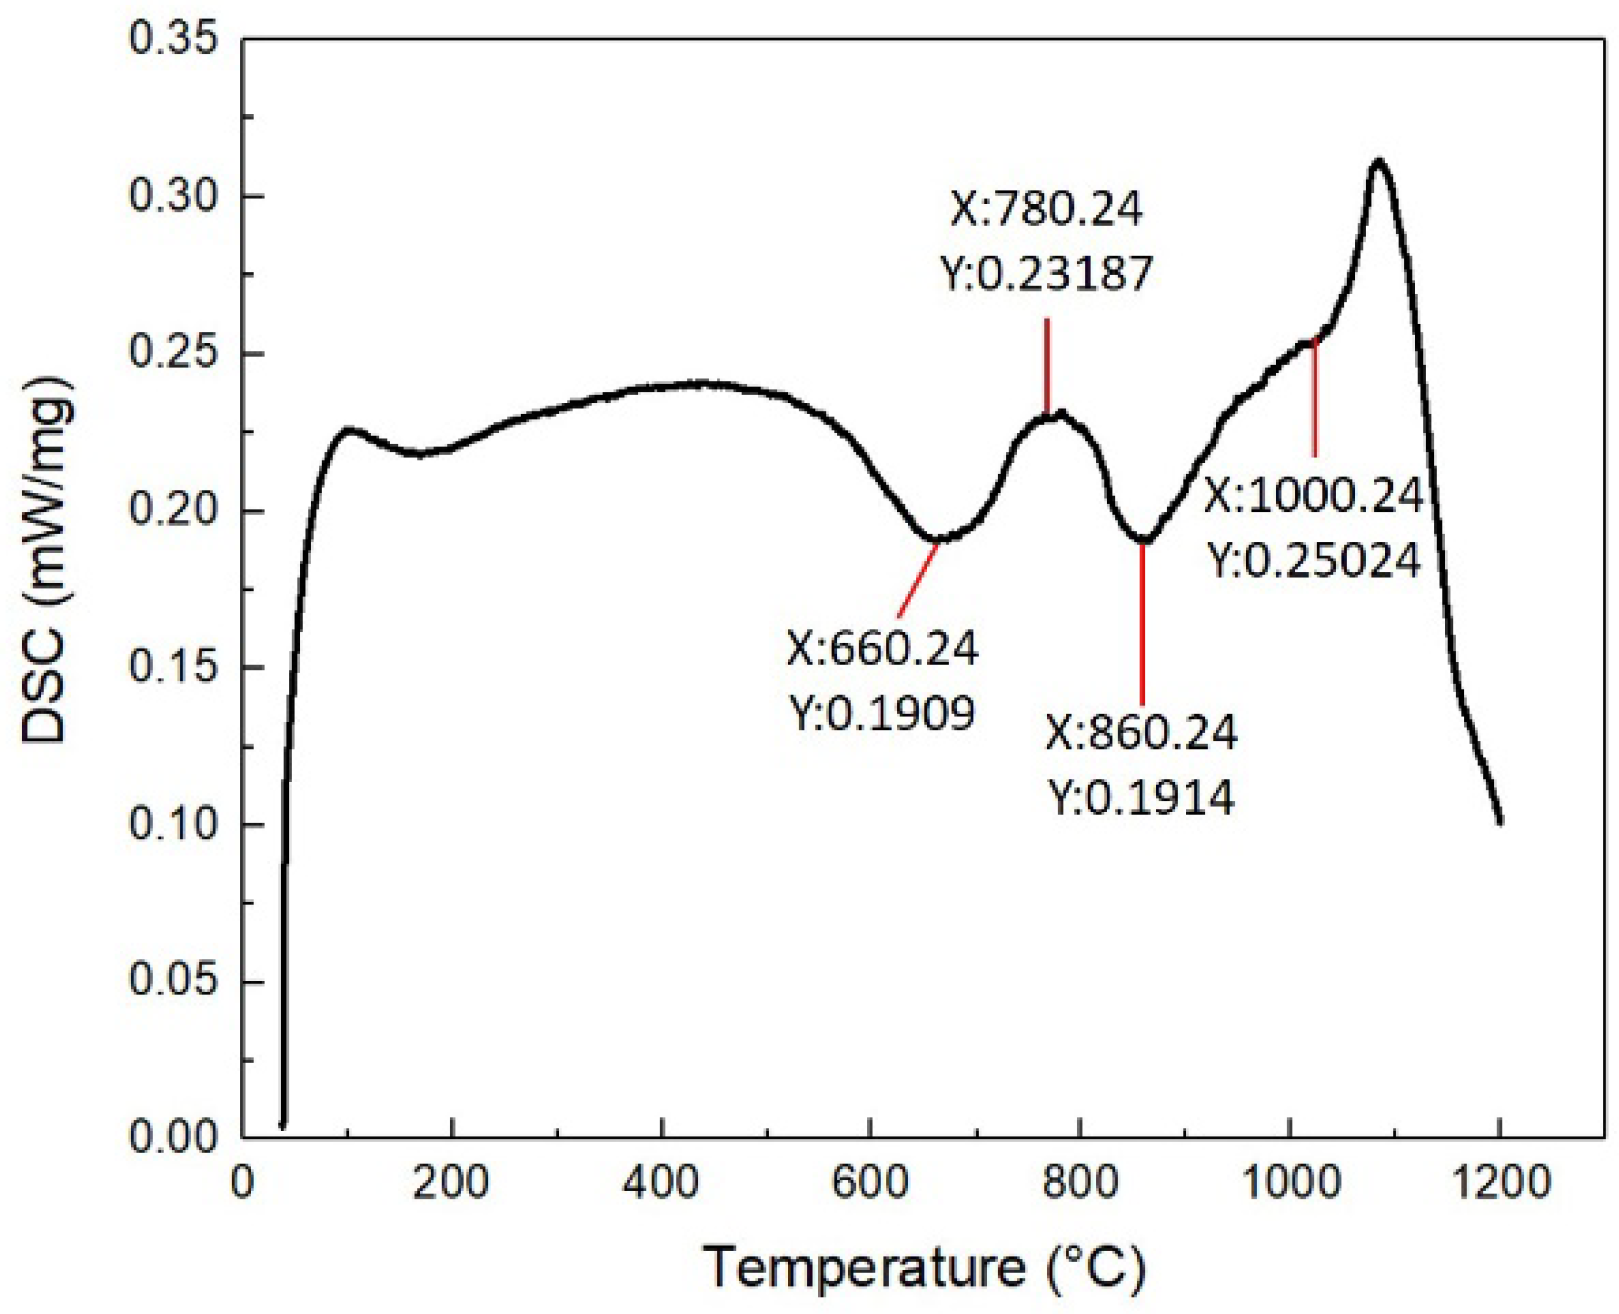
The CoCrFeNiMn coatings and substrate were cut into block specimens through wire-cut machining (WEDM). The free-stand coating was analyzed through STA 449C (NETZSCH GABO Instruments GmbH, Germany) with a sample weight of 10 mg and a breadth of no over 5 mm, heated up to 1200 °C at a rate of 10 °C per minute. The DSC results of the coating was shown in
Figure 4. The preferred heat treatment temperature and time were selected according to the DSC characteristic peaks. The heat treatment processing parameters were listed in
Table 3. The block specimens were heat treated in an atmosphere protection furnace (KSL-1100X, Hefei Kejing Instrument Co.Ltd, China) with argon as protection gas. The phases and microhardness of the heat-treated coatings were analyzed. The impact of heat treatment on the microstructure, strength and wear resistance of the coating were investigated.
2.3. Characterization of the HEA Coatings
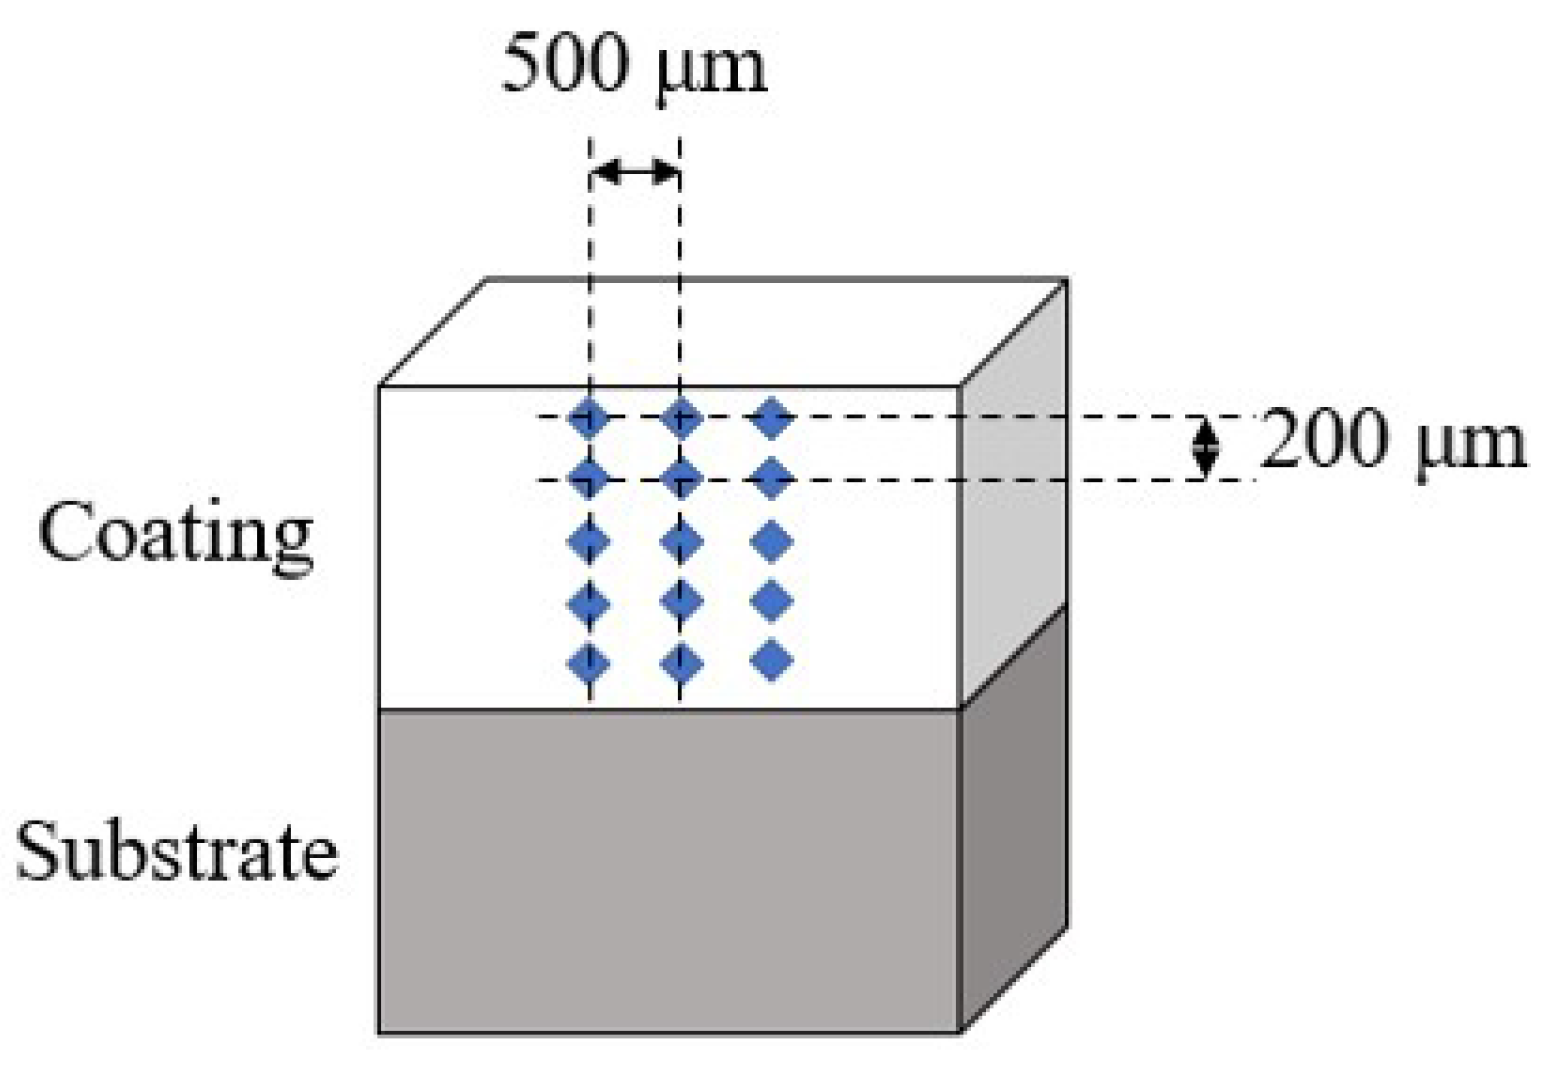
The microstructures of the powders and coatings were characterized by scanning electron microscopy (SEM, VEGA II-XMU, TESCAN, Bron, Czech Republic), and the elements of the coatings were characterized by EDS. The samples were etched with a 10% alcoholic solution of nitric acid for 3 seconds. The physical phases of the powders and coatings were analyzed by an X-ray diffractometer (D2, Bruker, USA) using Cu Kα radiation. The microhardness of the coatings was tested by a Vickers tester (HV-5, Shanghai Taimin, China) with a test load of 200 gf and a test time of 30 seconds at intervals of 200 μm from the top of the coatings to the heat affected zone, as shown in
Figure 5. To ensure data accuracy, three columns were selected for hardness testing, each column was spaced 500 μm apart.
2.4. Wear Test
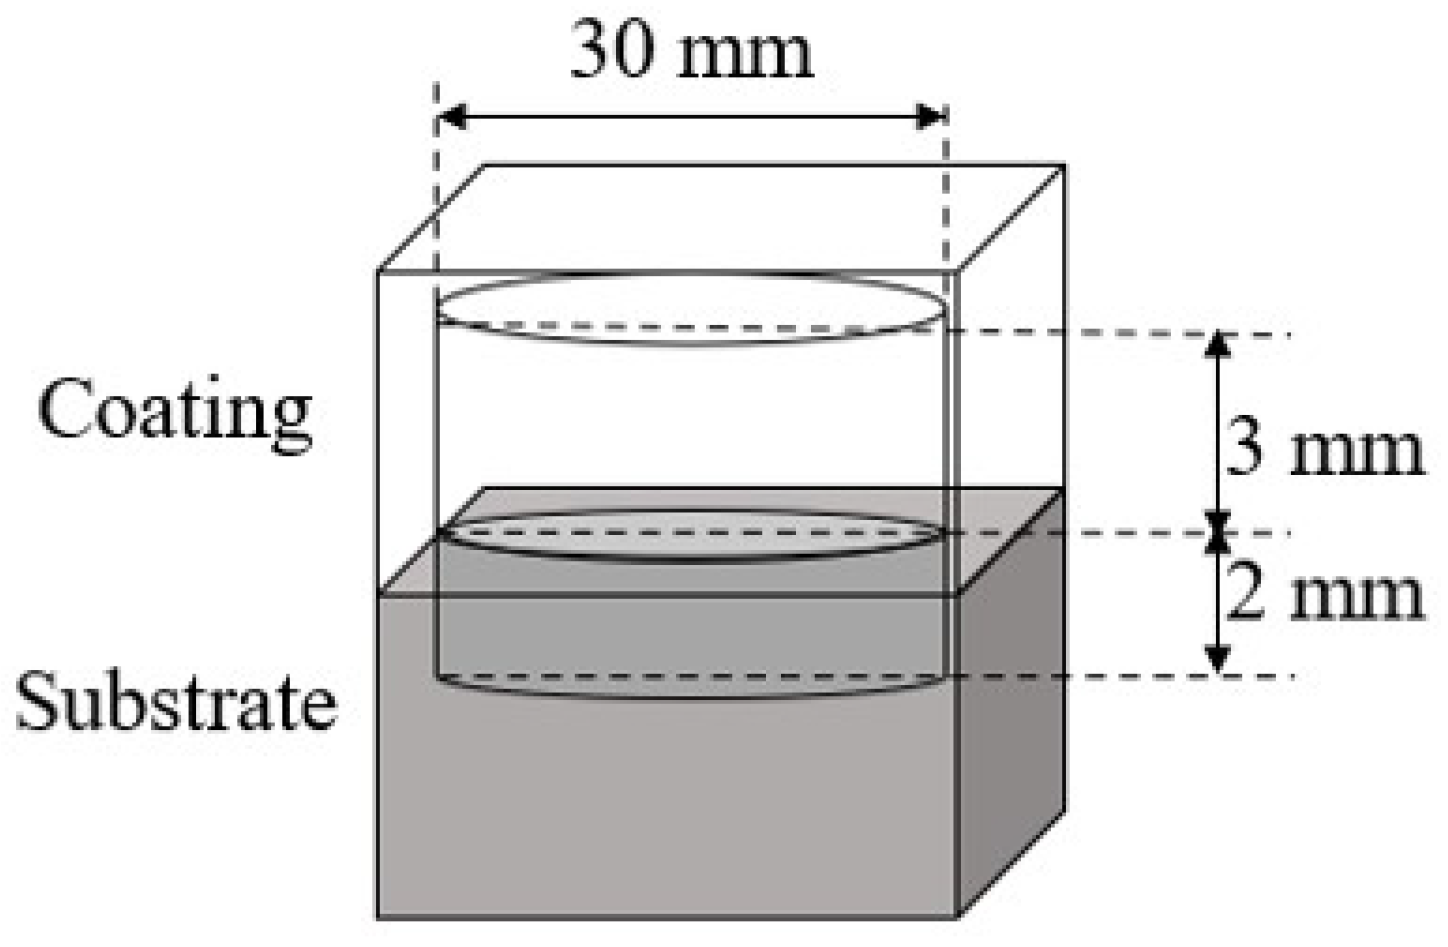
Figure 6 shows the diagram of wear test. The specimens were cut using wire cutting into cylindrical friction wear test specimens with the size Φ30×5 mm, where the coating thickness was 3 mm and the substrate thickness was 2 mm, and they were heat treated. The friction and wear test was carried out at 25 °C with a load of 10 N, a speed of 300 rad/min, and a test time of 30 min using a HT1000 friction and wear tester manufactured by Lanzhou Zhongke Kaihua Technology Development Co., Ltd. In the friction and wear test, the size of Φ 3×10 mm N80 pin was selected as the counterpart for coating. The wear mass loss of the coating was calculated by weighing the samples before and after the wear test through an electronic balance. After the wear test, the wear morphology was characterized by SEM and 3D confocal microscopy (VK-X3000, Keyence, Japan).
3. Results and Discussions
3.1. Microstructure
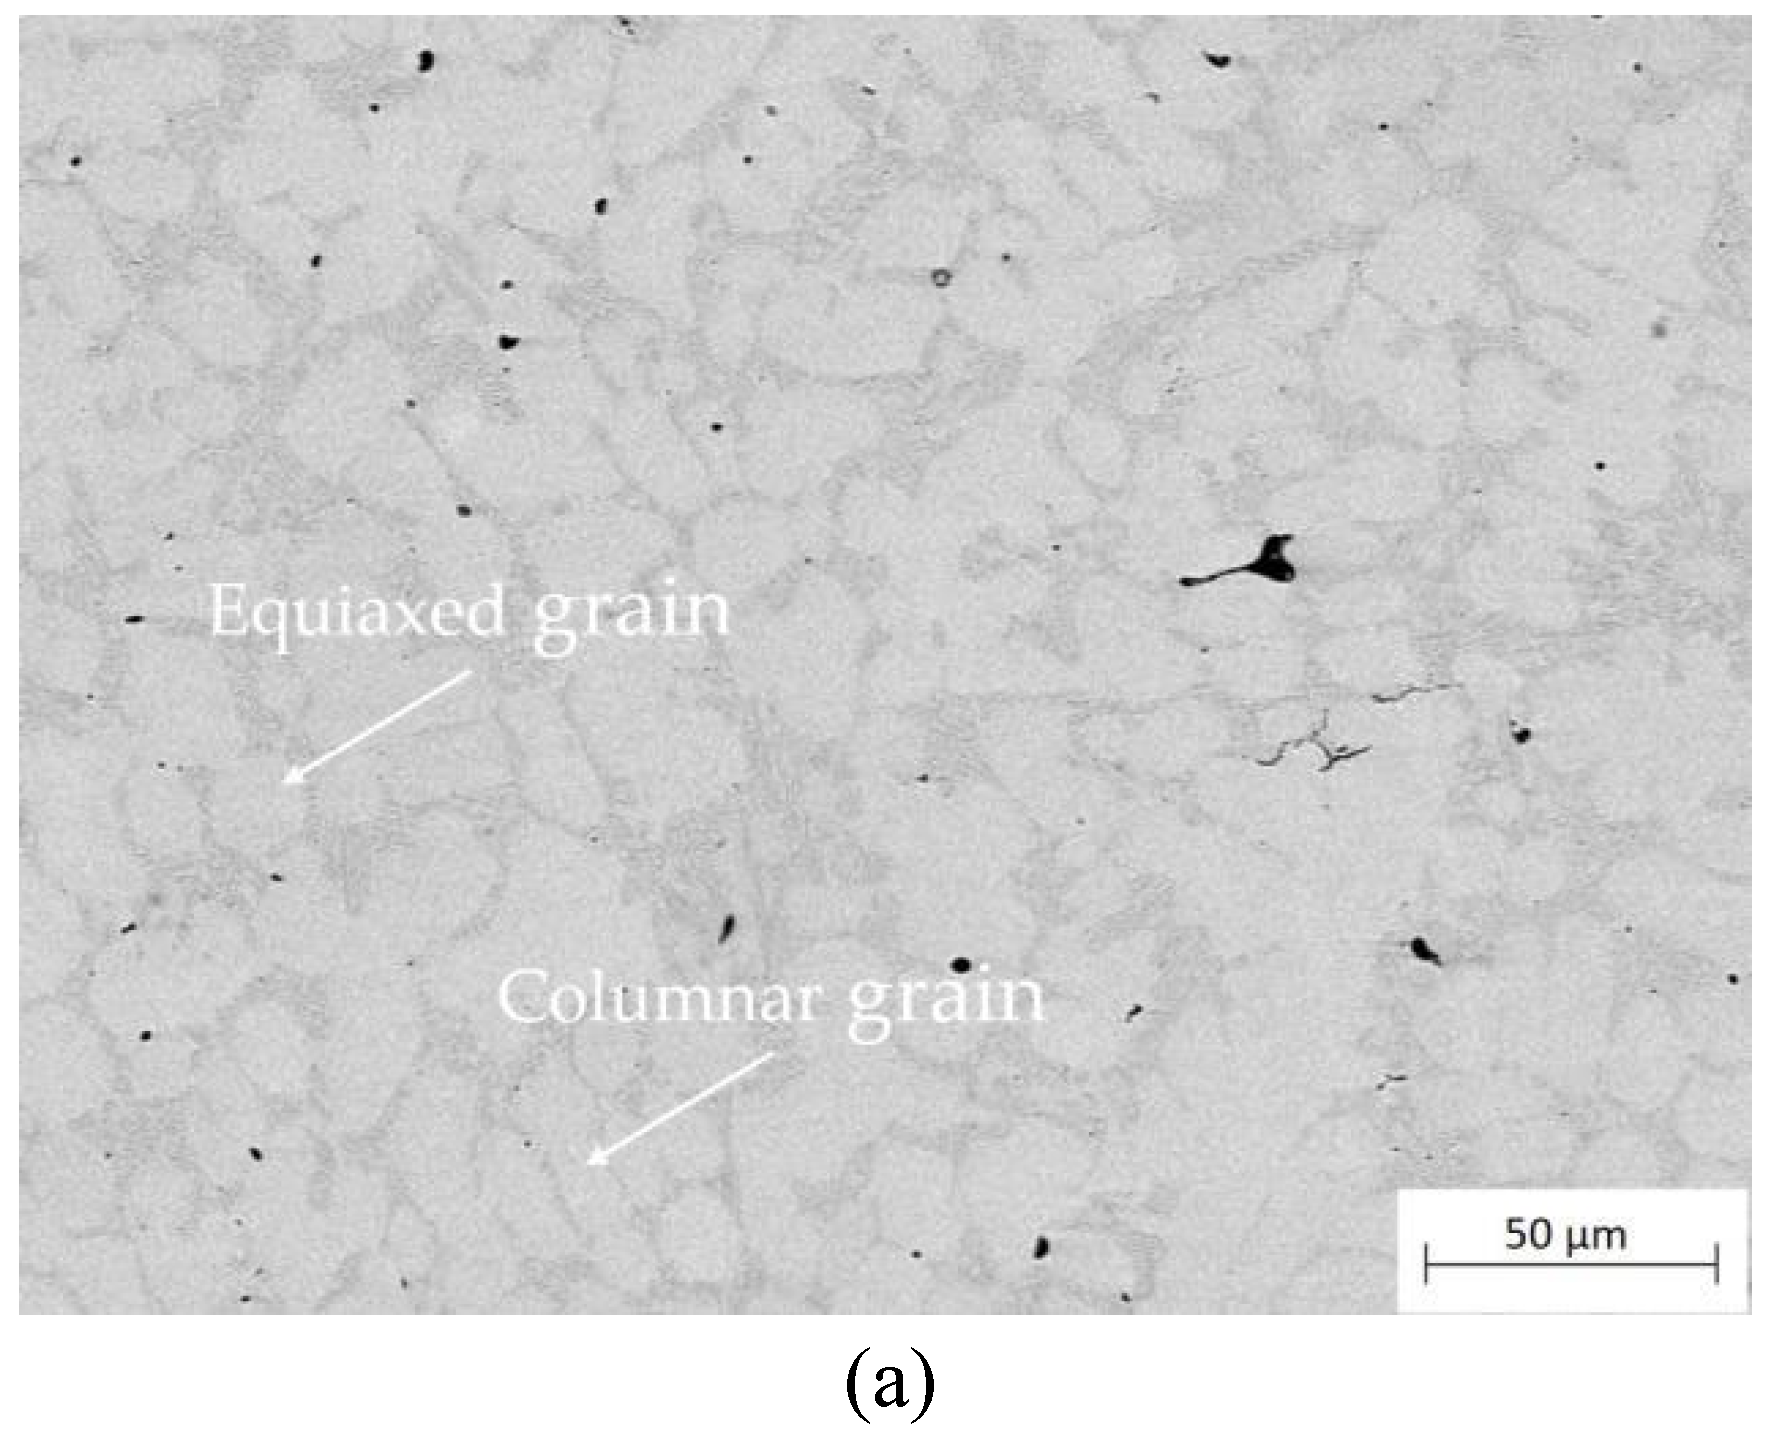
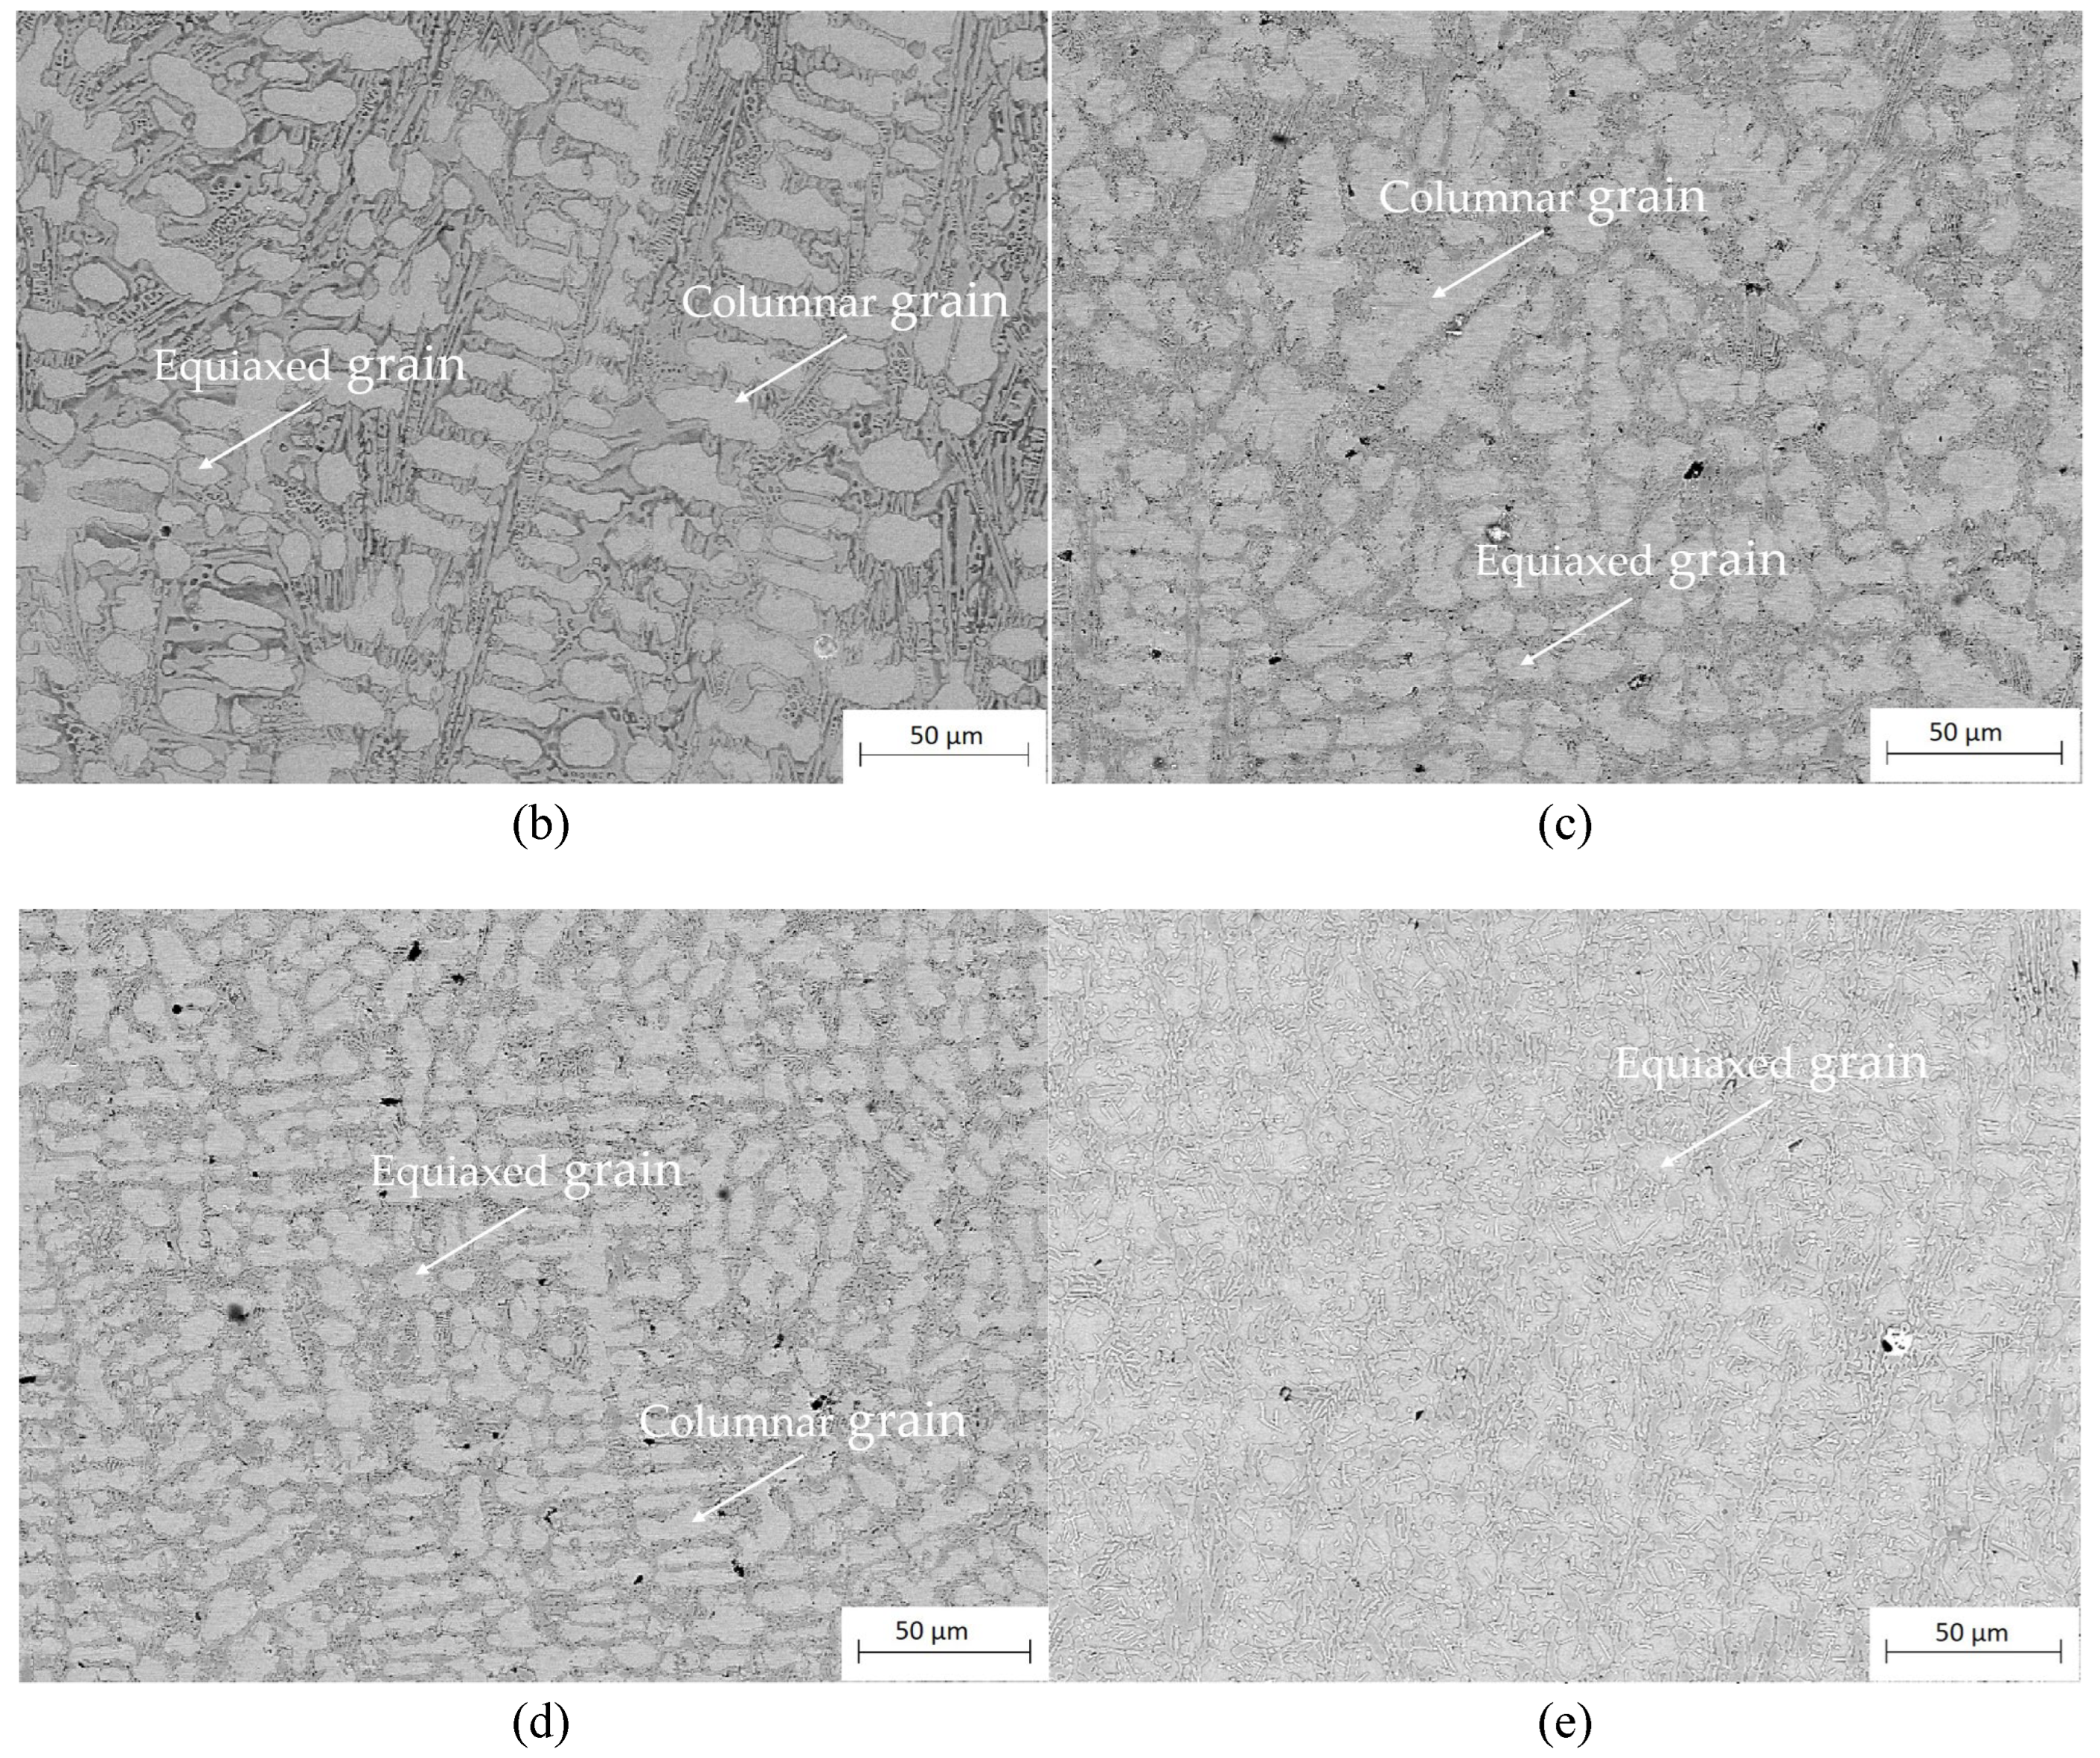
Figure 7 shows the cross-sectional microstructure of the as-cladded and heat-treated ones in middle part of the coating. The microstructure of the as-cladded coating mainly consists of columnar and equiaxed grains, which was related to the heat flow in the molten pool during the multi-pass cladding process as well as the cyclic heating and cooling in overlapped region. According to the theory of solidification thermodynamics and the direction of heat dissipation, fine equiaxed grains were generated in the top and bottom regions of the as-cladded coating because the cooling rate in these regions was greater than that in the middle of the coating, and the rate of grain growth was much lower than the growth rate. For the middle part of the as-cladded coating, the cooling rate of the liquid metal was slower, which was favorable for grain growth but not for grain nucleation, so the grain shape in the middle part of the coating was mainly coarse columnar digital grains, as shown in
Figure 7 .As the heat treatment temperature increased, the amounts of columnar grain within the middle of the coating decreased, the quantity of equiaxed grain would increase, and also the inter-dendrite step by step coarsened and solid solutions precipitated at the inter-dendrite. Once the heat treatment temperature was high to 1000°C, the grains square fully remodeled into equiaxed grain and an oversized quantity of solid solution precipitated at the inter-dendrite. Because the heat treatment temperature rise, the coating grains square measure refined and solid solution is off from the inter-dendrite, leading to fine grain strengthening.
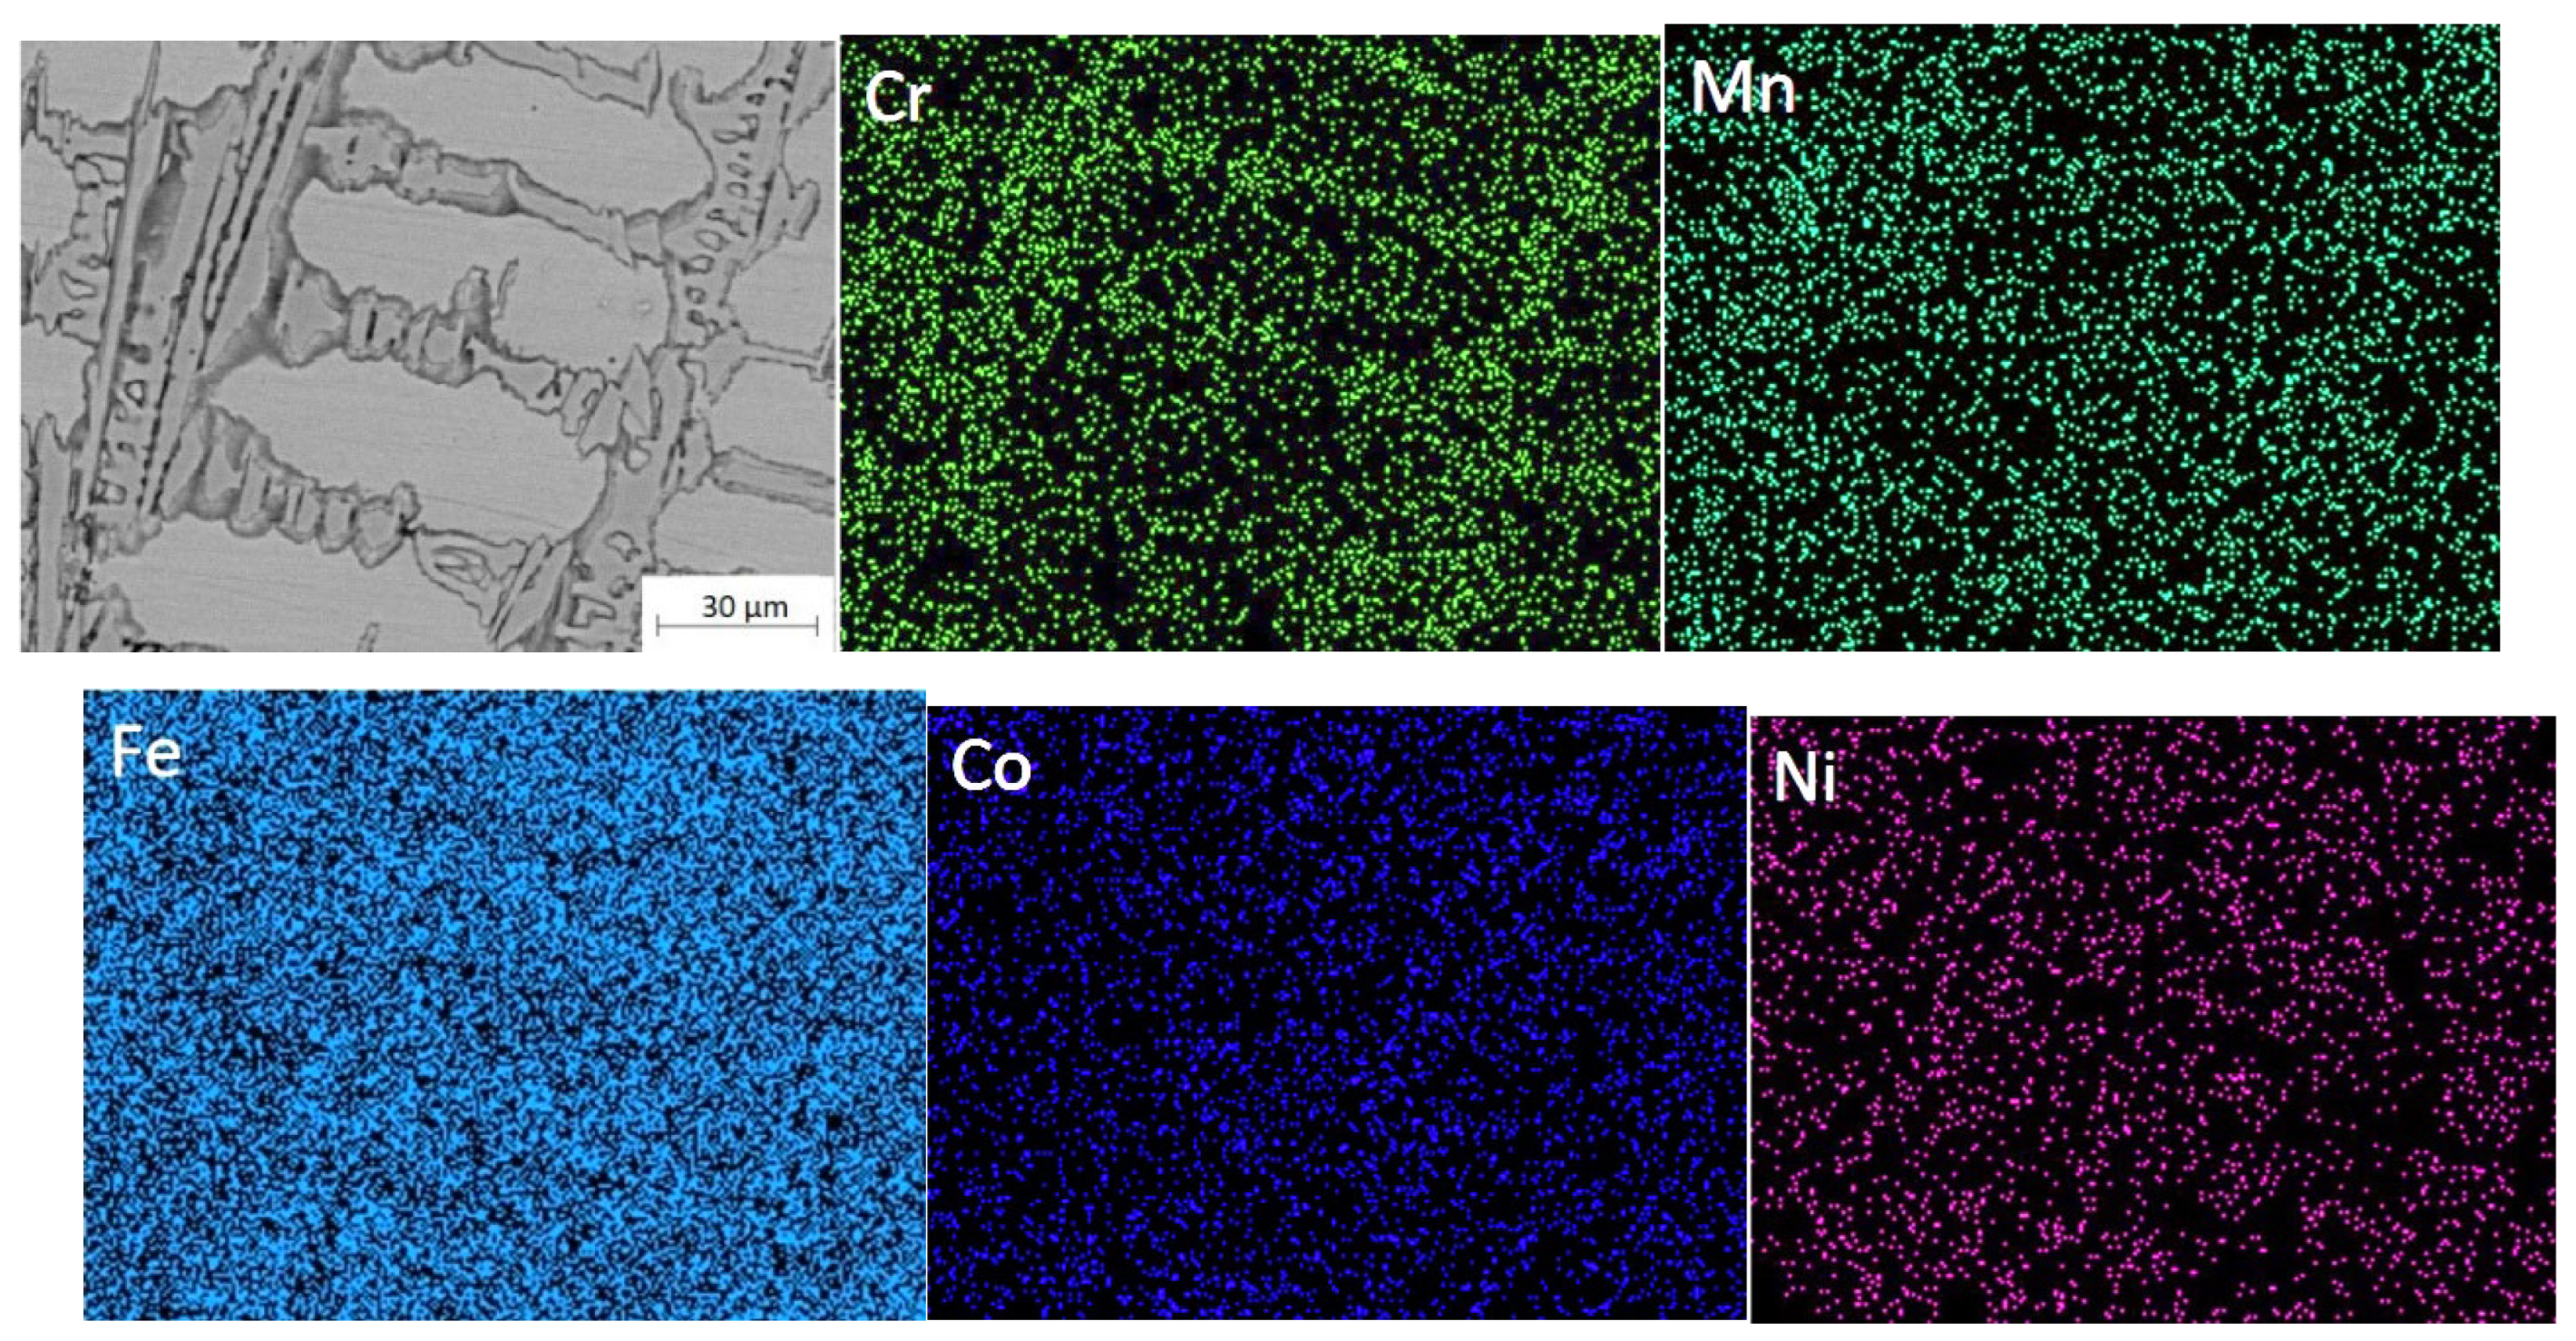
Figure 8 shows the EDS mapping in the cross-section of the CoCrNiMn coatings after a 90-minutes heat treatment at 780°C. The results were summarized in
Table 4.
Table 4 shows the composition of the dendritic (DR) and inter-dendritic (ID) regions in the central part of the heat-treated and coated CoCrNiMn coatings. The interdendritic (ID) region was rich in Cr and Mn. Iron was evenly dispersed. The distribution and enrichment of Ni and Mn in the dendritic (DR) fraction was more homogeneous than in the ID region. Elemental point analysis shows that the content of nickel and manganese elements were much higher inside the grains than at the grain boundaries. Cobalt and nickel were more concentrated in the dendritic (DR) region, while the interdendritic (ID) region contains more chromium and manganese. The elemental distribution of the as-cladded and the heat-treated coatings was mostly consistent with a rise in Cr and Mn content at the inter-dendrite of the coating. Even though there were the variations within the selected areas between the as-cladded and heat-treated coatings, they were typically consistent in the elemental distributions. As seen in
Table 4, the Cr and Mn contents of the coating were enriched considerably at the inter-dendrite once heat treated with a tiny low increase of Co and Ni elements at the dendrite, which was in consistence with the surface scan results.
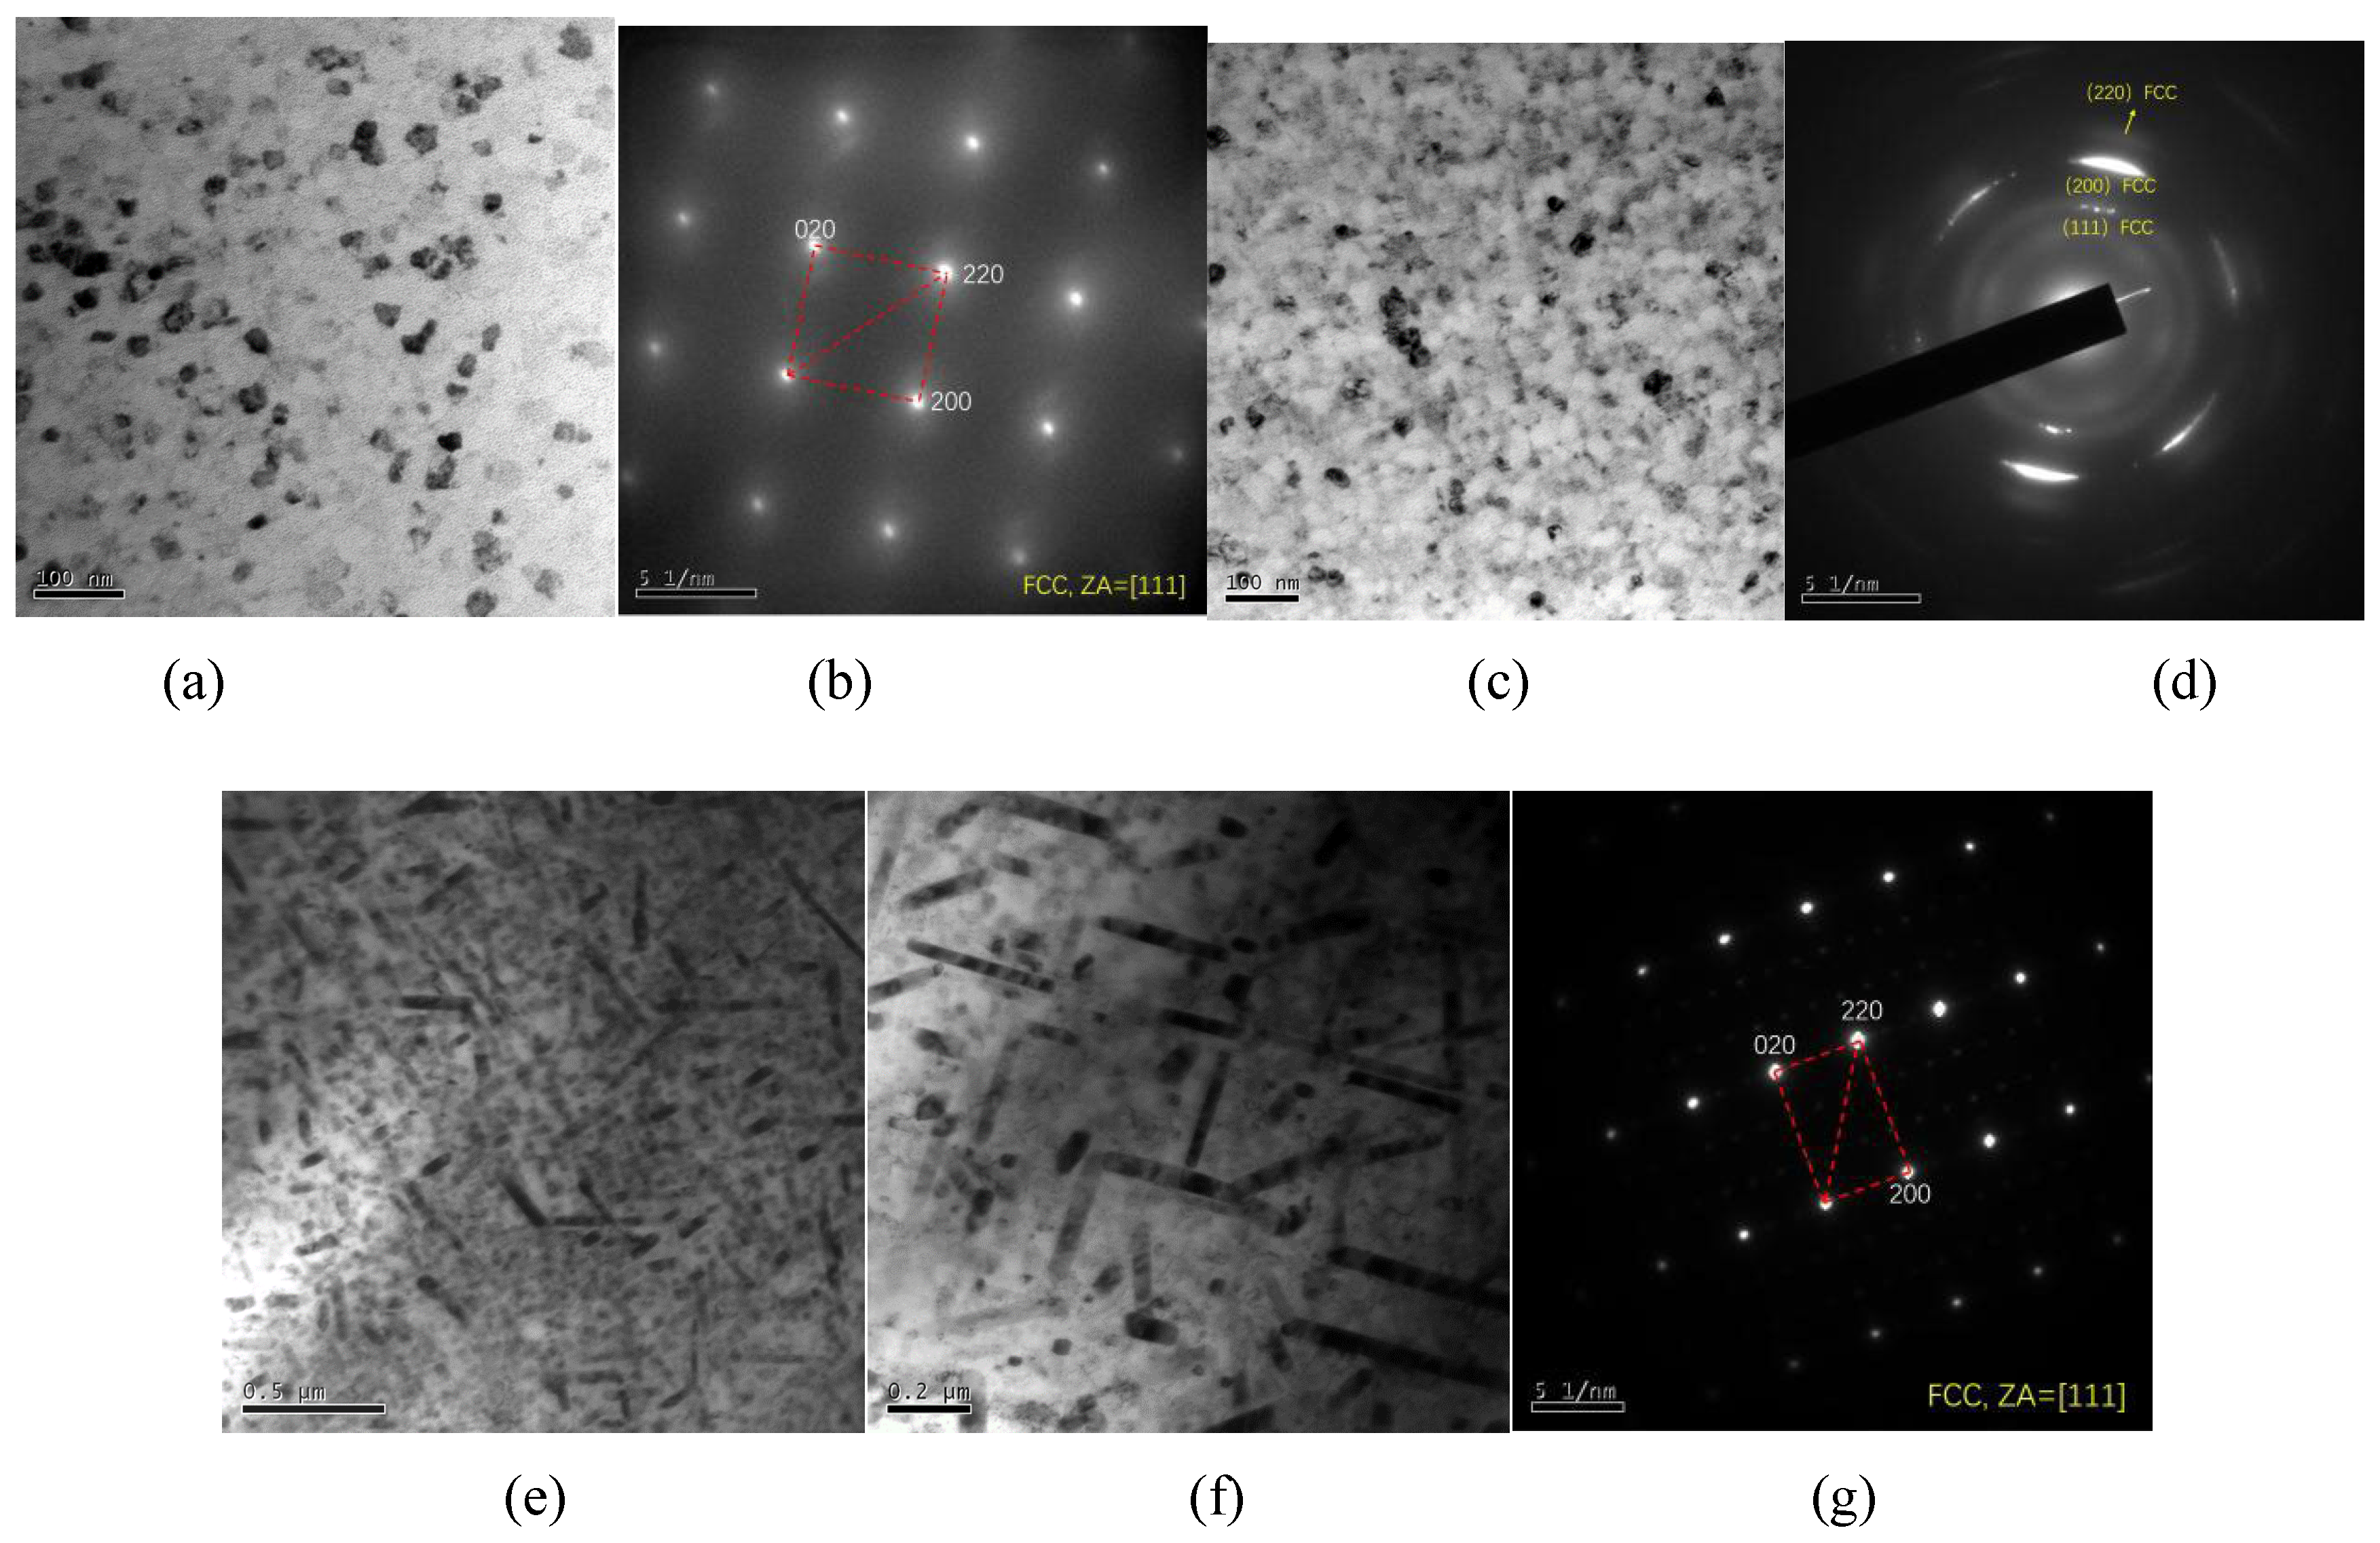
Figure 9 shows the microstructure of the coatings in high resolutions through TEM. There were large black square solid solutions formed within the coating. The square solid solutions were in an oversized range of equiaxed grain in the coating, the grain size was additionally uniform and the grain boundaries were obvious. Selected area diffraction patterns (SADPs) in the as-cladded CoCrFeNiMn coating were confirmed that the as-cladded CoCrFeNiMn composed of FCC solid-solution phase on the other hand. The electron diffraction patterns in the chosen area, as illustrated in
Figure 9d, revealed that the diffraction spots in semi-continuous circles were composed of grain boundaries with high angles of misorientation. The detected spots’ indexes were consistent with FCC phase structure. The coating presented an oversized quantity of patterned black solid solution after heat treatment. The grain size of the coating has been refined after heat treatment, which was mainly due to the solid solution of the microstructure after heat treatment, and the elements inside the grains were dispersed towards the inter-dendritic area. The SADPs, as shown in
Figure 9, made sure that the heat-treated CoCrFeNiMn coatings composed of the FCC phase once more. The coatings had a single FCC phase both in the as-cladded and heat-treated ones.
3.2. Phases
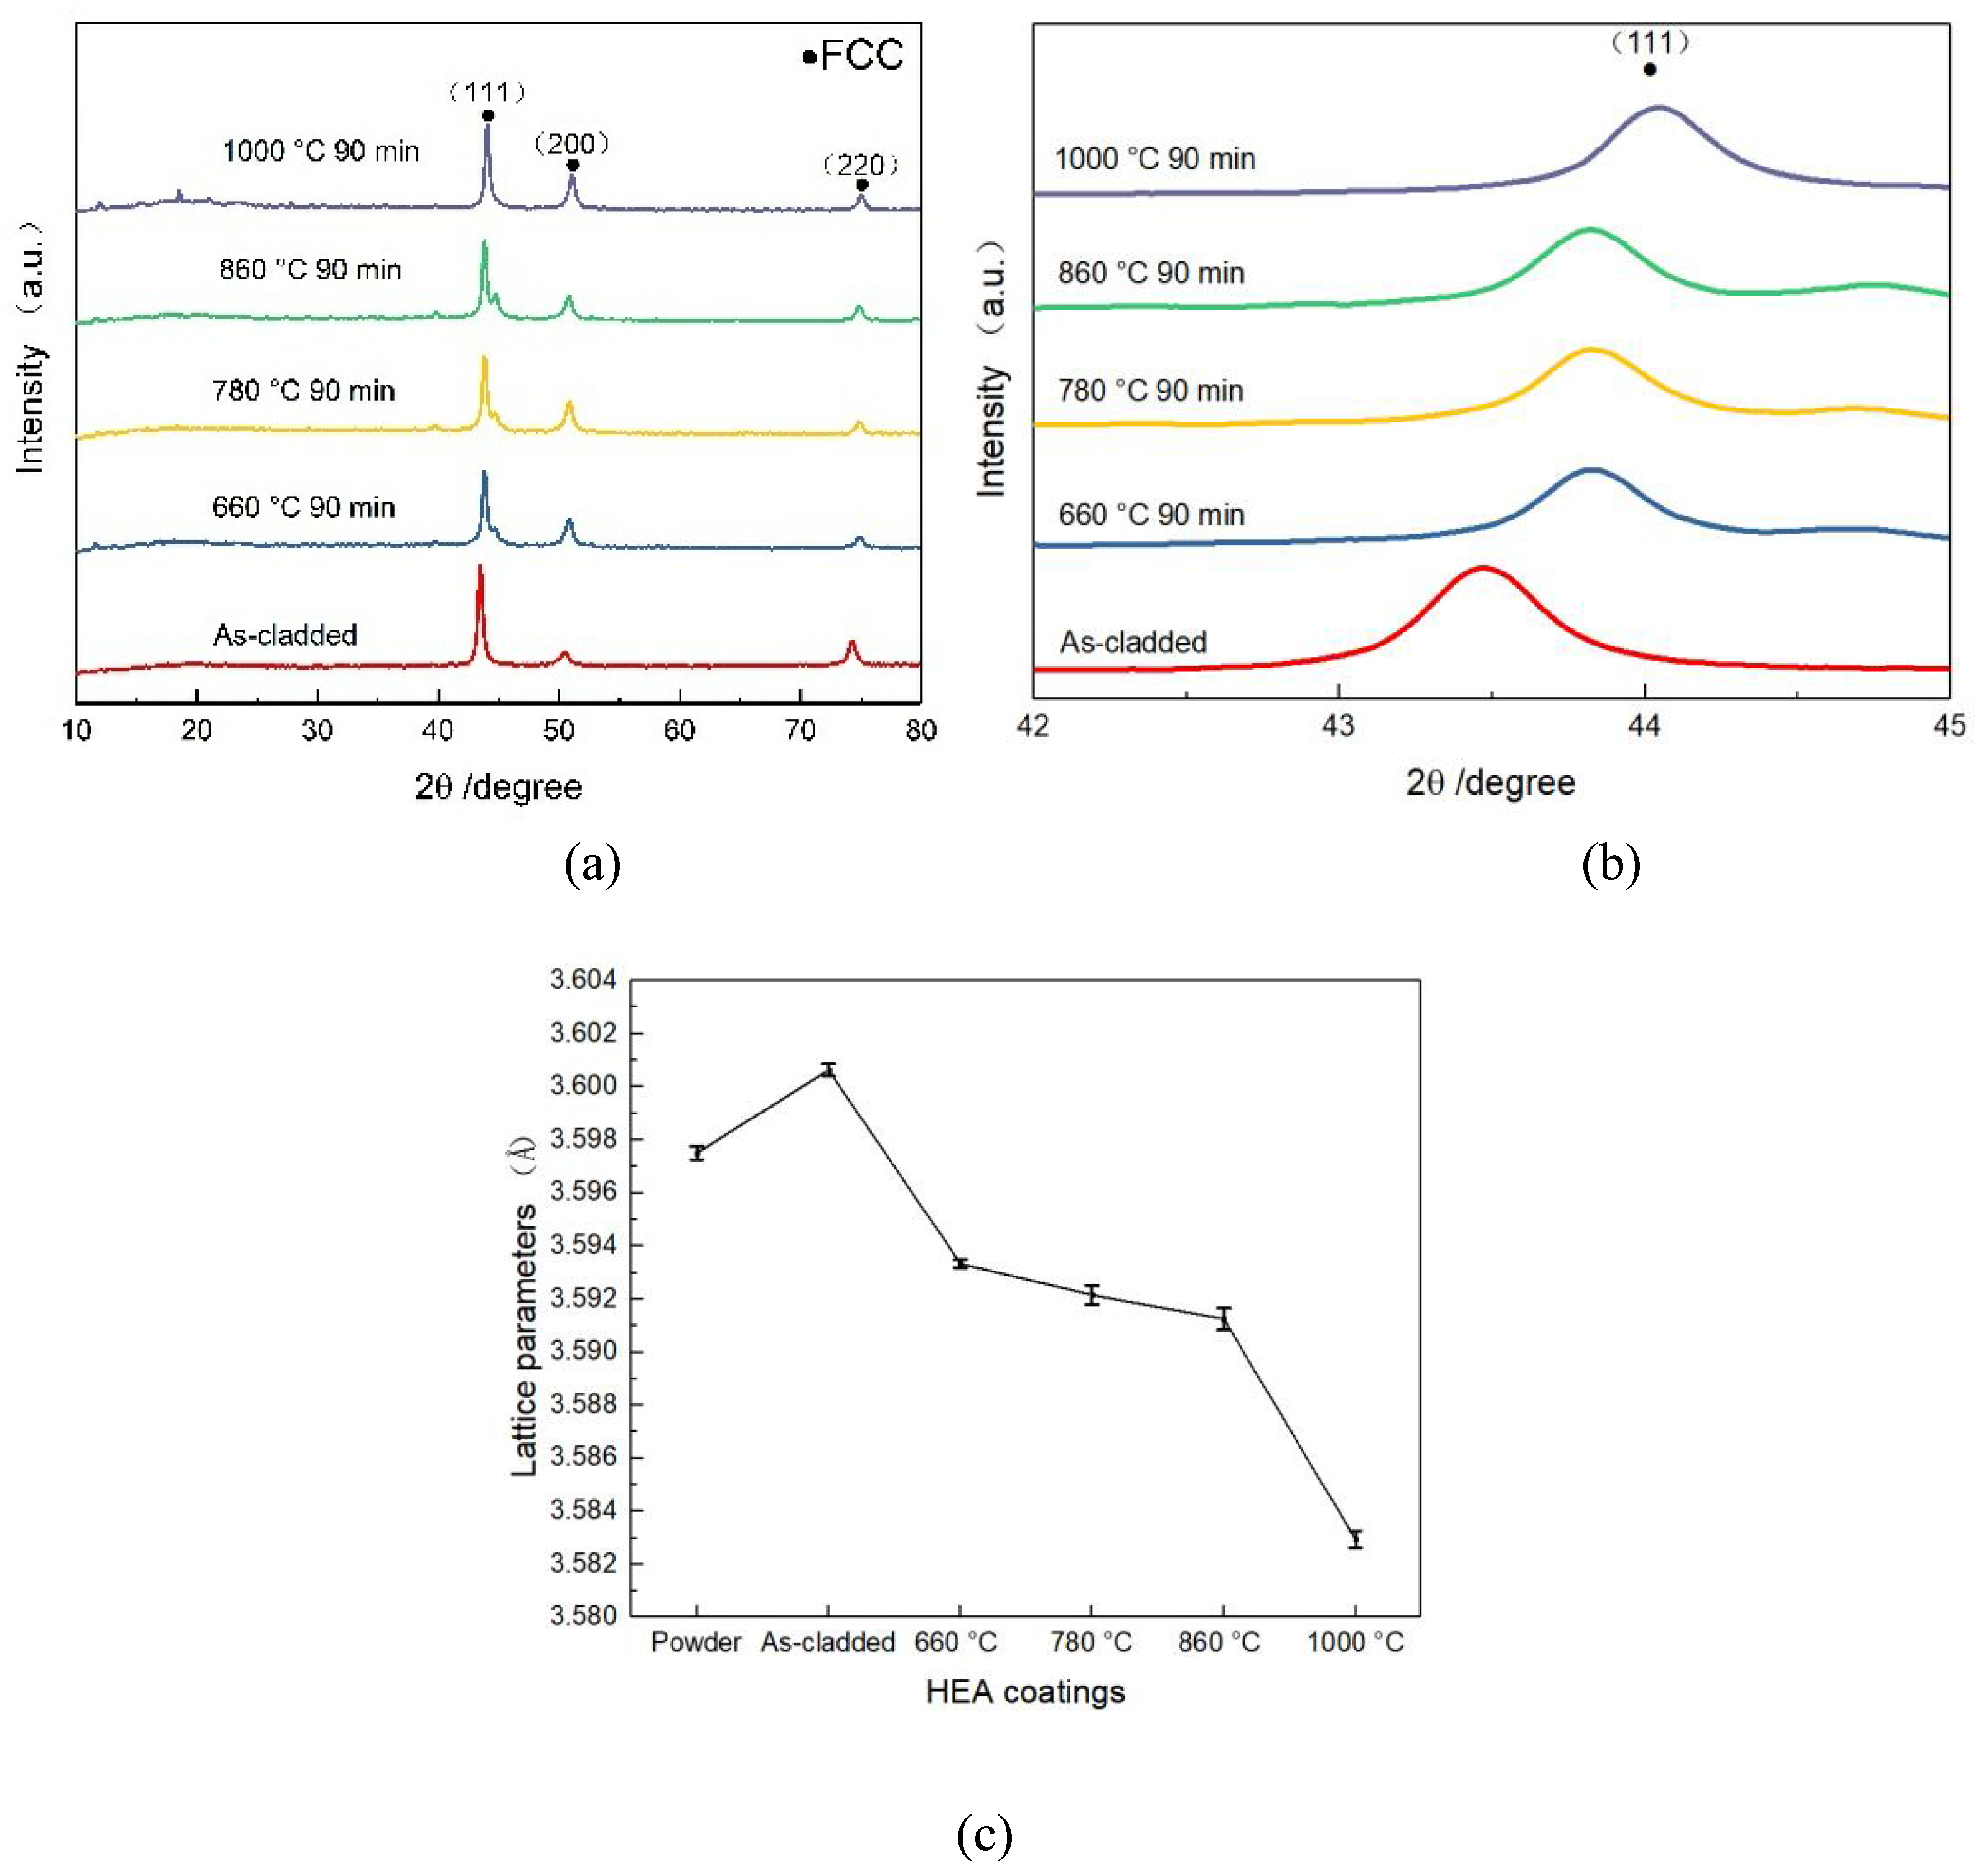
Figure 10 shows the XRD patterns of the CoCrFeNiMn coatings and the heat -treated ones with 3 major characteristic peaks at 2θ angles of 43.23°, 52.69° and 73.60°. The characteristic peaks were in correspondence with the results of D.Y. Lin et al [
32] and the (111), (200) as well as (220) lattice planes in face-centered cuboidal (FCC) solution with PDF card no. 33-0397. The coating consisted of stable single solution phase both in the as-cladded and heat-treated ones. The formation of the single-FCC phase was attributed to the high structural entropy of the five elements in the alloy, which results in a high entropy alloy with a low Gibbs free energy, favoring the maintenance of a single-phase structure for the alloy system [
33]. According to the physical science relations, the Josiah Willard Gibbs free energy (ΔG
mix=ΔH
mix-T×ΔS) changed and there was an outsized negative mix therapy among the elements of the system thanks to the iso-atomic quantitative relation of the mixed system, wherever the H and entropy changed reciprocally [
34]. The (111) peak exhibited the strongest diffraction intensity among all peaks, which meant a discriminatory growth of the crystal on this parallel direction. The intensity of the (111) and (200) peaks increased significantly with increasing heat treatment temperature, while the intensity of the (220) peak decreased. With magnified 2θ varied from 42° to 45°, as seen in
Figure 10(b), the (111) peak increased and became wide gradually with the increase of the temperature, which indicated that the increase of heat treatment temperature resulted in a slight decrease in grain spacing and a refinement of grain size [
35]. Once heat treatment was performed between 660°C and 860°C, a tiny low peak appeared on the proper aspect of (111) and exaggerated gradually in intensity. However, the proper aspect of (111) peak disappeared once the temperature exaggerated to 1000°C, which was attributed to recrystallization occurred at 1000°C. Since the manganese component has always had a low saturated vapor pressure and also a high capacity for deoxygenation and slag removal, it has the highest rate of combustion loss and a large amount of volatiles in the same environment. Meanwhile, the experiments were conducted in a full argon environment throughout the heat treatment to prevent oxidation [
36]. Therefore, there were no oxidization peaks existed in the XRD patterns.
The lattice parameter of the phases were calculated from the Scheler equation in the X-ray diffraction pattern and the results were shown in
Figure 10(c). It was found that the lattice parameter decreased from 3.59334 Å to 3.58295 Å with the increase of heat treatment temperature. The powder’s lattice parameter was 3.59751 Å and the as-cladded coating’s lattice parameter was 3.60063 Å. When the plasma arc current was 65 A, the heat input of the plasma cladding was larger and the heating rate as well as cooling rate of the protective cladding method was accelerated. The supercooling resulted within the CoCrFeNiMn HEA coating with more solid solutions, which eventually prompted a coating with a lattice parameter larger than that of the powder. During the heat treatment processing, the coating’s desolvation rate would increase and lead to lower lattice parameters. Additionally, it has conjointly been reported that the decline of the lattice constant was attributed to the precipitation of excess substance atoms [
37] and reduce of stress concentration [
38].
3.3. Microhardness
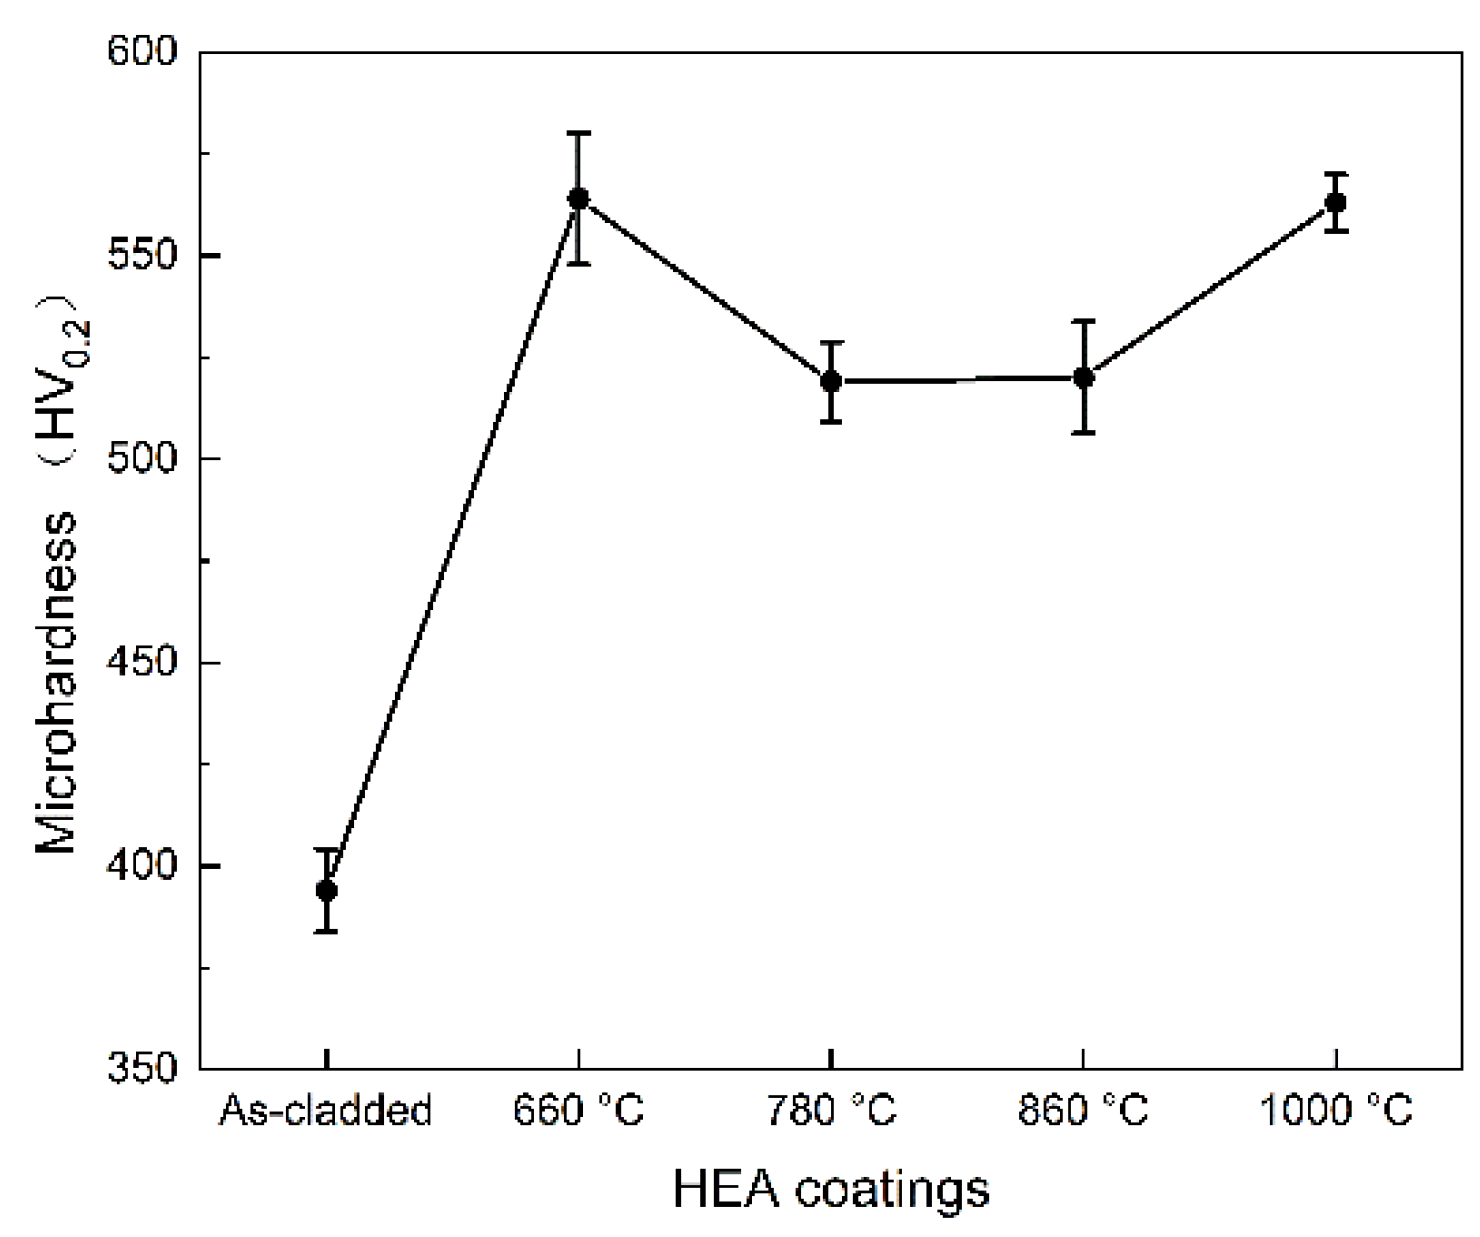
As can be seen in
Figure 11, the microhardness of the heat-treated coating was significantly higher than that of the as-cladded. When the heat treatment temperature was increased from 25 °C to 660 °C, the microhardness of the coating showed a sharp increase, and when the temperature was increased from 660℃ to 860℃, the microhardness of the coating decreases. When the temperature was increased to 1000℃, the microhardness of the coating increased again. When the CoCrFeNiMn coating was heat treated at 660°C for 90 minutes, it exhibited the highest microhardness of 563±6.9 HV
0.2. During heat treatment, some elements would desolate and precipitate from the solid solution, which would weaken the solid solution strengthening effect partially. While, with the rise of temperature, the coating grains were refined bit by bit accompanying with fine grain reinforcement effect. Meanwhile, there were {Fe-Cr} precipitations along the coating’s grain boundaries, similar to Ye‘s work [
39] and Zhang‘s results [
40], which contributed to the coating’s high microhardness mainly. In Shim’s work [
41], the microhardness varied from 213Hv (for Cu+Mn-rich FCC) to 325 Hv(Cr+Fe-rich BCC). As seen in
Figure 11, the precipitation of solid solution at the grain boundaries of the coating would enhance the microhardness principally for the grain boundary precipitation strengthening.
Combined with the SEM image, the analysis of the precipitation of solid solution at the grain boundaries incorporated with an improvement of the coating microhardness.
3.4. Wear Resistance
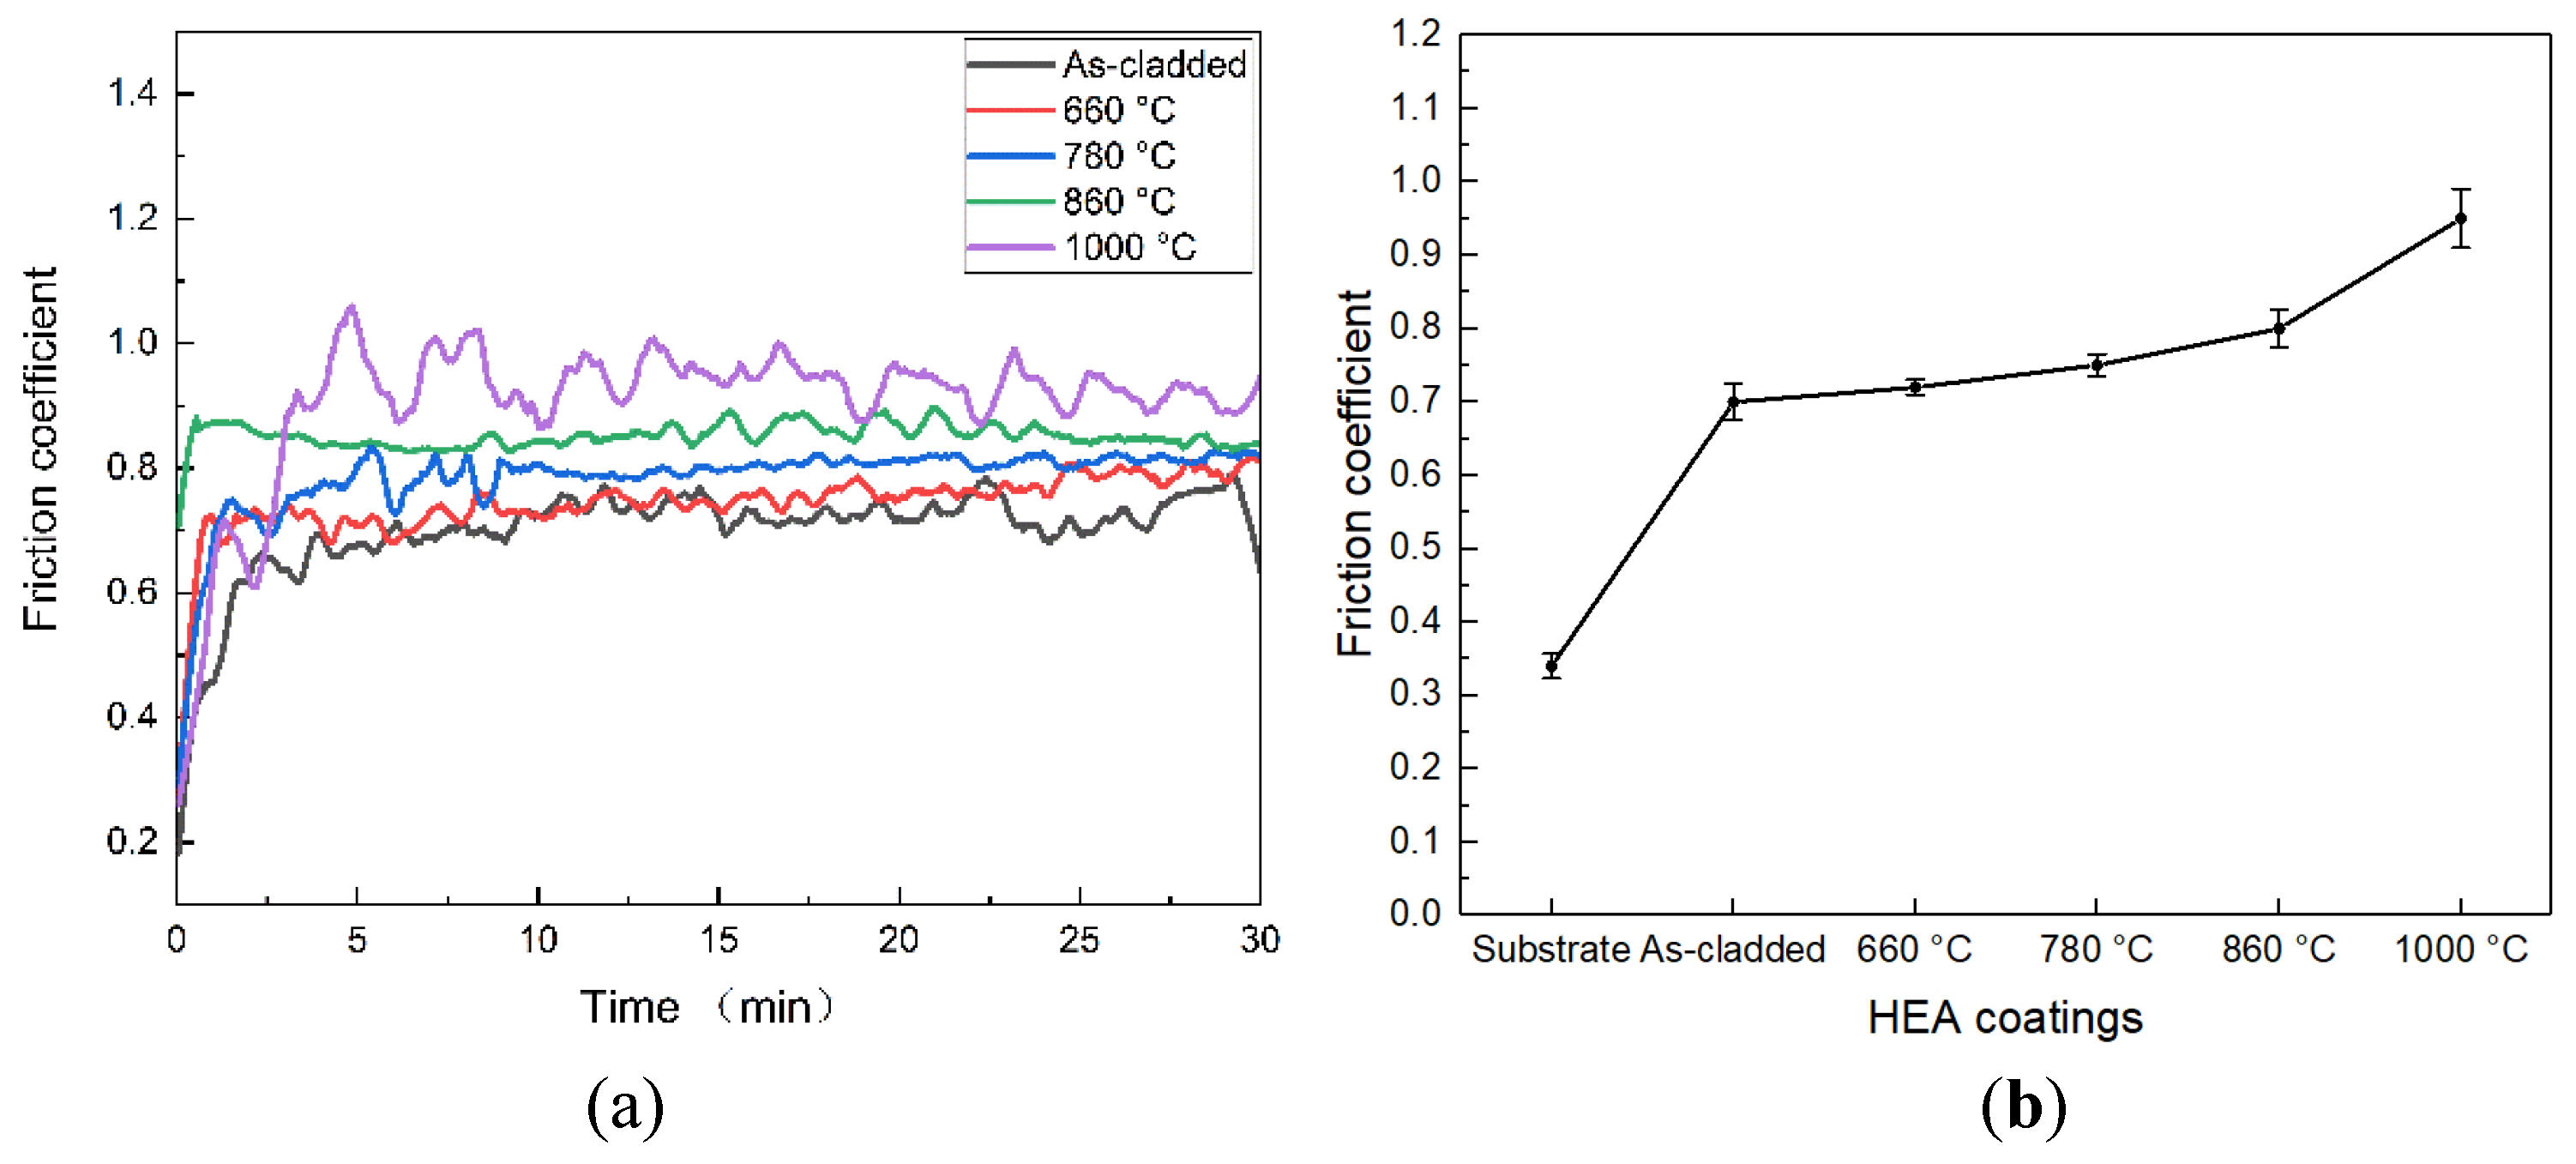
Figure 12 shows the frictional coefficient and the average frictional coefficient of the as-cladded CoCrFeNiMn coating and the heat-treated ones. The frictional coefficient increased sharply in the initial running-in stage and tended to be stable. At the start, the frictional coefficient was low because of the presence of associated oxide film on the surface of the coating. However, with the prolongation of the friction time, the oxide film was destroyed [
42]. The initial low frictional coefficient was attributed to the reaction of the coating surface, wherever a skinny oxide film was present. Once the oxide film was destroyed by resistance slippery, there would be adhesive wear between the coating surface and friction components so that the friction incredibly became severe and the frictional coefficient would increase sharply. At an equivalent time, the friction heat promoted the formation of associated oxide film on the surface of the coating, and these oxide films have a certain self-lubricating ability, which led to a slight decrease of the frictional coefficient. Oxide film in the wear process continues to experience the formation and destruction, once this dynamic cycle reaches equilibrium, the frictional resistance between the coating and the counterpart will be maintained at a constant value, the coefficient of friction will also tend to stabilize [
43]. The fluctuations that existed within the stable section of the frictional coefficient were primarily associated with instrument vibration and measuring accuracy. The typical frictional coefficient of the as-cladded and heat-treated coatings at 660°C, 780°C, 860°C and 1000°C were 0.7, 0.72, 0.75, 0.80 and 0.95, respectively. The heat-treated coatings at 1000°C had the highest friction coefficient and also the greatest fluctuations. The coatings heat-treated at 780°C and 860°C had slightly lower frictional coefficient, however considerably higher than those of the as-cladded and heat-treated one at 660°C. The as-cladded coating had the lowest frictional coefficient. Meanwhile, the heat-treated coating at 660°C had the best lubricity.
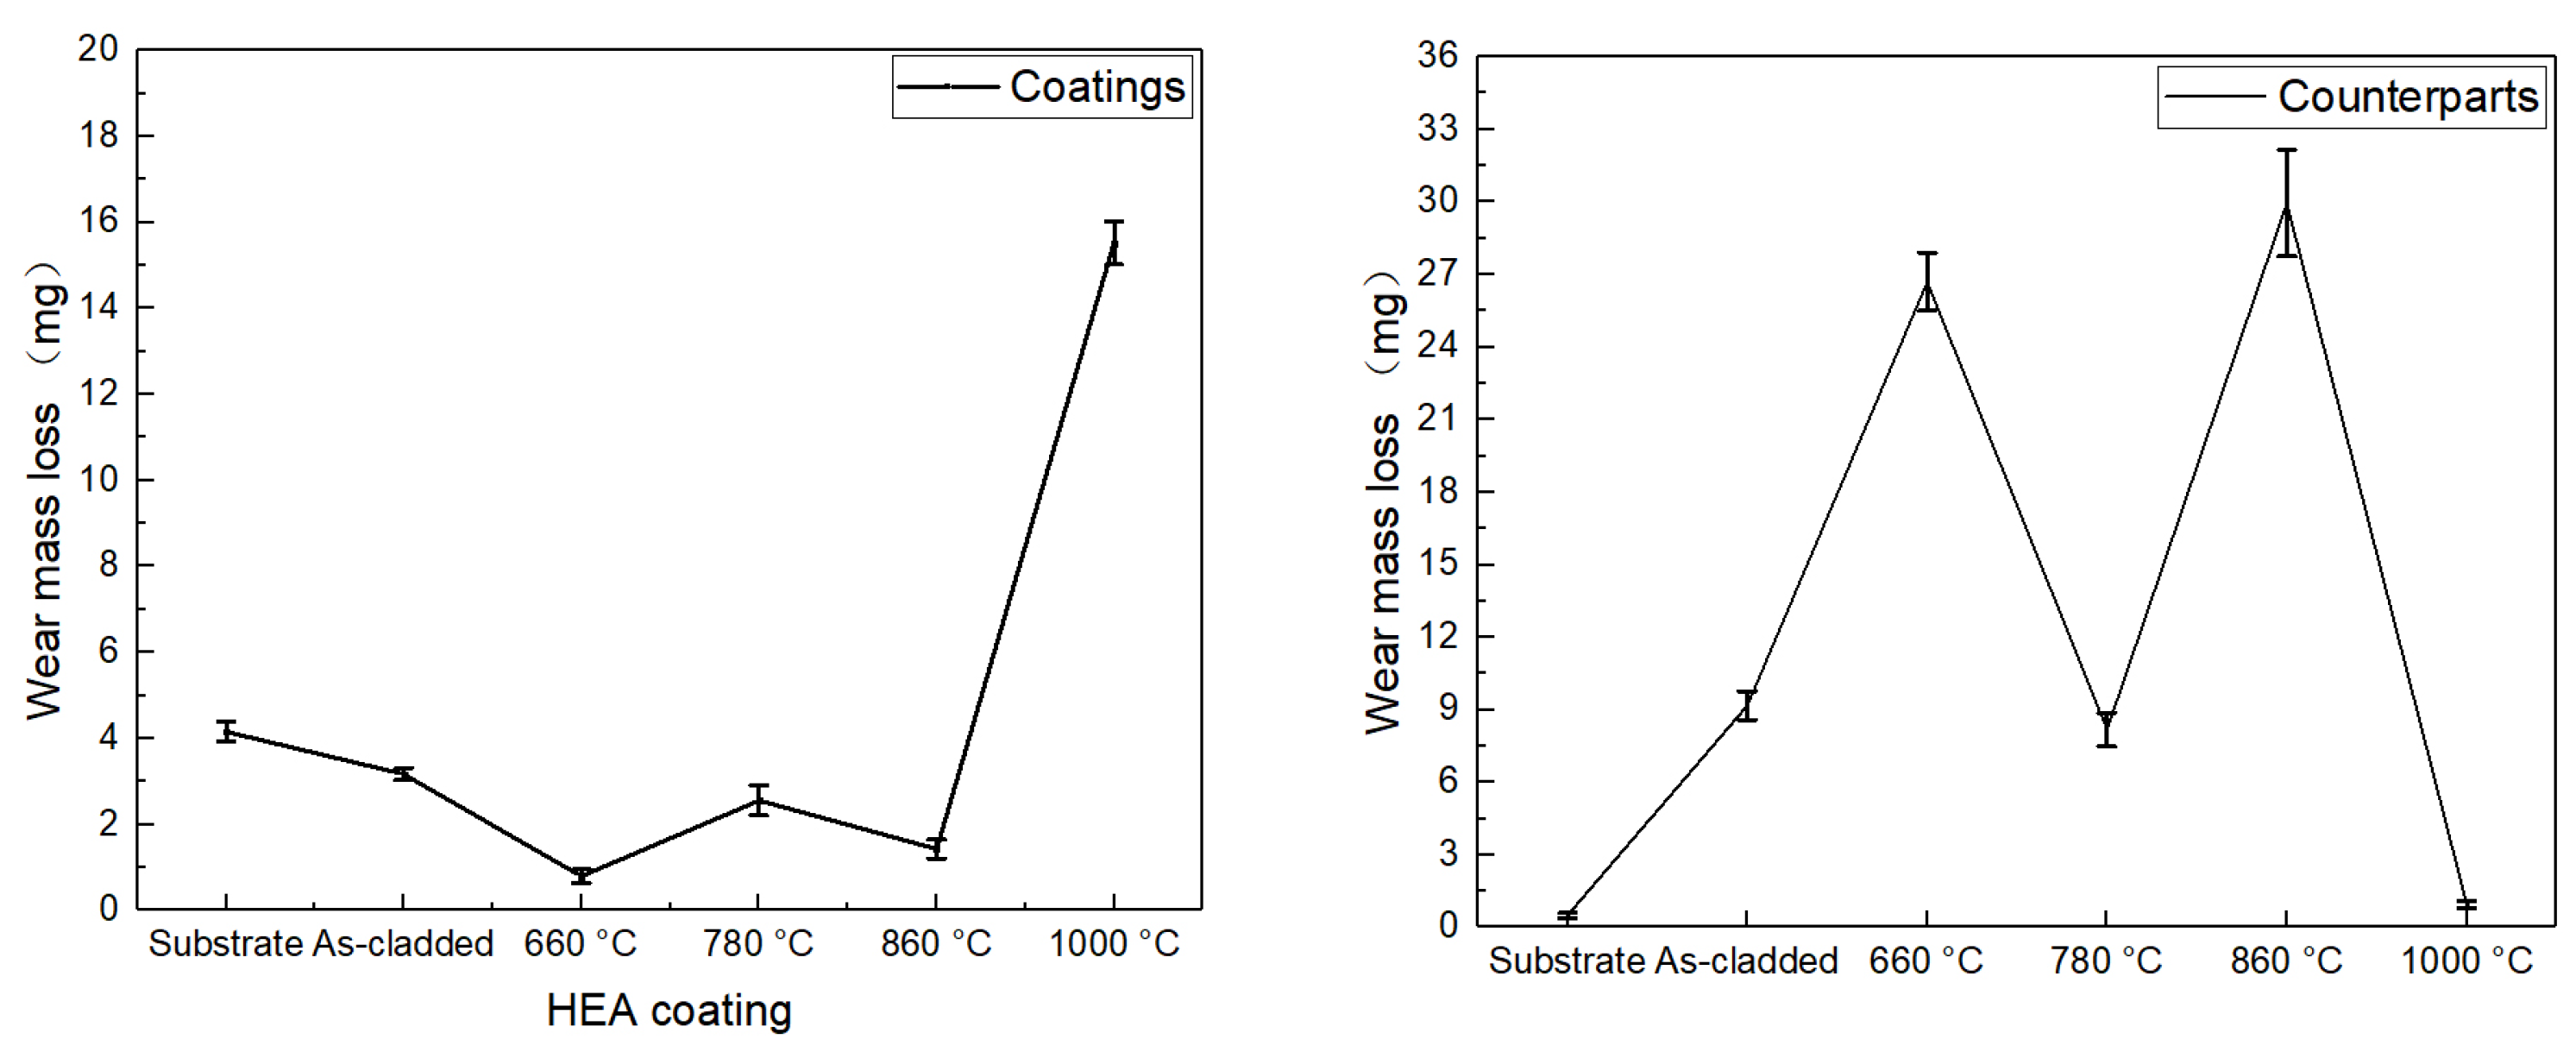
Figure 13 shows the wear mass loss of the as-cladded CoCrFeNiMn coatings, heat-treated ones and N80 counterparts after wear tests. As the width of the coating’s wear scar was not uniform, the wear mass loss was converted into a comparative analysis of the quality loss for the same width of the wear scars. At heat treatment temperatures of 660°C, 780°C and 860°C, the wear resistance of the coating was superior to that of the as-cladded. The wear resistance of the heat-treated coatings was optimized at a heat treatment temperature of 660°C. The lower the wear mass of the coating, the higher its wear resistance under the same wear conditions. There was a linear relationship between microhardness and the wear resistance of the material. The microhardnesses of the heat-treated coatings were all higher than that of the cladding. It is noteworthy that the microhardness of the coatings was highest at the heat treatment temperature of 1000°C, but the wear mass loss of the coatings increased sharply to 15.52 mg, and their friction coefficients were also the highest, with the largest fluctuation of the friction coefficients. The solid solution of the 1000°C heat-treated coating was the thickest and most varied. These strips and irregular {Fe-Cr} solid solutions varied in microhardness from the substrate and underneath the action of the resistance load which led to an asynchronous degree of wear and tear, successively developed into an outsized number of uneven micro-surfaces, resulting in a rise within the wear quantity of the coating. The degree of wear and tear was coupled with the resistance of the contact space. With the increase of the frictional resistance, the shear stress on the coating surface particles would increase, leading to the coating surface particles vulnerable to be worn out. The frictional coefficient of the coating was additionally related to phase changes and microhardness variations.
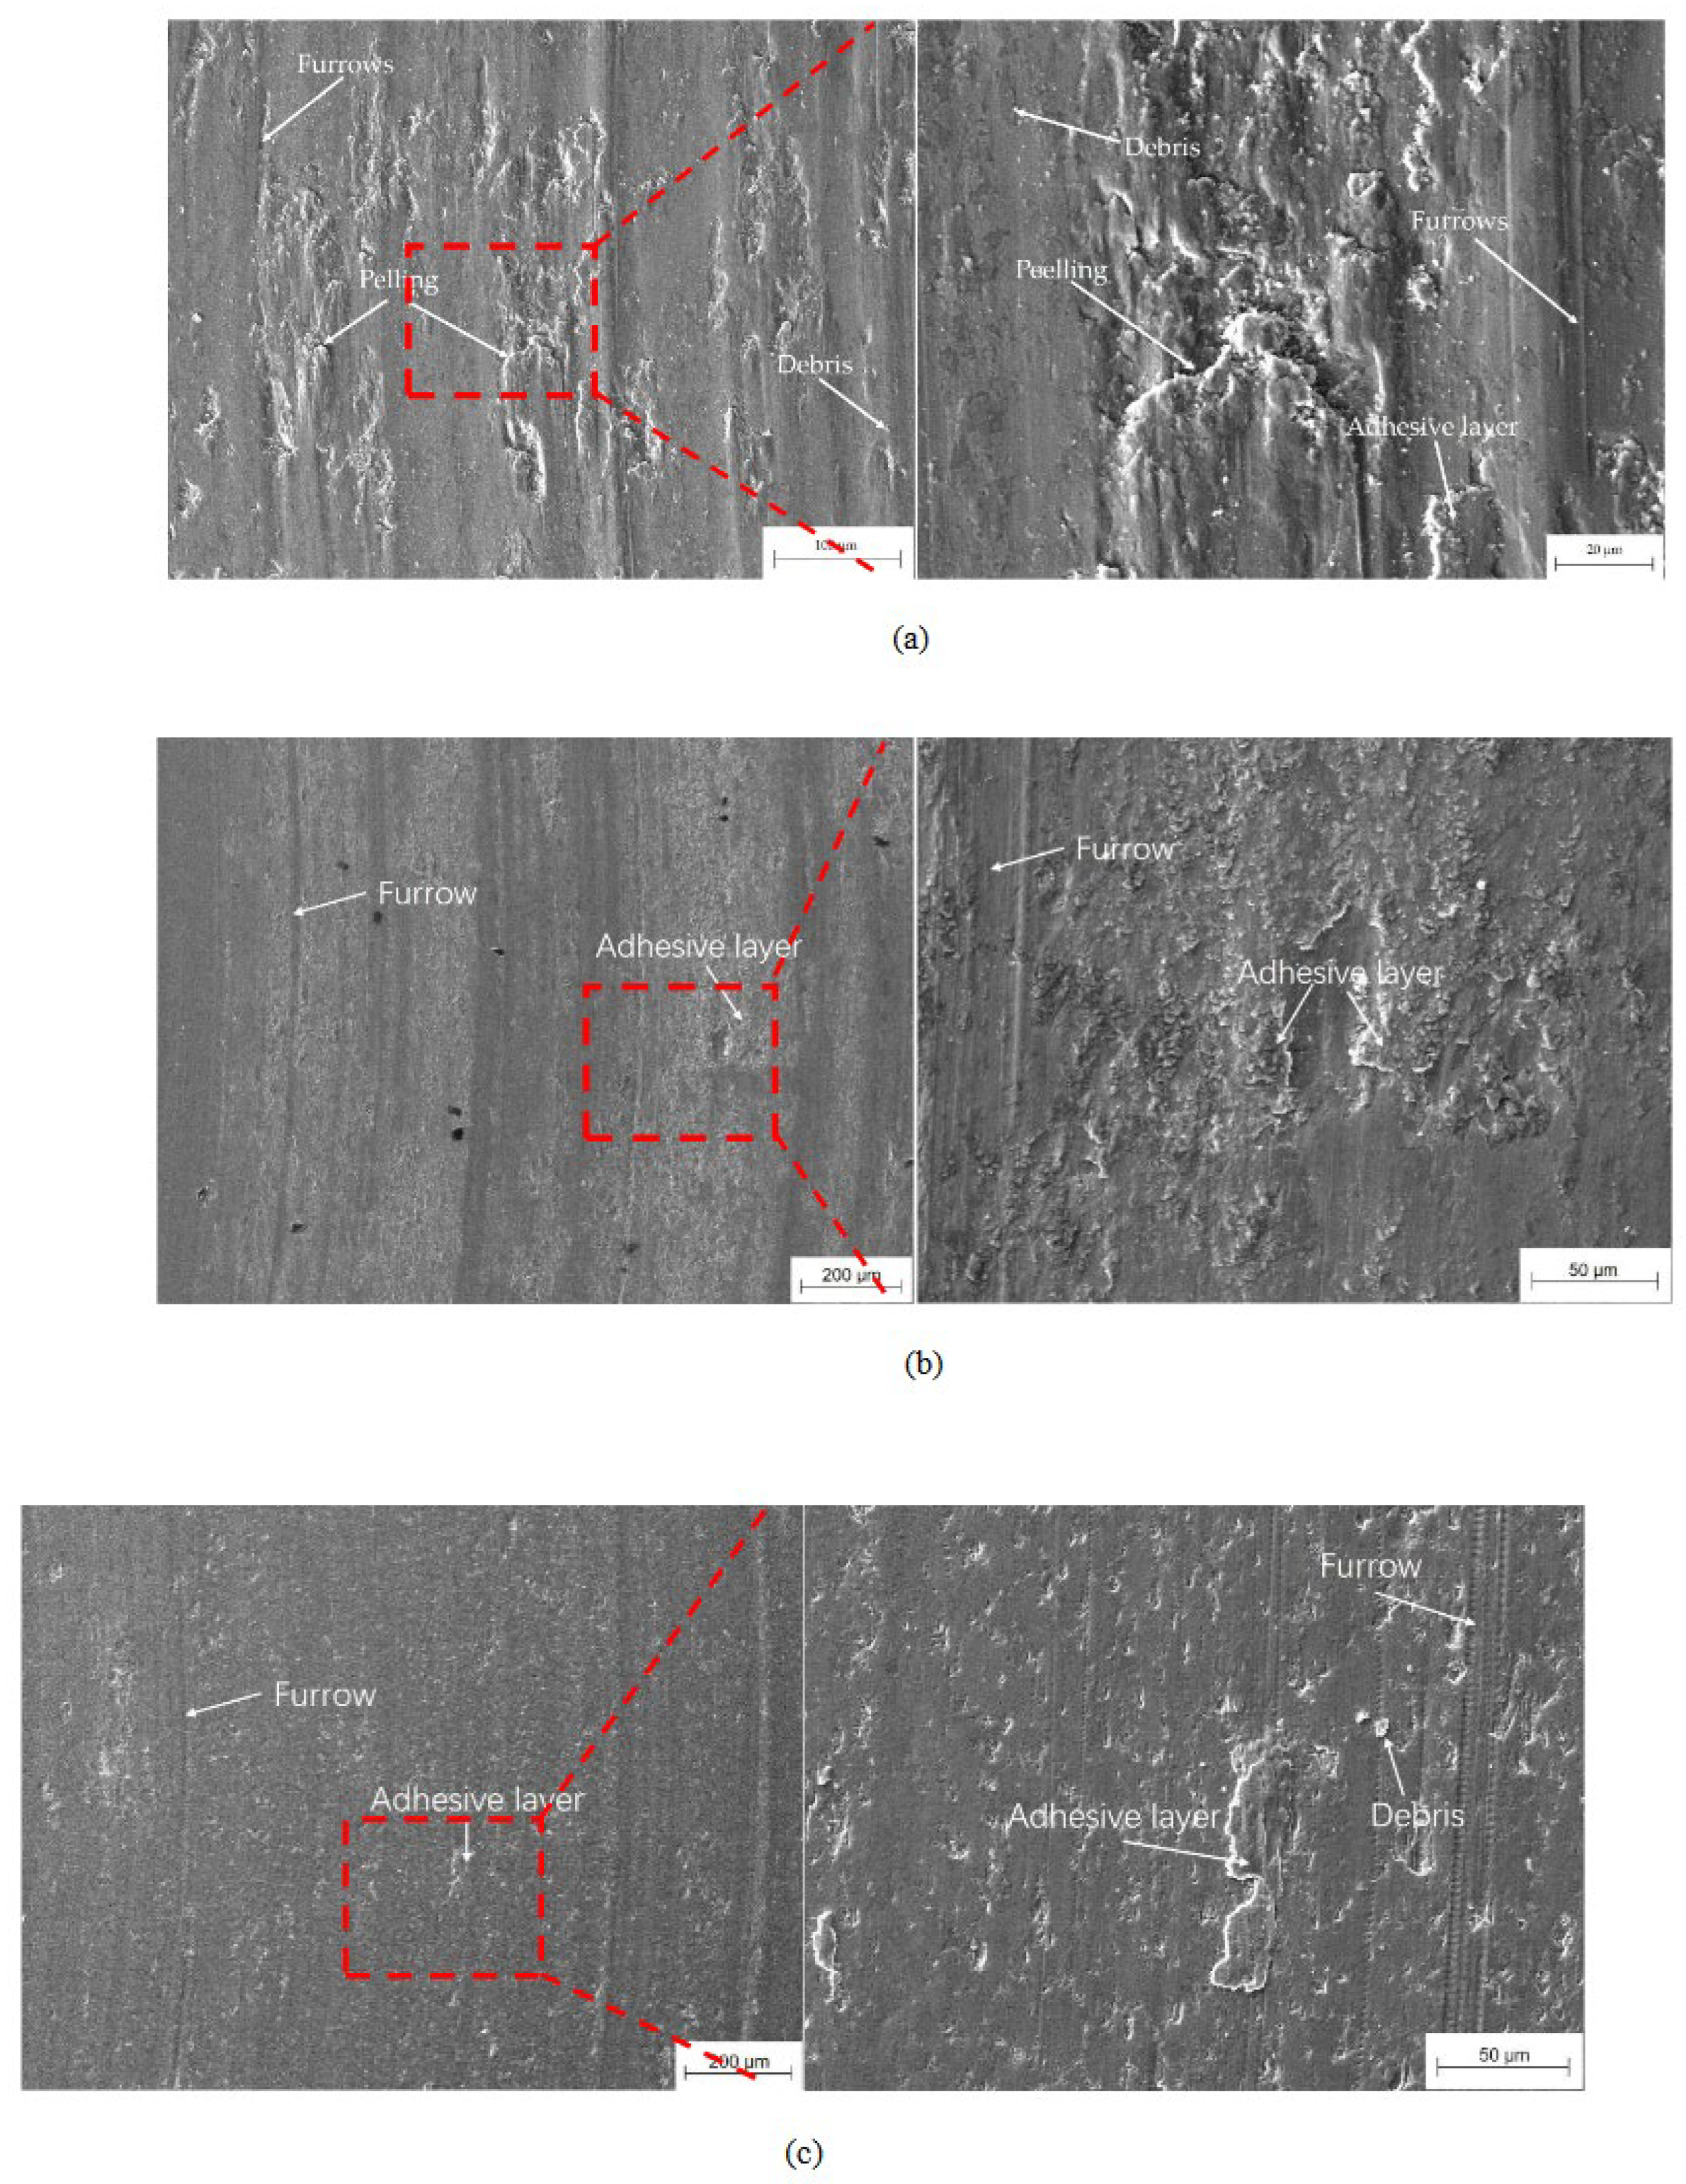
The worn surface of the as-cladded coating consists mainly of furrows, spalling, wear particles and adhesive layers as shown in
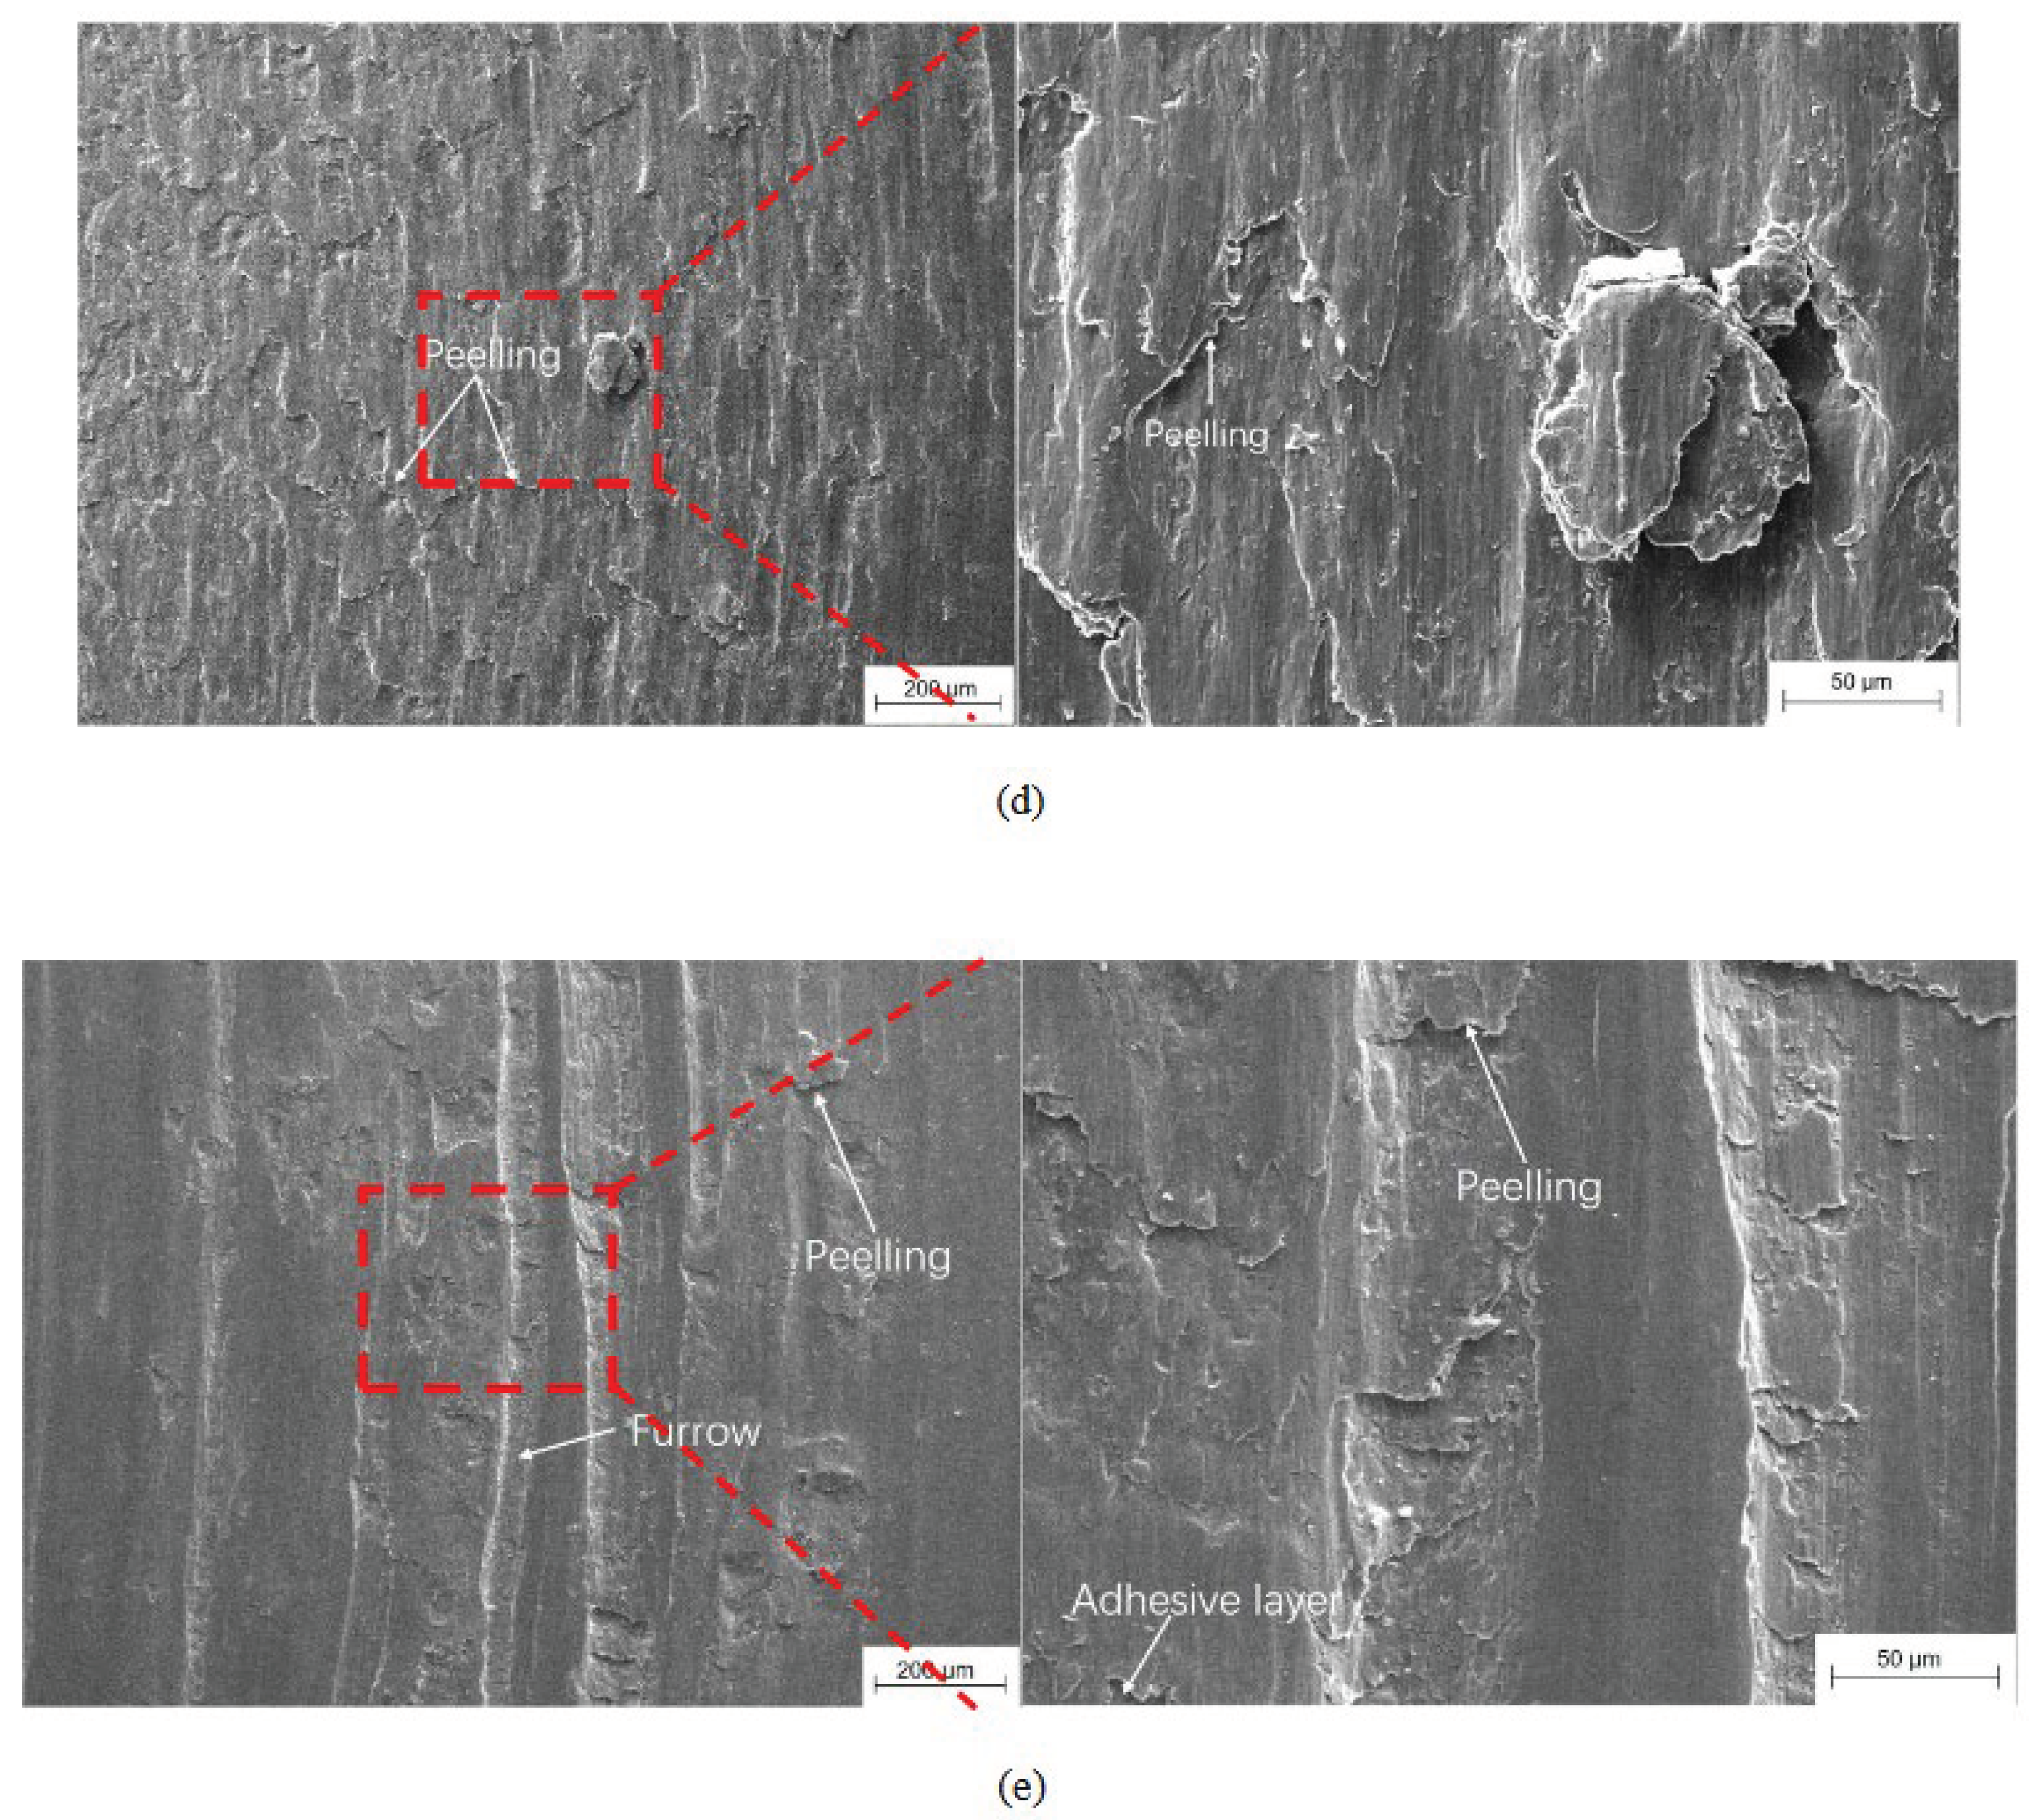
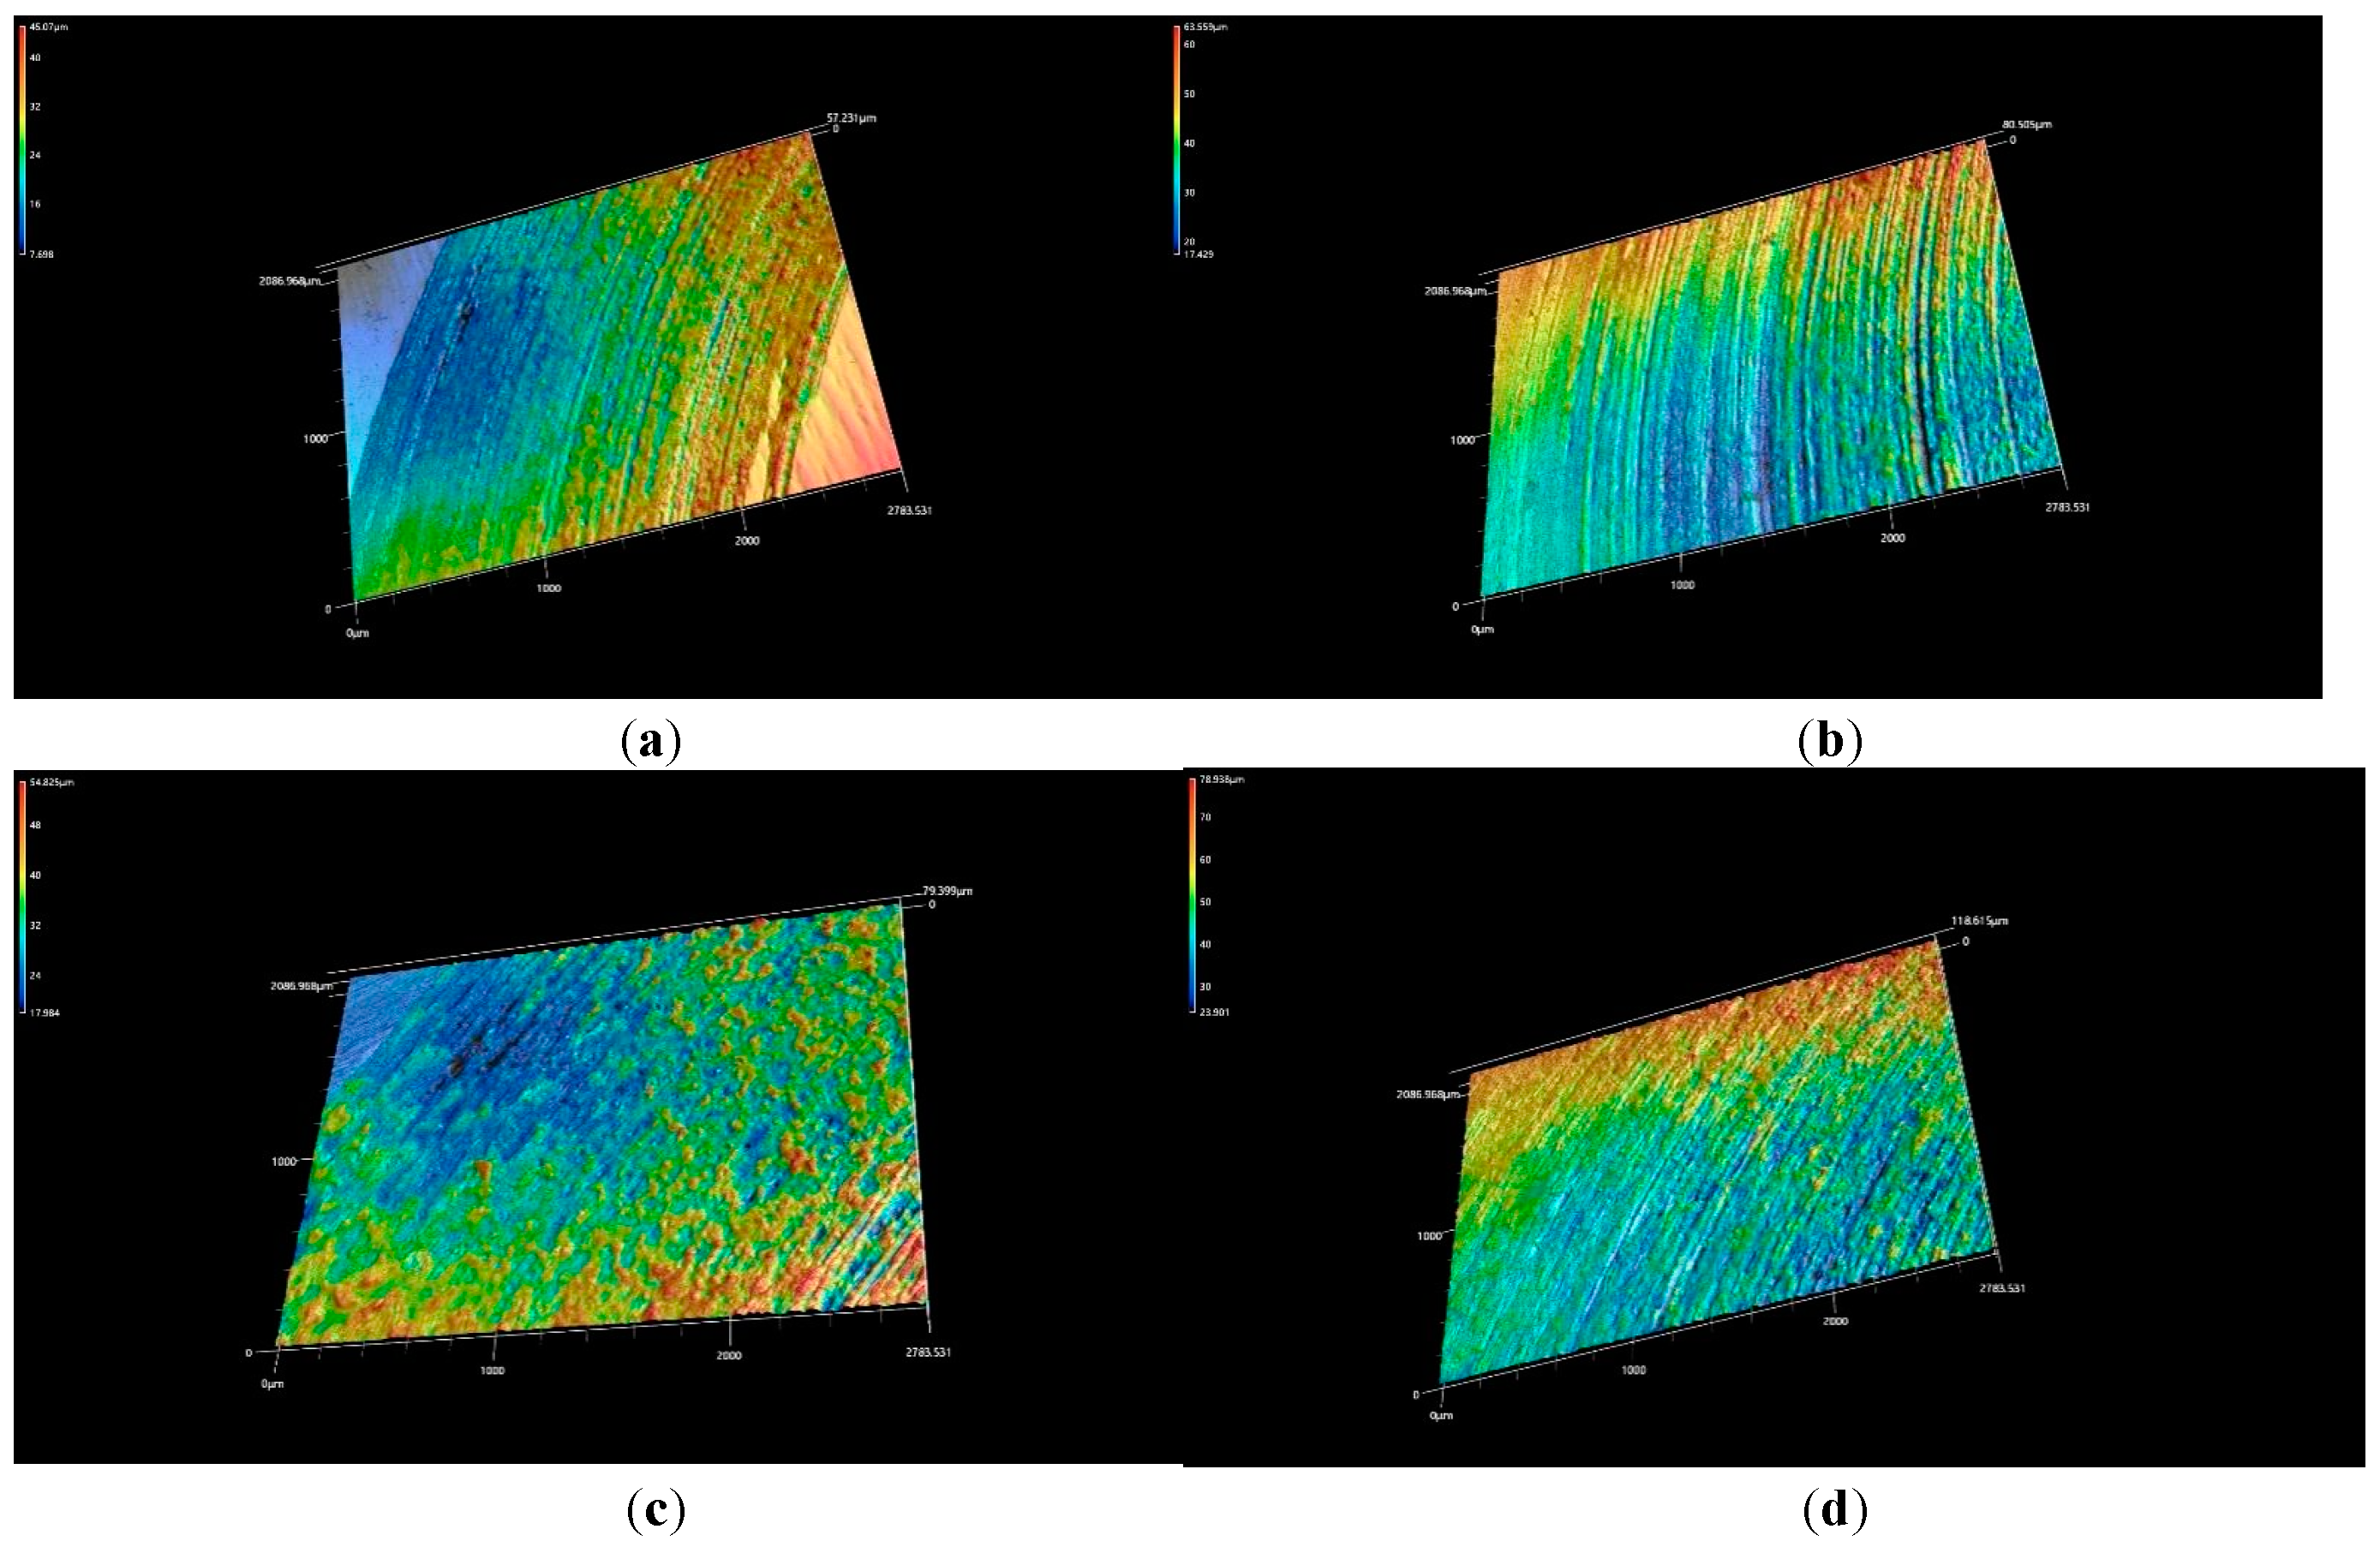
Figure 14. As the heat treatment temperature increased, the depth of the furrows on the worn surface increased, the degree of flaking increased, and the wear resistance of the coating decreased. When the temperature was 660°C, the worn surface of the coating became relatively flat. After heat treated at 780°C, the wear scars of the coating show shallow furrows and a small amount of adhesion, as shown in
Figure 14c. The wear scars of the heat-treated coating at 800°C was uneven furrow with a lot of flaking and adhesion. After heat treated at 1000°C, the roughness of the wear surface was the greatest, and the furrows were deep and wide, but the flaking and adhesion were weakened, as shown in
Figure 15. The coating was subjected to axial and tangential forces exerted by the N80 counterpart, resulting in the formation of grooves on its surface due to micro-cutting. As a result of the inertial and tangential forces, the broken metal parts were distributed on both sides of the grooves, forming wear debris. Typical localized high temperatures lasted only some milliseconds. At this moment, the coating’s surface chemical compound was broken and adhered at the contacting zone. Meanwhile, the metal on the surface would be torn apart forming abrasive particles, which would conjointly to be flake during the contacting and wearing between the wear surface of the coating and the counterpart. Some metal particles adhered to the surface of another metal, forming adhesive wear. The mechanism of adhesive wear could be cycles of adherence, destruction, and re-adhesion. All varieties of wear included plastic deformation, adhesive wear, slotted wear and spalling. Since the cladding layer had a single FCC phase with relative low microhardness, it had the plastic deformation adhesive wear, groove wear and spalling. throughout the wear. Oxidization particles formed on the worn surface under the action of high temperature. Consequently, adhesive, abrasive, and mild oxidative wear were the main wear mechanisms of the coating.
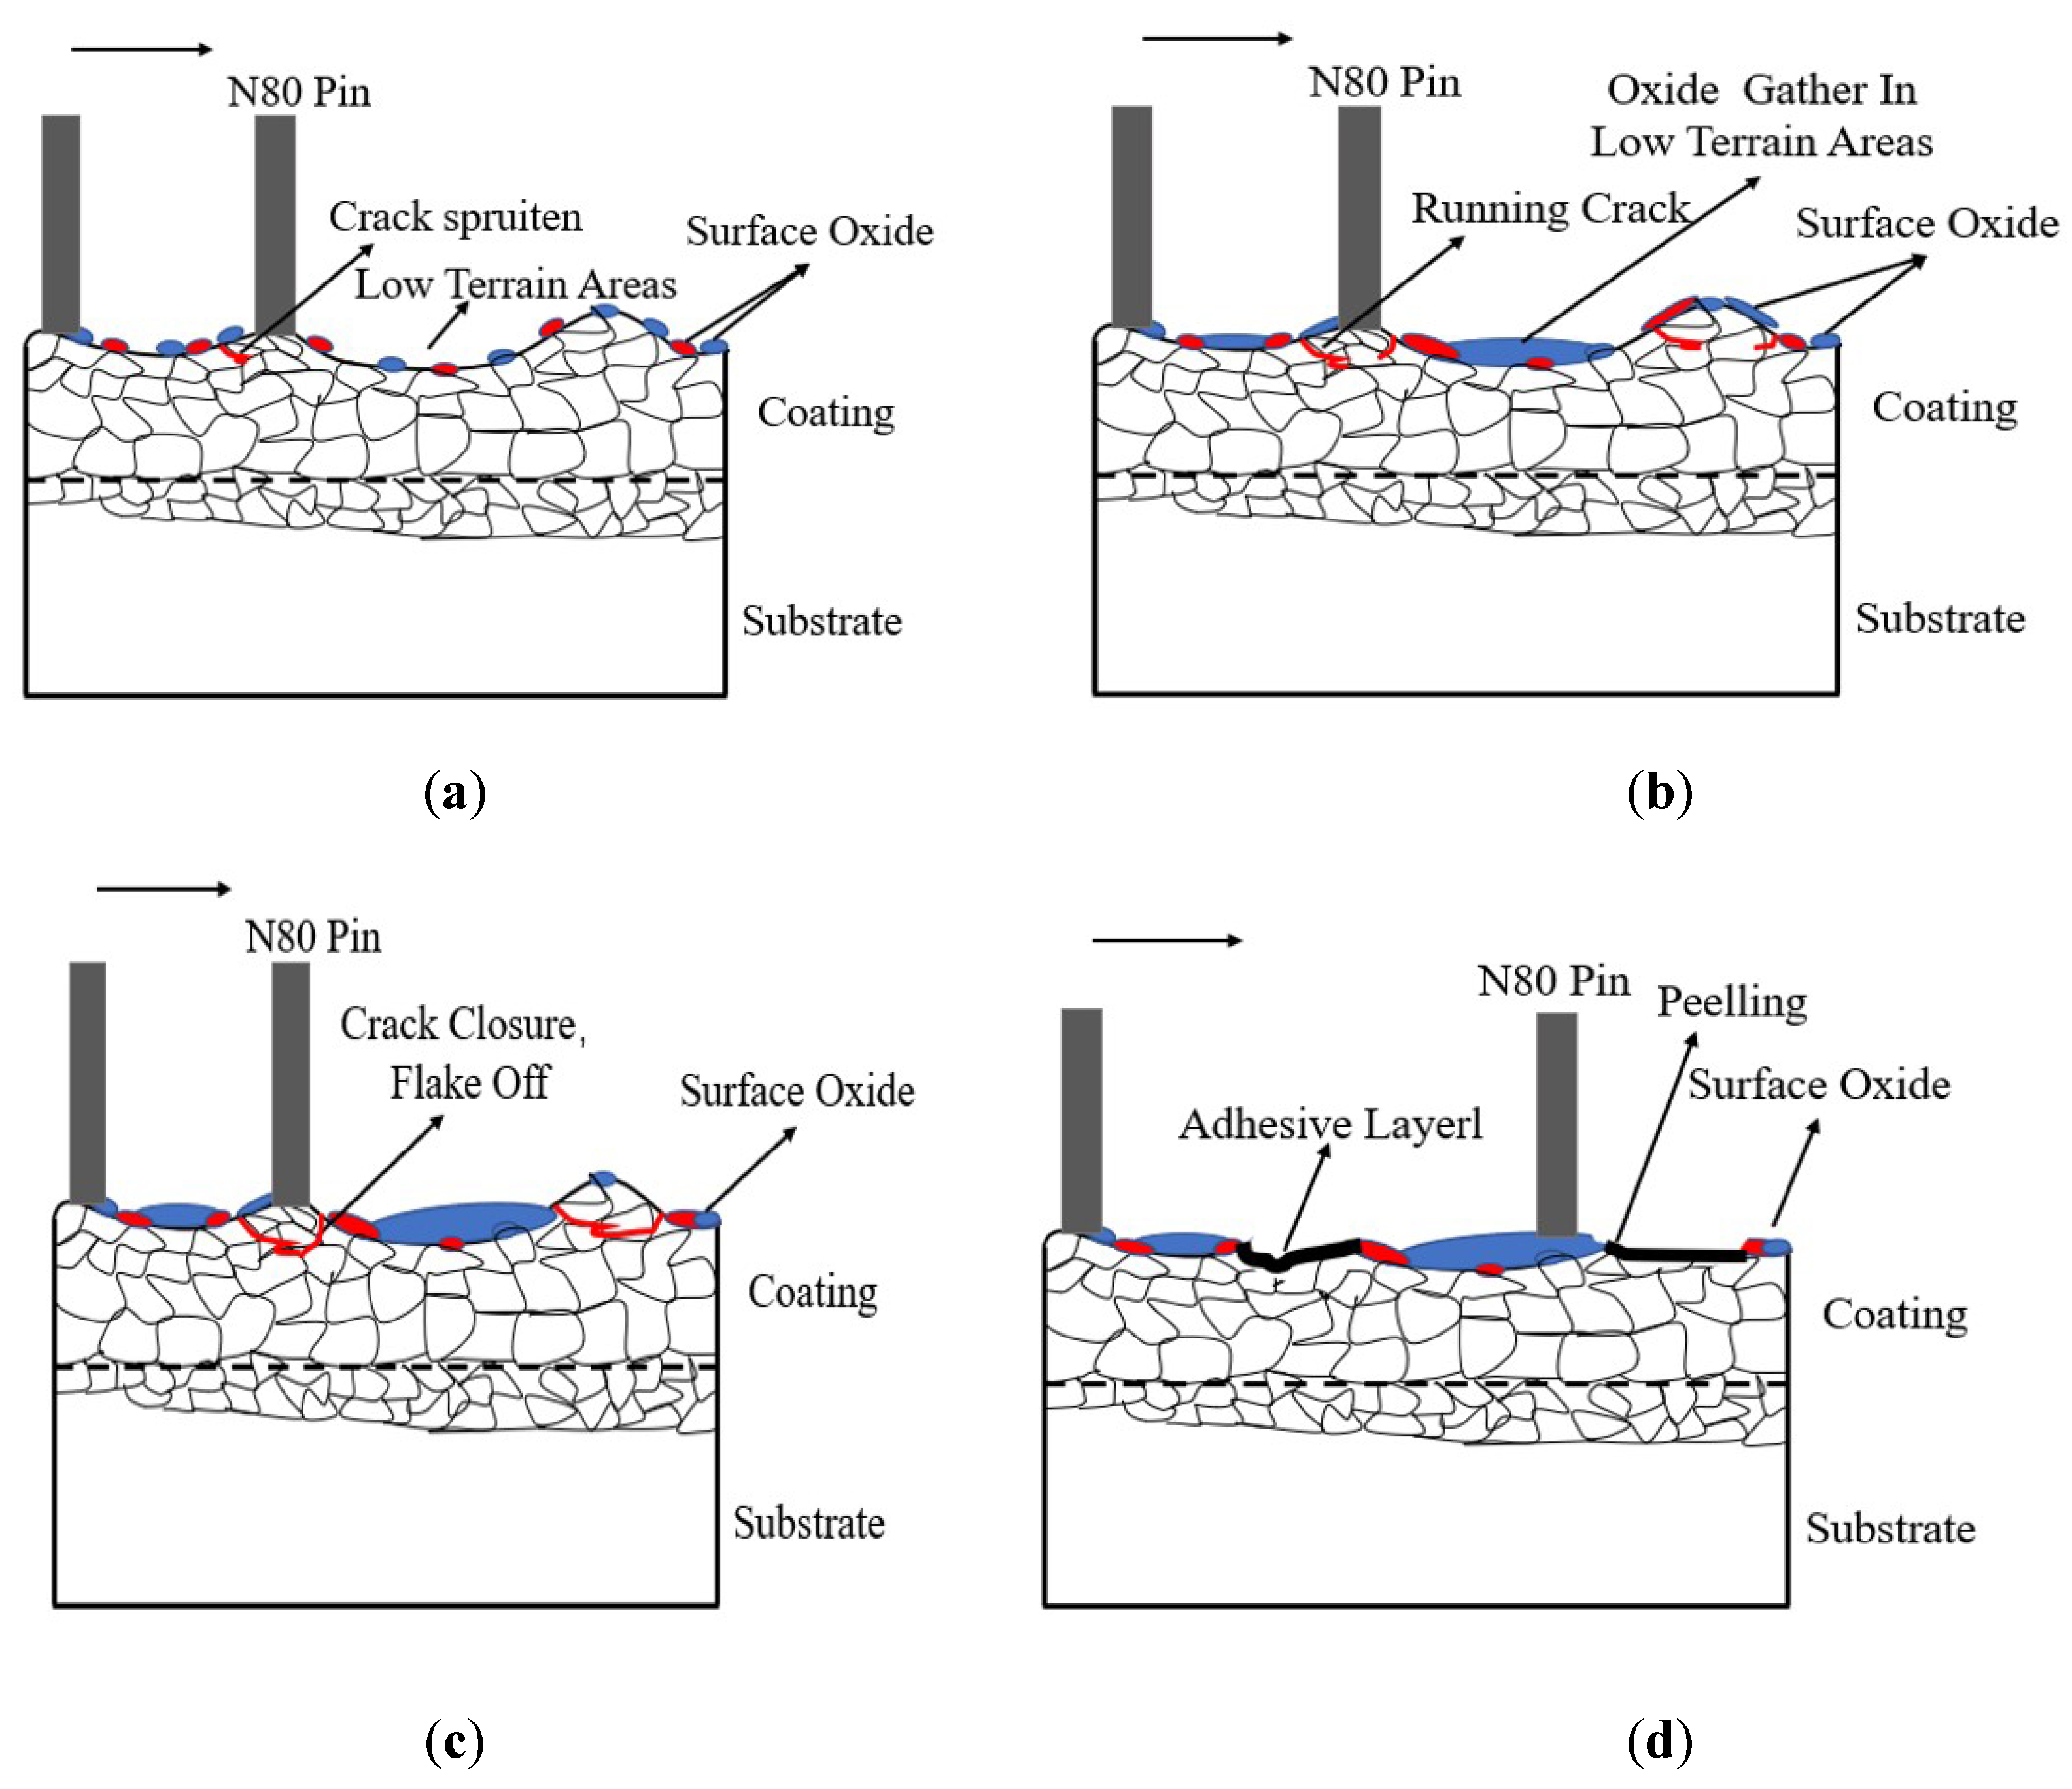
Figure 16 shows the wear schematic diagram of the CoCrFeNiMn coatings. In the initial stages of friction and wear test, the oxide film on the alloy surface was disrupted and abrasive chips were introduced by the micro-cutting force of the pin. As the friction test progressing, the abrasive chips continued to migrate across the friction surface. They gathered towards the cratered area of the friction surface and formed an adhesive under the pressure of the pin. With the micro-cutting power of the pin, the raised areas of the coating surface were submitted to transverse shear forces, which sprouted cracks and crack extension occurred. With the extension of the friction time, the distance passed by the pin on the surface of the coating increased, the abrasive chips gradually covered the friction surface of the coating. With the sliding of the pin, the migration of abrasive chips continuously occurred and the quantity of the wear loss gradually decreased for partially oxidative wear. Due to the micro-cutting of the pins, chips and abrasives were generated on the surface of the coating and a small amount of peeling occurred. With the constant movement of the pin, the pin generated continuous cyclic low amplitude vibrations in the cracks and cratered areas, spalling and raised areas of the coating surface, causing injury to the coating. Under continuous cyclic stress, the cracks on the coating surface expanded until the cracks closed and spalling occurred, resulting in the formation of spalling craters. During the movement of the pin, cracks would continue to sprout on the coating surface. As the cracks continued to develop until they closed, they would be peeled off, which would create a spalling pit. With the continuous movement of the counterpart pin, the resulting abrasive chips continued to move across the surface of the coating, adhering to the cratered area on the coating’s surface, which created an adhesive.
5. Conclusions
This work investigated the effects of heat treatment process on the phase composition, microstructure, and properties of CoCrFeNiMn coatings through plasma transfer arc cladding on compacted graphite iron . Several conclusions were drawn as follows:
1. After heat treatment with argon as protection gas, the CoCrFeNiMn coatings were kept with a single FCC phase structure. The grain size of the coating became refined with smaller dendrites, larger dendritic spacing and more Cr-rich compounds precipitated between dendrites as compared to the as-cladded one.
2. The CoCrFeNiMn coating’s microhardness was improved significantly through heat treatment. Following a 30-minute heat treatment at 660°C for the coating, it had the maximum microhardness of 563±6.9 HV0.2, 1.46 times of the as-cladded one.
3. When the coating was heat treated at 660°C for 30 minutes, it had the lowest frictional coefficient, the smallest wear mass loss and the greatest wear resistance. It took great strengthening and wear protection on compacted graphite iron
4. The CoCrFeNiMn coating exhibited adhesive wear, abrasive wear and oxidative wear. The CoCrFeNiMn coating exhibited less friction and wear damage as well as better durability as compared to compacted graphite iron.
Author Contributions
Conceptualization, B.Z., R.-T. F., P.-H.G., B.-Y.C. and J.-P. L.; methodology, B.Z., R.-T. F., P.-H.G., B.-Y.C., F.L., D.-M.Z., and A. N.; software, P.-H.G., R.-T. F., B.-Y.C. and Y.-C.G.; validation, P.-H.G., B.-Y.C. and B.Z.; formal analysis, B.Z., P.-H.G., R.-T. F., B.-Y.C and Z.Y.; investigation B.Z., R.-T. F., P.-H.G., B.-Y.C., F.L., D.-M.Z., J.-Y. G., L. C., J.-W. L. and Y. L.; data curation, Z.Y.; writing—original draft preparation, R.-T. F.; writing—review and editing, P.-H.G.; project administration, J.-P.L.; funding acquisition, P.-H.G. and J.-P.L.
Funding
This work was funded by the National Natural Science Foundation of China (51771140), Foreign Experts Program of the Ministry of Science and Technology (G2022040016L), The Youth Innovation Team of Shaanxi Universities: Metal Corrosion Protection and Surface Engineering Technology, Research and application of key component materials for engines, Shaanxi Provincial Natural Science Foundation (2023-JC-YB-380), Shaanxi Provincial Key Research and Development Project (2019ZDLGY05-09), Xi’an Science and Technology Plan Project (23LLRHZDZX0019).
Data Availability Statement
Not applicable.
Acknowledgments
We will thank Mr. Hongbo Duan for the characterization of wear scars.
Conflicts of Interest
The authors declare no conflict of interest.
References
- J.W. Yeh, S.K. Chen, S.J. Lin, J.Y. Gan, T.S. Chin, T.T. Shun, C.H. Tsau, S.Y. Chang, Nanostructured High-Entropy Alloys with Multiple Principal Elements: Novel Alloy Design Concepts and Outcomes, Adv. Eng. Mater. 2004, 6, 299-303. [CrossRef]
- J W Yeh, Physical metallurgy of high-entropy alloys, Journal of the Minerals Metals & Materials Society. 2015, 67, 2254-2261. [CrossRef]
- YY. Ma, Q. Wang, B.B. Jiang, et al, Controlled formation of coherent cuboidal nanoprecipitates in body-centered cubic high-entropy alloys based on Al2(Ni,Co,Fe,Cr)14 compositions, Acta Materialia. 2018, 147, 213-225. [CrossRef]
- Y. Zhang; T.T. Zuo; Z. Tang, M.C. Gao, K.A. Dahmen, P.K. Liaw, Z.P. Lu, Microstructures and properties of high-entropy alloys, Prog. Mater Sci. 2014, 61, 1-93. [CrossRef]
- Z.P. Tong, H.L. Liu, J.F. Jiao, W.F. Zhou, Y. Yang, X.D. Ren, Improving the strength and ductility of laser directed energy deposited CrMnFeCoNi high-entropy alloy by laser shock peening, Addit. Manuf. 2020, 35, 101417. [CrossRef]
- Z. Fu, L. Jiang, J.L. Wardini, B.E. MacDonald, H. W. Xiong, D. Zhang, Y. Zhou, T.J. Rupert, W. Chen, E.J. Lavernia, A high-entropy alloy with hierarchical nano-precipitates and ultrahigh strength, Sci. Adv. 2018, 4, 8712. [CrossRef]
- Y. Zou, H. Ma, R. Spolenak, Ultrastrong ductile and stable high-entropy alloys at small scales, Nat. Commun. 2015, 6, 7748. [CrossRef]
- Y. Yao, Z. Huang, P. Xie, S.D. Lacey, R.J. Jacob, H. Xie, F. Chen, A. Nie, T. Pu, M. Rehwoldt, D. Yu, M.R. Zachariah, C. Wang, R. Shahbazian—Yassar, J. Li, L.B Hu, Carbothermal shock synthesis of high-entropy-alloy nanoparticles, Science. 2018, 359, 1489–1494. [CrossRef]
- O. El-Atwani, N. Li, M. Li, A. Devaraj, J.K.S. Baldwin, M.M. Schneider, D. Sobieraj, J.S. Wróbel, D. Nguyen-Manh, S.A. Maloy, E. Martinez, Outstanding radiation resistance of tungsten-based high-entropy alloys, Sci. Adv. 2019, 5, 2002. [CrossRef]
- Y. Qiu, S. Thomas, M.A. Gibson, H.L Fraser, N Birbilis, Corrosion of high entropy alloys. npj Mater. Degrad. 2017, 1, 15. [CrossRef]
- M. Chuang, M. Tsai, W. Wang, S. Lin, J. Yeh, Microstructure and wear behavior of AlxCo1.5CrFeNi1.5Tiy high-entropy alloys, Acta Mater. 2011, 59, 6308–6317. [CrossRef]
- Zia Ullah Arifa, Muhammad YasirK halide, Ehtsham ur Rehmana, Sibghat Ullaha, Muhammad Atifb, Ali Tariqc, A review on laser cladding of high-entropy alloys, their recent trends and potential applications, J Manuf. Process. 2021, 68, 225-273. [CrossRef]
- Y. Cui, J.Q. Shen, K.P. Geng, S.S. Hu, Fabrication of FeCoCrNiMnAl0.5-FeCoCrNiMnAl gradient HEA coating by laser cladding technique, Surf. Coat. Tech. 2021, 412, 127077. [CrossRef]
- B.Y. Chen, P.H. Gao, B. Zhang, D.M. Zhao, W. Wang, C. Jin, Z. Yang, Y.C. Guo, M.X. Liang, J.P. Li, Y.Q. Lu, L. Jia, D. Zhao, Wear properties of iron-based alloy coatings prepared by plasma transfer arc cladding, Coatings. 2022, 12, 243. [CrossRef]
- P.H. Gao, R.T. Fu, B.Y. Chen, S.C. Zeng, B. Zhang, Z. Yang, Y.C. Guo, M.X. Liang, J.P. Li, Y.Q. Lu, L Jia, D Zhao, Corrosion Resistance of CoCrFeNiMn High Entropy Alloy Coating Prepared through Plasma Transfer Arc Claddings, Metals. 2021, 11, 1876. [CrossRef]
- J.B. Cheng, Hideyuki. Murakami, J.W. Yeh, A.C. Yeh, Kazuya Shimoda, On the study of thermal-sprayed Ni0.2Co0.6Fe0.2CrSi0.2AlTi0.2 HEA overlay coating, Surf. Coat. Tech. 2017, 316, 71-74. [CrossRef]
- Nikbakht. Roghayeh, Saadati. Mohammad, Kim. Taek-Soo, Jahazi. Mohammad, Kim. Hyoung Seop, Jodoin. Bertrand, Cold spray deposition characteristic and bonding of CrMnCoFeNi high entropy alloy, Surf. Coat. Tech. 2021, 425, 127748. [CrossRef]
- Y.M. Zhao, X.M. Zhang, H. Quan, Y.J. Chena, S. Wang, S. Zhang, Effect of Mo addition on structures and properties of FeCoNiCrMn high entropy alloy film by direct current magnetron sputtering, J Alloy Compd. 2022, 895, 162790. [CrossRef]
- Z.Z. Zhao, H.M. Meng, P.W. Ren, CoNiWReP high entropy alloy coatings prepared by pulse current electrodeposition from aqueous solution, Colloid Surface A. 2022, 648, 129404. [CrossRef]
- L. Zhao, F. Zhang, L. Wang, S. Yan, F. Yin, Effects of Post-Annealing on Microstructure and Mechanical Properties of Plasma Sprayed Ti-Si-C Com-posite Coatings with Al Addition, Surf. Coat. Tech. 2021, 416, 127164. [CrossRef]
- D. Hong, L. Huang, J. Yuan, C. Li, Influence of Annealing Temperature on Microstructure Evolution of TiAlSiN Coating and Its Tribological Behavior Against Ti6Al4V Alloys, Ceram. Int. 2021, 47, 3789-3796. [CrossRef]
- M. Sha, F. Li, J. Zhang, L. Na, W. Ning, Effects of Annealing on the Microstructure and Wear Resistance of AlCoCrFeNiTi0.5 High-Entropy Alloy Coating Prepared by Laser Cladding, Rare Metal Mat. Eng. 2017, 46, 1237-1240. [CrossRef]
- Enkang, Y. Hao, X. An, Y. Liu, H. Wang, F. Zhou, Effect of Annealing Treatment on Microstructures, Mechanical Properties and Cavitation Erosion Performance of High Velocity Oxy-Fuel Sprayed NiCoCrAlYTa Coating, J Mater. Sci. Technol. 2020, 53, 19-31. [CrossRef]
- D.Y. Lin, N.N. Zhang, B. He, B.Q. Jin, Y. Zhang, D.Y. Li, F.Y. Dong, Influence of laser remelting and vacuum heat treatment on plasma-sprayed FeCoCrNiAl alloycoatings, J Iron Steel Res. Int. 2017, 24, 1199-1205. [CrossRef]
- A. Munitz, S. Salhov, S. Hayun, N. Frage, Heat treatment impacts the micro-structure and mechanical properties of AlCoCrFeNi highentropy alloy, J Alloy Compd. 2016, 683, 221-230. [CrossRef]
- J. Li, J. Hui, Y.P. Lu, T. Wang, Z. Cao, T. Li, Mechanical properties improvement of AlCrFeNi2Ti0.5 high entropy alloy through annealing design andits relationship with its particle-reinforced microstructures, J Mater. Sci. Technol. 2015, 31, 397-402. [CrossRef]
- F. He, Z.J. Wang, S.Z. Niu, Q.F. Wu, J.J. Li, J.C. Wang, C.T. Liu, Y.Y. Dang, Strengthening the CoCrFeNiNb0.25 high entropy alloy by FCC precipitate, J Alloy Compd. 2016, 667, 53-57. [CrossRef]
- M.N. Zhang, X.L. Zhou, W.Z. Zhu, J.H. Li, Influence of annealing on microstructure and mechanical properties of refractory CoCrMoNbTi0.4 high-entropy alloy, Metall. Mater. Trans. A. 2018, 49, 1313-1327. [CrossRef]
- C. Zhang, G.F. Wu, P.Q. Dai, Phase transformation and aging behavior of Al0.5CoCrFeNiSi0.2 high-entropy alloy, J Mater. Eng. Perform. 2015, 24, 1918-1925. [CrossRef]
- S. Niu, H. Kou, G. Tong, Z. Yu, J. Wang, J. Li, Strengthening of nanoprecipitations in an annealed Al0.5CoCrFeNi high entropy alloy, Mat. Sci. Eng. A. 2016, 671, 82-86. [CrossRef]
- P.H. Gao, R.T. Fu, J.L. Liu, B.Y. Chen, B. Zhang, D.M. Zhao, Z. Yang, Y.C. Guo, M.X. Liang, J.P. Li, W. Wang, Z.Y. Yan, L.N. Zhang, Influence of Plasma Arc Current on the Friction and Wear Properties of CoCrFeNiMn High Entropy Alloy Coatings Prepared on CGI through Plasma Transfer Arc Cladding, Metals. 2022, 12, 633. [CrossRef]
- D.Y. Lin, N. Zhang, B. He, X. Gong, Y. Zhang, D. Li, F. Dong, Structural Evolution and Performance Changes in FeCoCrNiAlNbx High-Entropy Alloy Coatings Cladded by Laser, J. Therm. Spray Technol. 2017, 26, 2005-2012. [CrossRef]
- C. Wang, Y. Gao, R. Wang, D. Wei; M. Cai, Y. Fu, Microstructure of laser-clad Ni60 cladding layers added with different amounts of rare-earth oxides on 6063 Al alloys, J. Alloys Compd. 2018, 740, 1099-1107. [CrossRef]
- G. Laplanche, S. Berglund, C. Reinhart, A. Kostka, F. Fox, E. George, Phase stability and kinetics of &sigma-phase precipitation in CrMnFeCoNi high-entropy alloys, Acta Mater. 2018, 161, 338-351. [CrossRef]
- H.G. Li, Y.J. Huang, W.J. Zhao, T. Chen, J.F. Sun, D.Q. Wei, Q. Du, Y.C. Zou, Y.Z. Lu c, P. Zhu, X. Lu, A.H.W. Ngan, Overcoming the strength-ductility trade-off in an additively manufactured CoCrFeMnNi high entropy alloy via deep cryogenic treatment, Addit. Manuf. 2022, 50, 102546. [CrossRef]
- W. Wu, L. Jiang, H. Jiang, X. Pan, Z. Cao, D. Deng, T. Wang, T. Li. Phase Evolution and Properties of Al2CrFeNiMox High-Entropy Alloys Coatings by Laser Cladding, J. Therm. Spray Technol. 2015, 24, 1333-1340. [CrossRef]
- L. Jiang, Y.P. Lu, Y. Dong, T.M. Wang, Z.Q. Cao, T.J. Li, Annealing effects on the microstructure and properties of bulk high-entropy CoCrFeNiTi0.5 alloy casting ingot, Intermetallics. 2014, 44, 37-43. [CrossRef]
- Sathiyamoorthi. Praveen, Basu. Joysurya, Kashyap. Sanjay, K.G. Radeepd, Sankar Kottadaa. Ravi, Thermal stability and grain boundary strengthening in ultrafine-grained CoCrFeNi high entropy alloy composite, Mater. Design. 2017, 134, 426-433. [CrossRef]
- F. Ye, Z. Jiao, L. Zhao, Effect of Y2O3 addition on the microstructure and properties of Ni60 additives by micro-plasma cladding. Mater, Res. Express. 2019, 6, 026562. [CrossRef]
- Y. Zhang, T.T. Zuo, Y.Q. Cheng, P.K. Lia, High-entropy alloys with high saturation magnetization, electrical resistivity and malleability, Sci. Rep.2013, 3, 1455. [CrossRef]
- S.H. Shim, H. Pouraliakbar, H. Minouei, M.S. Rizi, V. Fallah, Y.S Na, J.H. Han, S.I. Hong, Characterization of the microscale/nanoscale hierarchical microstructure of an as-cast CrMnFeNiCu high-entropy alloy with promising mechanical properties, J. Alloy. Compd. 2023, 954, 170091. [CrossRef]
- P.H. Gao, R.T. Fu, B.Y. Chen, S.C. Zeng, B. Zhang, Z. Yang, Y.C. Guo, M.X. Liang, J.P. Li, Y.Q. Lu, L. Jia, D. Zhao, Corrosion Resistance of CoCrFeNiMn High Entropy Alloy Coating Prepared through Plasma Transfer Arc, Metals. 2021, 11, 1876. [CrossRef]
- P.H. Gao, B.Y. Chen, B. Zhang, Z. Yang, Y.C. Guo, J.P. Li, M.X. Liang, Q.P. Li, Preparations of iron-based alloy coatings on grey cast iron through plasma transfer arc welding, J. Adhes. Sci. Technol. 2022, 36, 833-844. [CrossRef]
Figure 1.
Microstructure of CoCrFeNiMn powder: (a) global morphology, (b) Cross-sectional microstructure.
Figure 1.
Microstructure of CoCrFeNiMn powder: (a) global morphology, (b) Cross-sectional microstructure.
Figure 2.
XRD pattern of the CoCrFeNiMn powder.
Figure 2.
XRD pattern of the CoCrFeNiMn powder.
Figure 3.
Microstructure of the CGI substrate.
Figure 3.
Microstructure of the CGI substrate.
Figure 4.
DSC curves of Plasma Cladded CoCrFeNiMn Coatings.
Figure 4.
DSC curves of Plasma Cladded CoCrFeNiMn Coatings.
Figure 5.
Diagram of microhardness test.
Figure 5.
Diagram of microhardness test.
Figure 6.
Diagram of wear test.
Figure 6.
Diagram of wear test.
Figure 7.
Cross-sectional microstructure of the as-cladded CoCrFeNiMn coating and the heat treated ones, (a) as-cladded; (b) 660 °C; (c) 780 °C; (d) 860 °C; (e)1000 °C for 90 minutes
Figure 7.
Cross-sectional microstructure of the as-cladded CoCrFeNiMn coating and the heat treated ones, (a) as-cladded; (b) 660 °C; (c) 780 °C; (d) 860 °C; (e)1000 °C for 90 minutes
Figure 8.
Cross-sectional distribution of elements in the CoCrFeNiMn coatings after heat treatment at 780°C for 90 minutes.
Figure 8.
Cross-sectional distribution of elements in the CoCrFeNiMn coatings after heat treatment at 780°C for 90 minutes.
Figure 9.
Microstructure analysis of the CoCrFeNiMn coating (a), (c) Bright-field TEM images of the as-cladded CoCrFeNiMn coating; (b), (d) selected area electron diffraction patterns; (e), (f) Bright-field TEM images of the CoCrFeNiMn coatings after heat treatment at 780°C for 90mintues; (g) selected area electron diffraction patterns.
Figure 10.
XRD analysis of the CoCrFeNiMn coating, (a) XRD patterns of CoCrFeNiMn coatings and the heat-treated ones, (b) magnified view of the area with 2θ ranging from 40°to 48°, (c) lattice parameter of (111) peak of the CoCrFeNiMn powder and coatings.
Figure 10.
XRD analysis of the CoCrFeNiMn coating, (a) XRD patterns of CoCrFeNiMn coatings and the heat-treated ones, (b) magnified view of the area with 2θ ranging from 40°to 48°, (c) lattice parameter of (111) peak of the CoCrFeNiMn powder and coatings.
Figure 11.
Cross-sectional distribution of microhardness in the as-cladded CoCrFeNiMn and the coatings after heat treatment.
Figure 11.
Cross-sectional distribution of microhardness in the as-cladded CoCrFeNiMn and the coatings after heat treatment.
Figure 12.
(a)Friction coefficient of the as-cladded coating and the coatings after heat treatment, (b)The average friction coefficient of the as-cladded coating and the coatings after heat treatment.
Figure 12.
(a)Friction coefficient of the as-cladded coating and the coatings after heat treatment, (b)The average friction coefficient of the as-cladded coating and the coatings after heat treatment.
Figure 13.
Wear mass loss of the CoCrFeNiMn coatings and N80 counterparts.
Figure 13.
Wear mass loss of the CoCrFeNiMn coatings and N80 counterparts.
Figure 14.
Wear morphologies of the as-cladded CoCrFeNiMn coating (a); the heat-treated ones at: (b) 660°C; (c) 780°C; (d) 860°C; (e) 1000°C for 90 minutes.
Figure 14.
Wear morphologies of the as-cladded CoCrFeNiMn coating (a); the heat-treated ones at: (b) 660°C; (c) 780°C; (d) 860°C; (e) 1000°C for 90 minutes.
Figure 15.
3D morphologies of the CoCrFeNiMn coatings after heat treatment: a) 660 °C, b) 780 °C, c) 860 °C, d) 1000 °C.
Figure 15.
3D morphologies of the CoCrFeNiMn coatings after heat treatment: a) 660 °C, b) 780 °C, c) 860 °C, d) 1000 °C.
Figure 16.
Wear schematic diagram of the CoCrFeNiMn coatings.
Figure 16.
Wear schematic diagram of the CoCrFeNiMn coatings.
Table 1.
Elemental composition of CoCrFeNiMn powder.
Table 1.
Elemental composition of CoCrFeNiMn powder.
| Elements |
Co |
Cr |
Fe |
Ni |
Mn |
| (Contentes/ wt% |
20.58 |
18.35 |
19.98 |
20.49 |
20.48 |
Table 2.
Chemical composition of the CGI substrate.
Table 2.
Chemical composition of the CGI substrate.
| Elements |
C |
Si |
Mn |
S |
P |
Fe |
| Contentes/ wt% |
3.4-3.7 |
2.4-3.0 |
≤0.6 |
≤0.6 |
≤0.06 |
Bal |
Table 3.
Heat treatment processing.
Table 3.
Heat treatment processing.
| Temperature/°C |
Time/min |
| 660 |
30 |
60 |
90 |
| 780 |
30 |
60 |
90 |
| 860 |
30 |
60 |
90 |
| 1000 |
30 |
60 |
90 |
Table 4.
Point analysis of elements in the middle part of the CoCrFeNiMn coating.
Table 4.
Point analysis of elements in the middle part of the CoCrFeNiMn coating.
| |
Weight percent /wt.% |
Region |
Cr |
Mn |
Fe |
Co |
Ni |
| Coatings |
|
|
|
|
|
|
|
| As-cladded |
Dendrit |
3.23 |
5.255 |
77.155 |
6.675 |
7.69 |
| Interdendrit |
12.03 |
9.123 |
72.913 |
3.413 |
2.52 |
| Heat treated coatings |
Dendrit |
4.05 |
6.85 |
68.81 |
10.415 |
9.875 |
| Interdendrit |
16.915 |
12.73 |
64.3 |
3.435 |
2.72 |
|
Disclaimer/Publisher’s Note: The statements, opinions and data contained in all publications are solely those of the individual author(s) and contributor(s) and not of MDPI and/or the editor(s). MDPI and/or the editor(s) disclaim responsibility for any injury to people or property resulting from any ideas, methods, instructions or products referred to in the content. |
© 2024 by the authors. Licensee MDPI, Basel, Switzerland. This article is an open access article distributed under the terms and conditions of the Creative Commons Attribution (CC BY) license (http://creativecommons.org/licenses/by/4.0/).
