1. Introduction
Composite materials are increasingly being introduced into various industries, including the aerospace industry [
1,
2].
The strength of pin-joints has a great influence on the strength of the product. Lugs are an important element in aerospace designs because they connect wings to the fuselage, engines to pylons, flaps, ailerons and spoilers to wings [
3]. During operation, the lugs are subjected to cyclic loads [
4,
5]. High stress concentrations can lead to cracks and their subsequent growth under loading [
5,
6]. It is important to develop damage-resistant design criteria and analysis methods to ensure the high performance and reliability of aircraft lug attachments [
7,
8].
To transfer local reinforcement in products made of composite materials, it is necessary to use embedded elements or bushings in places where concentrated loads are applied [
9,
10]. Currently, the design and production of embedded elements is based on the use of simple standard shapes manufactured by mechanical processing [
11]. Such embedded elements are characterized by excess weight, which has a particularly negative impact on the weight efficiency of aerospace products consisting of many parts. The use of topology optimization methods implies working with one material in the design area and does not allow considering the stiffness of the material surrounding the load-bearing design elements [
12,
13,
14]. Injection molding methods [
15] and additive technologies [
16] are often used to produce topologically complex designs. Low adhesion of embedded elements to the base material has a significant impact on the stress-strain state of the design and leads to a multiple reduction in its load-bearing capacity [
17].
About 50% of titanium used in the aerospace industry is Ti-6Al-4V alloy, which has a good combination of performance and technological properties [
18,
19]. The high strength of Ti-6Al-4V alloy is achieved through heat treatment [
20]. Compared with commercial pure titanium, Ti-6Al-4V alloy is more suitable for large-scale industrial applications, such as titanium hybrid bonding [
21]. According to test data [
22], the tensile strength of the Ti-6Al-4V alloy produced using selective laser melting (SLM) technology is slightly inferior to the tensile strength of the alloy obtained by rolling and stamping [
23], which indicates the high performance properties of the material. One of the main goals of the aerospace industry is to create lightweight designs. One approach is to use different materials, resulting in dissimilar bonds, such as metals and fiber-reinforced composites [
24]. The following technologies are used for titanium/polyamide bonding: induction technologies [
25]; adhesion; hot-pressing technology [
26]; mechanical assembly (such as riveting, screwing or snap jointing) or welding [
27,
28]. Surface preparation is the most important step in the process and influences the quality of the adhesive bond [
29].Various methods have been used to increase the adhesive strength between the connecting part and the embedded element [
30,
31,
32,
33]. A method for treating metal surfaces to enhance adhesion is chemical treatment [
34,
35]. The authors [
36] showed that the thickness of the oxide layer significantly influences the mechanical characteristics of the bond. The titanium/polyamide bond with a thick oxide layer showed lower load capacity, and with UV irradiation, a more pronounced decrease in bond strength was observed. Experimental studies [
37] revealed that surface cleaning, surface modification, and sodium hydroxide anodization of titanium resulted in significantly high peel strengths for a titanium/aluminum bond. Recent testing of adhesive bonds has shown that pre-treating the metal surface with a laser can also significantly increase the strength of the entire pin-joint [
37,
38,
39]. The modern method for producing hybrid bonds is injection molding, which combines automation, process speed, cost-effectiveness, and dimensional accuracy [
40]. The mechanical properties of a bond are also affected by the manufacturing process: in-mold assembly and post-mold assembly [
41]. A method for bonding titanium to the molding polymer designs is described in [
42].
Advances in additive manufacturing have enabled the use of reliable industrial lasers, high-performance software, cost-effective equipment, and advanced raw materials for aerospace manufacturing [
43]. Selective laser manufacturing parts can achieve full compaction with minimal defects if process parameters are carefully optimized [
44,
45]. Thus, process parameters must be correctly selected for each new material system [
46]. Article [
47] reviews the critical aspects of optimizing processing parameters affecting the properties of selective laser manufacturing titanium alloys and titanium matrix composites and critically evaluates the future prospects of such materials.
The cohesive zone material (CZM) model [
48], depending on the normal component (mode I) and the tangential component (mode II), is usually used to describe the mechanics of adhesive interaction. A comparative modes analysis is presented in [
49]. Delaminations can grow rapidly under mode I or mode II interlaminar fatigue loads [
50,
51,
52], which significantly limits the acceptable damage size for aircraft composite designs. In some cases, a mixed mode model is used, which considers both directions of destruction [
53]. It was noted in [
54,
55] that materials demonstrate higher resistance to mode II crack propagation compared to mode I. The work [
56] shows the effectiveness of increasing the roughness of the bushing and using stiffeners to reduce the mass of the bond. It was noted that mode II has the greatest impact on reducing the mass of the entire lug. Coefficients of the CZM model for composite/metal bonds are defined in [
57,
58,
59,
60,
61]. The work [
62] also notes a higher critical strain energy release rate for mode II compared to mode I. Moreover, mode I is difficult to measure and requires long samples [
63].The parameters of the contact interaction between metals and polymers are presented in [
40]. Among the forty studies presented , contact interaction with titanium is presented only in one work [
42] using the example of assessing the interaction of the PPS30GF/Ti6Al4V bond, therefore, assessing the parameters of contact of carbon filled PA6 with titanium alloys is relevant.
The goals of this study are to evaluate the parameters of the contact interaction model between parts made of thermoplastic short-reinforced composite materials based on polyamide-6 and embedded elements with different surface roughness values, made of titanium alloys manufactured by selective laser melting; and to evaluate the influence of the roughness of titanium embedded elements on the load-bearing capacity of designs. The study of the adhesive interaction model was carried out using lugs as an example because they are often encountered in practice, are easy to manufacture, and allow, through various loading methods, to obtain the characteristics of the contact model and verify this model.
Chapter 2 describes the materials and methods used in this study. An experimental tool was manufactured to obtain the contact properties and load-bearing capacity characteristics of lugs. Chapter 3 describes the experimental results and shows the fabricated designs: molding lugs and selective laser melting bushings with different roughnesses. Chapter 4 compares the load-bearing capacity of two types of lugs with bushings having different surface roughness values. Chapter 5 describes the obtained results.
2. Materials and Methods
2.1. Materials and Material Models
The material chosen for the lug is polyamide-6, reinforced with 30% short carbon fibers - a structural material with high weight efficiency and the technological ability to be molded using thermoplastic machines at temperatures from 220 to 270 °C. The study of the characteristics of the short-reinforced polyamide used for the manufacture of lugs is presented in detail in [
64] and includes the determination of the parameters of anisotropic models of the material used in the current work for numerical modeling. VT6 titanium, widely used for the SLM process and capable of withstanding high contact stresses, was chosen as the material for the embedded elements. A detailed study of the characteristics of the VT6 alloy used is presented in [
21].
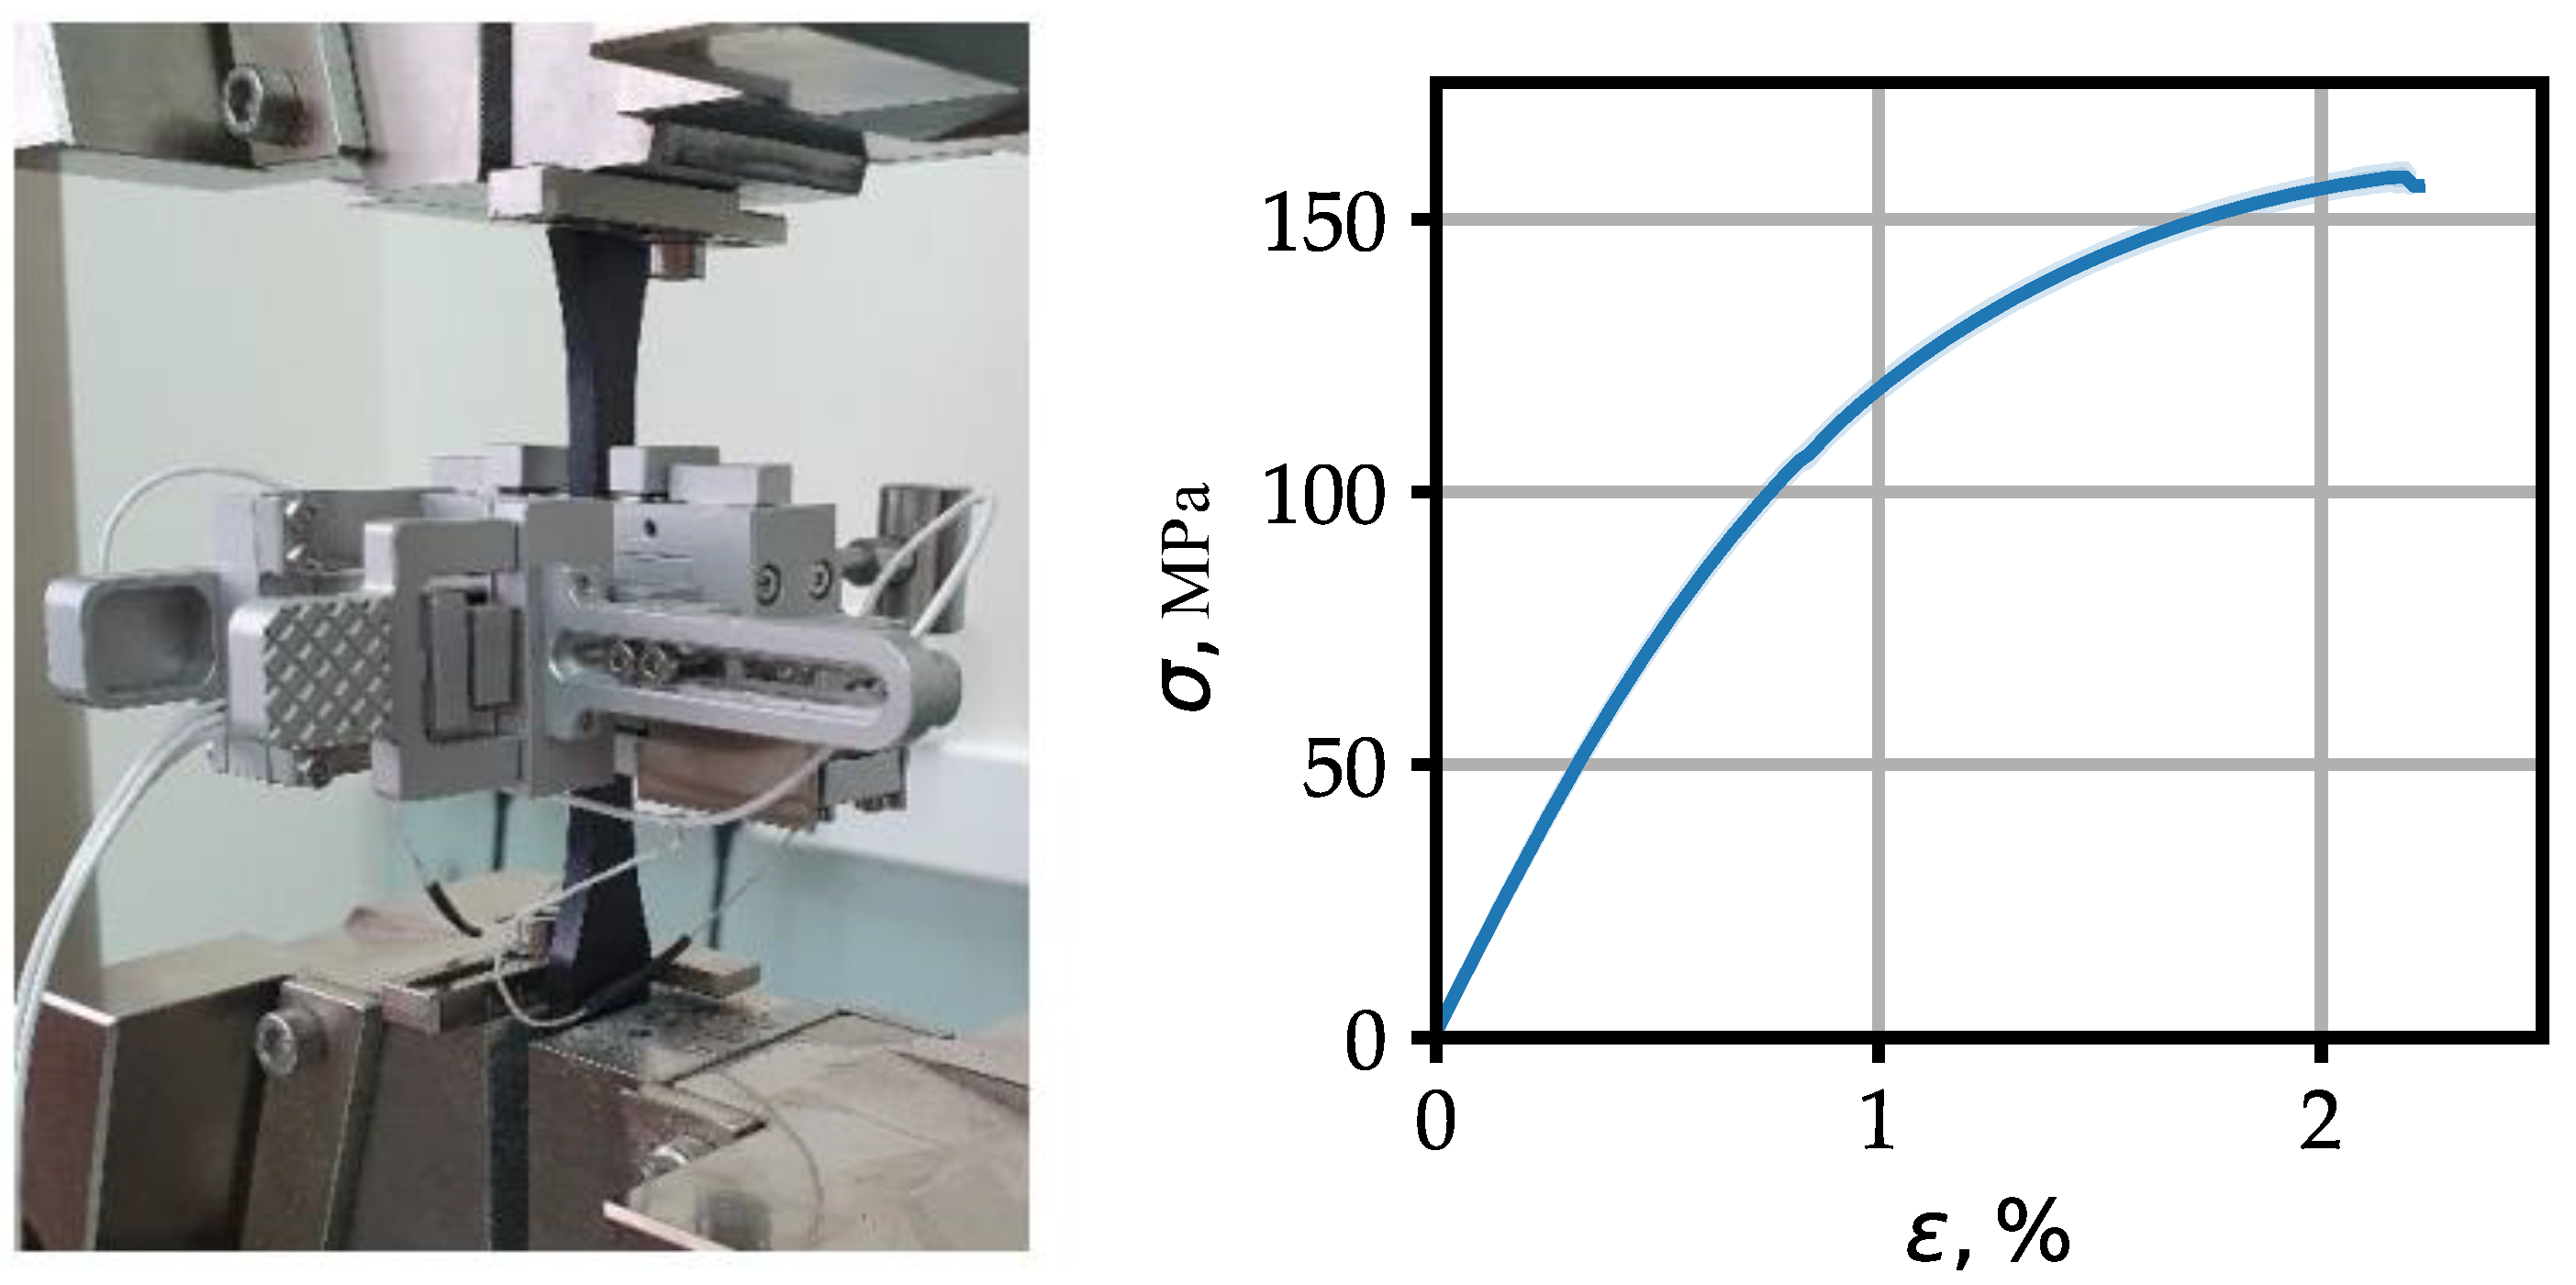
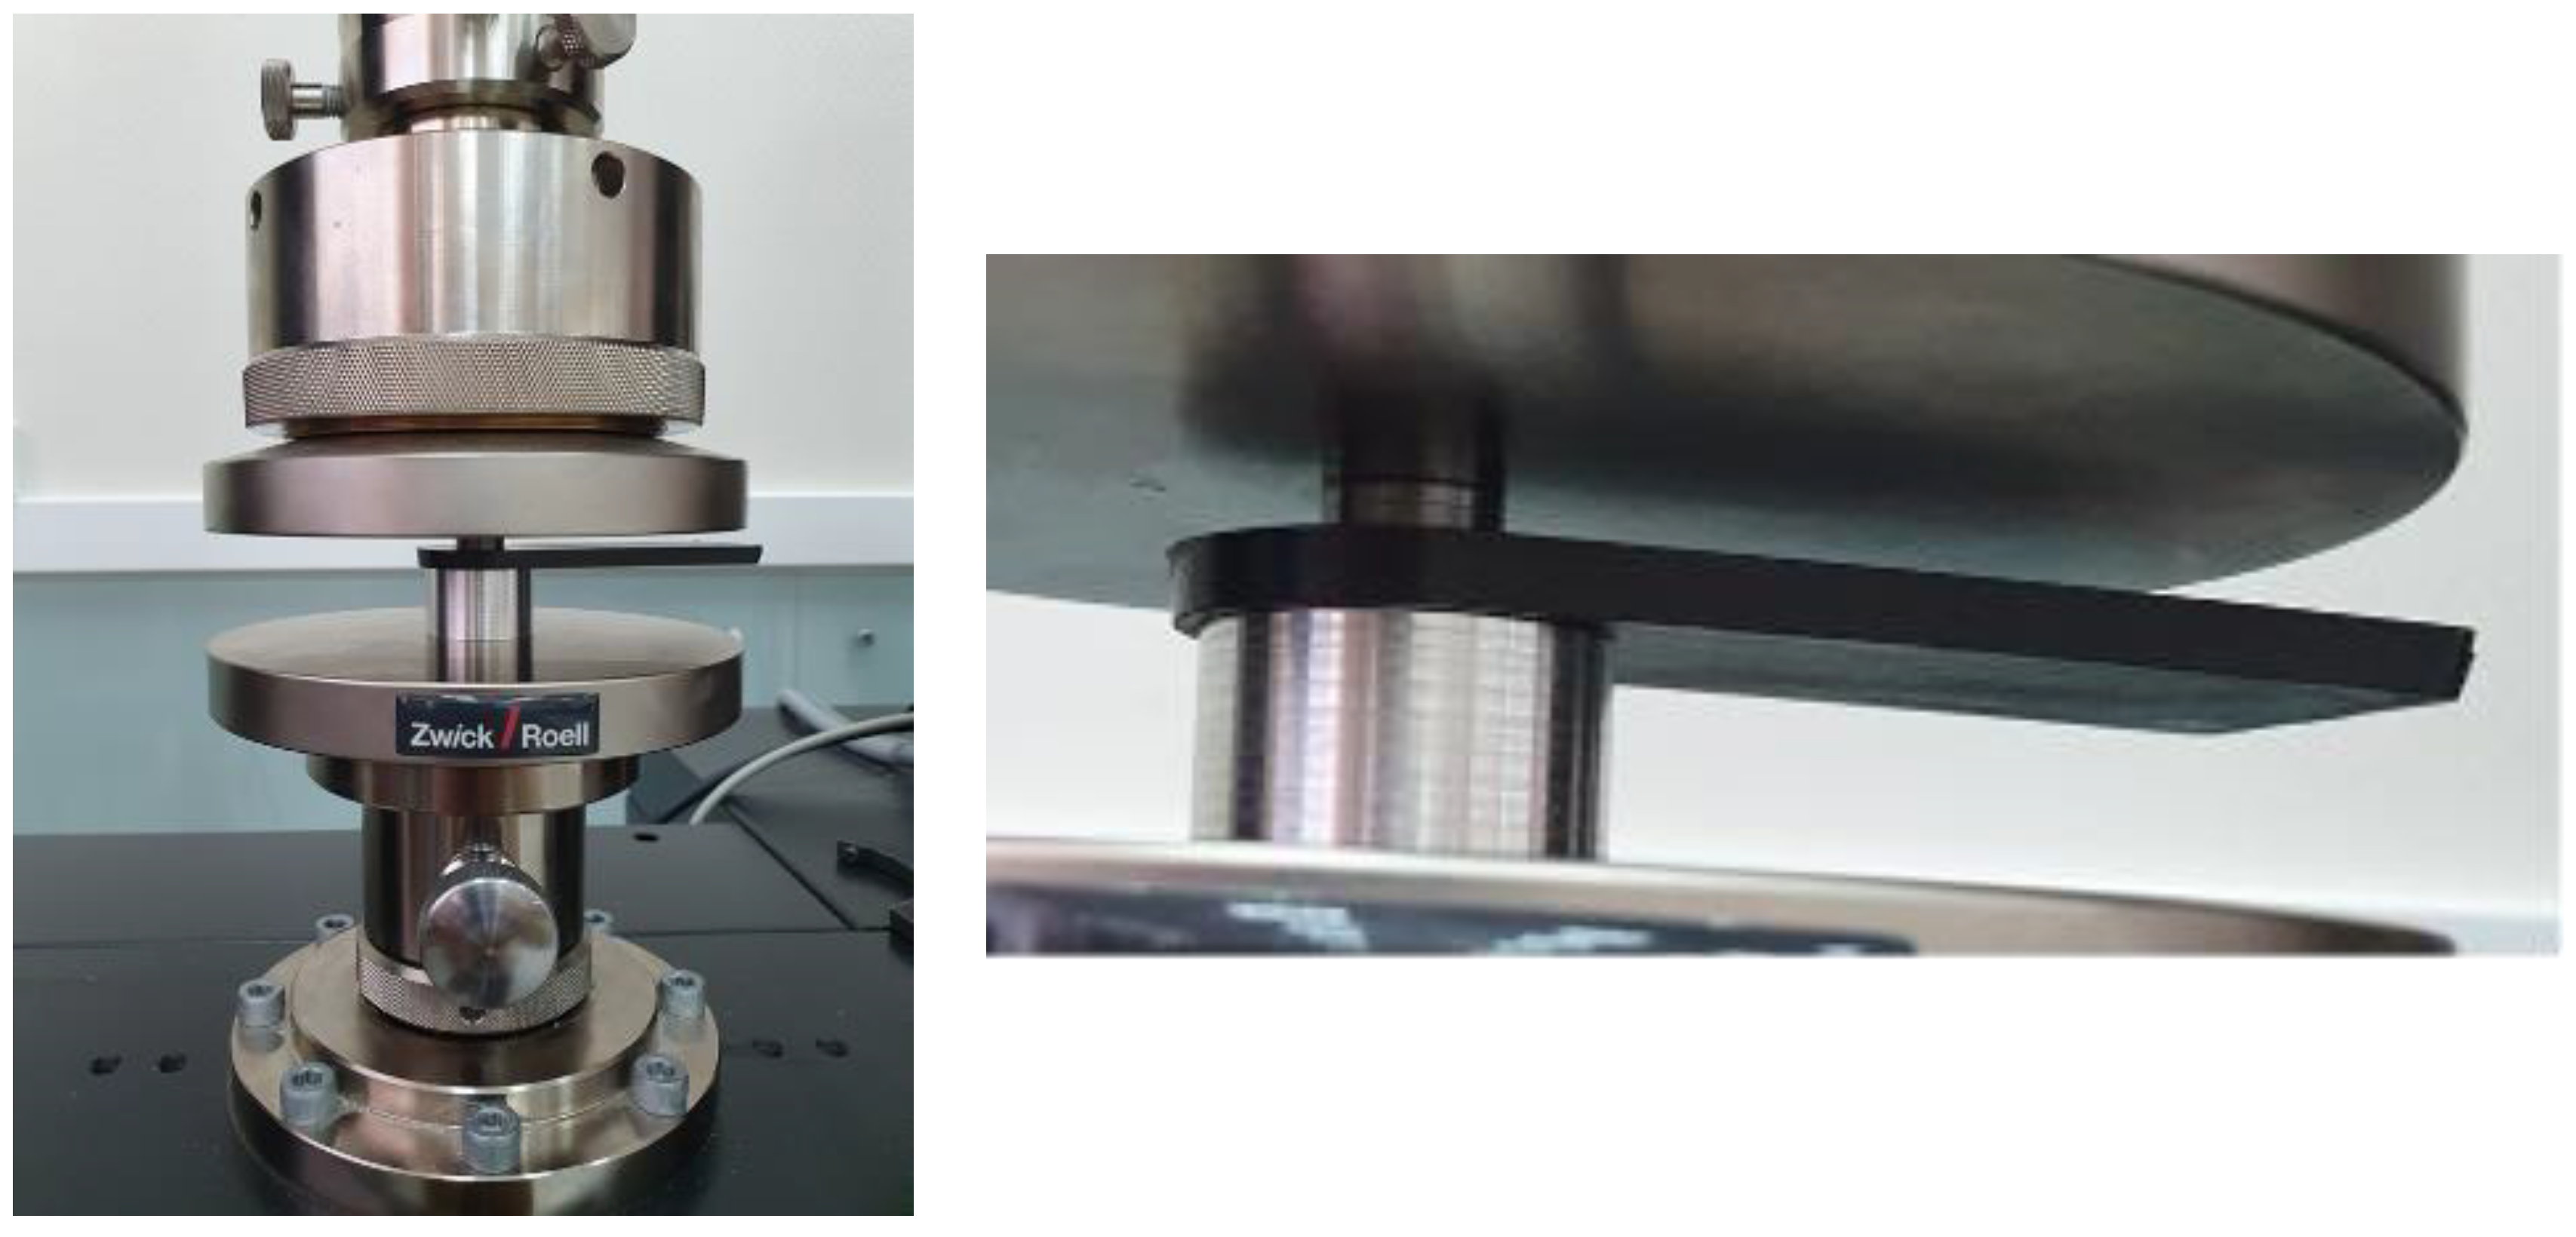
Tensile tests were performed on type 1BA samples according to the ISO 527-2 standard of polyamide-6 reinforced with 30% of the mass with short carbon fibers (Gamma-plast UPA 6 30 M) on a universal testing machine Zwick/Roell Z050 TE (see
Figure 1). The compliance of the material model used in the strength calculations [
64] with the mechanical characteristics of the samples in molding direction was confirmed.
2.2. Methods
2.2.1. Problem Statement and Lugs Geometry
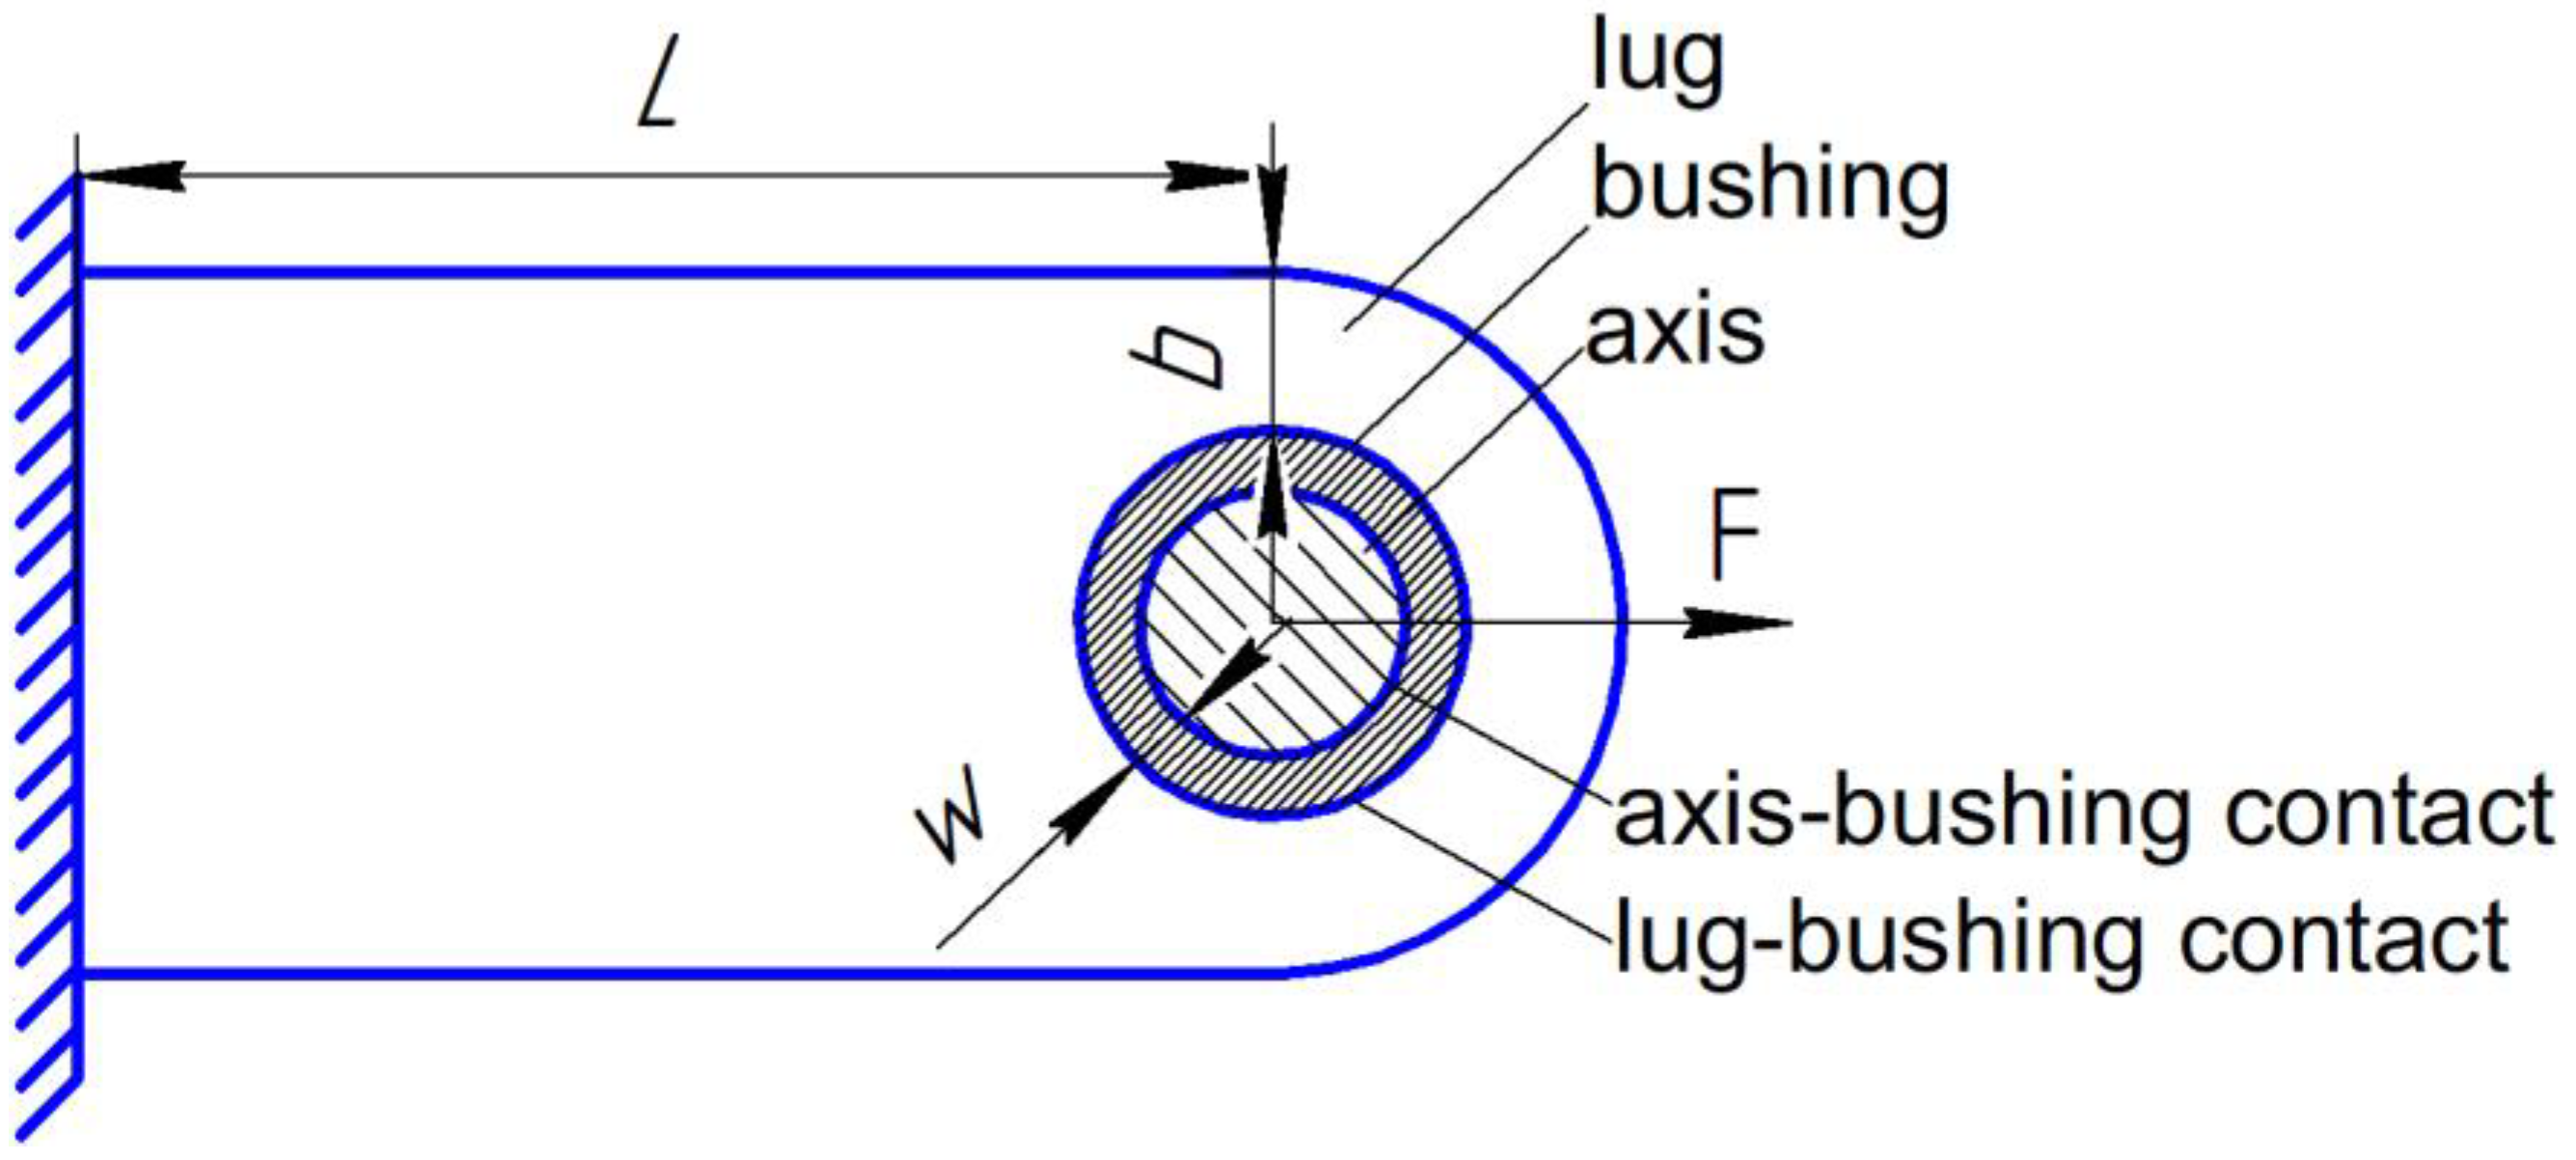
The study of the adhesion interaction model was conducted using lugs as an example (see
Figure 2). A previous study of the sensitivity of lug sizes to the characteristics of contact interaction [
56] showed that the maximum permissible stress in mode II of failure in the contact between the lug and the bushing has the greatest influence on the optimal lug bridge size. We will determine the dimensions of the lugs based on the experience gained in [
56] in optimizing the sizes of lugs depending on the characteristics of the contact interaction. The diameter of the lug axis is 12 mm, the lug length from the axis to the embedment is 56 mm, the size of the lugs for embedding in the experimental study is 12 mm, and the thickness of the lugs is 5 mm. The lug width is determined by the size of bridge b. Assuming the transmission of force at a level of 5000N, we will choose lugs of two standard types S and M, differing in the width of the bridge b for S type b is 5 mm, for M type b is 10 mm. The S type is suitable for cases where the contact interaction strength between the bushing and the lug material exceeds 4 MPa. The M type is better suited with respect to type S when adhesion between the bushing and lug can be neglected. The thickness of the bushing for such a lug, based on the strength limits of titanium and the manufacturability of production, is 1 mm.
2.2.1. CZM Model
The adhesive layer was considered by using contact elements in Ansys Mechanical APDL. The bilinear CZM model was used [
65]. Since mode II has the greatest impact on reducing the mass of the entire lug [
64], we choose a model based on mode II as the basis for predicting the load-bearing capacity of the lugs.
When describing the contact interaction tangential stress and were considered [
65]:
where
– tangential contact stresses, MPa,
– tangential contact stiffness, N/mm
3,
– tangential slip distance, mm,
,
u1 and
u2 – slip distances in the two principal direction in the tangent plane,
dt - debonding parameter. In the presence of compressive forces, the CZM model prevents penetration of the contacting surfaces. In case of unloading and subsequent reloading CZM model considering the debonding parameter [
19] which is defined as follows:
for
and d
t=0 for
where,
,
- tangential slip distance at the maximum tangential contact stress, mm.
The tangential critical value
calculate based on critical energy release rate
and maximum critical stress
, which are parameters of the contact model [
65]:
The process of convergence of the Newton-Raphson algorithm at a nonlinearity of the debonding type can be challenging; therefore, artificial damping was used to accelerate and stabilize the convergence process, which limits the amplitude of the change in the destruction parameter during the transition from one iteration to another:
where
– the time step (in the case of a static calculation, the time varies from 0 to 1 and is fictitious, determining simply the current load value),
– the destruction parameter in the previous step,
– the damping coefficient. The damping coefficient must be small compared to the time step to avoid introducing significant errors into the calculation. In this study, the damping coefficient was set to 0.01.
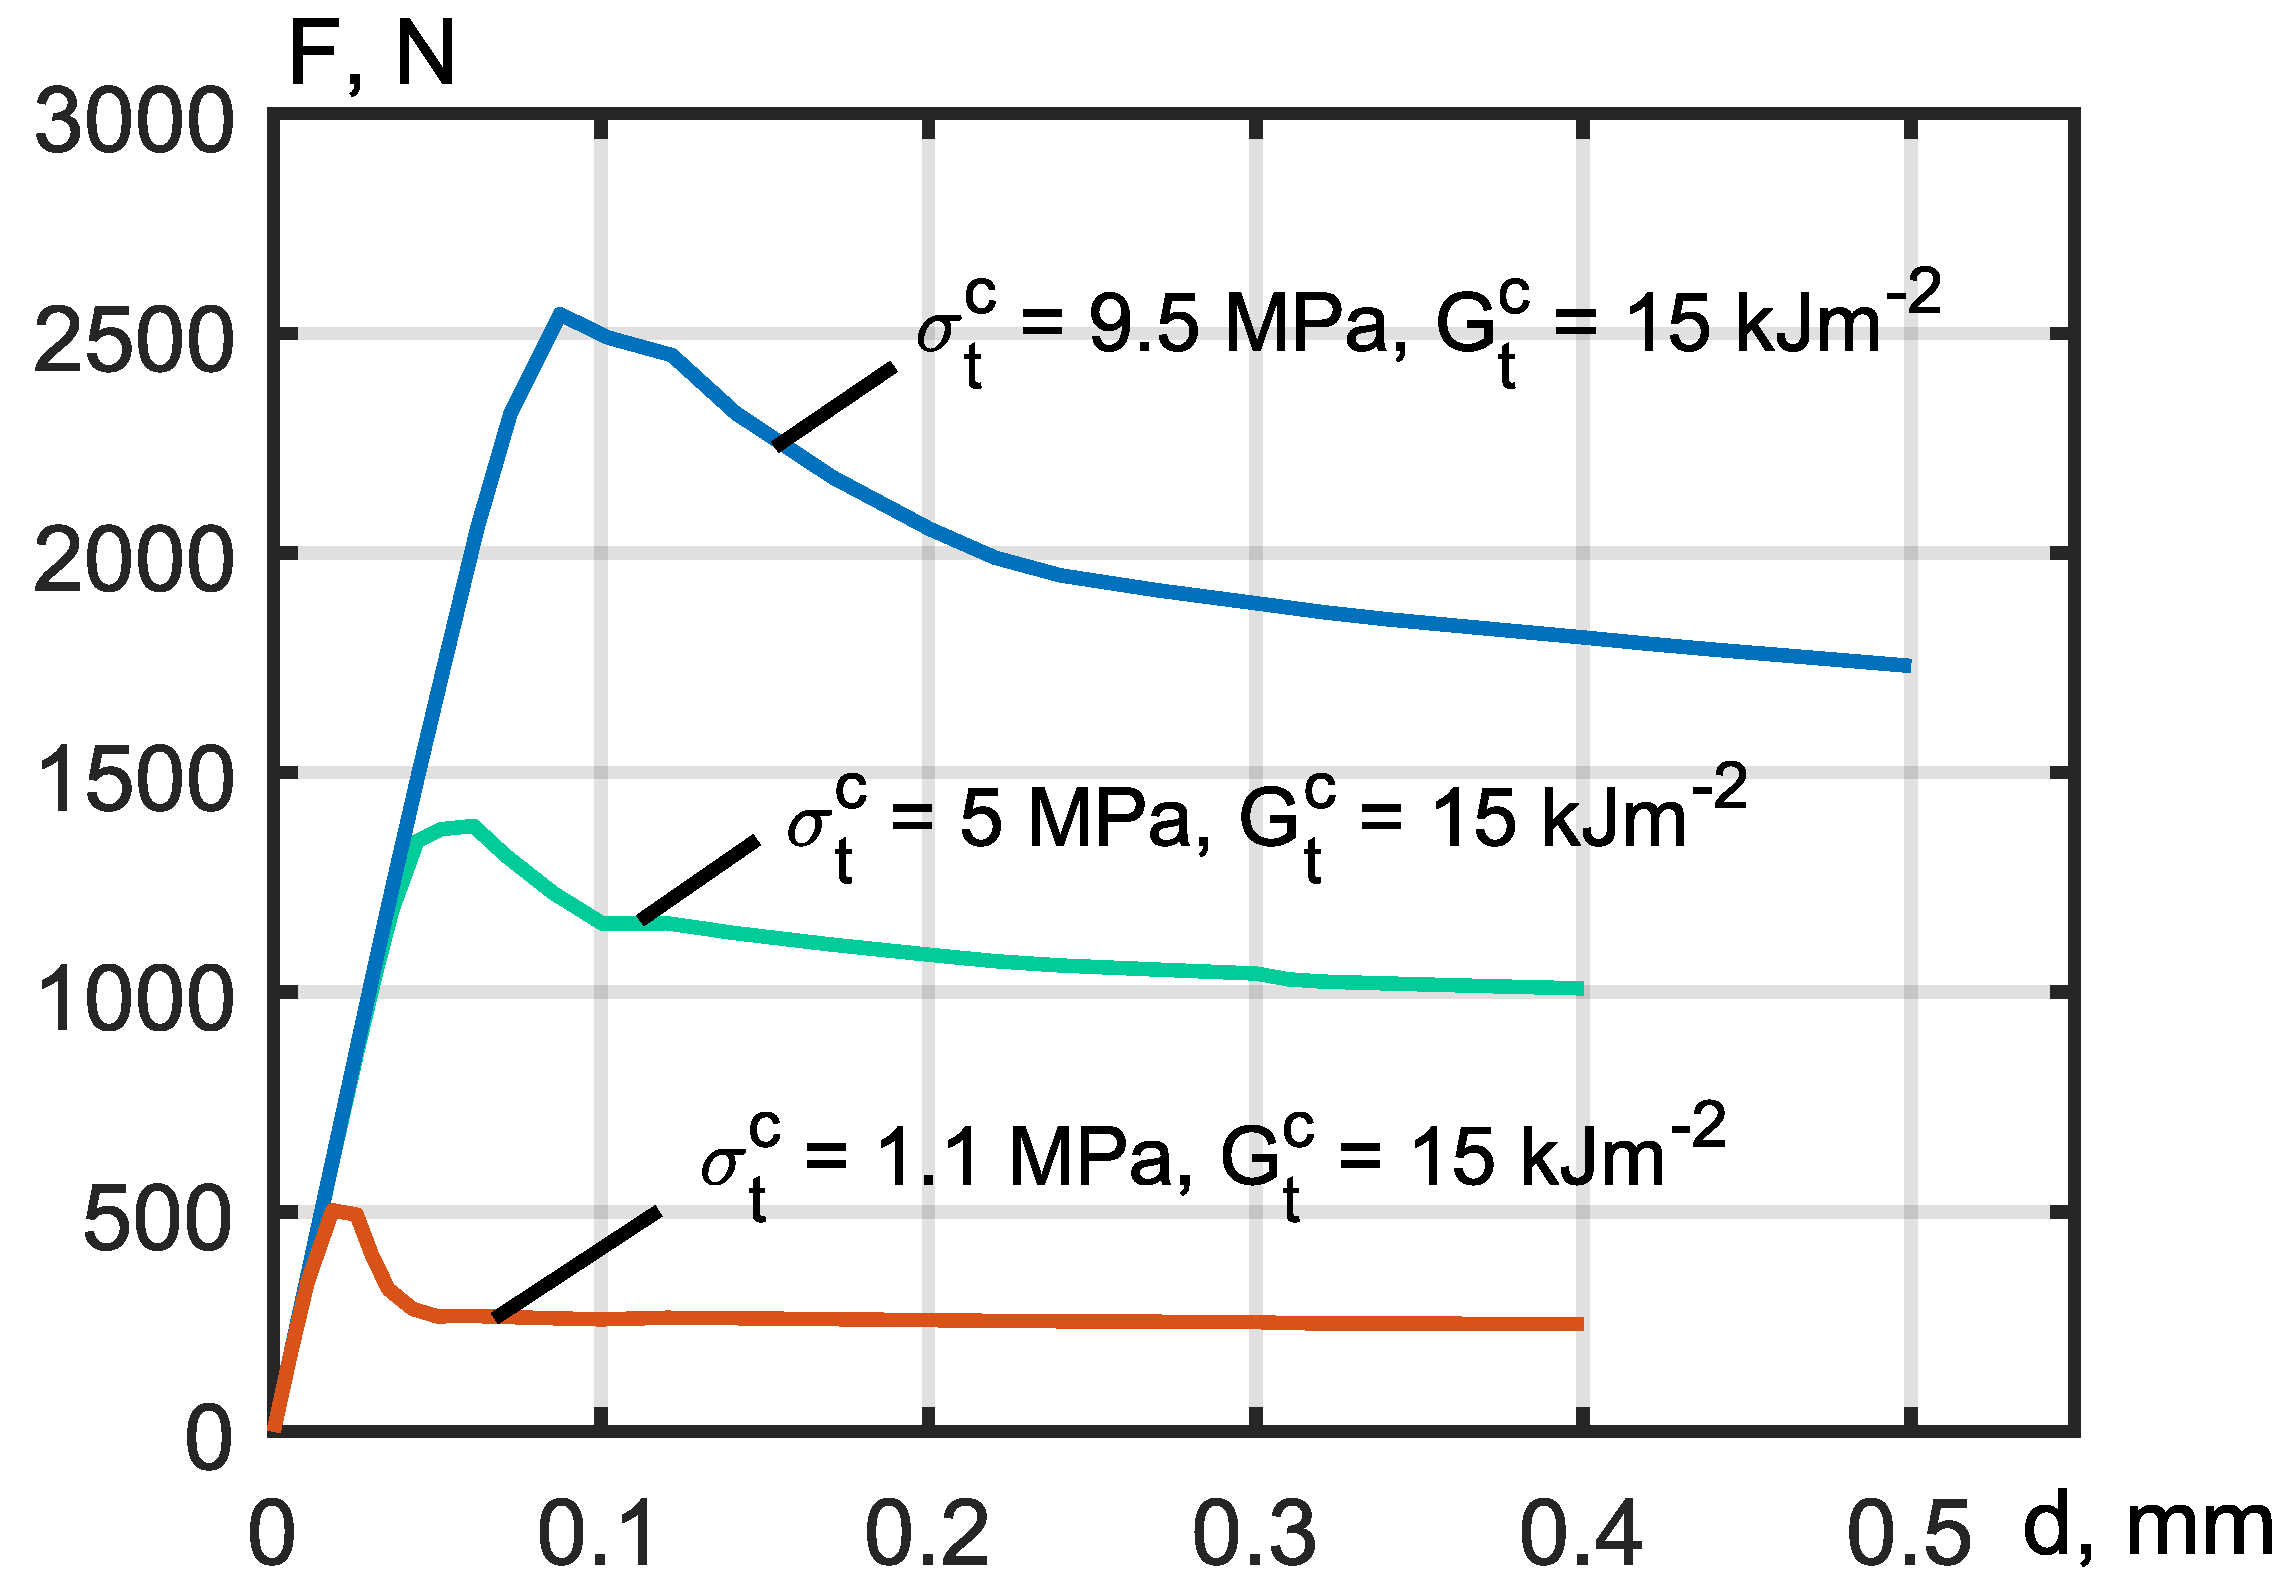
The values that determine the properties of the contact interaction of the bushing and the lug body were , , .
2.2.2. Determination of the Load-Bearing Capacity of Lugs with Bushings
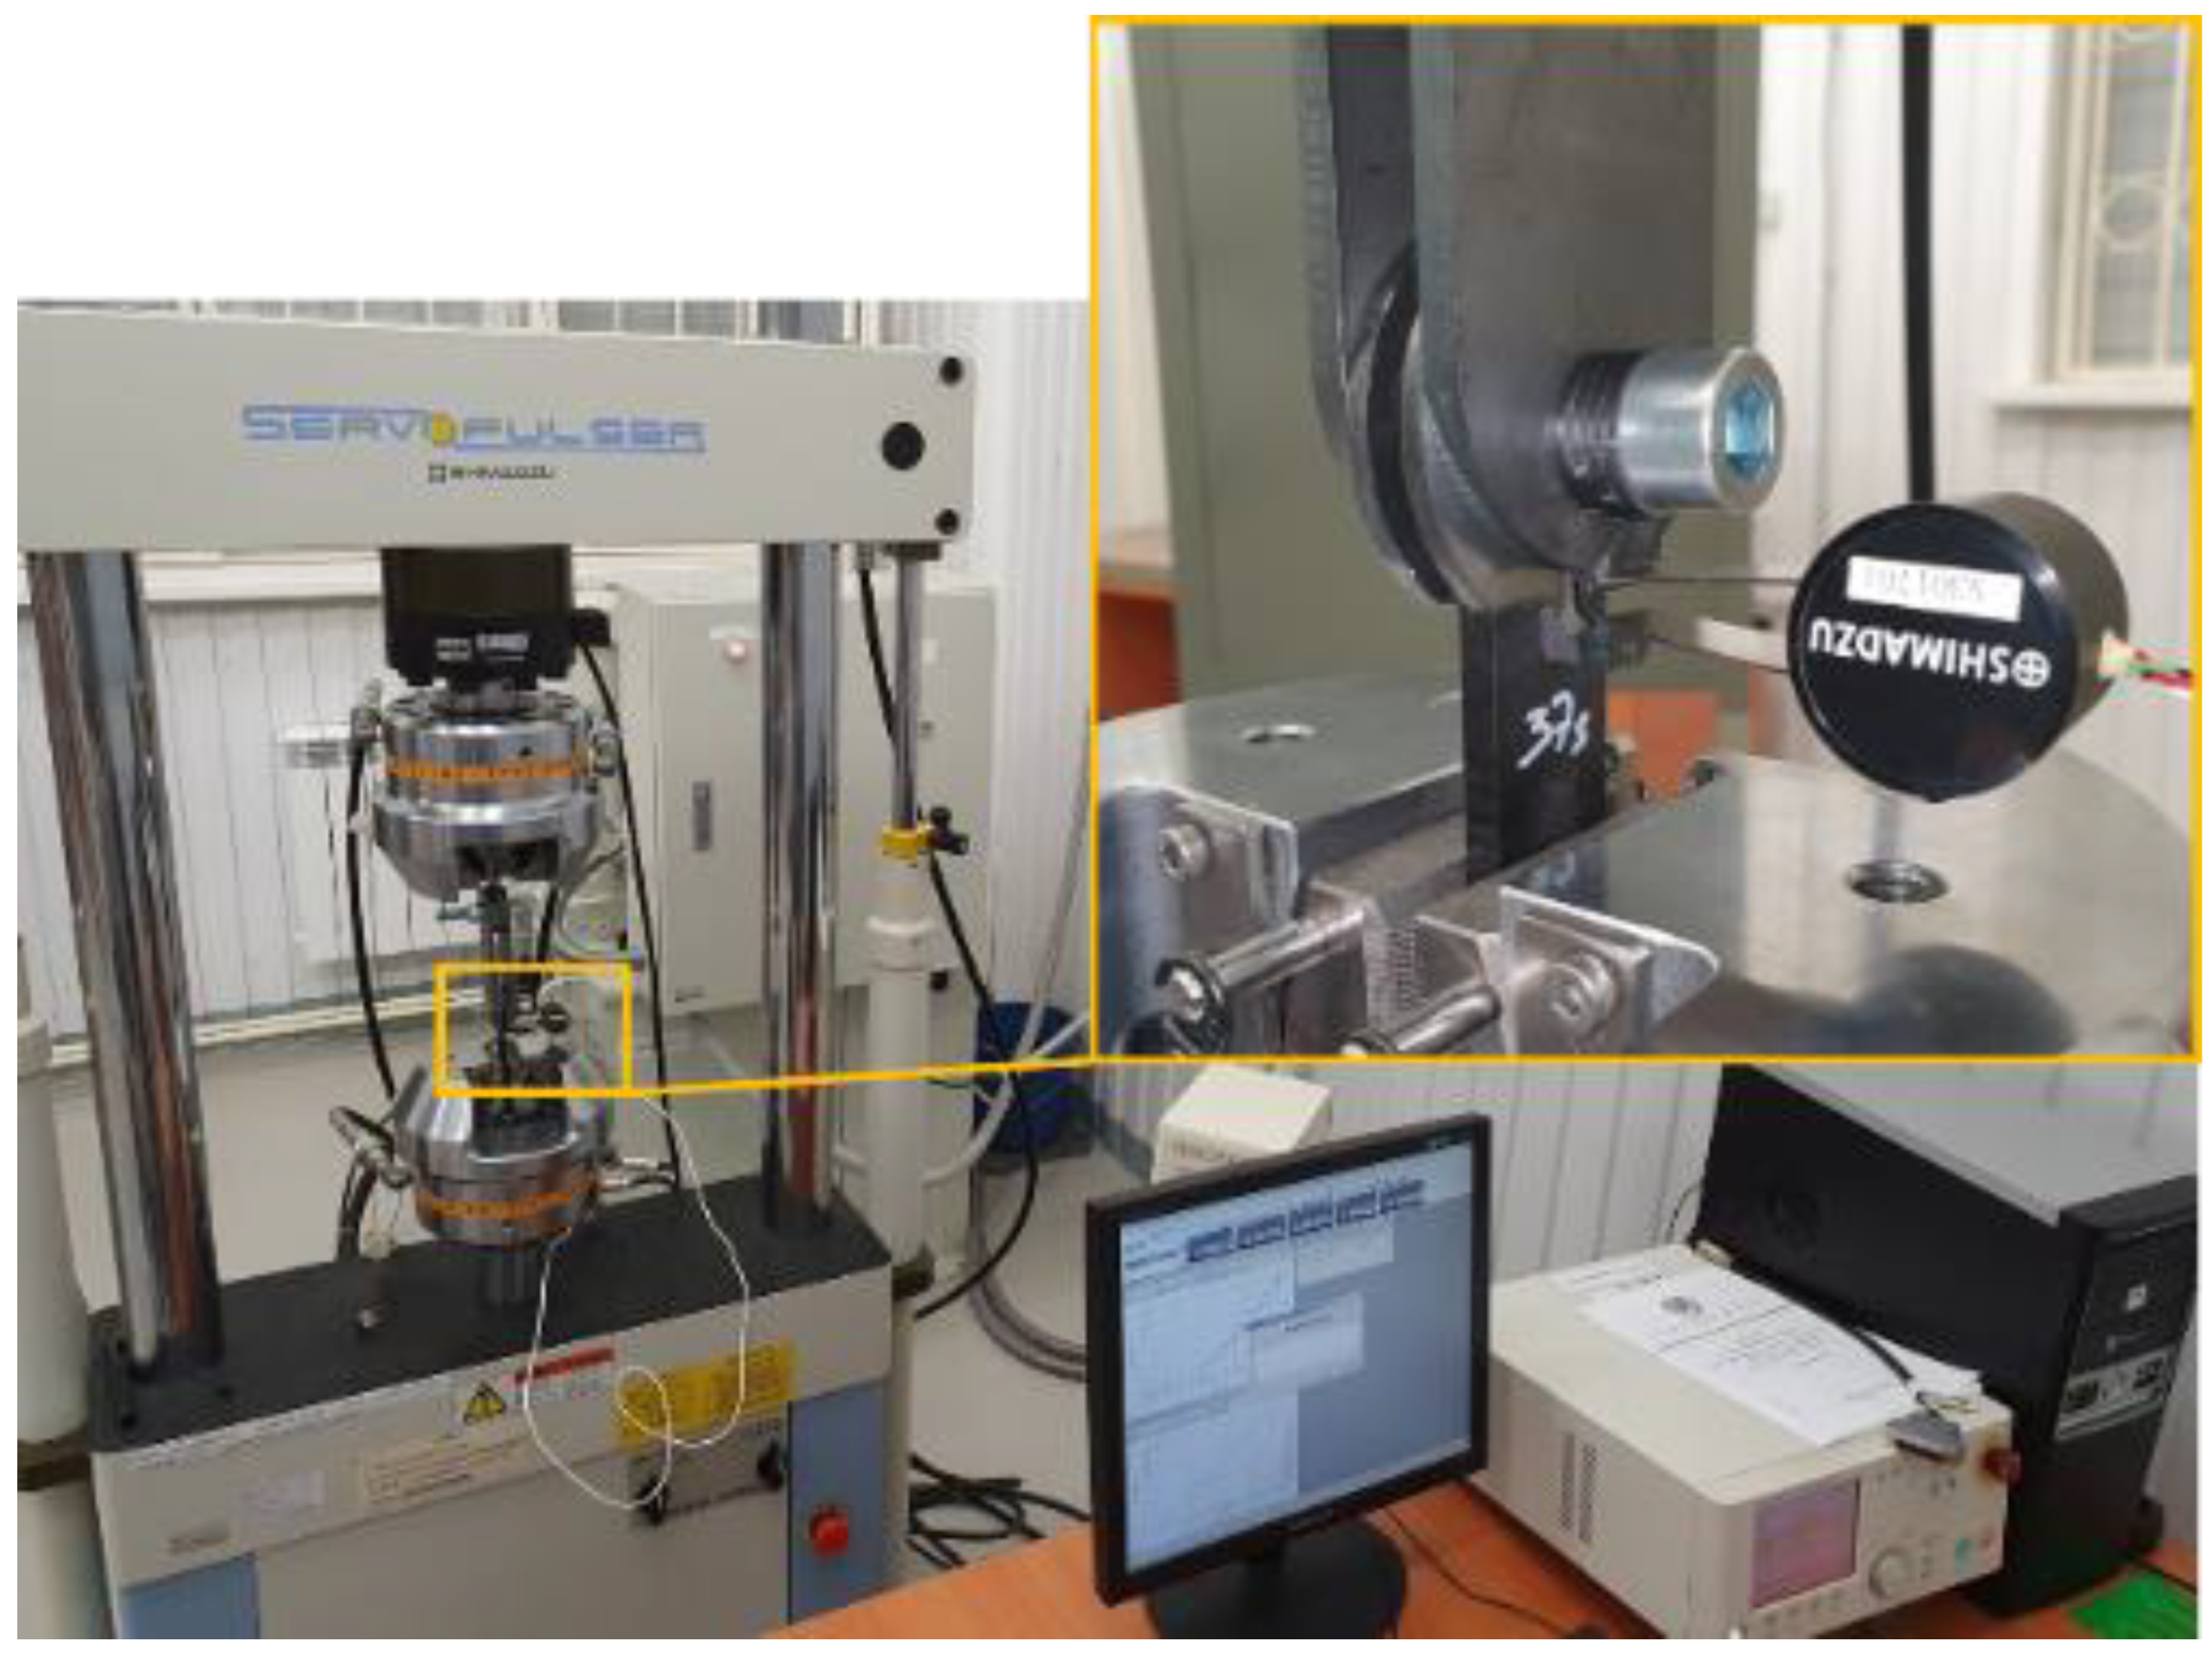
The load-bearing capacity of lugs with various embedded elements was assessed by tensile tests on a servo-hydraulic machine Shimadzu EHF-E.
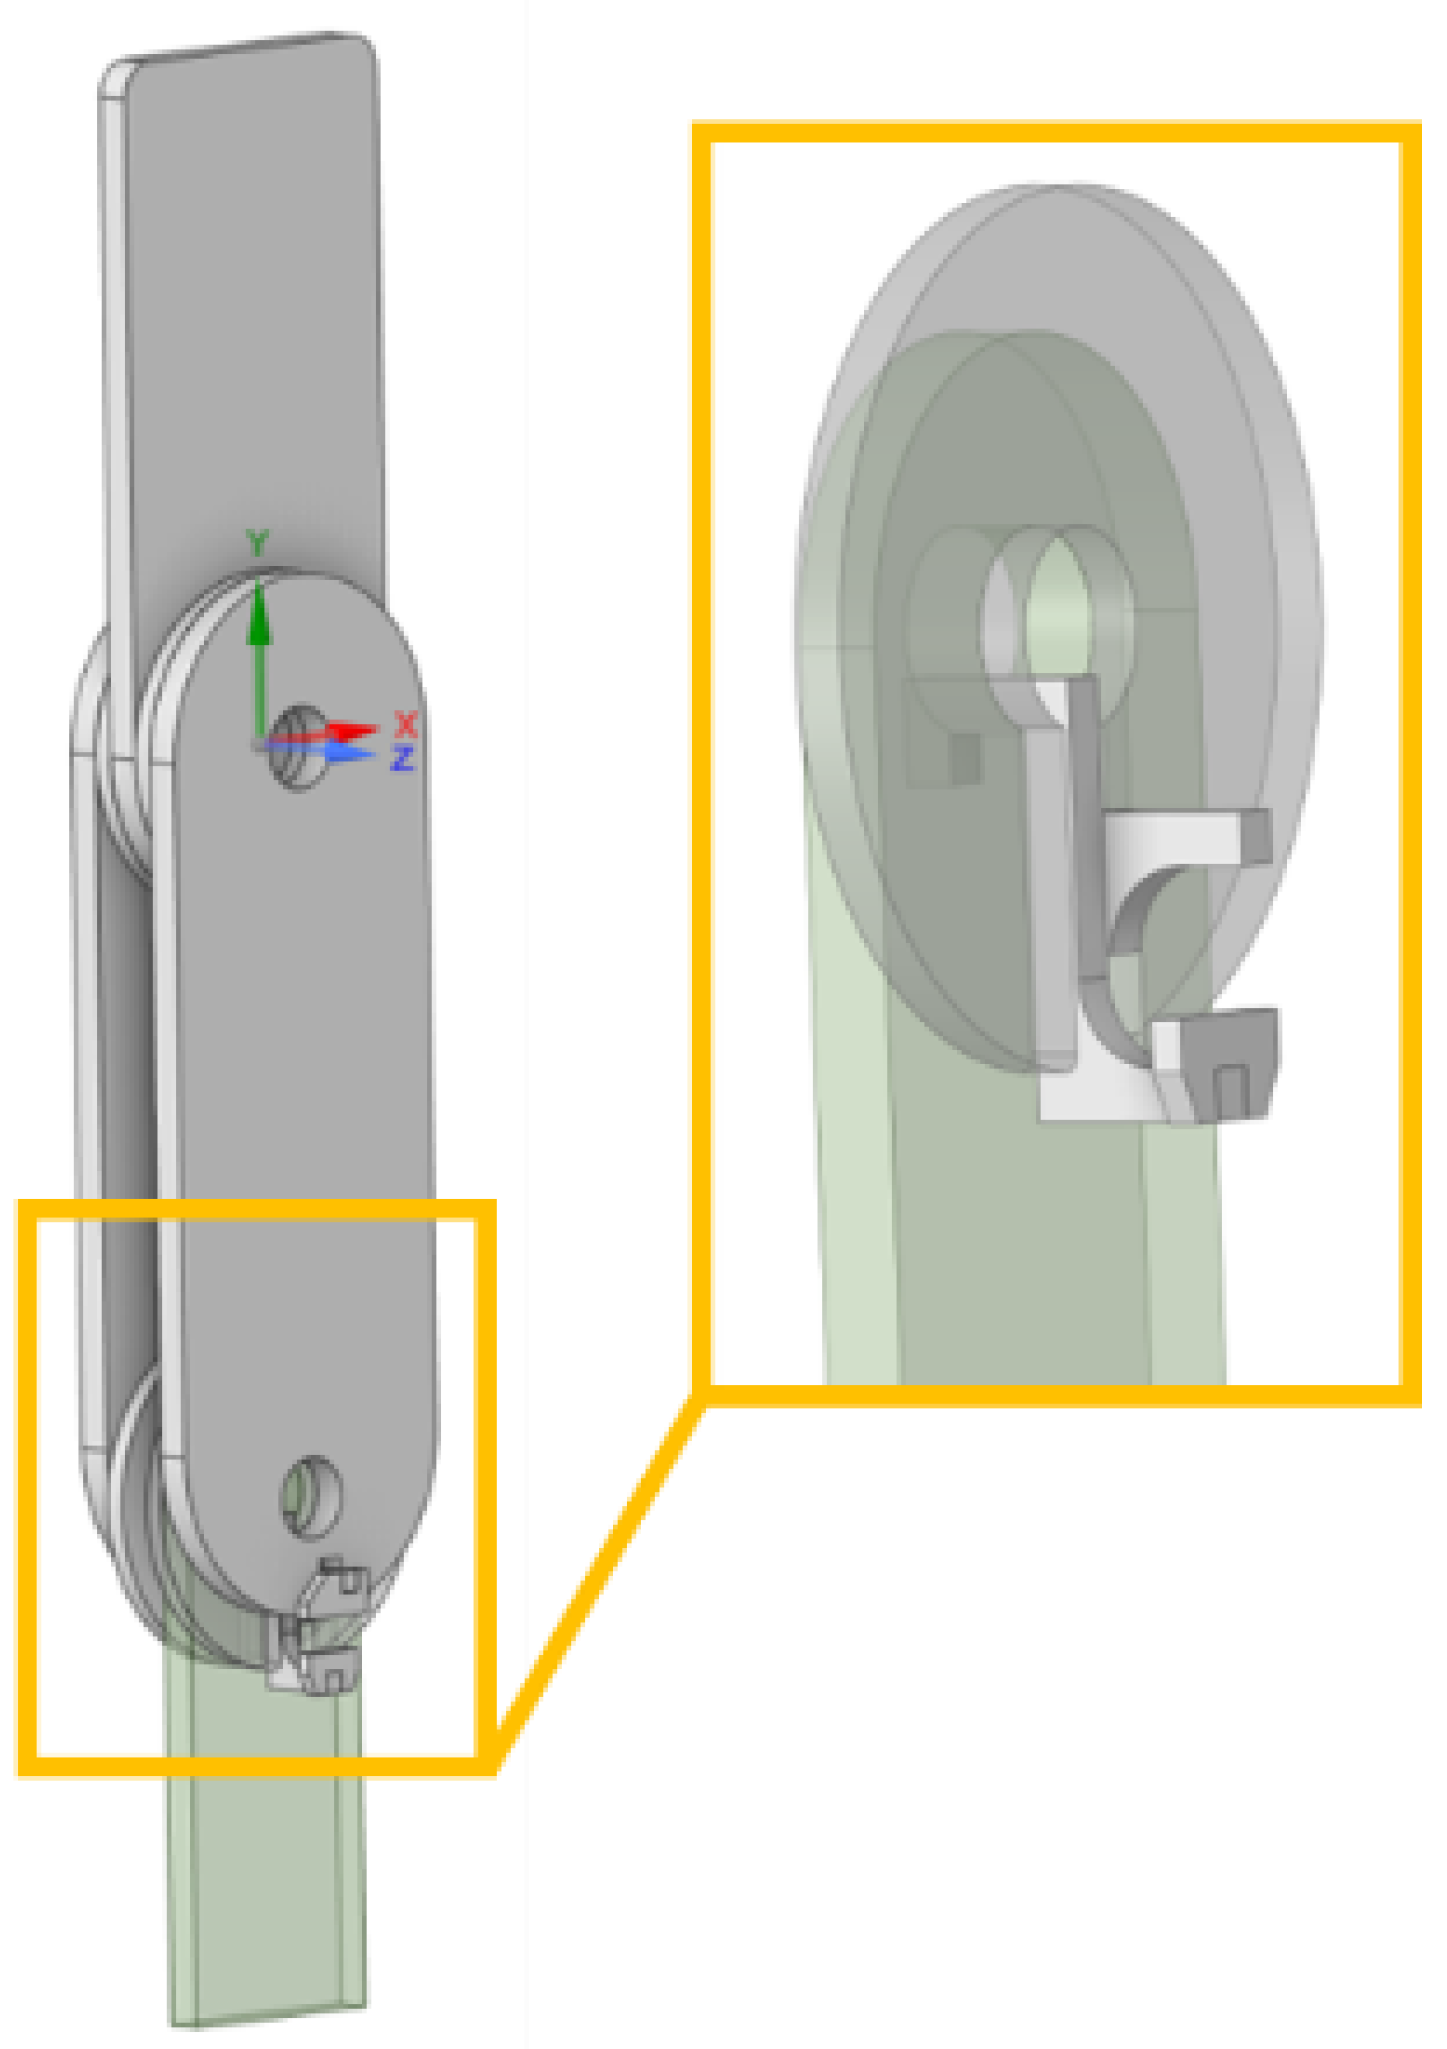
A tool for the tensile testing of lugs has been manufactured (see
Figure 4). The tool allows you to measure both the movements of the entire lug and separately control the displacement of the rear wall of the lug axis by installing an extensometer.
2.2.3. Manufacturing of Embedded Elements
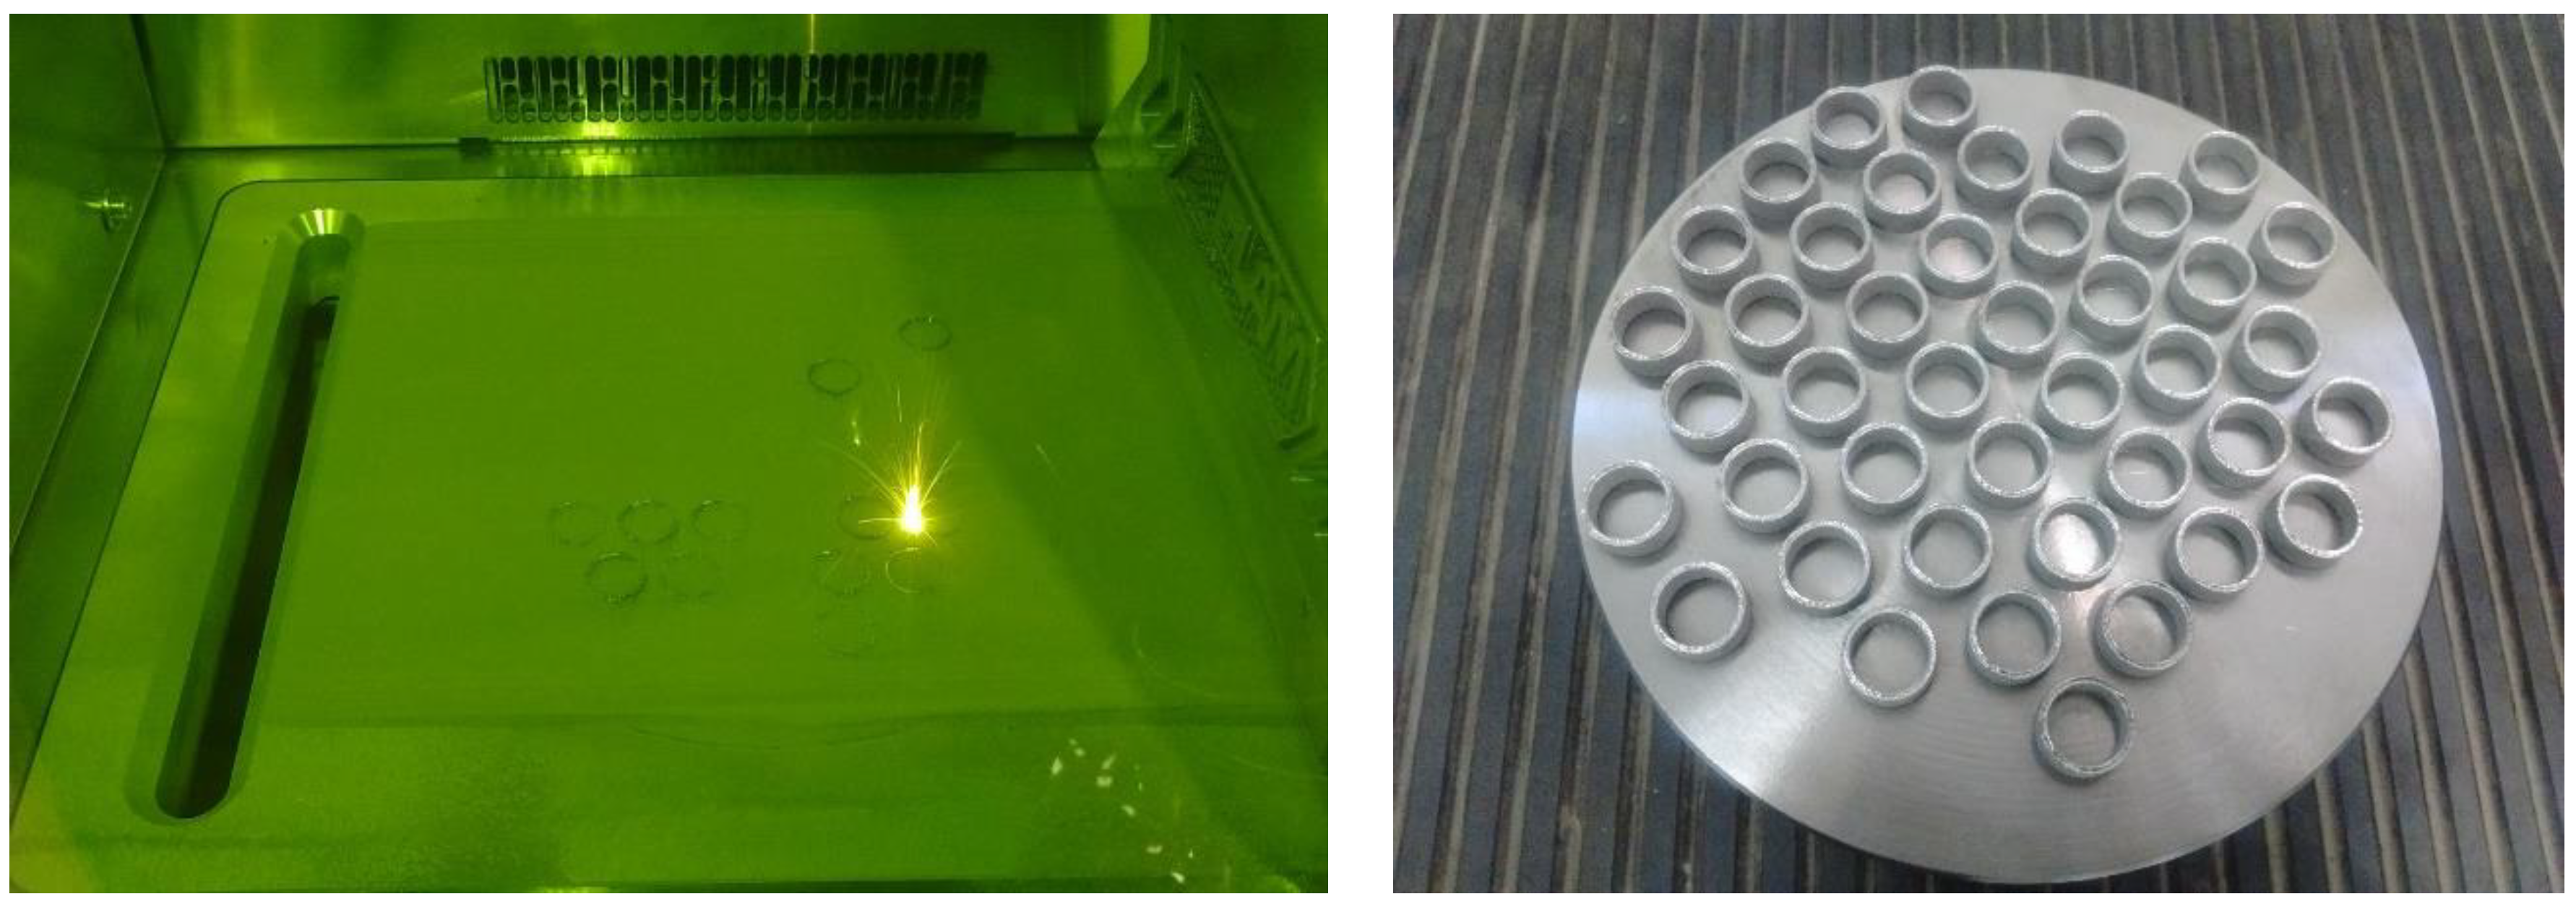
The production of titanium embedded mold elements was carried out using an additive installation 3DLAM Mid. The 3DLAM Mid selective laser melting system is designed for single and small-scale production of arbitrary-shaped parts by layer-by-layer selective fusion of metal powders with grain size 50 μm. Process parameters were controlled using the software 3DLAM Slicer (see
Table 1). After assigning the main technological parameters of the selective laser melting (SLM) process, a work file for manufacturing the part was generated. The manufacturing process is shown in
Figure 5.
Separation of the workpieces from the construction platform was performed using electrical discharge machining. After separation from the construction platform, mechanical processing of the samples was performed to bring the landing dimensions to the accuracy required for the molding process. Providing gaps between the mold and the embedded element in the range of 0.05–0.1 mm allowed for easy removal of molding parts, but did not allow plastic to penetrate the gaps between the embedded elements and the mold.
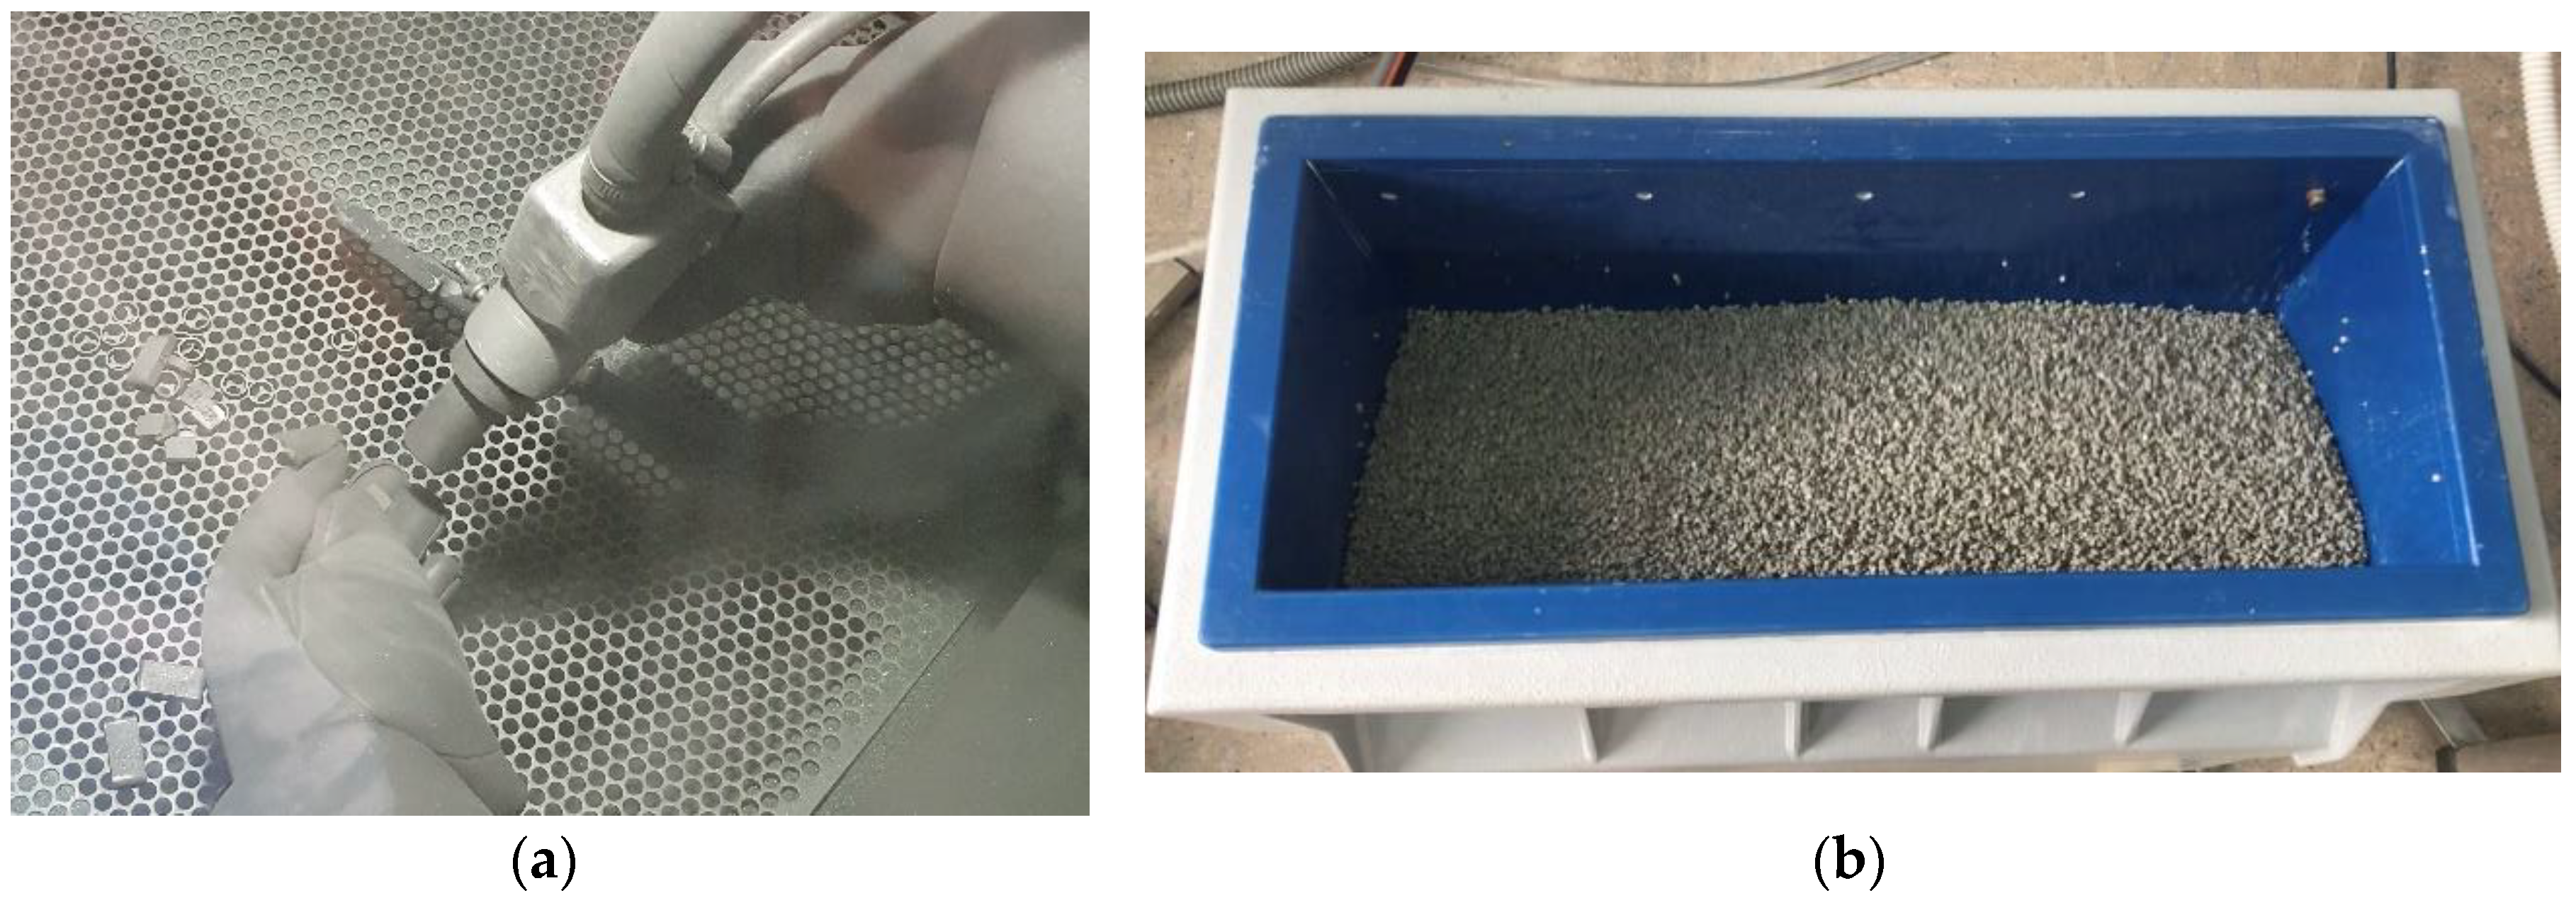
The embedded elements are divided into three groups according to the degree of roughness - the first part of the elements is left with the roughness obtained in the SLM process, the second part is subjected to sandblasting, and the third part is vibratory finishing (see
Figure 6).
Because the results of the parametric study revealed a high role of the shear strength of the contact, it was selected to additionally manufacture bushings with ribs. More than 50 embedded bushings were manufactured - from 5 to 7 of each roughness (vibratory finishing, sandblasting, initial SLM process, ribs) for each of the two standard types of the lug and more than 40 flat samples of two types of embedded elements (14 flat samples for each degree of roughness).
2.2.4. Measuring the Roughness of Samples
After surface treatment, the roughness of flat samples was studied using a profilometer (see
Figure 7).
2.2.5. Manufacturing of Samples of Lugs
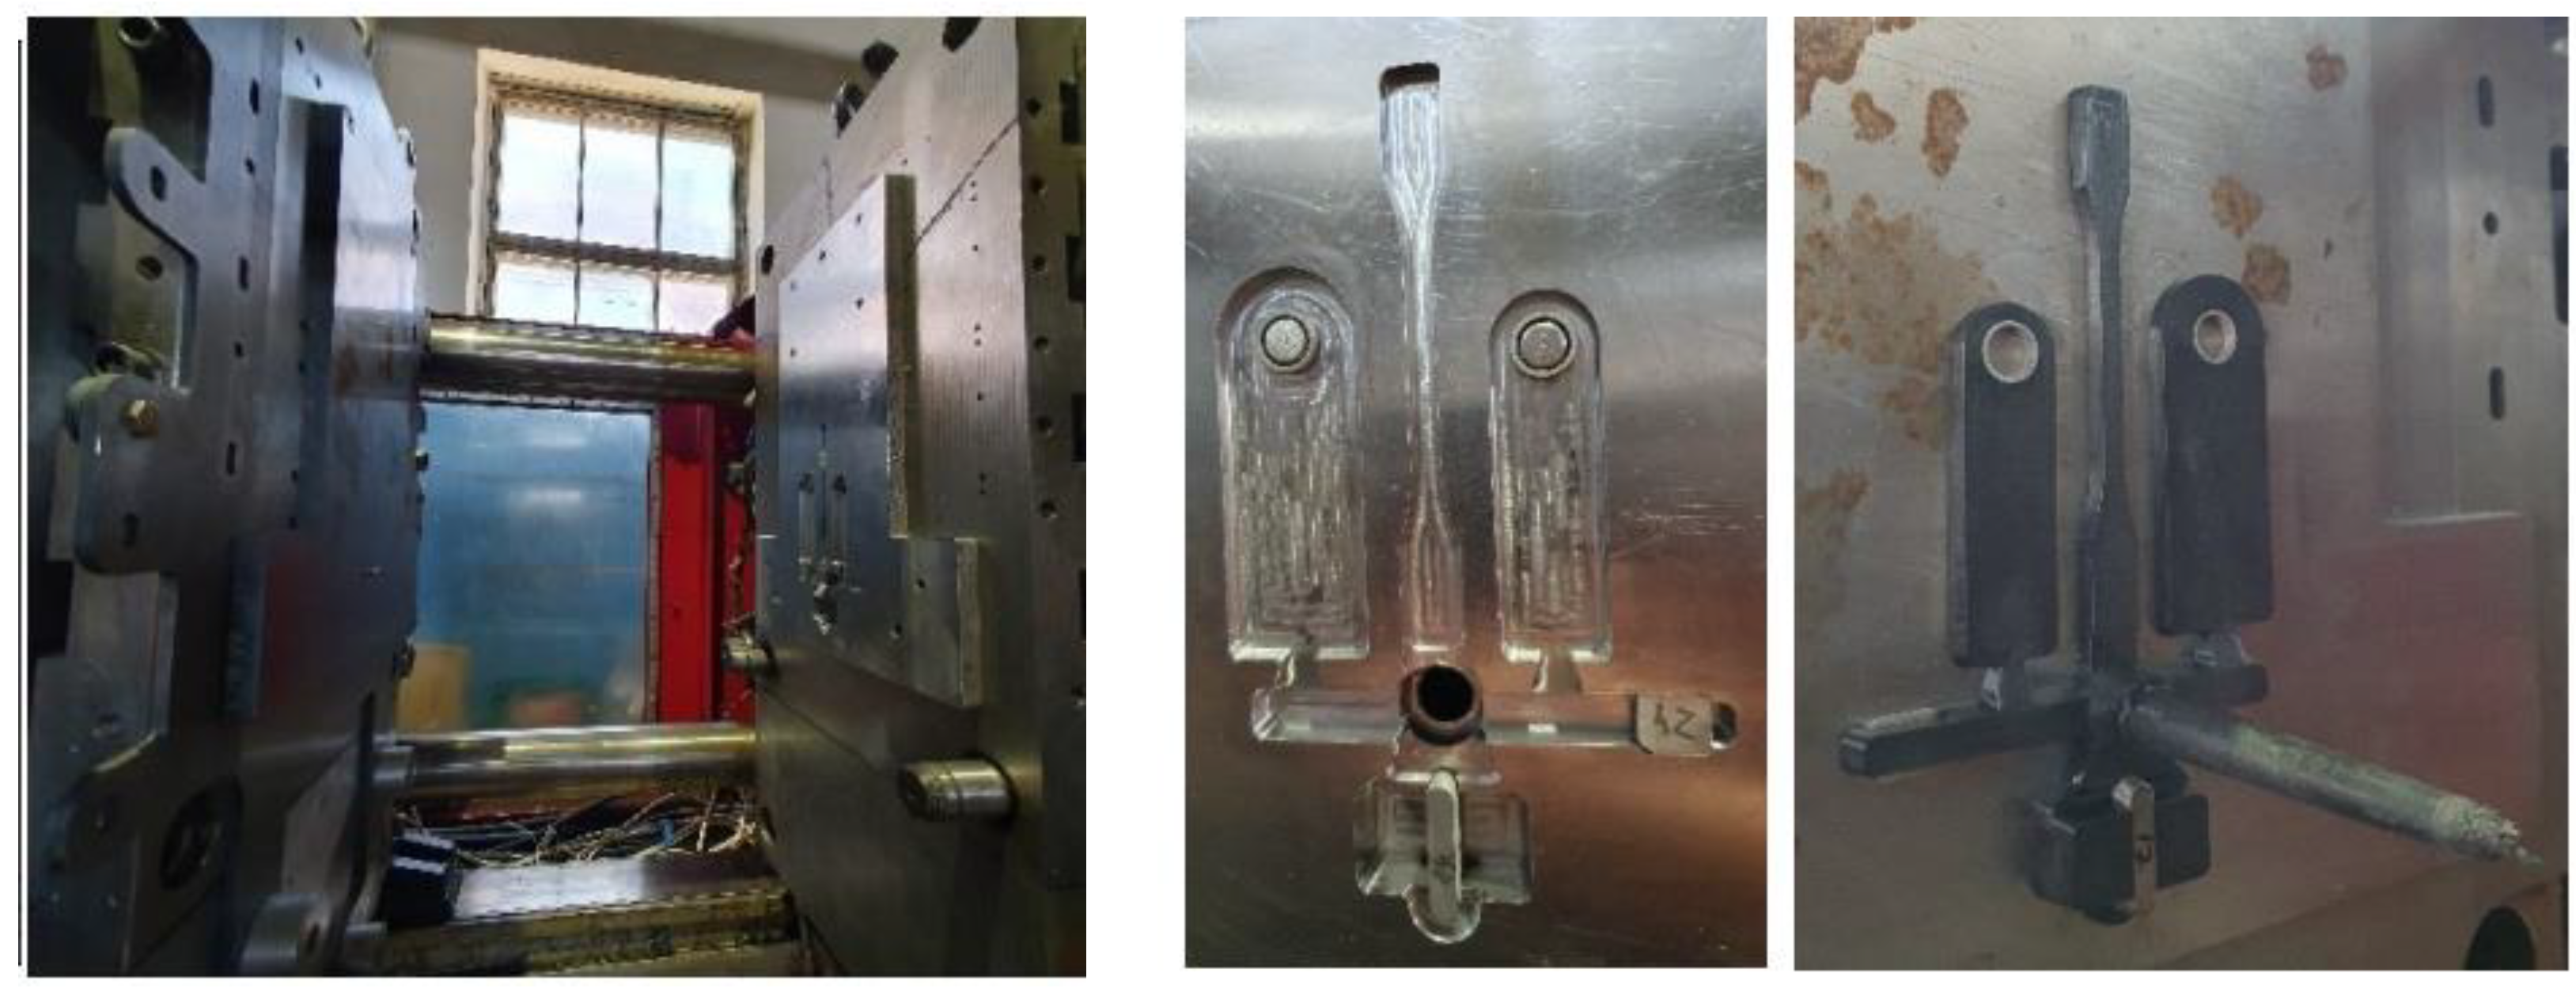
The lug molding tool was made of steel by milling on a computer numerically controlled (CNC) machine. The heating of the tool was performed using air heating elements. Tool cooling is not required because of the small series and long molding cycles. Injection molding of designs with embedded elements and samples made of short-reinforced composite material was performed on a Negri Bosi VE1700-210 electric injection molding machine (see
Figure 8). A preliminary simulation of the injection molding process was performed using Moldflow.
3. Results
3.1. Manufacturing of Samples of Embedded Elements and Lugs
To prepare embedded elements for 3D printing, finite element modeling of the SLM process was performed using the Simufact Additive CAE system. According to the calculation, the deformation due to thermal stresses is 0.03-0.06 mm, which indicates the correctness of the selected technological modes (see
Figure 9).
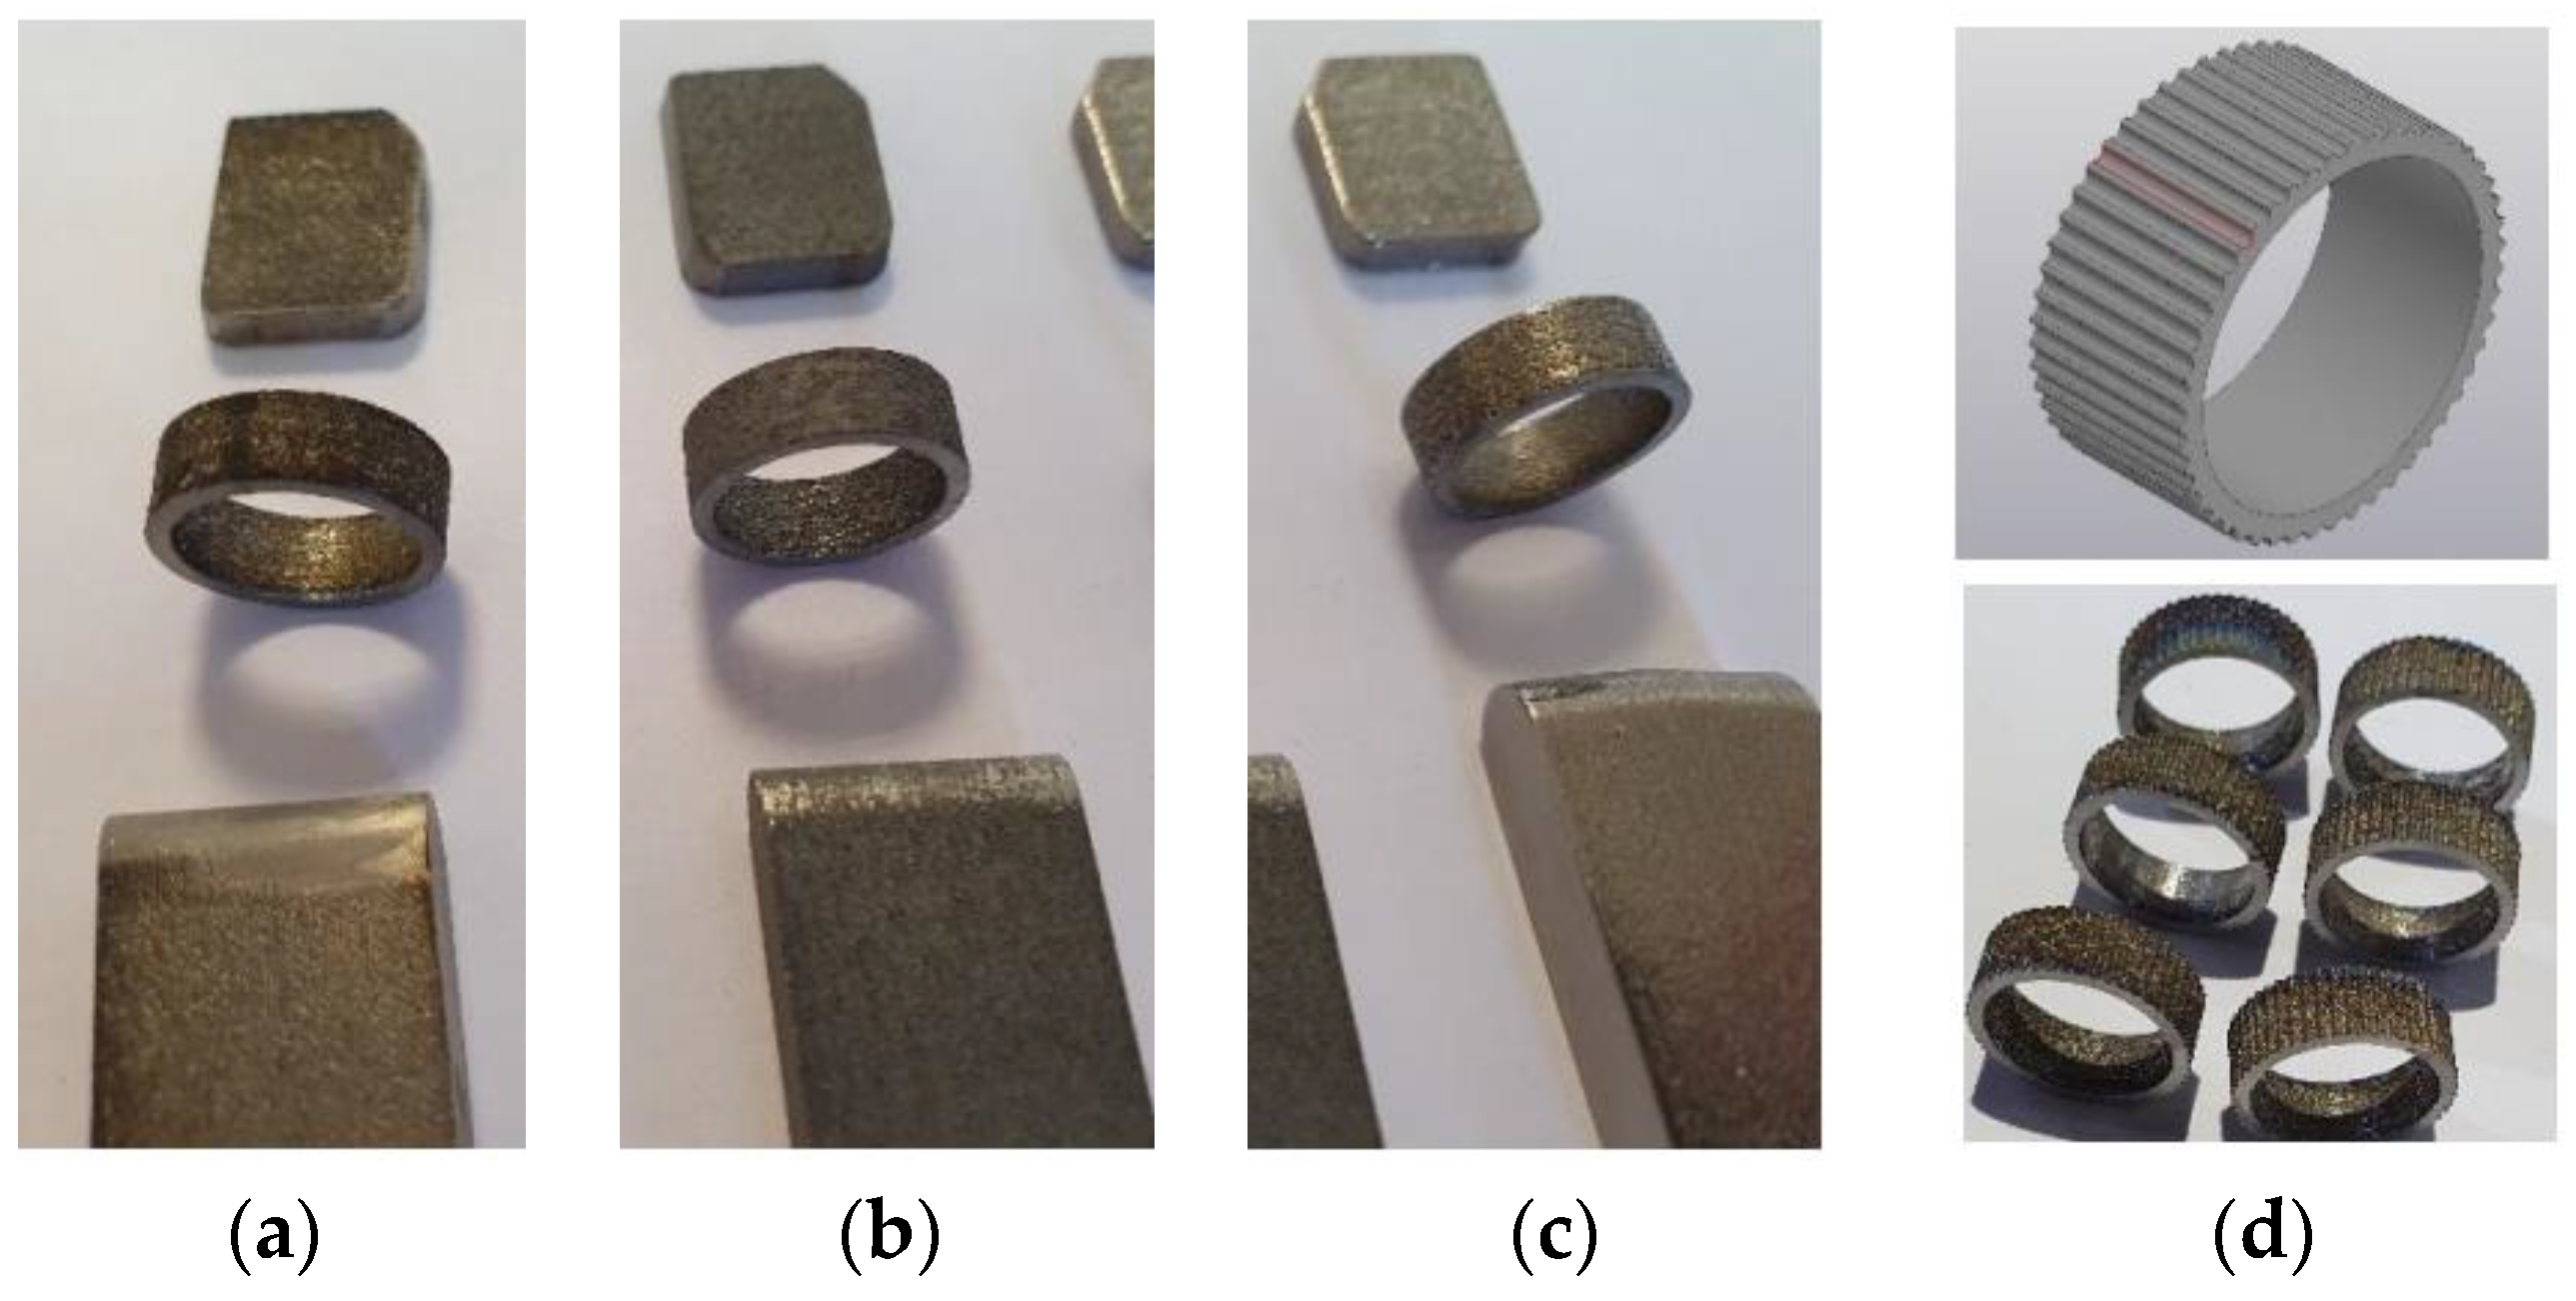
The production of titanium embedded elements was carried out using a 3DLAM Mid additive machine. Process parameters are controlled using the 3DLAM Slicer software. More than 50 embedded bushings and more than 40 flat samples of three roughnesses were manufactured using the SLM method. Three types of roughness are provided by the SLM process, sandblasting, and vibratory finishing (see
Figure 10).
Measurements of the surface roughness of samples of each type showed that the used additive technology produces a surface with a roughness of Ra = 10 μm, sandblasting reduces the roughness to 8.8 μm, and vibratory finishing provides a surface with a roughness of 2.7 μm (see
Table 2).
More than 35 molded parts were made, each of which contained lugs of two standard types and samples (see
Figure 11).
3.2. Verification of Molding Models
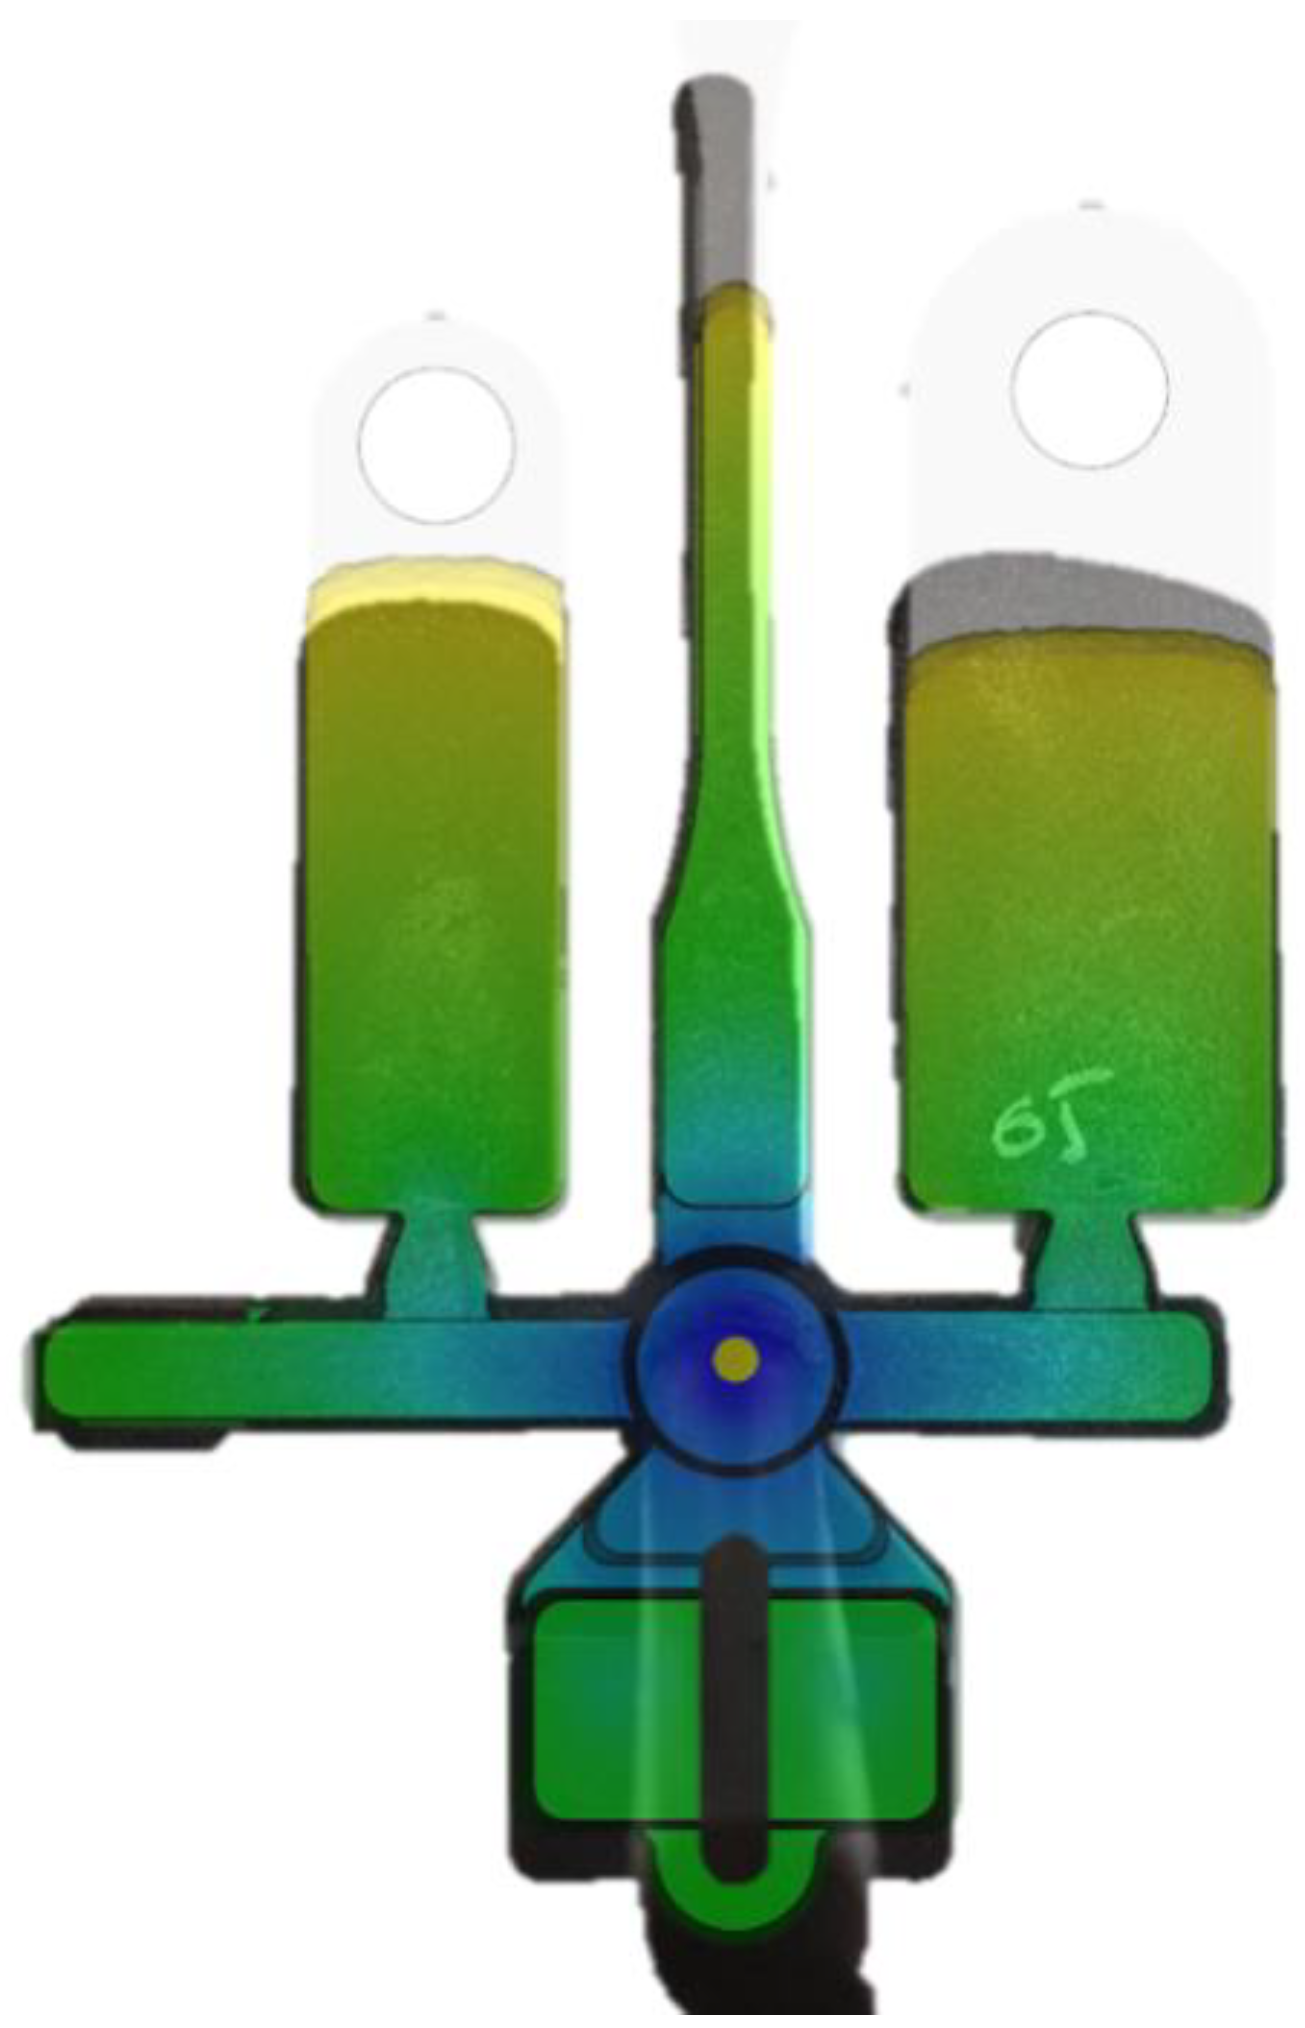
A comparison was made of the strength and rigidity of designs with embedded elements made of short-reinforced composite materials, obtained experimentally (partially filled) and by calculation, considering the anisotropy of the material model. To consider the anisotropy of the lud, a thermoplastic molding calculation was performed using the Autodesk Moldflow system, including the calculation of the orientation of the reinforcing fibers. The calculation was verified by determining the correspondence between the calculated (colored) and experimentally observed ( black) molding fronts (see
Figure 15).
3.2. Experimental Determination of the Load-Bearing Capacity of Lugs with Bushings
60 samples of lugs were tested - two standard types S and M with 5 surface options for embedded elements (vibratory finishing; sandblasting; SLM, bushing with ribs, with the original roughness of SLM process; lugs without bushing) (see
Figure 16,
Table 3).
3.3. Verification of the Contact Interaction Model
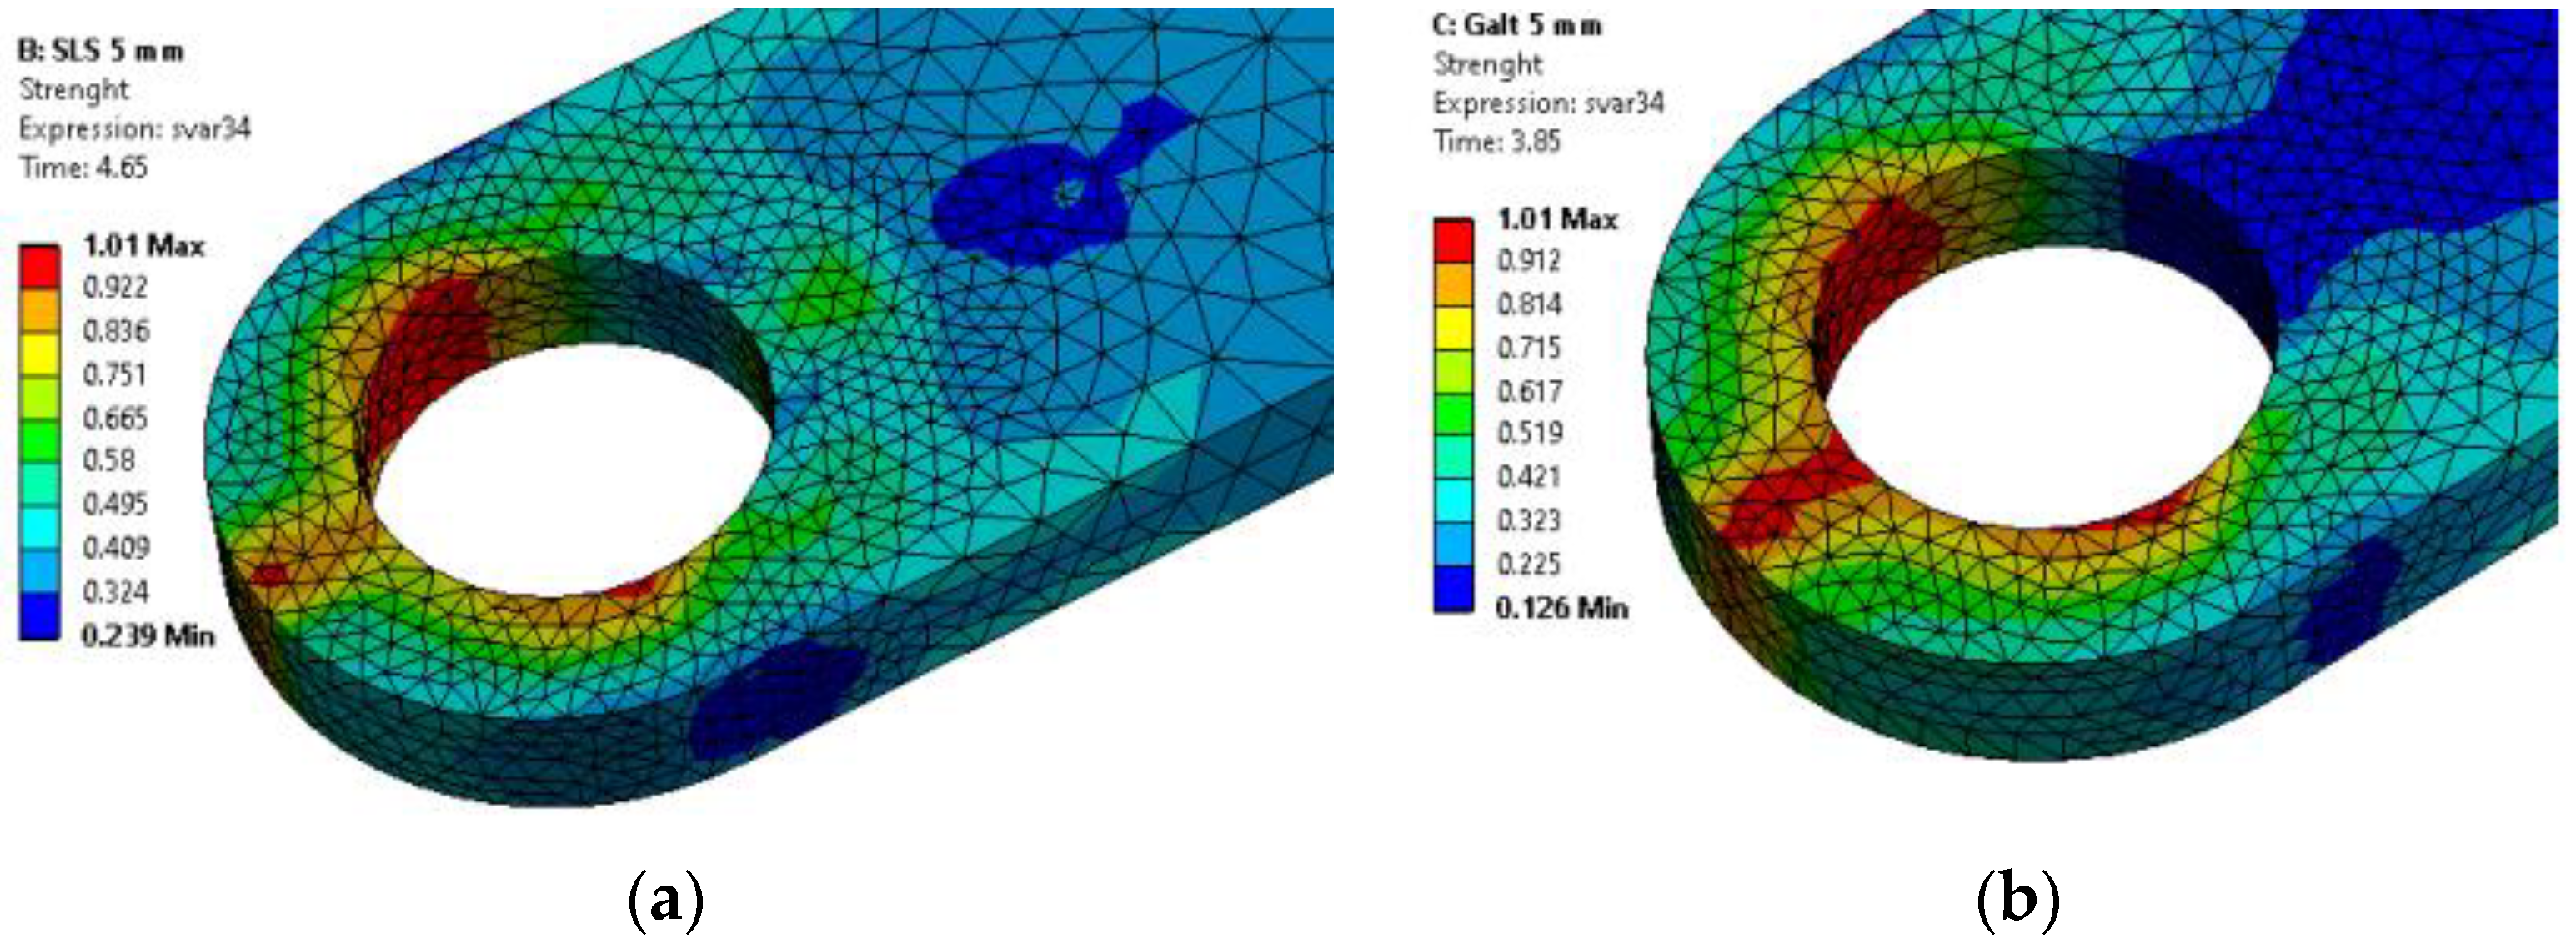
Considering the orientation of the reinforcing fibers makes it possible to use the anisotropic Tsai-Hill strength criterion in the First pseudo-grain failure (FPGF) formulation, which allows one to correctly predict the strength of short-reinforced composite materials, since the field of equivalent von Mises stresses cannot correctly consider the anisotropic behavior of plastics, for example, destruction in the lug nose of size S caused by the presence of a weld line . A comparison of the fields of the Tsai Hill strength criterion with the places of destruction of the samples shows a correct prediction of the places of initiation of destruction (see
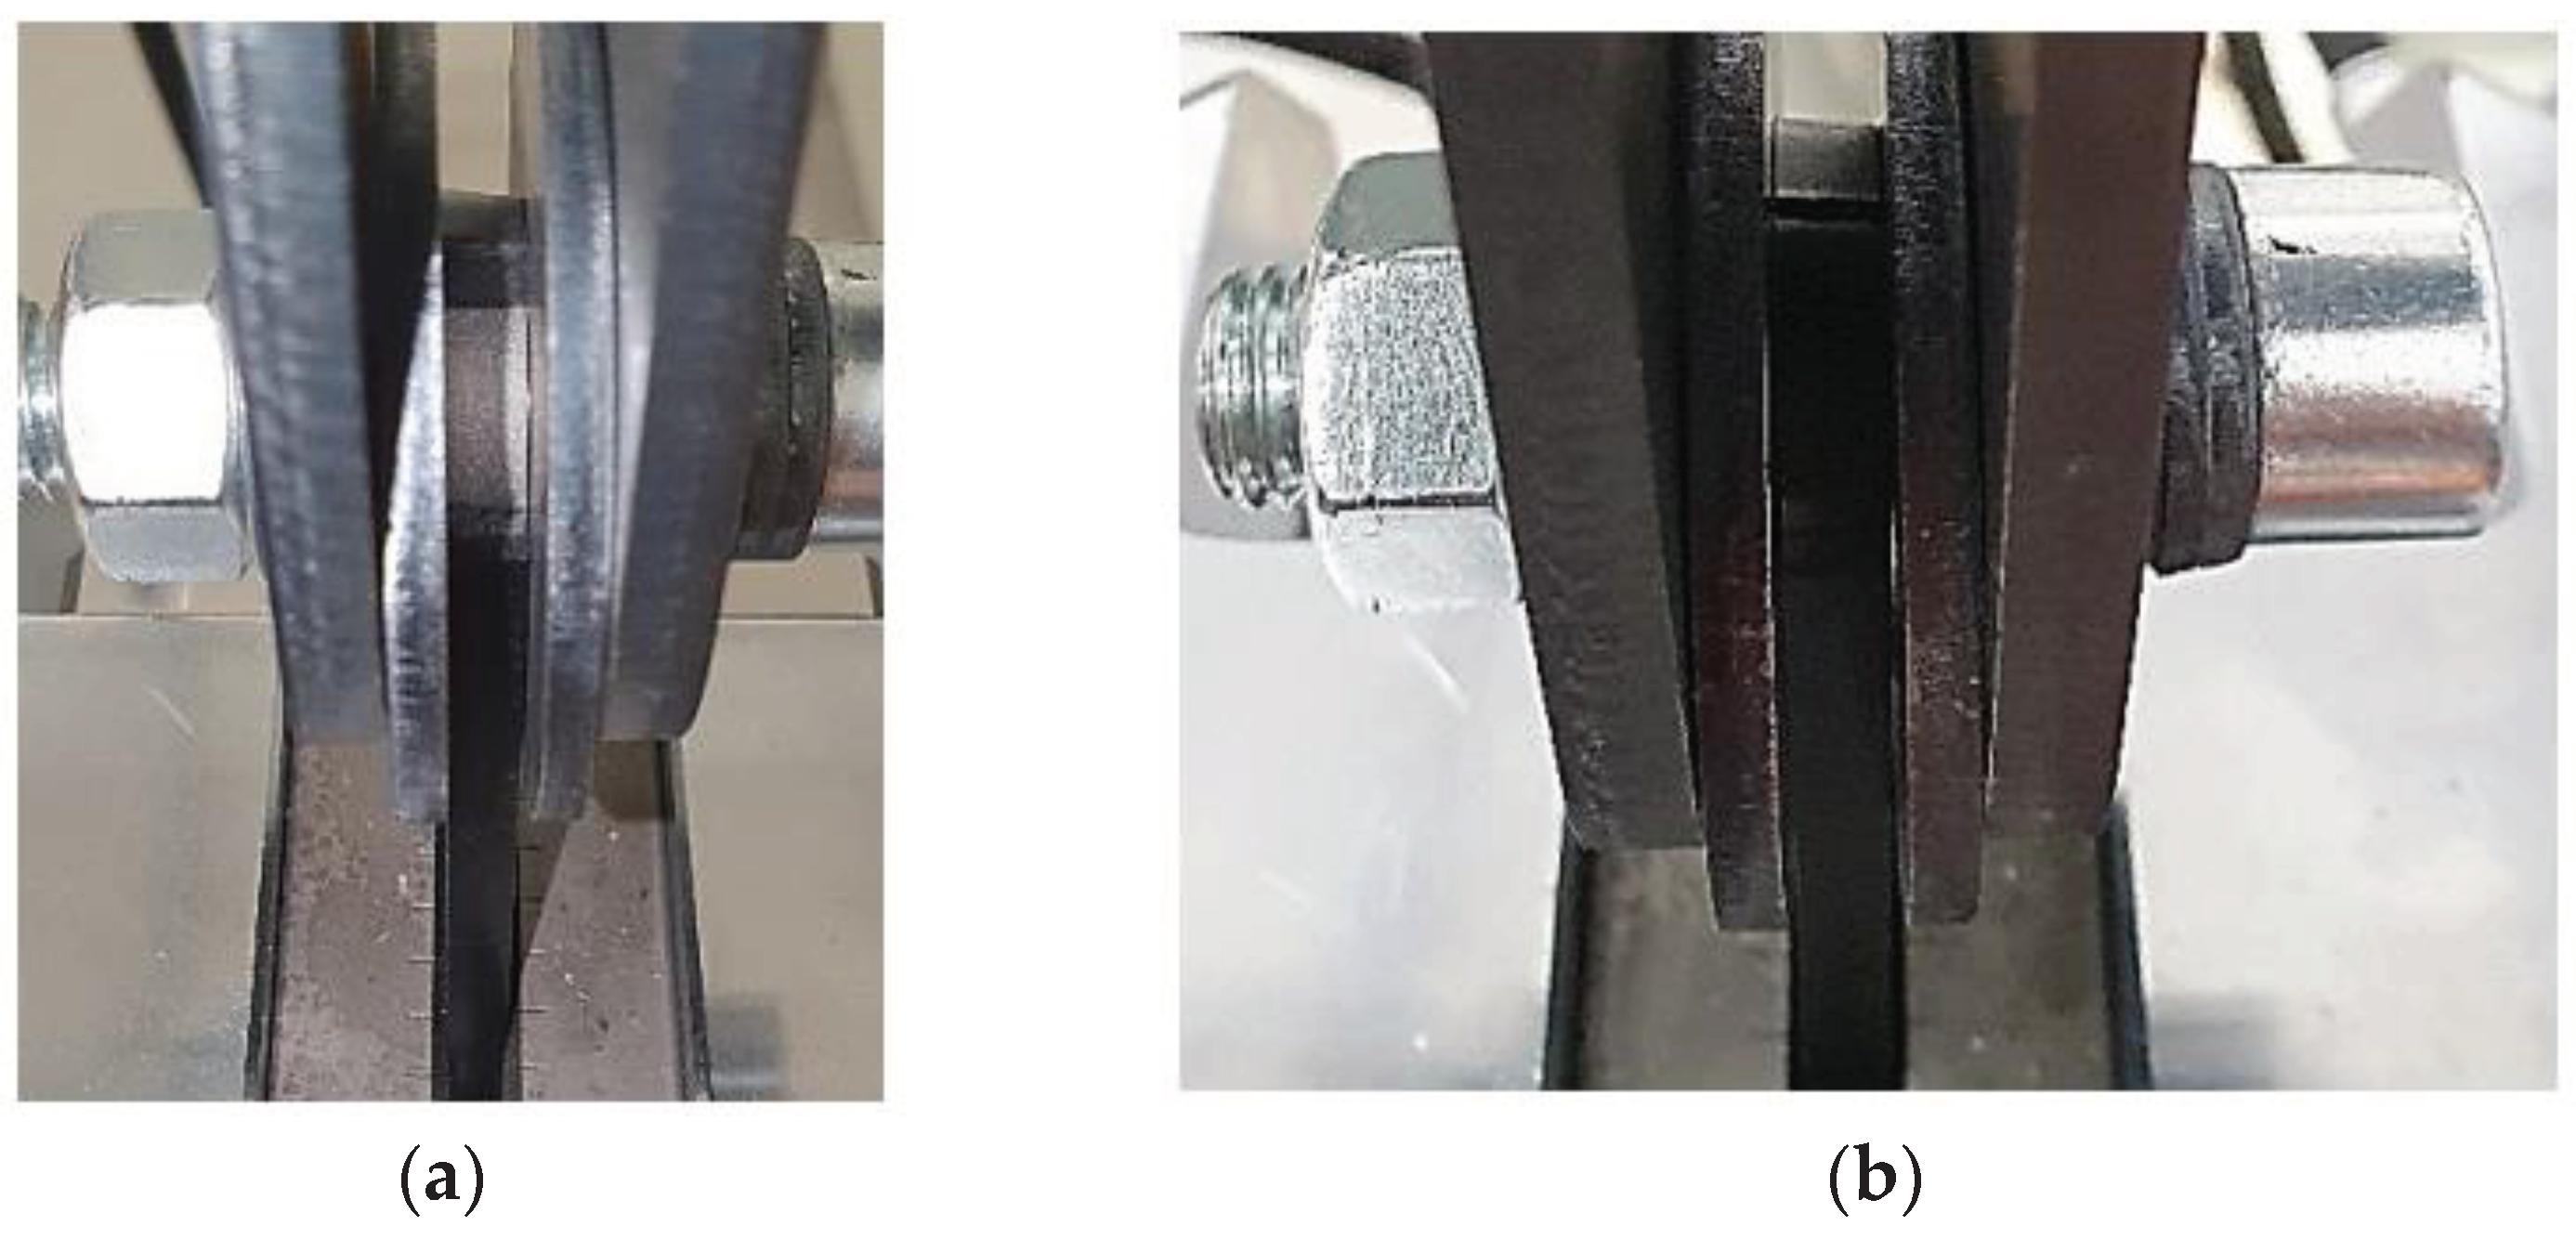
Figure 17). Moreover, the fracture locations, both in calculations and in experiments, depend on the contact parameters - S-type lugs with embedded parts processed by vibratory finishing are destroyed along the weld line in the lug nose, whereas lugs with embedded surfaces using SLM process are destroyed from the side, in the place of the highest contact stresses (see
Figure 18).
It is shown that the mathematical models used give a result that corresponds qualitatively - greater roughness gives greater load-bearing capacity and has load-bearing capacity values of the same order, but in the calculations, the influence of roughness on the load-bearing capacity is much stronger (see
Table 4). In calculations, the difference between the load-bearing capacity of pin-joints with bushings with surface after SLM and vibratory finishing is 53% for the S type and 44% for the M type, whereas in experiments, this difference is 11% for the S type and 3.5% for the M type.
4. Discussion
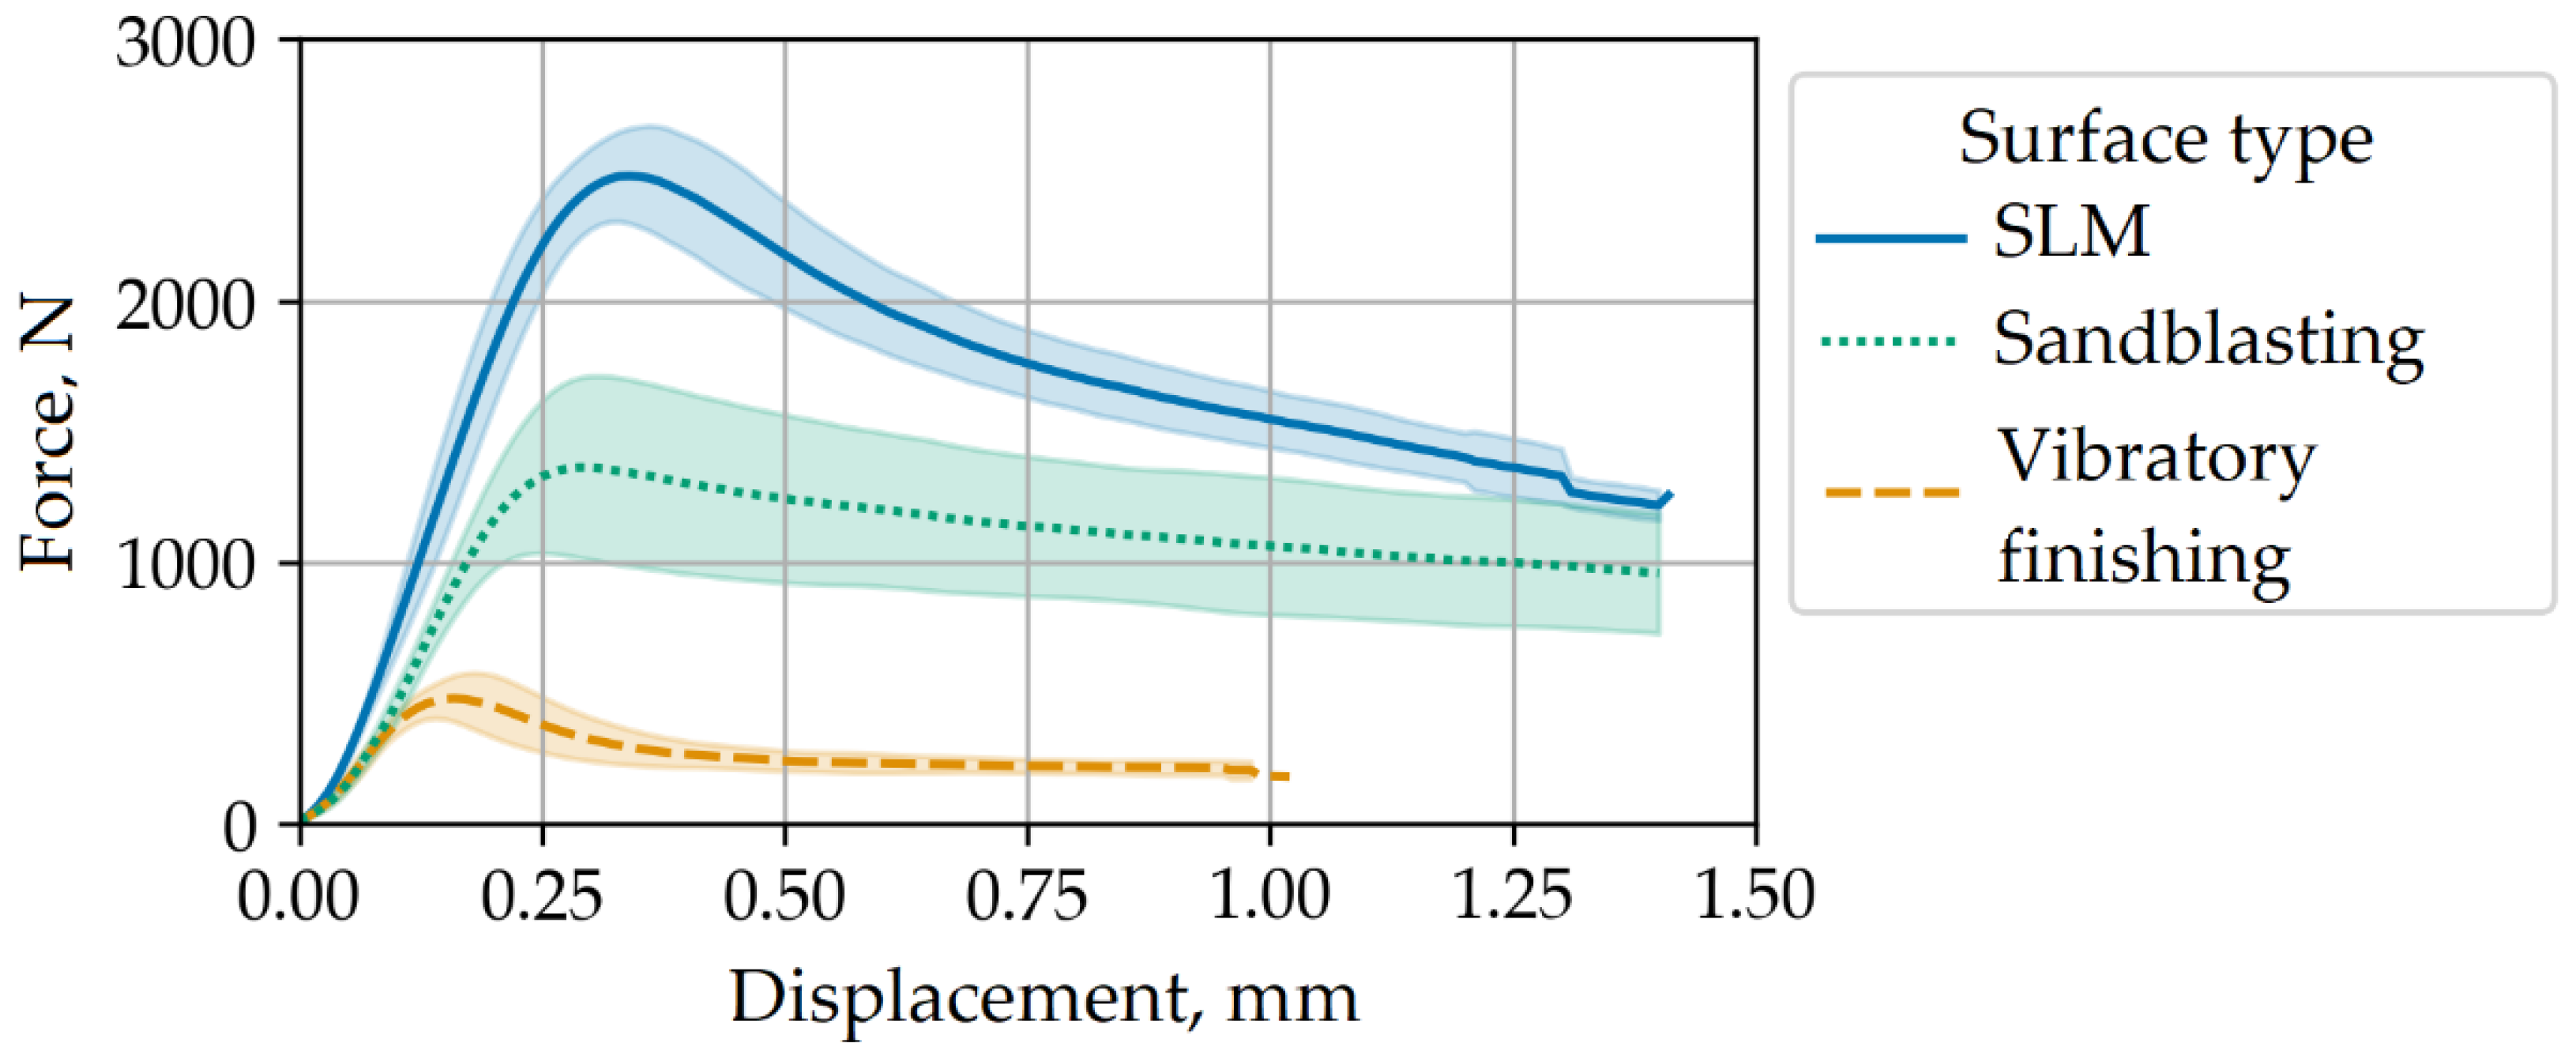
It has been experimentally confirmed that an increase in the roughness of the embedded element leads to an increase in the load-bearing capacity of the lugs. Thus, compared with the surface obtained by vibratory finishing, the original surface after the SLM process gives the load-bearing capacity of the unit 11% higher for standard S type and 3,5% higher for standard M type. For S type, during the design of which the contribution of the adhesive connection was considered, the influence of roughness is more noticeable than for M type, where the main load-bearing capacity lies on the lug body. The weight of the M type lug is 17 g, which is 1.58 times more than the weight of the S type lug (which weighs 10.7 g), and the maximum tensile load is only 1.42 times higher. Therefore, the S-type lug designed with an adhesive connection in mind has a weight efficiency that is 11.7% higher than that of the M-type lug. A comparison of the load-bearing capacity of lugs with a bushing and reference lugs without a bushing with the same internal and external diameters shows that the presence of a bushing with weak adhesion can lead to a decrease in the load-bearing capacity of the pin-joint compared with a pin-joint without an embedded element due to a reduction in the cross-sectional area of the plastic. The assumption about the importance of increasing the maximum equivalent tangential contact stress is confirmed by the fact that lugs with a bushing with ribs have a load-bearing capacity of 11% for S type and 8.6% for M type compared with lugs with a bushing of the same roughness, determined by the SLM process. Compared with lugs without bushings, the use of bushings with ribs increases the load-bearing capacity by 20% for S type and 11% for M type. The weight efficiency of an S-type lug with a bushing with ribs is 27% higher than that of an M-type lug without a bushing, which indicates the possibility of a significant reduction in weight with the development of SLM technology for the manufacture of embedded elements for aerospace designs. To determine the parameters of adhesive interaction in mode II, which determines damage caused by shear, extrusion tests were performed on bushings with varying degrees of roughness along the lug axis on a universal testing machine Zwick/Roell Z050 TE. The force acting on the bushing along the extrusion axis for surfaces provided by the SLM process, sandblasting, and vibratory finishing are 2500, 1383, and 496 N, respectively. That is, sandblasting can reduce the plastic shear force by 45%, and vibrating finishing can reduce the contact shear force by 80%.
5. Conclusion
This article describes the results of a study on the load-bearing capacity of an aerospace design with embedded elements with different surface roughness values. The CZM model of cohesive elements was used as the main model of contact interaction. The dimensions of the embedded elements are determined on the basis of parametric optimization, taking into account the various types of contact interactions. An experimental study was conducted using an example of lugs of two sizes. More than 50 embedded bushings and more than 40 flat samples of three roughnesses provided by the initial SLM process, sandblasting, and vibratory finishing were manufactured using the SLM method. A tool and 35 injection molding parts were made, each of which contained lugs of two types and flat samples. 60 lugs of two types and five types of bushings were tested, the surface of which was obtained by vibratory finishing, sandblasting, the SLM process, bushings with ribs, and lugs without a bushing. The rib height of the lug is 0.2 mm.
It has been shown that the use of sandblasting can reduce the shear force of plastic by 45%, and the use of vibratory finishing can reduce the shear force in contact by 80%. The mathematical models were refined based on the results of sample testing. A comparison was made of the strength of the designs with embedded elements made of short-reinforced composite materials obtained experimentally and by calculation. A comparison of the fields of the Tsai Hill strength criterion with the places of destruction of the samples shows a correct prediction of the places of initiation of destruction.
Author Contributions
Conceptualization, E.Ku.; Methodology, E.Ku., V.S., S.Ch.; Validation, E.Ku., S.Ch.; Formal analysis, E.Ki., V.Ch., V.A.; Resources, A.S., V.S., E.Ku.; Writing—Original draft preparation, A.S., E.Ku., V.Ch.; Writing—Review and editing, A.S., E.Ku., V.S., V.Ch., V.A., E.Ki., A.G., M.Z., S.Ch.; Visualization, V.Ch., V.A., A.G., M.Z.; Supervision, E.Ku., V.S.; Project administration, E.Ku.; Funding acquisition, A.S., E.Ku. All authors have read and agreed to the published version of the manuscript.
Funding
The study was financially supported by the Russian Science Foundation, project No. 22-79-10309.
Data Availability Statement
The data presented in this study are available on request from the corresponding author.
Acknowledgments
The authors thank G.V. Charkviani for help with tool design and production. The authors thank Pladep Ltd. for help in injection molding.
Conflicts of Interest
The authors declare no conflict of interest. The funders had no role in the design of the study; in the collection, analyses, or interpretation of data; in the writing of the manuscript, or in the decision to publish the results.
References
- Harris, C.E.; Starmes, J.H.Jr.; Shuart, M.J. Design and Manufacturing of Aerospace Composite Structures, State-of-the-Art Assessment. Journal of Aircraft 2002, 39, 4; 545-560. [CrossRef]
- Das, M.; Sahu, S.; Parhi, D.R. A Review of Application of Composite Materials for Aerospace Structures and its Damage Detection Using Artificial Intelligence Techniques. International Conference on Artificial Intelligence in Manufacturing & Renewable Energy (ICAIMRE) 2019; 10 p. [CrossRef]
- Sriranga, B. K.; Kumar, R. Stress Analysis and Fatigue Life Prediction of Wing-Fuselage Lug Joint Attachment Bracket of a Transport Aircraft. International Journal of Research in Engineering and Technology 2014, 3(3); 818-822. [CrossRef]
- Antoni, N.; Gaisne, F. Analytical Modelling for Static Stress Analysis of Pin-Loaded Lugs with Bush Fitting. Applied Mathematical Modelling 2011; 35(1). [CrossRef]
- Ekvall, J.C. Static Strength Analysis of Pin-Loaded Lugs. Journal of Aircraft 1986, 23; 438-443. [CrossRef]
- Schijve, J.; Hoeymakers, A.H.W. Fatigue Crack Growth in Lugs and the Stress Intensity Factor. Delft University of Technology, Department of Aerospace Engineering, Report LR-273 1978.
- Abraham J. Pulickal Design Structural Analysis and Fatigue Calculation of Wing Fuselage Lug Attachment of a Transport Aircraft. IJMETR 2017, 4(8); 60- 65. http://www.ijmetmr.com/olaugust2017/AbrahamJPulickal-DamodaraReddy-6.pdf.
- Sumanth, M.H.; Ayyappa, T. Comparative Analysis of Aircraft Wing Fuselage Lug Attachment Bracket. IJTRE 2017, 5(11); 4422- 4429.
- Wallin, M.; Saarela, O.; Law, B.; Liehu, T. RTM Composite Lugs for High Load Transfer Applications. 25th Congress of the International Council of the Aeronautical Sciences, Hamburg, Germany, 3-8 September, 2006. 9p. http://www.icas.org/ICAS_ARCHIVE/ICAS2006/PAPERS/448.PDF.
- Kurkin, E.; Espinosa Barcenas, O.U.; Kishov, E.; Lukyanov, O. Topology Optimization and Efficiency Evaluation of Short-Fiber-Reinforced Composite Structures Considering Anisotropy. Computation 2024, 12, 35. [Google Scholar] [CrossRef]
- Adin, H.; Bakir, G.S.; Özbay, M. Comparison of Different Bushing Applications in Composite Structures of the Aerospace Industry. Materials Testing 2017, 59, 6; 575-584. [CrossRef]
- Kaya, N. Shape Optimization of Rubber Bushing Using Differential Evolution Algorithm. The Scientific World Journal 2014, ID 379196, 9p. [Google Scholar] [CrossRef]
- Bilal, H.; Ozturk, F. Rubber Bushing Optimization by Using a Novel Chaotic Krill Herd Optimization Algorithm. Soft Computing 2021, 25; 14333-14355. [CrossRef]
- Zhang, H.; Takezawa A., Ding X., Xu S., Duan P., Li H., Guo H. Bi-material microstructural design of biodegradable composites using topology optimization. Materials and Design 2021, 209, 109973; 20 p. [CrossRef]
- Fu, H.; Xu, H.; Liu, Y.; Yang, Z.; Kormakov, S.; Wu, D.; Sun, J. Overview of Injection Molding Technology for Processing Polymers and Their Composites. ES Materials & Manufacturing 2020. [CrossRef]
- Thompson, M.K.; Moroni, G.; Vaneker, T.; Fadel, G.; Campbell, R.; Gibson, I.; Bernard, A.; Schulz, J.; Graf, P.; Ahuja, B.; Martina, F. Design for Additive Manufacturing: Trends, opportunities, considerations, and constraints. CIRP Annals 2016, 65, 2; 737-760. [CrossRef]
- Awaja, F.; Gilbert, M.; Kelly, G.; Fox, B.; Pigram, P. Adhesion of Polymers. Progress in Polymer Science 2009, 34(9); 948–968. [CrossRef]
- Titanium and Titanium Alloys. Fundamentals and applications 2003, edited by C. Leyens, M.Peters (WILEY-VCH Verlag GmbH&Co.KGaA, Weinheim, 2003).
- Moiseyev, V.N. Titanium alloys: Russian Aircraft and Aerospace Application, edited by J.N. Fridlyander 2005. [CrossRef]
- Etesami, A.; Fotovvati, B.; Asadi, E. Heat Treatment of Ti-6Al-4V Alloy Manufactured by Laser-Based Powder-Bed Fusion: Process, Microstructures, and Mechanical Properties Correlations. Journal of Alloys and Compounds 2022, 895, 162618. [CrossRef]
- Kolesnikov, B.; Herbeck L., Fink A. CFRP/titanium Hybrid Material for Improving Composite Bolted Joints. Compos. Struct. 2008, 83(4); 368-380. [CrossRef]
- Agapovichev, A.; Sotov, A.; Kokareva, V.; Smelov, V.G., Kyarimov, R. Study of the Structure And Mechanical Characteristics of Samples Obtained by Selective Laser Melting Technology From VT6 Alloy Metal Powder. Nanoscience and Technology: An International Journal 2017, 8. 323-330. [CrossRef]
- Aleksandrov, V.K.; Anoshkin, N.F.; Bochvar, G.A., et al. Semi-Finished Products from Titanium Alloys. Moscow: Metallurgiya Press 1979.
- Heinz, A.; Haszler, A.; Keidel, C.; Moldenhauer, S.; Benedictus, R.; Miller W.S. Recent Development in Aluminium Alloys for Aerospace Applications. Mater. Sci. Eng. 2000, A280; 102–107. [CrossRef]
- Lugauer, F.P., Kandler, A., Meyer, S.P. et al. Induction-Based Joining of Titanium with Thermoplastics. Prod. Eng. Res. Devel. 13 2019. 409–424. [CrossRef]
- Du, K.; Huang, J.; Li, Ch.; Chen, J.; Li, Y.; Yang, Ch.; Xia, X.; Sheng, X. The Bonding Strength of Polyamide-6 Direct Adhesion with Anodized AA5754 Aluminum Alloy. Journal of Thermoplastic Composite Materials 2020, 35. [Google Scholar] [CrossRef]
- Reisgen, U; Schleser, M.; Scheik, S. et al Novel Process Chainsfor the Production of Plastics/Metal-Hybrids. 17th International Conference on Concurrent Enterprising (ICE 2011) : Aachen, Germany, 20 - 22 June 2011.
- Ehrig, F.; Wey, H.-R. In-Mold Decoration: Foil Technology for Metal Surfaces. 2007, 97; 38-40.
- Molitor, P.; Barron, V.; Young, T. Surface Treatment of Titanium for Adhesive Bonding to Polymer Composites: a Review. Int J Adhes Adhesives 2001, 21(2); 129–36. [CrossRef]
- Schricker, K.; Schmitt, L.; Grätzel, M.; Ecke, G.; Bergmann, J. Bonding Mechanisms in Laser-Assisted Joining of Metal-Polymer Composites. Journal of Advanced Joining Processes 2020, 1:100008. [CrossRef]
- Li, M.; Xiong, X.; Ji, S.; Hu, W.; Yue, Y. Achieving High-Quality Metal to Polymer-Matrix Composites Joint via Topthe Mic Solid-State Lap Joining. Composites Part B: Engineering 2021, 219:108941. [CrossRef]
- Jun, G.; Lee, J-W.; Shin, Y.; Kim, K.; Hwang, W. Solvent-Aided Direct Adhesion of a Metal/ Polymer Joint using Micro/Nano Hierarchical Structures. Journal of Materials Processing Technology 2020, 285:116744. [CrossRef]
- Ding, Z.; Wang, H.; Luo, J.; Li, N. A Review on Forming Technologies of Fibre Metal Laminates. International Journal of Lightweight Materials and Manufacture 2020, 4(1):110–26. [CrossRef]
- Critchlow, G. W.; Brewis, D. M. Review of Surface Pretreatments for Titanium Alloys. International Journal of Adhesion and Adhesives 1995, 15(3), 161–172. [Google Scholar] [CrossRef]
- Molitor, P.; Barron V.; Young T. Surface Treatment of Titanium for Adhesive Bonding to Polymer Composites: A Review. International Journal of Adhesion and Adhesives 2001, 21; 129–136. [CrossRef]
- Chanthapan, S.; Wattanapornphan, P.; Phongphisutthinan, C.; Kawahito, Y.; Suga, T. Effects of Oxide Layer on Adhesion and Durability of Titanium and Transparent Polyamide Joint by Laser Joining. Journal of Laser Applications 2018, 30(4), 042005. [Google Scholar] [CrossRef]
- Roesner, A.; Scheik, S.; Olowinsky, A.; Gillner, A.; Reisgen, U.; Schleser, M. Laser Assisted Joining of Plastic Metal Hybrids. Phys Proc 2011, 37; 370–377. [CrossRef]
- Heckert, A.; Zaeh, MF. Laser Surface Pre-Treatment of Aluminium for Hybrid Joints with Glass Fibre Reinforced Thermoplastics. Phys Proc 2014, 56; 1171–1181. 1171. [CrossRef]
- Wang, Z.; Bi, X.; Liu, B.; Xu, M.; Dong, Z. Adhesion Enhancement of PEEK/6161-T6 FLJ Joints via Laser Surface Modification. Composites Part B: Engineering 2021, 216, 108797. [CrossRef]
- Vasconcelos, R.; Marcatto de Oliveira, G.; Amancio-Filho, S.; Bresciani Canto, L. Injection Overmolding of Polymer-Metal Hybrid Structures: A Review. Polymer Engineering & Science 2023, 63. [CrossRef]
- Kinloch, AJ. Durability of Structural Adhesives. Barking, UK:Elsevier Applied Science 1983; 15–16.
- Du, M.; Dong, W.; Li, X.; Wang, L.; Wang, B.; Tang, B. Effect of Surface Topography on Injection Joining Ti Alloy for Improved Bonding Strength of Metal-Polymer. Surface and Coatings Technology 2022, 433. [Google Scholar] [CrossRef]
- Larimian, T.; Borkar, T. Additive Manufacturing of In Situ Metal Matrix Composites. In: Addit. Manuf. Emerg. Mater., Springer International Publishing, Cham 2018. [CrossRef]
- Wang, Z.; Xie, M.; Li, Y.; Zhang, W.; Yang, C.; Kollo, L.; Eckert, J.; Prashanth, K.G. Premature Failure of an Additively Manufactured Material. NPG Asia Mater 2020, 12(1). [CrossRef]
- Singh, N.; Ummethala, R.; Hameed, P.; Sokkalingam, R.; Prashanth, K.G. Competition Between Densification and Microstructure of Functional Materials by Selective Laser Melting. Mater. Des. Material Design & Processing Communications 2020, 2(3). [CrossRef]
- Prashanth, K.G.; Scudino, S. Quasicrystalline Composites by Additive Manufacturing. Key Eng. Mater 2019, 818. [Google Scholar] [CrossRef]
- Singh, N.; Hameed, P.; Ummethala, R.; Manivasagam, G.; Prashanth, K.G.; Eckert, J. Selective Laser Manufacturing of Ti-based Alloys And Composites: Impact of Process Parameters, Application Trends, and Future Prospects. Materials Today Advances 2020, 8, 100097. [CrossRef]
- Abrate, S.; Ferrero, J.-F; Navarro, P. Cohesive Zone Models and Impact Damage Predictions for Composite Structures. Meccanica 2015, 50, 2587-2620. [Google Scholar] [CrossRef]
- Pegorin, F.; Pingkarawat, K.; Mouritz, A. P. Comparative Study of the Mode I and Mode II Delamination Fatigue Properties of Z-Pinned Aircraft Composites. Materials & Design 2015, 65; 139–146. [CrossRef]
- Asp, LE; Sjögren, A.; Greenhalgh, ES. Delamination Growth and Thresholds in a Carbon/Epoxy Composite under Fatigue Loading. J Compos Technol Res 2001, 23; 55–68. [CrossRef]
- Hojo, M.; Ando, T.; Tanaka, M.; Adachi, T.; Ochiai, S.; Endo, Y. Modes I and II Interlaminar Fracture Toughness and Fatigue Delamination of CF/Epoxy Laminates with Self-Same Epoxy Interleaf. Int J Fatigue 2006, 28; 1154–65. [CrossRef]
- Argüelles, A.; Vina, J.; Canteli, AF.; Castrillo, MA.; Bonhomme, J. Interlaminar Crack Initiation and Growth Rate in a Carbon–Fibre Epoxy Composite under Mode-I Fatigue Loading. Compos Sci Technol 2008, 68; 2325–31. [CrossRef]
- Thouless, M.; Parmigiani, J. Thouless, M.; Parmigiani, J. Mixed-Mode Cohesive-Zone Models for Delamination and Deflection in Composites. Proceedings of the 28th Risø International Symposium on Material Science: Interface Design of Polymer matrix Composites 2007.
- Evans, AG.; Hutchinson, JW. Effects of Non-Planarity on the Mixed Mode Fracture Resistance of Bimaterial Interfaces. Acta Metall 1989, 37(3); 909–16. [CrossRef]
- Cao, HC.; Thouless, MD.; Evans, AG. Residual Stresses and Cracking in Brittle Solids Bonded with a Thin Ductile Layer. Acta Metall 1988, 36(8); 2037–46. [CrossRef]
- Kurkin, E.; Kishov, E.; Chertykovtseva V. Influence of Cohesive Zone Model Parameters of Polymer Lugs with Metal Bushing on Their Geometrical and Mass Characteristics. Aerospace Systems 2023. [CrossRef]
- Reis, J. P.; de Moura, M. F. S. F.; Moreira, R. D. F.; Silva, F. G. A. Pure Mode I and II Interlaminar Fracture Characterization of Carbon-Fibre Reinforced Polyamide Composite. Composites Part B: Engineering 2019. [CrossRef]
- Li, X., Wang, B., Xu, D., Wang, B., Dong, W., Li, M. Super-High Bonding Strength of Polyphenylene Sulfide-Aluminum Alloy Composite Structure Achieved by Facile Molding Methods. Composites Part B: Engineering 2021, 224, 109204. [CrossRef]
- Du, K., Huang, J., Li, C., Chen, J., Li, Y., Yang, C., Sheng, X. The Bonding Strength of Polyamide-6 Direct Adhesion with Anodized AA5754 Aluminum Alloy. Journal of Thermoplastic Composite Materials 2020, 089270572093913. [CrossRef]
- Mahaphasukwat, S.; Shimamoto, K.; Hayashida, S. et al. Mode I Critical Fracture Energy of Adhesively Bonded Joints between Glass Fiber Reinforced Thermoplastics. Appl Adhes Sci 2015, 3, 4. [CrossRef]
- Duda, S.; Smolnicki, M.; Osiecki, T.; Lesiuk, G. Determination of Fracture Energy (Mode I) in the Inverse Fiber Metal Laminates using Experimental–Numerical Approach. International Journal of Fracture 2021. [CrossRef]
- Matinmanesh, A.; Li, Y.; Clarkin, O.; Zalzal, P.; Schemitsch, E.H.; Towler, M.R.; Papini M. Quantifying the Mode II Critical Strain Energy Release Rate of Borate Bioactive Glass Coatings on Ti6Al4V Substrates. Journal of the Mechanical Behavior of Biomedical Materials 2017, 75; 212-221. [CrossRef]
- Tsokanas, P.; Loutas, T.; Nijhuis, P. Interfacial Fracture Toughness Assessment of a New Titanium–CFRP Adhesive Joint: An Experimental Comparative Study. Metals 2020, 10, 699. [Google Scholar] [CrossRef]
- Kurkin, E.I.; Spirina, M.O.; Espinosa Barcenas, O.U.; Kurkina E.V. Calibration of the PA6 Short-Fiber Reinforced Material Model for 10% to 30% Carbon Mass Fraction Mechanical Characteristic Prediction. Polymers 2022, 14, 9. [CrossRef] [PubMed]
- Alfano, G.; Crisfield, M.A. Finite element interface models for the delamination analysis of laminated composites: mechanical and computational issues. International Journal for Numerical Methods in Engineering 2001, 50; 1701-1736. [CrossRef]
- Kammoun, S.; Doghri, I.; Adam, L.; Robert, G.; Delannay, L. First pseudo-grain failure model for inelastic composites with misaligned short fibers. Composites Part A-applied Science and Manufacturing 2011, 42; 1892-1902. [CrossRef]
Figure 1.
Tensile test samples PA6+30% carbon fibers ISO 527-2 type 1BA (average value+-standard deviation).
Figure 1.
Tensile test samples PA6+30% carbon fibers ISO 527-2 type 1BA (average value+-standard deviation).
Figure 2.
Statement of the problem.
Figure 2.
Statement of the problem.
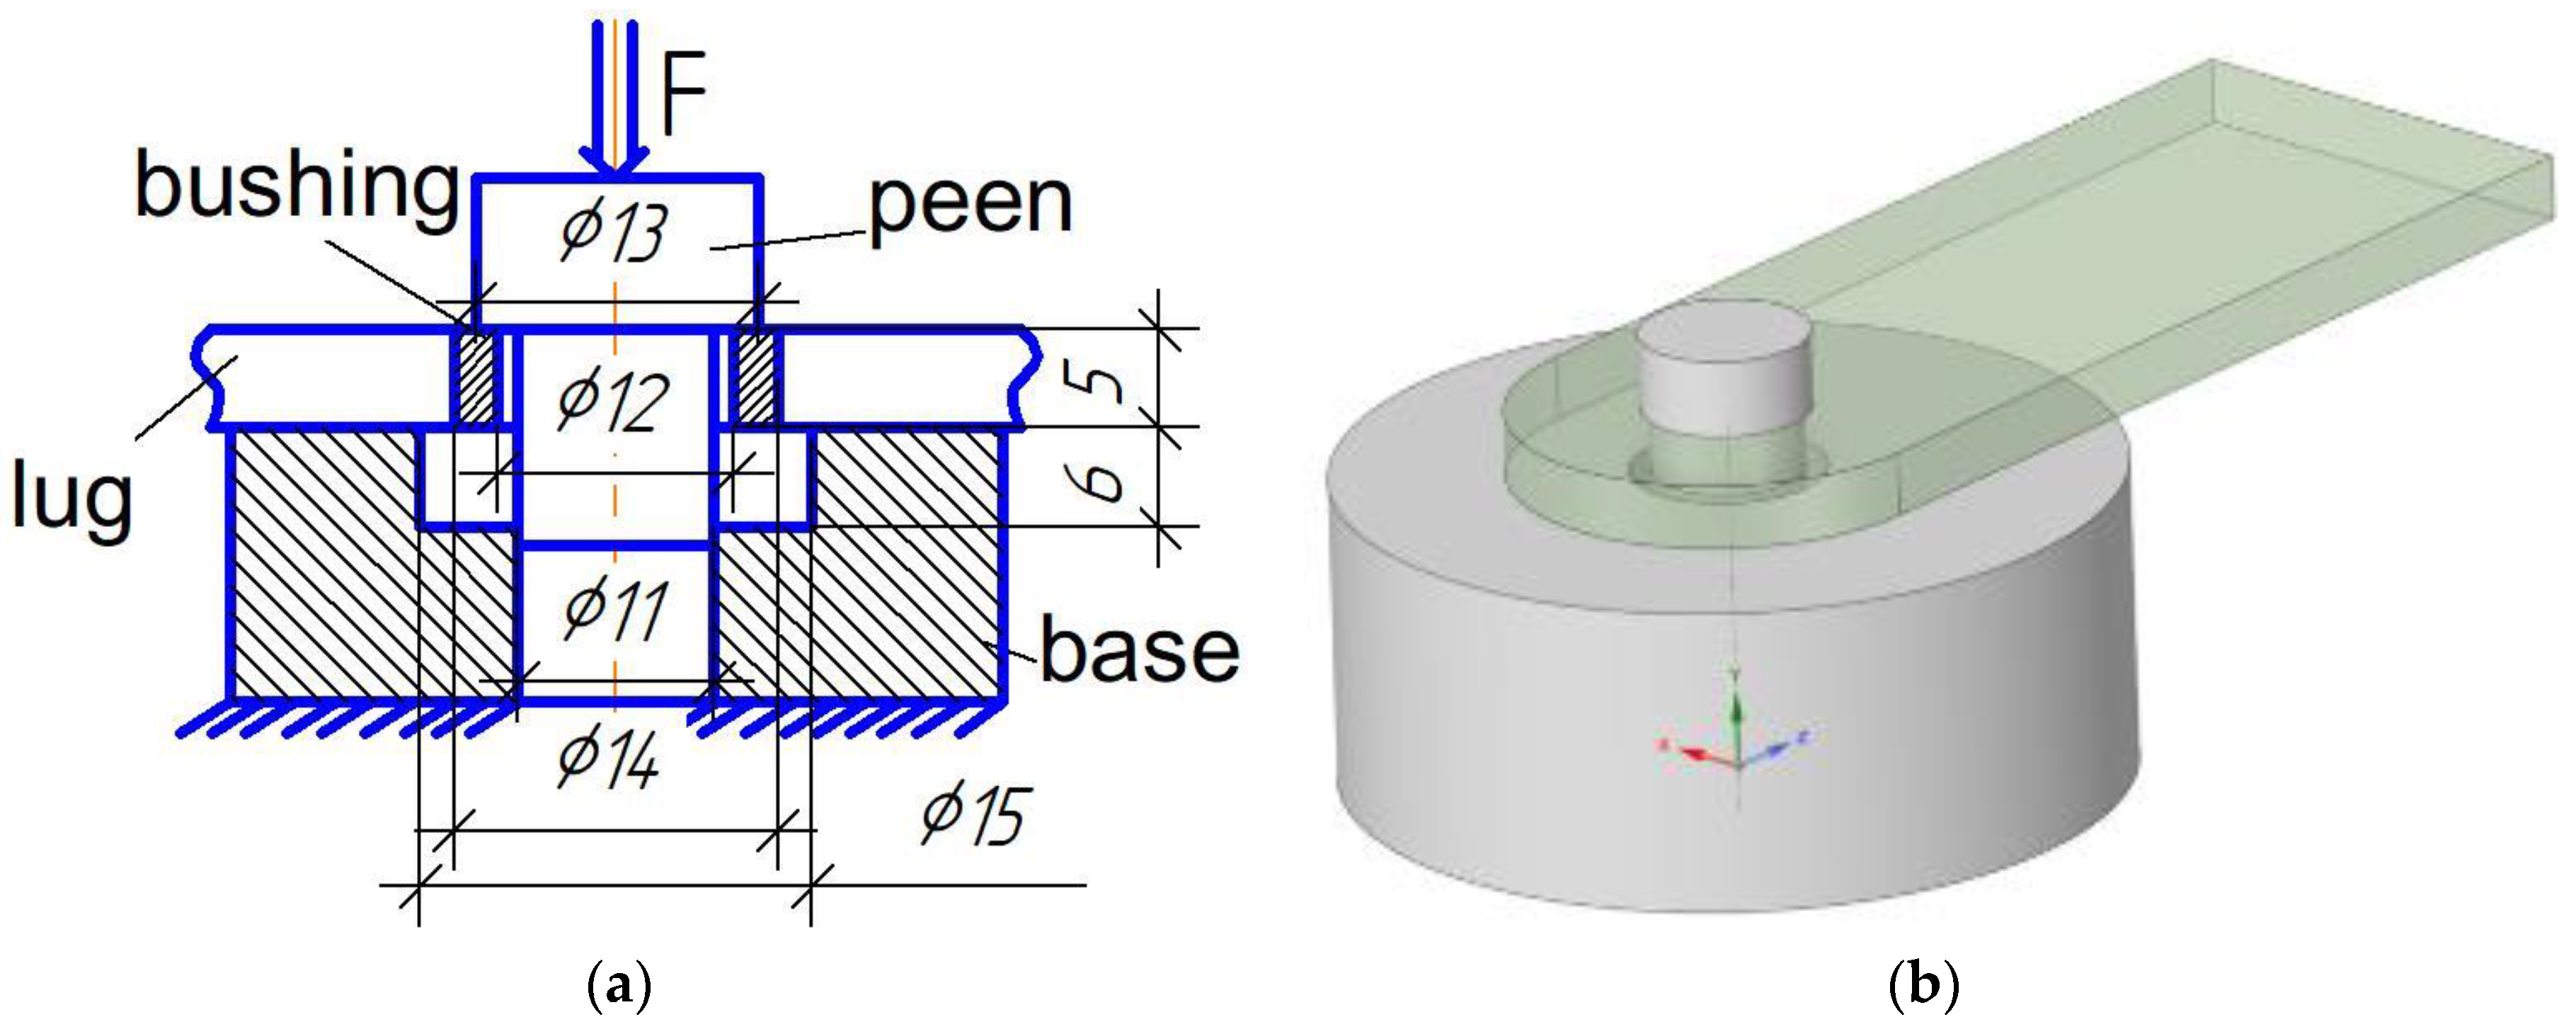
Figure 3.
Test scheme for determining the characteristics of the adhesion interaction model in mode II (tangential), (a) scheme of load, (b) 3d model of tool.
Figure 3.
Test scheme for determining the characteristics of the adhesion interaction model in mode II (tangential), (a) scheme of load, (b) 3d model of tool.
Figure 4.
Test scheme for determining the load-bearing capacity of lugs.
Figure 4.
Test scheme for determining the load-bearing capacity of lugs.
Figure 5.
Manufacturing process of embedded elements.
Figure 5.
Manufacturing process of embedded elements.
Figure 6.
The roughness: (a) sandblasting, (b) vibratory finishing.
Figure 6.
The roughness: (a) sandblasting, (b) vibratory finishing.
Figure 7.
Roughness measurement.
Figure 7.
Roughness measurement.
Figure 8.
Injection molding process.
Figure 8.
Injection molding process.
Figure 9.
Stress-strain analysis.
Figure 9.
Stress-strain analysis.
Figure 10.
The roughness: (a) SLM process; (b) sandblasting; (c) vibratory finishing; (d) ribbing.
Figure 10.
The roughness: (a) SLM process; (b) sandblasting; (c) vibratory finishing; (d) ribbing.
Figure 11.
Manufactured lugs.
Figure 11.
Manufactured lugs.
Figure 12.
Tests for extrusion of the bushing along the axis.
Figure 12.
Tests for extrusion of the bushing along the axis.
Figure 13.
Experimentally obtained force from displacement for extrusion of the bushing along the axis with different embedded elements surface types.
Figure 13.
Experimentally obtained force from displacement for extrusion of the bushing along the axis with different embedded elements surface types.
Figure 14.
Calculation of extrusion of the bushing along the axis of the lug with different parameters of CZM Mode II model.
Figure 14.
Calculation of extrusion of the bushing along the axis of the lug with different parameters of CZM Mode II model.
Figure 15.
Comparison of calculated and experimentally obtained molding fronts.
Figure 15.
Comparison of calculated and experimentally obtained molding fronts.
Figure 16.
Test to determine the load-bearing capacity of lugs.
Figure 16.
Test to determine the load-bearing capacity of lugs.
Figure 17.
Calculation of the strength criterion at the lugs destruction moment: (a) SLM bushing surface, (b) Vibratory finishing bushing surface.
Figure 17.
Calculation of the strength criterion at the lugs destruction moment: (a) SLM bushing surface, (b) Vibratory finishing bushing surface.
Figure 18.
Destruction of lugs with bushings of different roughness: (a) SLM bushing surface, (b) Vibratory finishing bushing surface.
Figure 18.
Destruction of lugs with bushings of different roughness: (a) SLM bushing surface, (b) Vibratory finishing bushing surface.
Table 1.
Technological parameters of the SLM process.
Table 1.
Technological parameters of the SLM process.
| Parameter |
Value |
| Laser power, W |
240 |
| Scanning speed, mm/s |
800 |
| Scanning step, mm |
0,09 |
| Layer thickness, μm |
280 |
Table 2.
Measurement results.
Table 2.
Measurement results.
| Surface |
Ra, μm |
CV, % |
| Vibratory finishing |
2,66 |
24,6 |
| Sandblasting |
8,79 |
24,9 |
| SLM |
10,02 |
17,9 |
Table 3.
Load-bearing capacity of lugs with different surfaces of embedded elements.
Table 3.
Load-bearing capacity of lugs with different surfaces of embedded elements.
| Surface |
F max, N |
CV, % |
F max, N |
CV, % |
| S type |
M type |
| Vibratory finishing |
4886 |
6.96 |
7457 |
6.54 |
| Sandblasting |
5186 |
3.39 |
7302 |
5.10 |
| SLM |
5429 |
1.63 |
7722 |
1.73 |
| Ribbing |
6029 |
1.24 |
8388 |
2.48 |
| Without bushing |
5008 |
1.72 |
7551 |
6.71 |
Table 4.
Calculated lag load capacity with fitted CZM Mode II parameters.
Table 4.
Calculated lag load capacity with fitted CZM Mode II parameters.
| Surface |
F max, N |
| S type |
M type |
| Vibratory finishing |
4741 |
6386 |
| Sandblasting |
6344 |
8052 |
| SLM |
7260 |
9220 |
|
Disclaimer/Publisher’s Note: The statements, opinions and data contained in all publications are solely those of the individual author(s) and contributor(s) and not of MDPI and/or the editor(s). MDPI and/or the editor(s) disclaim responsibility for any injury to people or property resulting from any ideas, methods, instructions or products referred to in the content. |
© 2024 by the authors. Licensee MDPI, Basel, Switzerland. This article is an open access article distributed under the terms and conditions of the Creative Commons Attribution (CC BY) license (http://creativecommons.org/licenses/by/4.0/).
