1. Introduction
Atmospheric corrosion is a significant problem due to the destruction of various materials, especially metals and their alloys. Corrosion research in industrially polluted environments is very important, since corrosion affects the load-bearing capacity and durability of steel structures, which causes huge costs for the maintenance of structures. The corrosion process develops most rapidly during the winter months due to an increase in the concentration of pollutants in the air, such as SO
2, CO
2, chloride ions and dust. Various combinations of these factors are typical for industrial environments. The most important climatic factors that affect the corrosion process are relative humidity, number of hours of sunshine, temperature of air and metal surfaces, wind speed and duration and frequency of rain, dew and fog. The influence of time and quantity of rain is very important for characterizing differences between indoor and outdoor corrosion [
1].
The subject of this study is degradation of steel elements due to the propagation of corrosion caused by the presence of corrosion agents in the industrial environment of RTB Bor (Serbia). General corrosion testing is carried out in the field, in selected atmospheric corrosion stations, near the Sulphuric acid factory, in the Electrolytic refining plant (electrolysis) and next to the automatic air quality monitoring station in Bor, for six months. Also, a certain number of specimens, steel test tubes, were tested in chambers for accelerated aging and immersion in electrolytes. All specimens were compared with reference specimens stored in laboratory conditions. To assess the corrosion resistance of steel S235JR, the analysis of mass loss and the evaluation of mechanical properties of specimens after exposure to the aggressive environments in Bor for a certain period of time were employed. Powdered rust taken from the specimens were subjected to X-ray diffraction (XRD) analysis, and scanning electron microscopy (SEM) was used for fracture surface examination. In order to obtain a complete characterization of the atmosphere, as well as of the exposure condition, meteorological data corresponding to six months in the period of the experiment duration in outdoor conditions were analysed, and also for one year period (extra six months after the experiment) were analysed to determinate corrosivity category. Pollution by SO2 alone was considered in this study because this is the most common and important corrosive agent. Both corrosion loss and mechanical properties of the experimental specimens were measured. With the help of a guantitative analysis of the test result, a better acceleration condition can be design which represents the actual environment.
The material loss caused by corrosion generates a behaviour similar to a ductile material with nucleation, growth and coalescence of the spherical voids. The evolution of the material properties with corrosion is important for modelling and predicting of damage in elements. The first model that takes into consideration the influence of microdamage on material strength was the Gurson [
2] model. Tvergaard [
3,
4] modified the Gurson model to account for microvoid interaction. Later, Tvergaard and Needleman [
5] further modified the Gurson yield criterion to account for the rapid loss of load bearing capacity during the microvoid coalescence phase. Zhang and his associates [
6] performed a significant modification of the GTN model; they included Thomason's failure criterion and thus got the so-called complete Gurson model (CGM). In the CGM, critical value of the damage parameter is calculated during the finite element analysis based on the plastic limit load in the ligament between the voids. In this work, this approach is extended by applying CGM to elements with surface damage, such as those caused by local corrosion. The extended damage model described above is implemented into the finite element code ABAQUS [
7] through the material user subroutine UMAT, developed by Zhang [6, 8-10]. The aim of the user-defined subroutine is to simulate material behaviour and degradation appropriately.
Previously, the calibration of the GTN model for various engineering applications involved integrating the results from the experiments with finite element analysis results. In most of the studies few model parameters are fixed and the rest are used as the fitting parameters to simulate the experimentally observed load displacement curves. Some authors [11-13], independently of each other, used mass loss ratio, obtained with accelerated corrosion test, as the initial void volume fraction of corroded stud shear connectors, reinforcing bar with corrosion pits and Al 7075-T6 alloy, with electrochemical accelerated corrosion test, fog room test and salt spray test, respectively. First, Wcislik [
14], then Kossakowski [
15] used the experimental approach that included the digital image analysis of the fracture surface of S235JR steel to determine the critical parameter
fF. Kiran et al. [
16] estimate the nucleation strain
; since
dictates the onset of damage initiation, the plastic strain at the instant when the load displacement curve in the finite element analysis result deviates from the experimental curve can be taken as an estimate of the nucleation strain. Tvergaard’s parameters
qi are depend on yield stress
fy to modulus of elasticity
E ratio. Calibrated
qi values are shown for the whole set of materials proposed by Faleskog [
17].
To determine certain parameters of constitutive model, a combination of numerical simulations and experimental data is essential. Using the experimental data as a foundation, a constitutive model was developed, outlining the correlation between corrosion rate and mechanical properties. It's crucial to recognize that defining most of these parameters is not straightforward. There is no universally accepted method for determining these parameters on a global scale.
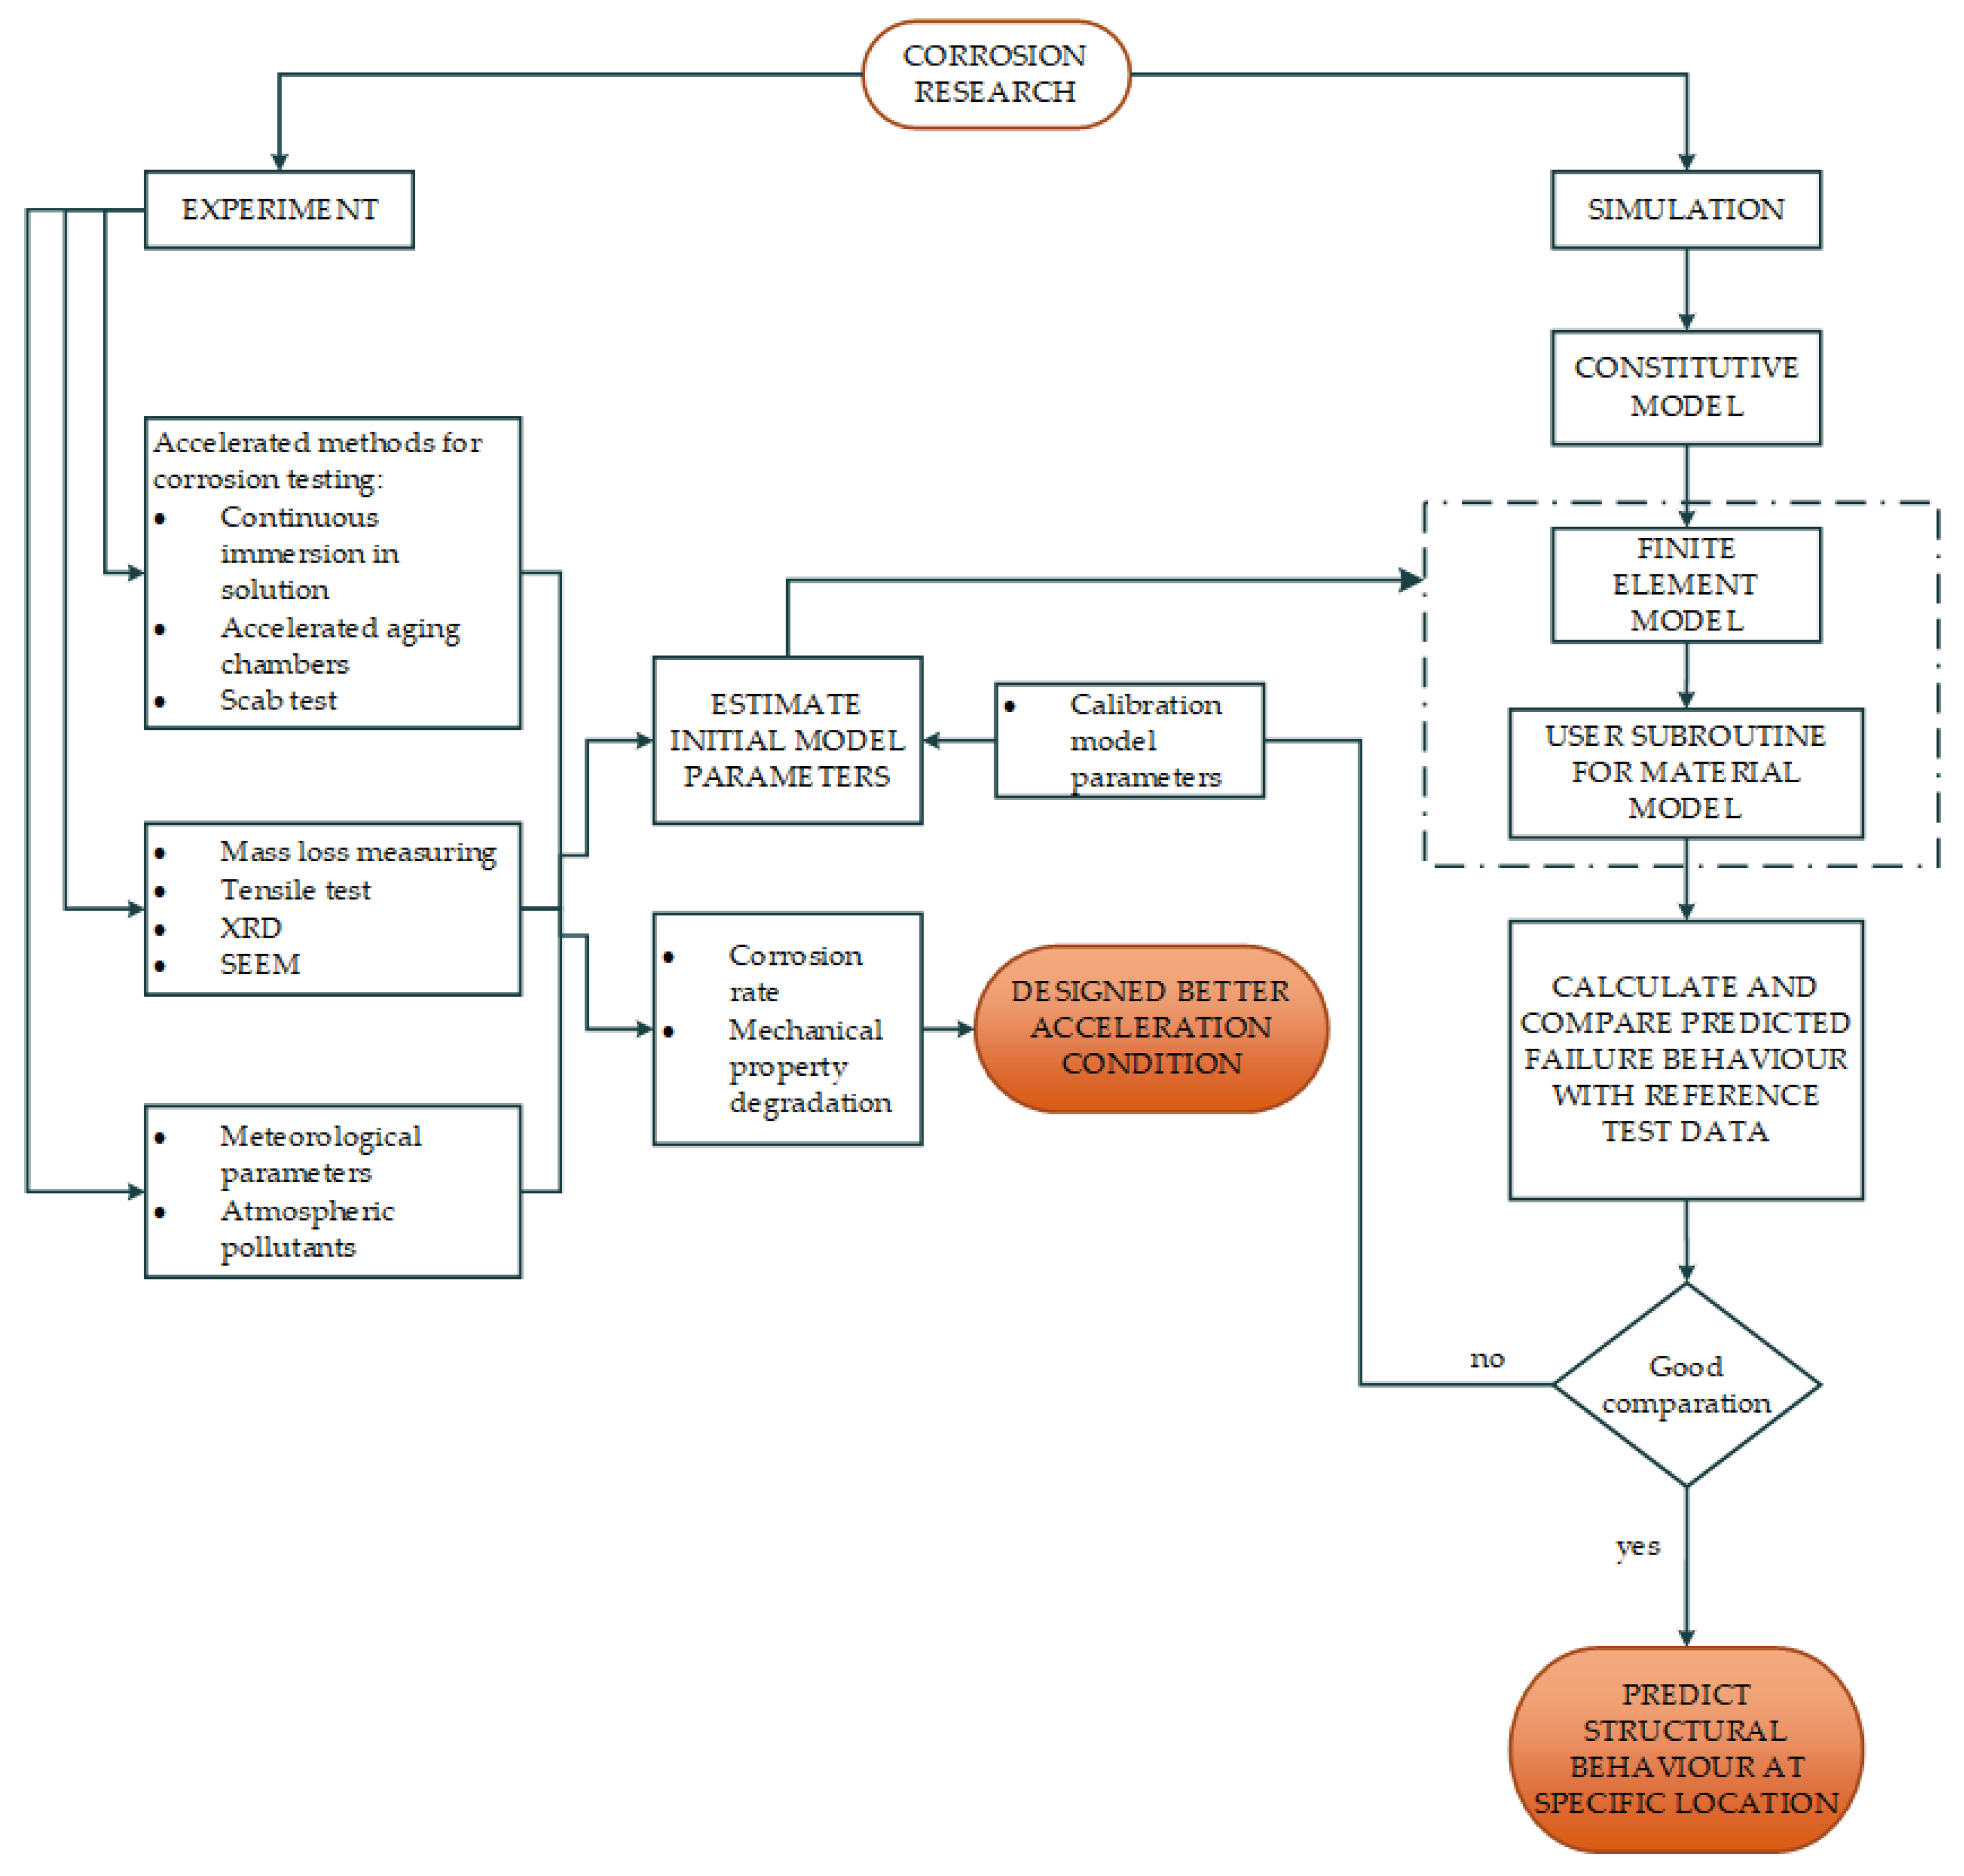
The logical structure of this paper is as follows: first, the experiment methods for corrosion testing were described. Second, the results of the experiment are presented and analysed in order to be used for the determination of constitutive model parameters. Thirdly, identification of the optimal experimental conditions that accurately represent the actual environment and offer the most significant acceleration effect. The usage of the user material subroutine (UMAT) and the Complete Gurson model (CGM) with adopted parameters are proposed. Finally, the load-displacement curves from reference test data were compared with numerical results to confirm efficacy of the proposed material constitutive model (
Figure 1). Also, recommendations for future research were put forward. The novelty of this work is that it attempts to determine the parameters that would describe the deterioration of materials in the industrially aggressive environment in Bor, in terms of the corrosion rate and tensile loading, so that they can be applied in engineering practice. As far as the author of this study is aware, these parameters have not been determined in Serbia yet, in order to create the possibility of using this advanced model in predicting load displacement behaviour, ductility and the fracture initiation location, but also the duration of the structure until failure.
2. Experimental Material and Methods
2.1. Experiment Preparation
Figure 2 presents a schematic of the coupon test specimen, detailing its precise dimensions. The tensile test specimen was fabricated in accordance with the EN10002-1 standard. The material used in this experiment was commercial steel S235JR. In
Figure 2,
a denotes the thickness of coupon testing for a tensile strength (4, 6 and 8 mm).
The chemical composition was tested on the standard plate, size 30x40x8 mm, by the use of optical emission spectrometry and is given in the following
Table 1:
The method of marking the specimens, according with the location where they were exposed and the period during which they were exposed to corrosion media, are shown in
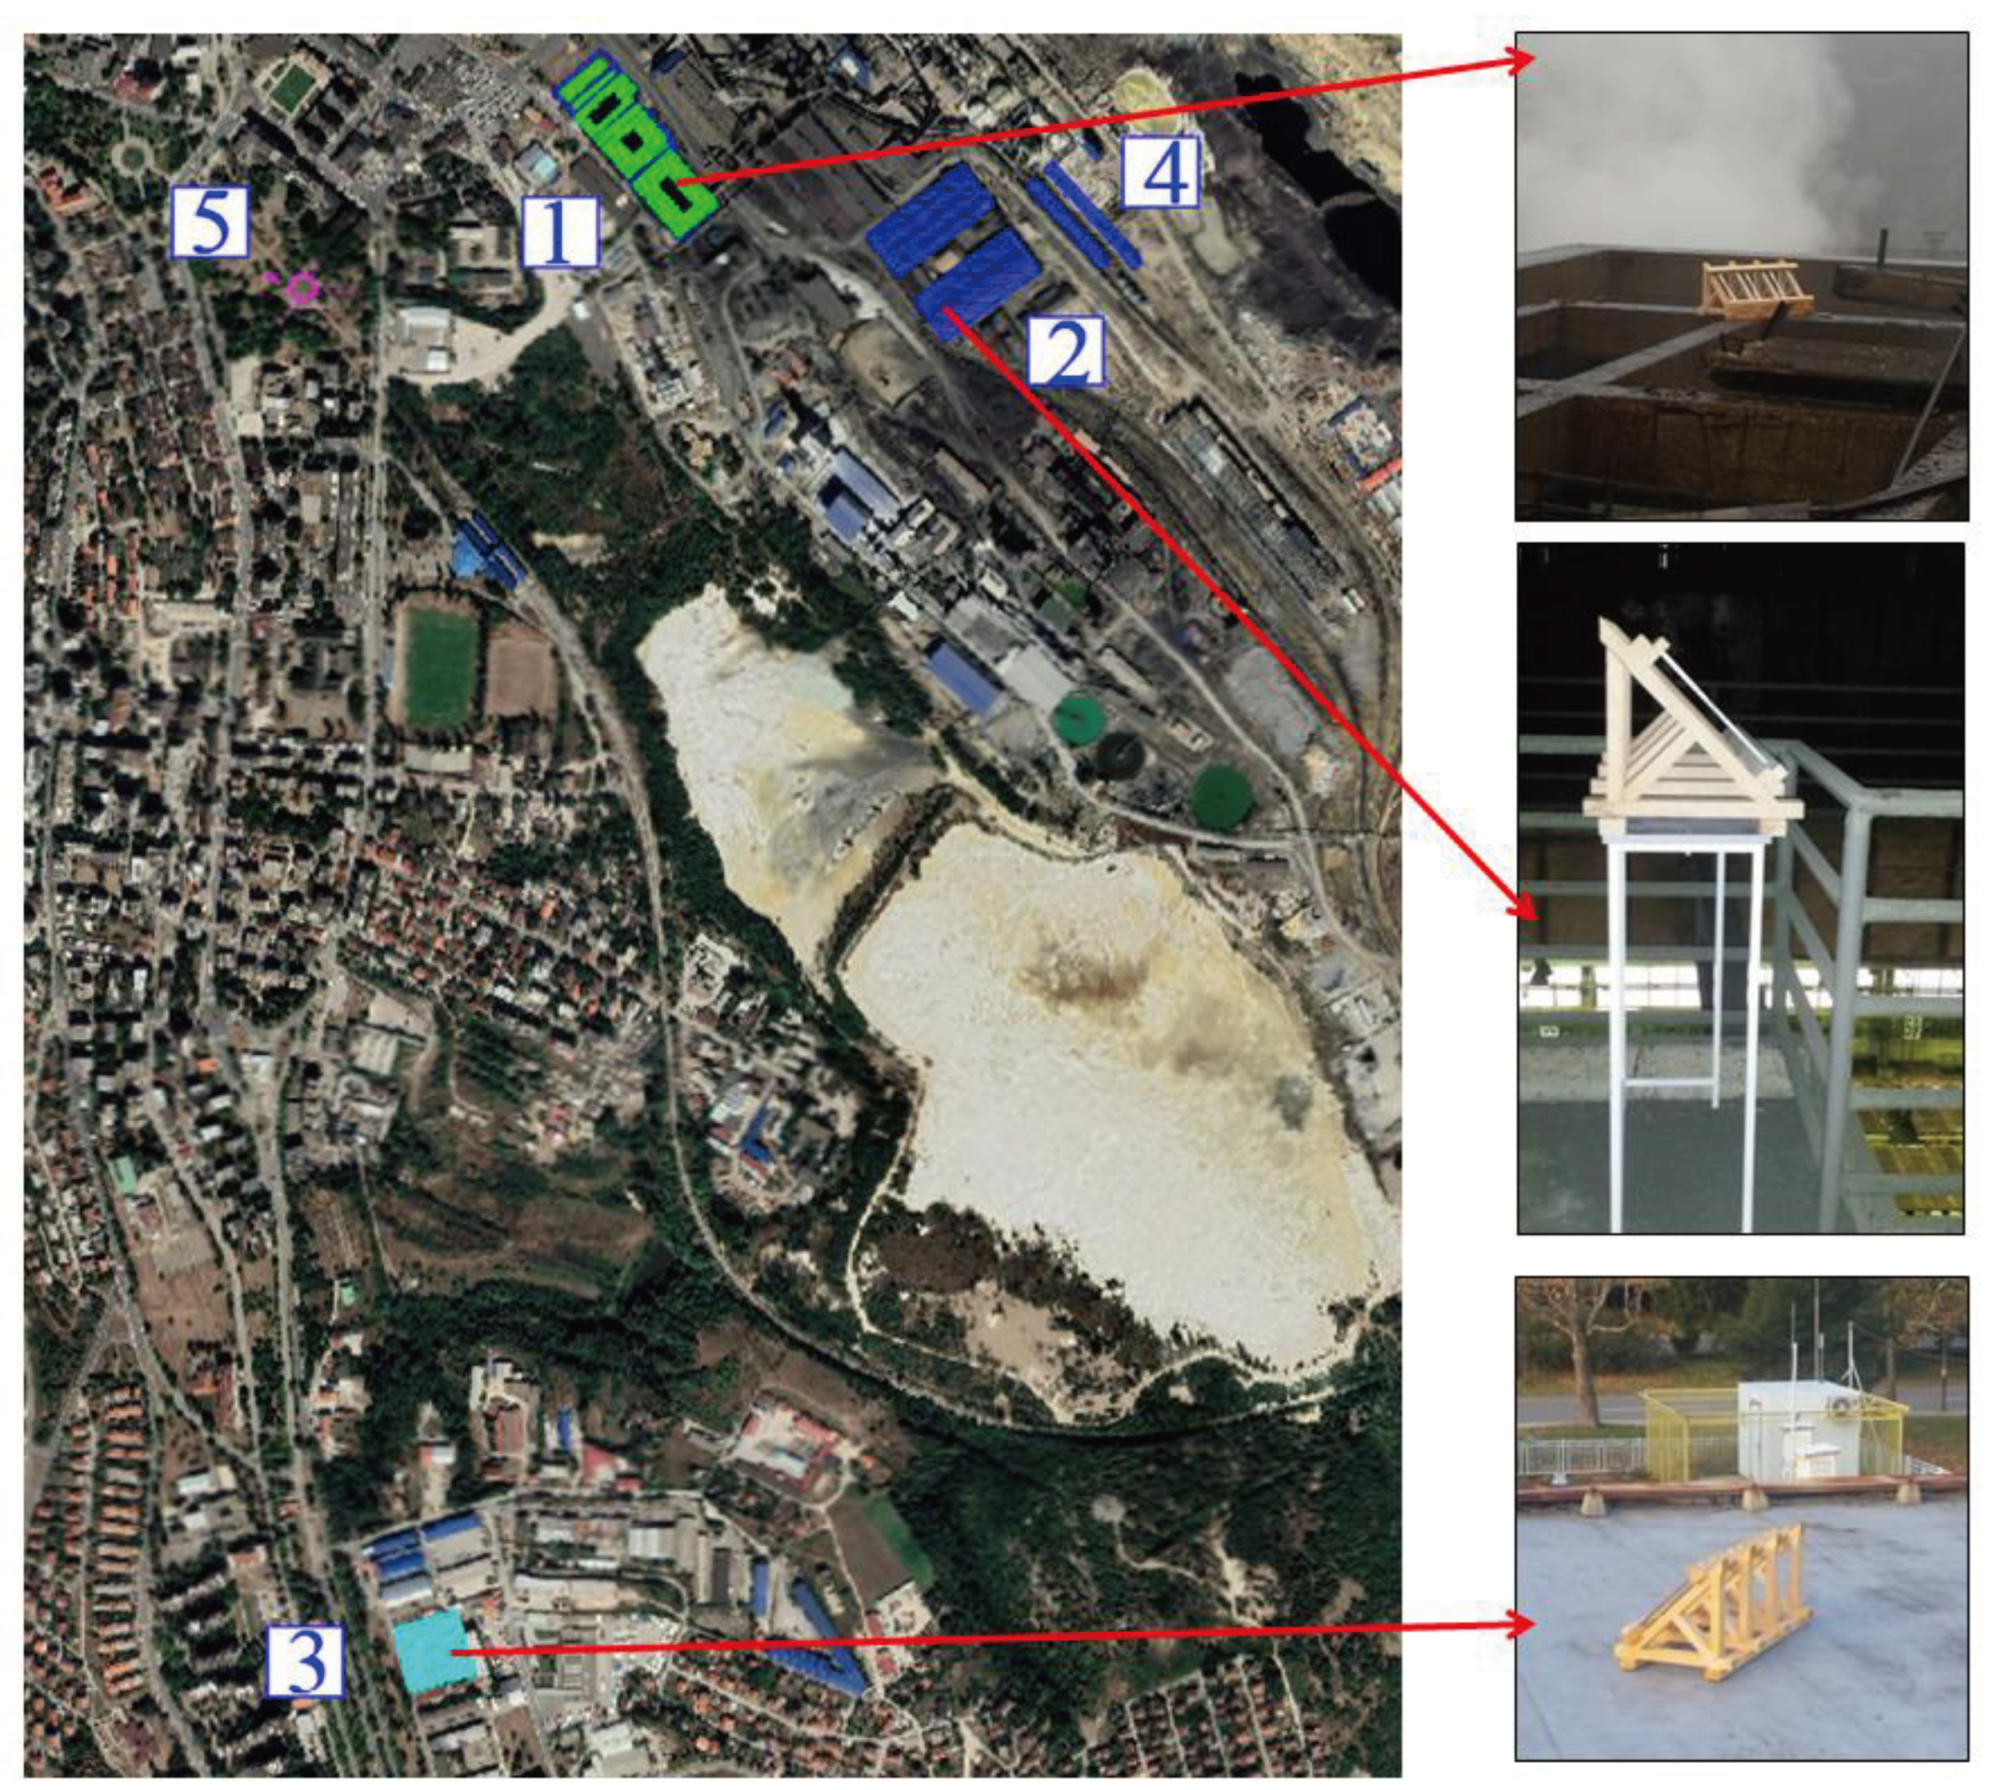
Table 2. Two specimens of the same thickness of 4, 6 and 8 mm were placed at each of 7 different location. A total of 42 specimens were analysed in this study. The location of corrosion testing methods used in this paper are explained below, in
Figure 3.
2.2. Accelerated Methods for Corrosion Testing
It is desirable that the corrosion resistance tests be performed in real operating conditions or on atmospheric corrosion stations. These are specially selected places, most often with an industrial atmosphere, where specimens are exhibited and monitoring of changes in them due to corrosion. Tests on corrosion stations are long-lasting, so accelerated laboratory tests are often used, during which corrosion destruction occurs in a relatively short time.
2.2.1. Continuous Immersion in Solution
Acceleration of the corrosion process is achieved by continuous or alternating immersion of specimens in solutions of a particular composition, at certain temperature. The tests are most often performed in chloride solutions (NaCl, FeCl3), usually with the addition of an oxidizing agent (H2O2, KCrO4). In this study, electrolyte solutions (Sulphuric acid solution with 40 g/l Cu, 160 g/l H2SO4) from the EF were used as a corrosive medium, which fulfilled the condition that solution corresponds to the industrial environment, at room temperature. The immersion was continuous, lasting for a month.
2.2.2. Accelerated Aging Chambers
In the chambers for corrosion tests, acceleration of the corrosion process is done by increasing temperature and relative humidity, with introduction of the aggressive components into atmosphere of chamber. The most important tests are in a wet chamber, a chamber with SO
2 and in a salt chamber (NSS, ASS and CASS methods). In this study, the test was performed in the salt chamber "Industrial filter" with an external compressor according to ISO 9227 [
18], with neutral spray (NSS test) for a duration of 120 h and 240 h. The concentration of NaCl solution was 5 % (pH 6.5 ÷ 7.2), at a temperature of 35°C (± 2°C).
2.2.3. Scab Test
This method is used for accelerated testing in the external field conditions, in selected atmospheric corrosion stations. In this study, for atmospheric corrosion stations were chosen location AF and air quality monitoring station in City park, as well as location MP and other air quality monitoring station. The distance between these two locations is about 3 km. This part of the study has been carried out in outdoor conditions. Another one, in the EF, has been carried out under indoor conditions (
Figure 3). Exposure of specimens (steel specimens) lasted for 6 months. Specimens are placed on a wooden frame so that they rest on it with the smallest surface. They are placed at an angle of 45 ° to the ground, horizontally, and facing south, which in many tests is considered as the position in which the largest surface of specimen is affected by corrosion in the longest time interval [
19]. The scab test is the subject of ISO 11474:1998 [
20], which defines repeated spraying of salt solutions. In this study, the standard in terms of spraying was deviated, because an attempt to obtain the material degradation due to corrosion with real agents in the industrially aggressive environments, with atmospheric conditions in winter months between November and May. Although it is technically easy to perform, this method is slow and labor-consuming.
After exposure, corrosion products from all specimens, as well as from the control specimen, were removed according to ISO 8407:2021 [
21]. This standard specifies procedures for removal the corrosion products from metals and alloys, which are created on specimens for corrosion testing during their exposure to the corrosive media. The procedures set out in this standard are intended to remove corrosion products without significant removal of the parent metal. To determine the mass loss of parent metal when removing the corrosion product, the parallel uncorroded, reference specimen is cleaned by the same procedure as the specimen under test. After removing corrosion products, all specimens are subjected to a standard coupon test.
2.3. Standard Coupon Test
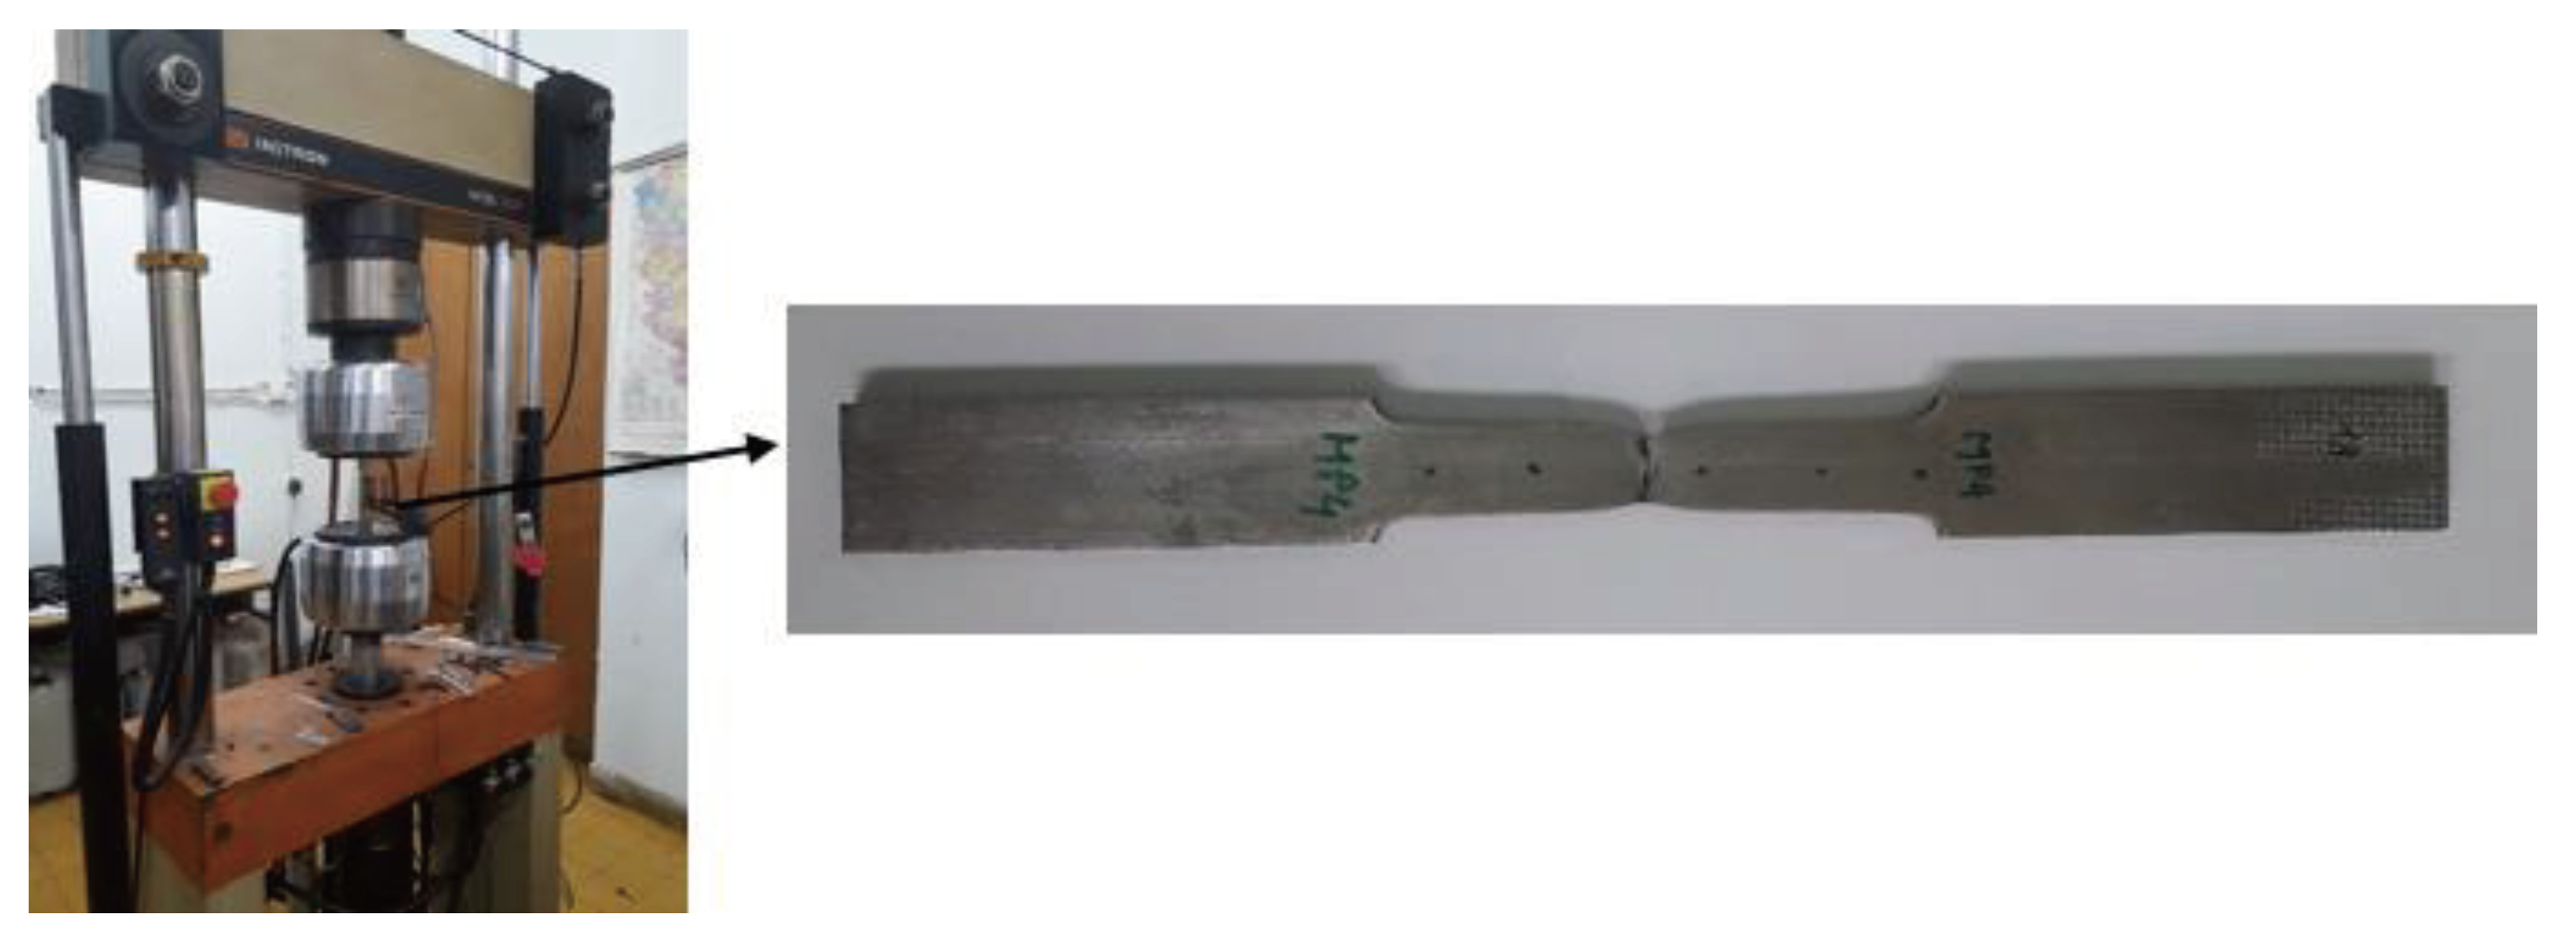
Standard coupon tests were conducted in this study to assess the mechanical properties, strength and the modul of elasticity of specimens under different corrosion conditions. Tensile tests were carried out on a servo-hydraulic universal testing machine (Instron 1332 with Fast Track 8800 control system) at a maximum load of 100 kN, and an extensometer with a gauge length of 50 mm was installed in the middle of the specimen to measure the deformation during the tensile test. In
Figure 4, it can be seen that the fracture mechanism is ductile; the broken test specimen shows considerable deformation in the longitudinal direction, as well as the neck formed at the middle of the specimen.
2.4. XRD Analysis
XRD analysis was used in this study as a relationship indicator between the loss of mechanical properties due corrosion and the type of environment in which corrosion develops.
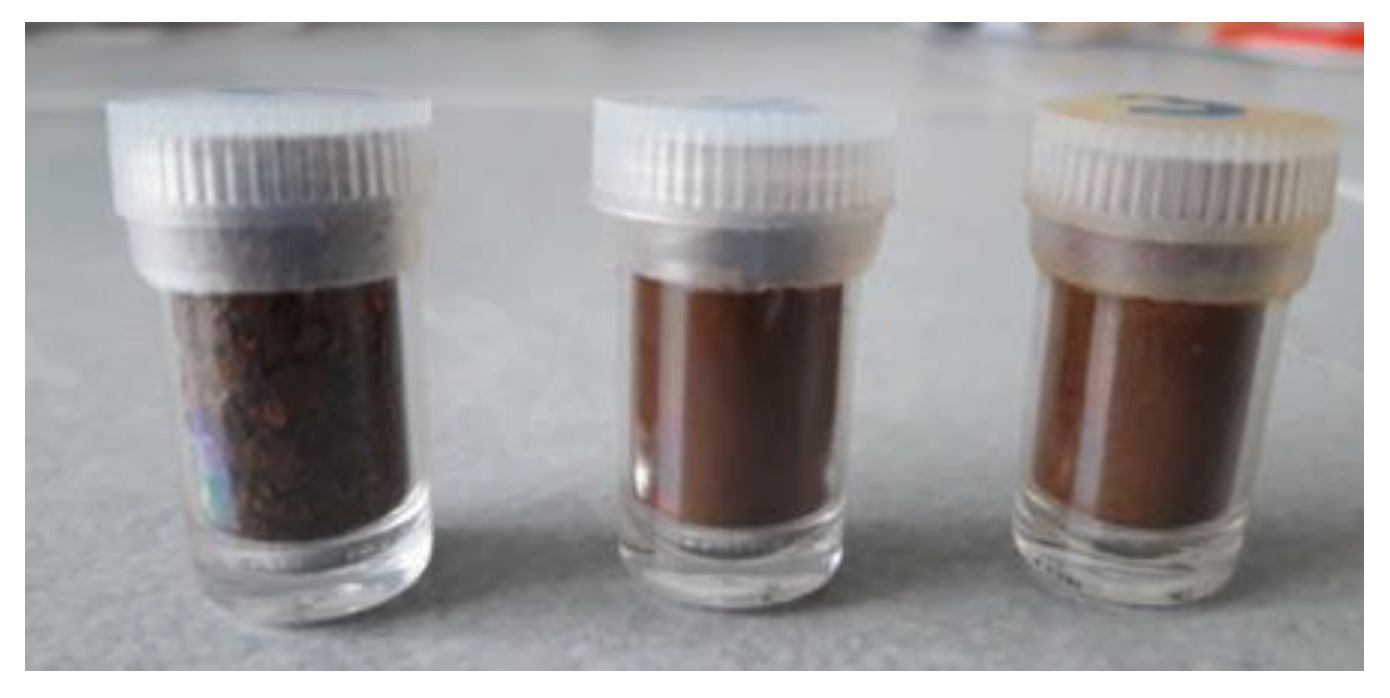
The X-ray diffraction was performed on powdered rust samples removed from the specimens (
Figure 5) using a Rigaku Mini Flex 600 diffractometer. The generator settings were 40 kV and 15 mA, in the angular range of 3±90° two-theta with a step width of 0.02°. In this study the software PDXL 2, version 2.4.2.0 for phase identification in the rust was employed. XRD was conducted to identify iron oxides formed at the three different exposure sites.
2.5. Meteorological Parameters
Some of the most important meteorological parameters in Bor for the corrosion process are shown in
Table 3. T is temperature in °C, RH is relative humidity and TOW is the time of wetness, estimated from the number of hours per year that the relative humidity was equal to or above 85% and the temperature exceeded 0°C.
2.6. Atmospheric Pollutants
The average, monthly values of SO
2 deposition rate for two different test stations, but same exposure conditions, are shown in
Table 4. As can be seen in this table, there is a noticeable difference in the SO
2 deposition rate between the two stations in some months.
2.7. SEM Analysis
Scanning electron microscopy (SEM) are used for fracture surface examination. It used the JEOL JXA-840 electron microscope equipped with a Link System electron microprobe. Analyses were carried out in cross-sections of the specimens, cut after the tensile test. A detailed optical and scanning electron microscopy of the fractured surfaces is performed to identify the void volume through quantitative image analysis.
3. Results of Experimental Research
3.1. Analysis Using X-ray Diffraction
The two phases in most cases present are lepidocrocite (γ-FeOOH) and goethite (α-FeOOH), in terms of content in the rust. Other phases usually present in the steel corrosion products are magnetite (Fe
3O
4) or maghemite (γ-Fe
2O
3), which cannot be differentiated by XRD due to their similar crystalline structure [
22]. Their preferential location in the lower strata of the rust layer, close to the base steel, is the reason why they remained undetected in the powder rust samples obtained from the surface of deteriorated steel specimens in the industrial atmosphere of Bor.
Table 5 shows the crystalline phases encountered in the corrosion products formed on S235JR steel. A semi-quantitative estimate of each detected phase has been made, expressed as a percentage of the total crystalline products found.
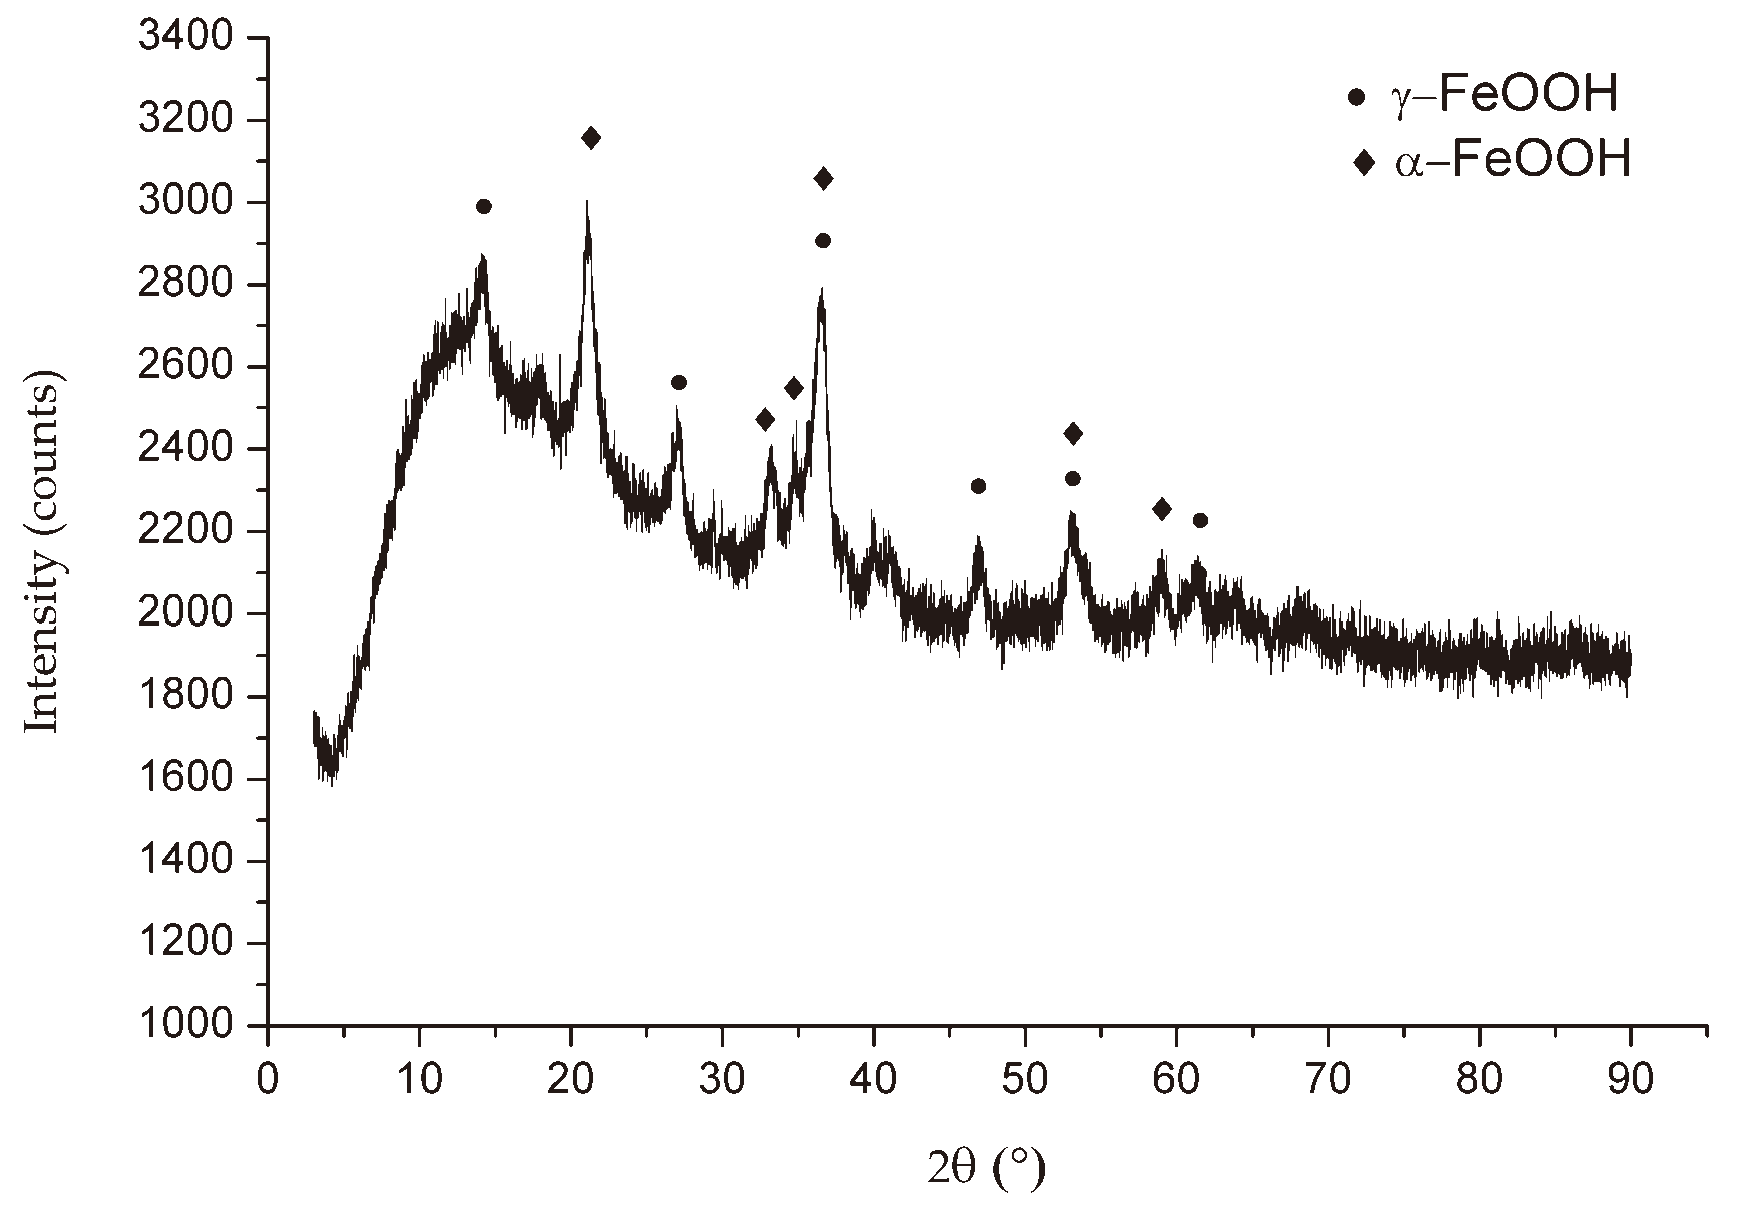
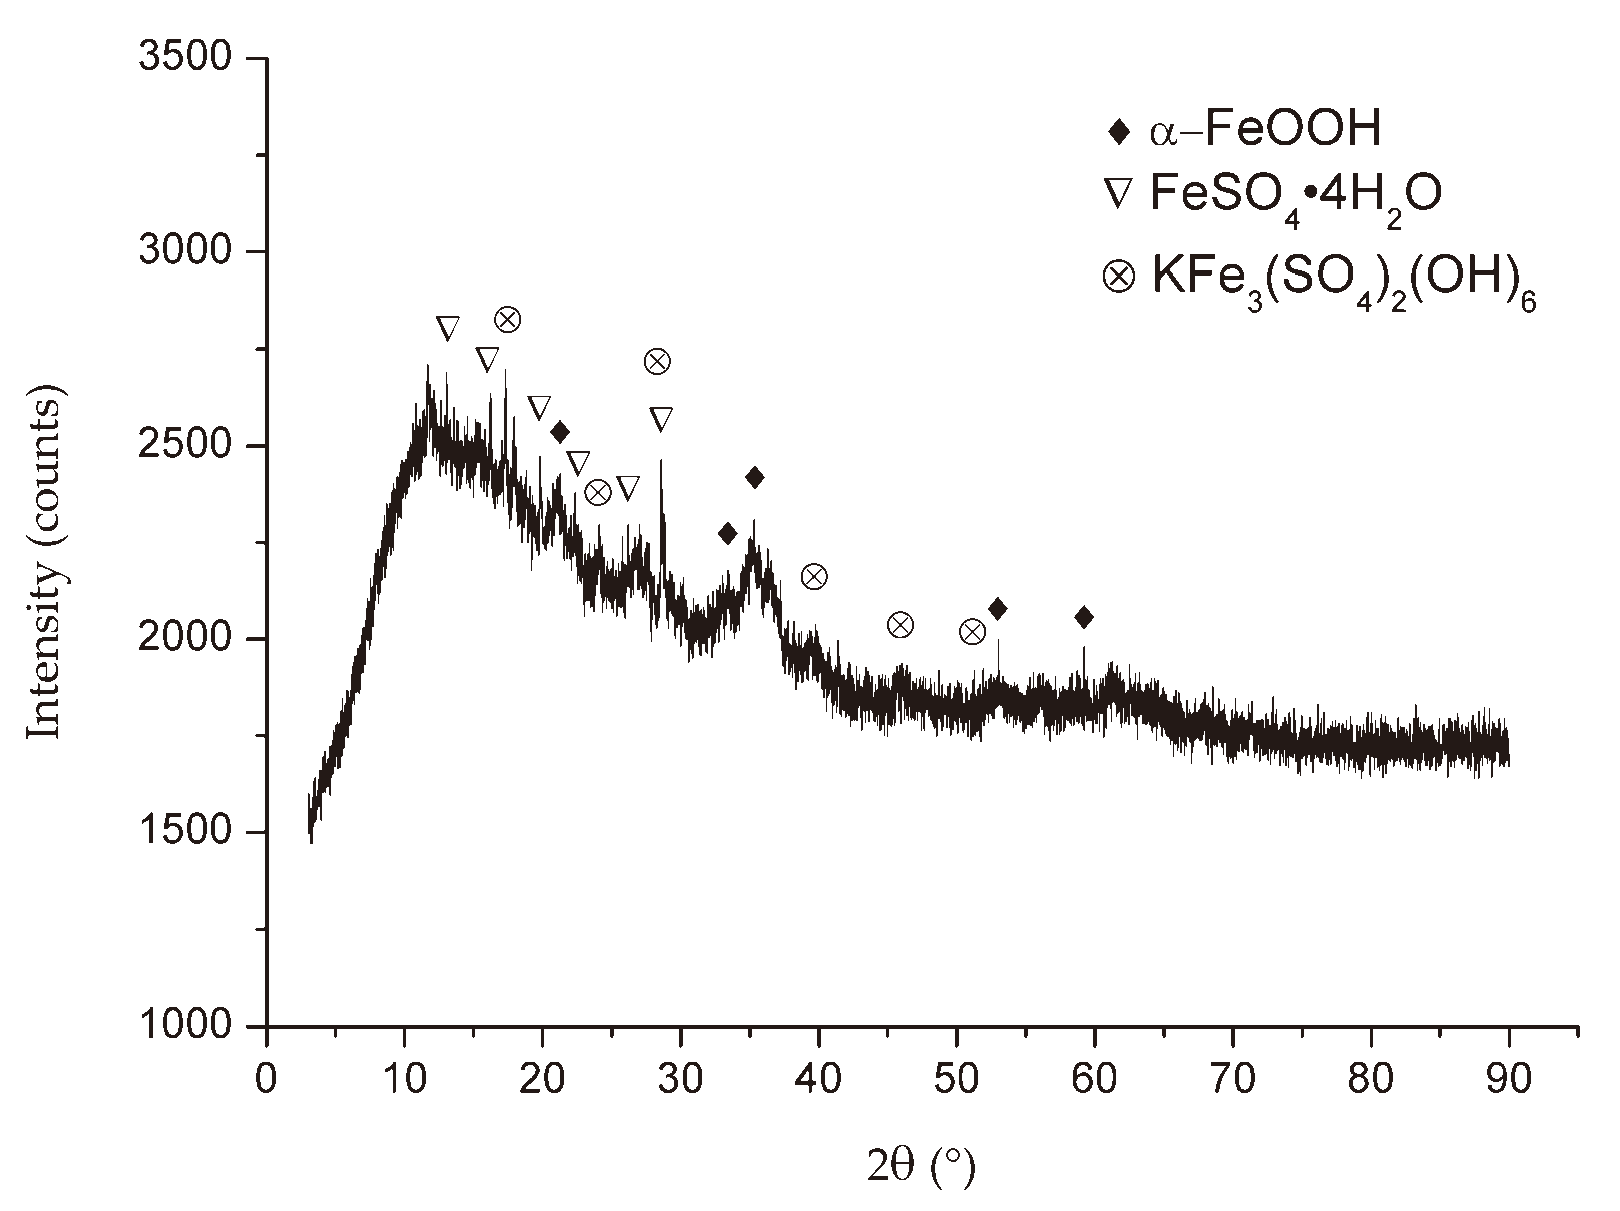
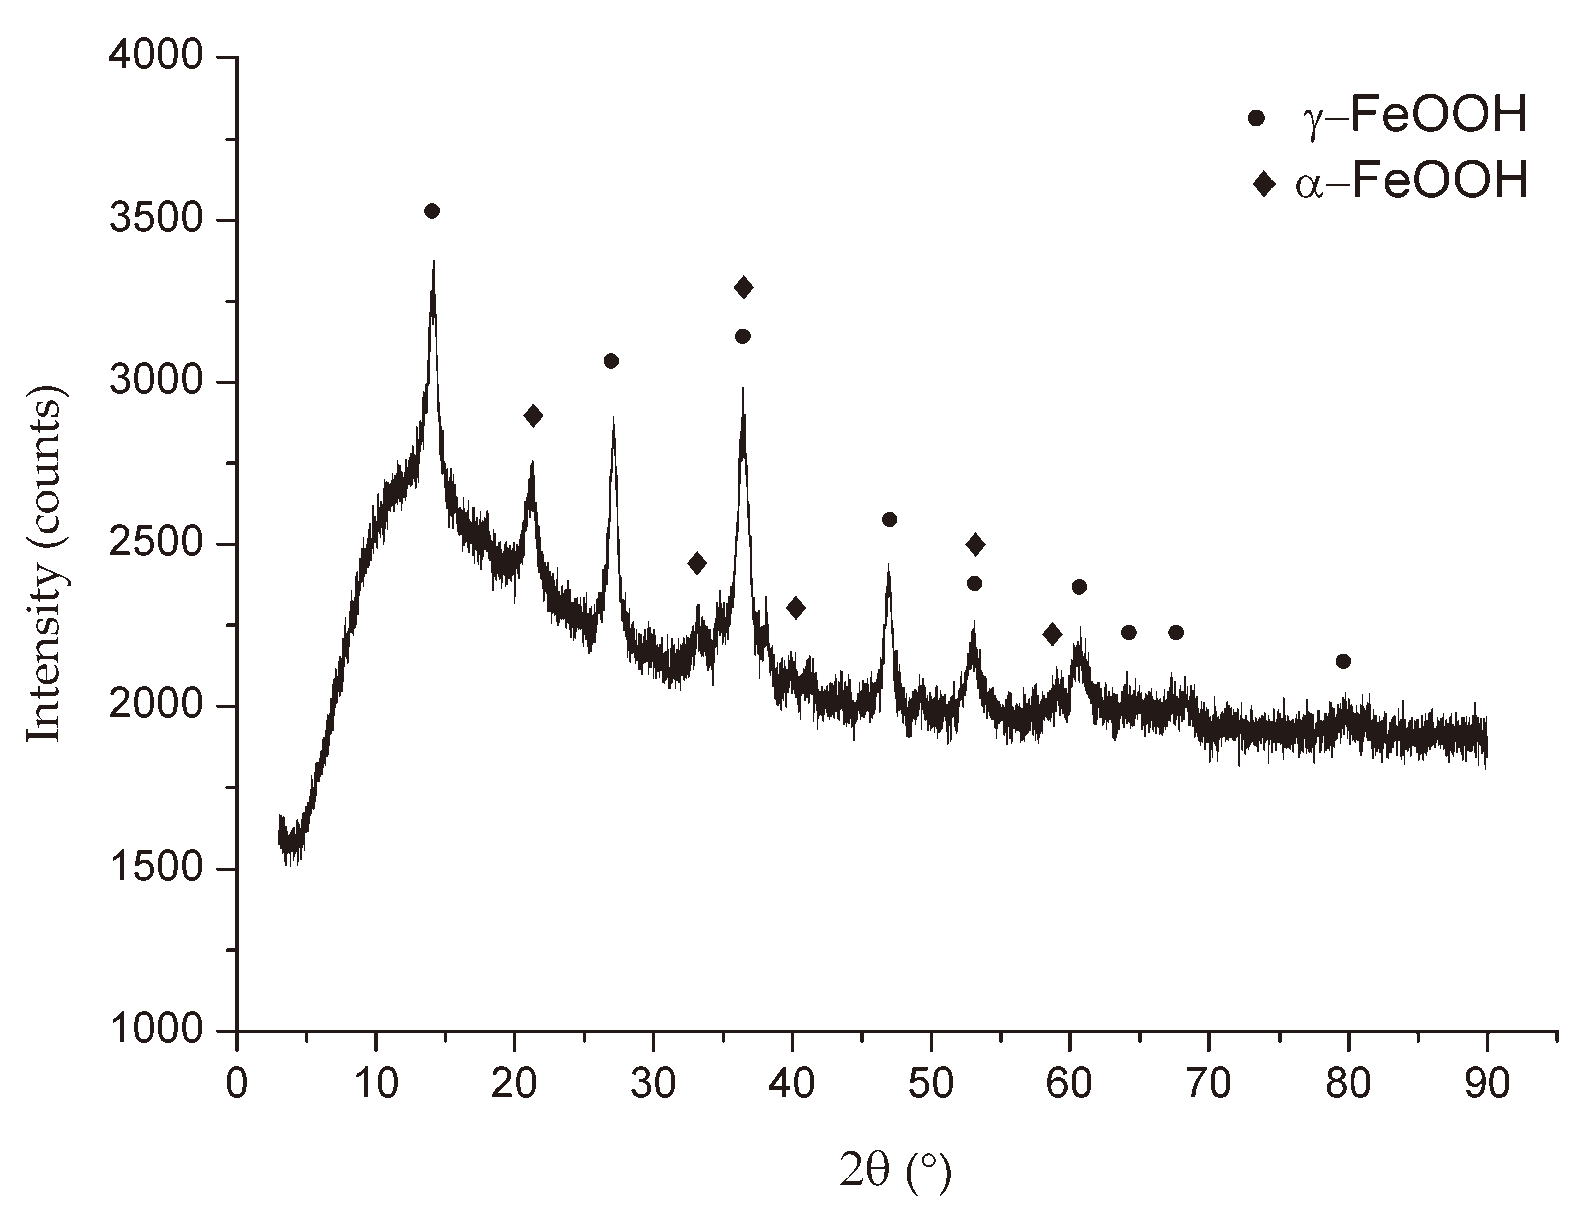
Figure 6,
Figure 7 and
Figure 8 show the XRD patterns of the corrosion products from three different locations. All the X-ray diffraction patterns had a very similar look independent of the exposure conditions, except for the diffraction pattern of the specimen in the EF. The crystalline products formed in the rust layer are lepidocrocite (γ-FeOOH) and goethite (α-FeOOH), which are typical in the case of atmospheric corrosion of carbon steel, as it comes out from other studies [1, 22]. It is also interesting to draw attention to the presence of rozenite (FeSO
4(H
2O)
4) and jarosite (KFe
3(SO
4)
2(OH)
6) in the industrial atmospheres of Bor, in the corrosion products formed on indoor specimens in EF. The appearance of these corrosion products was conditioned by the fumes of sulfuric acid and copper sulfate.
3.2. Corrosion of the S235JR Steel
Accelerated methods were used to determine the initial atmospheric corrosion of steel S235JR in the industrial environment at the site of Bor. The mass loss for each thickness of specimen after the exposion was calculated by:
In the previous equation
is the mass loss due to corrosion,
is the original mass prior to the corrosion test,
m is mass after the corrosion test,
and
are the mass of control specimens before and after chemically cleaning, respectively. In
Figure 9, it can be seen appearance of the specimens on the day of ending the experiment, before cleaning. In this study, two uncorroded reference specimens for each thickness also undergoing the same cleaning procedure to account for the mass loss due to chemical cleaning. Corrosion of steel specimens in all conditions can be classified as uniform corrosion; the degree of corrosion was quantified by the mass loss ratio
, which can be expressed as:
The mass loss ratio increases continuously due to the increase in corrosion time or due to the increase in corrosion factors. In general, after 6 months of exposure, most of the specimen surfaces were 100% covered by corrosion products. In accordance with ISO 9226:2012 [
23], after the determination of the initial total surface area of specimen
A and the mass loss during the test
, the average corrosion rate in the first year may then be obtained as follows:
where
t is a time of exposure in years (
a), and
D is density (g/m
3). The corrosion rates of S235JR steel are given in
Table 6.
Long-term predictions of metal corrosion losses (
C) follow the kinetic relationship for most of the experimental atmospheric corrosion data [
24]:
Equation (5) is used to describe the corrosion effects obtained in tests with various duration, in various location, where
C is the corrosion rate after
t years,
is that in the first year of exposure in grams per square meter per year (
or micrometer per year (
, and
b is an exponent, representing a function of the type of atmosphere where the steel is exposed. It should also be noted that the prediction of corrosion rate depends on the correct determination of
, and it is determined through this study, while
b value was taken as the average time exponents from regression analyses of the flat panel long-term results of the ISO CORRAG atmospheric exposure program, according to ISO 9224:2012 [
25].
Table 7 shows the mean annual values of meteorological parameters and atmospheric pollutants. Based on these values and the first year corrosion rate, the corrosivity category of outdoor atmospheric corrosion stations is obtained, according to ISO 9223:2012 [
26]. The meteorological data, in
Table 7 were analyzed from 8 November 2016 to 8 November 2017.
It should be noted that the prediction for each atmosphere type in
Figure 10a was carried out only for
within the ranges indicated in ISO 9223:2012 [
26].
Figure 10b shows differences between long-term prediction of corrosion rate with exposure time at test sites from this study. It is clear from
Figure 10 and
Table 7, that all test sites are C3, with medium corrosivity, except test site near to AF, which is C4, with high corrosivity.
3.3. Mass and Load Bearing Loss
The results showed that the corrosion can considerably affect the cross section capacity of steel structure elements. After corrosion, the maximum force of S235JR steel specimens with different mass loss percentages are listed in
Table 9. To quantify the influence of corrosion, mass loss, loss of maximum force after corrosion and loss of depth are shown in
Table 9. Results indicated that with an increment in corrosion, mass, depth and maximum force decreased significantly.
Table 8 shows the reference values for etalon specimens and mass loss due to chemical cleaning. The maximum force shown here is for comparison with values after corrosion. In
Table 9, the change in depth
Δdmass based on mass loss is also shown, represents the difference between the depth before corrosion and after corrosion. Depth before corrosion and after corrosion based on mass loss are determined as follows:
where
and
are mass before and after expose to corrosion, respectively,
is surface of sample, D is density (g/mm
3).
After the coupon tests, the load and displacement results of the S235JR specimens with different corrosion degrees were obtained.
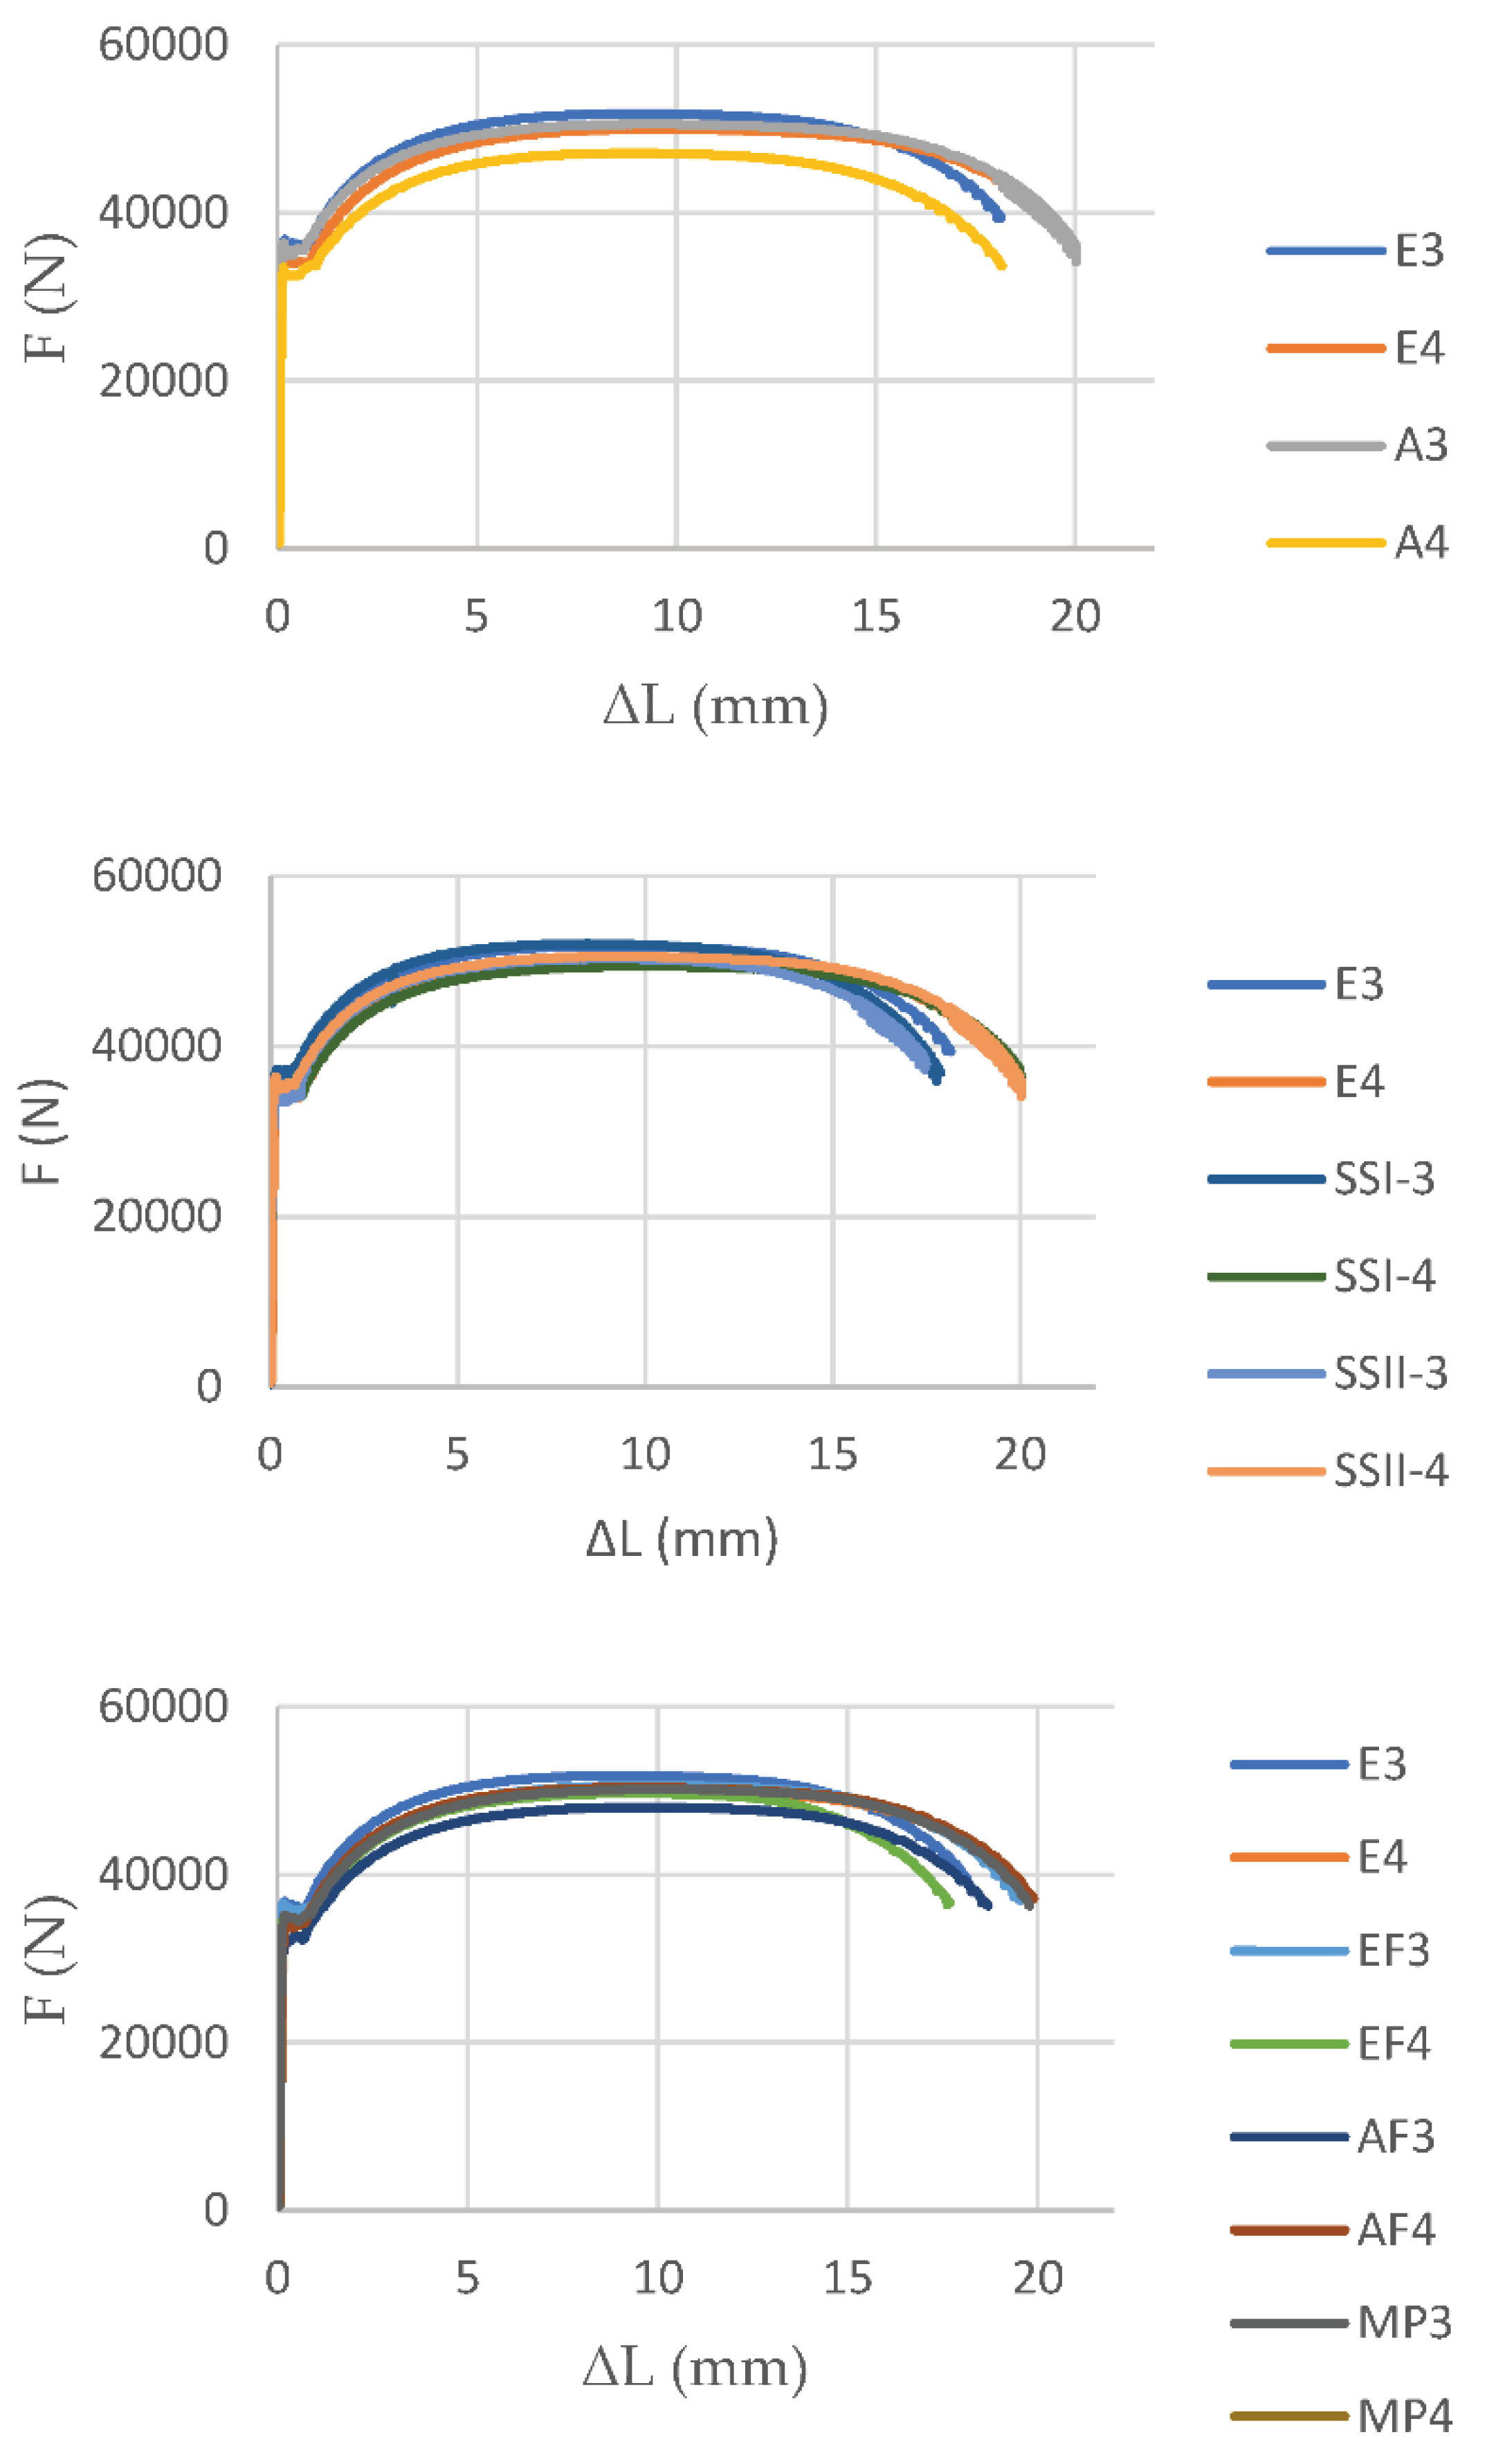
Figure 11 shows the schematic diagrams for force-elongation curve of corroded and uncorroded test steel S235JR specimens with thickness of 6mm. The main reason for the degradation of the maximum force is the effective reduction of the cross-sectional area of the corroded specimen. It is worth noting that the force degradation of the specimen was greater in the case of a higher corrosion rate.
4. Finite Element Analysis of Corroded Steel Specimens
4.1. Constitutive Modelling under Corrosion
On-going degradation due to corrosion and deformation process due to loading causes growth and coalescence of voids, which is followed by further destruction of the material and the appearance of new micro damages. The first model that takes into consideration the influence of micro damage on material strength was the Gurson [
2] model. One benefit of employing the original Gurson model lies in its capacity to integrate the damage parameter via the void volume fraction. The original Gurson condition was modified by Tvergaard [
3,
4] and Tvergaard and Needleman [
5]. In order to model the growth of voids in the final stage of ductile damage in better agreement with real material behaviour, Tvergaard introduced three constitutive parameters into the parts of expression of the yield surface in which they have an impact on the volume fraction of voids
f and mean stress:
where
is von Mises equivalent stress,
is the yield stress of the material,
is hydrostatic pressure (mean stress) and
f is void volume fraction or porosity (damage parameter). The Tvergaard parameters intensify the growth of variables
f and
, thus achieving faster damage propagation in the material.
During plastic yielding, the void volume fraction increases, due to growth of existing voids and due to the nucleation of new voids, which is described by the equation, proposed by Chu and Needleman [
27]:
where
is void volume fraction due to growth,
is nucleation of new voids,
is plastic part of the strain rate tensor, 𝑰 is a second-order unit tensor,
is equivalent plastic strain rate and A is void nucleation intensity, which takes damage acceleration into account. It is defined by an equation that follows a normal distribution:
where
is volume fraction of nucleated voids,
is mean strain for void nucleation,
is standard deviation for void nucleation,
is equivalent plastic strain in the matrix material.
Although the GTN (Gurson- Tvergaard- Needleman) model demonstrates the softening effect of the material, the model itself does not constitute a fracture criterion. The critical void volume fraction has been used to simulate the material failure and a new parameter is introduced
to replace
f in (8) in order to account for the void coalescence effect on final failure. It has been proposed by Tvergaard and Needleman [
5]:
where
is the critical void volume fraction at which voids coalesce,
is the void volume fraction at final failure of the material and
is the value of the ultimate void volume fraction
.
Based on detailed analysis of the mechanism of ductile fracture by the nucleation, growth and coalescence of voids, Thomason [
28] has presented a micromechanical plastic-limit load failure criterion for ductile fracture. Stable void growth is terminated once the applied load on the ligaments between the voids reaches the plastic limit load. Zhang and his associates [
6] performed a significant modification of the GTN model; they included Thomason's failure criterion (assuming that all voids are spherical) and thus got the complete Gurson model (CGM). In this case, the critical void volume fraction
is not considered as a material constant, but material response at void coalescence and it can be calculated during FE analysis.
4.2. Determination of Model Parameters
Many attempts to determine CGM parameters can be found in the literature, but they are usually determined based on matching the simulation and experiment results. Therefore, they are not universal and only constitute a solution to a single specific problem. Three types of parameters that require calibration have been reported:
Constitutive parameters: q1, q2 and q3;
The initial material and nucleation parameters, fo, fN, and sN;
Critical and final failure parameters, fc and fF.
The calibrated CGM parameters are used to successfully predict tensile strength and ductility of structural element. Experimental data obtained from the tensile specimens and results from the past studies are used to calibrate the CGM parameters for S235JR steels. They are employed to get the best fit model parameters that can predict the load displacement behaviour, ductility and the fracture initiation location. All parameters determinated for this specific problem (tensile loading, S235JR steel, corrosion due industrial environment in Bor) are summarized in
Table 10. Bolded values are determined in an experimental way. In this study, only specimens with a thickness of 6 mm were considered.
The values adopted in this paper for
and N=0.195 (characteristic value for S235JR according to [
29]) were obtained by interpolation for
q1, but for
q2 is adopted bigger value than recommended by Faleskog [
17], after a better match with the experimental results.
After confirming the values of
q1, q2 i q3,
fN,
and
sN, the corrosion mass loss ratio was defined as the initial void volume fraction
fo. The initial VVF parameter
fo characterizes the initial state of the material. In this study, the initial void volume fraction is determined based on the assumption that all mass loss due to corrosion is actually voids, that further affects the determination of other parameters of CGM. The initial void volume fraction is usually taken to be the non-metallic inclusions of sulphur and manganese, determinated by Franklin [
30]. The void volume fraction
fF at the moment of failure was determined experimentally by analysing the fracture surfaces of specimens used for tensile testing [
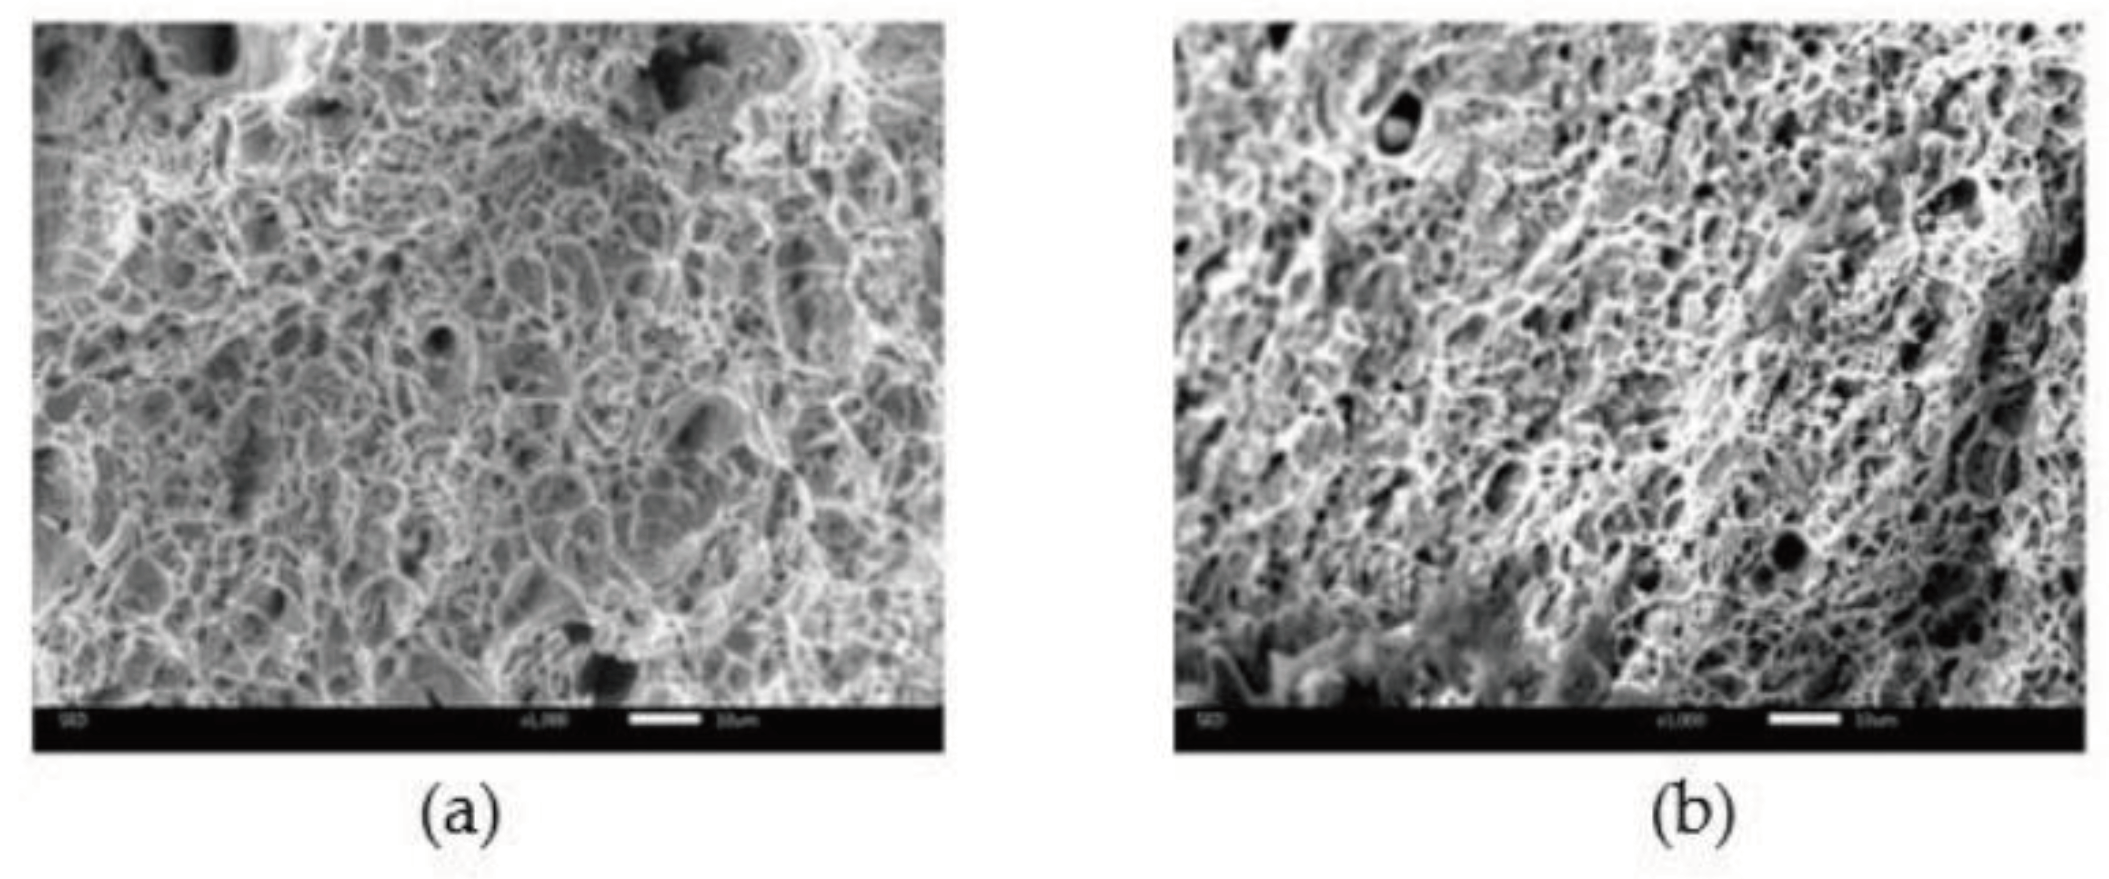
14]. Fracture surfaces were examined microscopically at a magnification of 1000x. The microscopic photographs of fracture surface of tensile specimens are shown in
Figure 12. The photographs were examined using methods of quantitative image analysis. Bright regions were assumed to represent the intervoid ligaments, while the darker area representing voids, at the moment of specimen failure. In the next stage, the percentage of darker area was calculated. The results were identified as the void volume fraction
fF at the time of failure.
The applied method for calibration of the CGM parameters for engineering applications is to change one parameter at one time while keeping the rest of the parameters constant during fitting parameters to simulate the experimentally observed load displacement curves. A combination of numerical results and experimental data is necessary in order to determine some of the parameters. The extended damage models described in the previous section are implemented into the finite element code ABAQUS [
7] through the material user subroutine UMAT, which has been developed by Zhang [6, 8-10]. The aim of user-defined subroutine is to appropriately simulate material behaviour and degradation, with the ability of simulate the whole process from void nucleation to the final damage. The proposed calculation method for material damage modelling was used by many authors [
31,
32].
4.3. Finite Element Model
In view of the geometric symmetry of the specimen, only 1/4 model was established for computational efficiency. The eight-node reduced integration with hourglass control linear brick element C3D8R was used in the finite analysis. The model was meshed with the unit size of 1 mm x 1 mm x 1 mm. The mesh size is confirmed by mesh sensitivity study. Reduced integration implies a smaller number of points compared to full integration, and thus fewer requirements in terms of computing resources. The symmetry boundary condition (YSYMM, U2=UR1=UR3=0) was applied to the top side of the model and the symmetry boundary condition (XSYMM, U1=UR2=UR3=0) was applied to the left side of the model. The bottom side of the specimen was fixed, it was not allowed to rotate in any direction, but it was allowed to move only in y direction. The displacement was applied to the bottom side of the model to obtain the results desired in the analysis step.
From the data obtained by [
33], the objective is to identify simultaneously the hardening laws and the CGM parameters. In literature, several formulated laws exist to describe the hardening behaviours from numerous parameters. The adopted law in this study is Hollomon [
34]. The load-displacement curve was obtained through the tensile test, from an uncorroded reference specimen, which was converted into a true stress-strain curve according to formulas
and
. Segment of the true stress-strain curve until load maximum point is approximated by this equations and after that point, an extrapolation
was used. Here
and
are true strain and true stress, respectively; E is modul of elasticity;
and
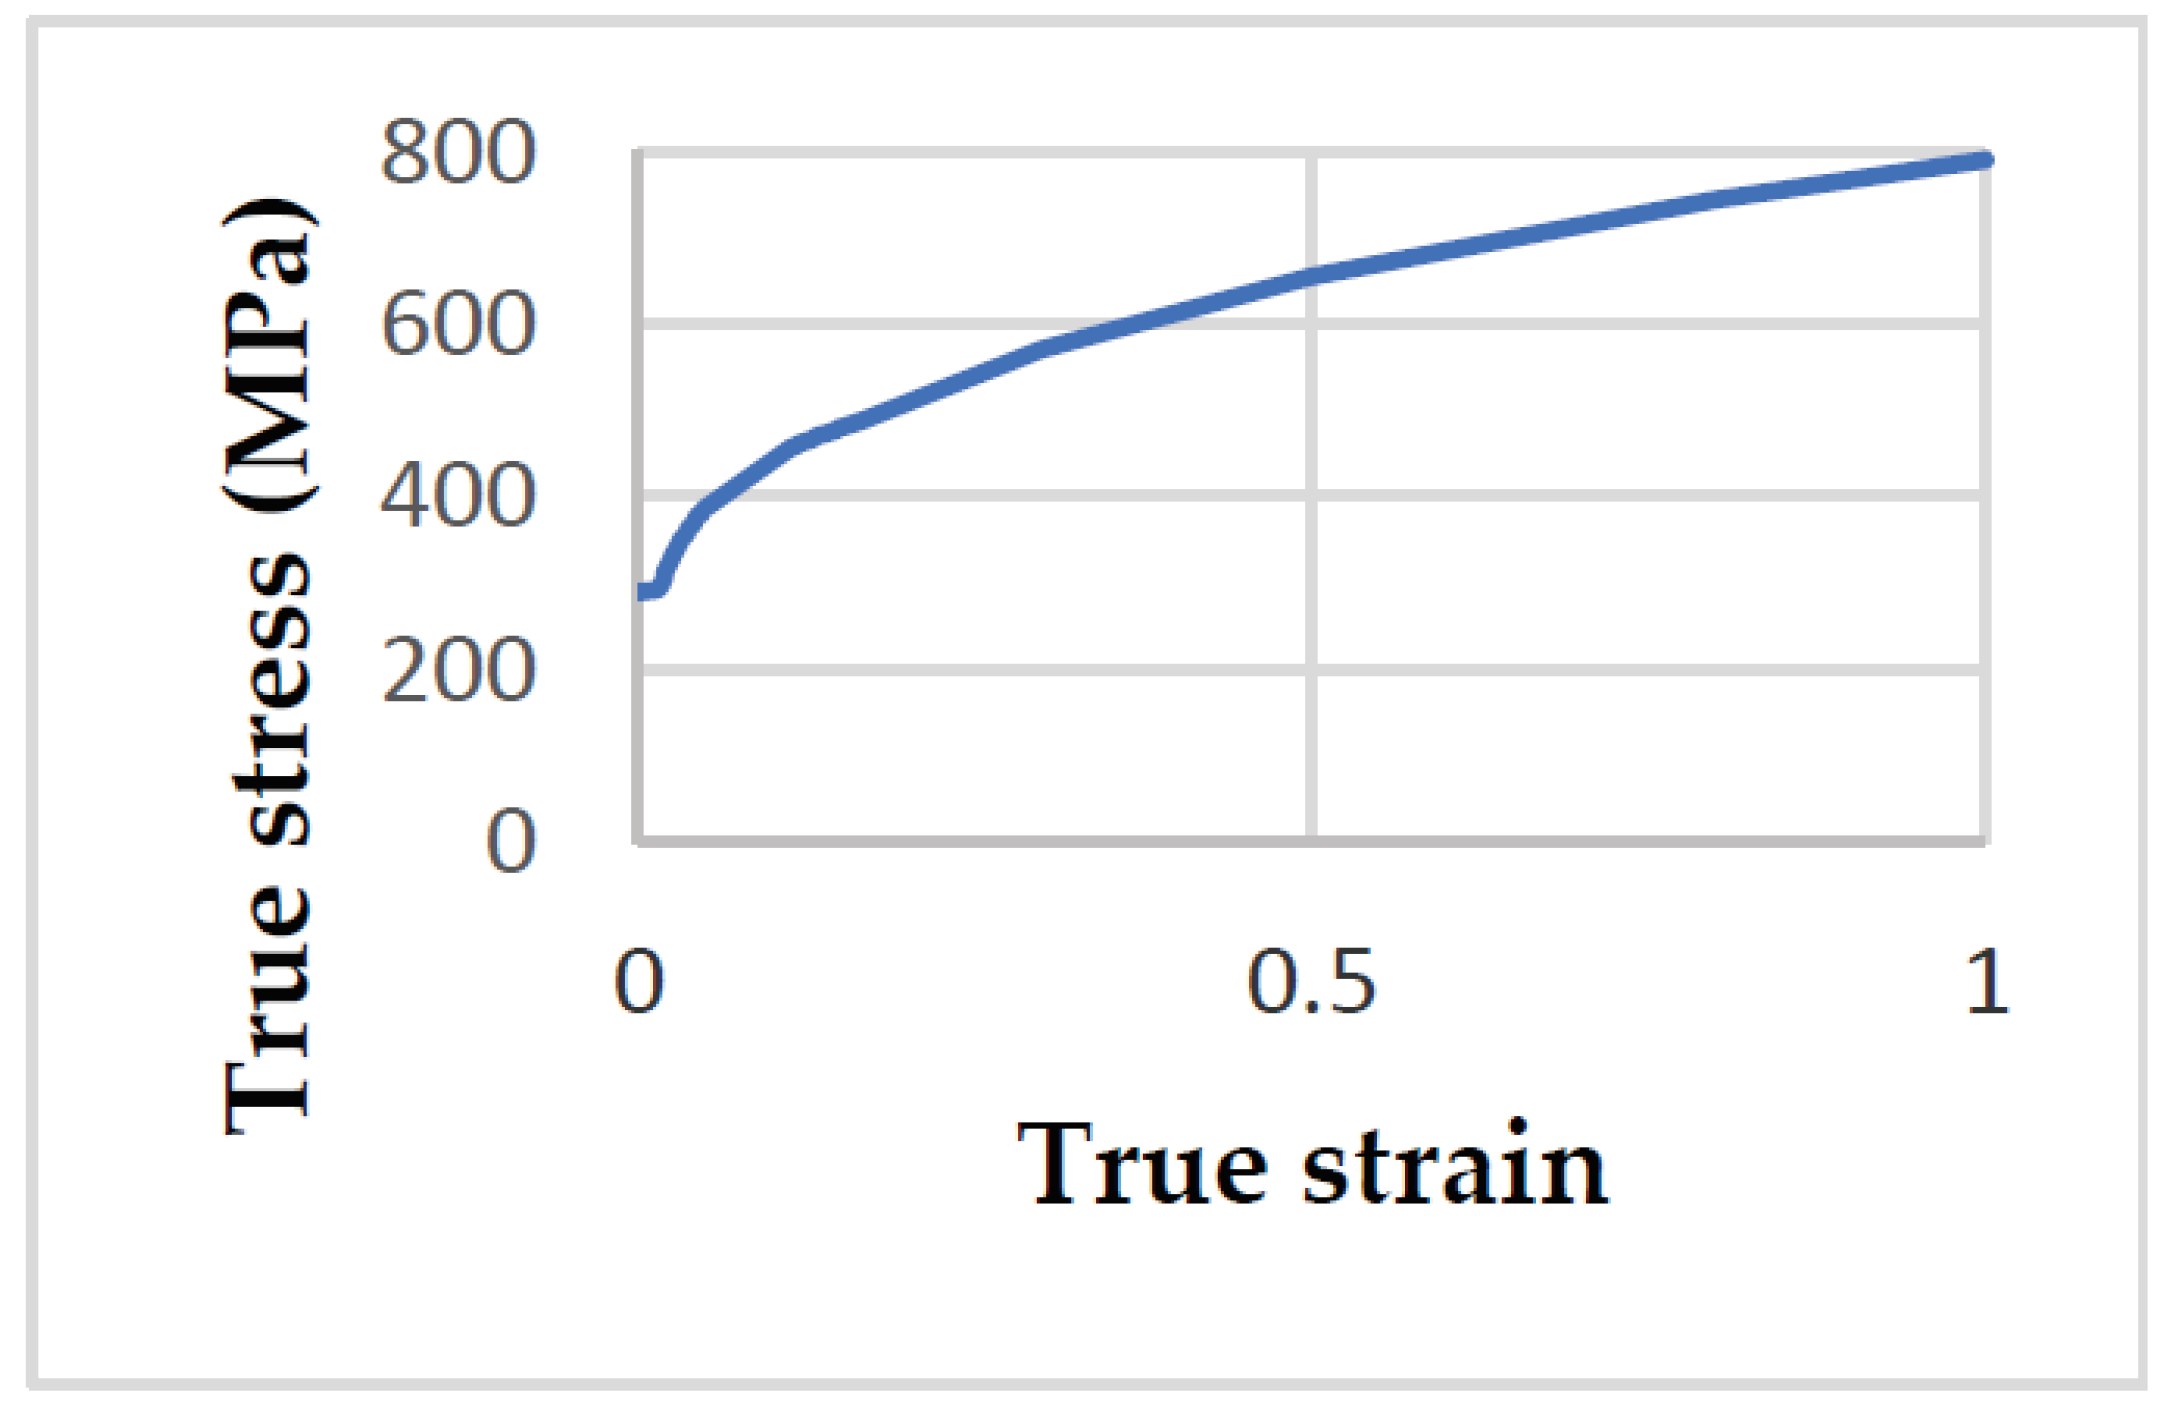
are engineering strain and engineering stress, respectively. According to the true-stress-strain curve of S235JR shown in
Figure 13, it can be seen that the stress increases as the strain increases.
4.4. Numerical Simulation Results
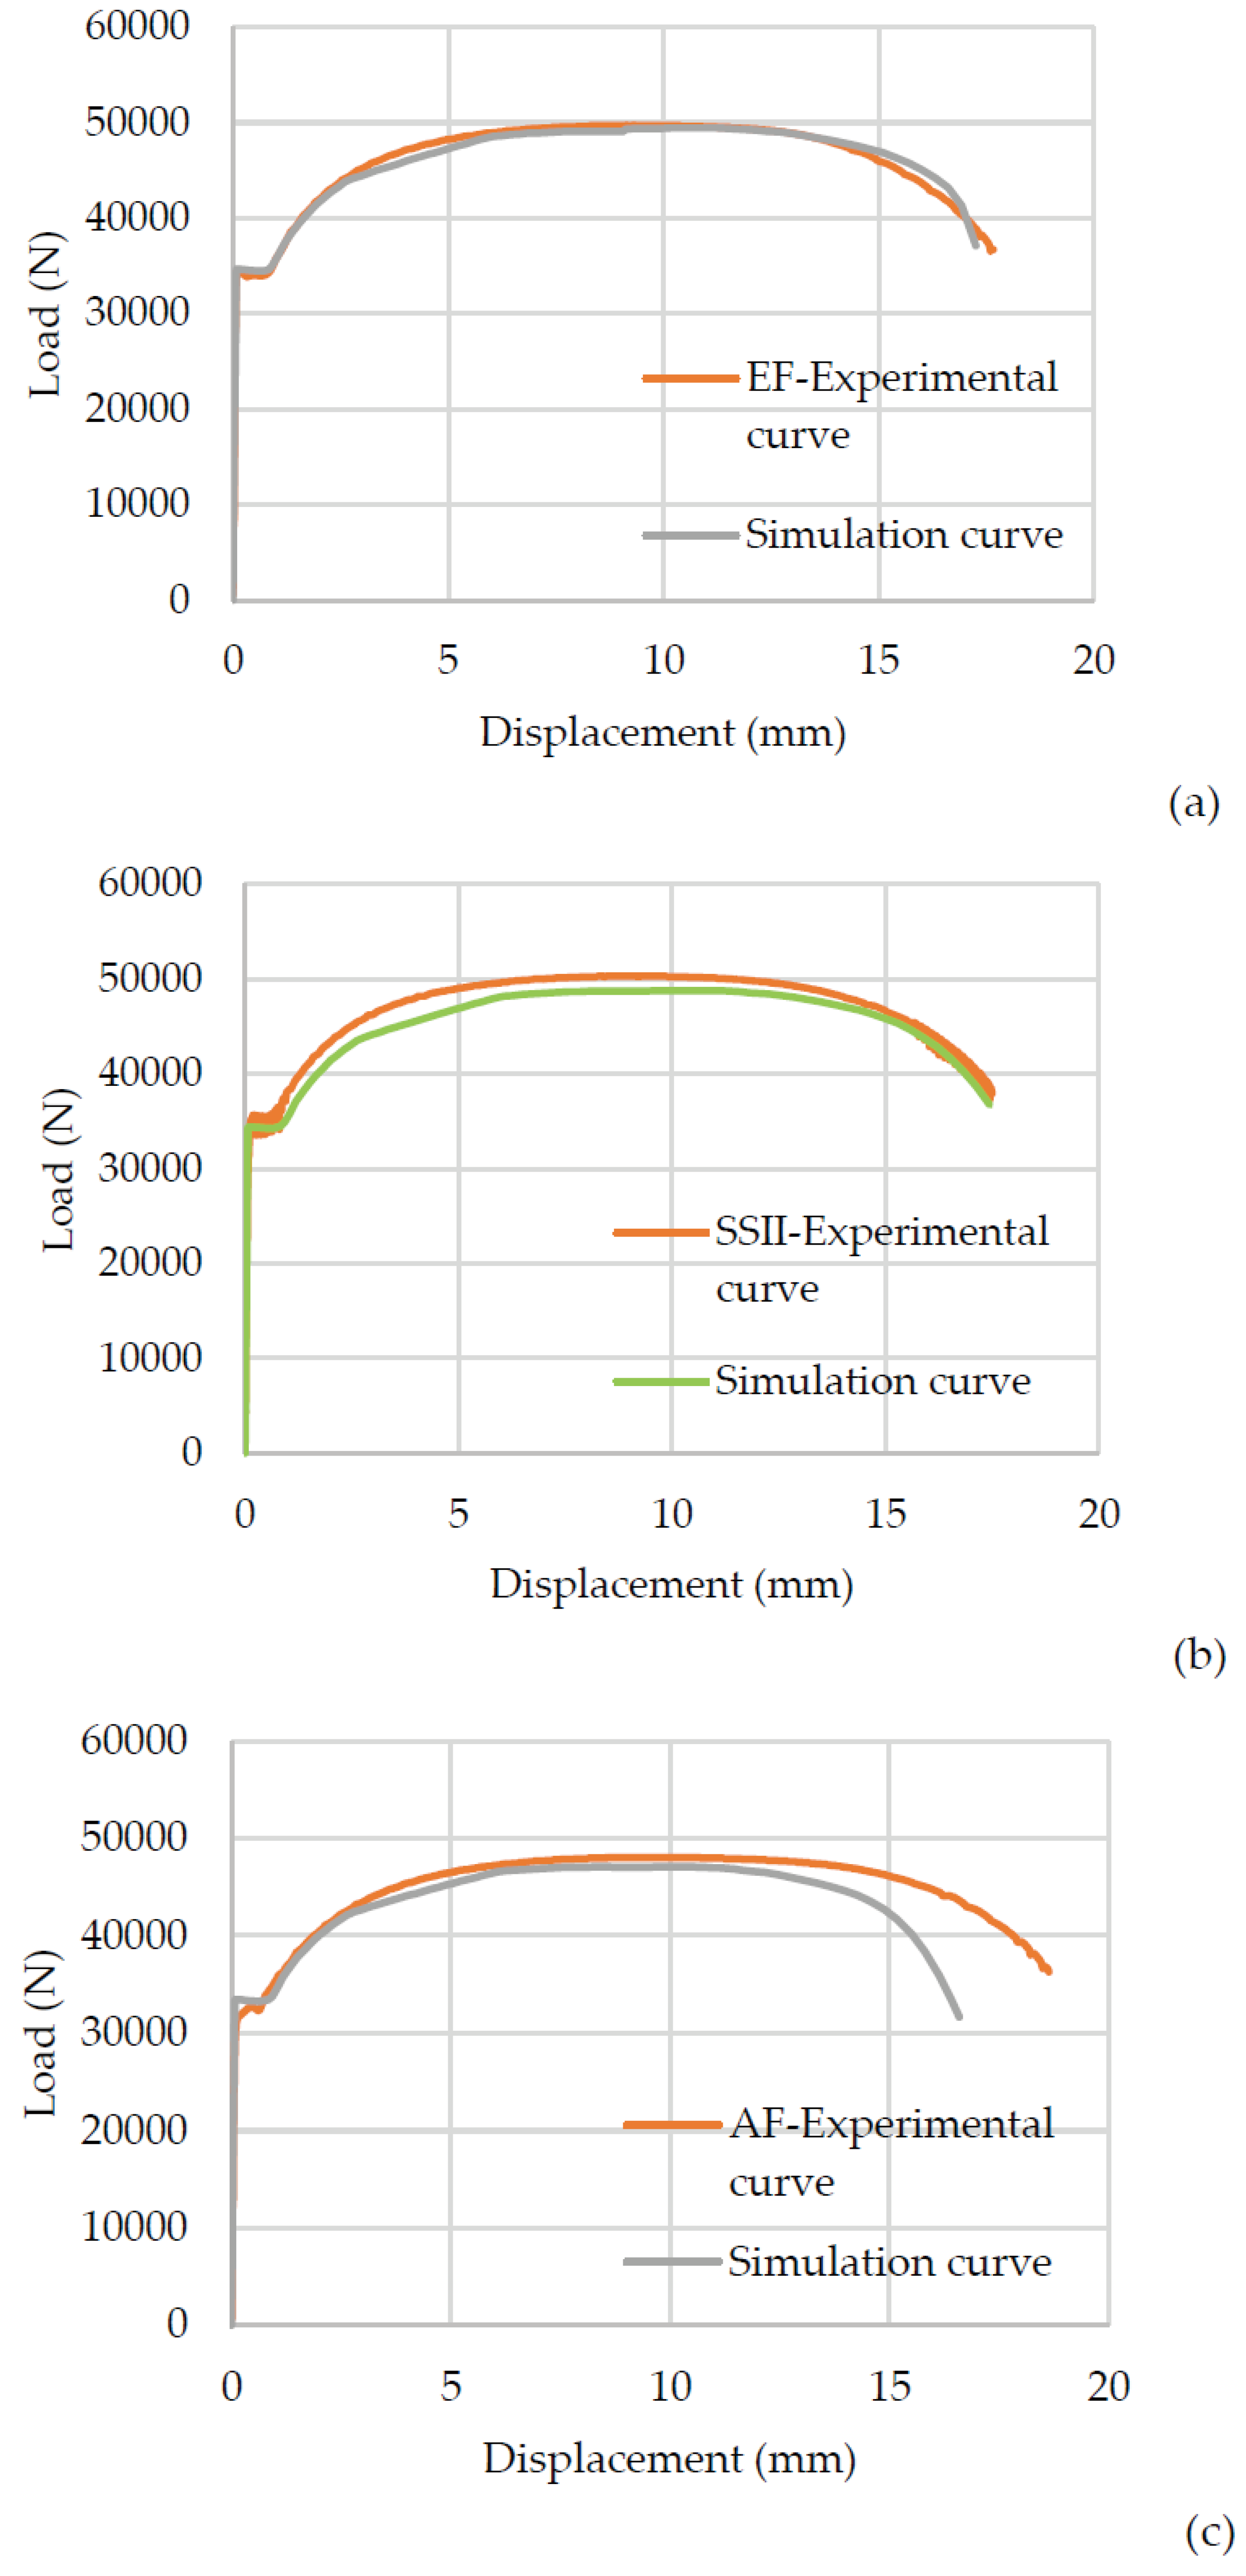
Figure 14 shows the load-displacement plot of simulation results of the corroded specimen in EF (14a), from the salt chamber for 240 h (16b) and from AF in Bor (14c) under uni-axial tensile loading. For comparation of simulation results with actual data, the experimental tensile loading of corroded specimens is also included in the figure. It can be seen from this plot that the proposed parameters of the complete Gurson model were able to predict the maximum force with an accuracy from 97% to even 99% (in the case of the salt chamber for 240h, EF and AF). This set of parameters is less precise when used to predict the ductility (in the descending part of the curve after reaching the tensile strength) of specimens next to AF, as can be seen in
Figure 14c. Using the same parameters further, for higher degrees of corrosion and, therefore higher values of the initial void volume fraction
fo, a curve that possesses the incorrect shape and slope is obtained.
The comparation of experimental curves with numerical simulation results obviously shows a good agreement and clearly demonstrates that the same set of parameters, that are applicable for accelerating experiment in salt chamber, can be also used successfully in prediction of strength for specimen EF and AF, to a certain extent. In general, it can be concluded that for the specimens that are part of the C3 corrosivity category, the proposed CGM parameters have a good agreement both in terms of load capacity and ductility, while specimens that are part of the C4 corrosivity category have a high prediction in terms of load capacity but not in terms of ductility; the curve falls faster in the last part (
Figure 14c). This may lead to the conclusion that other parameters should be applied for corrosivity category C4. For these specimens, the basic assumption is that initial void volume fraction
fo is significantly higher.
One of the advantages of the complete Gurson model is that both the crack initiation site and propagation path can be simulated.
Figure 15a shows the crack initiation location of the specimen and can also indicate the crack growth path. The red colour on the numerical model indicates the area with large values of
f in the elements that have already lost their load-bearing capacity due to the nucleation of voids, which matches the appearance of the fracture in the photograph of the specimen fracture surface in the
Figure 15b.
5. Discussion
In the industrial atmosphere of Bor, near to AF, the colour of the rust from steel specimens is obtain in dark brown tones; the granulations of rust layers are larger, while on the specimens in the EF and MP granulation of rust layers is smaller, like ground powder (
Figure 5). The dark brown colouring of the rust is the result of presence large concentration of SO
2 and accelerating transformation of lepidocrocite into goethite [
35]. In accordance with the statements of other authors [
1], transformation of lepidocrocite to goethite is a measure of the corrosion process extension, so that this agrees with the fact that lower corrosion is obtained in MP than near to AF in Bor. Atmospheric corrosion is quantitatively assessed by measuring the mass loss and then determining the corrosion rate for each location separately. A higher corrosion rate is always obtained for specimens closer to the AF for the same exposure period. Specimens that were exposed to corrosive agents from the outside, near the AF and next to MP, were uniformly corroded, while the dominant pitting corrosion can be observed in the specimens in EF. The highest corrosion rate values are generally associated with higher SO
2 levels in the air, ignoring specimens immersed in the solution, which are expected to have the highest mass loss.
From mass loss in
Table 6, it is concluded that tests by continuous immersion of specimens in electrolysis solution are unusable in terms of simulating atmospheric corrosion, because they have lost too much mass, which means that the time provided for immersion is too long. Still, this test can be used to compare other specimens near to AF but for long-term corrosion rate prediction. If we look at mass change over time, with the same power linear model used for corrosion rates of carbon steel, it can be concluded that the specimens immersed in the electrolytic solution can be used to calibrate a parameter for specimens next to AF after 15 years of exposure. This is also significant data because it provides information about the yield stress and the tensile strength to mass loss relation for specific specimens with which we can compare the numerically obtained values after the prediction of CGM parameters.
This study indicates that salt chamber tests can better replace the location in the EF and MP in Bor, which is location with lower sulphur content, than the location near the AF, with higher sulphur content. This can be concluded by comparing the mass loss, ultimate tensile values and ductility. Also, based on the corrosion rate diagram in
Figure 10, it can be noted that the function describing this curve is approximately the same. For further research, it is necessary to extend the duration of the test in the salt chamber from 240 h to 360 h and even longer, and shorten the immersion time of the specimen in order to approach the values of atmospheric corrosion even better.
For the corroded steel specimens, degree of mass loss is not linear with the reduction of maximum force (
Table 9). The cause of nonlinear reduction of maximum force is the appearance of pitting corrosion along with uniform corrosion, as well as the influence of local effects due to the inequalities on the specimens after exposure to corrosion. Local pitting corrosion has a significant impact on strength reduction in addition to section loss. It leads to fracture where the test specimens are weakest. The change in the path of fracture, with the development of corrosion, are also related with pitting corrosion. The force-elongation curve (
Figure 11) of the corroded specimens constantly decreases as the corrosion rate increases. Less corroded specimens have a larger "necking" area, while in more corroded specimens, the "necking" area decreases together with the ductility of the elements. Specimens that suffered a greater loss of mass, become less ductile, due to local material damage that cannot be described by a uniform corrosion rate law and a uniform change in mass.
The numerical predictions of tensile strength and ductility showed that the selected complete Gurson model parameters provided a similar behaviour to the experimentally observed results. The methodology proposed in this work proved to be capable of predicting the macro-mechanical behaviour of steel elements under uni-axial tensile loading in an industrial environment, C3 corrosivity category. Some remarks regarding the proposed methodology should be addressed. Firstly, experimental results analysis were used only to define the initial void volume fraction (mass loss ratio), void volume fraction at the failure (using scanning electron microscopy on failure surface of specimens) and to forecast the plastic behaviour of the material with true stress-true strain curve (
Section 4.2). The classical GTN damage model parameters considers the void contributions related to the growth of existing voids and the nucleation of new voids, and they were obtained in this work on the basis of calibration. In the necking region of load-displacement curve, between the maximum force and fracture, the greatest influence is exerted by Tvergaard’s parameters
qi, which affect the growth of voids, leading to an enlargement of existing cavities. Specimens that are part of the C4 corrosivity category have good prediction in terms of load capacity but not in terms of ductility; the curve drops too quickly before rapture point, in the area where
qi parameters have the greatest influence. In order to achieve a better match in the domain of ductility, it is necessary to analyze the change of
qi parameters with the deterioration of the material due to corrosion. This means that it is possible to use other Tvergaard’s parameters when corrosion progresses over the years, rather than those adopted in the first years of the corrosion process. Tvergaard’s parameters
qi depend on yield stress
fy to modulus of elasticity
E ratio, which decreases with the change of the cross-section due to corrosion, as a result of mass loss. This assumption will be the subject of further research.
6. Conclusions and Recommendation for Future Work
The obtained results and data from this work should contribute to the understanding of the problem of strength capacity and durability of steel structures weakened by corrosion in industrial environments such as in Bor, where there are numerous inhibitors of atmospheric corrosion. First of all, it is necessary to check laboratory accelerated corrosion methods in real conditions of exploitation, which would reduce the time required for conducting experiments.
The main conclusions are as follows:
The tests that were carried out are important in the analysis of the possibility of applying the constitutive model in predicting the degradation due to corrosion and, finally, the ductile fracture of the structural steel elements;
The obtained experimental results and numerical data will contribute to the understanding and study of the problem of bearing capacity and durability of steel structures weakened by corrosion in industrial environments. It has been shown that in precisely controlled laboratory conditions, the atmospheric corrosion of industrial environments can be simulated, with acceptable accuracy, thus simplifying and speeding up the experimental process;
Long-term prediction of corrosion rate for industrial environments such as in Bor, at two locations with different SO2 deposition are given, as well. This can be very useful for everyday engineering practice.
In this study, it is clearly shown that the adopted CGM parameters and proposed UMAT subroutine satisfy and can describe the behaviour of corroded material subjected to tension loading and material softening, associated with changes in the material microstructure. This is especially valid for the C3 corrosivity category and the defined sulphur content, which coincides with ISO 9224:2012. The calibrated parameters fully describe the behaviour and deterioration of the material due to corrosion, both in terms of load-bearing capacity and in terms of ductility, while for corrosivity category C4 with a higher mass loss and severe atmospheric conditions in the industrial environment, it is necessary to perform a new calibration of the parameters. This leads to the conclusion that different parameters should be applied to the corrosivity category C4.
Based on these results, it is possible to predict the structural behaviour of S235JR steel elements exposed to the influence of corrosion in industrially aggressive environments in Bor and at a specific location with the same corrosivity category and concentrations of air pollutants SO2.
The issue of CGM parameters identification in an industrial environments such as Bor requires further investigations, taking into account different quality of steel materials, load layouts and increasing concentrations of air pollutants such as SO2. This will provide the list of typical CGM parameters useful for engineers who want to perform strength analyses of structural members prior to failure. One of the problems that should be also solved in the future is the transfer of parameters from specimens to structural elements.
Author Contributions
Conceptualization, Zoran M. and Zlatko M.; methodology, formal analysis, investigation, resources and data curation, J.S., Zoran M., and S.D.; software, numerical simulation and review, J.S. and M.S.; writing—original draft preparation, J.S.; writing—review and editing, J.S, Zoran M, Zlatko M. and S.D.; visualization, J.S.; supervision, Zoran M. and Zlatko M.; project administration, Zoran M. and J.S.; funding acquisition, J.S. All authors have read and agreed to the published version of the manuscript.
Funding
This work was financially supported by the Ministry of Science, Technological Development and Innovation of the Republic of Serbia, contract number: 451-03-66/2024-03/200052 and contract number 451-03-66/2024-03/200287 and No. 200092, Faculty of Civil Engineering University of Belgrade.
Data Availability Statement
The data presented in this study are available on request from the corresponding author.
Acknowledgments
We are kindly thankful to the Mining and Metallurgy Institute Bor for funding part of the laboratory work. The authors wish to thank Silvana Dimitrijević for help within the laboratory experiment, and Zoran Avramović for field work.
Conflicts of Interest
The authors declare no conflicts of interest.
References
- Mendoza A., Corvo F., Outdoor and indoor atmospheric corrosion of carbon steel, Corrosion Science 41 (1999) 75-86.
- Gurson, A.L. Continuum theory of ductile rupture by void nucleation and growth: Part I-Yield criteria and flow rules for porous ductile media. J. Eng. Mater. Technol. 1977, 99, 2–15. [Google Scholar] [CrossRef]
- Tvergaard, V. Influence of voids on shear band instabilities under plane strain conditions. Int. J. Fract. 1981, 17, 389–407. [Google Scholar] [CrossRef]
- Tvergaard, V. On localization in ductile materials containing spherical voids. Int. J. Fract. 1982, 18, 237–252. [Google Scholar] [CrossRef]
- Tvergaard, V.; Needleman, A. Analysis of the cup-cone fracture in a round tensile bar. Acta Met. 1984, 32, 157–169. [Google Scholar] [CrossRef]
- Zhang, Z.L.; Thaulow, C.; Ødegård, J. A complete Gurson model approach for ductile fracture. Eng. Fract. Mech. 2000, 67, 155–168. [Google Scholar] [CrossRef]
- ABAQUS Analysis User’s Manual; Version 6.14; ABAQUS. Inc.: Paris, France, 2014.
- Zhang, Z.L. A practical micro-mechanical model-based local approach methodology for the analysis of ductile fracture of welded T-joints. Ph.D. Thesis, Lappeenranta University of Technology, Finland, 1994. [Google Scholar]
- Zhang, Z.L.; Niemi, E. A new failure criterion for the Gurson-Tvergaard dilational constitutive model. Int. J. Fract. 1995, 70, 321–334. [Google Scholar] [CrossRef]
- Zhang, Z.L.; Niemi, E. Studies on the ductility predictions by different local failure criteria. Eng. Fract. Mech. 1994, 48, 529–540. [Google Scholar] [CrossRef]
- Wang, B., Liu, X., Du, J., Experimental Research and Simulation on the Mechanical Performance Degradation of Corroded Stud Shear Connectors. Mathematical Problems in Engineering, 2019, 1–12. [CrossRef]
- Xu Y., Qian C., Application of Gurson–Tvergaard–Needleman Constitutive Model to the Tensile Behaviour of Reinforcing Bars with Corrosion Pits. PLoS ONE, 2013, 8(1), e54368. [CrossRef]
- Guo Y., Wu S.Q., Study on the relationship between corrosion damage and residual strength of Al 7075-T6 Alloy, Proceedings of the 26TH International congress of the aeronautical sciences, USA, Anchorage, Alaska, 14 - 19 September 2008.
- Wcislik W., Experimental determination of critical void volume fraction fF for the Gurson Tvergaard Needleman (GTN) model, 21ST European Conference on Fracture, ECF21, Catania, Italy, 20-24 June 2016.
- Kossakowski, P.G., Analysis of the void volume fraction for S235JR steel at failure for low initial stress triaxiality, Archives of Civil Engineering, 2018, 64 (1), 101-115.
- Kiran, R.; Khandelwal, K. Gurson model parameters for ductile fracture simulation in ASTM A992 steels. Fatigue and Fracture of Engineering Materials and Structures 2014, 2, 171–183. [Google Scholar] [CrossRef]
- Faleskog, J.; Gao, X.; Shih, C.F. Cell model for nonlinear fracture analysis-I. Micromechanics Calibration. Int. J. Fract. 1998, 89, 355–373. [Google Scholar] [CrossRef]
- International Organization for Standardization. Corrosion tests in artificial atmospheres, Salt spray tests (ISO/DIS Standard No. 9227); International Organization for Standardization: Geneva, Switzerland, 2022. [Google Scholar]
- S. P. Parekh, A. V. Pandya, H. K.Kadiya, Progressive Atmospheric Corrosion Study of Metals Like Mild Steel, Zinc and Aluminum in Urban Station of Ahmedabad District, International Journal of ChemTech Research, CODEN (USA), Vol. 4, No. 4, Oct-Dec 2012,1700-1774.
- International Organization for Standardization. Corrosion of metals and alloys, Corrosion tests in artificial atmosphere, Accelerated outdoor test by intermittent spraying of a salt solution (Scab test) (ISO/DIS Standard No. 11474); International Organization for Standardization: Geneva, Switzerland, 1998. [Google Scholar]
- International Organization for Standardization. Corrosion of Metals and Alloys: Corrosivity of atmospheres: Removal of Corrosion Products from Corrosion Test Specimens (ISO/DIS Standard No. 8407); International Organization for Standardization: Geneva, Switzerland, 2021. [Google Scholar]
- De la Fuente D., Díaz I., Simancas J., Chico B., Morcillo M. Long-term atmospheric corrosion of mild steel. Corrosion Science 2011, 53, 604–617. [Google Scholar] [CrossRef]
- International Organization for Standardization. Corrosion of metals and alloys — Corrosivity of atmospheres — Determination of corrosion rate of standard specimens for the evaluation of corrosivity (ISO/DIS Standard No. 9226); International Organization for Standardization: Geneva, Switzerland, 2012. [Google Scholar]
- Morcillo M., Chico B., Díaz I., Cano H., de la Fuente D. Atmospheric corrosion data of weathering steel. A review. Corrosion Science 2013, 77, 6–24. [Google Scholar] [CrossRef]
- International Organization for Standardization. Corrosion of metals and alloys — Corrosivity of atmospheres — Guiding values for the corrosivity categories (ISO/DIS Standard No. 9224); International Organization for Standardization: Geneva, Switzerland, 2012. [Google Scholar]
- International Organization for Standardization. Corrosion of metals and alloys — Corrosivity of atmospheres — Classification, determination and estimation (ISO/DIS Standard No. 9223); International Organization for Standardization: Geneva, Switzerland, 2012. [Google Scholar]
- Chu, C.; Needleman, A. Void nucleation effects in biaxially stretched sheets. Journal of Engineering Materials and Technology 1980, 102, 249–256. [Google Scholar] [CrossRef]
- Thomason, P.F. Ductile fracture of Metals, 1st ed.; Pergamon Press: Oxford, UK, 1990. [Google Scholar]
- Kossakowski P.G., Influence of initial porosity on strength properties of S235JR steel at low stress triaxiality, Archives of civil engineering, LVIII, 3, 2012.
- Franklin, A.G. Comparison between a quantitative microscopic and chemical methods for assessment on non-metallic inclusions. The Journal of the Iron and Steel Institute 1969, 207, 181–186. [Google Scholar]
- Younise, B.S. ; Micromechanical fracture analysis of high strength steel weldments. Ph.D. Thesis, University of Belgrade, Serbia, 2013. [Google Scholar]
- Međo, B.I. ; Local approach to ductile fracture of low alloy steel welded joints. Ph.D. Thesis, University of Belgrade, Serbia, 2012. [Google Scholar]
- Miloud H., Imad M., Benseddiq A., Bachir Bouiadjra N., Bounif B., and Serier A., A numerical analysis of relationship between ductility and nucleation and critical void volume fraction parameters of Gurson– Tvergaard–Needleman model, Proc IMechE Part C: J Mechanical Engineering Science, IMechE, 2013, 227(11), 2634–2646.
- Hollomon, J.H., Tensile Deformation, Transactions of the Mettallurgical Society of AIME, 1945, 162, 268-290.
- Montoya P., Díaz I., Granizo N., de la Fuente D., Morcillo M. An study on accelerated corrosion testing of weathering steel. Materials Chemistry and Physics 2013, 142, 220–228. [Google Scholar] [CrossRef]
Figure 1.
Structure of research presented in paper.
Figure 1.
Structure of research presented in paper.
Figure 2.
Tensile test specimen (EN 10002-1).
Figure 2.
Tensile test specimen (EN 10002-1).
Figure 3.
Location of the stations across the industrial area of Bor (left figure from Google Earth): (1) near to Sulphuric acid plant (AF); (2) inside Electrolytic refining plant (EF); (3) next to the automatic air quality monitoring station in Mining and Metallurgy Institute Bor (MP); (4) Sulphuric acid plant; (5) Air quality monitoring station in City park.
Figure 4.
Tensile test equipment and coupon test specimen after fracture.
Figure 4.
Tensile test equipment and coupon test specimen after fracture.
Figure 5.
Corrosion products prepared for XRD analysis (from left to right) (1) near to Sulphuric acid plant; (2) in the Electrolytic refining plant; (3) next to the automatic air quality monitoring station in Mining and Metallurgy Institute Bor.
Figure 5.
Corrosion products prepared for XRD analysis (from left to right) (1) near to Sulphuric acid plant; (2) in the Electrolytic refining plant; (3) next to the automatic air quality monitoring station in Mining and Metallurgy Institute Bor.
Figure 6.
X-ray diffraction of corrosion products of mild steel after 6 months of exposure near to Sulphuric acid plant in Bor.
Figure 6.
X-ray diffraction of corrosion products of mild steel after 6 months of exposure near to Sulphuric acid plant in Bor.
Figure 7.
X-ray diffraction of corrosion products of mild steel after 6 months of exposure into the Electrolytic refining plant in Bor.
Figure 7.
X-ray diffraction of corrosion products of mild steel after 6 months of exposure into the Electrolytic refining plant in Bor.
Figure 8.
Figure 8 – X-ray diffraction and corrosion products of mild steel after 6 months of exposure next to the automatic air quality monitoring station in Mining and Metallurgy Institute Bor.
Figure 8.
Figure 8 – X-ray diffraction and corrosion products of mild steel after 6 months of exposure next to the automatic air quality monitoring station in Mining and Metallurgy Institute Bor.
Figure 9.
Appearance of the specimens on the day of ending the experiment
Figure 9.
Appearance of the specimens on the day of ending the experiment
Figure 10.
Long-term prediction of corrosion rate on power linear model: (a) for corrosivity categories C1, C2, C3, C4, C5, CX; (b) with exposure time at different location AF, EF, MP, SSI, SSII.
Figure 10.
Long-term prediction of corrosion rate on power linear model: (a) for corrosivity categories C1, C2, C3, C4, C5, CX; (b) with exposure time at different location AF, EF, MP, SSI, SSII.
Figure 11.
Load-displacement relationship between E and A, SSI, SSII, EF, AF and MP for specimens with thickness of 6 mm.
Figure 11.
Load-displacement relationship between E and A, SSI, SSII, EF, AF and MP for specimens with thickness of 6 mm.
Figure 12.
The microscopic photograph of fracture surface of S235JR steel specimens: (a) MP; and (b) SSII.
Figure 12.
The microscopic photograph of fracture surface of S235JR steel specimens: (a) MP; and (b) SSII.
Figure 13.
True stress-strain curve of S235JR steel etalon specimen E3.
Figure 13.
True stress-strain curve of S235JR steel etalon specimen E3.
Figure 14.
Comparation of reference, experimental and numerical load-displacement curves by CGM. (a) EF-Electrolytic refining plant, (b) SSII- Specimens from the salt chamber duration 240 h, (c) AF-Sulphuric acid plant (AF).
Figure 14.
Comparation of reference, experimental and numerical load-displacement curves by CGM. (a) EF-Electrolytic refining plant, (b) SSII- Specimens from the salt chamber duration 240 h, (c) AF-Sulphuric acid plant (AF).
Figure 15.
The void volume fraction in cross section of specimen in salt chamber: (a) at crack initiation; (b) picture of cross section of specimen after fracture.
Figure 15.
The void volume fraction in cross section of specimen in salt chamber: (a) at crack initiation; (b) picture of cross section of specimen after fracture.
Table 1.
The chemical composition of tested steel (wt%).
Table 1.
The chemical composition of tested steel (wt%).
| Element |
C |
Si |
Mn |
Cr |
Mo |
Ni |
P |
S |
| Weight % |
0.12 |
0.012 |
0.27 |
0.012 |
0.003 |
0.013 |
0.005 |
0.008 |
| |
Al |
Cu |
B |
Nb |
V |
Ti |
Sn |
Fe |
| |
0.036 |
0.041 |
0.0003 |
<0.004 |
<0.0005 |
<0.001 |
0.0006 |
99.40 |
Table 2.
Categorization of the specimens and specimen designation.
Table 2.
Categorization of the specimens and specimen designation.
| Label |
Specimens |
Specimens location |
Exposure time |
Exposure period |
| E |
E1-E6 |
Etalon (laboratory) |
6 months |
November-May |
| A |
A1-A6 |
Specimens immersed in electrolyte from Electrolysis |
1 month |
April-May |
| EF |
EF1-EF6 |
Electrolytic refining plant (Electrolysis) |
6 months |
November-May |
| AF |
AF1-AF6 |
Sulphuric acid factory |
6 months |
November-May |
| MP |
MP1-MP6 |
Automatic air quality monitoring station in Bor |
6 months |
November-May |
| SSI |
SSI1-SSI6 |
Specimens from the salt chamber I |
120 h |
|
| SSII |
SSII1-SSII6 |
Specimens from the salt chamber II |
240 h |
|
Table 3.
Monthly average meteorological parameters 1.
Table 3.
Monthly average meteorological parameters 1.
| Month |
T (°C) |
RH (%) |
TOW (h) |
Fall (mm/m2) |
Atmosphere Pressure
(mbar) |
| November 2016 |
6.9 |
70 |
168 |
50 |
976.3 |
| December 2016 |
2.5 |
69 |
192 |
7.4 |
984.1 |
| January 2017 |
0.4 |
83 |
144 |
47 |
970.5 |
| February 2017 |
6.7 |
79 |
360 |
24.7 |
970.1 |
| March 2017 |
6.6 |
79 |
240 |
21.1 |
967.5 |
| April 2017 |
12.4 |
72 |
120 |
42.7 |
968.1 |
Table 4.
Monthly average SO2 deposition (mg/m2) 1.
Table 4.
Monthly average SO2 deposition (mg/m2) 1.
| Month |
Air Quality Monitoring Station in Mining and Metallurgy Institute Bor |
Air Quality Monitoring Station in City Park |
| November 2016 |
26.41 |
26.242 |
| December 2016 |
29.025 |
26.02 |
| January 2017 |
54.073 |
66.766 |
| February 2017 |
24.691 |
59.286 |
| March 2017 |
20.368 |
43.595 |
| April 2017 |
15.962 |
42.262 |
| the maximum measured value during the test period |
272.58 (measured on 01.02.2017) |
299.95 (measured on 01.05.2017) |
Table 5.
Crystalline phases of corrosion products of S235JR steel formed in the different atmospheres from layers of corrosion products.
Table 5.
Crystalline phases of corrosion products of S235JR steel formed in the different atmospheres from layers of corrosion products.
| Atmosphere |
Test Site |
γ-FeOOH (lepidocrocite) |
α-FeOOH (goethite) |
FeSO4(H2O)4 (rozenite) |
KFe3(SO4)2(OH)6 (jarosite) |
Fe3O4 (magnetite), γ-Fe2O3
(maghemite) |
| near to Sulphuric acid plant |
Bor |
57 % |
43 % |
/ |
/ |
Without quantify |
| into the Electrolytic refining plant |
Bor |
/ |
33 % |
20 % |
47 % |
Without quantify |
| next to the automatic air quality monitoring station in Mining and Metallurgy Institute Bor |
Bor |
68 % |
32 % |
/ |
/ |
Without quantify |
Table 6.
Corrosion rate values and mass loss of steel specimens with the thickness of 4, 6, 8 mm.
Table 6.
Corrosion rate values and mass loss of steel specimens with the thickness of 4, 6, 8 mm.
| Nominal thickness |
Specimens label |
Mass loss (g) |
Mass loss ratio r |
(g/(m2*a)) |
(µm/a) |
| ≠4 |
A1 |
27.24 |
0.119 |
290.85 |
37.00 |
| A2 |
24.70 |
0.107 |
263.71 |
33.55 |
| EF1 |
0.81 |
0.003 |
8.64 |
1.10 |
| EF2 |
0.83 |
0.003 |
8.81 |
1.12 |
| AF1 |
6.42 |
0.026 |
68.59 |
8.73 |
| AF2 |
6.39 |
0.026 |
68.19 |
8.68 |
| MP1 |
2.05 |
0.008 |
21.89 |
2.79 |
| MP2 |
2.00 |
0.008 |
21.31 |
2.71 |
| SSI1 |
1.44 |
0.005 |
15.39 |
1.96 |
| SSI2 |
1.29 |
0.006 |
13.81 |
1.76 |
| SSII1 |
1.57 |
0.006 |
16.80 |
2.14 |
| SSII2 |
1.69 |
0.007 |
18.05 |
2.30 |
| ≠6 |
A3 |
30.52 |
0.086 |
304.14 |
38.69 |
| A4 |
25.87 |
0.072 |
257.76 |
32.79 |
| EF3 |
0.97 |
0.003 |
9.69 |
1.23 |
| EF4 |
0.99 |
0.002 |
9.86 |
1.26 |
| AF3 |
7.35 |
0.020 |
73.26 |
9.32 |
| AF4 |
7.21 |
0.019 |
71.80 |
9.13 |
| MP3 |
2.28 |
0.006 |
22.69 |
2.89 |
| MP4 |
2.30 |
0.006 |
22.96 |
2.92 |
| SSI3 |
1.32 |
0.003 |
13.15 |
1.67 |
| SSI4 |
1.36 |
0.003 |
13.50 |
1.72 |
| SSII3 |
2.17 |
0.006 |
21.59 |
2.75 |
| SSII4 |
1.69 |
0.004 |
16.80 |
2.14 |
| ≠8 |
A5 |
32.01 |
0.065 |
298.98 |
38.04 |
| A6 |
33.23 |
0.068 |
310.34 |
39.48 |
| EF5 |
0.89 |
0.002 |
8.27 |
1.05 |
| EF6 |
1.04 |
0.002 |
9.69 |
1.23 |
| AF5 |
7.75 |
0.015 |
72.35 |
9.20 |
| AF6 |
7.53 |
0.015 |
70.30 |
8.94 |
| MP5 |
2.31 |
0.004 |
21.58 |
2.75 |
| MP6 |
1.58 |
0.003 |
14.71 |
1.87 |
| SSI5 |
1.24 |
0.002 |
11.62 |
1.48 |
| SSI6 |
1.37 |
0.003 |
12.75 |
1.62 |
| SSII5 |
1.94 |
0.004 |
18.11 |
2.30 |
| SSII6 |
1.76 |
0.003 |
16.41 |
2.09 |
Table 7.
Outdoor atmospheric corrosion stations near to Sulphuric acid plant (AF) and next to the automatic air quality monitoring station in Mining and Metallurgy Institute Bor (MP). Environmental characteristics and corrosivity.
Table 7.
Outdoor atmospheric corrosion stations near to Sulphuric acid plant (AF) and next to the automatic air quality monitoring station in Mining and Metallurgy Institute Bor (MP). Environmental characteristics and corrosivity.
| Atmosphere |
Test site |
TOW) (h/year) ) 1
|
SO2 deposition (mg/m2) ) 2
|
First year corrosion rate (μm) |
ISO 9223 corrosivity category |
Corrosivity |
| Industrial |
AF |
2640 |
44.03 |
70.75 |
C4 |
High |
| Industrial |
MP |
2640 |
28.42 |
20.86 |
C3 |
Medium |
Table 8.
Etalon specimens before and after chemically cleaning.
Table 8.
Etalon specimens before and after chemically cleaning.
| Etalon specimens before cleaning |
Etalon specimens after cleaning |
| Nominal thickness |
Specimens label |
Mass0 (g) |
do (mm) |
Mass1 (g) |
d1 (mm) |
Fmax (N) |
| ≠4 |
E1 |
254.654 |
4.044 |
254.570 |
4.043 |
32158.0 |
| E2 |
250.437 |
3.977 |
250.393 |
3.976 |
31090.0 |
| |
|
|
|
|
|
| ≠6 |
E3 |
387.606 |
6.156 |
387.563 |
6.155 |
51727.0 |
| E4 |
385.880 |
6.128 |
385.843 |
6.127 |
49944.0 |
| |
|
|
|
|
|
| ≠8 |
E5 |
521.467 |
8.281 |
521.440 |
8.281 |
63597.0 |
| E6 |
513.088 |
8.148 |
513.056 |
8.148 |
62120.0 |
| |
|
|
|
|
|
Table 9.
Specimens before and after expose to corrosion.
Table 9.
Specimens before and after expose to corrosion.
| Specimens before expose to corrosion |
Specimens after expose to corrosion |
| Thickness |
Specimens label |
Mass0 (g) |
d0 (mm) |
Mass1 (g) |
d1 (mm) |
Mass loss (%) |
Δdmass (mm) |
Fmax (N) |
| ≠4-nominal |
A1 |
256.977 |
4.081 |
229.676 |
3.647 |
10.5990% |
0.4336 |
27989.00 |
| A2 |
255.465 |
4.057 |
230.706 |
3.664 |
9.6667% |
0.3932 |
27905.00 |
| EF1 |
253.268 |
4.022 |
252.395 |
4.008 |
0.3194% |
0.0139 |
31020.00 |
| EF2 |
254.246 |
4.038 |
253.357 |
4.024 |
0.3245% |
0.0141 |
31527.00 |
| AF1 |
254.398 |
4.040 |
247.911 |
3.937 |
2.5248% |
0.1030 |
30291.00 |
| AF2 |
252.915 |
4.017 |
246.465 |
3.914 |
2.5250% |
0.1024 |
30001.00 |
| MP1 |
256.429 |
4.072 |
254.315 |
4.039 |
0.7994% |
0.0336 |
31164.00 |
| MP2 |
253.477 |
4.025 |
251.417 |
3.993 |
0.7874% |
0.0327 |
30800.00 |
| SSI1 |
256.108 |
4.067 |
254.603 |
4.043 |
0.5627% |
0.0239 |
30475.15 |
| SSI2 |
259.190 |
4.116 |
257.833 |
4.095 |
0.4989% |
0.0216 |
31461.09 |
| SSII1 |
255.815 |
4.063 |
254.178 |
4.037 |
0.6149% |
0.0260 |
31150.02 |
| SSII2 |
255.907 |
4.064 |
254.153 |
4.036 |
0.6604% |
0.0279 |
31047.15 |
| ≠6-nominal |
A3 |
387.425 |
6.153 |
356.863 |
5.667 |
7.8789% |
0.4854 |
45217.00 |
| A4 |
382.985 |
6.082 |
357.117 |
5.671 |
6.7447% |
0.4108 |
47073.00 |
| EF3 |
385.470 |
6.122 |
384.458 |
6.106 |
0.2529% |
0.0161 |
50533.00 |
| EF4 |
384.272 |
6.103 |
383.282 |
6.087 |
0.2480% |
0.0157 |
49602.00 |
| AF3 |
383.004 |
6.082 |
375.612 |
5.965 |
1.9203% |
0.1174 |
48012.00 |
| AF4 |
387.129 |
6.148 |
379.884 |
6.033 |
1.8619% |
0.1151 |
50293.00 |
| MP3 |
385.095 |
6.116 |
382.778 |
6.079 |
0.5921% |
0.0368 |
50174.00 |
| MP4 |
383.985 |
6.098 |
381.641 |
6.061 |
0.6008% |
0.0372 |
52322.00 |
| SSI3 |
386.304 |
6.135 |
384.944 |
6.113 |
0.3425% |
0.0216 |
51963.00 |
| SSI4 |
387.833 |
6.159 |
386.478 |
6.138 |
0.3398% |
0.0215 |
49375.00 |
| SSII3 |
384.556 |
6.107 |
382.349 |
6.072 |
0.5643% |
0.0350 |
50296.00 |
| SSII4 |
387.568 |
6.155 |
385.842 |
6.128 |
0.4358% |
0.0274 |
50532.00 |
| ≠8-nominal |
A5 |
521.264 |
8.278 |
489.223 |
7.769 |
6.1411% |
0.5088 |
57798.00 |
| A6 |
518.690 |
8.237 |
485.432 |
7.709 |
6.4062% |
0.5282 |
57479.00 |
| EF5 |
521.256 |
8.278 |
520.341 |
8.264 |
0.1699% |
0.0145 |
63154.00 |
| EF6 |
503.781 |
8.001 |
502.714 |
7.984 |
0.2059% |
0.0169 |
61382.00 |
| AF5 |
519.034 |
8.243 |
511.258 |
8.119 |
1.4925% |
0.1235 |
61680.00 |
| AF6 |
521.248 |
8.278 |
513.691 |
8.158 |
1.4441% |
0.1200 |
61972.00 |
| MP5 |
521.210 |
8.277 |
518.870 |
8.240 |
0.4433% |
0.0372 |
63303.00 |
| MP6 |
513.096 |
8.148 |
511.491 |
8.123 |
0.3071% |
0.0255 |
62127.00 |
| SSI5 |
522.374 |
8.296 |
521.100 |
8.276 |
0.2382% |
0.0202 |
62563.00 |
| SSI6 |
521.472 |
8.281 |
520.077 |
8.259 |
0.2619% |
0.0222 |
62126.00 |
| SSII5 |
507.020 |
8.052 |
505.051 |
8.021 |
0.3825% |
0.0313 |
60053.00 |
| SSII6 |
510.228 |
8.103 |
508.441 |
8.075 |
0.3445% |
0.0284 |
60791.00 |
Table 10.
The parameters of S235JR steel damage by corrosion in the CGM used in this study.
Table 10.
The parameters of S235JR steel damage by corrosion in the CGM used in this study.
|
|
|
|
|
|
|
|
| Mass loss ratio r |
0.02 |
0.25 |
0.05 |
0.40 |
1.8965 |
0.90 |
3.5967 |
|
Disclaimer/Publisher’s Note: The statements, opinions and data contained in all publications are solely those of the individual author(s) and contributor(s) and not of MDPI and/or the editor(s). MDPI and/or the editor(s) disclaim responsibility for any injury to people or property resulting from any ideas, methods, instructions or products referred to in the content. |
© 2024 by the authors. Licensee MDPI, Basel, Switzerland. This article is an open access article distributed under the terms and conditions of the Creative Commons Attribution (CC BY) license (http://creativecommons.org/licenses/by/4.0/).
