1. Introduction
The deployment of Fiber Reinforced Polymer (FRP) in various industries such as aeronautics, automotive, marine, and sports applications has become pervasive in contemporary times. This prevalence stems from their favourable characteristics, including lightweight, fatigue and corrosion resistance, as well as high modulus, specific stiffness, and strength. Despite their capability to be manufactured into intricate structures with near net shape, machining operations, predominantly cutting, milling, and drilling, are often required for achieving dimensional precision and meeting assembly requisites.
Although alternative machining processes exist and appear to address certain challenges, conventional methods remain favoured due to cost and time efficiency considerations. Unlike metals, optimization efforts must be adapted to improve the cutting quality of FRP composites. However, the inherent inhomogeneity and anisotropy of these materials make such processes difficult, often leading to extensive damage that compromises quality and dimensional accuracy and, in severe cases, results in component failure.
Theoretical models and experimental applications on orthogonal cutting are essential for understanding the fundamental principles of more complex machining processes such as drilling and milling [
1,
2,
3]. By analysing cutting forces in simple models, it is possible to identify factor influencing material removal, tool wear, and surface quality. Integrating theoretical models with experimental data enhances machining strategies, optimizing cutting conditions to increase the efficiency and quality.
According to Panico et al. [
4], the machining of FRP composites present challenges due to the heterogeneity and anisotropic properties of the material, leading to the chip formation mechanisms and process force analysis dependent on the cutting angle of the fibres, as evidenced by various experimental studies [
5,
6,
7,
8,
9]. In addition, the abrasive nature of the fibers causes rapid and severe wear of the tools, resulting in increased cutting forces, delamination defects, burrs, and a decrease in the quality of the machined surface, as demonstrated by Maegawa et al. [
10] during the milling of unidirectional (UD) CFRP material. However, it’s worth noting that the study referenced is limited to cutting conditions parallel and perpendicular to the fiber orientation, thereby excluding numerous other cutting configurations.
As known, process parameters including cutting speed, depth of cut, cutting angle, and tool geometry exert a substantial influence on the efficacy and outcome of cutting processes in composite materials. These parameters have a very complex interaction with material properties, affecting both the quality of the machined surfaces and the overall efficiency of the machining operations. Thus, a comprehensive study necessitates the inclusion of several variables in both numerical simulations and experimental analysis. While existing research provides valuable insights into cutting composite materials, many studies do not consider the full range of relevant process parameters.
Li et al. [
11] focus primarily on fiber orientation angle and depth of cut as key factors in chip formation mechanism. However, their study overlooks cutting angle, tool geometry, and cutting speed, which is held constant at 0.5 m/min.
Chen et al. [
12] developed a force prediction model specifically for orthogonal cutting of unidirectional CFRP composites, taking into account nearly all the major variables mentioned. However, it is worth noting that also this study considered cutting conditions at low speed, specifically 1 m/min.
Investigating cutting conditions at high speeds holds significant importance from both industrial productivity and process influences perspectives. Industrial applications often demand increased productivity, making high-speed cutting a priority for enhancing manufacturing efficiency. Moreover, understanding the influence of cutting speed on the process is necessary for optimizing the quality of the cut. High cutting speeds can affect various aspects of the cutting process, including heat generation, chip formation, tool wear, and material removal mechanism. The dynamic interaction between the cutting tool and the workpiece at higher speeds introduces complexities that can significantly impact surface finish, dimensional accuracy, and integrity of the machined components [
13,
14]. Therefore, thorough investigation of high-speed cutting conditions is essential for achieving both productivity goals and ensuring the quality and reliability of the manufacturing process.
Pecat et al. [
15] and An et al. [
16] conducted a study on the orthogonal cutting of CFRP at extremely high cutting speed, up to 200 m/min. Both studies utilized rectangular specimens for their investigation, so only specific fiber orientation angles were considered. Although different cutting conditions were implemented in terms of the angle formed between the tool and fiber orientation, the use of rectangular specimens did not allow for a continuous acquisition of the characteristic forces of the process.
In addition to experimental activities, several analytical models have been developed over the years primarily to predict forces in the orthogonal cutting of UD-CFRP for specific ranges of fiber orientation [
17,
18]. Having an analytical model represents a valuable tool not only quantitatively but also qualitatively in industrial context, as tool wear and hence product quality are directly correlated to the force. Furthermore, the existence of analytical models and comprehensive experimental data, which include the full range of variables affecting the process, provide the opportunity to develop numerical finite element simulation models that closely approximate the real process. This approach could substantially reduce costs and time by avoiding the need for extensive experimental campaign covering all fiber orientation angles.
Both Calzada et al. [
19] and Xu et al. [
20] developed finite element simulation models for orthogonal and oblique cutting UD-CFRP, respectively. However, these models were constructed for a limited number of fiber orientation angles (0°, 45°, 90°, and 135° for Calzada et al., and 0°, 45°, and 90° for Xu et al.).
Additionally, the issue of incomplete fiber cutting poses a challenge to acquiring precise cutting force data crucial for analysing chip formation mechanism, cut quality, and understanding the influence of cutting parameters on these aspects.
The primary focus of this study is to investigate orthogonal cutting of UD laminates across the full range of fiber orientation angles using a single simple test methos. To achieve this, high-speed orthogonal cutting tests were conducted on rectangular and circular specimens of UD-GFRP at a cutting speed of 25 m/min. The circular specimen design allows for continuous variation in fiber orientation relative to the cutting direction within a single test, facilitating observation of its impact on cutting force development. Additionally, two polycarbonate backing plates were glued to the upper and lower surfaces of some samples to prevent the formation of the burrs.
Subsequently, employing a cutting speed of 50 m/min, comprehensive analysis of high-speed orthogonal cutting of GFRP was performed across all fiber orientation angles, with and without burr defects. The study aims to examine chip morphology to correlate it with cutting force trends and evaluate machined surface quality, which is heavily influenced by material anisotropy and other cutting parameters. This approach aims to gain precise insights into the phenomenon while simultaneously optimizing all aspects of the cutting process.
2. Materials and Methods
UD-GFRP laminates, measuring 410 mm x 410 mm x 3.8 mm, are produced by the Vacuum Assisted Resin Transfer Molding (VARTM) process, utilizing SX10 epoxy resin and 20 layers of unidirectional glass fiber, characterized by an areal density of 300 g/m2. From these laminates, two types of specimens are extracted: circular specimens, 200 mm in diameter, and rectangular specimens, 400 mm x 100 mm. For the rectangular specimens, four values of fibre orientation angle are considered, i.e. 0°, 45°, 90° and 135°.
In addition, in order to understand the influence of the burr defect on the characteristic forces of the process, as will be explained in the section 3.1, additional samples were made. In details, for some samples, on both the surfaces, two plates in polycarbonate (1 mm thick) are glued with a 0.5 mm thick layer of Araldite 2021 structural adhesive in order to avoid the formation of burrs. In addition, as will be explained in the section 3.1, samples made of only two glued plates of polycarbonate were made.
Cutting tests are carried out on a five-axis CNC machine (C.B. Ferrari). Tools made of High Speed Steel, larger than the specimens and accurately refreshed before each test by sharpening, are used.
Figure 1 and
Figure 2 show, respectively for rectangular and circular specimens, a cutting test (left) and their schematisation (right), in which features like the cutting angles (relief angle α and rake angle γ), the cutting speed (v
c), the fibre orientation angle (θ) and the principal and thrust forces (F
p and F
t) are indicated. As shown in
Figure 2, for the circular specimens a single radial notch is created. This is necessary to detect θ during the rotation of the specimen. In fact, the notch causes a sudden decrease in the forces value, allowing the setting up of a reference point to identify θ.
Two sets of tests are considered. The first one is carried out on both types of specimens to investigate if circular specimens can overcome the limitation related to rectangular ones. The phenomenon of burrs, cutting forces and roughness are analysed. The comparison is carried out for two combination of process parameters; specifically, the tools have α = 0° and α = 30°, vc = 25 m/min and the depth of cut, ac, is equal to 0.1 and 0.2 mm.
A second set of tests, carried out on circular specimens, is primarily considered to analyse chip morphology, vc is equal to 50 m/min, and ac equal to 0.05, 0.1, 0.15 and 0.2 mm. The tool angles are varied: the range of γ is 0° ÷ 30°, and the range of α is 5° ÷ 30°.
Regarding the tests on circular specimens, five revolutions are enough for the analyses; consequently, the cutting speed can be considered constant during each test, although the rotation speed does not change. In fact, by considering the cutting condition with the highest material removal (depth of cut equal to 0.2 mm), there is a reduction in terms of radius equal to 1 mm and a reduction of the cutting speed equal to 1%.
During the tests, Fp and Ft were recorded using a KISTLER 9257A load cell and a KISTLER 9277 A25 load cell respectively; the data are stored using the NI 9239 board and the VBA acquisition software. The forces are recorded at high sample rate equal to 25000 Hz. An Olympus high-speed camera was used to acquire the images of the cutting zone for the analysis of the chip morphology.
To evaluate the quality of the machined surface, roughness measurements were carried out by using a confocal Microscope (Sensofar S). Finally, a visual inspection was conducted using an optical microscope.
3. Results and Discussion
The following results are related to the first (Sections 3.1–3.3) and the second set of tests (section 3.4.).
3.1. Burrs
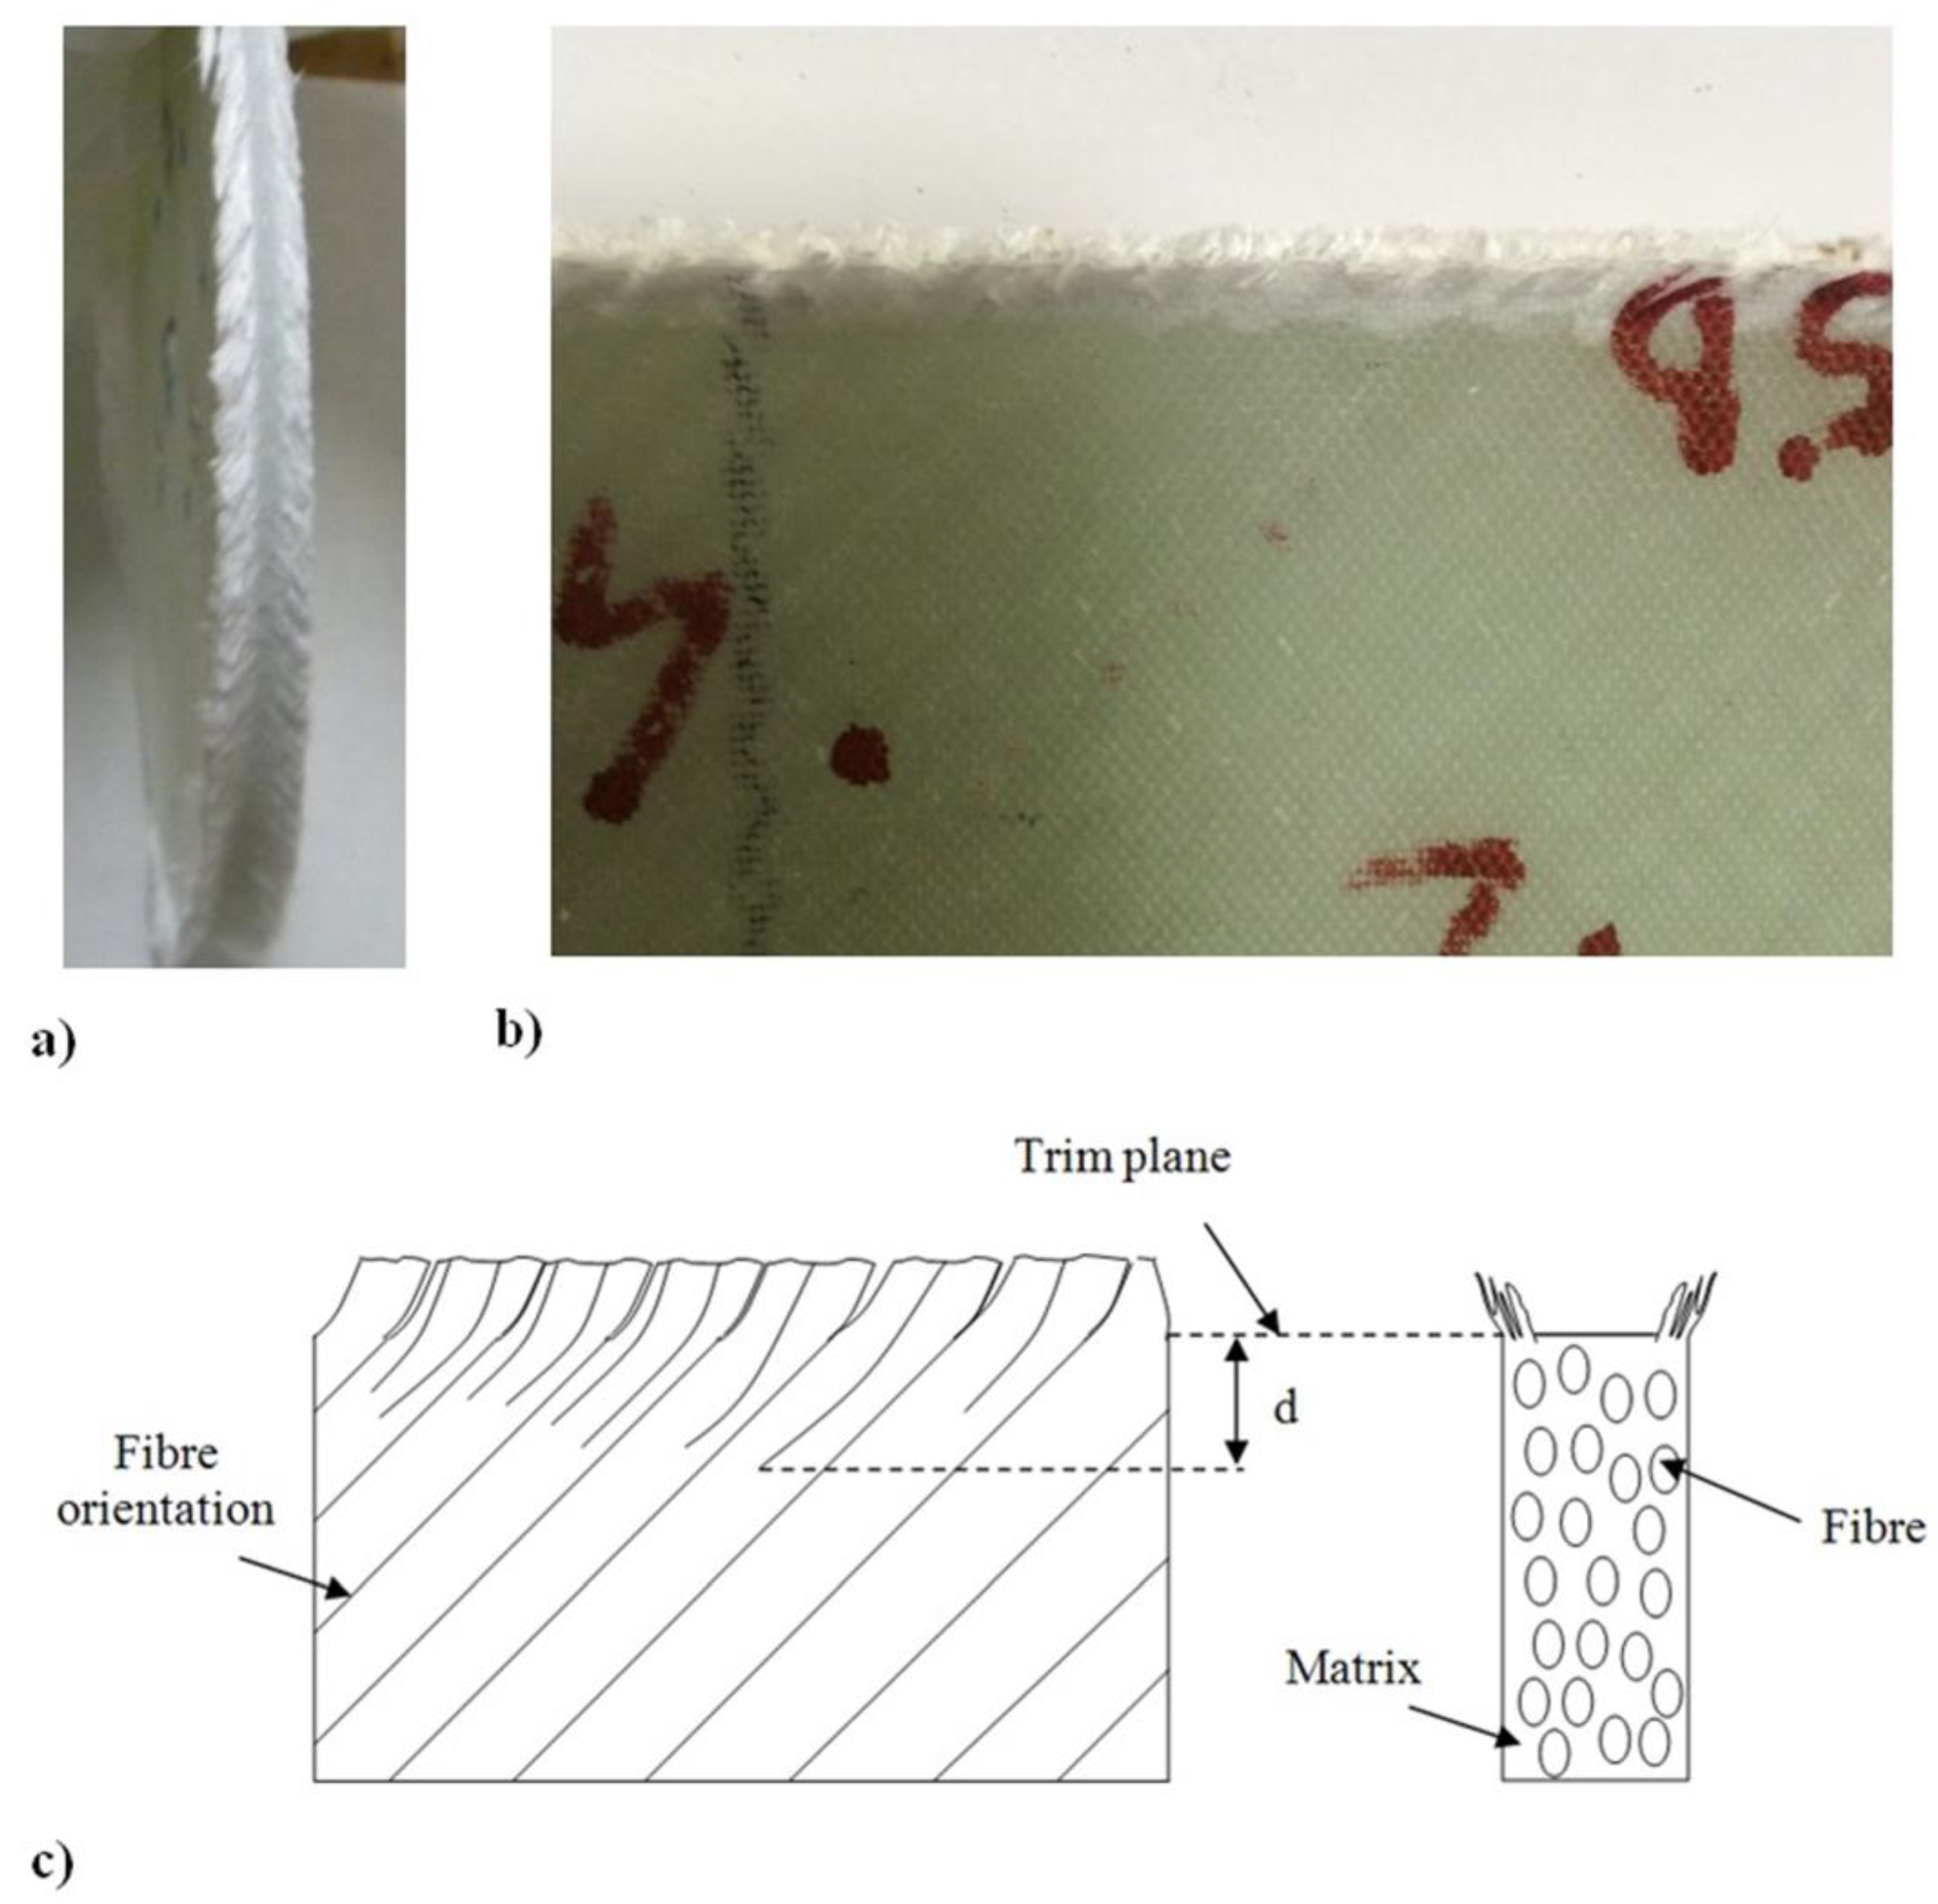
It is important to observe that during the orthogonal cutting of unidirectional composites, a characteristic defect appears when θ increases; it can be indicated as "burrs" [
21]. The burrs (
Figure 3a,b) are formed on the workpiece below the trim plane where it is possible to see some cracks; these cracks are extended for a length,
d, of some millimetres within the workpiece along the fibre direction. At the same time, two thin layers, severely bending out-of-plane, are created at the unsupported edges of the workpiece (
Figure 3c).
These layers are formed by uncut fibres that pass below the tool and against the tool flank. This determines poor cut quality and causes an unacceptable subsurface damage to the workpiece. Additionally, the main problem in the generation of these defects is their variability, in terms of degree of surface damage, number of layers involved in the thickness direction, and range of fiber orientation angles that are involved in the damage. It depends not only on the fibre volume fraction of the material being processed but also on different cutting conditions and the geometry of the tool, in particular γ [
22].
In this study, to avoid the formation of the burrs, two plates in polycarbonate are glued with a structural adhesive on the upper and lower surface of circular and rectangular specimens.
3.2. Cutting Forces
For the evaluation of the cutting forces, both depth of cut values are considered on specimens without and with polycarbonate. Three specimens are tested for each condition.
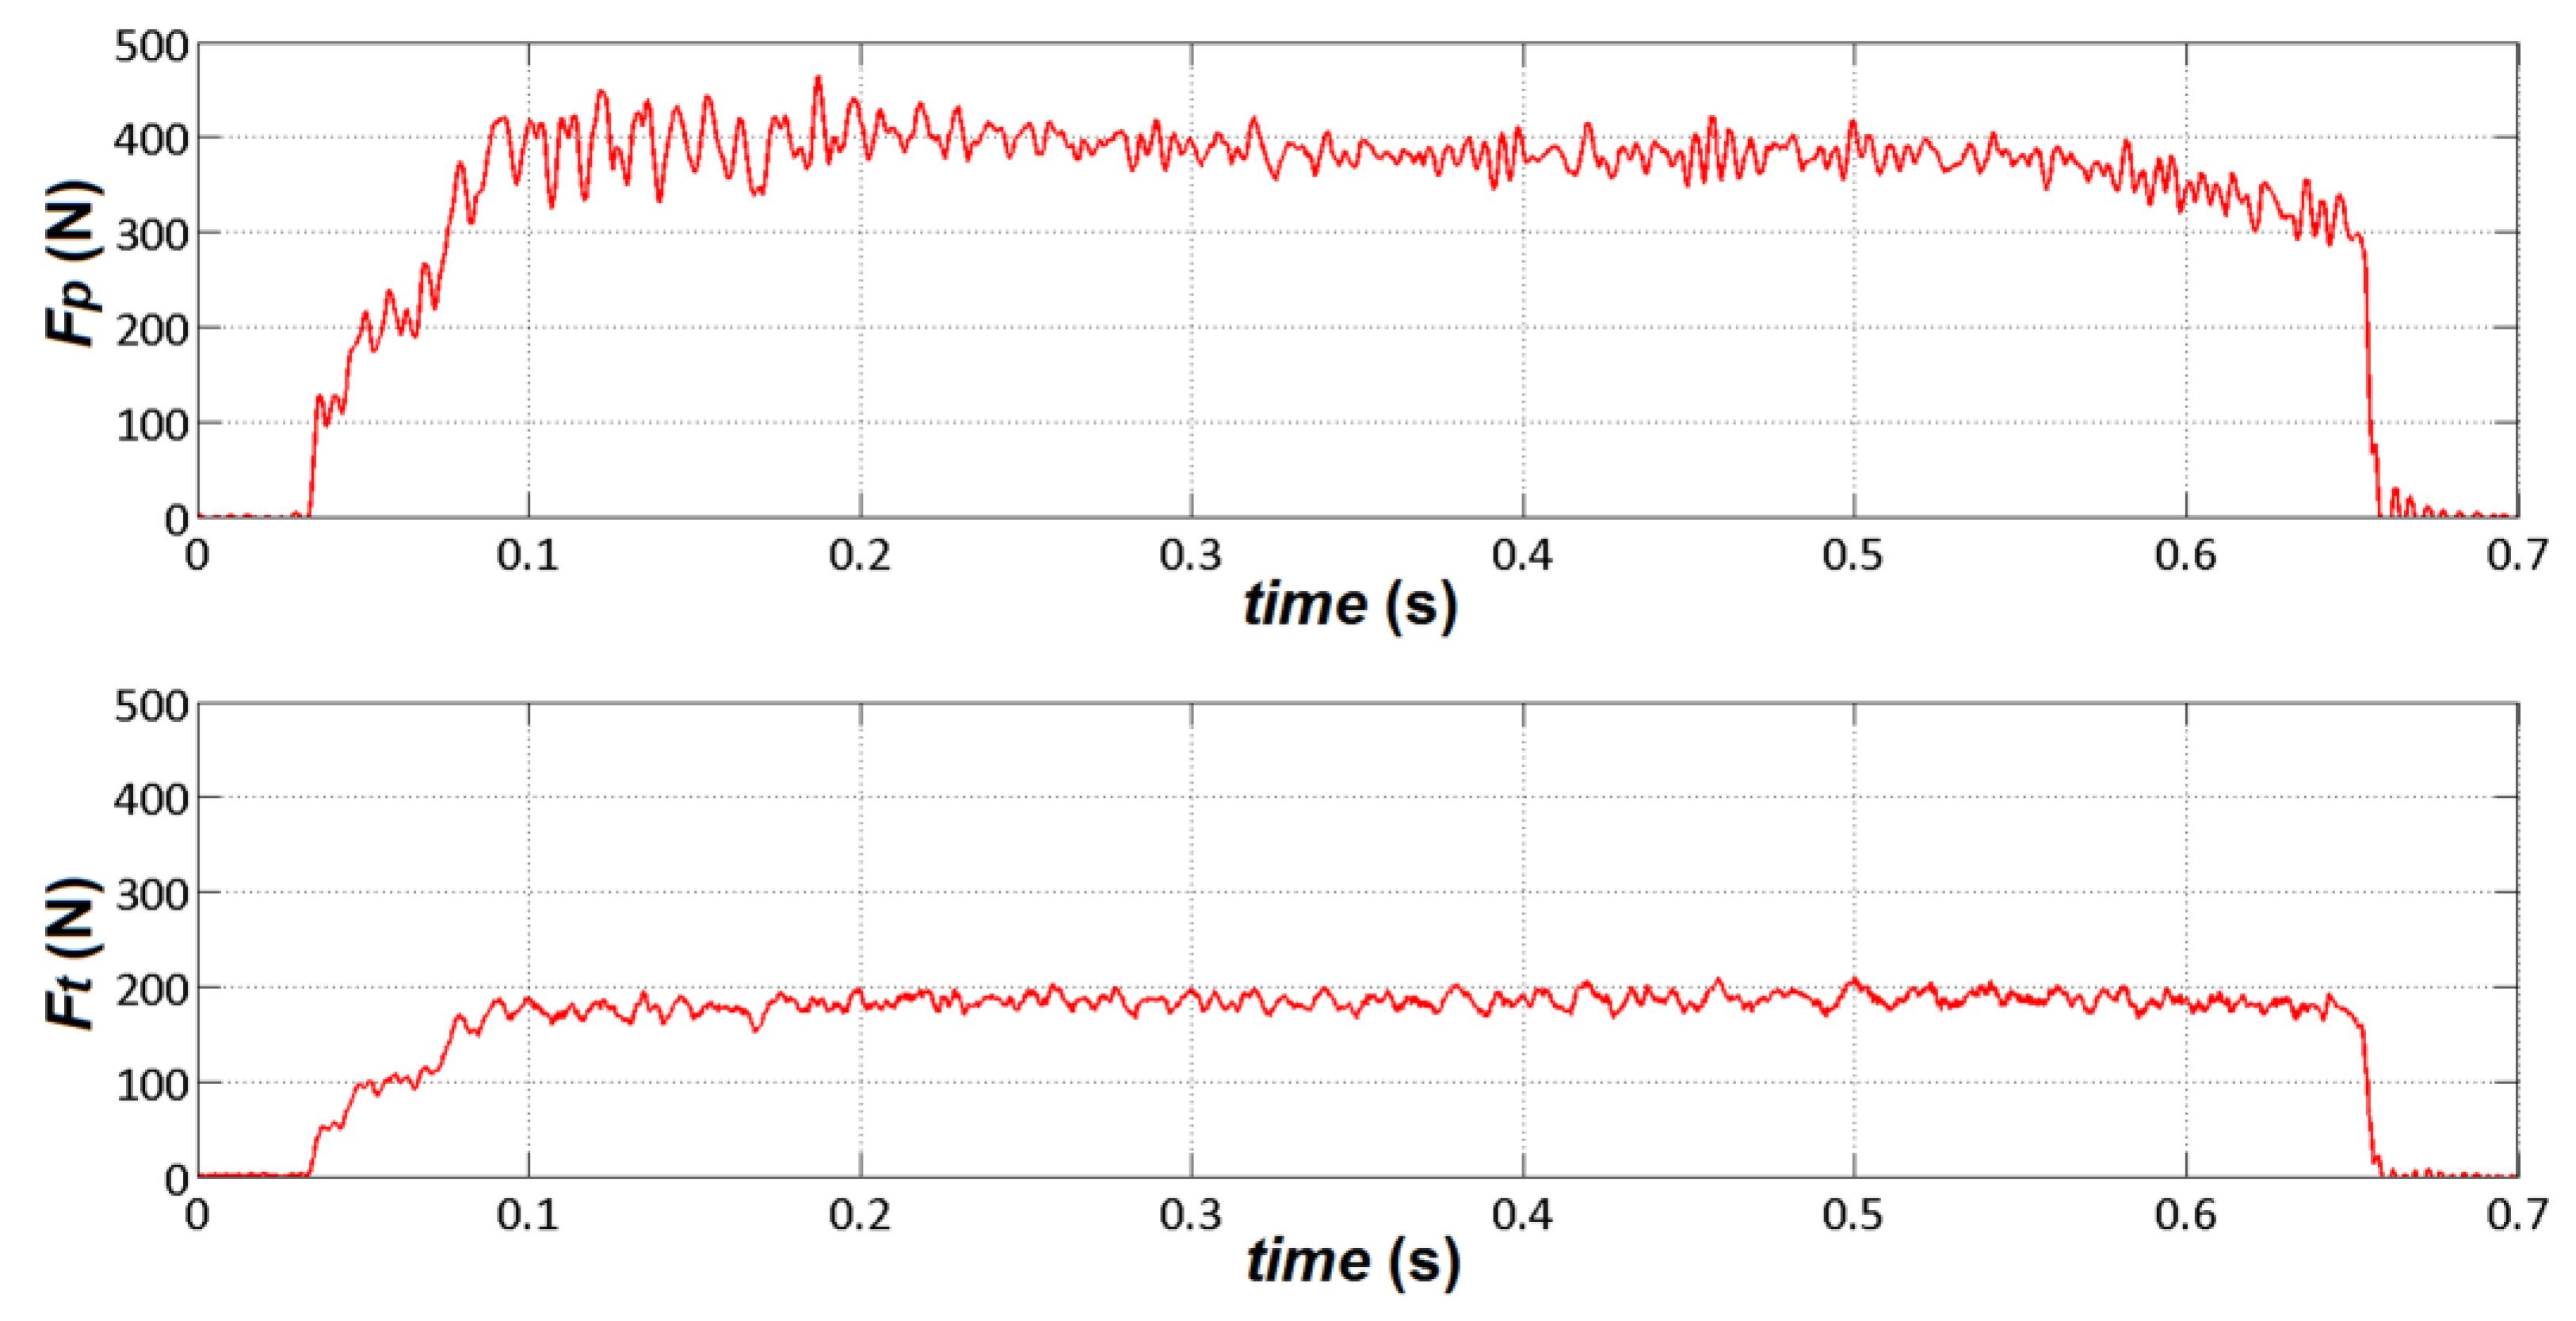
For rectangular specimens, the forces assume the typical trends reported in
Figure 4.
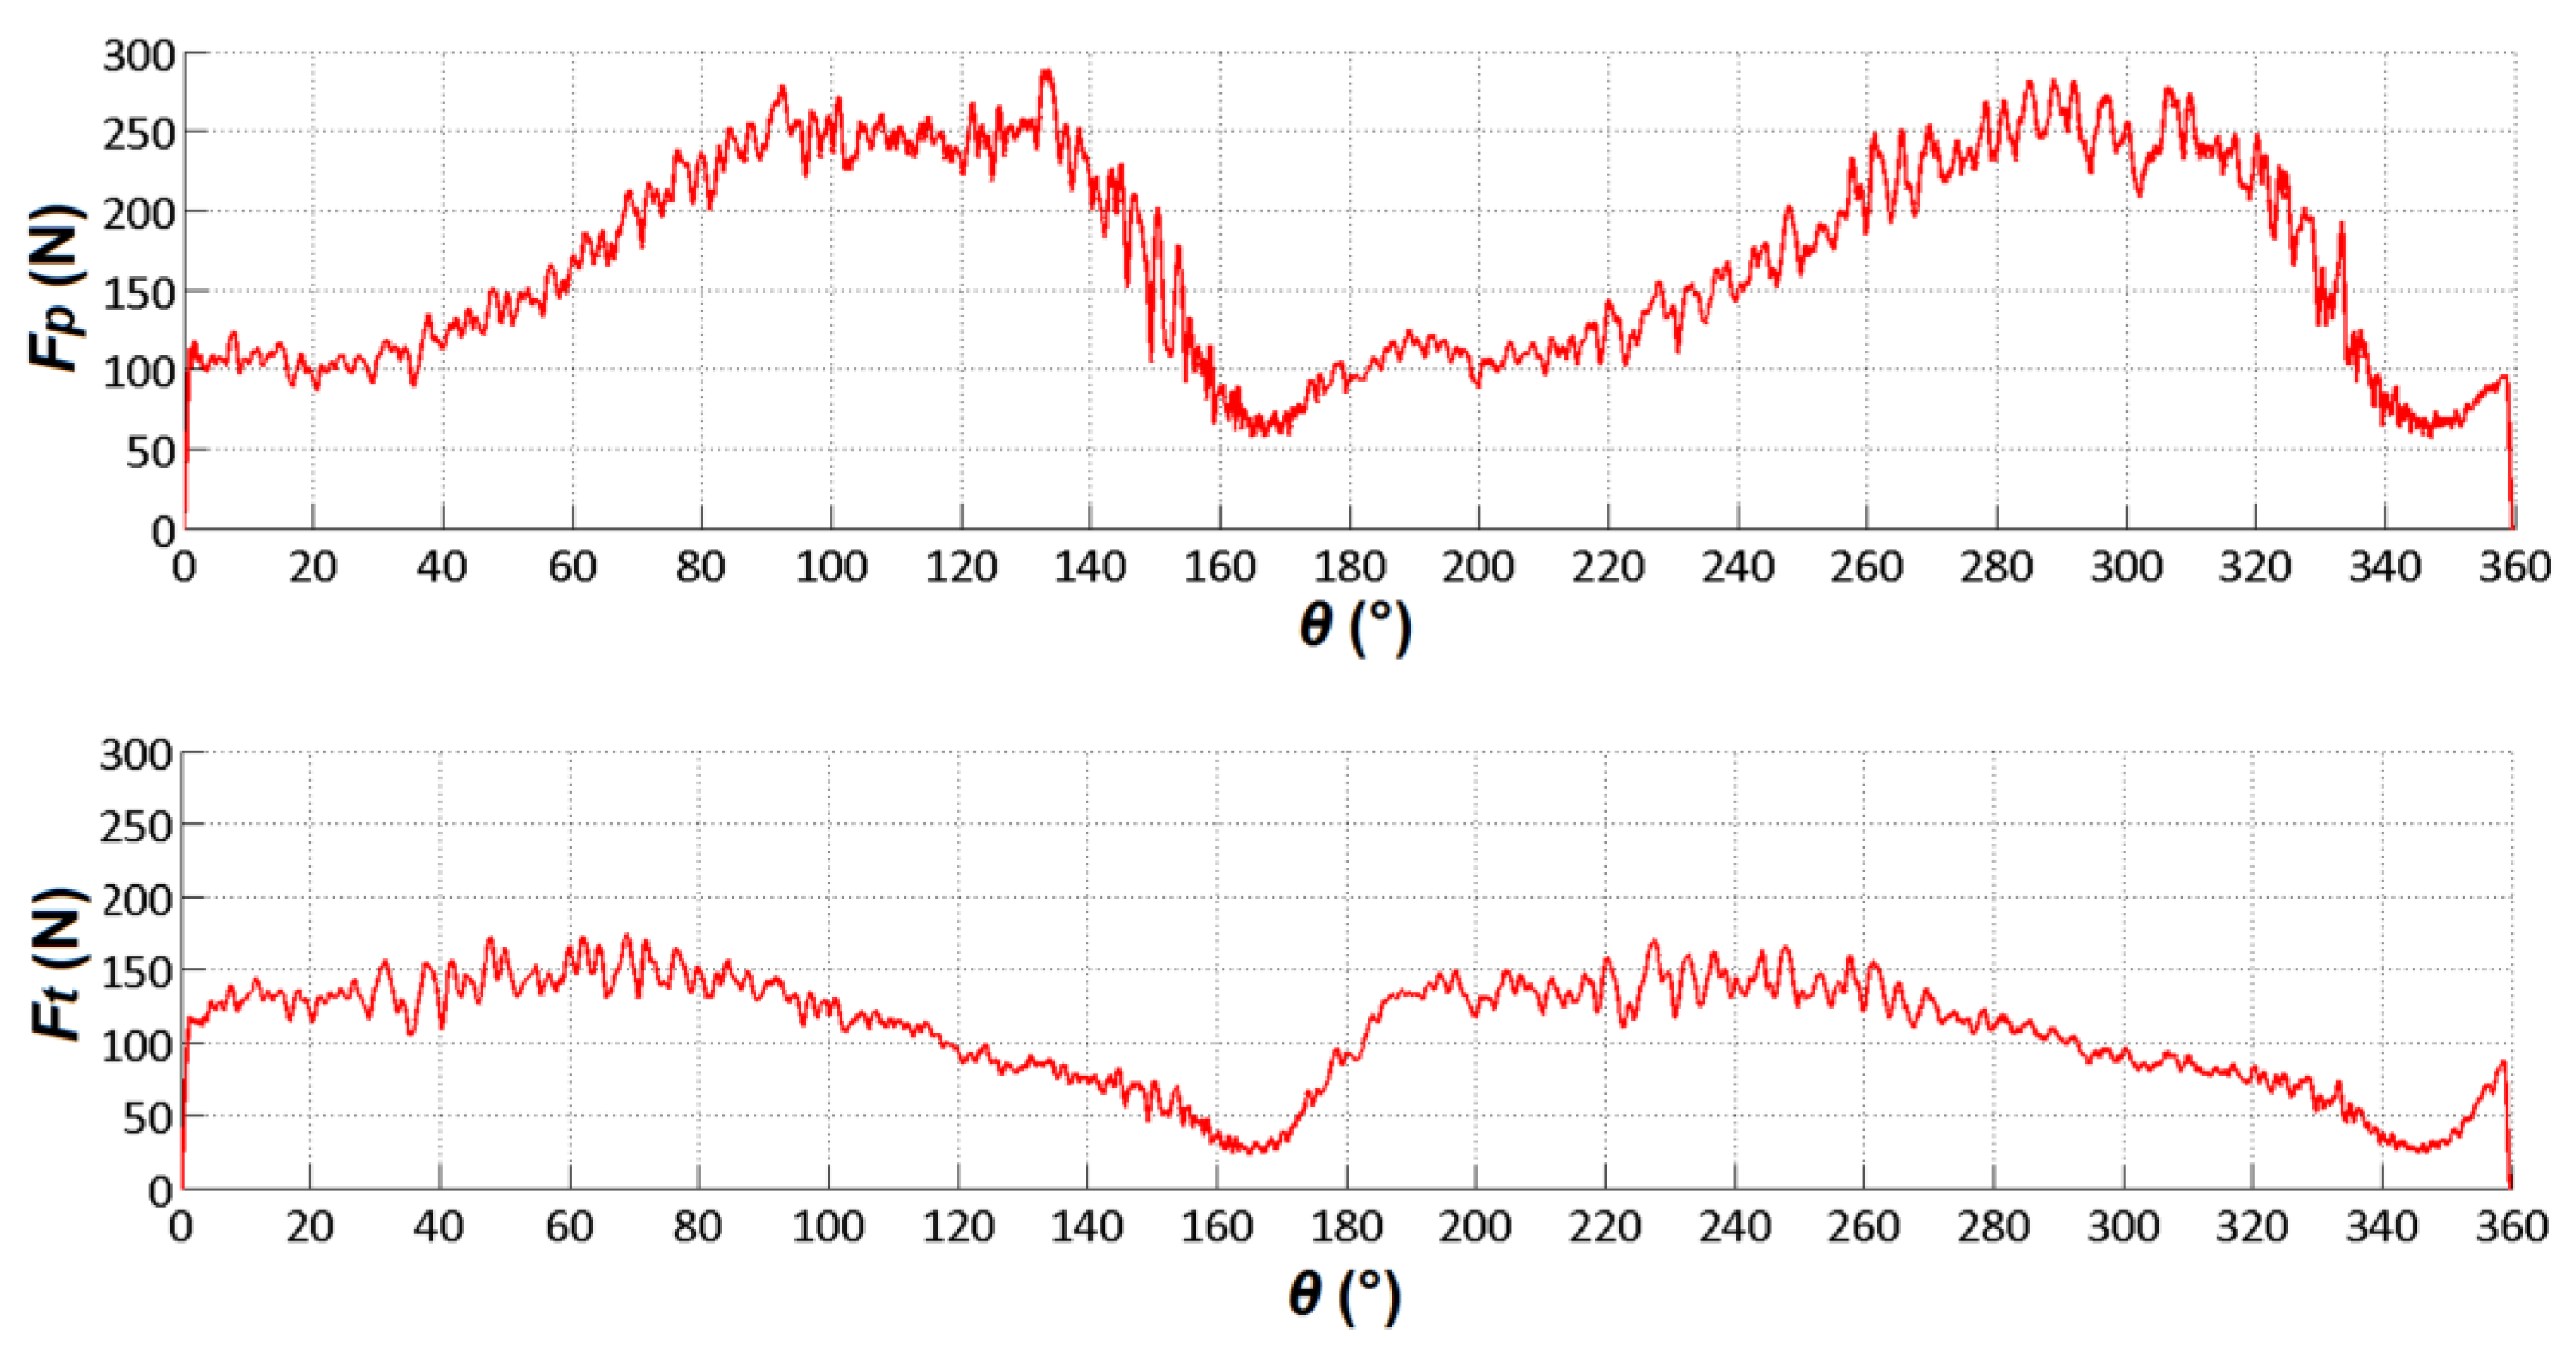
In the case of circular specimens, F
p and F
t tend to increase within the second or third turns; then, after some turns, a steady state is achieved. The analysis of the cutting forces is carried out with reference to the onset of this steady stage, to prevent tool wear from influencing the force values, particularly Ft, which is much more sensitive to tool wear than F
p when machining composites [
23,
24]. From the recorded data, it is possible to obtain F
p and F
t as a function of θ (
Figure 5). The values of θ cover the range 0° ÷ 360°, which corresponds to a complete revolution of the specimen. The trend of F
p and F
t is periodic with period 180°; then, the same cutting conditions occur when, during each revolution of the specimen, θ assumes the values of 0°, 180° and 360°.
From the figure, it is possible to observe that the cutting forces are very sensitive to θ, reflecting the high anisotropy of UD composites. The oscillations of Fp and Ft are due to the formation of a discontinuous chip during the cutting of these materials.
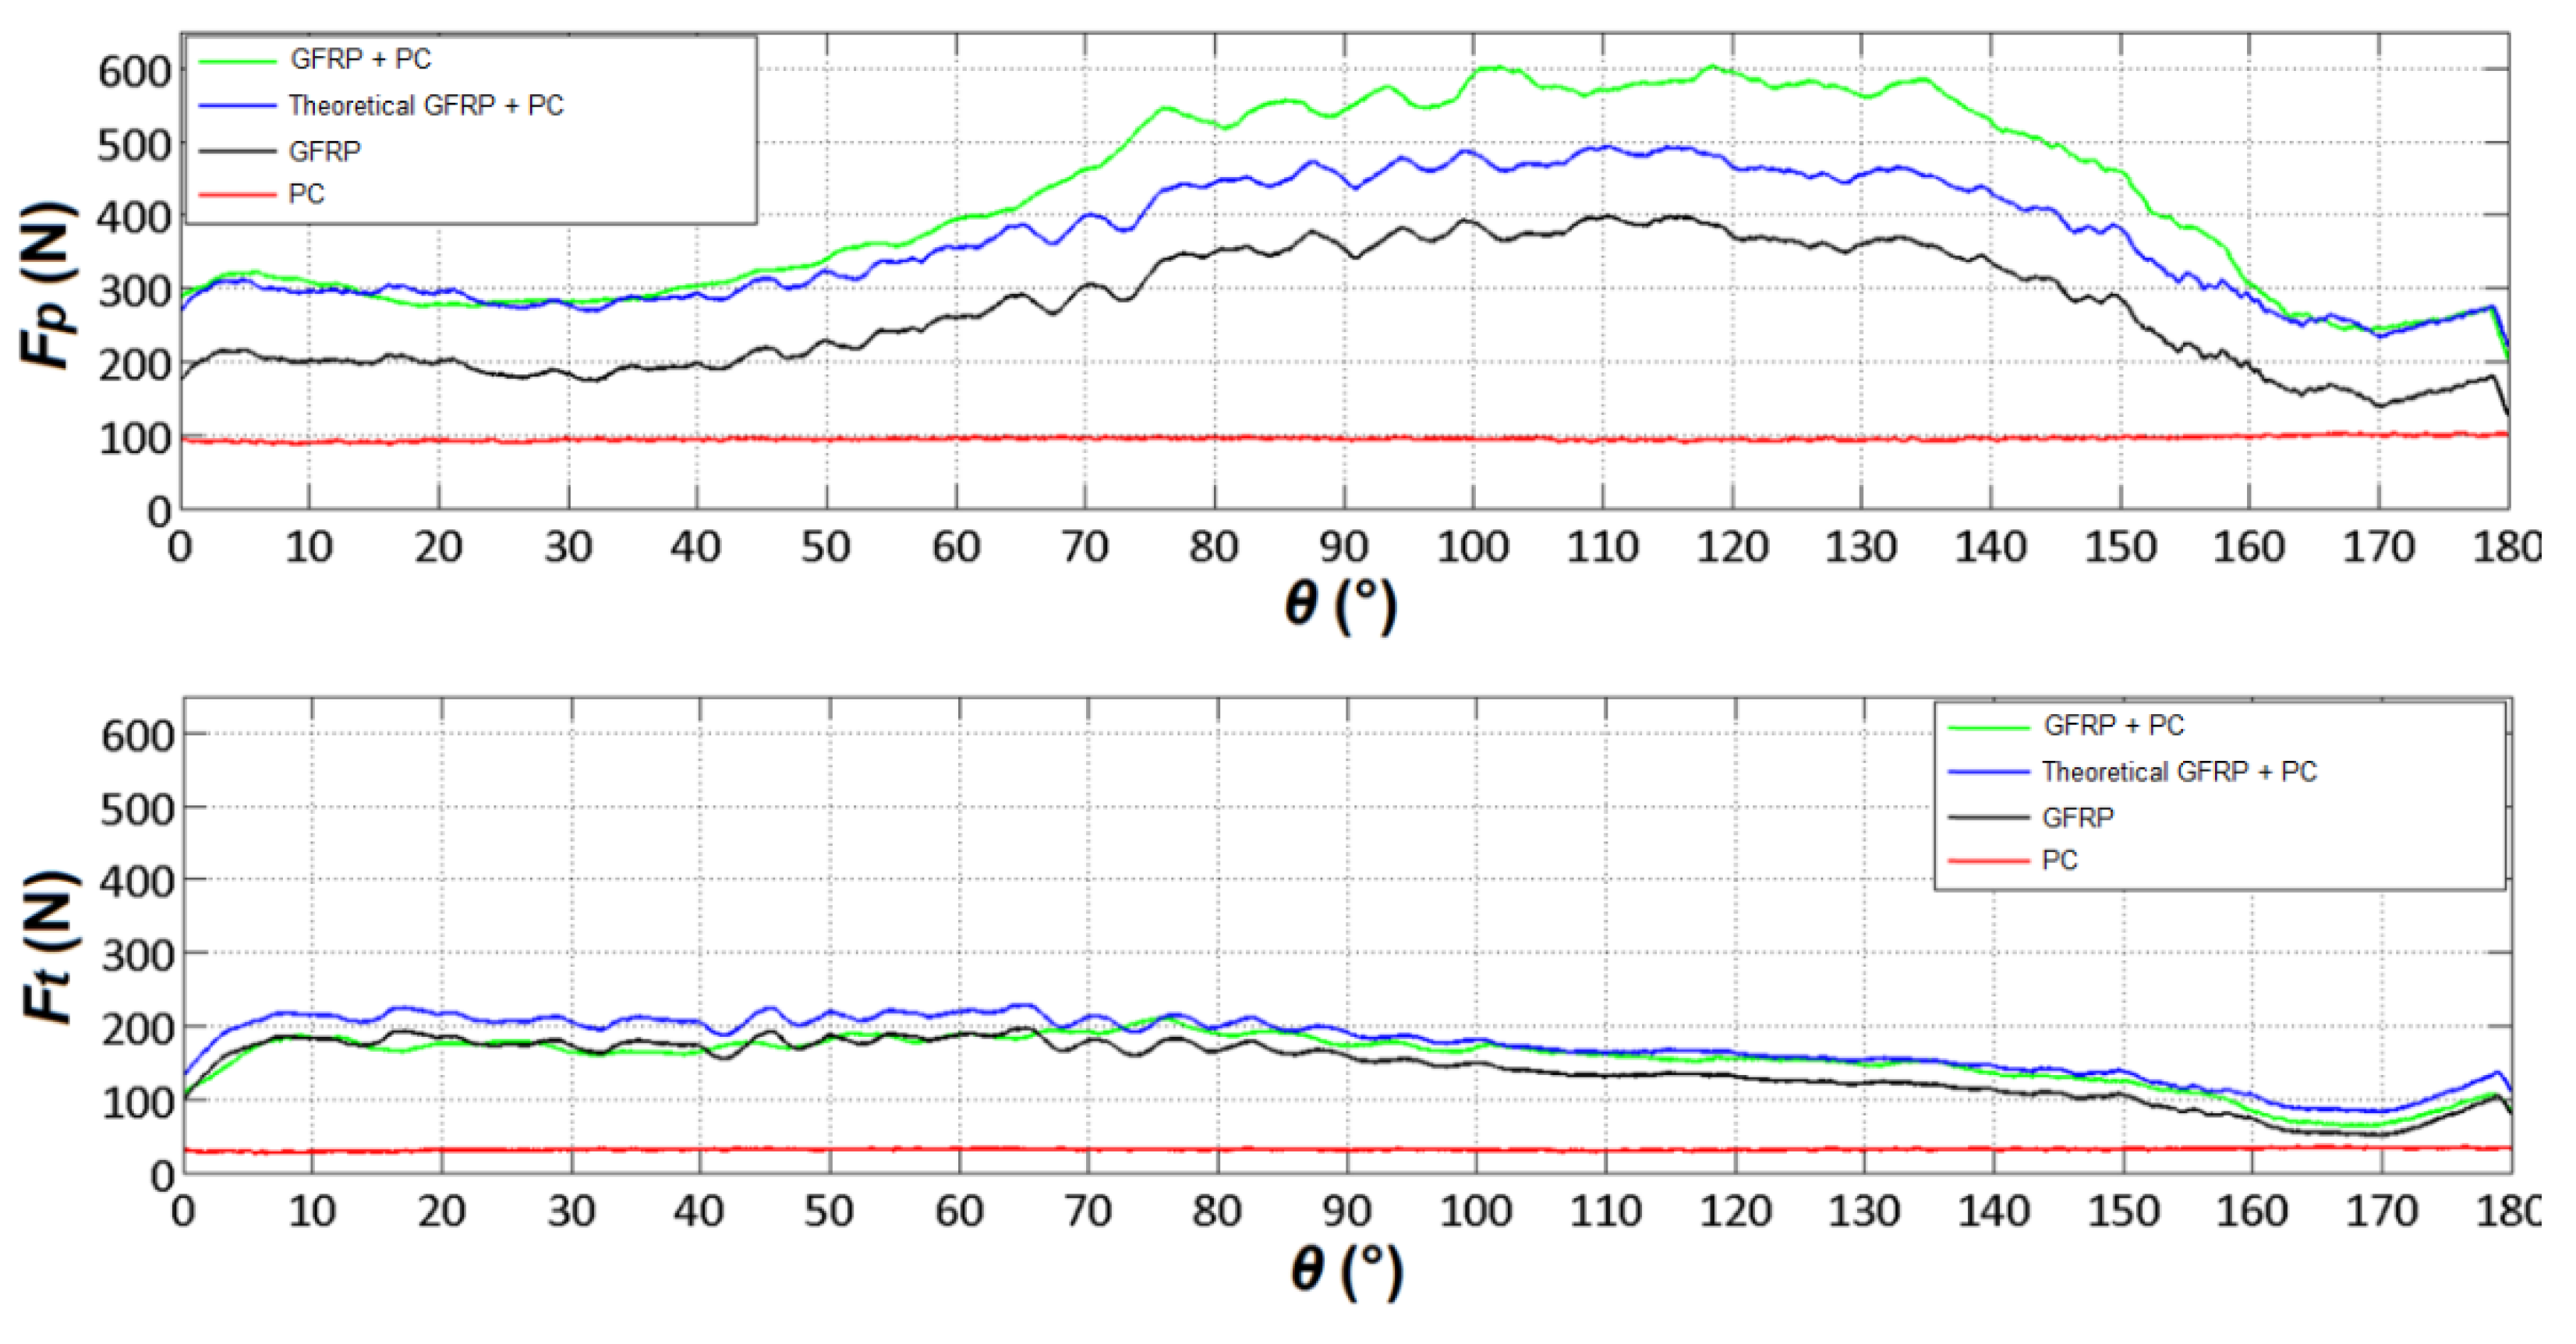
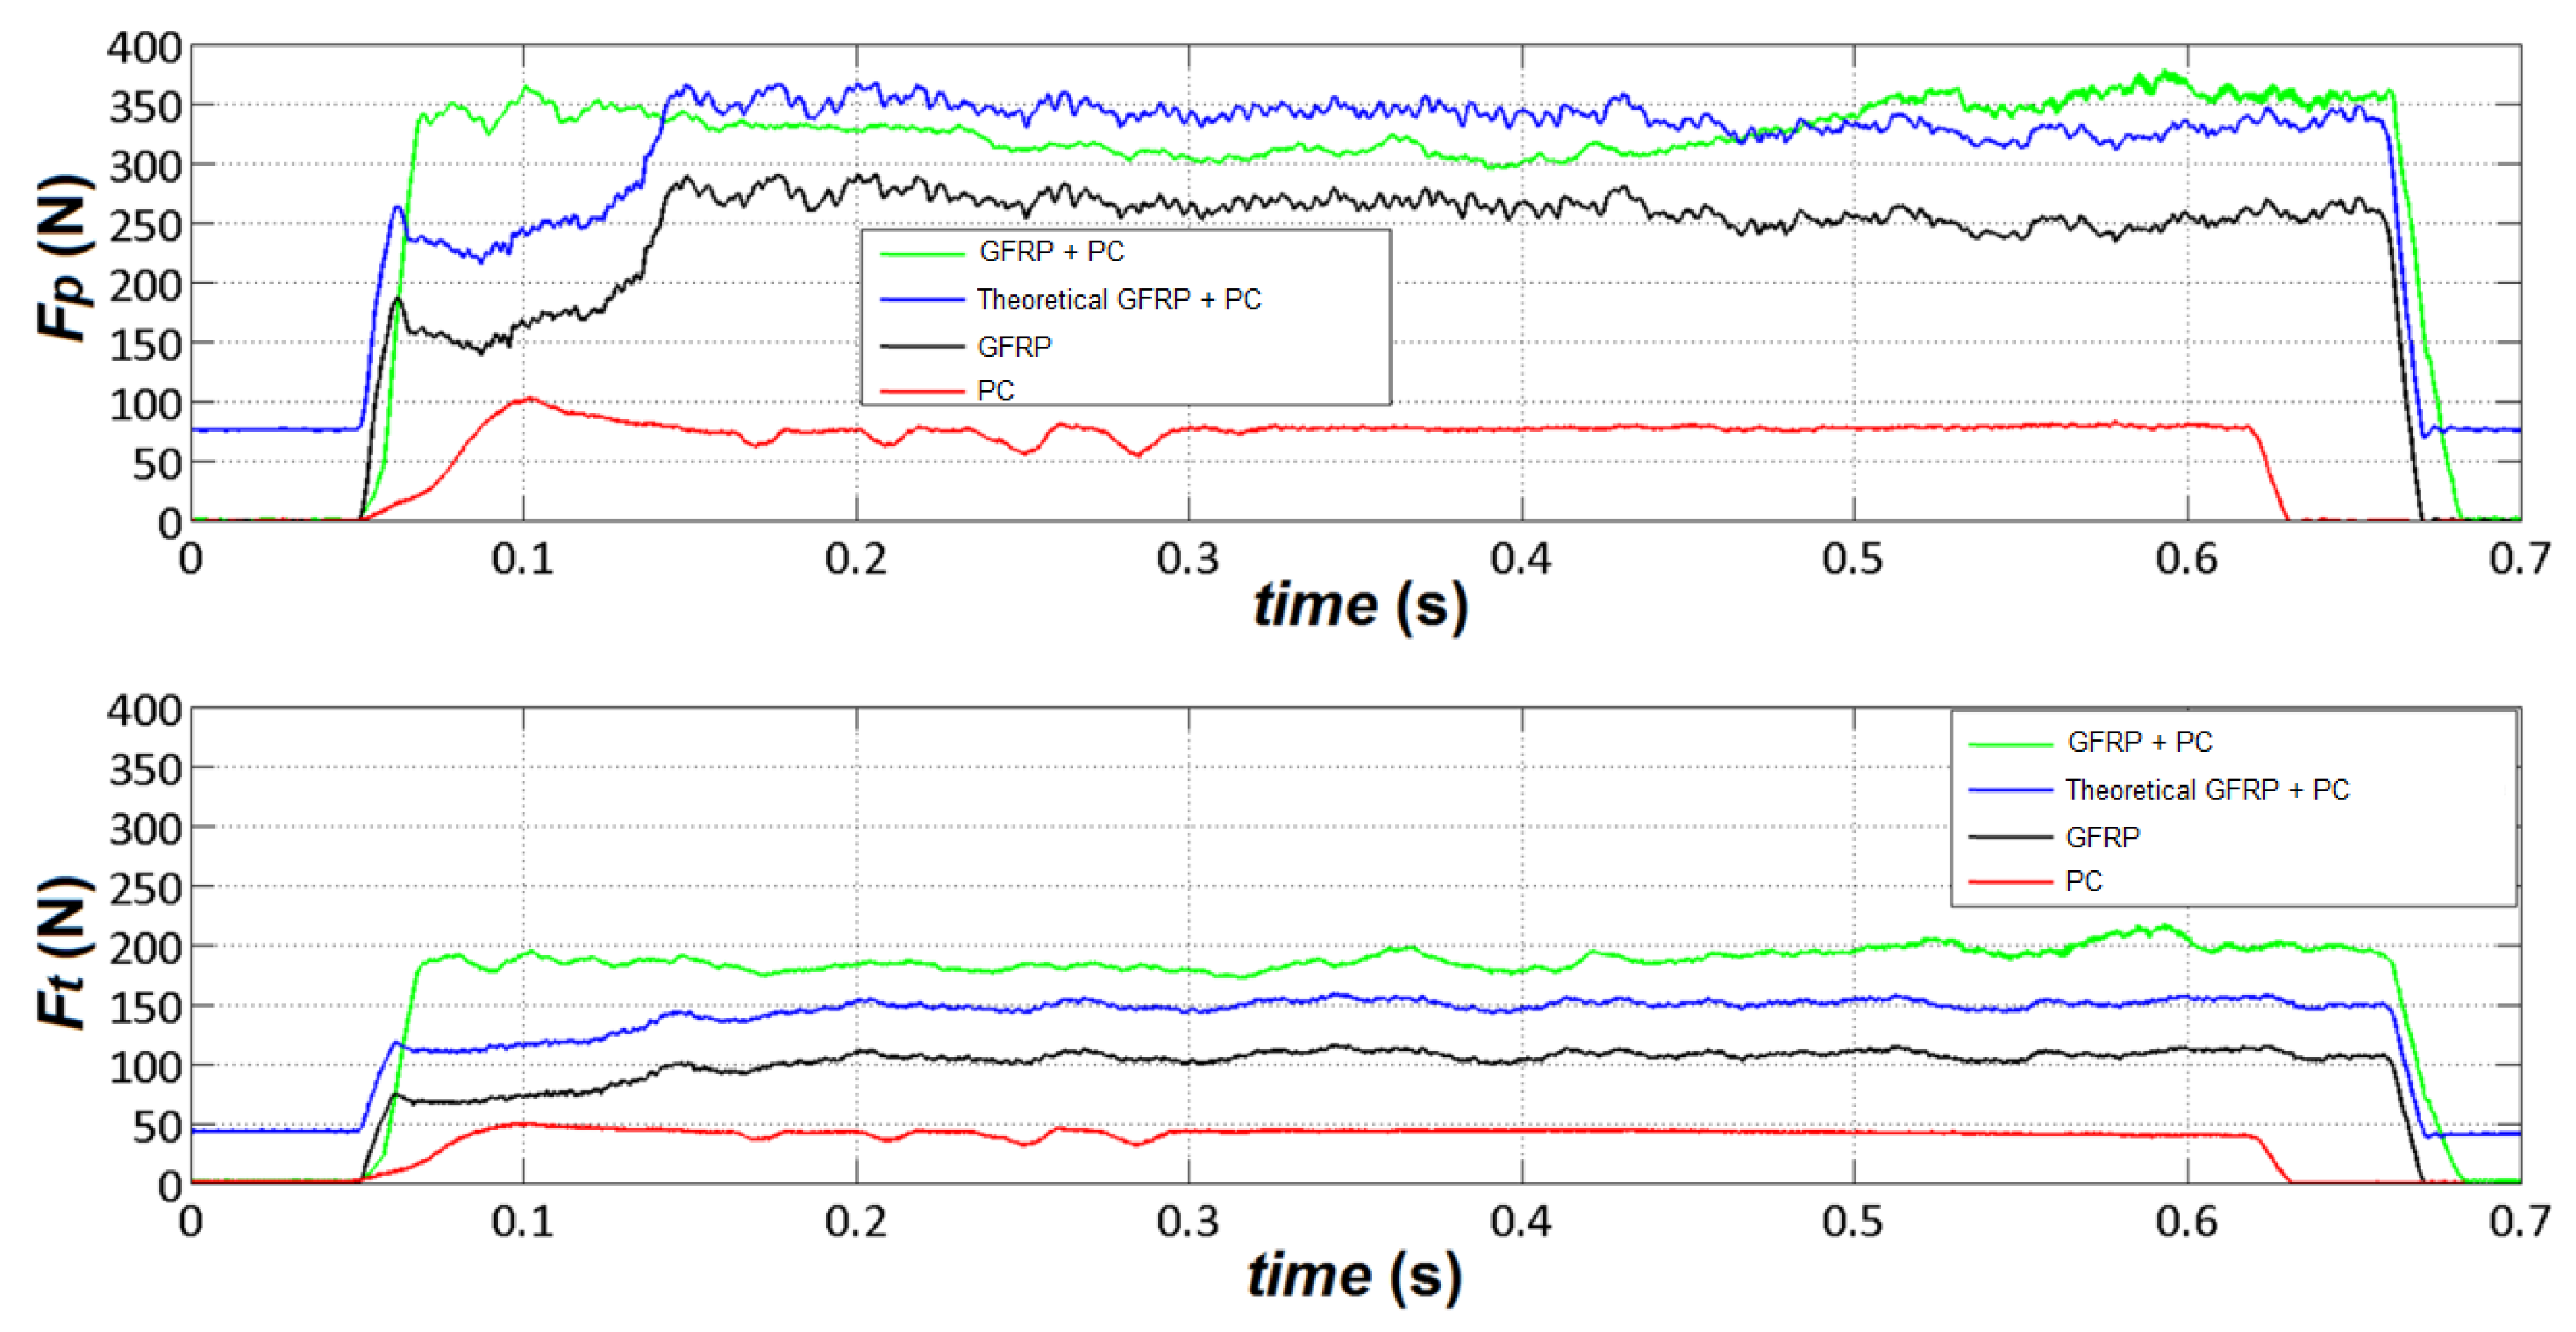
To consider the influence of burrs,
Figure 6 and
Figure 7 depict the typical trend of cutting forces for circular and rectangular (θ = 90°) specimens, respectively, with a fixed depth of cut of 0.2 mm. In these figures, four curves are presented with the following labels:
The "GFRP" curve represents specimens made solely of GFRP.
The "GFRP+PC" curve represents specimens made of GFRP with additional external layers of polycarbonate.
The "PC" curve represents specimens made only with two layers of polycarbonate.
The "Theoretical GFRP+PC" curve is derived by summing the values of the "GFRP" and "PC" curves
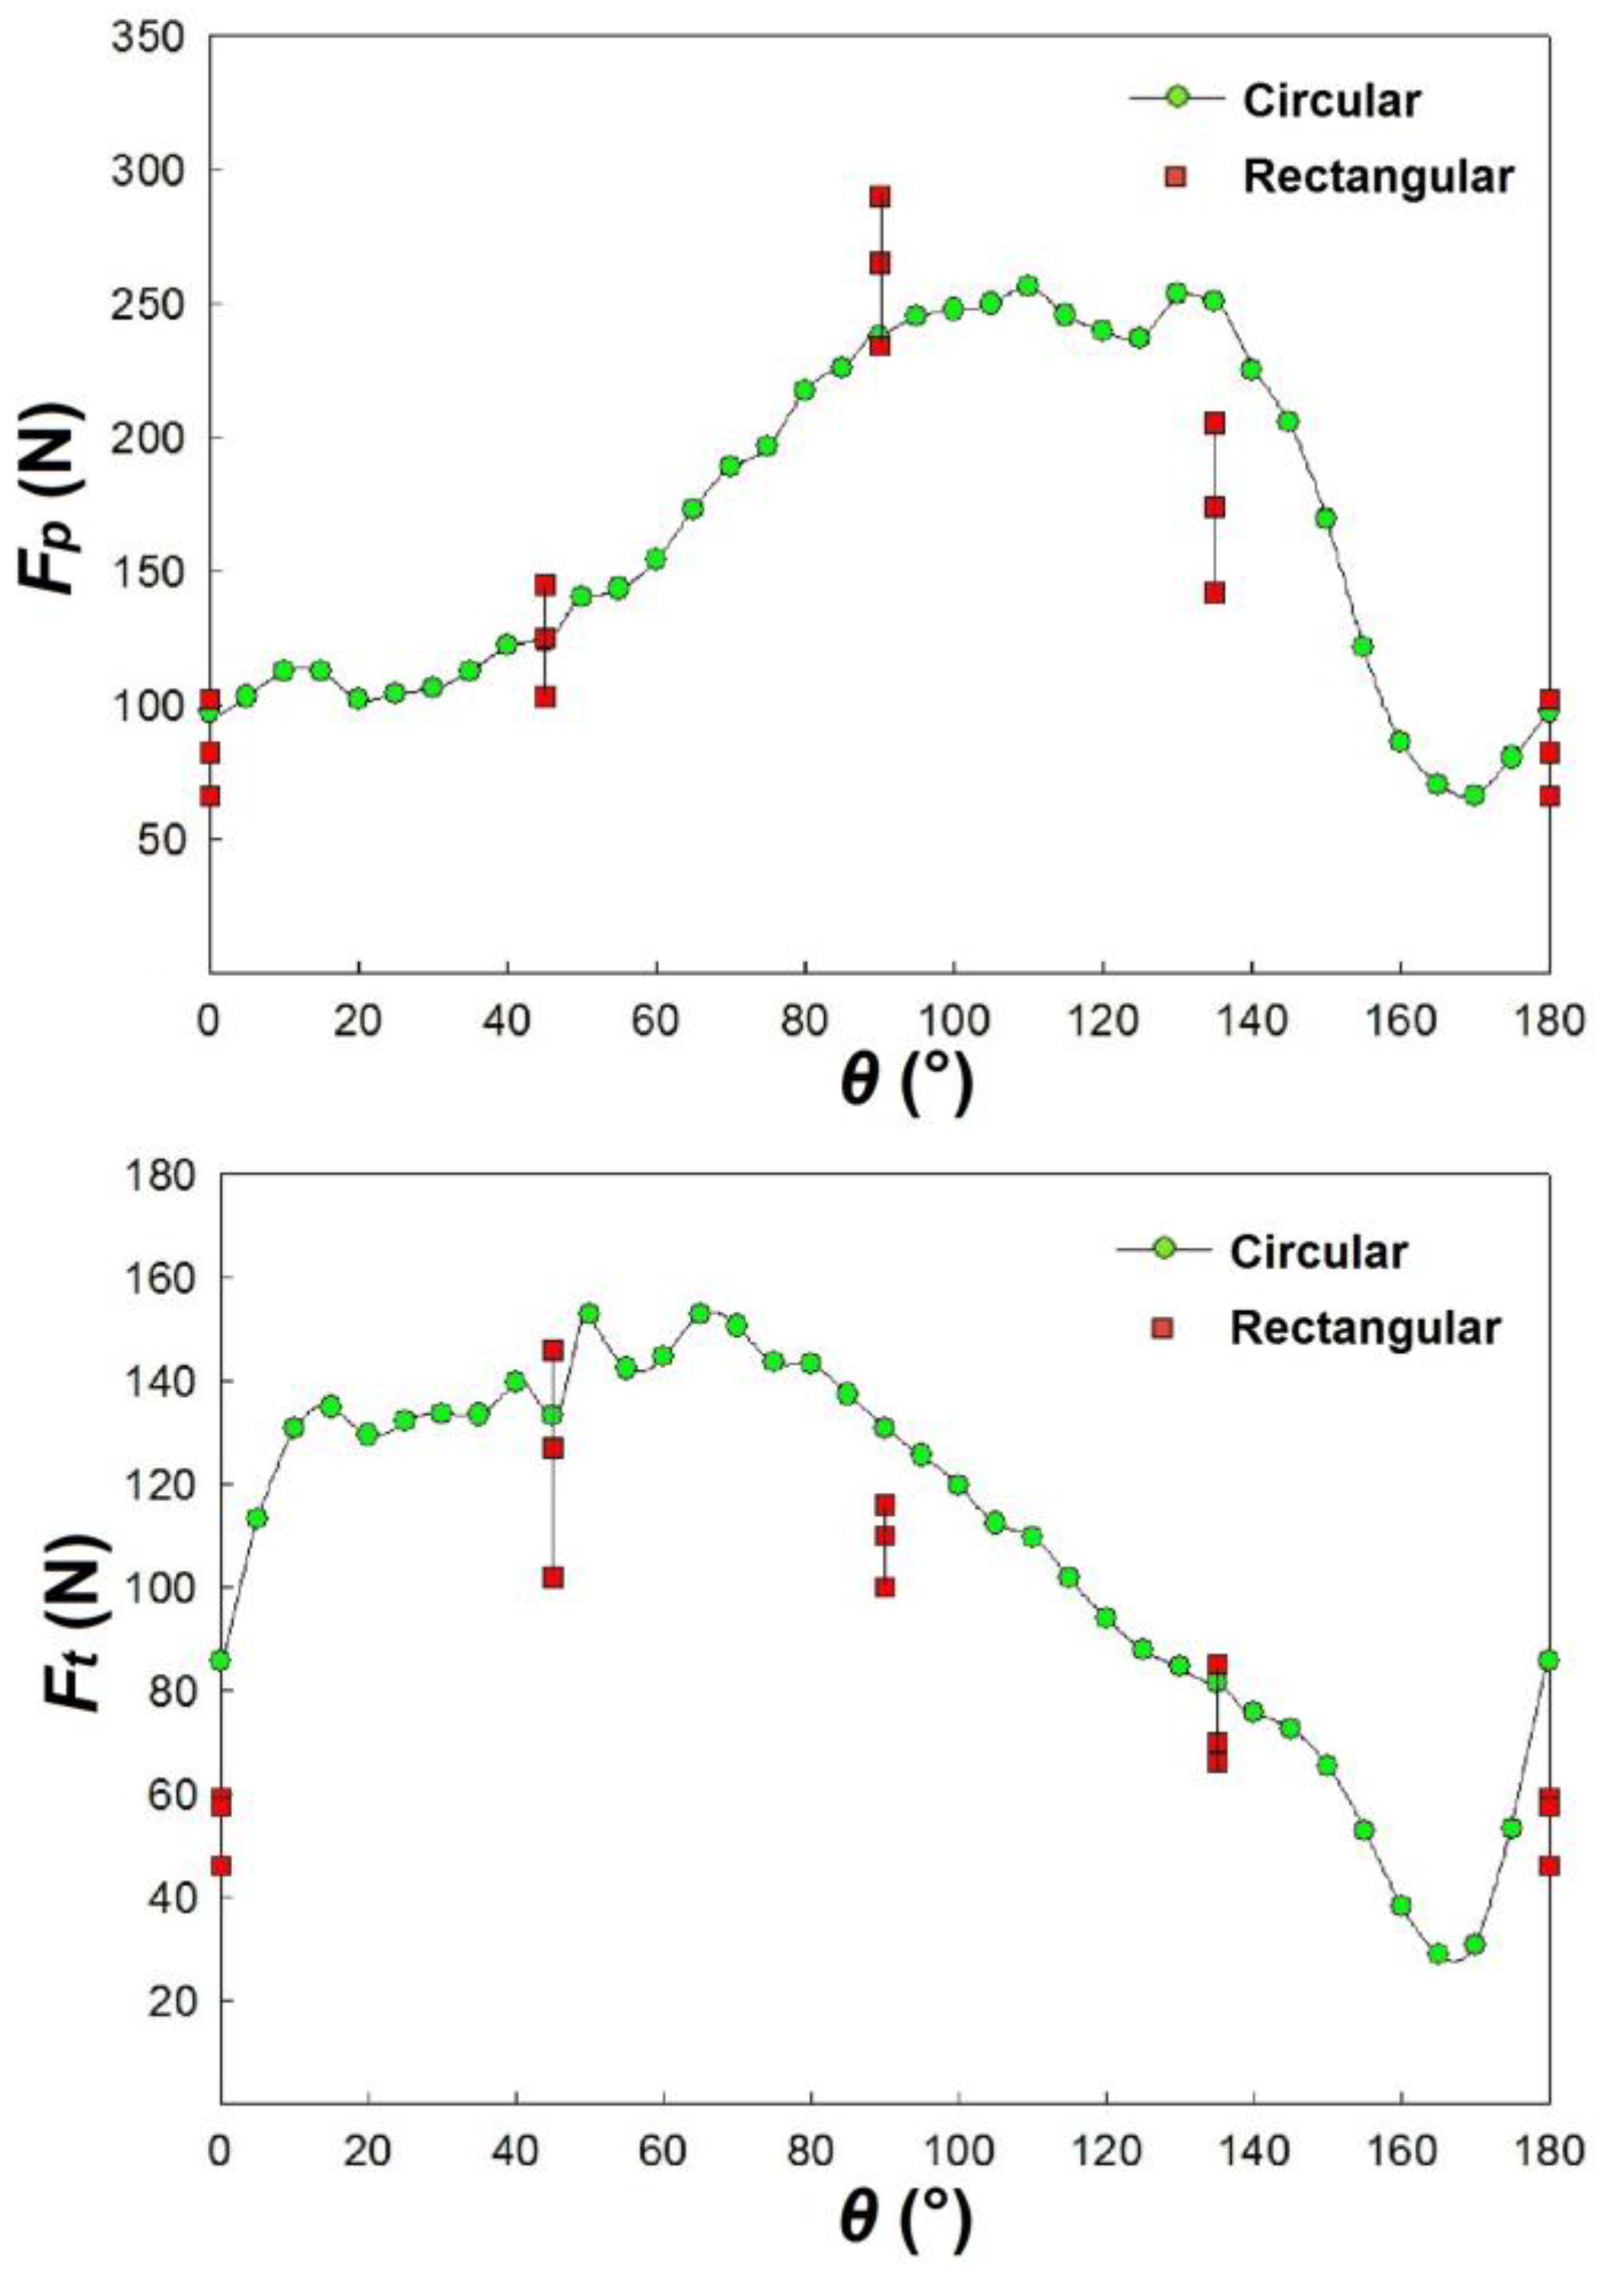
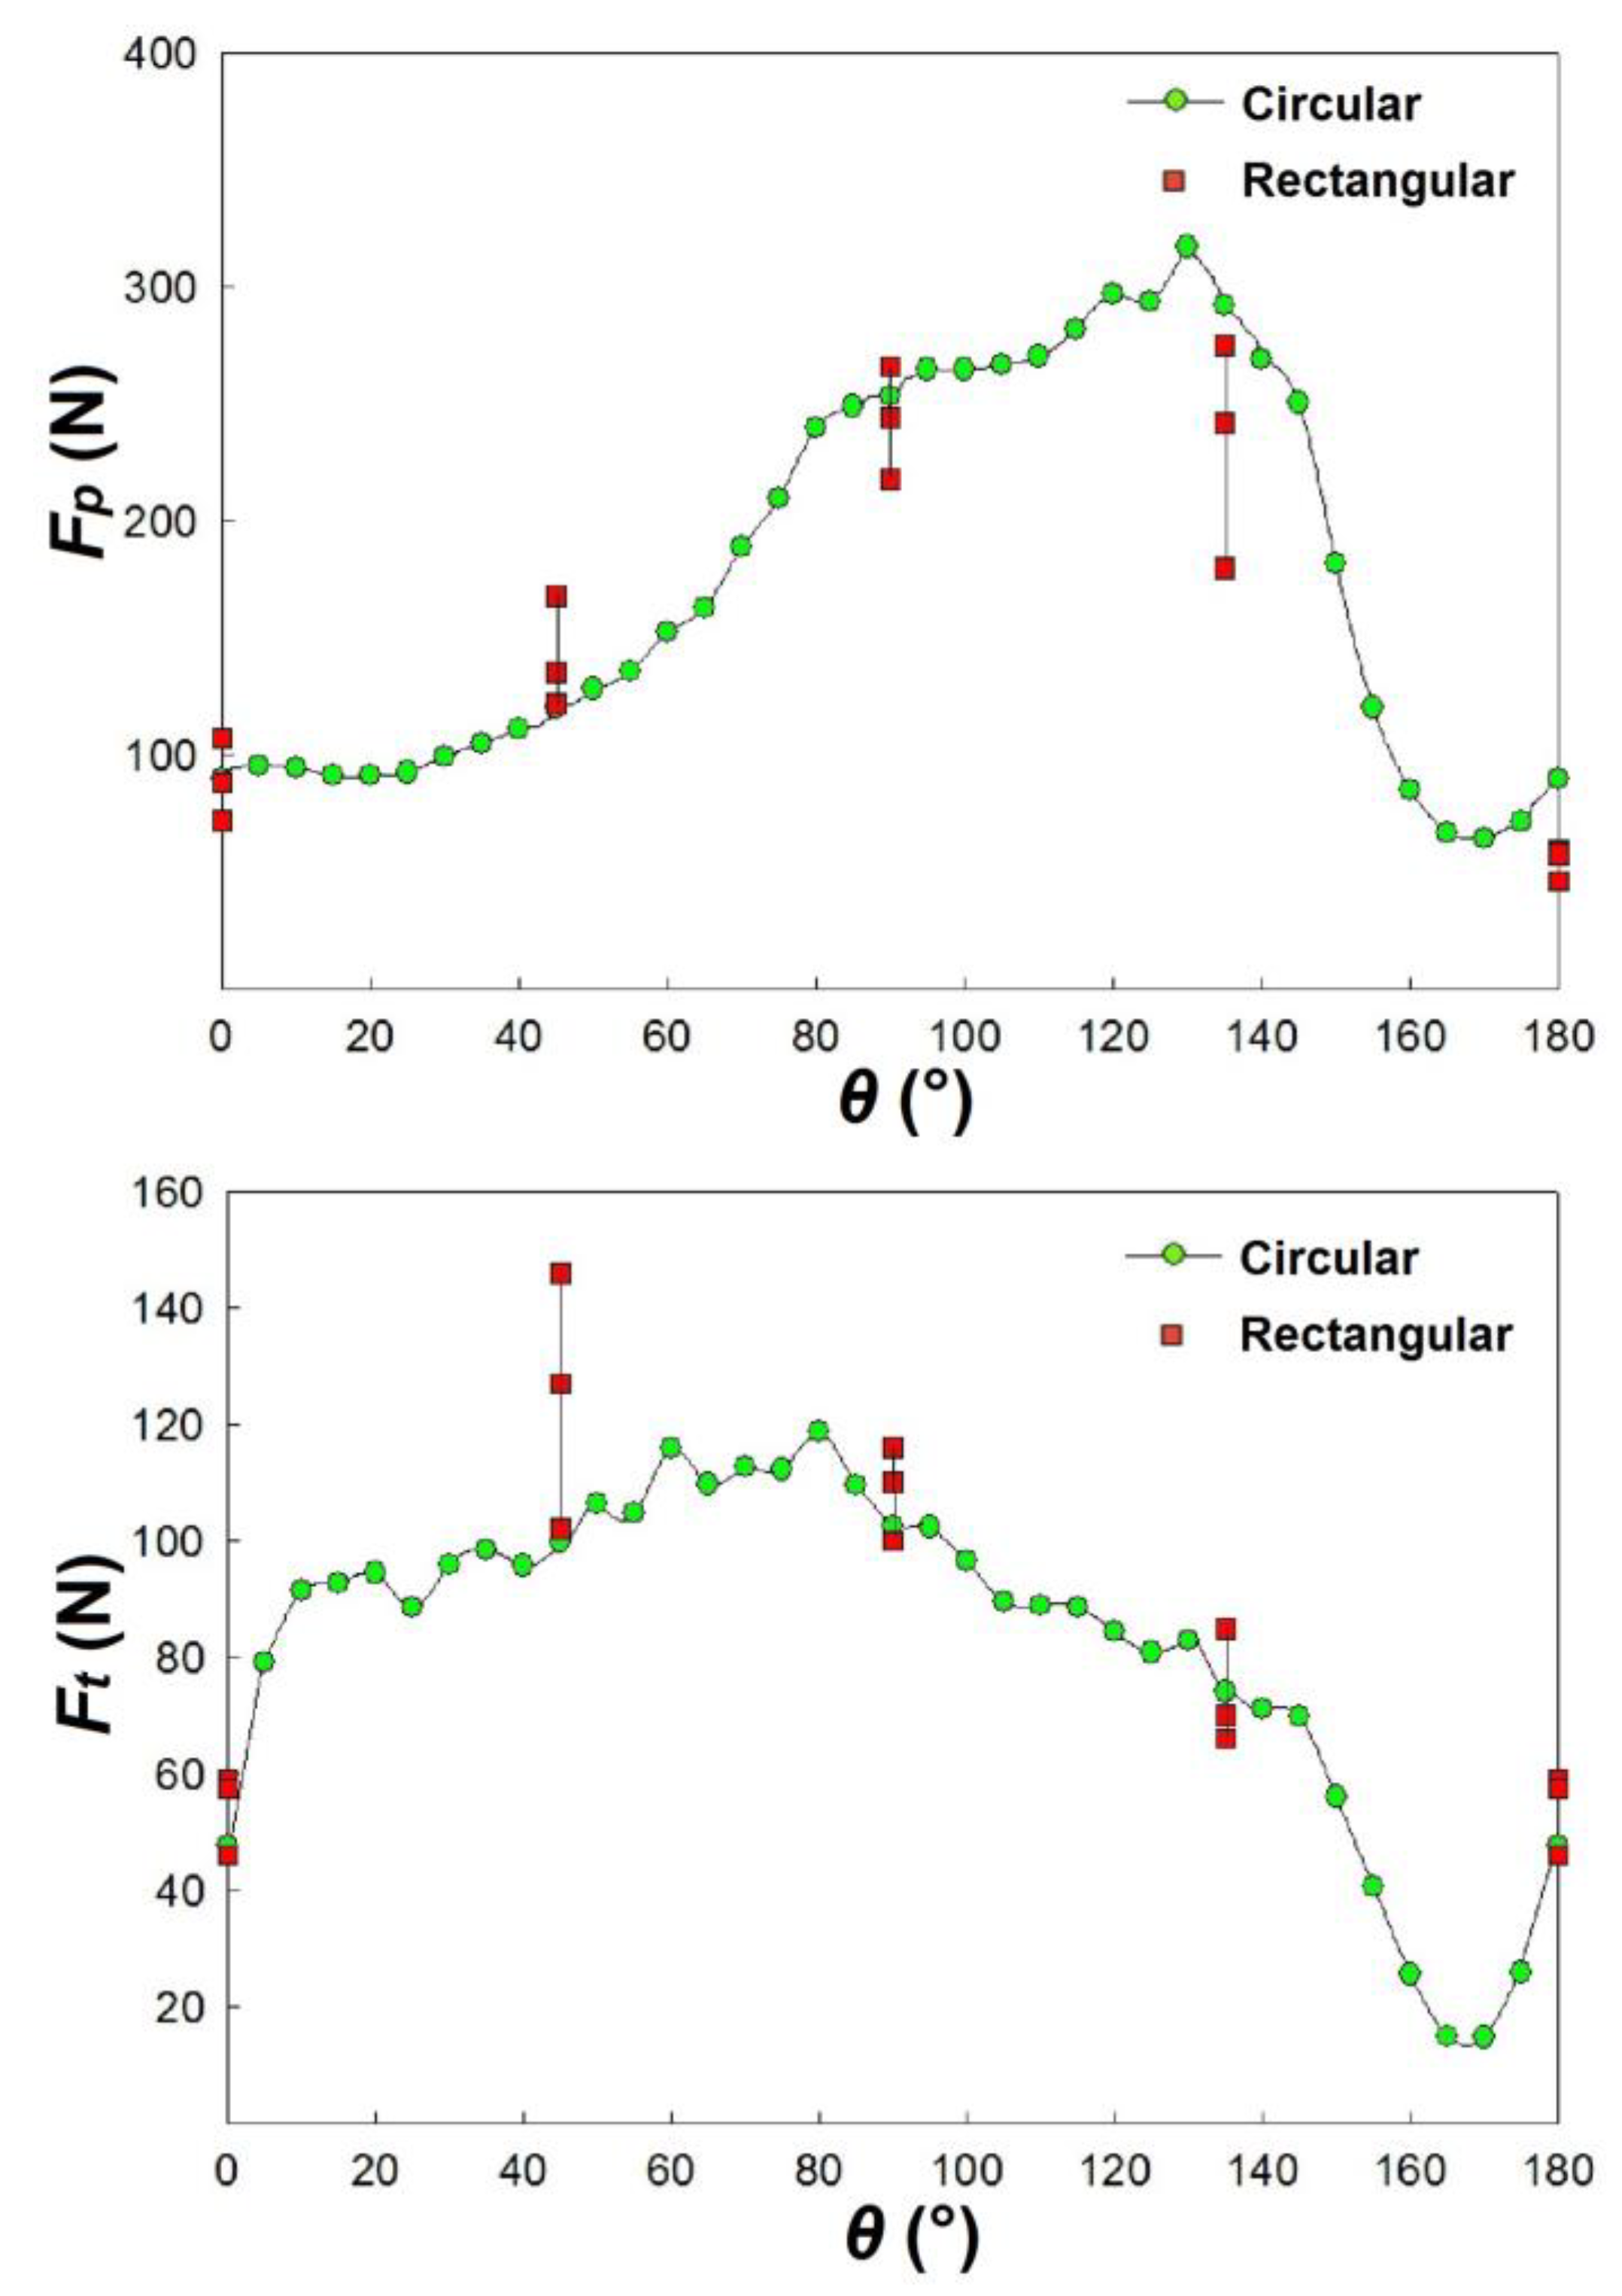
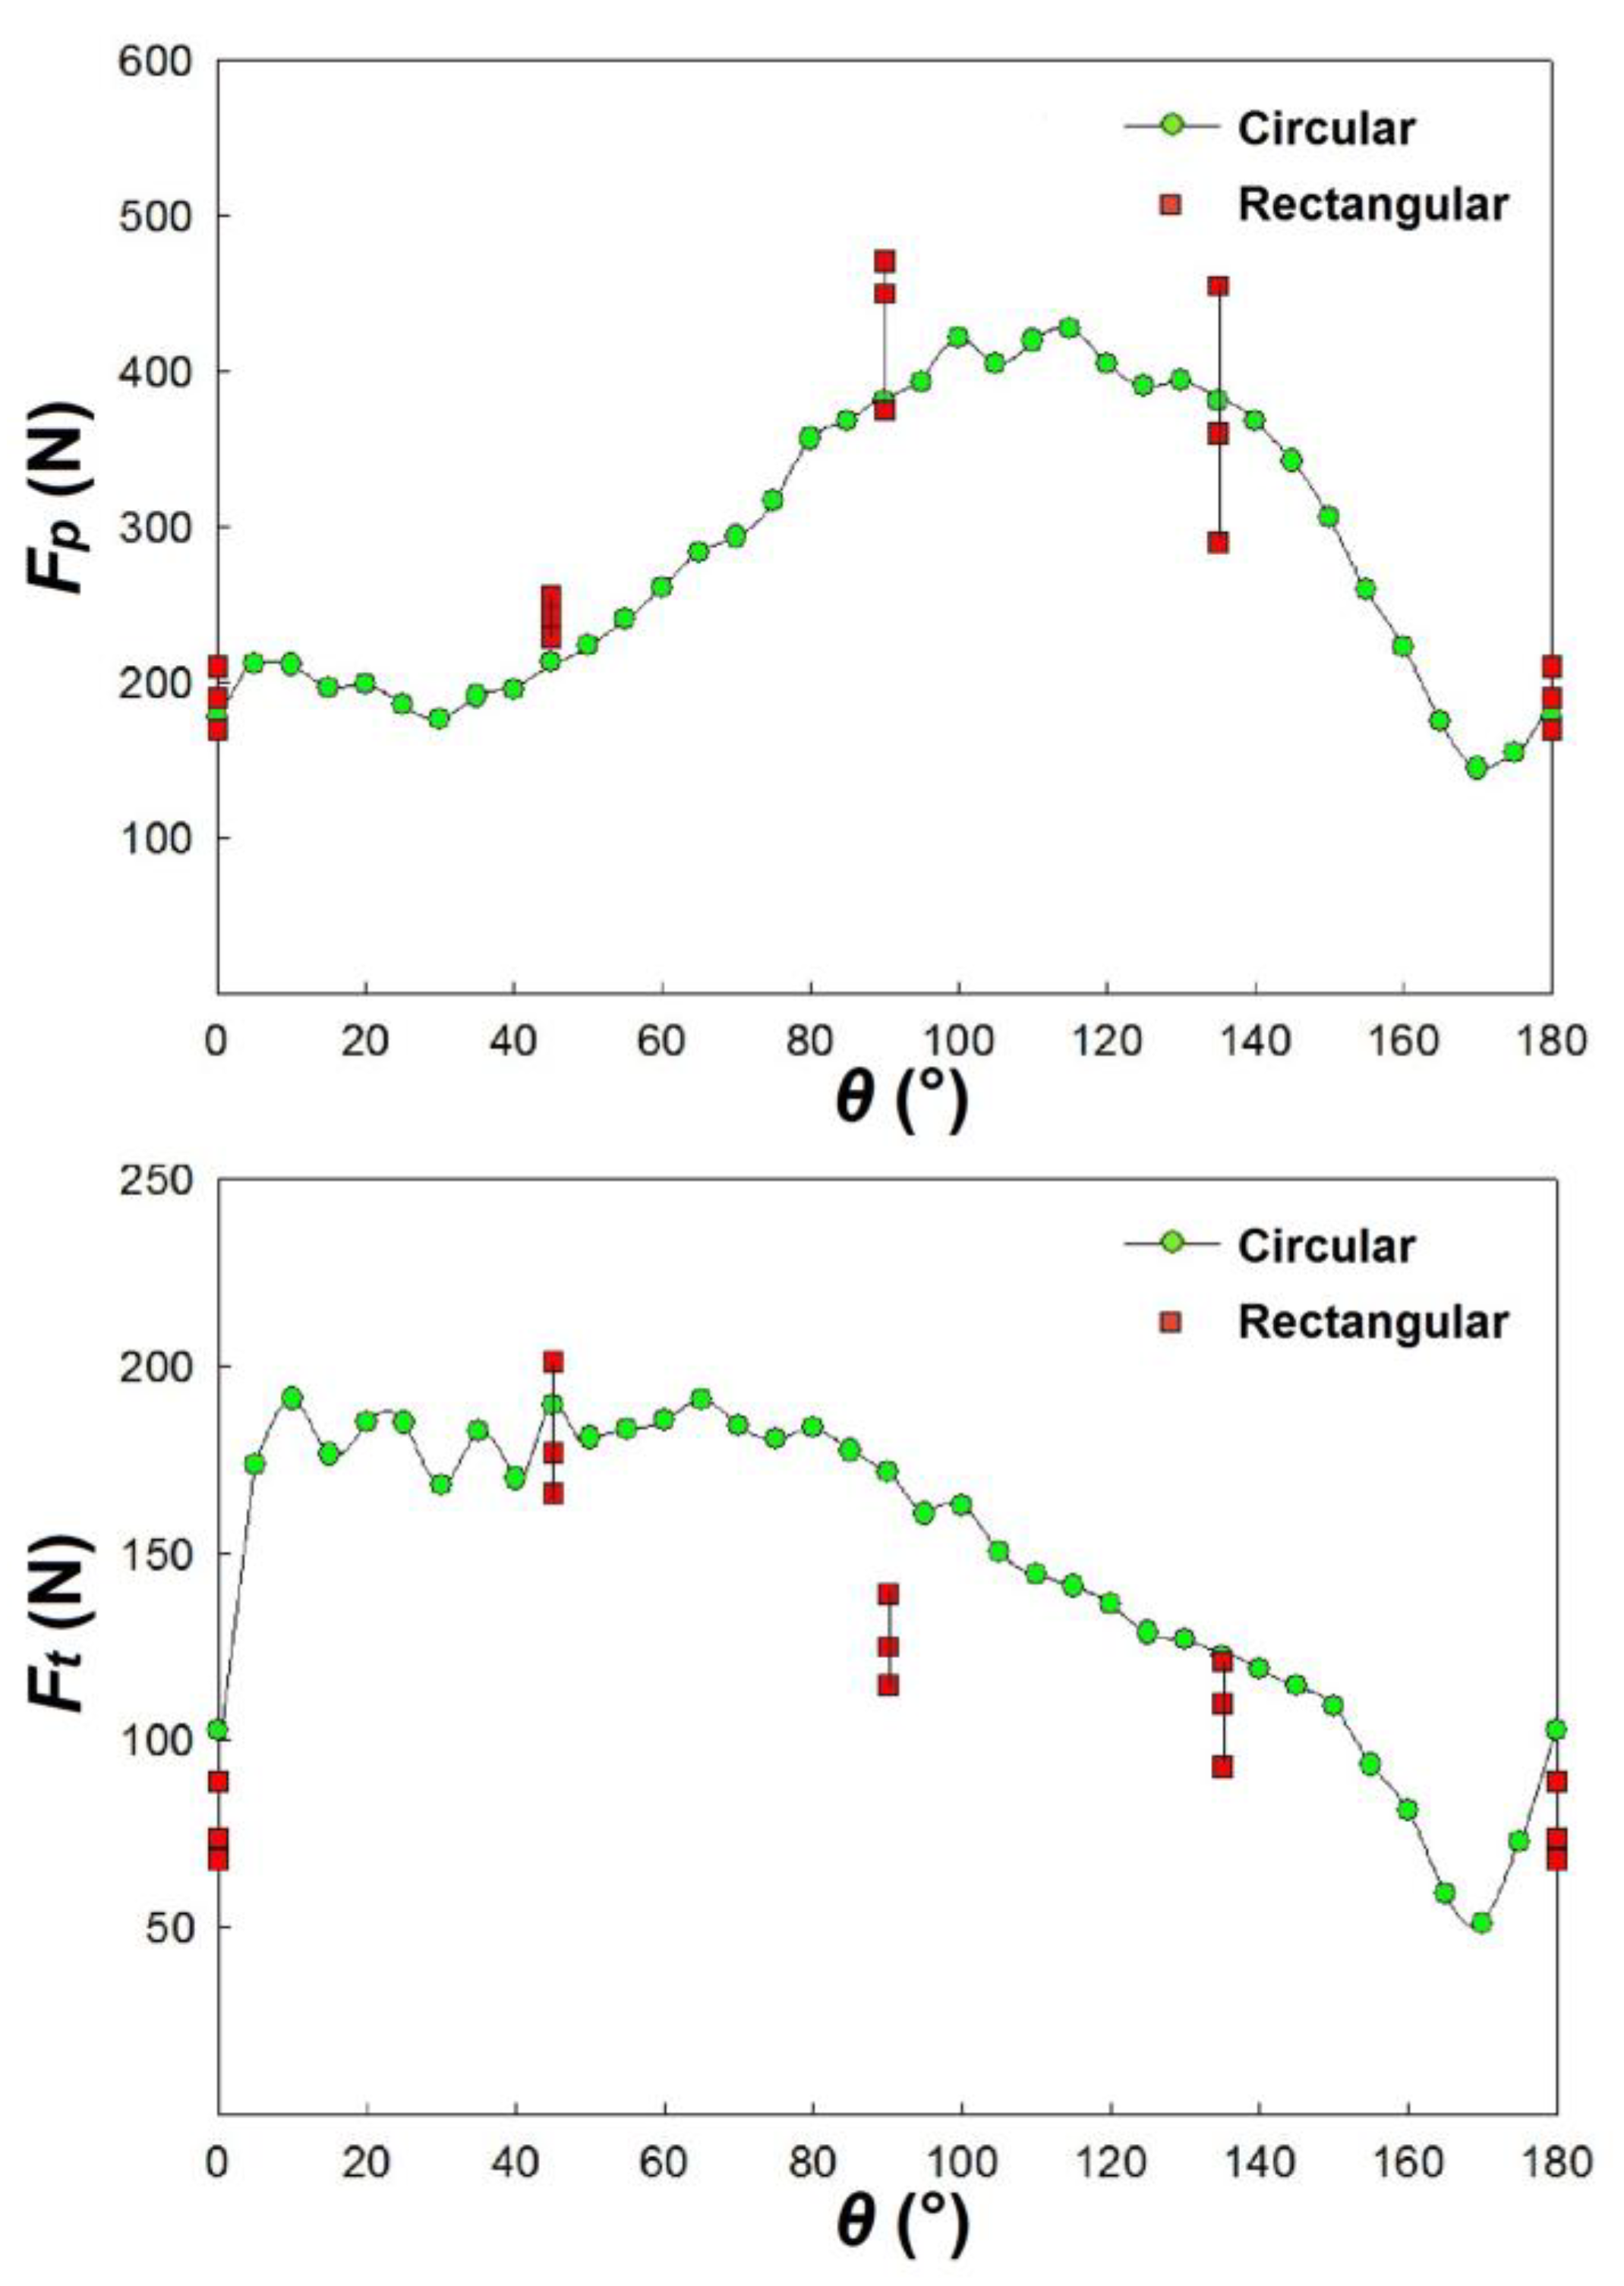
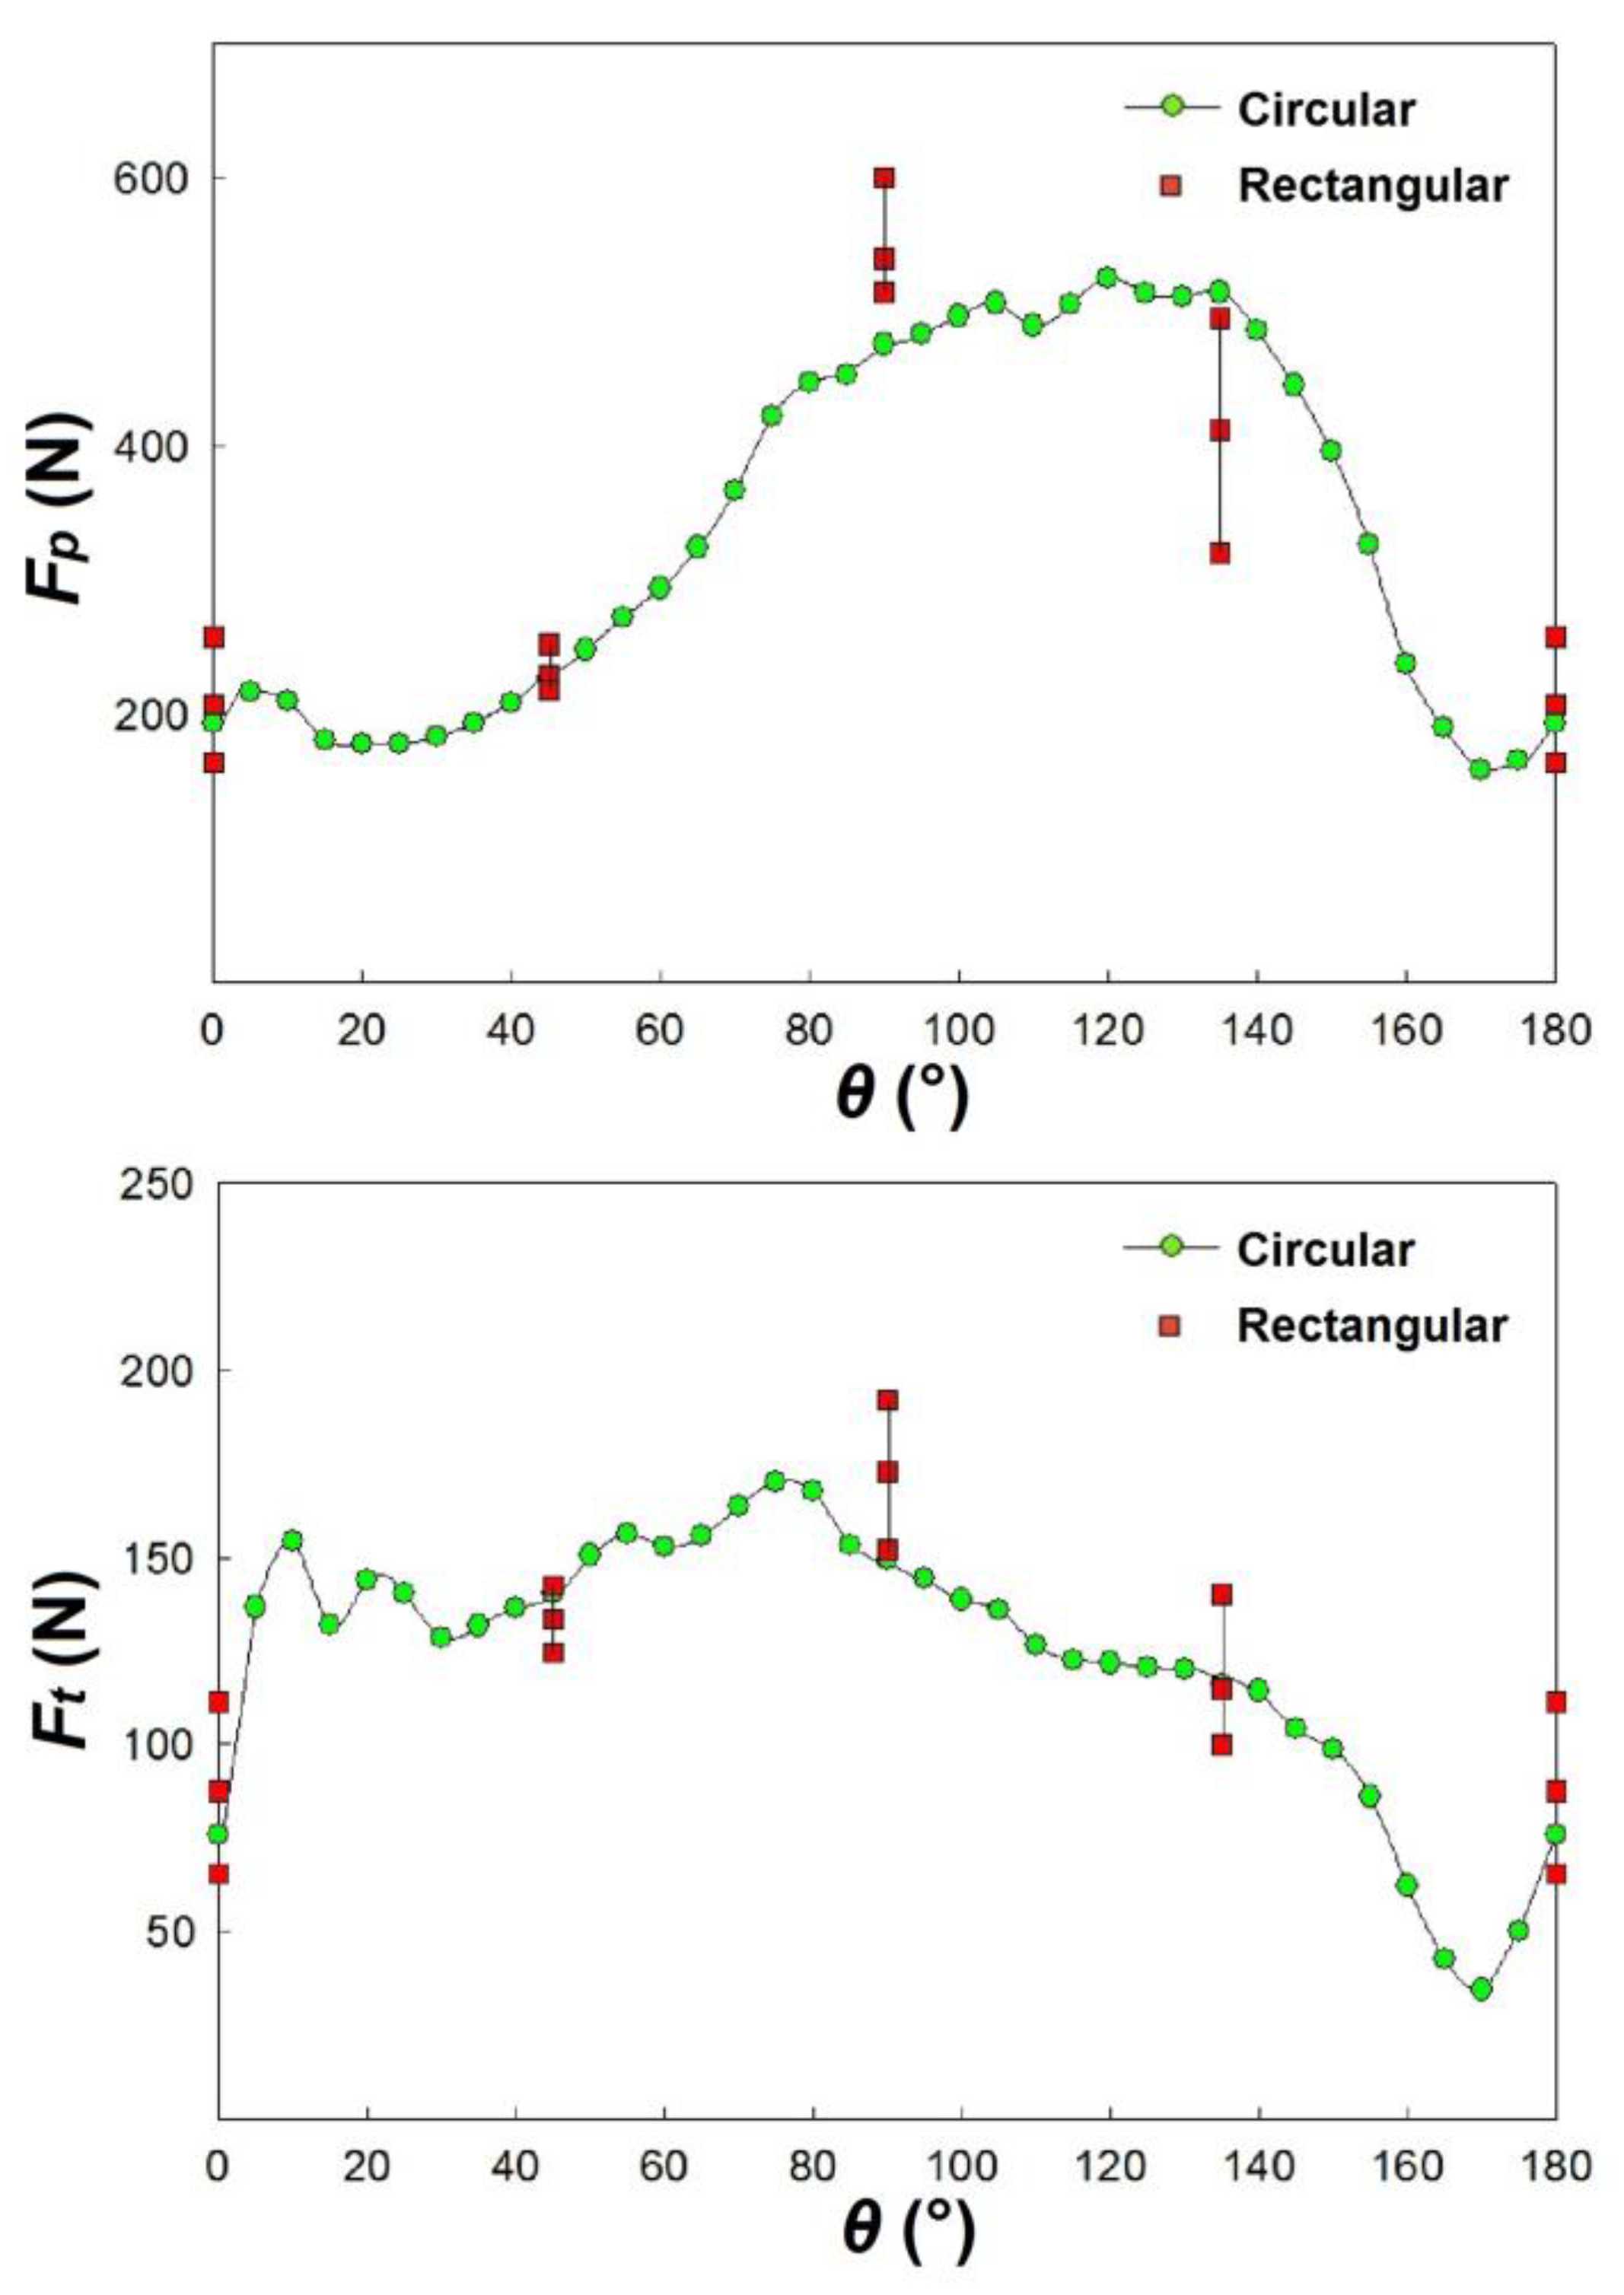
The effect of the burrs is evident for Fp. Indeed, the " theoretical GFRP+PC " curve is lower than "GFRP+PC" one. For Ft, these effects are not so evident. Overall, the difference between these values is the additional force that is necessary to avoid the formation of the burrs and to cut the material completely. The rectangular specimens cannot highlight these differences, because of the difficulty in reaching regime conditions of the data for such very short tests.
The trends of Fp and Ft related to the tests carried out on GFRP specimens with additional external layers of polycarbonate were adjusted by subtracting the contribution of polycarbonate as built. Indeed, by comparing the trends of “GFRP + PC” and “Theoretical GFRP + PC”, it is possible to understand the effective extra cutting force arising from the presence of the burr. For the circular specimens, a typical curve obtained with a mobile average and representative of all the recorded data is reported, while for the rectangular ones the average, the maximum and the minimum value recorded from the steady state of the curves for each of the θ values.
In the case of circular specimens, the cut time can be higher than 10-15 s without the variation of cutting conditions, especially when circular specimens with higher diameter are used. In the case of rectangular specimens, the contact time of the tool with the specimen is very short due to its small length, especially when vc is very high. In fact, the cutting time for the tests at vc = 25 m/min is of only about 0.6 s. This causes a higher difficulty in recording the cutting forces than in the case of circular specimens.
The higher differences are noted for θ = 45° and 135° while the lower ones for θ = 0° and 90°.
Finally, it is possible to note that Fp and Ft assume the same trend in the two types of specimens.
3.3. Roughness
Roughness measurements are performed on each of the four specified θ values for rectangular specimens. For circular specimens, measurements are conducted every 15° within the range of 0° to 180°. On each specimen, three surfaces were acquired and the roughness results are then averaged.
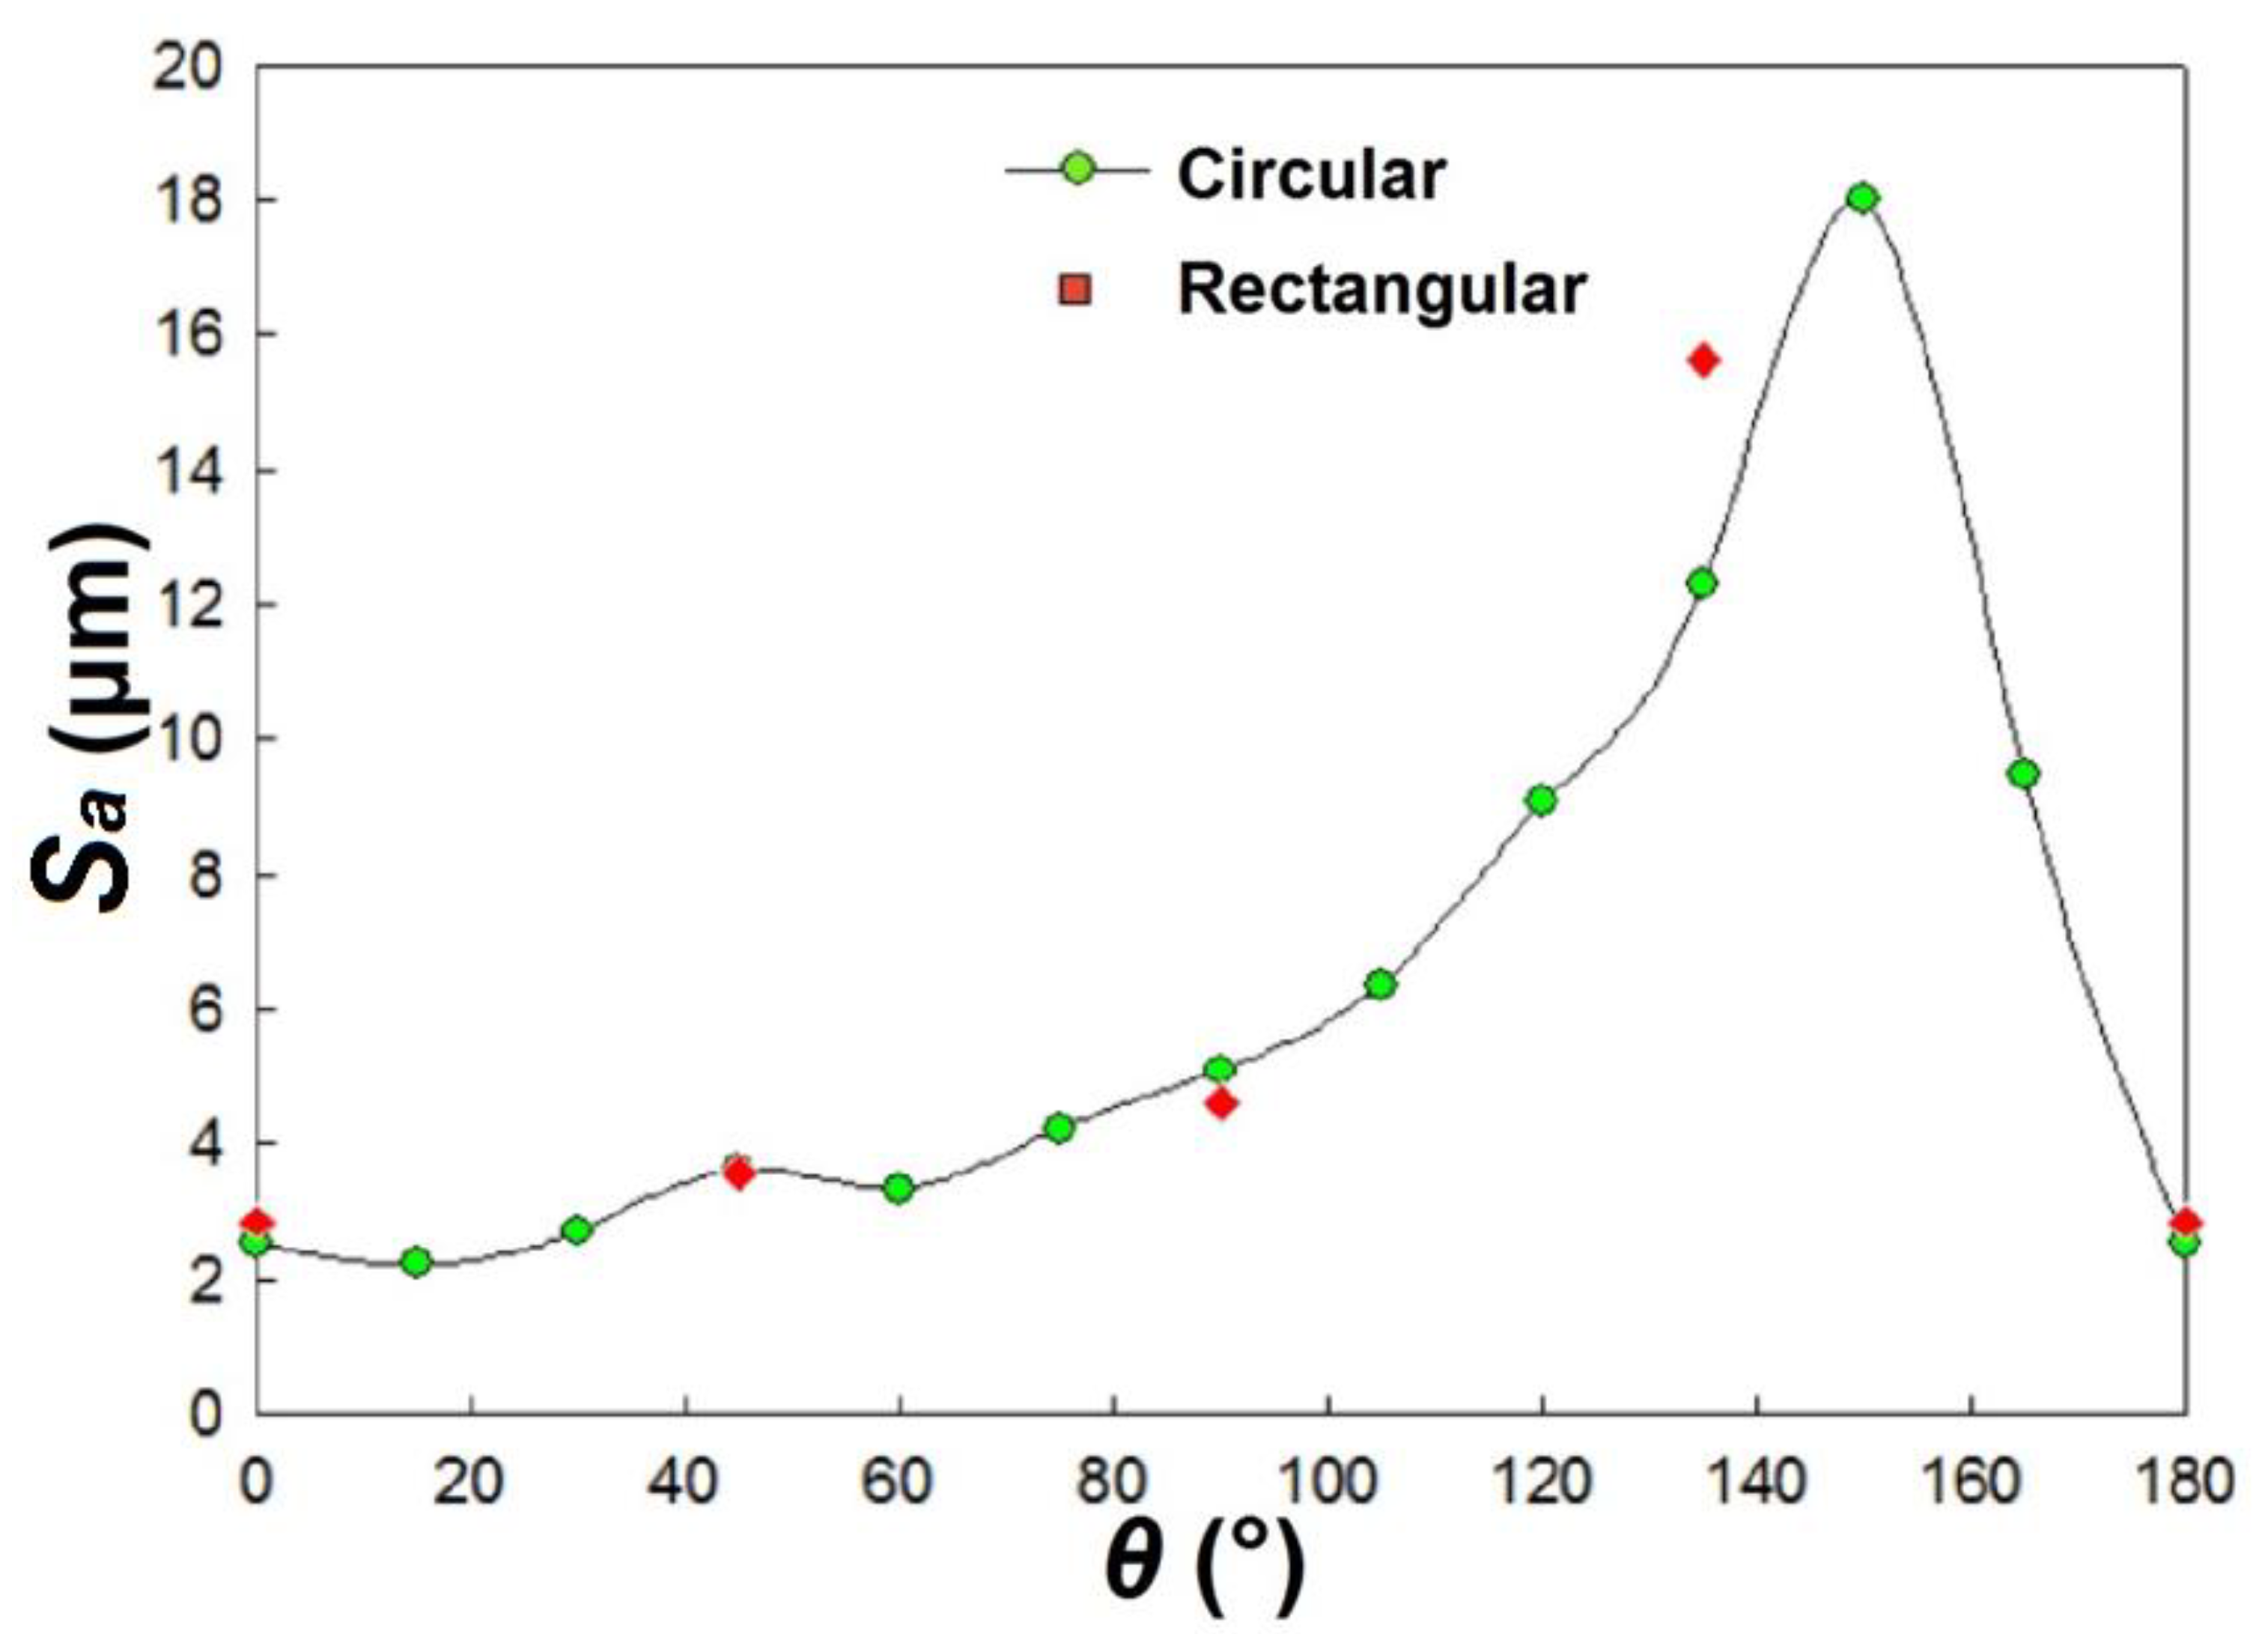
Figure 12 shows the average values of S
a for the circular and rectangular specimens with polycarbonate, for a
c = 0.20 mm. The figure illustrates a good correlation between the values measured for the two types of specimens. For the circular specimens, the trend of S
a is similar to that of F
p, indicating that θ is the parameter that most influences the roughness.
Table 1 presents both the average and standard deviation of S
a values. The lowest value is measured for θ = 0°, while the highest is observed for θ = 150°. A high variability of the data, attributed to the degradation of the machined surface, is also recorded in the range of 135° to 165°.
3.4. Chip and Cutting Surface Morphology
Before presenting the results related to the chip morphology and the quality of the cutting surfaces and in order to better understand the above-mentioned features, some observations on the cutting forces for the second set of tests are below highlighted.
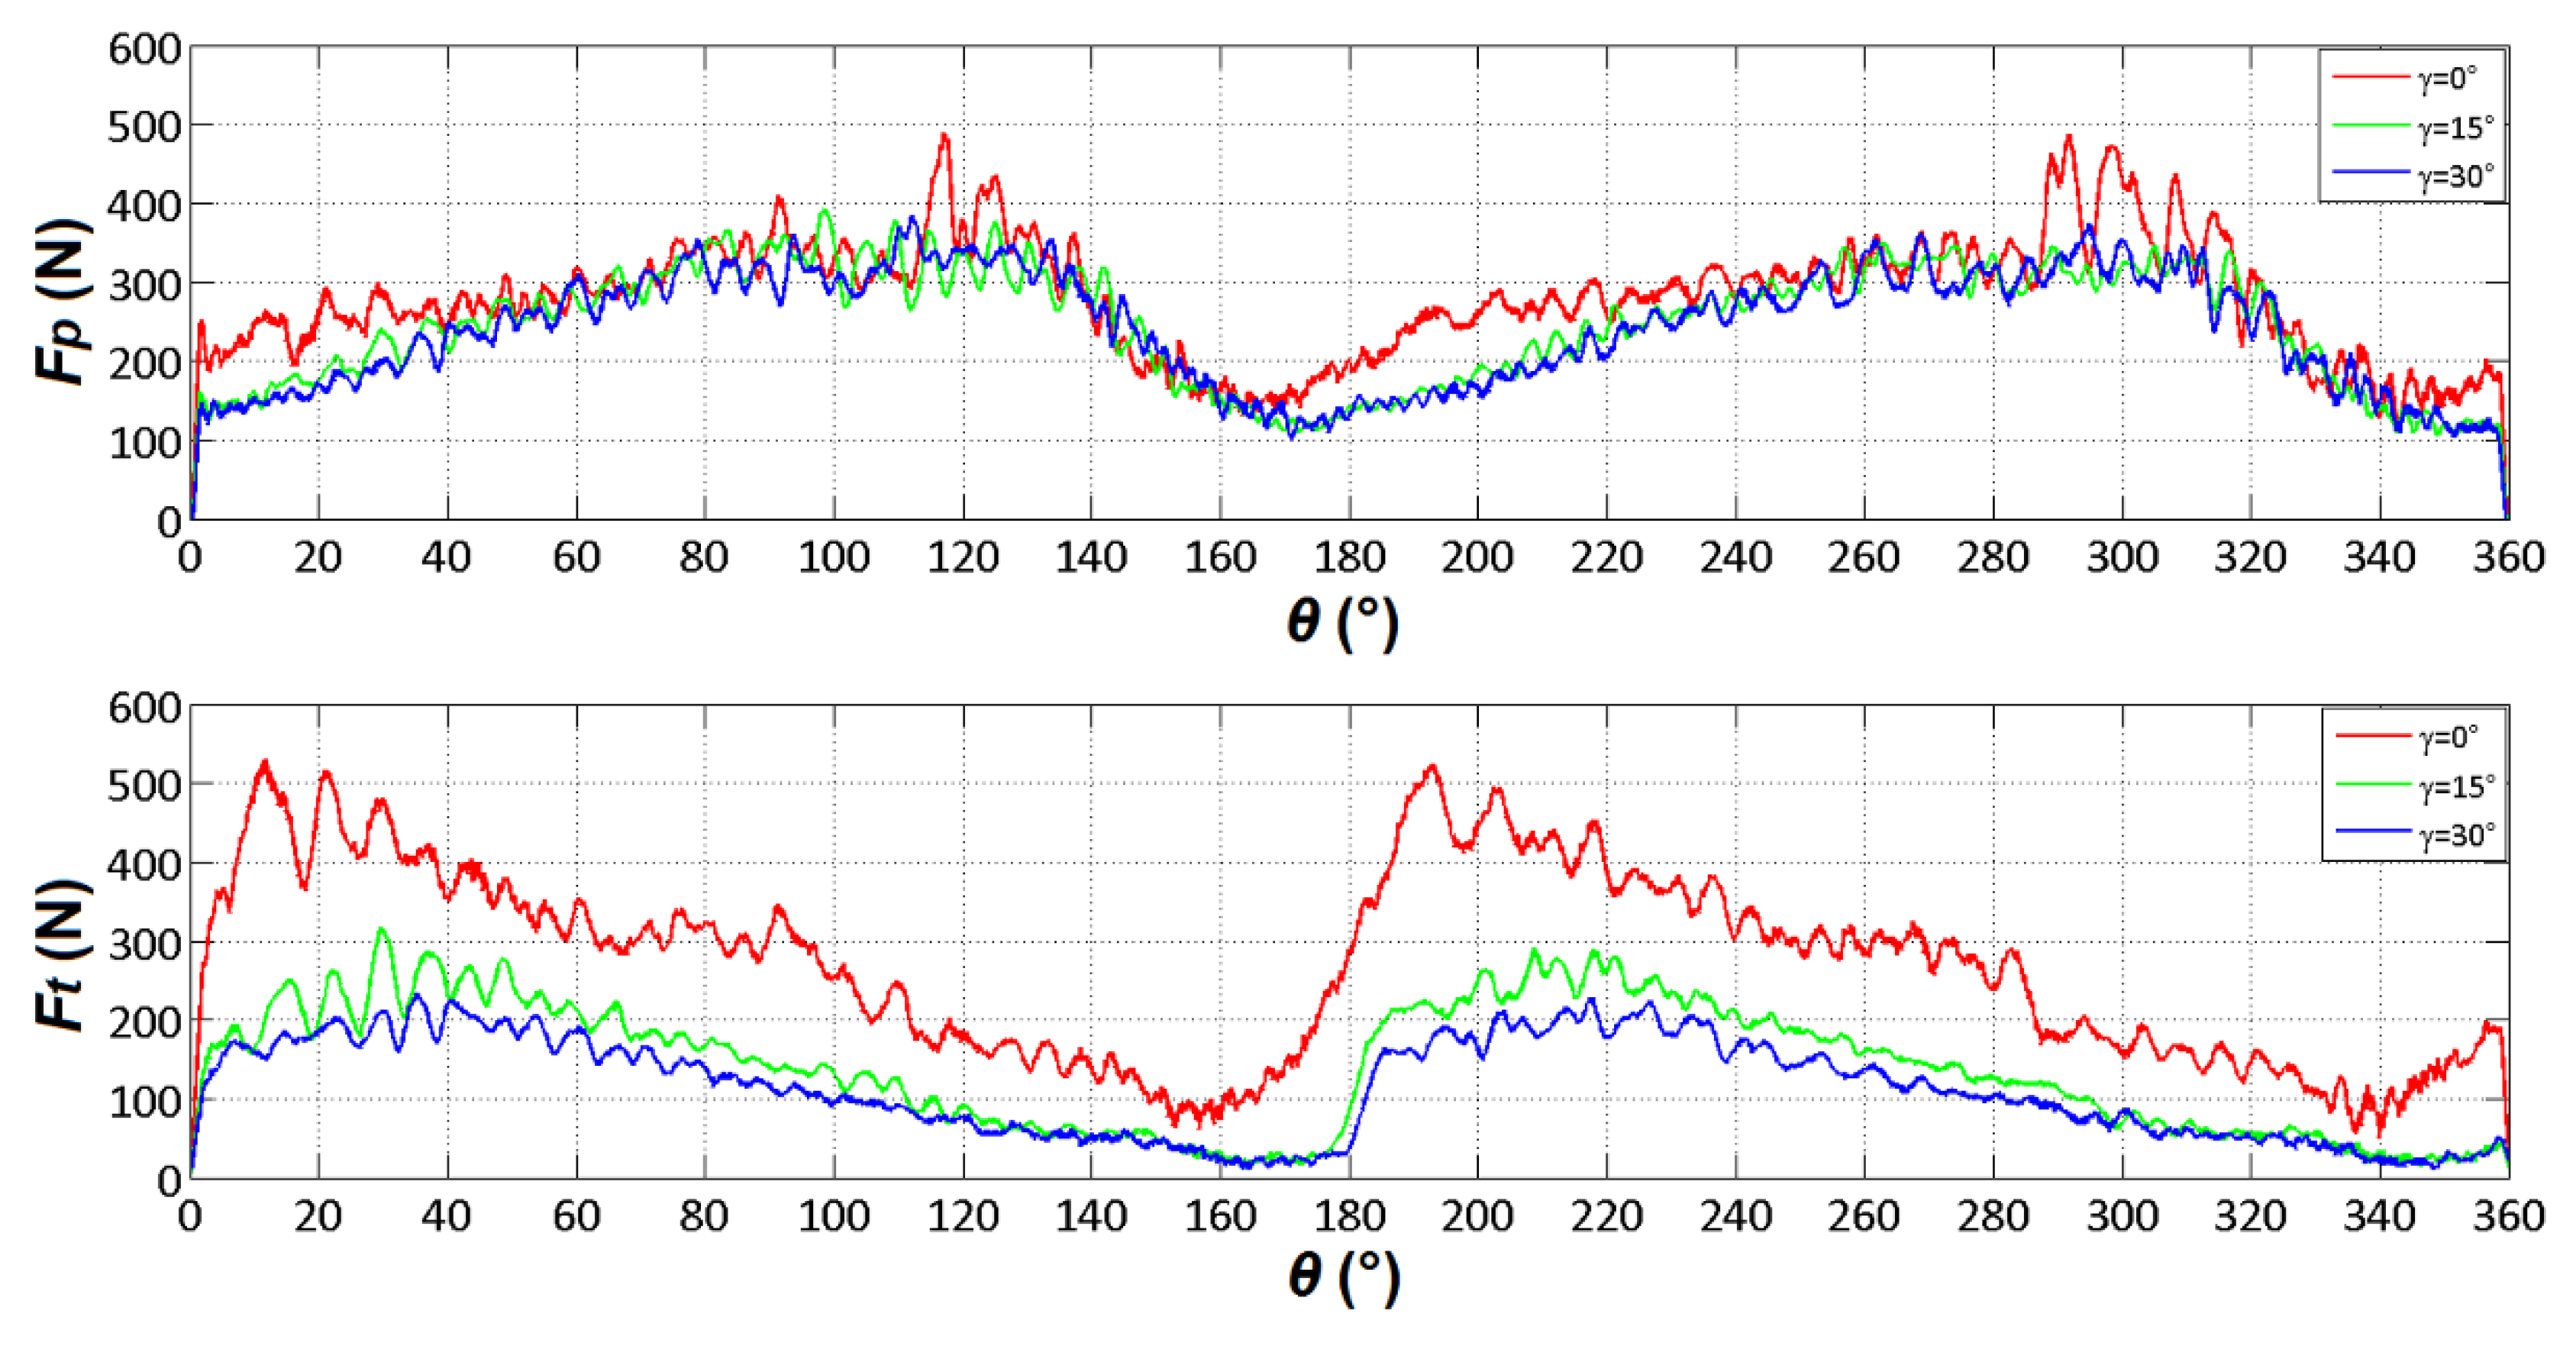
Figure 13 shows the trend of F
p and F
t for γ = 0°, 15° and 30°, α = 15° and a
c = 0.20 mm. Fp seems to remain unaffected by variations in the angle γ, while Ft displays distinct behaviour between γ = 0° and γ > 0°. Specifically, Ft decreases as γ increases.
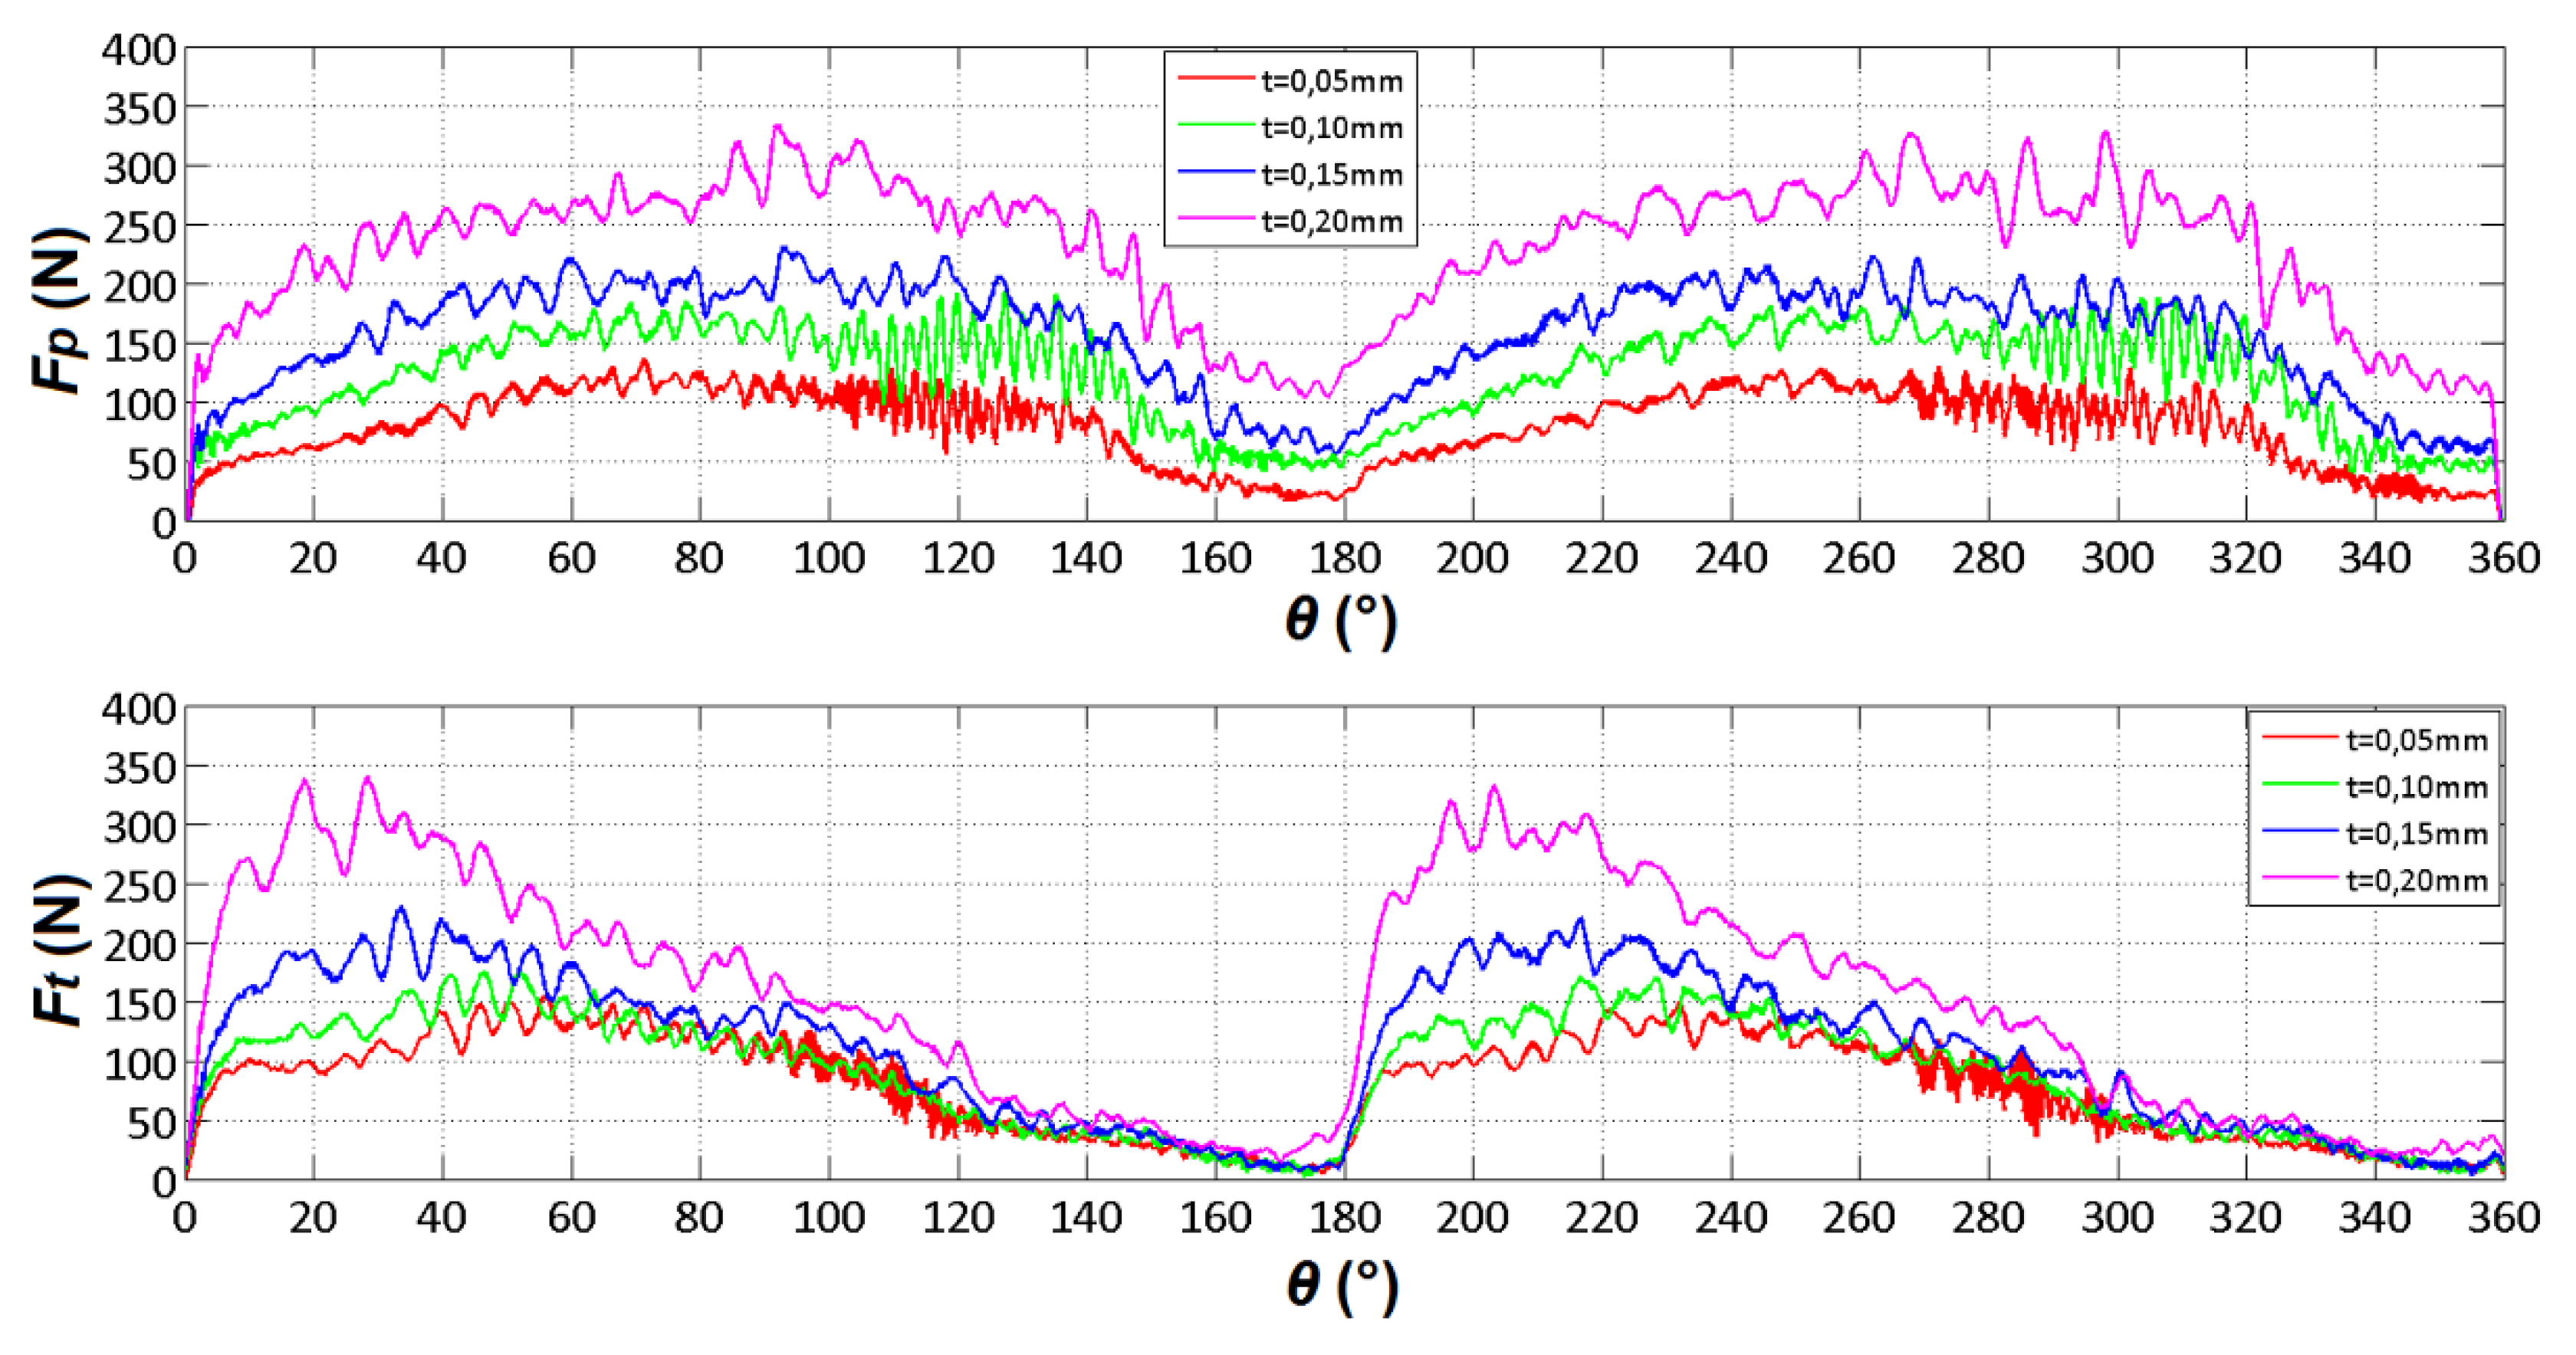
Figure 14 depicts the trend of Fp and Ft for a
c = 0.05, 0.10, 0.15, and 0.20 mm, with γ = 30° and α = 15°. Both components of the cutting force exhibit an increase with the depth of cut, a
c.
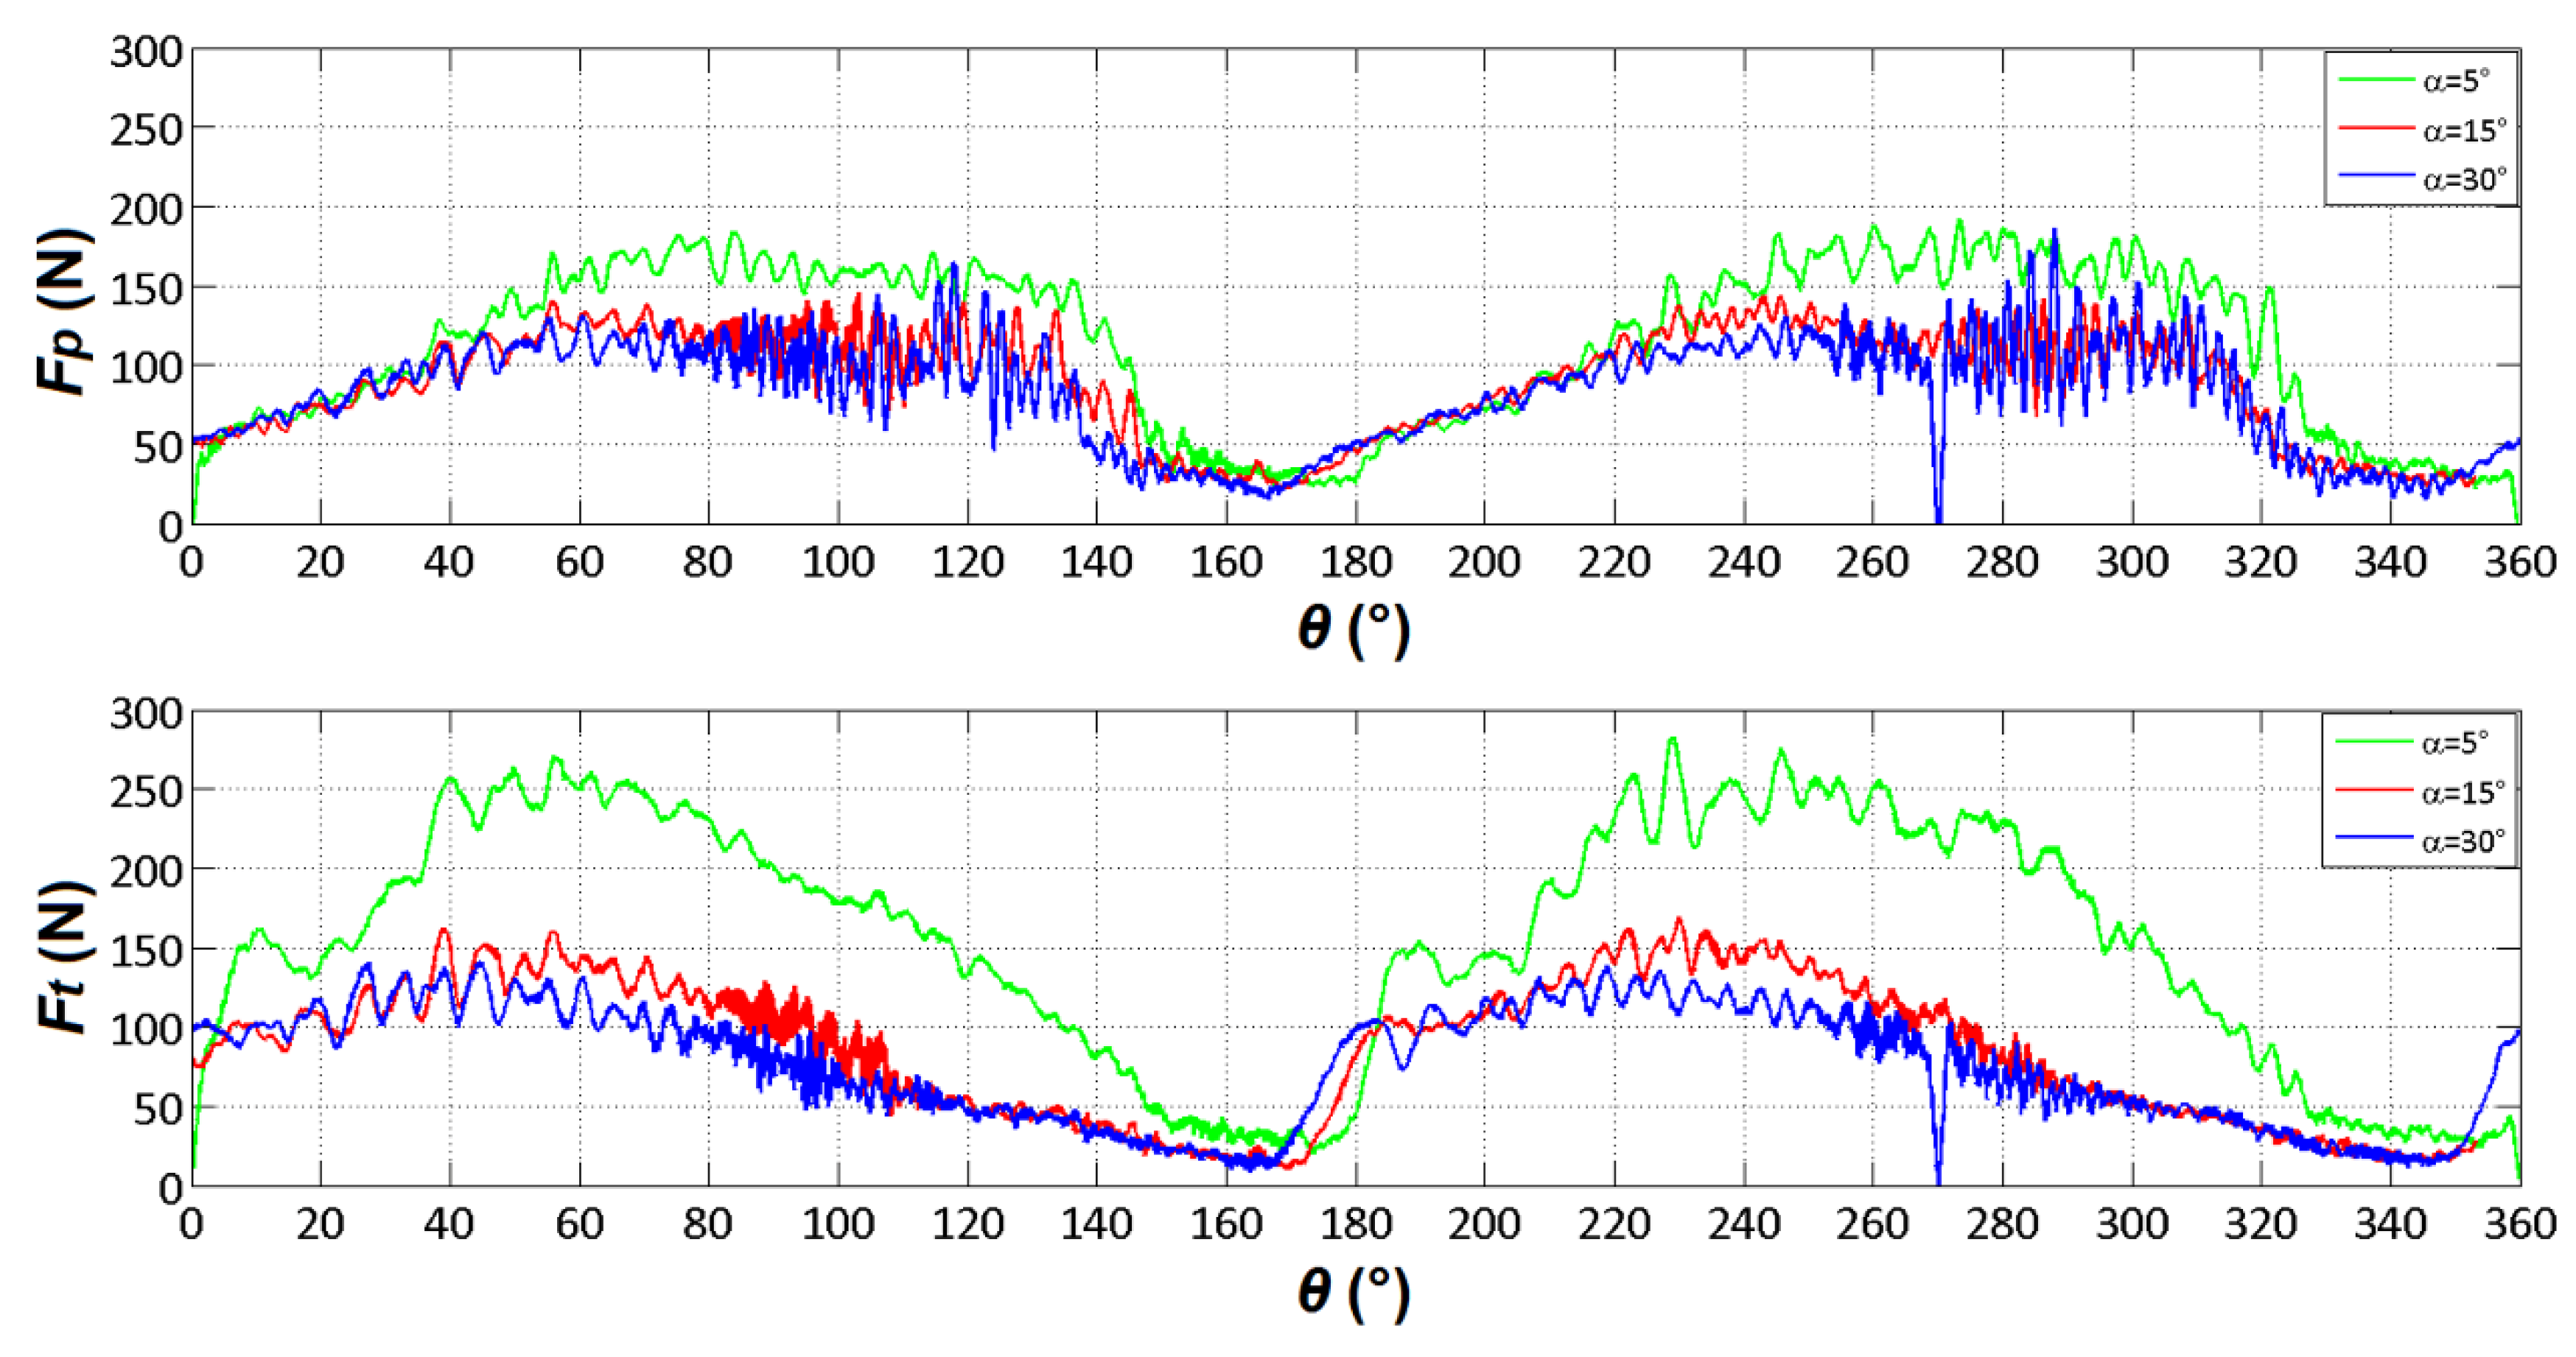
Figure 15 illustrates the behaviour of Fp and Ft for α = 5°, 15°, and 30°, with γ = 15° and a depth of cut of 0.05 mm. Notably, there is a significant decrease in the forces observed when transitioning from α = 5° to 15°. Additionally, smaller decreases are evident when progressing from α = 15° to 30°.
3.1.1. Chip Morphology for θ = 0°/180°/360°
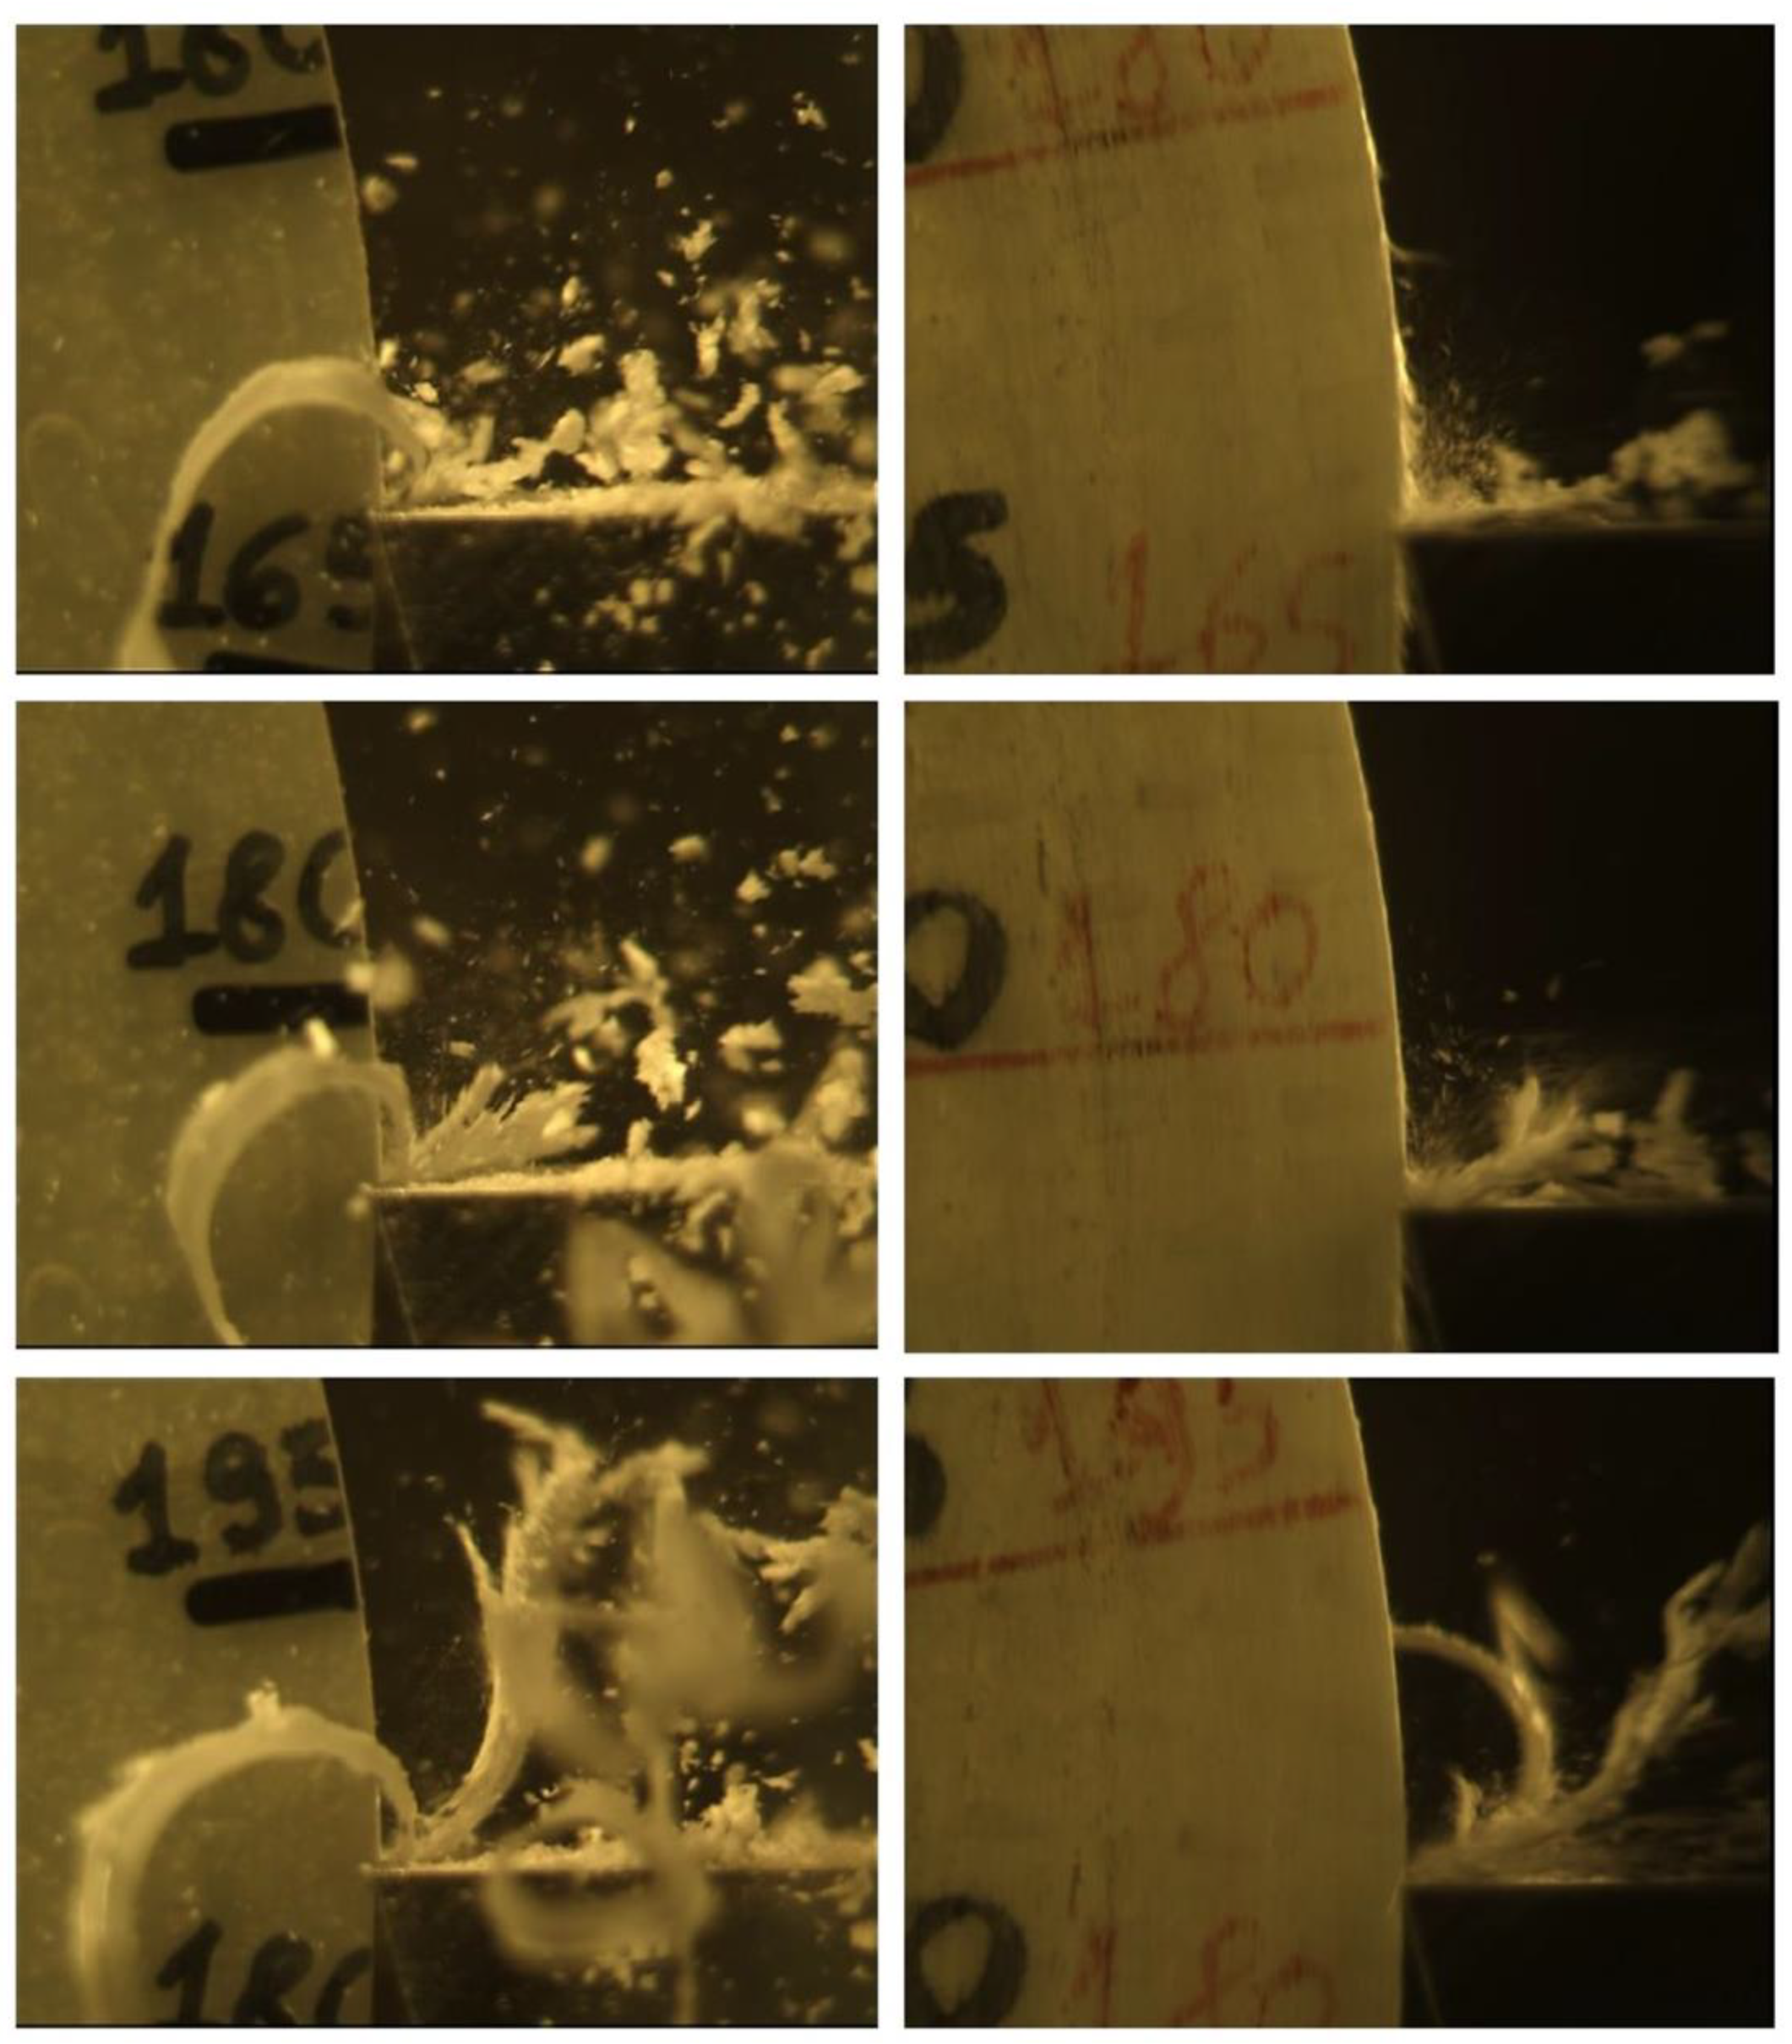
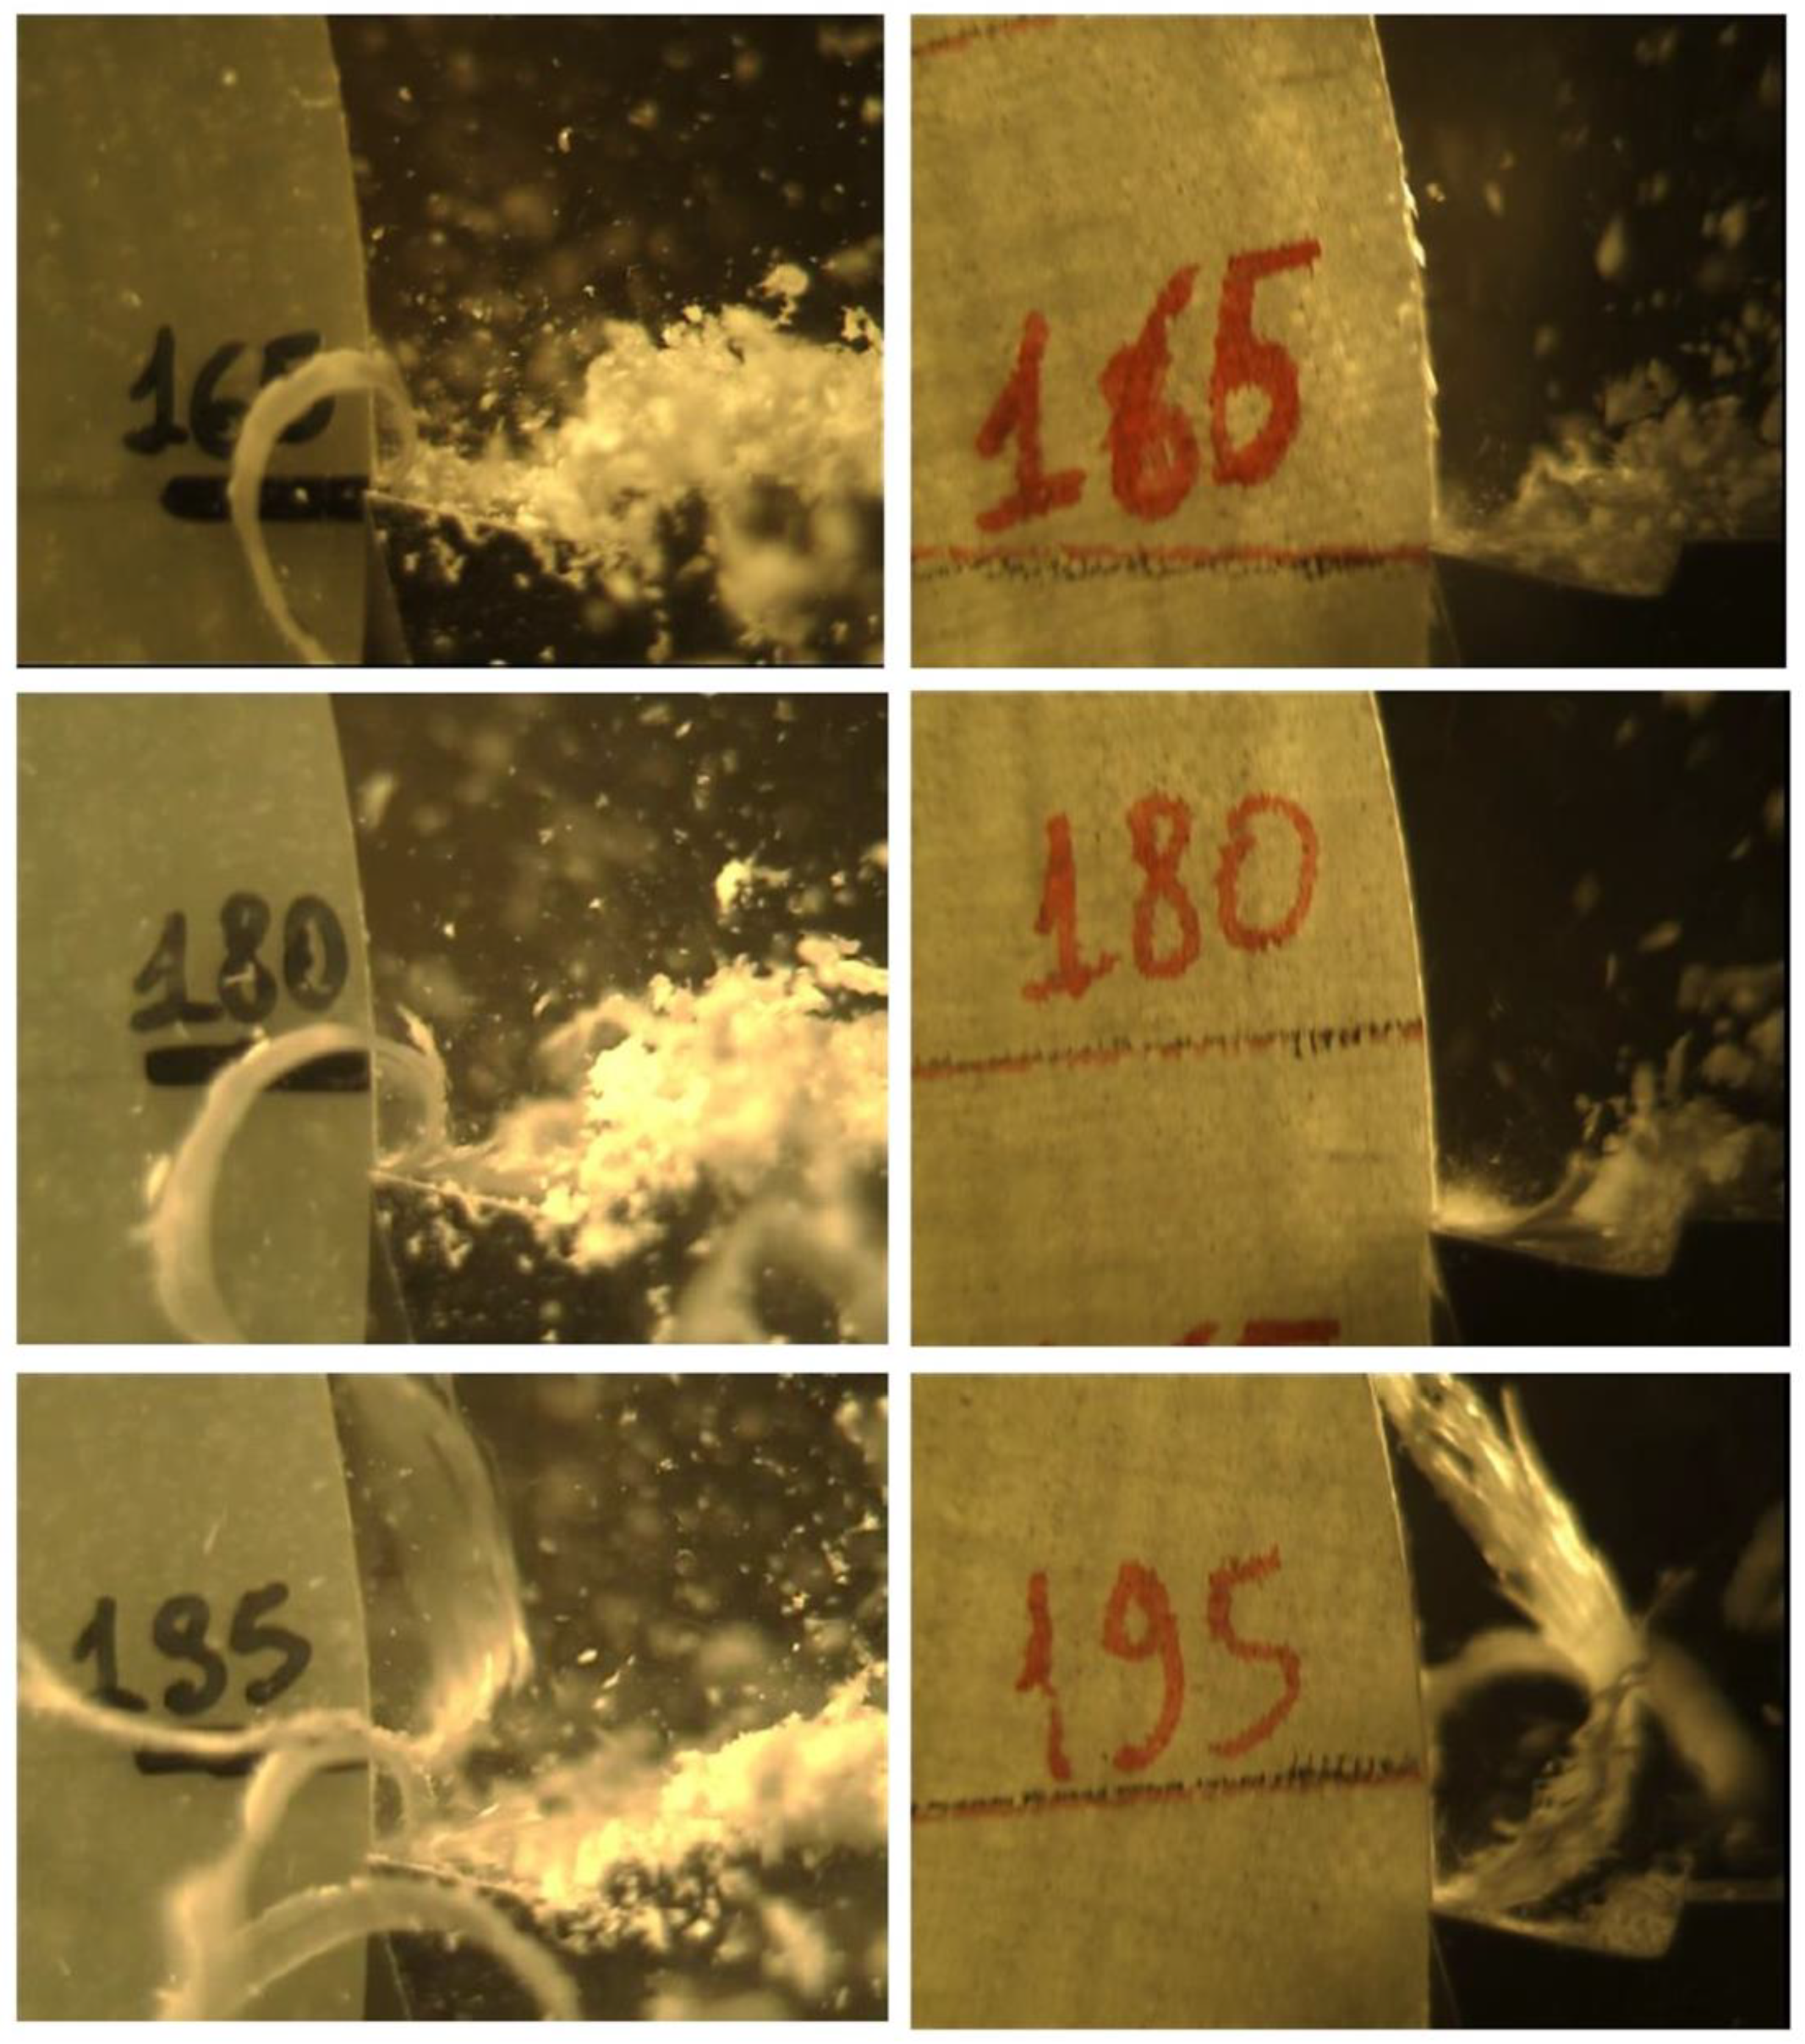
For sake of brevity, images related to all angles are not included, but it was found that the greatest chip lengths were identified when the angle θ was between 160° and 180°. As an example,
Figure 16 and
Figure 17 depict the chip morphology around θ = 180° for α = 15°, a
c = 0.20 mm and, respectively, γ = 0° and 15°, for specimens with (left) and without polycarbonate (right). On the left side of the figures, a continuous polycarbonate chip is prominently visible in the foreground. Conversely, on the right side, the cutting zone appears clearer.
The reason is that near θ =180°, the fibers have an orientation such that it is easier for the tool to generate delamination inside the specimen, resulting in easier penetration and longer chip length. To testify this, it can observe that in
Figure 13 and
Figure 14 a clear decrease in force near 180°. Therefore, lower cutting forces are associated with longer chip.
This is supported by the results of the analytical model proposed by Pwu et al. [
25]. They found that the formation of the longest chip can be associated with the minimum value of the cutting forces when cutting fibre-reinforced plastics perpendicular to the fibre axis. In the present investigation this condition occurred at θ ≈ 165° when γ = 0° and at higher θ values for γ > 0° (this is particularly evident looking at
Figure 14 where F
t remains practically constant up to θ = 180°).
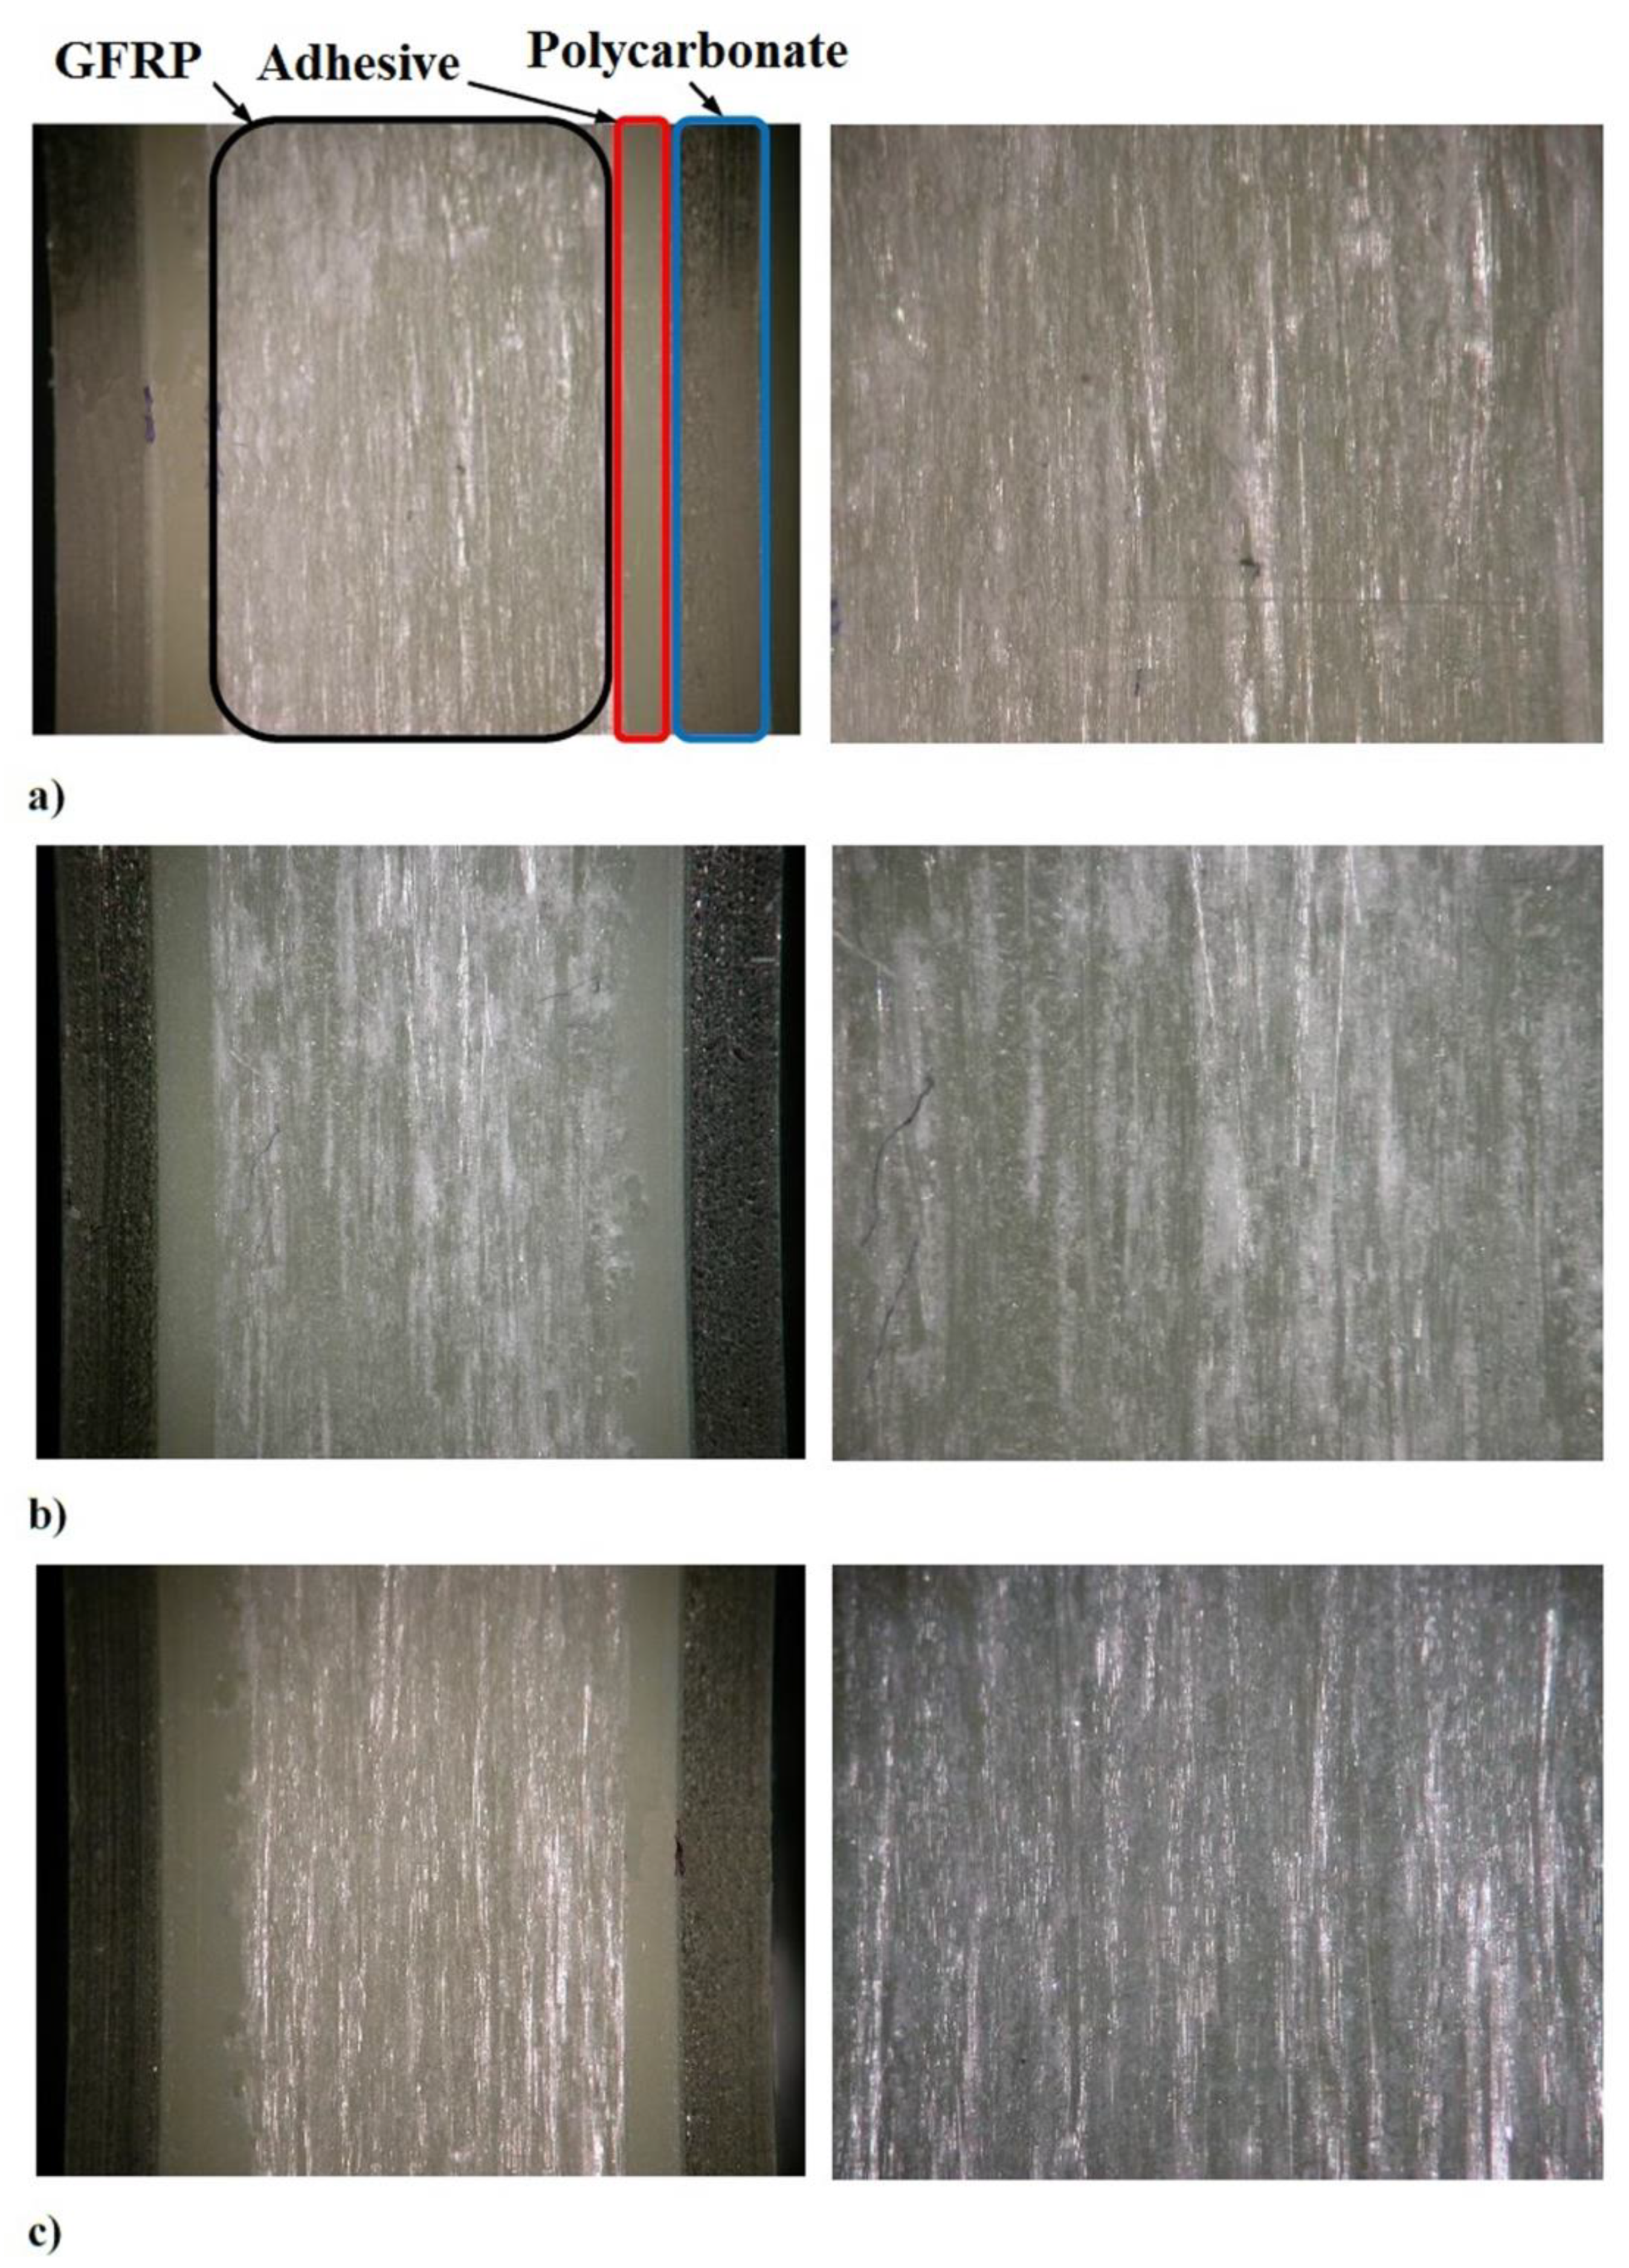
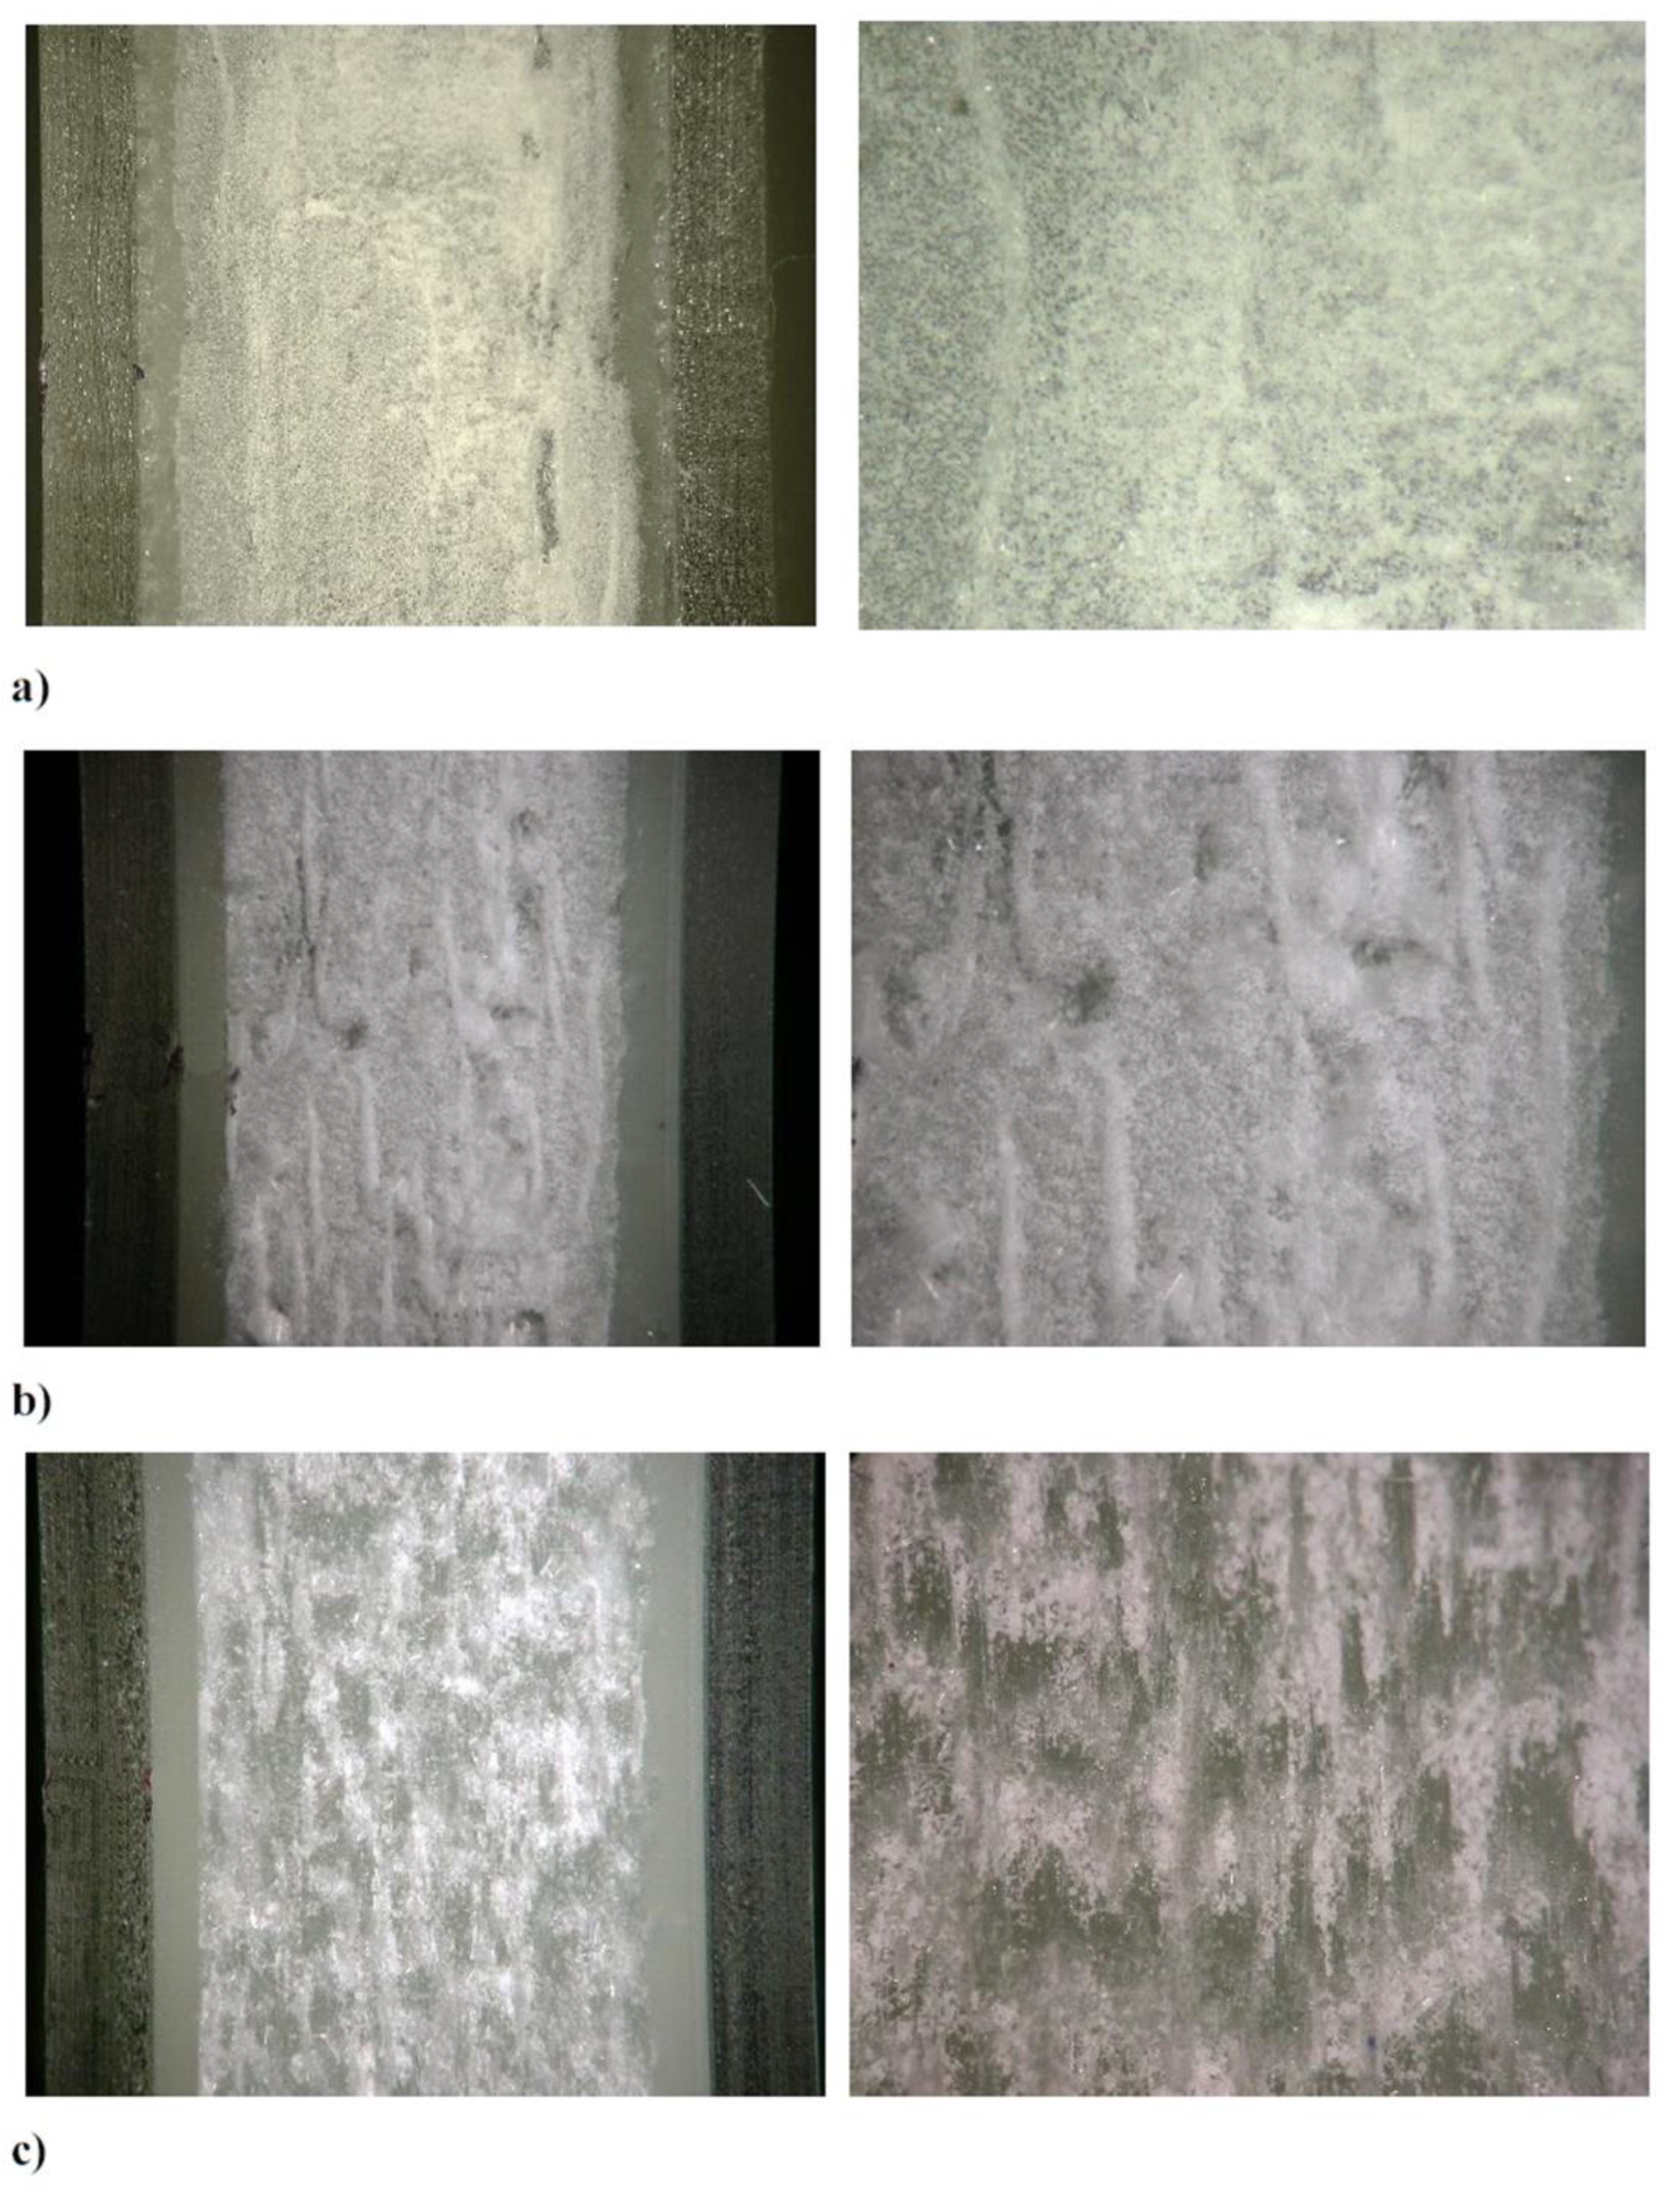
The described mechanism is validated by the microscopic analysis of the machined surface.
Figure 18 presents images at 5x (left) and 10x (right) of the machined surface for α = 15°, ac = 0.20 mm, and varying γ values.
In both cases (γ = 0° and γ > 0°), the morphology of the cutting surface appears similar. An alternation of darker and lighter areas is evident. The lighter areas correspond to the glass fibers, which exhibit higher light reflectivity, while the darker areas correspond to the matrix material. The glass fibers are distinctly visible due to their exposure by crack propagation along the direction parallel to the fibers during the formation of the “longest chip ”. These observations confirm the results obtained by Wang et al. [
26] on the cutting mechanism in the orthogonal machining of epoxy composites reinforced by unidirectional carbon fibres when subjected to orthogonal cutting.
3.1.2. Chip Morphology for θ = 0°/180°/360°
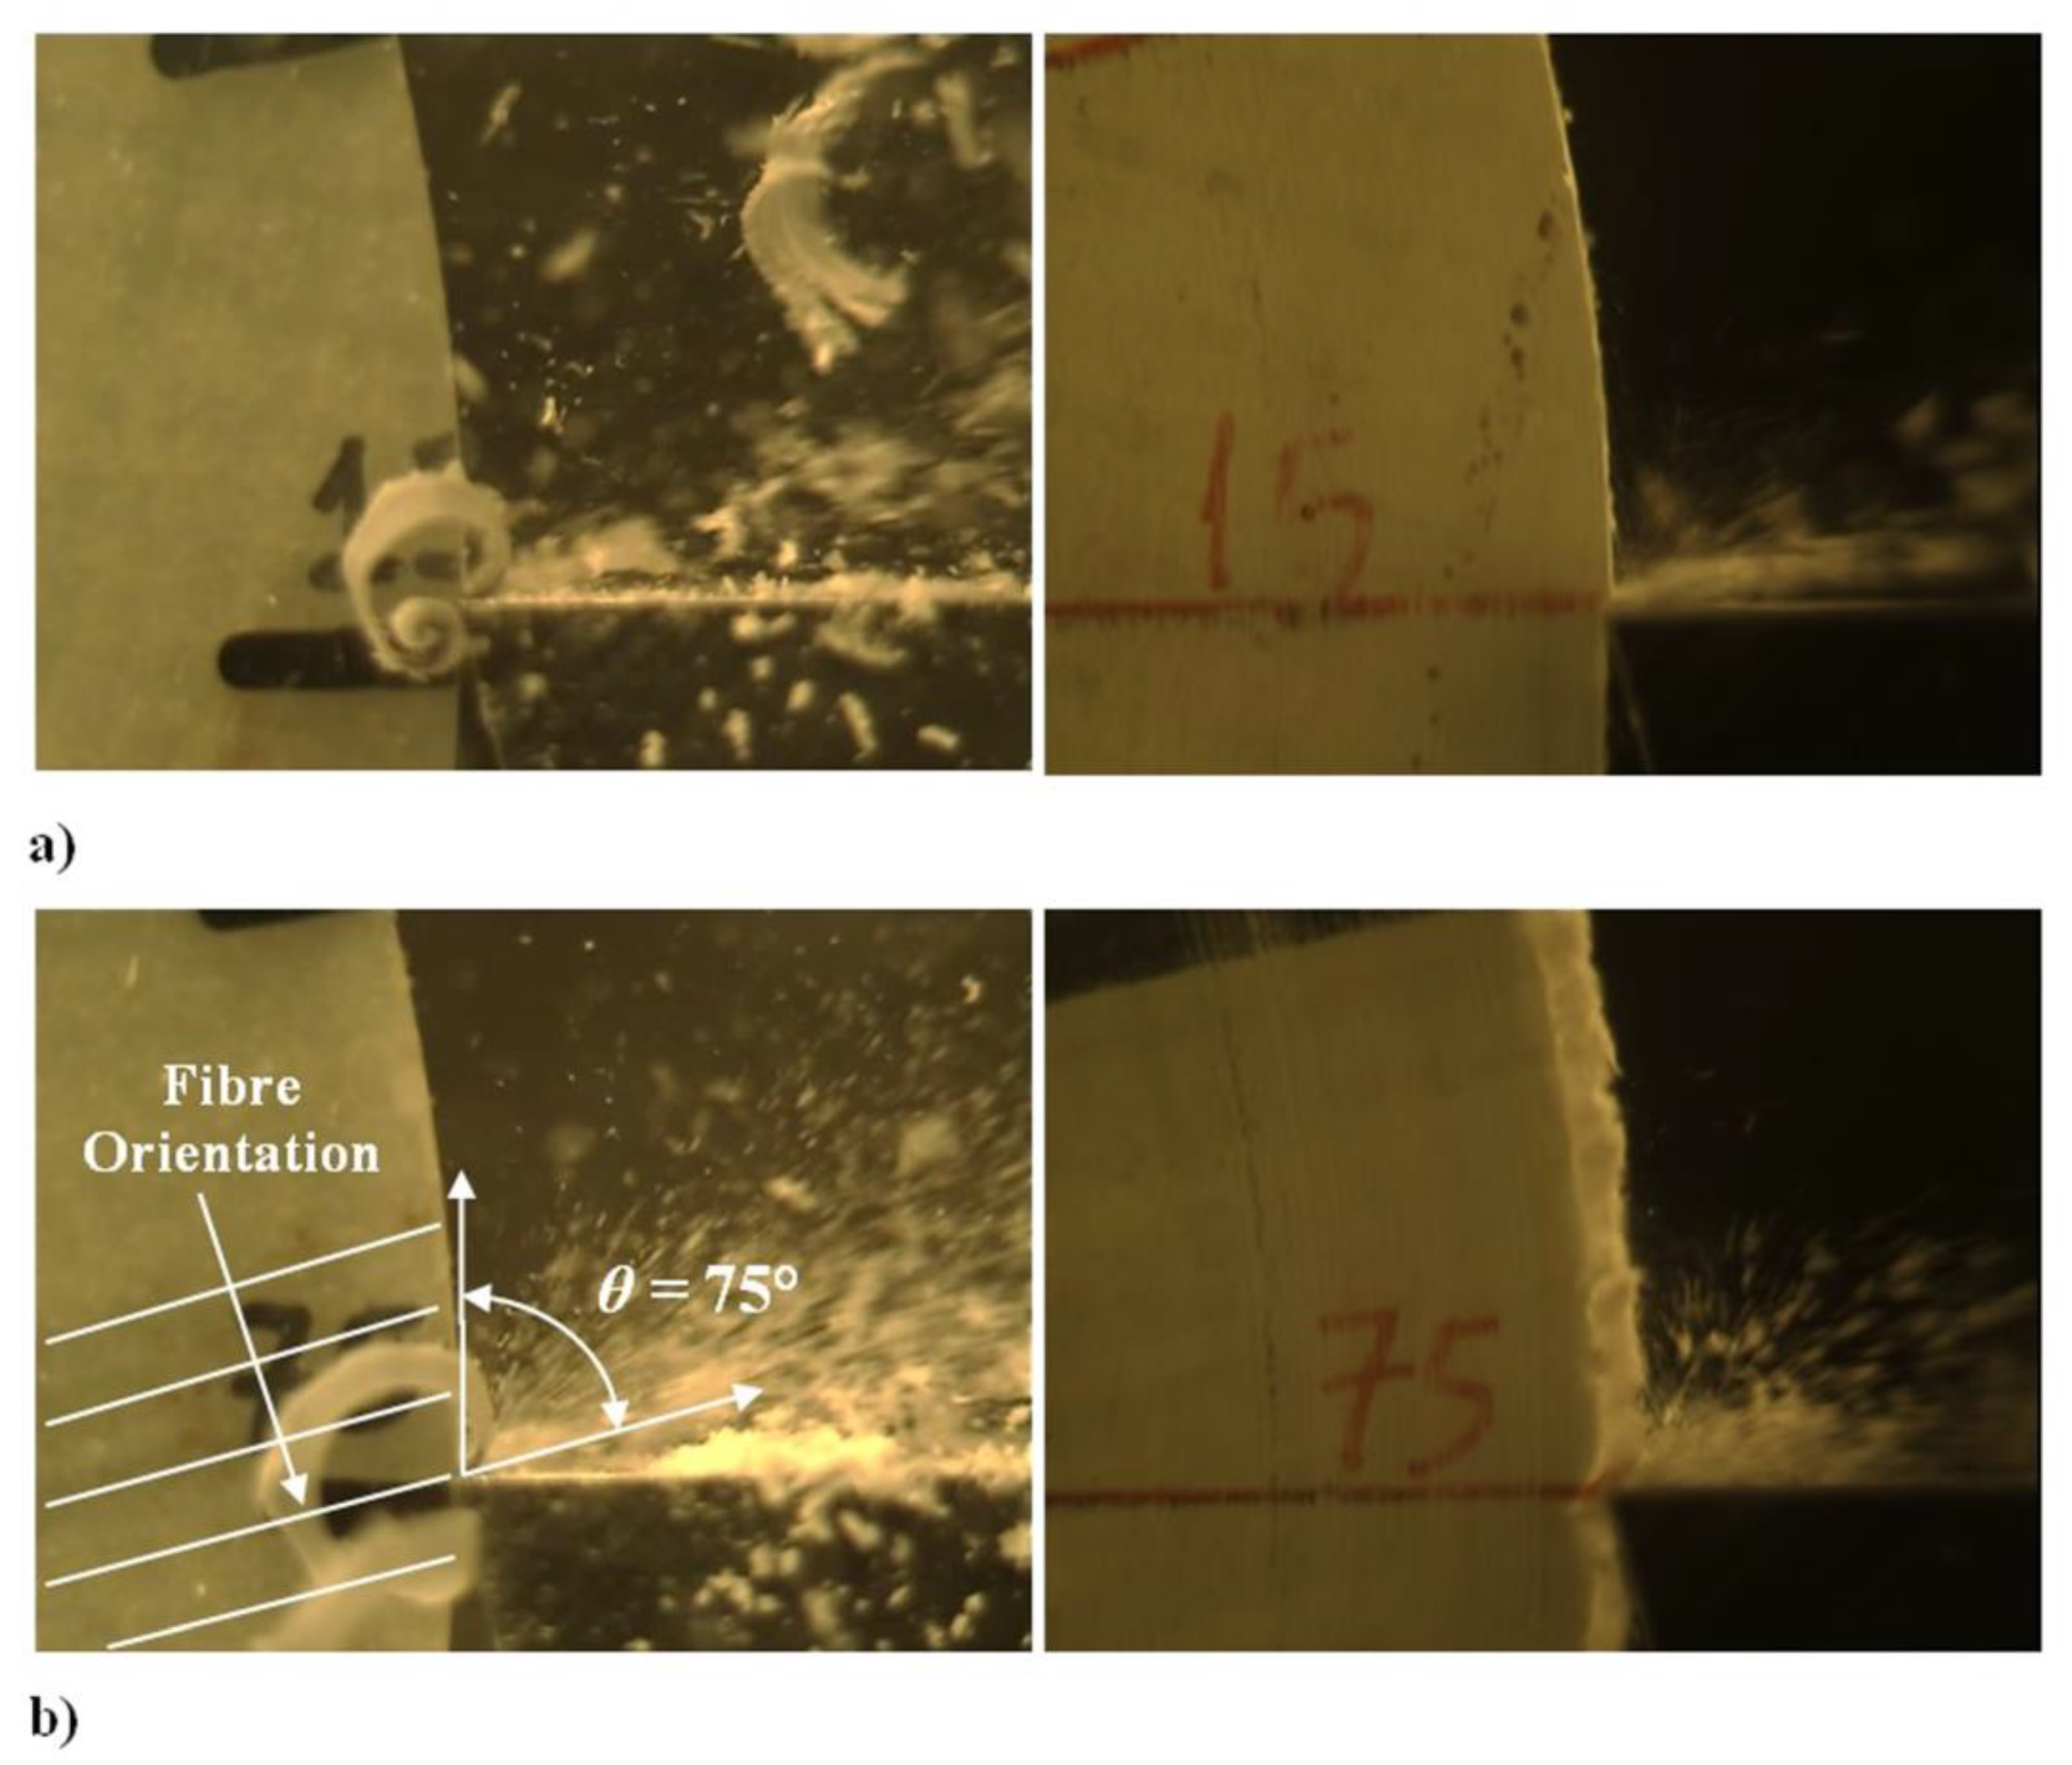
Figure 19 illustrates the chip morphology for γ = 0°, α = 15°, ac = 0.20 mm, and various θ values on specimens with (left) and without (right) polycarbonate. In both scenarios, a powdery chip is expelled at high velocity from the cutting area, following trajectories that align with the orientation of the fibers.
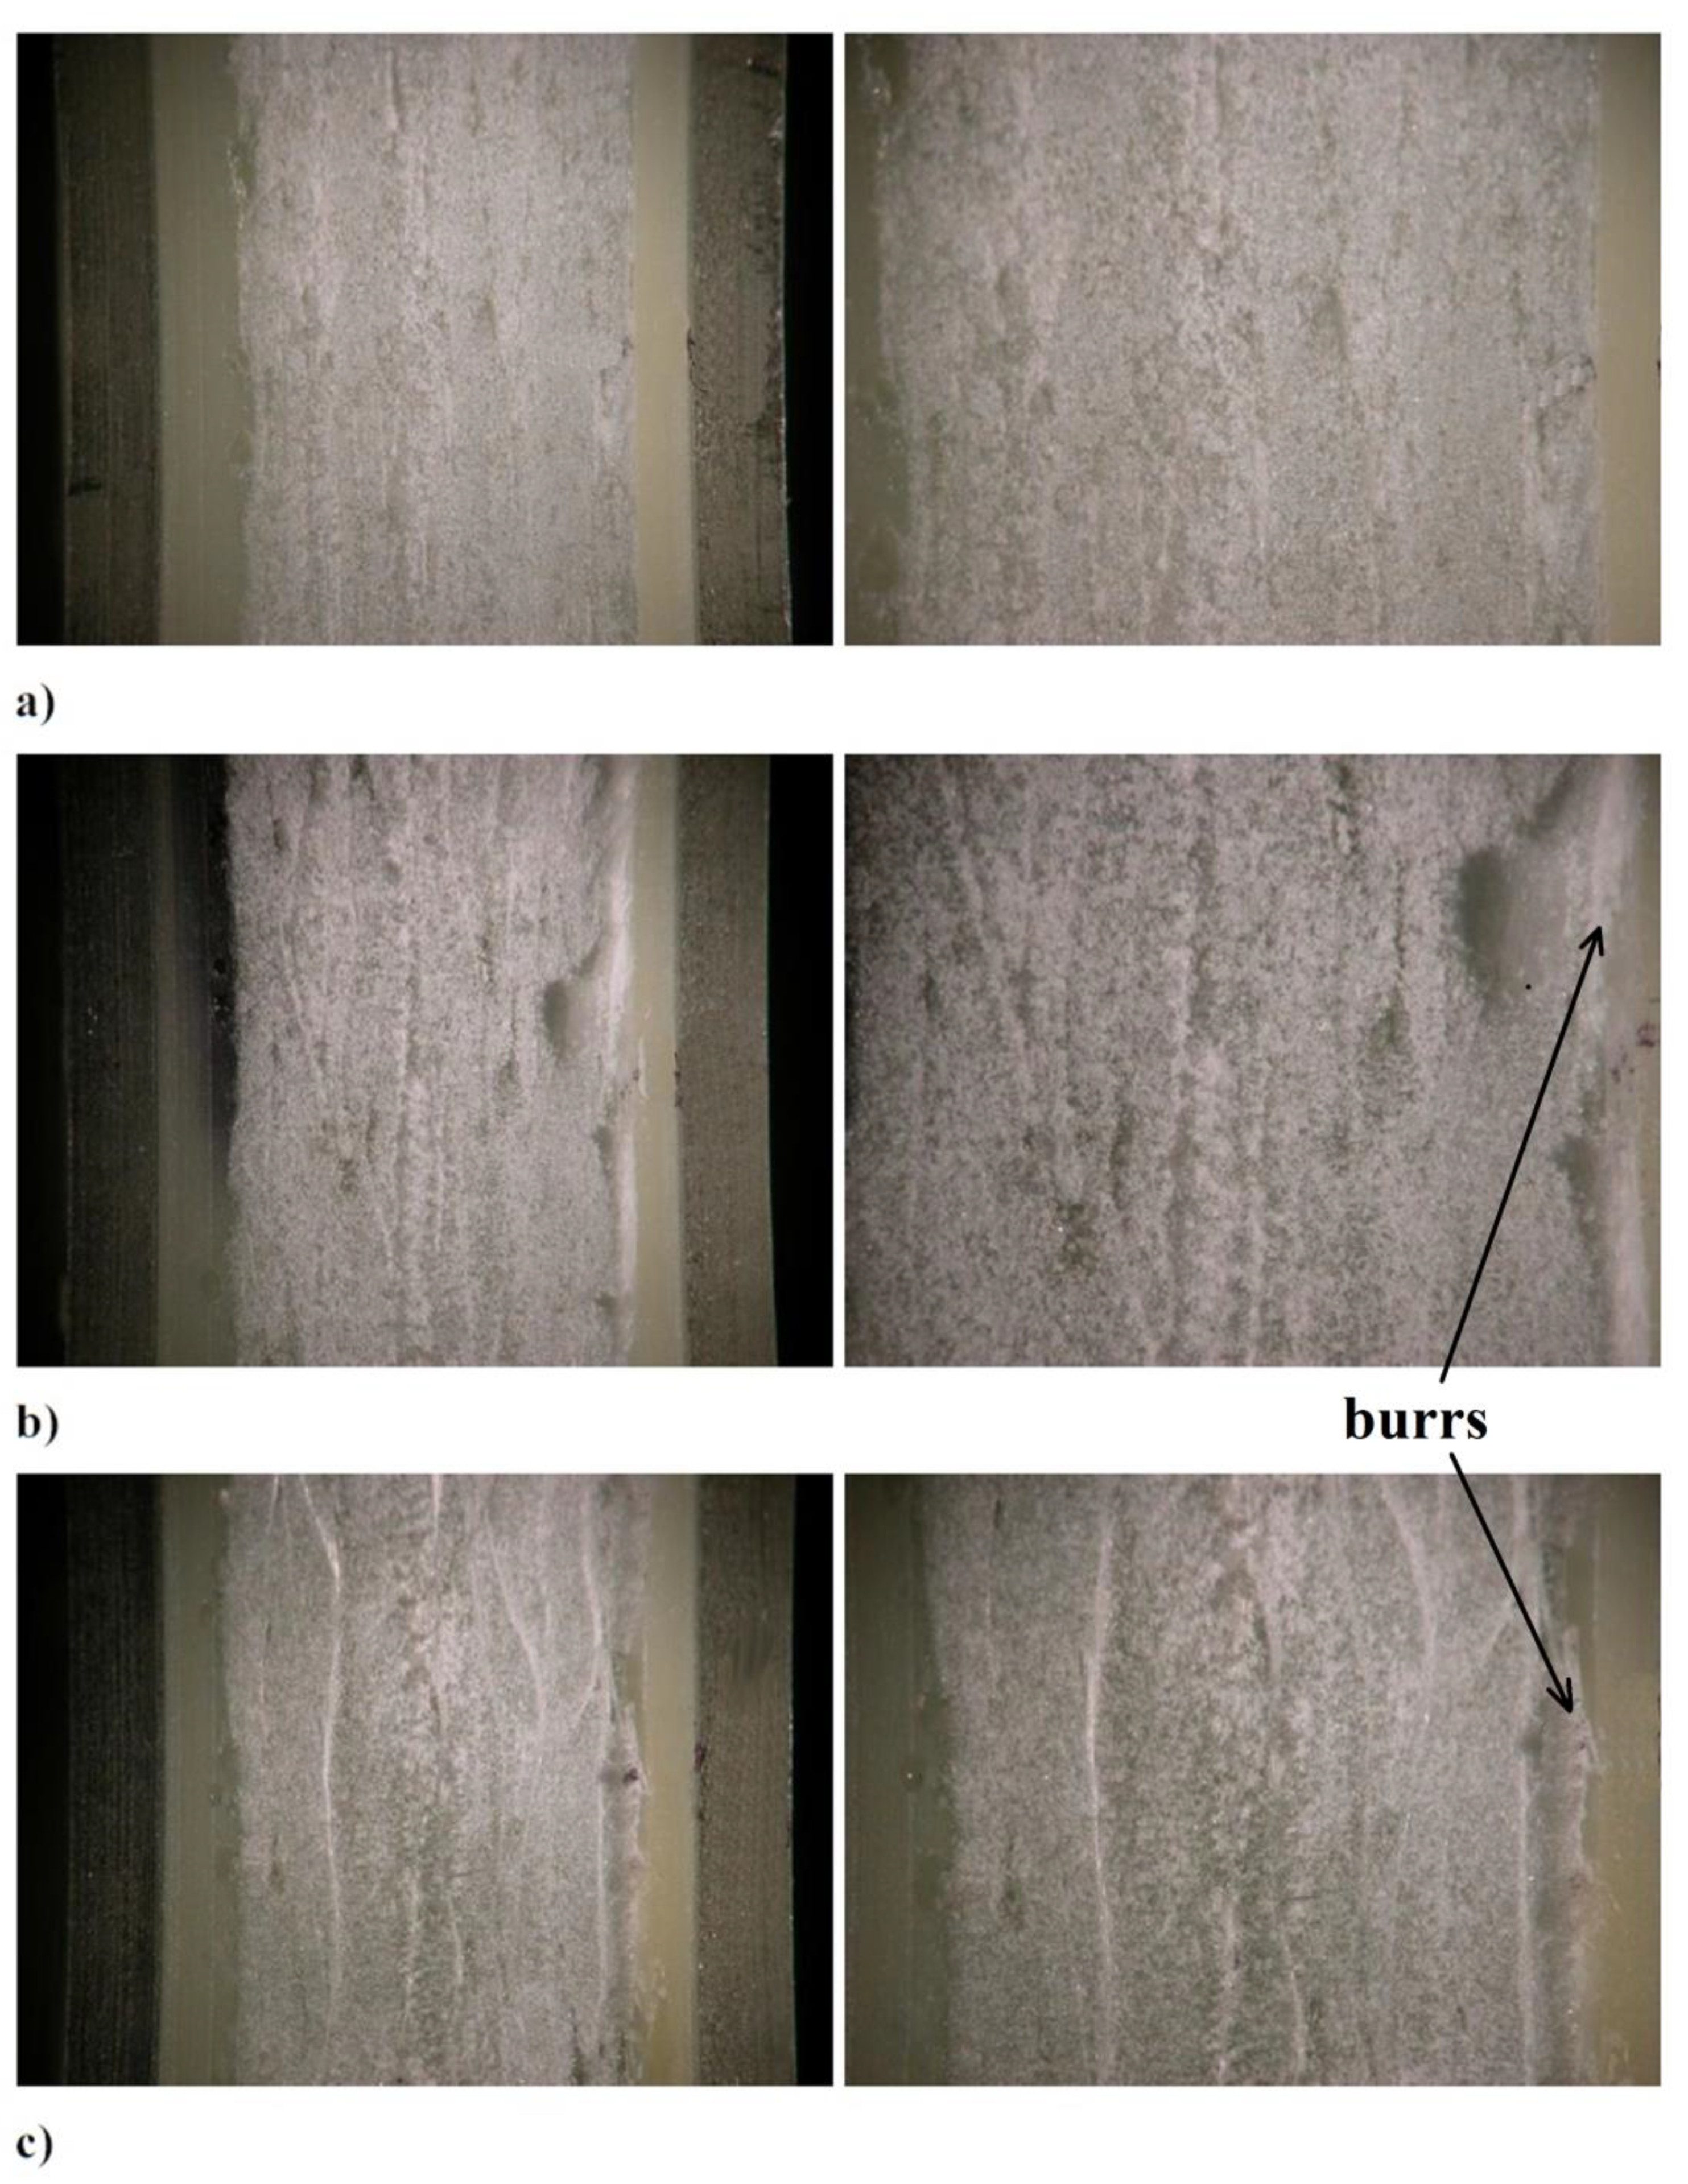
Figure 20 displays images at 5x (left) and 10x (right) of the machined surface for α = 15°, γ = 30°, ac = 0.20 mm, and various θ values.
For θ = 30° (
Figure 20a), the machined surface predominantly appears white due to the presence of frayed sections of the cut fibers, accompanied by slight pull-out. Scattered darker areas are observable where fibers and matrix have undergone a more uniform cut.
As θ increases, the surface quality deteriorates (
Figure 20b,c). In these instances, some burrs can be observed on the external laminas, indicating an exacerbation of surface irregularities.
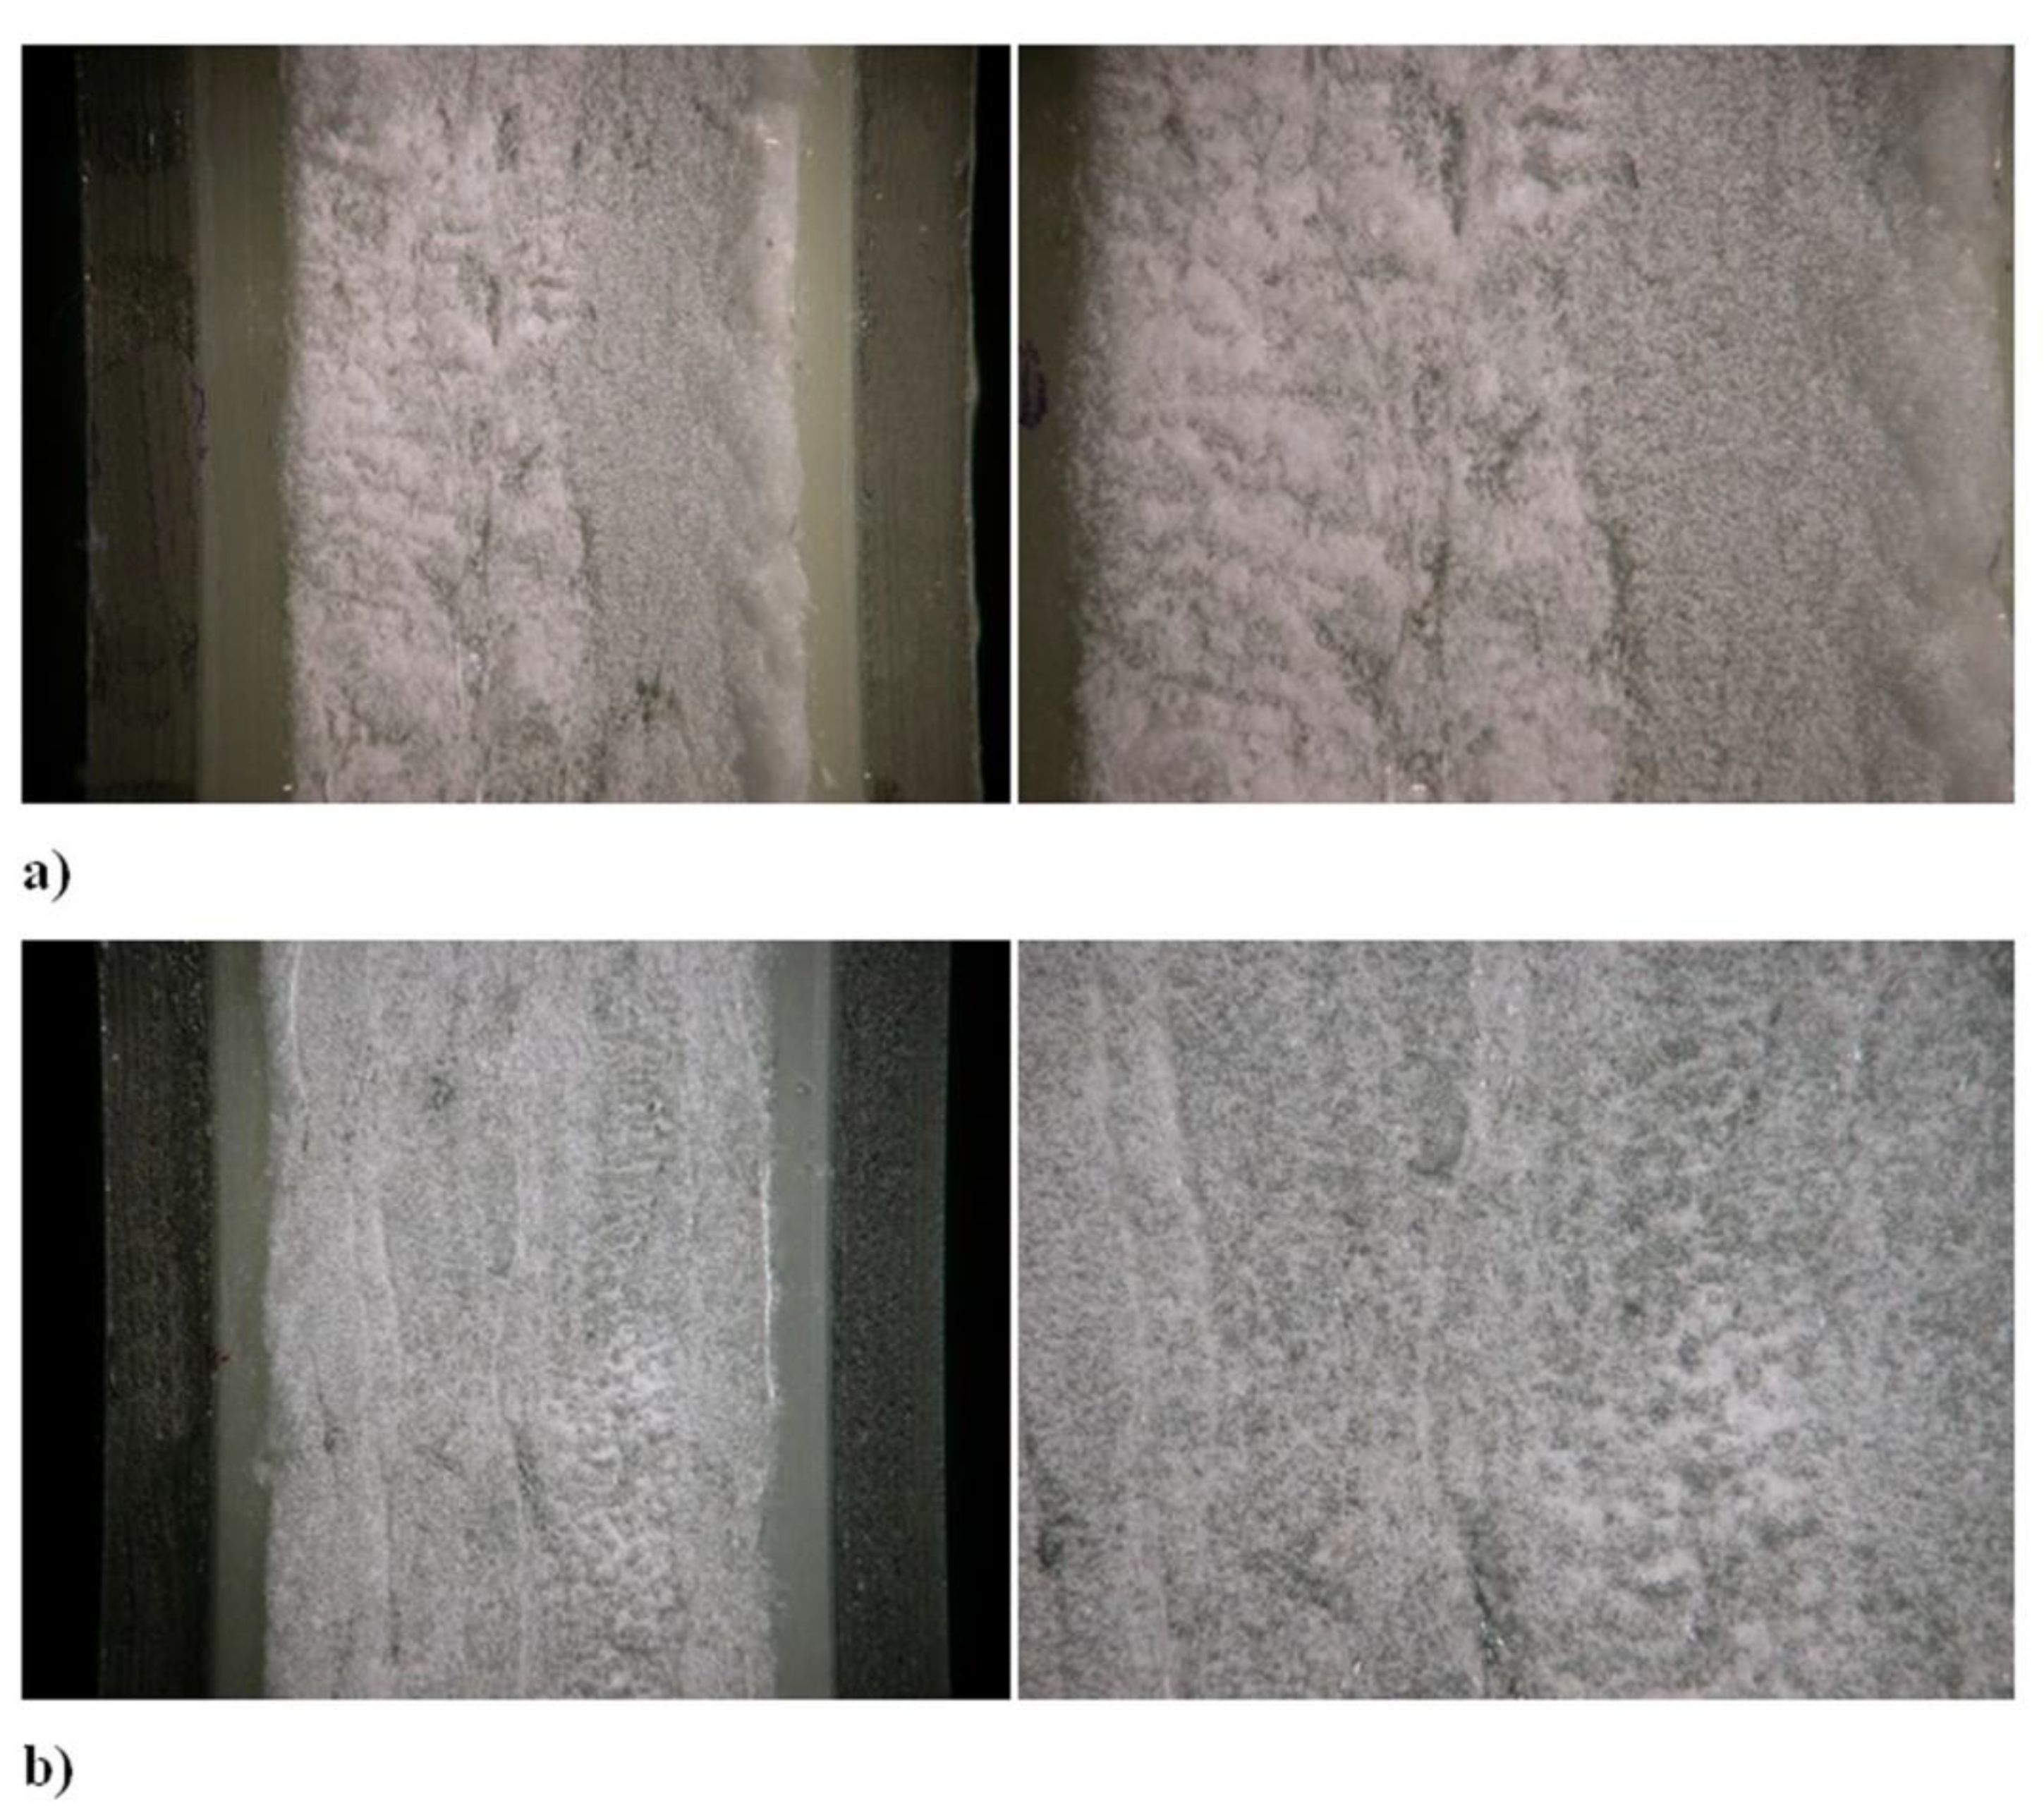
Figure 21 shows images at 5x (left) and 10x (right) of the machined surface for θ = 90°, α = 15°, ac = 0.20 mm, and varying γ values.
The surface morphology remains similar for both cases, with a slight deterioration observed for γ > 0°. This observation confirms that the chip morphology within the range of 0° < θ ≤ 90° is primarily dependent on the angle θ.
3.1.2. Chip Morphology for 90° <θ < 180°
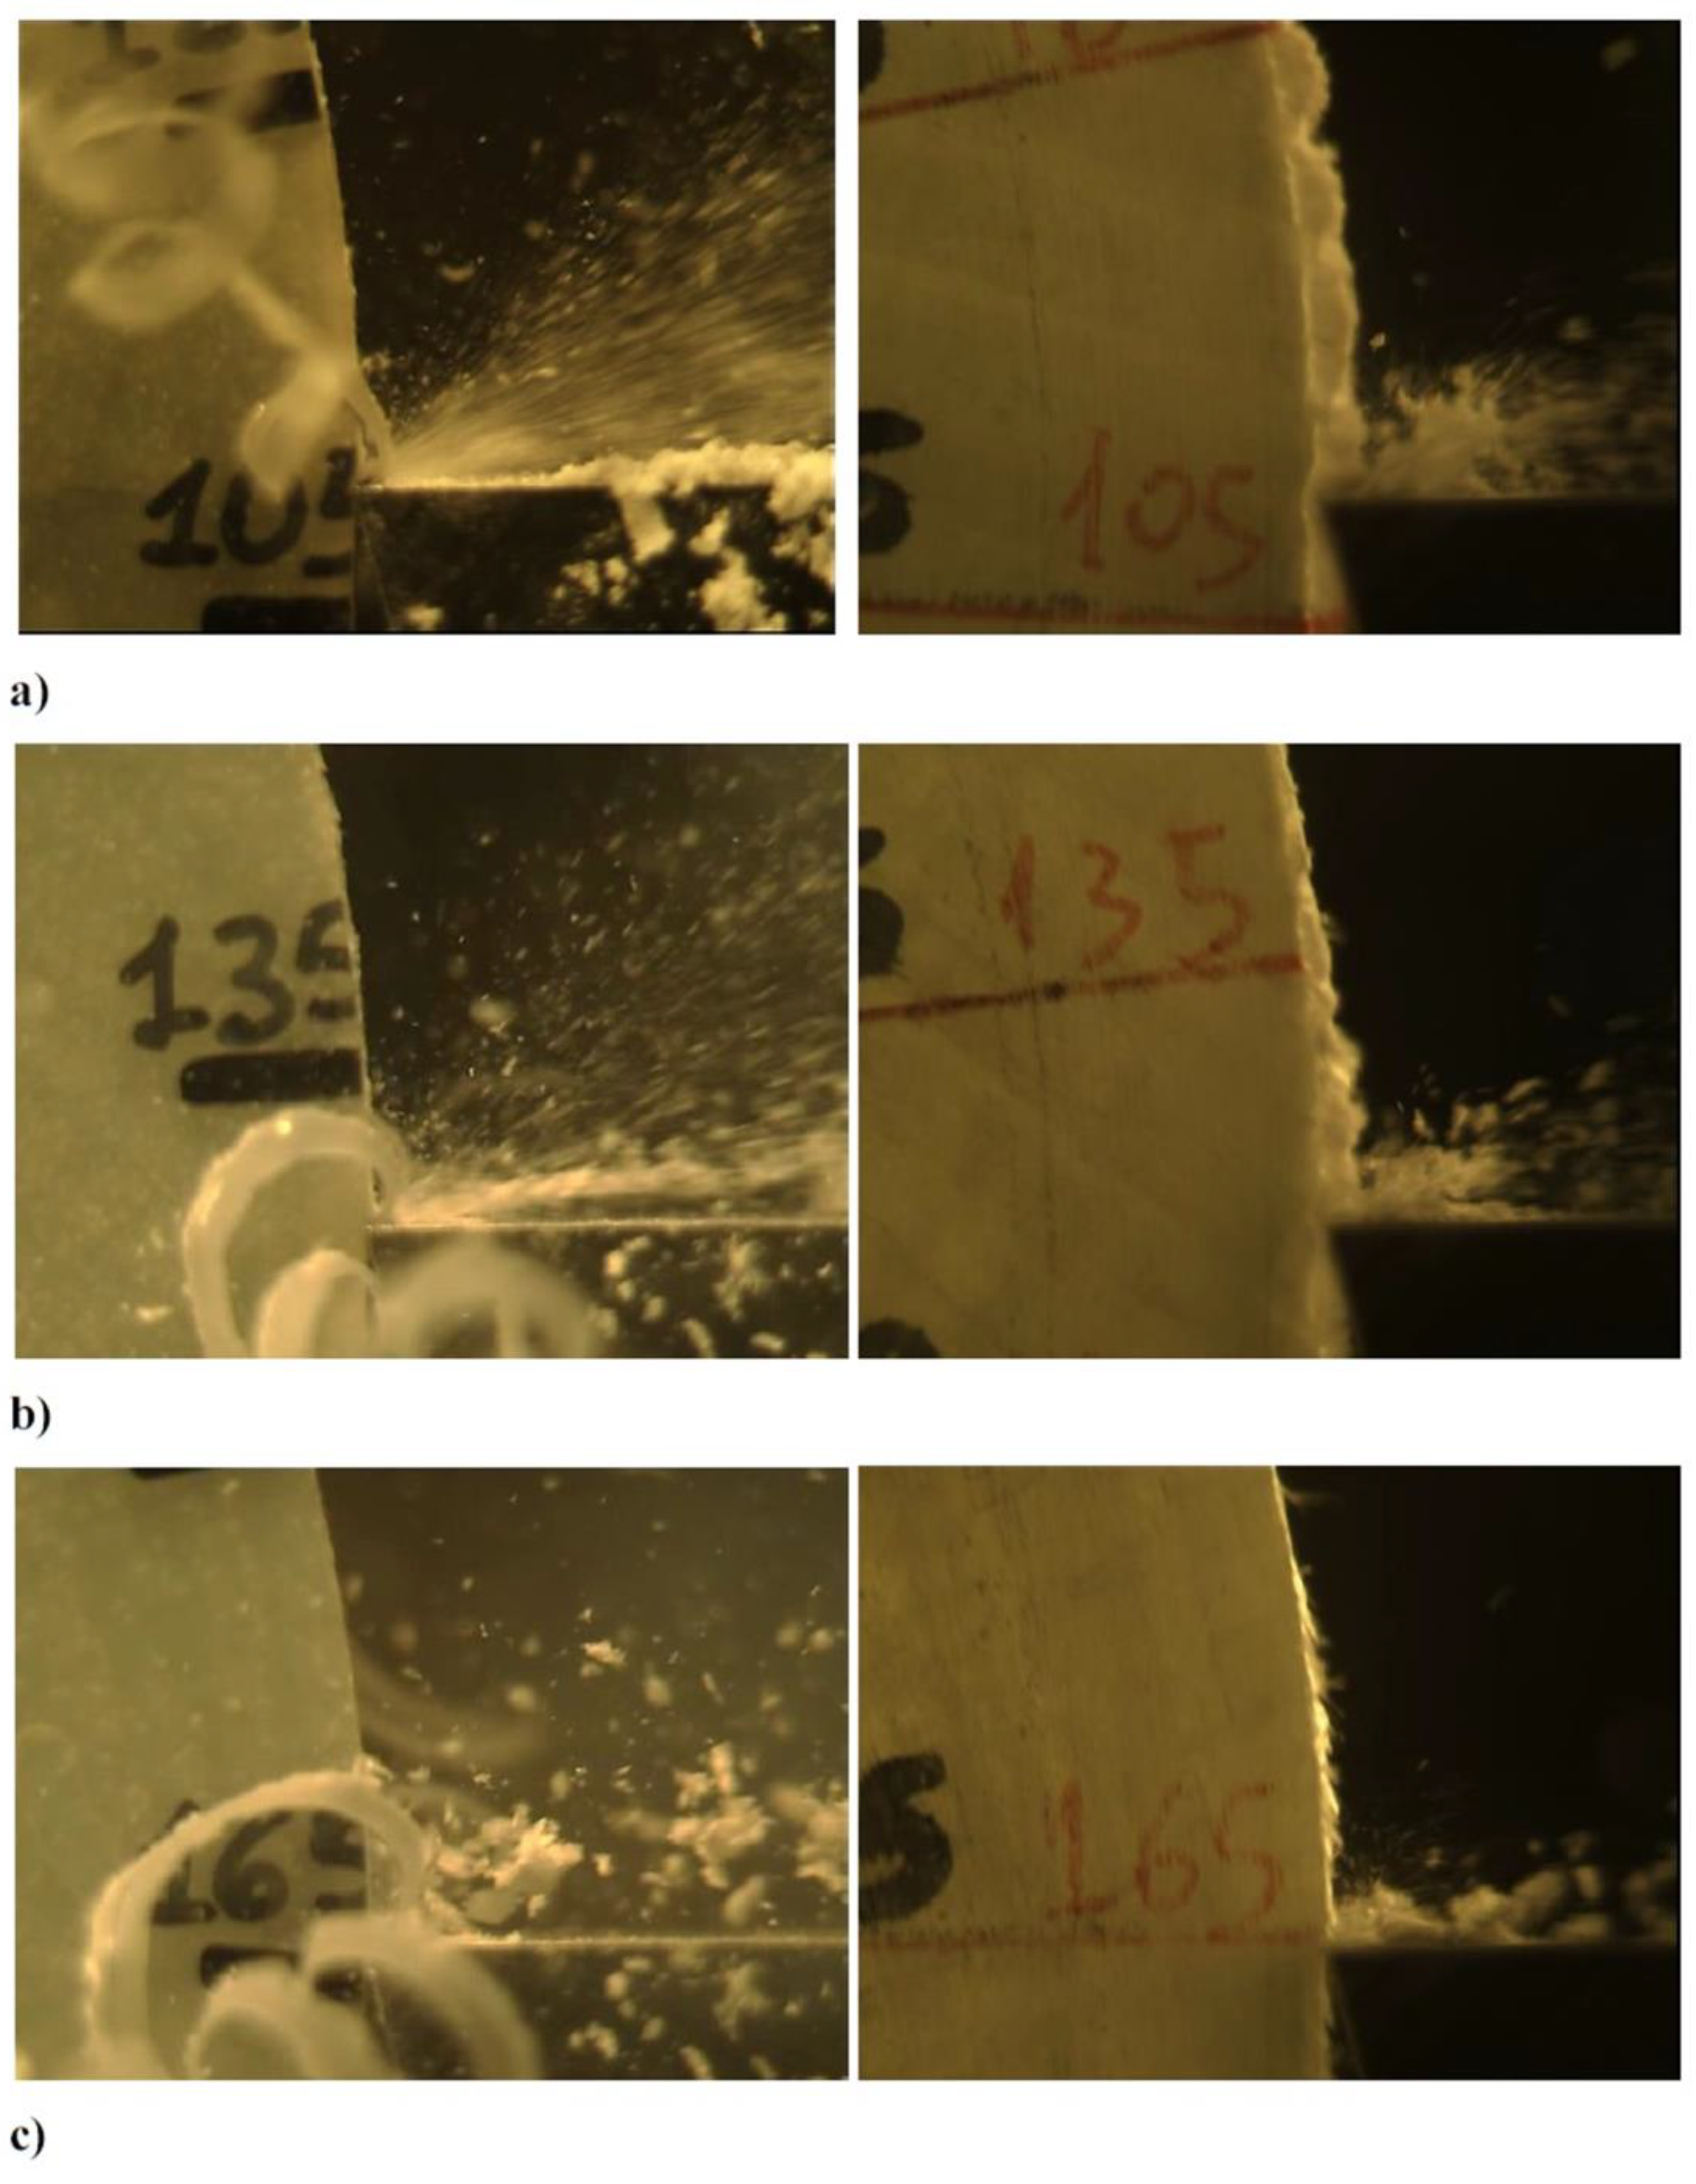
Figure 22 illustrates the chip morphology for γ = 15°, α = 15°, ac = 0.20 mm, and various θ values on specimens with (left) and without (right) polycarbonate.
Without polycarbonate supports, fibers can pass uncut under the tool, leading to the formation of burrs (
Figure 22, right). Conversely, with polycarbonate, the outer fibers are laterally supported, enabling proper cutting (
Figure 22, left).
In the range of 90° to 135° of θ, the chip appears as a powder (
Figure 22a,b). Beyond 135°, the tool more easily lifts the fibers, resulting in a chip with larger dimensions (
Figure 22c).
Figure 23 shows images at 5x (left) and 10x (right) magnifications of the machined surface for α = 15°, γ = 15°, ac = 0.20 mm, and various θ values.
The morphology of the machined surface takes on the appearance of a sawtooth pattern, particularly notable in
Figure 23c.
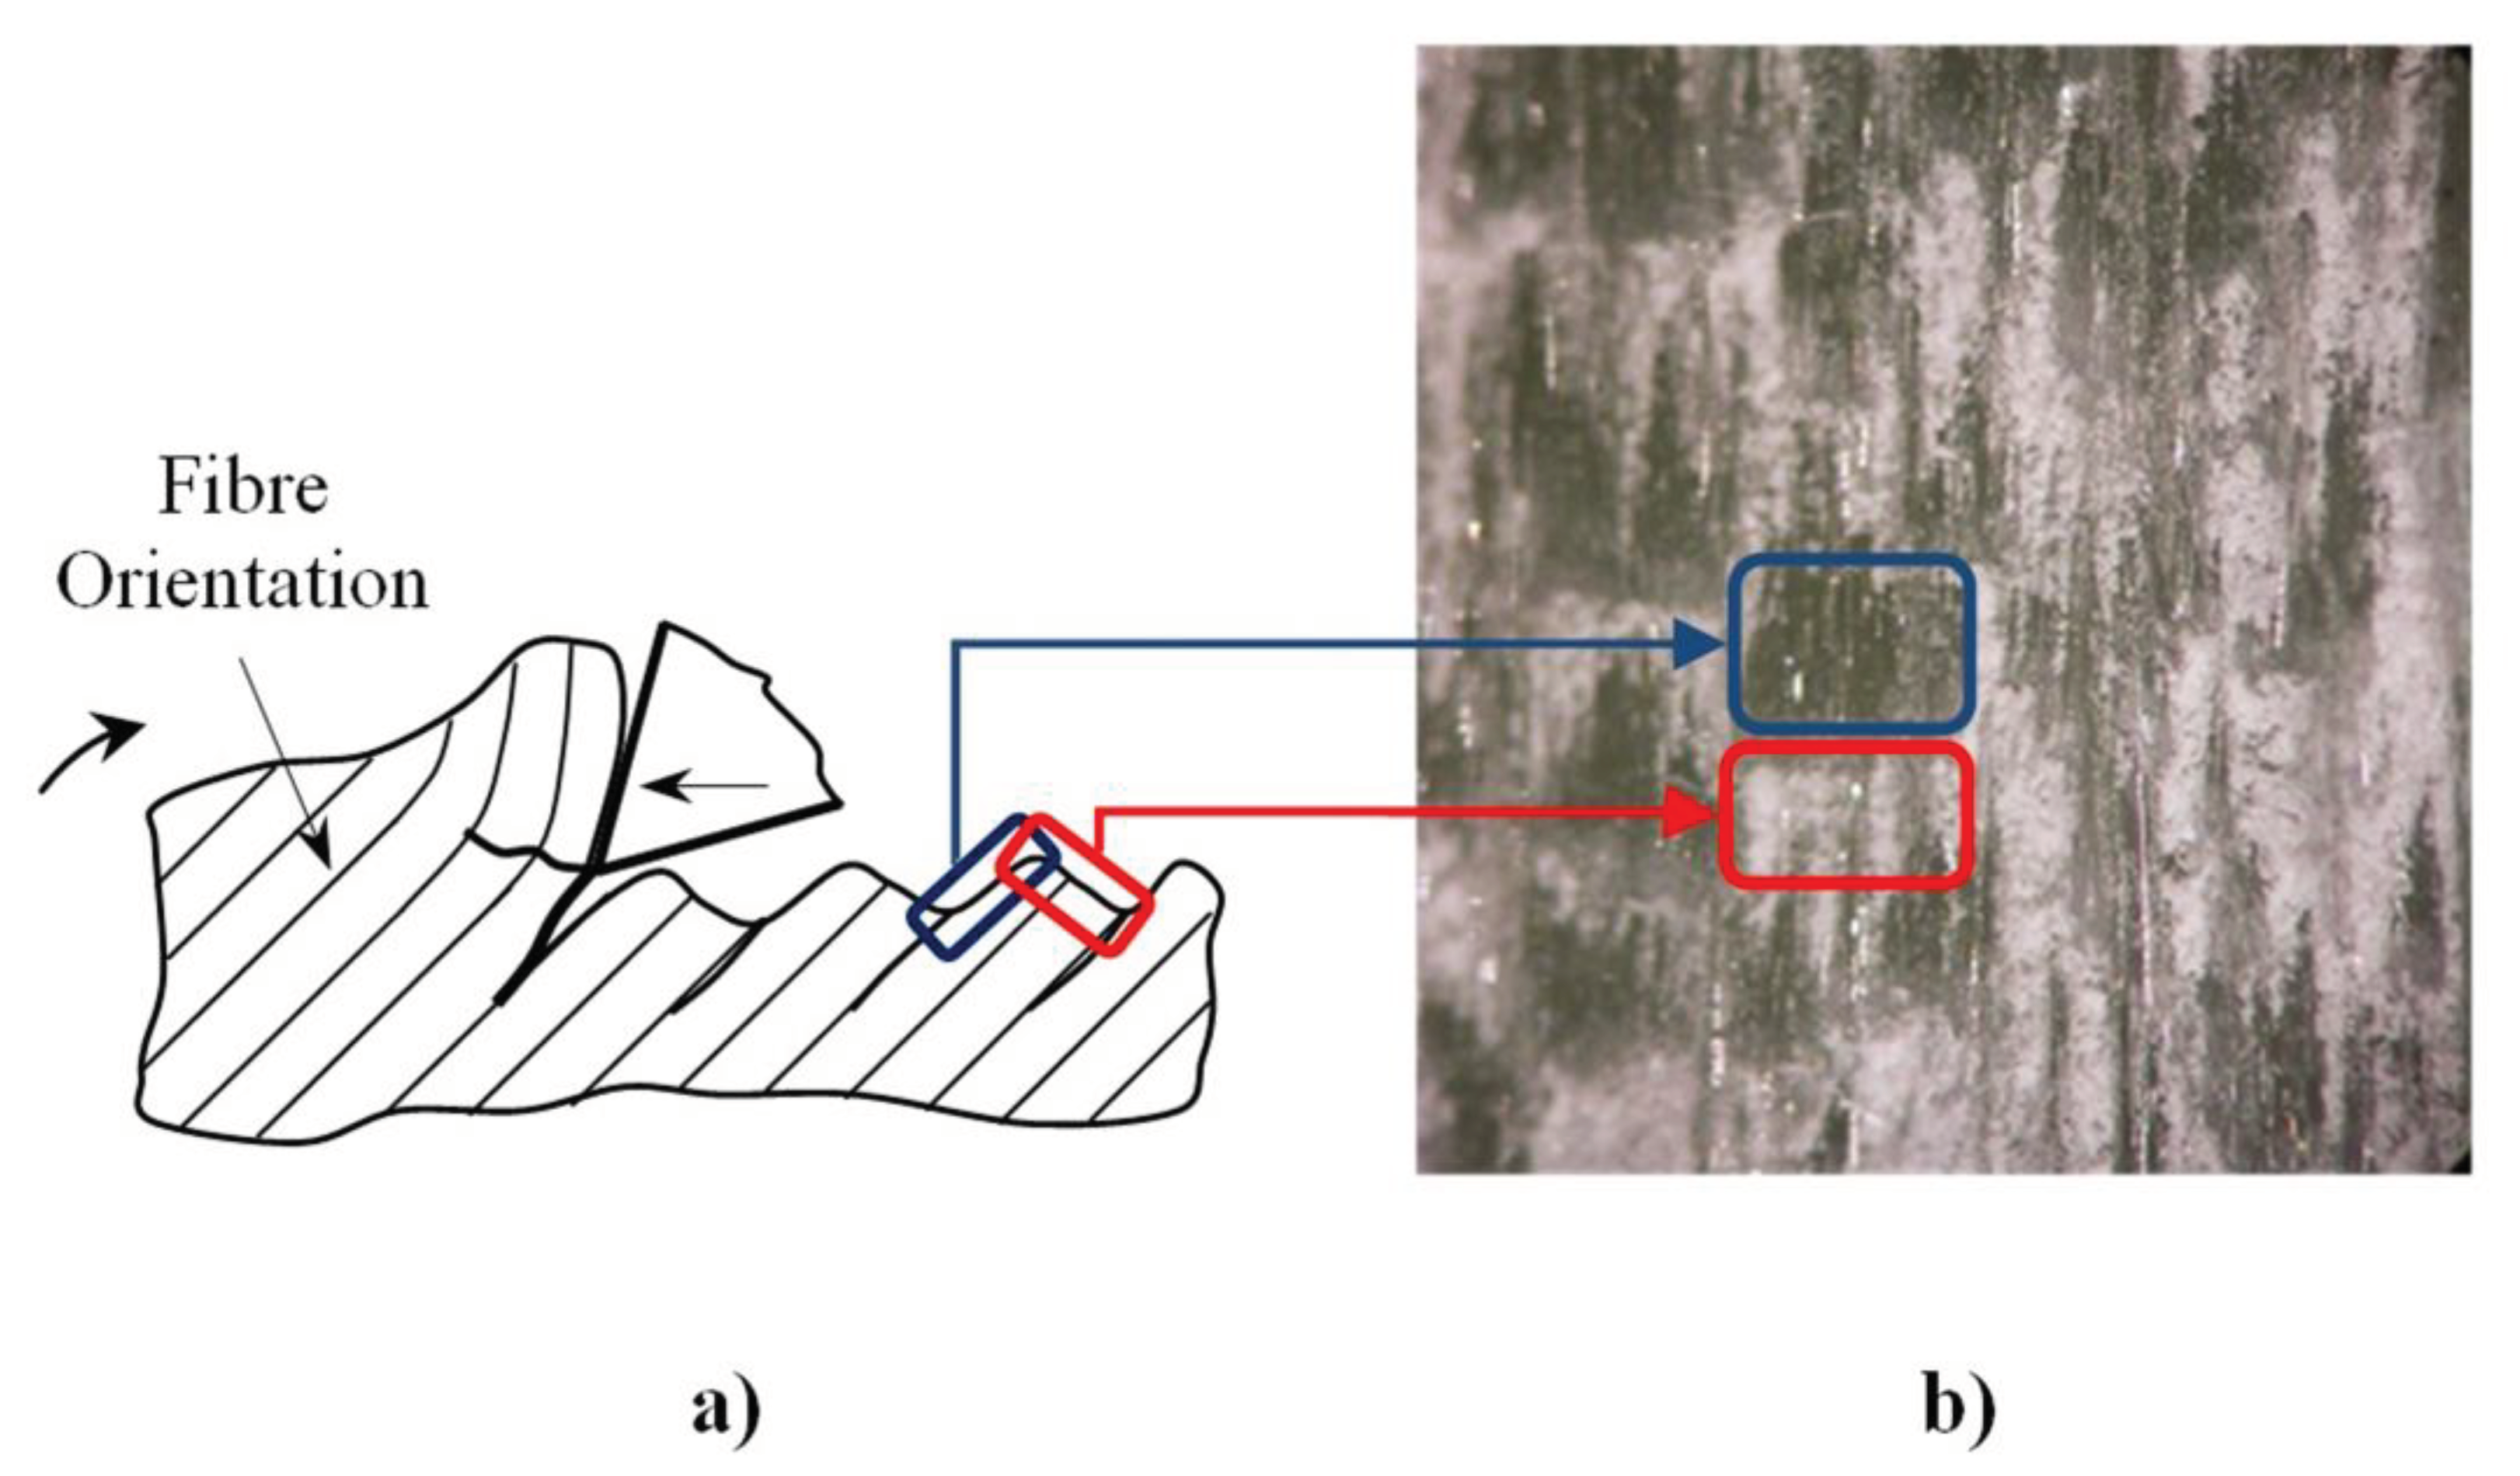
The morphology of the machined surface is better described in
Figure 24, where it is easy to identify darker and lighter areas (
Figure 24b). The darker ones correspond to the areas where the crack propagates at the fibre-matrix interface, while the lighter ones correspond to fibres cut during the tool passage (
Figure 24a). These observations also confirm the findings of Wang et al. [
26].
4. Conclusions
Unlike what is evident from the literature review, where in most studies the investigation of orthogonal cutting of composites is conducted on rectangular specimens with the consequent limitations in terms of short tool-specimen contact during cutting, low cutting speed, and restricted values of the fiber orientation angle, in this article in this this paper was proposed and studied an experimental procedure for investigating high-speed orthogonal cutting of UD-GFRP.
The experimental results demonstrated that circular specimens offer advantages over rectangular ones by enabling continuous monitoring of variations in principal force and thrust force while manipulating the fiber orientation.
Furthermore, the study examined the influence of cutting forces on different specimen geometries and cutting conditions. It was observed that cutting forces are highly sensitive to variations in the fiber orientation angle, reflecting the anisotropic nature of UD composites. Additionally, the analysis of cutting forces highlighted the importance of accounting for the presence of burrs, as they contribute to additional cutting forces required to ensure complete material removal.
Moreover, the research investigated the roughness of machined surfaces and the morphology of chips and cutting surfaces. The findings indicated a correlation between fiber orientation angle and surface roughness, with higher variability observed at certain angle ranges. Additionally, the morphology of chips and cutting surfaces varied depending on the cutting conditions, with notable differences observed in the presence of burrs and unsupported fibers.
In conclusion, the study provides valuable insights into the complex interactions between cutting parameters, material properties, and machining outcomes in the high-speed machining of GFRP composites.
Author Contributions
For research articles with several authors, a short paragraph specifying their individual contributions must be provided. The following statements should be used “Conceptualization, A.L.; methodology, A.L. and G.V.; software, G.V. and M.P.; validation, L.B. and A.F.; formal analysis, L.B., A.F., M.P. and G.V.; investigation, G.V. and A.L.; resources, A.L.; data curation, L.B., A.F., M.P. and G.V.; writing—original draft preparation, L.B., A.F., M.P. and G.V.; writing—review and editing, M.P. and L.B.; visualization, L.B., A.F., M.P. and G.V.; supervision, L.B., A.F. and A.L.; project administration, A.L.; funding acquisition, A.L.
Funding
This research received no external funding.
Conflicts of Interest
The authors declare no conflicts of interest.
References
- He, Y.; Sheikh-Ahmad, J.; Zhu, S.; Zhao, C. Cutting Force Analysis Considering Edge Effects in the Milling of Carbon Fiber Reinforced Polymer Composite. J Mater Process Technol 2020, 279. [Google Scholar] [CrossRef]
- Storchak, M.; Stehle, T.; Möhring, H.-C. Numerical Modeling of Cutting Characteristics during Short Hole Drilling: Modeling of Kinetic Characteristics. J Manuf Mater Process 2023, 7, 195. [Google Scholar] [CrossRef]
- Storchak, M.; Stehle, T.; Möhring, H.-C. Numerical Modeling of Titanium Alloy Ti10V2Fe3Al Milling Process. J Manuf Mater Process 2023, 7, 1. [Google Scholar] [CrossRef]
- Panico, M.; Durante, M.; Langella, A.; Boccarusso, L. One-Shot Drilling Process for Thin CFRP/Aluminium Alloys Stacks. Mater Manuf Process 2024, in press. [Google Scholar] [CrossRef]
- Seeholzer, L.; Kneubühler, F.; Grossenbacher, F.; Wegener, K. Tool Wear and Spring Back Analysis in Orthogonal Machining Unidirectional CFRP with Respect to Tool Geometry and Fibre Orientation. J Adv Manuf Technol 2021, 115, 2905–2928. [Google Scholar] [CrossRef]
- El-Ghaoui, K.; Chatelain, J.-F.; Ouellet-Plamondon, C. Effect of Graphene on Machinability of Glass Fiber Reinforced Polymer (GFRP). J. Manuf. Mater. Process. 2019, 3, 78. [Google Scholar]
- Durante, M.; Boccarusso, L.; De Fazio, D.; Langella, A. Circular Cutting Strategy for Drilling of Carbon Fiber-Reinforced Plastics (CFRPs). Mater Manuf Process 2019, 34, 554–566. [Google Scholar] [CrossRef]
- Panico, M.; Durante, M.; Langella, A.; Boccarusso, L. Numerical and theoretical approach to evaluate the clamping force and the interlayer gap extent during drilling of stacked materials. Proc Inst Mech Eng, Part B.
- Bolat, Ç.; Karakılınç, U.; Yalçın, B.; Öz, Y.; Yavaş, Ç.; Ergene, B.; Ercetin, A.; Akkoyun, F. Effect of Drilling Parameters and Tool Geometry on the Thrust Force and Surface Roughness of Aerospace Grade Laminate Composites. Micromachines 2023, 14, 1427. [Google Scholar] [CrossRef]
- Maegawa, S.; Morikawa, Y.; Hayakawa, S.; Itoigawa, F.; Nakamura, T. Mechanism for Changes in Cutting Forces for Down-Milling of Unidirectional Carbon Fiber Reinforced Polymer Laminates: Modeling and Experimentation. Int J Mach Tools Manuf 2016, 100, 7–13. [Google Scholar] [CrossRef]
- Li, H.; Qin, X.; He, G.; Jin, Y.; Sun, D.; Price, M. Investigation of Chip Formation and Fracture Toughness in Orthogonal Cutting of UD-CFRP. J Adv Manuf Technol 2016, 82, 1079–1088. [Google Scholar] [CrossRef]
- Chen, L.; Zhang, K.; Cheng, H.; Qi, Z.; Meng, Q. A Cutting Force Predicting Model in Orthogonal Machining of Unidirectional CFRP for Entire Range of Fiber Orientation. J Adv Manuf Techno 2017, 89, 833–846. [Google Scholar] [CrossRef]
- Wang, B.; Liu, Z.; Cai, Y.; Luo, X.; Ma, H.; Song, Q.; Xiong, Z. Advancements in Material Removal Mechanism and Surface Integrity of High Speed Metal Cutting: A Review. Int J Mach Tools Manuf 2021, 166, 103744. [Google Scholar] [CrossRef]
- Slamani, M.; Chatelain, J.-F. A Review on the Machining of Polymer Composites Reinforced with Carbon (CFRP), Glass (GFRP), and Natural Fibers (NFRP). Discover Mechanical Engineering 2023, 2, 4. [Google Scholar] [CrossRef]
- Pecat, O.; Rentsch, R.; Brinksmeier, E. Influence of Milling Process Parameters on the Surface Integrity of CFRP. Procedia CIRP 2012, 1, 466–470. [Google Scholar] [CrossRef]
- An, Q.; Cai, C.; Cai, X.; Chen, M. Experimental Investigation on the Cutting Mechanism and Surface Generation in Orthogonal Cutting of UD-CFRP Laminates. Compos Struct 2019, 230, 111441. [Google Scholar] [CrossRef]
- Voss, R.; Seeholzer, L.; Kuster, F.; Wegener, K. Analytical Force Model for Orthogonal Machining of Unidirectional Carbon Fibre Reinforced Polymers (CFRP) as a Function of the Fibre Orientation. J Mater Process Technol 2019, 263, 440–469. [Google Scholar] [CrossRef]
- Zhang, L.C.; Zhang, H.J.; Wang, X.M. A FORCE PREDICTION MODEL FOR CUTTING UNIDIRECTIONAL FIBRE-REINFORCED PLASTICS. Mach Sci Technol 2001, 5, 293–305. [Google Scholar] [CrossRef]
- Calzada, K.A.; Kapoor, S.G.; DeVor, R.E.; Samuel, J.; Srivastava, A.K. Modeling and Interpretation of Fiber Orientation-Based Failure Mechanisms in Machining of Carbon Fiber-Reinforced Polymer Composites. J Manuf Process 2012, 14, 141–149. [Google Scholar] [CrossRef]
- Xu, X.; Jin, X. 3-D Finite Element Modeling of Sequential Oblique Cutting of Unidirectional Carbon Fiber Reinforced Polymer. Compos Struct 2021, 256, 113127. [Google Scholar] [CrossRef]
- Wang, F.; Yin, J.; Ma, J.; Jia, Z.; Yang, F.; Niu, B. Effects of Cutting Edge Radius and Fiber Cutting Angle on the Cutting-Induced Surface Damage in Machining of Unidirectional CFRP Composite Laminates. J Adv Manuf Technol 2017, 91, 3107–3120. [Google Scholar] [CrossRef]
- Caprino, G.; Langella, A. Analysing Cutting Forces in Machining Processes for Polymer-Based Composites. In Machining Technology for Composite Materials; Hocheng, H, Ed.; Publisher: Elsevier, 2012; pp. 75–115. [Google Scholar]
- Rathod, K.B.; Lalwani, D.I. Force Modelling in Orthogonal Cutting Considering Flank Wear Effect. J Inst of Eng Ser C 2018, 99, 673–679. [Google Scholar] [CrossRef]
- Henerichs, M.; Voß, R.; Kuster, F.; Wegener, K. Machining of Carbon Fiber Reinforced Plastics: Influence of Tool Geometry and Fiber Orientation on the Machining Forces. CIRP J Manuf Sci Technol 2015, 9, 136–145. [Google Scholar] [CrossRef]
- Pwu, H; Hocheng, H. Chip Formation Model of Cutting Fiber-Reinforced Plastics Perpendicular to Fiber Axis. ASME J Manuf Sci Eng 1998, 120, 192–196. [Google Scholar] [CrossRef]
- Wang, X.M.; Zhang, L.C. An Experimental Investigation into the Orthogonal Cutting of Unidirectional Fibre Reinforced Plastics. Int J Mach Tools Manuf 2003, 43, 1015–1022. [Google Scholar] [CrossRef]
Figure 1.
Rectangular specimen: cutting test (left) and its schematisation (right).
Figure 1.
Rectangular specimen: cutting test (left) and its schematisation (right).
Figure 2.
Circular specimen: cutting test (left) and its schematisation (right).
Figure 2.
Circular specimen: cutting test (left) and its schematisation (right).
Figure 3.
Burrs observed on specimens (a and b) and schematisation of their formation (c).
Figure 3.
Burrs observed on specimens (a and b) and schematisation of their formation (c).
Figure 4.
Fp and Ft versus time, for rectangular specimens with polycarbonate (θ = 45°, γ = 0°, α = 30°, ac = 0.20 mm, vc = 25 m/min).
Figure 4.
Fp and Ft versus time, for rectangular specimens with polycarbonate (θ = 45°, γ = 0°, α = 30°, ac = 0.20 mm, vc = 25 m/min).
Figure 5.
Fp and Ft versus θ, for circular specimens without polycarbonate (γ = 0°, α = 30°, ac = 0.10 mm, vc = 25 m/min).
Figure 5.
Fp and Ft versus θ, for circular specimens without polycarbonate (γ = 0°, α = 30°, ac = 0.10 mm, vc = 25 m/min).
Figure 6.
Fp and Ft versus θ, for circular specimens with and without polycarbonate (γ = 0°, α = 30°, ac = 0.20 mm, vc = 25 m/min).
Figure 6.
Fp and Ft versus θ, for circular specimens with and without polycarbonate (γ = 0°, α = 30°, ac = 0.20 mm, vc = 25 m/min).
Figure 7.
Fp and Ft versus time, for rectangular specimens with and without polycarbonate (θ = 90°, γ = 0°, α = 30°, ac = 0.20 mm, vc = 25 m/min).
Figure 7.
Fp and Ft versus time, for rectangular specimens with and without polycarbonate (θ = 90°, γ = 0°, α = 30°, ac = 0.20 mm, vc = 25 m/min).
Figure 8.
Fp and Ft versus θ, for circular and rectangular specimens without polycarbonate (γ = 0°, α = 30°, ac = 0.10 mm, vc = 25 m/min).
Figure 8.
Fp and Ft versus θ, for circular and rectangular specimens without polycarbonate (γ = 0°, α = 30°, ac = 0.10 mm, vc = 25 m/min).
Figure 9.
Fp and Ft versus θ, for circular and rectangular specimens with polycarbonate (γ = 0°, α = 30°, ac = 0.10 mm, vc = 25 m/min).
Figure 9.
Fp and Ft versus θ, for circular and rectangular specimens with polycarbonate (γ = 0°, α = 30°, ac = 0.10 mm, vc = 25 m/min).
Figure 10.
Fp and Ft versus θ, for circular and rectangular specimens without polycarbonate (γ = 0°, α= 30°, ac = 0.20 mm, vc = 25 m/min).
Figure 10.
Fp and Ft versus θ, for circular and rectangular specimens without polycarbonate (γ = 0°, α= 30°, ac = 0.20 mm, vc = 25 m/min).
Figure 11.
Fp and Ft versus θ, for circular and rectangular specimens with polycarbonate (γ = 0°, α = 30°, ac = 0.20 mm, vc = 25 m/min).
Figure 11.
Fp and Ft versus θ, for circular and rectangular specimens with polycarbonate (γ = 0°, α = 30°, ac = 0.20 mm, vc = 25 m/min).
Figure 12.
Ra versus θ, for circular and rectangular specimens with polycarbonate (γ = 0°, α = 30°, ac = 0.20 mm, vc = 25 m/min).
Figure 12.
Ra versus θ, for circular and rectangular specimens with polycarbonate (γ = 0°, α = 30°, ac = 0.20 mm, vc = 25 m/min).
Figure 13.
Fp and Ft versus θ, for different γ values (α = 15°, ac = 0.20 mm, vc = 50 m/min).
Figure 13.
Fp and Ft versus θ, for different γ values (α = 15°, ac = 0.20 mm, vc = 50 m/min).
Figure 14.
Fp and Ft versus θ, for different t values (γ = 30°, α = 15°, vc = 50 m/min).
Figure 14.
Fp and Ft versus θ, for different t values (γ = 30°, α = 15°, vc = 50 m/min).
Figure 15.
Fp and Ft versus θ, for different α values (γ = 15°, t=0.05 mm, c = 50 m/min).
Figure 15.
Fp and Ft versus θ, for different α values (γ = 15°, t=0.05 mm, c = 50 m/min).
Figure 16.
Chip morphology for circular specimens with (left) and without polycarbonate (right), around θ = 180° (γ = 0°, α = 15°, ac = 0.20 mm, Vc = 50 m/min).
Figure 16.
Chip morphology for circular specimens with (left) and without polycarbonate (right), around θ = 180° (γ = 0°, α = 15°, ac = 0.20 mm, Vc = 50 m/min).
Figure 17.
Chip morphology for circular specimens with (left) and without polycarbonate (right), around θ = 180° (γ =15°, α =15°, ac = 0.20 mm, vc = 50 m/min).
Figure 17.
Chip morphology for circular specimens with (left) and without polycarbonate (right), around θ = 180° (γ =15°, α =15°, ac = 0.20 mm, vc = 50 m/min).
Figure 18.
Machined surface of the machined surface at 5x (left) and 10x (right), for θ = 180° and γ = 0° (a), 15° (b) and 30° (c) (α = 15°, ac = 0.20 mm, vc = 50 m/min).
Figure 18.
Machined surface of the machined surface at 5x (left) and 10x (right), for θ = 180° and γ = 0° (a), 15° (b) and 30° (c) (α = 15°, ac = 0.20 mm, vc = 50 m/min).
Figure 19.
Chip morphology for circular specimens with (left) and without polycarbonate (right), for θ =15° (a) and 75° (b) (γ =0°, α =15°, ac = 0.20 mm, vc = 50 m/min).
Figure 19.
Chip morphology for circular specimens with (left) and without polycarbonate (right), for θ =15° (a) and 75° (b) (γ =0°, α =15°, ac = 0.20 mm, vc = 50 m/min).
Figure 20.
Machined surface of the cutting surface at 5x (left) and 10x (right), for θ = 30° (a), 60° (b) and 90° (c) (γ = 30°, α = 15°, ac = 0.20 mm, vc = 50 m/min).
Figure 20.
Machined surface of the cutting surface at 5x (left) and 10x (right), for θ = 30° (a), 60° (b) and 90° (c) (γ = 30°, α = 15°, ac = 0.20 mm, vc = 50 m/min).
Figure 21.
Machined surface of the cutting surface at 5x (left) and 10x (right), for γ = 0° (a) and 15° (b) (θ = 90°, α = 15°, ac = 0.20 mm, vc = 50 m/min).
Figure 21.
Machined surface of the cutting surface at 5x (left) and 10x (right), for γ = 0° (a) and 15° (b) (θ = 90°, α = 15°, ac = 0.20 mm, vc = 50 m/min).
Figure 22.
Chip morphology for circular specimens with (left) and without polycarbonate (right), for θ = 105° (a), 135° (b) and 165° (c) (γ = 15°, α = 15°, ac = 0.20 mm, vc = 50 m/min).
Figure 22.
Chip morphology for circular specimens with (left) and without polycarbonate (right), for θ = 105° (a), 135° (b) and 165° (c) (γ = 15°, α = 15°, ac = 0.20 mm, vc = 50 m/min).
Figure 23.
Machined surface of the cutting surface at 5x (left) and 10x (right), for θ = 105° (a), 135° (b) and 165° (c) (γ = 15°, α = 15°, ac = 0.20 mm, vc = 50 m/min).
Figure 23.
Machined surface of the cutting surface at 5x (left) and 10x (right), for θ = 105° (a), 135° (b) and 165° (c) (γ = 15°, α = 15°, ac = 0.20 mm, vc = 50 m/min).
Figure 24.
Details of the machined surface (θ = 165°, γ = 15°, α = 15°, ac = 0.20 mm, vc = 50 m/min).
Figure 24.
Details of the machined surface (θ = 165°, γ = 15°, α = 15°, ac = 0.20 mm, vc = 50 m/min).
Table 1.
Average and standard deviations of Sa versus θ, for circular and rectangular specimens with polycarbonate (γ = 0°, α = 30°, ac = 0.20 mm, vc = 25 m/min).
Table 1.
Average and standard deviations of Sa versus θ, for circular and rectangular specimens with polycarbonate (γ = 0°, α = 30°, ac = 0.20 mm, vc = 25 m/min).
| |
Circular specimens |
Rectangular specimens |
| θ (°) |
Average (μm) |
St. Dev. (μm) |
Average (μm) |
St. Dev. (μm) |
| 0 |
2.51 |
0.16 |
2.83 |
0.24 |
| 15 |
2.21 |
0.33 |
|
|
| 30 |
2.69 |
0.29 |
|
|
| 45 |
3.62 |
0.47 |
3.57 |
0.18 |
| 60 |
3.33 |
0.28 |
|
|
| 75 |
4.21 |
0.59 |
|
|
| 90 |
5.07 |
0.52 |
4.61 |
0.30 |
| 105 |
6.35 |
0.34 |
|
|
| 120 |
9.09 |
0.02 |
|
|
| 135 |
12.31 |
2.63 |
15.63 |
4.26 |
| 150 |
17.98 |
2.33 |
|
|
| 165 |
9.46 |
2.10 |
|
|
| 180 |
2.51 |
0.16 |
2.83 |
0.24 |
|
Disclaimer/Publisher’s Note: The statements, opinions and data contained in all publications are solely those of the individual author(s) and contributor(s) and not of MDPI and/or the editor(s). MDPI and/or the editor(s) disclaim responsibility for any injury to people or property resulting from any ideas, methods, instructions or products referred to in the content. |
© 2024 by the authors. Licensee MDPI, Basel, Switzerland. This article is an open access article distributed under the terms and conditions of the Creative Commons Attribution (CC BY) license (http://creativecommons.org/licenses/by/4.0/).


