1. Introduction
Alloy 800H, also known as INCOLOY 800H has been a candidate material for use in high-temperature nuclear reactor applications [
1,
2,
3,
4,
5,
6]. It is currently being considered for the design and construction of High-Temperature Gas-cooled Reactors (HTGRs) and Very High-Temperature Reactors (VHTRs) [
1,
5,
7,
8,
9,
10]. Alloy 800H is an austenitic stainless steel alloy that was developed in the 1950s with Ni, Fe, and Cr as its major contents. Mn, Si, Ti, and Al were added to be present in the matrix for solid solution hardening [
1]. During the typical final annealing at around 1175 ᵒC, the alloying elements would precipitate out to form M
23C
6 and Ti(C, N) particles at both grain interior and boundaries, thus providing extra strengthening from precipitate obstacles [
11,
12,
13]. Due to these specially strengthening mechanisms, Alloy 800H showed low and high-temperature mechanical property stability, such as no significant reduction of the strength and ductility till 700 ᵒC [
14] and good creep properties [
7,
15].
Deformation of Alloy 800H was previously investigated via cold and hot rolling by several authors [
4,
16,
17,
18,
19,
20,
21,
22]. Five main texture components were claimed in the deformed specimens, i.e., Goss {110} < 001 >, Brass {110} < 112 >, Copper {112} < 111 >, S {123} < 634 > and Copper Twin {552} < 115 >. The texture and grains were also reported to be significantly impacted by the rolling paths and strains [
23,
24]. There was a texture transition from Copper to Brass and Goss after 25% of rolling reduction. Goss, Brass, and Copper were the dominant textures in the unidirectional rolled (UR) specimens, while in the cross-rolled (CR) samples the dominant textures were Brass and ND-rotated Brass [
16,
18]. The as-deformed texture and microstructure also showed influence on the subsequent annealing behaviours [
19]. A combination of Goss, Copper, and rotated Brass textures was reported in the UR samples while the recrystallization texture in the CR specimens was Brass. The recrystallized grain size of the CR specimens was smaller than the UR ones at the same annealing conditions which was attributed to the randomization of nucleation sites upon cross-rolling [
19].
Previous studies were focused on the microstructure evolution during a single rolling strategy such as rolling with only UR or CR. In this study, the UR and CR were intentionally combined to evaluate the microstructure evolution during the rolling processes and subsequent heat treatments. It was expected that the microstructure is different from that from a single rolling scheme.
2. Materials and Methods
2.1. Material
The material used in the present study was Alloy 800H; the chemical composition is listed in
Table 1. The material was produced from hot rolling and then with a final solution annealing at 1167 ᵒC for 32 mins. The as-received plates have a thickness of 2 mm.
2.2. Cold Rolling and Heat Treatments
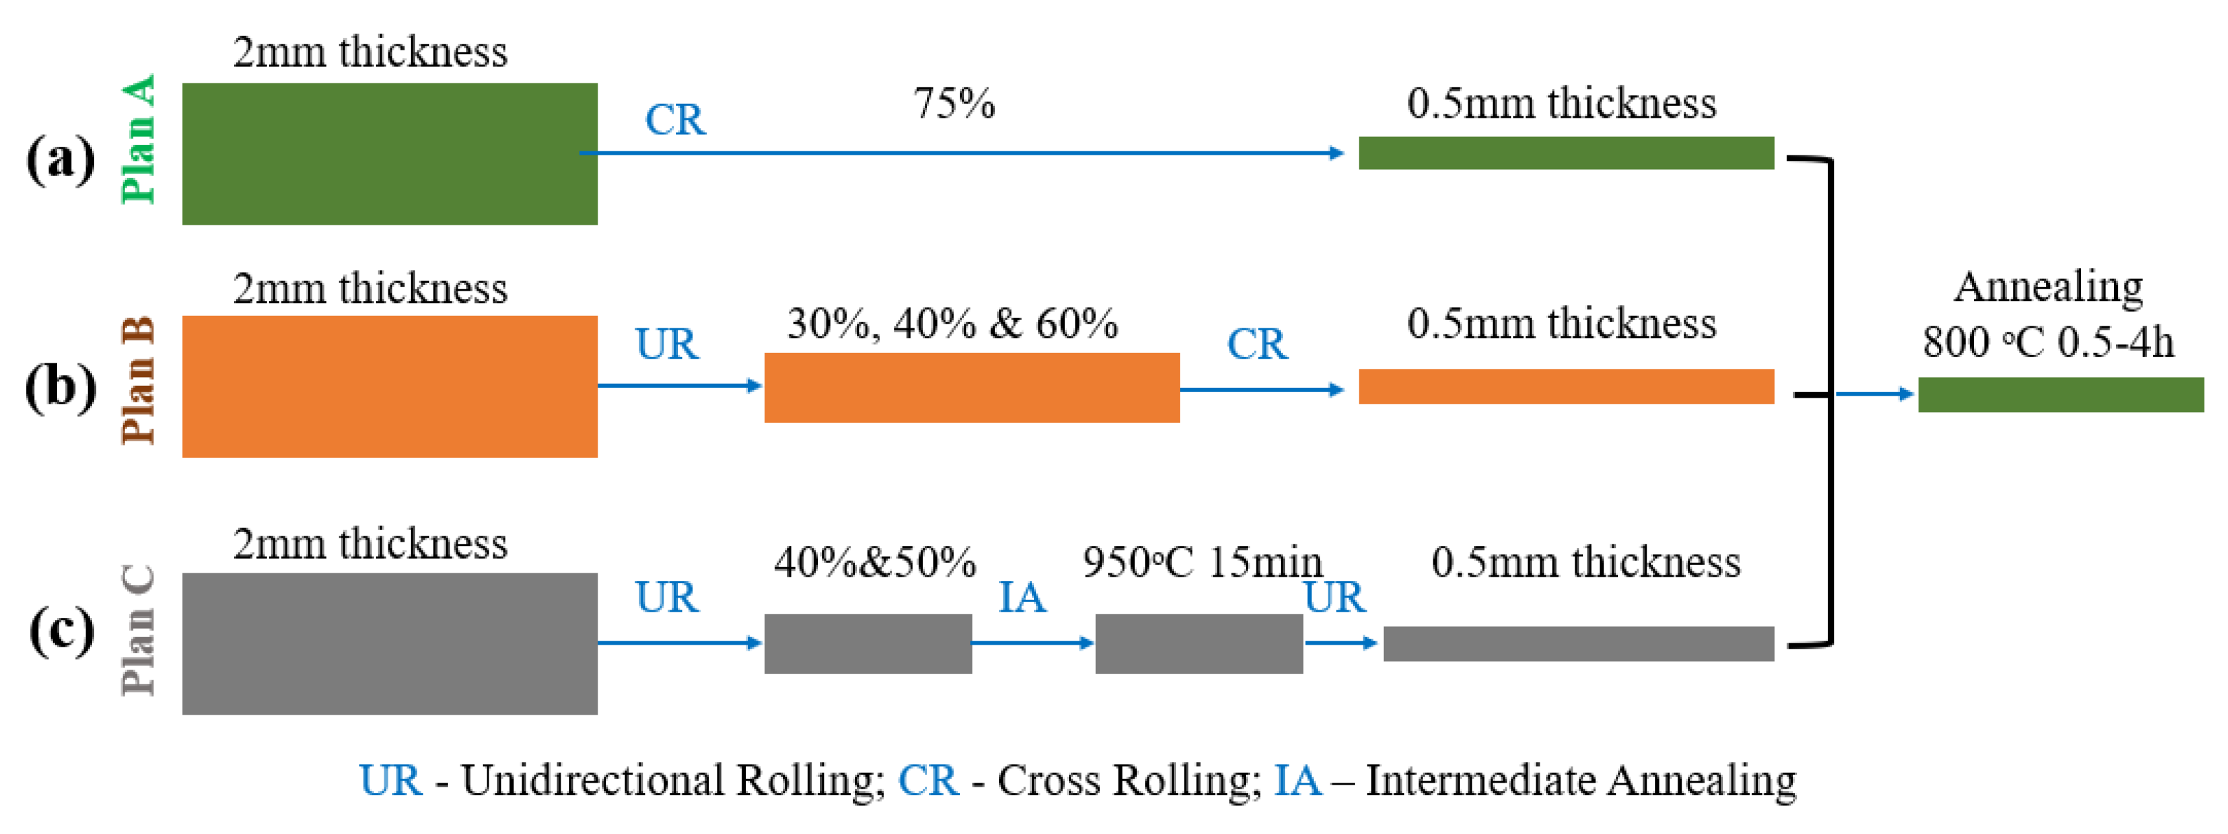
Each of the as-received Alloy 800H plates was cold rolled and heat treated subsequently using one of the three schemes that are displayed in
Figure 1. The unidirectional rolling, cross rolling, and intermediate annealing (IA) were intentionally combined to evaluate the microstructure evolution behaviours during the cold rolling and heat treatments. The unidirectional rolling is on the rolling direction (RD) - transverse direction (TD) surface and the rolling direction is along the RD. In the first plan, Plan A in
Figure 1a, only cross-rolling was performed, while in Plan B (
Figure 1b) unidirectional rolling and cross-rolling were combined. In Plan C (
Figure 1c), intermediate annealing was introduced between unidirectional rolling passes to reduce the stress caused by grain boundaries and dislocations from accumulated rolling. All of the rolled specimens started with a thickness of 2 mm and ended with a final thickness of 0.5 mm, which is equal to a deformation of 75%. After cold rolling, all of the specimens were annealed at 800 ᵒC for 0.5 h – 4 h to study the recrystallization behaviours. The specimens from different rolling plans are named in
Table 2. In the cold-rolling process, it is important to optimize the reduction per pass to avoid cracking. The rolling reduction used in this investigation was 10% of the thickness before each rolling pass. Therefore, a total of 15 passes were applied.
2.3. Microstructure Characterization
The microstructure of the cold-rolled and annealed specimens was characterized by an optical microscope (OM), and scanning electron microscopy (SEM). For OM characterizations, the specimens were ground using sandpapers of increasing grit number, followed by final polishing with 9 μm, 6 μm, and 3 μm diamond suspension and 0.5 µm colloidal silica, and then etched in a Marble reagent solution (20 ml H2O + 20 ml HCl + 4g CuSO4). For SEM characterizations, the polished specimen was electro polished in a Struers LectroPol electropolisher using 5% perchloric in methanol at -20 °C at an applied voltage of 20 V for 60 s.
3. Results
3.1. As-Received Microstructure
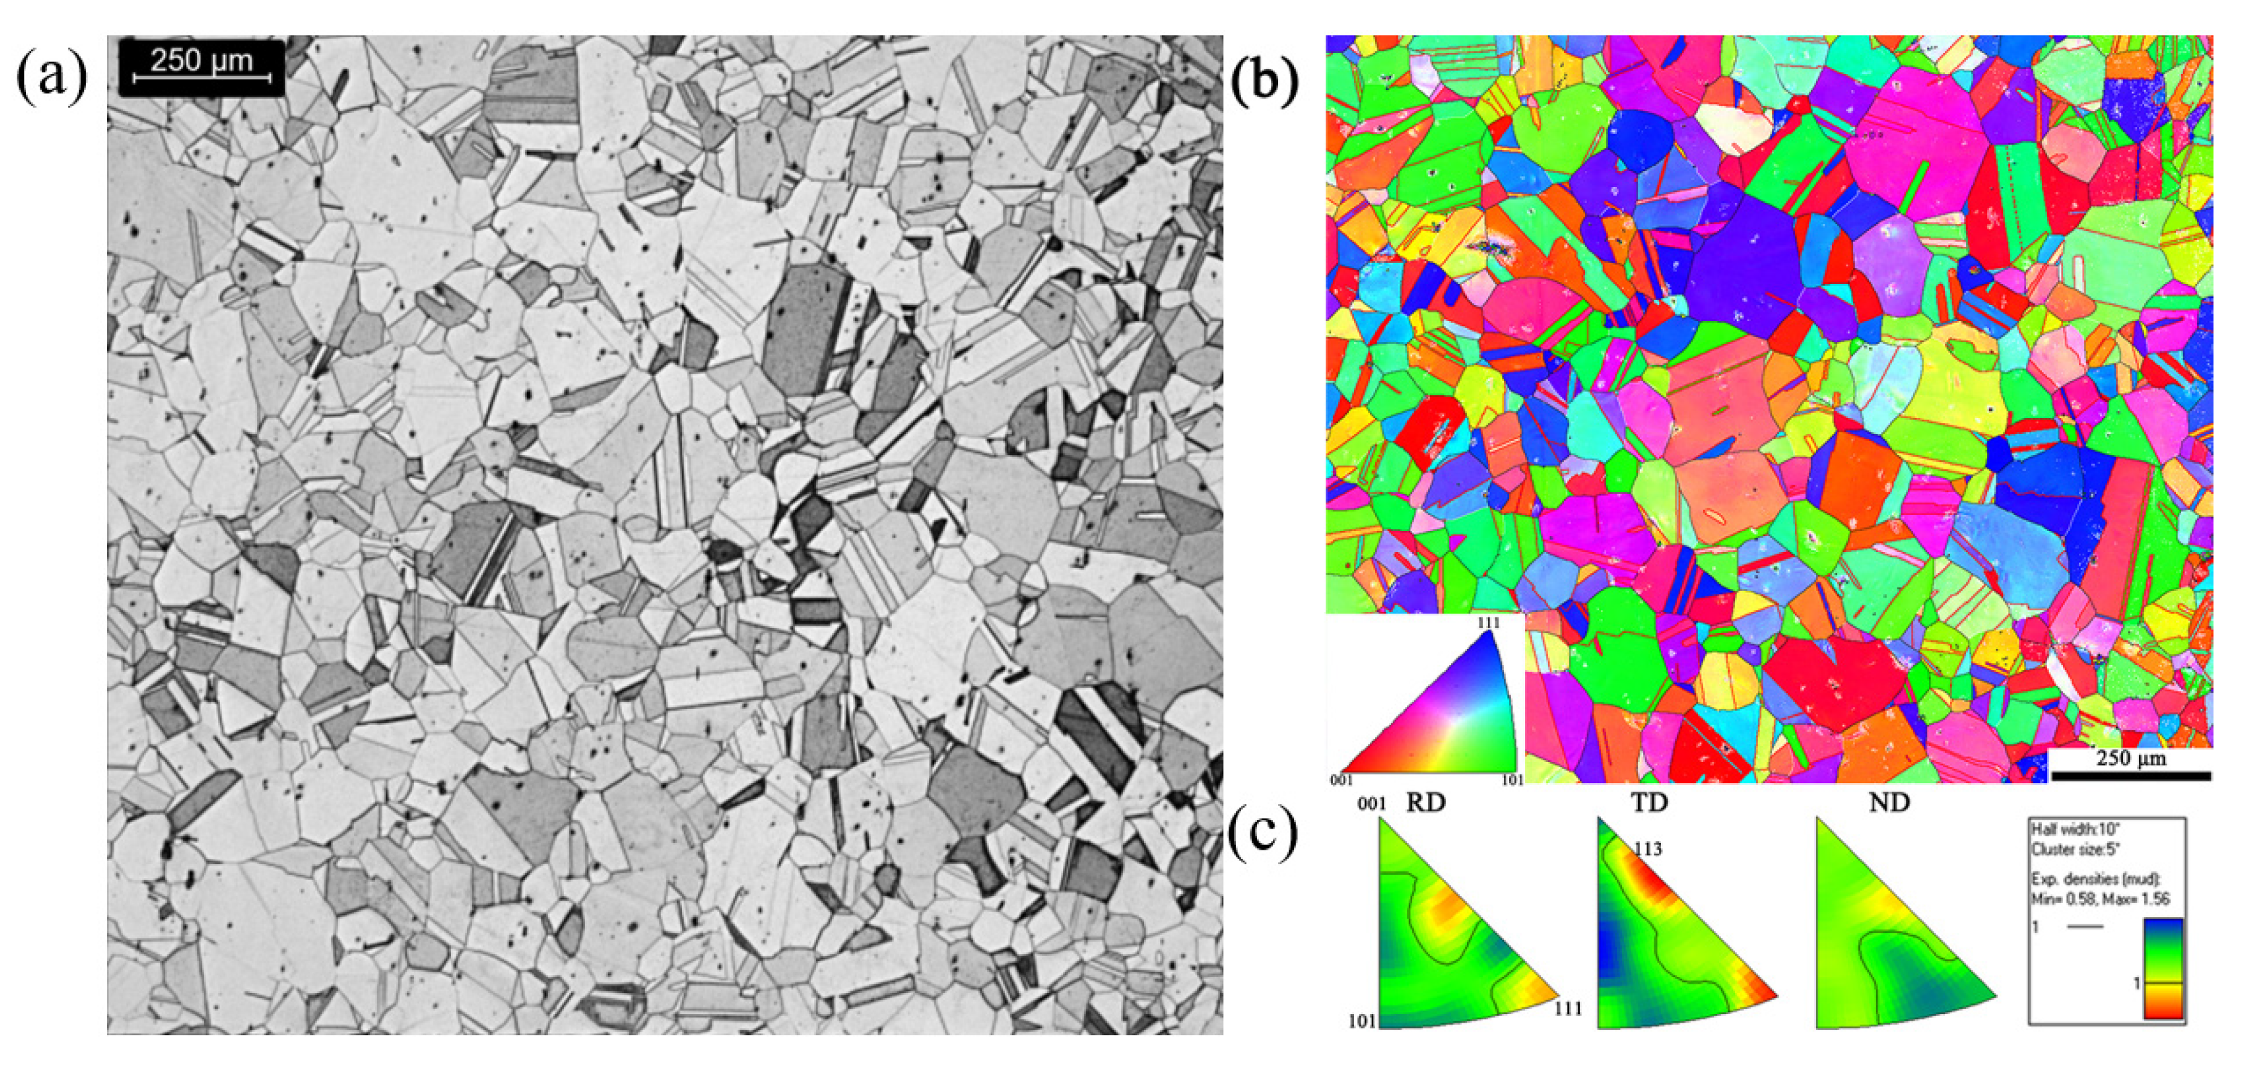
The microstructure of the as-received Alloy 800H was analyzed with an optical microscope and Electron Backscatter Diffraction (EBSD) and is displayed in
Figure 2. The average grain size of the as-received material is 120 μm but with a variation of grain size, as shown in
Figure 2a. EBSD maps in
Figure 2b show that a texture is presented with a weak <113> and <111> texture along the transverse direction (TD) direction. Though the as-received material was heat-treated, the material is still textured since the significant rolling reduction occurred before the final annealing process. It is believed that the new recrystallization grains originate from dislocation cells or subgrains which are present after deformation [
25]. The new grains are normally from the strain-induced grain boundary migration (SIBM) from the deformed grains [
25]. Therefore, the annealing is expected to result in a recrystallization texture which is closely related to the deformation texture.
3.2. Cold-Rolled Microstructure
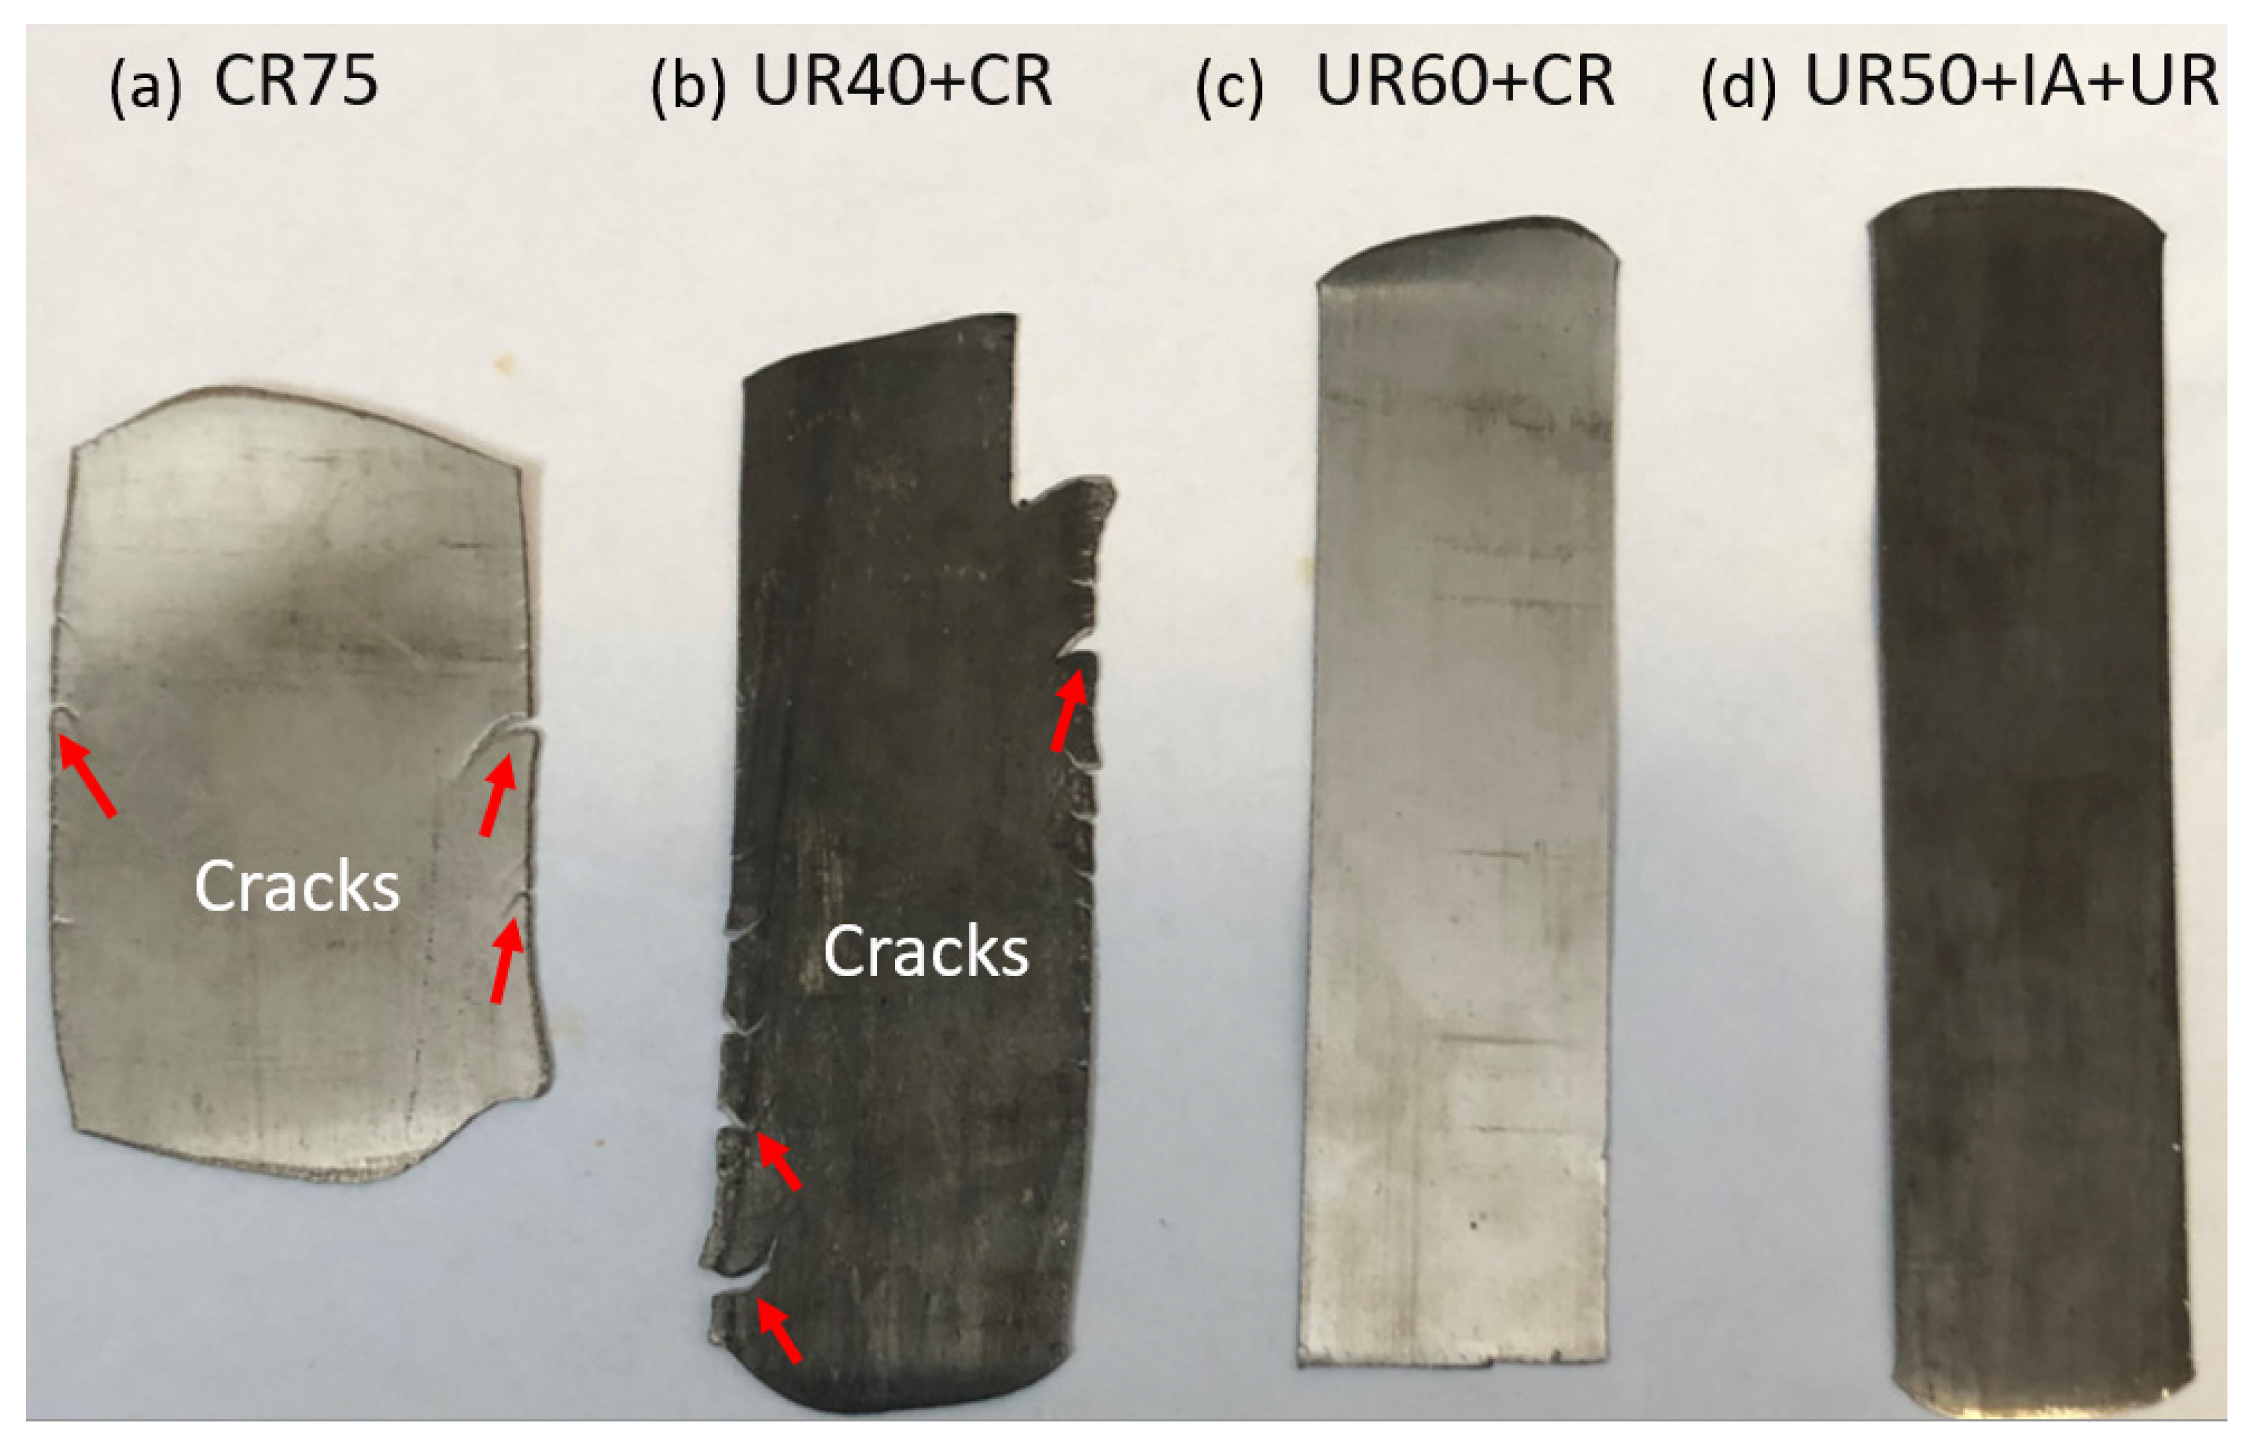
Figure 3 displays a general view of the cold-rolled plates. Some cracks at the edges of the rolled plates were observed in the CR75 (
Figure 3a), UR30+CR, and UR40+CR (
Figure 3c) plates. In the plates where large unidirectional deformation occurred such as UR60+CR, UR40+IA+UR, and UR50+IA+UR (
Figure 3d), cracking during the rolling process was absent. This indicates that the as-received Alloy 800H has less deformability during cross-rolling than unidirectional rolling.
3.2.1. Microstructure of Cold Rolling Plan A
Figure 4 exhibits the microstructure of CR75 from the RD-ND surface by the optical microscope with different magnifications. The microstructure is inhomogeneous. Both large and small deformed grains can be observed. The large grains are elongated along the RD direction, while the small grains are embedded in the large grains.
3.2.2. Microstructure of Cold Rolling Plan B
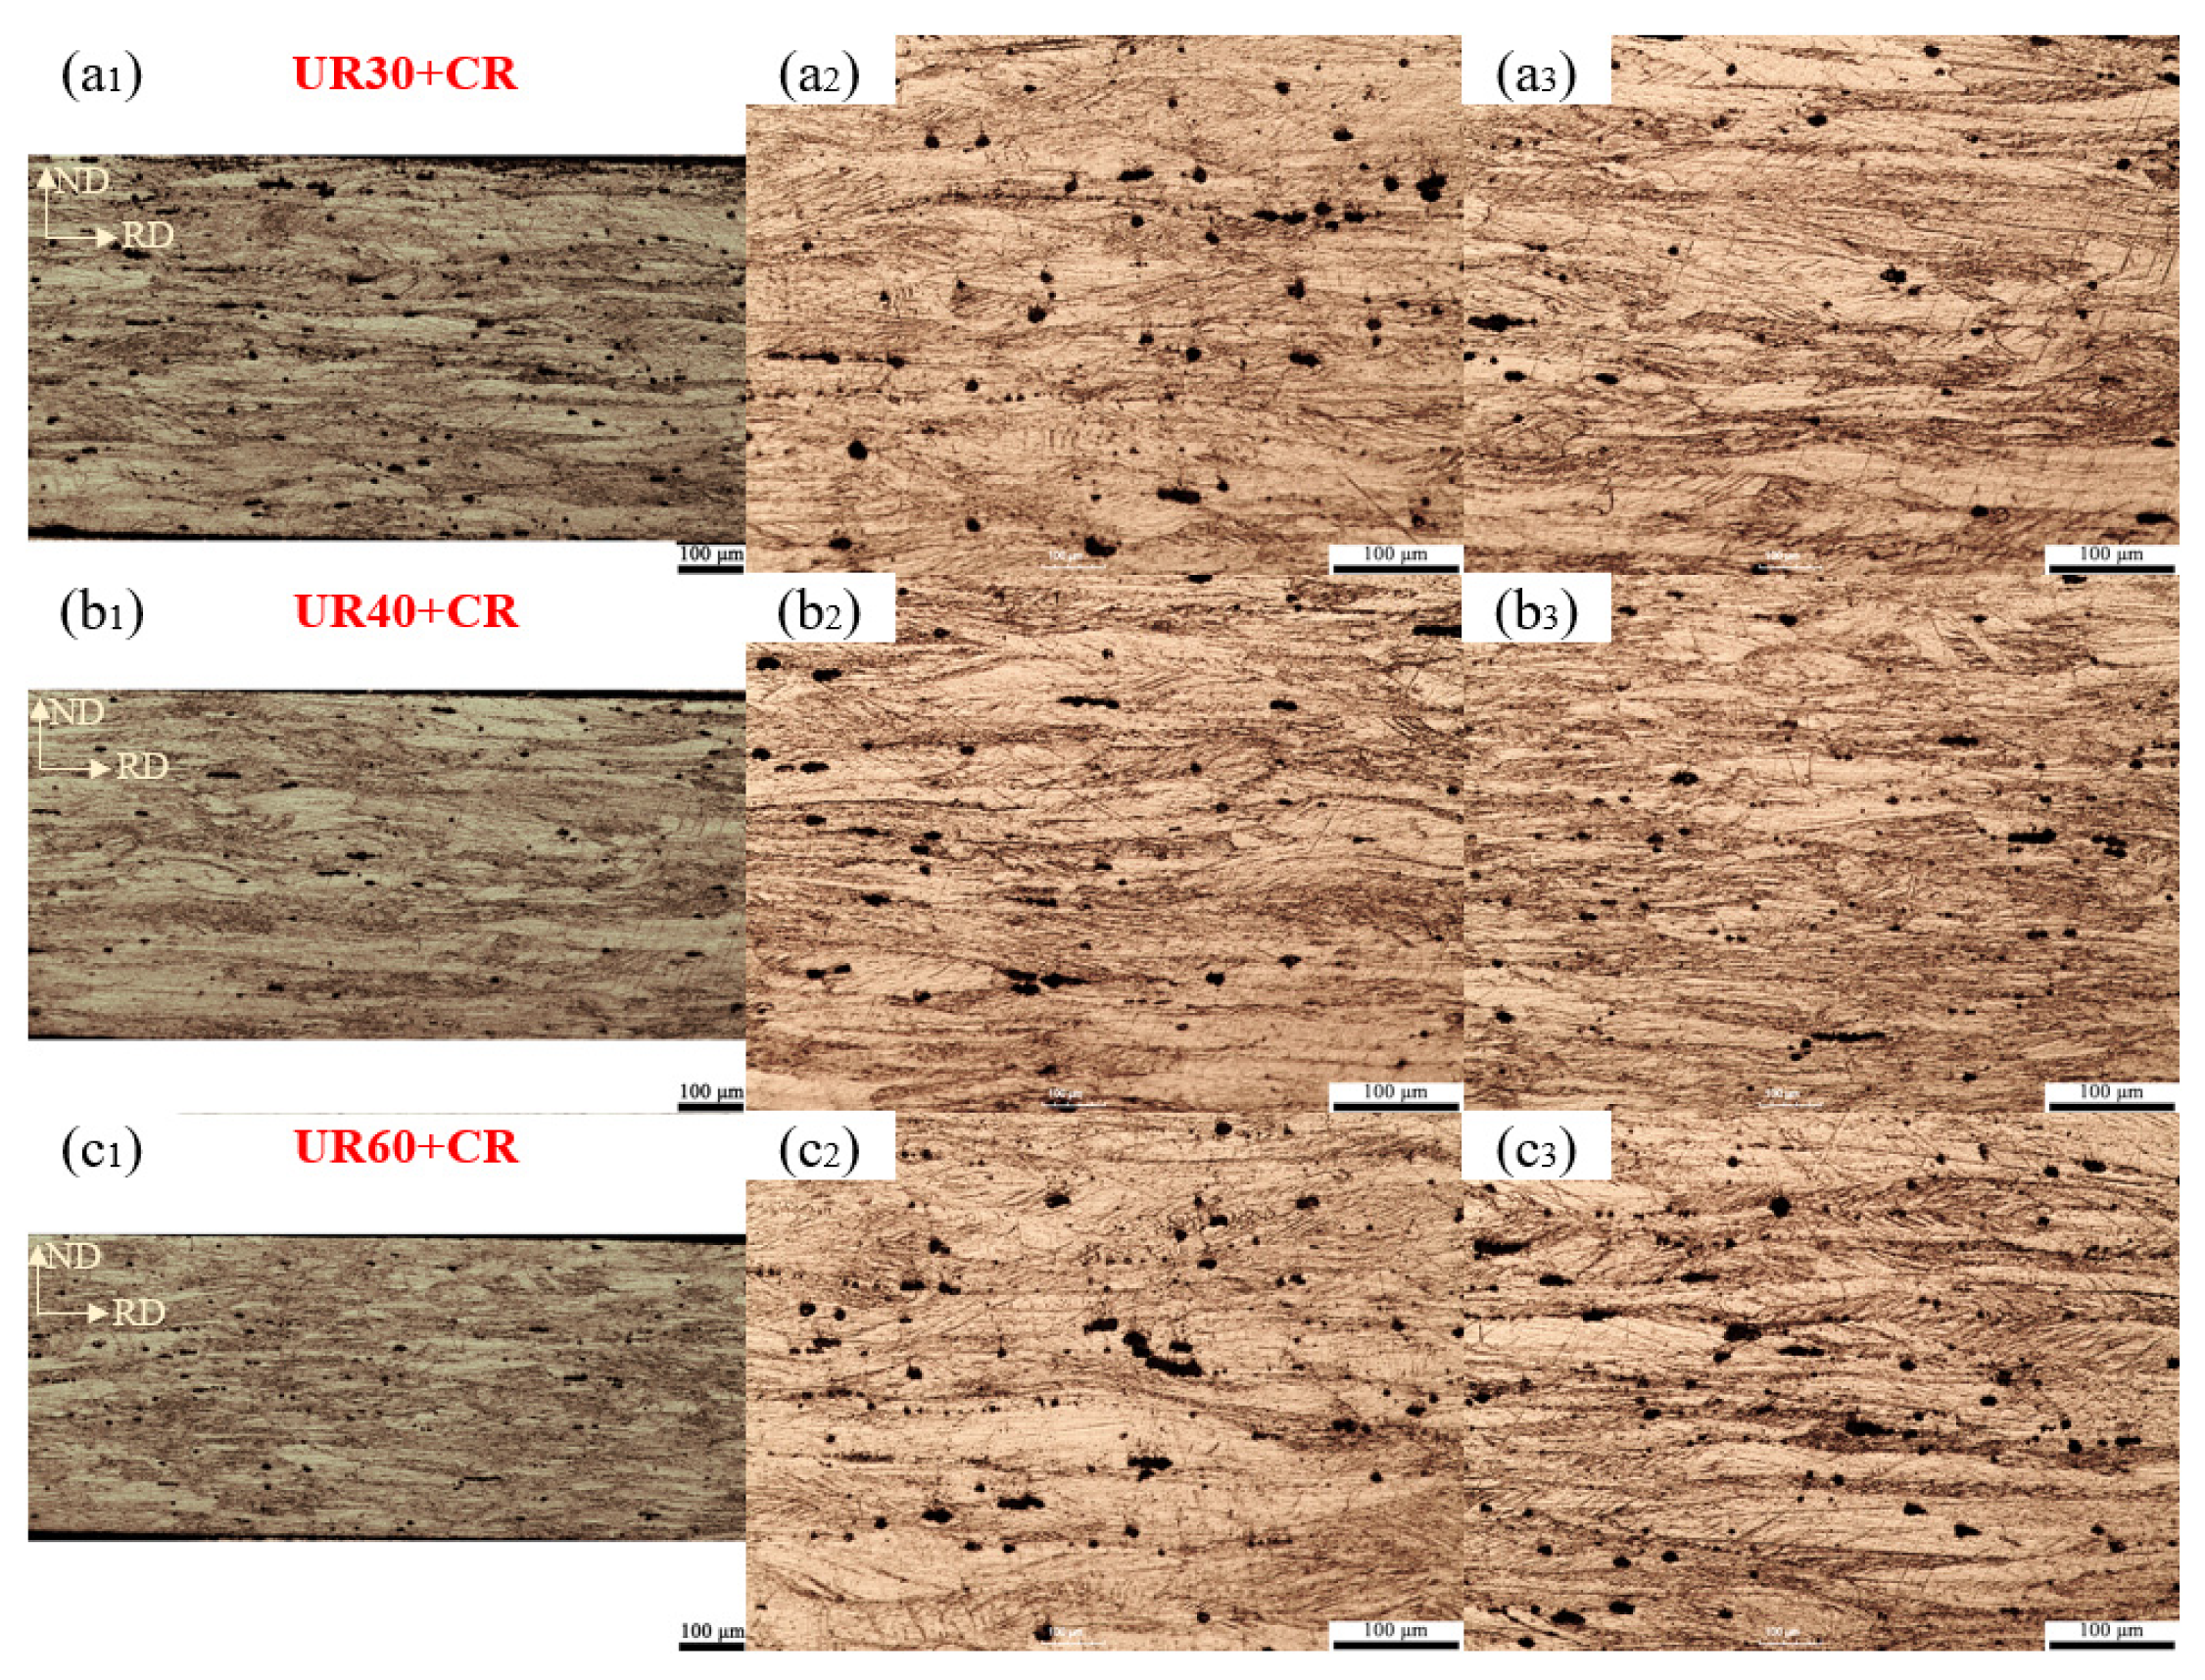
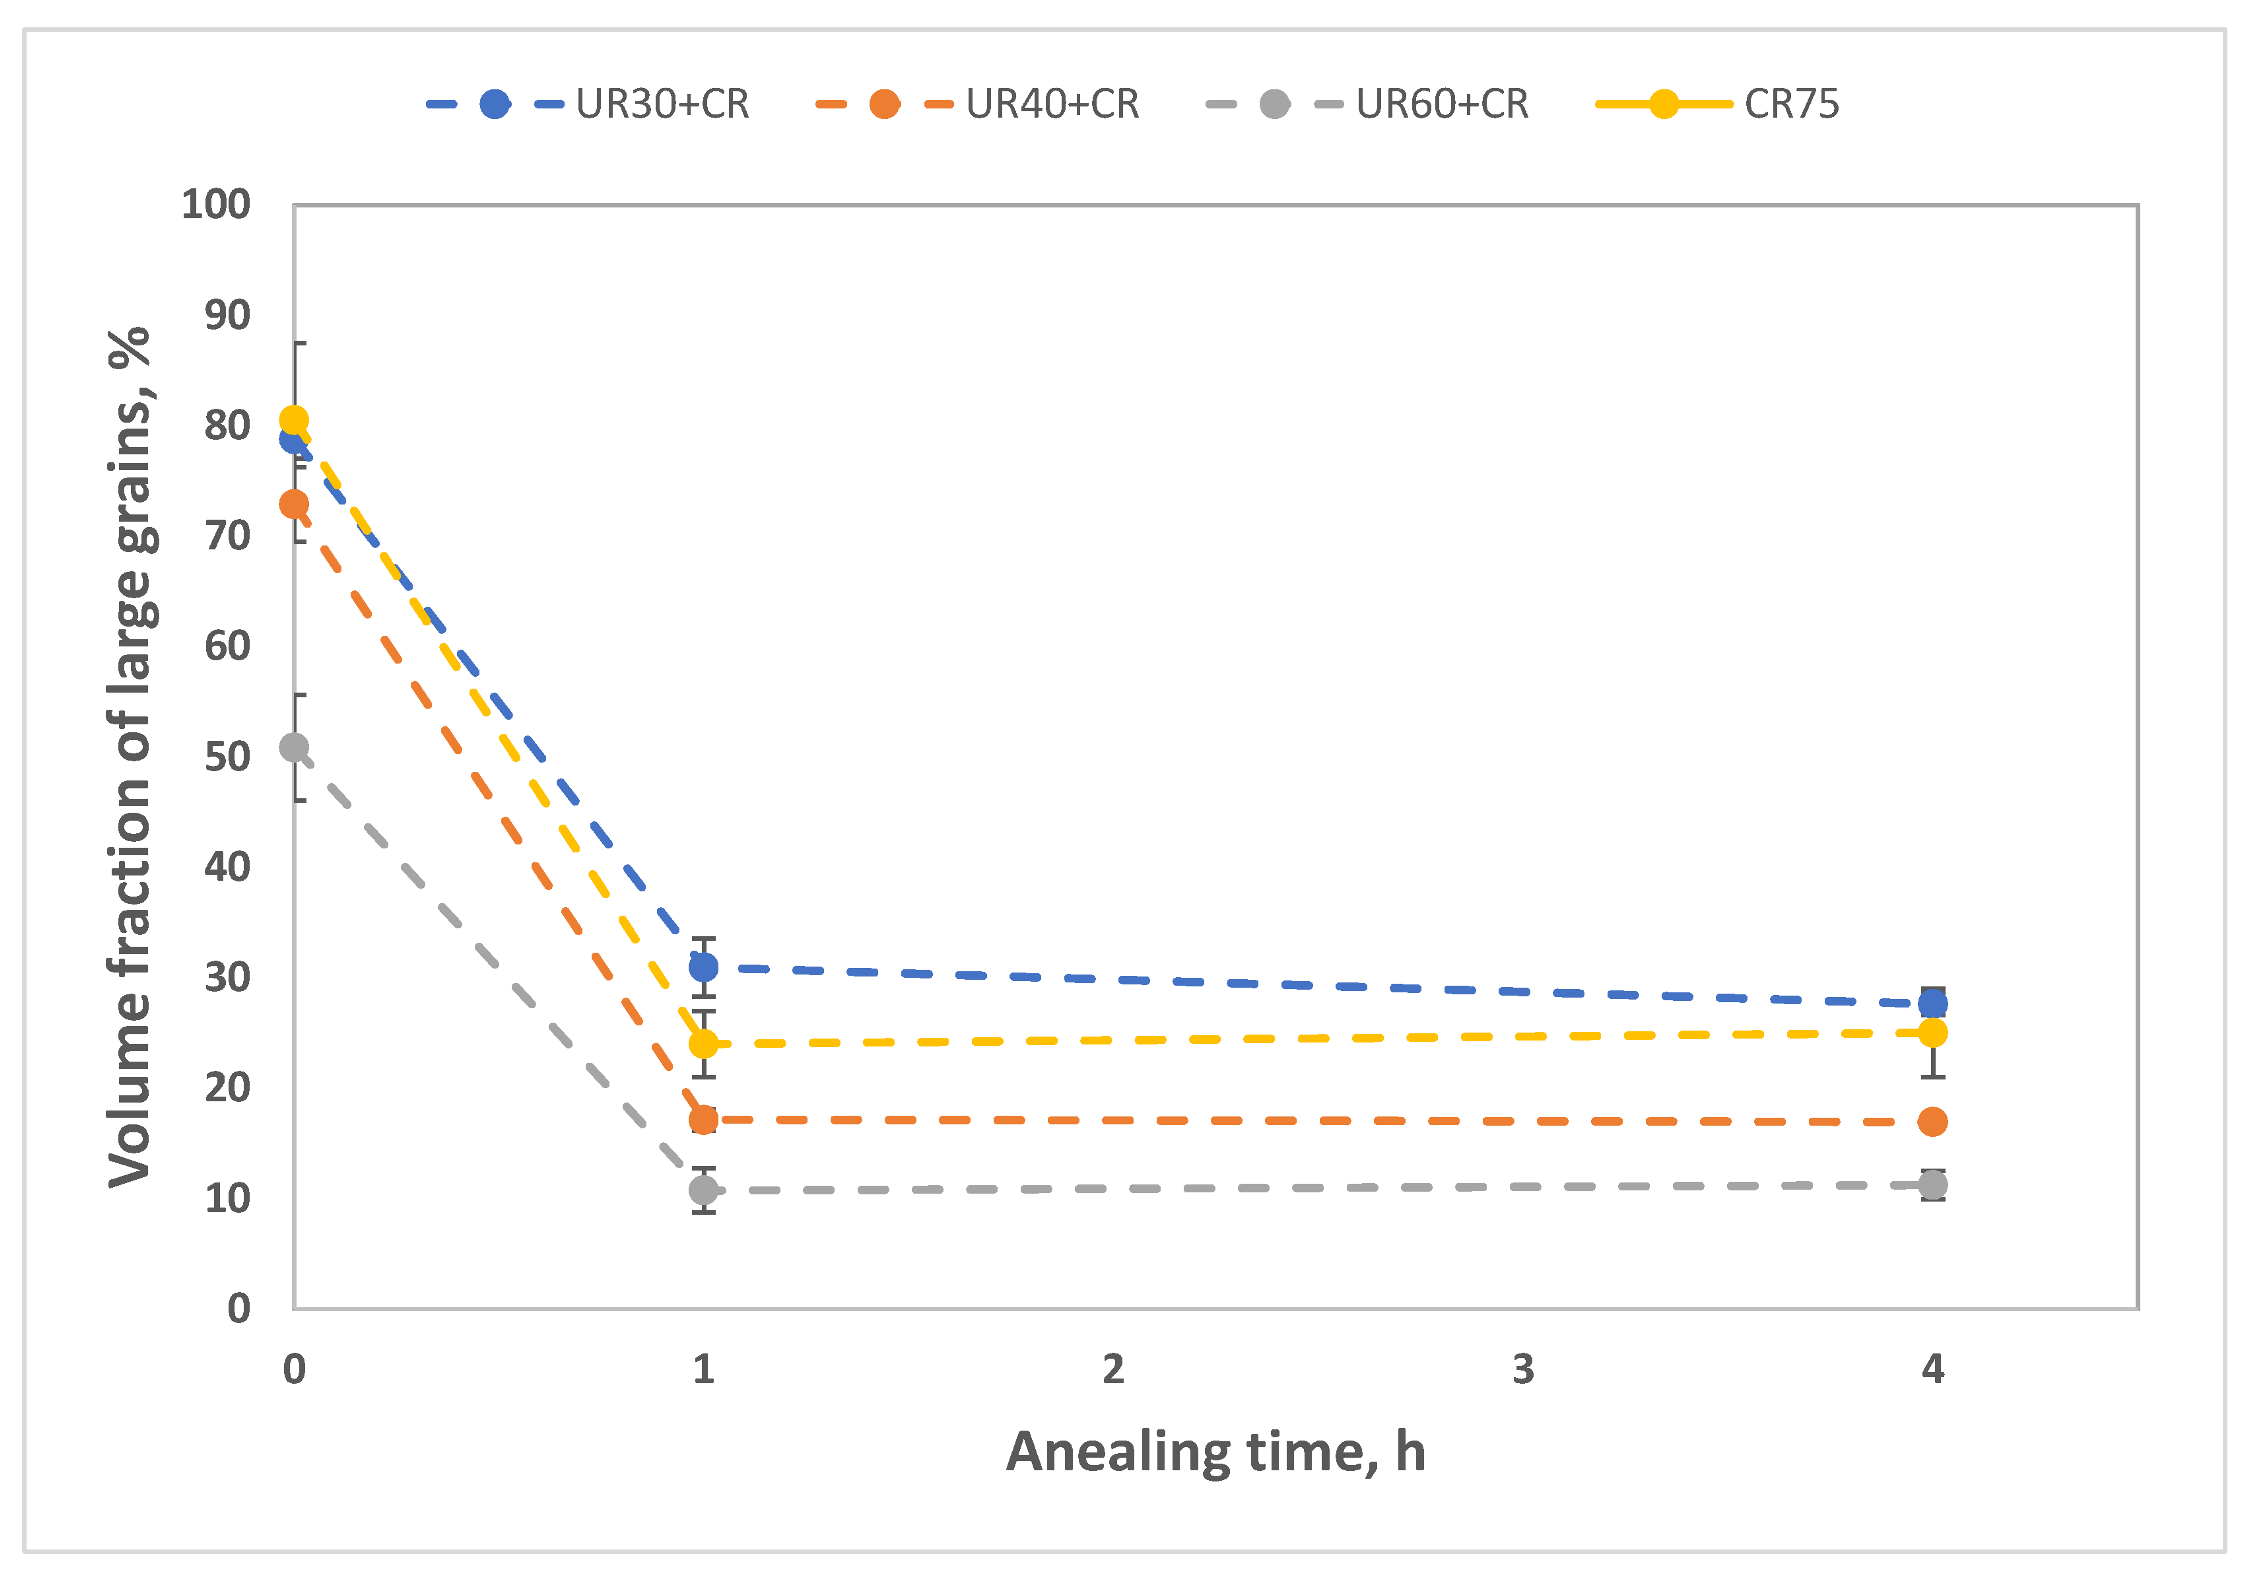
Figure 5 shows the microstructure of the plates with a mixture of UR and CR. The microstructure is similar to the one in CR75 with both large and small deformed grains. The fraction of the large grains in different cold-rolled plates is displayed in
Figure 6. The large-grain (grain size > 50 μm) fraction is lower for the rolling with a mixture of UR and CR than that of the one with merely CR. In addition, a larger amount of UR before CR resulted in a lower fraction of large grains. This is inconsistent with the observation from
Figure 3, i.e., better deformability was seen in the UR specimens.
3.2.3. Microstructure of Cold Rolling Plan C
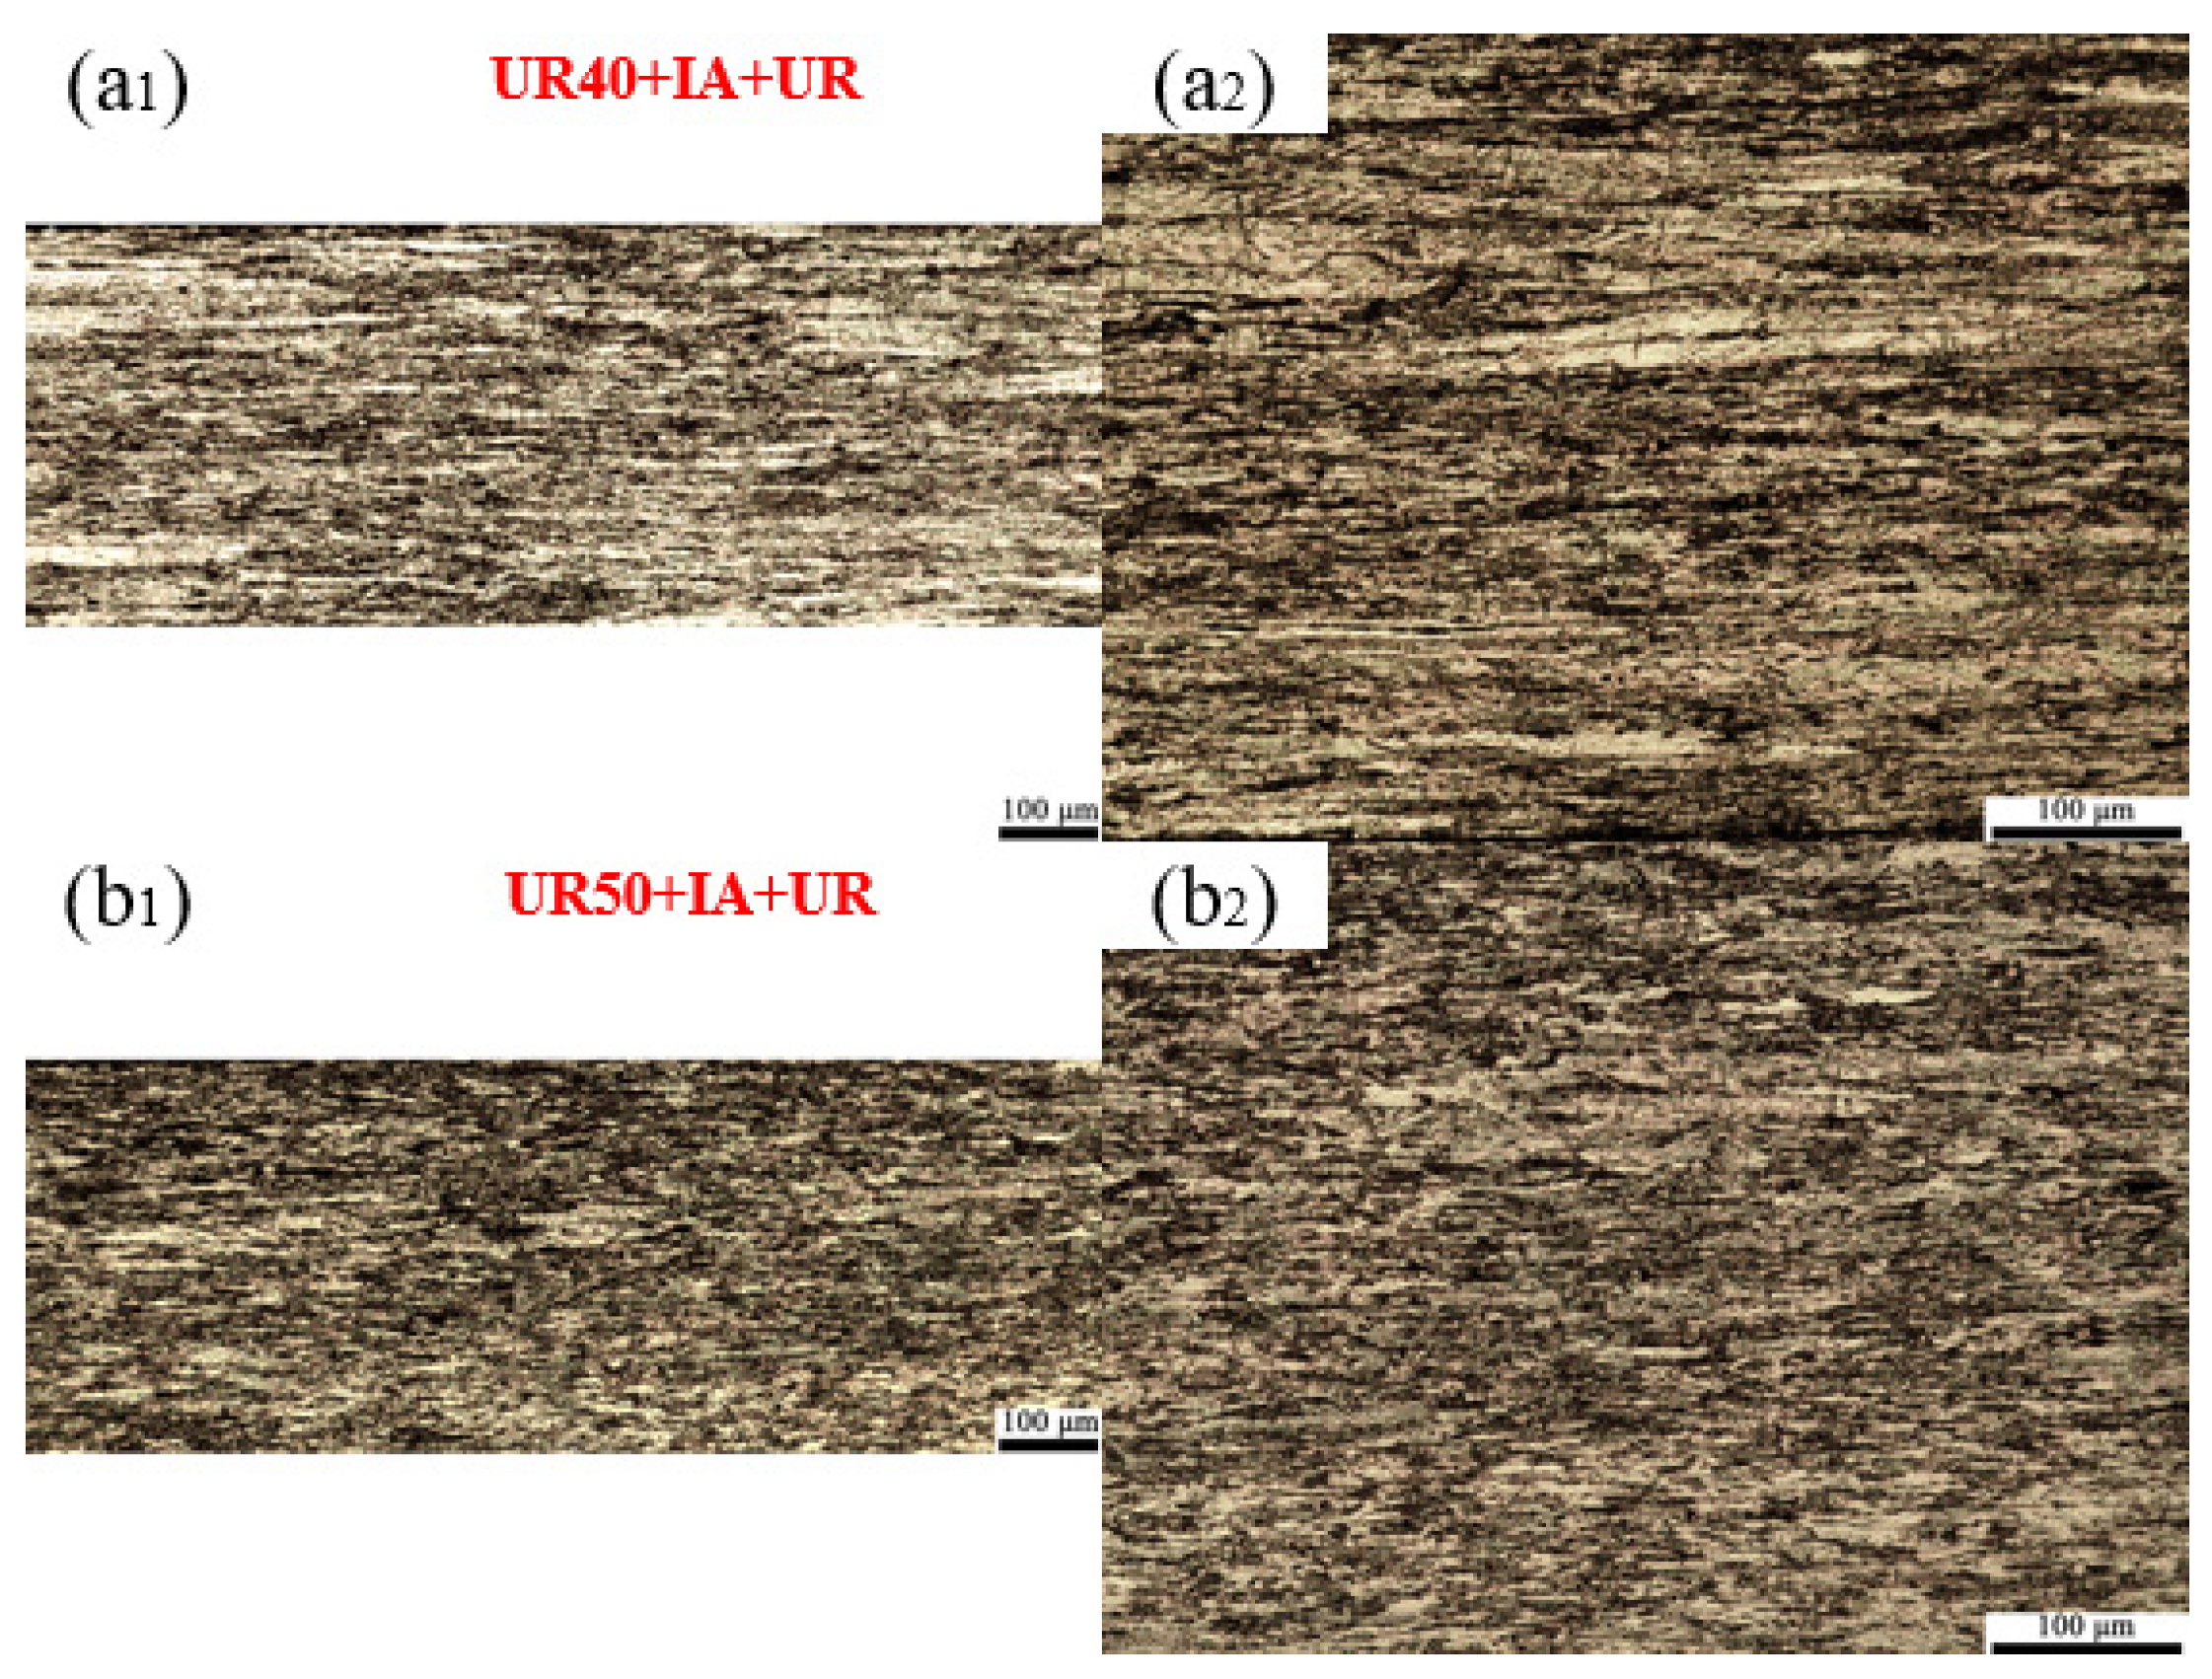
Figure 7 shows the microstructure of the unidirectionally rolled plates, UR40 and UR50. In these plates, the intermediate heat treatment at 950 ᵒC for 15 min was performed to reduce the internal stress. The UR significantly reduced the grain size compared to the one from CR in
Figure 4. Elongated grains can be observed with their major axes along the RD. A comparison between UR40+IA+UR and UR50+IA+UR indicates that a larger rolling reduction before intermediate annealing could reduce the grain size after the final rolling.
3.3. Annealed Microstructure
3.3.1. Microstructure of Annealing Plan A
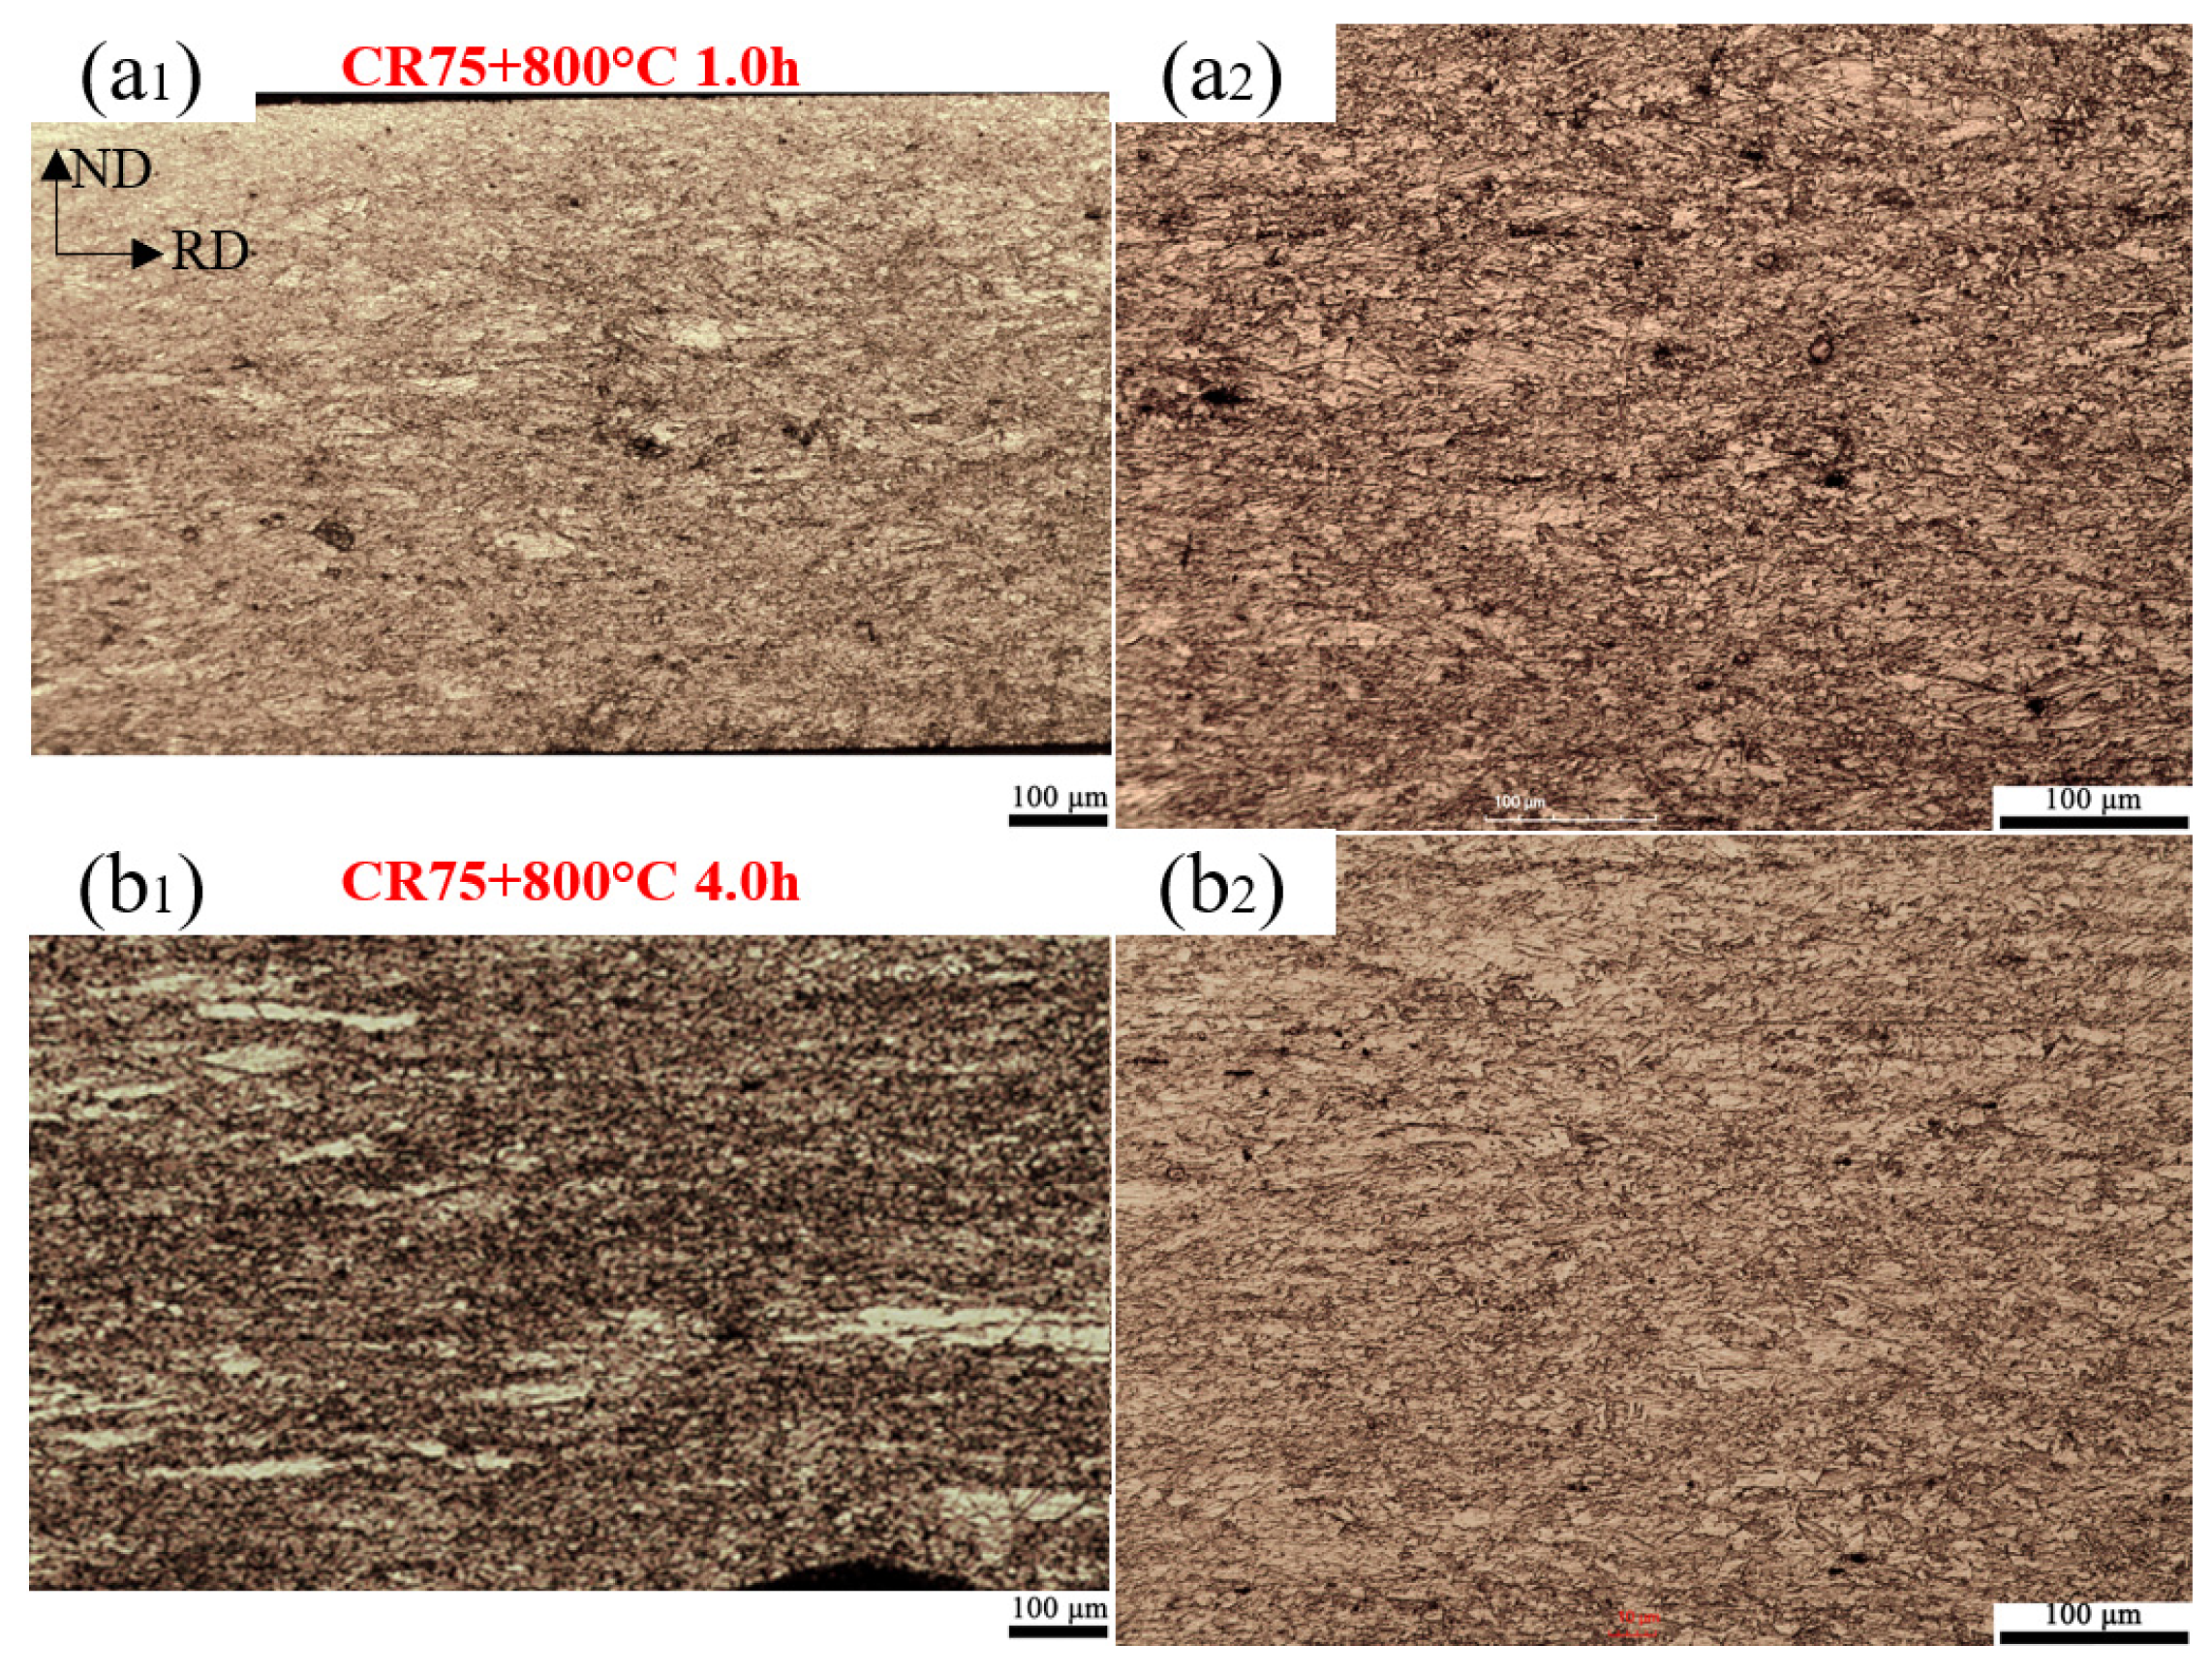
Figure 8 displays the heat-treated microstructure of CR75 at 800 ᵒC for 1 h and 4 h. The microstructure is mixed with deformed and recrystallized grains for both heat treatment conditions. Compared to the as-deformed CR75 in
Figure 4, the fraction of large grains dropped quickly after 1 h of annealing at 800 ᵒC. However, there is no significant change in the fraction from 1 h to 4 h, as shown in
Figure 6. Because the large grains in the annealed specimens were retained from the deformed plates, the fraction of the large grain indicates the percentage of recrystallization during heat treatments.
3.3.2. Microstructure of Annealing Plan B
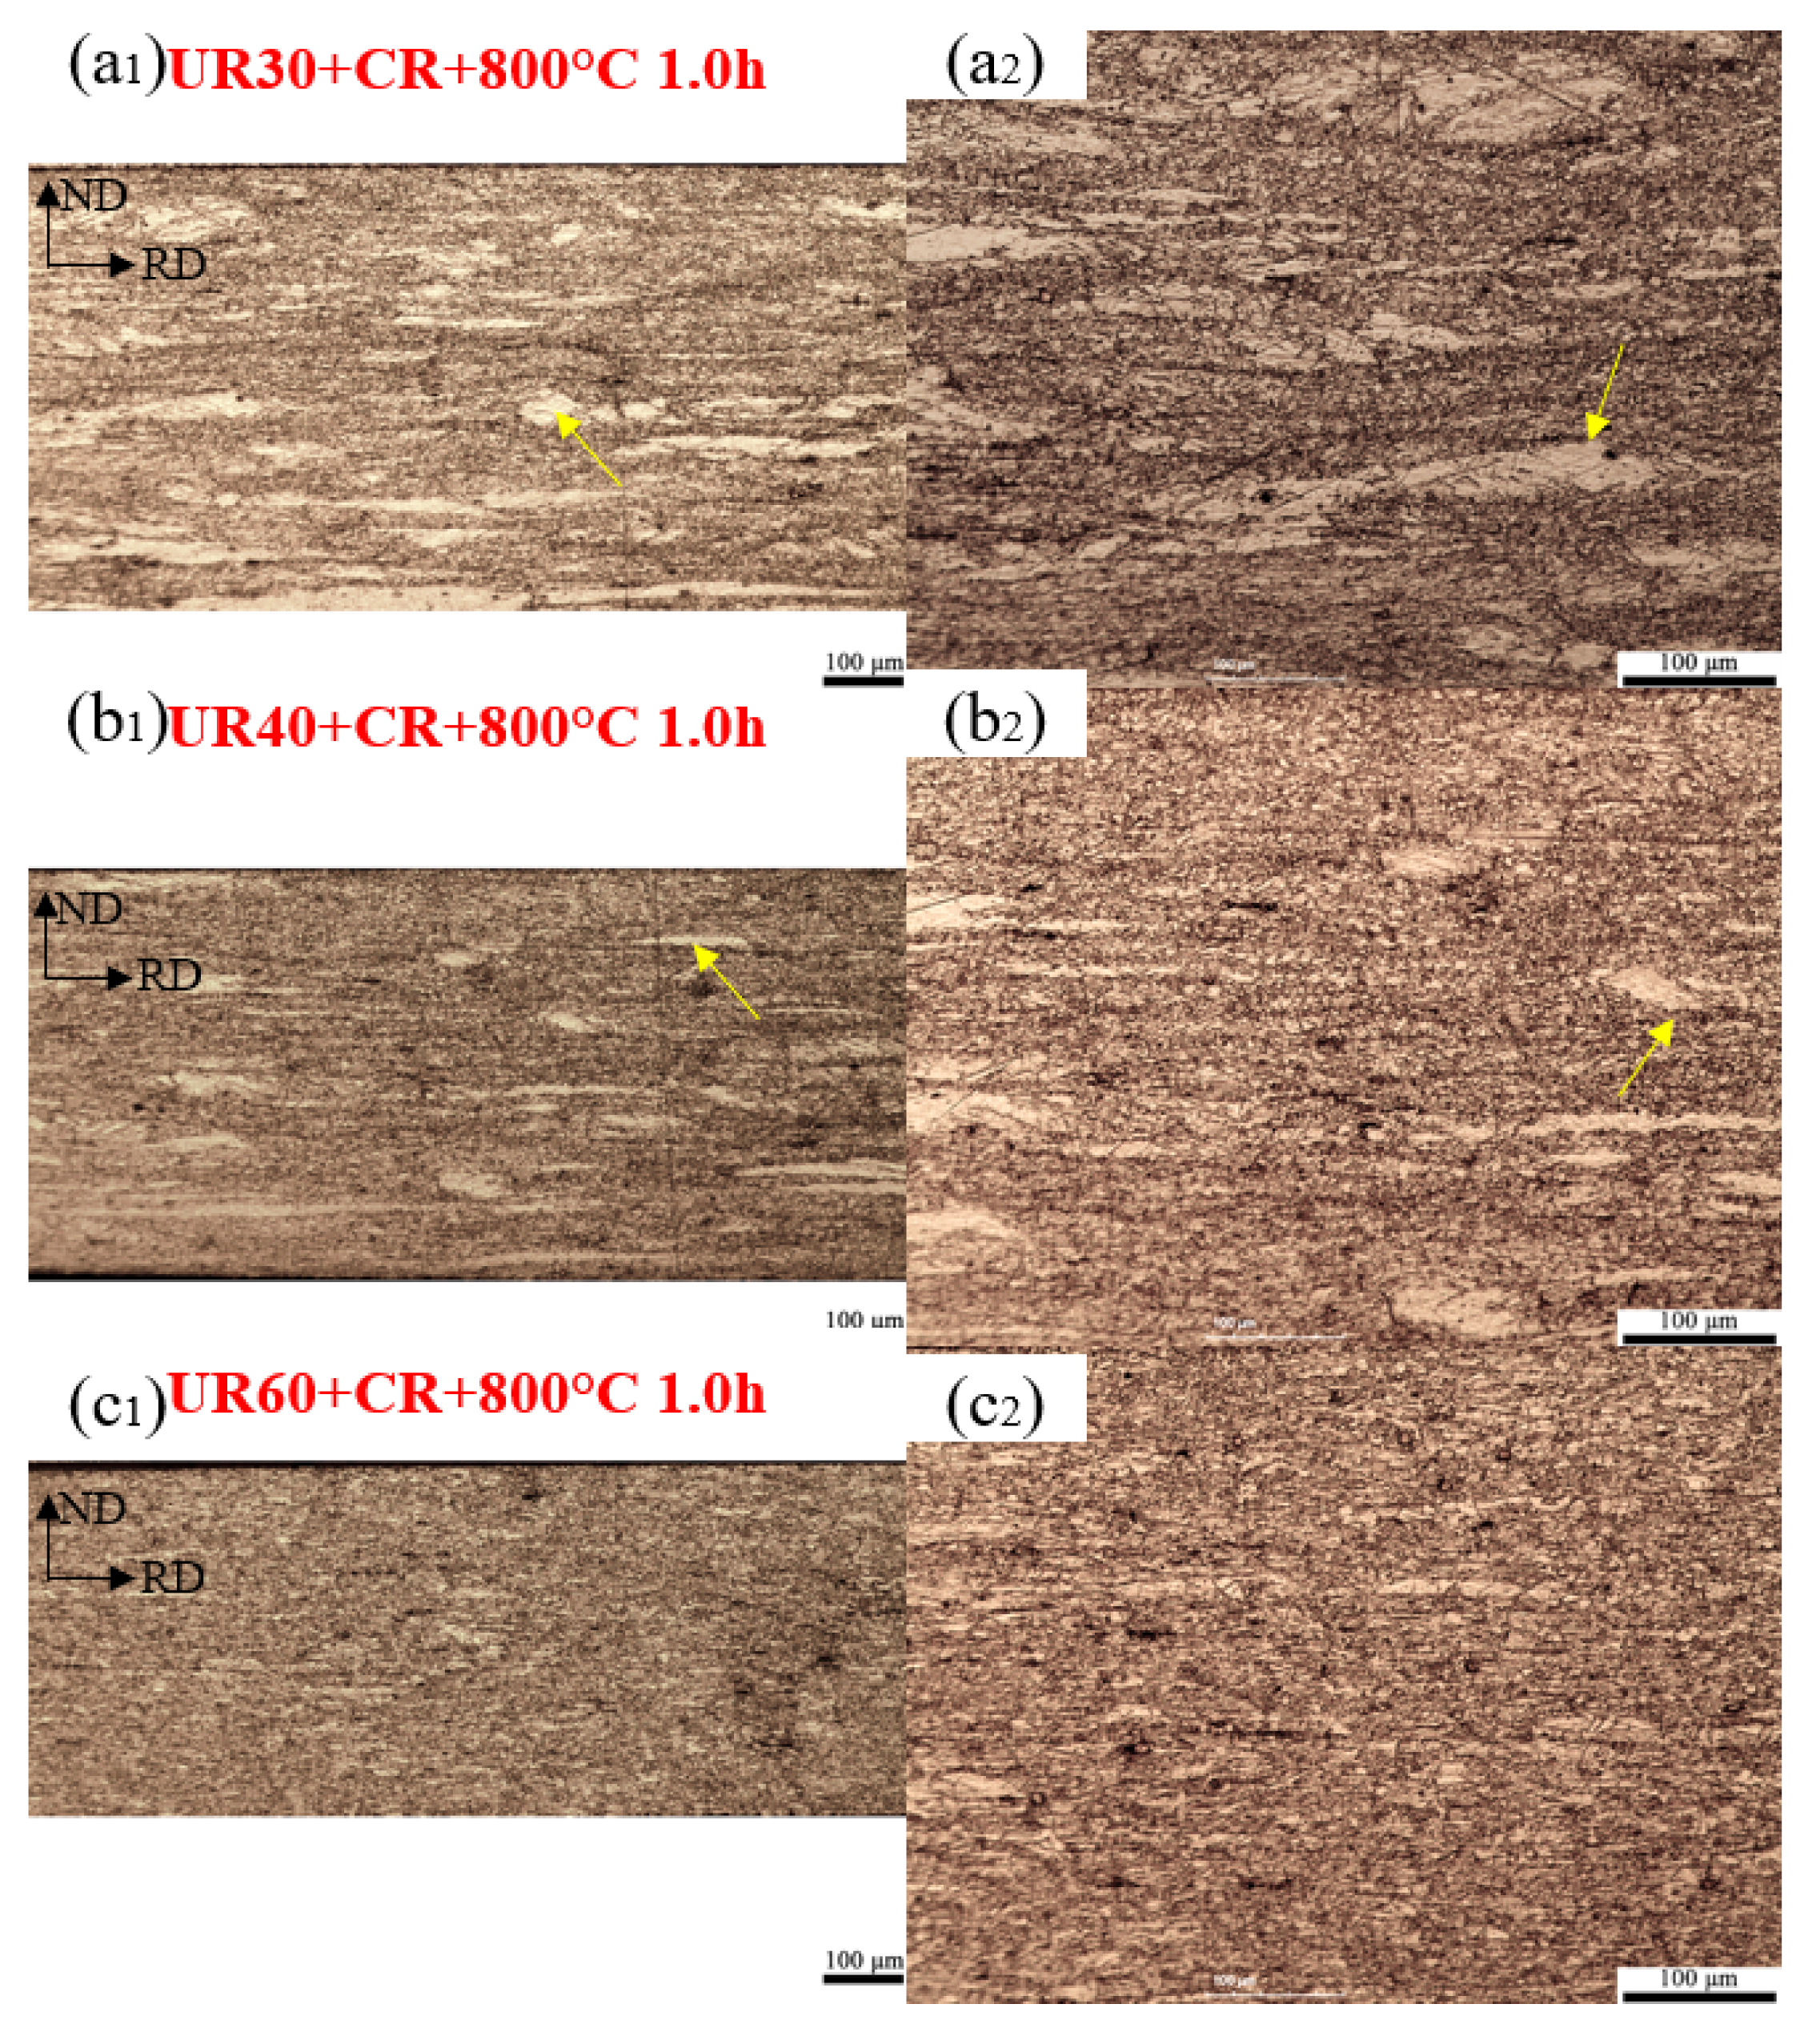
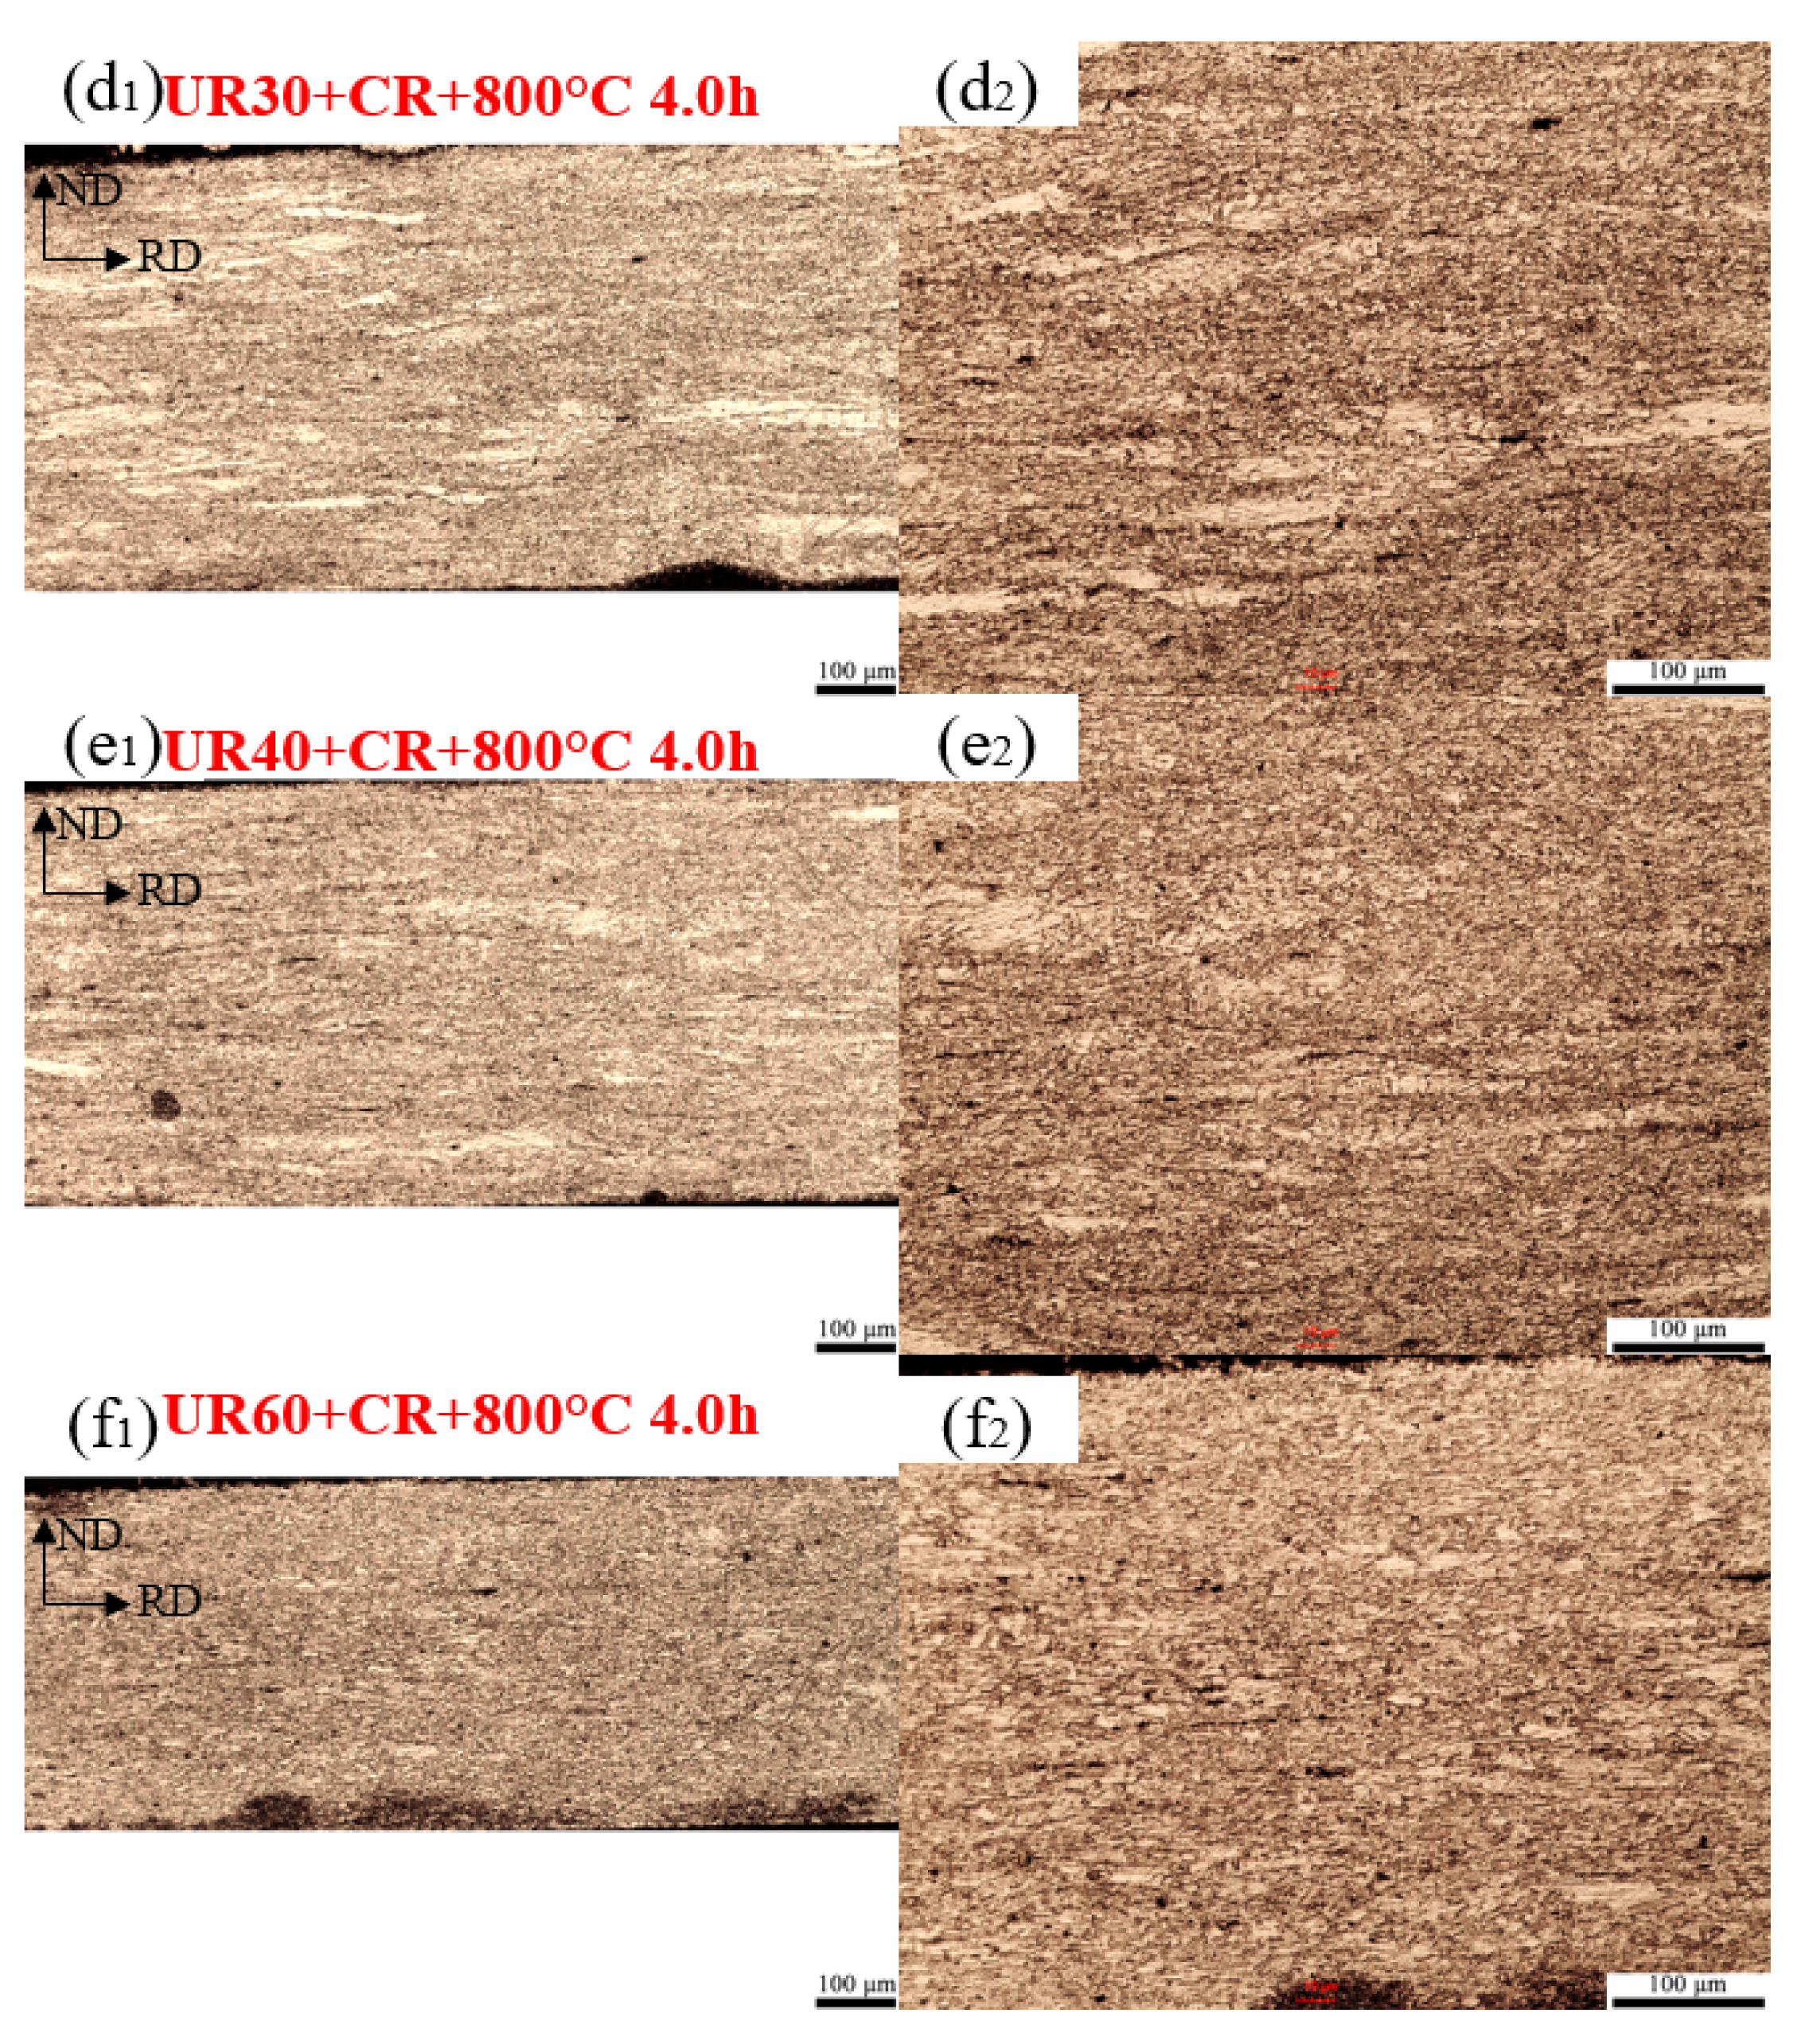
Figure 9 exhibits the microstructure evolution for the combination of UR and CR plates annealed at 800 ᵒC for 1h to 4 h. It can be seen that there are elongated and equiaxed grains after annealing for both conditions for all three rolling schemes, UR30+CR, UR40+CR, and UR60+CR. The statistical analysis of the fraction of the recrystallized and non-recrystallized grains is displayed in
Figure 6. There is a quick drop in the volume fraction of large deformed grains for all three rolling conditions. However, no significant decrease in the fraction of recrystallized grains was observed from 1 h to 4 h of annealing. The plates with a higher reduction of UR displayed a higher fraction of recrystallized grains, which indicates recrystallization occurred faster in the plates with a higher percentage of UR reductions.
3.3.3. Microstructure of Annealing Plan C
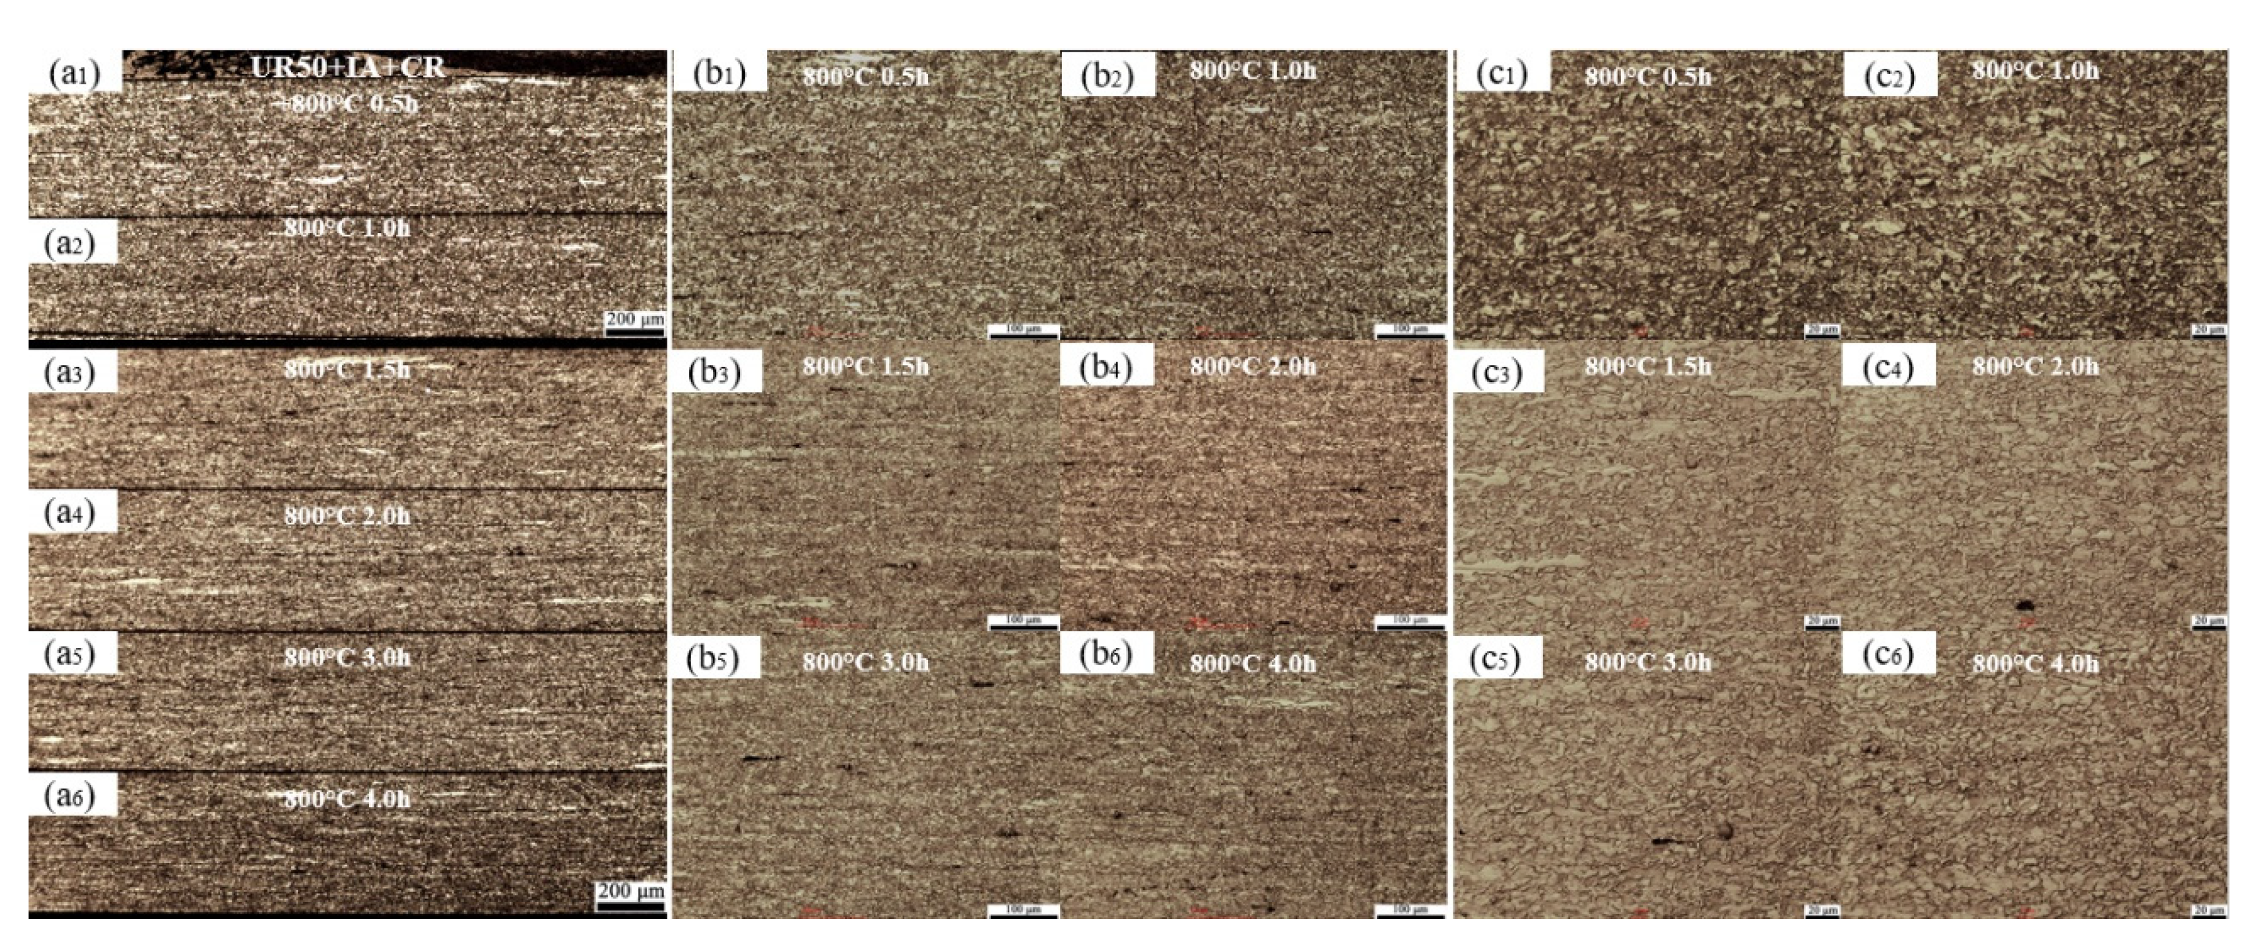
The microstructure evolution of UR plates after annealing is shown in
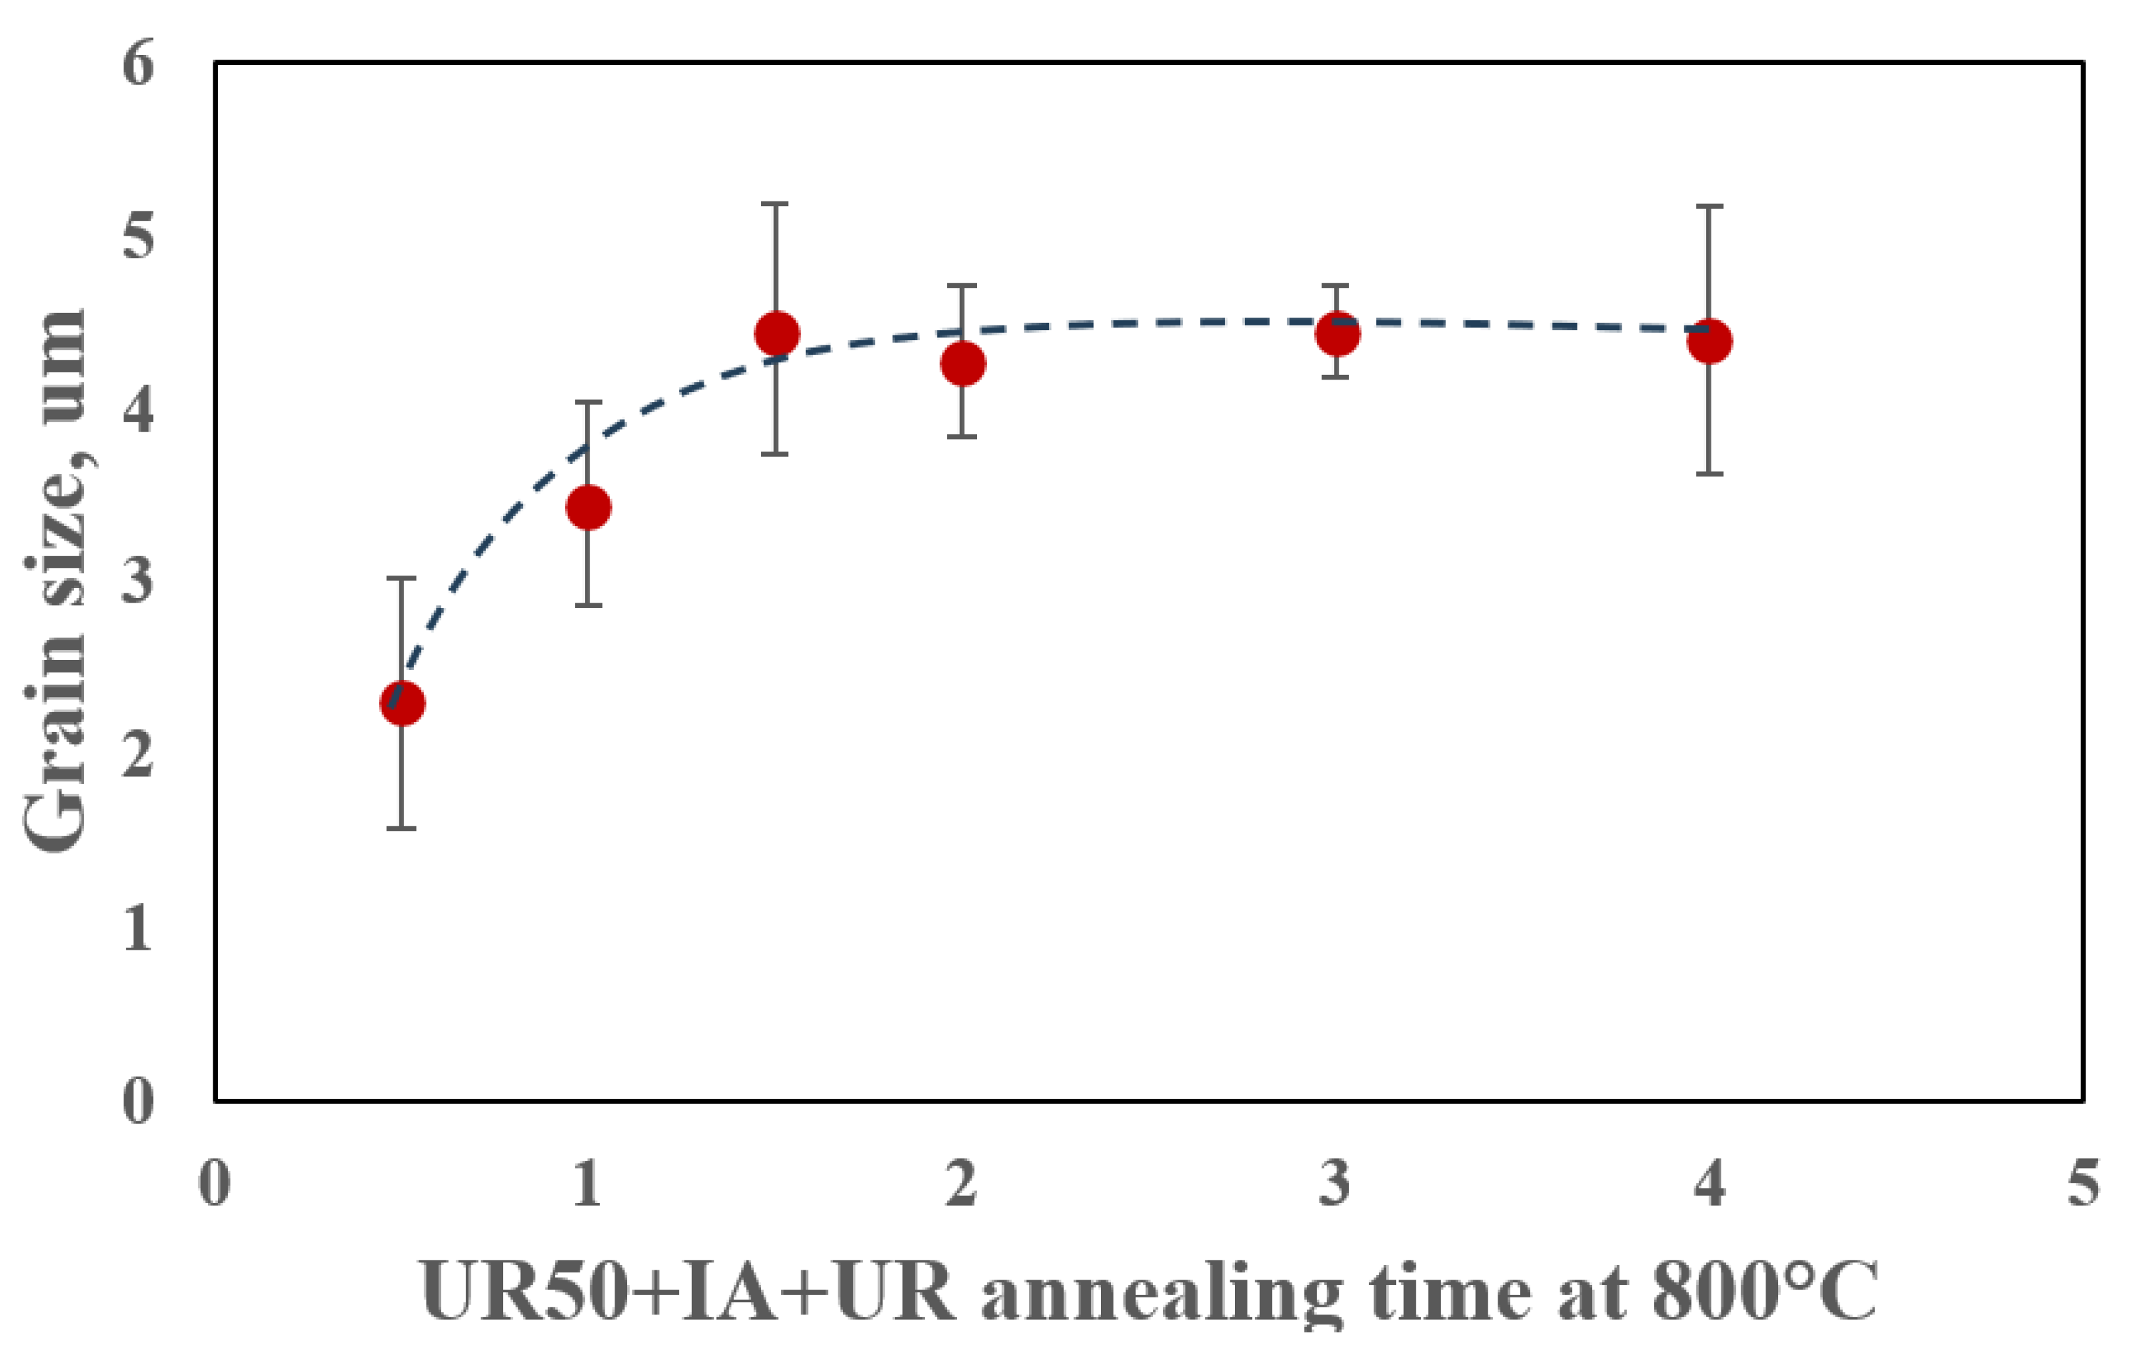
Figure 10 and an analysis of the grain size is shown in
Figure 11. The grains are much more homogeneous compared to those with CR from Plans A and B. In plates with a shorter annealing time (0.5-1 h), the deformed microstructure such as elongated deformation strips and small deformed grains can be observed. However, after 2 hours of annealing, the grain size stays constant (4.28 ± 0.23 μm) and equiaxed grains are seen, which means a full recrystallization was reached (
Figure 11).
4. Discussion
From the above experimental results, it is clear that the plates from cross-rolling showed less deformability than the ones from unidirectional rolling. Previous studies [
16,
17,
18,
19,
23,
24] on the deformation of Alloy 800H/HT showed that there are five major types of textures in the cold-rolled alloy, i.e., Goss {110} <001>, Brass {110} <11-2>, Copper {112} <11-1>, S {123} <63-4>, and Copper Twin {552} <11-5>. During the unidirectional deformation process, the volume fraction of the above-mentioned texture gradually increases from 12.5% in the as-received material to over 70% in the 55% cold-rolled plates [
16]. The evolution of texture is greatly influenced by the dislocation slips [
25].
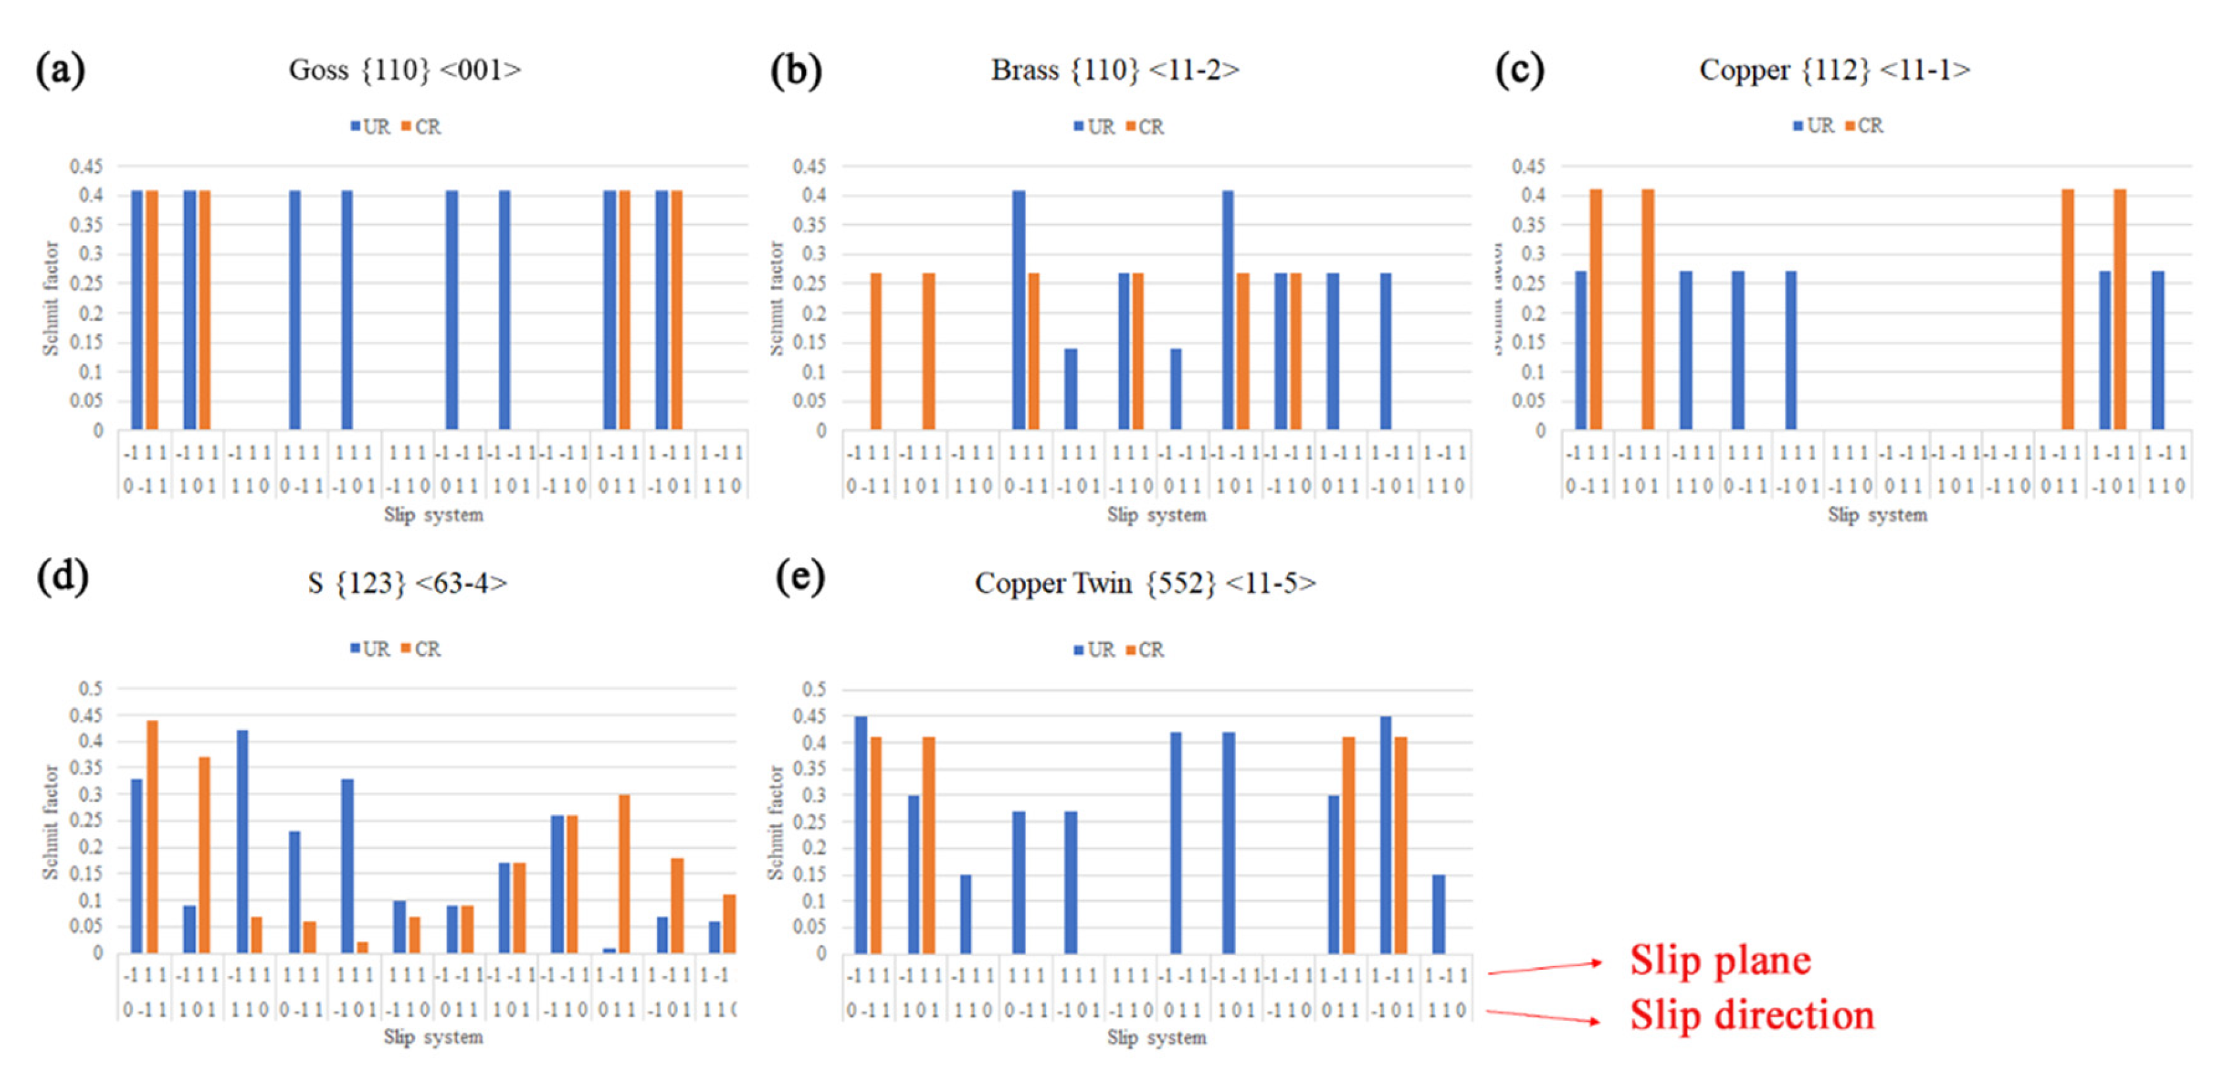
Figure 13 shows the Schmit factors, which represent the readiness of dislocations to move in different textures during two different deformation routes, i.e., unidirectional rolling and cross rolling. The unidirectional and cross-rolling are represented by blue and orange bars, respectively. For Goss orientation, eight dislocation slip systems are operational in the unidirectional deformation while only four are operational in the cross-rolling condition. Similar to the Brass and Copper Twin orientations, the dislocation slips are easier to trigger in unidirectional rolling. However, the slips are easier in the S and Copper orientations in the cross-rolled plates than in the unidirectional ones. Though the dislocation slips are easy in the S and Copper orientations for cross-rolling, they are not the dominant textures since their total volume fraction is less than 30% of the total texture component [
16,
18,
19]. Therefore, the overall dislocation slips are easier in the unidirectional rolling than in the cross rolling, which leads to better deformability during the unidirectional rolling process.
5. Conclusion
The microstructure evolution during different cold rolling and subsequent annealing processes was studied by OM and SEM. The major findings are summarized below:
- Better deformability was observed in the plates during unidirectional rolling than during cross-rolling, which was explained by the readiness of dislocation slip operation during the rolling processes.
- A higher volume fraction of large deformed grains was observed in the cross-rolled plates than in the unidirectionally rolled plates. The higher the amount of unidirectional rolling before cross-rolling is performed, the higher the fraction of small, deformed grains observed in the final deformed plates.
- Recrystallization occurred faster in plates from unidirectional rolling than from cross-rolling.
Acknowledgment:
This work was supported by Atomic Energy of Canada Limited’s Federal Nuclear Science & Technology Work Plan. The authors thank Matthew Sedore and Professor Bradley J. Diak at Queen’s University for their help with all of the rolling processes.
Conflicts of Interest
The authors declare that they have no known competing financial interests or personal relationships that could have appeared to influence the work reported in this paper.
References
- Beardsley, A.L.; Bishop, C.M.; Kral, M.V. A Deformation Mechanism Map for Incoloy 800H Optimized Using the Genetic Algorithm. Met. Mater. Trans. A 2019, 50, 4098–4110. [Google Scholar] [CrossRef]
- Wright, J.; Carroll, L.; Cabet, C.; Lillo, T.; Benz, J.; Simpson, J.; Lloyd, W.; Chapman, J. ; Wright Characterization of elevated temperature properties of heat exchanger and steam generator alloys. Nucl. Eng. Des. 2012, 251, 252–260. [Google Scholar] [CrossRef]
- Dai, C.; Wang, Q.; Prudil, A.; Li, W.; Walters, L. Radiation-induced segregation at grain boundaries of alloy 800H: Experimentally-informed atomistic simulations. J. Nucl. Mater. 2023, 579, 154395. [Google Scholar] [CrossRef]
- Jia, Z.; Zhang, P.; Wang, H.; Ji, J.; Wang, T.; Wang, Y.; Wang, X. Thermal Deformation Characteristics and Dynamic Recrystallization Mechanism of Incoloy 800H Alloy under Different Deformations. Adv. Eng. Mater. 2023, 25, 2300810. [Google Scholar] [CrossRef]
- Su, H.; Sun, D.; Jiang, Y.; Shi, Y.; Zhang, L.; Chen, K.; Andresen, P.L. Investigation on the corrosion behavior of Alloy 800H at various levels of deformation. Corros. Sci. 2023, 212, 110926. [Google Scholar] [CrossRef]
- Weng, W.; Biesiekierski, A.; Yang, C.; Zhang, Z.; Wen, C.; Wang, M.; Lv, Q.; Zhu, X. Microstructural evolution of 800H alloy after long-time creep rupture test at 675 °C. Mater. Charact. 2023, 205, 113352. [Google Scholar] [CrossRef]
- Ren, W.; Swindeman, R. A Review of Alloy 800H for Applications in the Gen IV Nuclear Energy Systems. In Proceedings of the ASME 2010 Pressure Vessels and Piping Conference, Washington, DC, USA, 18–20 July 2010; Parts A and B; Volume 6, pp. 821–836. [Google Scholar] [CrossRef]
- Li, H.; Zhang, H.; Zheng, W.; Du, B.; Yin, H.; He, X.; Ma, T.; Yang, X. Study on oxidation kinetics of three kinds of candidate superalloys for VHTR under air ingress accident. Ann. Nucl. Energy 2023, 189. [Google Scholar] [CrossRef]
- H. Us, Oxidation behavior of very high temperature reactor (VHTR) candidate materials: 316l stainless steel, Alloy 617, and Incoloy-800H, University of Missouri--Columbia, 2016.
- Xiao, L.; Li, W.; Cota-Sanchez, G. Mechanical property and microstructure characterization of incoloy 800H alloy and its welds after corrosion testing in high temperature steam. Nucl. Eng. Des. 2022, 398, 111970. [Google Scholar] [CrossRef]
- Q. Dong, W. Q. Dong, W. Li, L. Xiao, L. Walters, M. Ienzi, R. Sloan, Creep fracture behavior of Alloy 800H weldment with Haynes 230 filler metal at 760 ᵒC and 950 ᵒC, To be submitted (2024).
- Li, W.; Xiao, L.; Walters, L.; Dong, Q.; Ienzi, M.; Sloan, R. High-Temperature Creep and Microstructure Evolution of Alloy 800H Weldments with Inconel 625 and Haynes 230 Filler Materials. Appl. Sci. 2024, 14, 1347. [Google Scholar] [CrossRef]
- Swindeman, R.W.; Zamrik, S.Y.; Maziasz, P.J. Effects of Long-Term Service on the Microstructure and Tensile Properties of Alloy 800H. ASME 2007 Pressure Vessels and Piping Conference. pp. 483–492.
- Roy, A.K.; Virupaksha, V. Performance of alloy 800H for high-temperature heat exchanger applications. Mater. Sci. Eng. A 2007, 452-453, 665–672. [Google Scholar] [CrossRef]
- Swindeman, R.W.; Swindeman, M.J.; Ren, W. Can coverage of Alloy 800H in ASME section III subsection NH be extended to 850° C?, ASME Pressure Vessels and Piping Conference, 2006, pp. 521-528.
- Wang, J.; Cheng, S.; Wu, Y.; Wang, T.; Qin, X.; Zhou, L. Effect of cold rolling on microstructure, texture, and tensile properties of a Ni-Fe-based superalloy. J. Alloy. Compd. 2023, 937, 168383. [Google Scholar] [CrossRef]
- Cao, Y.; Shen, X.; Di, H.; Huang, G. Texture and microstructure evolution of Incoloy 800H superalloy during hot rolling and solution treatment. J. Alloy. Compd. 2017, 698, 304–316. [Google Scholar] [CrossRef]
- Akhiani, H.; Nezakat, M.; Szpunar, J.A. Evolution of deformation and annealing textures in Incoloy 800H/HT via different rolling paths and strains. Mater. Sci. Eng. A 2014, 614, 250–263. [Google Scholar] [CrossRef]
- Akhiani, H.; Nezakat, M.; Sonboli, A.; Szpunar, J. The origin of annealing texture in a cold-rolled Incoloy 800H/HT after different strain paths. Mater. Sci. Eng. A 2014, 619, 334–344. [Google Scholar] [CrossRef]
- Chaganty, B.; Maredla, T.; Bobby, S.S.; Sahoo, S.K.; Vanitha, C. Effect of Cold Rolling on Texture and Microstructure Development in Annealed Incoloy 800 Fabricated Using Selective Laser Melting. J. Mater. Eng. Perform. 2024, 1–8. [Google Scholar] [CrossRef]
- Frommert, M.; Gottstein, G. Mechanical behavior and microstructure evolution during steady-state dynamic recrystallization in the austenitic steel 800H. Mater. Sci. Eng. A 2009, 506, 101–110. [Google Scholar] [CrossRef]
- Mizia, R.E.; Clark, D.E.; Glazoff, M.V.; Lister, T.E.; Trowbridge, T.L. Optimizing the Diffusion Welding Process for Alloy 800H: Thermodynamic, Diffusion Modeling, and Experimental Work. Met. Mater. Trans. A 2011, 44, 154–161. [Google Scholar] [CrossRef]
- Wronski, S.; Wrobel, M.; Baczmanski, A.; Wierzbanowski, K.; Effects of cross-rolling on residual stress, texture and plastic anisotropy in f. c.c. and b.c.c. metals. Materials Characterization 2013, 77, 116–126. [Google Scholar] [CrossRef]
- Bhattacharjee, P.P.; Joshi, M.; Chaudhary, V.P.; Gatti, J.R.; Zaid, M. Texture Evolution During Cross Rolling and Annealing of High-Purity Nickel. Met. Mater. Trans. A 2013, 44, 2707–2716. [Google Scholar] [CrossRef]
- Humphreys, F.J.; Hatherly, M. Recrystallization and related annealing phenomena; Elsevier: 2012.
Figure 1.
Schematic representation of the cold rolling plans. The plates in plan A (a) were cross-rolled to 0.5 mm thickness, while the plates in plan B (b) were unidirectionally rolled to 30%, 40%, and 60% reductions and then cross-rolled to the final thickness of 0.5 mm. The plates in plan C (c) were unidirectionally rolled to 40% and 50% reductions, followed by an intermediate annealing at 950 ᵒC for 15 minutes and then unidirectionally rolled to the 0.5 mm final thickness. All of the rolled plates were heat treated in a furnace at 800 ᵒC for 0.5 to 4 hrs.
Figure 2.
OM (a) and EBSD (b) images showing the microstructure and inverse pole figures (c) of the as-received Alloy 800H.
Figure 2.
OM (a) and EBSD (b) images showing the microstructure and inverse pole figures (c) of the as-received Alloy 800H.
Figure 3.
A general view of the plates with different process histories: (a) CR75, (b) UR40+CR, (c) UR60+CR, and (d) UR50+IA+UR.
Figure 3.
A general view of the plates with different process histories: (a) CR75, (b) UR40+CR, (c) UR60+CR, and (d) UR50+IA+UR.
Figure 4.
OM images with low (a) and high (b-c) magnifications showing the microstructure of the CR75 plates.
Figure 4.
OM images with low (a) and high (b-c) magnifications showing the microstructure of the CR75 plates.
Figure 5.
OM images showing the microstructure of UR30+CR (a1-a3), UR40+CR (b1-b3), and UR60+CR (c1-c3) plates.
Figure 5.
OM images showing the microstructure of UR30+CR (a1-a3), UR40+CR (b1-b3), and UR60+CR (c1-c3) plates.
Figure 6.
Fraction of large grains in deformed and annealed CR75, UR30+CR, UR40+CR, and UR60+CR specimens.
Figure 6.
Fraction of large grains in deformed and annealed CR75, UR30+CR, UR40+CR, and UR60+CR specimens.
Figure 7.
OM images showing the microstructure of the UR40+IA+UR (a1-a2) and UR50+IA+UR (b1-b2) plates.
Figure 7.
OM images showing the microstructure of the UR40+IA+UR (a1-a2) and UR50+IA+UR (b1-b2) plates.
Figure 8.
OM micrographs showing the microstructure of CR75 specimens after heat treatment at 800 ᵒC for 1 h (a1-a2) and 4 h (b1-b2).
Figure 8.
OM micrographs showing the microstructure of CR75 specimens after heat treatment at 800 ᵒC for 1 h (a1-a2) and 4 h (b1-b2).
Figure 9.
OM micrographs showing the microstructure evolution of UR30+CR (a1-a2 and d1-d2), UR40+CR (b1-b2 and e1-e2) and UR60+CR (c1-c2 and f1-f2) plates after heat treatment at 800 ᵒC for 1 h and 4 h.
Figure 9.
OM micrographs showing the microstructure evolution of UR30+CR (a1-a2 and d1-d2), UR40+CR (b1-b2 and e1-e2) and UR60+CR (c1-c2 and f1-f2) plates after heat treatment at 800 ᵒC for 1 h and 4 h.
Figure 10.
OM micrographs showing the microstructure evolution of UR50+IA+UR plates after heat treatment at 800 ᵒC for 0.5 h (a1, b1 and c1), 1 h (a2, b2 and c2), 1.5 h (a3, b3 and c3), 2.0 h (a4, b4 and c4), 3.0 h (a5, b5 and c5) and 4.0 h (a6, b6 and c6).
Figure 10.
OM micrographs showing the microstructure evolution of UR50+IA+UR plates after heat treatment at 800 ᵒC for 0.5 h (a1, b1 and c1), 1 h (a2, b2 and c2), 1.5 h (a3, b3 and c3), 2.0 h (a4, b4 and c4), 3.0 h (a5, b5 and c5) and 4.0 h (a6, b6 and c6).
Figure 11.
Grain size variation with the annealing time in the UR50+IA+UR plates after heat treatment at 800 ᵒC for 0.5 - 4 h.
Figure 11.
Grain size variation with the annealing time in the UR50+IA+UR plates after heat treatment at 800 ᵒC for 0.5 - 4 h.
Figure 13.
Calculated Schmit factors of Goss (a), Brass (b), Copper (c), S (d), and Copper Twin (e) orientations for UR and CR. Blue and orange bars represent the Schmit factor values for UR and CR, respectively. The top and bottom numbers for the X-axis represent the slip directions and planes for an FCC crystal, respectively.
Table 1.
The chemical composition of the as-received Alloy 800H in wt.%.
Table 1.
The chemical composition of the as-received Alloy 800H in wt.%.
| Elements |
Ni |
Cr |
Mo |
Co |
Mn |
Al |
Ti |
Al+Ti |
Cu |
Si |
S |
C |
Fe |
| Alloy 800H |
30.3 |
20.6 |
0.7 |
0.05 |
0.7 |
0.49 |
0.52 |
1.01 |
0.09 |
0.4 |
<0.002 |
0.08 |
Bal. |
Table 2.
Specimen name from various rolling plans.
Table 2.
Specimen name from various rolling plans.
| Rolling plan |
Process history |
Specimen name |
| Plan A |
75% cross rolling to 0.5 mm |
CR75 |
| Plan B |
30% unidirectional rolling + cross rolling to 0.5 mm thickness |
UR30+CR |
| 40% unidirectional rolling + cross rolling to 0.5 mm thickness |
UR40+CR |
| 60% unidirectional rolling + cross rolling to 0.5 mm thickness |
UR60+CR |
| Plan C |
40% unidirectional rolling + intermediate annealing + unidirectional rolling to 0.5 mm thickness |
UR40+IA+UR |
| 50% unidirectional rolling + intermediate annealing + unidirectional rolling to 0.5 mm thickness |
UR50+IA+UR |
|
Disclaimer/Publisher’s Note: The statements, opinions and data contained in all publications are solely those of the individual author(s) and contributor(s) and not of MDPI and/or the editor(s). MDPI and/or the editor(s) disclaim responsibility for any injury to people or property resulting from any ideas, methods, instructions or products referred to in the content. |
© 2024 by the authors. Licensee MDPI, Basel, Switzerland. This article is an open access article distributed under the terms and conditions of the Creative Commons Attribution (CC BY) license (http://creativecommons.org/licenses/by/4.0/).
