1. Introduction
Friction Stir Welding (FSW) is an advanced friction-based welding technique that originated in the early 1990s [
1]. Unlike traditional fusion welding methods that involve melting and solidifying the base materials, FSW is a friction-based welding method that joins materials through mechanical deformation. It is particularly well-suited for welding high-strength and heat-sensitive materials like aluminum alloys, which tend to lose their mechanical properties when subjected to traditional fusion welding [
2]. Compared to fusion welding methods, FSW produces welds with superior mechanical properties, including higher strength and fatigue resistance, due to the solid-state joining process [
3].
In FSW, a specifically designed revolving tool with a pin and shoulder installed between the two pieces of material to be linked [
4]. The tool is then rotated at high speeds while simultaneously traversing along the joint line. This rotation and movement Frictional heat generation softens the material without melting it. The softened material is mechanically stirred by the rotating tool, forming a high-quality, defect-free weld joint. FSW provides multiple benefits compared to conventional welding techniques, such as superior material behavior, reduced distortion, minimal porosity, and the capability to weld materials that are typically tough to fuse [
5]. FSW is employed in diverse industrial applications, involving aviation, navy, automotive, construction, and more, where the need for strong, lightweight, and high-quality welds is paramount.
During recent years, the FSW. technique has been the subject of several research studies aiming to the optimization of FSW tool parameters. Hassanifard et al. [
6] evaluated tensile and fatigue responses of AA 7075-T6 lap joints. This material exhibited slightly improved tensile strength after undergoing FSW process. Additionally, the fatigue lives enhanced up to 2.5 times. Lunetto et al. [
7] investigated how different tool shapes affect lap joint friction stir welding (FSW) of titanium sheets. This work emphasized on optimization strategies and tool-related considerations in FSW processes. Babu Rao et al. [
8] employed stochastic analysis techniques to evaluate the variability in the tensile strength of the welded lap joints of AA 7075-T6, The lowest tensile strength was obtained for the weld realized by the straight cylindrical profiled tool. Additionally, the tensile strength increased by increasing the tool rotational speed up to 2000 rpm. Balakrishnan et al. [
9] evaluated friction stir welds prepared using AA7075-T6 aluminum alloy with controlled variations in pin imperfections. Torque measurements showed an increase in the volume of material stirred by the tool when increasing the welding pitch, proving the effectiveness of using this technique to simulate material adhesion to the tool. Ge et al. [
10] analyzed the impact of pin length and welding speed on the quality of lap joints formed by friction stir welding dissimilar aluminum alloys. This study revealed that both pin length and welding speed significantly influence the quality of the lap joints and longer pin lengths generally result in better joint formation, while higher welding speeds may lead to decreased joint quality due to insufficient material flow and mixing.
Yuvaraj et al. [
11] underscored the pivotal role of FSW tool parameter optimization in joining aluminum alloys of different compositions type AA6061 and AA7075-T651. By employing the Taguchi technique, they identified the optimal combination of parameters for achieving welds characterized by enhanced strength and reduced defects. The significance lies in demonstrating the critical importance of selecting and optimizing FSW tool parameters for reliable and high-quality welds in dissimilar aluminum alloys.
Other studies were interested in the mechanical behavior and microstructure of FSW joints. Abolusoro et al. [
12] delved into the evaluation of AA7075 aluminum alloy welded lap joints using FSW. The primary aim was to assess the weld quality, mechanical properties, and microstructure by systematically varying welding factors, including tool dimensions and design, traverse and rotational speeds. The findings provided valuable insights for optimizing FSW parameters, particularly in achieving high-quality welded joints of AA 7075 aluminum alloy. Kubit et al. [
13,
14] analyzed the mechanisms leading to mechanical behavior in overlap joints produced by FSW. By identifying the specific failure modes and underlying causes, including crack initiation at the weld interface, crack growth along the nugget periphery, and eventual joint separation, factors such as welding parameters, joint geometry, and material properties significantly influence performance. Microstructural analysis indicates that microstructural features, such as grain morphology and precipitate distribution, play a crucial role in determining fatigue resistance.
AA 7075 T6 aluminum alloy stands out as a popular selection for friction stir welding (FSW) due to its unique combination of strength and lightweight characteristics. Renowned for its high strength-to-weight ratio and heat-treatable properties, this alloy is extensively used across various industries, particularly in aerospace and aviation [
15]. Lap joints provide easier access for the FSW tool to traverse along the joint line and have the potential for more uniform material flow and mechanical properties compared to other joints such as butt joint. This accessibility facilitates the experimental setup and allows for more controlled and consistent welding conditions [
16].
The AA 7075 T6 material has been extensively studied under FSW conditions. Most of these studies focused on investigating the effect on the material mechanical proprieties of various process parameters such as the rotational and advancing speeds, the tool geometry, the joint type, etc. However, few studies have focused on optimizing this process by considering the thermal effect which plays a crucial role in the FSW results.
The current study is a first attempt to optimize the FSW conditions ofAA7075-T6 lap joint, based on the heat generation during welding. This study focuses on determining the effects of specific welding speeds on the thermomechanical proprieties of the material.
Therefore, the primary goal of the current research is to experimentally assess the effects of FSW process parameters on the lap joint thermomechanical proprieties of the commonly used aluminum alloy AA 7075-T6. The temperature evolution, the stress-deformation curves, the hardness profiles, and the microstructure of the welded joint have been measured at optimal advancing (welding) speeds. These speeds were selected based on a prior investigation focused on predicting the optimal FSW process parameters by optimizing the heat input during welding.
2. Experimental Set-Up
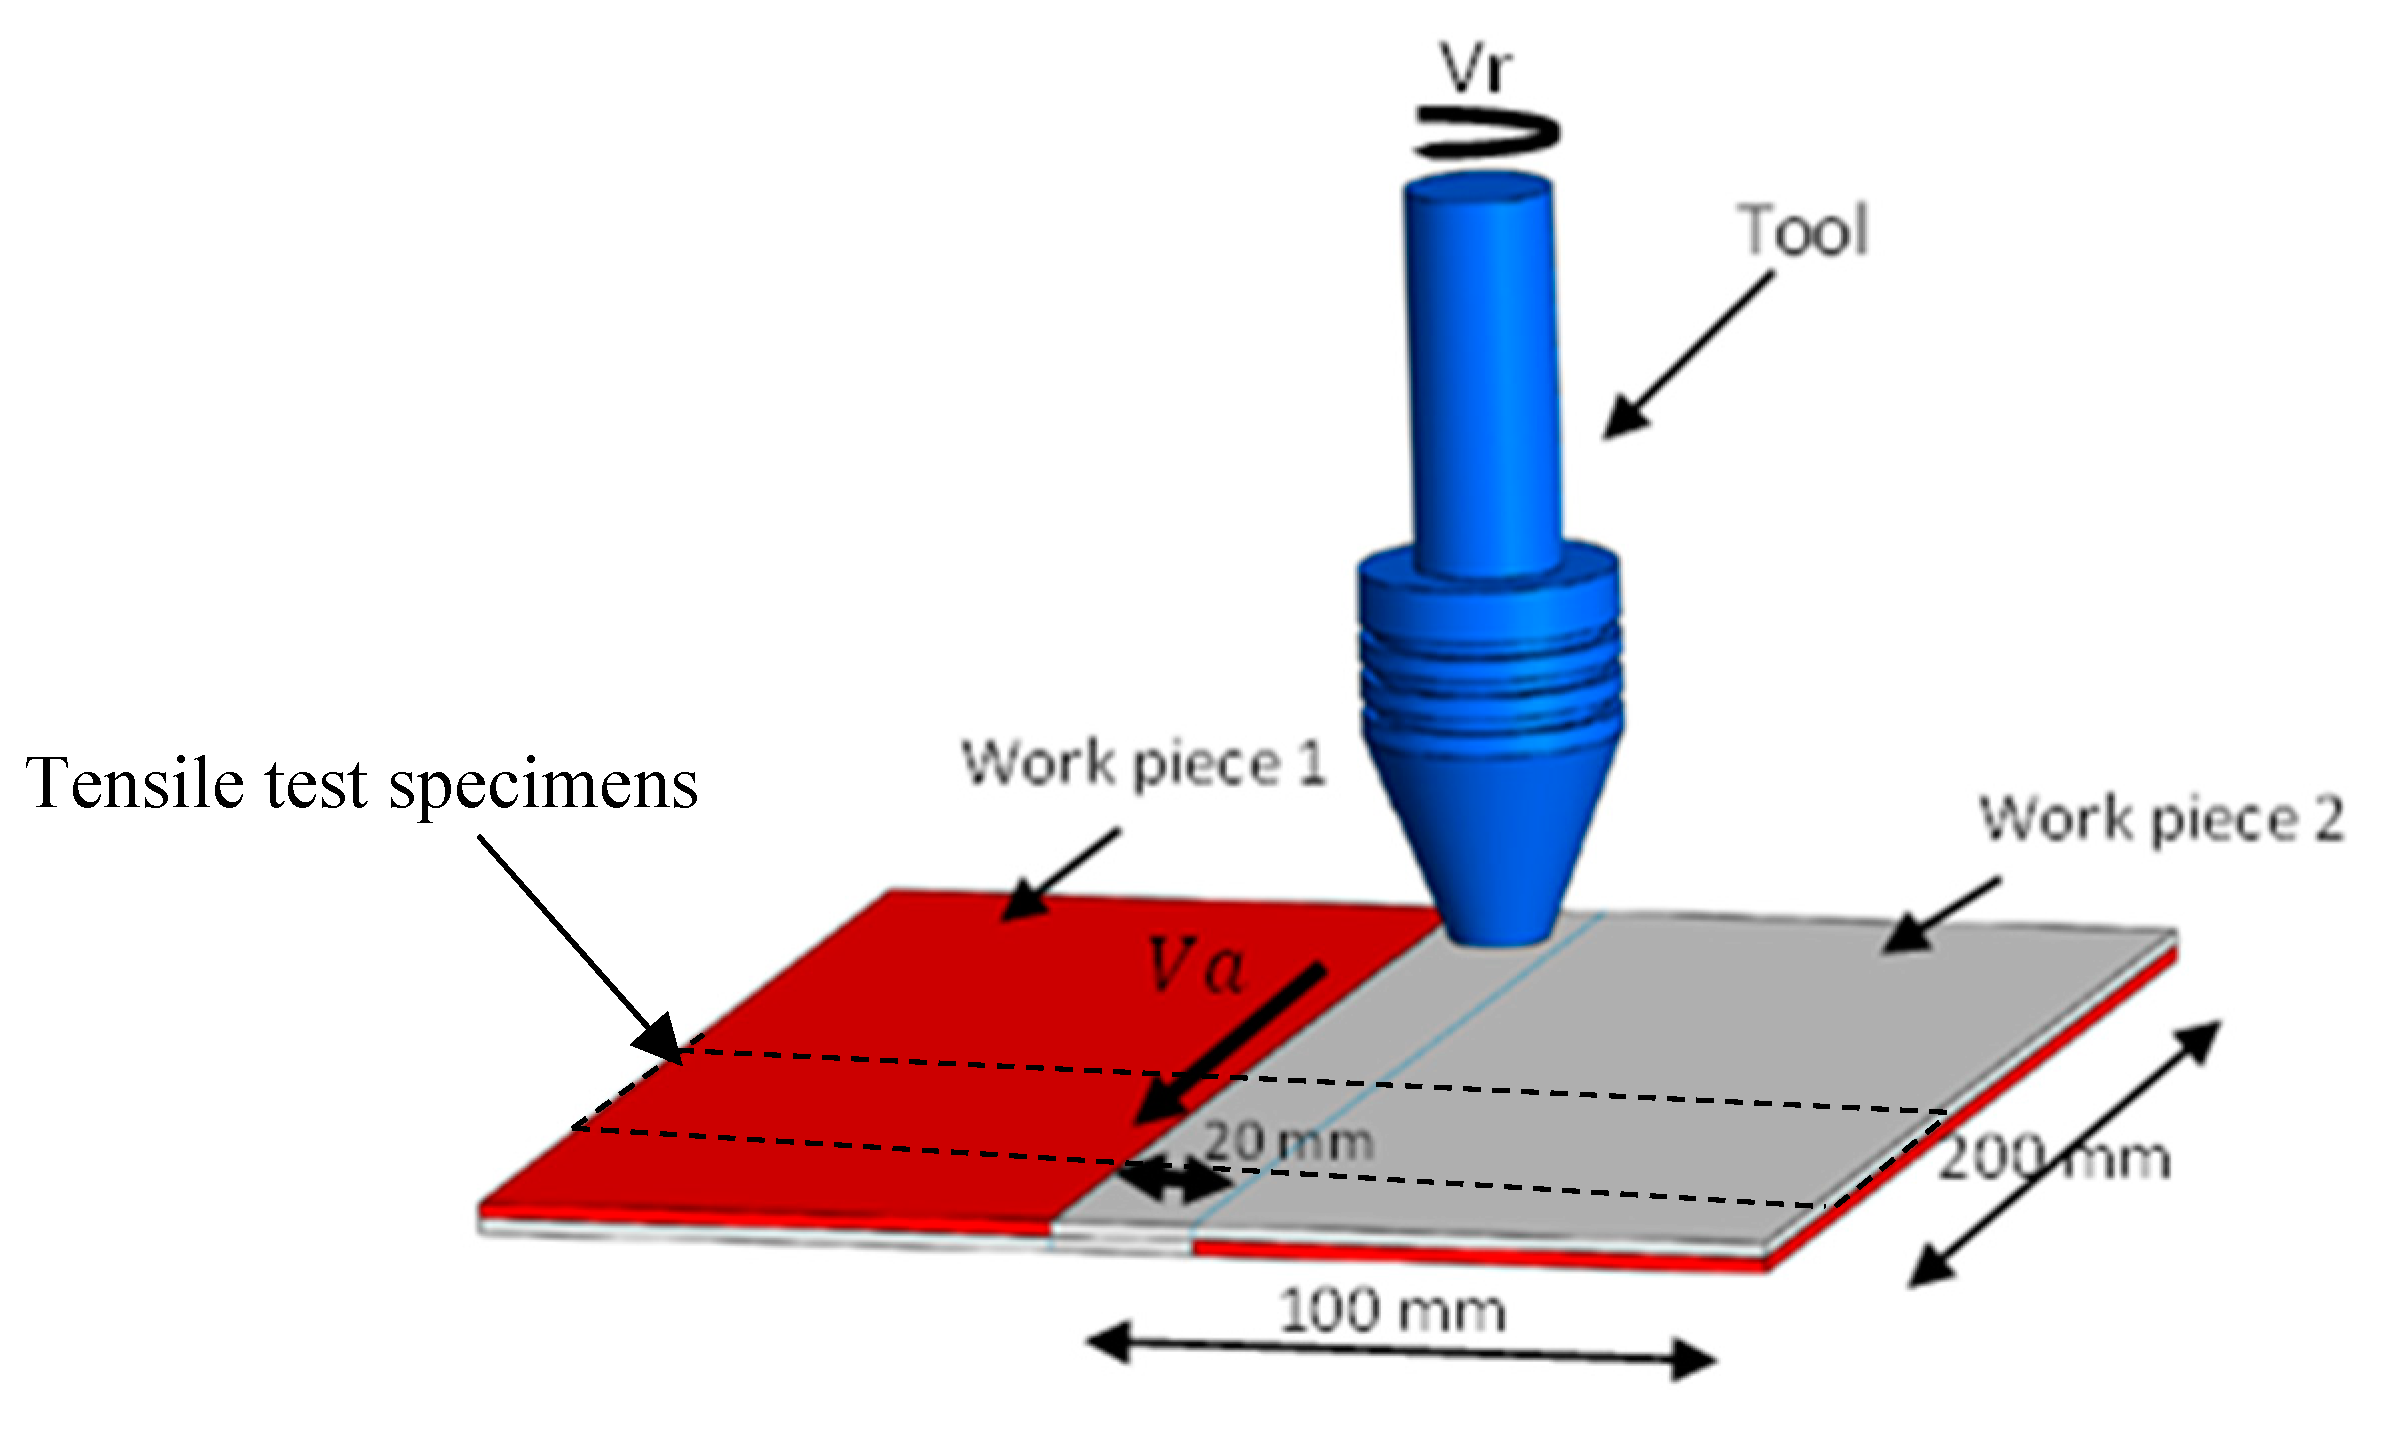
The experimental set-up consists of a welding tool mounted in a milling machine and two flat workpieces each measuring 200mm ×100mm ×2mm. The welding tool is made from structural steel AISI H13, which has been demonstrated to be effective for the FSW of aluminum alloys. The FSW process was employed to assemble two AA7075-T6 plates using lap joint configuration (
Figure 1).
The sheet metal surfaces are meticulously cleaned to eradicate contaminants such as dirt and oxides. We then proceed to preheat the surfaces to achieve the optimal welding temperature, thereby reducing thermal gradients across the joint. Finally, the sheet metal pieces are collaboratively clamped with two holding wedges added to conserve the linearity securely to prevent any potential movement or misalignment during welding.
The mechanical behavior and average composition of AA7075-T6 are detailed in
Table 1 and
Table 2, additionally, the chemical composition of AISI H13 is provided in Table 3.
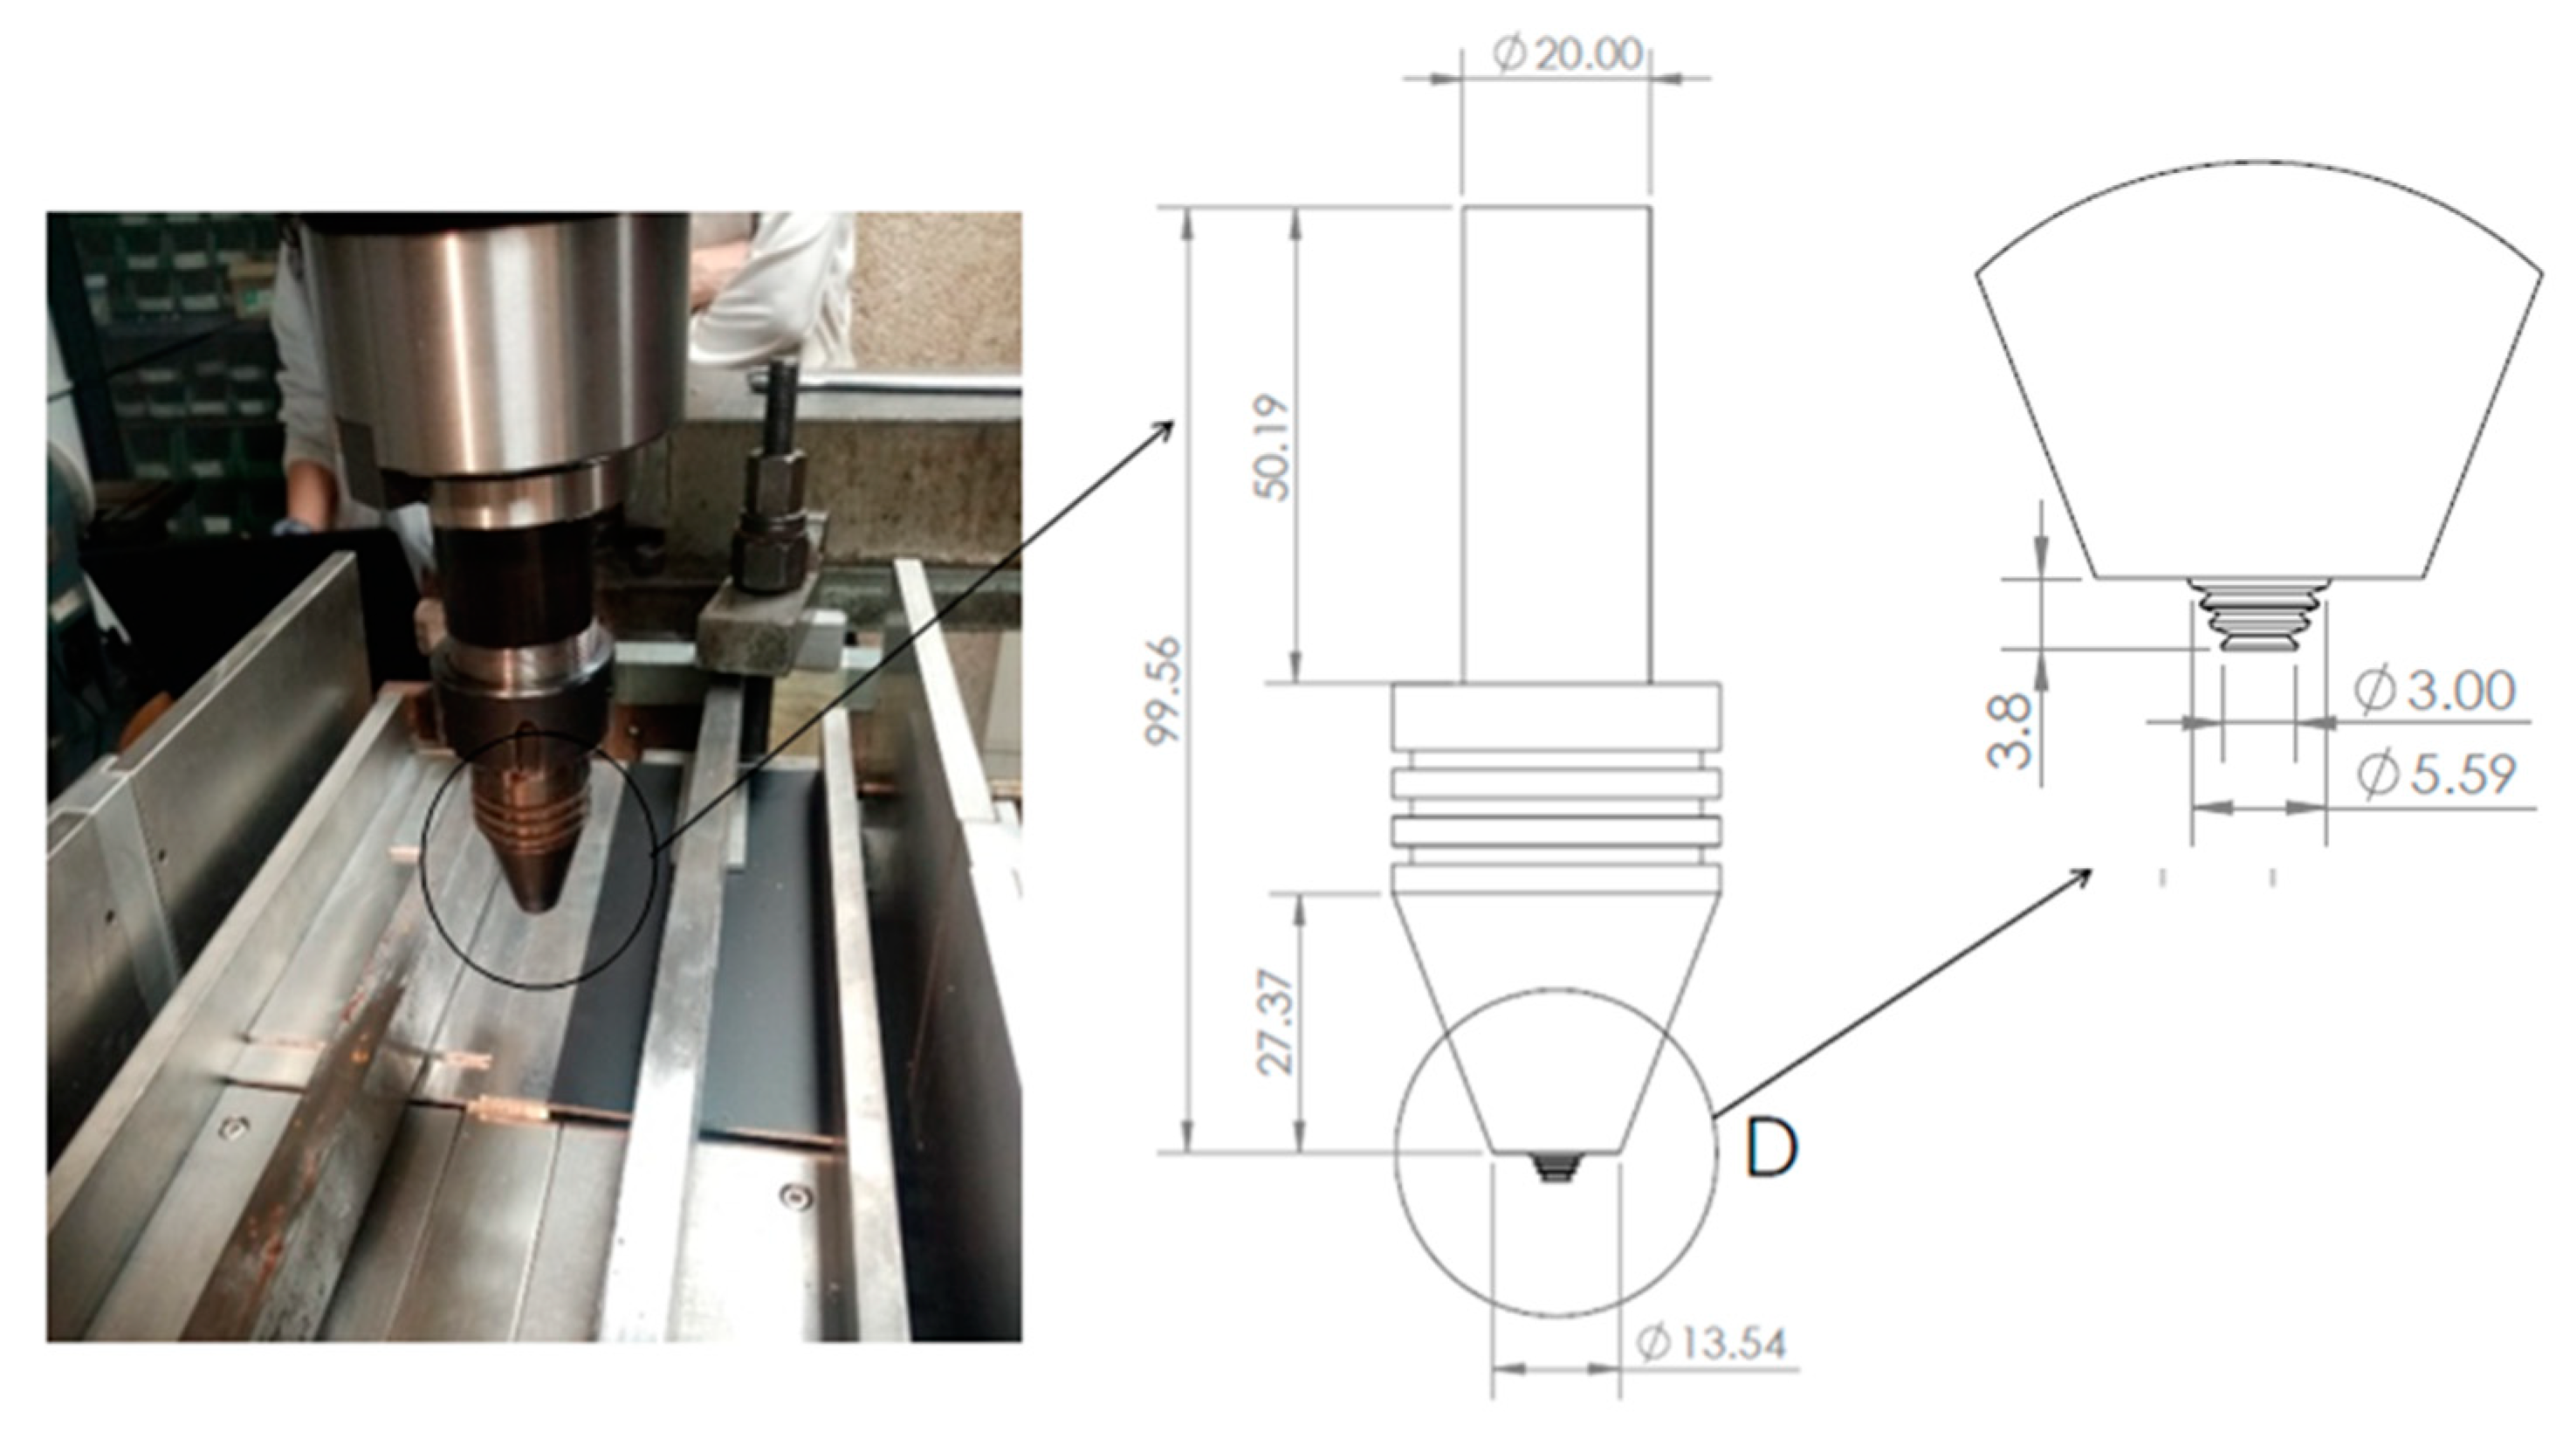
This tool had a cylindrical threaded shape with a 20mm diameter, a 6mm pin diameter, and a left-threaded cylindrical pin profile with a 1 mm pitch (
Figure 2).
2.1. Optimal FSW Process Conditions Prediction
The welding speeds have been chosen according to a previous study aiming to predict the appropriate FSW process parameters which were determined according to the optimization of the heat input during the process.
Yi et al. [
18]have predicted the appropriate FSW process factors based on the optimization of the heat input during welding. They conducted a comprehensive study and established a regression equation relating welding parameters and heat input. This equation was used in the current study, considering optimized minimum and maximum heat input values, to determine the welding speeds as follows:
where HI, D, V, h, N, λ and d represent the heat input (J/mm), probe diameter (mm), advancing speed (mm/s), probe length (mm), rotating speed (rad/s), thermal conductivity of the workpiece (W/mK), and shoulder diameter (mm), respectively.
The tool parameters are D = 13 mm, d = 3 mm, h = 3 mm. the AA 7075-T6 thermal conductivity is λ = 130 W/mk [
19].
According to Yi et al.,
and
The chosen rotational speed is 1320 rpm giving N=141.37 rad/s [
20,
21].
Based on equation (1), the optimal minimum and maximum welding speeds are:
The impacts of these two advancing speeds on the thermomechanical behavior and microstructure of AA 7075-T6 lap joints have been experimentally carried out.
2.2. Temperature Measurement
Temperature measurements were taken during FSW on both the workpieces and the FSW tool. A digital K-type thermocouple laser thermometer was utilized to measure these temperatures. In order to evaluate how welding speed affects the temperature distribution throughout the weld, measurements were conducted at a distance of 0.5 mm from the shoulder surface and both the probe tip and the shoulder surface. Stir zone temperatures are measured close to the transition from the probe to the shoulder, as this is considered the hottest point inside the weld [
22]. The thermometer laser beam was pointed at the weld center on the work piece and close to the rotating pin area. The time variations of the temperature were recorded for the two welding speeds Vmin (Hot) and Vmax (Cold).
2.3. Test Specimens Preparation
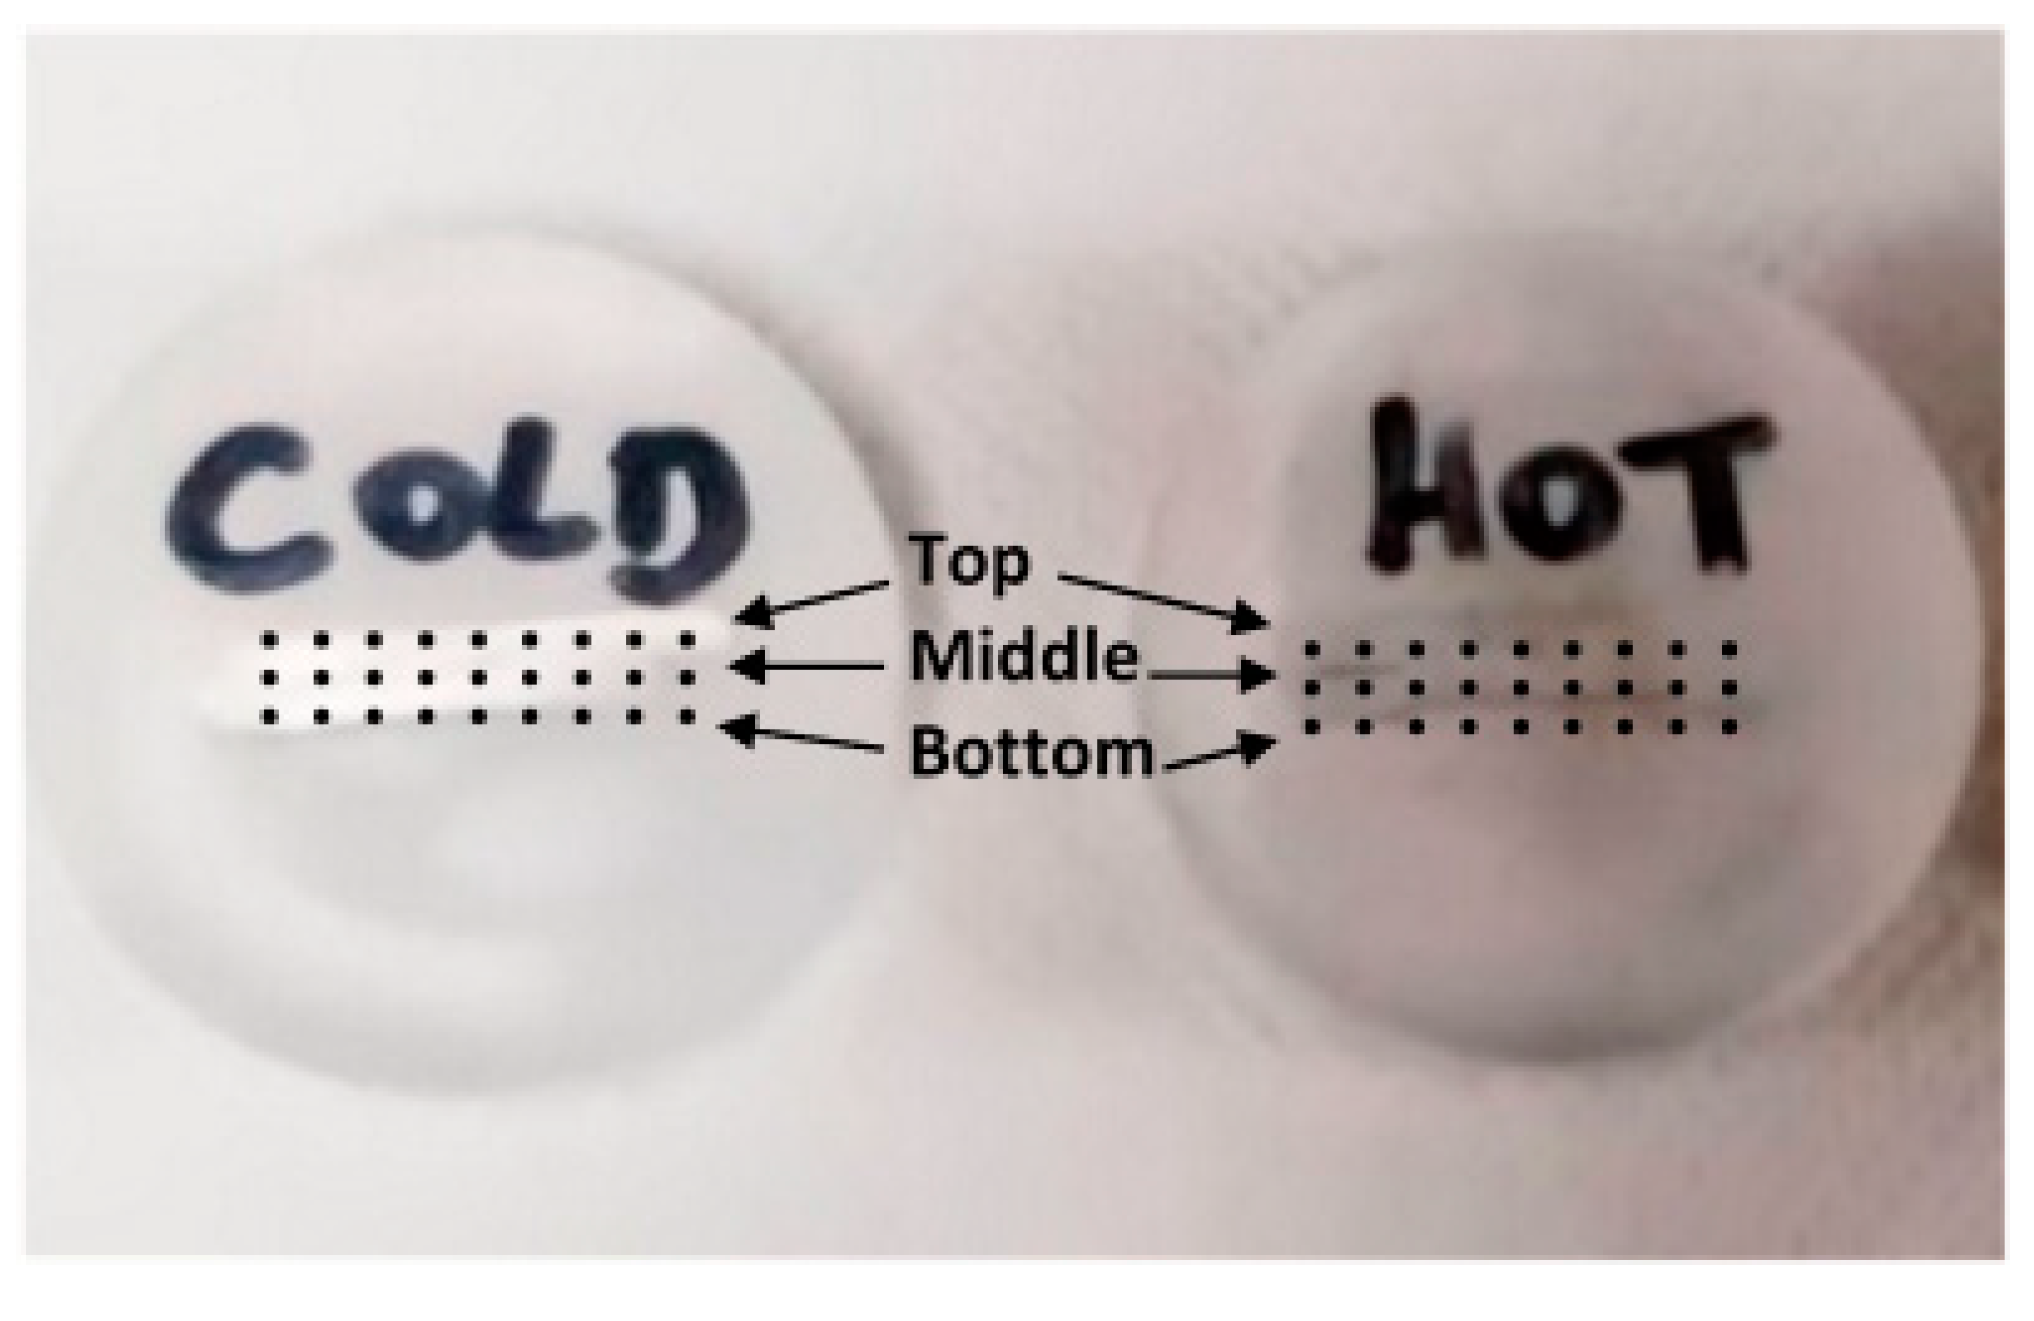
The test samples have been extracted from the welds executed at the two welding speeds. To facilitate the analysis process, the samples was mounted using a conductive thermosetting resin as presented in
Figure 3. Subsequently, these mounted samples were placed on an abrasive disc and polished using polycrystalline diamond powder, ranging from 0.05 to 9 µm, on a cloth disc.
To be able to observe the microstructure formed a long the FSW joint, measurements were taken under the two advancing speed conditions. The polished test samples were immersed in an aqueous hydrofluoric acid solution. The analysis was initiated with optical microscopy using Leica DCM3D confocal microscope to detect any potential internal defects, and subsequently, with the aim to analyze the weld surface microstructure, the scanning electron microscopy using Hitachi TM3000 was employed.
Additionally, Vickers micro hardness tests were conducted using a LEICA VMHT AUTO machine. Specifically, hardness measurements were conducted at three locations, spaced near 2 mm apart, across the cross-section of the welded line, as illustrated in
Figure 4.
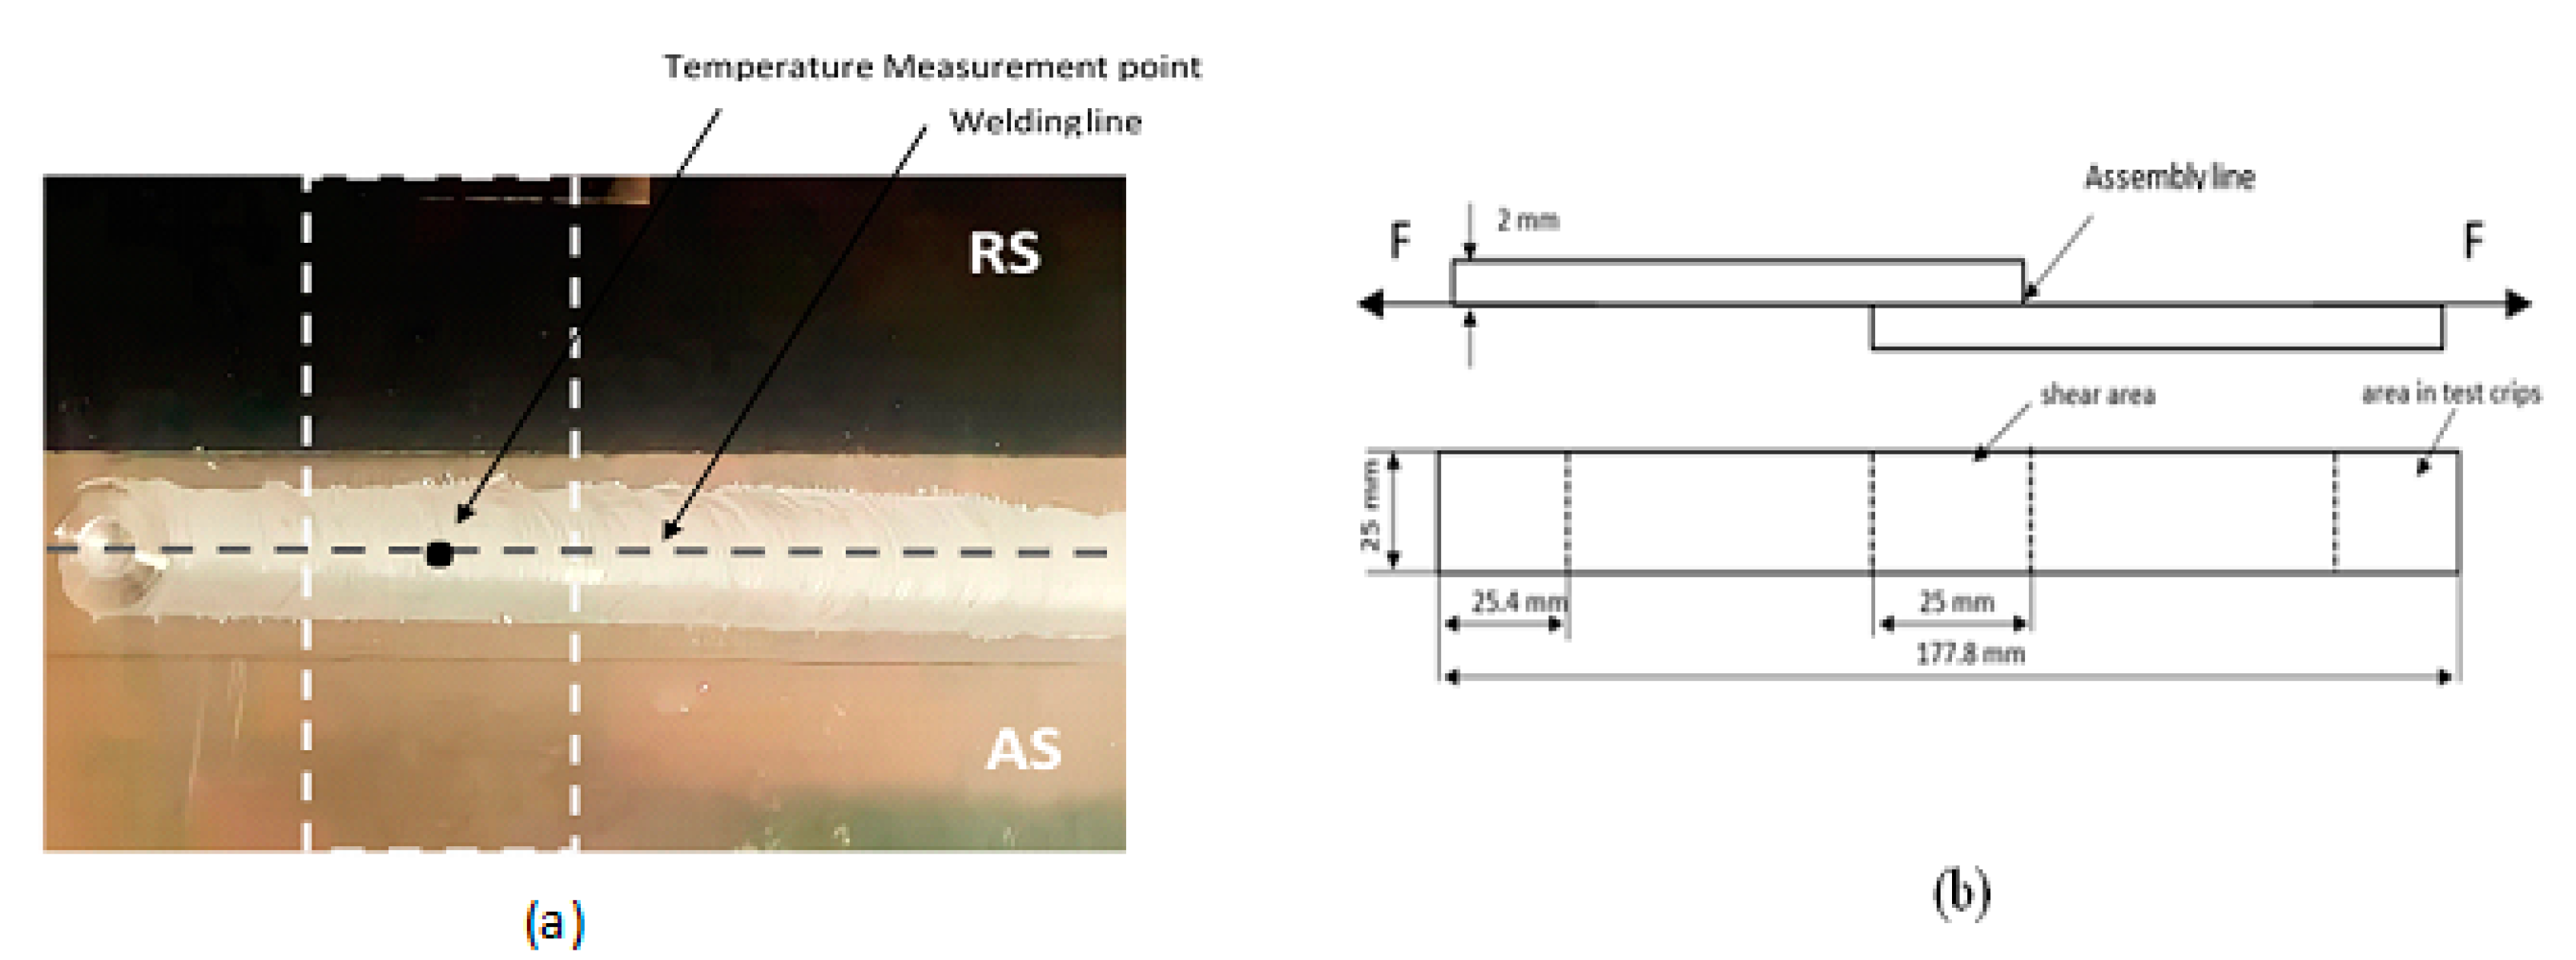
Moreover, tensile tests have been performed following the ASTM E8 standard on lap joint samples of 2 mm thickness for each part, as depicted in
Figure 5. During these tensile tests, a constant tensile test speed of 1.3 mm/min [
23] was selected. Firstly, the lap joint is securely fixed or clamped to ensure stability during the extraction process. Then, a cutting tool, water jet cutting machine, is used to precisely cut through the joint, separating it into individual specimens. Care is taken to ensure that the specimens are extracted in a manner that preserves their integrity and dimensions, minimizing any potential distortion or damage to the weld zone.
Various tensile strength specimens were extracted from each weld executed at the chosen welding speed. The average value was then calculated.
3. Result and Discussions
3.1. Temperature
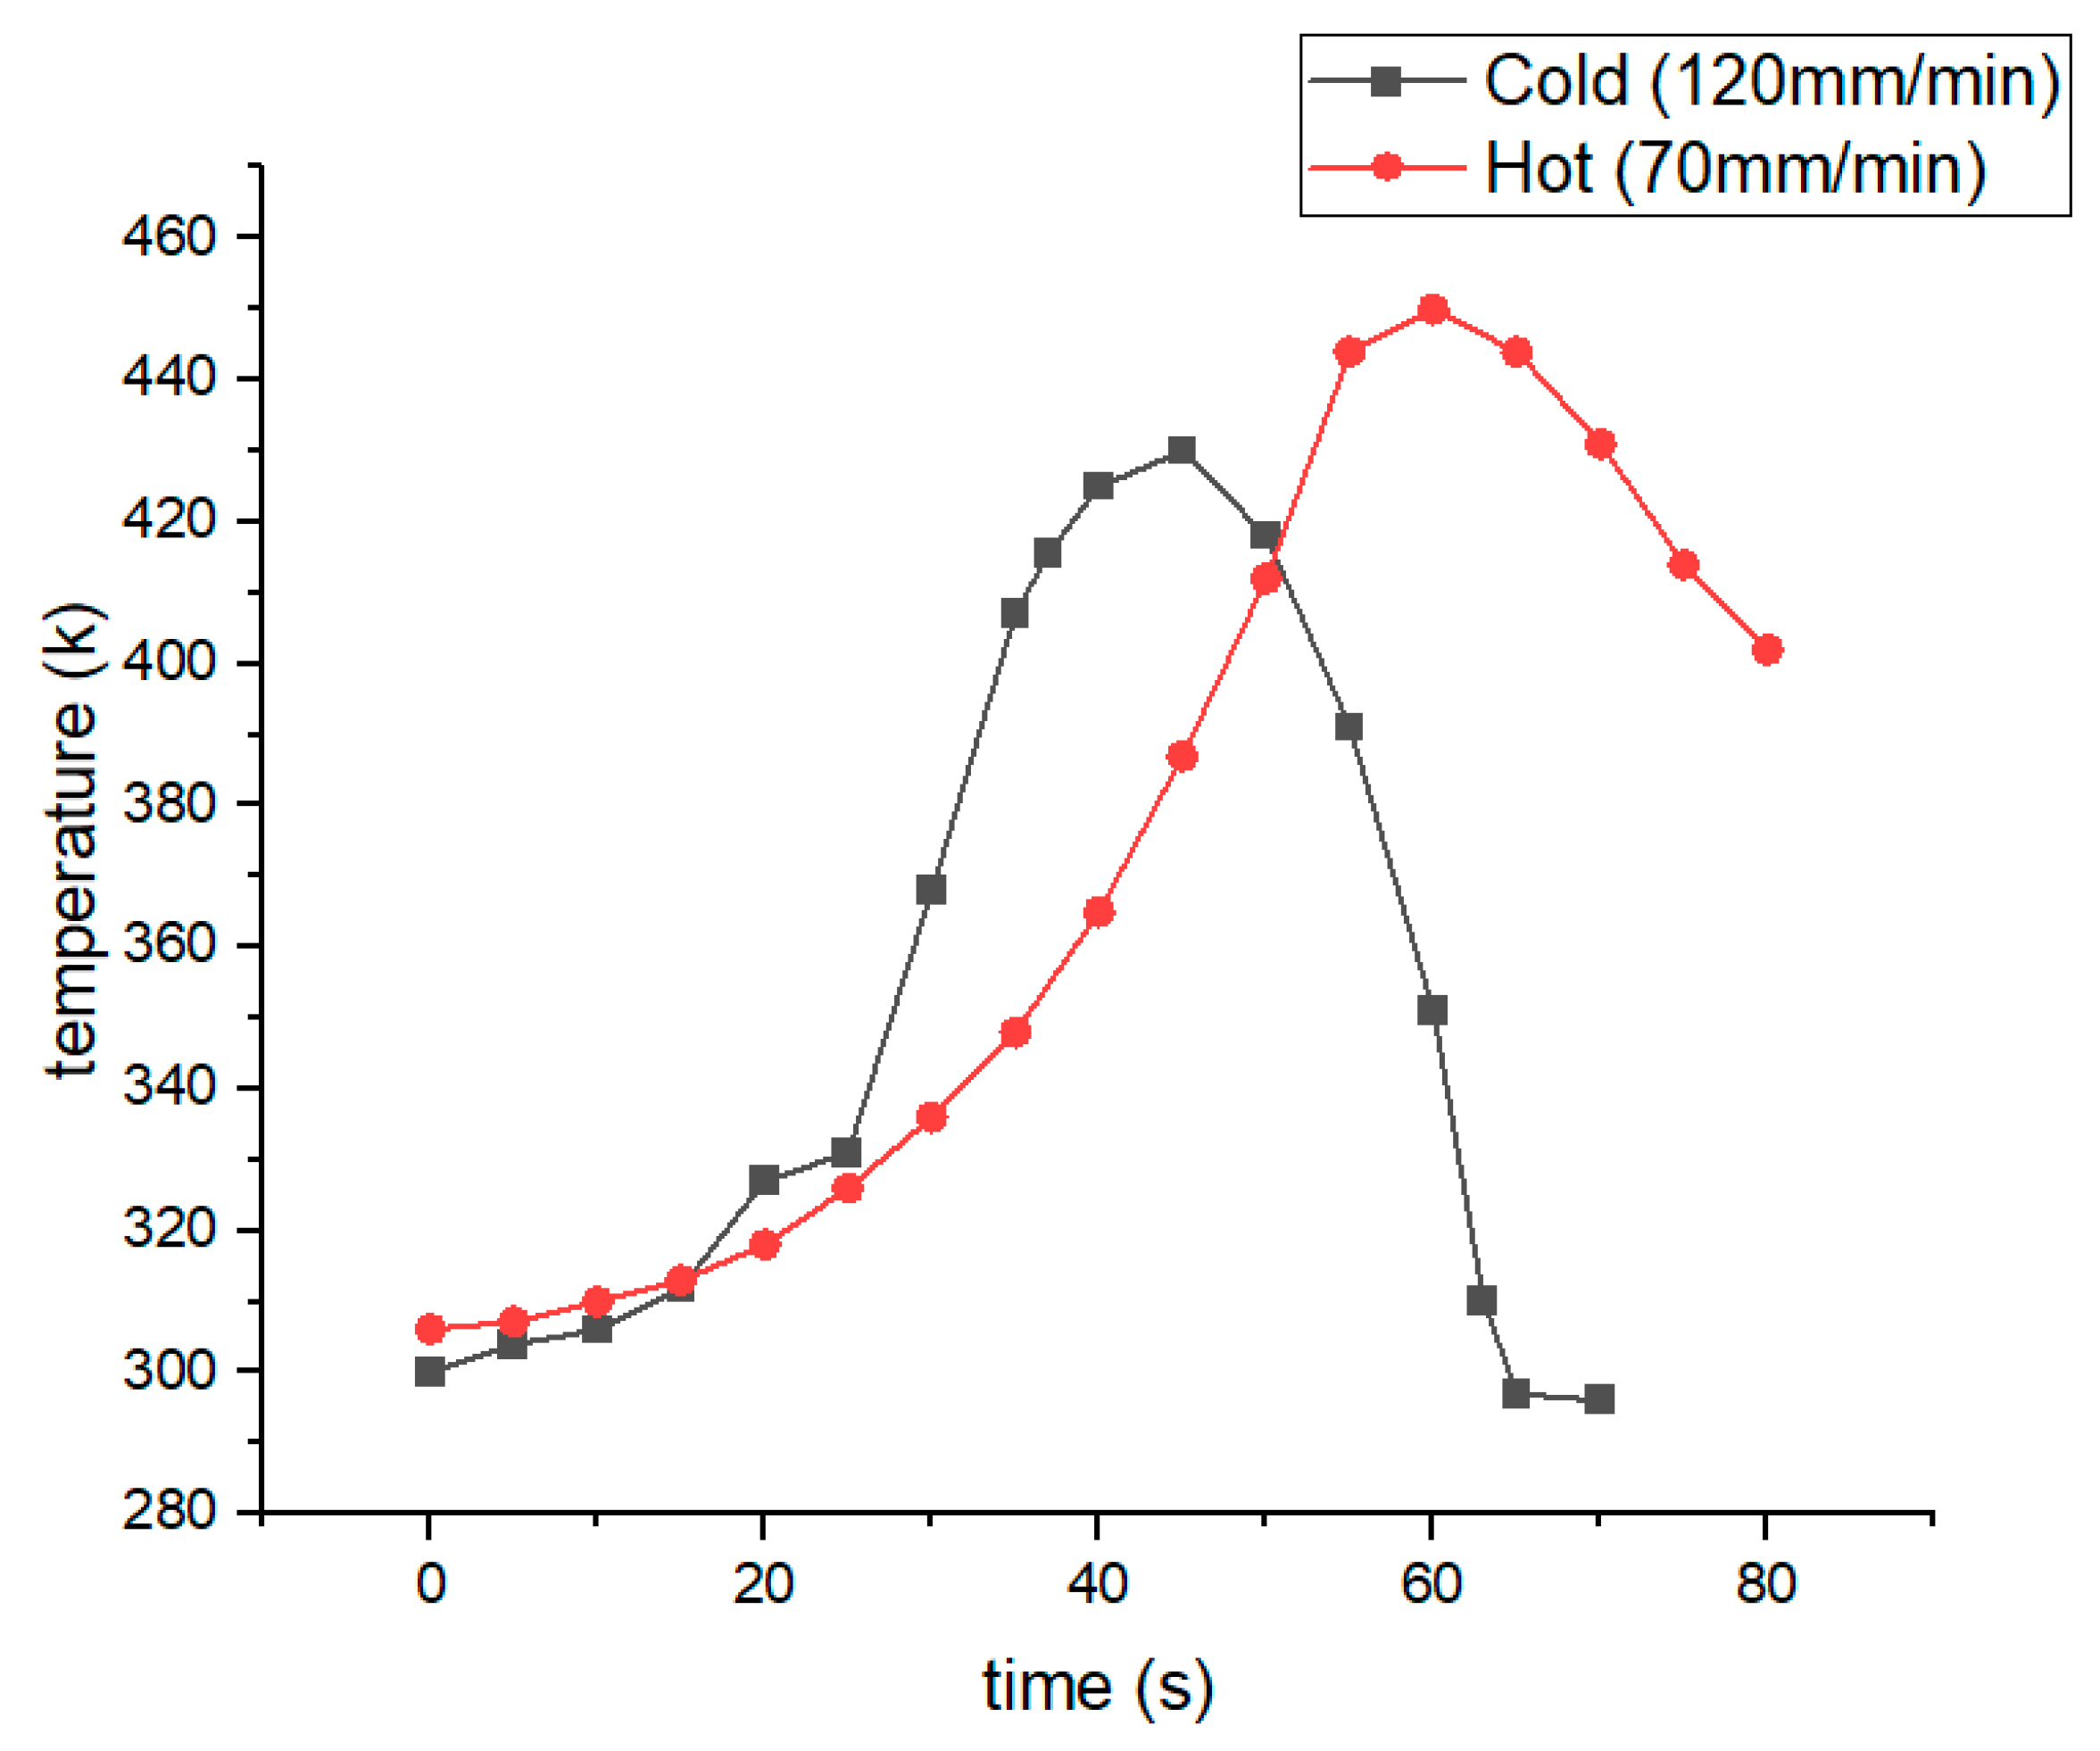
The temperature evolution a long FSW was determined in real time using a laser thermometer, along the weld line behind the tool. Temperature measurements were initiated at the beginning of welding to capture the initial heating stages, and the temperature evolution in point measurement along the FSW process was determined in real-time.
Figure 6 illustrates the time variations of the temperature of the AA7075-T6 lap joint welds under the two welding speed conditions, 70 mm/min and 120 mm/min, labelled hot and cold weldings, respectively. It is clear that, in both cases, the temperature peaks were obtained after a certain time and nearing the end of the welding process. This can be ascribed to the heat accumulation resulting from the heat input during the tool advancement, which results in temperature rises. Increasing welding speed significantly decreases the duration of high temperatures. This suggests that welding speed significantly influences the exposure time of the weld zone to high temperatures, primarily due to the shortened dwell time per unit length as welding speed increases.
As shown in
Figure 6, the temperature increases faster during cold welding as a result of the increased welding speed, reaching a value of about 433 K in near 50 s. However, in the case of hot welding, the peak temperature of near 450 K was reached in more time, near 60 s. These results resemble to those obtained by Nandan et al.[
24]. In this last case, the higher value of peak temperature is due to the lower welding speed allowing for more residence time, which results in more friction interaction between the pieces and the tool and then giving more heat fluxes as explained by Verma and Misra[
25].
3.2. Micro Hardness
The Vickers bulk hardness tester was employed to assess the hardness values of friction stir weld (FSW) joint specimens. Hardness measurements were taken equidistantly from both sides of the weld nugget zone (NZ).
Figure 7 gives the micro-hardness determined in the three zones (top, middle, and bottom) of the specimens described previously in
Figure 3. It is noteworthy that the highest micro-hardness records were noted near the center of the NZ, gradually decreasing as one approaches the thermo-mechanically affected zone (TMAZ) and then the heat-affected zone (HAZ). This trend remained consistent irrespective of the welding speeds.
The base metal (BM), especially in the middle and bottom zones, exhibited a maximum hardness of approximately 110 ± 5 HV, while the NZ material displayed a higher hardness of about 155 ± 2 HV, in the case of cold welding. The increased hardness in the NZ is caused by the disruption of significant primary grain structures caused by the stirring action produced by the rotation of the tool, as described by Nadikudi et al.[
26]. However, in the thermo-mechanically affected zone (TMAZ), the lower strain energy leads to plastic deformation and recrystallization occurs partially and at a slower rate compared to the NZ. Consequently, this leads to the formation of coarse, uneven, and elonged grains, resulting in lower hardness than that in the NZ. Dong et al.[
27] reported similar findings. Additionally, in the HAZ, the temperature input from the rotating tool is lower than in the TMAZ due to the distance from the NZ. This results in the formation of larger grains and subsequently lower hardness due to the annealing effect caused by the slower cooling rate.
Moreover, the hardness profile indicates that the hardness on the weld advancing side (AS) is marginally higher compared to the retreating side (RS). This variance can be ascribed to the increased heat input from the advancing side, caused by increased friction and shear forces. Consequently, this leads to enhanced grain refinement and increased hardness on the AS, as described by Verma and Misra[
25].
As shown in
Figure 7, it is evident that the variation of the welding speed influenced hardness values. Regardless the welded joint region, the hardness increased with the welding speed increase. At low welding speed, higher temperatures are reached, and larger grains are obtained, leading to lower hardness levels. However, at high welding speed, lower temperatures are attained, resulting in smaller grains, giving higher hardness levels. The same explanation was given by Kumar et al.[
28].In the top zone, the peak values were detected on the left hand side due to the intensity of the forces involved in this area, while the advancing side is generally less hard due to the relatively less intense interaction with the welding tool. In the middle zone, the curves exhibit twin peaks, this indicates areas of localized hardness due to the combined effects of heat and mechanical deformation during the welding process. In the bottom zone, the peak values shifted to the right.
3.3. Tensile Test
The tensile strength were conduction using the Galdabini QUASAR 50 is a universal testing machine. As presented previously, the samples were extracted from welds executed at different welding speeds.
Figure 8 presents an example of fractured tensile specimens for cold and hot welding.
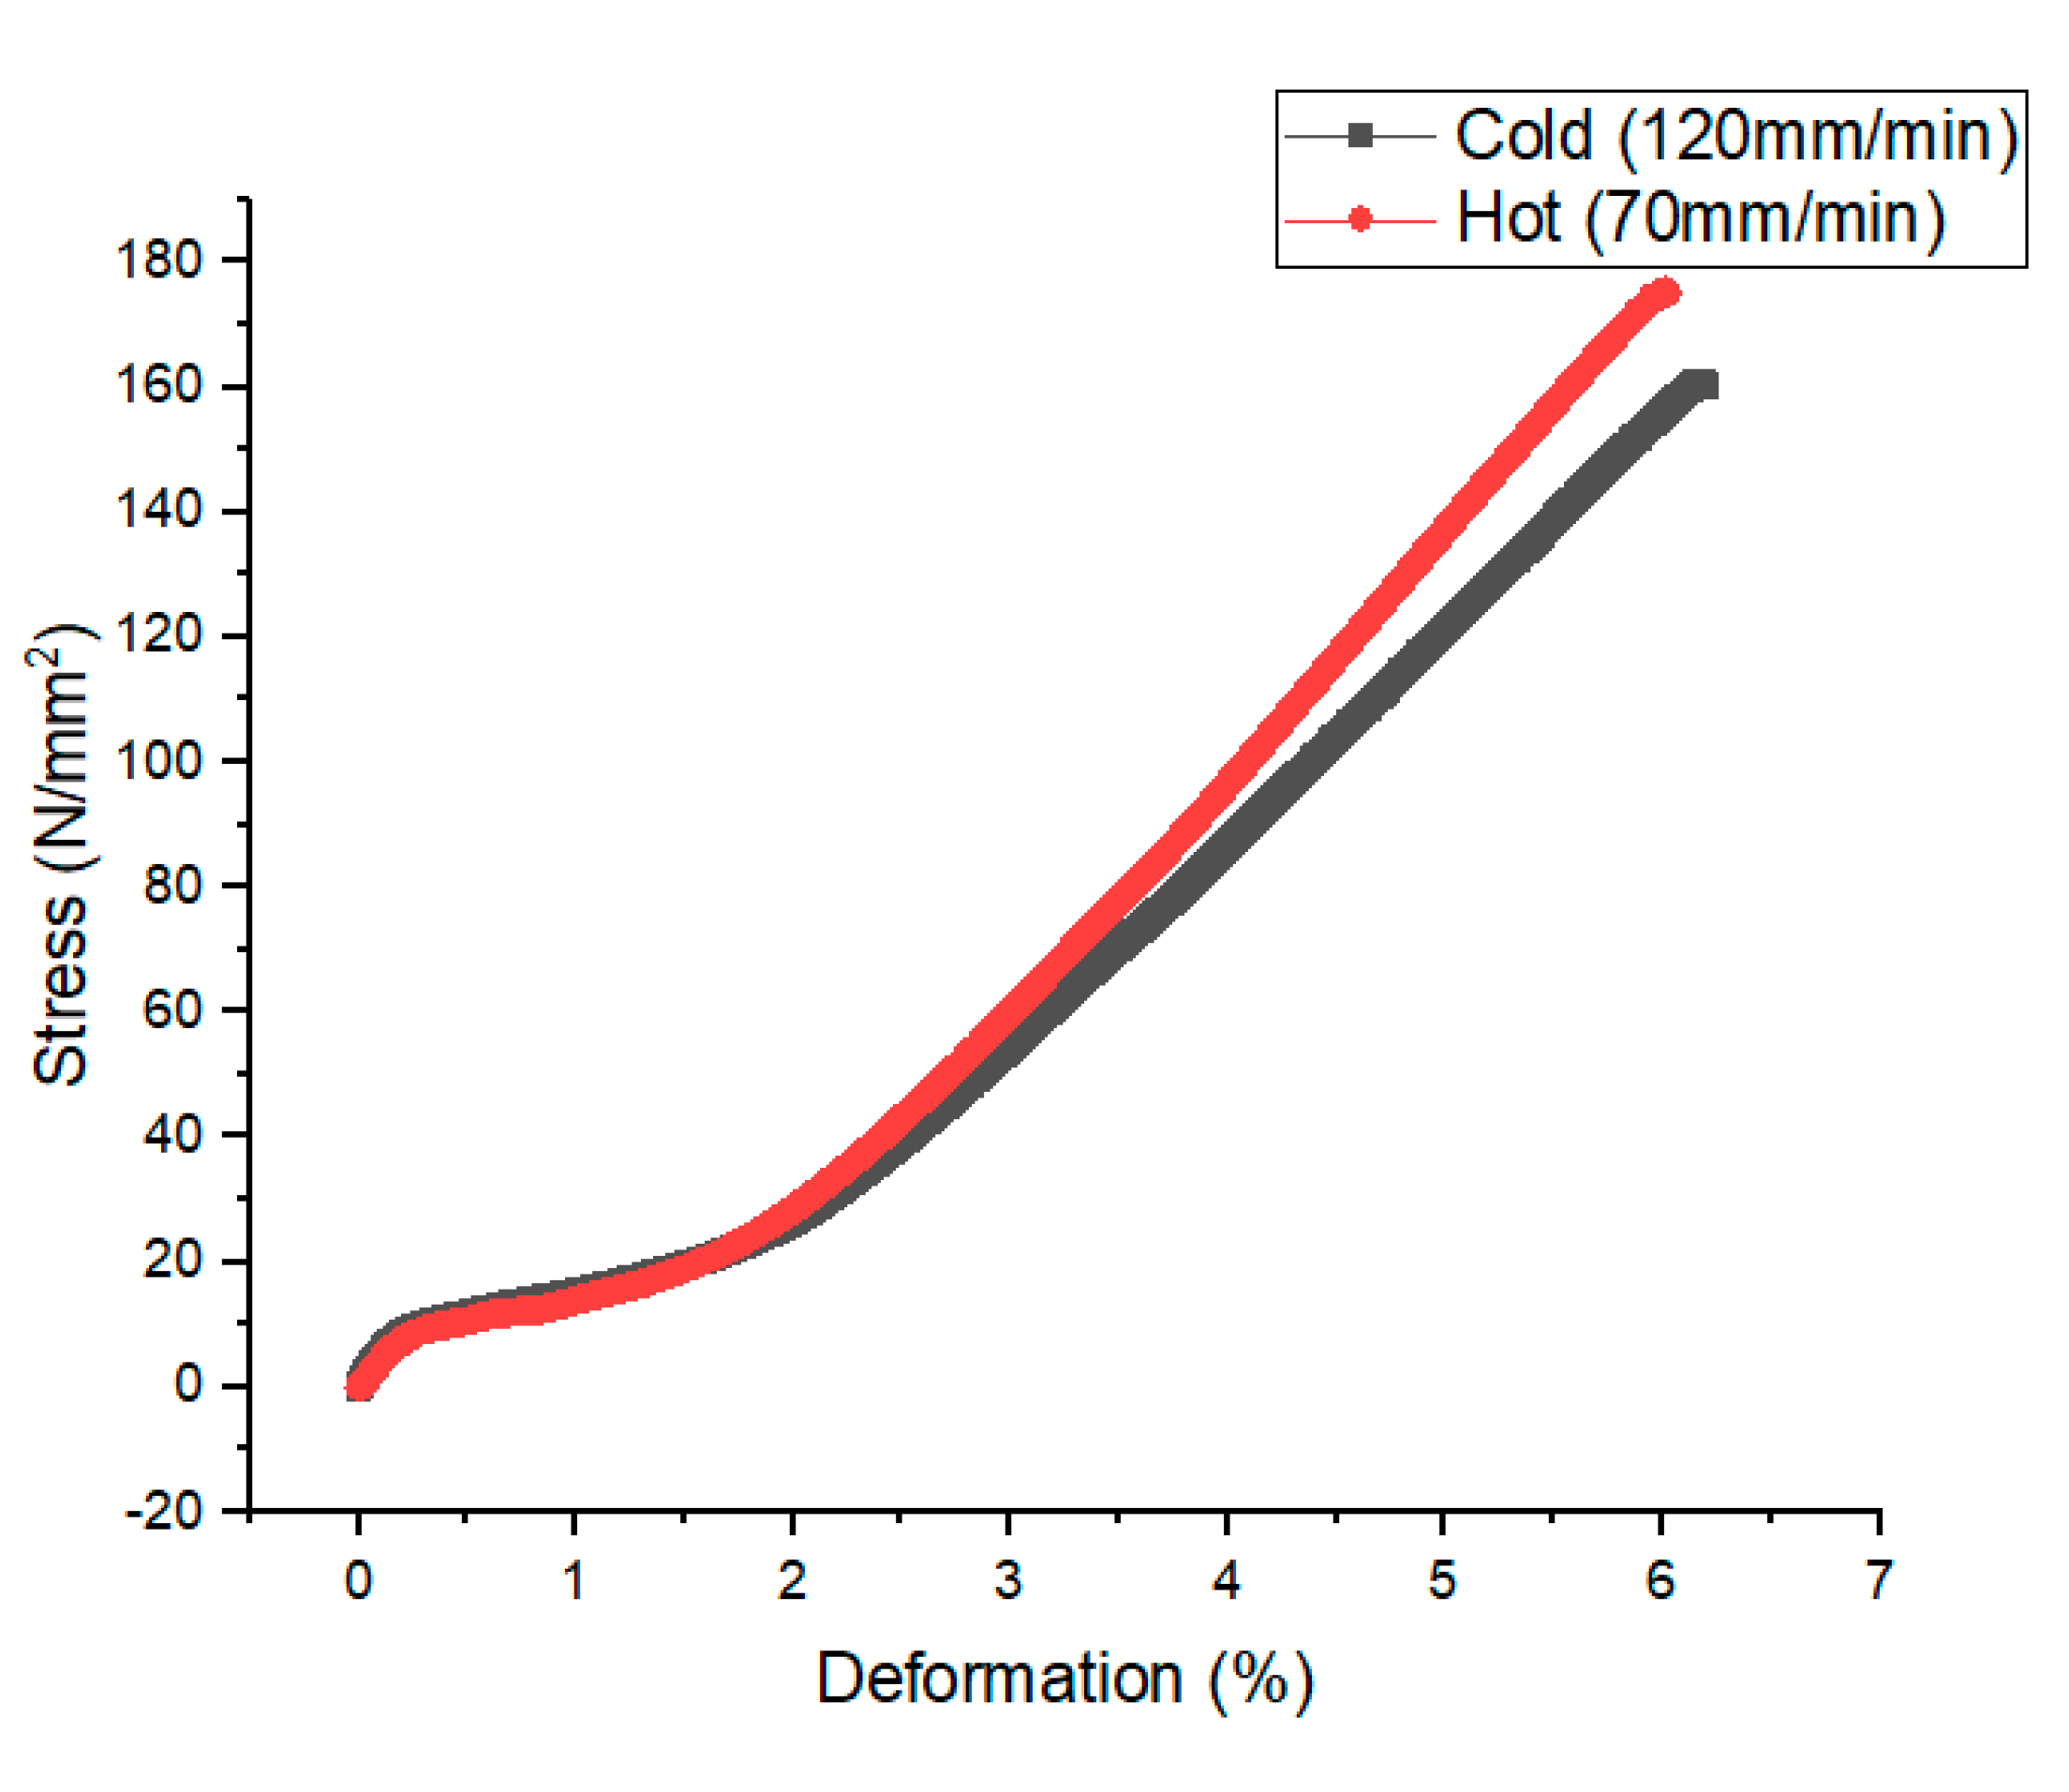
Figure 9 presents the stress-strain curves obtained through tensile tests on AA 7075-T6 material subjected to both hot and cold welding processes. The tests were executed in the transversal direction of the welding line. The data illustrated in the graph reveal an interesting trend: despite the similarity in yield stress variations observed between both types of weld samples, there is a discernible disparity in the overall ductility. Specifically, the ductility of the hot-welded samples exhibits a reduction when compared to the cold-welded material. Hence, the elongation at break (fracture strain) increased from around 5.5% in the case of hot-welded sample to around 5.9% in the case of cold-welded sample, which represent an increase of more than 7% by increasing the welding speed from 70 mm/min to 130 mm/min. This decline in ductility for the hot-welded samples aligns with findings from Darzi Naghibi et al.[
29], and Babu Rao [
8] who previously reported a significant hardness mismatch in these particular welds. This phenomenon highlights the significant impact of process conditions on the mechanical behavior of the resulting joints, particularly in terms of ductility. These experimental findings corroborate the importance of considering ductility and hardness matching in welding processes, as highlighted by the comparison between hot and cold welding in this study. It’s important to note that the material exhibits a rapid strain rate, indicating elastic deformation behavior due to alterations in atomic adhesion. This phenomenon contributes to material weakness and eventual fracture [
30]. Conversely, materials with high toughness exhibit greater resistance to atomic dislocation, resulting in limited elastic deformation behavior. For instance, under conditions such as a rotational speed of 1320 rpm, the AA7075 T6 aluminum alloy demonstrated maximum tensile strengths of 170 MPa and 160 MPa, with a strain rate of 6% and 6.3%, at welding speeds of 70 mm/min and 120 mm/min, respectively. This is attributed to the alloy’s inherent strength and ductility
. Compared to the values obtained, by Cabrini et al.[
31], for the base material, FSW has led to a decrease in stress by about 200 MPa. Increasing welding speeds also heightens the probability of residual stresses within the welded structure. Such stresses have the potential to compromise the material’s integrity, rendering it more prone to cracking and failure.
3.4. Microstructure
The FSW welds microstructure has been revealed through optical and scanning electron microscopes.
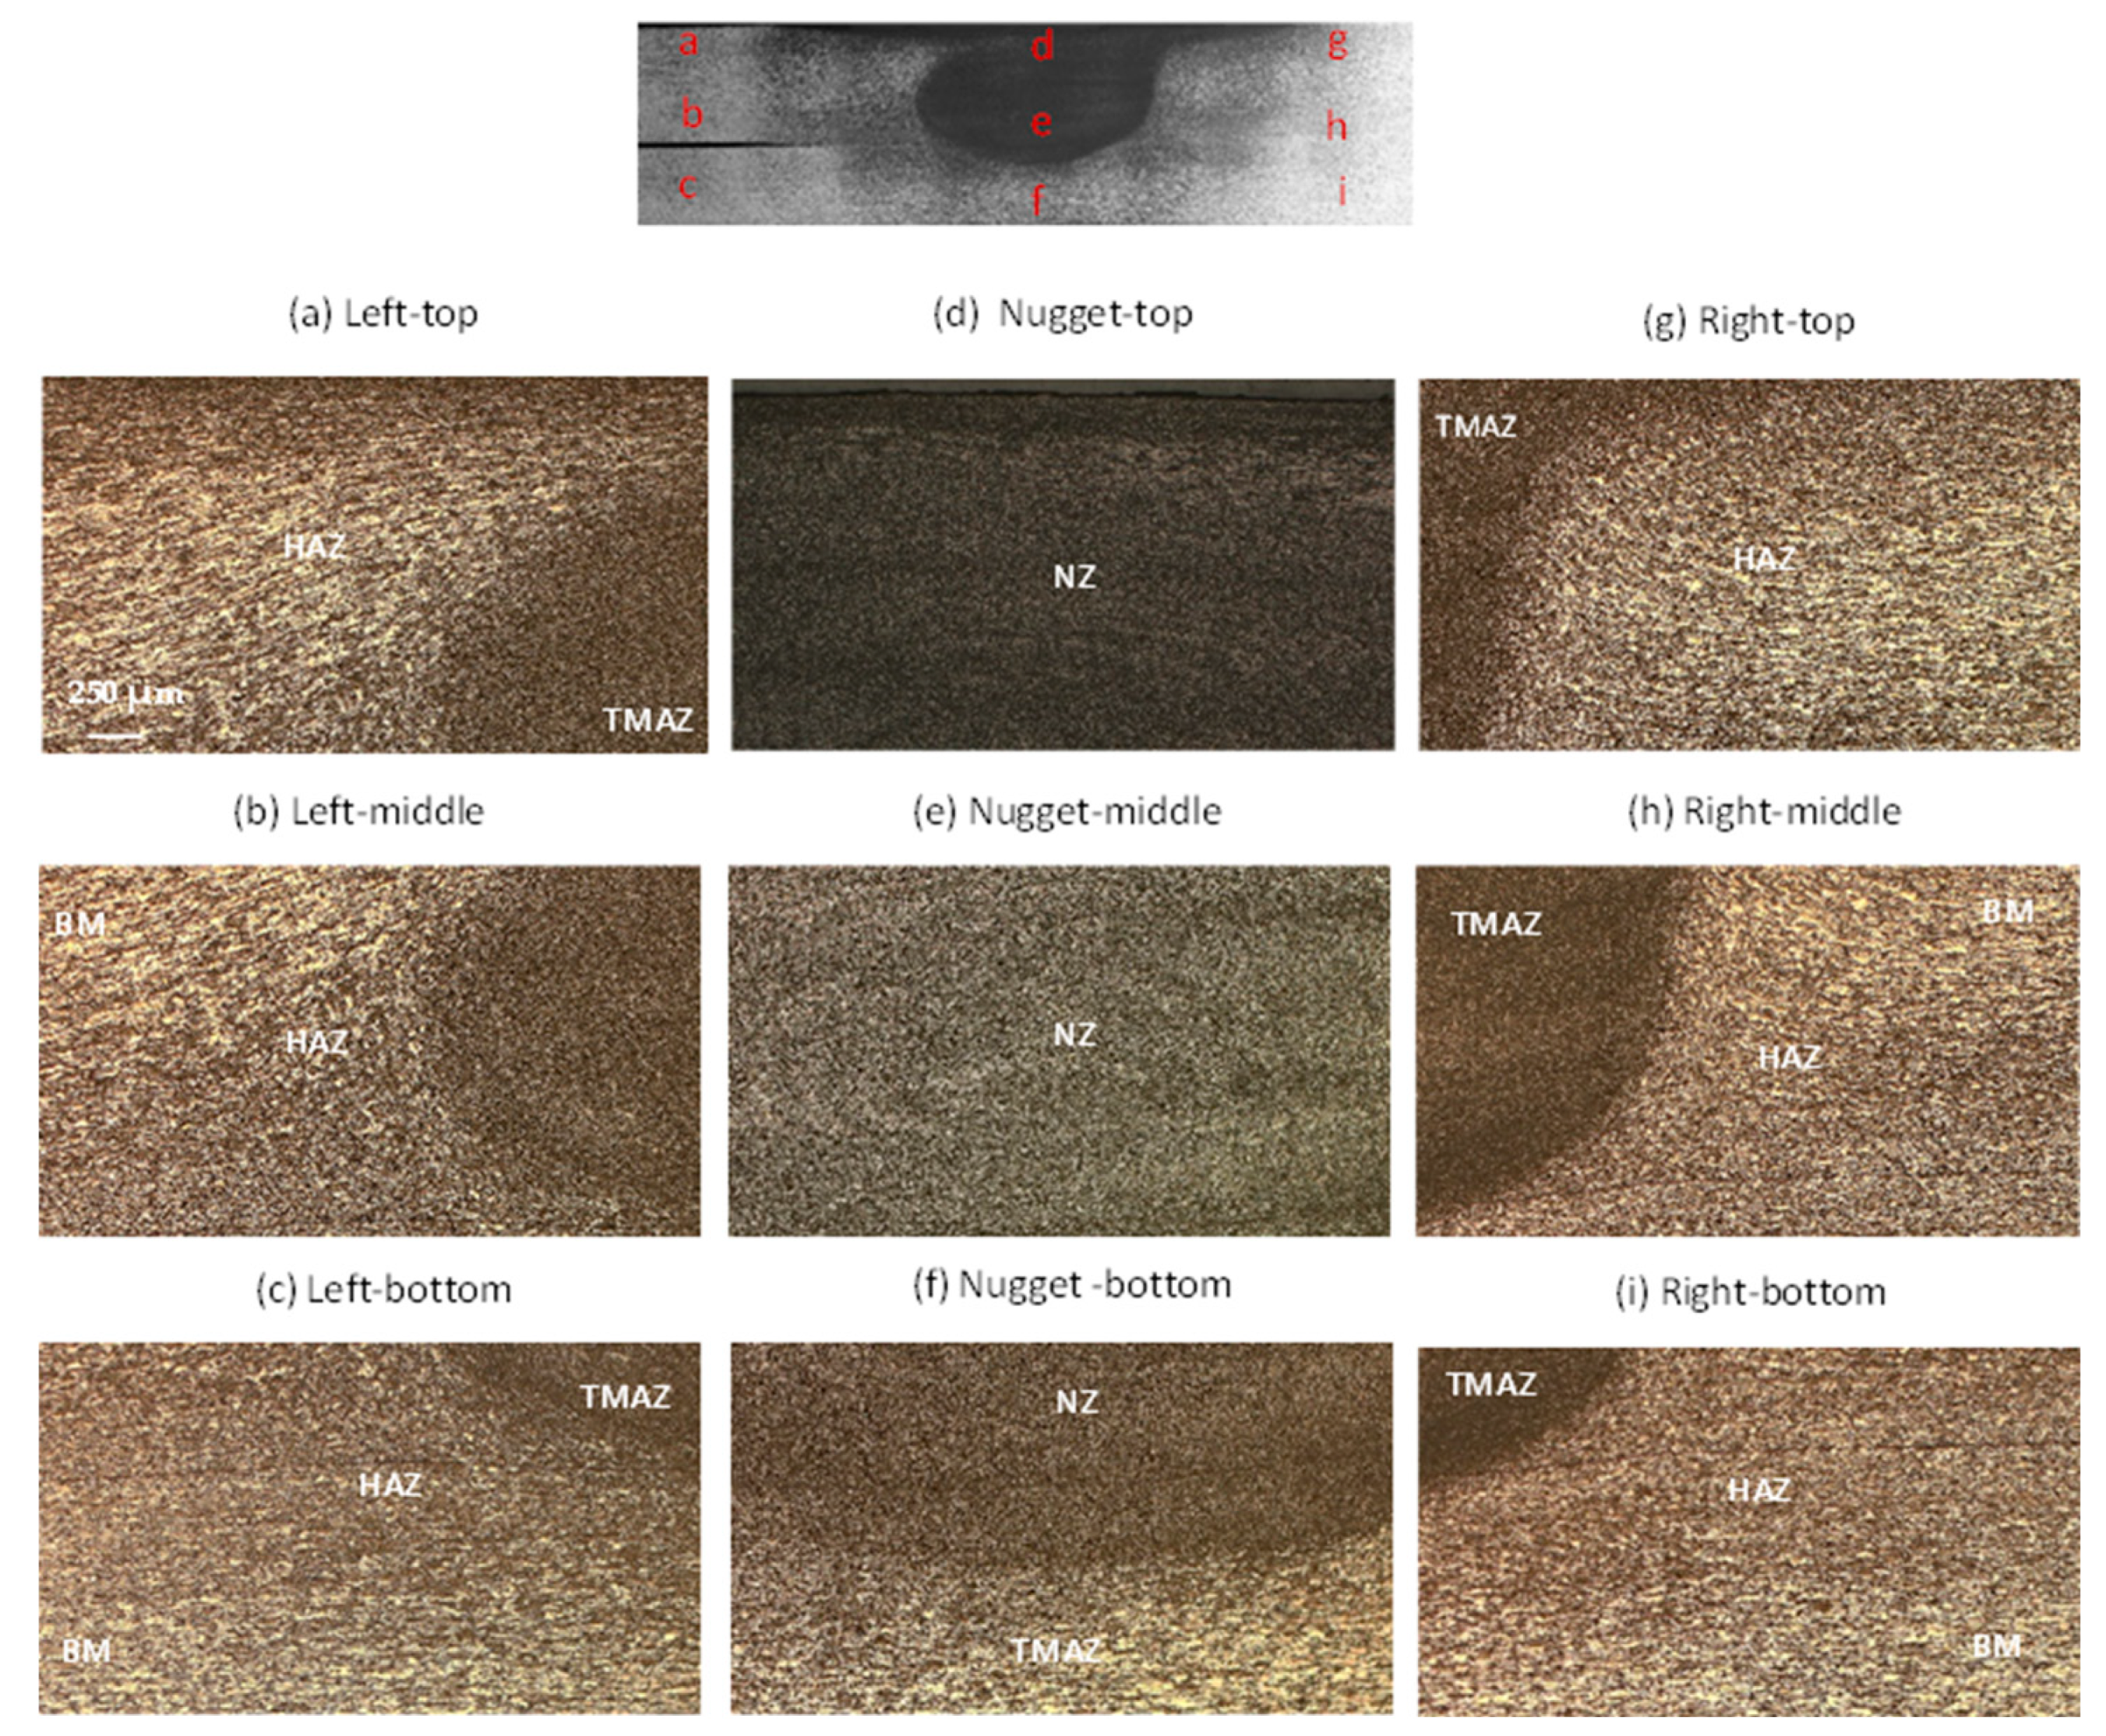
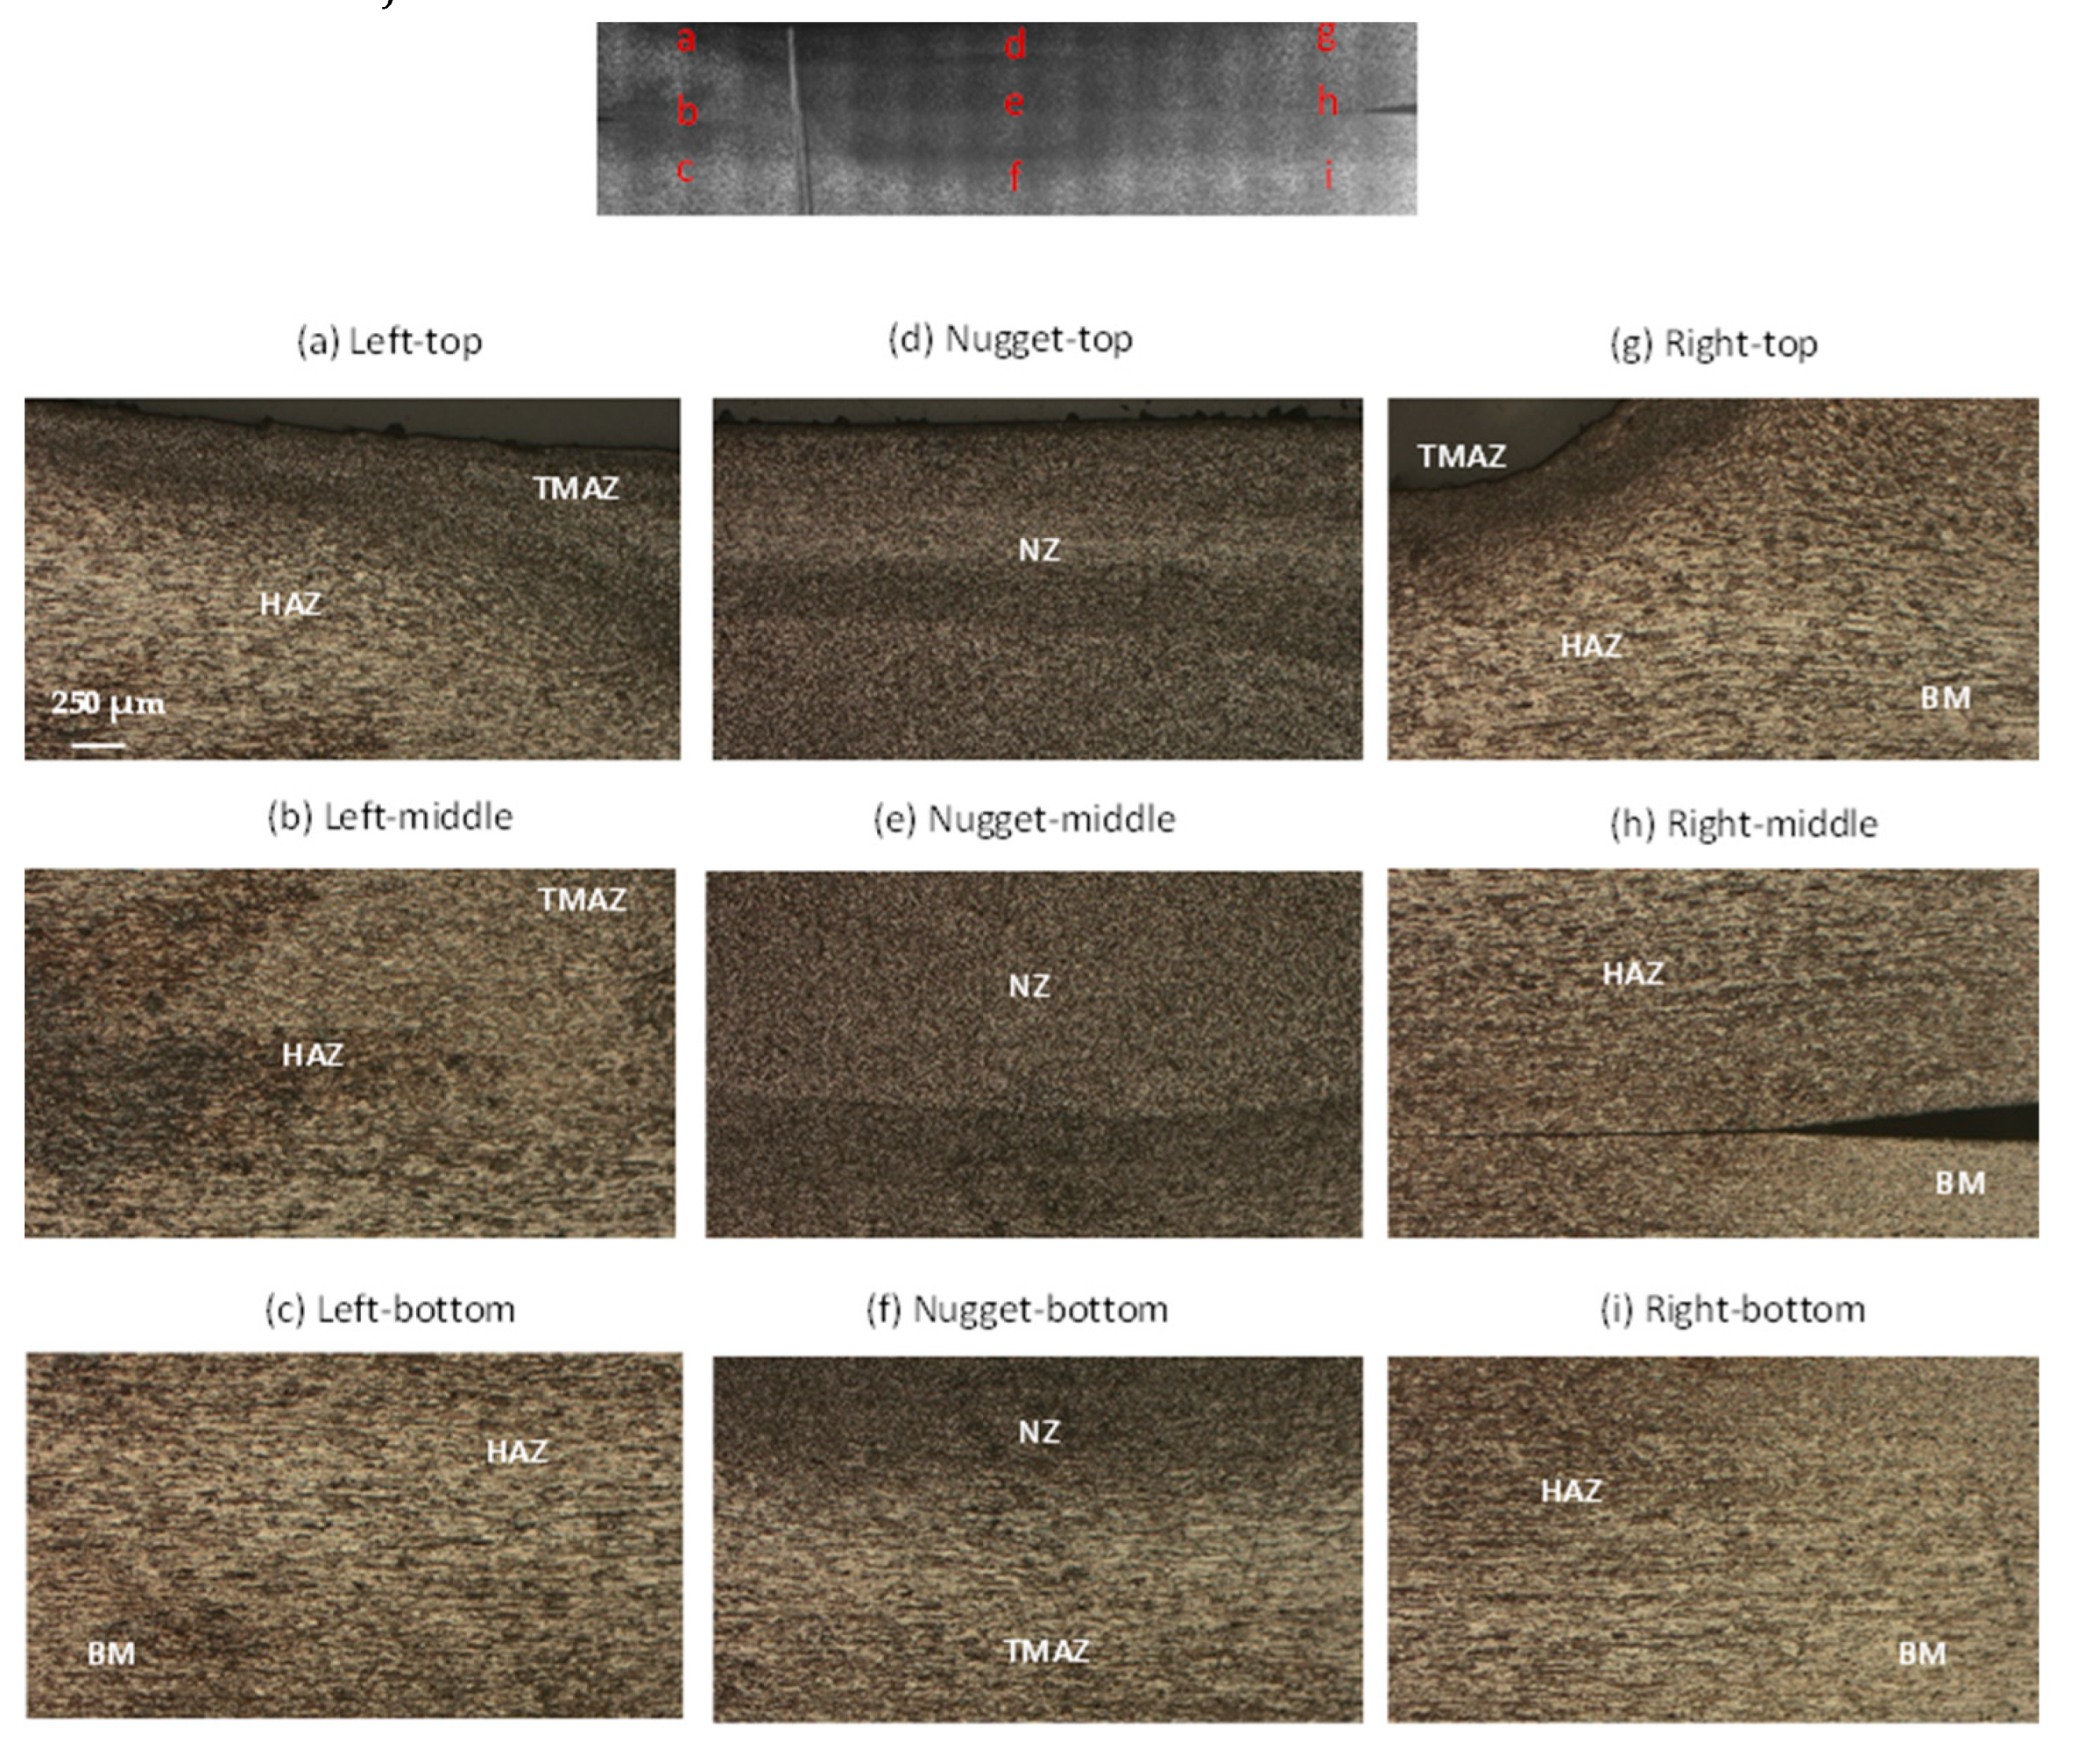
Figure 10 and
Figure 11 present the micrographs of various regions of the joint under cold and hot welding conditions, respectively. The grain sizes (
Figure 11) were measured by employing ImageJ software.
Figure 10 offers insights into the metallurgical characteristics observed in the cross-sectional view. Upon macroscopic examination, no discernible flaws were detected in the analyzed joint. Notably, a substantial grain refinement is evident when comparing the microstructures of the base metal (BM) and the nugget zone (NZ). The BM structure,
Figure 10.c and 10.i, typically comprises elongated grains, resembling to those commonly found in rolled plates, with an average grain size of 15 to 20 µm. NZ,
Figure 10.d, is described as the zone of the joint bead where full recrystallization has taken place as a result of the tool activity. This leads to the development of a finer grain microstructure in the NZ (
Figure 10.e and 10.f), with an average grain size of less than 14 µm as depicted by
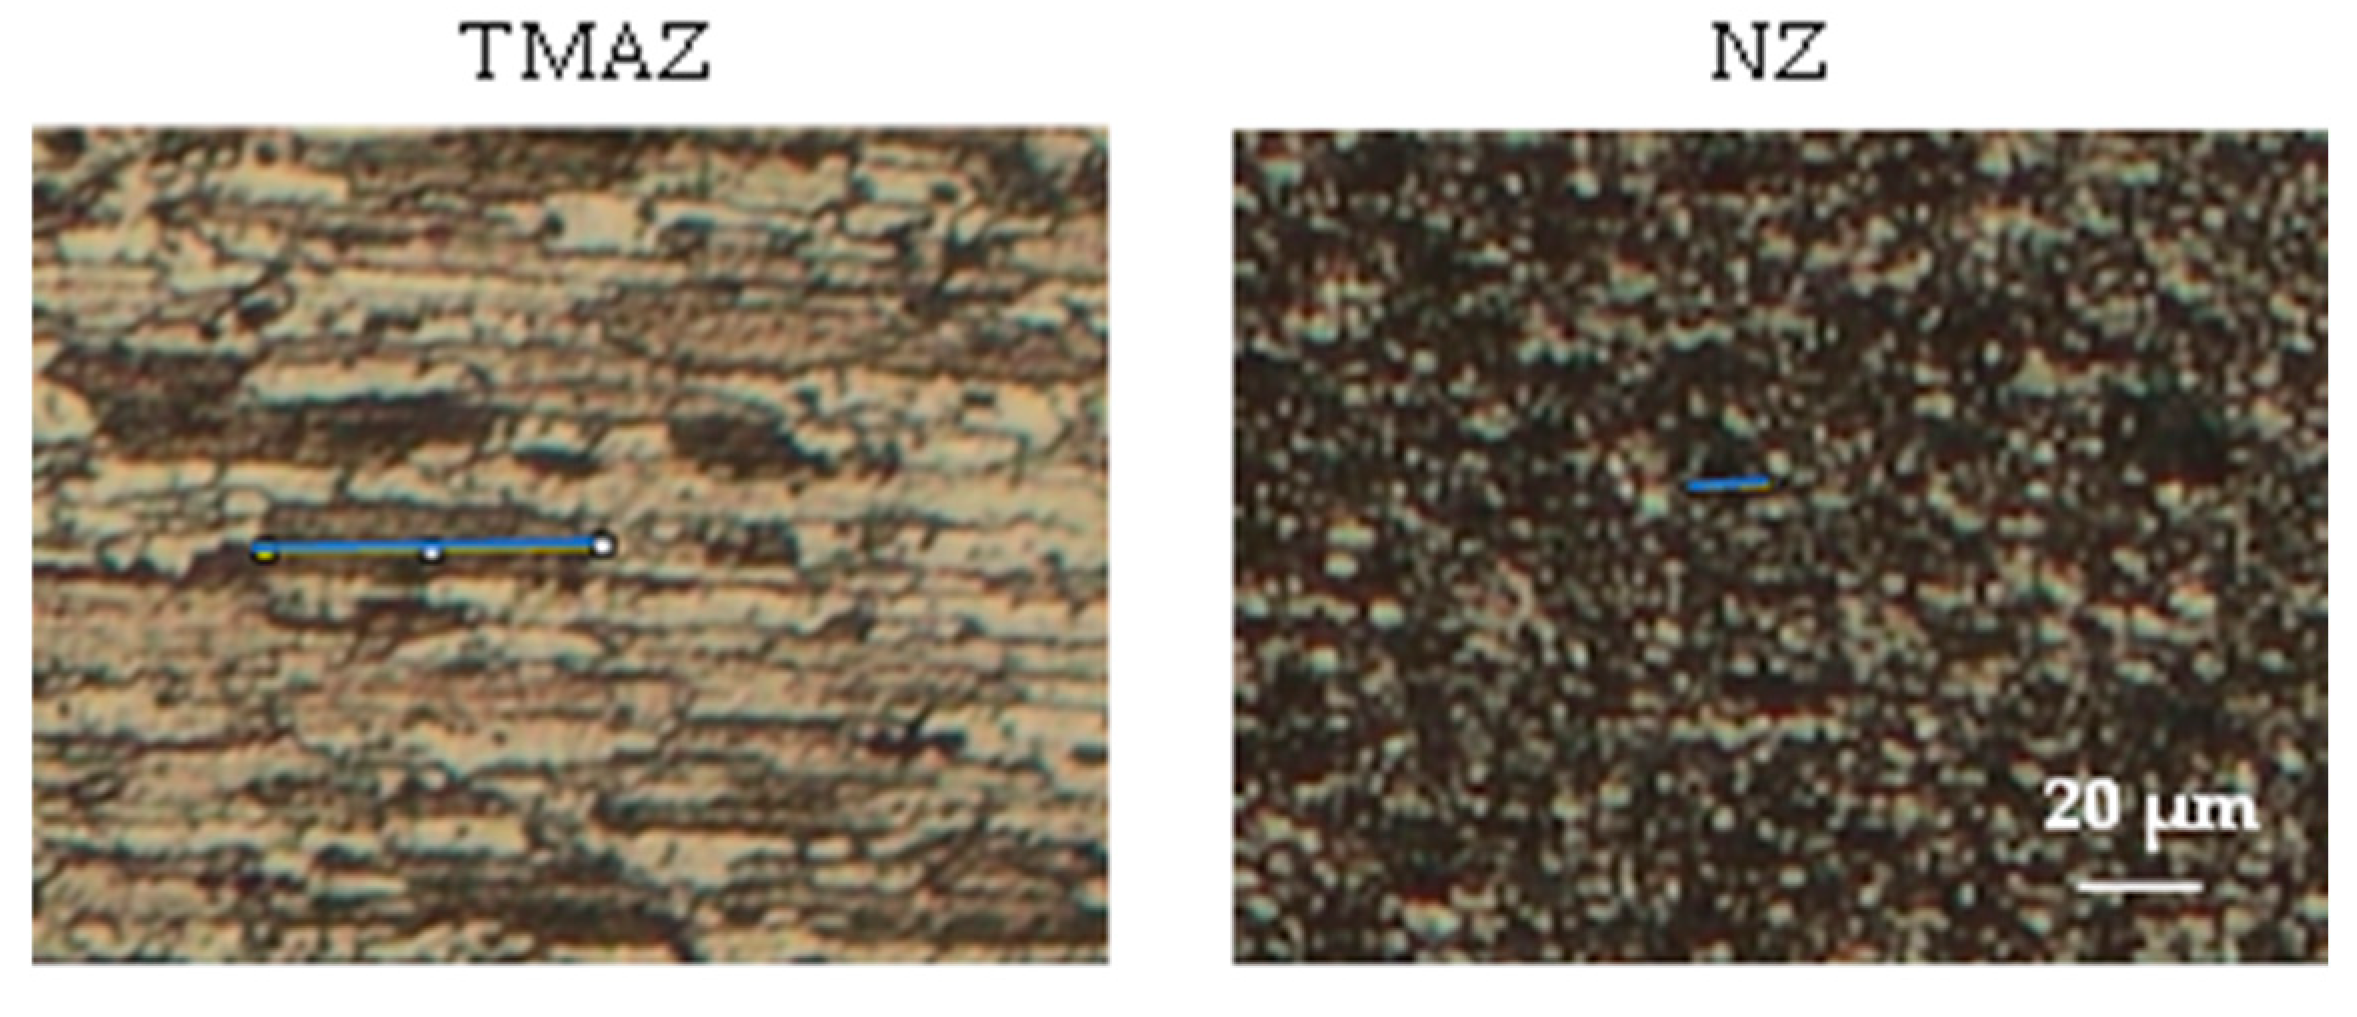
Figure 11. The thermomechanical-affected zone (TMAZ)is the zone of the weld bead with deformed and extended grains indicating the direction of material movement in FSW process. Adjacent to the Nugget Zone (NZ), the TMAZ undergoes plastic deformation while being exposed to elevated temperatures. However, this zone does not experience recrystallization. The conditions are inadequate to induce recrystallization. Instead, the grains in the thermomechanical-affected zone (TMAZ) are stretched, as illustrated in
Figure 10.a and 10.g, aligning with the flow direction. This stretching causes a reduction in width and an extension in grain length, with a mean value of about 66 µm to 75 µm as illustrated by
Figure 11. Fully recrystallized zones are noticeable in the center of the joint (
Figure 10.e). The boundary between the Thermomechanical affected zone (TMAZ) and the Nugget Zone (NZ) is evident in
Figure 10.b and 10.e. However, there is significant material flow at the boundary between the NZ and TMAZ, with material rising from the bottom of the workpiece and descending from the surface. As a result, the demarcation between the NZ and TMAZ is diffuse and gradual. When examined at higher magnifications, it becomes apparent that the weld nugget displays fine grains that are equiaxed, while TMAZ exhibits larger and elongated grains. Similar observations have been stated by Aydin et al and Manikandan et al.[
30,
32]. They elucidated that the microstructure of the nugget zone (NZ) primarily arises from elevated temperatures and plastic deformation, resulting in dynamic recrystallization. Conversely, the microstructure of the thermo-mechanically affected zone (TMAZ) is attributable to the combined effects of high stress and large strain but without recrystallization.
In
Figure 10.b, the extremely fine tip, encircled by fully recrystallized AA7075-T6 grains, is discernible.
Figure 10.f points out two distinct areas, TMAZ and the stretched grains of the heat-affected zone (HAZ). At these magnifications, the heat affected zone (HAZ) is difficult to be identified due to its distinct distribution characteristics, as stated by Carlone et al.[
33]. This particularity has been observed across various aluminum alloys.
Figure 10 shows that the tool has not been fully plunged. The pin extends approximately 3.8 mm in length, while each sheet thickness is 2mm. However, the image reveals that the stir zone has only marginally affected the bottom sheet. Conversely,
Figure 12 illustrates a more pronounced plunge into the bottom sheet. This increased penetration suggests a greater interaction between the tool and the material, resulting in a deeper stir zone. Difference in tool plunge between the two images influences the heat dissipation dynamics. When the tool makes a more severe plunge into the bottom sheet, as depicted in
Figure 12, it facilitates enhanced contact and frictional forces between the tool and the material. Consequently, this intensified interaction lead to increased heat dissipation downwards into the material, affecting the thermal profile and influencing the resulting mechanical properties of the welded joint.
The microstructure of the FSW lap joint under hot welding conditions (low advancing speed) is illustrated in
Figure 12. The Nugget Zone (NZ)is clearly visible in
Figure 12.d and 12.e, showcasing a distinct and continuous process of dynamic recrystallization. Comparatively to cold welding, when utilizing hot friction stir welding (FSW), there is a rise in the grain size of the AA7075-T6 aluminum alloy, ranging from 20 µm to 25 µm, accompanied by a transformation to equiaxed shapes. Notably, coarser grains are identifiable, according to the findings of Topic et al.[
34]and Sun et al[
35]. The temperature within the NZ reaches as high as 250 °C, a level sufficient to induce overaging effects.
The micrographs in
Figure 13 depict a trend where grain sizes tend to increase as the advancing speed of the tool decreases. In the heat-affected zone (HAZ) and in the thermo-mechanical-affected zone (TMAZ) where grains are solely influenced by heat, larger grains are observed with a mean size ranging from 68 µm to 79µm. This phenomenon can be attributed to the substantial deformations caused by the mechanical effect of the tool at elevated temperatures during welding, as elucidated by Aliha et al.[
36].
4. Conclusion
This study delved into the thermomechanical proprieties of friction stir welding (FSW) in lap joints of AA 7075-T6 aluminum alloy. Through extensive experimental investigations, temperature profiles during welding, mechanical properties, and microstructural alterations were scrutinized. The examination into the microstructure, microhardness, tensile test behavior of grinding blend welded lap joints of AA7075-T6 aluminum alloy carried out under various process conditions, specifically, two advancing speeds, revealed the following findings:
− The lowest tensile test was the result of the weld joint at hot temperatures generated by the straight cylindrical threaded tool pin. However, it is considered to be lesser than the ultimate tensile strength of AA7075-T6 cold welded alloy. The tensile test decreased by lowering the welding speed. This trend was also observed for hardness.
− The FSW process parameters were evaluated via tensile test and hardness tests. Comparing the two welding speeds, at a rotational speed of 1320 rpm, the best parameters were obtained at a welding speed of 120 mm/min.
− The nugget zone (NZ) microstructure was characterized by extremely thin, completely reformed equiaxed grains, exhibiting the most significant refinement. In contrast, the thermomechanical-affected zone (TMAZ) consisted of highly distorted and partially recrystallized grain, caused by the elevated temperature and deformation applied by the welding tool. However, heat affected zone (HAZ) microstructure, characterized by overgrown grains, was similar to that of the base metal BM, since HAZ is only exposed to heat but not to deformations.
− The ascending trend in TMAZ grain size from hot welding, at Vs=70 mm/min, to cold welding at Vs=120 mm/min, shows that the generated heat played the main role in FSW rather than plastic deformation.
Author Contributions
Conceptualization, Oumayma Toumi, Ridha Ennetta and Umberto Prisco; Methodology, Alessia Teresa Silvestri, Fabio Scherillo and Umberto Prisco; Software, Oumayma Toumi, Romdhane Ben Khalifa and Ridha Ennetta; Validation, Oumayma Toumi, Romdhane Ben Khalifa and Umberto Prisco; Formal analysis, Oumayma Toumi, Alessia Teresa Silvestri and Ridha Ennetta; Investigation, Oumayma Toumi, Romdhane Ben Khalifa and Fabio Scherillo; Resources, Alessia Teresa Silvestri; Data curation, Oumayma Toumi and Alessia Teresa Silvestri; Writing – original draft, Oumayma Toumi and Ridha Ennetta; Writing – review & editing, Oumayma Toumi and Ridha Ennetta; Visualization, Oumayma Toumi and Romdhane Ben Khalifa; Supervision, Ridha Ennetta and Umberto Prisco; Project administration, Fabio Scherillo; Funding acquisition, Oumayma Toumi and Ridha Ennetta.
Conflicts of Interest
The authors did not receive support from any organization for the submitted work. The authors have no financial or proprietary interests in any material discussed in this article. The Authors declare that there is no conflict of interest.
References
- Thomas, W.; Nicholas, E.; Needham, J.; Murch, M.; Temple-Smith, P. and Dawes, C. Friction Stir Butt Welding (the Welding Institute (TWI)). PCT World Patent Application WO93/10935 1993.
- Xiao, X.; Mao, Y.; Wang, X.; Qin, D. and Fu, L. Effects of Curvature Direction on Friction Stir Welding Lap Joint of Aluminum Alloy “S” Curved Surface. The International Journal of Advanced Manufacturing Technology 2023, 125, 4693–4705. [Google Scholar] [CrossRef]
- Yaduwanshi, D.K.; Rao, C.R.M.; Naidu, S.R.M.; Sakharwade, S.G.; Sharma, S.; Khalkar, V.; Baskar, S. and Kaliyaperumal, G. Thermal Evaluation of Aluminum Welding: A Comparative Study of Friction Stir Welding (FSW), Plasma-Fsw, and Tungsten Inert Gas (TIG)-FSW Techniques. International Journal on Interactive Design and Manufacturing (IJIDeM). [CrossRef]
- Mirzaei, M.; Asadi, P. and Fazli, A. Effect of Tool Pin Profile on Material Flow in Double Shoulder Friction Stir Welding of AZ91 Magnesium Alloy. International Journal of Mechanical Sciences 2020, 183, 105775. [Google Scholar] [CrossRef]
- Alemdar, A.S.A.; Jalal, S.R. and Mulapeer, M.M.S. Influence of Friction Stir Welding Process on the Mechanical Characteristics of the Hybrid Joints AA2198-T8 to AA2024-T3. Advances in Materials Science and Engineering 2022, 2022, 1–11. [Google Scholar] [CrossRef]
- Hassanifard, S.; Ghiasvand, A. and Varvani-Farahani, A. Fatigue Response of Aluminum 7075-T6 Joints through Inclusion of Al 2 O 3 Particles to the Weld Nugget Zone during Friction Stir Spot Welding. Journal of Materials Engineering and Performance 2021, 1–10. [CrossRef]
- Lunetto, V.; De Maddis, M. and Russo Spena, P. Similar and Dissimilar Lap Friction Stir Welding of Titanium Alloys: On the Elimination of the Hook Defect. The International Journal of Advanced Manufacturing Technology 2023, 126, 3417–3435. [Google Scholar] [CrossRef]
- Babu Rao, T. Stochastic Tensile Failure Analysis on Dissimilar AA6061-T6 with AA7075-T6 Friction Stir Welded Joints and Predictive Modeling. Journal of Failure Analysis and Prevention 2020, 20, 1333–1350. [Google Scholar] [CrossRef]
- Balakrishnan, M.; Leitão, C.; Arruti, E.; Aldanondo, E. and Rodrigues, D. Influence of Pin Imperfections on the Tensile and Fatigue Behaviour of AA 7075-T6 Friction Stir Lap Welds. The International Journal of Advanced Manufacturing Technology 2018, 97, 3129–3139. [Google Scholar] [CrossRef]
- Ge, Z.; Gao, S.; Ji, S. and Yan, D. Effect of Pin Length and Welding Speed on Lap Joint Quality of Friction Stir Welded Dissimilar Aluminum Alloys. The International Journal of Advanced Manufacturing Technology 2018, 98, 1461–1469. [Google Scholar] [CrossRef]
- Yuvaraj, K.; Varthanan, P.A.; Haribabu, L.; Madhubalan, R. and Boopathiraja, K. Optimization of FSW Tool Parameters for Joining Dissimilar AA7075-T651 and AA6061 Aluminium Alloys Using Taguchi Technique. Materials today: proceedings 2021, 45, 919–925. [Google Scholar] [CrossRef]
- Abolusoro, O. P. , Akinlabi, E. T, and Kailas, S. V. Tool rotational speed impact on temperature variations, mechanical properties and microstructure of friction stir welding of dissimilar high-strength aluminium alloys. Journal of the Brazilian Society of Mechanical Sciences and Engineering 2020, 42, 1–12. [Google Scholar] [CrossRef]
- Kubit, A.; Bucior, M; Wydrzyński, D. ; Trzepieciński, T.and Pytel, M. Failure Mechanisms of Refill Friction Stir Spot Welded 7075-T6 Aluminium Alloy Single-Lap Joints. The International Journal of Advanced Manufacturing Technology 2018, 94, 4479–4491. [Google Scholar] [CrossRef]
- Kubit, A.; Trzepiecinski, T.; Bochnowski, W; Drabczyk, M. and Faes, K. Analysis of the Mechanism of Fatigue Failure of the Refill Friction Stir Spot Welded Overlap Joints. Archives of Civil and Mechanical Engineering 2019, 19, 1419–1430. [Google Scholar] [CrossRef]
- Garg, A.; Raturi, M.; Garg, A. and Bhattacharya, A. Microstructure Evolution and Mechanical Properties of Double-Sided Friction Stir Welding between AA6061-T6 and AA7075-T651. CIRP Journal of Manufacturing Science and Technology 2020, 31, 431–438. [Google Scholar] [CrossRef]
- Li, B. and Shen, Y. A Feasibility Research on Friction Stir Welding of a New-Typed Lap–Butt Joint of Dissimilar Al Alloys. Materials & Design 2012, 34, 725–731. [Google Scholar] [CrossRef]
- Ghiasvand, A.; Suksatan, W.; Tomków, J.; Rogalski, G. and Derazkola, H.A. Investigation of the Effects of Tool Positioning Factors on Peak Temperature in Dissimilar Friction Stir Welding of AA6061-T6 and AA7075-T6 Aluminum Alloys. Materials 2022, 15, 702. [Google Scholar] [CrossRef] [PubMed]
- Yi, D.; Onuma, T.; Mironov, S.; Sato, Y. and Kokawa, H. Evaluation of Heat Input during Friction Stir Welding of Aluminium Alloys. Science and Technology of Welding and Joining 2017, 22, 41–46. [Google Scholar] [CrossRef]
- Ishak, M.; Noordin, N. and Shah, L. Parametric Studies on Tensile Strength in Joining AA6061-T6 and AA7075-T6 by Gas Metal Arc Welding Process.; IOP Publishing, 2015; Vol. 100, p. 012042. [CrossRef]
- Meengam, C. and Sillapasa, K. Evaluation of Optimization Parameters of Semi-Solid Metal 6063 Aluminum Alloy from Friction Stir Welding Process Using Factorial Design Analysis. Journal of Manufacturing and Materials Processing 2020, 4, 123. [Google Scholar] [CrossRef]
- Azimzadegan, T. and Serajzadeh, S. An Investigation into Microstructures and Mechanical Properties of AA7075-T6 during Friction Stir Welding at Relatively High Rotational Speeds. Journal of materials engineering and performance 2010, 19, 1256–1263. [Google Scholar] [CrossRef]
- Silva, A.; De Backer, J. and Bolmsjö, G. Temperature Measurements during Friction Stir Welding. The International Journal of Advanced Manufacturing Technology 2017, 88, 2899–2908. [Google Scholar] [CrossRef]
- Robitaille, B.; Provencher, P.R.; St-Georges, L. and Brochu, M. Mechanical Properties of 2024-T3 AlClad Aluminum FSW Lap Joints and Impact of Surface Preparation. International Journal of Fatigue 2021, 143, 105979. [Google Scholar] [CrossRef]
- Nandan, R.; Roy, G.; Lienert, T and Debroy, T. Three-Dimensional Heat and Material Flow during Friction Stir Welding of Mild Steel. Acta materialia 2007, 55, 883–895. [Google Scholar] [CrossRef]
- Verma, S. and Misra, J.P. Effect of Process Parameters on Temperature and Force Distribution during Friction Stir Welding of Armor-Marine Grade Aluminum Alloy. Proceedings of the Institution of Mechanical Engineers, Part B: Journal of Engineering Manufacture2021, 235, 144–154. [CrossRef]
- Nadikudi, B.K.B; Davidson, M.; Akasapu, N.R. and Govindaraju, M. Formability Analysis of Dissimilar Tailor Welded Blanks Welded with Different Tool Pin Profiles. Transactions of Nonferrous Metals Society of China 2015, 25, 1787–1793. [Google Scholar] [CrossRef]
- Dong, P.; Li, H.; Sun, D.; Gong, W. and Liu, J. Effects of Welding Speed on the Microstructure and Hardness in Friction Stir Welding Joints of 6005A-T6 Aluminum Alloy. Materials & Design 2013, 45, 524–531. [Google Scholar] [CrossRef]
- Kumar, A.; Veeresh Nayak, C.; Herbert, M.A. and Rao, S.S. Microstructure and Hardness of Friction Stir Welded Aluminium–Copper Matrix-Based Composite Reinforced with 10 Wt-% SiCp. Materials Research Innovations 2014, 18, S6–84. [Google Scholar] [CrossRef]
- Darzi Naghibi, H.; Shakeri, M and; Hosseinzadeh, M. Neural Network and Genetic Algorithm Based Modeling and Optimization of Tensile Properties in FSW of AA 5052 to AISI 304 Dissimilar Joints. Transactions of the Indian Institute of Metals 2016, 69, 891–900. [Google Scholar] [CrossRef]
- Aydin, H.; Tutar, M.; Durmuş, A.; Bayram, A. and Sayaca, T. Effect of Welding Parameters on Tensile Properties and Fatigue Behavior of Friction Stir Welded 2014-T6 Aluminum Alloy. Transactions of the Indian Institute of Metals 2012, 65, 21–30. [Google Scholar] [CrossRef]
- Cabrini, M.; Bocchi, S.; D’Urso, G.; Giardini, C.; Lorenzi, S.; Testa, C. and Pastore, T. Effect of Load on the Corrosion Behavior of Friction Stir Welded AA 7075-T6 Aluminum Alloy. Materials 2020, 13, 2600. [Google Scholar] [CrossRef] [PubMed]
- Manikandan, P.; Prabhu, T.A.; Manwatkar, S.K.; Rao, G.S.; Murty, S.N.; Sivakumar, D.; Pant, B. and Mohan, M. Tensile and Fracture Properties of Aluminium Alloy AA2219-T87 Friction Stir Weld Joints for Aerospace Applications. Metallurgical and Materials Transactions A 2021, 52, 3759–3776. [Google Scholar] [CrossRef]
- Carlone, P.; Astarita, A.; Rubino, F. and Pasquino, N. Microstructural Aspects in FSW and TIG Welding of Cast ZE41A Magnesium Alloy. Metallurgical and Materials Transactions B 2016, 47, 1340–1346. [Google Scholar] [CrossRef]
- Topic, I.; Höppel, H.W. and Göken, M. Deformation Behaviour of Accumulative Roll Bonded and Friction Stir Welded Aluminium Alloys. Trans Tech Publ 2008, 584, 833–839. [Google Scholar] [CrossRef]
- Sun, Y.; Fujii, H.; Takada, Y.; Tsuji, N.; Nakata, K. and Nogi, K. Effect of Initial Grain Size on the Joint Properties of Friction Stir Welded Aluminum. Materials Science and Engineering: A 2009, 527, 317–321. [Google Scholar] [CrossRef]
- Aliha, M.; Shahheidari, M.; Bisadi, M.; Akbari, M. and Hossain, S. Mechanical and Metallurgical Properties of Dissimilar AA6061-T6 and AA7277-T6 Joint Made by FSW Technique. The International Journal of Advanced Manufacturing Technology 2016, 86, 2551–2565. [Google Scholar] [CrossRef]
|
Disclaimer/Publisher’s Note: The statements, opinions and data contained in all publications are solely those of the individual author(s) and contributor(s) and not of MDPI and/or the editor(s). MDPI and/or the editor(s) disclaim responsibility for any injury to people or property resulting from any ideas, methods, instructions or products referred to in the content. |
© 2024 by the authors. Licensee MDPI, Basel, Switzerland. This article is an open access article distributed under the terms and conditions of the Creative Commons Attribution (CC BY) license (http://creativecommons.org/licenses/by/4.0/).
