1. Introduction
Ceramics are inherently brittle materials. In the absence of R-curve effects, their strength σ
a priori depends on the fracture toughness K
IC and the defect size a (σ = K
IC/√(πa)). Improving the strength of ceramic components is therefore a matter of sophisticated processing (compounding, shaping, sintering, machining) to reduce defect size and material science to develop materials with higher toughness. According to Evans the total toughness is determined by the combination of the intrinsic toughness K
0 and the sum of the toughness increments K
i introduced by different reinforcements effects (K
IC = K
0 + ΣK
i) [
1].
In partially stabilized zirconia materials the dominant reinforcement effect is transformation toughening, a stress-induced martensitic transformation of metastable tetragonal phase to stable monoclinic phase associated with volume expansion and shear [
2]. The phase transformation is triggered at the tip of a crack under tensile stress. As the crack proceeds, the compressive stresses on both sides of the crack resulting from transformation induced volume expansion close the crack and thereby reduce the stress intensity at the crack tip [
3].
In order to retain the metastable tetragonal phase after sintering, stabilizer oxides are added which form solid solutions with zirconia and stabilize the high temperature phase by expanding the lattice (oversize dopants) with cation radius r
c > r (Zr
4+) and/or by introduction of oxygen vacancies (aliovalent cations such as Y
3+ or other trivalent rare earth cations) [
4,
5]. The second prerequisite to retain the tetragonal phase metastable is a sufficiently fast cooling after sintering.
Depending on the type and amount of stabilizer oxide the partially stabilized zirconia materials (either entirely tetragonal as TZP = tetragonal zirconia polycrystals or as tetragonal precipitates in a cubic matrix PSZ = partially stabilized zirconia) show different features concerning strength and toughness. Yttria stabilized zirconia, which is frequently applied in mechanical engineering and biomedical, is typically stabilized with 3 mol-% Y
2O
3 (3Y-TZP) and has high strength of > 1000 MPa but moderate toughness of ~5 MPa√m [
6]. Ceria stabilized zirconia (with ~12 mol-% CeO
2 = 12 Ce-TZP) has high toughness but only moderate strength [
7]. The stabilizer cations also effect the transformation behavior of the TZP material. In Ce-TZP the large tetravalent ceria cations expand the zirconia lattice (which leads to a minor lattice distortion) but do not introduce oxygen vacancies. Ce-TZP therefore tends to transform in a cooperative (autocatalytic) manner, as due to the high symmetry of the lattice, the monoclinic lamella can easily trigger the transformation of adjacent grains [
8]. Stress strain curves of tough Ce-TZP materials show characteristics analogous to work-hardening in metals. The autocatalytic or burst transformation is interrupted when the remaining tetragonal domains are locally separated by transformed material or a second phase, i.e. when the transformation is exhausted [
9,
10]. Ce-TZP materials are typically very tough, but autocatalytic transformation is not very efficient [
11]. It is noteworthy that in Ce-TZP there is significant transformation before the crack tip and not only in the wake of the crack. Such materials show R-curve or transformation dominated failure, i.e. the material transforms prior to crack growth.
In yttria stabilized zirconia, the trivalent dopants introduce oxygen vacancies for charge neutrality, reduce the coordination number of zirconium cations and thereby distort the zirconia lattice significantly [
8]; additionally there is a moderate contribution by lattice expansion. The symmetry reduction leads to a more localized transformation behavior. Individual grains with the right size and orientation to the applied stress transform. The transformation is predominantly dilational; burst transformation is not observed. This leads to materials with moderate toughness but a very steep R-curve [
12]. The plateau toughness is reached after a few micrometers crack length. This behavior makes Y-TZP materials attractive for small and mechanically highly loaded components.
According to McMeeking and Evans (equation 1) [
13], the two important parameters which govern the transformation toughness ΔK
ICT are the transformability V
f and the size of the transformation zone h. All other parameters such as υ = Poisson’s ratio, E = Young’s modulus and ε
T = transformation strain are material constants. The parameter X describes the transformation characteristics, X = 0.22 for purely dilational transformation and 0.48 for dilation and shear. Y-TZP has a predominantly dilational transformation characteristics (X = 0.27) [
12].
The transformability of a tetragonal grain depends on its size, its stabilizer content and the constraint of the surrounding matrix [
14]. In order to increase the toughness of Y-TZP, either larger grain sizes are produced by increasing the firing temperature or the stabilizer content is reduced [
15,
16]. Thus, for a given stabilizer content a critical grain size exists above which spontaneous transformation during cooling is observed. The lower the stabilizer content the smaller the critical grain size [
17]. Thermodynamically, reduction of stabilizer content has another implication, the t/t+c phase boundary at typical sintering temperatures of ~1400°C is located at 2.5 mol-% Y
2O
3 [
18]. Materials made from coprecipitated Y-TZP powders with yttria contents above this limit are supersaturated with yttria. Complete segregation of cubic phase, however, requires high sintering temperature and prolonged sintering [
19]. Materials with yttria contents lower than 2.5 mol-% are entirely tetragonal. Yttria segregation to grain boundaries is less pronounced than in 3Y-TZP. Hence, their grain growth is not retarded to the same extent. Moreover, such materials are potentially more prone to low temperature degradation (LTD) due to their low yttria content and the moderate segregation of the stabilizer to the grain boundaries. Low-yttria Y-TZP materials therefore typically require very fine grain starting powders with excellent sinterability to obtain fully dense and fine grain sintered Y-TZP.
Y-TZP materials from powders with less than 2 mol-% yttria are well documented in scientific literature. Toughness values achieved in these lab-scale studies were considerable [
20,
21]. However, until recently few reproducible and processible ultrafine powders were available. The practical application of extremely understabilized Y-TZP was probably considered too dangerous with respect to spontaneous phase transformation and component failure. Today, fine grain Y-TZP powders with yttria contents between 1.5–2 mol-% are available from different manufacturers in reproducible quality and are provided not only as plain powders but also as ready-to-press (RTP) granulate formulations. Concerning the Tosoh ZGAIA 1.5YHT RTP powder used in this study, a first publication by Matsui [
22] gave information about the suitable sintering temperature range (≤ 1400 °C/1 h), indicated a homogeneous stabilizer distribution, reported an extremely high toughness (> 20 MPa√m, measured by indentation) and high bending strength of 1300 MPa (3pt bending). With respect to the experimental database of strength toughness correlations compiled by Swain [
12], this extreme toughness combined with a high strength was questionable. In another study on the same material, Imariouane [
23] confirmed high strength and a lower but still very considerable toughness of 8.5 MPa√m (SEVNB method), which is within the theoretically accepted limits. They showed transformation bands indicating transformation induced failure, yet no non-linearity in the stress-strain curves. Susceptibility towards LTD seems moderate. In a second paper the sensitivity to sintering conditions was highlighted, slow cooling leads to LTD in presence of ambient moisture and does not require presence of hot water or steam [
24]. A summary of strength and toughness of various 1.5-2Y-TZP materials using different measurement protocols is given in [
25].
In the present paper we attempt to understand more about the transformation behavior and failure characteristics of 1.5Y-TZP and clarify why direct crack length measurements lead to drastically overestimated toughness values. Finally, we tried to elaborate a reliable indentation based protocol to measure fracture toughness for fine grained and transformable TZP.
2. Materials and Methods
The powder used in this study was spray granulated ready-to-press (RTP) powder provided by the manufacturer (ZGAIA 1.5HT, Tosoh, Tokio, Japan). According to the data sheet, the powder is stabilized with 1.5 mol-% Y
2O
3, 0.3 vol% of alumina is added as a sintering aid. The powder is the same as in [
22,
23].
Quadratic plates of 35 x 35 mm² size and 2.5 mm thickness were pressed using a manually operated uniaxial hydraulic press (Paul Weber, Remshalden, Germany). The stainless steel die has rounded corners and double sided punches. The applied load was 150 kN corresponding to 125 MPa pressure. 9 g of RTP powder was weighed for each sample and 16 plates were manufactured with identical pressing parameters.
The plates were subsequently de-bindered in air (60 °C/h to 600 °C, 3 h dwell, free cooling). Four plates per sintering temperature were then sintered in a dental furnace at 1250 °C, 1300 °C, 1350 °C and 1400 °C (MIHM-Vogt HT speed, Stutensee, Germany). Heating was performed with 2 °C/min to 1200 °C and then with 1 °C/min to final sintering temperature, the dwell was 2 h, then the samples were cooled with the maximum cooling speed possible.
The sintered plates were then manually beveled with a 40 µm diamond disk and glued on sample holders. Machining included automatic lapping with 15 µm diamond suspension (Struers Rotopol, Copenhagen, Denmark) on both sides. One side was polished for 30 min each using 15 µm, 6 µm, 3 µm and 1 µm diamond suspension to obtain a mirror-like surface. After machining the thickness of the plates was 2 ± 0.1 mm.
The plates were cut into bending bars of 4 mm width using a diamond wheel (Struers Accutom, Copenhagen, Denmark). The as-cut bars were lapped on the sides to remove the cutting grooves and beveled at the edges.
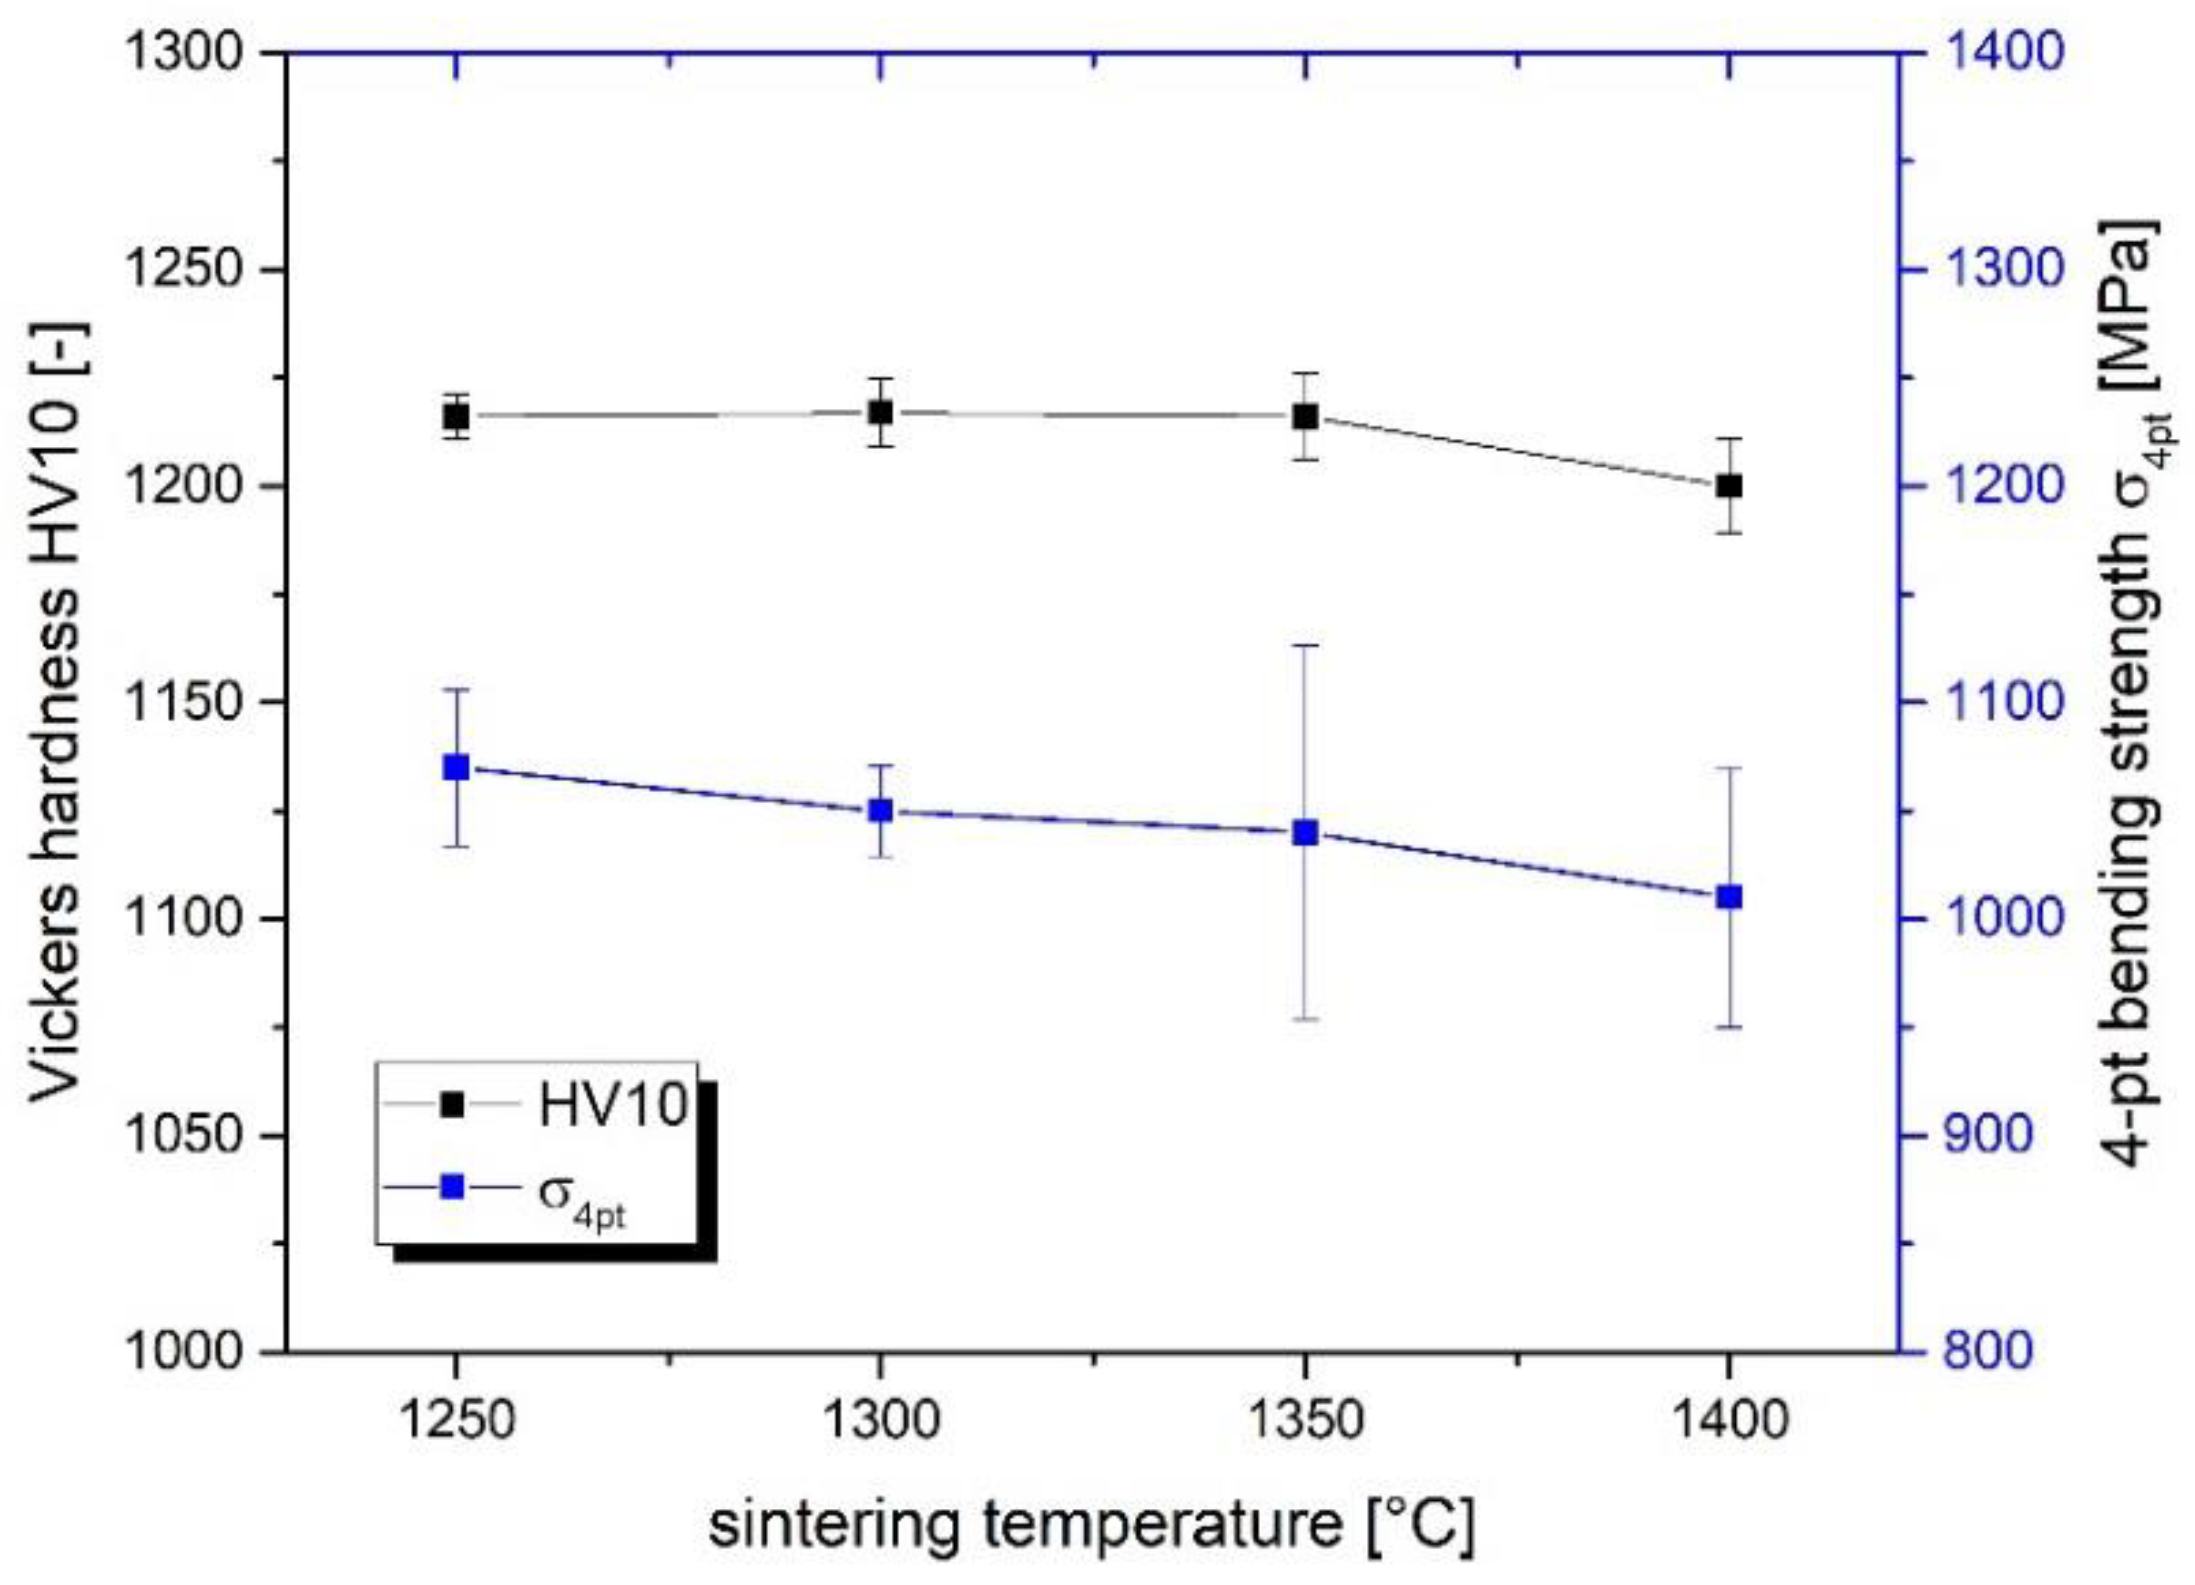
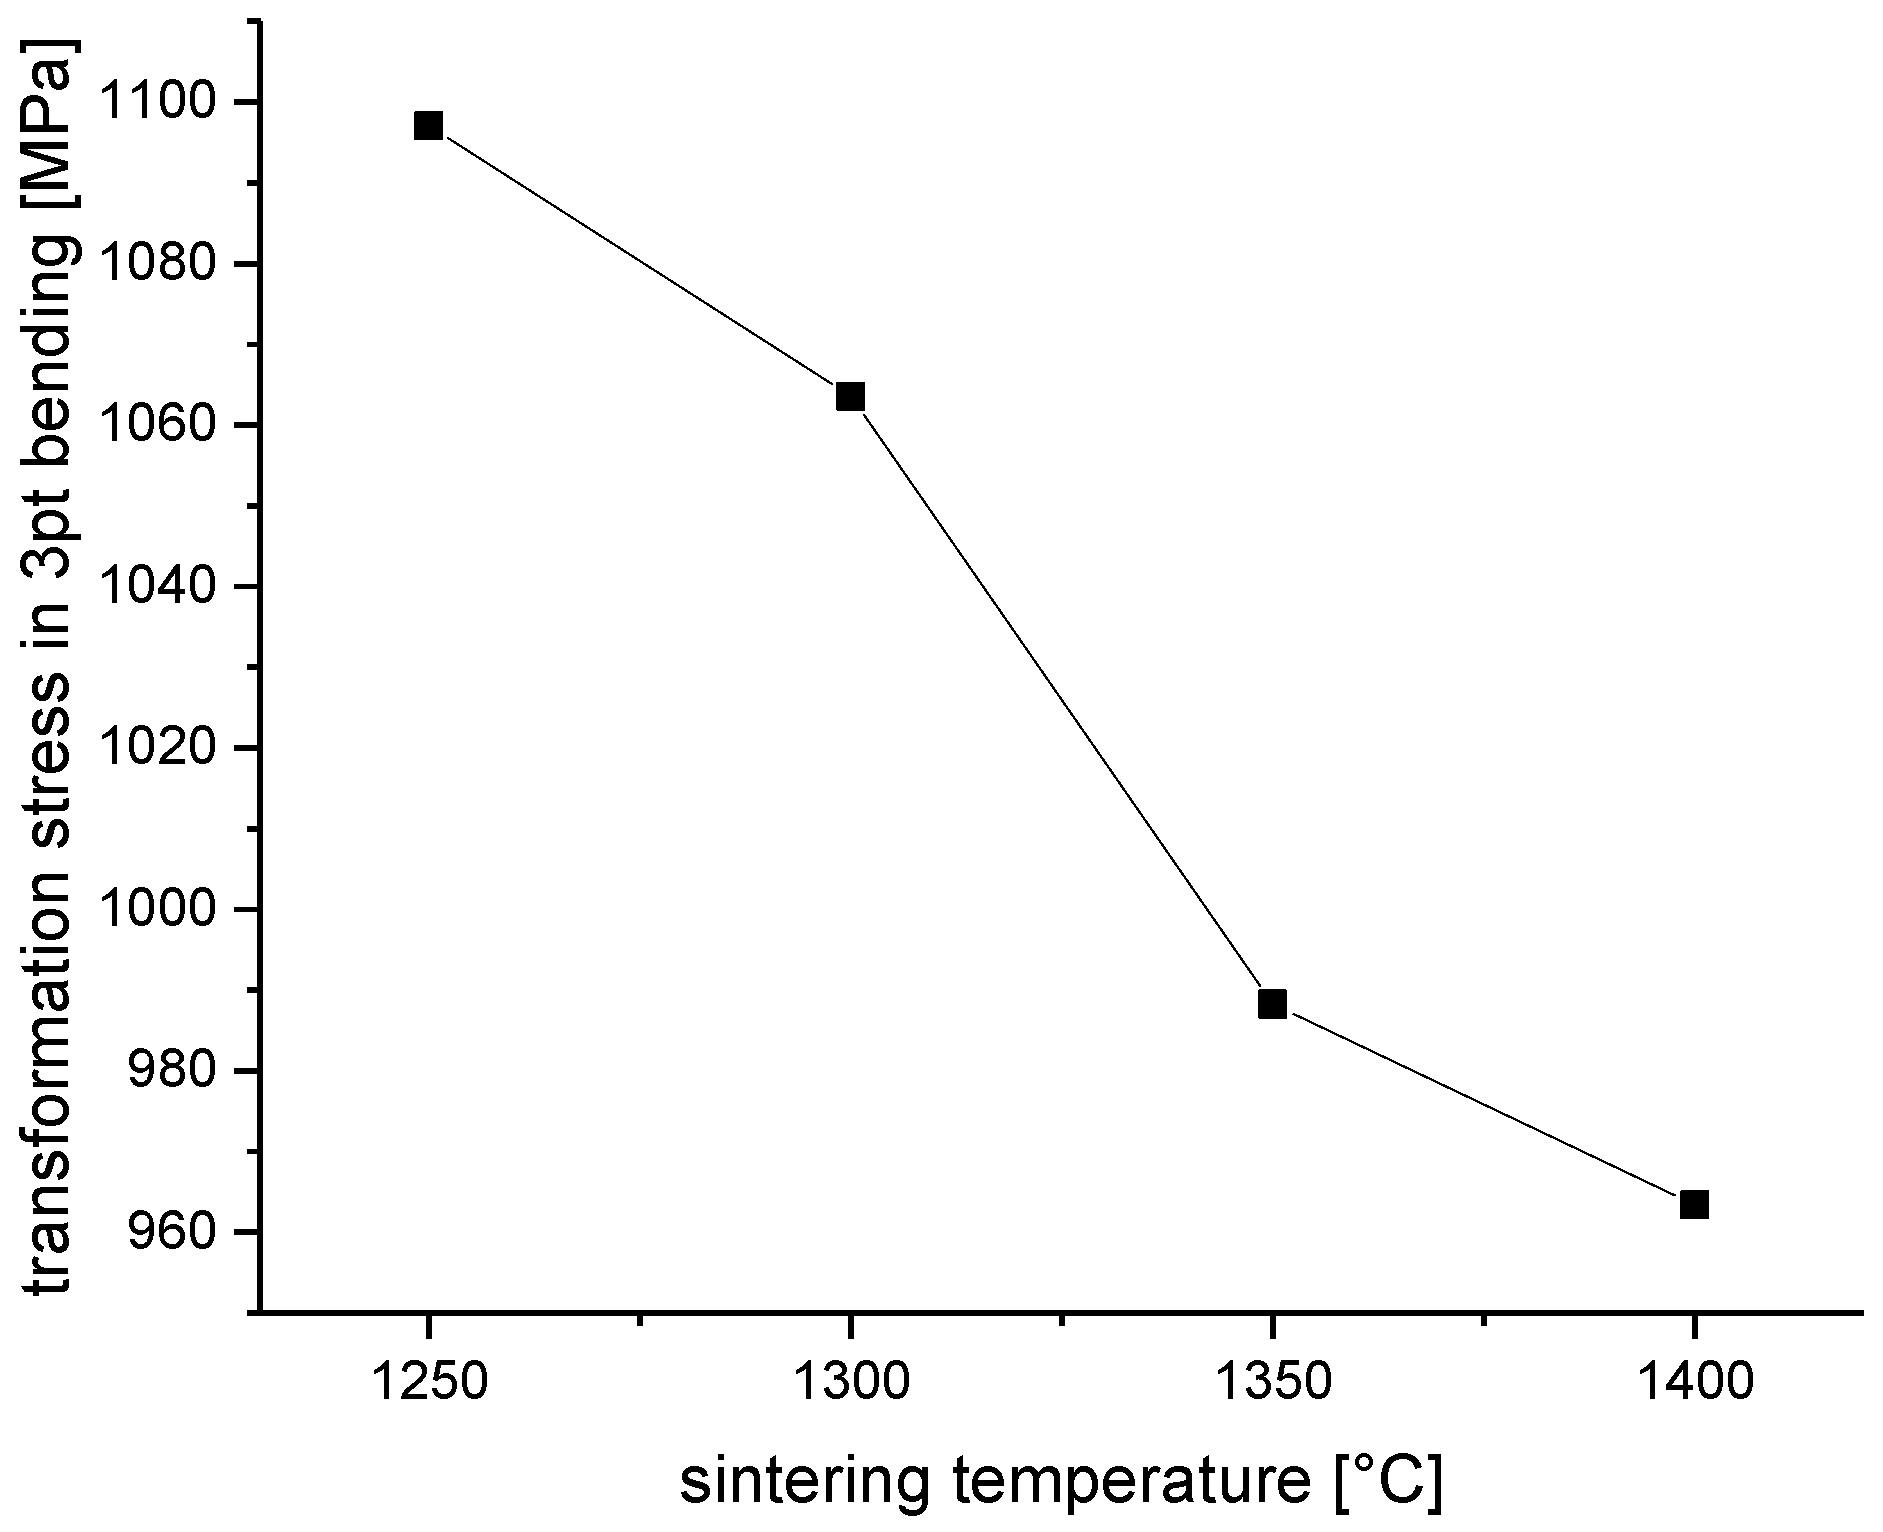
Mechanical testing included Vickers hardness measurements (five HV10 indents per sample, 98.1 N, Bareiss, Oberdischingen, Germany), the Young’s modulus was assumed to be 210 GPa, which is the typical values for fully dense Y-TZP. Bending strength was performed in a 4-pt setup with 20 mm outer and 10 mm inner span, the crosshead speed was set to 0.5 mm/min (Zwick, Ulm, Germany, 10 samples). Up to three bars were tested in a 3pt setup to eventually create transformation bands which allow to determine transformation stress. The transformation stress σ
T can be calculated from the distance of the first transformation bands d divided by the span length l and the failure stress (σ
T = σ
F ∙ d/l) [
26].
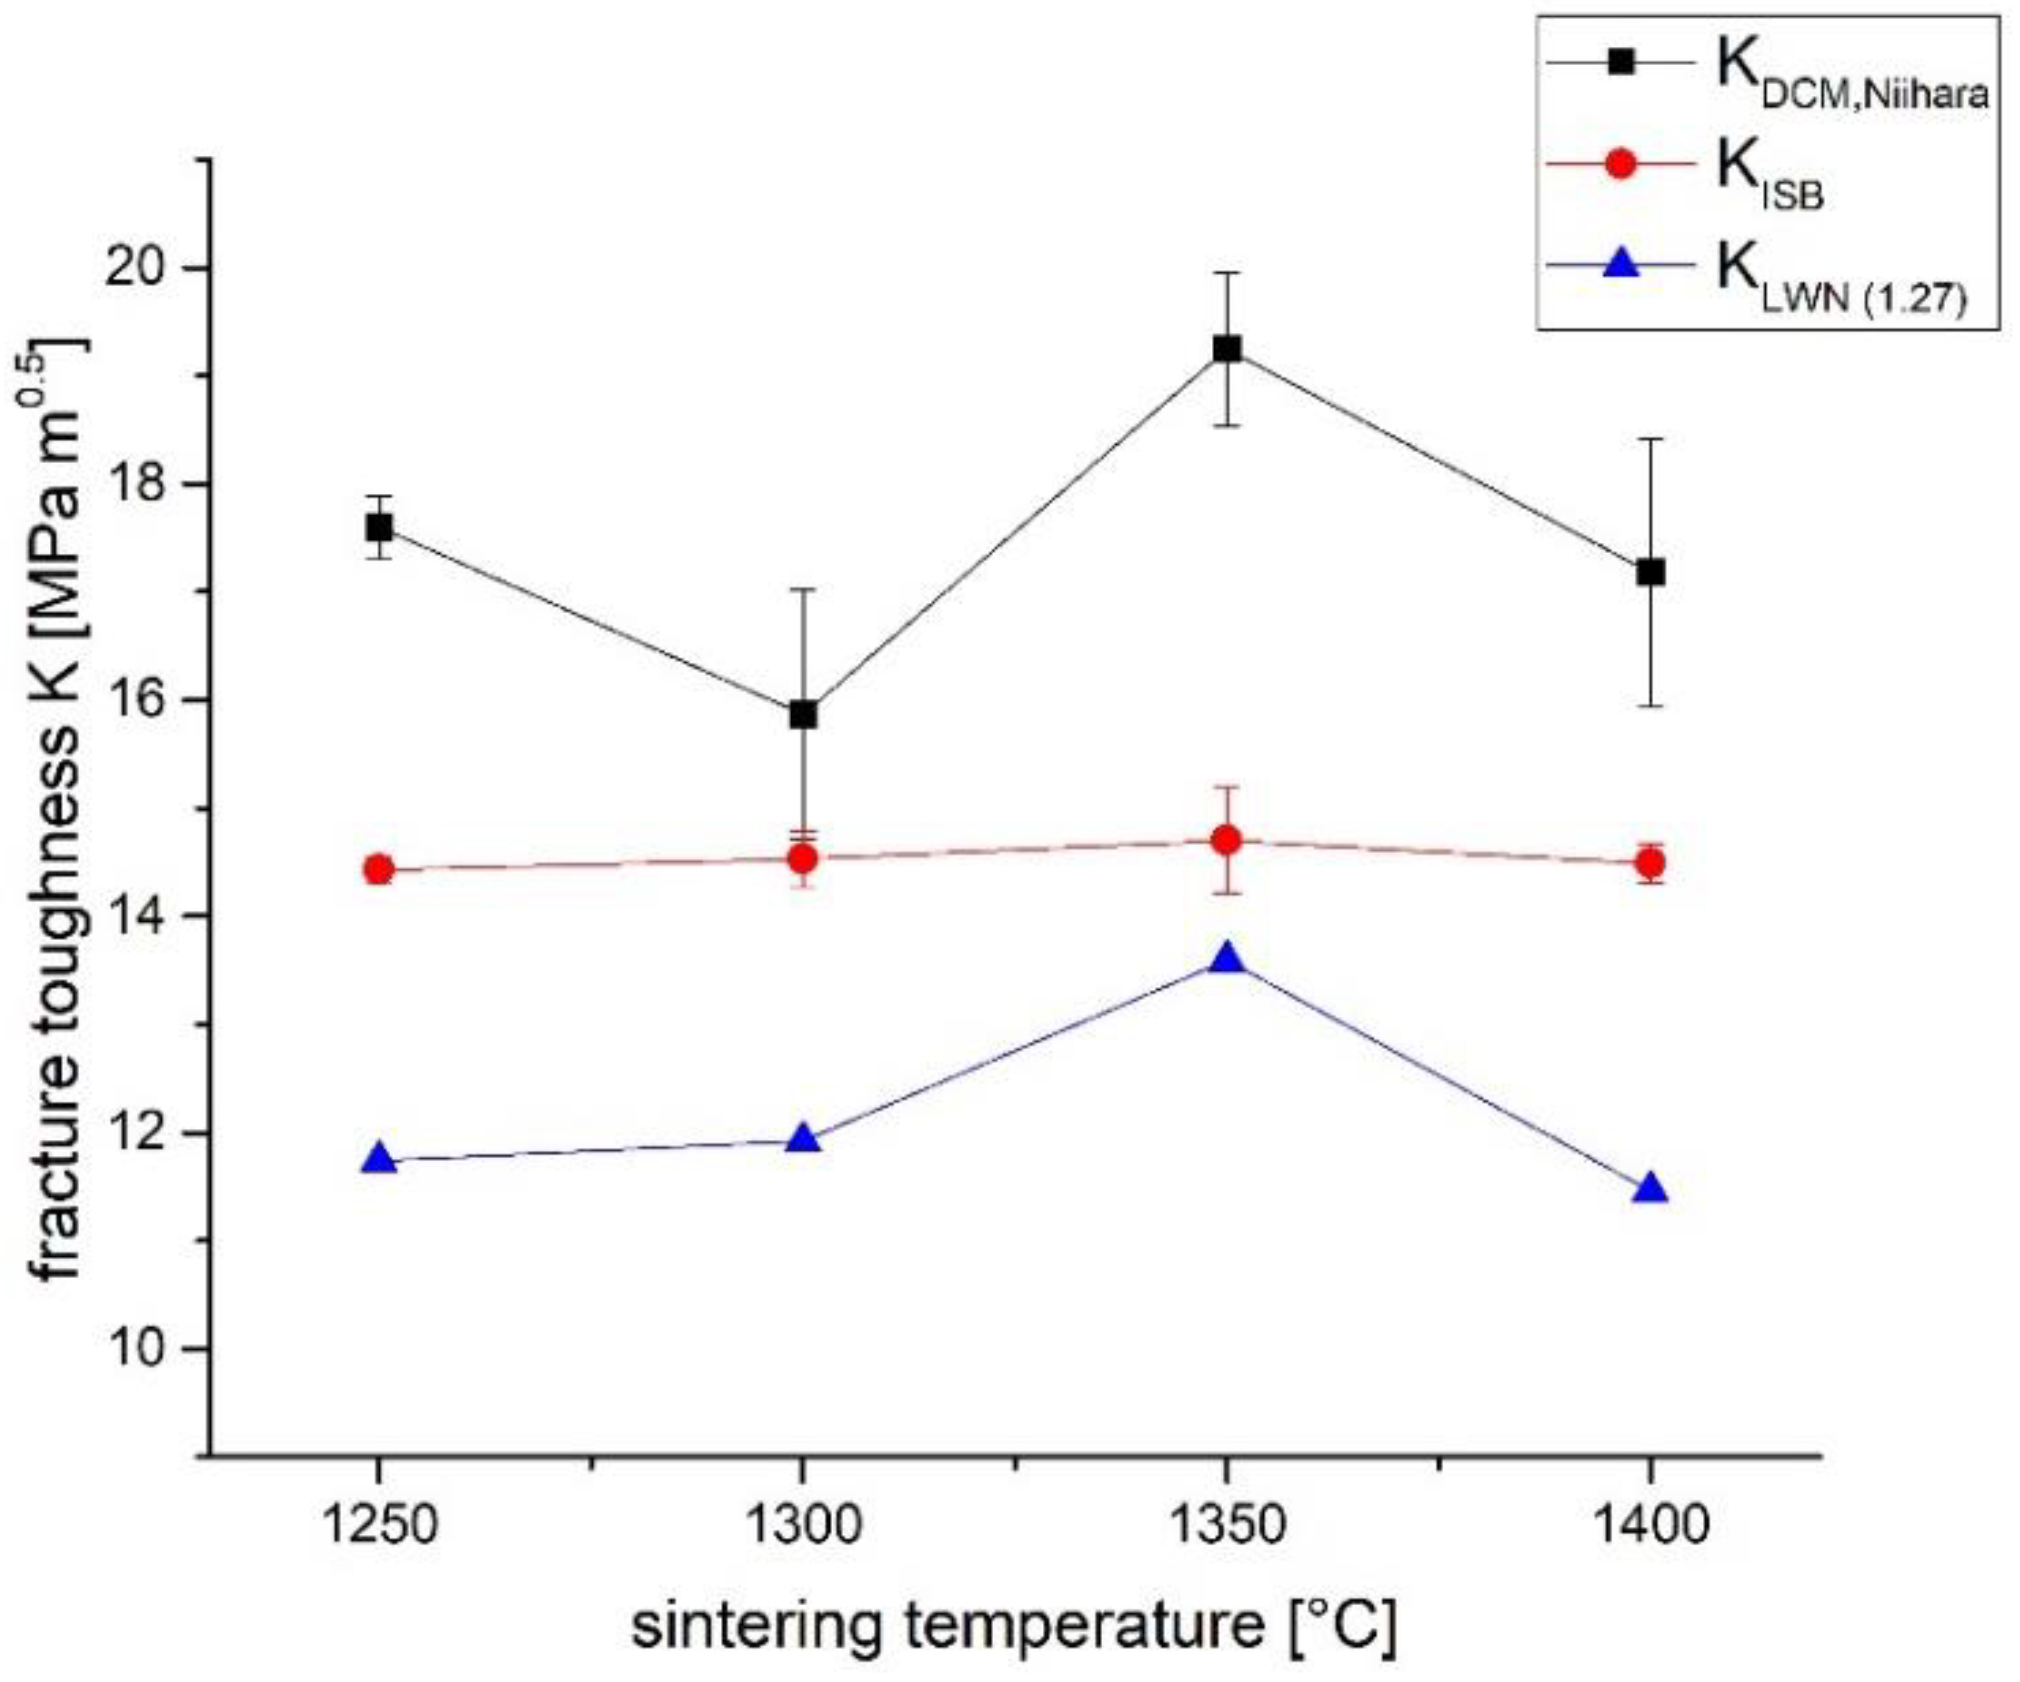
As data on fracture toughness of this material are controversial in literature, various toughness measurement protocols were applied. Indentation toughness measurements with direct crack length measurement K
DCM were performed to reproduce Matsui’s measurements [
22]. On the leftover pieces of sample cutting as many indents (typically ~20 per sample) were placed to collect 20 valid wing crack length values (due to crack trapping in the transformation zone around the indents most HV10 indents only produce 1-2 wing cracks, fully valid crack patterns were rare). The indentation toughness K
DCM was then calculated using the formula of Niihara et. al assuming Palmqvist type cracks [
27].
Four bars were notched with four indents each on the polished tensile side for toughness measurements by indentation strength in bending (K
ISB). The cracks were placed at a distance of 2 mm so that they all fit within the inner span of the above mentioned 4pt setup. Cracks of the indents were oriented parallel and perpendicular to the sample sides. Four indents were placed to compensate the poor yield of valid indents. The residual strength was tested immediately after notching in the same 4pt setup at a fast crosshead speed of 2.5 mm/min to avoid subcritical crack growth effects. The calculation of K
ISB was carried out according to Chantikul [
28].
Moreover, this dummy indentation method (only one indent leads to fracture) offers the opportunity to calculate the fracture resistance K
LWN from the extension of the cracks of the longest surviving cracks. This was carried out by the procedure described by Dransmann [
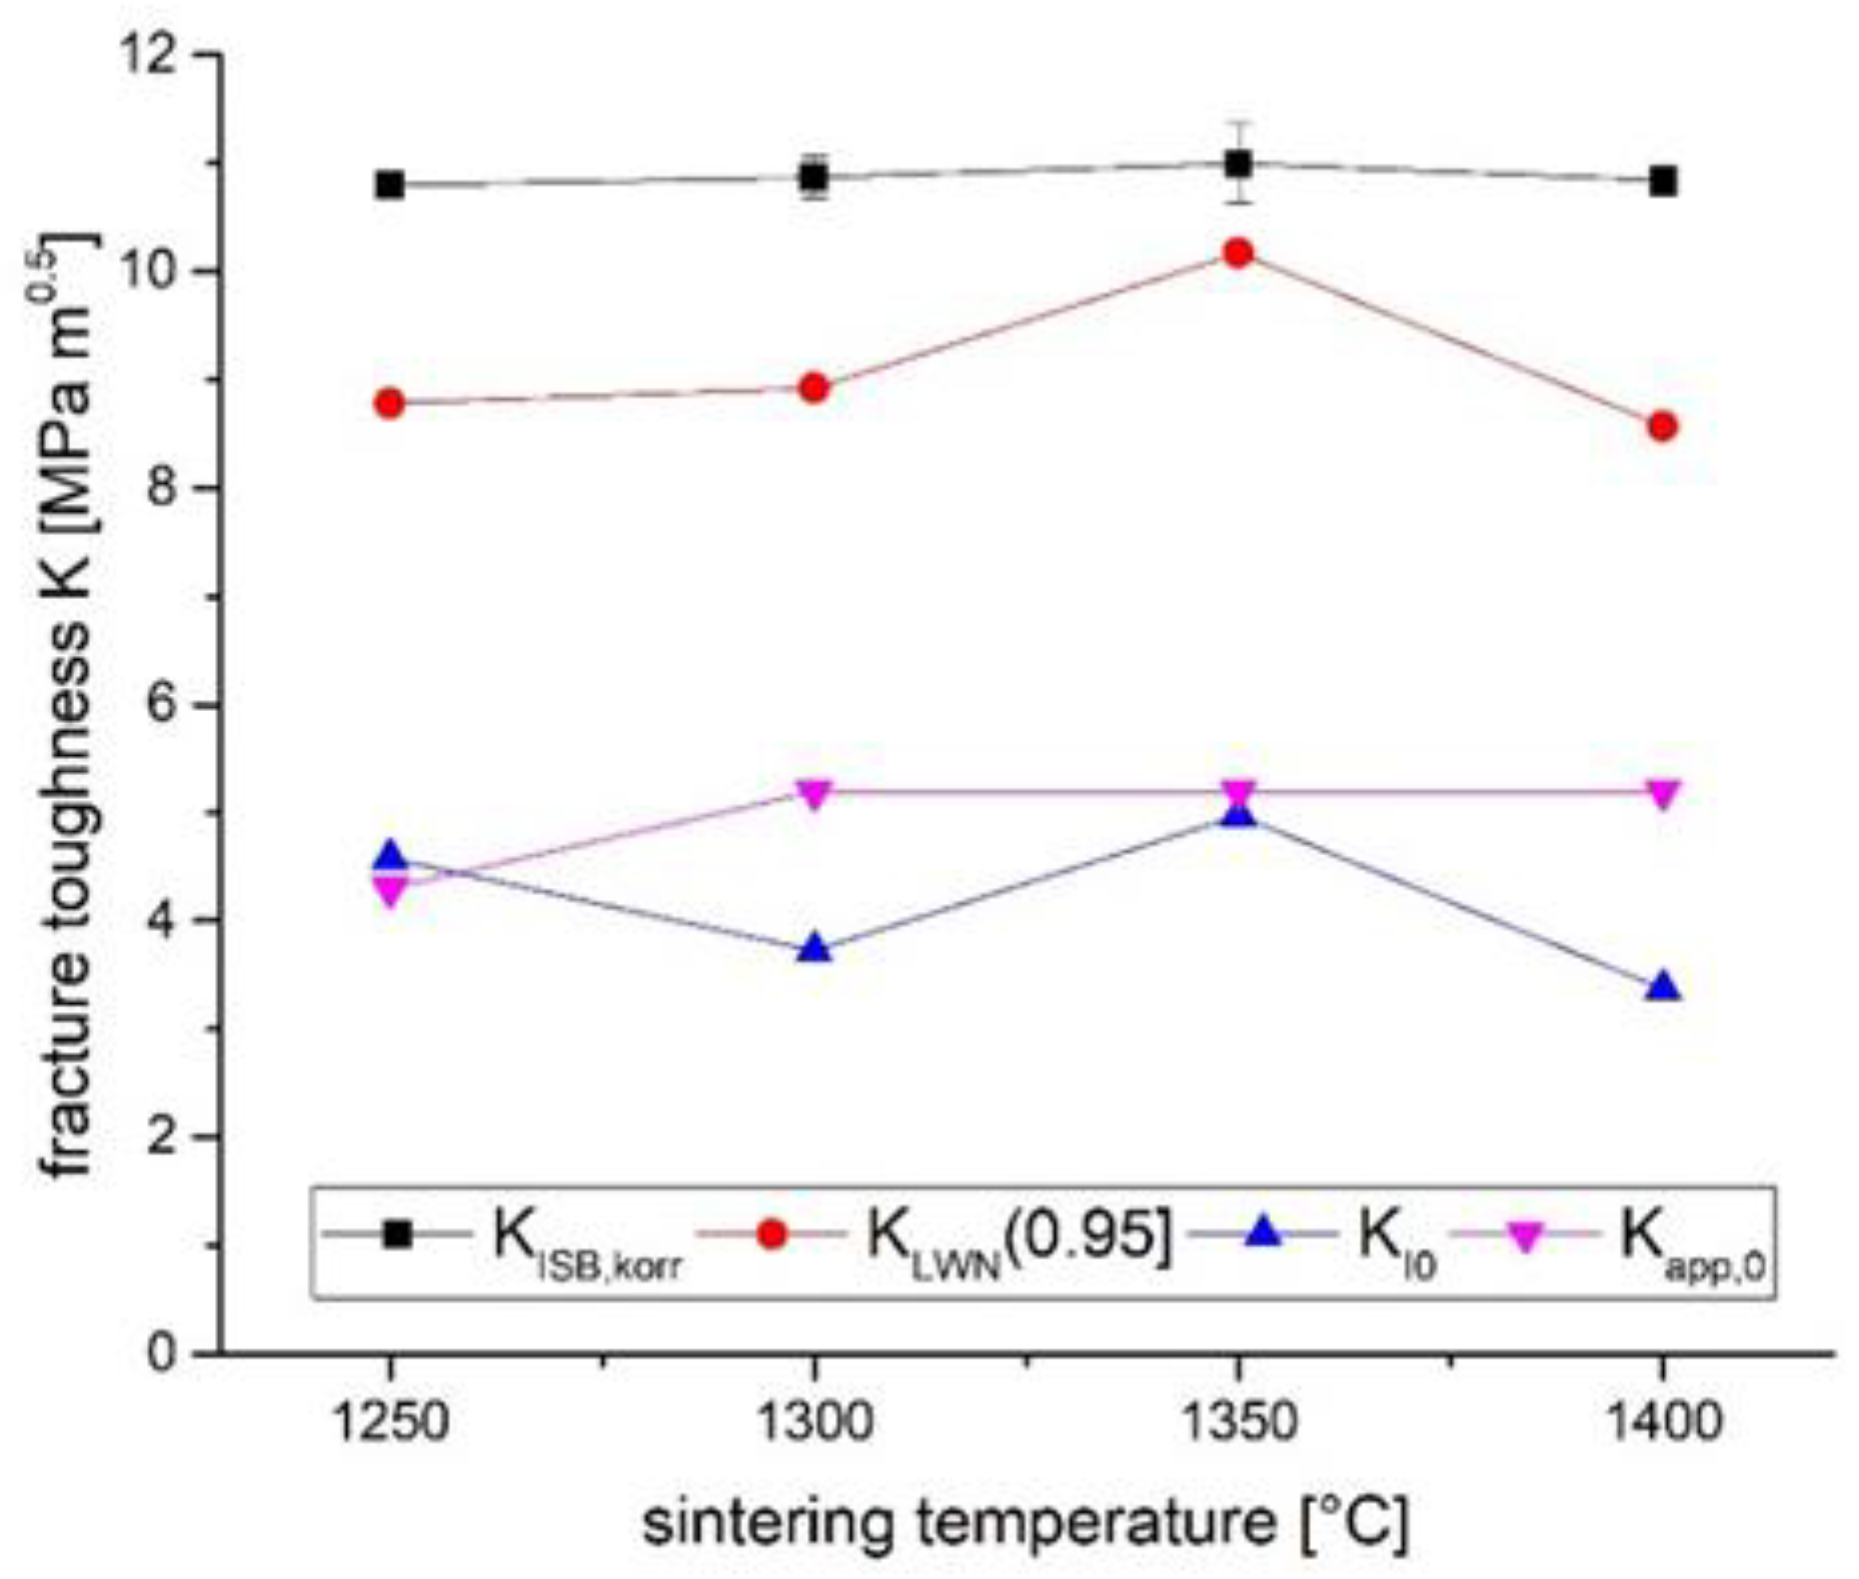
29] assuming a crack geometry factor of ψ = 0.95 (This value was chosen after inspecting some fractured bars). Palmqvist cracks are flatter than halfpenny cracks with a geometry factor of ψ = 1.27 for which the method was originally designed by Braun and Lawn [
30]. The same crack shape correction was also applied to the ISB test.
Finally, the stable indentation crack growth in bending (SIGB) test was carried out with HV10 indents placed at elevated temperature. It is known that the transformability is temperature dependent. Tsai found a complete elimination of transformation in Ce-TZP at 400 °C [
11]. The idea was to produce valid indentations with wing cracks exceeding the size of the transformation zone and thereby eliminate crack trapping effects [
31]. With respect to the thermal vulnerability of the 1.5Y-TZP material [
24] preliminary tests were carried out to identify the correct temperature to reliably induce cracks without damaging the material too much. A heating plate (IKA-Werke, Staufen, Germany) was set to 200 °C and the samples were pre-heated on a zirconia support plate for 15 min. Then the sample was transferred to the indenter device together with the support plate (to prevent too fast cooling) and the four HV10 indents were placed immediately as described above. Temperatures > 200 °C lead to spontaneous transformation. The SIGB test was carried out with an initial bending stress of 400 MPa. Then the stress was increased in 100 MPa increments until sample failure. The crack length was measured after each loading step with the microscope of the hardness machine. The crosshead speed was set to 5 mm/min to avoid subcritical crack growth in the same 4pt test setup.
For evaluation of the SIGB test results, it is assumed that the indenter causes a certain stress intensity which leads to crack opening. After lifting the indenter, a residual (negative!) stress intensity K
res is stored in the sample. The indentation cracks are exposed to a total stress intensity K
tot which combines K
res and the applied stress intensity K
app (equation 2).
With: P the indentation load, χ the residual stress coefficient, ψ is a geometry factor (e.g. 1.27 for a halfpenny crack), σ the bending stress and c the surface crack length. The onset of crack growth by applied bending stress requires that the applied stress intensity K
app > K
app,0 = - K
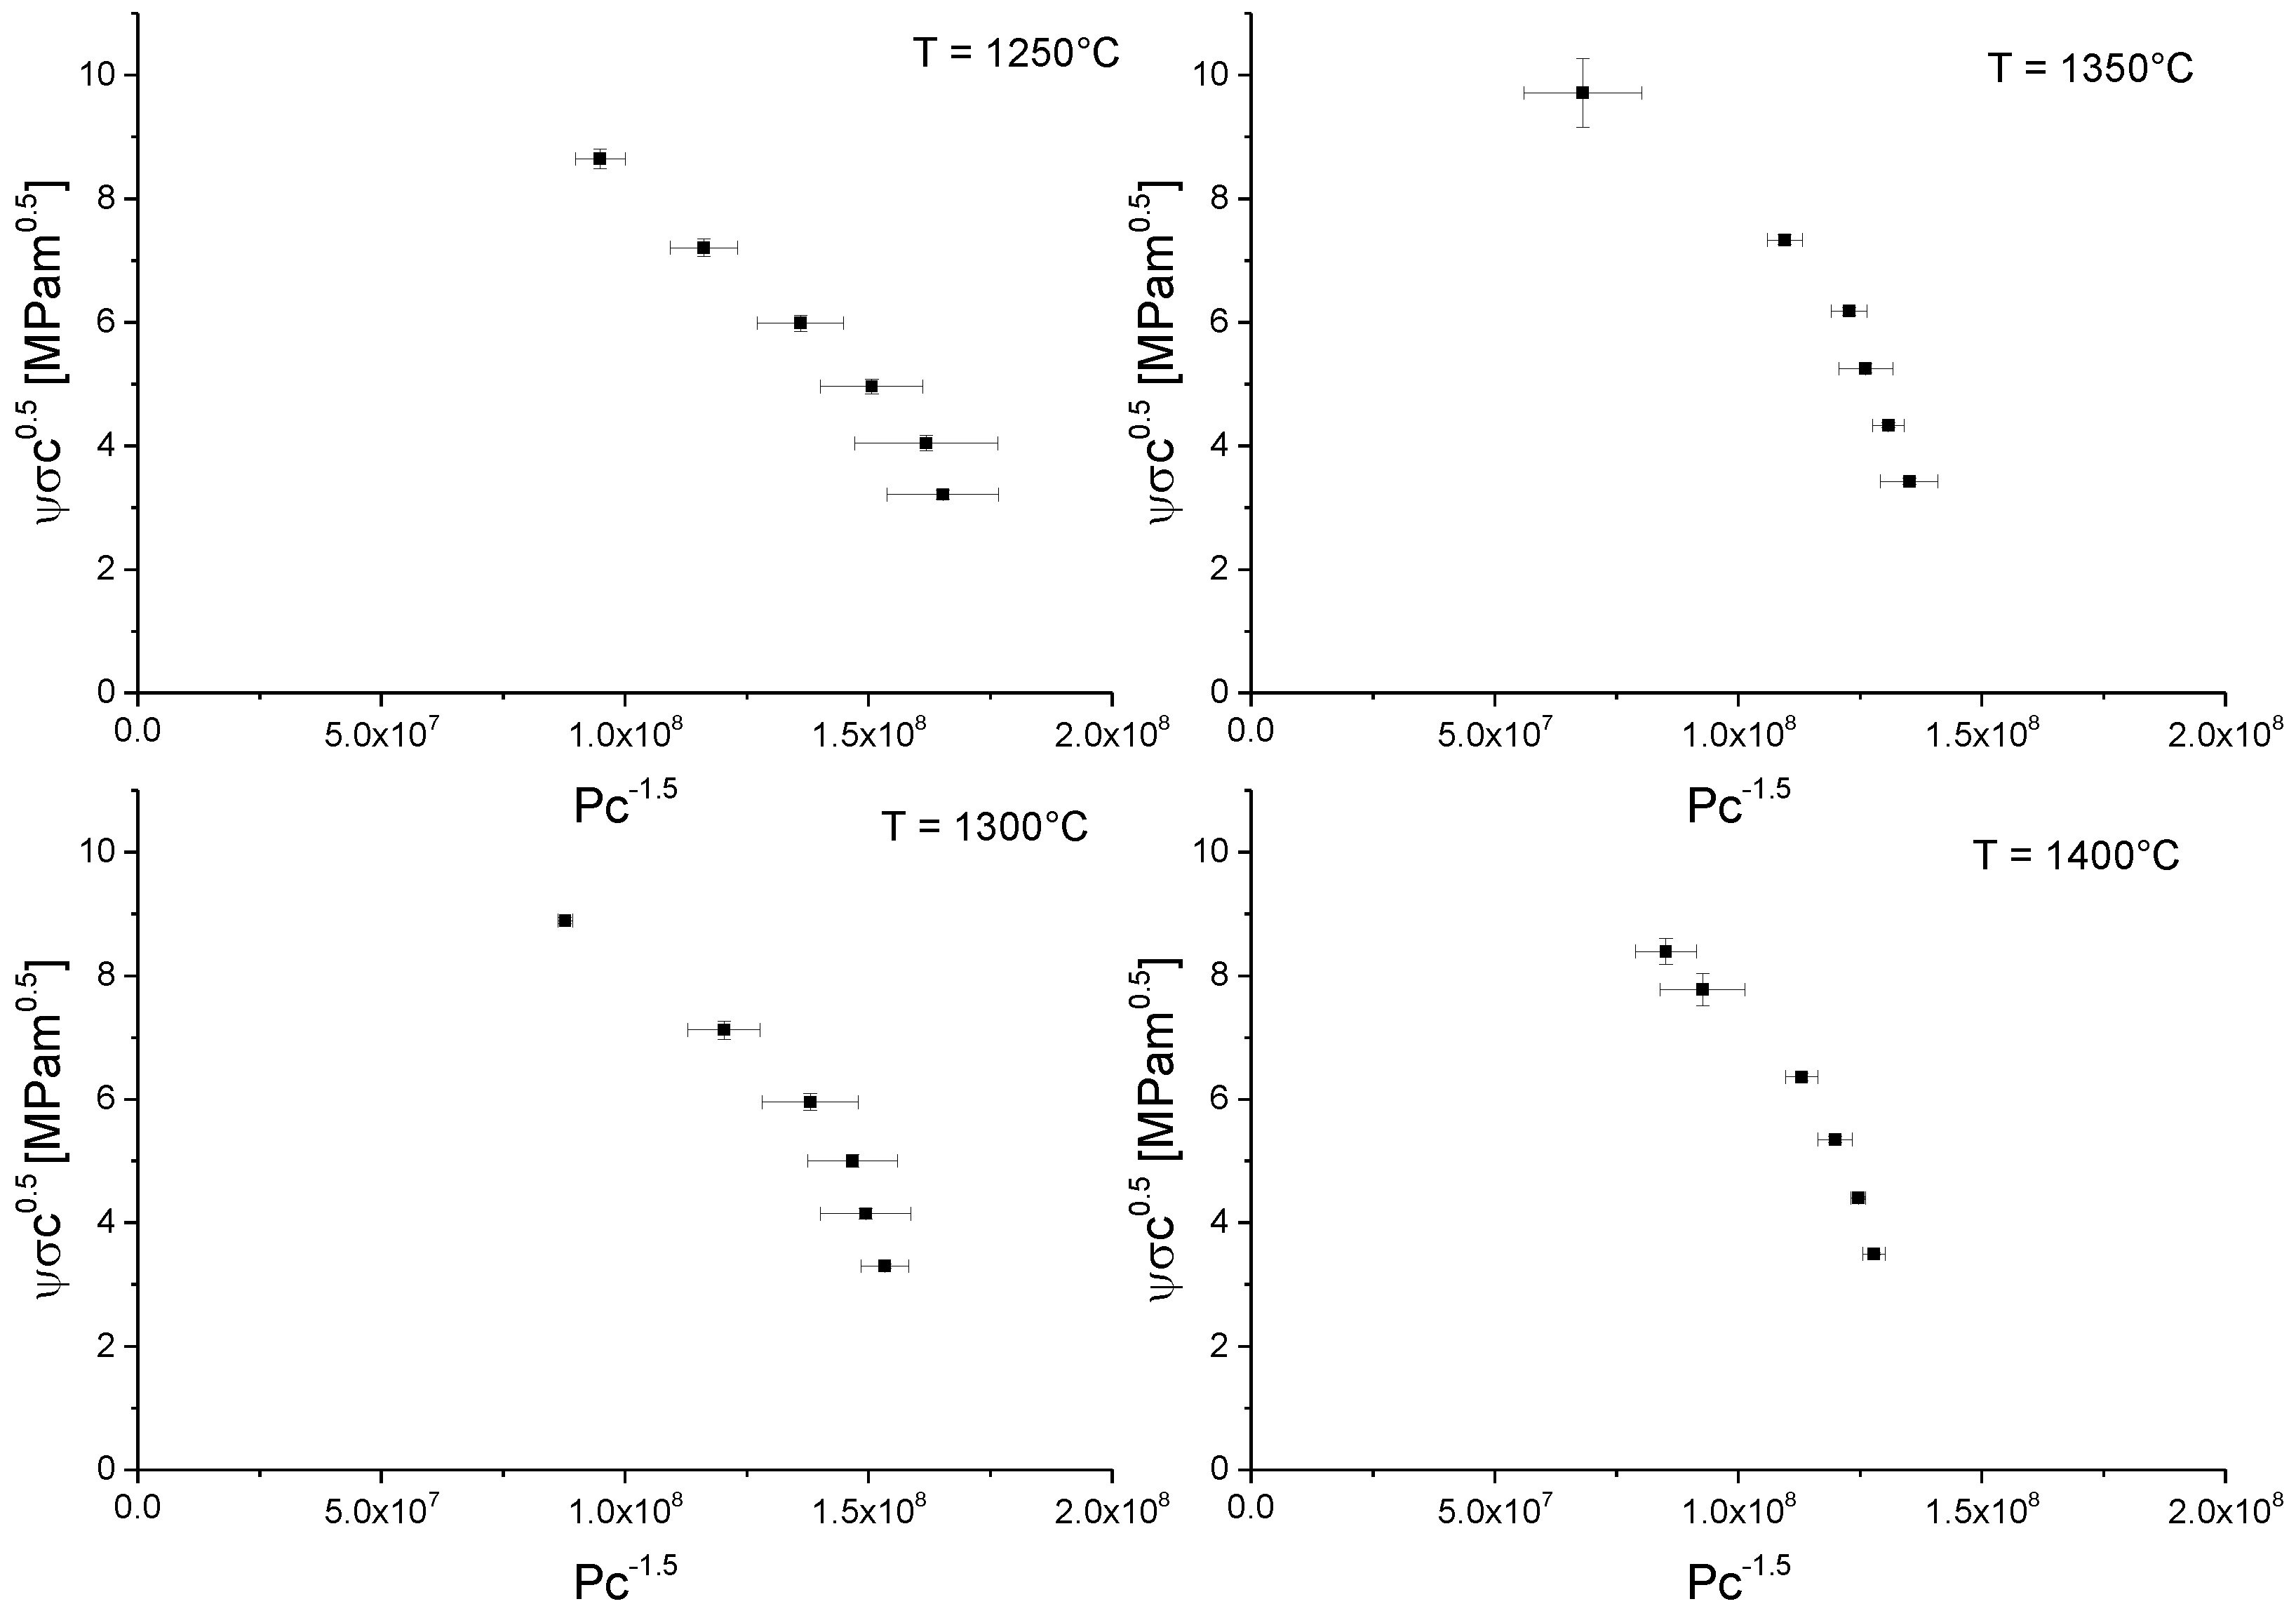
res. With increasing applied stress intensity the crack grows until the sample finally fails. For quantitative evaluation ψ∙σ∙√c is plotted versus P∙c
-1.5. In the resulting plot ψ∙σ∙√c rises at constant crack length until K
app > K
app,0. Then at higher stress intensity the crack starts to grow and the curve rises with a slope χ. In the plot the Y-axis intercept represents the fracture toughness K
IC (at infinite crack length) while the kink in the curve represents K
app,0. K
app,0 is the R-curve dependent part of the toughness and K
I0 = K
IC-K
app,0 is the threshold toughness, also called the resistance to subcritical crack growth [
29]. With respect to the flat crack profiles a geometry factor of ψ = 0.95 was chosen for the evaluation of the plot. Hence, toughness values with crack shape correction are approximately 25 % lower compared to the values assuming semicircular cracks (ψ = 1.27).
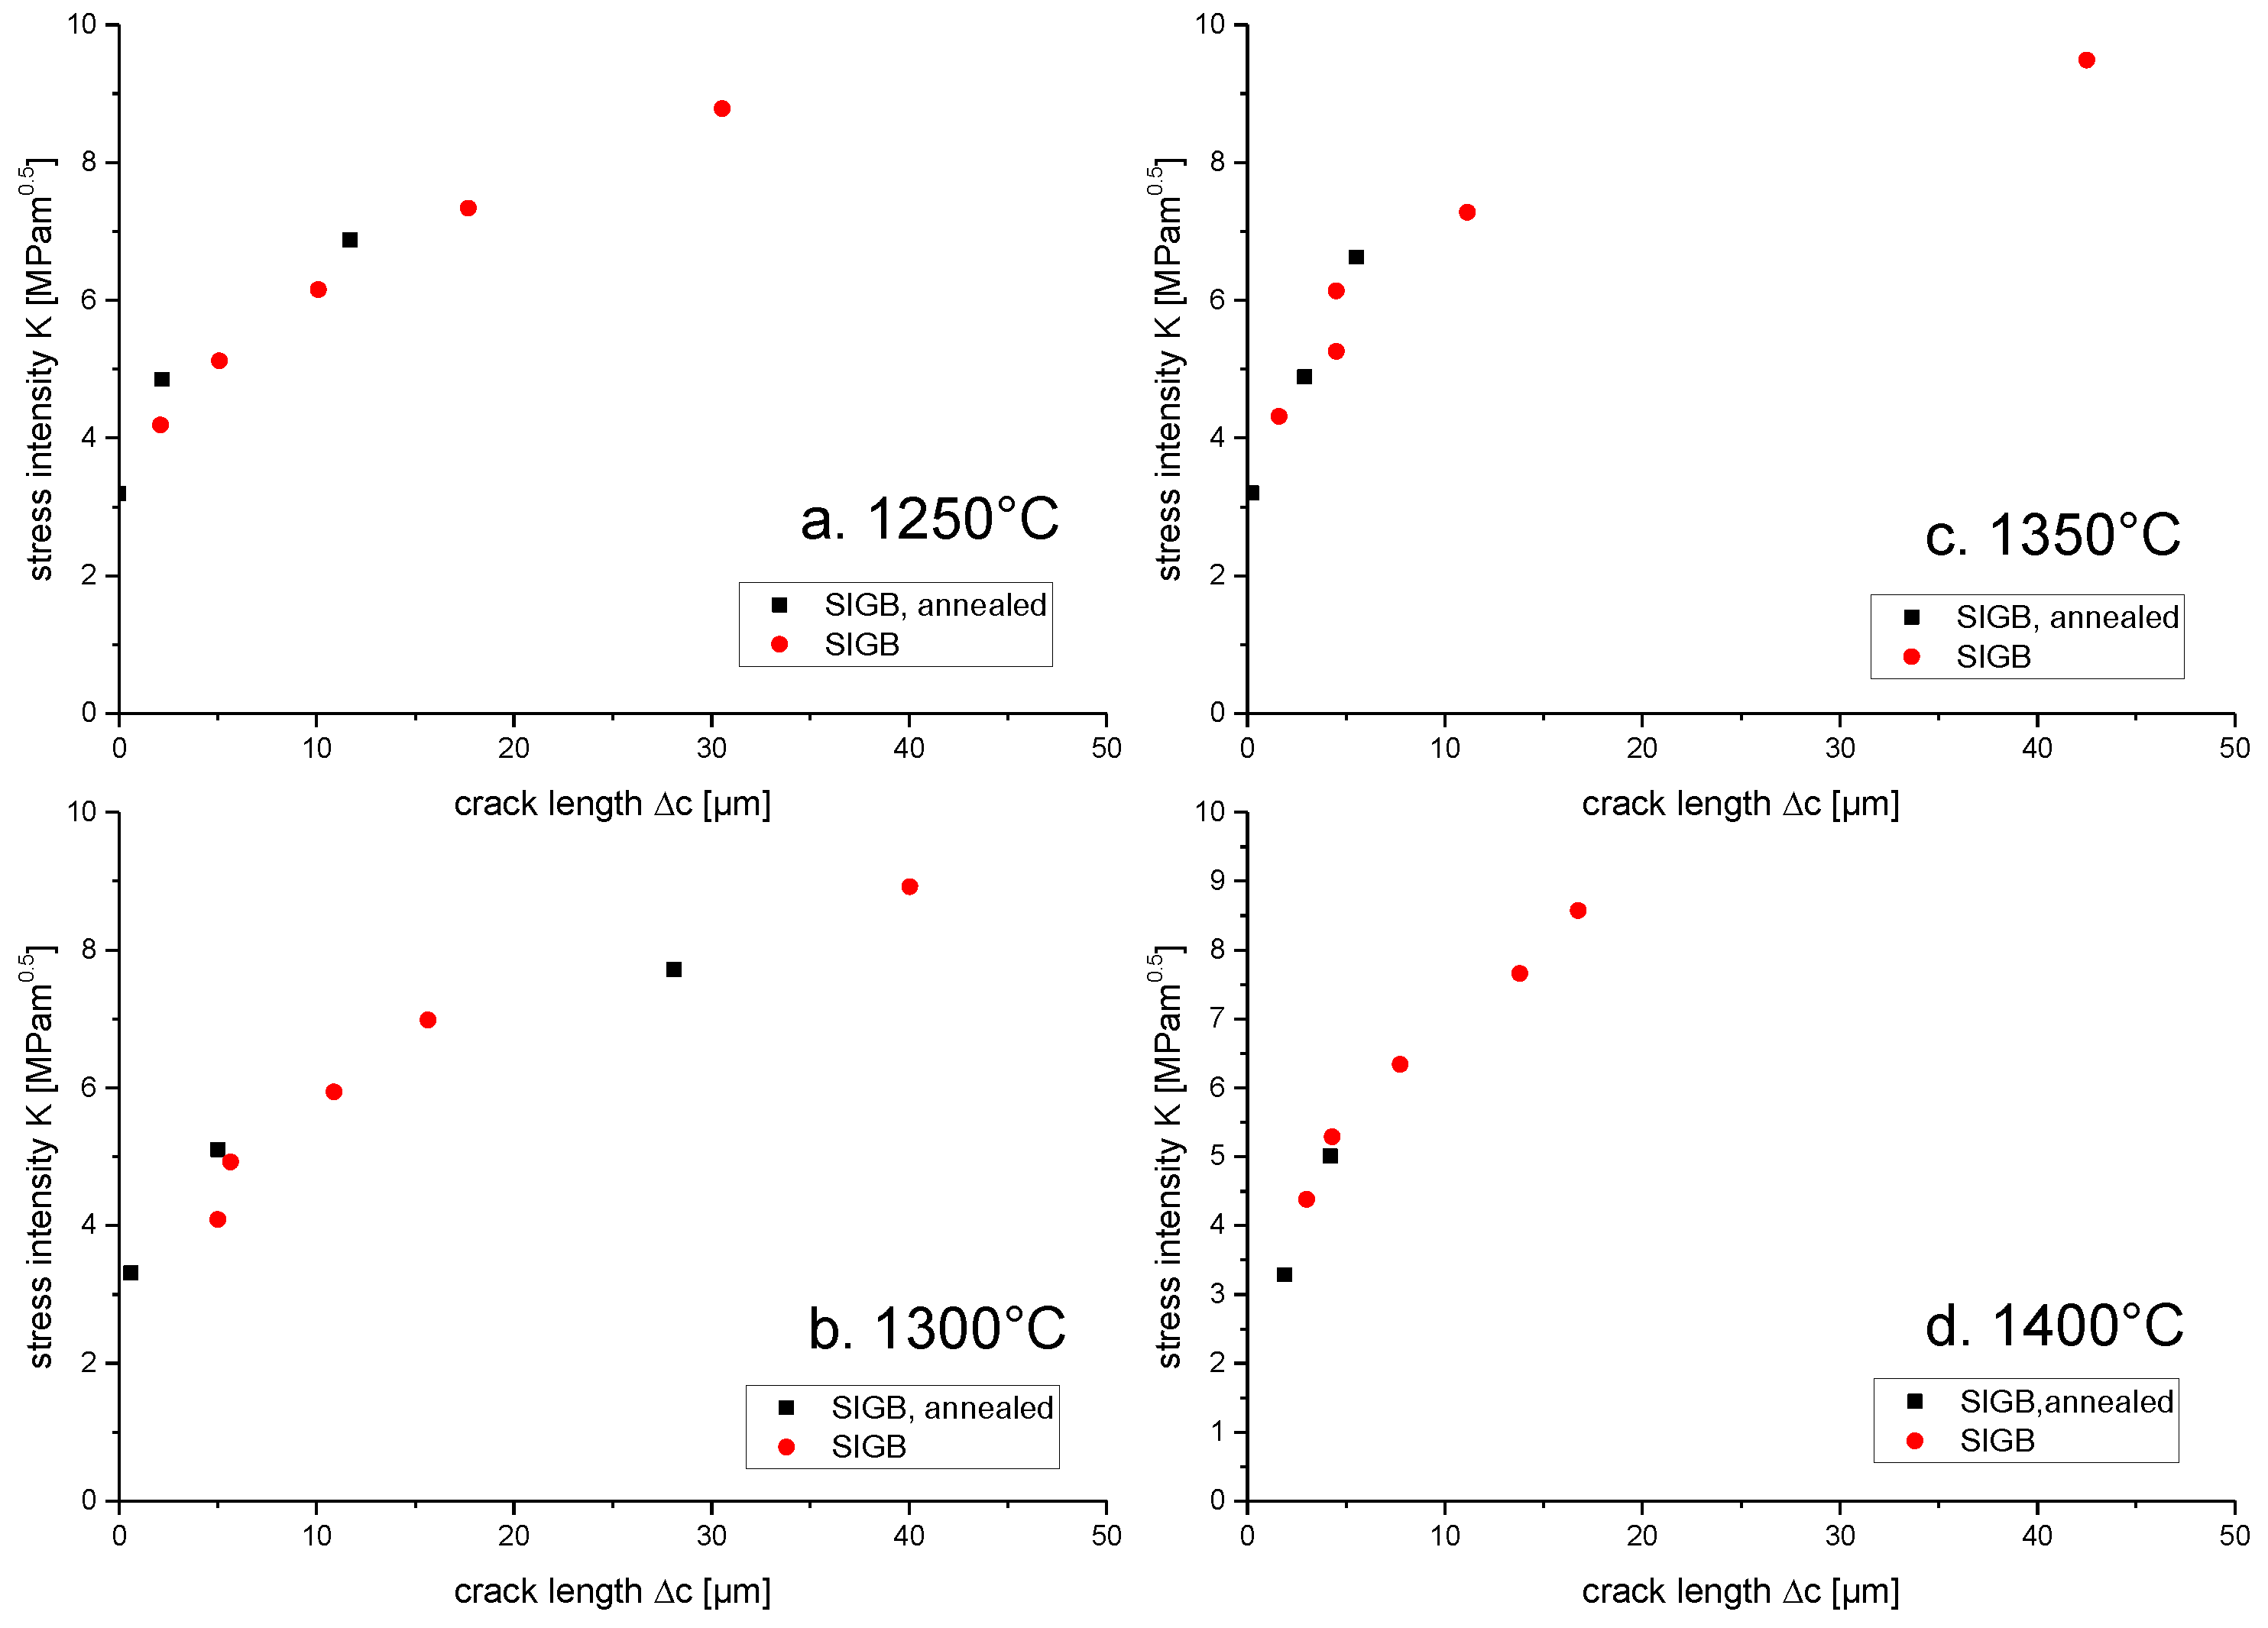
The SIGB test also allows calculation of R-curves [
29]. In case of very steep R-curves the initial region at the onset of crack growth is difficult to investigate by SEVNB tests. For the given material Imariouane determined a plateau toughness after a crack extension of less than 100 µm [
23]. The initial part of the R-curve can be measured according to Anderson [
32]. Here bending bars are indented at elevated temperature as before and then annealed at 1150 °C for 5 minutes to revert the phase transformation and eliminate the residual stress caused by the indentations. Such indentation based R-curves typically are measured in two steps: for the initial few microns of crack growth indented and annealed samples are tested (without residual stress K
res = 0 and K
tot = ψσ√c), for longer crack lengths K
res → 0; the data from the SIGB tests can be used. Combination of both tests leads to the complete R-curve.
Based on the assumption that the compressive transformation related stress is the main component of the indentation induced residual stress Kres in the vicinity of the indent, the notching at elevated temperature will trigger significantly less phase transformation; this should reduce Kres and thereby possible crack trapping significantly.
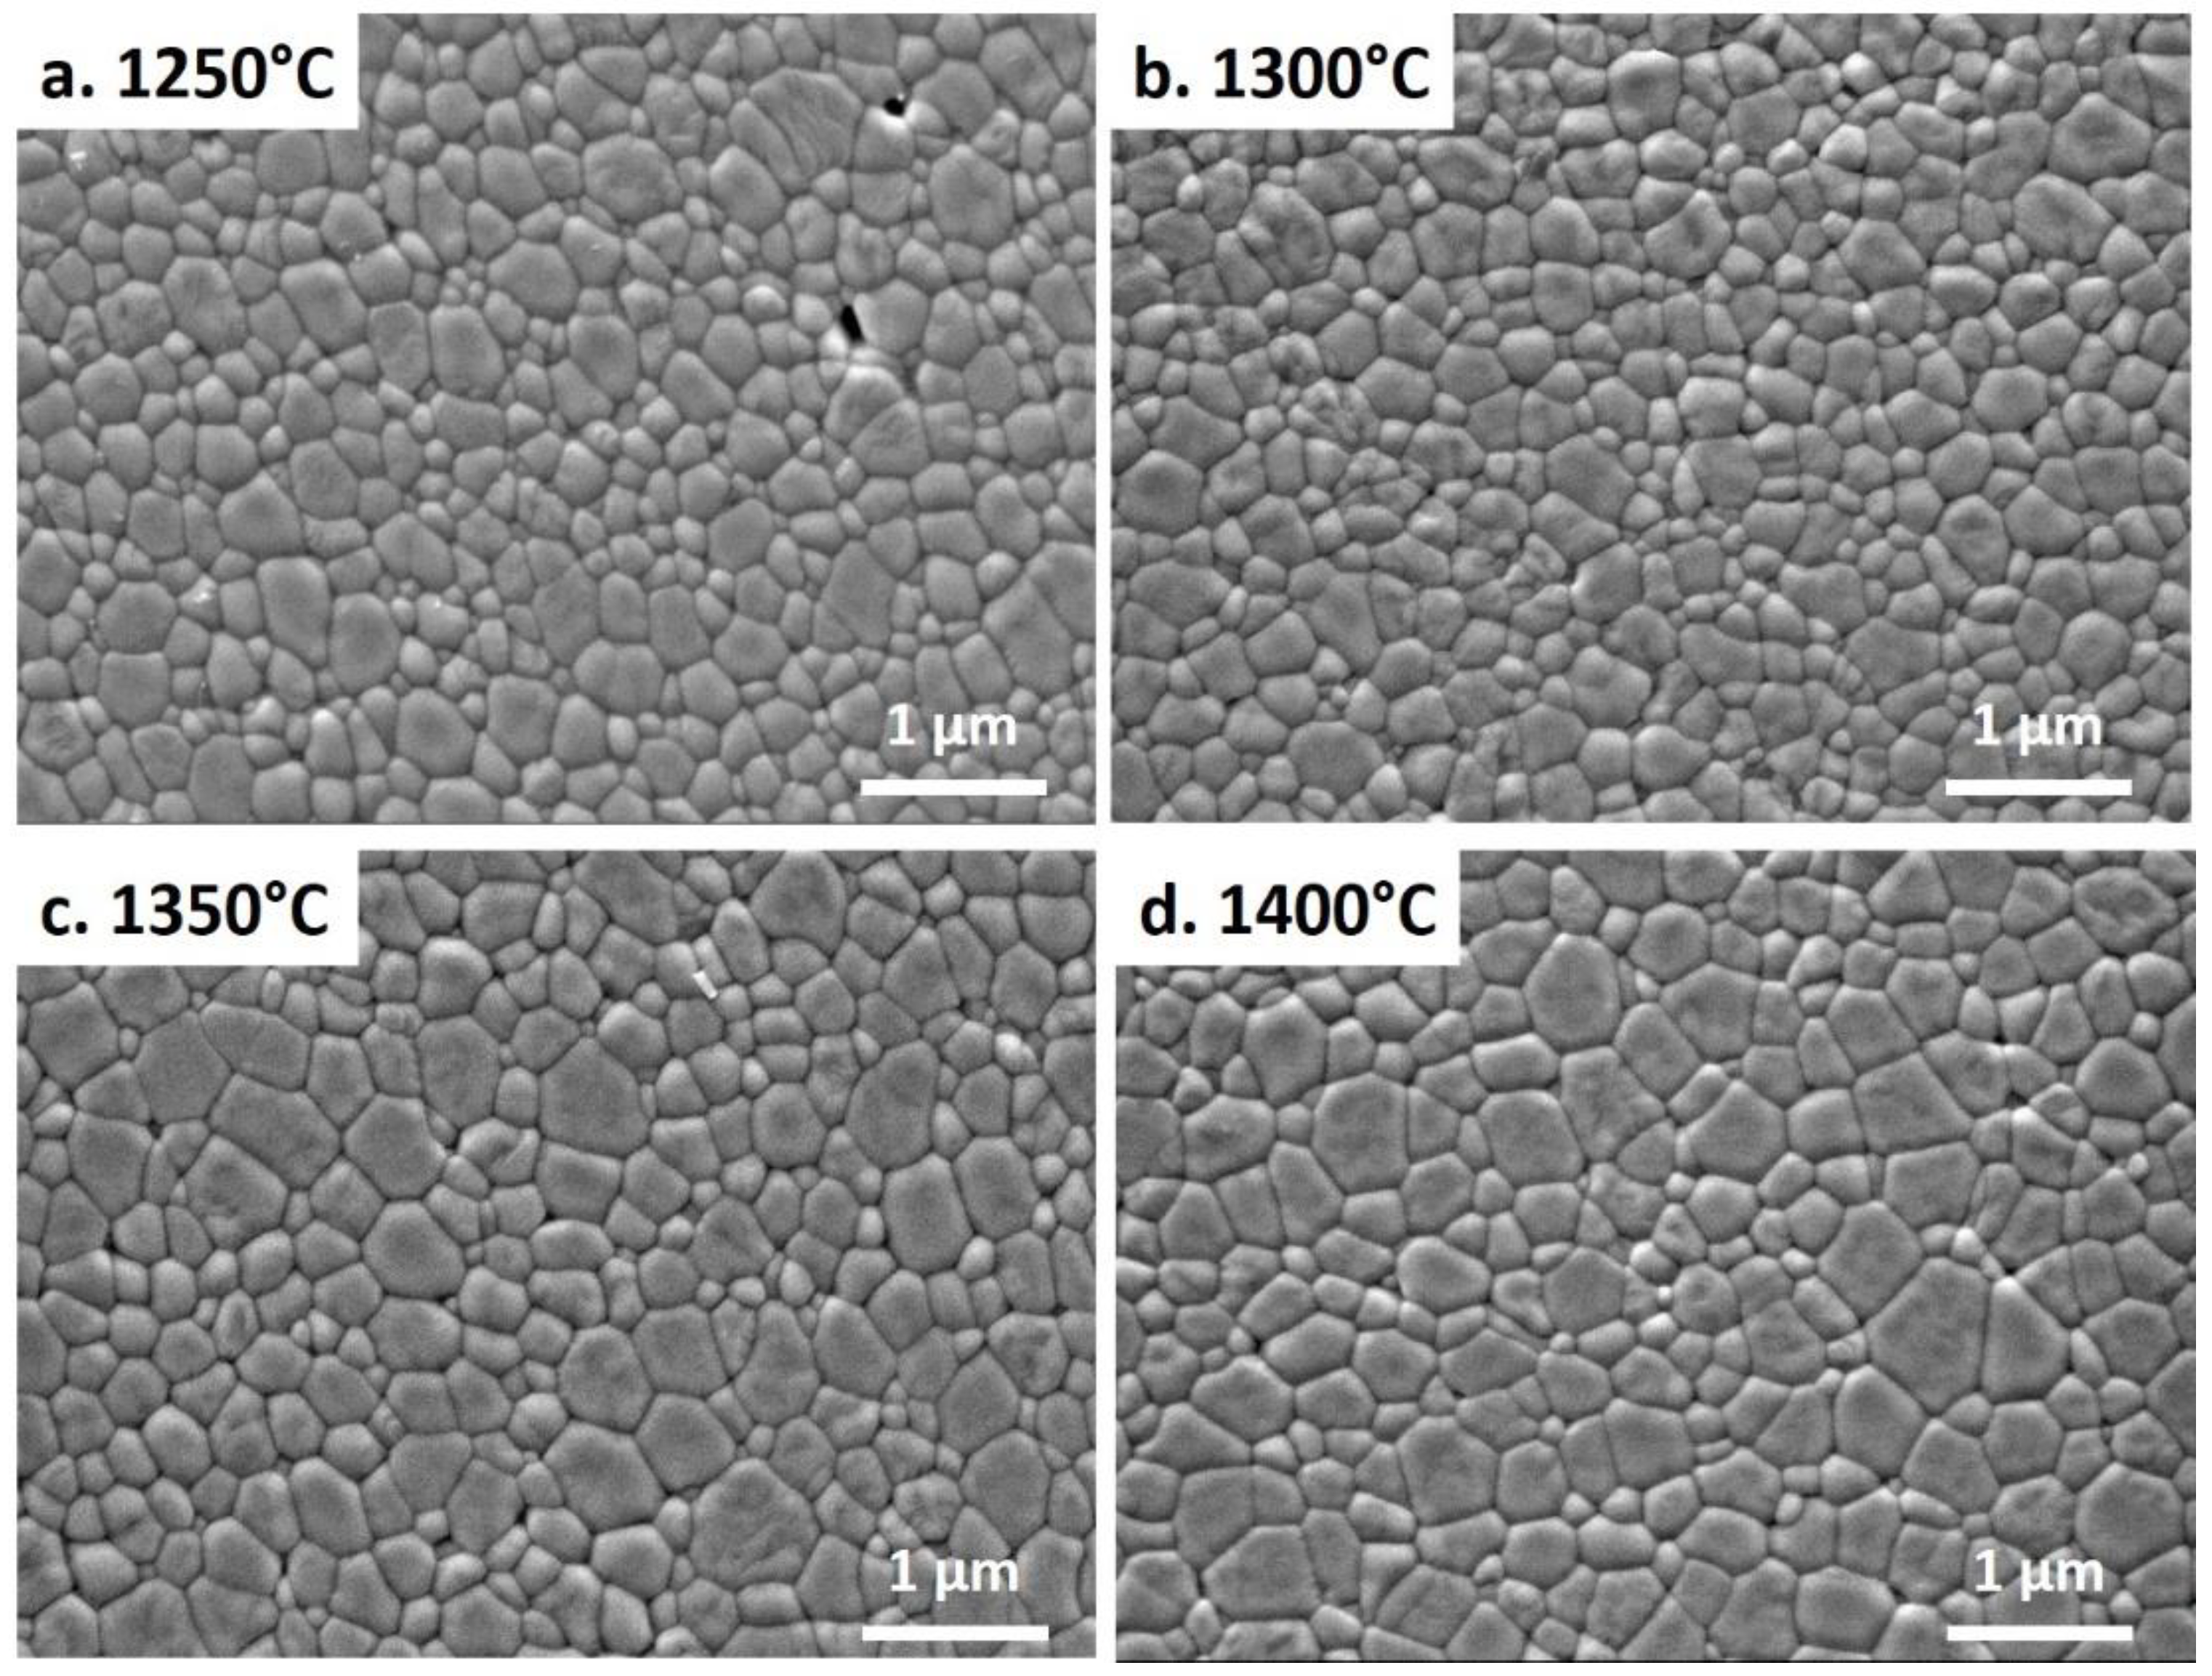
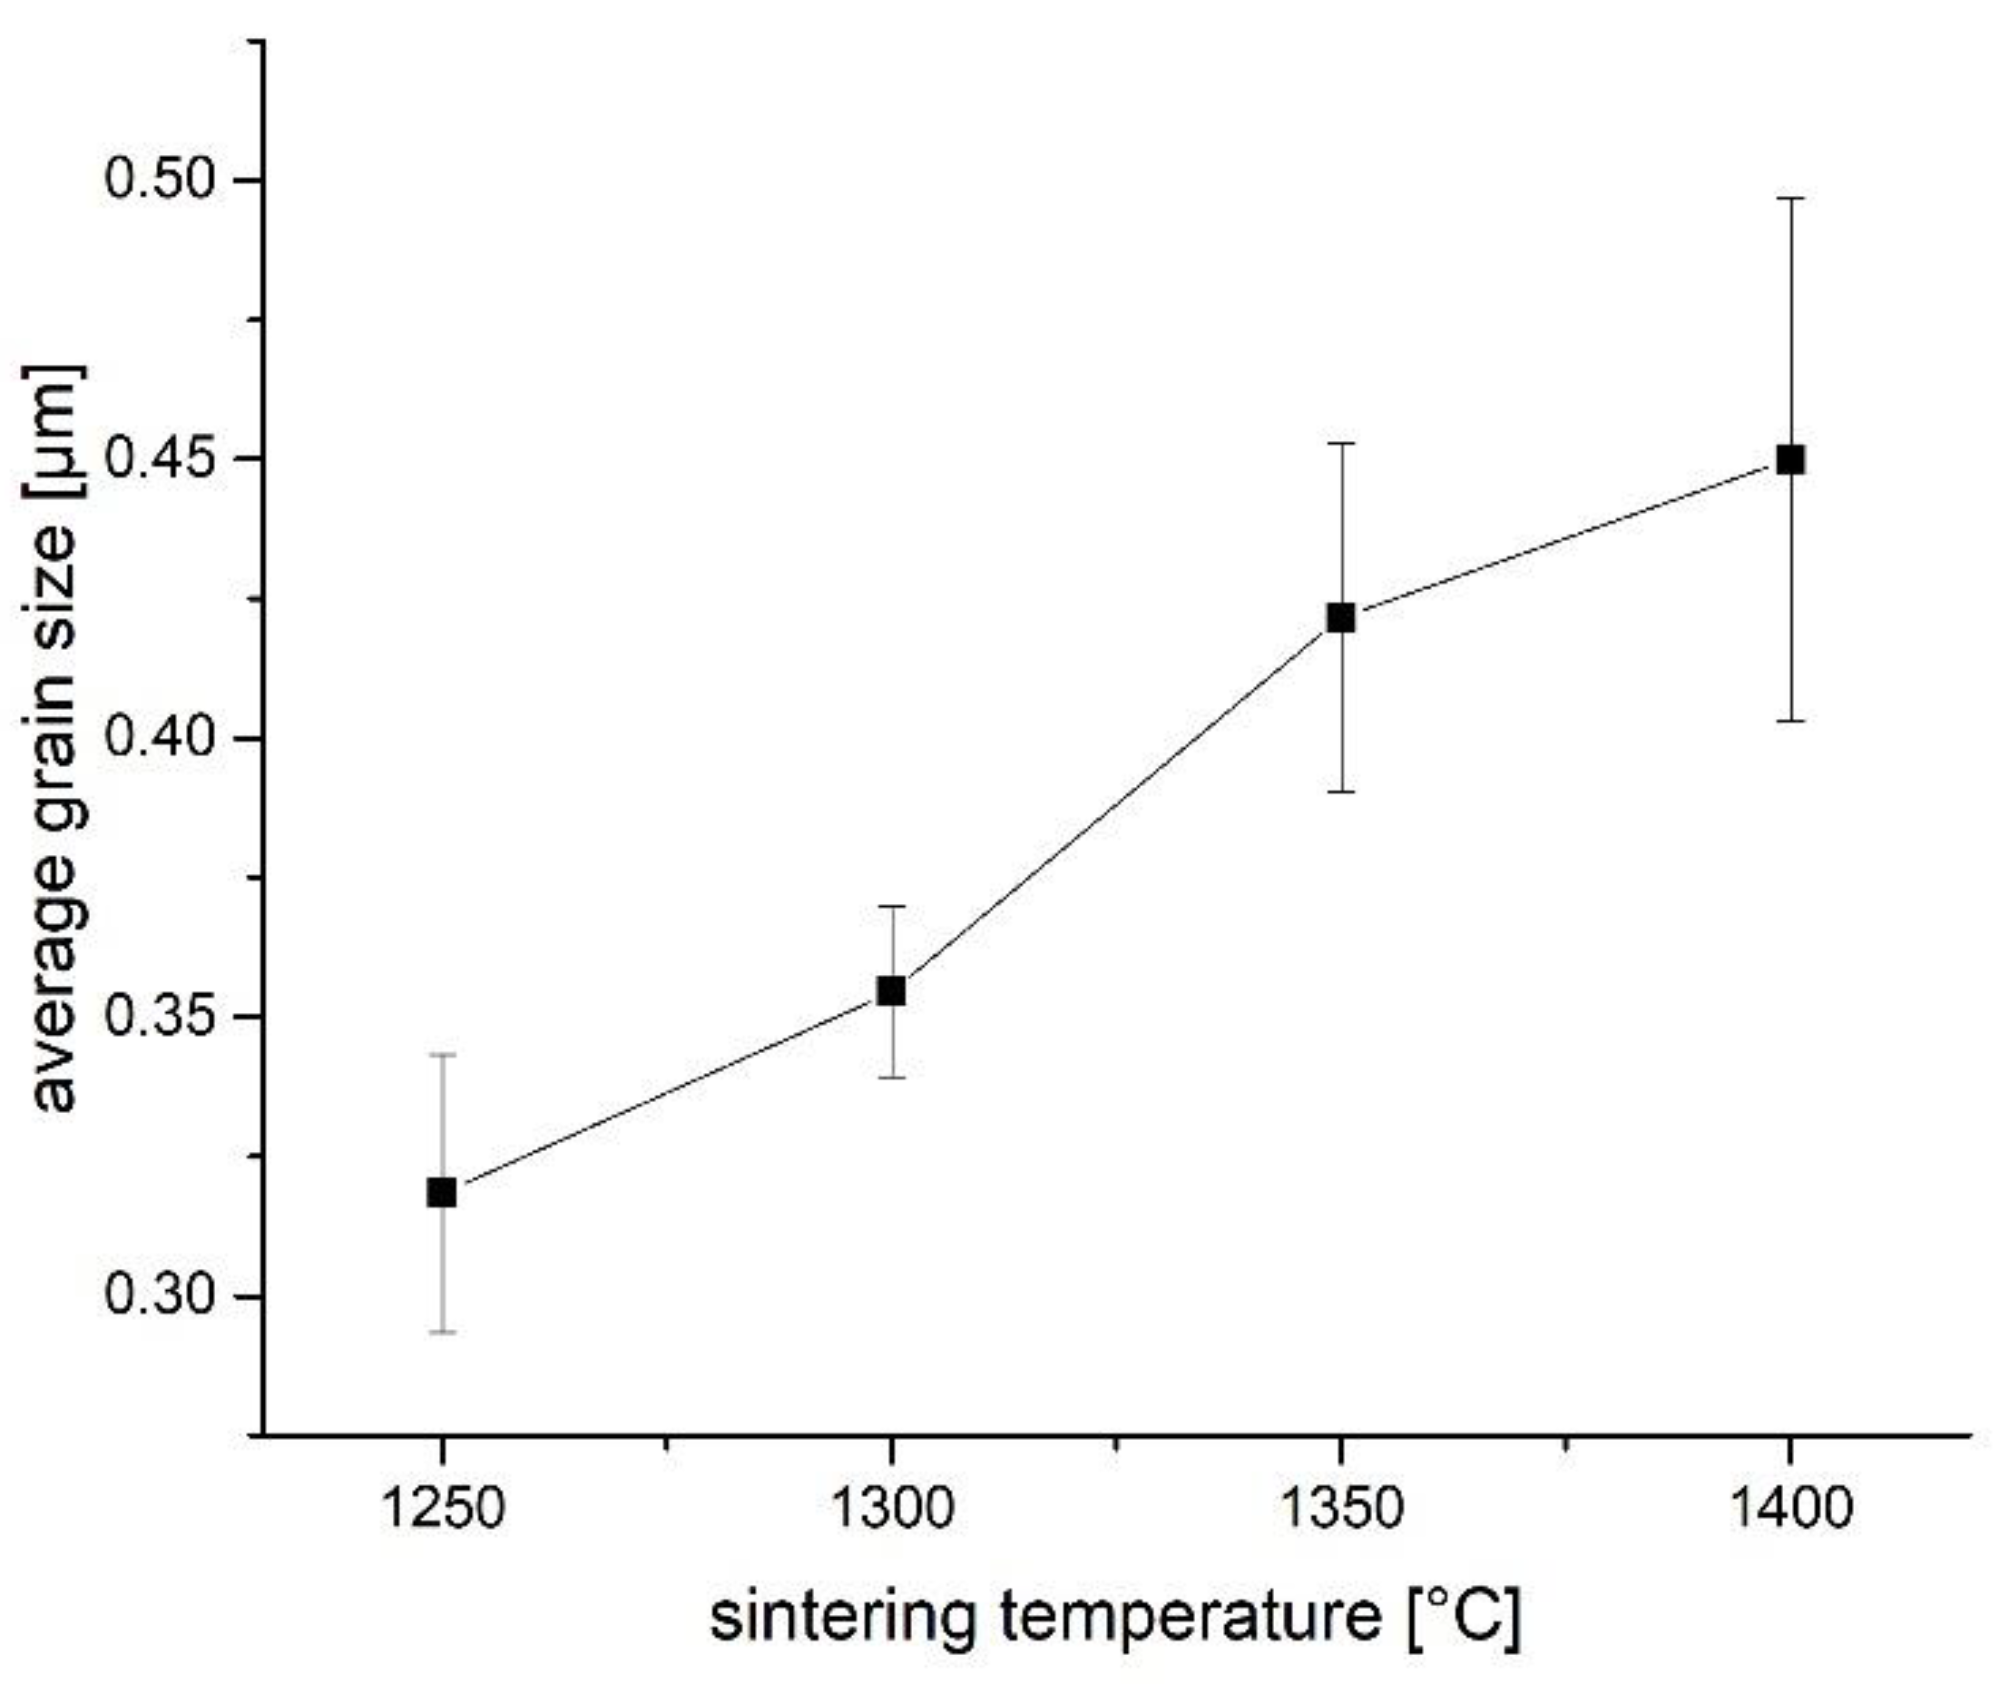
Scanning electron microscopy SEM images of the microstructure were made from polished and thermally etched (1150 °C/5 min, air) surfaces, (FEI Helios nanolab600, Eindhoven, the Netherlands, SE 3kV acceleration voltage). The average grain size was determined by linear intercept method using the correction factor of Mendelson [
33].
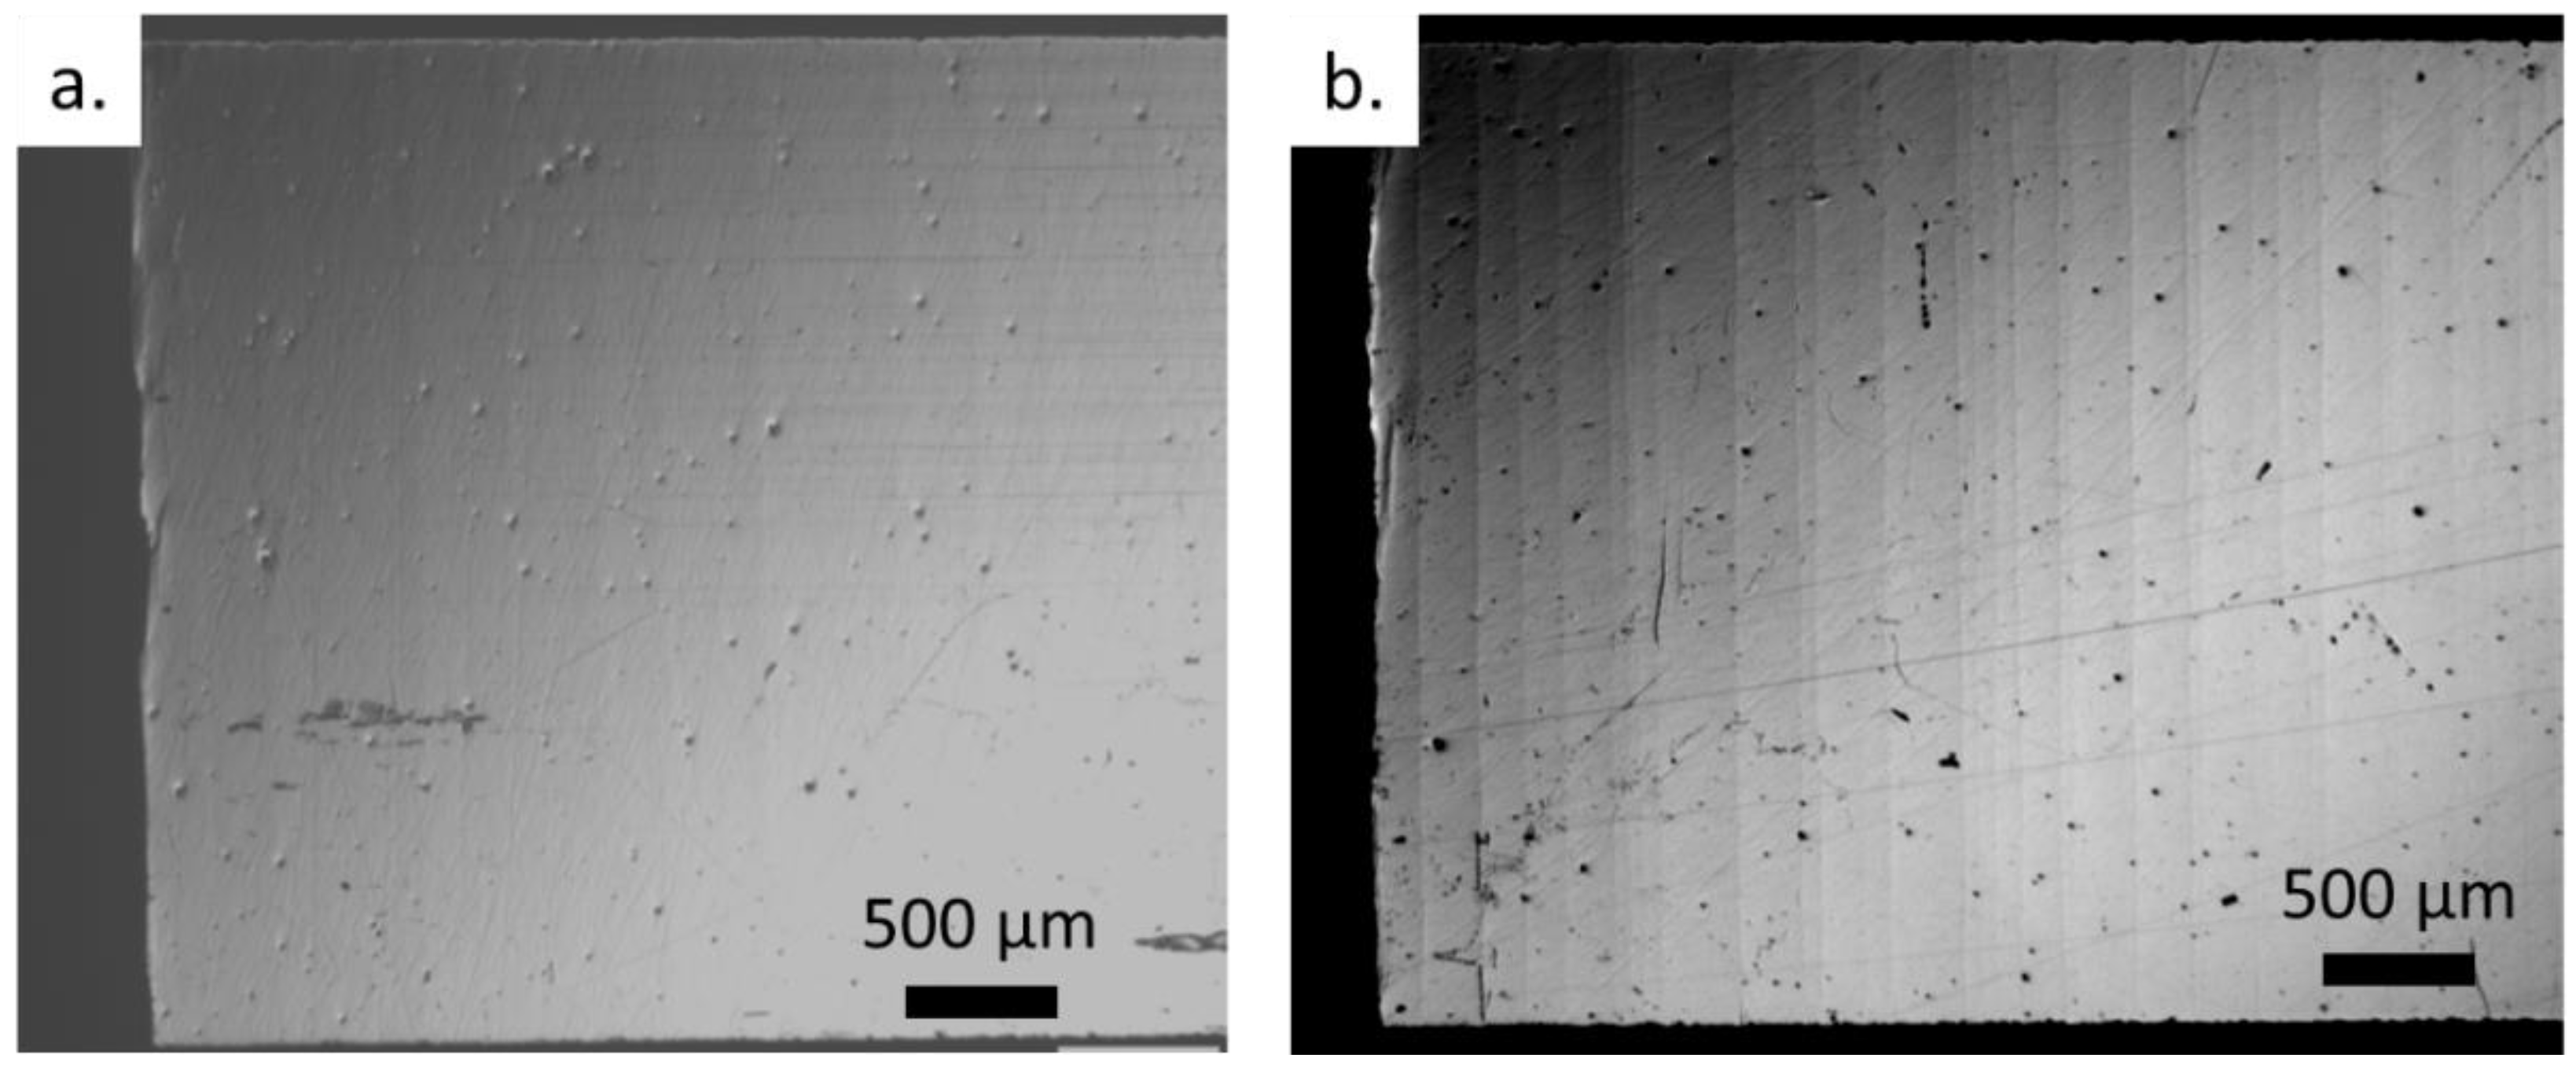
The tensile sides of the fractured bars were inspected for transformation bands by optical microscopy equipped with differential interference contrast (DIC).
The phase composition was studied by X-Ray diffraction (X’Pert MPD, Panalytical, Eindhoven, the Netherlands, CuKα1, Ge-monochromator, Bragg-Brentano setup, accelerator detector). The samples were studied as-fired after sintering and in polished condition. The fracture surfaces of 4pt bending bars were also inspected. The monoclinic and tetragonal fractions were evaluated by integrating the monoclinic -111 and 111 peaks and the tetragonal 101 peak in the 27–33° 2θ fingerprint range. The volumetric contents were calculated from the peak areas using the calibration curve of Toraya [
34]. The transformation zone sizes h were calculated from XRD-Data according to Kosmac [
35]. Transformation toughness values were calculated according to McMeeking (equation 1) using a transformation efficiency factor of X = 0.27 [
13].
The density of the materials was determined by buoyancy method (Kern&Sohn, Lörrach, Germany).
4. Discussion
1.5Y-TZP materials were manufactured by axial pressing of commercially available RTP powders. Materials were characterized with respect to microstructure, transformation characteristics and mechanical properties. The materials show a combination of high strength and toughness within a relatively broad processing temperature field of 1250–1400 °C. The study allowed to re-evaluate the previous publications by Matsui and Imariouane [
22,
23] using the same starting powder but slightly different processing conditions.
The extremely high stress induced transformability of the materials (> 80 % phase transformation in fracture surfaces) guarantees a high damage tolerance. Samples sintered at 1250–1300 °C showed almost no scattering in their strength data. Simultaneously the high transformability seems to be the reason for over-estimation of fracture toughness by direct crack length measurement. Quinn and Bradt [
39] have banned direct crack length measurements in general due to unclear criteria for crack arrest. This popular technique is however very fast and easy to apply. In fact, for small samples there are not many alternatives. In the present case using DCM definitely cannot be recommended.
The reason for the over-estimated DCM toughness values for 1.5Y-TZP [
20,
21,
22] seems to be material specific. Indentation causes phase transformation around the indent which, due to volume expansion of the material, prevents crack growth extremely efficiently. Hence, cracks are trapped and regular crack patterns are seldom obtained. This phenomenon was described by Cook for 3Y-TZP materials [
31]. Our experience is however that in case of the less transformable 3Y-TZP the trapping problem can be avoided if sample preparation is gentle and automated in order to avoid residual stress introduced by the final machining process.
This intense transformation behavior also affects toughness measurements from residual strength measurements if samples are notched with Vickers indents at ambient temperature. Residual strength levels in such ISB-tests may reach almost 1000 MPa and are therefore only marginally lower than the strength of the pristine samples. Surviving cracks of multiple indentations either grow and the sample fails at this indent or they are trapped and only little crack growth is observed. In its extreme case the crack requires such a high stress intensity to exit the trapping zone that, once the region outside the zone is reached, immediate failure occurs. An indentation crack trapped by compressive stress in the transformation zone cannot be compared to a natural flaw where the transformation zone is built up during crack growth and where much more pronounced crack growth can be expected.
Indentation at elevated temperature can help to produce more regular crack patterns. Cracks introduced by HV10 indentations at 200 °C extend 20 µm further than cracks induced at room temperature. The required applied stress to let them grow is reduced; simultaneously the transformation around the indent is suppressed. In combination this means a reduction of Kres which results in regular crack patterns with four well developed wing cracks of equal length. This facilitates SIGB tests and introduces more statistical quality, typically all perpendicular crack pairs grow with increasing applied stress and can be measured. In cold indented materials it happens frequently that only one crack is “running” while the others remain trapped.
However, the temperature for hot indentation has to be chosen with care. In case of the 1.5Y-TZP material tested in this study (which was known to be thermally vulnerable [
24]) notching at 250 °C leads to spontaneous uncontrolled transformation of the material surrounding the indent, so that not only wing cracks but also cracks from the sides of the indents are produced. Transferring the method to other materials with high transformability therefore should be done with care and the appropriate temperatures should be checked by preliminary experiments. The comparison with the results of Imariouane [
23] shows that the modified indentation methodology seems valid to determine the toughness of this highly transformable material reliably. The slight reduction of toughness and strength in the TZP sintered at 1400 °C/2 h compared to TZPs sintered at lower temperature indicates that this material is very close to the critical grain size.
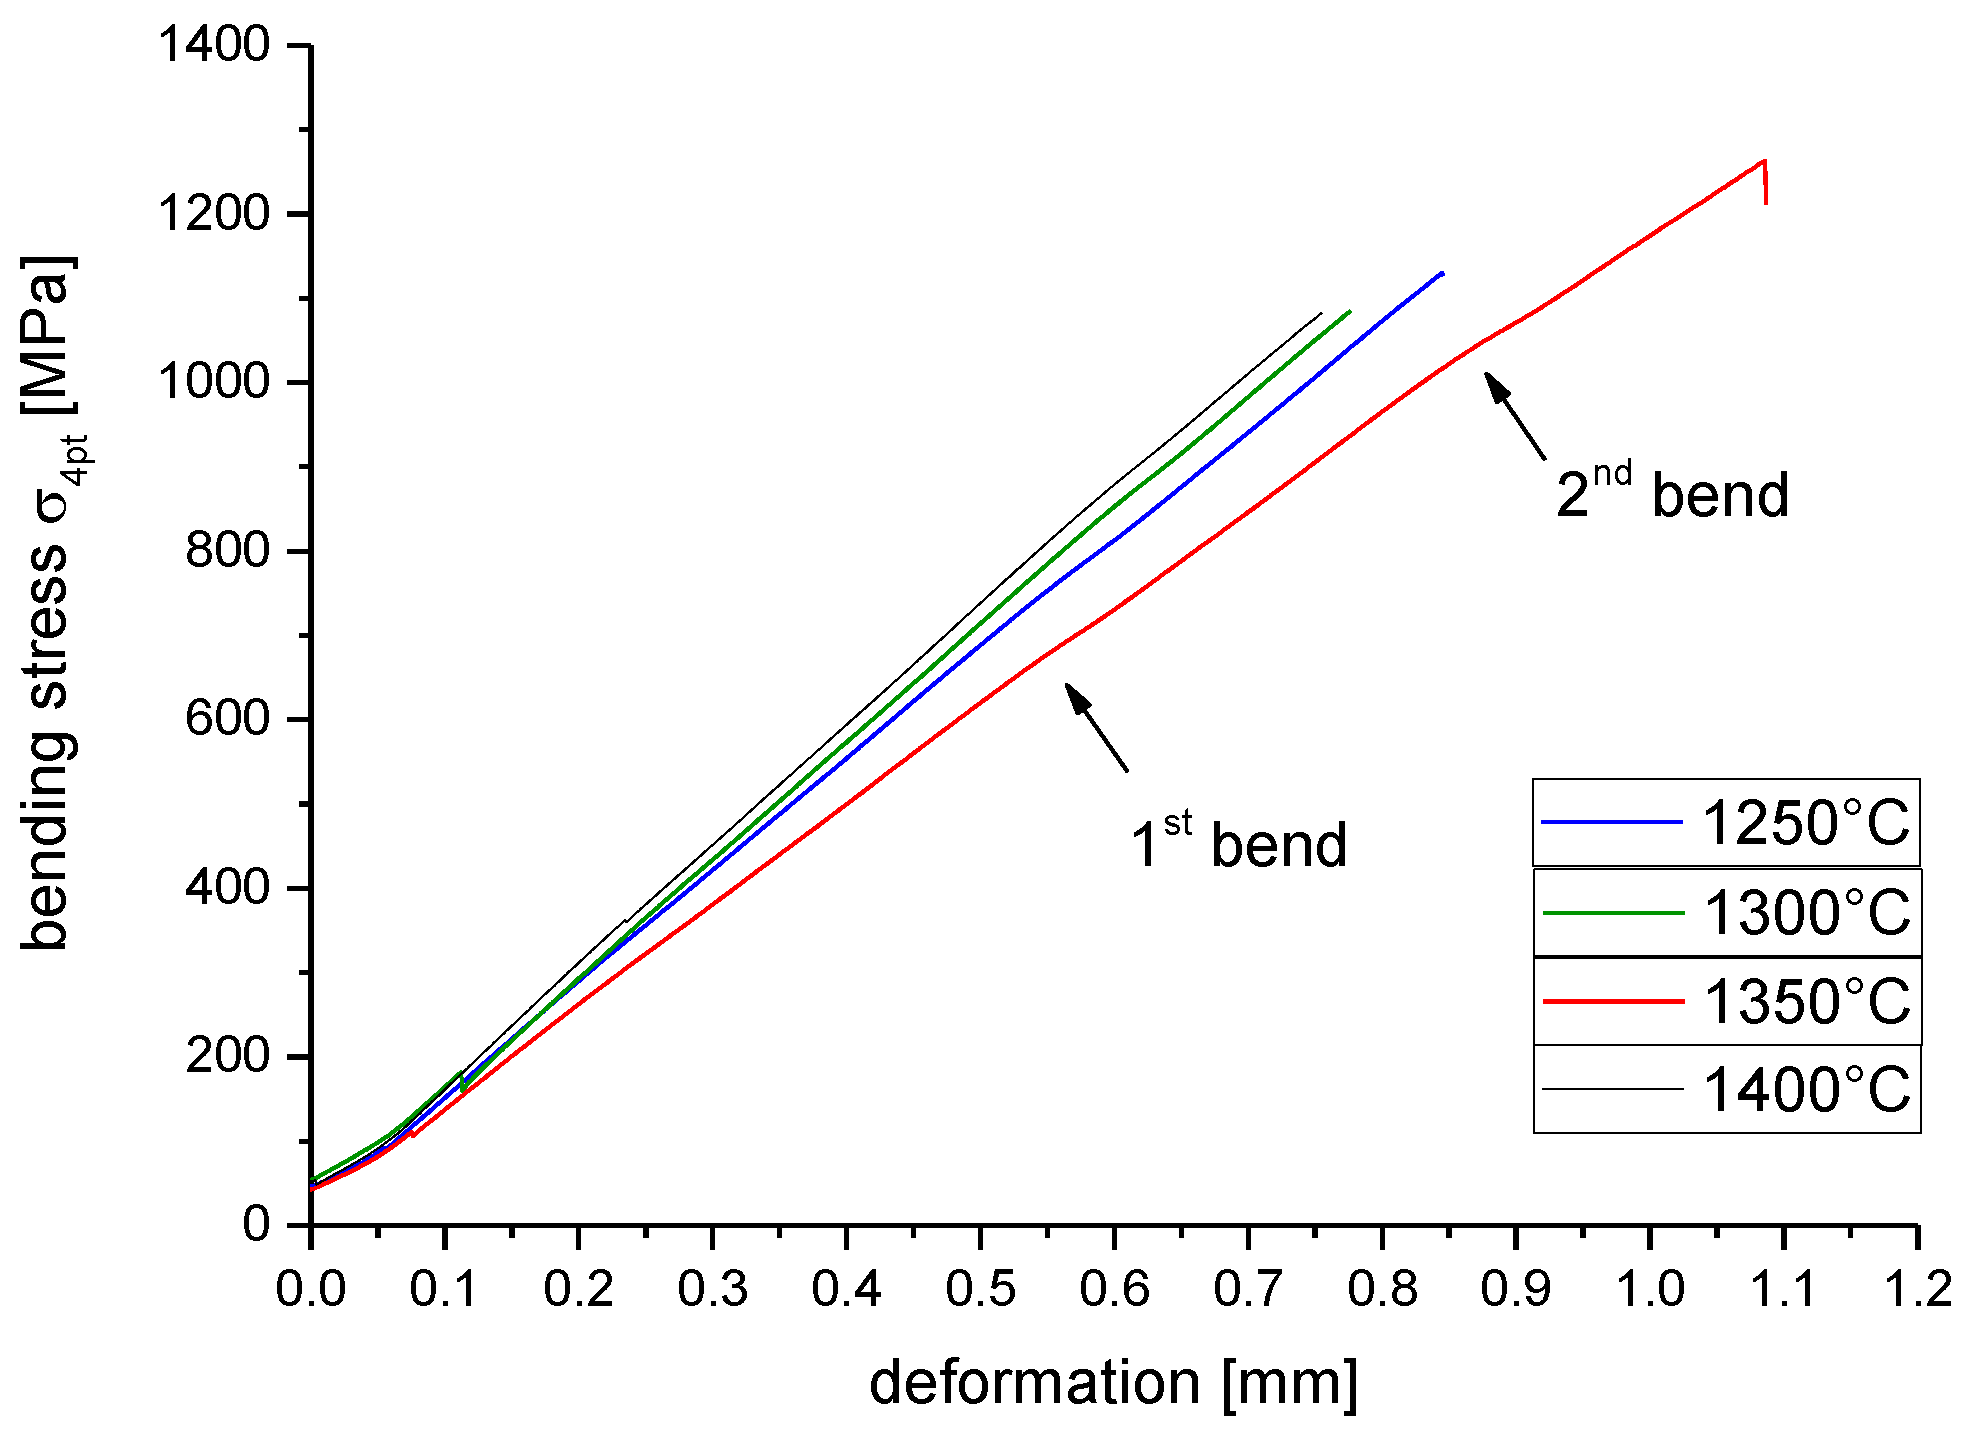
The relatively weak non-linearity of stress-deformation curves of 4pt bending tests is evident. We can, however, only speculate why the slope of the stress-deformation curves does not decline continuously after triggering the phase transformation. Transformation is initiated when a certain population of large grains reaches its critical transformation stress. The transformation bands are known to exert a certain stress shielding effect in their vicinity which prevents formation of new bands close to the initial ones [
25]. This may restore the rigidity of the material until the stress is high enough to either lead to failure (the common case) or to formation of new bands while the sample survives up to a somewhat higher stress (only observed in a single case). In case of 3pt bending with a localized high stress, only single bending events occur close to the failure stress.
The calculated transformation toughness values (approximately 5 MPa√m), the K
app,0 values of SIGB tests which represent the R-curve dependent part of toughness (5 MPa√m) and the R-curve related part of toughness obtained directly from R-curves (5.5–6 MPa√m) agree very well. It is assumed that transformation toughening is the only relevant toughening mechanism. According to Swain the maximum toughness allowed for flaw size related failure in Y-TZP is ~7.5 MPa√m [
12]. Consequently, depending on the K
0 value (4 MPa√m acc. to Swain, 3 MPa√m measured in this study) the R-curve related toughness should not be higher than 3.5–4.5 MPa√m. The R-curve related toughness measured in this study (5-6 MPa√m depending on the method used) is well above this level. Transformation related failure is confirmed by formation of transformation bands prior to failure. Transformation bands are however very narrow and start to occur at a stress slightly below the failure stress. This explains why a high strength level can be maintained. Macroscopic non-linearity of stress-strain curves was only observed in a few samples with relatively high strength. Typically, samples fail upon reaching the critical transformation stress.
These tough 1.5Y-TZP materials offer a very narrow and reliable strength distribution and high safety in case of catastrophic events. Under fatigue load conditions their relatively unfavorable K
I0/K
IC ratio allows constant stress levels not higher than 450–500 MPa to prevent fatigue failure. With respect to sintering temperature and LTD resistance reported in literature [
24] it is probably advisable not to fully exploit the potential toughness and to choose a sintering temperatures not higher than 1300 °C at 2 h dwell. Moreover, it has to be stated that this 1.5Y-TZP is a material to be applied at ambient temperature, exposition to elevated temperatures for a prolonged time should be avoided.
