1. Introduction
In the digital age, as-built monitoring is becoming increasingly important. In the context of growing 3D model-based digital fabrication processes, especially in concrete [
1], the efficient as-built monitoring is the basis for the implementation of digital twins and to enable intelligent quality control [
2] and AI-based progress monitoring in construction [
3]. As-built monitoring is also relevant for a digital transformation in circular economy in construction [
4] since it provides large amounts of raw geometric data to create digital records of existing buildings. These digital representations facilitate deconstruction, new design, procurement, and new construction, enabling building owners, inspectors, and deconstruction groups to implement closed circular resource strategies by linking recovered materials to new projects [
5].
3D scanners, which generate a 3D model as a mesh or point cloud of the building structure, are an important aspect of as-built monitoring. Terrestrial laser scanning and mobile scanners reflect a history of rapid technological advancement and increasing accessibility. From early, cumbersome systems to today’s highly portable and sophisticated devices, these technologies have transformed numerous industries by providing detailed, accurate, real-time 3D data [
2]. In the manufacturing industry, 3D laser scanners are commonly used, which orient themselves using reference points on the structure to scan or stationary reference positions and generate and display the 3D model in real time using coordinate measuring technology [
6]. In the consumer market, the built-in cameras and depth sensors of mobile devices can be used to create photogrammetry-based 3D point clouds with textures [
7]. In surveying and geotechnical engineering, on the other hand, terrestrial laser scanners are primarily used to map the environment from various locations using point clouds [
10].
This article examines the suitability of three representative devices using these methods for 3D as-built monitoring of concrete structures. For this purpose, the devices are tested and analyzed on concrete structures of different size, geometry and fabrication process. Based on these tests, the potentials and challenges of the scanning methods for different applications are elaborated in order to facilitate the application of as-built monitoring for developers and users of digital concrete construction processes.
2. Scanning Systems and Concrete Structures
The Zeiss T-SCAN hawk handheld 3D laser scanner with mobile workstation and GOM post-processing software was used as a representative laser scanner of the highest industry standards (see
Figure 1, S1). The scanner weighs less than 1 kg and has a measurement accuracy of 0.02 mm ± 0.015 mm/m. The scanner orients itself to reference points that are applied to the structure in advance at a distance of 5 to 15 cm. During scanning, the scanner is moved over the structure at a distance of 25 to 50 cm, and the result is displayed as a surface mesh directly on the user interface. The scanner is widely used in manufacturing industries such as automotive or mechanical engineering [
10].
The 3D scanning function of the mobile device ipad Pro [
10] with the modeling software Pix4D [
11] was used as an inexpensive and widespread alternative (see
Figure 1, S2). The modeling is based on camera images with depth data, which are merged to a 3D model by photogrammetry in the post-processing software. The result is a mesh of the environment with textures. Point cloud analysis tools (e.g. CloudCompare [
12]) allow to extract the structures from the environment.
The Riegl VZ-400i terrestrial laser scanner with the proprietary RiScanPro software is the representative of surveying and geotechnical engineering (see
Figure 1, S3). The laser scanner is set up in various positions and scans the entire environment using the laser pulse principle with a measuring range of 100° vertically and 360° horizontally. The repetition rate is 1200 kHz and the range is 800 m [
13]. The resulting point clouds are registered in laser scanners software with the position data of the scans determined by global positioning data (GNSS). The result is a holistic 3D point cloud of the structure and its environment.
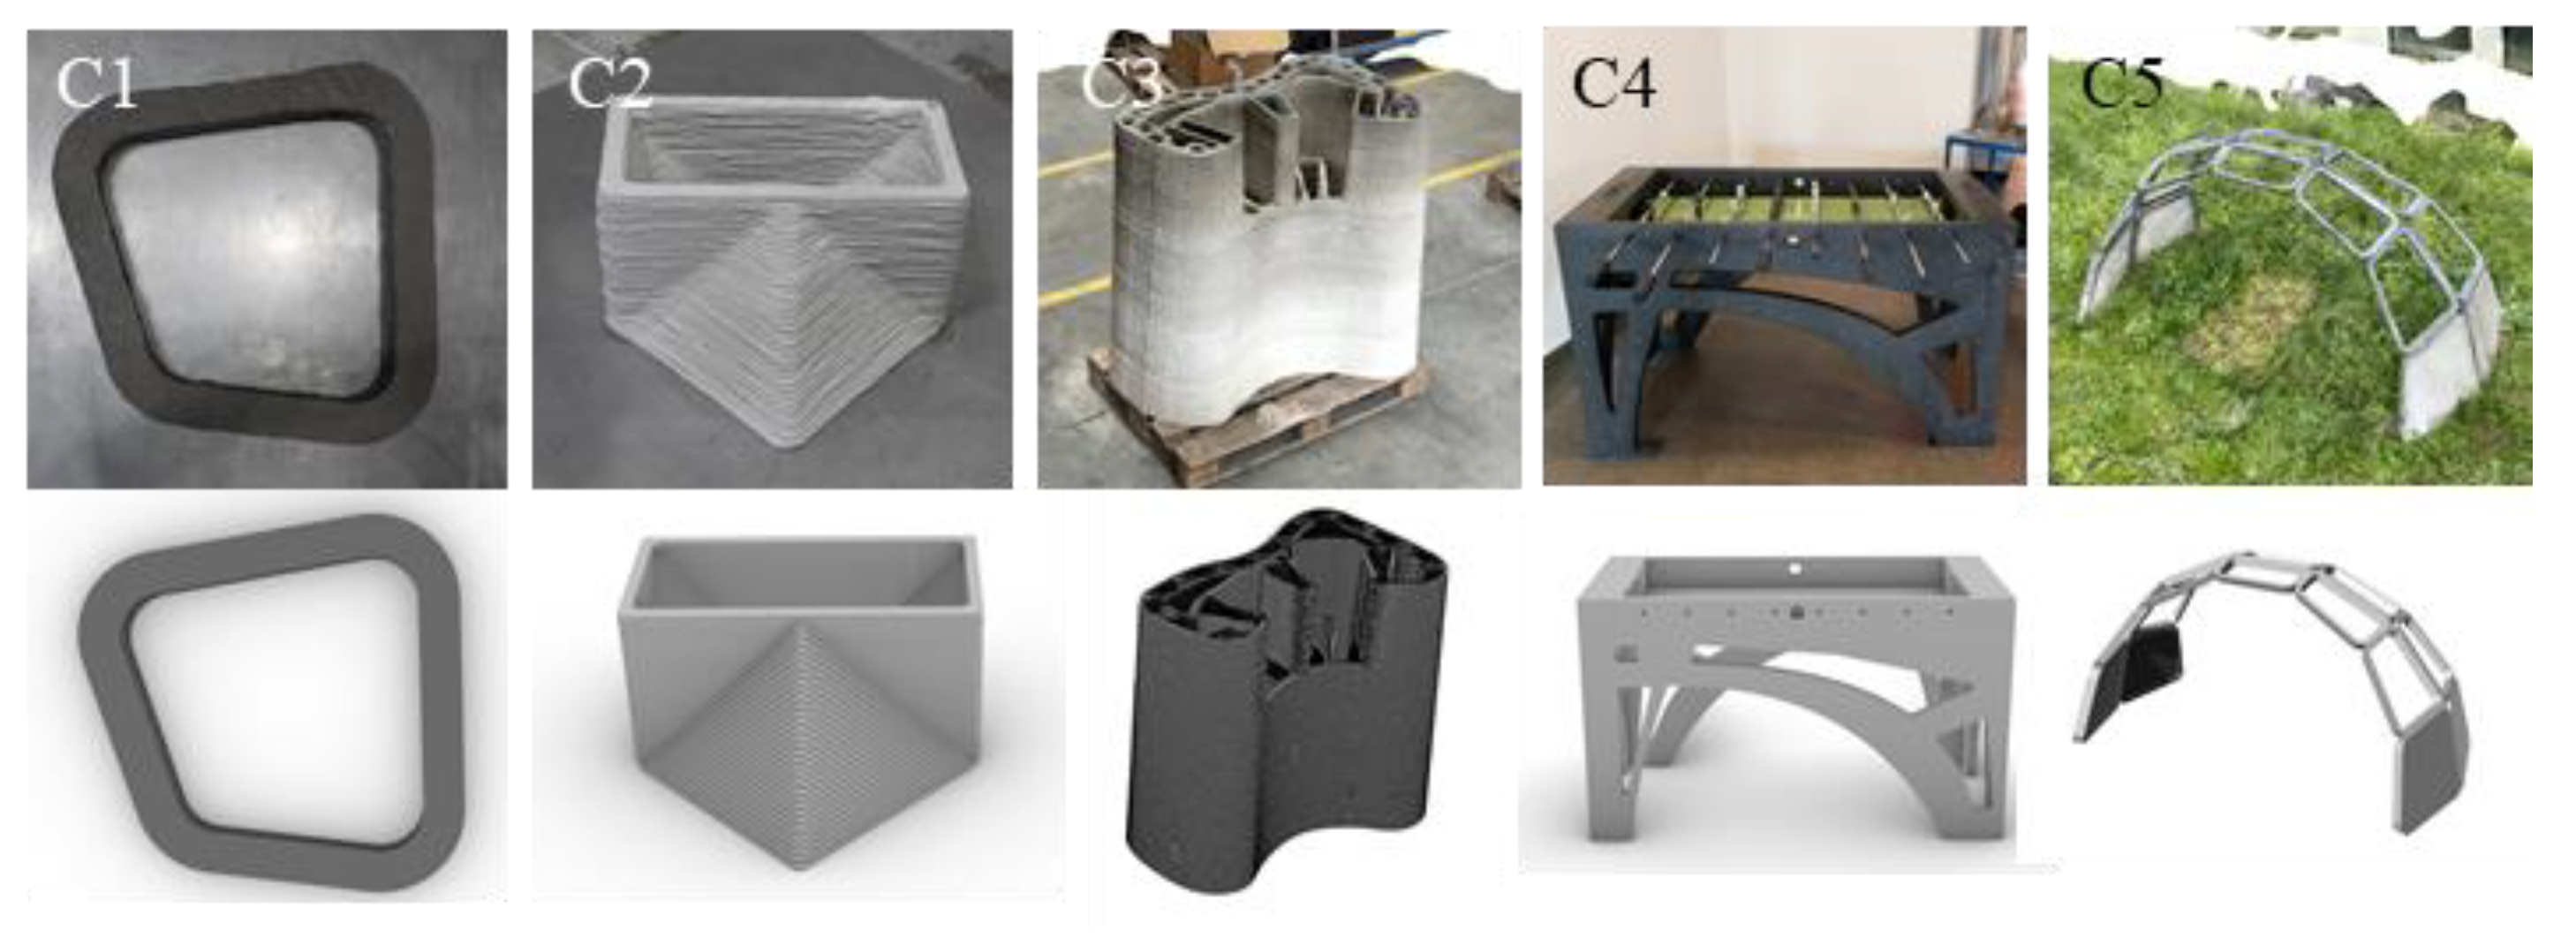
The scanners were tested on five concrete structures with different sizes and geometries for which 3D planning models were available (see
Figure 2). These included: a modular frame structure from [
14] (C1) made by 3D printing via horizontal deposition of fibre reinforced concrete strands, an interlocking block (C2), which was 3D concrete printed via vertical extrusion of concrete [
15], a counter (C3), 3D printed with the same method as C2, a carbon textile reinforced Kicker Table (C4), which was manufactured by casting of high strength concrete into a formwork and an assembled structure (C5) made of frame modules produced accordingly to C1 [
16].
3. Scan Results
Figure 3 shows the heterogeneous unfiltered scan results of the investigated 3D scanners. The handheld 3D laser scanner (S1) produces a high-resolution triangulated mesh of the entire concrete structure. The photogrammetric capture with the mobile device (S2) results in a surface model that represents both the structure and its immediate environment. In addition to the mesh information, the model also contains the texture of the concrete structure. In the case of terrestrial laser scanners, at first, the individual point clouds of the different positions were first registered to form a holistic point cloud. A holistic point cloud of the wider environment is then created from the terrestrial laser scan point clouds. Without camera, the point cloud contains no textures. In the example (s.
Figure 3), with an accuracy of 5 mm, the size was, with over 700 MB, 10 times larger than the photogrammetric model.
To illustrate the potential and challenges of different scanners for scan-to-BIM or quality control, as-built and as-planned comparisons of concrete elements were carried out based on the point cloud data. For S1, the point cloud data was extracted from the concrete structures meshes, and for S2 and S3, the concrete structure information was cropped from the environment model and then extracted as point data to obtain the as-built model. Artificial point clouds were generated from the planning models, which were originally available as constructive solid geometry (CSG) or boundary representation (B-Rep), to obtain the as-planned models. The point clouds were generated at a density of one million points per component. The as-built models were then registered by reference points with the planning models and the point-to-point distances between as-built and as-planned were determined.
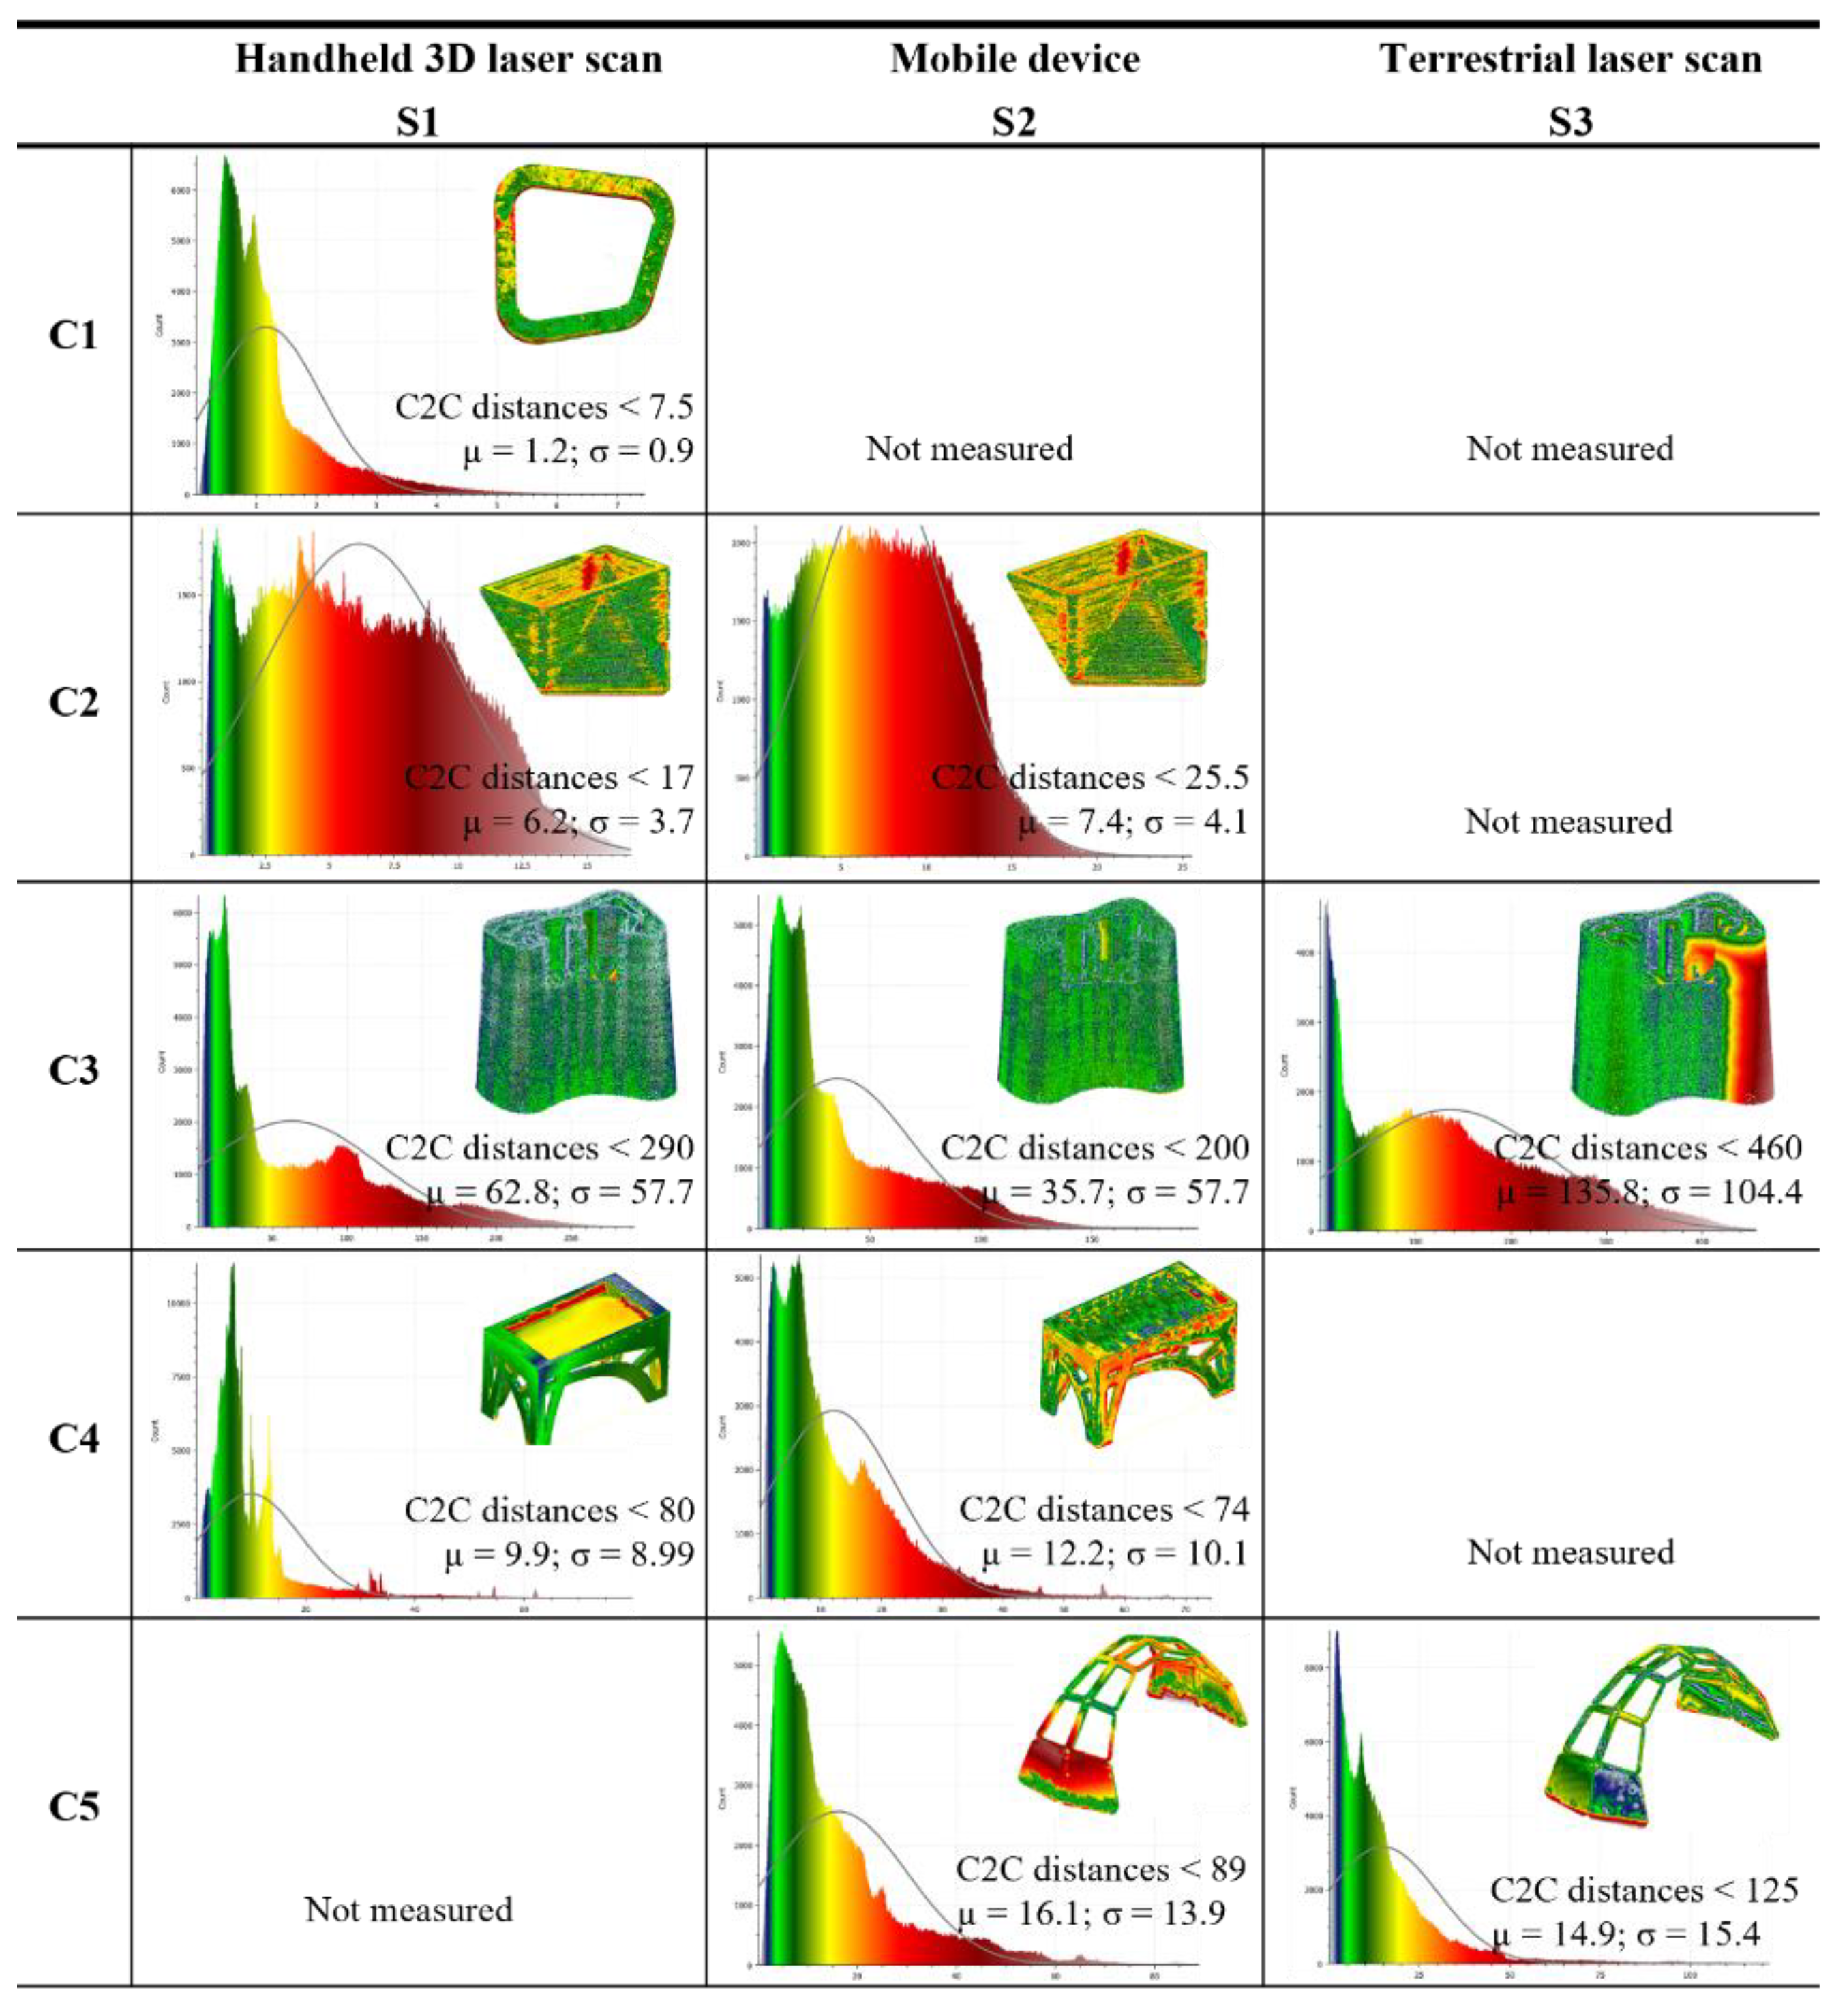
The scanned as-built and planned point clouds were compared using Cloud-to-Cloud (C2C) distances, which is a common method for direct comparison of point clouds. [
17]. The distribution of C2C distances is shown as a histogram with Gaussian mean (µ) and corresponding standard deviation (σ) as shown in
Figure 4. The range of values (< max. distances) varies depending on concrete structure size and point cloud accuracy. All dimensions are given in mm.
The results vary significantly and illustrate various inaccuracies in an as-built to as-planned comparison. The type of concrete parts has a significant influence on the validity of the comparison. While the structures produced by horizontal deposition of shaped concrete strands and casting (C1, C4 and C5) show low average deviations (µ < 20) for all scanners, the deviations of the 3D concrete printed parts (C2 and C3) are much higher. This indicates a dimensional inaccuracy of the 3D concrete printing process used here, where dimensional deviations between the planned 3D model and the real structure can be caused by, for example, strand deviations due to insufficient description of strand information in the planning model, or process deviations due to different concrete extrusion rates or robot motion speeds.
Accessibility and portability of the scanners also have a significant impact. In the unfiltered results, C2C distances greater than 10 mm are primarily due to missing areas during scanning. Such areas are particularly evident in the parts with infill (C3), which were not accessible to all scanners. For scanners S2 and S3, the part cannot be moved during the scan. As a result, the bottom of the part can’t be scanned, shadows can occur and areas of the structures can’t be exposed. In particular, terrestrial laser scanning had problems exposing the side face of part C3. As a result, the as-built to as-planned comparison can be severely distorted due to the lack of scan data or process deviation during fabrication (e.g. which can occur with angles or foot points etc.).
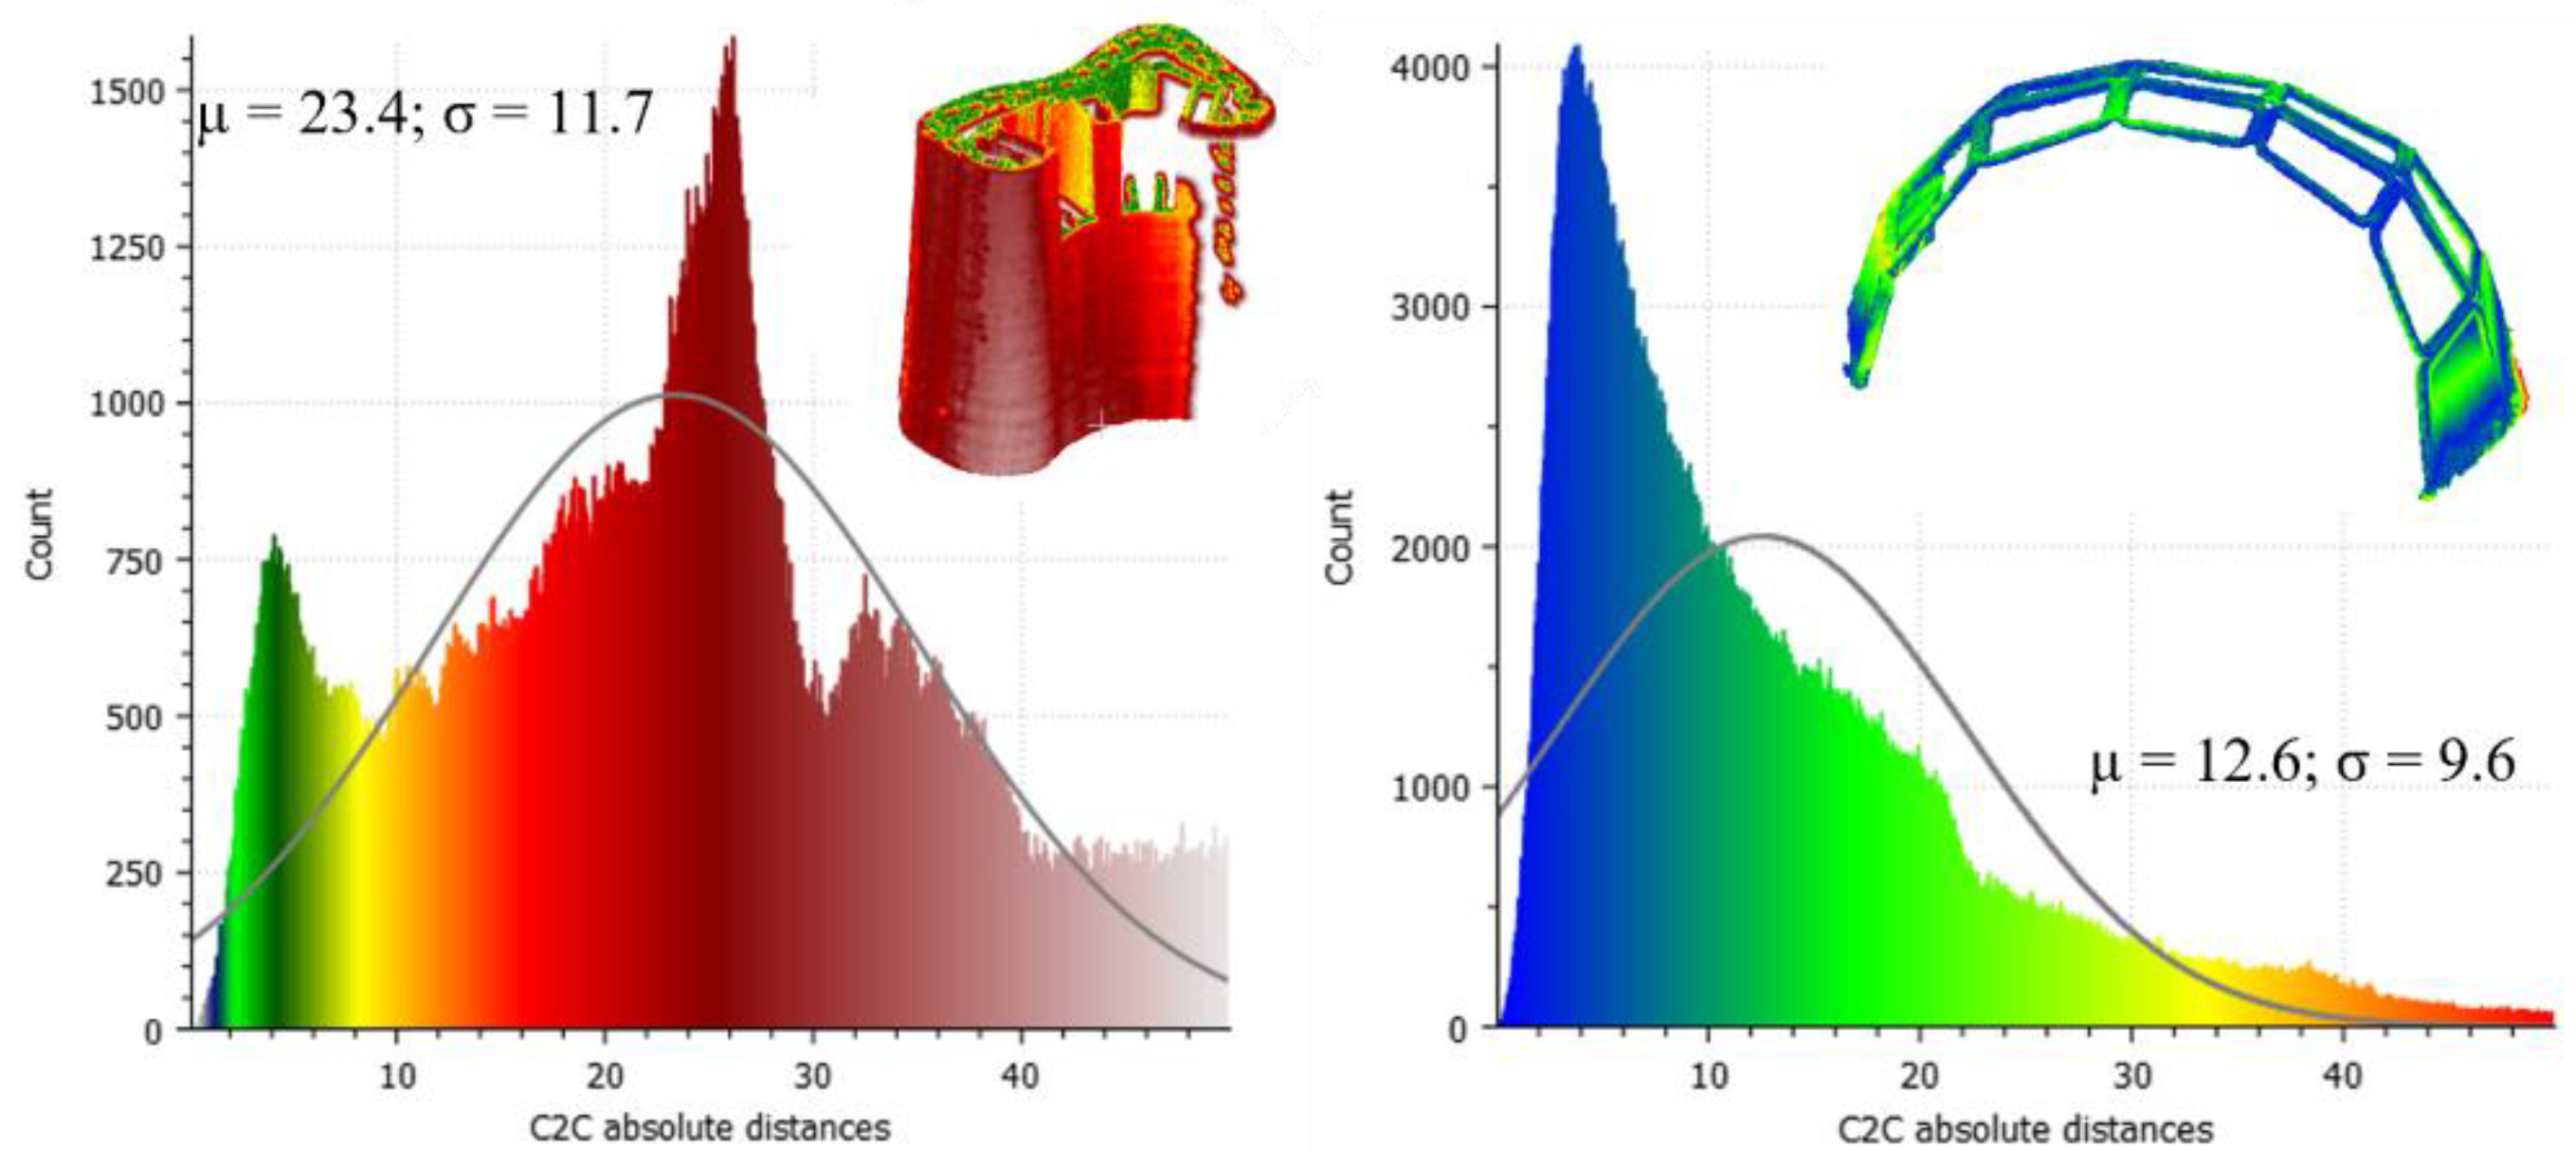
Figure 5 shows the results of the mobile device photogrammetry (S2) and terrestrial laser scanners (S3) in direct distance comparison on the concrete structures (C3 and C5). While the image of structure C3 was inaccurate with both scanners, the images of the more open structure C5 were relatively good with both scanners. For concrete structures such as these, modern cameras and depth sensors offer a viable alternative to costly terrestrial or CMM-based 3D laser scanners.
4. Discussion
The results show that the handheld 3D laser scanner provides high accuracy and measurement quality on small concrete structures. The fixed reference points on the concrete structure allow the concrete structure to be rotated and completely captured from all sides, if the component weight allows it. The output is processed directly during the scan and can be easily refined as a closed mesh of the structure after the scan. However, reference points have limited adhesion to porous surfaces, especially 3D printed concrete, making preparation labor intensive and costly, especially for larger structures.
The photogrammetry-based scans performed by the mobile device with depth sensor proved to be a versatile and cost-effective alternative for all the concrete structures tested. The rough surface of the 3D printed concrete structures facilitates the registration of the images, which is advantageous for model creation. Post-processing is quick and the results include point cloud data, vertices and textures of the environment. Since the concrete structure cannot be moved during the measurement, the capture is limited to the externally visible surfaces. Because of the photogrammetric post-processing, the measurements cannot be used for real-time monitoring.
The terrestrial laser scanner was least suitable for the concrete structures under investigation. Due to the horizontal orientation of the scanner and the distance required between the scanner and the object, the relatively small concrete structures could not be adequately exposed and large areas of the structures were not captured. The point cloud registration took a comparatively long time and resulted in a large amount of unnecessary point cloud data. Terrestrial laser scanners, on the other hand, have more potential to capture entire buildings or large construction sites with a range of several hundred meters.
The suitability of scanners depends on the application. While the industrial scanners produce highly accurate closed 3D models that can be used for simulation and advanced analysis, the point cloud output of the terrestrial laser scan is much better suited for visualization or AI-based construction progress monitoring of complete construction sites. In terms of accuracy, handheld 3D laser scanning offers the best accuracy due to the large number of reference points required. However, low-cost mobile devices can produce very accurate results with similar accuracy to terrestrial lasers, suitable for as-built to as-planned comparisons, which appear to be essential for dimensionally sensitive manufacturing processes such as 3D concrete printing.
5. Conclusion
3D scanning is the basis for model-based building condition assessment. The examined scanning methods show the following differences.
Industrial 3D laser scanners enable high-precision, closed 3D volume models for simulation and advanced analysis of as-built conditions. For concrete structures, the chosen system reaches its limits with increasing concrete structure size (< 1 m³) due to complex installation and insufficient adhesion of the reference points.
Terrestrial laser scanners cover large areas of several hundred meters and provide a detailed representation of entire buildings and environments. However, the method is unsuitable for as-built monitoring of individual concrete structures because a large portion of the surfaces cannot be captured due to shading.
Photogrammetry-based scanning using mobile devices with depth image recognition has proven to be an accurate and cost-effective alternative for concrete structures ranging in size from a few decimeters to several meters. Here, the textured surface of 3D printed concrete structures facilitates registration of photos and modeling with surprisingly high dimensional accuracy.
With photogrammetric scanning using modern mobile devices, as-built monitoring has become very accessible. It allows easy and accurate as-built monitoring to verify the quality of dimensionally sensitive processes such as 3D concrete printing, but also to collect a large amount of data to train and optimize deep learning models for component segmentation or automated construction progress analysis, among others.
Acknowledgements
Funded by the State of North Rhine-Westphalia as part of the „Digitalisierung der Bauwirtschaft und innovatives Bauen” funding program, grant number: 35.05.04.01-lB-2022-007.
References
- Buswell RA, da Silva WL, Bos FP, Schipper HR, Lowke D, Hack N, Kloft H, Mechtcherine V, Wangler T, Roussel N (2020) A process classification framework for defining and describing Digital Fabrication with Concrete. Cement and Concrete Research 134:106068. [CrossRef]
- Schmitt RH, Peterek M, Morse E, Knapp W, Galetto M, Härtig F, Goch G, Hughes B, Forbes A, Estler WT (2016) Advances in Large-Scale Metrology – Review and future trends. CIRP Annals 65(2):643–665. [CrossRef]
- Fahrendholz, J. L. , Kirner, L. & Brell-Cokcan, S. (2024). Entwicklung und Umsetzung einer automatisierten Baufortschrittsüberwachung mittels Deep Learning basierend auf Punktwolken und Bauinformationsmodellen. In Springer: Internet of Construction (S. 765–815). [CrossRef]
- Banihashemi S, Meskin S, Sheikhkhoshkar M, Mohandes SR, Hajirasouli A, LeNguyen K (2024) Circular economy in construction: The digital transformation perspective. Cleaner Engineering and Technology 18:100715. [CrossRef]
- Gordon M, Zimmerman L von, Haradhun O, Campanella D, Bräutigam M, Wolf C de (2024) Digitising
Building Materials for Reuse with Reality Capture and Scan-to-BIM Technologies. In: Wolf C de, Çetin S,
Bocken NMP (Hrsg) A Circular Built Environment in the Digital Age. Springer International Publishing,
Cham, S 41–55.
- Fahrendholz, J. L. , Adams, T. & Wildemann, P. R. (2024). Methoden zur Digitalisierung von Baustellenprozessen durch Punktwolken. In Springer: Internet of Construction (S. 685–716). [CrossRef]
- Luhmann T, Robson S, Kyle S, Boehm J (Hrsg) (2023) Close-Range Photogrammetry and 3D Imaging. De Gruyter.
- Wu C, Yuan Y, Tang Y, Tian B (2021) Application of Terrestrial Laser Scanning (TLS) in the Architecture, Engineering and Construction (AEC) Industry. Sensors (Basel) 22(1). [CrossRef]
- Carl Zeiss GOM Metrology (2023) T-SCAN hawk 2. HandsOnMetrology.
- Apple (2022) iPad Pro - Technische Daten. https://www.apple.com/de/ipad-pro/specs/. Zugegriffen: 21. Februar 2023.
- PIX4D (2024) PIX4Dcloud: Cloud based drone mapping software | Pix4D. https://www.pix4d.com/product/pix4dcloud/. Accessed: 13. März 2024.
- Cloud Compare (2022) CloudCompare - Open Source project. https://cloudcompare.org/. Zugegriffen: 13. März 2024.
- Riegl Laser Measurement Systems GmbH (2022) RIEGL VZ-400i Datasheet.
- Ivaniuk E, Friedrich Eichenauer M, Tošić Z, Müller S, Lordick D, Mechtcherine V (2022) 3D printing and assembling of frame modules using printable strain-hardening cement-based composites (SHCC). Materials & Design 219:110757. [CrossRef]
- Goertzen T, Neef T, Niemeyer AC, Mechtcherine V (2024) Investigation of digitally produced, interlocking concrete blocks for a modular slab construction. Conference paper at Digital Concrete 2024 in Munich.
- Ivaniuk E, Tošić Z, Müller S, Mechtcherine V Automated manufacturing of reinforced planar modules for
segmented shells based on 3D printing with Strain-Hardening Cementitious Composites. Under review in
Automation in Construction.
- Jafari, Bahman; Khaloo, Ali; Lattanzi, David (2017): Deformation Tracking in 3D Point Clouds Via Statistical Sampling of Direct Cloud-to-Cloud Distances. In J Nondestruct Eval 36 (4). [CrossRef]
|
Disclaimer/Publisher’s Note: The statements, opinions and data contained in all publications are solely those of the individual author(s) and contributor(s) and not of MDPI and/or the editor(s). MDPI and/or the editor(s) disclaim responsibility for any injury to people or property resulting from any ideas, methods, instructions or products referred to in the content. |
© 2024 by the authors. Licensee MDPI, Basel, Switzerland. This article is an open access article distributed under the terms and conditions of the Creative Commons Attribution (CC BY) license (http://creativecommons.org/licenses/by/4.0/).


