1. Introduction
In additive manufacturing, particularly Directed Energy Deposition (DED), understanding the pneumatic conveying characteristics of metal powder feedstock is crucial. The powder is fed into the pneumatic system using metering equipment that ensures a uniform gas/powder mixture flow. Upon reaching the nozzle, various configurations such as off-axis, discrete coaxial, continuous coaxial, annular continuous, and discrete laser beam are possible [
1].
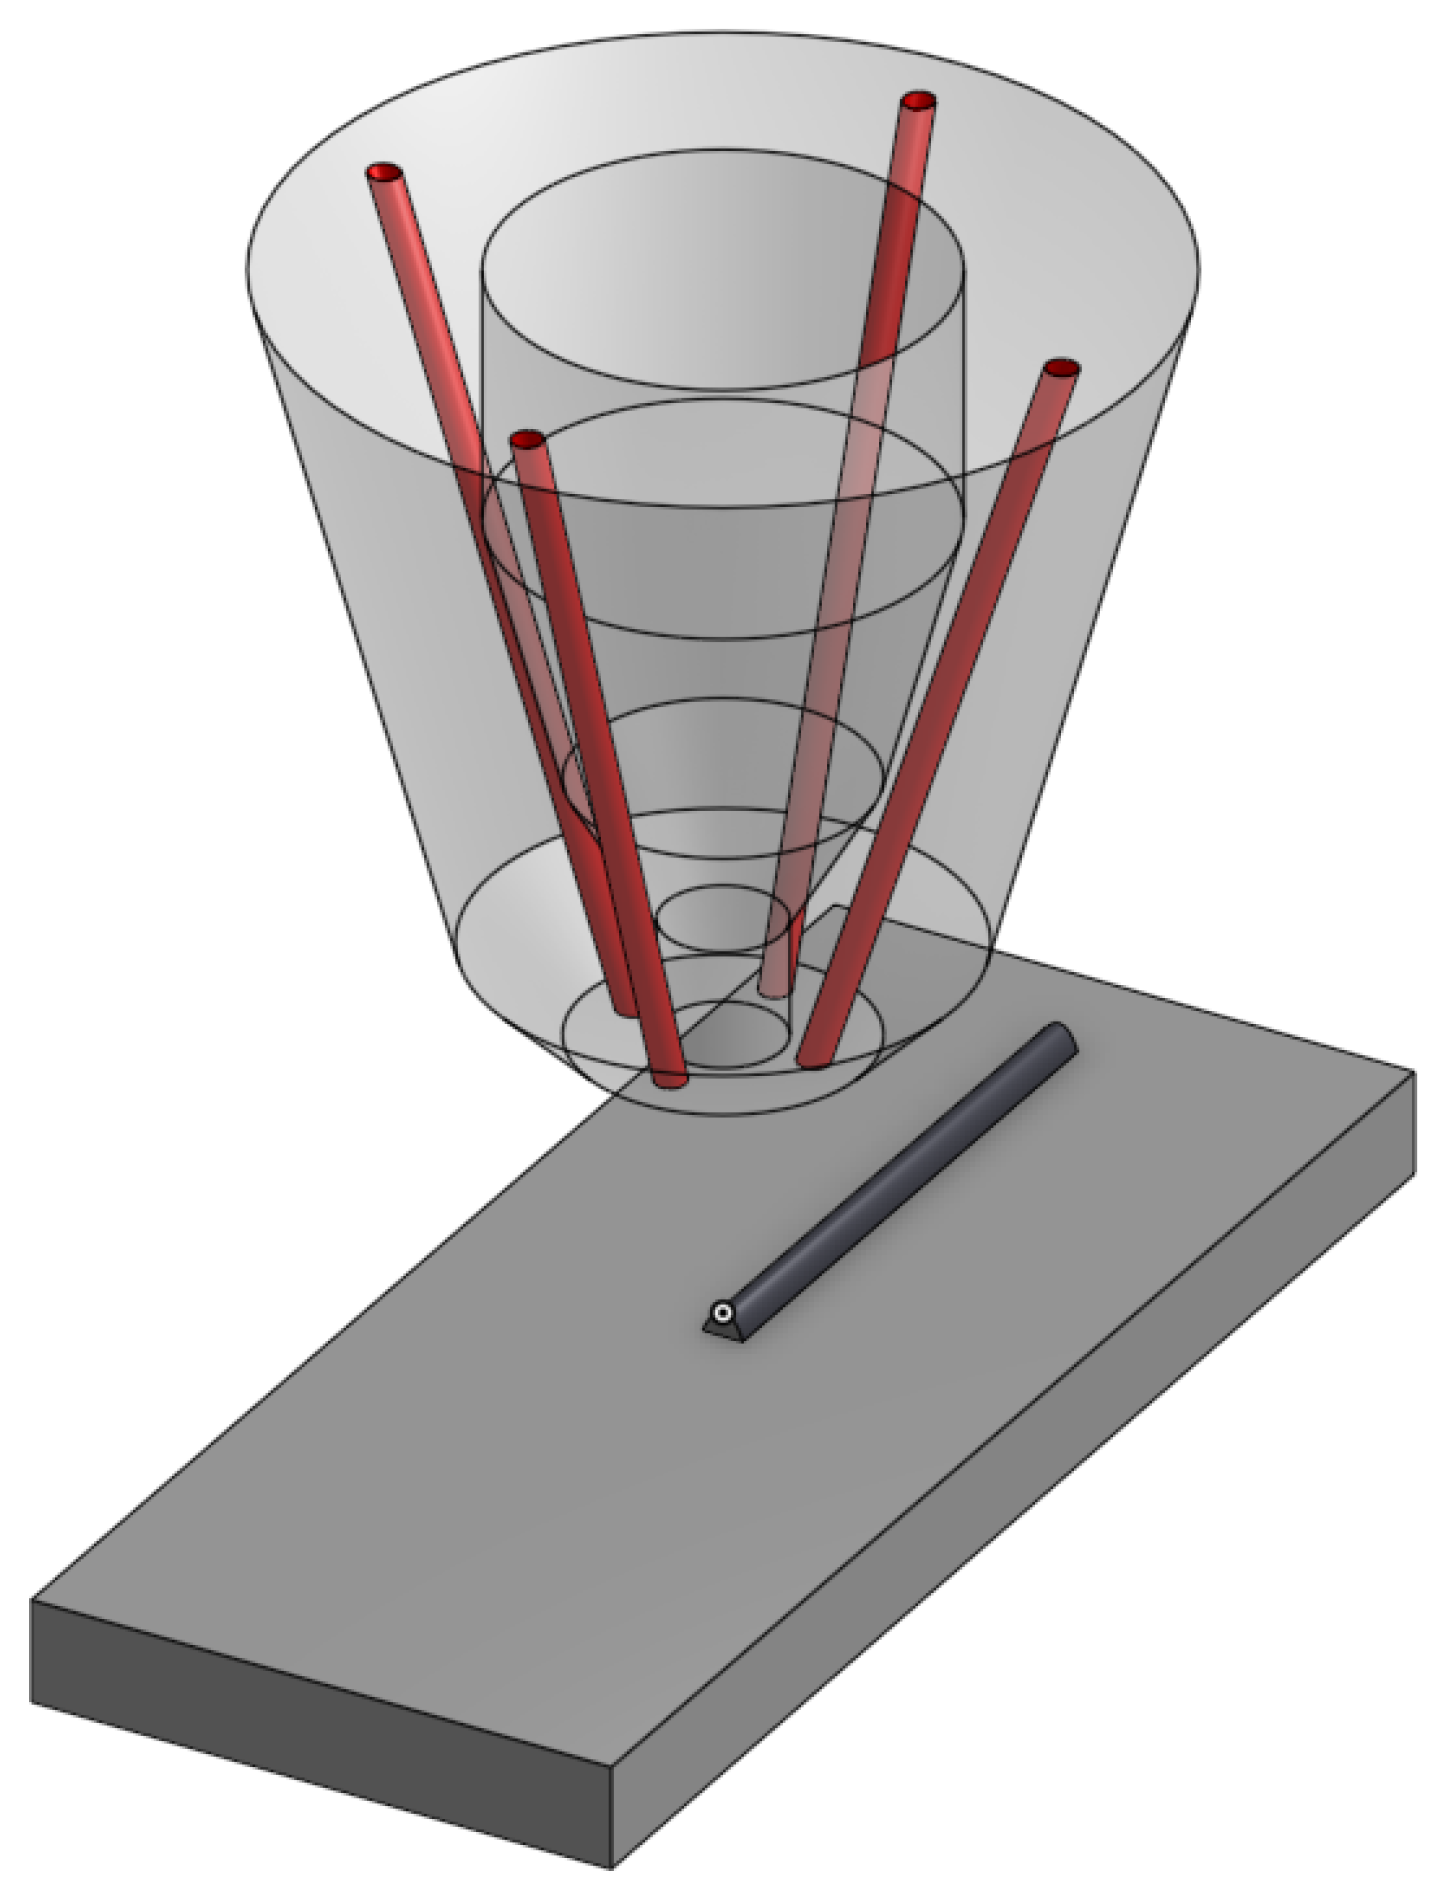
Figure 1 illustrates a discrete coaxial nozzle with four channels conveying metallic powder towards the melt pool, where the red-highlighted channels show the final part of the conveying path.
Irregularities in track width in the deposition direction and roughness profiles, as reported by Dadbakhsh et al. [
2], motivate this investigation. Variations in the powder feed can impact the quality of the deposited material. While previous studies often consider time-averaged powder flows [
3,
4], the mass flow rate variability in pneumatic conveying systems is a well-documented phenomenon [
5,
6,
7,
8]. Several factors influence pneumatic conveying flow, which are thoroughly discussed in literature [
9,
10,
11], and remain an active area of research due to the variability in powder characteristics and application-specific requirements.
Self-induced and regular variations in pneumatic conveying flow can affect particle velocity and instantaneous powder mass flow rate, directly influencing the material deposition rate in DED processes. Zhou et al. [
12] studied larger-scale pneumatic conveying systems, observing pulsating flow phenomena and periodic flow regimes in a rectangular pipe, both experimentally and through simulations. Self-excited flow oscillations can be simulated with four-way coupled simulations, but not when the particle effect on the carrier flow is neglected. In CFD-DEM simulations of a horizontal channel by Zhao [
13], uniform particle motion and velocity were observed under 1-way coupling, whereas considering particle influence on the fluid motion (two-way coupling) resulted in visible bands of higher and lower particle concentration.
Experimental studies by Alkassar et al. [
14] on pneumatic conveying pipelines with dilute and dune flow revealed regular pulsations in pipe pressure, with wavelet analysis showing dependence on solid loading and characteristics. Literature on LMD nozzle systems often uses MP-PIC or Discrete Particle Models for the powder phase, motivated by low particle loading [
15,
3]. Particle-particle interactions in CFD-DEM simulations have been shown to cause cluster formation and powder mass flow rate fluctuations [
5,
16]. Despite its primary application in large reactors, the MP-PIC model is also used in modeling pneumatic conveying of solids [
17].
Existing literature on LMD nozzle systems which employs a Lagrangian model for the powder phase, mostly analyzes the process using MP-PIC [
15,
3] or Discrete particle Models 1-way or 2-way coupling [
15], motivated by the low particle loading in the system. Previous studies report how the particle-particle interaction in CFD-DEM simulations leads to the formation of clusters [
5,
16], and therefore powder mass flow rate fluctuations. Even though the MP-PIC model find most of its applications in large reactor models, it is used in the modelling of pneumatic conveying of solids [
17]
2. Experimental Setup
2.1. Conveying Circuit
Experiments were conducted using circular, borosilicate glass pipes of
at different gas flowrates of
. The material is AISI 316L stainless steel, in the commercial form
Oerlikon MetcoAdd 316L-D [
18] with a nominal Particle Size Distribution (PSD) described by
and
. These values can be compared with the PSD determined experimentally, in
Figure 11.
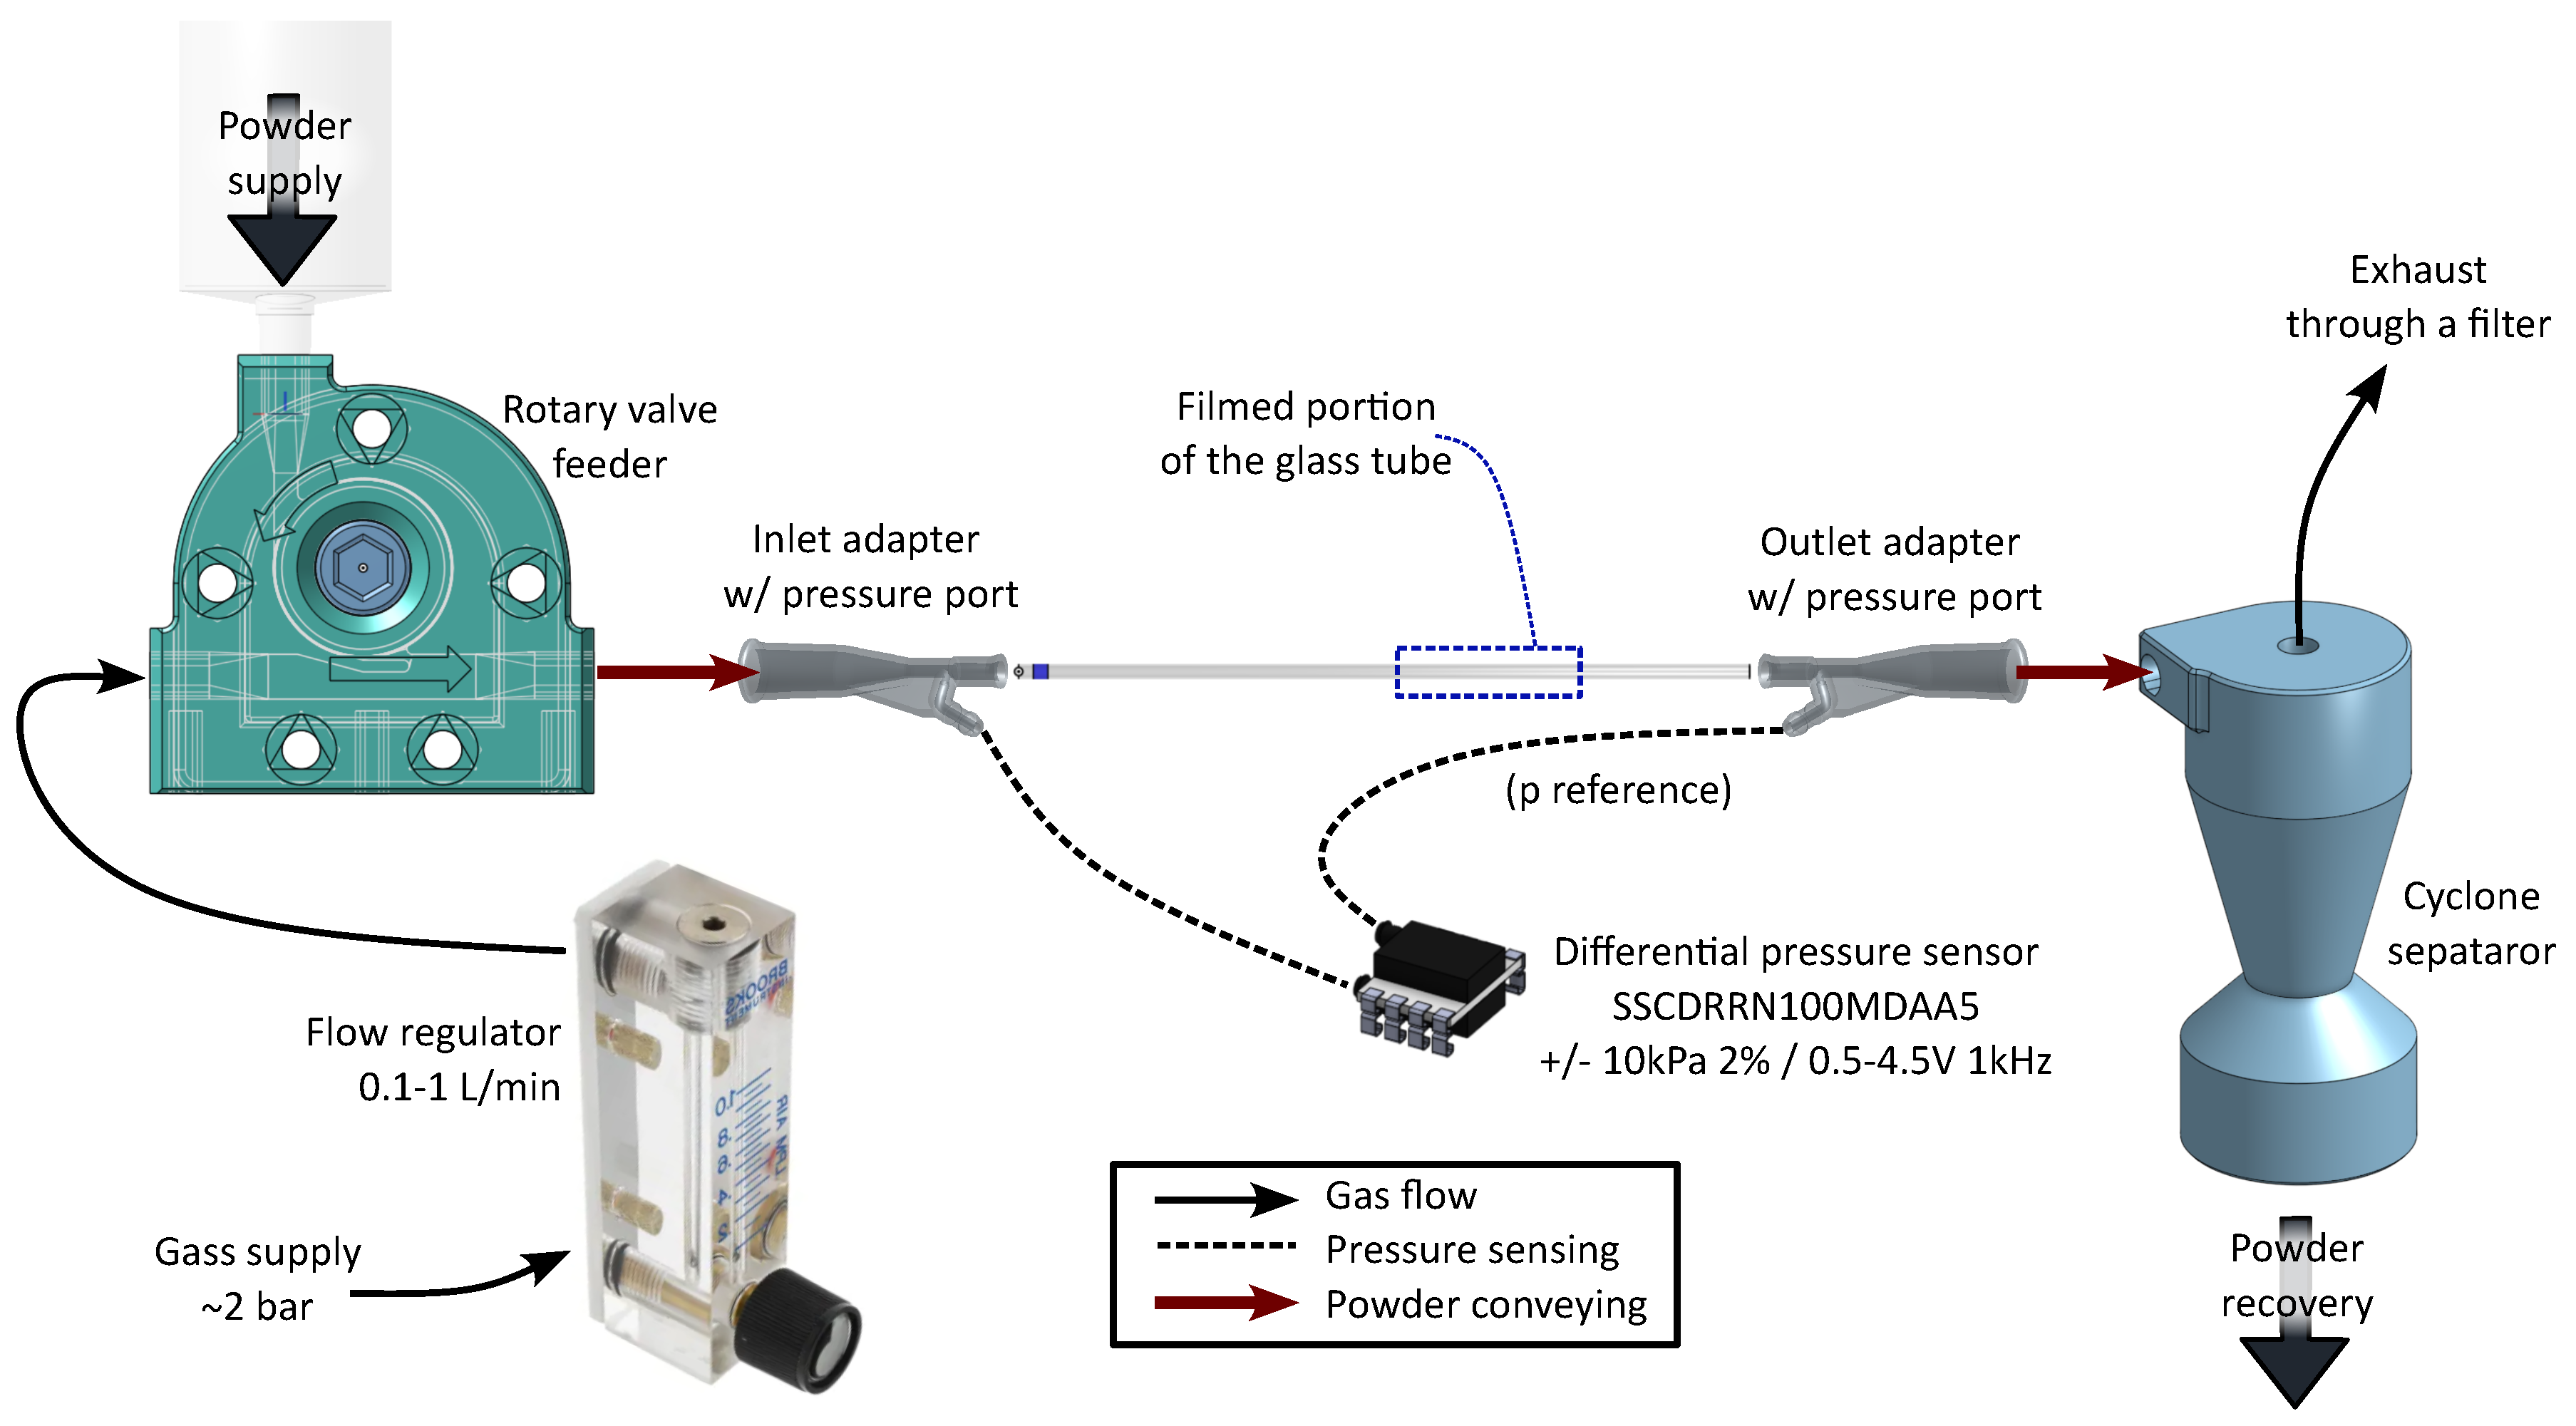
The setup is sketched in
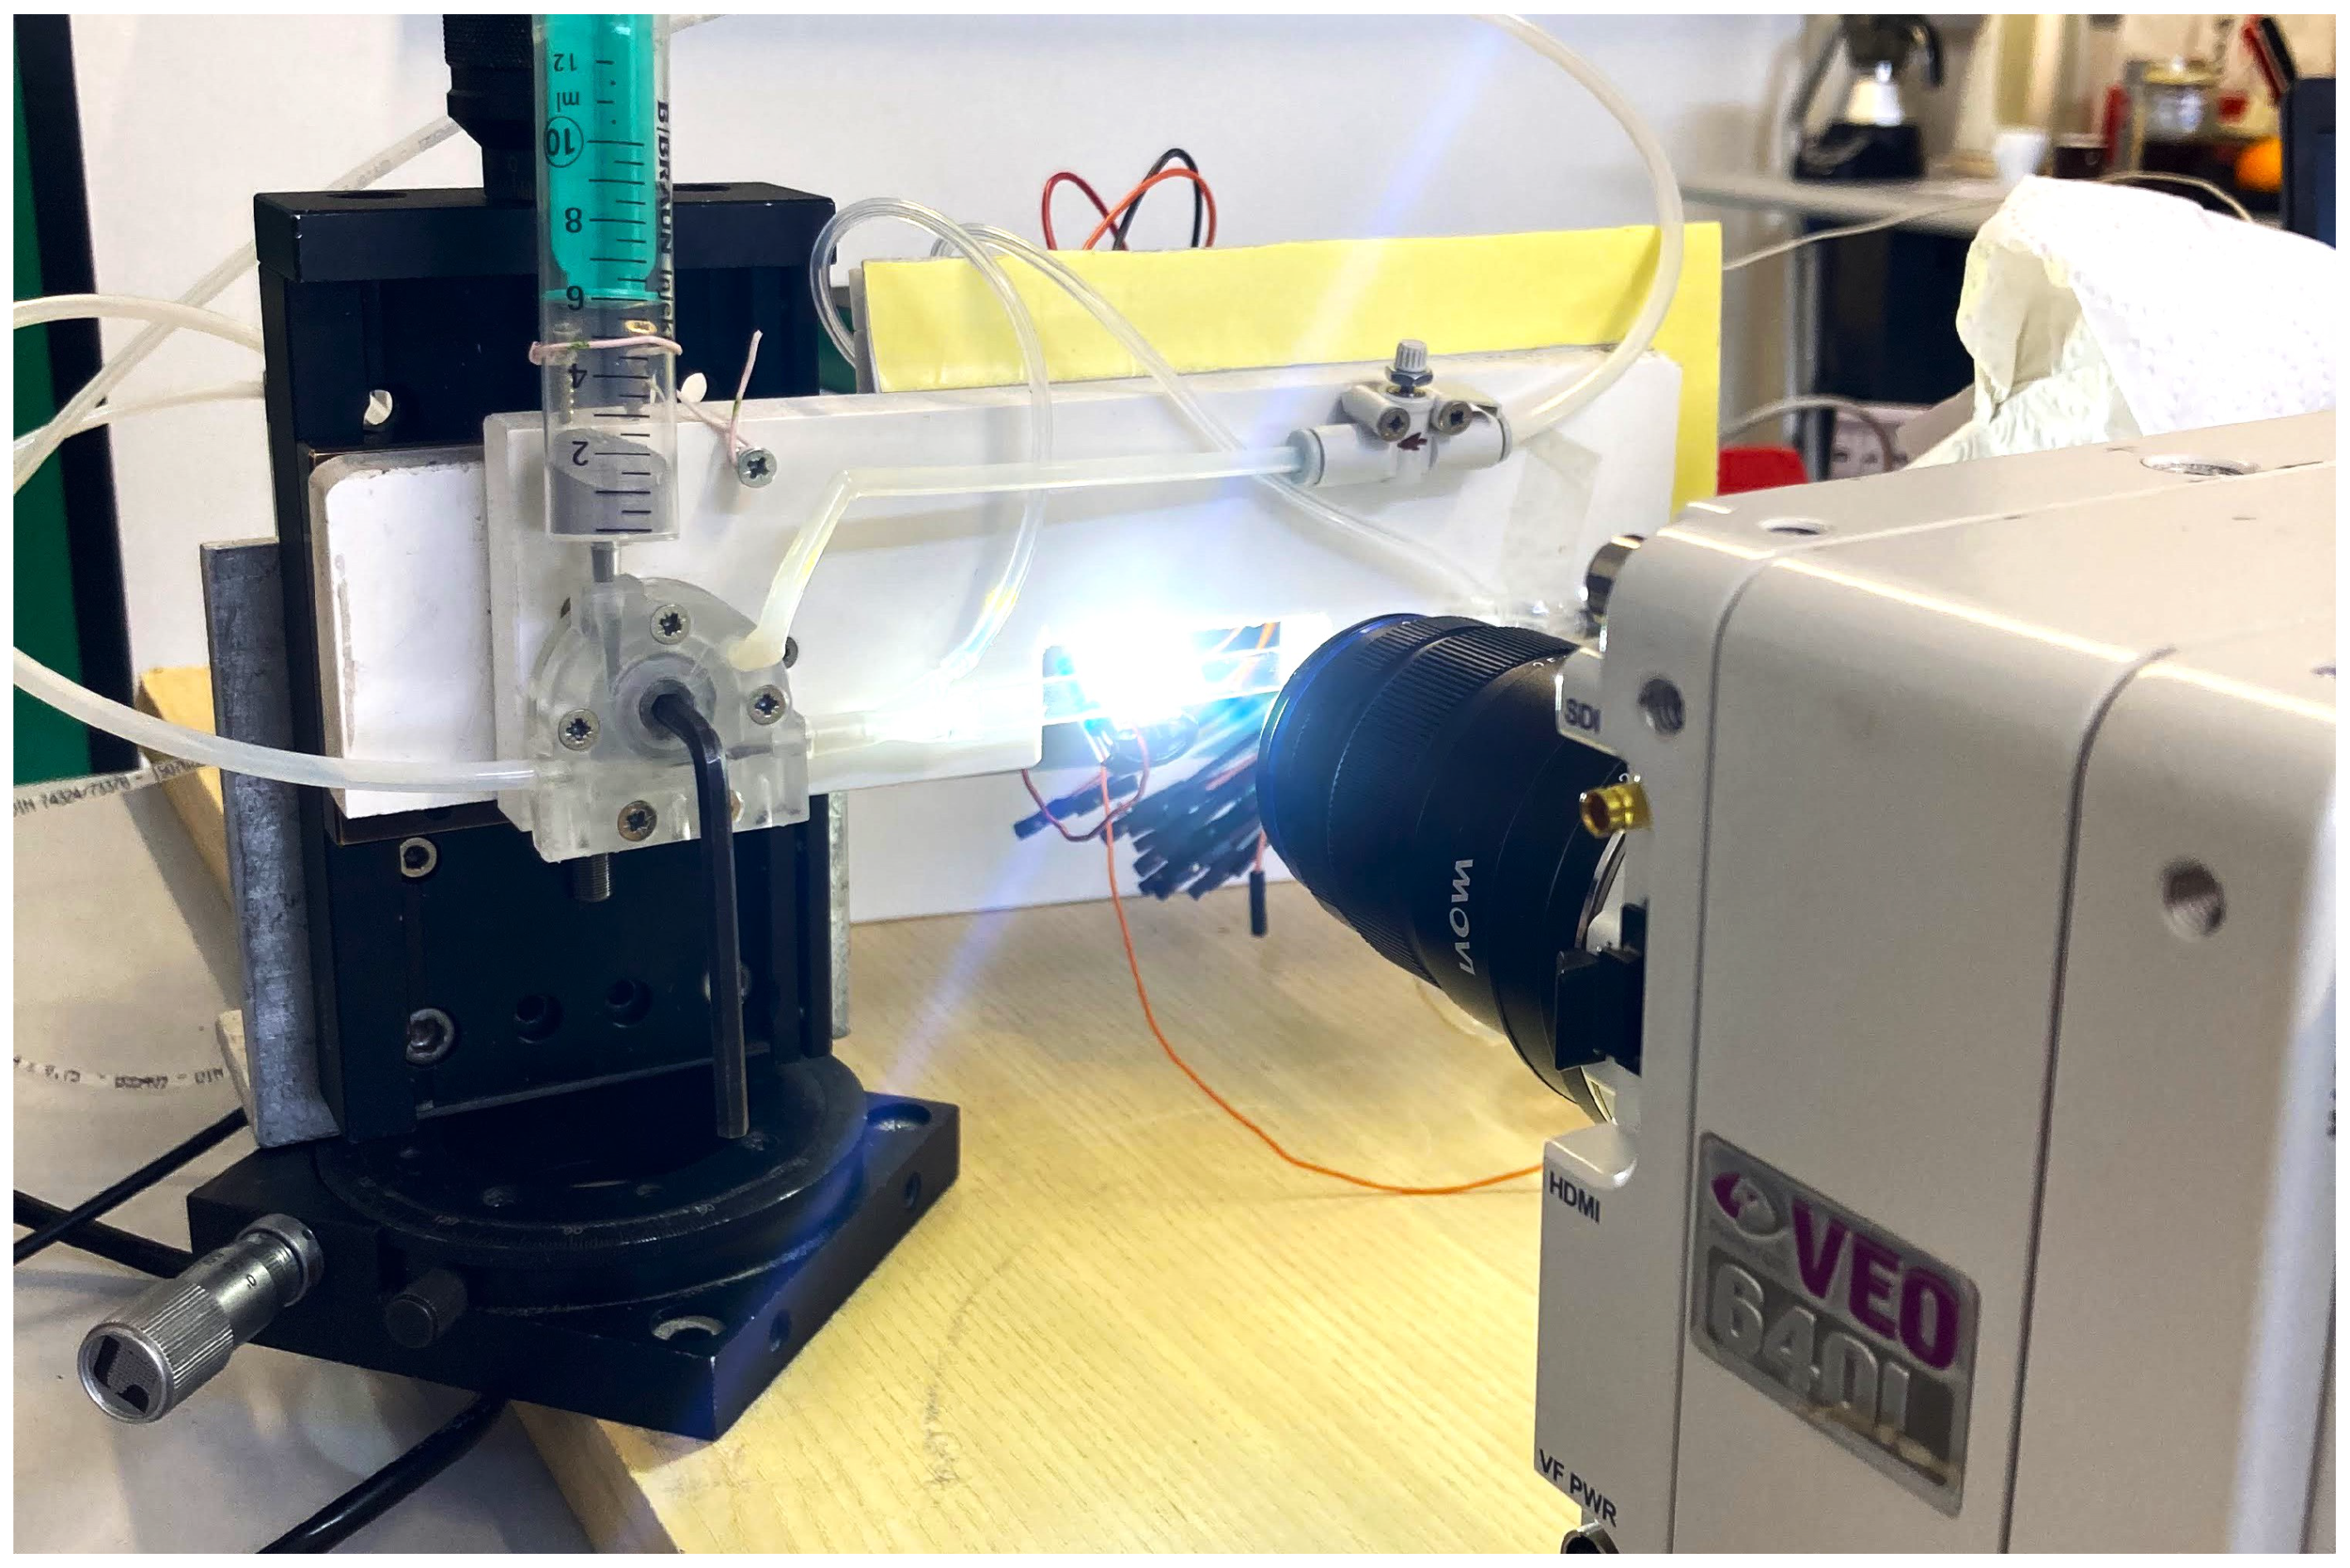
Figure 4, where also the camera and lighting system are visible. Notice the vertical adjustment of the whole pipe, other adjustments were done by strategic placement of shims and adhesive tape. The pneumatic conveying circuit is presented in
Figure 2.
The central part of the circuit is the borosilicate glass pipe, of which the wall thickness is .
2.1.1. Glass Pipe Coupler
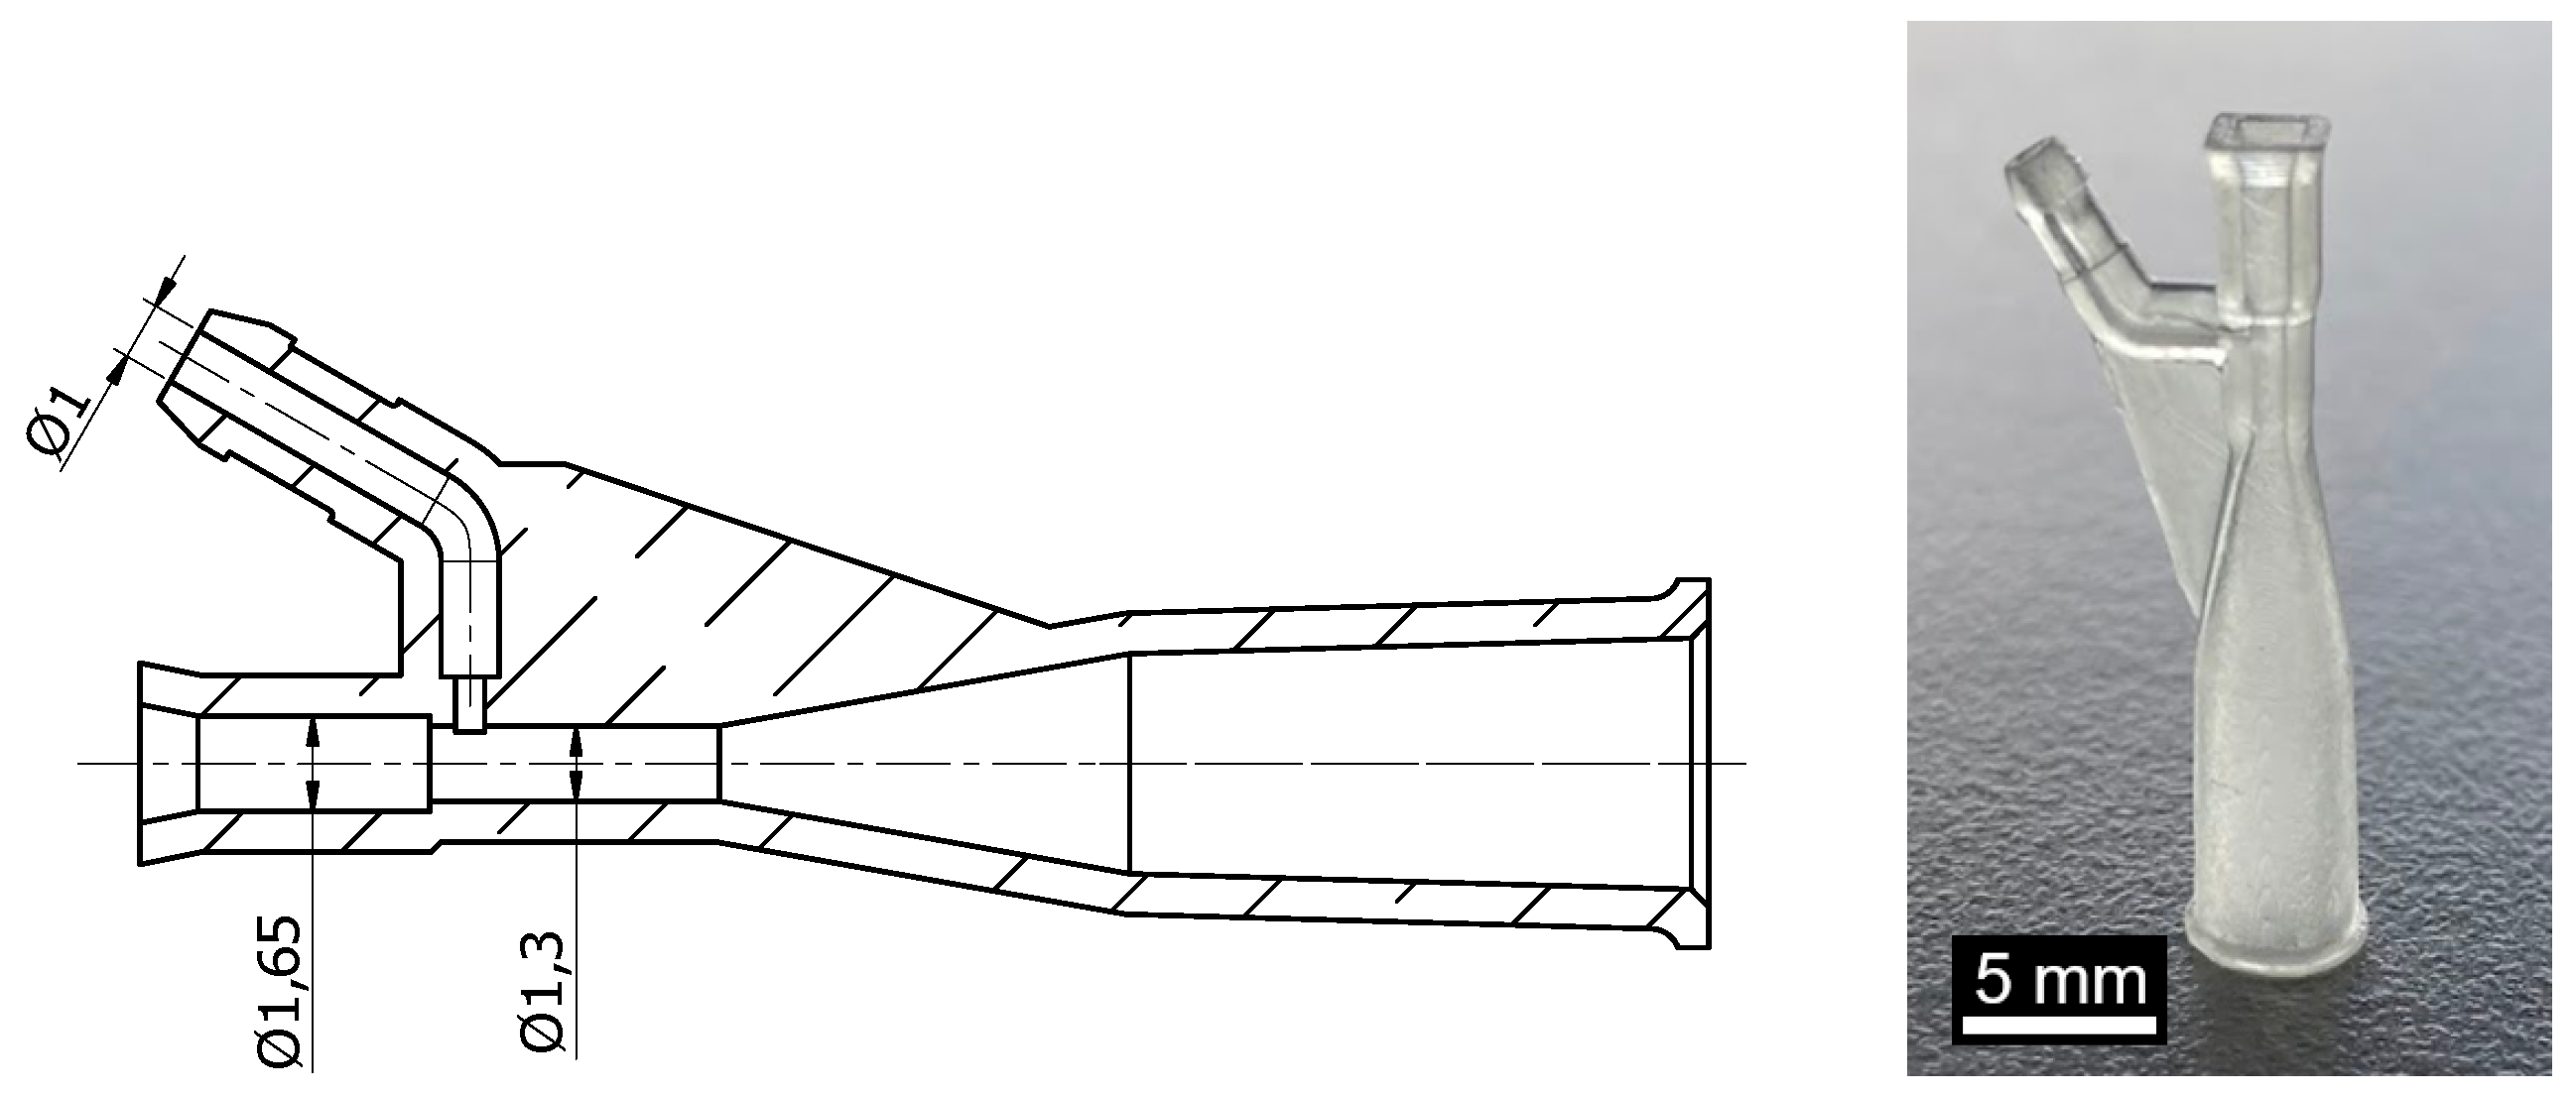
The development of the system involved the design of the small-scale couplers for the pipe.
Figure 3 shows the finished result, manufactured using Stereolitography 3D printing. The internal channels have larger nominal sizes to account for manufacturing tolerances. The couplers were printed in a batch and manually selected to ensure best fit with the pipe’s internal channel.
Figure 3.
One of the couplers. The opening of the static pressure port in the manufactured part is barely visible to the naked eye. A section view presents the internal channels. The conic section is used to fit the coupler to the flexible pipe.
Figure 3.
One of the couplers. The opening of the static pressure port in the manufactured part is barely visible to the naked eye. A section view presents the internal channels. The conic section is used to fit the coupler to the flexible pipe.
The same technology allowed to manufacture and iterate on a rotary valve feeder. This element shows areas of improvement, but it allowed to effectively feed the powder in the circuit for the short duration of the measurements.
The gas supply is provided by a high-pressure tank of clean, dry, pure nitrogen gas. This high purity gas supply ensures that the contamination from moisture or oils is not present, and completely avoids a compressor which might send vibrations down the gas line. A needle regulator was used to set the gas flowrate.
2.1.2. Sensors integration
The circuit schematic in
Figure 2 shows that the pressure ports are connected to a Honeywell SSCDRRN100MDAA5 [
19] piezo-resistive differential pressure sensor. The sensor provides a
analog output, with a full scale of
. The 3D-printed couplers, see
Figure 3, were designed to have a lateral port to measure the static pressure at the inlet and outlet of the pipe. A batch of couplers was printed, selecting those that provided best alignment of the central channel between the glass pipe and the coupler. Therefore, minimum disturbance is expected when measuring the static pressure.
The calibrated output values are updated at , and recorded using a 14-bit USB oscilloscope. The sensor provides an accuracy of FSS (Full Scale Span) in the same measurement period. When accounting for other effects (temperature variation, voltage offset, calibration, orientation respective to gravity), the manufacturer declares a total error band of FSS. Consequently, while the absolute value of the differential pressure can be determined within , the accuracy for tracking pressure changes over time remains at .
The second channel of the oscilloscope was connected to a Vishay BPW34 photodiode, with a sensing area of . A simple voltage divider and amplifier was used as preconditioning circuit.
2.2. Camera Configuration
A
Pantom VEO 640L high speed camera is visible in the setup of
Figure 4. It carries a CMOS (global shutter) sensor, with
, each pixel is a square of side
. The camera has an electronic global shutter which duration can be selected independent of the fps. With good illumination the optimal balance was found at around
; longer times result in better illumination but the particles form a streak if they are moving too fast.
Figure 4.
Photo of the setup for the pneumatic conveying experiment.
Figure 4.
Photo of the setup for the pneumatic conveying experiment.
The camera is equipped with a
25mm f/2.8 2.5-5X Ultra Macro lens. Compared with similar models, it has a good aperture (F2.8), meaning it is expected to deliver more light to the sensor compared to other alternatives. The aperture can be reduced (down to F16) to improve the depth of field. Given the camera’s sensor size of
(circa APS-C), pixel size of 10um. The recording window for the circular and square pipes was selected at
, with a sample rate of
. At full acquisition window, the lens can provide an image:
| Magnification |
Field of View |
Pixel Size |
| 2.5x |
10.24x6.4mm |
4um |
| 5x |
5.12x3.2mm |
2um |
The camera is also mounted on a slider, which allows it to move closer or farther from the pipe in a precise manner, changing the focus. Especially with full aperture, the field of view is quite shallow, and it is crucial to put the focus plane on the center of the pipe. The pipe assembly is moved in order to align its mid-plane with the recording plane. The image is captured around the middle of the pipe length, limiting edge issues. The resulting pictures are of good quality and an example with minimal post-processing is shown in
Figure 5.
Figure 5.
Circular pipe (⌀ 1.15 ), 1280x400 , exposure 6.5 , aperture F8, sample rate .
Figure 5.
Circular pipe (⌀ 1.15 ), 1280x400 , exposure 6.5 , aperture F8, sample rate .
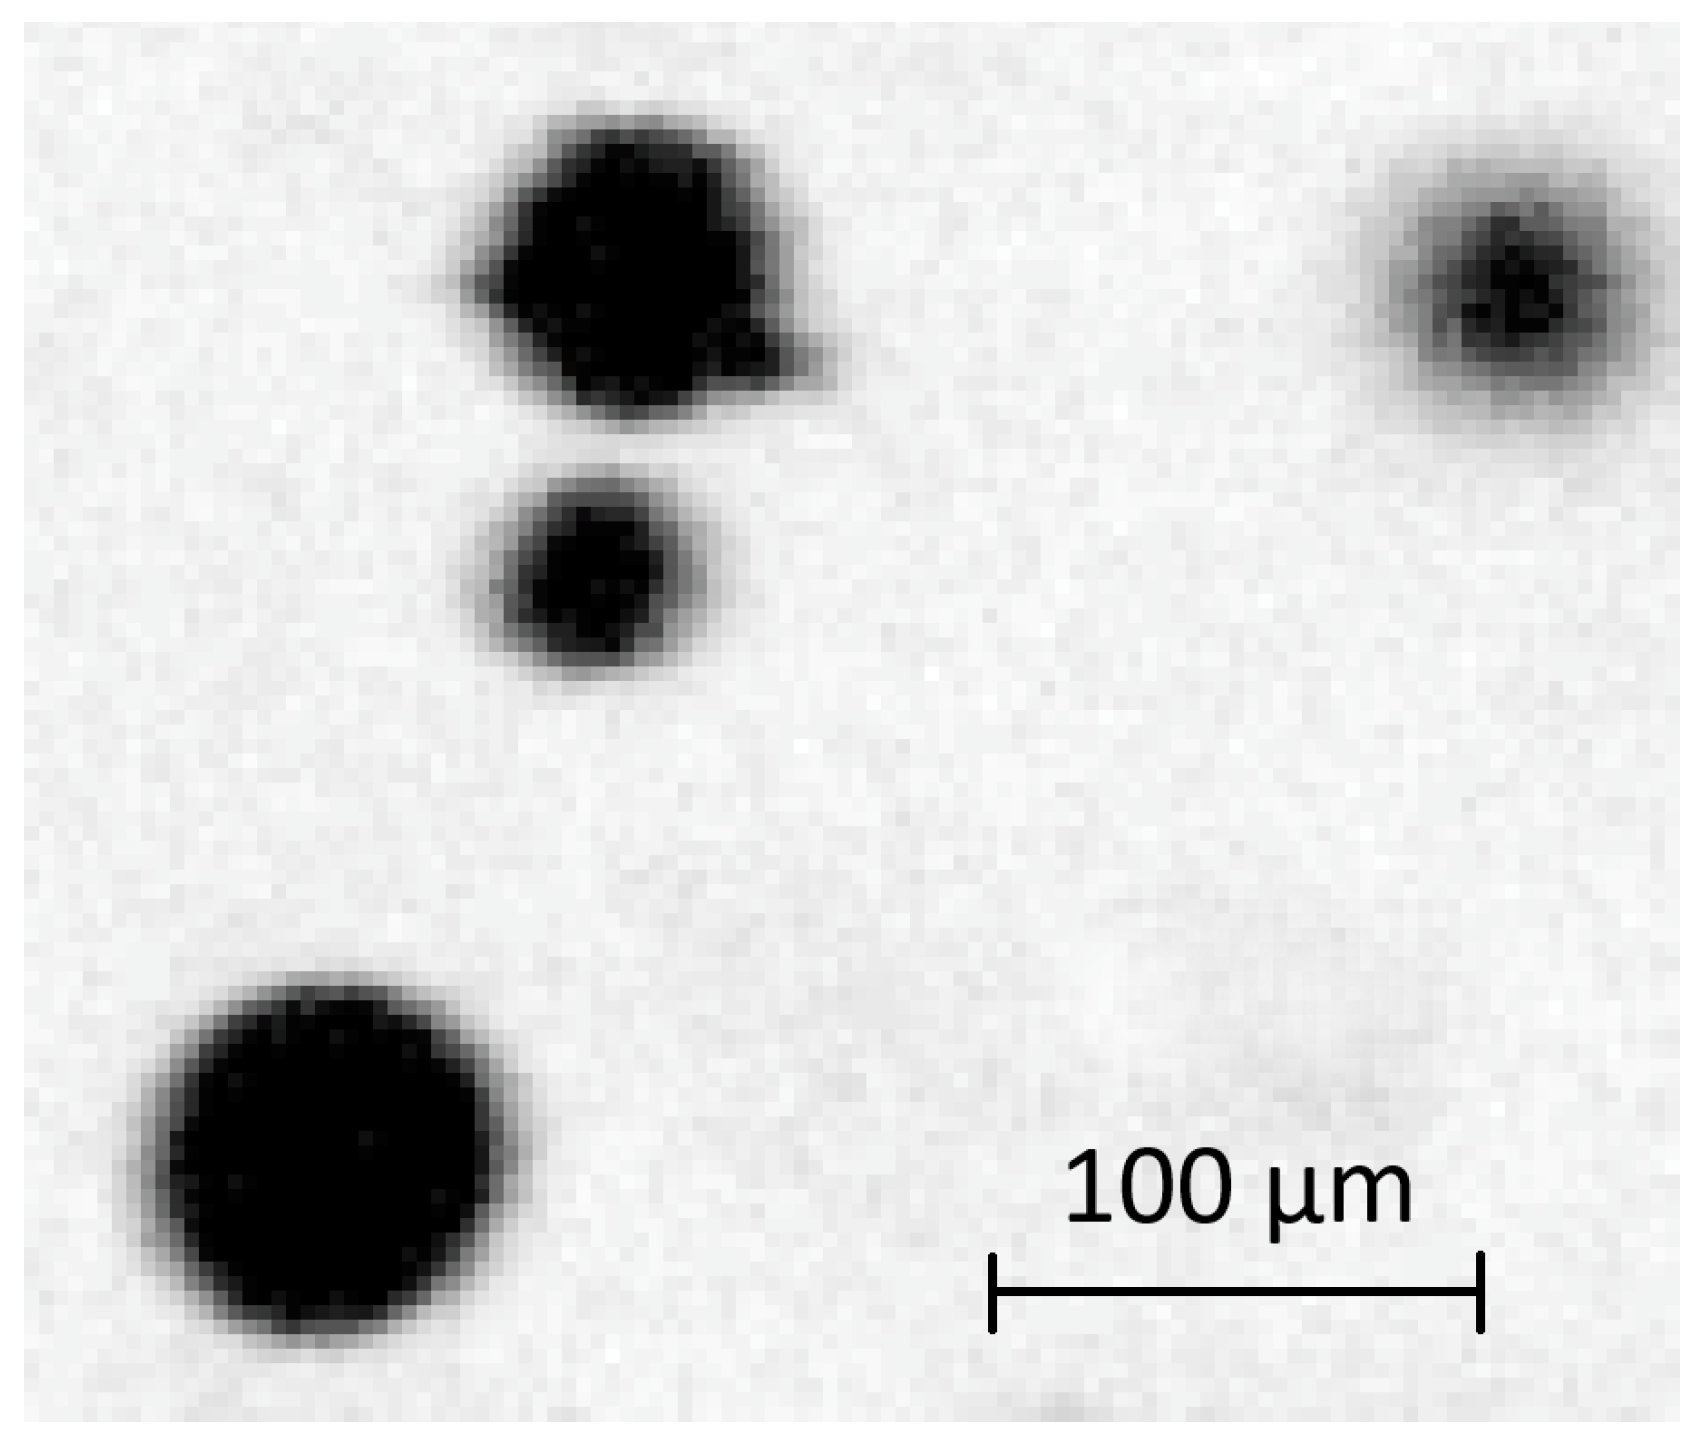
Figure 6 presents a detail view of a group of medium sized particles, where the pixel size is approximately
. The image resolution allows a direct estimation of the PSD, given the expected particle diameters from the powder’s datasheet [
18]. The exposure, or the time when light is actually collected by the sensor, must be relatively short to avoid blur in the direction of motion. An exposure of around
almost completely eliminated the streaks while maintaining a good image luminosity with an aperture between F5.6 and F8.
Illumination of the section of interest is directly from the side opposite from the lens. A high powered LED light shines light towards the pipe and to the lens. It is extremely bright, and it is advisable to use some level of PPE when on. A layer of frosted acrylic sheet in front of the LED diffuses the light, resulting in sharper images and a more uniform background.
Figure 6.
Detail view of four particles captured in
Figure 5 (B).
Figure 6.
Detail view of four particles captured in
Figure 5 (B).
3. Particle Tracking
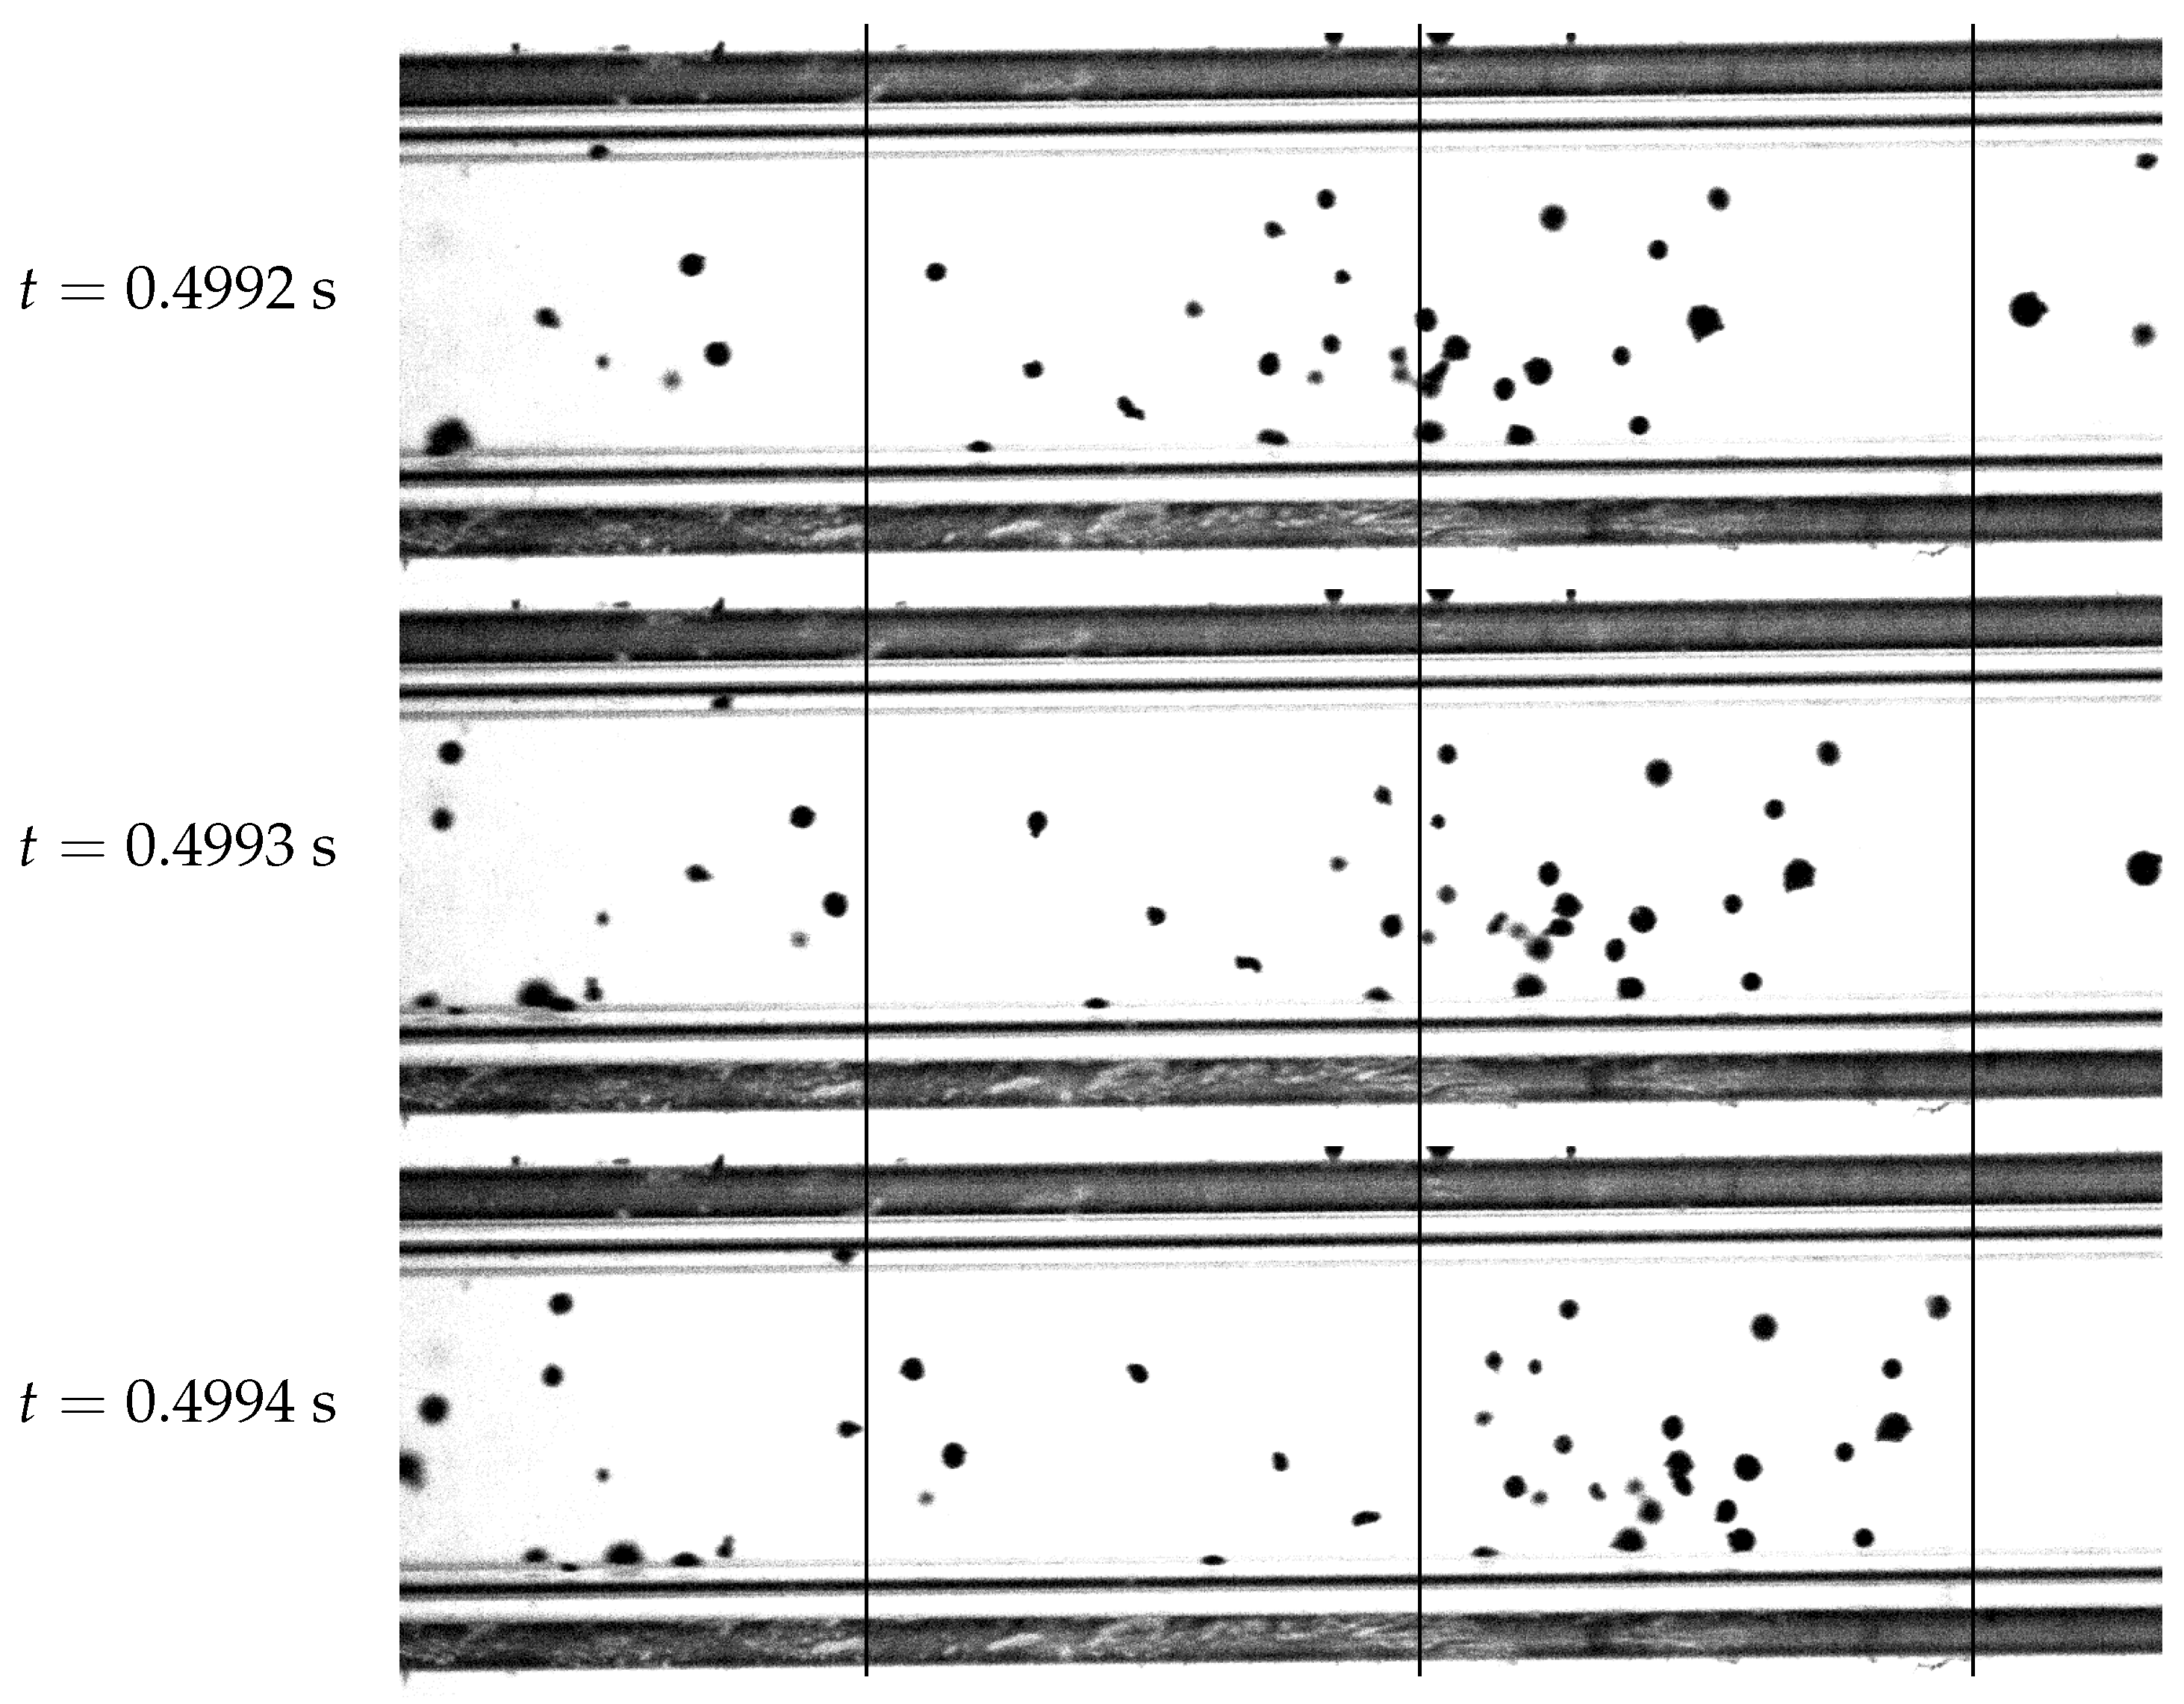
Figure 5 reports static snapshots of the flow conditions. To track the movement of particles over time, the positions should not change excessively from a frame to another. The image sequence is presented in
Figure 7, where the particles’ movement is immediately evident. Each recording is in the order of
frames, for a total duration of around
. Counting all the particles present in all the frames, the number of spots to be considered for the tracking procedure is approximately
.
Figure 7.
Image sequence from the recordings. The gas flow in this case is . Notice the particles’ movement relative to the vertical grid lines.
Figure 7.
Image sequence from the recordings. The gas flow in this case is . Notice the particles’ movement relative to the vertical grid lines.
The videos captured using the setup described in this Section were analyzed as an "image stack", or a sequence of 8-bit gray scale images, in the image processing software Fiji/ImageJ [
20]. In the pre-processing step, the original video is rotated, cropped, and transformed into a black and white binary mask according to a brightness threshold. More advanced image filtering and segmentation methods are available in the software and were tested, but resulted superfluous thanks to the camera and lighting setup, which already provide very easily identifiable spots. This work refers to particles as the physical, 3-D objects that compose the powder; spots are their 2D shadows captured on each image of the high-speed video.
Particle tracking and analysis was performed using TrackMate [
21], an additional plugin to Fiji. Essential to this work is its implementation of the linear motion tracker, which can deal with particles moving with a roughly constant velocity. It is based on the LAP framework [
22], which approximates multiple-hypothesis tracking using a linear assignment problem: a cost matrix penalizes the least likely movements. It was developed mostly to track the Brownian motion of bacteria, but it is used in TrackMate to track fast moving objects using a Khalman filter strategy: the particle tracks are analyzed, in the hypothesis of mostly linear motion, and a prediction is made for the subsequent steps. If there is a particle within a tolerance of the expected landing spot, a new segment (called edge) is added to the track. With enough information, the implementation can track the particle even if it is not visible for a predefined number of steps. Penalties can be assigned to several conditions, namely the spot area and perimeter, increasing the robustness of the system to track objects that are not expected to change in shape and size; lower weights can be assigned to loosen the condition, accounting for rotating particles. Conveniently, the spot identification step of TrackMate records the geometric descriptor of each spot: area and perimeter are used to calculate the equivalent diameter, along with other shape descriptors like circularity, Feret diameters, and ellipsoid axes. The post-processed high speed videos result in four different files:
spots.csv containing the position of each spot in time and space, a unique numeric identifier (ID), geometrical information (area, perimeter, circularity,…), as well as the ID of the track it is included in.
edges.csv specifies the source and target spot IDs, the displacement and duration (which may be multiples of the frame ), the speed, and again the ID of the track it is included in.
tracks.csv specifies the overall track information, like total track duration, average speed, and more.
allspots.csv is the same as spots.csv, but it also includes the spots that do not participate in a track, therefore is preferred when determining the concentration.
3.1. Occlusion
At this stage, no specific assumptions were made regarding the depth of the pipe along the camera axis. However, occlusion significantly impacts the accuracy of volumetric density measurements. Spinewine et al. [
23] offer a detailed analysis of occlusion effects observed when imaging particles at increasing depths within a channel. In their work,
Figure 7a depicts the distribution of visible particle centers relative to depth (perpendicular to the wall) for two distinct concentrations (
and
). The figure clearly demonstrates that the observable particle volumetric density is merely a fraction of the actual volumetric density, with the discrepancy widening as the depth from the camera’s viewpoint increases.
3.2. Tracking verification
The particle tracking software was tested on a simulated dataset to estimate the performance of the technique, having control on all possible variables. The model discussed in the article by Pedrolli et.al. [
24] was adjusted to replicate the flow in conditions similar to the experiment. The simulation yielded a series of datasets containing particle positions and velocities recorded at intervals of
, matching the framerate of the high-speed videos. These datasets serve as the baseline, or "ground truth," for assessing the error introduced during the particle tracking phase of the analysis.
Using Paraview [
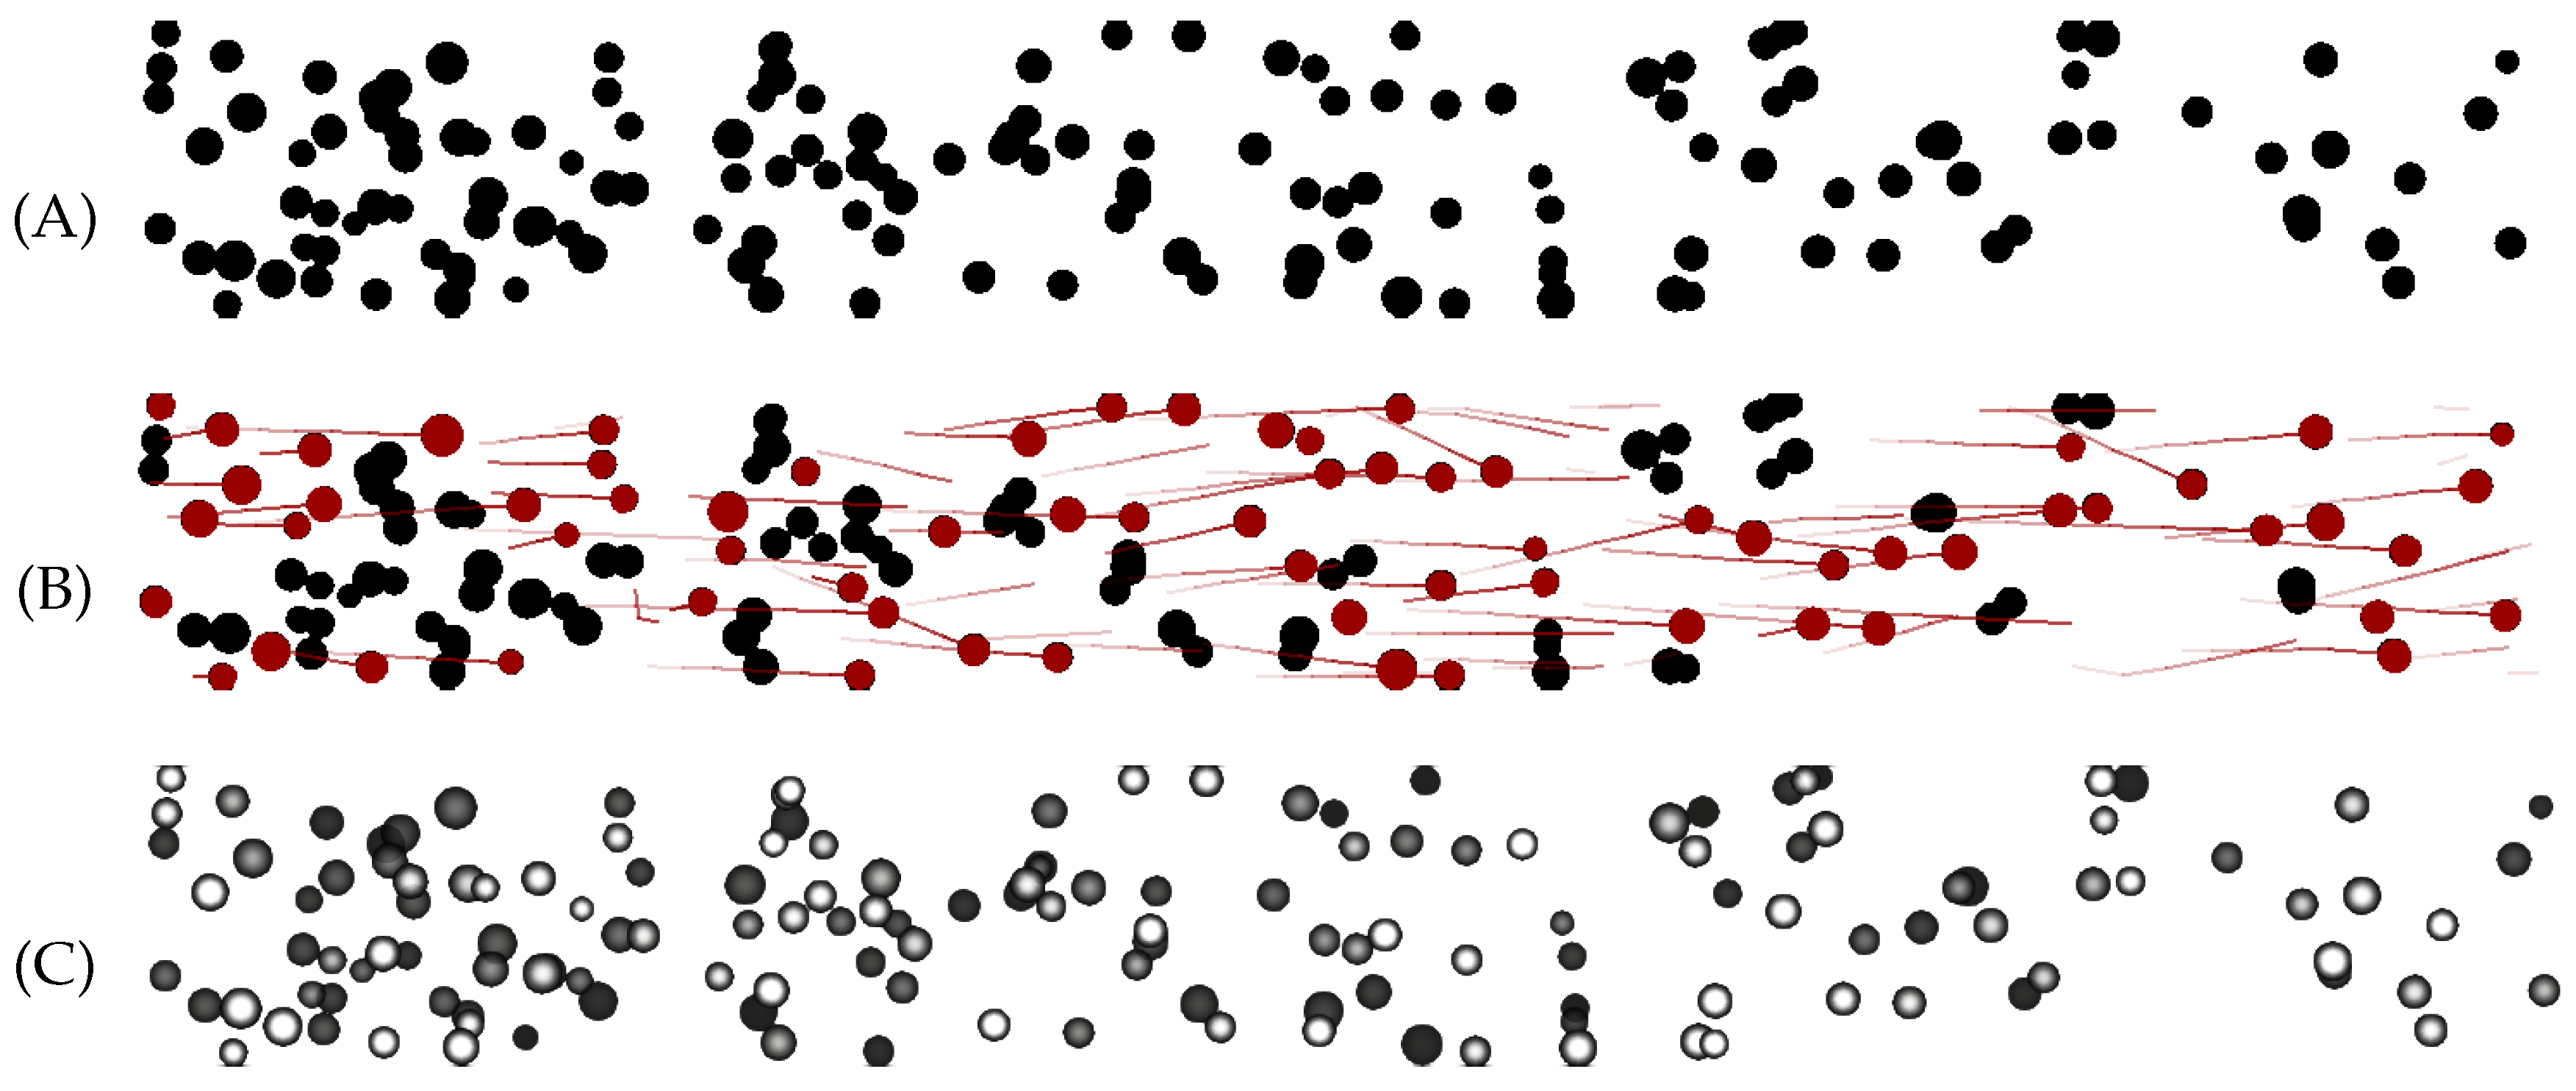
25], the simulation output was post-processed into a series of images, replicating those captured by the experimental setup. In these images, particles are depicted as dark circles against a white background, as shown in
Figure 8 (A), occasionally overlapping. Overlapping particles pose a challenge for tracking. To address this, the chosen approach involves selecting only fully visible particles, employing the Kalman filter strategy implemented in TrackMate [
21].
Figure 8 (B) illustrates the same frame as (A), overlaying the spots utilized in tracking and their corresponding tracks. It is worth noting that while the tracks may be incomplete, they provide sufficient data for velocity analysis.
Figure 8.
Example snapshot of the Simulated Particle Tracking (sPT). (A) shows particles represented as uniformly colored dark circles. The tracking result in (B) highlights the tracked spots and their respective tracks (backwards in time). The shaded representation in (C) displays particle overlapping, with darker particles being farther from the observer.
The tracking information was exported from TrackMate as CSV files containing all the Spots, Edges, and Tracks. Tracks consist of a series of edges, each defined by an origin and target spot. These elements are interconnected through identifier numbers (IDs), with edges containing the IDs of their respective origin and target spots.
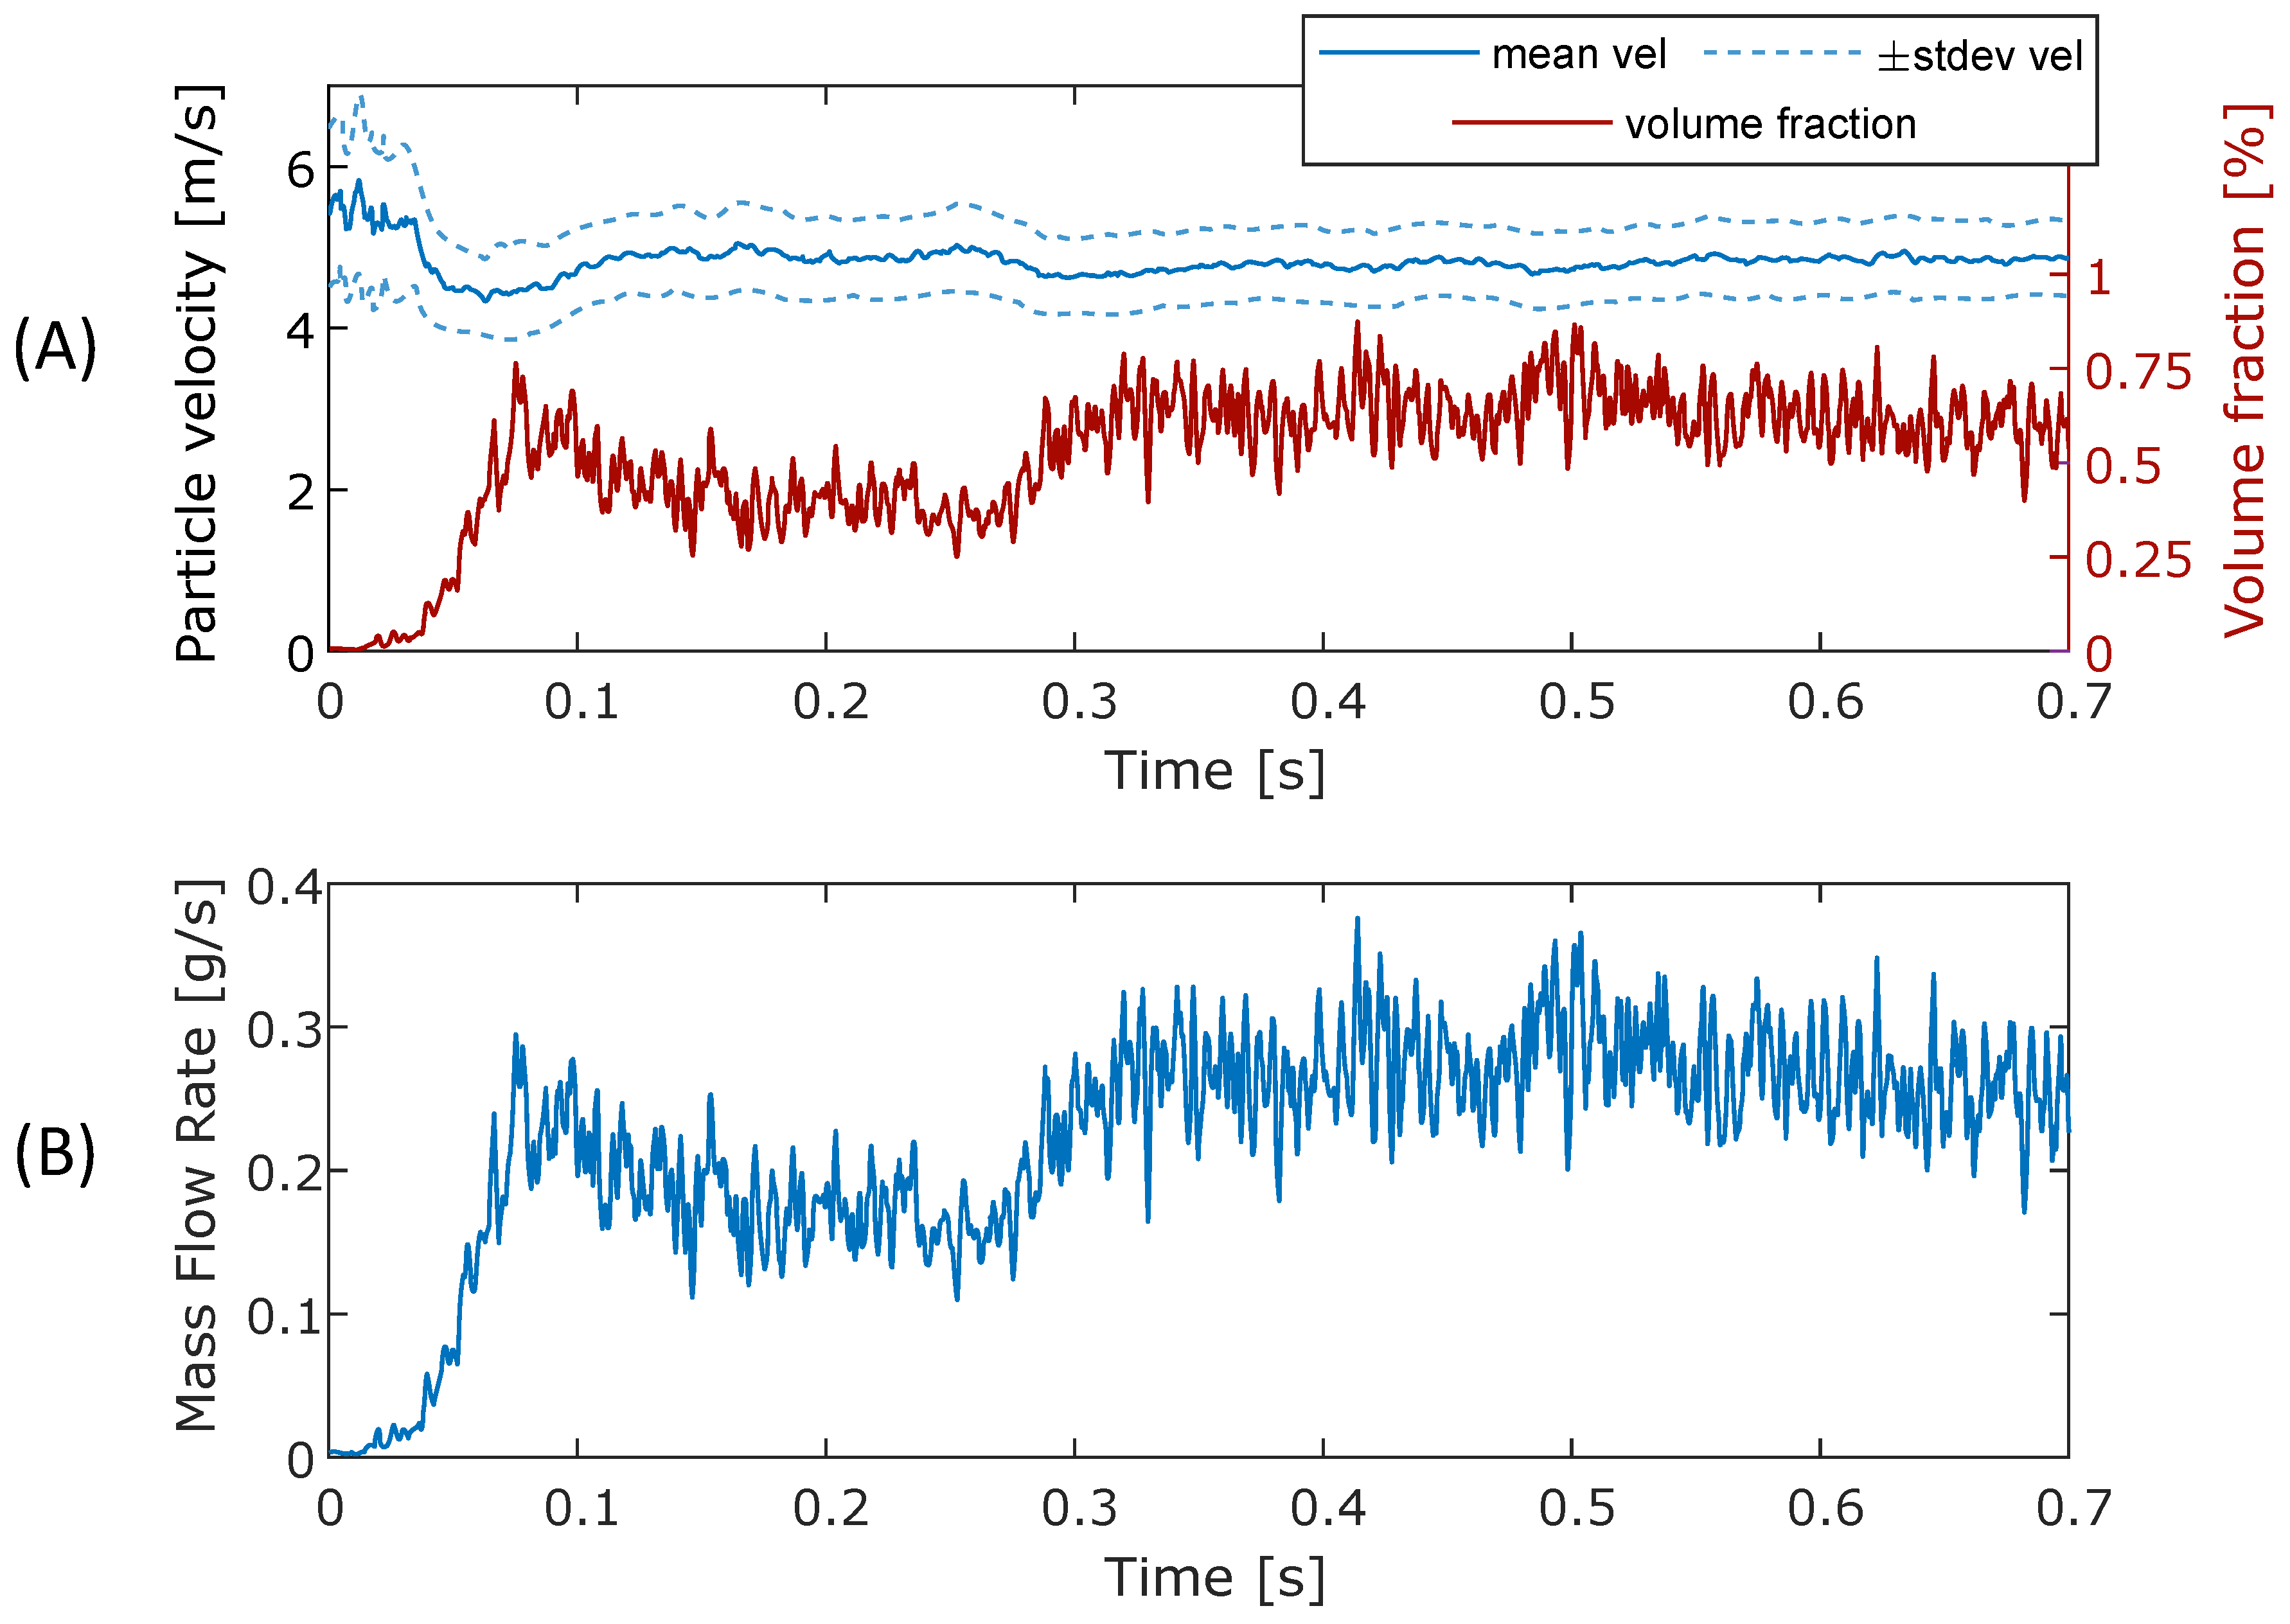
Matlab scripting was the tool of choice to analyze the results, and get to the values of interest. Most relevant for the LMD process is the instantaneous mass flowrate of metallic powder. The resulting values are depicted in
Figure 9 and
Figure 10. The values labelled as
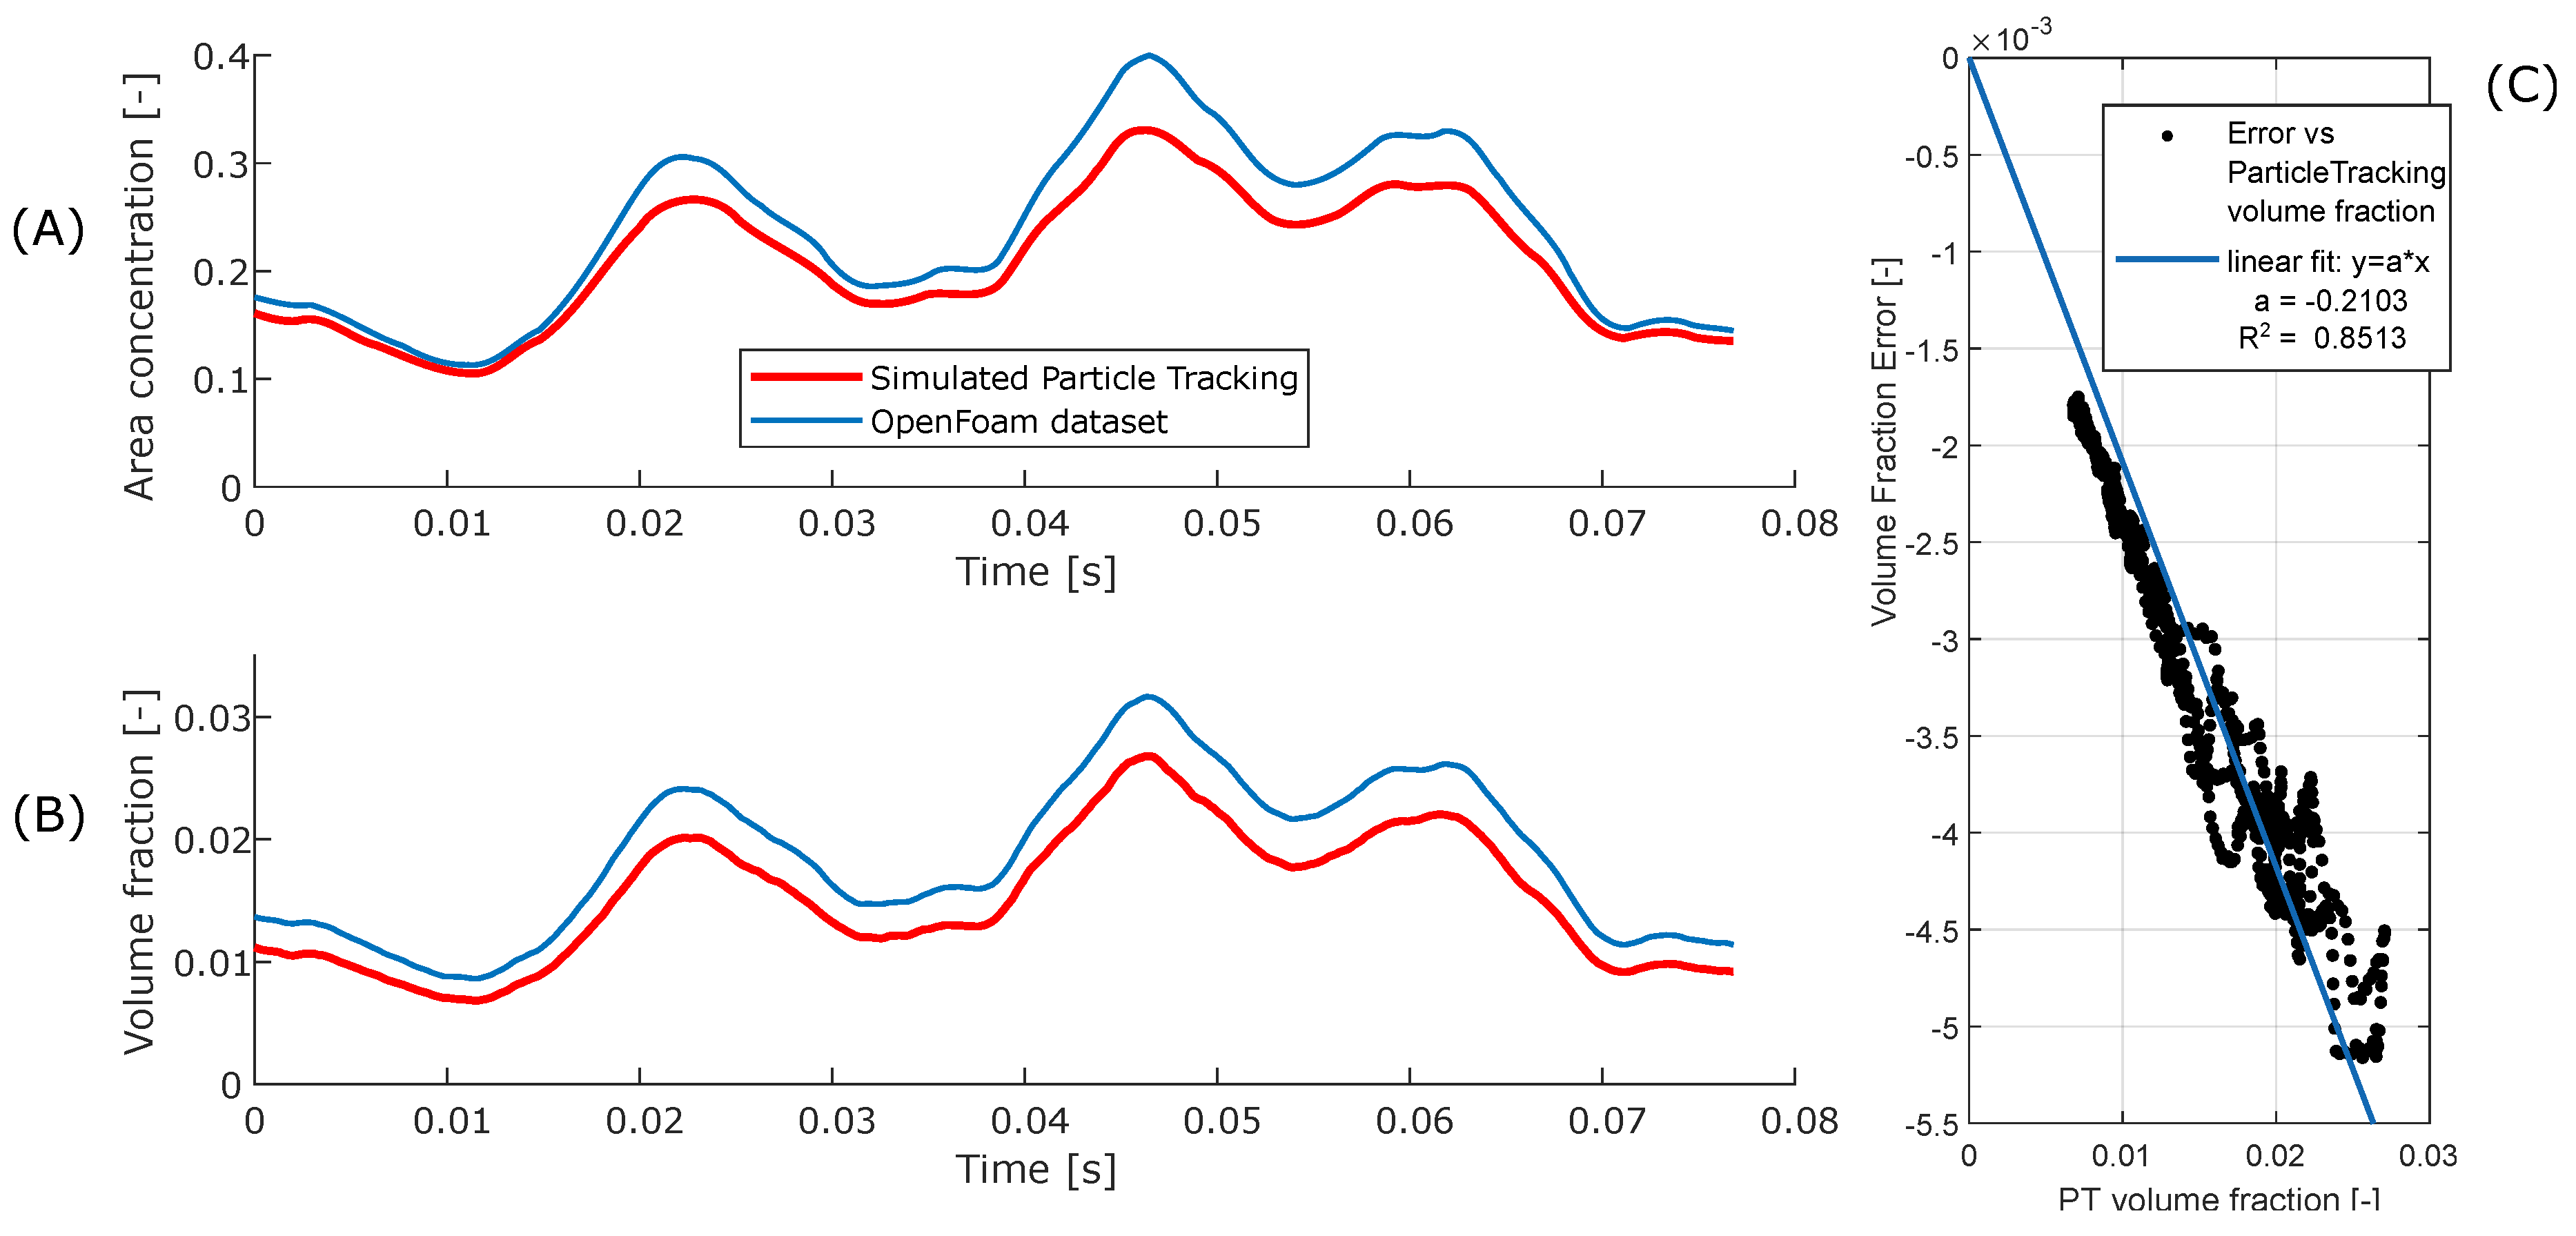
OpenFoam data refer to the direct extraction of particle diameters and velocities from the simulation. Both the results of the tracking and the simulation’s raw dataset were processed the same way, for consistency. The area concentration from the particle tracking is the direct measurement of the dark spots against the light background, essentially equivalent to counting the black vs white pixels of the binary map represented in
Figure 8 (A).
Figure 9 displays the difference between the ground truth (
OpenFOAM data) and the simulated
Particle Tracking. In both cases, area and volume fraction concentrations, there is a discrepancy. The volume fraction discrepancy was plotted as a function of the volume fraction
determined using the Particle tracking and the expected one determined by the simulation. This results in a clear linear relationship. This is easily explained by the occlusion phenomena (see
Section 3.1), therefore the line passes through the origin since the occlusion error should tend to zero for very low concentrations. Compared to the work by Spinewine et.al. [
23], in this case the concentration is much lower, therefore the linear fit will be used directly to correct the volumetric concentration and then calculate the mass flowrate.
Knowing the bulk density of the material
, the mass flowrate of the solid particles is calculated as
where
is the average velocity of the particles along the pipe, determined using the particle tracking of
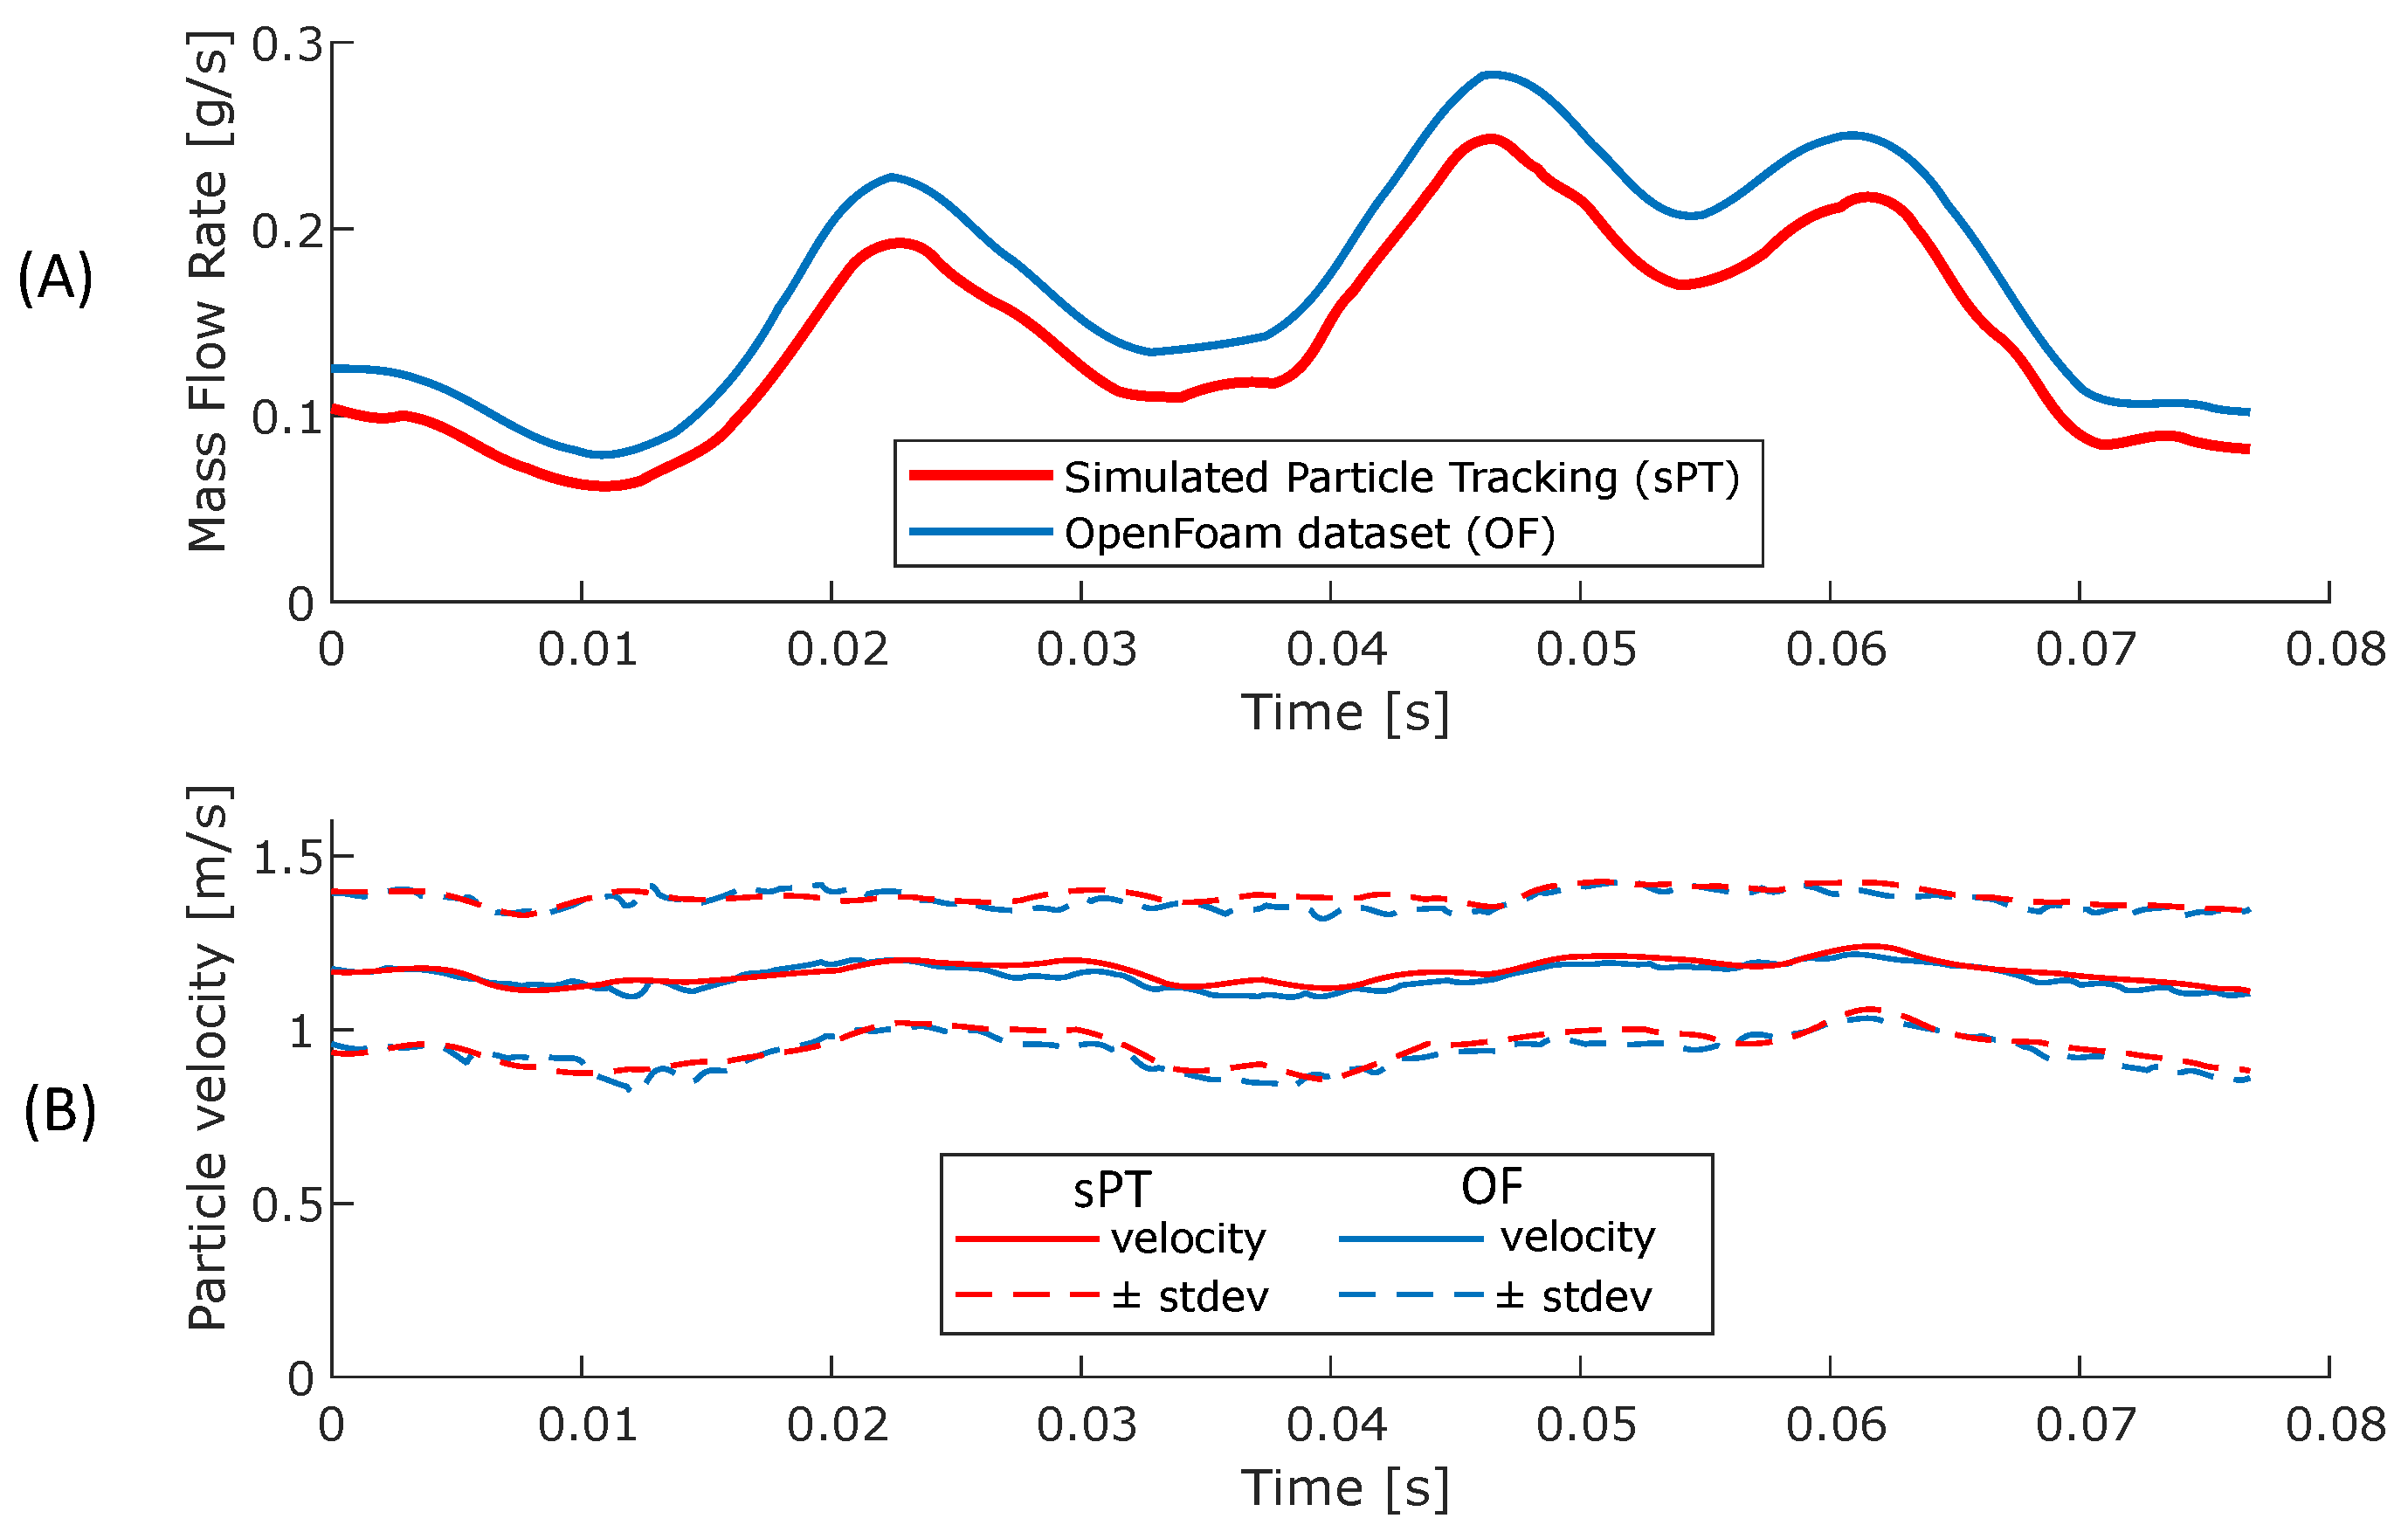
Figure 8. Without applying the correction on the volume this results in the mass flowrate reported in
Figure 10. This diagram also reports the average particle velocity and the standard deviation intervals in of the velocities in the frame, which coincide almost perfectly (the average error is less than
). The flowrate corrected using the linear fit is not represented in the figure as the two lines effectively overlap, and the error is also less than
.
Figure 9.
Simulated: solids concentration in the simulated flow, both as projected area (A) and volumetric (B). The values coming from the Particle Tracking method is compared with those of the raw dataset. All data was filtered with a moving average. (C) the error in the estimated volume fraction is fitted by a line passing through the origin.
Figure 10.
Simulated: particle average velocity and standard distribution in the observed section of the simulated flow over time (A), and calculated mass flowrate (B). The data was filtered with a
moving average. This data was not corrected with the information of
Figure 9.
Figure 10.
Simulated: particle average velocity and standard distribution in the observed section of the simulated flow over time (A), and calculated mass flowrate (B). The data was filtered with a
moving average. This data was not corrected with the information of
Figure 9.
4. Results
The Experimental Particle Tracking (ePT) results are discussed in this section. For the main presented case, the flowrate of clean and pure Nitrogen gas was set to
, which corresponds to the average gas velocity
average gas velocity. In this case, the Reynolds number is:
where, considering the standard conditions of 20 °C and 1 atm,
is the gas’ density,
is the pipe diameter,
. This low value denotes that a laminar flow is expected.
The number of items for each type generated by the particle tracking code from the experimental recordings is presented in
Table 1; the files are available as an open repository [
26]. The table also reports the average number of spots contained in each frame. If not indicated otherwise, the values over time are filtered using a moving average over 2 ms, the number of spots in the averaging window is indicated in the table.
4.1. Particle Size Distribution
The PT algorithm uses the spot area and other metrics to find the most likely trajectories. As indicated, all this information is available in the output files. When determining the Particle Size Distribution, it is appropriate to use the method described in
Appendix B to correct for the occlusion. Finding a PSD skewed towards larger particle size is to be expected, but the largest assemblies of particles that would cause noticeable outliers are avoided. The PSD is evaluated on the total recorded number of spots, reported in
Table 1.
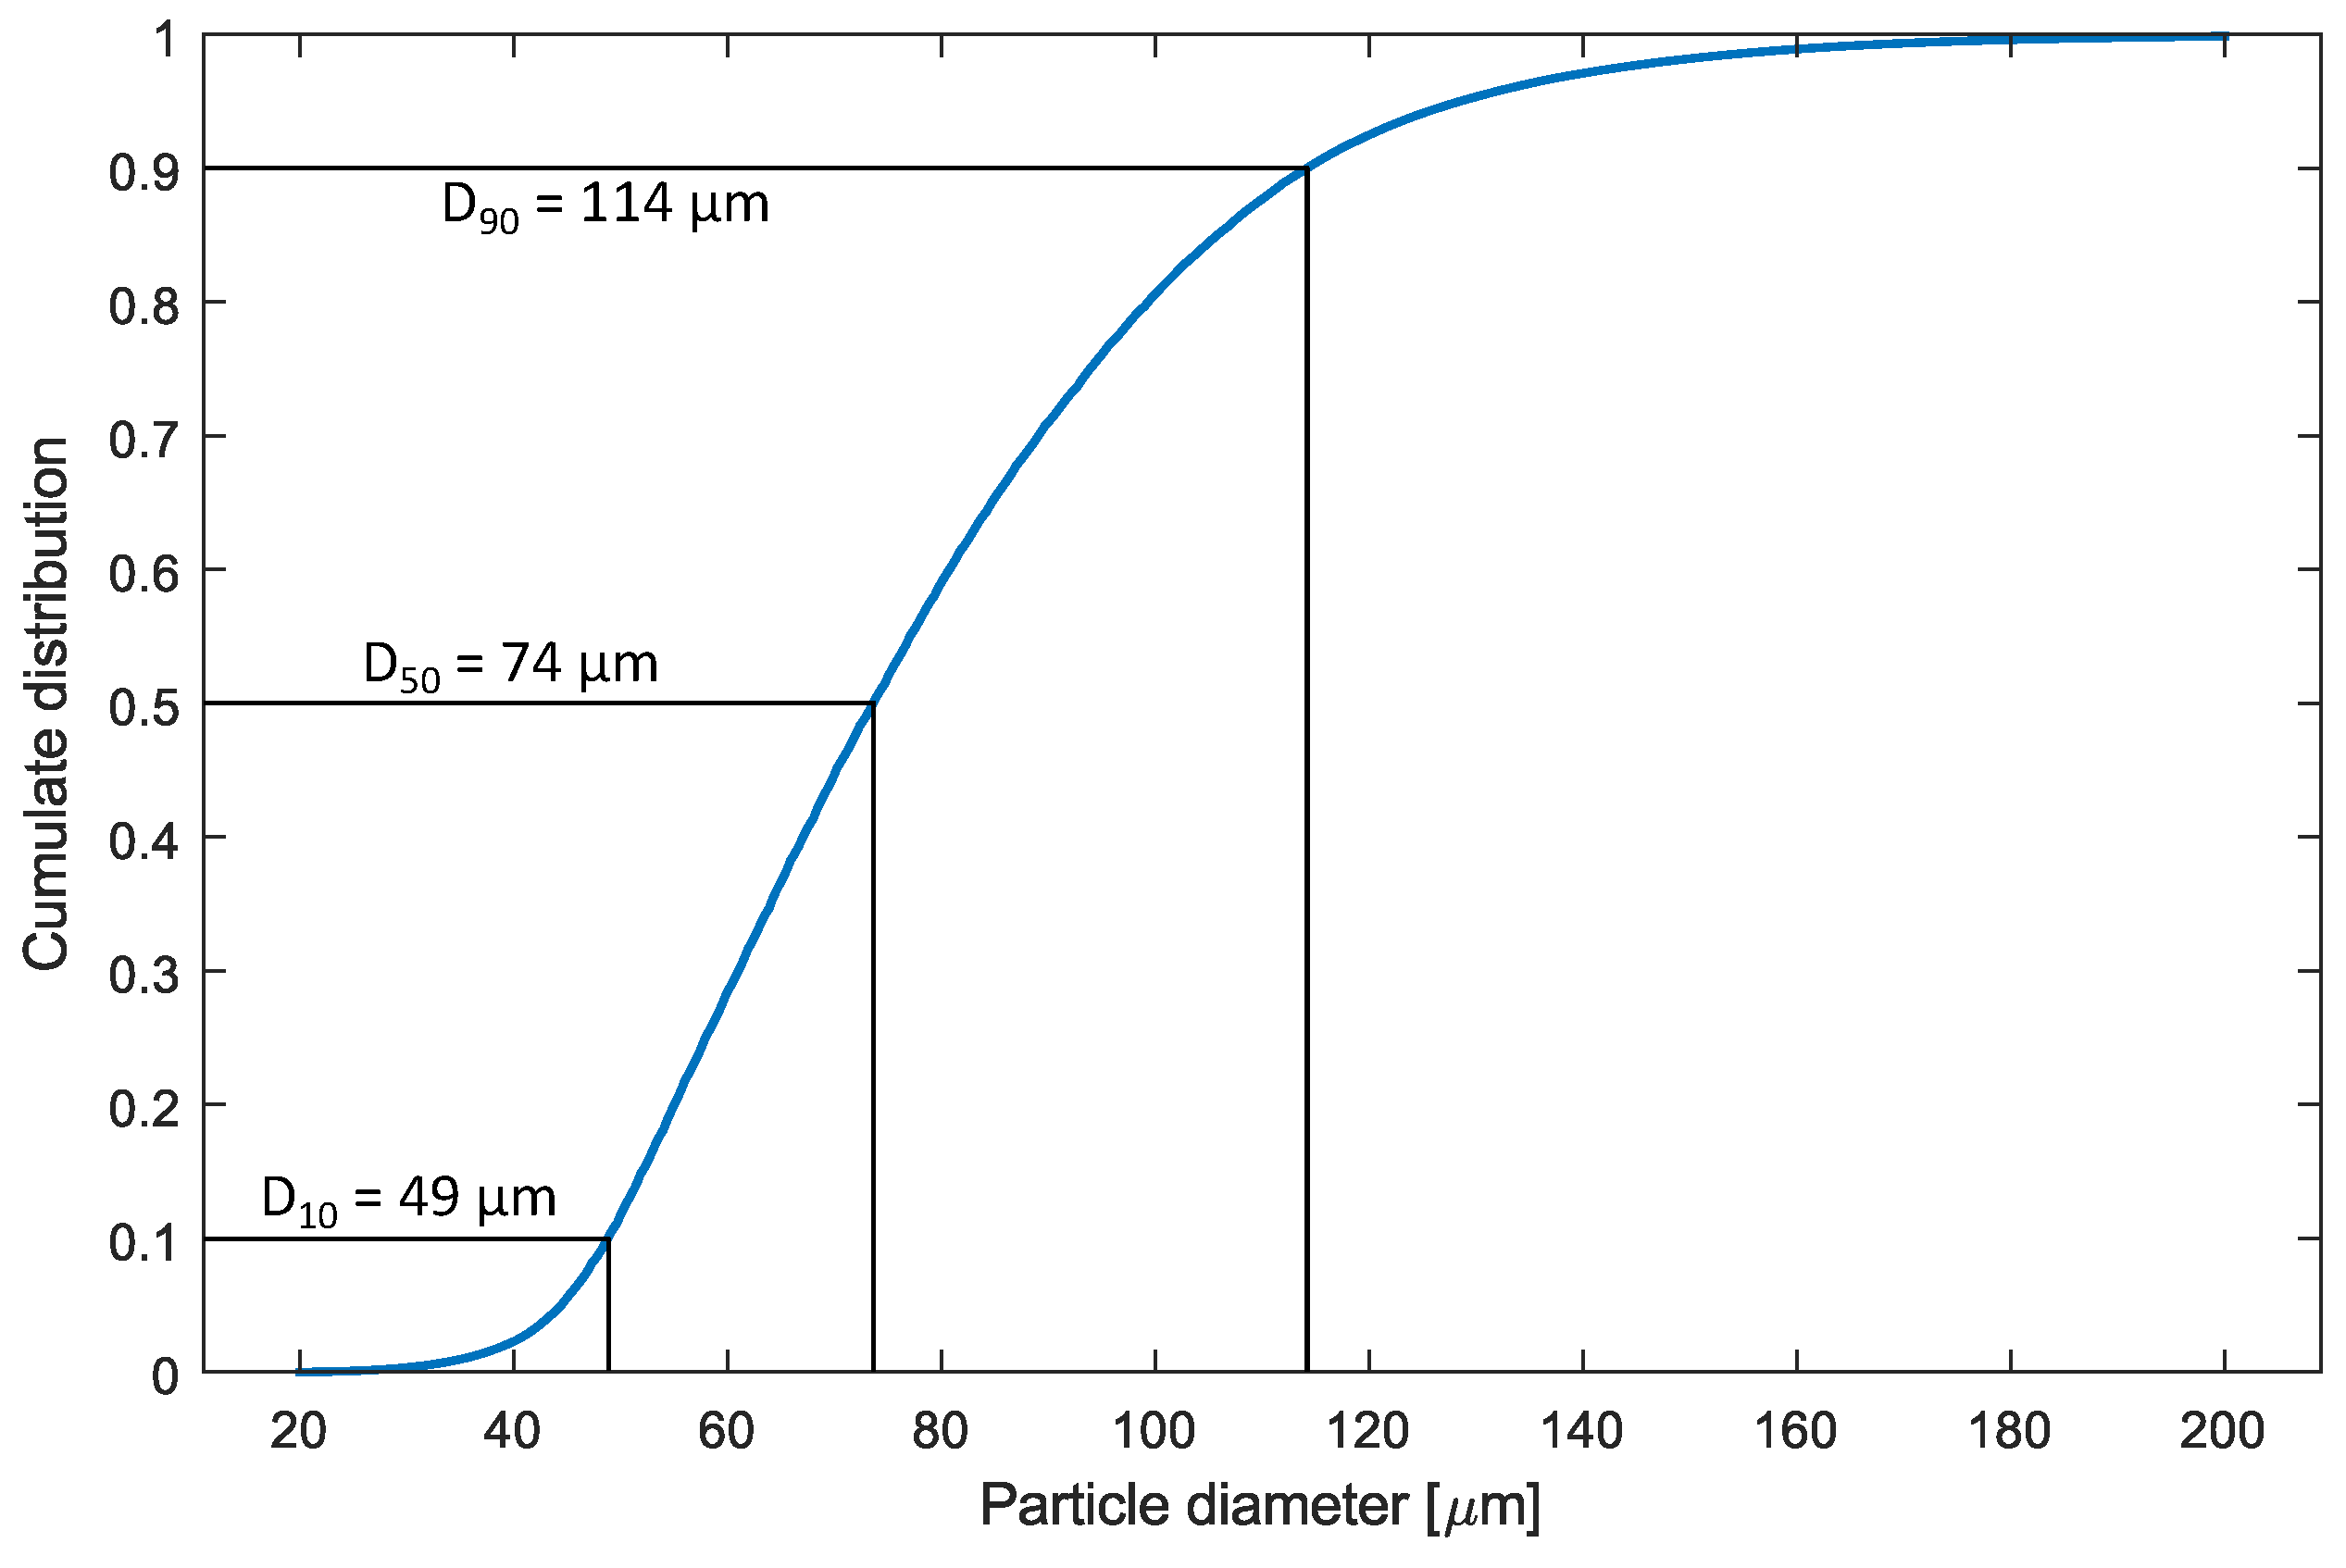
Figure 11 reports the PSD measured in the
test, and is repeatable across different runs. The experimentally measured values
and
are very similar to the one expected for the powder
MetcoAdd 316L-D [
18] (
and
). This encouraging result shows that the setup is indeed able to accurately capture the particles.
Figure 11 also reports
.
Figure 11.
Particle Size Distribution (PSD) measured in the experiments.
Figure 11.
Particle Size Distribution (PSD) measured in the experiments.
The accuracy of this measurement is very dependent on the sharpness of the original images, and on the parallax error. The camera setup can be improved by a telecentric lens, and secondarily by a parallel rays light source. Nonetheless, the PSD is essentially spot-on with the values declared by the manufacturer.
4.2. Mass flowrate estimation
Figure 12 reports the final results of the particle tracking, calculated using Equation
1. Considering the established flow for
, the particles’ average velocity remains relatively constant, with a narrow distribution. Indeed there is a small dependency on the particle loading, as a denser flow determines a slightly lower average velocity, but in this case the flowrate variation is to be attributed for the most part to the variation of particle concentration.
Figure 12.
Particle tracking result for a conveying flow of nitrogen of , corresponding to an average gas velocity of . The diagram reports the particles’ velocity distribution and volumetric concentration, averaged over the recorded frame () and over a moving time window (). These are used to calculate the mass flowrate.
4.3. Flow fluctuations
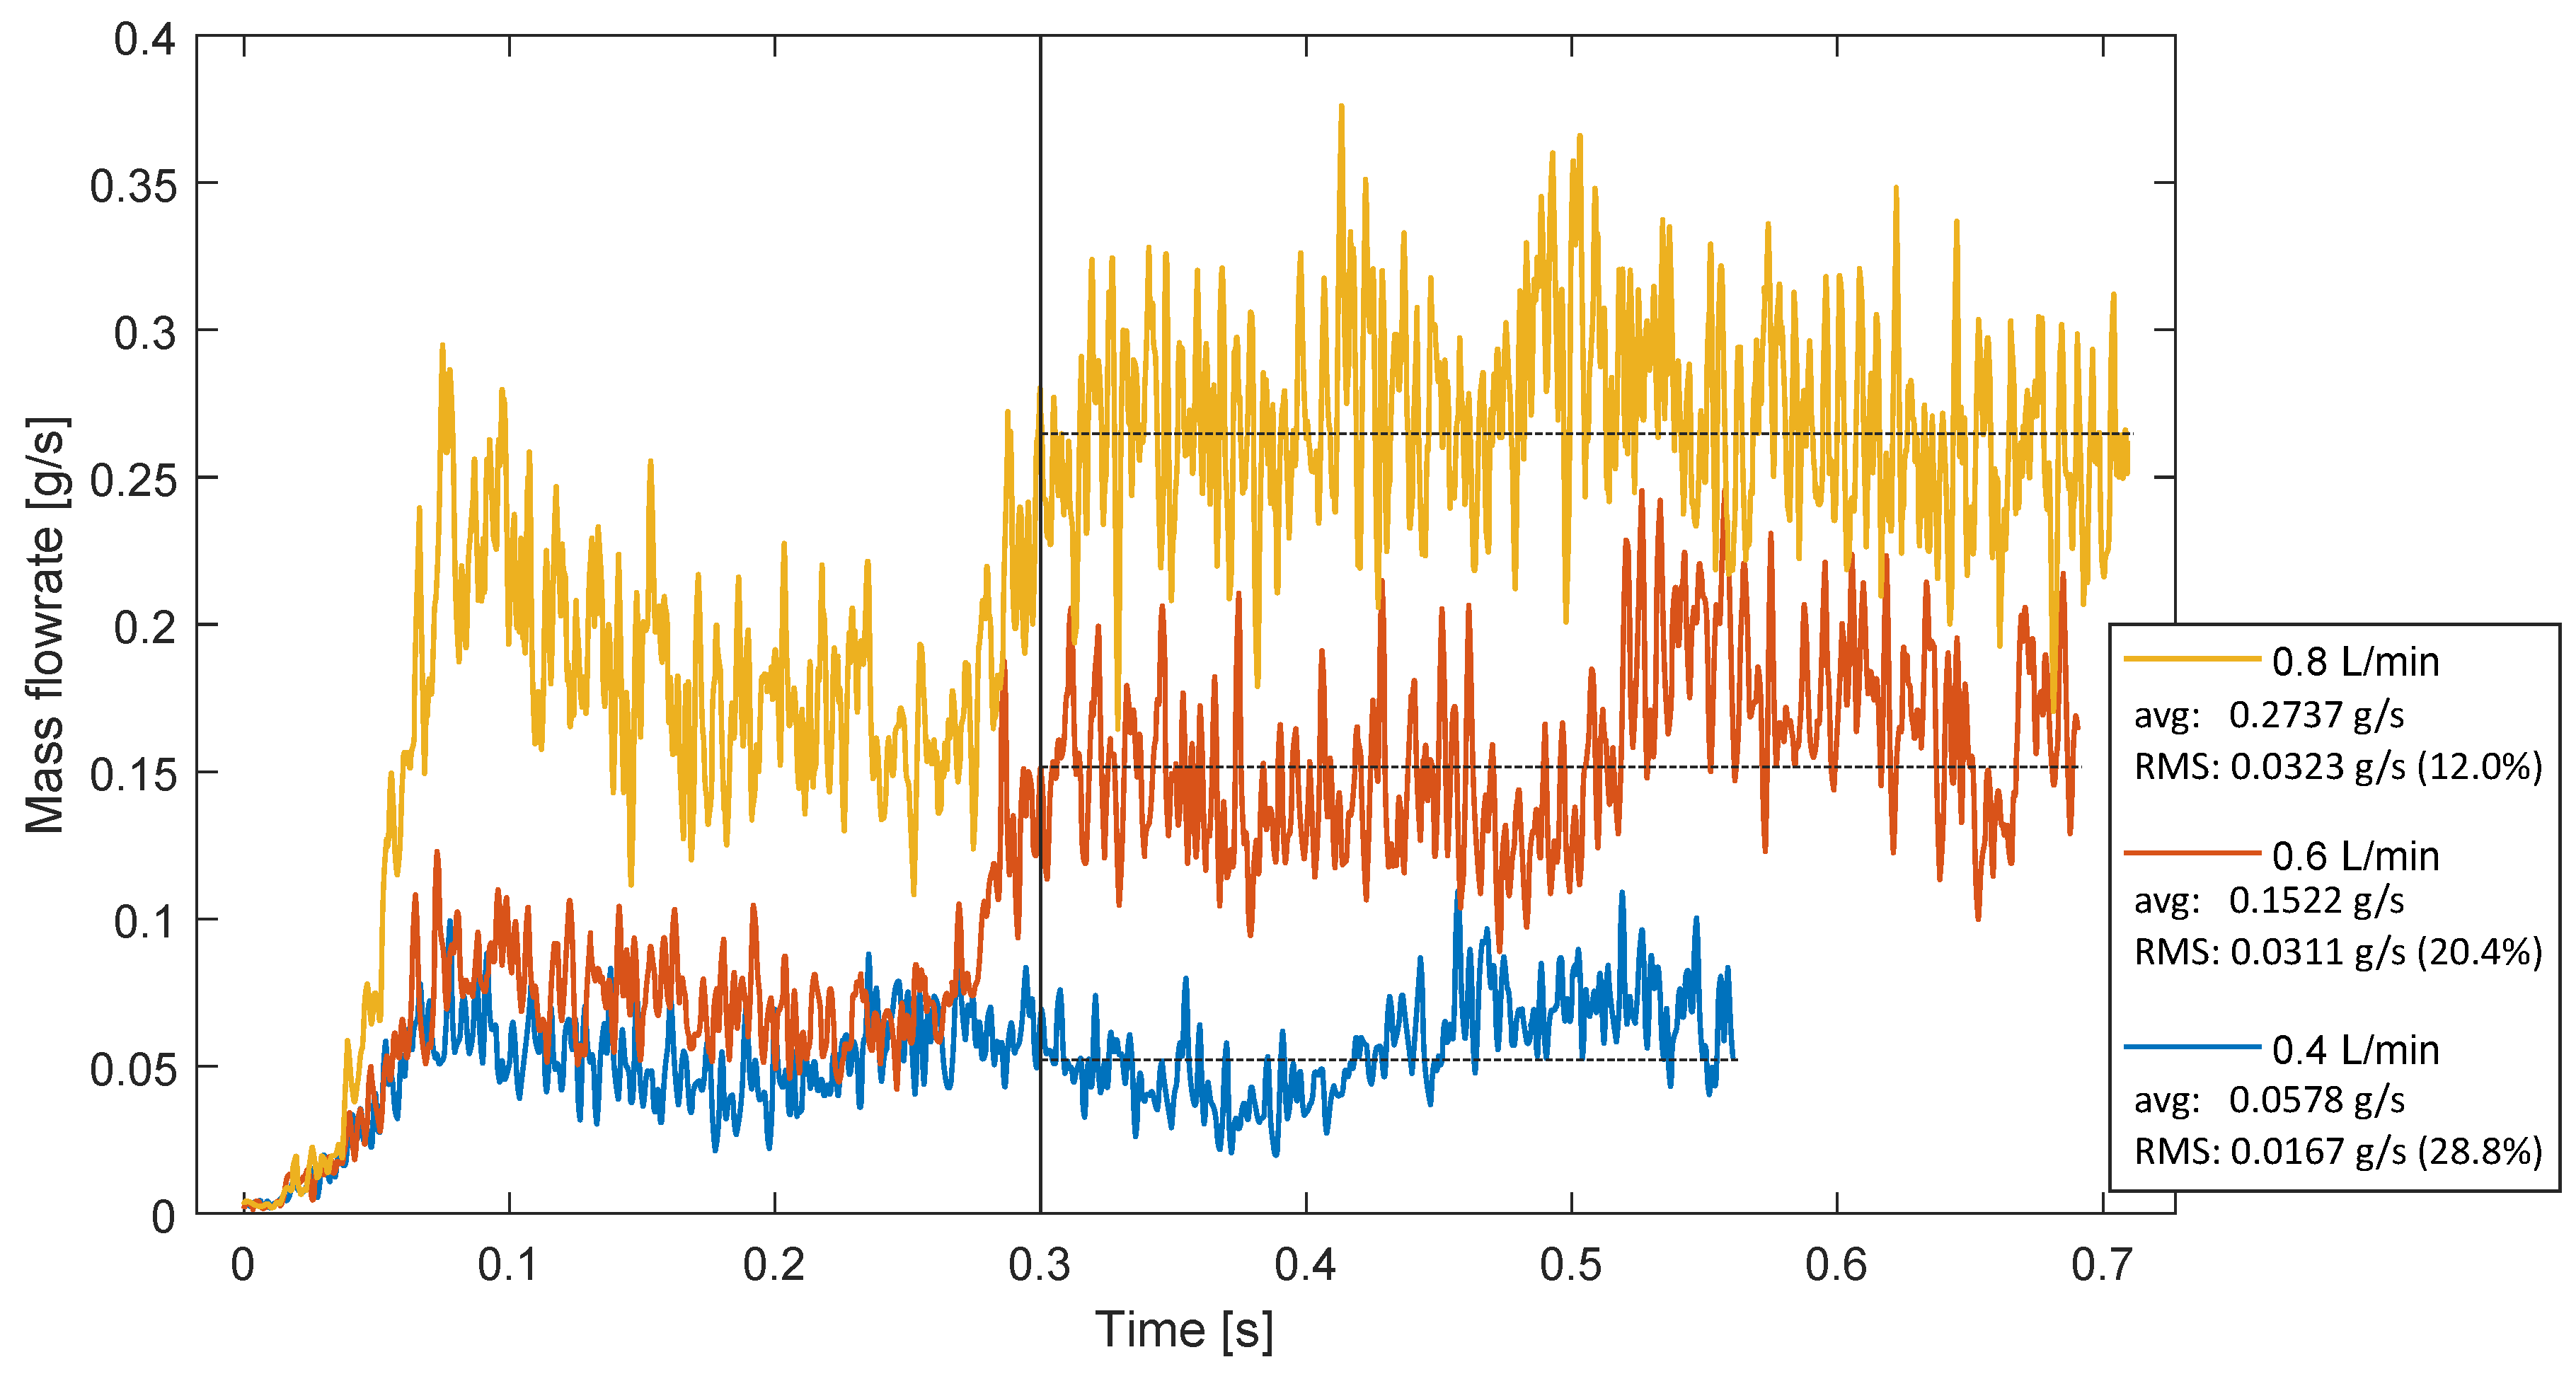
Considering
Figure 13, we can evaluate the average of the mass flowrate. The deviation from the average mass flow rate is expressed in terms of the Root Mean Square (RMS), a statistical measure that quantifies the spread or variability of a set of values, or a continuous function, around the average. Assuming a finite number
n of virtual measurements, the
i-th mass flow rate measurement
and the average at the outlet
, the RMS value is defined as:
The results are reported on the same figure, and can be compared in
Table 2. The intensity of flow irregularities is very close in magnitude to what was determined using CFD-DEM, though with an imperfect match.
Figure 13.
Powder mass flowrate determined using PT for three conditions. The resulting average and RMS values are determined for what are considered as established flow conditions, or .
Figure 13.
Powder mass flowrate determined using PT for three conditions. The resulting average and RMS values are determined for what are considered as established flow conditions, or .
4.4. Photodiode calibration
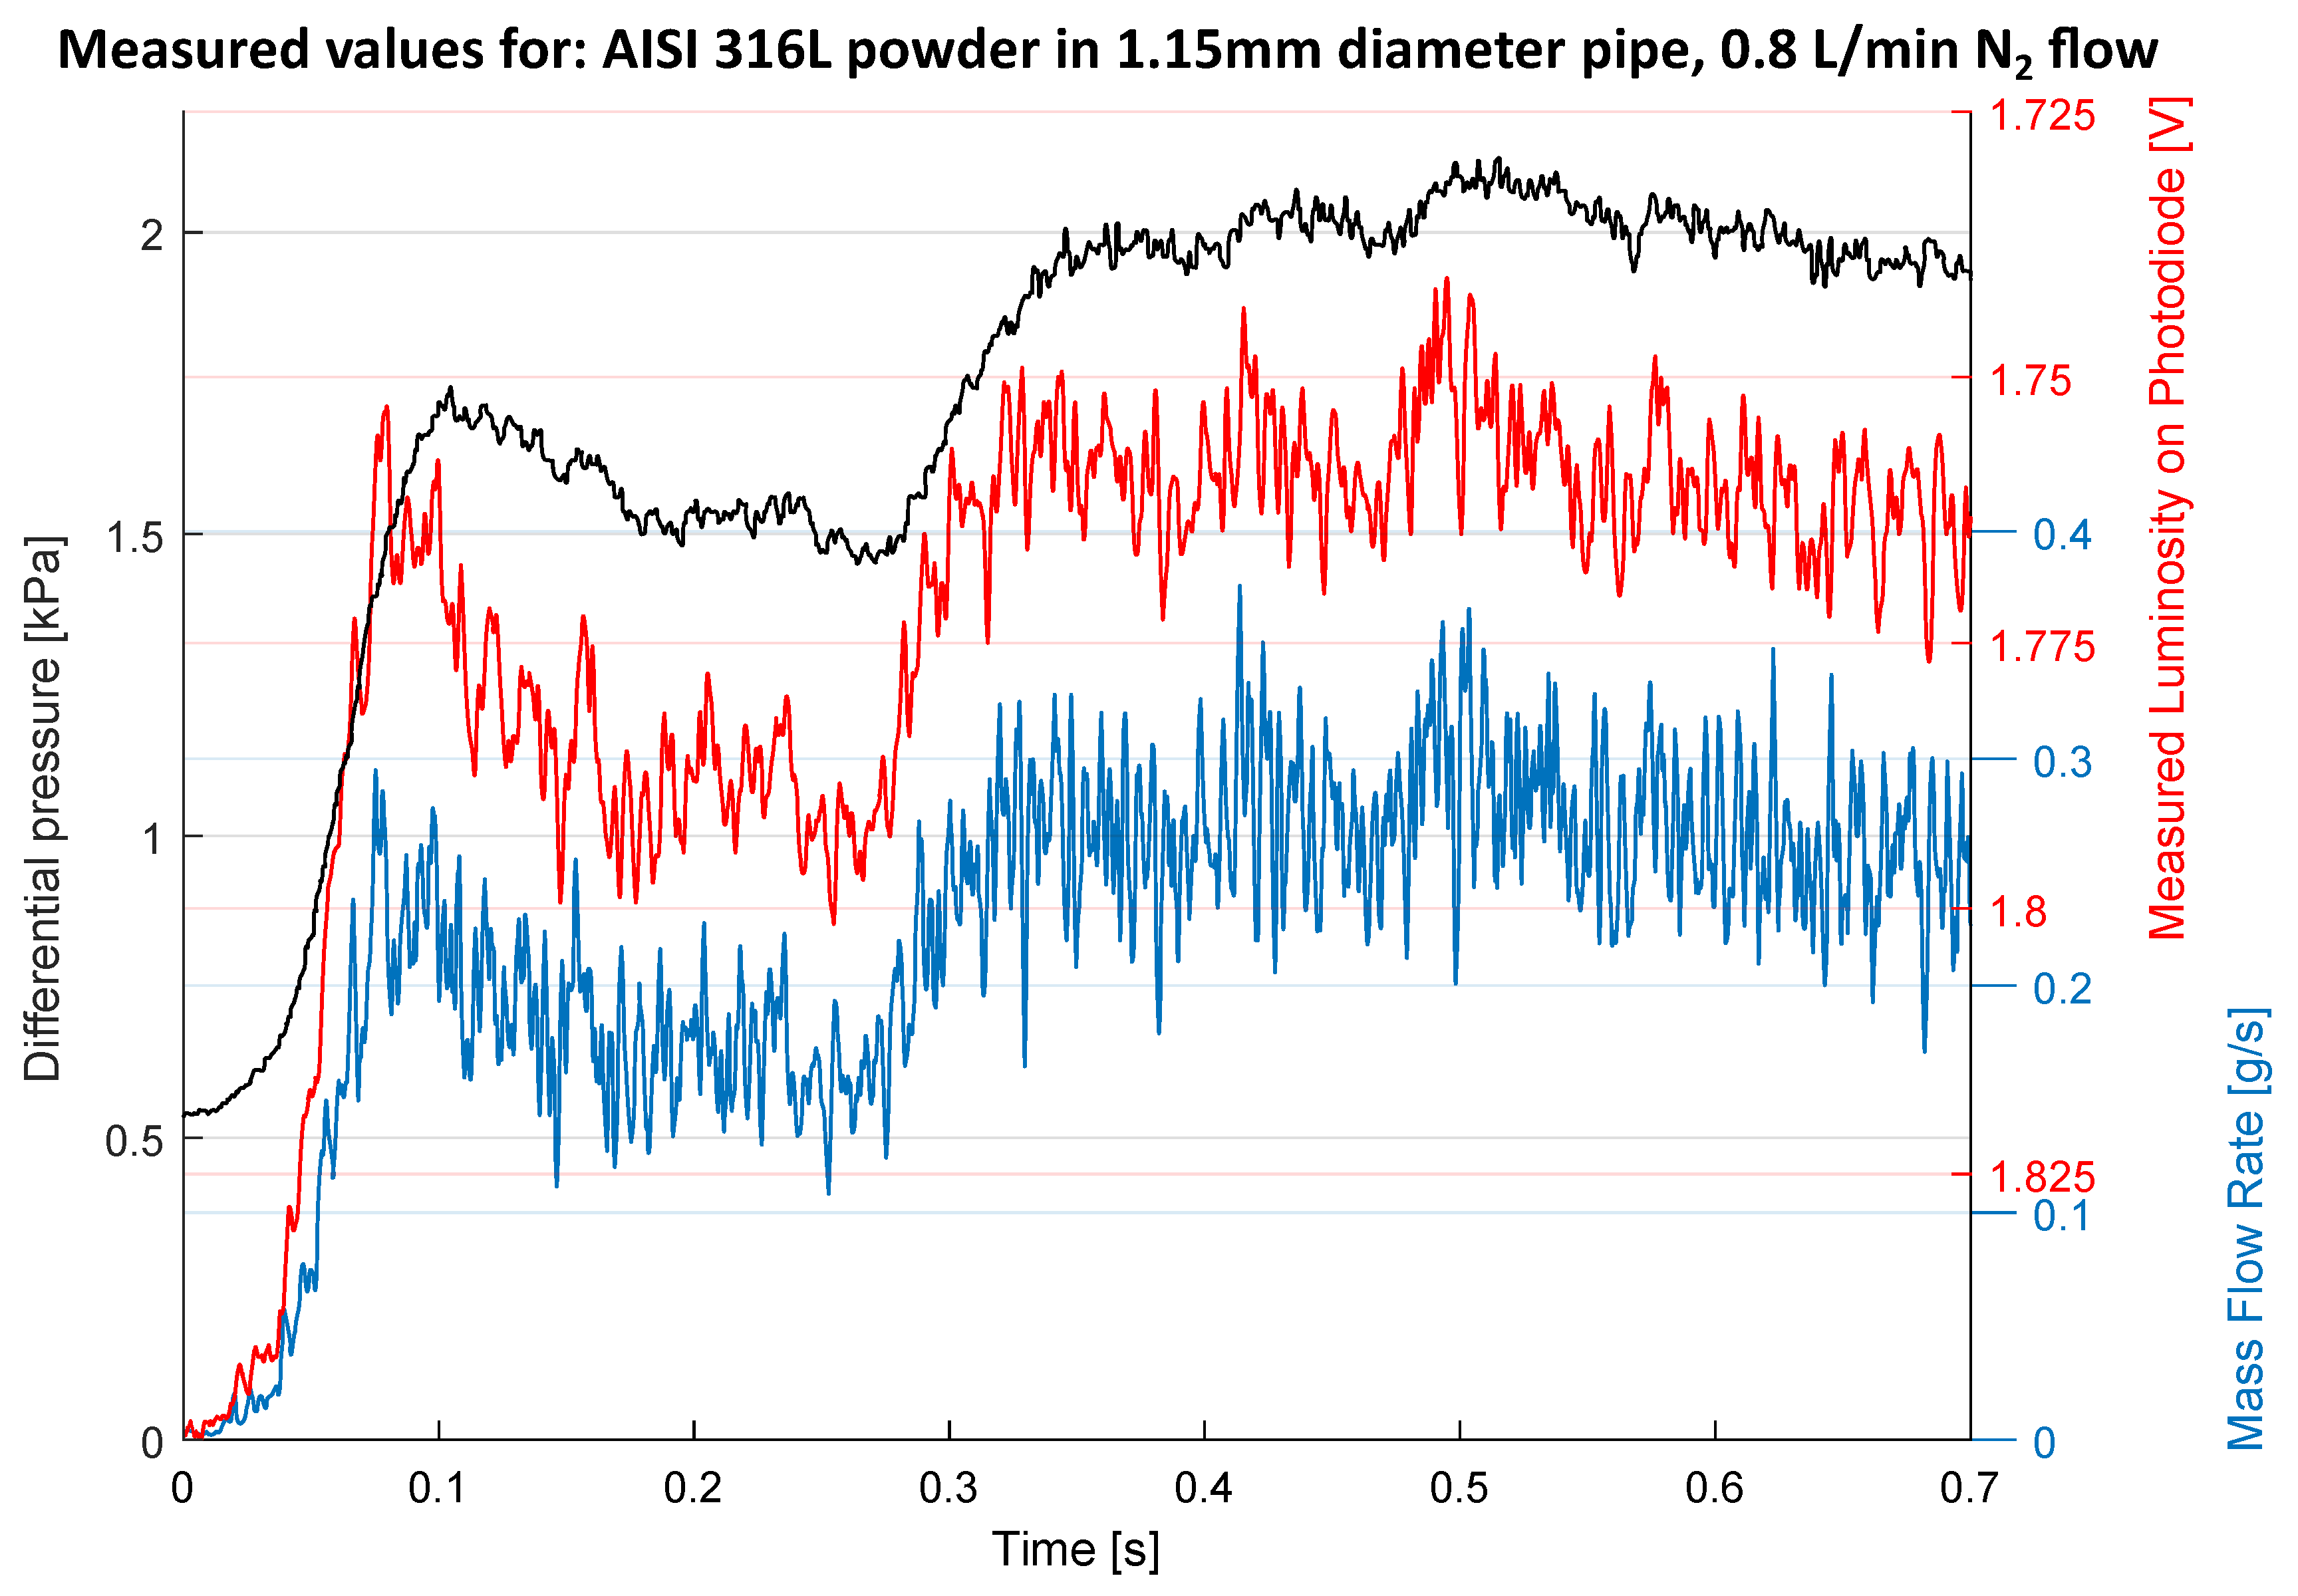
The values measured by the photodiode and the differential pressure sensor are reported in
Figure 14. The figure shows an evident correlation of all the signals, which suggests the possibility to calibrate inexpensive and small sensors to determine the powder flowrate in positions close to the nozzle.
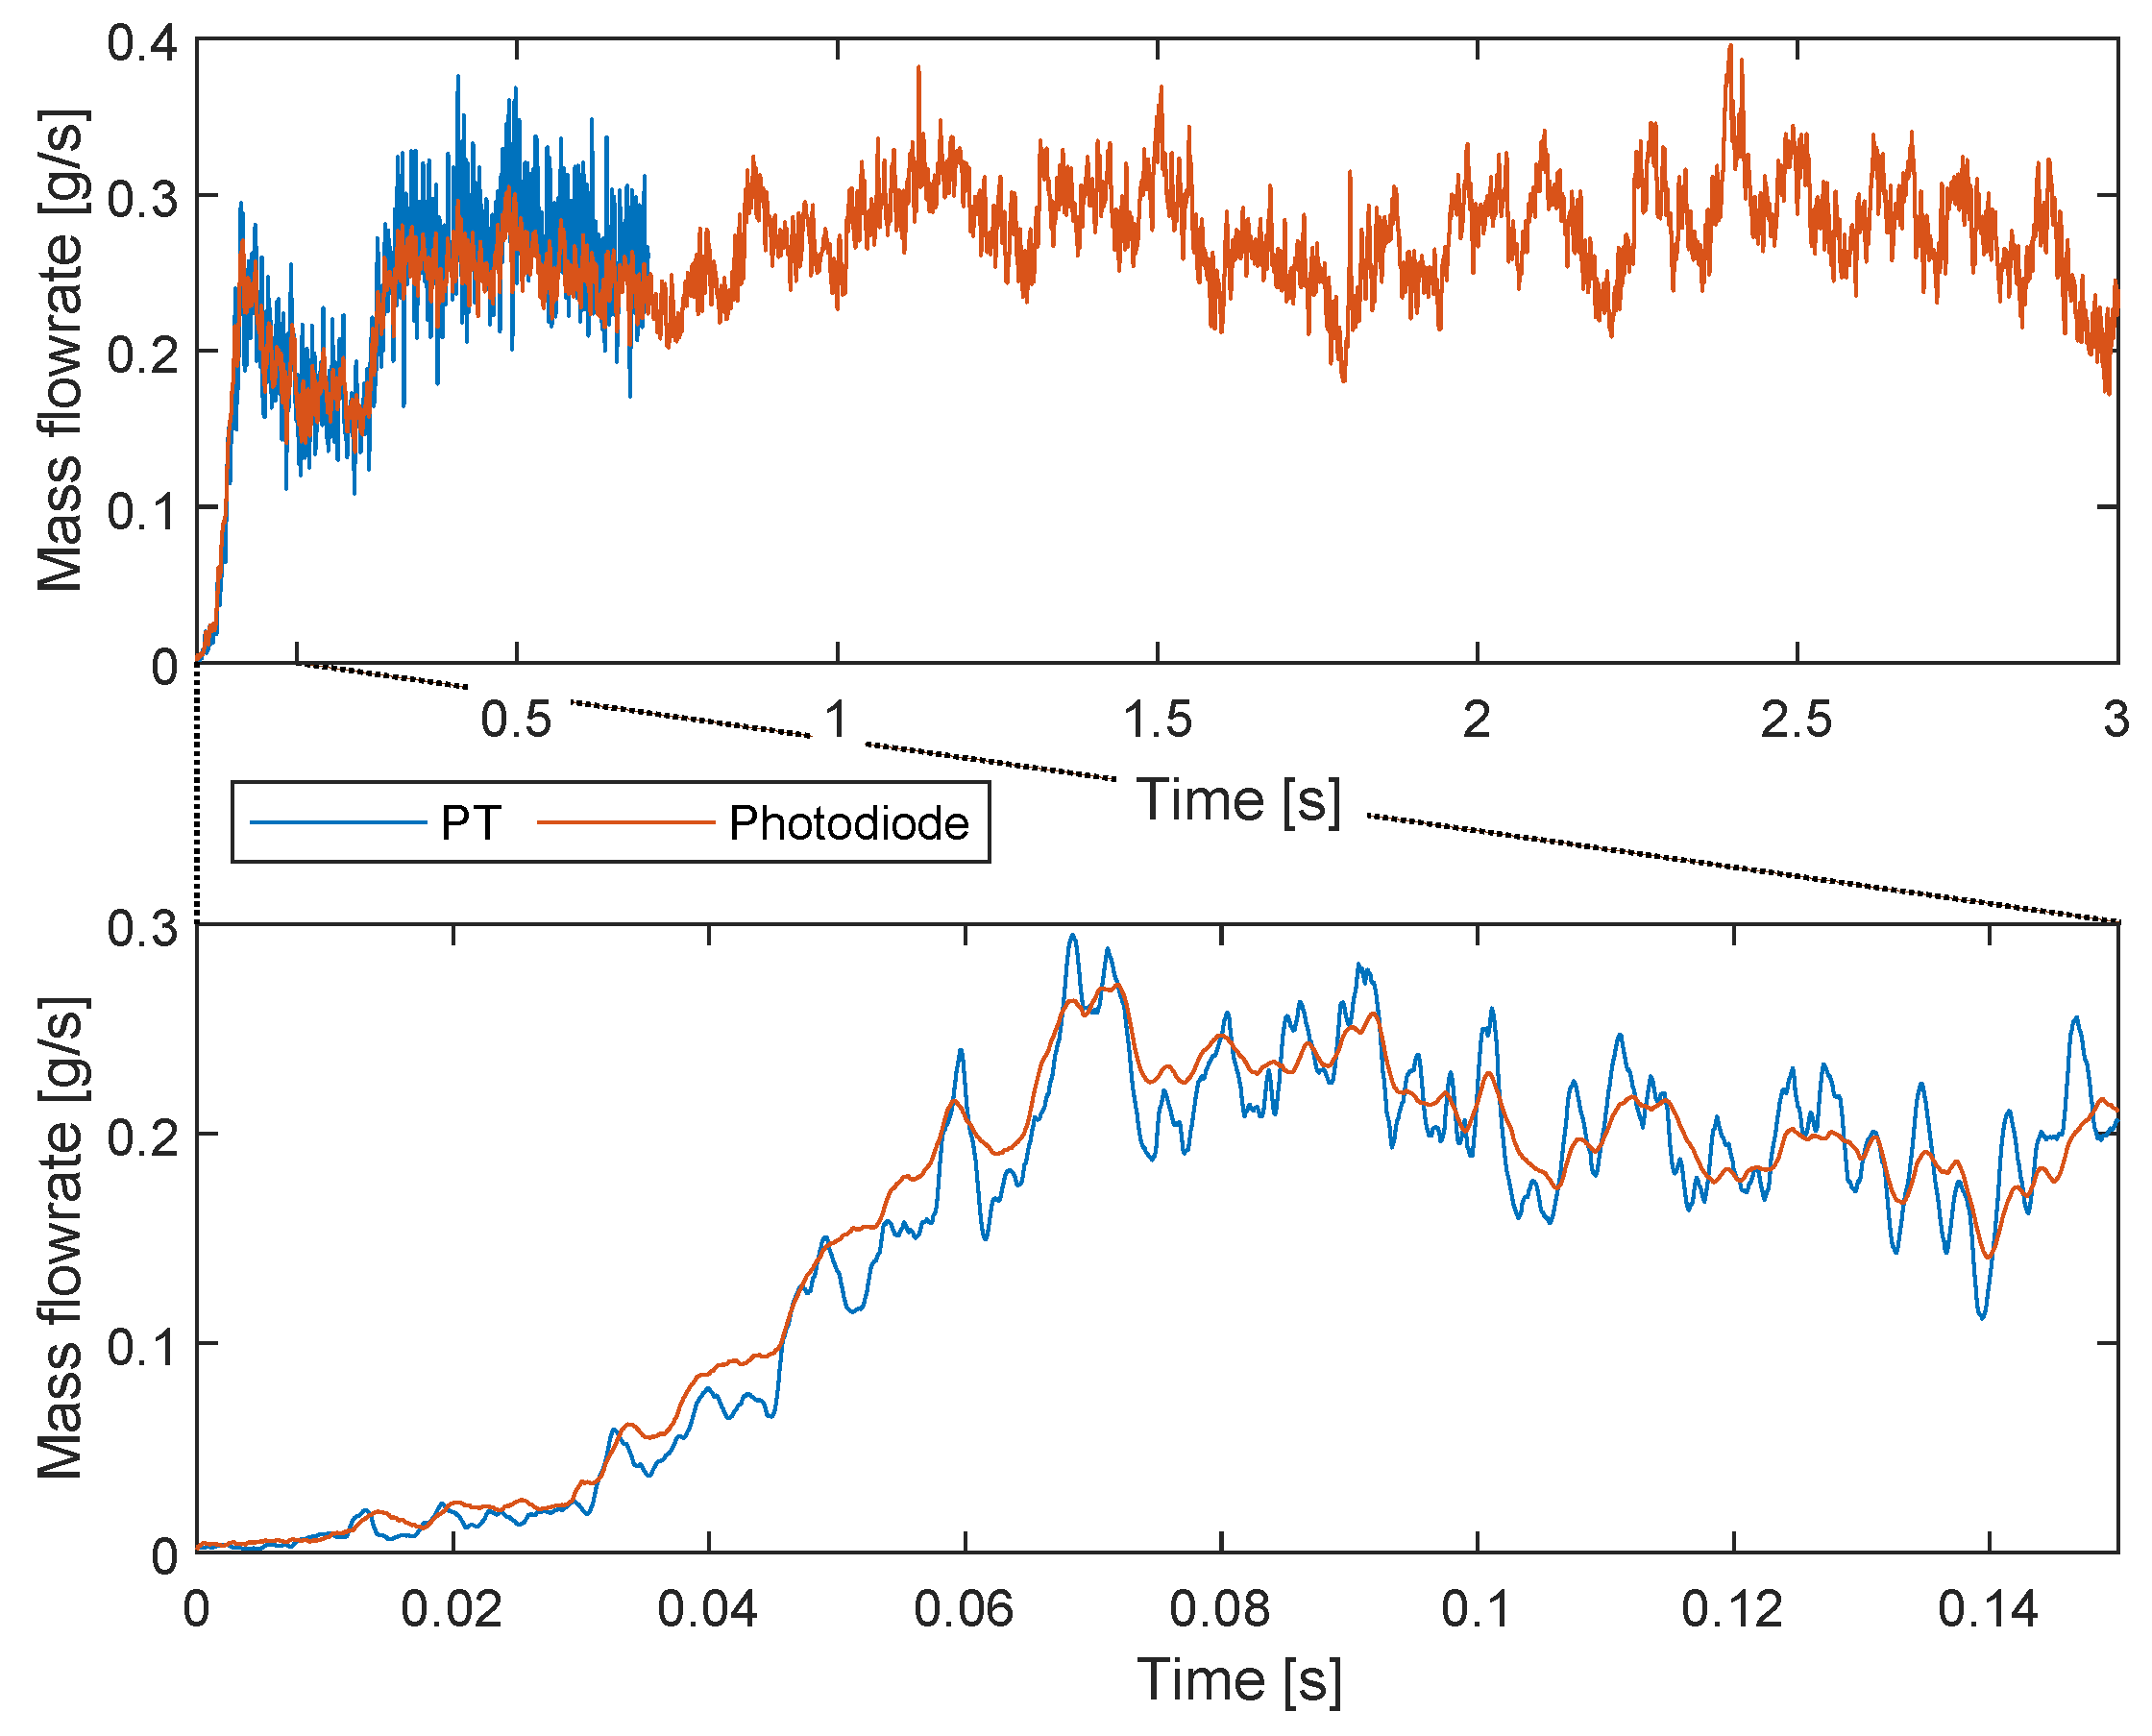
The signal from the photodiode was directly scaled to the mass flowrate by matching on the average values of the two signals between
and
. This resulted in an extremely good agreement, with the signals almost superimposed, as shown in
Figure 15. Evaluating the calibrated flowrate in the stable conditions, or for
, returns
, only slightly lower compared to the value determined using PT.
Figure 14.
Particles’ mass flowrate, for a conveying flow of nitrogen of , corresponding to an average gas velocity of . The pressure measurement and transmitted luminosity are included, each on the respective axis.
Figure 14.
Particles’ mass flowrate, for a conveying flow of nitrogen of , corresponding to an average gas velocity of . The pressure measurement and transmitted luminosity are included, each on the respective axis.
Figure 15.
Particles’ mass flowrate measured using Particle Tracking (PT) and the photodiode signal, linearly calibrated, for a conveying flow of . The lower panel reports a detail, showing proper signal synchronization.
Figure 15.
Particles’ mass flowrate measured using Particle Tracking (PT) and the photodiode signal, linearly calibrated, for a conveying flow of . The lower panel reports a detail, showing proper signal synchronization.
Even if the acquisition rate was higher, at , the measurement performed via the photodiode shows less steep changes than PT, deriving the physical construction of the device itself. A diode with lower parasitic capacitance, and a better preconditioning circuit, can certainly improve the response time of the sensor, capturing faster varying phenomena. It is unlikely that the photodiode sensing element size, which is , caused this smoothing: when analyzing the high-speed video, the observed pipe length was a similar value.
4.5. Pressure measurement
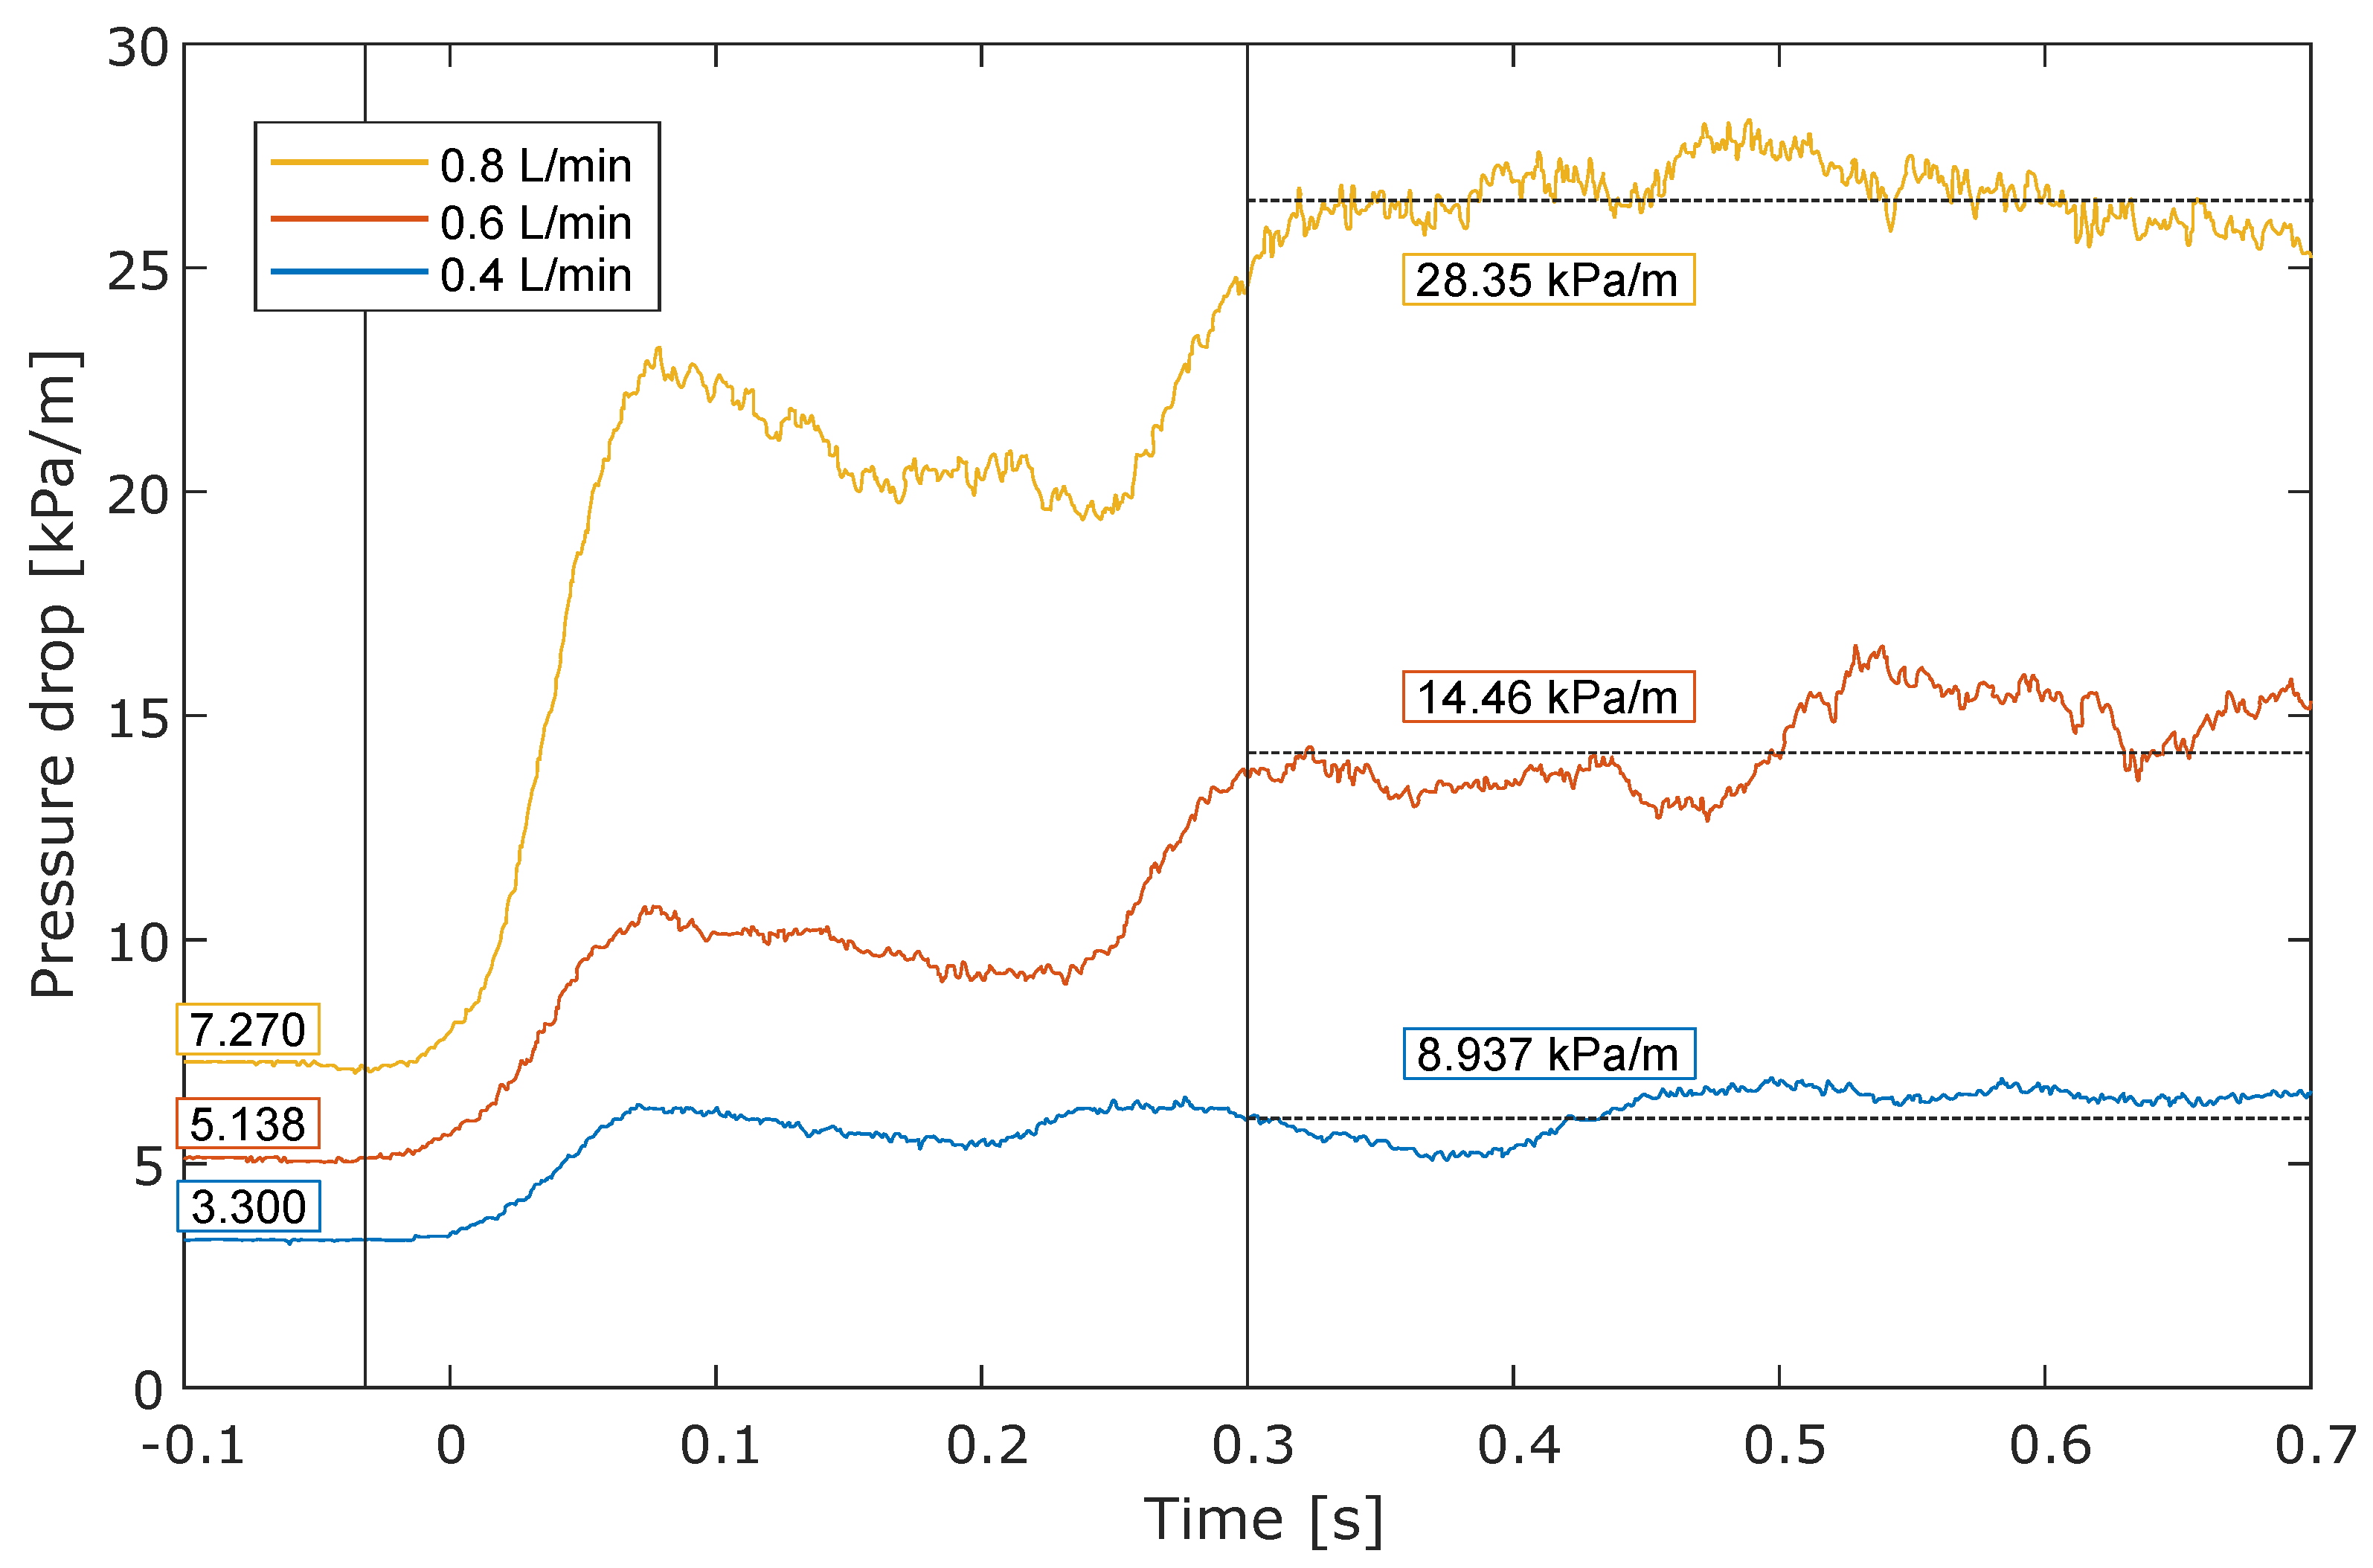
The pressure sensor is an internally compensated and calibrated Integrated Circuit (IC), the values over time are reported in
Figure 16. The average values for
are calculated, as well as the initial values for the empty pipe.
Figure 16.
Measured pressure drop along the pipe. The slope is calculated for the nominal pipe length.
Figure 16.
Measured pressure drop along the pipe. The slope is calculated for the nominal pipe length.
The experimental values are higher than those obtained by the CFD-DEM simulation [
24], reported in
Table 3. The simulations are conducted with the hypothesis of laminar flow and Argon gas. Also, the experimental values might be afflicted by localized pressure drops in proximity of the ports, given the couplers geometry of
Figure 3, which deviates from the ideal.
The signal is directly affected by the volumetric fraction present in the pipe, but the faster variations are not captured. The differential sensor, connected at the entrance and exit of the pipe, measures the average drop necessary to convey the powder present in the whole pipe. Therefore, even if the sensor declares a response time of , the faster variations are averaged over the whole pipe length.
One issue to be aware of when deploying such sensors is that the static port, visible in the coupler of
Figure 3, is a few tenths of a mm wide and could become clogged. On the other hand, a visible amount of fine particles were able to pass through the small orifice, and make their way through the connecting transparent silicone tube. This could cause issues on the delicate MEMS, which can work in humid conditions, but is not qualified in terms of dust protection.
5. Discussion
The proposed methodology accurately measures the Particle Size Distribution (PSD), with results consistent with the expected distribution. The accuracy of these measurements is highly dependent on the sharpness of the original images and the parallax error. It is suggested that the camera setup can be improved by using a telecentric lens and a parallel rays light source. Despite these potential improvements, the PSD measurements are repeatable and align closely with the values declared by the manufacturer, validating the image quality of the experimental setup.
Particle velocities are determined experimentally with a high degree of accuracy, using a particle tracking algorithm. Combined with the measured PSD, the proposed methodology can indirectly measure the powder mass flow rate and volumetric concentration. The measurements have a high temporal resolution, determined by the camera’s maximum frame rate at the given resolution, which is or .
The flow rate measurements reveal fluctuations, quantified using the Root Mean Square (RMS) of the deviation from the average in a 2 ms time window, under the conditions identified as established flow. These results are consistent with findings from our previous work on CFD-DEM simulation [
24], where similar patterns in mass flow rate and pressure were observed. The values recorded by the experiment and simulations are not an exact match. Nonetheless, the experimental investigation presented in this work provides further information to improve the CFD-DEM simulations.
The photodiode used in the experimental setup shows a high degree of correlation with the measured mass flow rate, and the signal magnitude is linearly proportional to the values measured with the more accurate camera setup. The flow irregularities have lower temporal resolution; therefore, the RMS value reflects this. This reduction in the RMS of flow rate irregularities is especially evident with the pressure measurement, which is nominally acquired every 1 ms and taken over the entire pipe length. This comprehensive measurement effectively averages the observed length, smoothing out the measurement.
Author Contributions
Conceptualization, Lorenzo Pedrolli; Data curation, Lorenzo Pedrolli; Formal analysis, Lorenzo Pedrolli and Luigi Fraccarollo; Funding acquisition, Beatriz Achiaga and Alejandro López García; Investigation, Lorenzo Pedrolli and Luigi Fraccarollo; Methodology, Lorenzo Pedrolli; Project administration, Luigi Fraccarollo, Beatriz Achiaga and Alejandro López García; Resources, Luigi Fraccarollo; Supervision, Luigi Fraccarollo, Beatriz Achiaga and Alejandro López García; Visualization, Lorenzo Pedrolli; Writing – original draft, Lorenzo Pedrolli; Writing – review & editing, Lorenzo Pedrolli and Luigi Fraccarollo.
Funding
This project has received funding from the European Union’s Horizon 2020 research and innovation programme under the Marie Skłodowska-Curie grant agreement No. 847624. In addition, a number of institutions back and co-finance this project. This study received financial support from the Basque Government through the Research Group program IT1507-22.
Data Availability Statement
The pre-processed data is be available as a Zenodo repository [
26] (Temporary URL). The Matlab scripts are available upon request to the corresponding author.
Conflicts of Interest
The authors declare no conflicts of interest.
Appendix A. Kalman Tracking Initialization
In the Jaquaman linking step of the tracker, the software needs to look for possible targets for each origin spots in order to initiate a track. The search radius, by default, is centered on the origin spot, and must be relatively large to account for the movement. After the track is initiated, the next search circles can be much smaller thanks to the predictive step of the Kalman filter.
In the fast flows, initiating a track is not optimal, as the spots might move a lot in a preferential direction, leading to an impractically large search radius. Most of the initiated tracks ended up being incorrect, and terminated only after one or two steps. The presence of these artifact tracks also impedes the initiation of the true tracks, therefore some visually very clear cases are ignored. In the end, only few tracks per frame were visible, most particles were unable to be traced.
To solve this issue, the TrackMate plugin [
21] was modified, in order to include a manual first guess. In this strategy, the Jaquaman linking step of the tracker sees the unmodified target spot, but the origin spot is translated by a displacement vector, specified as manual input. Moving the origin spots closer to the expected position of the target spots allows for a much smaller initial search radius, increasing the efficacy of the Jaquaman linking step. After determining the relation between an origin and a target spot, the tracking can then proceed using the unmodified Kalman filter. The modification has been submitted to the public repository of the plugin at
https://github.com/trackmate-sc/TrackMate/pull/296.
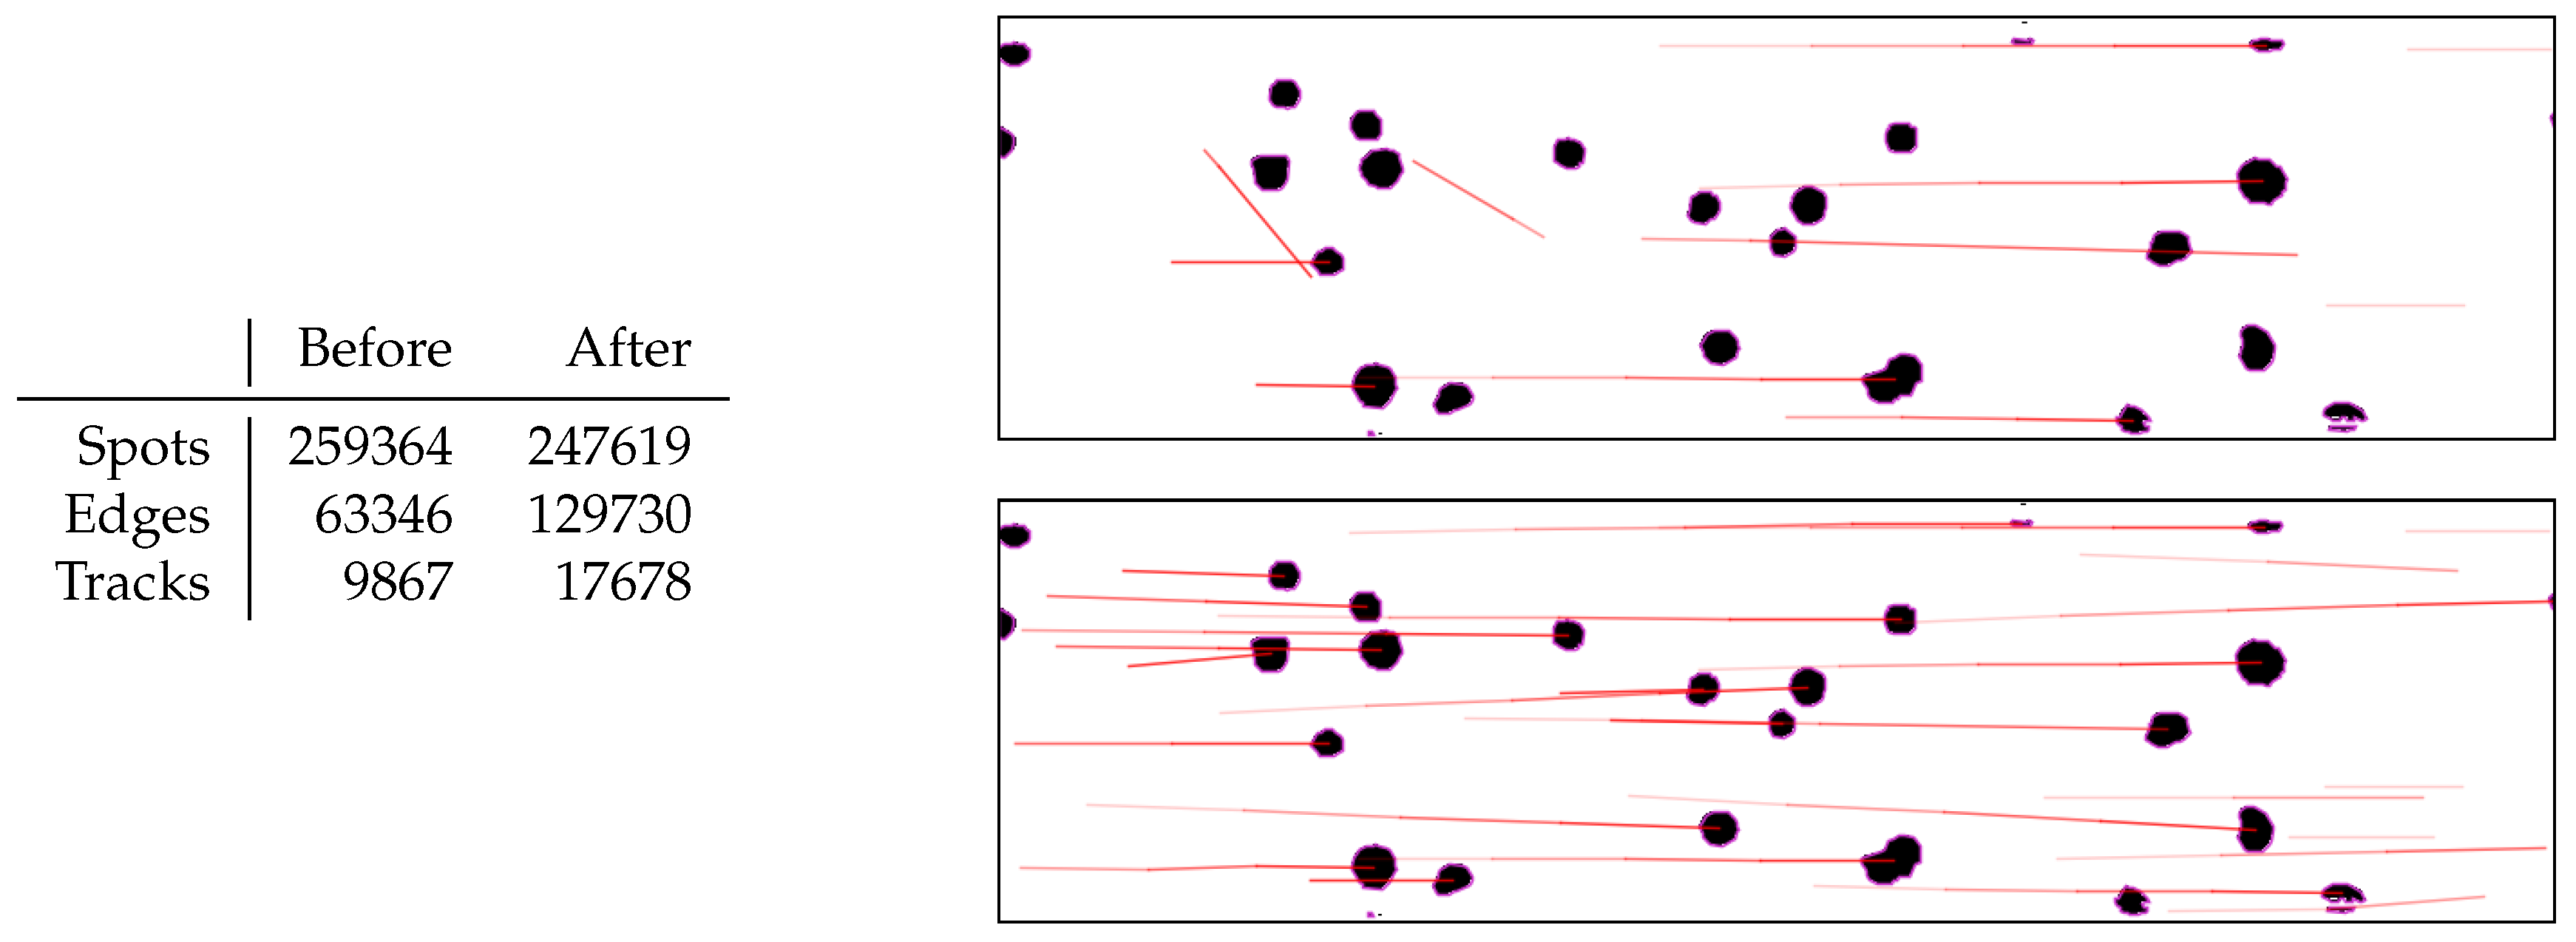
The improvement in tracking the particles in this situation is evident, and reported in the table of
Figure A1, without which the particle tracking was rather inefficient. The difference in the number of total recognized spots is negligible, and only due to the fact that the filtering on the particle size is done through sliders instead of text input. The greatest difference is in the numbers of edges and tracks, which mean that there is more information on the movement. But, more importantly, before the improvement there were several tracks moving in unpredictable directions, as seen in the image, which is incorrect. In the new implementation, the tracks are on average much longer, and span the whole length of the window, denoting a correct tracking.
Figure A1.
Enhancement in particle tracking capabilities in the same test recording.
Figure A1.
Enhancement in particle tracking capabilities in the same test recording.
Appendix B. Particle Volume Estimation
The computational model assumes spherical particles, which, when projected onto a plane, create circular shadows that may overlap. As observed in
Figure 8, some overlapping particles are not involved in the tracking but need to be considered to evaluate the volume accurately. The following method reduces the error using a simple algebraic model, which could be further improved with additional data, potentially using an artificial neural network (ANN) or more rigorous mathematical definitions. However, the current method already provides satisfactory results under the presented conditions.
The equations describing relationships for the perimeter, area, and volume for a system composed of multiple circular objects (in 2D) or spherical objects (in 3D), each with radius
are:
They express the idea that the total perimeter, area, and volume can be represented by equivalent sums of the contributions of individual objects with a mean or effective radius
and a total number of objects
n. The objective is to attempt to estimate
V from the first two,
P and
A, deriving
and
n.
From the perimeter and area, we derive
as:
Equating the expressions for
:
Divide area and perimeter to find
:
At this point,
n and
can be used to find the volume:
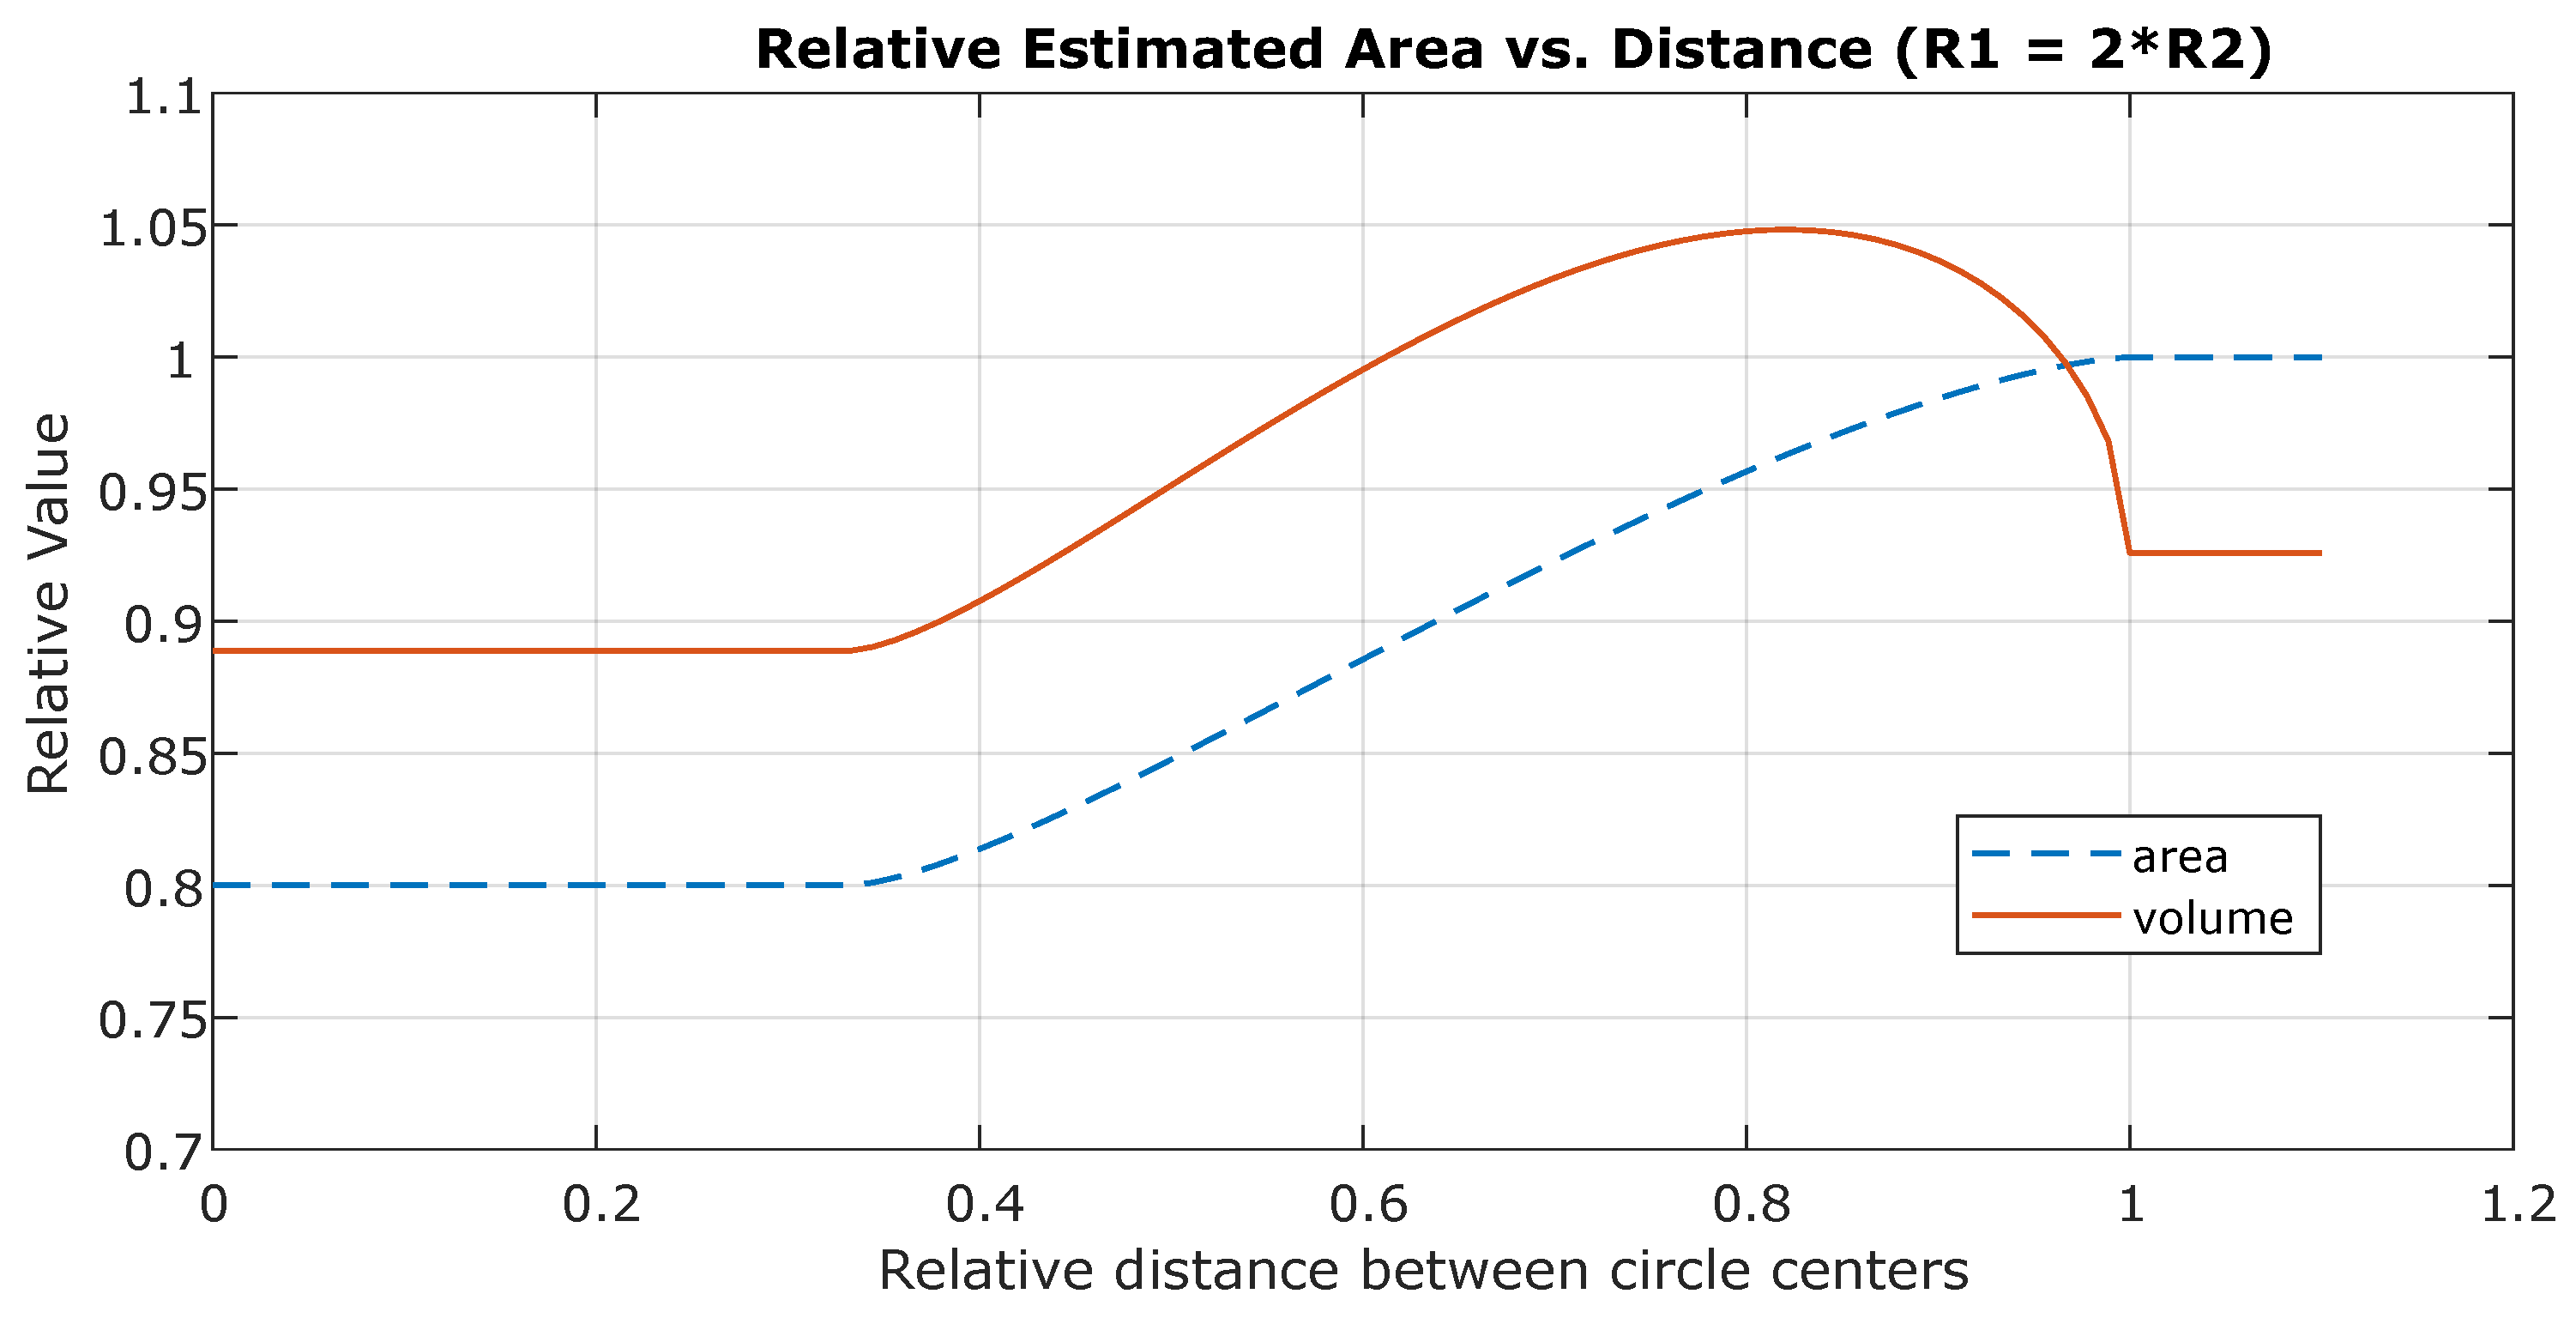
This method has an error proportional to the overlap. Considering only two particles: from no overlap, where the error is theoretically zero, the real area and volume are underestimated by half when both particles are exactly the same size and completely overlapped. If the particles are of different sizes, the error is less than that. This is verified using the script
circleOverlapSimulation.m, resulting in
Figure A2. The error at distance greater than 1 disappears for more dissimilar sizes, and the global error reduces for more dissimilar sizes. The worst case scenario is for equal radius, where both estimated values are half of the real area and volume, when both particles are totally overlapped. If only one circle is evaluated (or
), the formula is exact. This discrepancy is to be expected and a correction would need to be applied; it was decided to avoid applying further hypotheses for a marginal improvement that anyway would not account slightly oval, elongated, or joined particles.
Figure A2.
Relative values of volume and area estimated using the measured apparent area and perimeter of overlapping disks.
Figure A2.
Relative values of volume and area estimated using the measured apparent area and perimeter of overlapping disks.
References
- Singh, A.; Kapil, S.; Das, M. A comprehensive review of the methods and mechanisms for powder feedstock handling in directed energy deposition. Additive Manufacturing 2020, 35, 101388. [Google Scholar] [CrossRef]
- Dadbakhsh, S.; Hao, L.; Kong, C. Surface finish improvement of LMD samples using laser polishing. Virtual and Physical Prototyping 2010, 5, 215–221. [Google Scholar] [CrossRef]
- Murer, M.; Furlan, V.; Formica, G.; Morganti, S.; Previtali, B.; Auricchio, F. Numerical simulation of particles flow in Laser Metal Deposition technology comparing Eulerian-Eulerian and Lagrangian-Eulerian approaches. Journal of Manufacturing Processes 2021, 68, 186–197. [Google Scholar] [CrossRef]
- Zekovic, S.; Dwivedi, R.; Kovacevic, R. Numerical simulation and experimental investigation of gas–powder flow from radially symmetrical nozzles in laser-based direct metal deposition. International Journal of Machine Tools and Manufacture 2007, 47, 112–123. [Google Scholar] [CrossRef]
- Mezhericher, M.; Brosh, T.; Levy, A. Modeling of Particle Pneumatic Conveying Using DEM and DPM Methods. Particulate Science and Technology 2011, 29, 197–208. [Google Scholar] [CrossRef]
- Baraldo, S.; Roncoroni, A.; Palo, F.; Valente, A. Multi-physics based methodology for evaluating powder feeding quality for Laser Metal Deposition. Procedia CIRP 2022, 107, 623–628. [Google Scholar] [CrossRef]
- Higashitani, K.; Makino, H.; Matsusaka, S. Powder technology handbook; CRC Press, Taylor & Francis Group, 2020.
- Levy, A. Handbook of conveying and handling of particulate solids; Elsevier: Amsterdam New York, 2001; pp. 403–409. [Google Scholar] [CrossRef]
-
Colin Thornton. Granular Dynamics, Contact Mechanics and Particle System Simulations: A DEM study; Springer-Verlag GmbH, 2015; p. 195.
- Klinzing, G.E.; Rizk, F.; Marcus, R.; Leung, L.S. Pneumatic Conveying of Solids: A Theoretical and Practical Approach, 3 ed.; SPRINGER NATURE: Dordrecht, 2010. [Google Scholar]
- Mills, D. Handbook of pneumatic conveying engineering; Marcel Dekker: New York, 2004. [Google Scholar]
- Zhou, F.; Hu, S.; Liu, Y.; Liu, C.; Xia, T. CFD–DEM simulation of the pneumatic conveying of fine particles through a horizontal slit. Particuology 2014, 16, 196–205. [Google Scholar] [CrossRef]
- Zhao, H.; Zhao, Y. CFD–DEM simulation of pneumatic conveying in a horizontal channel. International Journal of Multiphase Flow 2019, 118, 64–74. [Google Scholar] [CrossRef]
- Alkassar, Y.; Agarwal, V.K.; Behera, N.; Jones, M.G.; Pandey, R.K. Transient characteristics of fine powder flows within fluidized dense phase pneumatic conveying systems. Powder Technology 2019, 343, 629–643. [Google Scholar] [CrossRef]
- Li, L.; Huang, Y.; Zou, C.; Tao, W. Numerical Study on Powder Stream Characteristics of Coaxial Laser Metal Deposition Nozzle. Crystals 2021, 11, 282. [Google Scholar] [CrossRef]
- Sommerfeld, M. Analysis of collision effects for turbulent gas-particle flow in a horizontal channel: Part I. Particle transport. International Journal of Multiphase Flow 2003, 29, 675–699. [Google Scholar] [CrossRef]
- Song, Z.; Li, Q.; Li, F.; Chen, Y.; Ullah, A.; Chen, S.; Wang, W. MP-PIC simulation of dilute-phase pneumatic conveying in a horizontal pipe. Powder Technology 2022, 410, 117894. [Google Scholar] [CrossRef]
- Oerlikon. Datasheet of gas-atomized powder MetcoAdd 316L-D.
- Honeywell International Inc.. Honeywell TruStability™SSC pressure sensors.
- Schindelin, J.; Arganda-Carreras, I.; Frise, E.; Kaynig, V.; Longair, M.; Pietzsch, T.; Preibisch, S.; Rueden, C.; Saalfeld, S.; Schmid, B.; Tinevez, J.Y.; White, D.J.; Hartenstein, V.; Eliceiri, K.; Tomancak, P.; Cardona, A. Fiji: an open-source platform for biological-image analysis. Nature Methods 2012, 9, 676–682. [Google Scholar] [CrossRef]
- Tinevez, J.Y.; Perry, N.; Schindelin, J.; Hoopes, G.M.; Reynolds, G.D.; Laplantine, E.; Bednarek, S.Y.; Shorte, S.L.; Eliceiri, K.W. TrackMate: An open and extensible platform for single-particle tracking. Methods 2017, 115, 80–90. [Google Scholar] [CrossRef] [PubMed]
- Jaqaman, K.; Loerke, D.; Mettlen, M.; Kuwata, H.; Grinstein, S.; Schmid, S.L.; Danuser, G. Robust single-particle tracking in live-cell time-lapse sequences. Nature Methods 2008, 5, 695–702. [Google Scholar] [CrossRef]
- Spinewine, B.; Capart, H.; Larcher, M.; Zech, Y. Three-dimensional Voronoï imaging methods for the measurement of near-wall particulate flows. Experiments in Fluids 2003, 34, 227–241. [Google Scholar] [CrossRef]
- Pedrolli, L.; Achiaga Menor, B.; Martinez de Arenaza, I.; López, A. Comparison of CFD-DEM and MP-PIC in the Simulation of Metal Powder Conveying for Laser Metal Deposition. OpenFOAM® Journal 2024, 4, 26–40. [Google Scholar] [CrossRef]
- Ayachit, U. The ParaView guide, full color version ed.; Kitware Inc., 2015.
- Pedrolli, L. Optical Particle Tracking in the Pneumatic Conveying of Metal Powders through a Thin Capillary Pipe, 2024.
|
Disclaimer/Publisher’s Note: The statements, opinions and data contained in all publications are solely those of the individual author(s) and contributor(s) and not of MDPI and/or the editor(s). MDPI and/or the editor(s) disclaim responsibility for any injury to people or property resulting from any ideas, methods, instructions or products referred to in the content. |
© 2024 by the authors. Licensee MDPI, Basel, Switzerland. This article is an open access article distributed under the terms and conditions of the Creative Commons Attribution (CC BY) license (http://creativecommons.org/licenses/by/4.0/).
