1. Introduction
Coating thickness is crucial for the longevity and effectiveness of surface treatments. An optimal coating thickness is essential; lower thicknesses fail to provide adequate protection, while higher thicknesses can lead to adhesion problems and reduced coating life. Therefore, determining the optimum coating thickness is vital for enhancing the durability of coated materials [
1,
2]. In the machinery manufacturing sector, fatigue and wear are common damage mechanisms. These issues typically initiate on the surface, making surface coating or hardening processes necessary. Boronizing, a process involving the alloying of boron atoms to the metal surface via thermo-diffusion, forms a thin, hard layer of metal borides (FeB and Fe2B) on the surface, significantly enhancing hardness and wear resistance [
4]. This process can be carried out using solid, liquid, and gas methods [
5].
Boronizing is widely applied to various iron alloys, including steel, to preserve the material's toughness while extending the damage time of machine elements [
6]. The surface hardness of boronized parts can vary between 2000-2500 HV (Vickers), depending on the steel's chemical composition and the boronizing technique used. Compared to other surface treatments, boronizing offers high surface hardness, reduced friction coefficient, and increased corrosion resistance [
7,
8].
Several studies have explored the effects of boronizing on different materials. For instance, in a study where AISI 1050 steel was boronized for 3 hours at 950 °C, the hardness values of the main layer were found to be 496-1290 HV in the boride layer, 300-334 HV in the transition zone, and 260-266 HV in the main structure [
9]. However, it was determined that the effect of boride decreased due to the reduction in the amount of diffusion from the surface into the material. As the processing time increases, the differences between the thicknesses of the boride layers also increase [
10].
In this surface hardening technique, the formation of a single-phase Fe2B layer is more preferred than a dual-phase Fe2B+FeB layer. The FeB phase creates tensile stress, while the Fe2B phase creates compressive stress. These opposing stresses can lead to cracks between the two phases [
11]. Due to different thermal coefficients, cracks can occur at the interface of the FeB/Fe2B dual-phase layer. In another study, SAE 4140 steel samples were boronized for 120, 240, and 480 minutes. The thickest boron layer was obtained at a temperature of 1050 °C for 6 hours. It was emphasized that the abrasion resistance of boronized samples increased by 3-4 times, with the best abrasion resistance observed in samples boronized at 900 °C for 6 hours. External factors such as dynamic variable mechanical stresses and sudden thermal changes can cause these phase structures to separate and rupture from the surface, a phenomenon described as dehulling of the hardened layer [
12,
13]. Zhank [
14], explored how the boronizing process affects the microstructure and mechanical properties of 20CrMnTi steel. Boronizing is a surface treatment process where boron atoms are diffused into the surface of a metal, typically to improve its hardness, wear resistance, and corrosion resistance.
The focus of this study is to determine the effect of the thermo-diffusion boriding process on the thickness, hardness, and wear resistance of the borided layer. Improving the surface properties of AISI 1137 medium carbon steel is preferable over using higher-cost alloy steels in the production industry.
2. Experimental Details
In this study, thermo diffusion boronizing was applied to AISI 1137 steel which is frequently preferred in spline shafts, studs, bolts, nuts with machined threads and similar parts. Thus, it is aimed to harden the surface of steel and determine the mechanical properties and morphology of the formed boride layers. The test samples prepared 20x20x20 mm cube on milling machine and got ready for boronizing. The chemical content of AISI 1137 steel used in the experiments is given in
Table 1.
In the process of diffusion boronization, the material to be boronized is placed in the middle of powdered boron and usually held at 850-1000 °C for 2-10 hours. Ekabor 1 powder was used in this study. Ekabor 1 is a commercial boriding agent known for its ability to produce high-quality boride layers. The chemical composition of Ekabor 1 includes boron carbide (B4C) as the primary boron source, along with activators such as potassium tetrafluoroborate (KBF4) and other proprietary additives that enhance the diffusion process.
The rationale for using Ekabor 1 in this study includes:
Optimal Layer Thickness: Ekabor 1 is known to produce consistent and optimal boride layer thickness, which is crucial for achieving the desired surface properties.
Surface Quality: The use of Ekabor 1 results in high-quality surface roughness, which is beneficial for applications requiring smooth and wear-resistant surfaces.
General Purpose: Ekabor 1 is suitable for use with general-purpose iron and steel materials, making it a versatile choice for various industrial applications.
A total of 12 samples were boronized at 850 °C and 950 °C for 2, 4 and 8 hours with 2 pieces the same parameters. Boronized samples were first subjected to abrasion tests. Abrasion tests performed on the disk-pin test assembly. Using abrasives of 800 and 1200 mesh Al2O3, a total of 150 m with 25 m intervals, abrasive wear tests performed at 10 N and 30 N loads and 0.2 m/s shear speed. Loading on the wear device carried out by the application of constant weight. The samples wiped and cleaned with alcohol before the test and weighed before and after the wear test by 0.1 mg precision scales. New abrasive sandpaper used for each test.
Then, samples were polished with metallographic polishing technique and images taken under optical microscope. In this way, the depth of the boronized layer was measured. After this examination, the surfaces of the samples were polished again and micro hardness measurements were made in order to remove the chemical effect of acid etching.
The hardness of the boronized layer was assessed using Vickers microhardness testing. Measurements were taken at various depths from the surface to evaluate the hardness gradient. The highest hardness value recorded was 1963.7 HV at a depth of 10 μm from the surface, while the lowest value was 219.3 HV at a depth of 160 μm near the base metal. The results demonstrated that both the boronizing temperature and time contribute to the hardness of the boride layer. Higher temperatures and longer durations facilitate greater boron diffusion, resulting in a thicker and harder surface layer. This increased hardness is crucial for enhancing the wear resistance of the steel.
3. Results and Discussion
3.1. Wear Resistance Tests
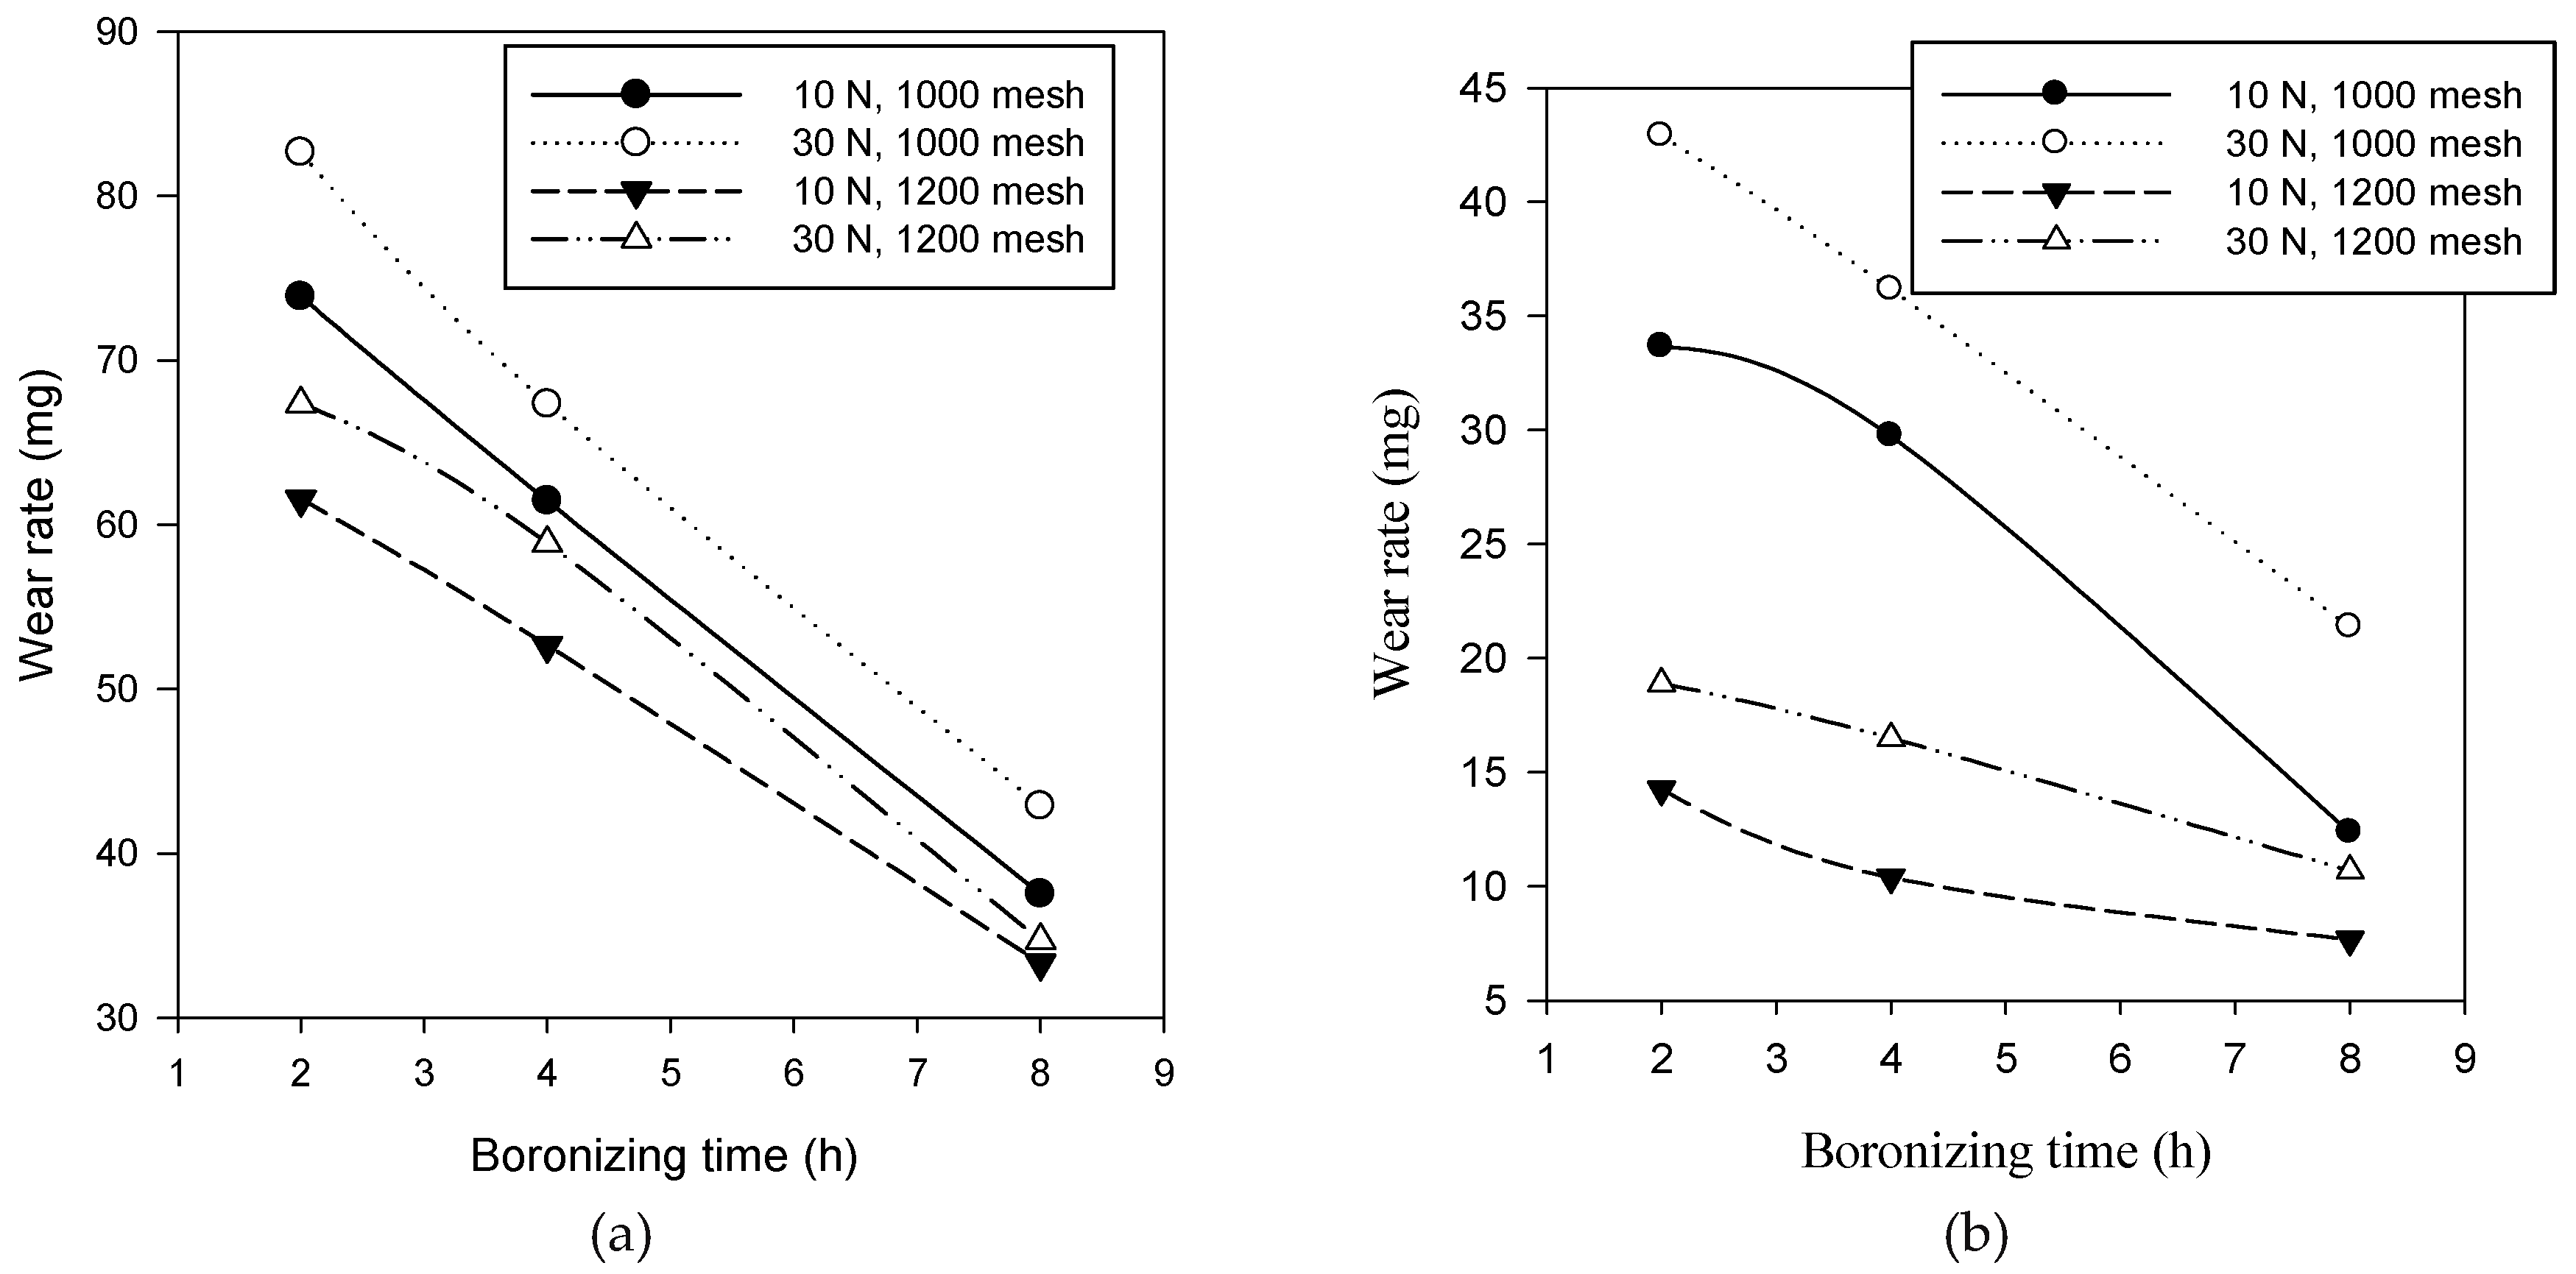
Wear behavior tests of boron coated samples show that wear loss increase when abrasive grain size (1000 mesh) increased. And also, when evaluate wear loss according to applied loads, it increases with increment of load, too. It was also found that with increasing boronization time, the thickness of the boron layer increased and consequently the wear loss decreased. The lowest wear rate was determined in boronized materials at 950 °C for 8 hours. This is due to the formation of FeB on the surface of the material depending on the boronization time [
15]. The FeB phase increases the hardness and abrasion resistance of the material [
16,
17]. The highest wear loss were found on boronized samples at 850 °C for 2 hours (
Figure 1).
Upon examining
Figure 1-a and 1-b, it was observed that when the compressive force applied during abrasion tests was increased for boronized samples at 850 °C, the resulting change in the amount of abrasion was less significant compared to the boronized samples processed at 950 °C. The wear resistance of the boronized AISI 1137 steel samples was evaluated through a series of abrasion tests. These tests were conducted using a disk-pin test assembly with abrasives of 800 and 1200 mesh Al₂O₃. The samples were subjected to a total sliding distance of 150 meters, divided into 25-meter intervals, under loads of 10 N and 30 N at a shear speed of 0.2 m/s. The wear resistance was quantified by measuring the weight loss of the samples before and after the tests using a precision scale with an accuracy of 0.1 mg.
The results indicated a significant improvement in wear resistance with increasing boronizing temperature and time. Specifically, samples boronized at 950 °C exhibited superior wear resistance compared to those treated at 850 °C. This enhancement is attributed to the formation of a thicker and harder boride layer at higher temperatures, which effectively protects the underlying steel from abrasive wear. However, it was observed that the bonding between the base material and the boronized layer could be compromised at higher temperatures, leading to partial wear from the base material under increased load conditions. This phenomenon, described as crusting in the brittle layer, is thought to occur due to the effect of the increased load and partial wear from the base material.
3.2. Optical Image Analysis and Thickness Measurement
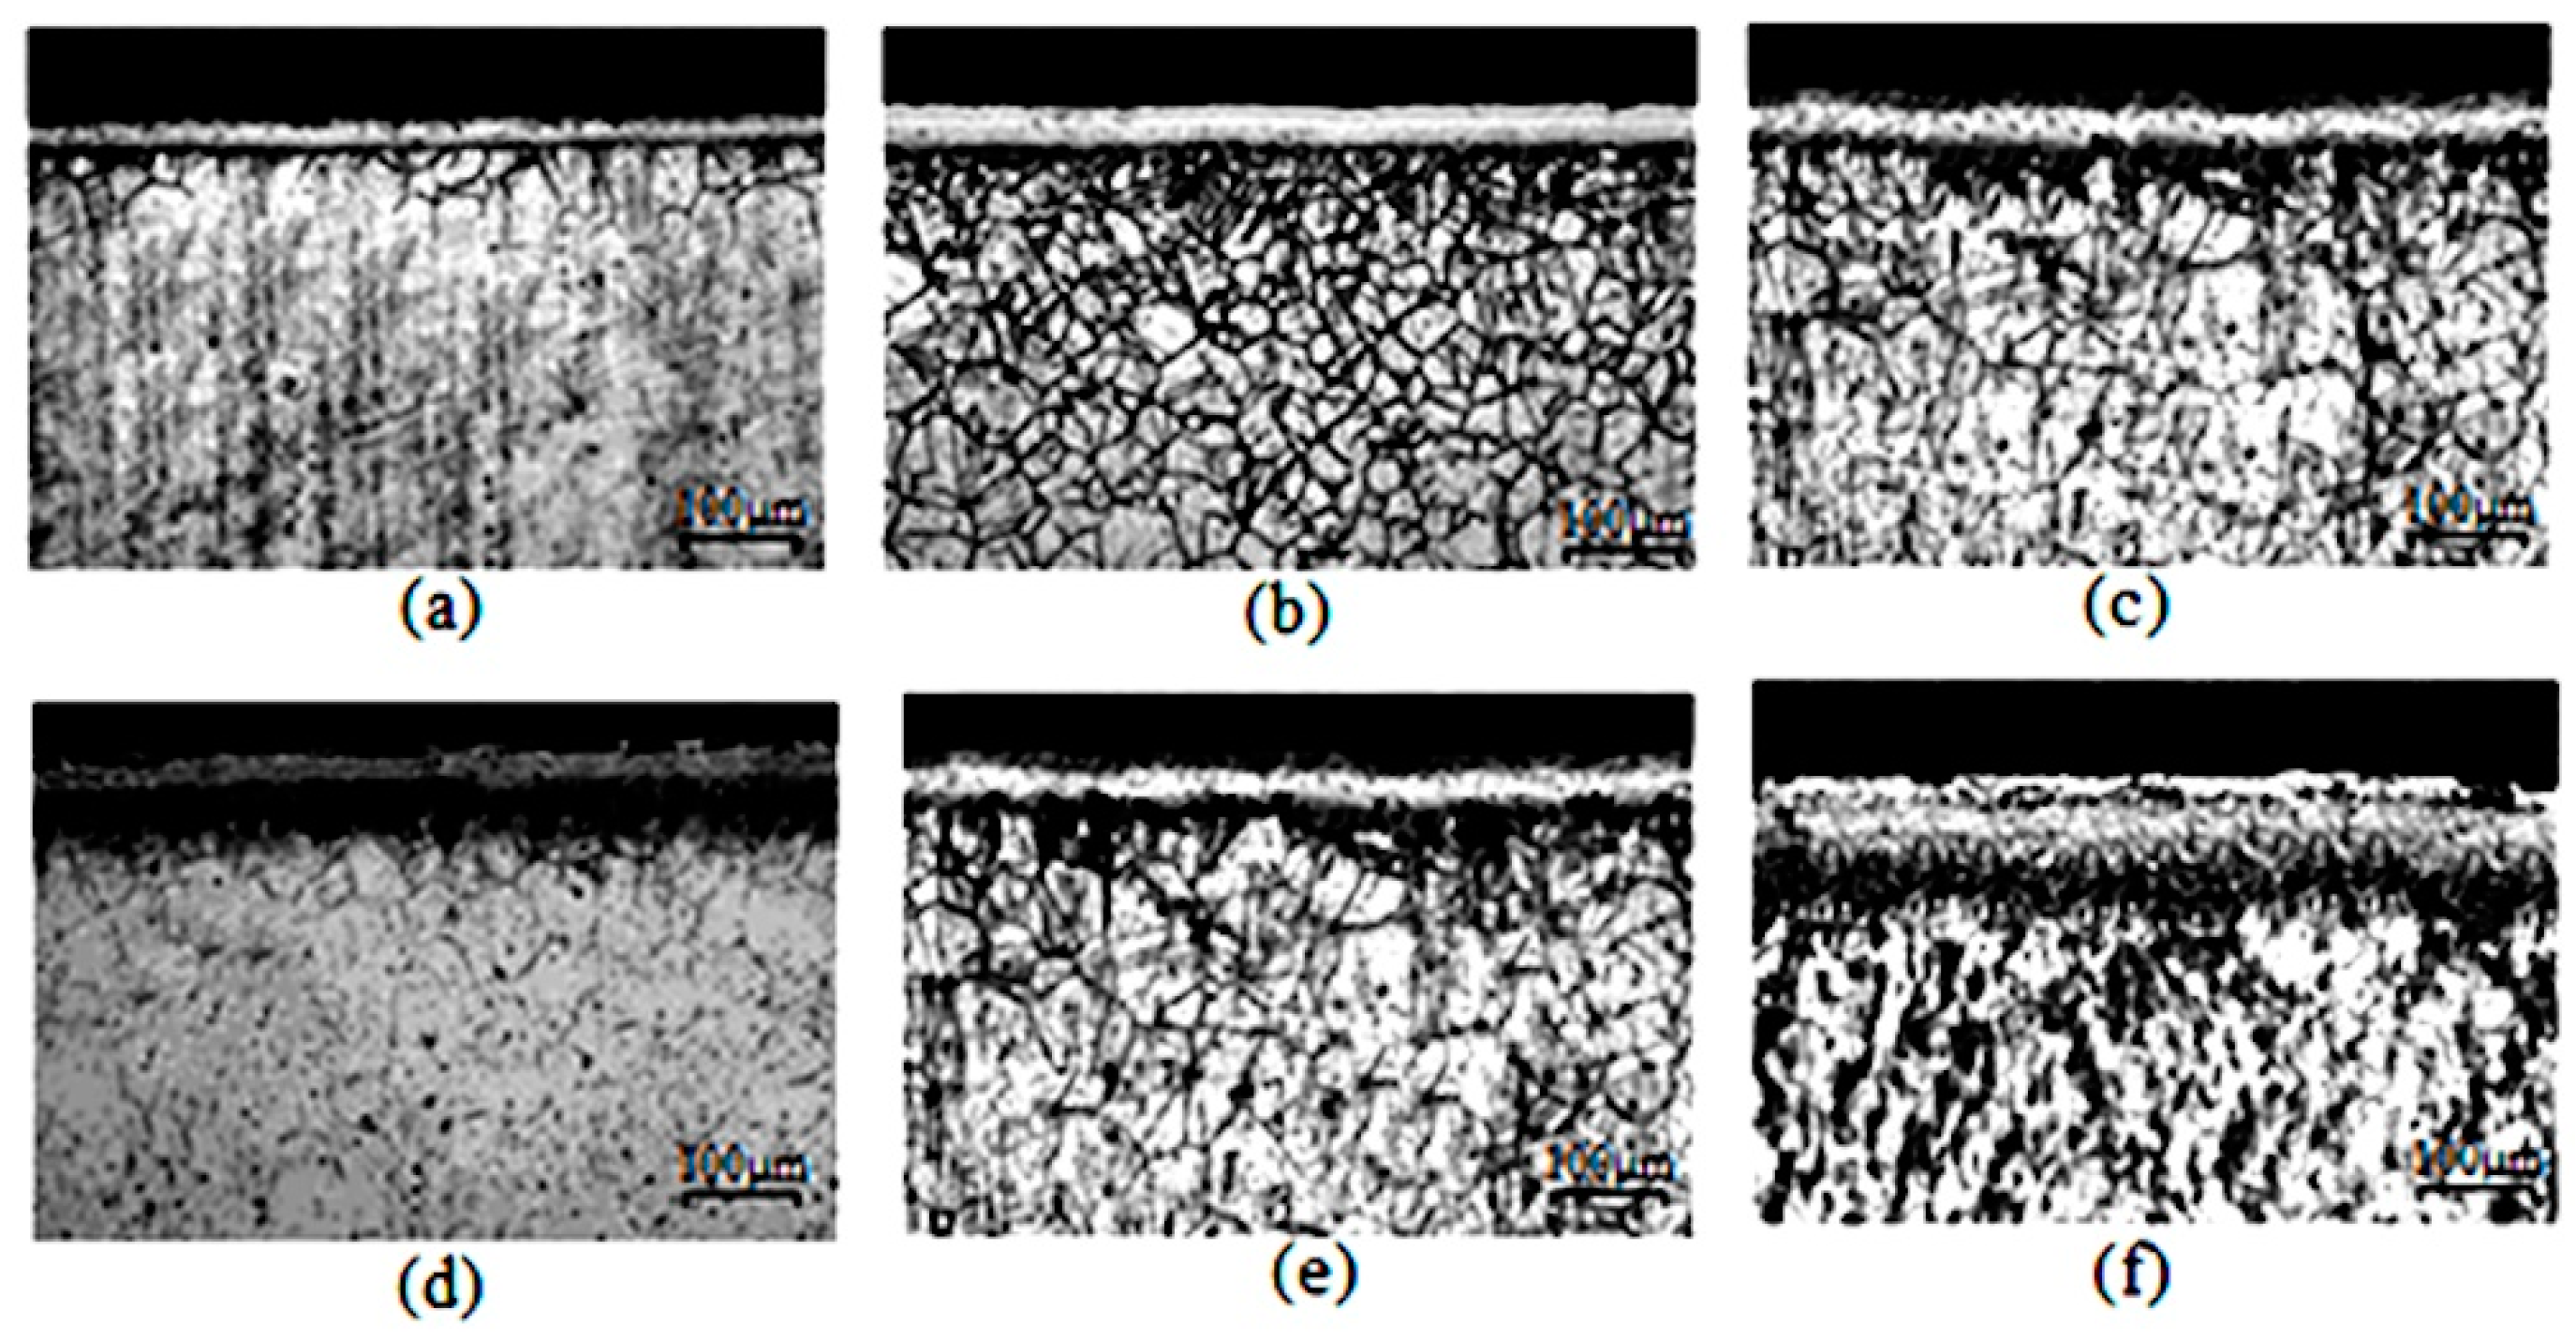
The microstructural analysis of the boronized samples was performed using optical microscopy. The samples were prepared through metallographic polishing and acid etching to reveal the boride layer. The thickness of the boronized layer was measured from the optical images, showing a clear correlation between the boronizing parameters and the layer thickness.
The analysis revealed that both the boronizing temperature and time significantly influence the thickness of the boride layer. Samples treated at 950 °C for 8 hours exhibited the maximum layer thickness of 127.45 μm. This increase in thickness with higher temperature and longer duration is due to the enhanced diffusion of boron atoms into the steel substrate, forming a more substantial boride layer.
When the optical images were examined, it was found that the boron layer an inhomogeneous appearance when the process time getting longer. Although the thickness of the boron layer increased from surface to inward, a thermally affected layer formed towards the base material (
Figure 2-d–f).
Table 2.
Boronized layer thicknesses.
Table 2.
Boronized layer thicknesses.
Boronizing Temperature
(°C) |
Boronizing Time
(hour) |
Boronized Layer Thickness
(µm) |
| 850 |
2 |
64.8 |
| 4 |
78.36 |
| 8 |
102.65 |
| 950 |
2 |
73.45 |
| 4 |
94.78 |
| 8 |
127.45 |
3.3. Hardness Measurement
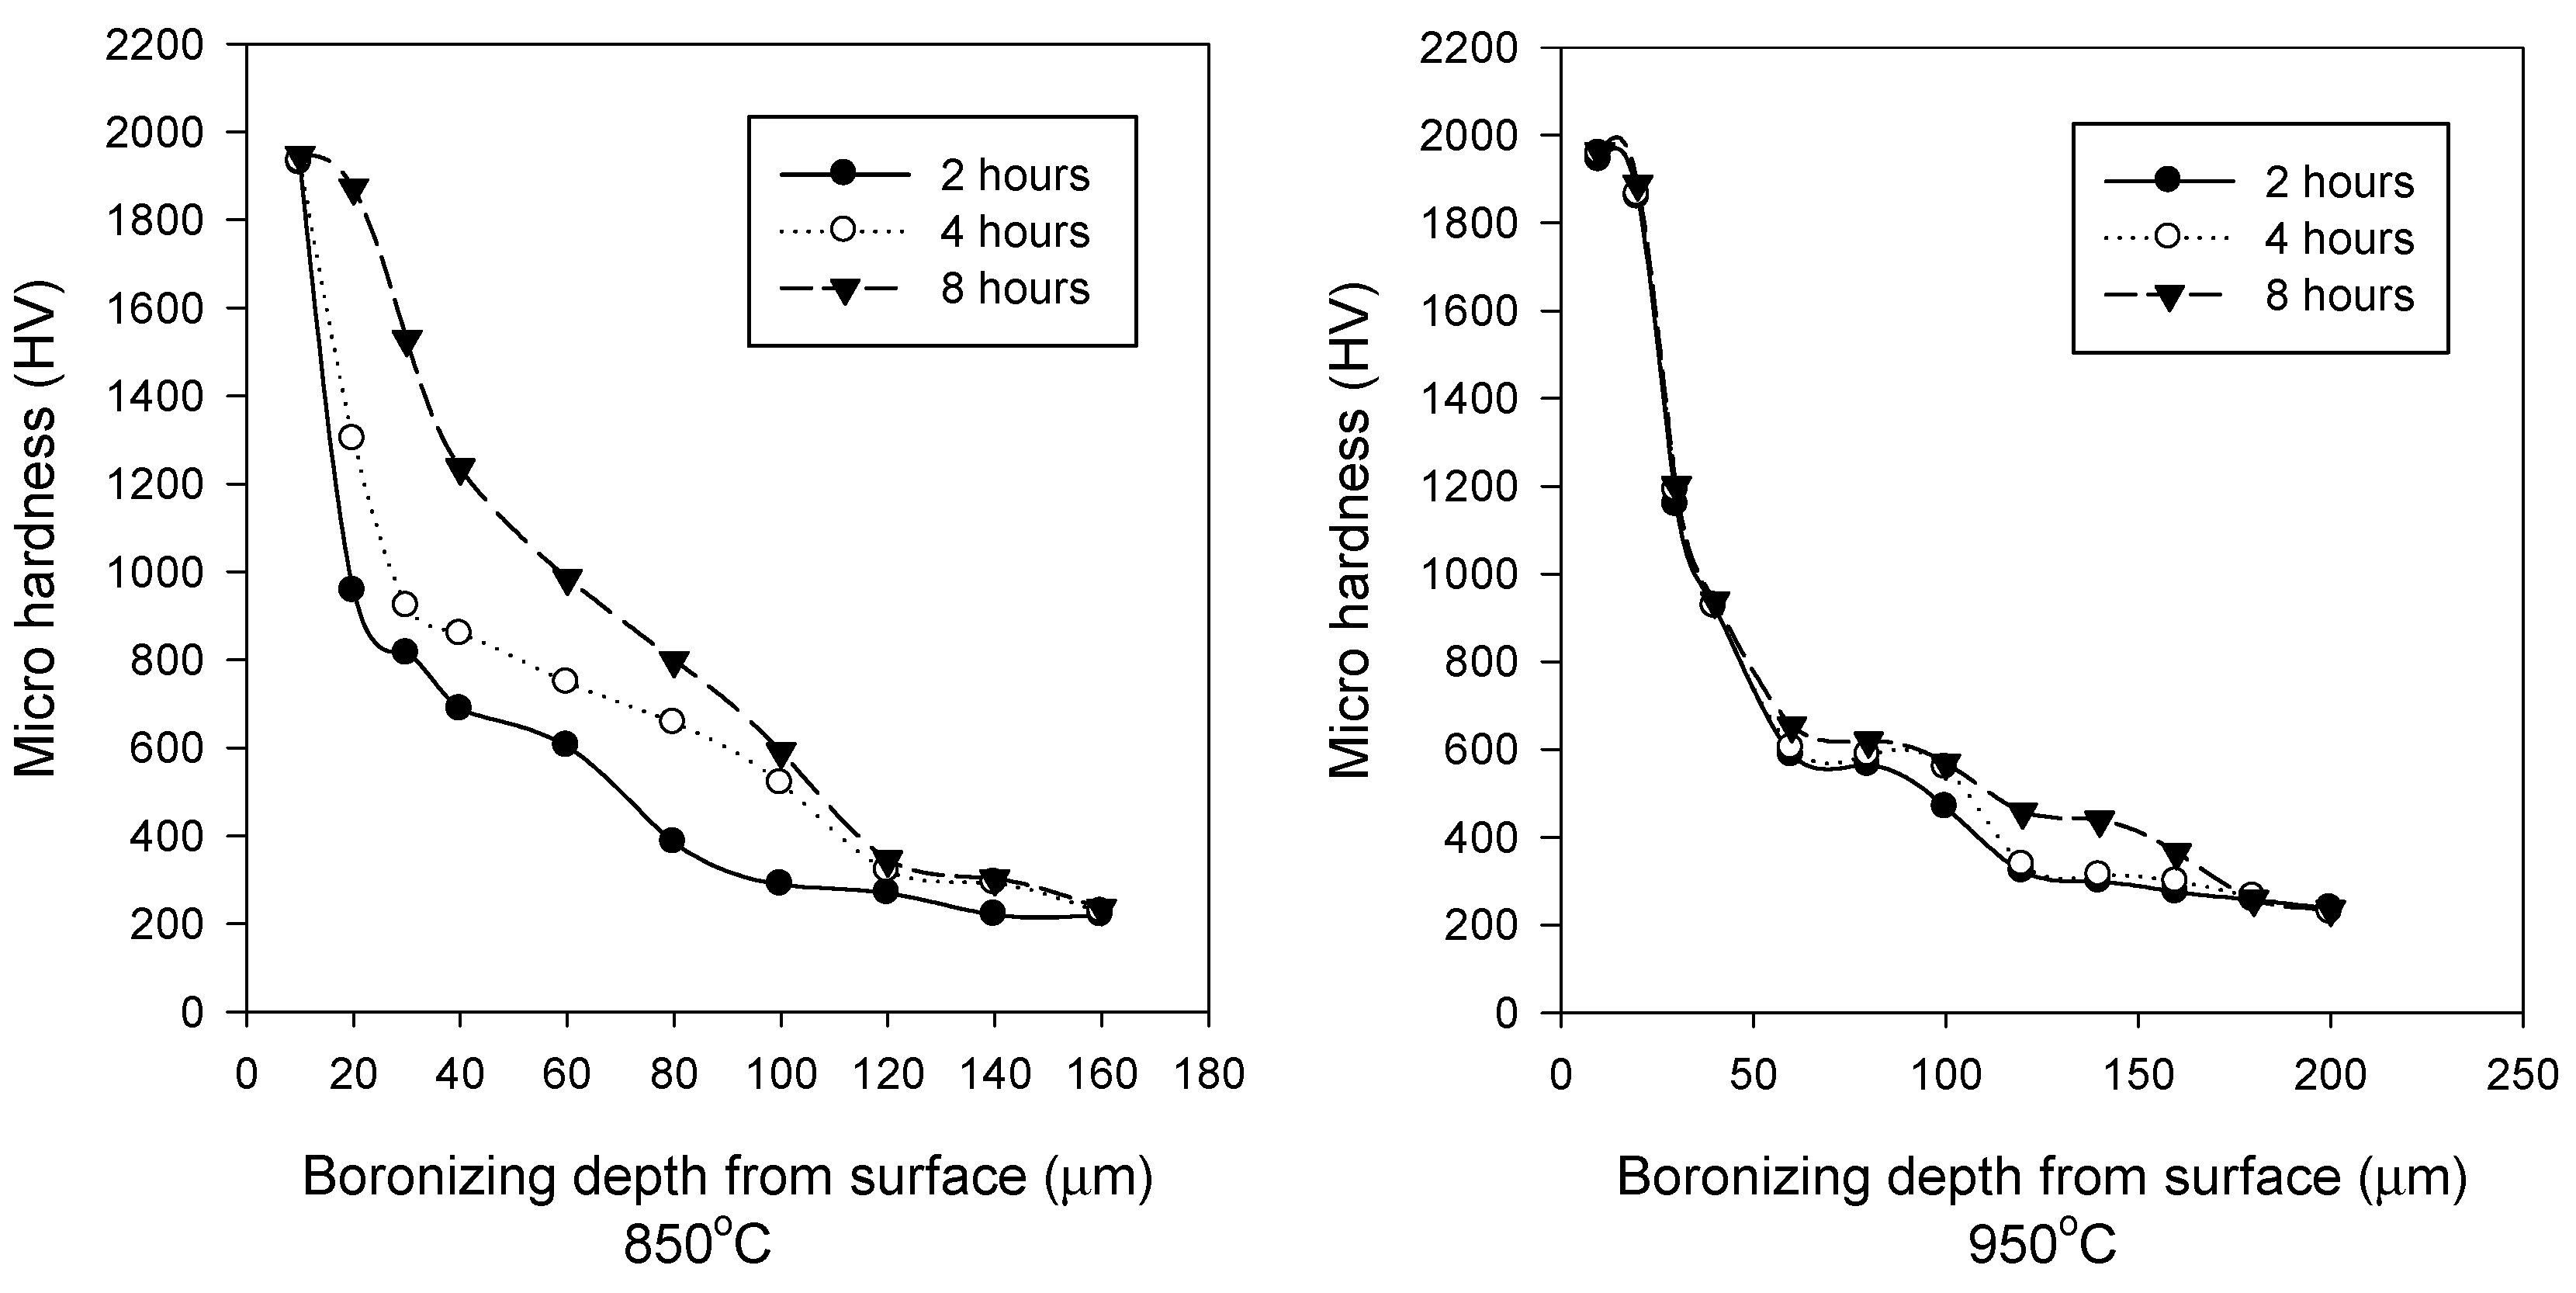
Metallographic examinated surfaces of the specimens polished by fine sandpaper and the hardness measurements were performed at diffusion and transition layer. The hardness of the boronized layer increased with increasing processing temperature and time. Commercially available non-boronized sample’s hardness 207 HV. Micro hardness values increased 1.14–9.48 times when you compare to untreated sample (
Figure 3). The highest values measured at 1963.7 HV in the boronized sample at 950 °C for 8 hours. As the thickness of the hard and brittle layer decreases inward to the base material, the hardness value decreases as well. When the hardness values measured near the top surface for all samples and then compared, it was observed that the hardness increased with increasing thickness of the layer. This is due to more effective diffusion of boron on the outermost surface of the sample at high temperature. For special applications, it is suggested that the temperature scale and thermal holding time should be evaluated separately. In studies involving heat transfer and energy transfer, it is essential to investigate the effect of the temperature difference to which the surface layer generated by the boronizing process on steel is exposed on wear resistance. This aspect stands out as a prominent issue in research assessing the impact of varying temperature and pressure conditions on material properties. It is crucial to determine the temperature effect in studies examining how different flow conditions influence heat transfer performance or investigating the impact of parameters such as jet flow density and velocity on heat transfer on a flat surface. This is emphasized as an important aspect for understanding and improving the performance of different heat transfer systems in academic research [
18,
19].
Ultimately, both graphs unequivocally depict the influence of boronizing temperature and duration on the microhardness profile. It is evident that boronizing carried out at 950°C typically yields higher microhardness values than the process conducted at 850°C, and longer durations tend to promote the formation of harder surface layers. This comparative analysis offers valuable insights for the optimization of the boronizing process.
3.4. Discussion of Results
The experimental results indicate that the thickness of the boronized layer, hardness, and wear resistance of AISI 1137 steel are significantly influenced by the boronizing temperature and time. The increase in layer thickness with higher temperatures and longer durations can be attributed to the enhanced diffusion of boron atoms into the steel matrix. At elevated temperatures, the atomic bonds within the base metal weaken, facilitating deeper penetration of boron atoms and resulting in a thicker boronized layer.
The observed increase in hardness is primarily due to the formation of hard boride phases such as FeB and Fe2B. These phases are known to enhance the surface hardness and wear resistance of the material. The highest hardness values were recorded at the surface and decreased with depth, indicating a gradient in boron concentration.
The wear resistance tests revealed that samples boronized at 950 °C exhibited significantly lower wear rates compared to those boronized at 850 °C. This can be explained by the formation of a more robust and wear-resistant boride layer at higher temperatures. The FeB phase, in particular, is known for its superior hardness and abrasion resistance, which likely contributed to the improved wear performance.
These findings are consistent with existing literature, which also reports increased hardness and wear resistance with higher boronizing temperatures and longer durations [
8,
9,
10,
15,
16,
17]. However, this study provides a more detailed optimization analysis using Taguchi and ANOVA methods, offering valuable insights for industrial applications.
In summary, the underlying phenomena driving the observed improvements in mechanical properties are primarily related to the diffusion kinetics of boron atoms and the formation of hard boride phases.
3.5. Wear Mechanisms and Practical Implications
The wear resistance of borided AISI 1137 steel is significantly influenced by the underlying wear mechanisms. In this study, the primary wear mechanisms observed were abrasive wear and adhesive wear. Abrasive wear occurs when hard particles or asperities on the counterface slide against the boronized layer, causing material removal. The high hardness of the boronized layer, particularly the formation of FeB and Fe2B phases, enhances resistance to abrasive wear by providing a hard, protective surface.
Adhesive wear, on the other hand, involves the transfer of material from one surface to another due to localized bonding and subsequent fracture. The boronized layer's improved hardness and reduced friction coefficient help mitigate adhesive wear by minimizing the extent of material transfer and bonding.
The wear tests conducted at 10 N and 30 N compressive forces revealed that the boronized samples exhibited significantly lower wear rates at 950 °C compared to 850 °C. This can be attributed to the formation of a more robust and wear-resistant boride layer at higher temperatures. The FeB phase, in particular, is known for its superior hardness and abrasion resistance, which likely contributed to the improved wear performance.
In practical applications, borided AISI 1137 steel can be used in components subjected to high wear conditions, such as spline shafts, studs, bolts, and nuts. To prolong the lifetime of these components, it is essential to optimize the boronizing process parameters, such as temperature and time, to achieve the desired layer thickness and hardness. Additionally, regular maintenance and monitoring of wear surfaces can help identify early signs of wear and prevent catastrophic failures.
4. Optimization of Boronizing AISI 1137 Steel
4.1. Taguchi and Anova Analysis for Layer Thickness
First, boriding thickness analyzes depending on temperature and time were made. The result of the analysis is given in
Figure 4.
In light of the analysis of
Figure 4, it has been determined that the boronizing process performed on AISI 1137 steel yields the optimal layer thickness when the parameters are set to a boronizing temperature of 950°C and a boronizing time of 4 hours. Examining the ANOVA analysis in
Table 3 reveals that the most influential parameter affecting the layer thickness is the boronizing time, accounting for 81.7% of the effect (P=0.070, where P < 0.005). Conversely, the temperature parameter appears to have an insignificant influence (P=0.070, where P < 0.05), with its contribution to the effect being merely 15.7%.
These findings suggest that the duration of the boronizing process plays a critical role in determining the layer thickness, overshadowing the impact of temperature. The negligible effect of temperature may be attributed to the saturation of the boron diffusion process at higher temperatures, where time becomes the dominant factor in facilitating further diffusion and growth of the boride layer.
4.2. Taguchi and Anova Analysis for Wear Rate
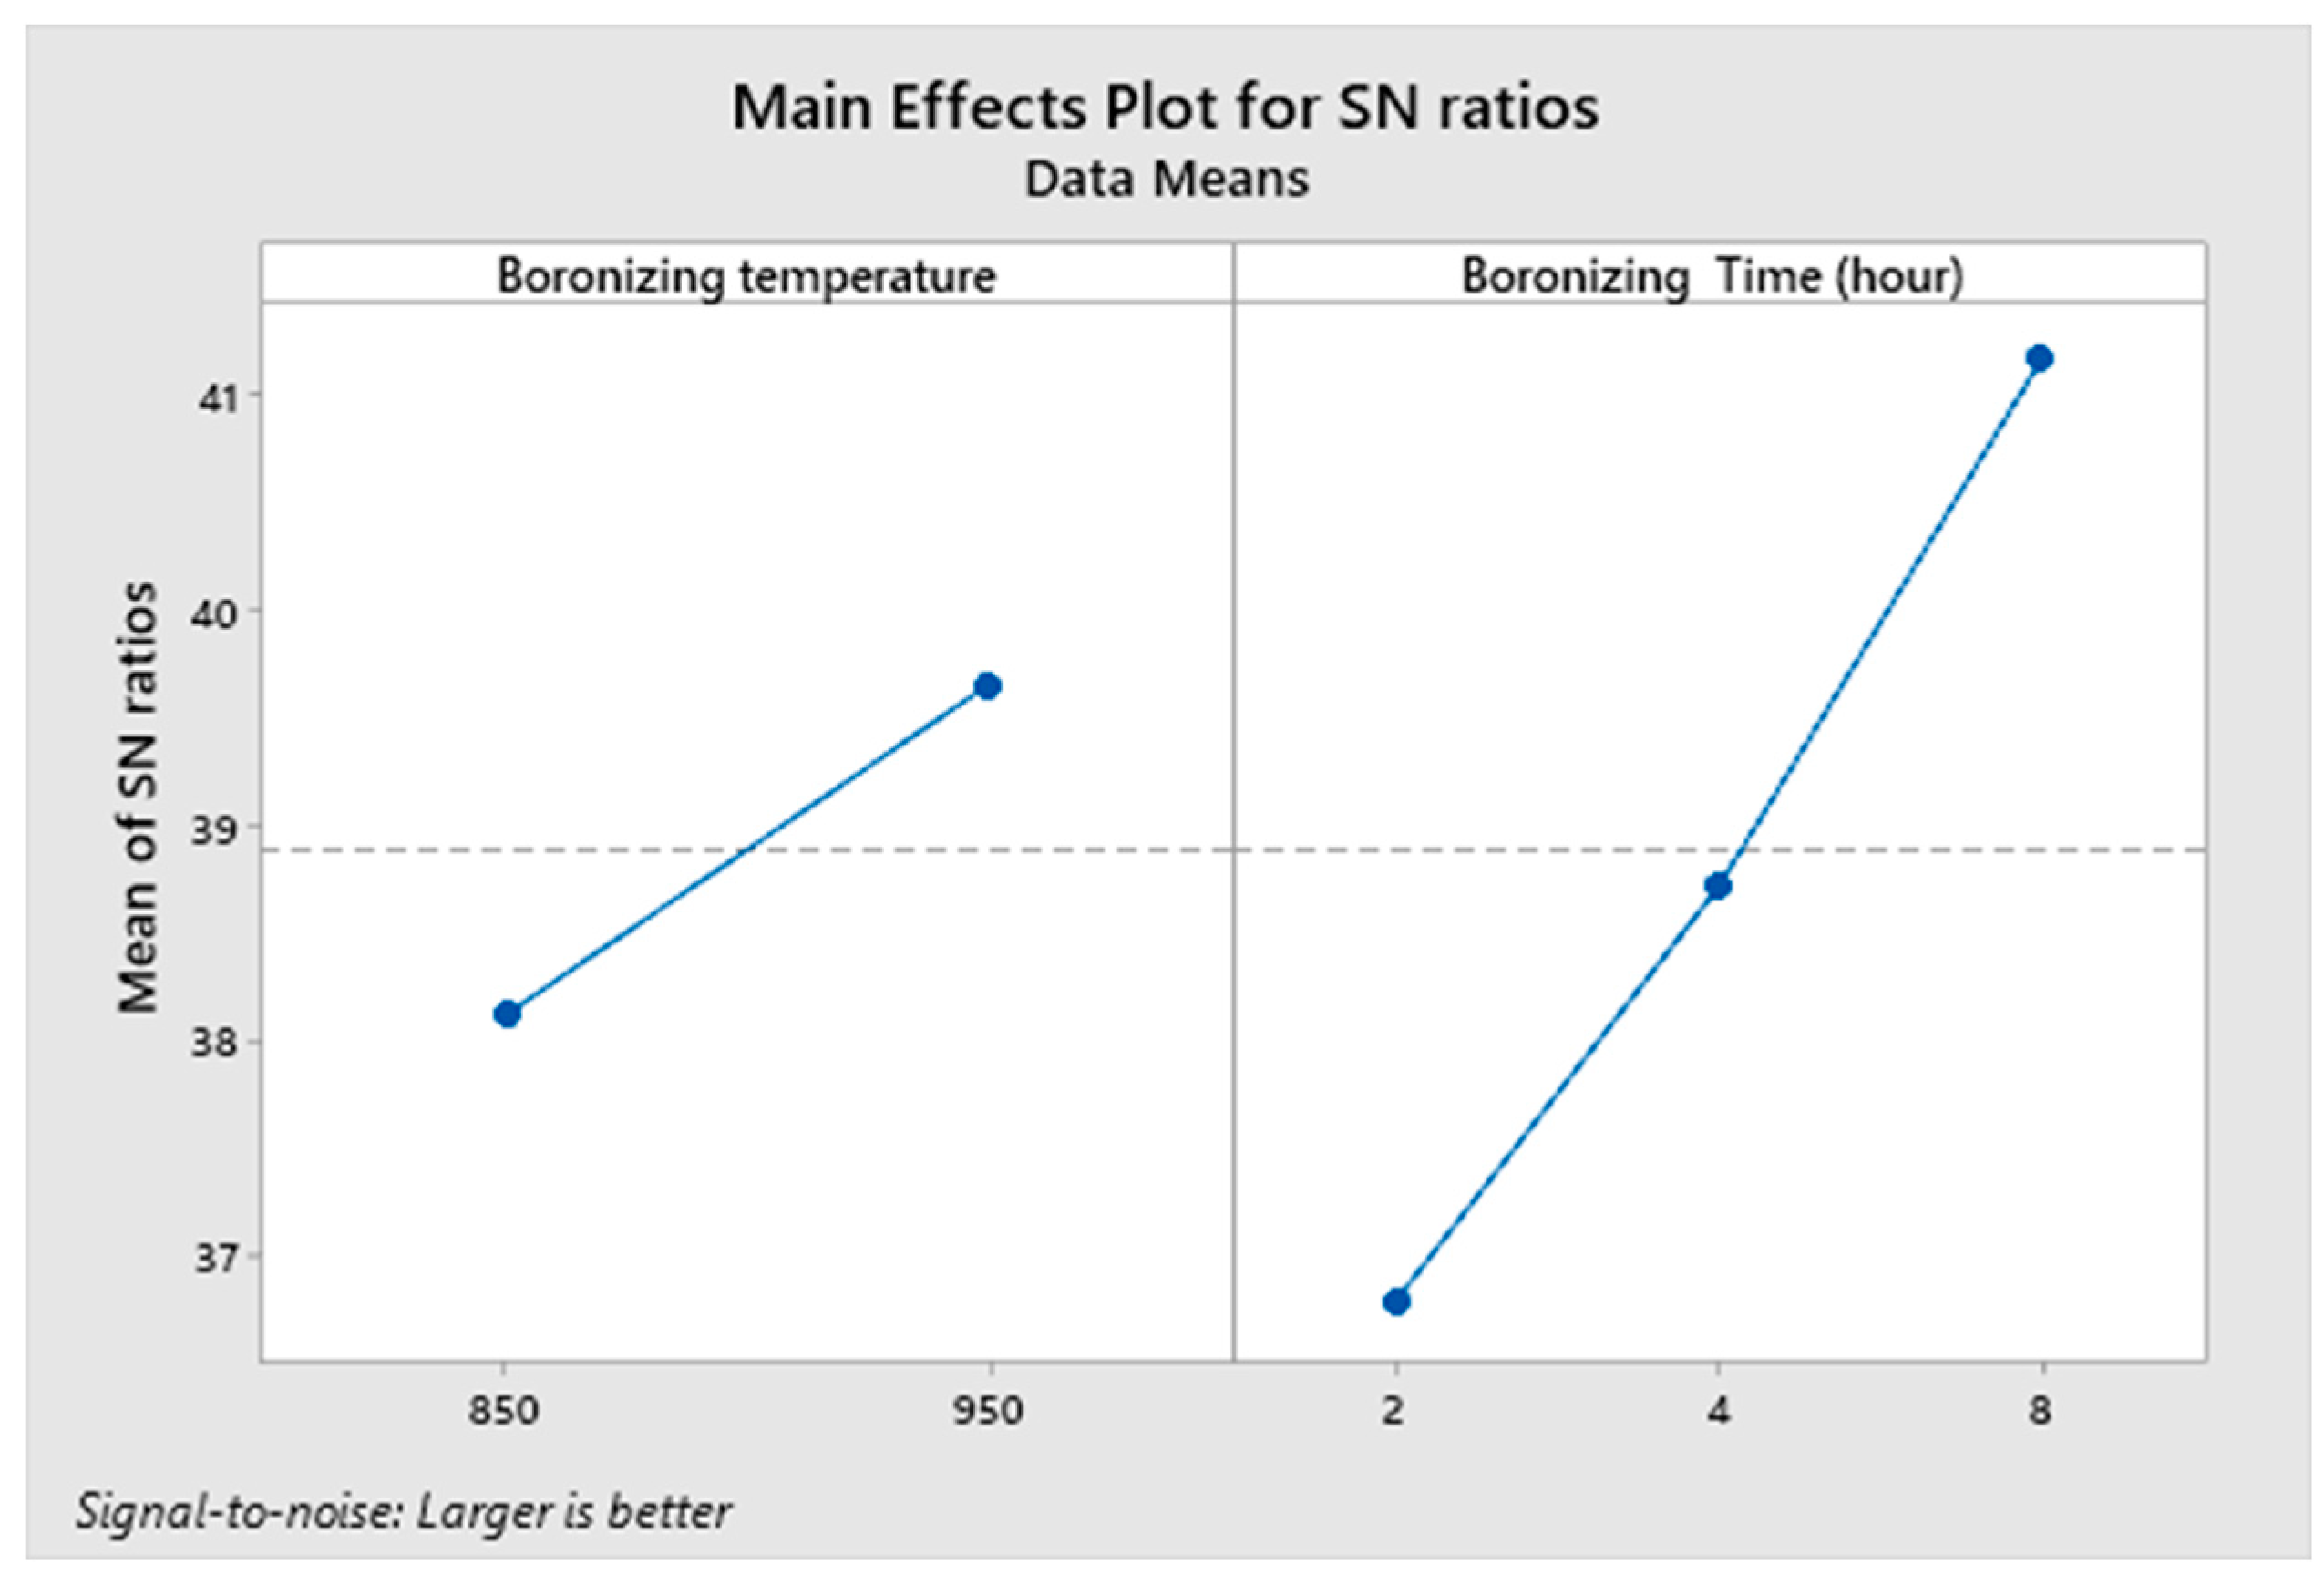
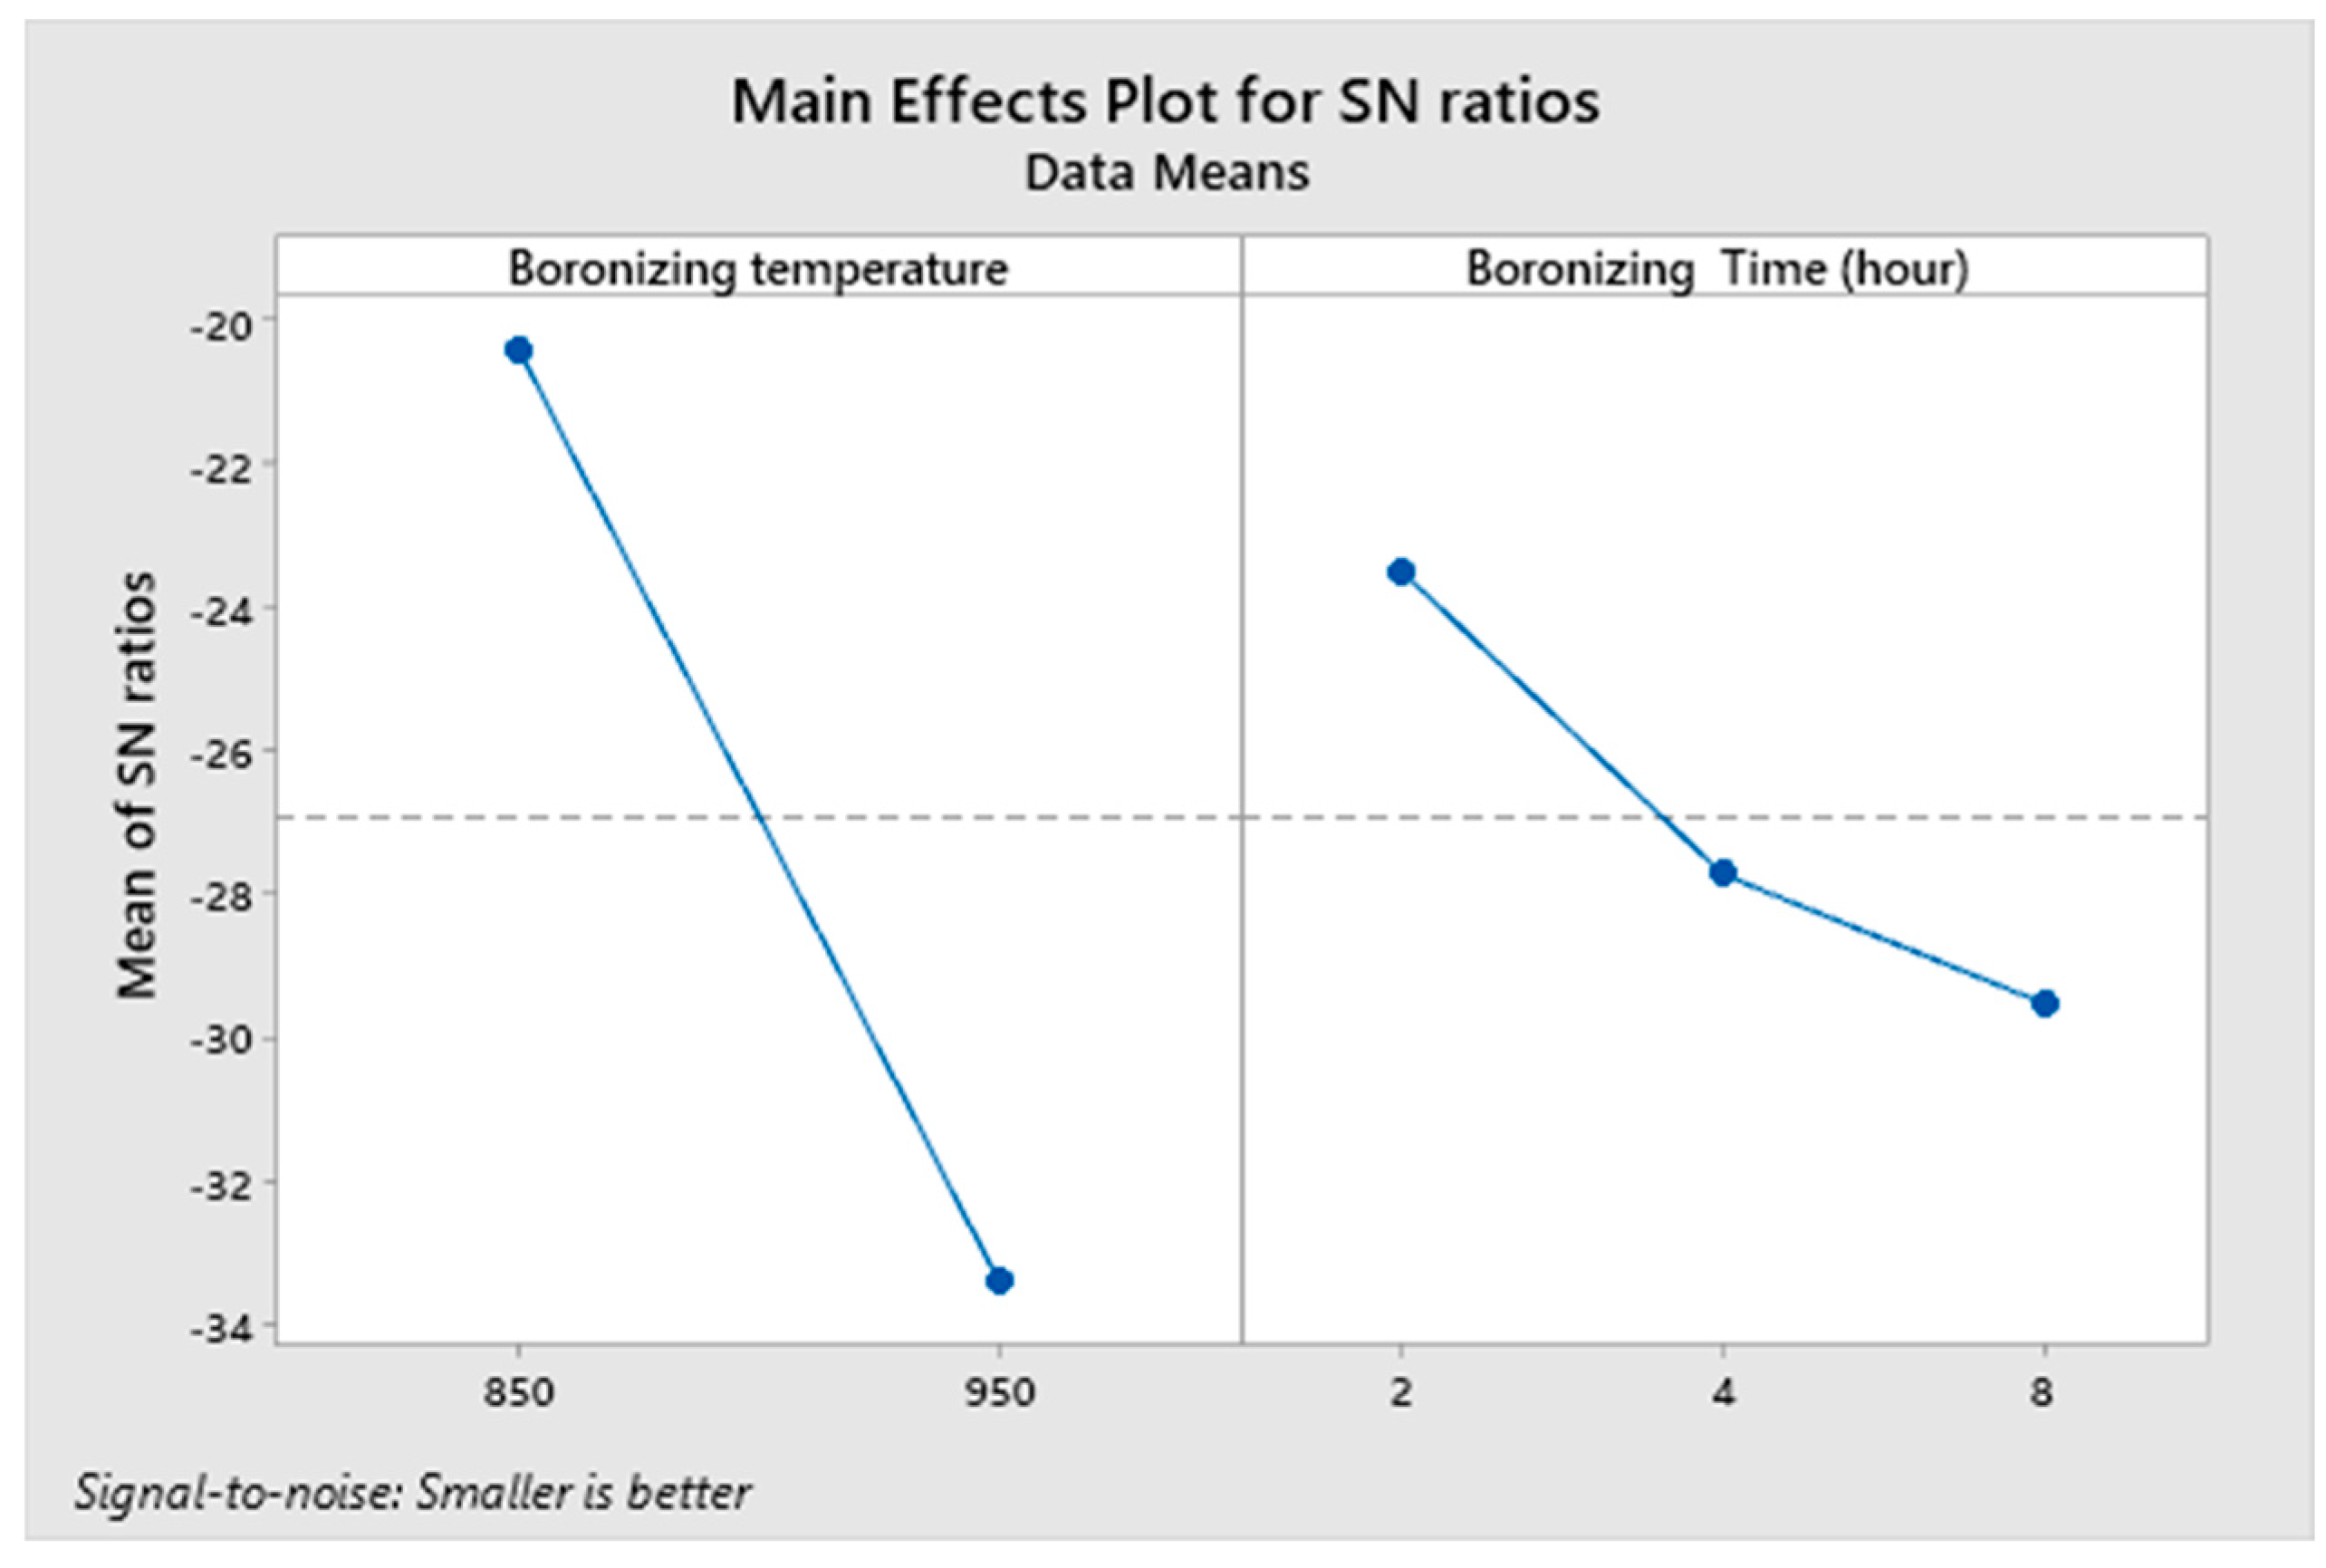
In the second stage, the analysis of time and temperature on wear is given in
Figure 5.
Boronizing treatments were conducted on AISI 1137 steel at temperatures of 850°C and 950°C for durations of 2, 4, and 8 hours. The analysis of
Figure 5, using Taguchi methodology, indicates that the optimal parameters for minimizing wear rate are a boronizing temperature of 950°C and a boronizing time of 8 hours. Examination of the ANOVA analysis results presented in
Table 4 demonstrates that temperature significantly affects the wear rate (P=0.027, where P < 0.005), whereas time does not have a significant impact (P=0.260, where P < 0.005). Specifically, the boronizing temperature accounts for 82% of the influence on the wear rate, while the boronizing time contributes only 13%.
These findings suggest that the temperature parameter is the dominant factor in reducing wear rate, overshadowing the contribution of time. This significant influence of temperature can be attributed to its effect on the formation and characteristics of the boride layer, which plays a crucial role in wear resistance. Therefore, adjusting the boronizing temperature appears to be a more effective approach for optimizing wear rate compared to modifying the boronizing time within the investigated range.
4.3. Taguchi and Anova Analysis for Hardness
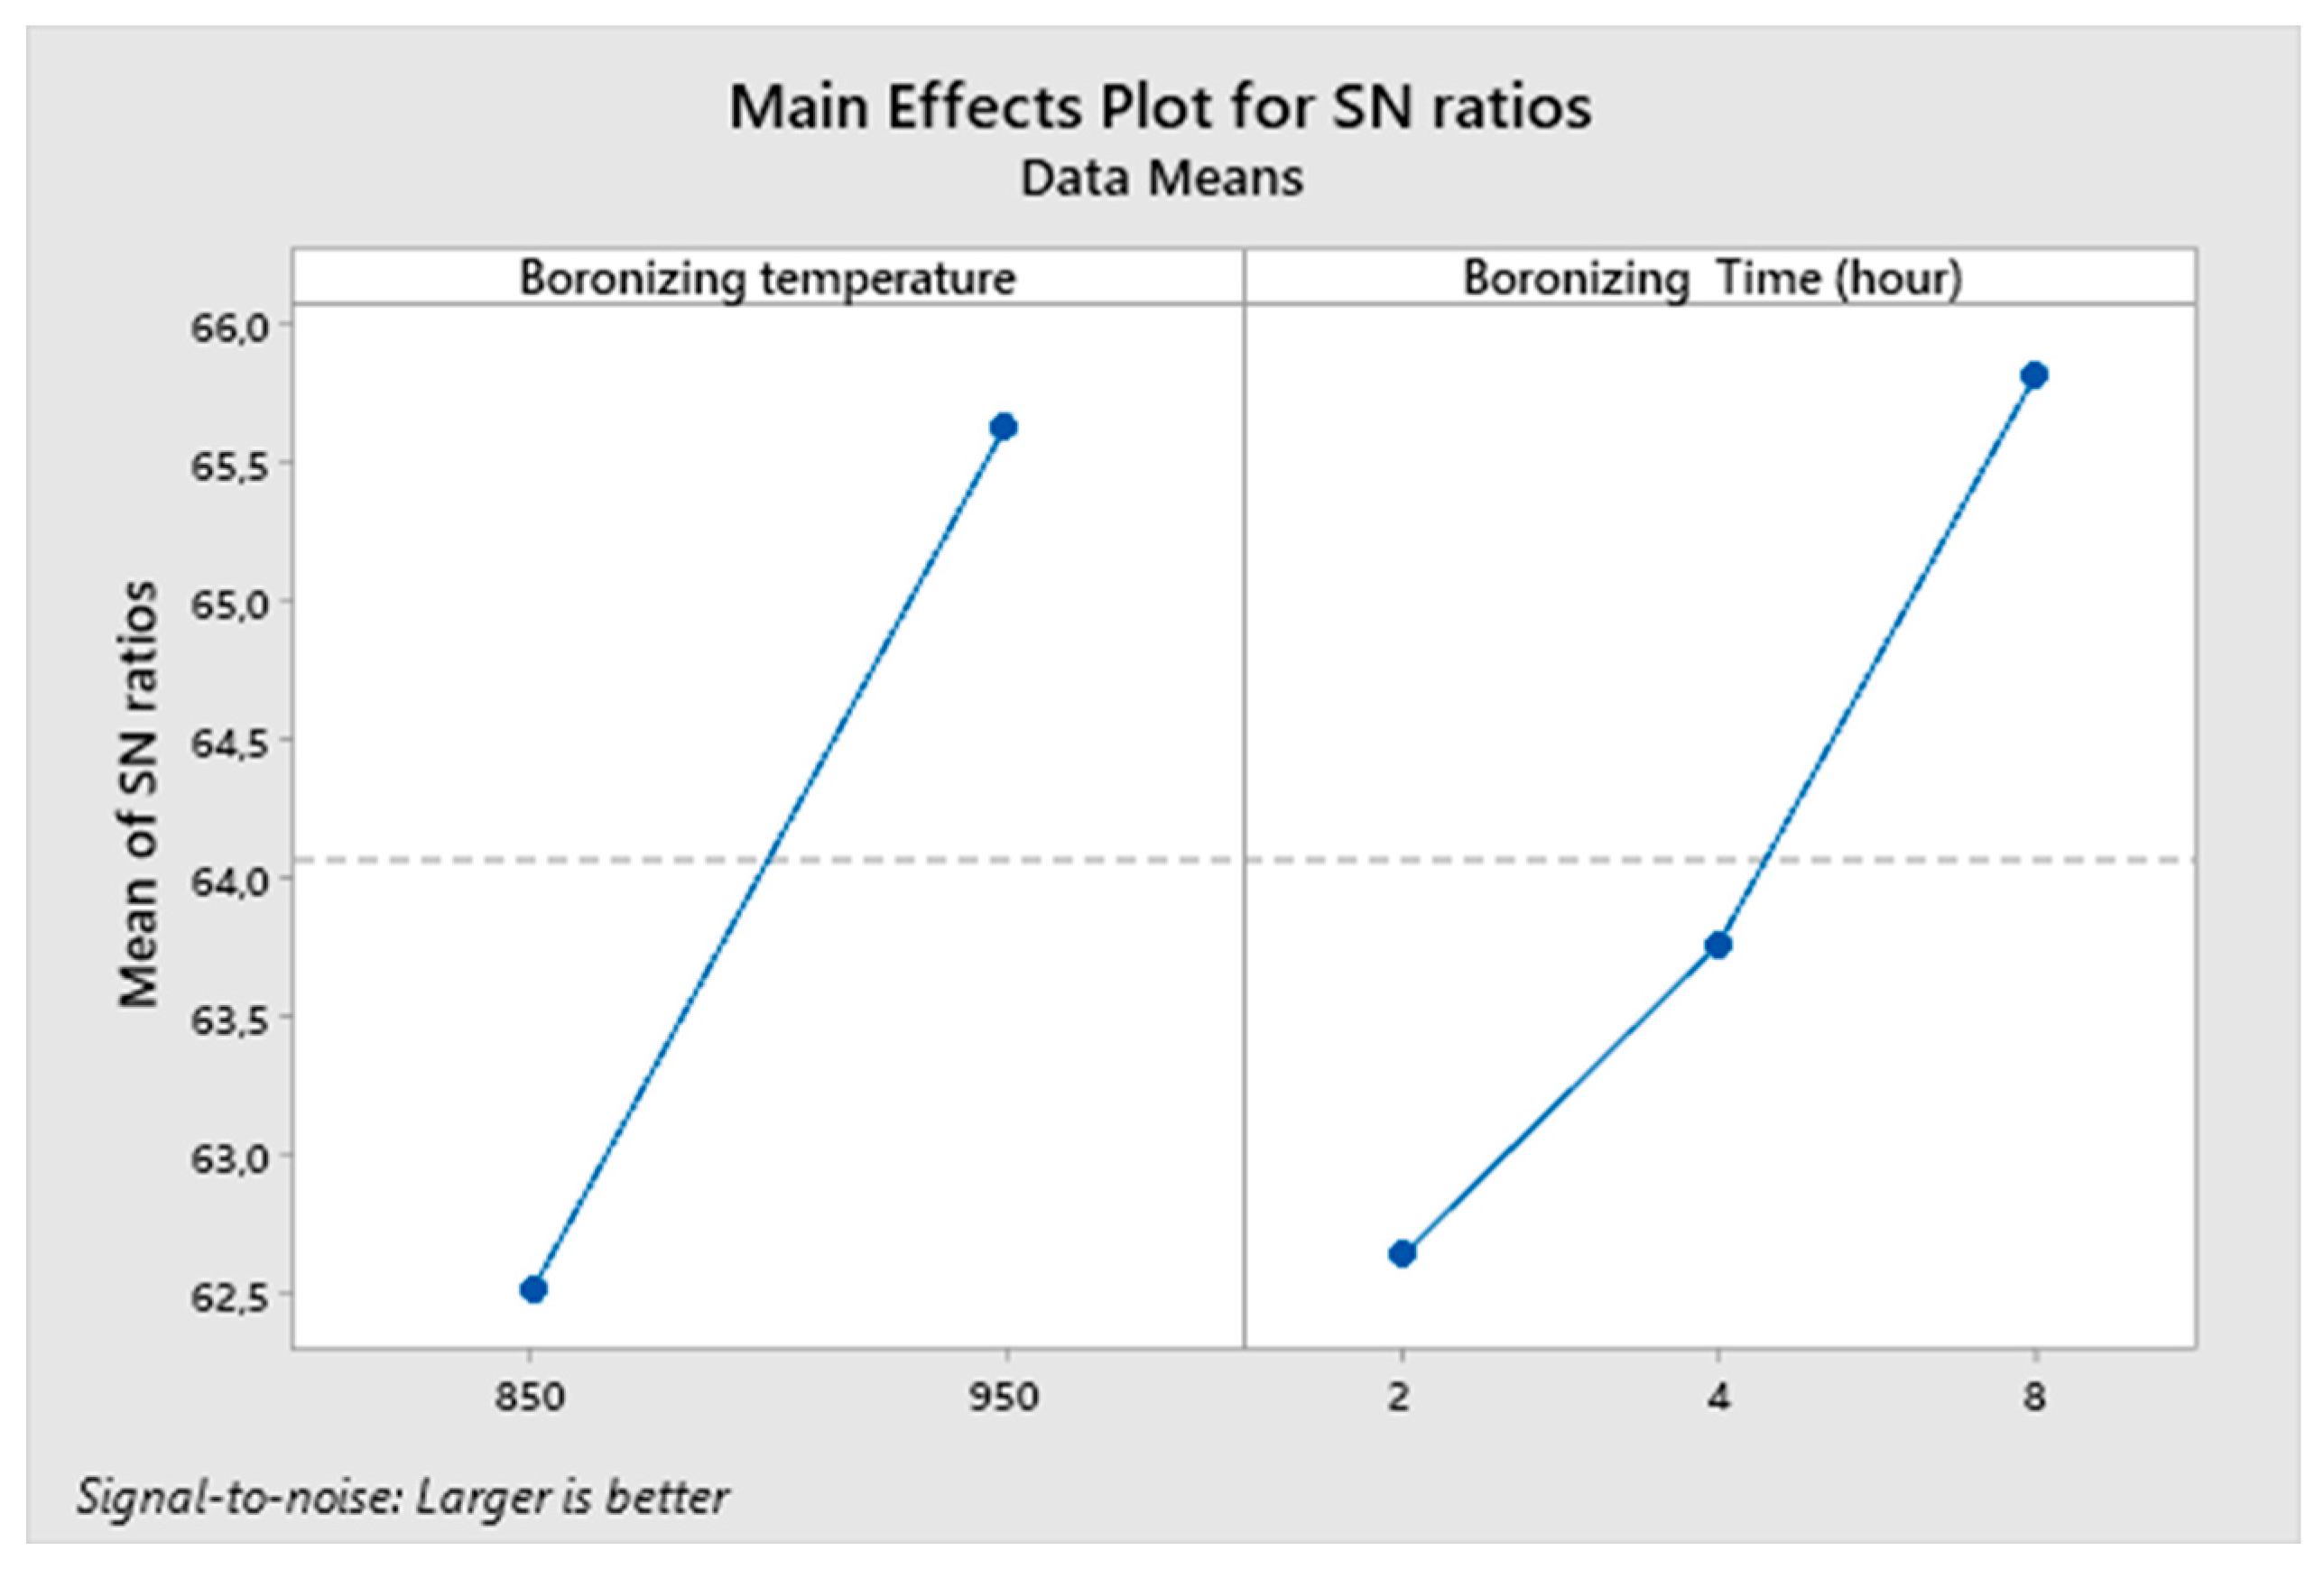
In the last stage, the change in hardness was analyzed and given in
Figure 6.
Boronizing treatments were performed on AISI 1137 steel at temperatures of 850°C and 950°C for durations of 2, 4, and 8 hours. It was observed that the thickness of the boronized layer increased with both time and temperature, which consequently led to an increase in hardness. According to the Taguchi analysis presented in
Figure 6, the optimal parameters for achieving the highest hardness are a boronizing temperature of 950°C and a boronizing time of 8 hours. However, the ANOVA analysis detailed in
Table 5 reveals that neither temperature (P=0.181, where P < 0.005 is not satisfied) nor time (P=0.405, where P < 0.005 is not satisfied) significantly influence hardness. Despite this, their contributions to the hardness cannot be entirely dismissed, as it was found that temperature has a 45% influence and time has a 32% influence on hardness.
These findings suggest that while the boronizing parameters of temperature and time do not show a statistically significant effect on hardness individually, they still contribute substantially to the overall hardness achieved. The increase in hardness with higher temperatures and longer boronizing times can be attributed to the enhanced diffusion of boron atoms, resulting in a thicker and harder boride layer. Thus, optimizing both temperature and time is essential for achieving improved hardness in AISI 1137 steel through the boronizing process.
4.4. Taguchi Method and Anova Analysis
The Taguchi method is a robust statistical technique used for optimizing process parameters and improving quality. It employs orthogonal arrays to systematically vary and test multiple factors, allowing for the identification of optimal conditions with a minimal number of experiments [
20]. In this study, an L9 orthogonal array was selected to investigate the effects of two temperatures (850 °C and 950 °C) and three treatment times (2, 4, and 8 hours) on layer thickness, wear rate, and hardness.
The signal-to-noise (S/N) ratio was calculated for each response variable to determine the optimal levels of the factors. The S/N ratio helps in identifying the settings that minimize variability and improve performance. For layer thickness and hardness, the "larger-the-better" criterion was used, while for wear rate, the "smaller-the-better" criterion was applied. Anova was employed to analyze the significance of the factors and their interactions. This statistical method decomposes the total variability of the data into contributions from each factor and error. The F-value and P-value were calculated to determine the statistical significance of the factors. A P-value less than 0.05 indicates a significant effect. The percentage contribution of each factor was also computed to understand its impact on the response variables [
21].
In this study, the ANOVA results revealed that boronizing time had the most significant effect on layer thickness, accounting for 81.7% of the variation, while temperature had a minor influence. Conversely, temperature was the dominant factor affecting wear rate, contributing 82% to the variation, with time having a lesser impact. For hardness, neither temperature nor time showed a statistically significant effect individually, but their combined influence was substantial. By integrating the Taguchi method and Anova, the optimal boronizing parameters were identified as a temperature of 950 °C and a duration of 4 to 8 hours. These settings yielded the best combination of layer thickness, hardness, and wear resistance, providing valuable insights for industrial applications.
5. Bronzing Surface
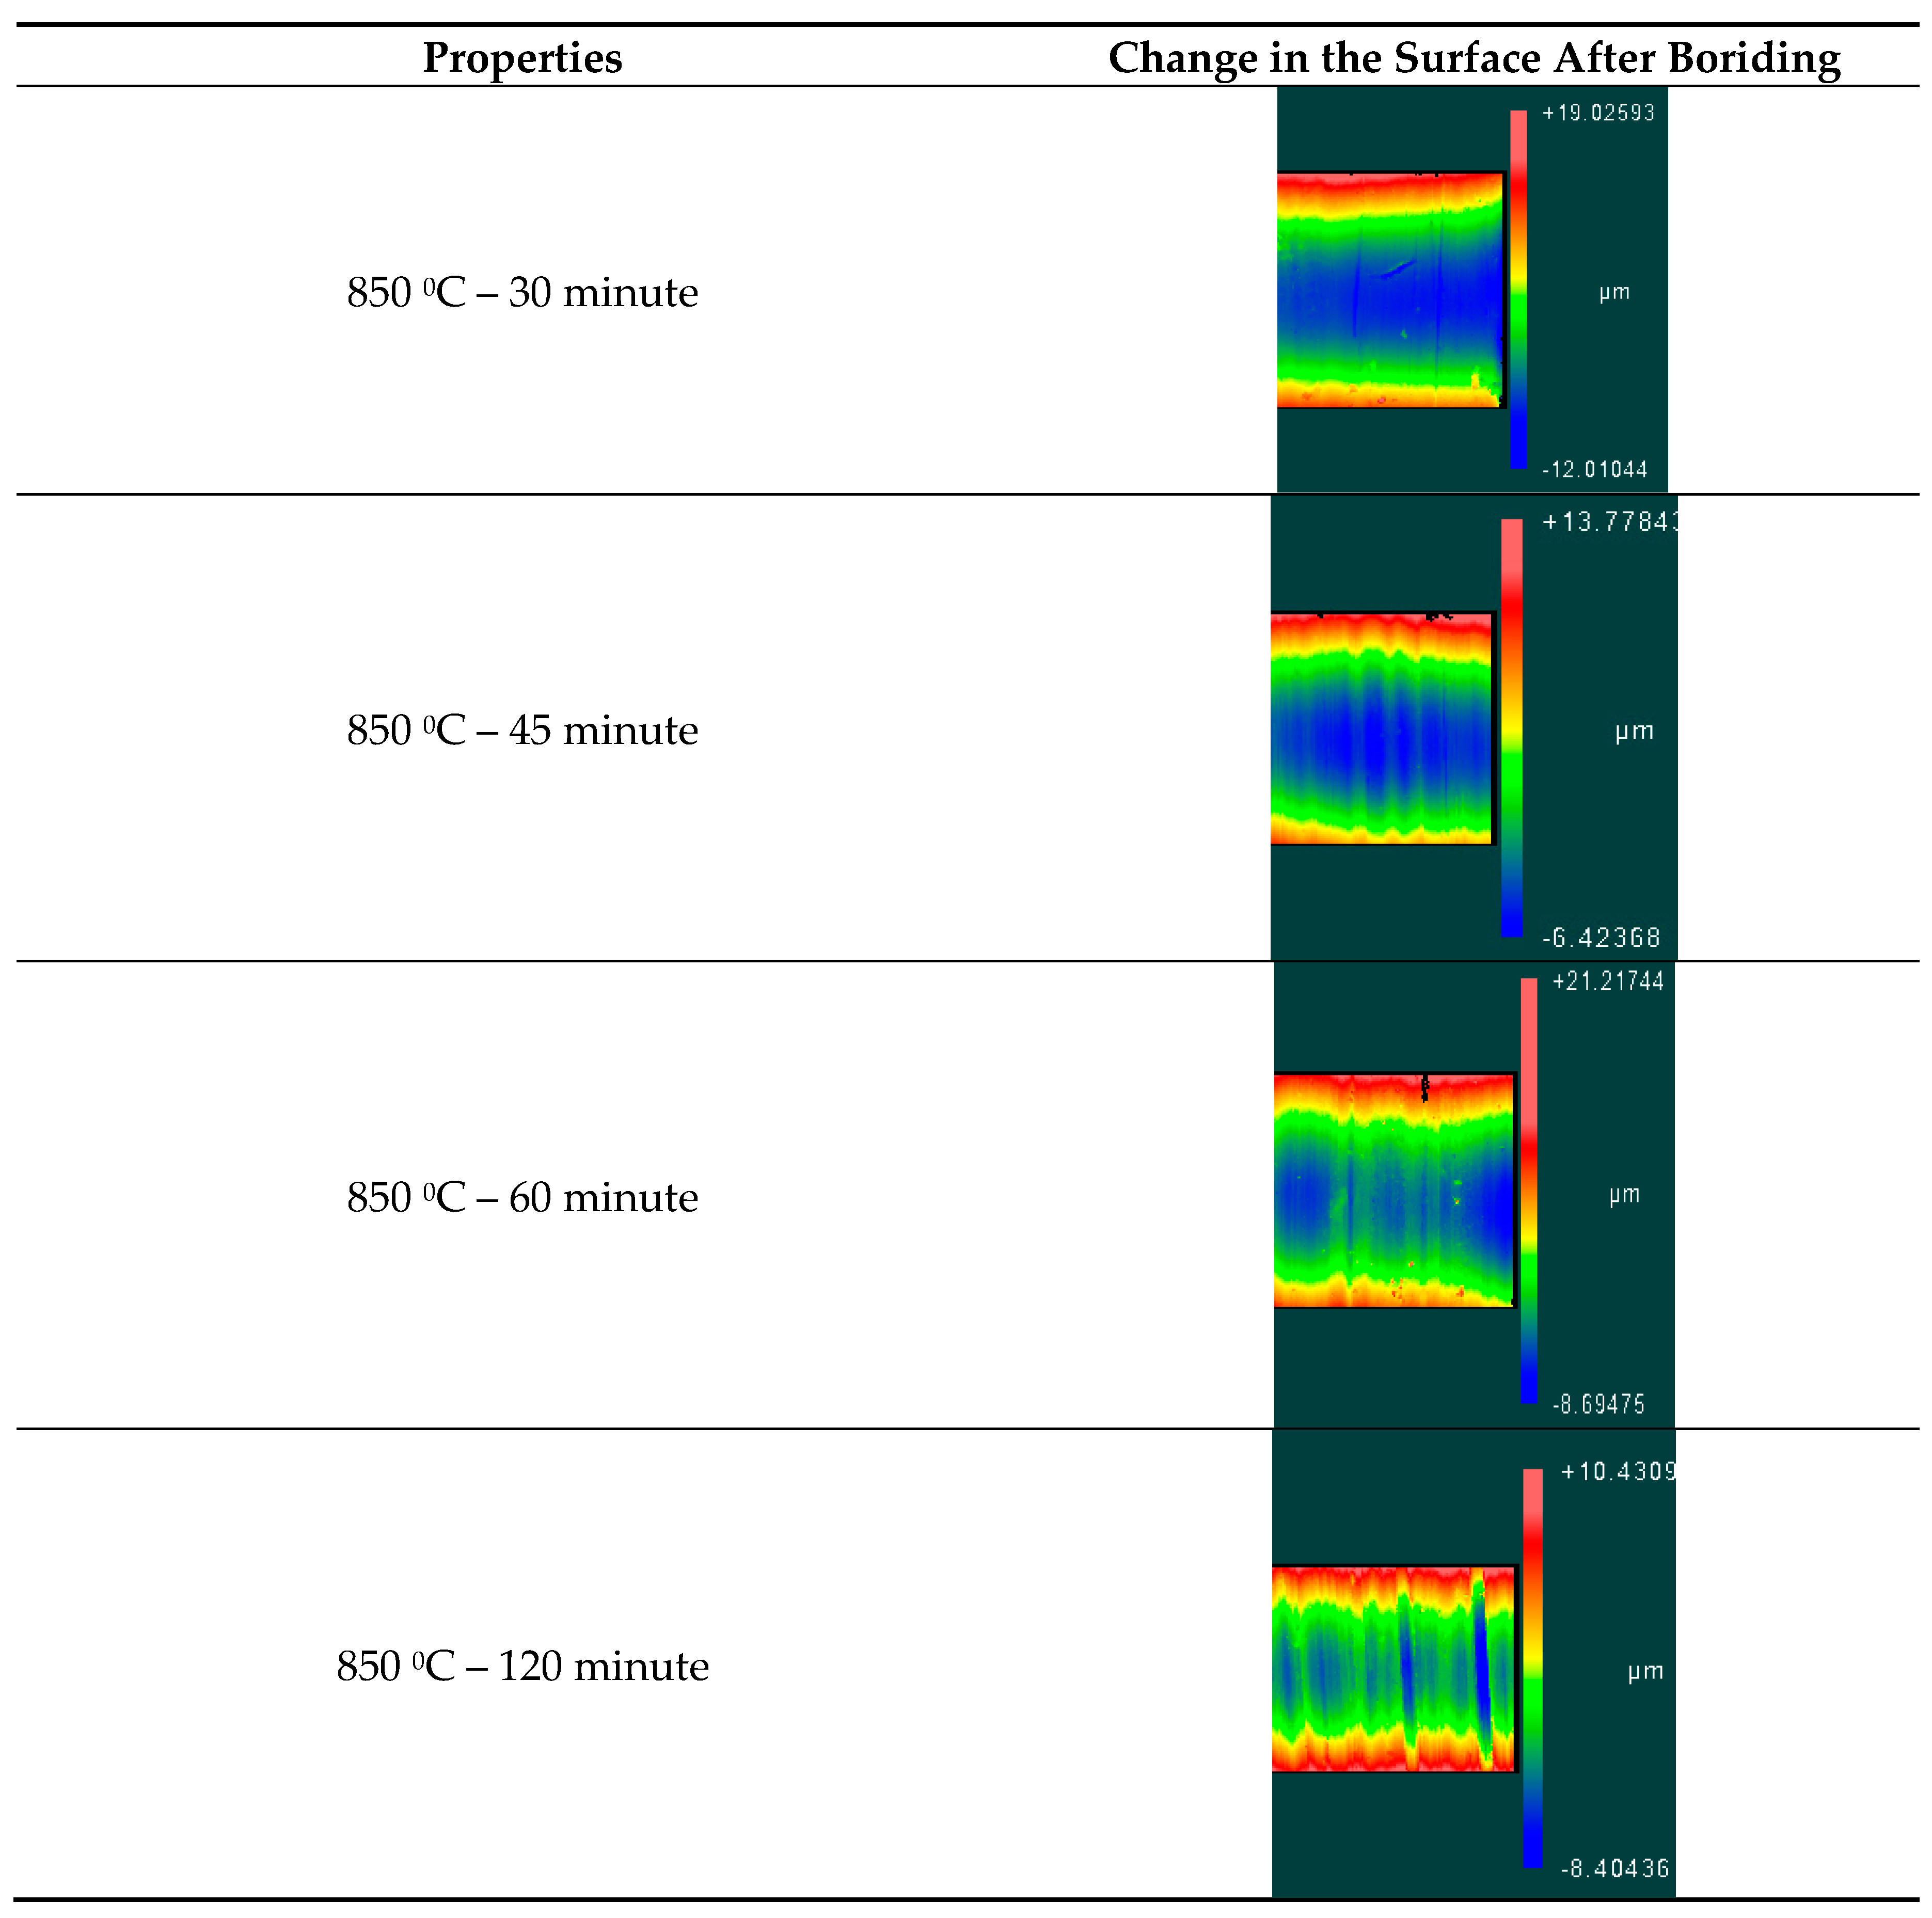
The AISI 1137 steel was visualized using the 3D optical imager to determine the surface metrology. In
Table 6, optical images are given for 2-6-8 hours at 850 C temperature. The images presented in the table showcase the surface modifications resulting from boriding processes conducted at varying durations and a temperature of 850°C. The data in this table meticulously examines the surface fluctuations based on the duration of the boriding process. Detailed information regarding the temperature and duration of each boriding operation is encapsulated within the Properties column, depicting processes carried out at 850°C for durations of 30 minutes, 45 minutes, 60 minutes, and 120 minutes. Each row in the table is accompanied by a corresponding color map in the Change in Surface after Boriding column, visually representing the depth and intensity of surface alterations following the boriding procedure. Noteworthy transformations are observed after the 30-minute boriding process, with the color map illustrating the extent of the surface modification. A more profound and intensified alteration is evident after the 45-minute boriding process, signifying a noticeable impact on the surface.
The 60-minute boriding process results in further deepening and intensification of surface modifications, as depicted in the color map highlighting its significant influence on the surface. Finally, the 120-minute boriding process induces the most substantial and intense surface alterations, with the color map showcasing the maximum impact achieved during this duration.
Overall, the data unequivocally demonstrates that prolonging the boriding duration leads to deeper and more intense surface alterations. These insights are invaluable for optimizing the boriding process and effectively achieving the desired surface characteristics.
6. Conclusions
This study systematically investigated the effects of boronizing temperatures (850 °C and 950 °C) and durations (2, 4, and 8 hours) on the structural and mechanical properties of AISI 1137 steel. The findings provide a comprehensive analysis of the optimal boronizing parameters for enhancing wear resistance and hardness, which has not been extensively covered in previous research. It was determined that the optimal boronizing parameters for AISI 1137 steel are a temperature of 950 °C and a duration of 8 hours. These conditions resulted in the formation of FeB and Fe2B phases, significantly improving the mechanical properties of the steel.
The practical significance of these findings is substantial. Boronizing at 950 °C for 8 hours can improve the wear resistance of AISI 1137 steel by 1.8-3.9 times compared to boronizing at 850 °C. This has direct implications for industries where medium carbon steels are used in demanding applications, such as automotive and machinery components. The hardness of the boronized surface layers was measured between 1963.7 HV and 219.3 HV, with hardness decreasing from the boronized layer toward the base material. This gradient in hardness can be beneficial for applications requiring a hard surface with a tough core.
Future research could explore the effects of different boronizing atmospheres, cooling rates, and post-treatment processes on the wear mechanisms and overall performance of borided steel. Understanding these factors will provide a more comprehensive approach to enhancing the wear resistance and durability of borided AISI 1137 steel in various industrial applications. Additionally, investigating the impact of varying temperature and pressure conditions on material properties, such as jet flow density and velocity on heat transfer, could further optimize the boronizing process.
The optimized boronizing parameters identified in this study can be applied to medium carbon steel components used in the automotive industry, such as gears, shafts, and bearings, to enhance their wear resistance and extend their service life. Machinery components subjected to high wear conditions, such as cutting tools and dies, can also benefit from the improved surface properties achieved through the optimized boronizing process. By integrating the Taguchi method and Anova, the optimal boronizing parameters were identified as a temperature of 950 °C and a duration of 4 to 8 hours. These settings yielded the best combination of layer thickness, hardness and wear resistance, providing valuable insights for industrial applications.
Authors Contributions
Asım Genç- original draft preparation, review experimental treatment and methodology, editing; Levent Urtekin- investigation and visualization, data curation, formal analysis; Merdin Danışmaz- heat treatment process and its assessment.
References
- Salman, S.; Köse, R.; Urtekin, L.; Findik, F. An investigation of different ceramic coating thermal properties. Mater. Des. 2006, 27, 585–590, . [CrossRef]
- Ramazan, K.; Levent, U.; Ali, C.; Serdar, S.; Fehim, F. Three types of ceramic coating applicability in automotive industry for wear resistance purpose. Ind. Lubr. Tribol. 2005, 57, 140–144, doi:10.1108/00368790510601680.
- Urtekin, L.; Kucukturk, G.; Karacay, T.; Uslan, I.; Salman, S. An Investigation of Thermal Properties of Zirconia Coating on Aluminum. Arab. J. Sci. Eng. 2012, 37, 2323–2332, . [CrossRef]
- M. Aliofkhazraei, N. Ali, (2019). Surface Boriding of Metals for Enhanced Hardness and Wear Resistance: A Review. Surface Engineering, 35(10):847-864.
- Gheisari, M. H. Sohi, M. E. Bahrololoom, (2018). A Review on Boronizing of Steels Using the Powder-Pack Method. Surface Engineering 34(5):330-343.
- X. Chen, Y. Zhang, Z. Wang, Q. Liu, Y. Li, (2021). Boronizing of Iron Alloys: Methods, Mechanisms, and Applications. Journal of Materials Science & Technology, 56:105-120.
- Gräfen, W.; Edenhofer, B. New developments in thermo-chemical diffusion processes. Surf. Coatings Technol. 2005, 200, 1830–1836, . [CrossRef]
- Martini, C.; Palombarini, G.; Poli, G.; Prandstraller, D. Sliding and abrasive wear behaviour of boride coatings. Wear 2004, 256, 608–613, . [CrossRef]
- S. Guler, M. Calik, A. Almis, E. Tasgetiren, F. Yilmaz, (2018). Effect of Boronizing Time on the Microstructure and Wear Behavior of AISI 1050 Steel. Surface and Coatings Technology 333:109-116.
- E. A. Karakoç, O. N. Celik, M. Calik, M. E. Bayramoglu, M, (2016). Effect of Boronizing Time on the Microstructure and Thickness of Boride Layers Formed on AISI 1045 Steel. Materials Science and Engineering: A, 652:131-138.
- S. Silva, C. A. Silva, L. O. Araujo, J. M. D. Neto, A. Sinatora, M. Ueda, (2013). Microstructural Characterization of Borided AISI 1040 Steel. Journal of Materials Engineering and Performance 22(2):445-451.
- S. Zhang, Y. Liu, L. Shi, M. Li, J. Peng, (2020). Influence of processing parameters on microstructure and properties of boronized layer on H13 steel. Surface and Coatings Technology, 401, 126234.
- V. K. Sikka, S. Misra, (2018). Surface hardening of steels by a new boriding process. Surface Engineering, 34(8): 605-609.
- W. Zhang, L. Sun, C. Li, H. Yu, (2019). Effects of boronizing process on microstructure and mechanical properties of 20CrMnTi steel. Journal of Materials Research and Technology, 8(4): 3760-3770.
- Özkaya, E. Can, H. Übeyli, M. Çolak, O. (2020). Effect of Boronizing Parameters on the Wear Behavior of Medium Carbon Steel. Surface and Coatings Technology, 382:125132.
- Jain, V.; Sundararajan, G. Influence of the pack thickness of the boronizing mixture on the boriding of steel. Surf. Coatings Technol. 2002, 149, 21–26, . [CrossRef]
- Campos-Silva, I.; Ortiz-Domínguez, M.; Tapia-Quintero, C.; Rodríguez-Castro, G.; Jiménez-Reyes, M.Y.; Chávez-Gutiérrez, E. Kinetics and Boron Diffusion in the FeB/Fe2B Layers Formed at the Surface of Borided High-Alloy Steel. J. Mater. Eng. Perform. 2011, 21, 1714–1723, . [CrossRef]
- Danışmaz, M.; Demirbilek, M. Assessment of heat transfer capabilities of some known nanofluids under turbulent flow conditions in a five-turn spiral pipe flow. Appl. Rheol. 2024, 34, . [CrossRef]
- Akdag, U.; Akcay, S.; Un, N.; Danismaz, M. Experimental investigation of the heat transfer characteristics of a synthetic annular jet impingement on a flat surface. Exp. Heat Transf. 2024, 1–20, . [CrossRef]
- ahin, İ. B., Urtekin, L., Genç, A., & Özerkan, H. B. (2022). Optimızation Of Machining Parameters For Boron Alloy Steel By Plunge Electro Erosion By Taguchi Technique. Journal Of Scientific Reports-A, (050), 169-180.
- Şahin, I.B.; Yilan, F.; Urtekin, L. Optimisation on machining parametres by EDM of TiN coated Ti6Al4V alloys. Adv. Mater. Process. Technol. 2023, 10, 960–970, . [CrossRef]
|
Disclaimer/Publisher’s Note: The statements, opinions and data contained in all publications are solely those of the individual author(s) and contributor(s) and not of MDPI and/or the editor(s). MDPI and/or the editor(s) disclaim responsibility for any injury to people or property resulting from any ideas, methods, instructions or products referred to in the content. |
© 2024 by the authors. Licensee MDPI, Basel, Switzerland. This article is an open access article distributed under the terms and conditions of the Creative Commons Attribution (CC BY) license (http://creativecommons.org/licenses/by/4.0/).
