1. Introduction
Modern industry requires quality control of manufactured components. Various inspection methods are used in quality testing. The main division is destructive and non-destructive methods. A non-destructive method that offers great insight is the ultrasonic method. This is a method that uses the phenomena of transition, reflection and refraction of ultrasonic waves. This method makes it possible to detect surface and subsurface cracks [
1,
2], evaluate welded joints [
3,
4] and diffusion joints [
5]. Ultrasonic testing commonly uses longitudinal waves and transverse waves [
6,
7].
It has been noted that it is possible to make greater use of Rayleigh waves in ultrasonic testing than before. An ultrasonic Rayleigh wave is a wave that propagates along the surface of the elements under study, penetrating to a small thickness. Although the first description of surface waves was presented by Lord Rayleigh in 1885, the problem of surface waves is still relevant, as evidenced by the wide range of ongoing research in the area of these waves [
8,
9,
10]. Research in the area of ultrasonic Rayleigh waves covers a wide range. Part of the work conducted, included non-contact laser ultrasonic methods for studying the propagation of Surface Acoustic Wave (SAW) on curved surfaces. The authors [
11] have shown that they eliminate coupling issues in wave generation and detection, and their high temporal resolution makes it possible to study the dispersion effect over a large frequency range. In the work [
12], it was shown that it is possible to detect cracks of very small depth (h≈80 μm), compared to the Rayleigh wavelength (λ≅2 mm). In this work, the Rayleigh wave was used to study fatigue cracking. The results confirmed that macro-cracks lead to a significant decrease in the transmission of the Rayleigh wave. In addition, it was found that the acoustic nonlinearity parameters initially stabilize, after which they significantly increase from the pristine state to the propagation of microcracks. The obtained index can be used for localization and characterization of fatigue damage. The authors, confirmed that the study of the multicomponent nonlinear interaction between Rayleigh wave and evolving fatigue damage can provide clues to nonlinear Rayleigh wave detection of evolving fatigue damage.
The temporal resolution makes it possible to study the dispersion effect over a large frequency range. There was work being done, in terms of using surface wave dispersion measurements can be used to nondestructively characterize shot-peened, laser shock-peened, burnished, and otherwise surface-treated specimens [
13]. The results suggest that a diffraction correction may be introduced to increase the accuracy of surface wave dispersion measurements. A simple diffraction correction model was developed for surface waves and this correction was subsequently validated by laser-interferometric velocity measurements on aluminum specimens. However, the work carried out, covered a relatively small range of variation in surface parameters. Work has also been carried out in which theoretical model, along with experimental verification, is developed to describe the generation, propagation and reception of a Rayleigh wave using angle beam wedge transducers [
14,
15]. The paper [
16] proposed a geometry model for determining Rayleigh wave beams using an area sound source in the x-y plane. The results obtained confirmed that the oscillatory motion for Rayleigh waves is elliptical in nature. In addition, it was confirmed that the distributions of received waves at different propagation distances depend not only on the size of the receiver, but also on the attenuation of the Rayleigh wave. The authors performed simulations and proposed their own model. The results obtained using the proposed model and three other simple models were compared. The resulting differences between these results were discussed in detail. The results confirmed an effective tool for nondestructive testing and evaluation of Rayleigh waves using wedge beam transducers under practical conditions.
Additional research is being conducted, including ultrasonic studies utilizing surface waves. In reference [
17], the authors employed Rayleigh-like surface waves, generated and detected in a pitch-catch configuration, to mitigate the effects of masking. By using electromagnetic acoustic transducers (EMATs) with a minimal standoff, it is possible to surpass many of the current speed limitations in rail testing, achieving high accuracy in detecting and assessing surface defects. The article presents experiments on rail samples with both real and machined defects, where EMATs were used to generate and detect low-frequency wide-band surface waves. The depth of these defects can be characterized by analyzing both the amplitude of the time-domain signal and the frequency-dependent behavior.
The paper [
18] used an ultrasonic method to detect cracks during operation (on-line). The authors noted that most of the previous studies involved off-line testing. In this work [
18], the authors also used surface wave and showed that a suitable candidate is the Surface Acoustic Wave approach (SAW). The apparatus was shown to be quite compact, while it was also found that the use of high-frequency transducers, allows for high resolution and allows while being robust with respect to environmental noise.
Ultrasonic Rayleigh waves have been used in tests on a variety of materials, including composite materials [
19], and on metals [
20]. Tests have been conducted in which fatigue cracks have been detected as they form.
Ultrasonic surface wave has also been used to study the shear-thickness of a path applied to steel profiles [
21] and to study the kinetics of adhesive bonding two-ways [
22]. There has also been work on the in situ monitoring of stresses provides a crucial input for residual life prognosis and is an integral part of structural health monitoring systems [
23].
Analysing the available literature, no results were encountered on the influence of post-surface condition on Rayleigh wave properties.
The primary objective of the research is to find out the influence of roughness parameters on the propagation of the surface wave, the Rayleigh wave. The analysis of selected parameters in the context of wave propagation should allow us to understand the relationship between the parameters of the ultrasonic wave and the surface structure of the components under study. The research also aims to identify potential practical applications in ultrasonic research using surface waves.
2. Research
2.1. Research Procedure
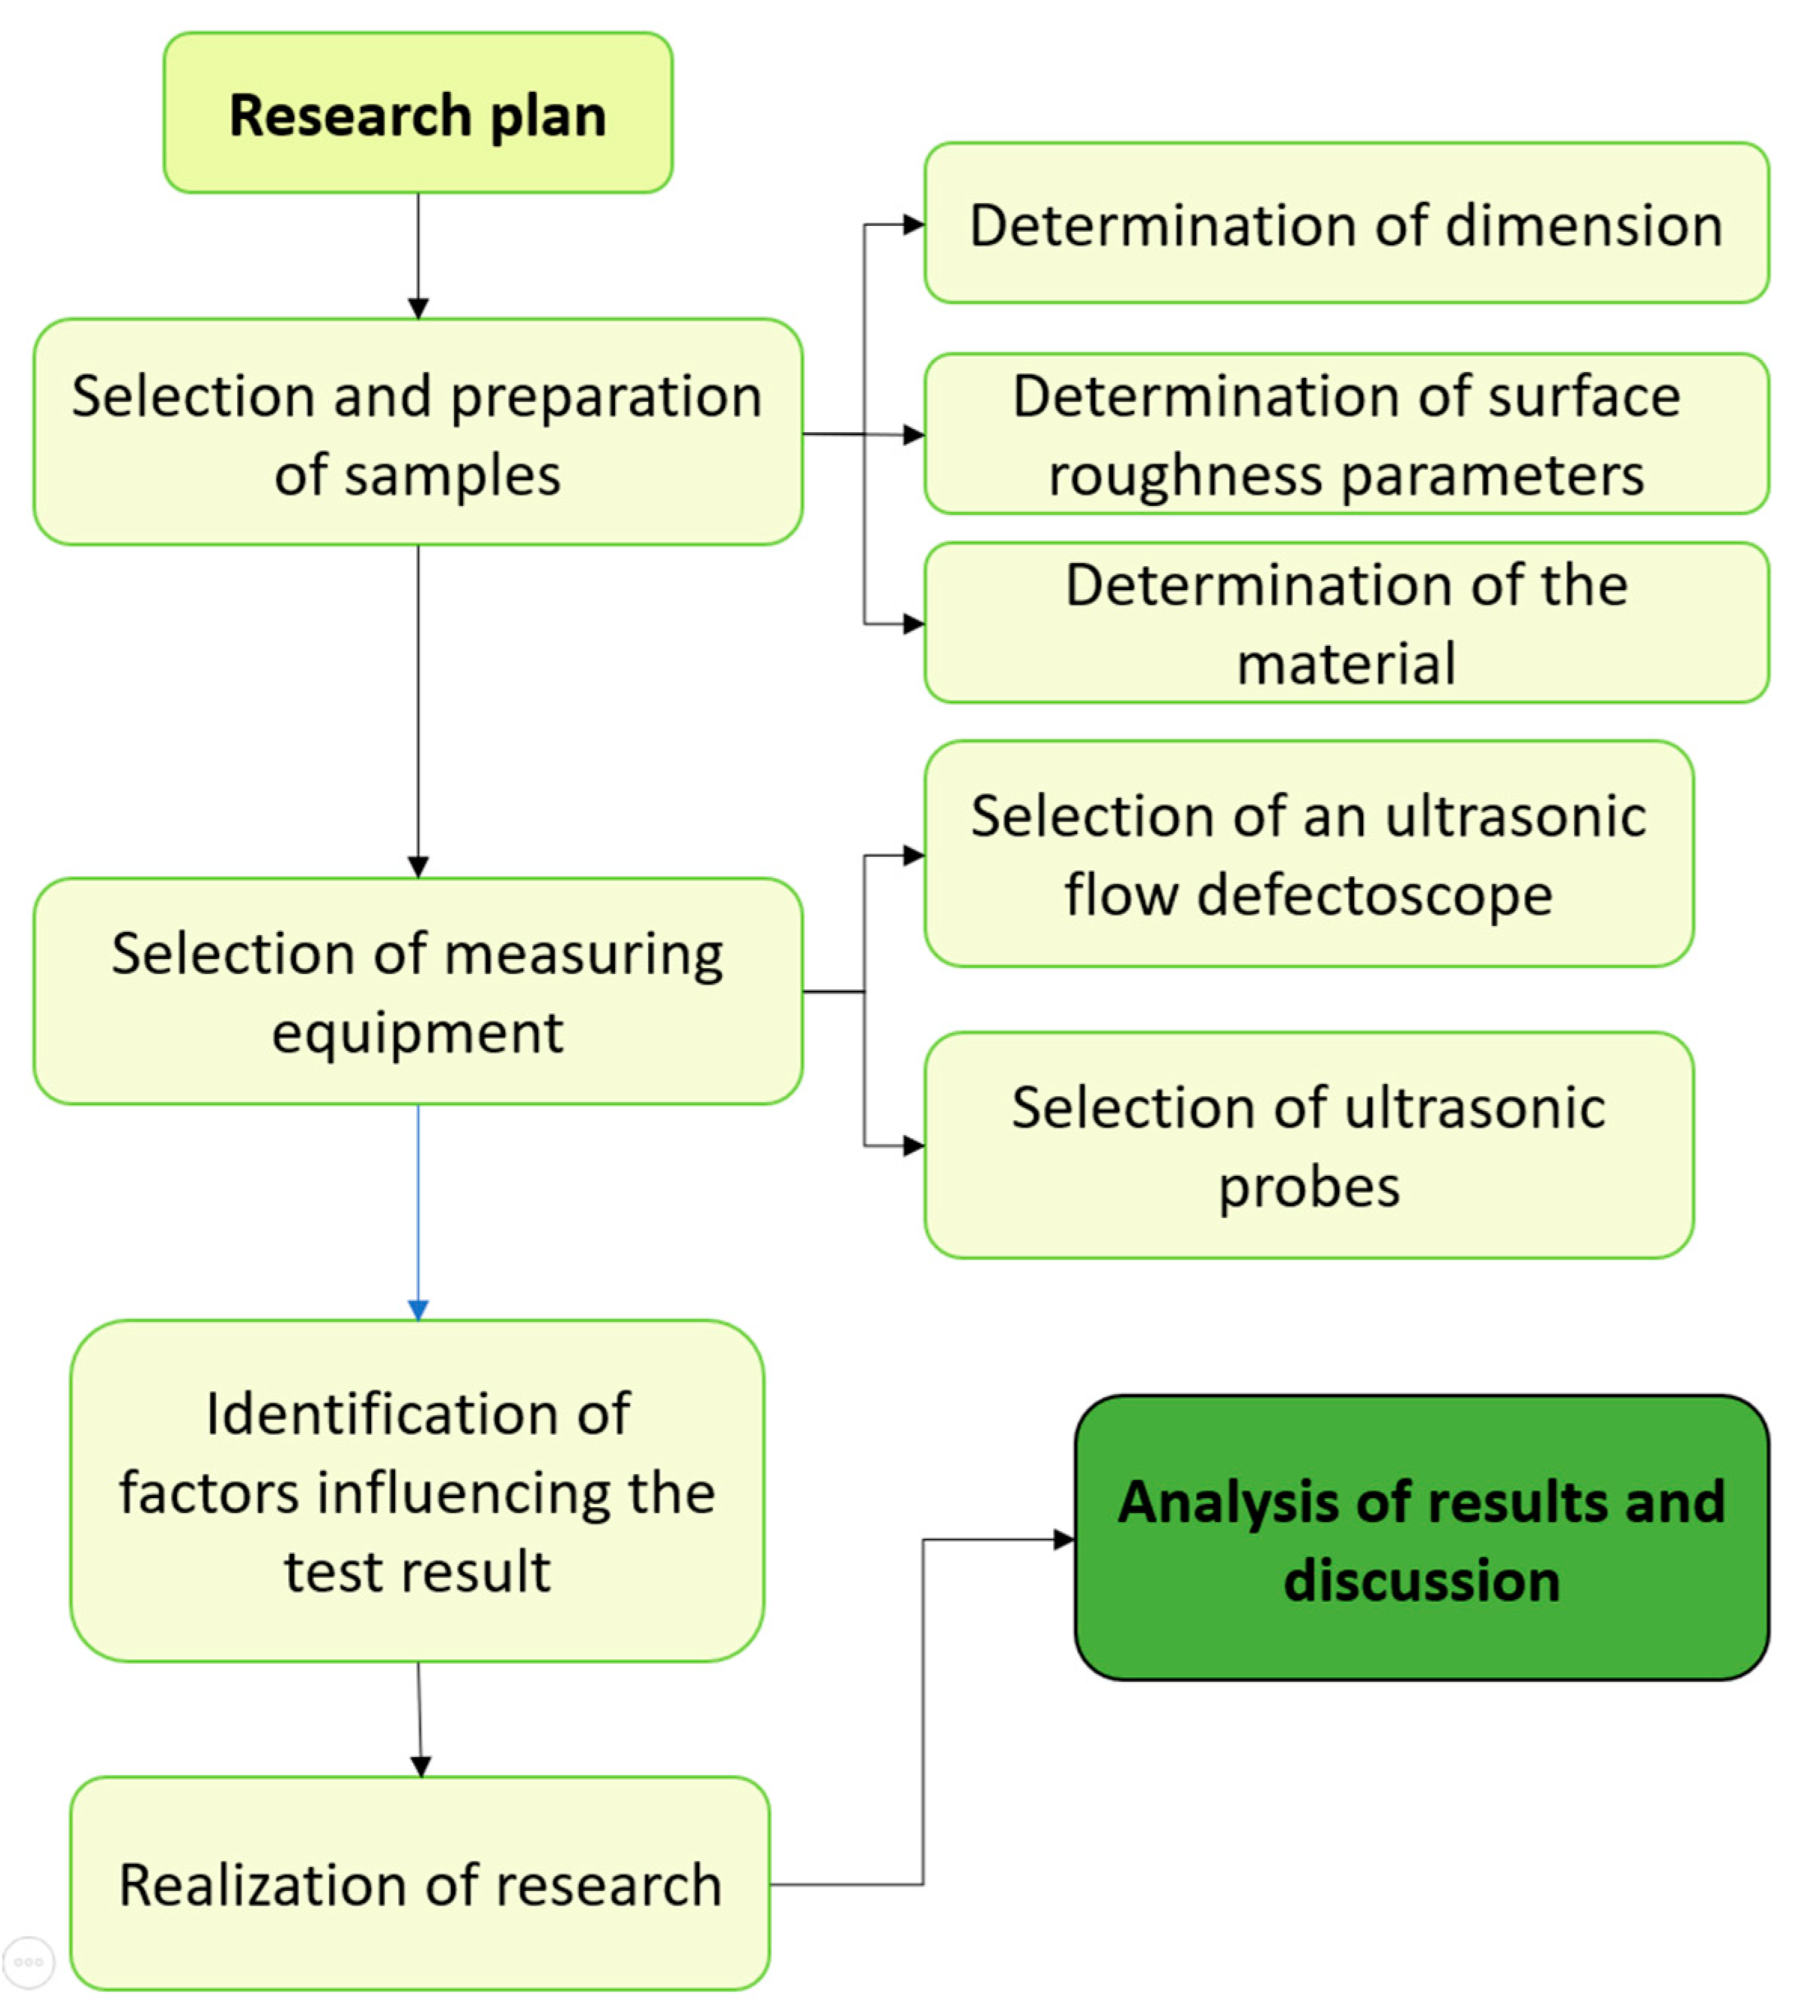
The experiment consisted of studying the passage of an ultrasonic Rayleigh wave through surfaces with significantly different surface roughness parameters. A digital ultrasonic defectoskop was used, and it was checked what influenced the test results and kept this influence to a minimum. Measurement errors were determined for the measurement systems used. All this research work was carried out based on the test procedure shown in
Figure 1.
The research began with the selection of measurement samples. As part of this step, the dimensions of the specimens, the materials from which they were made, and the roughness parameters were determined. The samples were then fabricated using a digitally controlled machining center (CNC). In the next step, ultrasonic heads and an ultrasonic defectoscope were selected from digital industrial apparatuses. Once the apparatus was chosen, the factors that could affect the test results were identified. Subsequently, the surface roughness parameters were verified [
24], and the testing system was prepared to minimize the influence of factors affecting the test results. Finally, measurement errors and ultrasonic wave velocities were determined, allowing for testing and analysis of the results.
2.2. Materials and Methods
In a production environment, ultrasonic testing is usually carried out using ultrasonic testing probes with frequencies of between 2 and 10 MHz, and most objects that are tested using ultrasonic methods are made of steel. For this reason, the test specimens were made from 18G2A steel, a high-strength, weldable steel. The chemical composition is shown in
Table 1.
The softened hardness of 18G2A steel is 220 HB, the tensile strength Rm is 490 - 630 MPa and the yield strength Re is 335 MPa. A drawing of an example specimen is shown in
Figure 2a and its dimensions in
Figure 2b.
Steel is widely used mainly for building structures, bridges, it was decided when planning the specimens to reflect real conditions as closely as possible. Therefore, the thickness of the specimen was assumed to be 20 mm, the area of the field with the roughness was 100x120 mm, while the whole specimen was 200 mm, i.e. a field of 50 mm was left - the place where ultrasonic heads are applied, according to
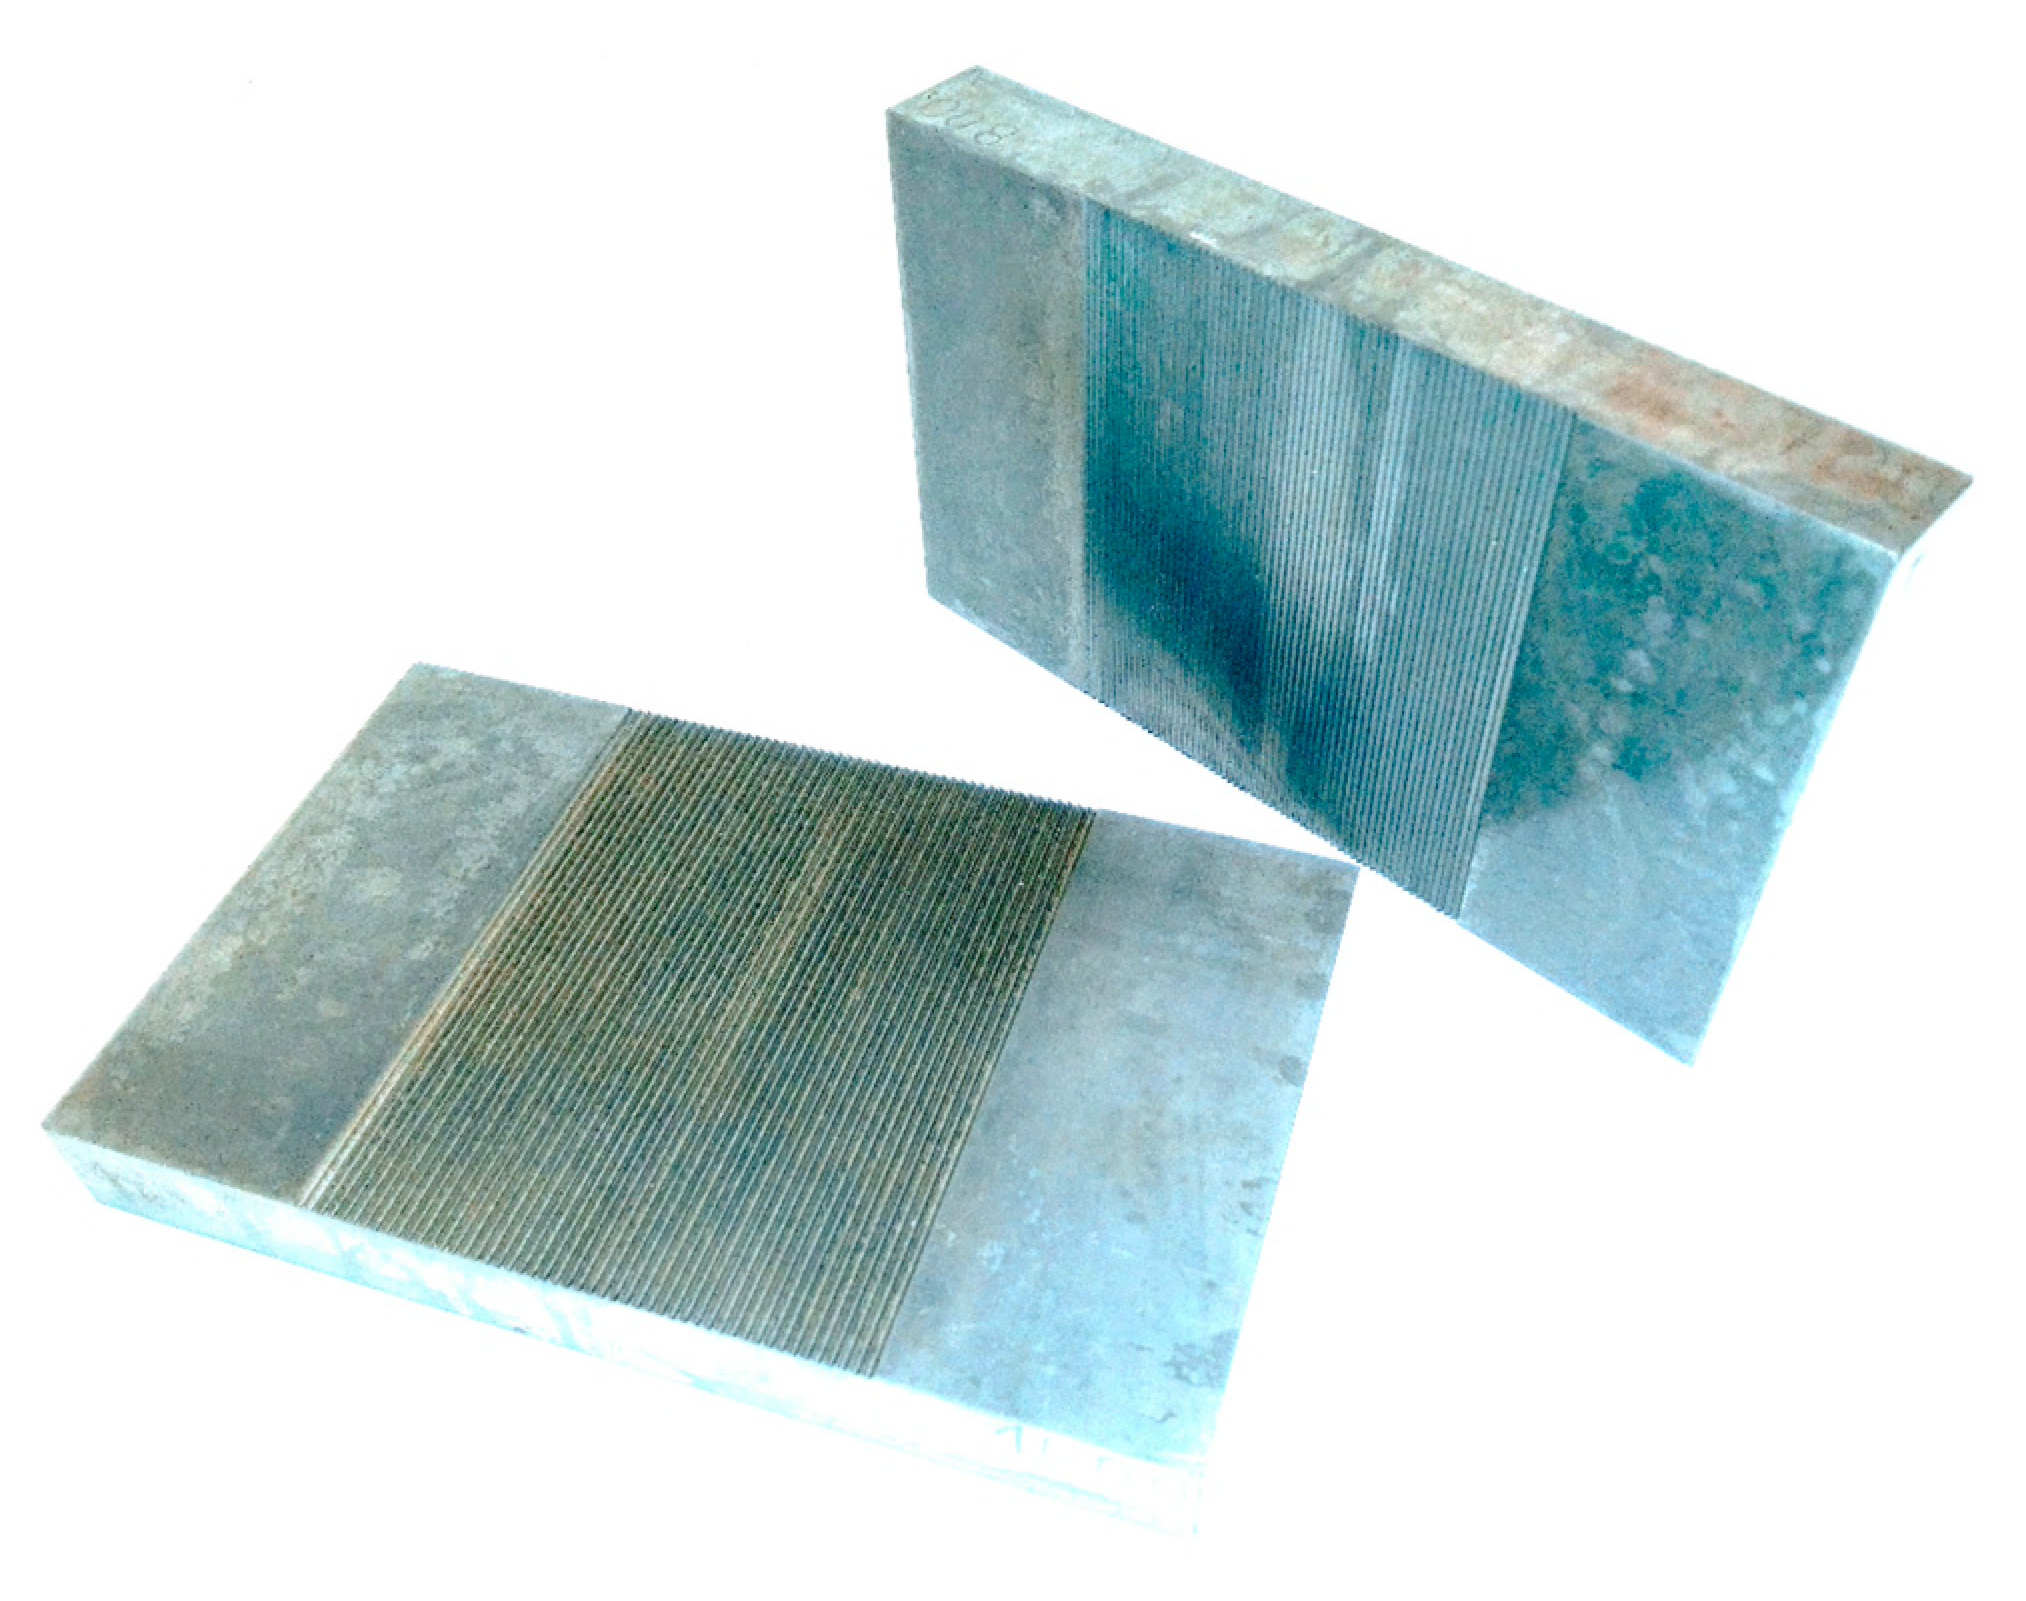
Figure 2b. A view of the sample specimens is shown in
Figure 3.
Bearing in mind the differences between optical and tactile methods of surface topography measurements [
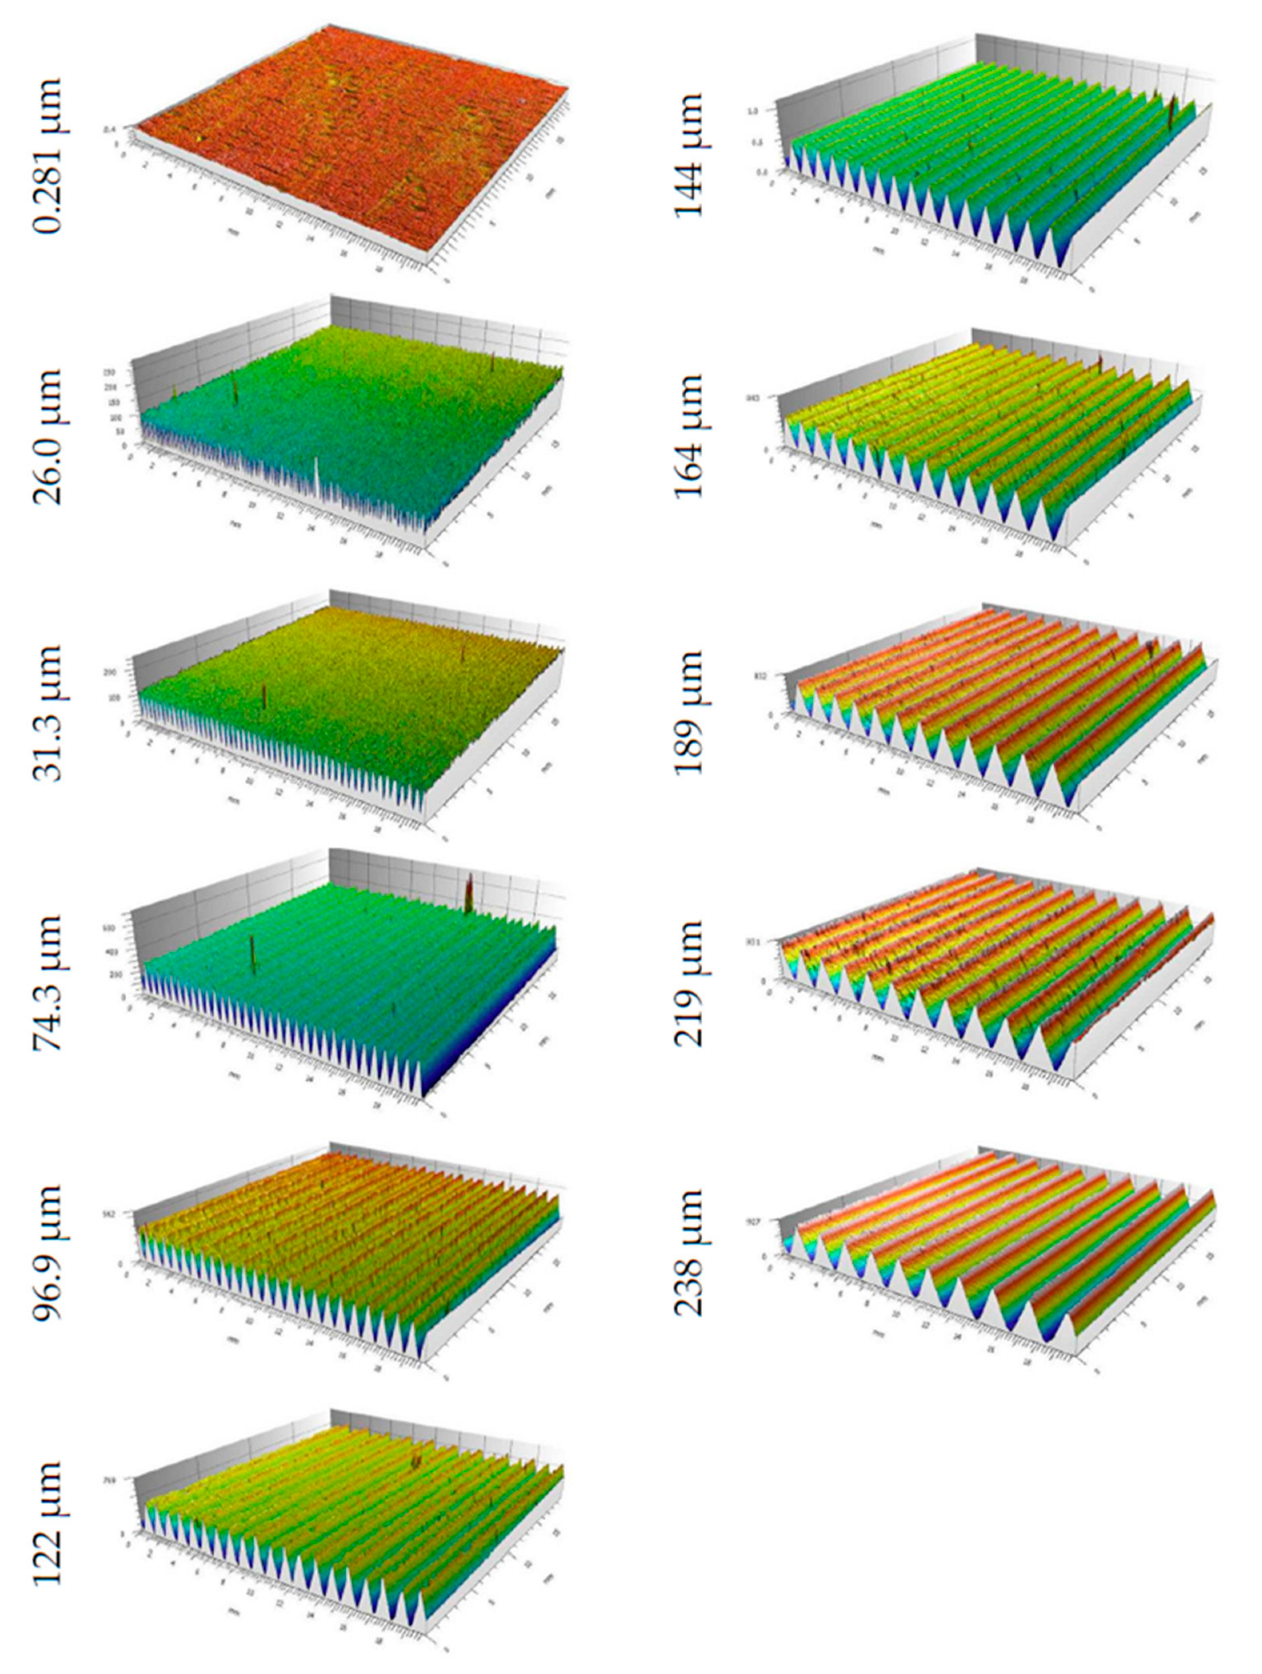
25], and considering the speed of measurement, an optical technique was chosen to investigate surface asperities. The surface parameters were determined using the µCMM Alicona (operating on the focus variation technique), and the results of these measurements are shown in
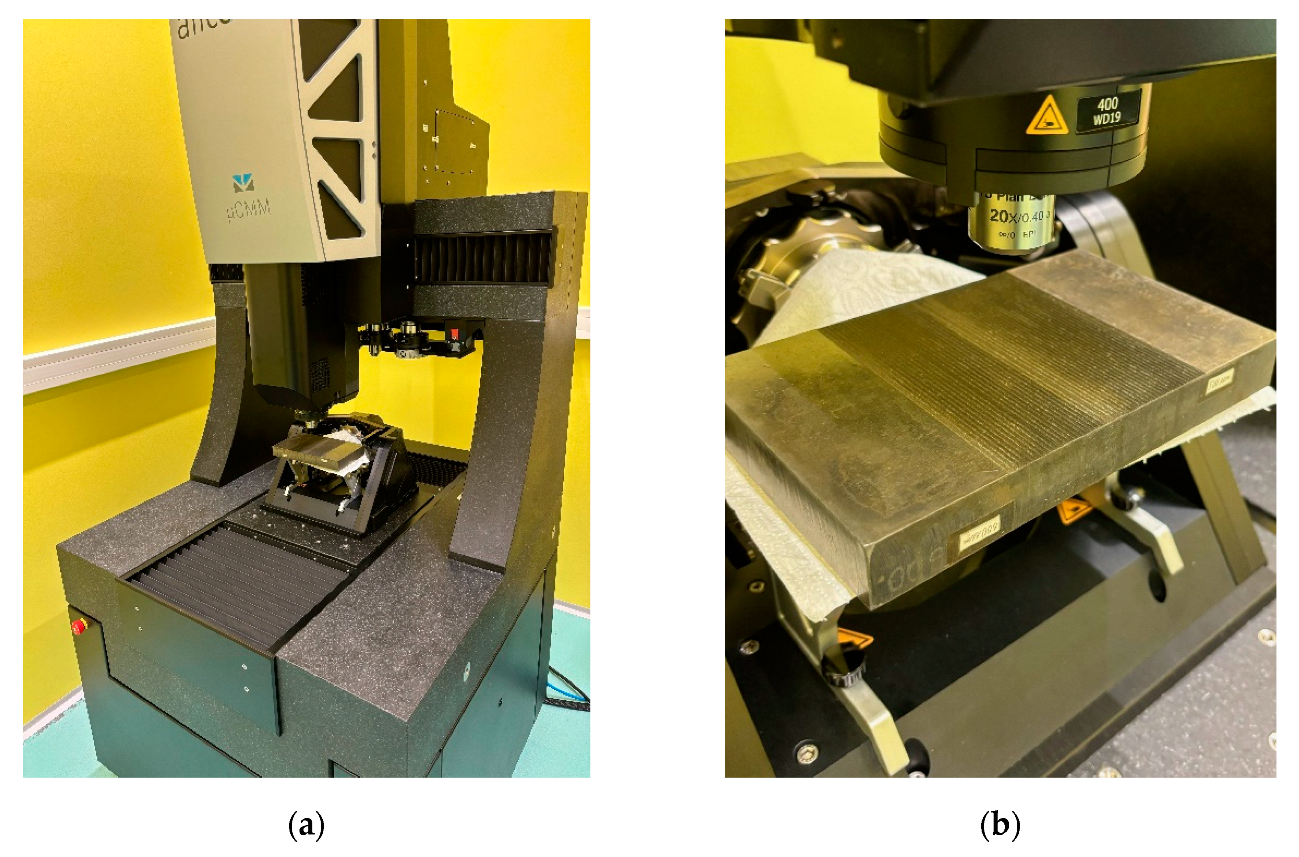
Figure 4. A view of the stand where the surface parameters were measured is displayed in
Figure 5.
Focus Variation Microscopy (FV) provides the best results for the analyzed surfaces because it is based on the texture present in the bright-field image. This technique is generally suitable for low magnification, where capturing the geometric macrostructure of the surface is most important, and where the use of other measurement methods, particularly contact profilometry, is not feasible due to the risk of damaging the measurement probe. In this technique, it is crucial to use proper lighting [
26] and maintain consistent measurement conditions for each sample to avoid potential errors [
27].
In the parametric analysis of the data, measurement segments appropriate for the periodic nature of the surface were individually selected based on the measured structure. The focus was primarily on the surface amplitude parameters. The obtained data were filtered (post-processed) to remove maximum amplitude deviations and measurement noise in order to accurately represent the characteristics of the studied structure.
In the study, a 20x magnification objective was used, providing a large measurement area, which is particularly important for amplitude changes on the surface. Due to the periodic nature of the texture, the Lateral Resolution parameters were defined at 0.5 µm, and Vertical Resolution at 0.3 µm. The lighting parameters were set to High Dynamic Range mode, using coaxial illumination (Gain = 1, contrast = 0.54).
3.3. Ultrasonic Apparatus
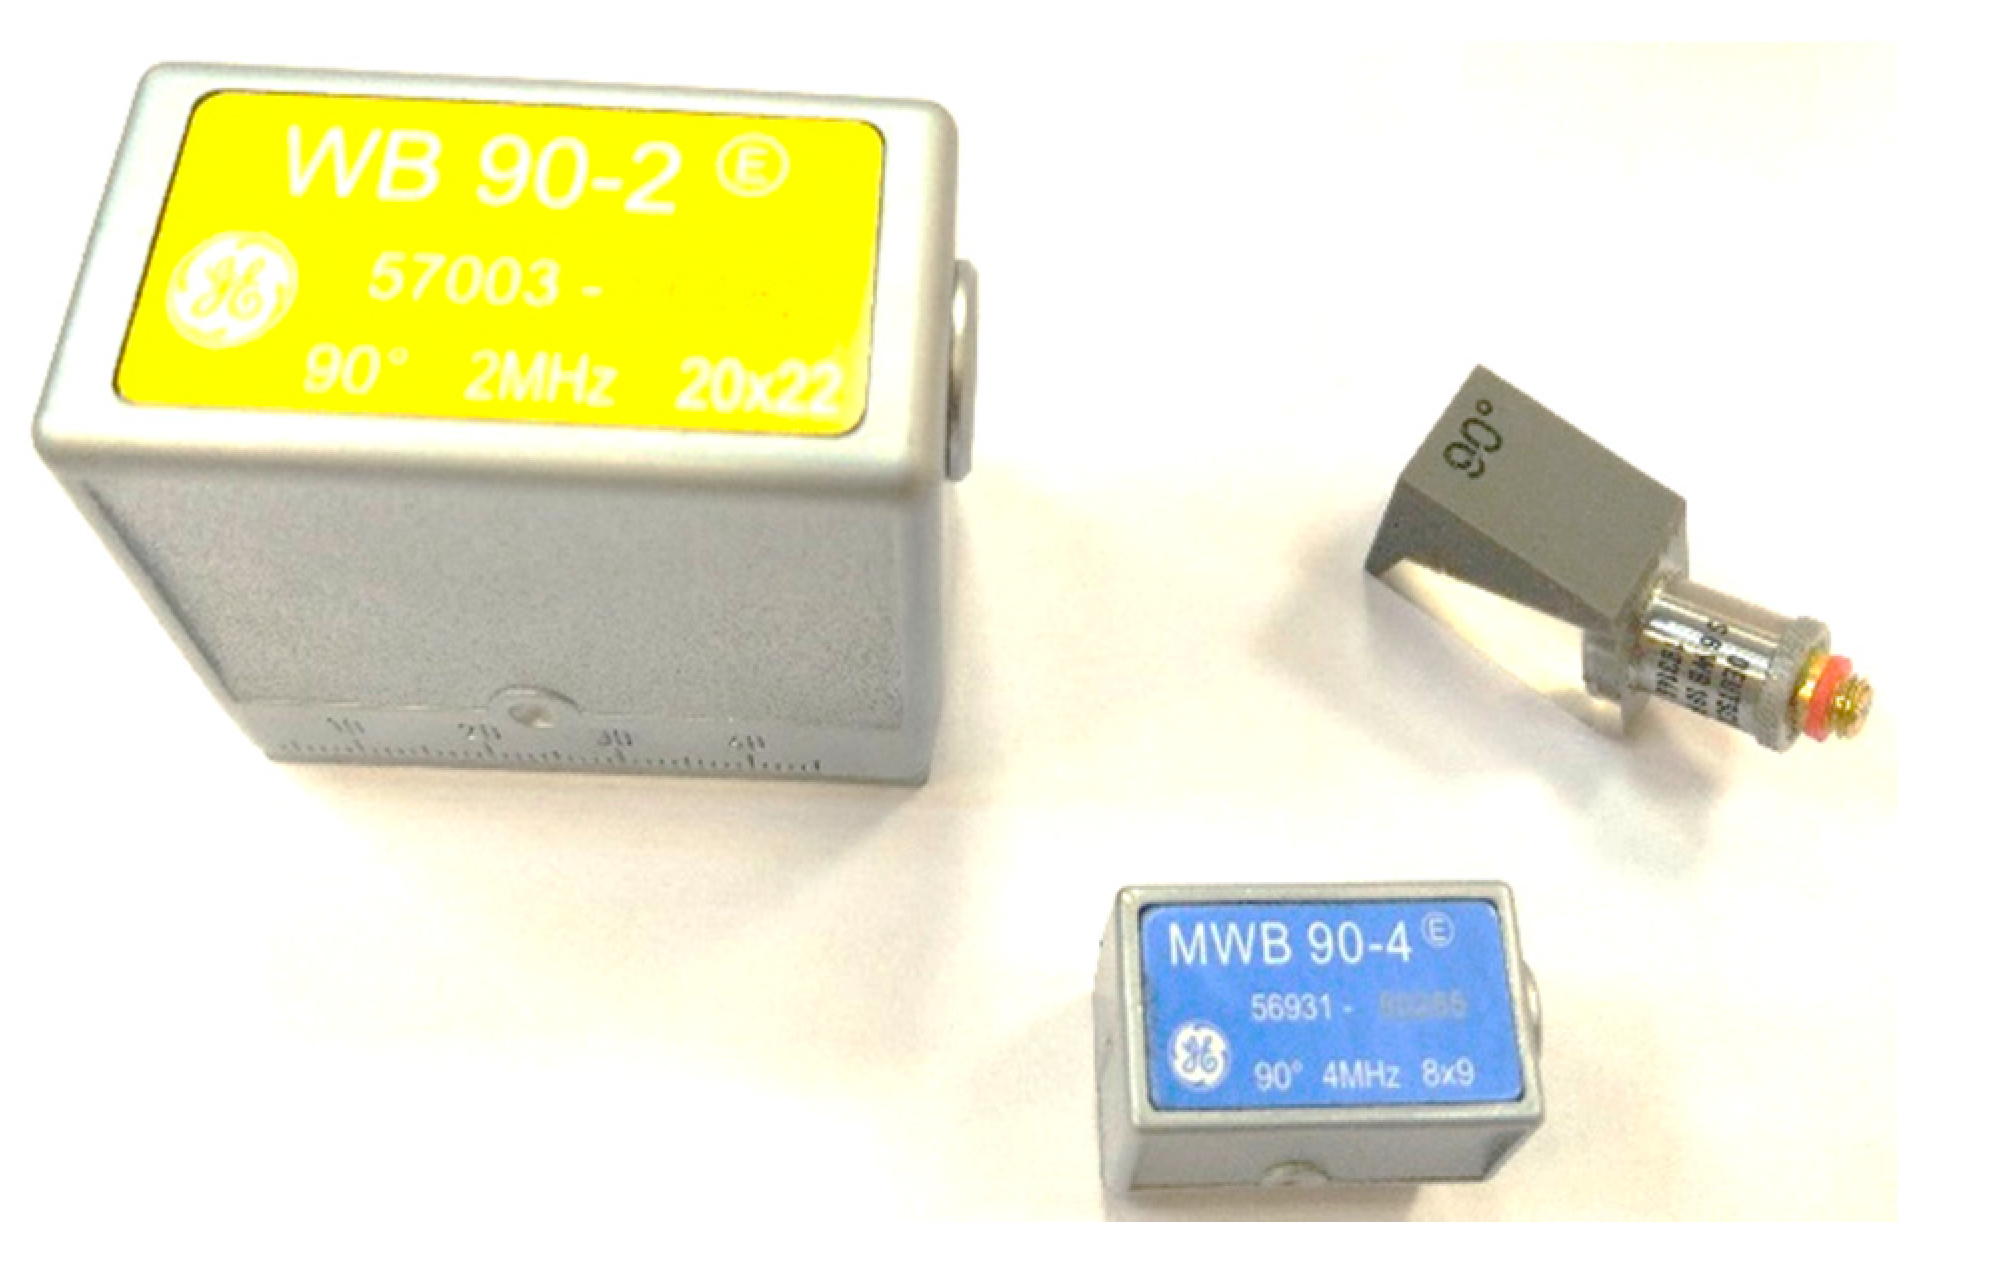
Due to the practical nature of the research, an industrial digital ultrasonic defectoscope USM35XS was used for the measurements, along with a set of ultrasonic probes. Three pairs of ultrasonic transducers were used, each with the same frequencies as those used for testing in real industrial environments. It was decided to choose the following probes: Karl Deutsch S6WB10WM (designation KD), General Electric Company MWB 90-4 8x9 and General Electric Company WB 90-2 20x22 (
Figure 6).
The actual frequency of the ultrasonic transducers used was checked prior to testing. A summary of the frequency given by the probe manufacturer and the measured frequency, as well as the dimensions of the transducers, are included in
Table 2.
The next step was to study the factors likely to influence the test results. In this study, the ultrasonic transmission technique was used. This is a method in which the transmitting probe emits an ultrasonic wave that propagates across the surface of the test piece and reaches the receiving probe, and the only parameter that can be measured is the height of the pulse. With this method, a single pulse is generated on the defecoscope screen.
Measurement results can be influenced by factors such as the angle of the ultrasonic probes to each other, the distance between the ultrasonic probes, the condition of the coupling medium, contamination of the test surfaces and the configuration of the defecoscope.
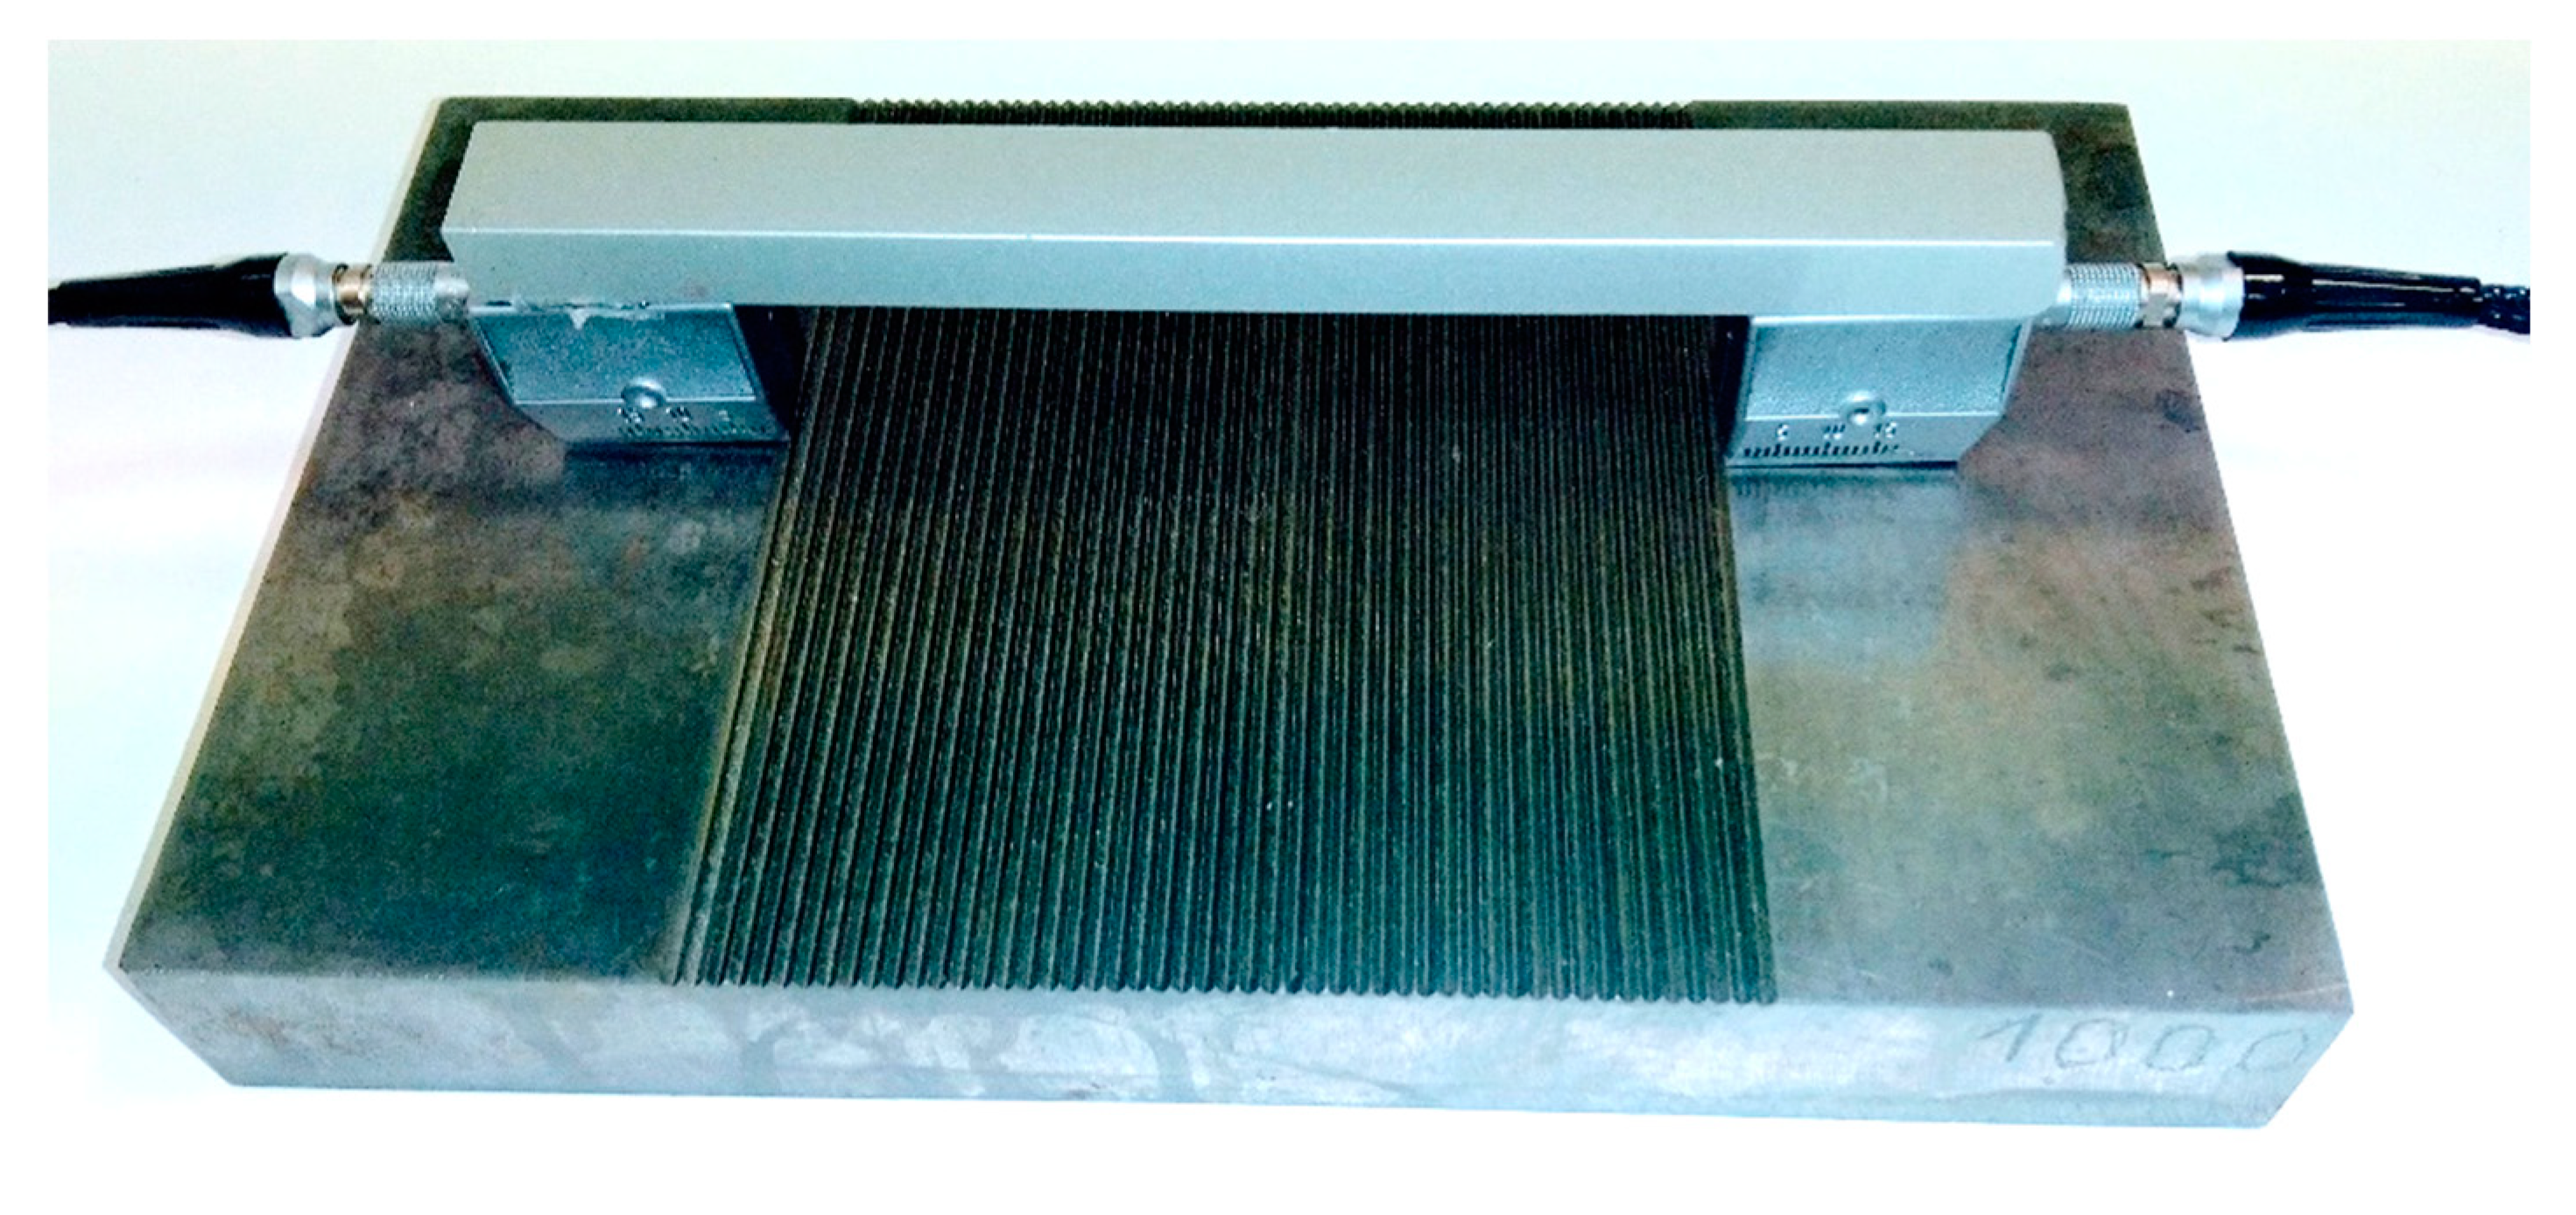
To reduce the influence of these factors on the test results, the ultrasonic probes were bonded to an aluminium profile. This mounting of the probes (
Figure 7) guarantees a constant angle between the probes and a constant distance between them. In addition, the sample was degreased immediately prior to measurement and the Karl Deutsch EchoFluid coupling agent was applied between the probes and the surface, after which the probes were aligned parallel to the long edge of the sample and pressed with a constant force.
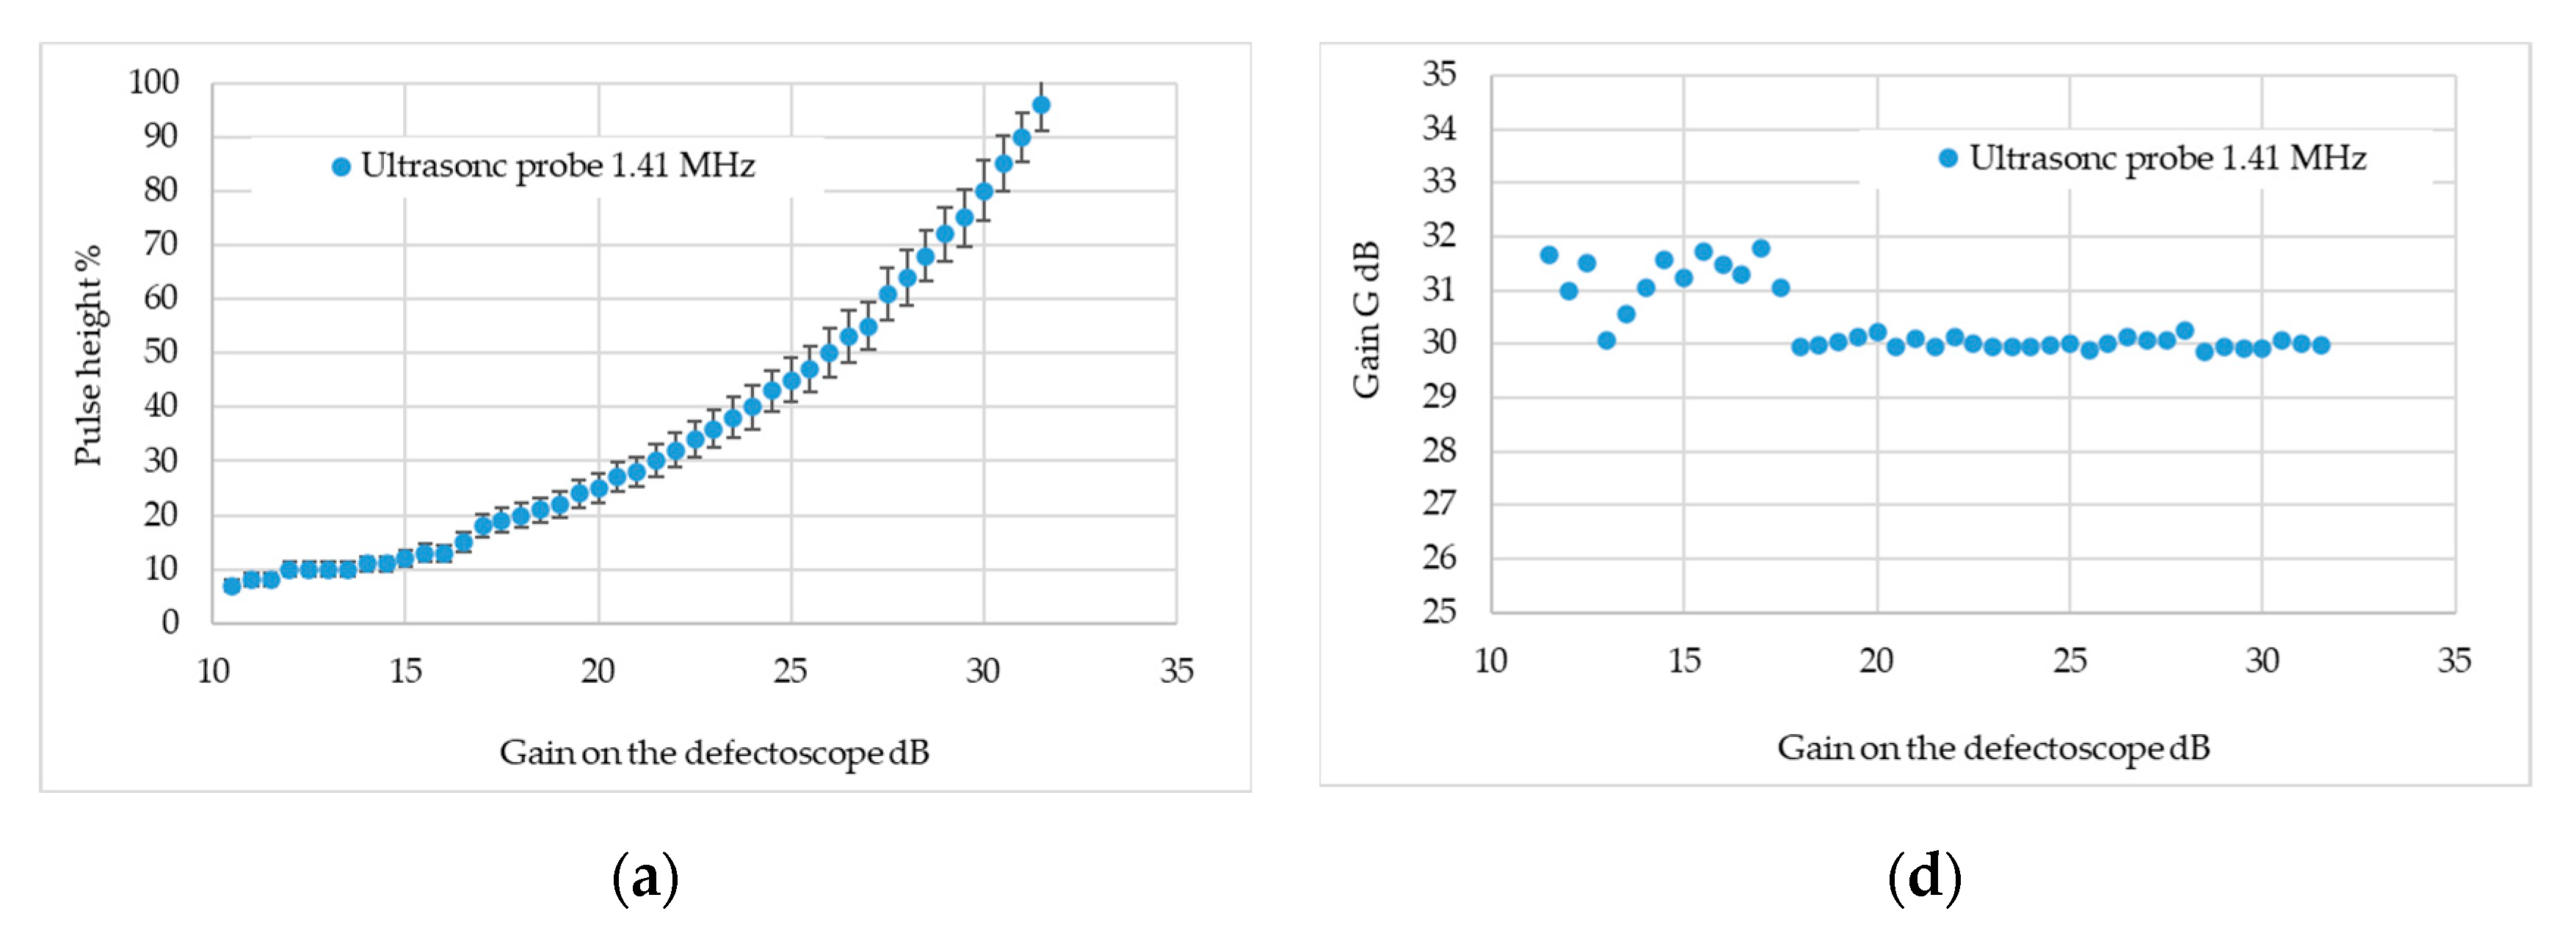
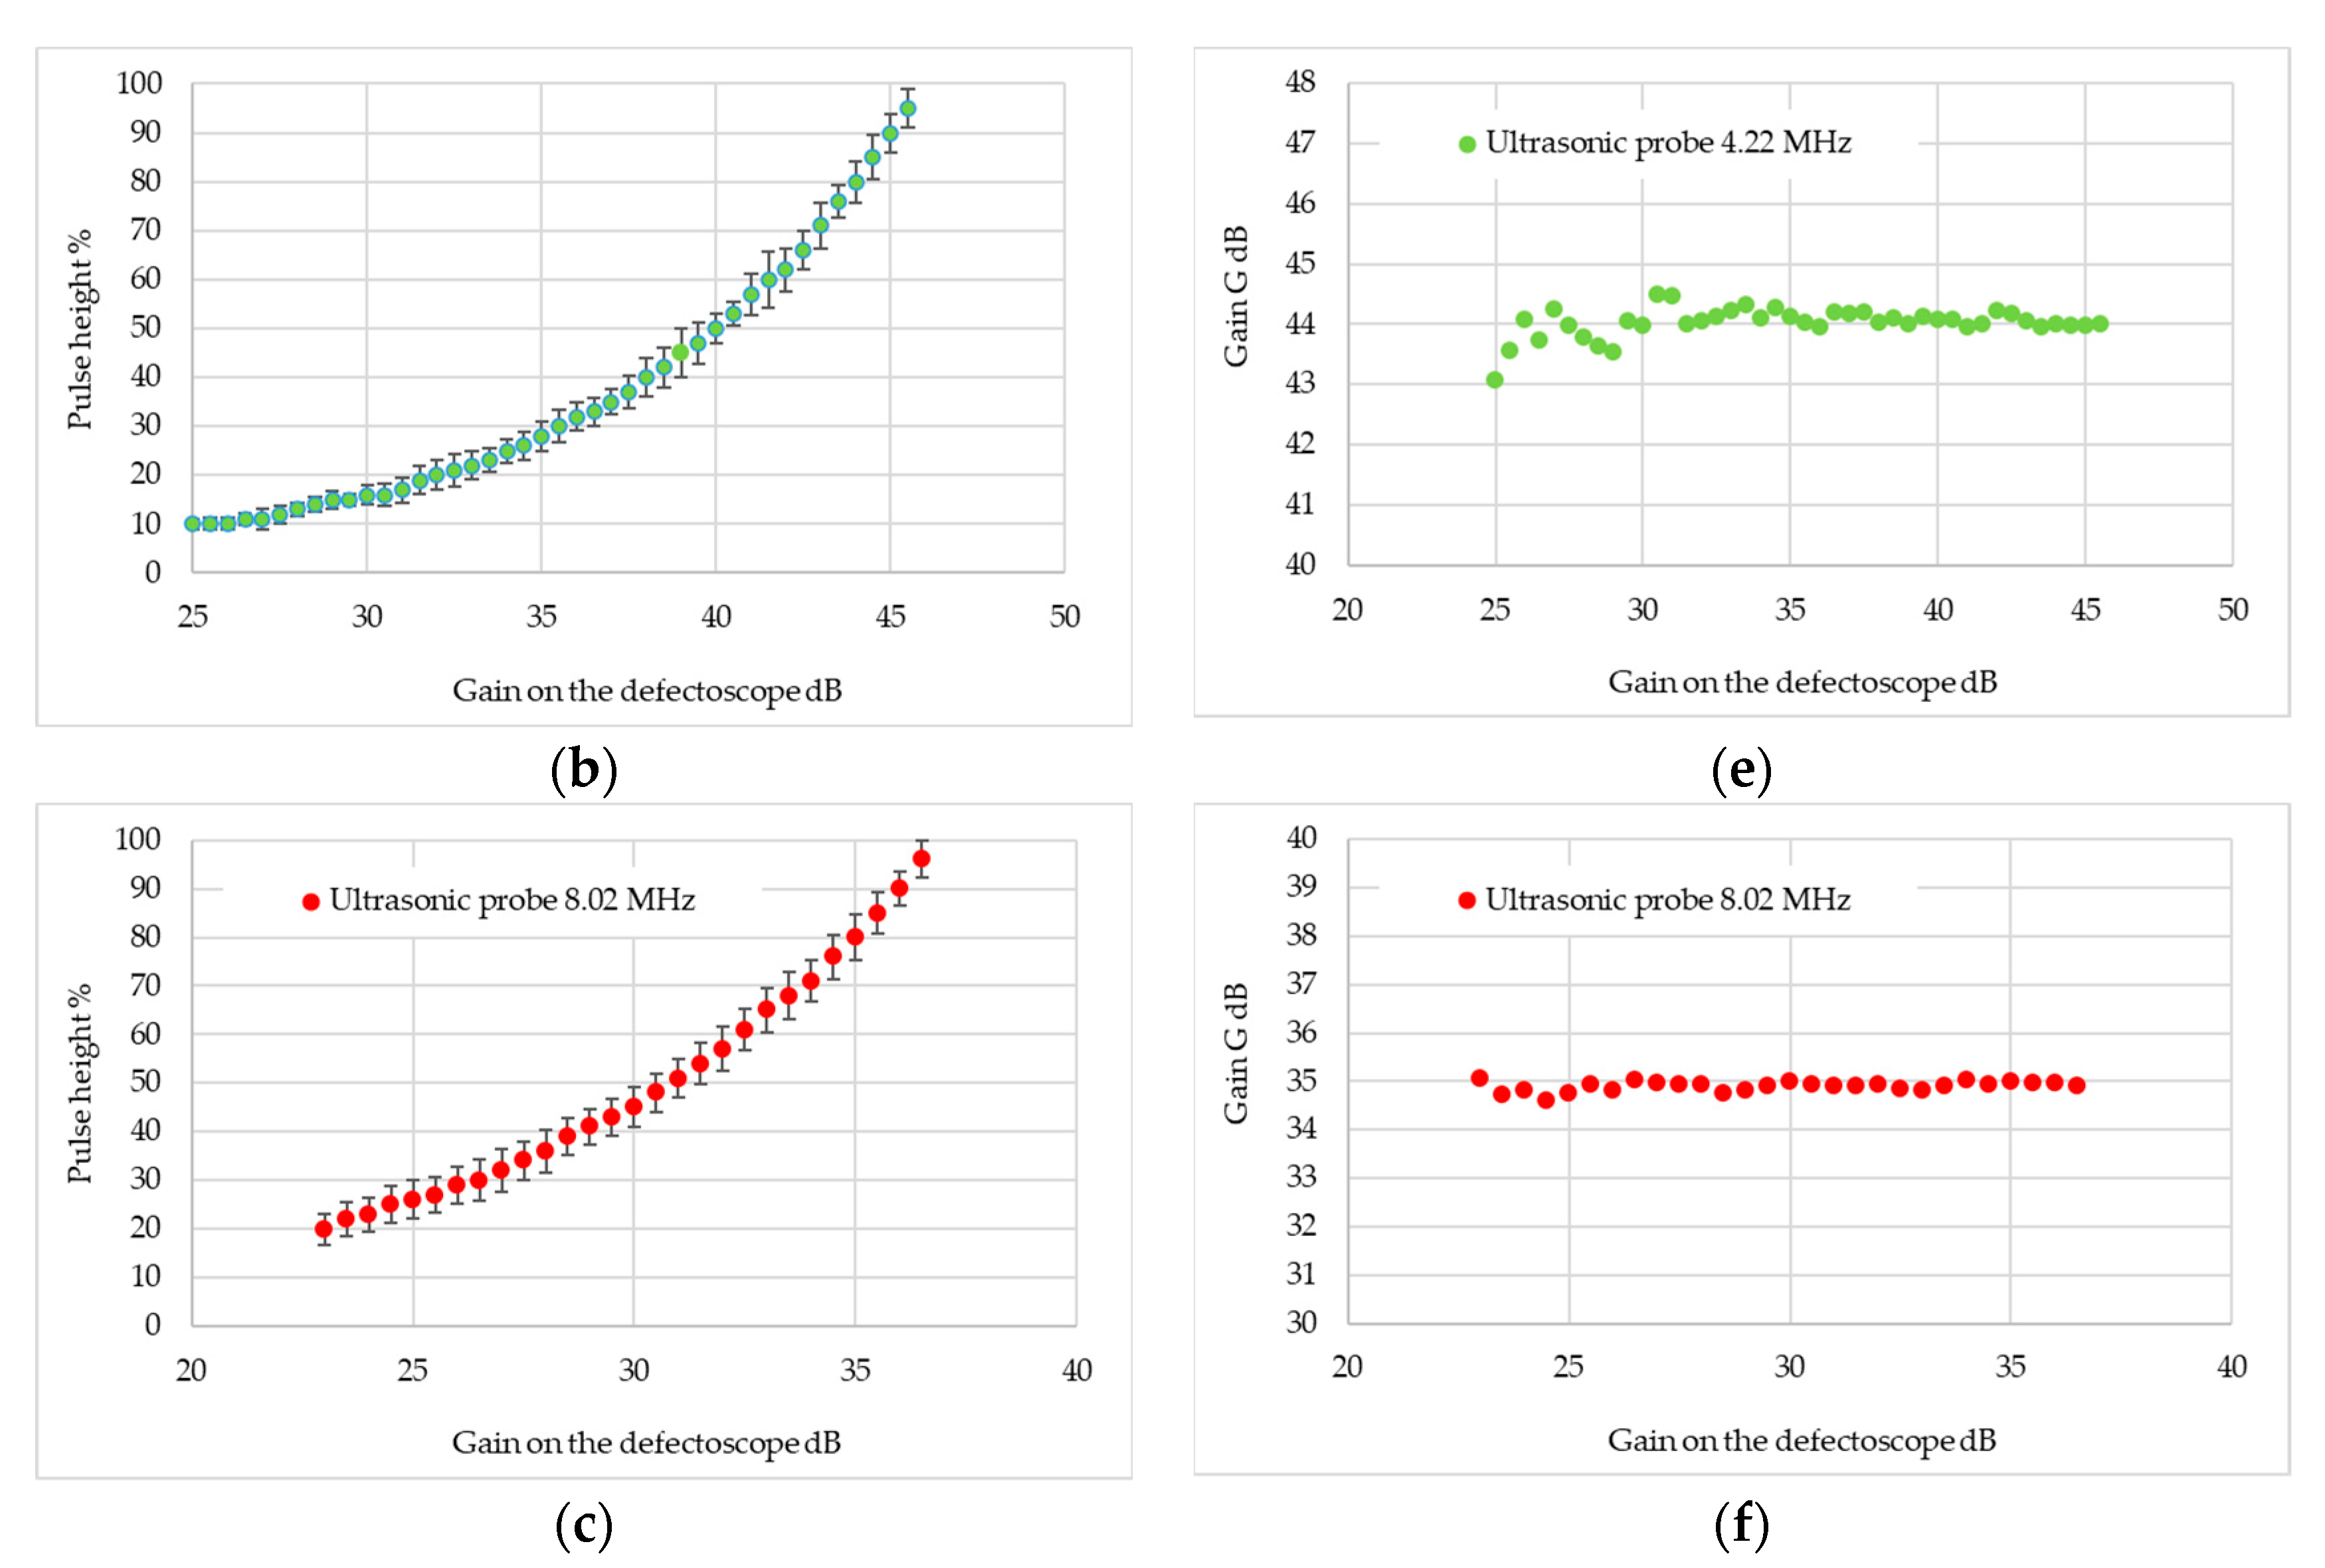
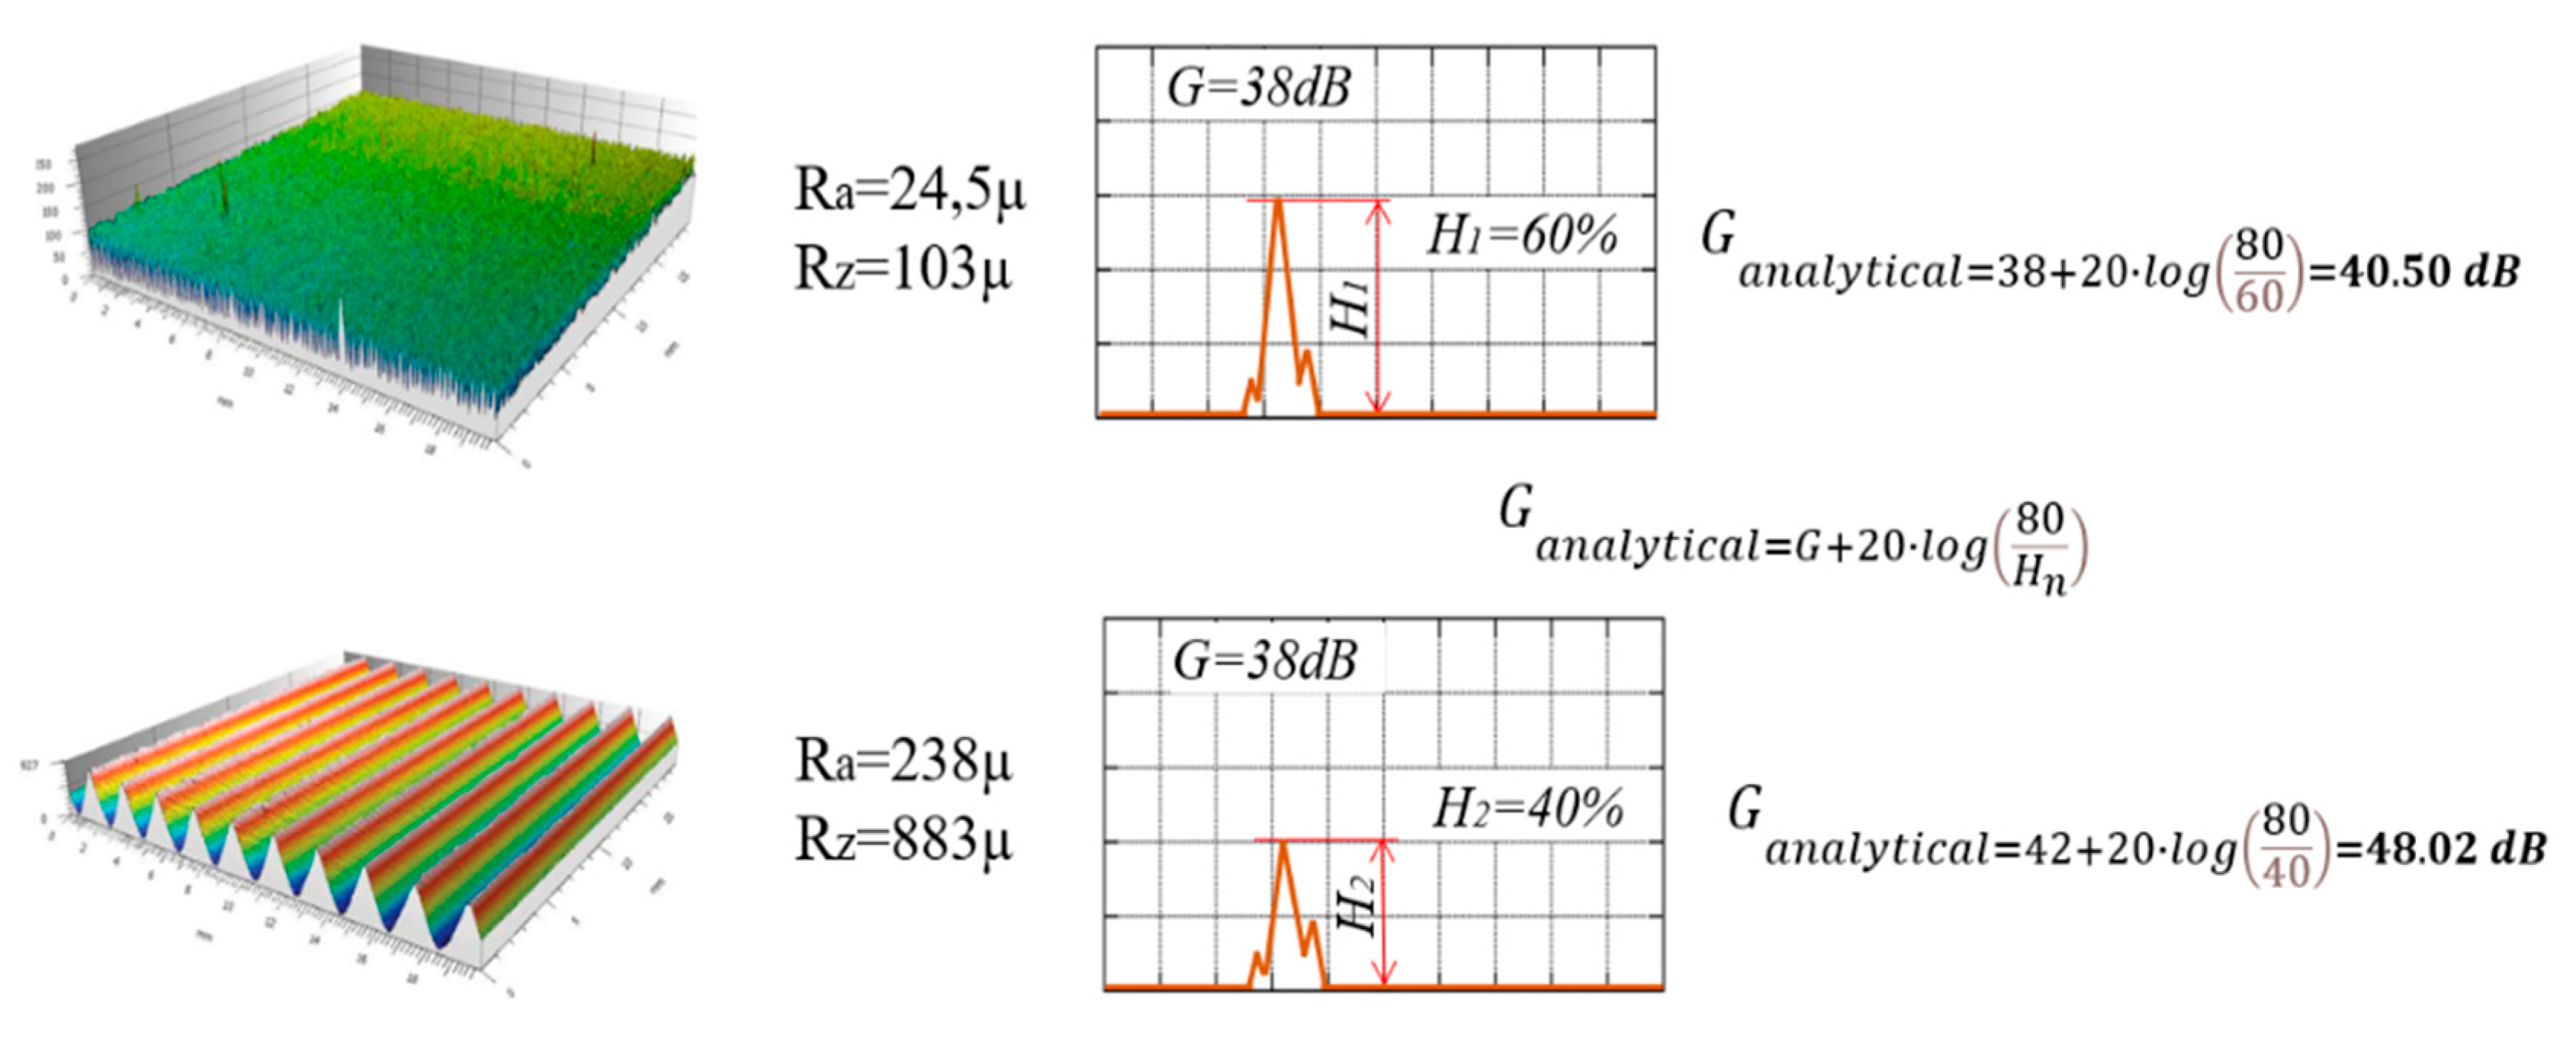
The extent to which the defectoscope's settings affect the measurement results was also checked; measurements were made for the probe with the highest and lowest frequencies. The pulse height on the defectoscope screen was measured by varying the gain of the defectoscope. The gain was changed so that the pulse height ranged from 10 to 100 per cent of the defectoscope screen height, then the analytical gain were determined for a pulse height of 80 per cent of the screen height. Each measurement was repeated ten times and the results are shown in
Figure 8.
Since, the intended specimens had varying surfaces, it was envisaged that the tests would be carried out at different gain, and the measure of the surface condition would not be the height of the pulse on the defectoscope screen but the gain value needed to obtain a pulse of 80 per cent of the screen. This gain value is denoted as G
analitical. The dependence of the gain needed to obtain a pulse height of 80 per cent of the screen on the defectoscope gain is shown in
Figure 9.
The graphs show that the least effect of the gain set on the defectoscope is observed for gains of more than 18dB for the 1.41MHz probe and 26.5dB for the 4.42MHz probe - it was decided that the tests would be performed for the indicated gains. For the 8.02MHz head for the entire range of gains, no effect of gain on the measurement results was noticed.
In the next step, the ultrasonic Rayleigh wave velocity was determined for all the probes used, which allowed calibration of the ultrasonic equipment.
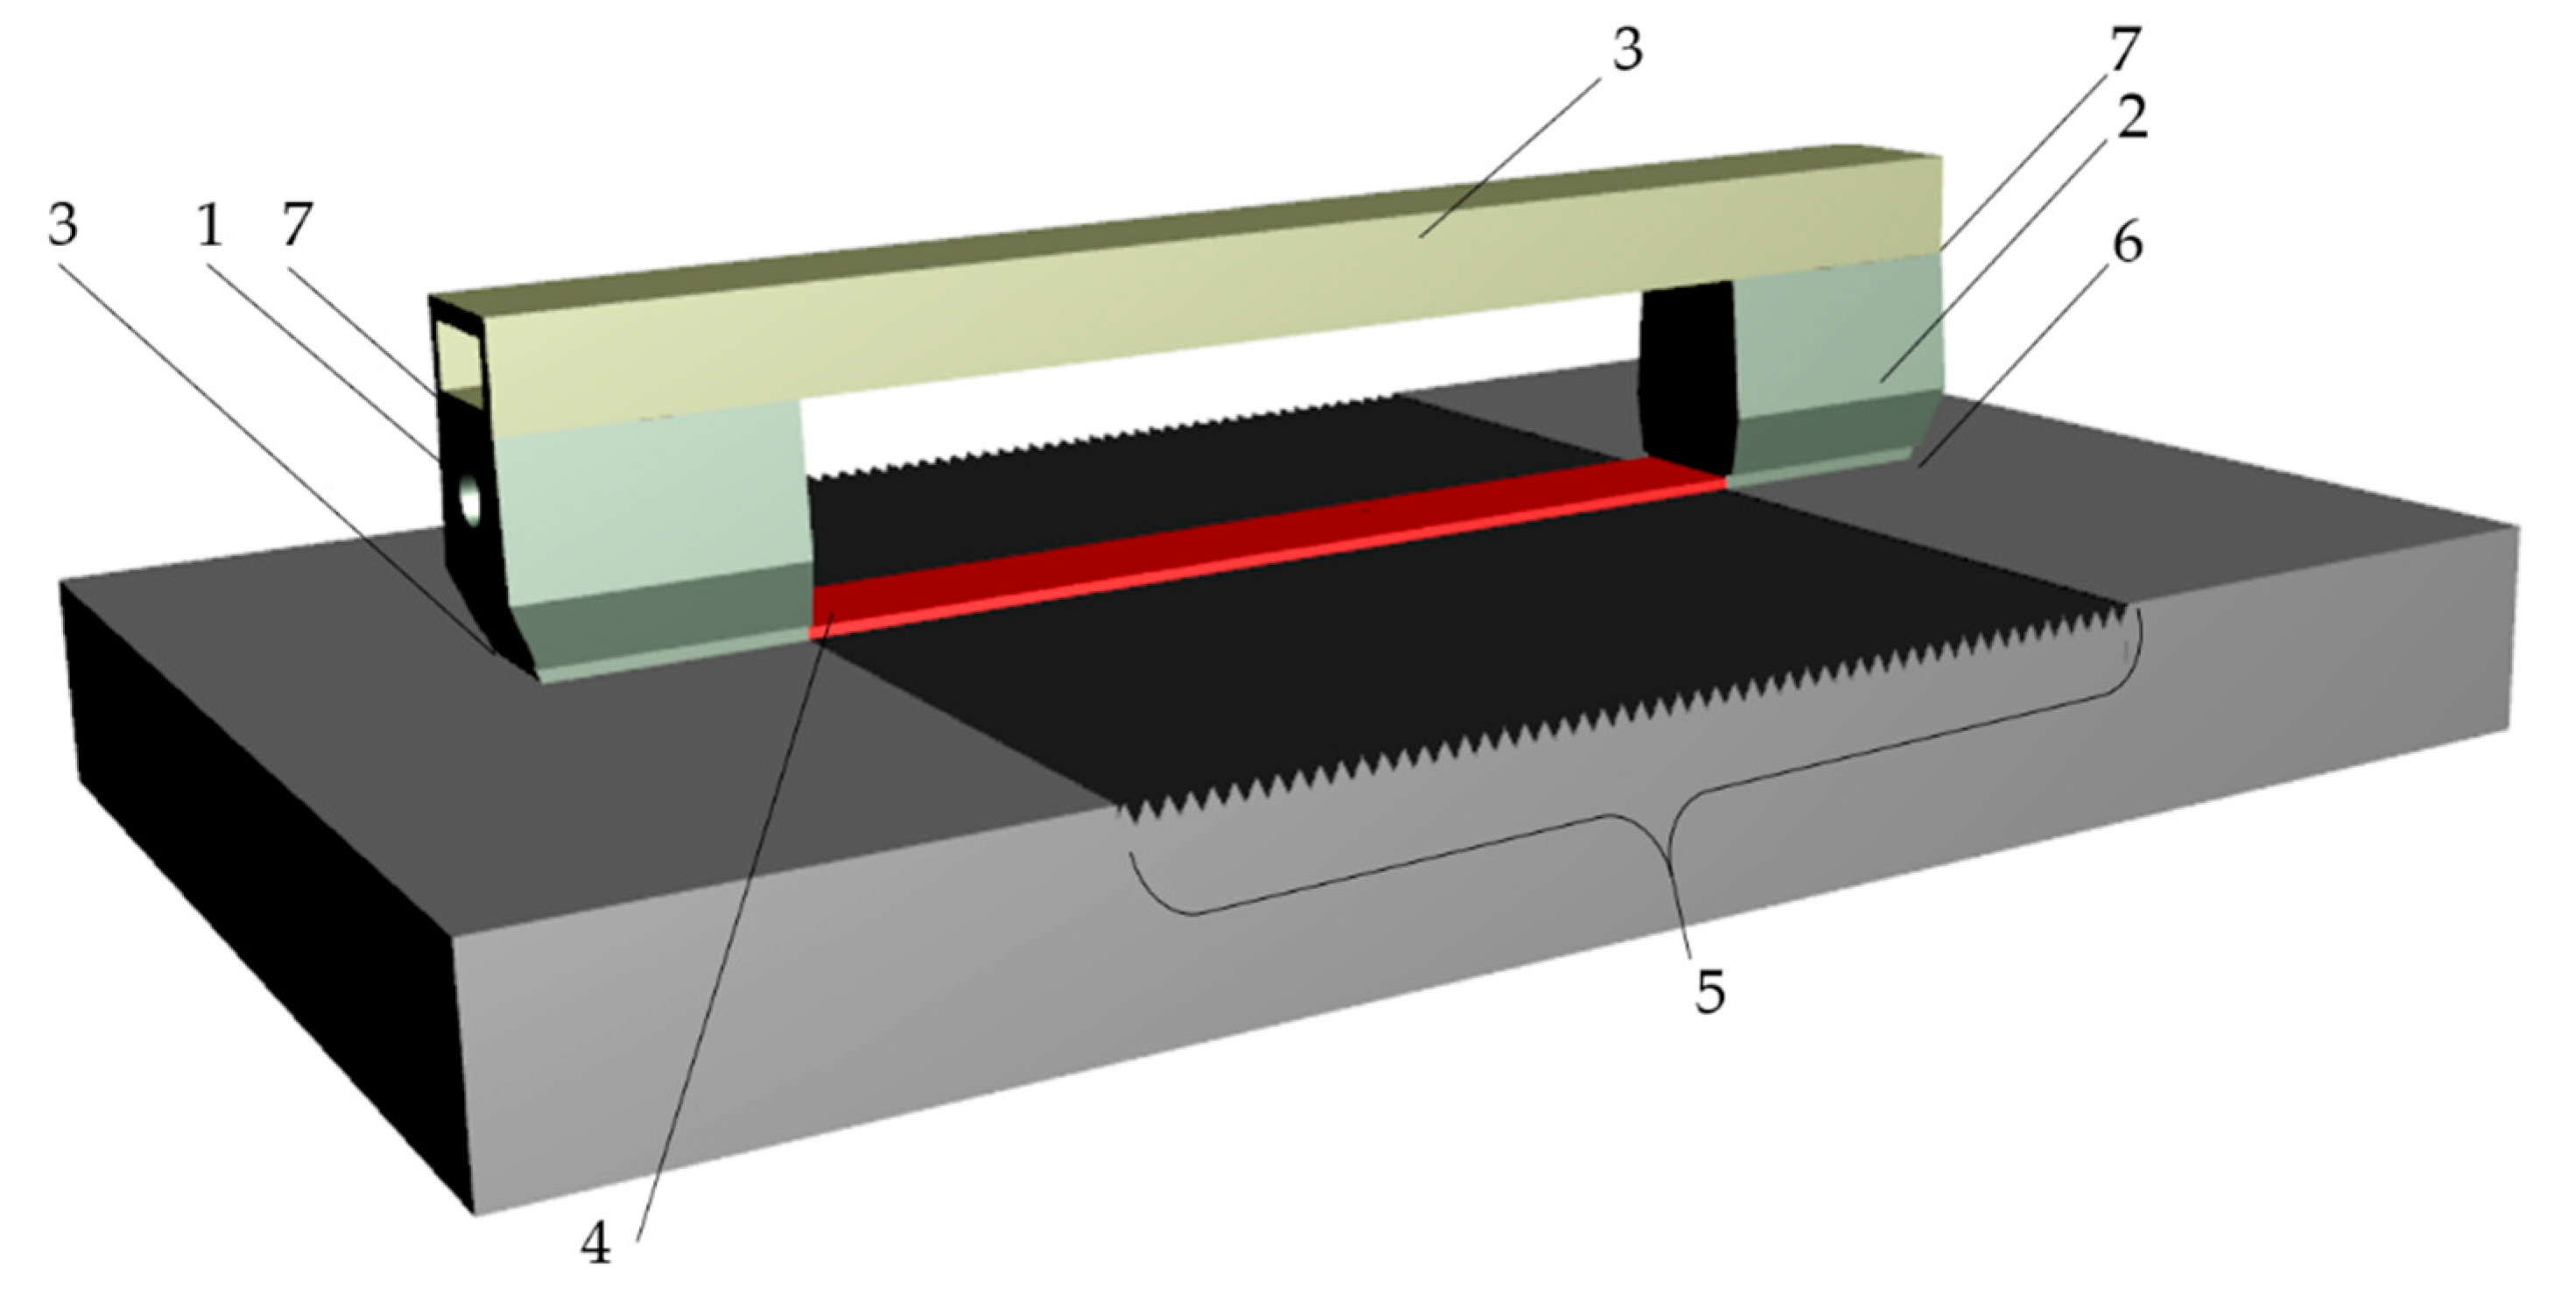
The final step in the study was to perform measurements for all samples and probes, during which the pulse heights on the defectoscope screen were recorded, as well as the time of passage of the ultrasonic wave through the tested surface, according to the scheme shown in
Figure 10.
3. Results
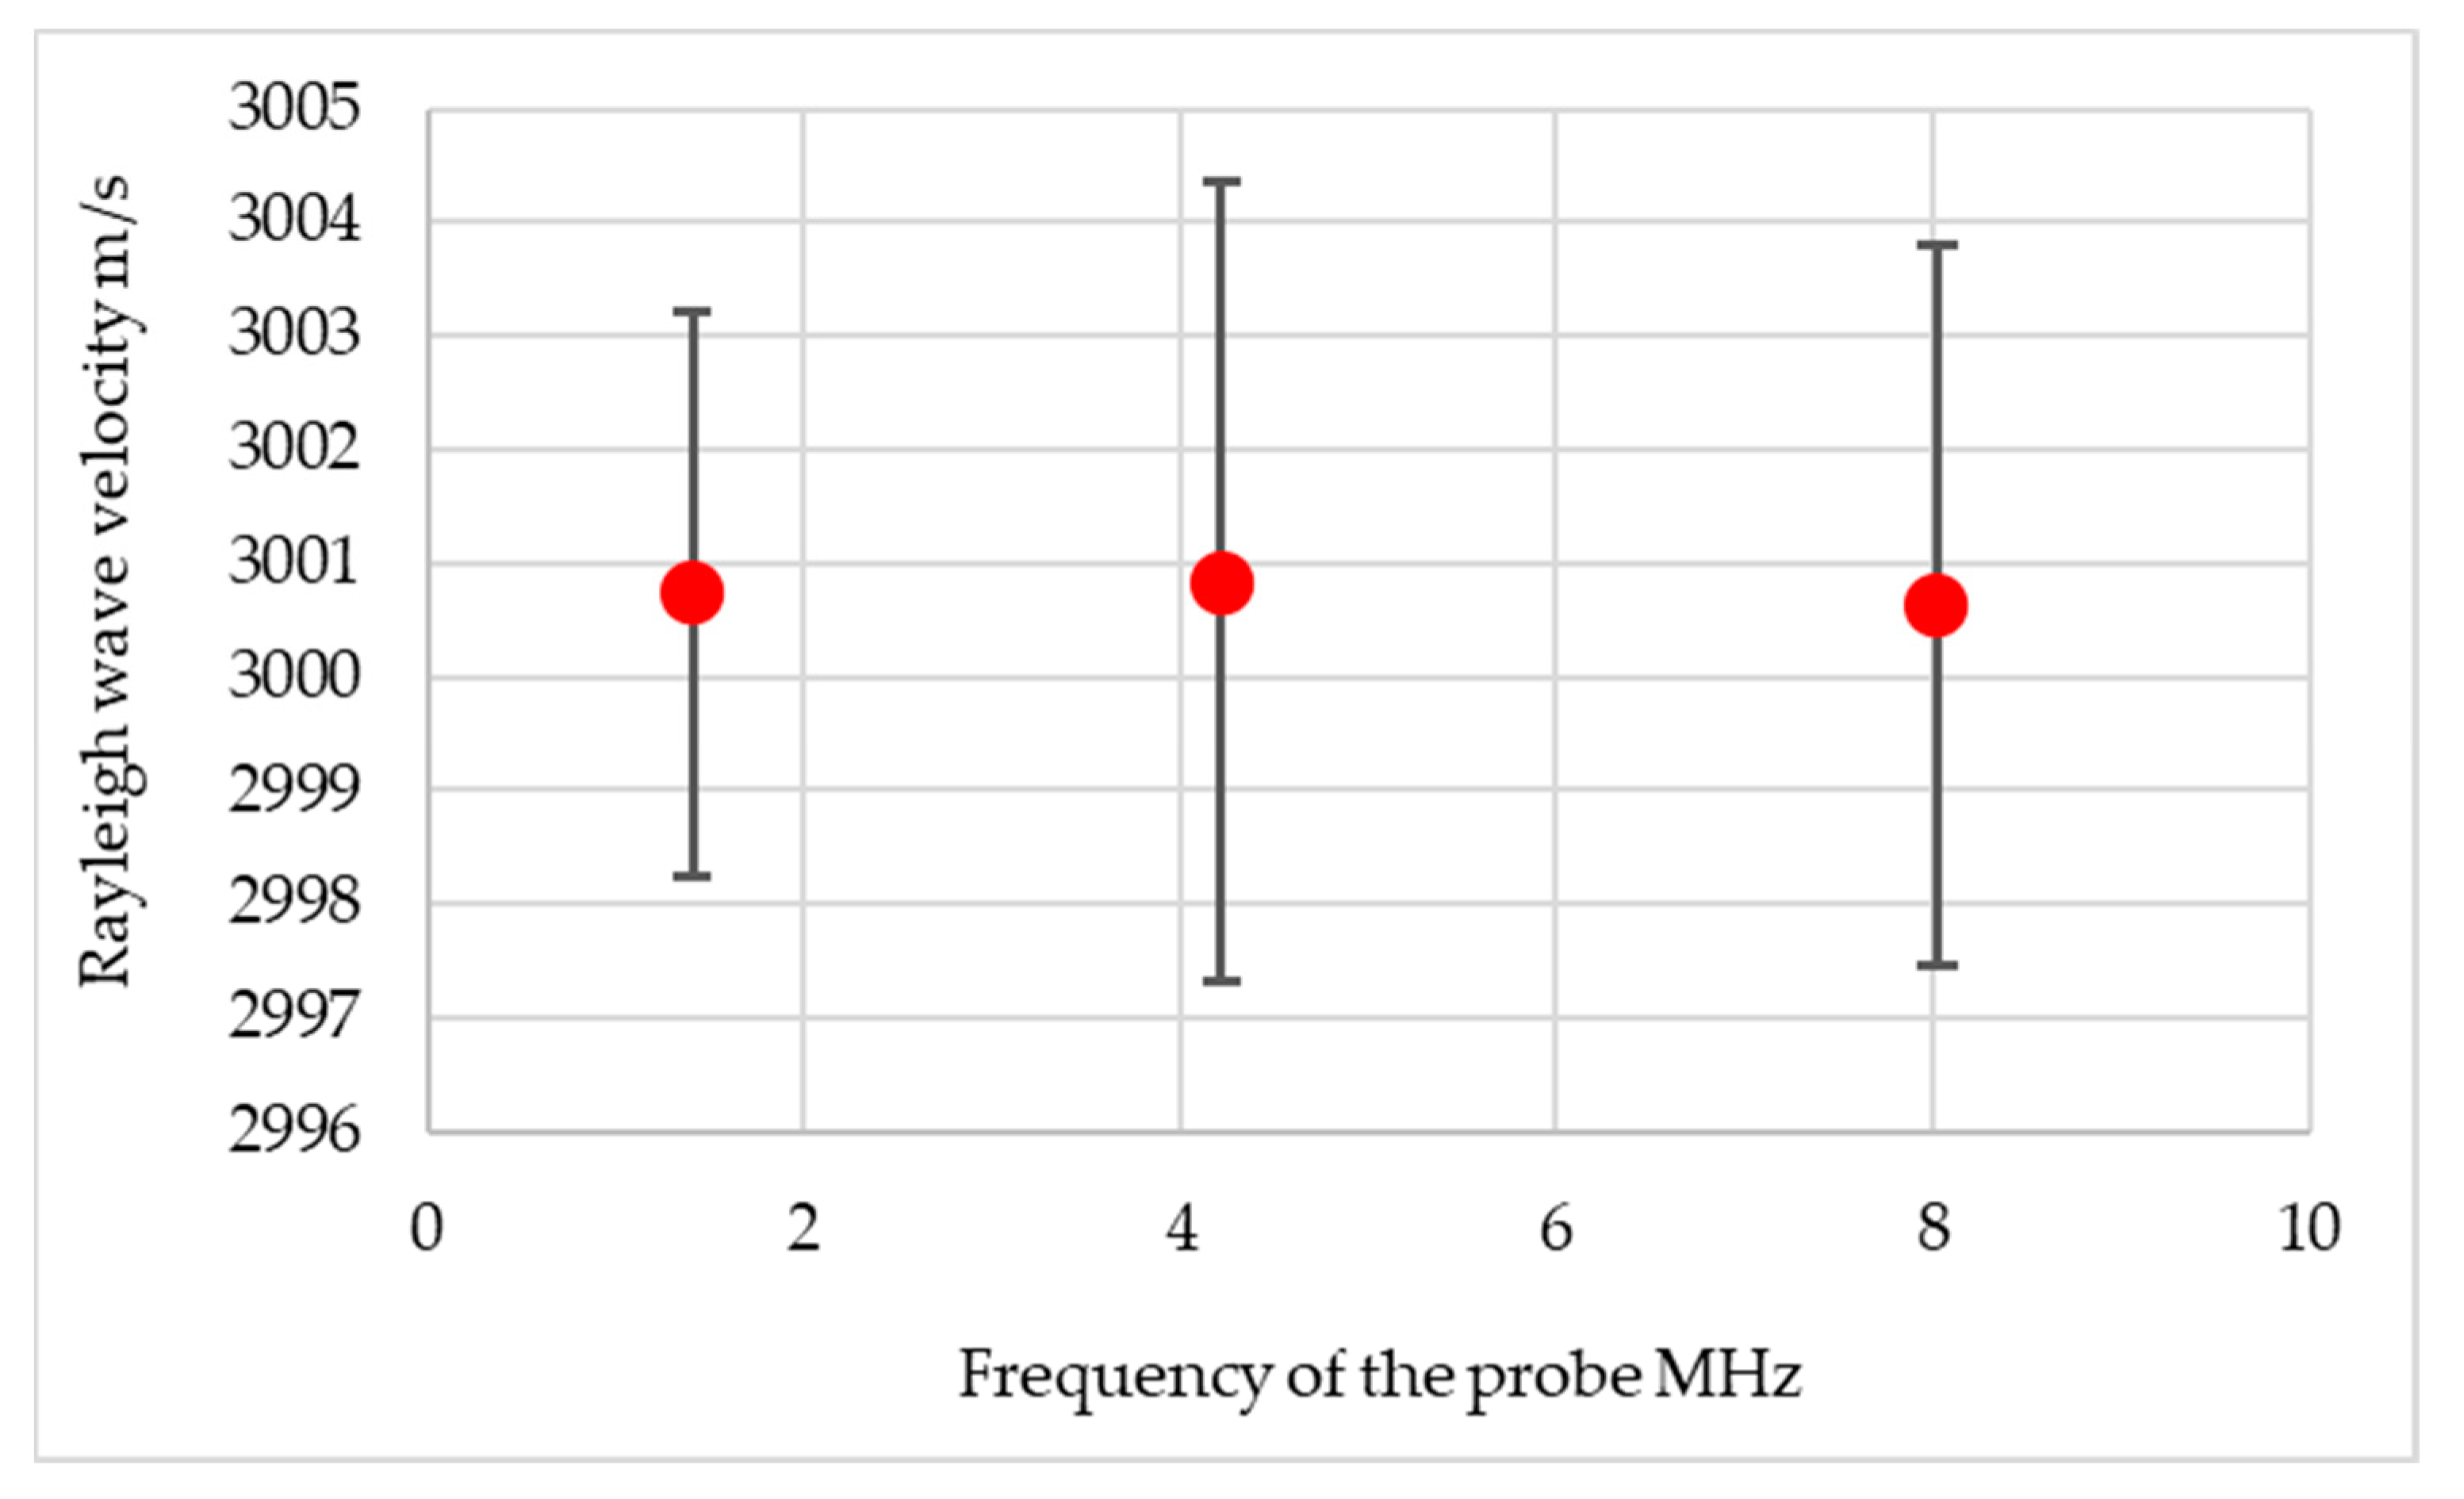
The first stage of the research was to determine the speed of the ultrasonic wave. It was confirmed that the velocity of the ultrasonic wave does not depend on the frequency of the wave. The determined Rayleigh wave velocity was 3001 m/s, with detailed results shown in
Figure 11.
As an ultrasonic measure, not the pulse height as it is implemented in classical testing, but the gain of the defectoscope that allows the pulse height on the defectoscope screen to be 80 percent of the height of the entire screen. This is due to the relatively large influence of roughness on pulse heights and the need to conduct tests at different gains.
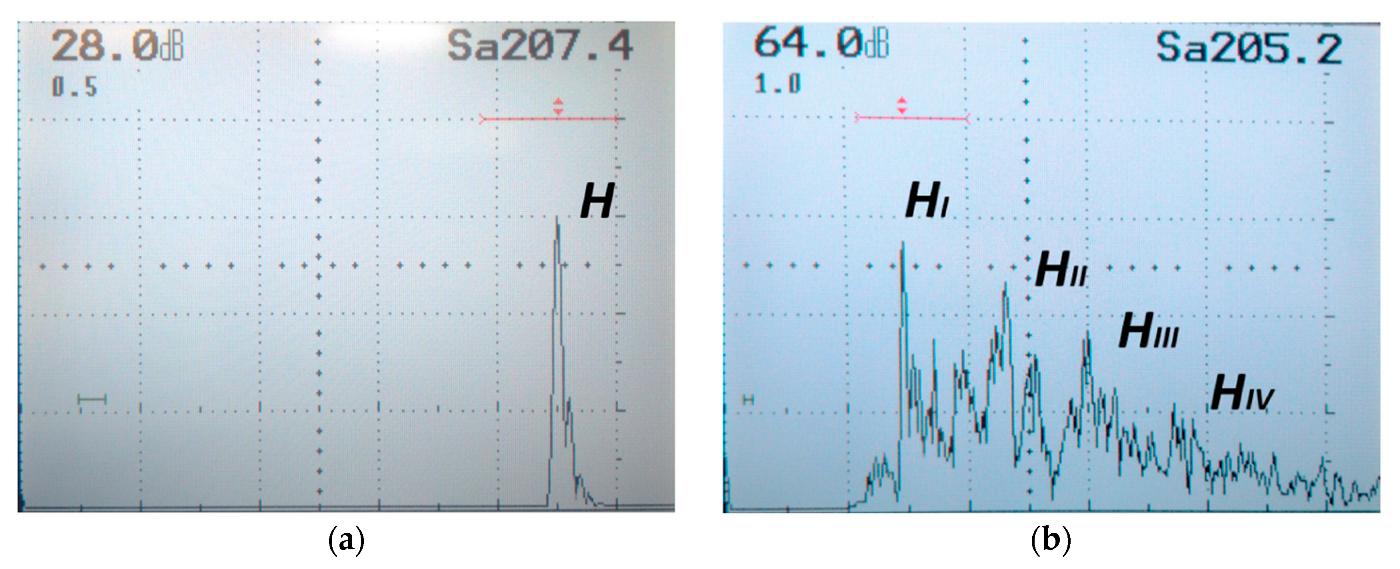
It is noted that higher roughnesses are followed by pulse stretching, allowing to distinguish several partial pulses, labeled for testing H
I, H
II, H
III and H
IV (
Figure 12).
The results of the pretreatment measurements are shown in
Table 3 -
Table 5.
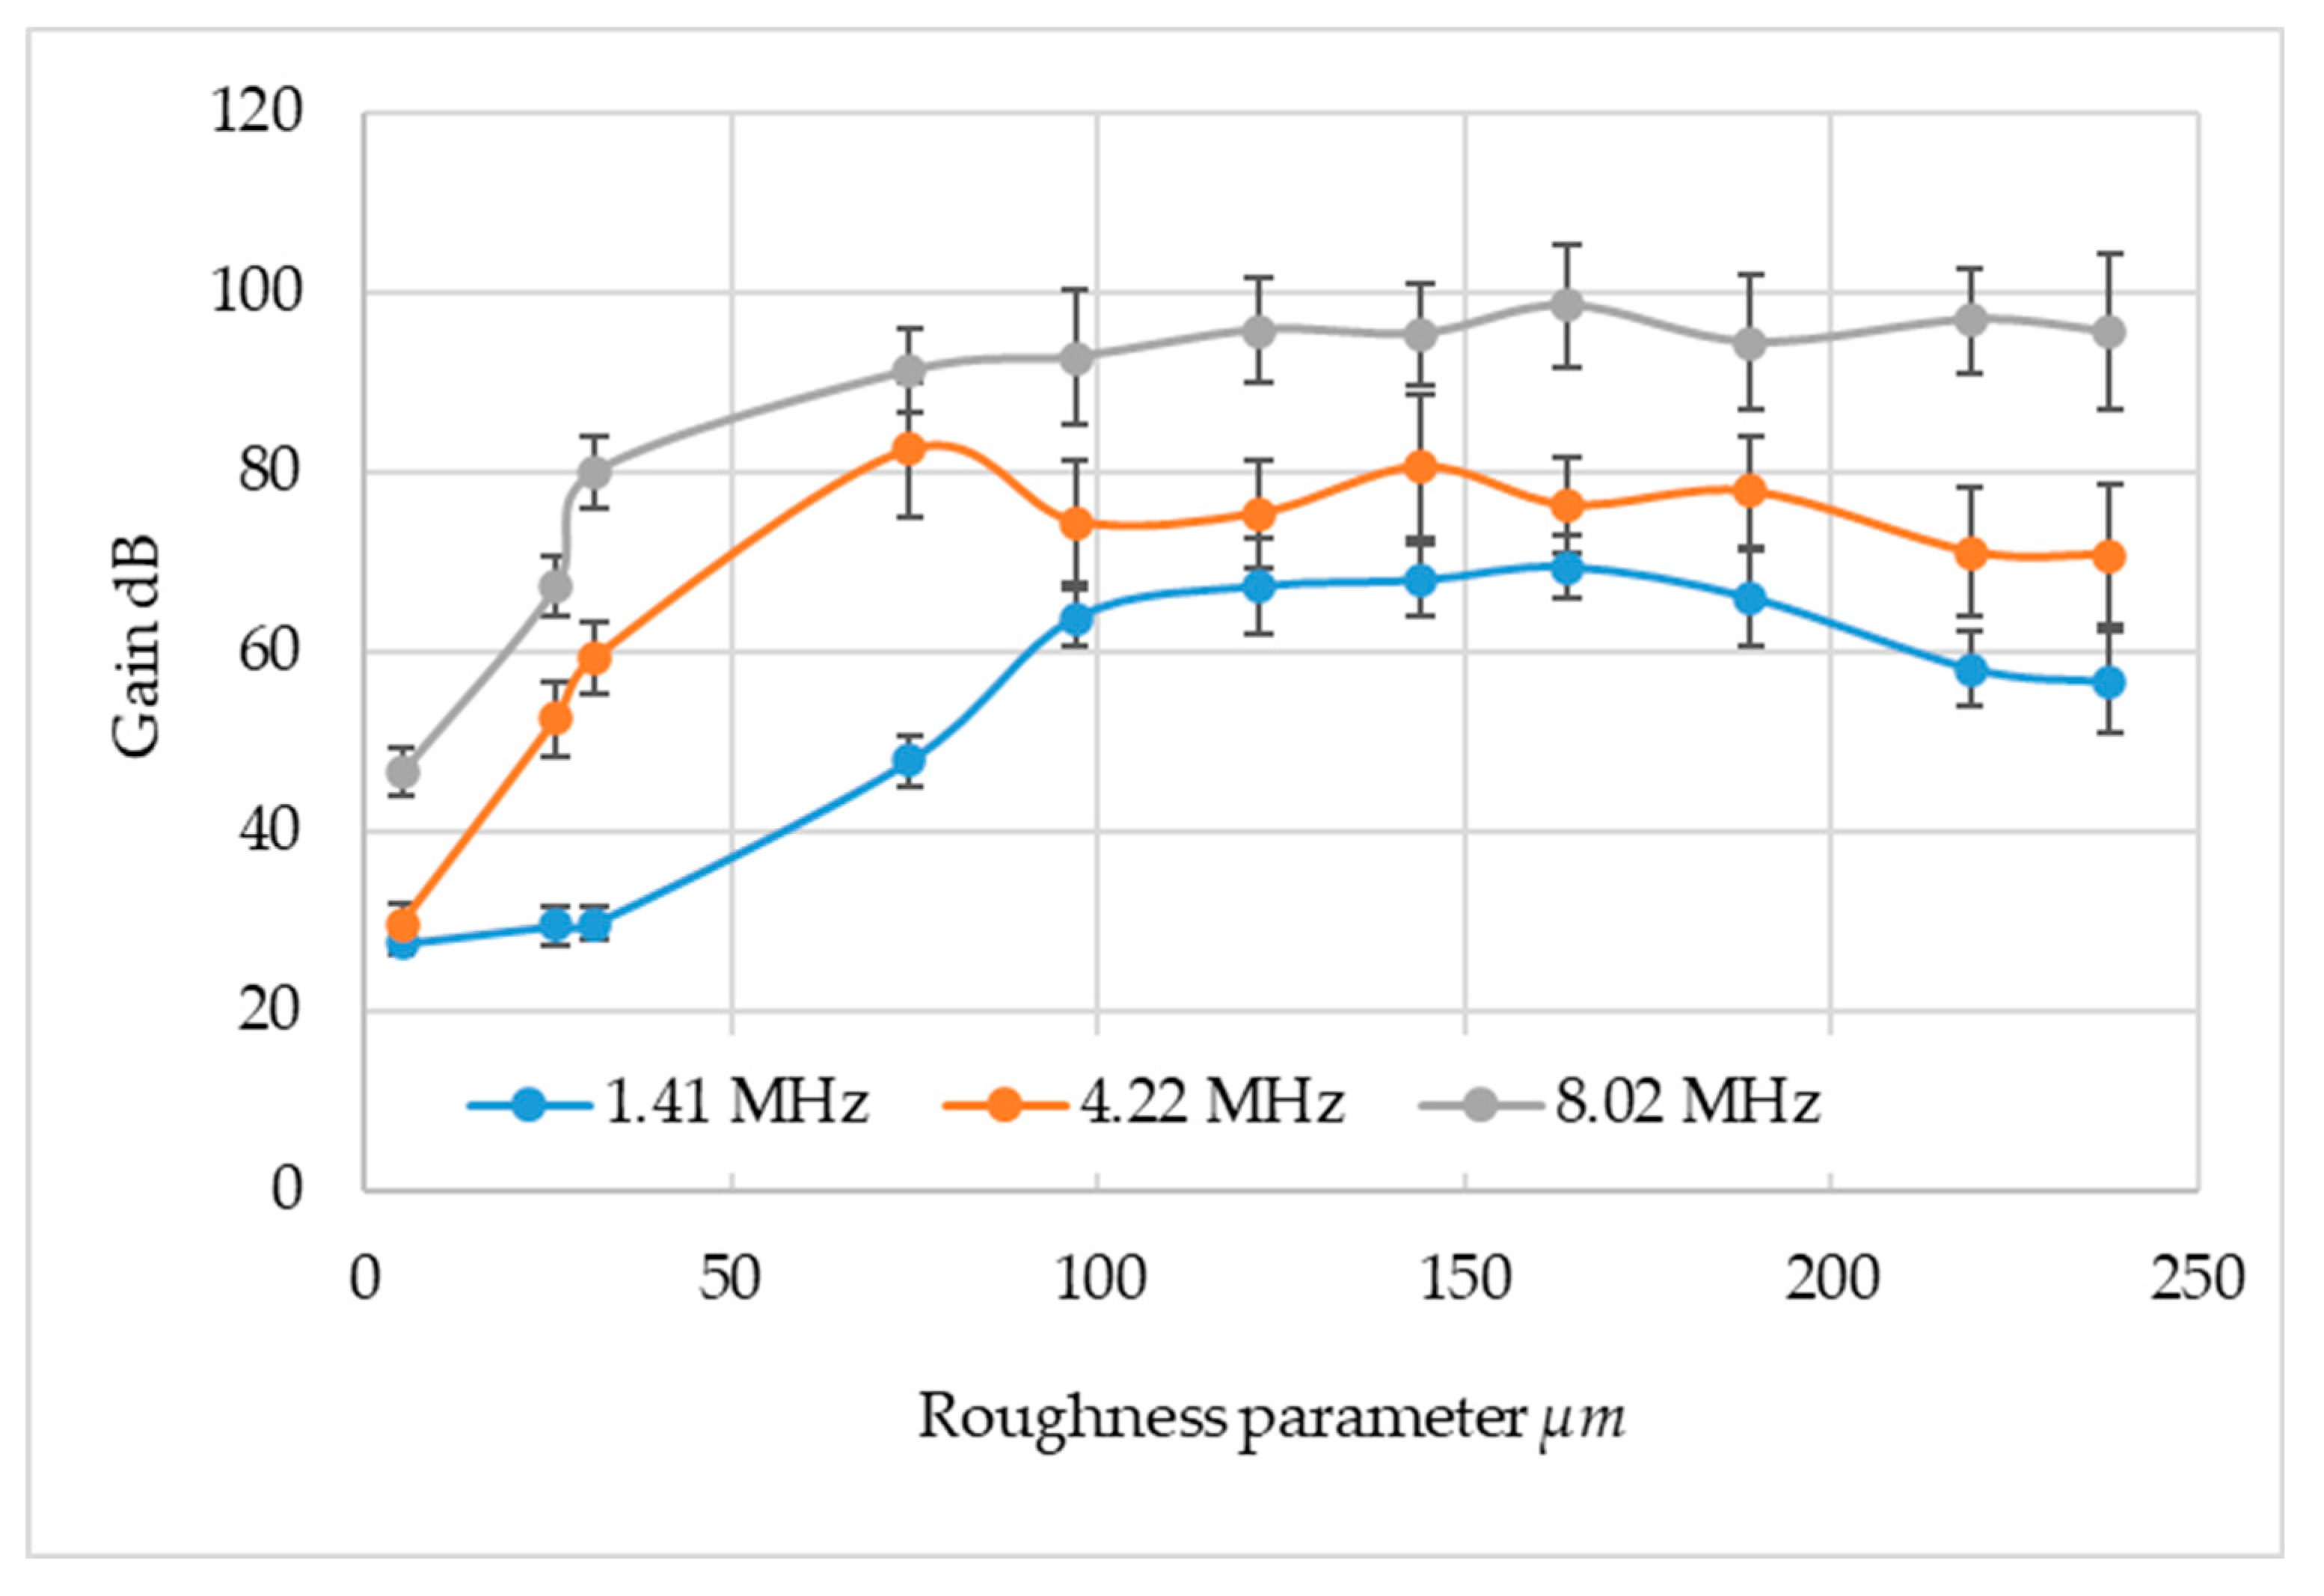
Conducting an analysis of the results, defectoscope gains were determined, such that the pulse height was 80 percent of the screen. These results are shown in
Figure 13.
For further analysis, the ultrasonic wavelength was determined by dividing the wave speed by its frequency. For the frequency of 1.41 MHz, the wavelength was 2.13 mm, for 4.22 MHz it was 0.71 mm, while for 8.02 MHz the wavelength was 0.374.
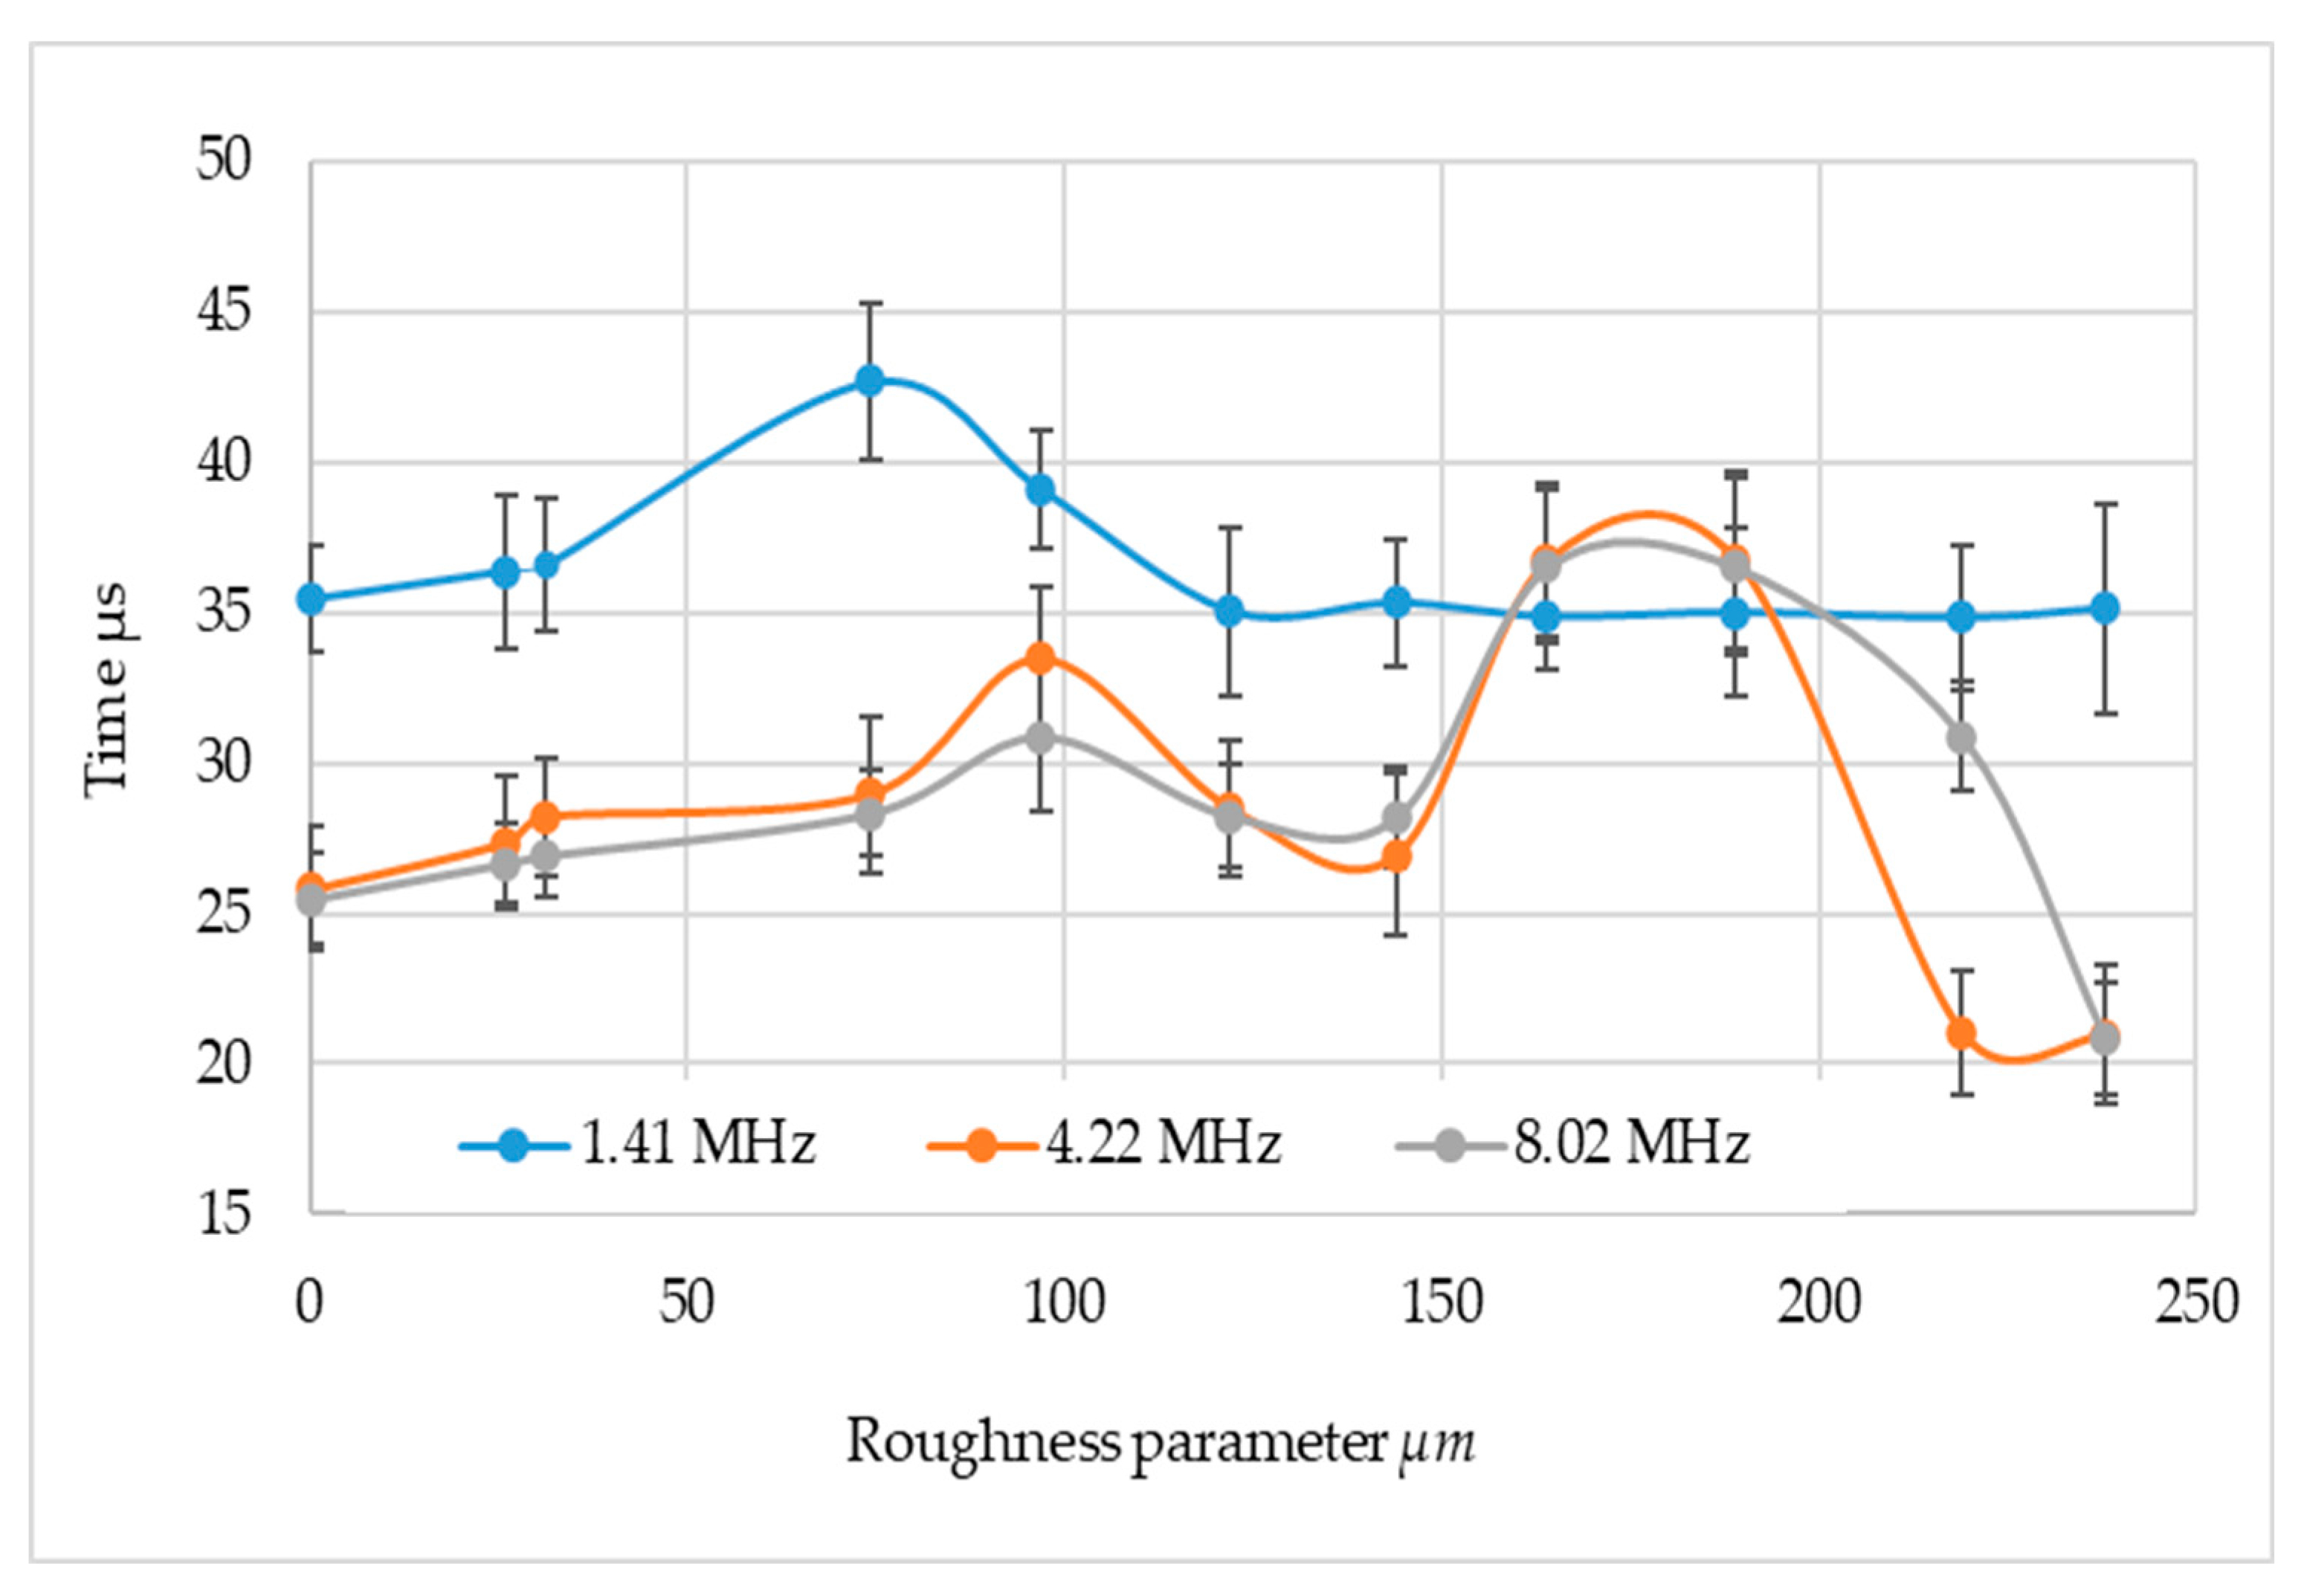
During the measurements, the ultrasonic wave transit time was also recorded for all measurement systems. Since the probes were of different sizes, these times differ from each other. What is important, however, is their change with the change in the state of the surface of the tested materials. The aggregate results are shown in
Figure 14.
Analyzing the results in the gain area, it was found that all three frequencies show a certain pattern of gain increase as the area parameter increases up to a certain point, followed by a decrease. A similar character pattern of gain for all frequencies used was observed for Sa in the range of 0.281 to 75 µm - a gain increase of about 20%. Then, for Sa in the range of 75 to 165 µm there is a slow increase for ultrasonic probes at frequencies of 1.41 MHz and 8.02 MHz. For the frequency of 4.22 MHz, a slight gain waver is noted. For the 1.41 and 4.22 MHz frequencies, a decrease in gain was noted at the highest waviness (above 164 µm). For the frequency of 8.02, a gain stabilization was noted at this roughness. The frequency of 1.41 MHz shows the greatest variation and highest gain values, which is due to the fact that the attenuation coefficient increases with increasing frequency 4.22 MHz i 8.02 MHz have more similar values and similar shape of curves.
The 8.02 MHz wave is the smallest wavelength, it is the most attenuated, but at the same time the test system has a high defect susceptibility.
Analyzing the passage time of an ultrasonic wave through an area with different surface parameters, it can be seen that the least susceptible to the surface condition is the wave with a frequency of 1.41 µm. This is probably due to the fact that it is the longest wavelength wave, at the same time it has the lowest testing resolution.
A similar character of changes was noticed for higher frequencies. For all frequencies, an increase in the transition time of the ultrasonic wave was found for Sa below 75 µm. Then, for frequencies 4.22 and 8.02 MHz, a significant increase in this time was noted from about 27 µs (at Sa equal to 144 µm) to about 37 µs at Sa = 164 and Sa = 189 µm. Subsequently, it was noted that the ultrasonic wave transition time was significantly reduced by about 40%, or to 21 µs. It was noted that the highest roughness and high frequency ultrasonic wave transition time is shorter than when the ultrasonic wave passes over a surface with low Sa - 0.281 µm. The way of mounting the ultrasonic probes (fixed connection to the profile excludes the change of the distance between them, it can be assumed that there was a transposition of the ultrasonic wave to from Rayleigh wave to Stoneley wave.
4. Conclusions
The results confirmed that the condition of the surface affects the ultrasonic Rayleigh waveform. Changes were observed in three areas:
The time it takes for the wave to pass through a particular section of the surface.
The change in pulse height on the screen of the ultrasonic defectoscope.
The change in pulse shape - including the appearance of additional pulses resulting from the transposition of the ultrasonic wave.
It was also found that the changes in the signal on the screen of the defectoscope depend significantly on the ultrasonic wavelength. The wavelength is dependent on the frequency of the ultrasonic probes and the speed of the wave. The research has also shown that it is worthwhile to determine the actual frequency of the ultrasonic probe before starting the measurements, as it can differ significantly from the frequency quoted by the probe manufacturer.
The results of the research, although carried out in the laboratory, can be used in industrial applications. It is possible to determine the condition of the surface to be tested, using the surface wave. This is particularly important in those facilities where the test area is built up and it is not possible to classically assess the condition of its surface.
Directions for further research should include the use of amplitude-frequency analysis in the assessment of surface condition for different materials.
Author Contributions
Conceptualization, J.K., K.G.; methodology, J.K., K.G.; validation, M.W.; resources, J.K. and K.G.; data curation, M.J.; writing—original draft preparation, M.J. and J.K.; writing—review and editing, K.G. and M.W.; visualization, K.G. All authors have read and agreed to the published version of the manuscript.
Funding
The presented research results were funded by grants for education allocated by the Ministry of Higher Education in Poland.
Institutional Review Board Statement
Not applicable.
Informed Consent Statement
Not applicable.
Data Availability Statement
The data presented in this study are available on request from the corresponding author.
Acknowledgments
In this section, you can acknowledge any support given which is not covered by the author contribution or funding sections. This may include administrative and technical support, or donations in kind (e.g., materials used for experiments).
Conflicts of Interest
The authors declare no conflict of interest.
References
- Zeng, Z.; Wu, J.; Zheng, M.; Ma, H. Rail Flaw Detection via Kolmogorov Entropy of Chaotic Oscillator Based on Ultrasonic Guided Waves. Sensors, 2024, 24, 2730. [Google Scholar] [CrossRef] [PubMed]
- Fei, Q.; Cao, J.; Xu, W.; Jiang, L.; Zhang, J.; Ding, H.; Yan, J. A Deep Learning-Based Ultrasonic Diffraction Data Analysis Method for Accurate Automatic Crack Sizing. Appl. Sci. 2024, 14, 4619. [Google Scholar] [CrossRef]
- Chu, Q.; Wang, G.; Yuan, R.; Xu, X. Effect of Ultrasonic Treatment on Microstructure and Properties of 2000 MPa Ultra-High-Strength Steel-Welded Joints. Coatings, 2023, 13, 1995. [Google Scholar] [CrossRef]
- Ulbrich, D.; Kańczurzewska, M. Correlation Tests of Ultrasonic Wave and Mechanical Parameters of Spot-Welded Joints. Materials 2022, 15, 1701. [Google Scholar] [CrossRef]
- Zhang, C.; Pan, Q.; Liu, T.; Zhang, L.; Gang, T. Nonlinear Ultrasonic C-Scan Imaging for Contact-Type Defects in Diffusion-Bonded Joints—A Case Study. Materials 2024, 17, 1288. [Google Scholar] [CrossRef]
- Rose, J.L. Ultrasonic Waves in Solid Media; Cambridge University Press: London, UK, 2004. [Google Scholar]
- Alberto, R.M.; Nagy, P.B. Diffraction correction for precision surface acoustic wave velocity measurements. Journal of the Acoustical Society of America, 2002, 112, 835–842. [Google Scholar]
- Zhang, S.; Li, X.; Jeong, H. Measurement of Rayleigh Wave Beams Using Angle Beam Wedge Transducers as the Transmitter and Receiver with Consideration of Beam Spreading. Sensors, 2017, 17, 1449. [Google Scholar] [CrossRef]
- Spies, M. Elastic wave propagation in transversely isotropic media. II. The generalized Rayleigh function and an integral representation for the transducer field. Theory. Journal of the Acoustical Society of America, 1995, 97, 1–13. [Google Scholar] [CrossRef]
- Zhang, S.; Li, X.; Jeong, H. A more general model equation of nonlinear Rayleigh waves and quasilinear solutions. Modern Physics Letters B, 2016, 30, 1650096. [Google Scholar] [CrossRef]
- Royer, D.; Clorennec, D. Theoretical and Experimental Investigation of Rayleigh Waves on Spherical and Cylindrical Surfaces. 1st International Symposium on Laser Ultrasonics: Science, Technology and Applications, Montreal, Canada, 2008. e-Journal of Nondestructive Testing Vol. 13, 10.
- Cheng, Q.; He, J.; Yang, S.; Xiong, X.; Liang, Z.; Luo, Y. 2024. [CrossRef]
- Ruiz MA, Nagy PB. Diffraction correction for precision surface acoustic wave velocity measurements. The Journal of the Acoustical Society of America, 2002, 112, 3, 835.
- Zhang, S.Z. , Li, X. B., and Hyunjo, J., Phased array beam fields of nonlinear Rayleigh surface waves, Chinese Physical Letters, 2016, 33, 7, 074302. [Google Scholar]
- Zhang, S.; Li, X.; Jeong, H.; Hu, H. Modeling nonlinear Rayleigh wave fields generated by angle beam wedge transducers—A theoretical study. Wave Motion, 2016, 67, 141–159. [Google Scholar] [CrossRef]
- Edwards, R.S.; Dixon, S.; Jian, X. 2006; 39. [CrossRef]
- Zhang, S.; Li, X.; Jeong, H. Measurement of Rayleigh Wave Beams Using Angle Beam Wedge Transducers as the Transmitter and Receiver with Consideration of Beam Spreading. Sensors, 2017, 17, 1449. [Google Scholar] [CrossRef] [PubMed]
- Vanlanduit, S.; Guillaume, P. 2003; 36. [CrossRef]
- Zurn, B.; Mantell, S.C. Nondestructive evaluation of laminated composites using Rayleigh waves. Journal of composite materials, 2001, 35, 12, 1026–1044. [Google Scholar] [CrossRef]
- Halabe, U. B.; Franklin, R. Fatigue crack detection in metallic members using ultrasonic Rayleigh waves with time and frequency analyses. Materials evaluation, 2001, 59, 3, 424–431. [Google Scholar]
- Kowalczyk, J.; Ulbrich, D. Evaluation of Adhesive Joints Using Ultrasonic Rayleigh Waves. Materials 2024, 17, 1367. [Google Scholar] [CrossRef]
- Kowalczyk, J.; Jósko, M.; Wieczorek, D.; Sędłak, K.; Nowak, M. Study of the Kinetics of Adhesive Bond Formation Using the Ultrasonic Method. Appl. Sci. 2024, 14, 163. [Google Scholar] [CrossRef]
- Hughes, J.M. ; Vidler J, Ng C-T, et al. Comparative evaluation of in situ stress monitoring with Rayleigh waves. Structural Health Monitoring, 2019, 18, 1, 205–215. [Google Scholar] [CrossRef]
- Pawlus, P.; Reizer, R.; Wieczorowski, M. Functional importance of surface texture parameters. Materials 2021, 14(18), 5326. [Google Scholar] [CrossRef]
- Pawlus, P.; Reizer, R.; Wieczorowski, M. Comparison of results of surface texture measurement obtained with stylus methods and optical methods. Metrology and Measurement Systems 2018, 25(3), 589–602. [Google Scholar] [CrossRef]
- Grochalski, K.; Wieczorowski, M.; H'Roura, J.; Le Goic, G. The Optical Aspect of Errors in Measurements of Surface Asperities Using the Optical Profilometry Method. Frontiers in Mechanical Engineering 2020, 6, 12. [Google Scholar] [CrossRef]
- Grochalski, K.; Podbereska, D.; Wieczorowski, M.; Talar, R.; Graboń, W. Selected Errors in Spatial Measurements of Surface Asperities. Materials 2024, 17, 2918. [Google Scholar] [CrossRef] [PubMed]
Figure 2.
Sample used in the study; (a) general view; (b) dimensions.
Figure 2.
Sample used in the study; (a) general view; (b) dimensions.
Figure 3.
Examples of samples used in the research.
Figure 3.
Examples of samples used in the research.
Figure 4.
Surface parameters of the samples used.
Figure 4.
Surface parameters of the samples used.
Figure 5.
Measurements of the surface parameters of the test samples; (a) view of station, (b) view of measuring head.
Figure 5.
Measurements of the surface parameters of the test samples; (a) view of station, (b) view of measuring head.
Figure 6.
Ultrasonic probes used in research.
Figure 6.
Ultrasonic probes used in research.
Figure 7.
Ultrasonic probes used in research.
Figure 7.
Ultrasonic probes used in research.
Figure 8.
Testing the influence of amplification on the measurement result; Testing the influence of amplification on the measurement result; (a) change in pulse height depending on gain for an ultrasonic wave frequency of 1.41 Mz, (b) change in pulse height depending on gain for an ultrasonic wave frequency of 4.22 Mz; (c) change in pulse height depending on gain for an ultrasonic wave frequency of 8.02 Mz, analytically determined gain value for a pulse height of 80 % of screen height at frequencies (d) 1.41 MHz, (e) 4.22 MHz and (f) 8.02 MHz.
Figure 9.
Study of the effect of gain on the measurement result.
Figure 9.
Study of the effect of gain on the measurement result.
Figure 10.
Measurement stand; 1 - ultrasonic probe; 2 - ultrasonic receiving probe; 3 - cantilever, 4 - Rayleigh wave, 5 - tested surface; 6 - coupling medium; 7 - adhesive.
Figure 10.
Measurement stand; 1 - ultrasonic probe; 2 - ultrasonic receiving probe; 3 - cantilever, 4 - Rayleigh wave, 5 - tested surface; 6 - coupling medium; 7 - adhesive.
Figure 11.
Rayleigh wave velocity.
Figure 11.
Rayleigh wave velocity.
Figure 12.
Marking the pulses on the defectoscope screen.
Figure 12.
Marking the pulses on the defectoscope screen.
Figure 13.
Research results in the area of reinforcement.
Figure 13.
Research results in the area of reinforcement.
Figure 14.
Research results in the area of time wave transitions.
Figure 14.
Research results in the area of time wave transitions.
Table 1.
Characteristics of the 18G2A steel used in the study.
Table 1.
Characteristics of the 18G2A steel used in the study.
| Designation |
Numerical classification |
C [%] |
Si [%] |
Mn [%] |
Cr [%] |
Al [%] |
Ni [%] |
Cu [%] |
S [%] |
P [%] |
| 18G2A |
1.0562 |
<20 |
0.20-0.50 |
<0.015 |
<0.30 |
<0.02 |
<0.30 |
<0.30 |
<0.04 |
<0.04 |
Table 2.
Properties of the ultrasonic probes used.
Table 2.
Properties of the ultrasonic probes used.
| Designations |
Manufacturer |
Name |
Transducer dimensions |
Declared frequency |
Actual frequency |
| P1 |
Karl Deutsch |
S6WB10WM |
diameter 6 mm |
10 MHz |
8.02 MHz |
| P2 |
General Electric Company |
MWB 90-4 |
8 x 9 mm |
4 MHz |
4.22 HMz |
| P3 |
General Electric Company |
WB 90-2 |
20 x 22 mm |
2 MHz |
1.41 MHz |
Table 3.
Measurement results for the 1.44 MHz ultrasonic transducer.
Table 3.
Measurement results for the 1.44 MHz ultrasonic transducer.
| Sa µm |
Gain db |
HI% |
HII% |
HIII% |
HIV % |
| 0.28 |
27 |
76 |
|
|
|
| 26 |
31 |
96 |
|
|
|
| 31.3 |
31 |
93 |
|
|
|
| 74.3 |
45 |
58 |
|
|
|
| 96.9 |
60 |
52 |
|
|
|
| 122 |
64 |
55 |
46 |
37 |
|
| 144 |
64 |
51 |
45 |
37 |
30 |
| 164 |
64 |
43 |
91 |
75 |
55 |
| 189 |
64 |
64 |
92 |
72 |
84 |
| 219 |
59 |
89 |
48 |
56 |
53 |
Table 4.
Measurement results for the 4.22 MHz ultrasonic transducer.
Table 4.
Measurement results for the 4.22 MHz ultrasonic transducer.
| Sa µm |
Gain db |
HI% |
HII% |
| 0.28 |
30 |
83 |
|
| 26 |
48 |
48 |
|
| 31.3 |
55 |
49 |
|
| 74.3 |
70 |
19 |
|
| 96.9 |
70 |
48 |
63 |
| 122 |
70 |
43 |
|
| 144 |
77 |
53 |
52 |
| 164 |
77 |
87 |
|
| 189 |
77 |
73 |
|
| 219 |
67 |
50 |
32 |
Table 5.
Measurement results for the 4.22 MHz ultrasonic transducer.
Table 5.
Measurement results for the 4.22 MHz ultrasonic transducer.
| Sa µm |
Gain db |
HI% |
HII% |
| 0.28 |
46 |
75 |
|
| 26 |
46 |
74 |
|
| 31.3 |
75 |
45 |
|
| 74.3 |
87 |
49 |
|
| 96.9 |
87 |
41 |
|
| 122 |
90 |
41 |
|
| 144 |
90 |
43 |
|
| 164 |
90 |
30 |
|
| 189 |
90 |
48 |
|
| 219 |
90 |
36 |
39 |
|
Disclaimer/Publisher’s Note: The statements, opinions and data contained in all publications are solely those of the individual author(s) and contributor(s) and not of MDPI and/or the editor(s). MDPI and/or the editor(s) disclaim responsibility for any injury to people or property resulting from any ideas, methods, instructions or products referred to in the content. |
© 2024 by the authors. Licensee MDPI, Basel, Switzerland. This article is an open access article distributed under the terms and conditions of the Creative Commons Attribution (CC BY) license (http://creativecommons.org/licenses/by/4.0/).
